

Page 1
Service & Parts Manual
by
Convotherm Combination Oven-Steamer
MODELS:
OES-10.10
Electric 10.10 and 6.20
OES-6.20
Enodis
OEB-10.10
OEB-6.20
1333 East 179th St., Cleveland, Ohio, U.S.A. 441
Phone: (216) 481-4900 Fax: (216) 481-3782
Visit our web site at www.clevelandrange.com
10
0706
Page 2

Table of Contents
Installation For the Installer . . . . . . . . . . . . . . . . . . . . . . . . . . . . . . . . . . . . . . . . . . . . . 1
Warranty . . . . . . . . . . . . . . . . . . . . . . . . . . . . . . . . . . . . . . . . . . . . . . . . . . . 2
General Information . . . . . . . . . . . . . . . . . . . . . . . . . . . . . . . . . . . . . . . . . . 3
Installation Instructions. . . . . . . . . . . . . . . . . . . . . . . . . . . . . . . . . . . . . . 4-5
Instructions for Casters. . . . . . . . . . . . . . . . . . . . . . . . . . . . . . . . . . . . . . . . 6
Specification Sheets -
OEB-10.10 . . . . . . . . . . . . . . . . . . . . . . . . . . . . . . . . . . . . . . . . . . . . . . . . 7-8
OES-10.10 . . . . . . . . . . . . . . . . . . . . . . . . . . . . . . . . . . . . . . . . . . . . . . . 9-10
OEB-6.20 . . . . . . . . . . . . . . . . . . . . . . . . . . . . . . . . . . . . . . . . . . . . . . . 11-12
OES-6.20 . . . . . . . . . . . . . . . . . . . . . . . . . . . . . . . . . . . . . . . . . . . . . . . 13-14
Operating Instructions Control Panel, Quick Start . . . . . . . . . . . . . . . . . . . . . . . . . . . . . . . . . . . . 15
Control Panel, Detail View . . . . . . . . . . . . . . . . . . . . . . . . . . . . . . . . . 16-17
Cleaning Instructions Cleaning the Oven Chamber . . . . . . . . . . . . . . . . . . . . . . . . . . . . . . . . 18-20
Semi- Automatic Cleaning of Oven Chamber . . . . . . . . . . . . . . . . . . . 21-22
CONVOClean Automatic Cleaning System (optional) . . . . . . . . . . . . 23-24
Descale Steam Generator . . . . . . . . . . . . . . . . . . . . . . . . . . . . . . . . . . 25-27
Service Parts General Assembly Drawings -
10.10 Electric Generator with Cleaning . . . . . . . . . . . . . . . . . . . . . . . 28-29
10.10 Electric Injection with Cleaning . . . . . . . . . . . . . . . . . . . . . . . . 30-31
6.20 Electric Generator with Cleaning . . . . . . . . . . . . . . . . . . . . . . . . 32-33
6.20 Electric Injection with Cleaning . . . . . . . . . . . . . . . . . . . . . . . . . 34-35
Component Panel (all models). . . . . . . . . . . . . . . . . . . . . . . . . . . . . . 36-37
Control Panel, with Picto (all models) . . . . . . . . .. . . . . . . . . . . . . . . . . . 38
Base, Electric Injector no Cleaning . . . . . . . . . . . . . . . . . . . . . . . . . . . . . 39
Base, Electric Generator with Cleaning (OEB 10.10) . . . . . . . . . . . . . . . 40
Base, Electric Injector with Cleaning (OES 10.10) . . . . . . . . . . . . . . . . 41
Base, Electric Generator no Cleaning (OEB & OES 6.20) . . . . . . . . . . . 42
Base, Electric, Generator with Cleaning (OEB 6.20) . . . . . . . . . . . . . . . 43
Outer Base (all models) . . . . . . . . . . . . . . . . . . . . . . . . . . . . . . . . . . . . . . 44
Water Hose System, Condenser (all 6.20 models) . . . . . . . . . . . . . . . . . . 45
Water Valve w/Cleaning System (OEB 10.10) . . . . . . . . . . . . . . . . . . . . . 46
Water Valve (all models) . . . . . . . . . . . . . . . . . . . . . . . . . . . . . . . . . . . . . . 47
Water Valve, Injector, Electric (OES 6.20 & 10.10) . . . . . . . . . . . . . . . . . 48
Water Supply, Generator W/Cleaning System (OEB & OGB 6.20) . . . . . 49
Water Valve (OES 6.20). . . . . . . . . . . . . . . . . . . . . . . . . . . . . . . . . . . . . . . 50
Steam Generator, Electric, Heater Selection (OEB 6.20 & 10.10) . . . . . 51
Steam Generator, Electric (OEB 6.20 & 10.10) . . . . . . . . . . . . . . . . . . . . 52
Page 3

Table of Contents (continued)
Service Parts Pump, Steam Generator, Electric, (OEB 6.20 & 10.10). . . . . . . . . . . . . . 53
(continued) Door (OES 6.20 & 10.10). . . . . . . . . . . . . . . . . . . . . . . . . . . . . . . . . . . . . 54
Sliding Plate, Complete (all models) . . . . . . . . . . . . . . . . . . . . . . . . . 55-56
Exterior Sheeting (all models) . . . . . . . . . . . . . . . . . . . . . . . . . . . . . . . . . 57
Stand, Assembly, Closed Base (all models) . . . . . . . . . . . . . . . . . . . . . . . 58
Assemblies, Stacking Kits
Gas Models (6.20 on 6.20 or 10.20 & 6.10 on 6.10 or 10.10). . . . . . . . . 59
Electric Models (6.10 on 6.10 or 10.10). . . . . . . . . . . . . . . . . . . . . . . . . . 60
Maintenance OEB 6.20 & 10.10 -
Sequence of Operations . . . . . . . . . . . . . . . . . . . . . . . . . . . . . . . . . . . . 61-69
Wiring Diagrams . . . . . . . . . . . . . . . . . . . . . . . . . . . . . . . . . . . . . . . . . 70-74
Ladder Diagrams . . . . . . . . . . . . . . . . . . . . . . . . . . . . . . . . . . . . . . . . . 75-76
OES
6.20 & 10.10 -. . . . . . . . . . . . . . . . . . . . . . . . . . . . . . . . . . . . . . . . . . . .
Sequence of Operations . . . . . . . . . . . . . . . . . . . . . . . . . . . . . . . . . . . . 77-83
Wiring Diagrams . . . . . . . . . . . . . . . . . . . . . . . . . . . . . . . . . . . . . . . . . 84-88
Ladder Diagrams. . . . . . . . . . . . . . . . . . . . . . . . . . . . . . . . . . . . . . . . . 89-90
Page 4

INSTALLATION
1
FOR YOUR SAFETY
Do not store or use gasoline or
other flammable vapors or
liquids in the vicinity of this or
any other appliance.
WARNING
I Improper installation, adjustment, alteration, service or
maintenance can cause property damage, injury or death.
Read the installation, operating and maintenance instructions
thoroughly before installing or servicing this equipment.
WARNING
Disconnect power at the main external power switch before servicing or repairing a Combi.
Failure to disconnect power can result in death, injury, and property damage.
ALL SERVICE MUST BE PERFORMED BY A QUALIFIED
CLEVELAND RANGE AUTHORIZED TECHNICIAN.
Do not connect the Combi Oven-Steamer drain connection to any
drain material that cannot sustain 140o Fahrenheit.
Using drain material that cannot withstand 140o Fahrenheit can
result in injury, equipment damage, and property damage.
WARNING
The Installation Manual is a part of your new Combi Oven-Steamer. You must keep and maintain it
for the entire life span of your Combi and pass it on to the next owner of the Combi.
For complete installation instruction refer to the installation manual
supplied with the combi.
This manual may be subject to new technical developments, modifications, and unforeseen errors.
DO NOT OPERATE OR ATTEMPT TO OPERATE THIS APPLIANCE OR ANY ACCESSORIES WITHOUT READING
COMPLETELY AND FULLY UNDERSTANDING THIS MANUAL
For caster equipped Combis: Per separate instructions, connect the strain relief (restraining
device) and complete any remaining installation procedures BEFORE starting the Combi.
Convotherm by Cleveland Combi Oven-Steamers are intended for other than household use.
Page 5

Cleveland STATEMENT OF POLICIES
2
L I M I T E D W A R R A N T Y
CLEVELAND RANGE products are warranted to the original purchaser to be free from defects in materials and workmanship under
normal use and service for the standard warranty period of one year from date of installation or 18 months from date of shipment,
which ever comes first.
CLEVELAND RANGE agrees to repair or replace, at its option, f.o.b. factory, any part which proves to be defective due to defects
in material or workmanship during the warranty period, providing the equipment has been unaltered, and has been PROPERLY
INSTALLED, MAINTAINED, AND OPERATED IN ACCORDANCE WITH THE CLEVELAND RANGE OWNER’S MANUAL.
CLEVELAND RANGE agrees to pay any FACTORY AUTHORIZED EQUIPMENT SERVICE AGENCY (within the continental
United States, and Hawaii) for reasonable labor required to repair or replace, at our option, f.o.b. factory, any part which proves to be
defective due to defects in material or workmanship, during the labor warranty period. This warranty includes travel time not to
exceed two hours and mileage not to exceed 50 miles (100 miles round-trip), BUT DOES NOT INCLUDE POST START-UP,
TIGHTENING LOOSE FITTINGS, MINOR ADJUSTMENTS, MAINTENANCE, CLEANING OR DESCALING.
The standard labor warranty allows factory payment of reasonable labor required to repair or replace such defective parts.
Cleveland Range will not reimburse the expense of labor required for the repair or replacement of parts after the standard warranty
period, unless an Extended Labor Warranty Contract has been purchased to cover the equipment for the balance of the warranty
period from the date of equipment installation, start-up, or demonstration.
PROPER INSTALLATION IS THE RESPONSIBILITY OF THE DEALER, THE OWNER-USER, OR INSTALLING CONTRACTOR,
AND IS NOT COVERED BY THIS WARRANTY. Many local codes exist, and it is the responsibility of the owner and installer to
comply with these codes. Cleveland Range equipment is built to comply with applicable standards for manufacturers, including UL,
ANSI, NSF, ASME/Ntl. Bd., CSA, and others.
BOILER (Steam Generator) MAINTENANCE IS THE RESPONSIBILITY OF THE OWNER-USER AND IS NOT COVERED BY
THIS WARRANTY. The use of good quality feed water is the responsibility of the Owner-User (see Water Quality Recommendations
below). THE USE OF POOR QUALITY FEED WATER WILL VOID EQUIPMENT WARRANTIES. Boiler maintenance supplies,
including boiler hand hole gaskets, are not warranted beyond the first 90 days after the date the equipment is placed into service.
Preventive maintenance records must be available showing descaling per applicable Cleveland Operator Manual for Boiler Proration
Program considerations.
WATER QUALITY RECOMMENDATIONS
TOTAL DISSOLVED SOLIDS less than 60 parts per million
TOTAL ALKALINITY less than 20 parts per million
SILICA less than 13 parts per million
CHLORIDE less than 30 parts per million
pH FACTOR greater than 7.5
The foregoing shall constitute the sole and exclusive remedy of original purchaser and the full liability of Cleveland Range for any
breach of warranty. THE FOREGOING IS EXCLUSIVE AND IN LIEU OF ALL OTHER WARRANTIES, WHETHER WRITTEN,
ORAL, OR IMPLIED, INCLUDING ANY WARRANTY OF PERFORMANCE, MERCHANTABILITY, OR FITNESS FOR PURPOSE,
AND SUPERSEDES AND EXCLUDES ANY ORAL WARRANTIES OR REPRESENTATIONS, OR WRITTEN WARRANTIES OR
REPRESENTATIONS, NOT EXPRESSLY DESIGNATED IN WRITING AS A “WARRANTY” OR “GUARANTEE” OF CLEVELAND
RANGE MADE OR IMPLIED IN ANY MANUAL, LITERATURE, ADVERTISING BROCHURE OR OTHER MATERIALS.
CLEVELAND RANGE’S liability on any claim of any kind, including negligence, with respect to the goods or services covered
hereunder, shall in no case exceed the price of the goods or services, or part thereof, which gives rise to the claim. IN NO EVENT
SHALL CLEVELAND RANGE BE LIABLE FOR SPECIAL, INCIDENTAL, OR CONSEQUENTIAL DAMAGES, OR ANY DAMAGES
IN THE NATURE OF PENALTIES.
Page 6
3
GENERAL INFORMATION ABOUT COMBIS
A. PRODUCT INFORMATION
Cleveland Range, LLC assigns two product identification numbers to each Combi: a model number and a
serial number. The model number identifies the product characteristics. The serial number identifies the
individual unit.
1. Model Number
a. This manual covers installation of the OEB and OES model electric powered Combis.
b. Model Number Key: “O” stands for the Combi series Oven, “E” or “G” designates Electric or Gas,
“B” designates Steam Generator, and “S” designates Boilerless. The first number designates the
number of shelves in the oven rack. The second number is either “.10” for 12” X 20” steam table
pans or “.20” for 18” X 26” full size sheet pans. For further information, contact your Convotherm by
Cleveland sales representative or Cleveland Range.
2. Serial Number and Equipment Record
During manufacture, Combis are assigned individual serial numbers. Please provide the following
information when you contact Cleveland Range or a qualified Cleveland Range authorized service
representative:
Serial Number________________________________________________________________
(Write the Serial Number of your Combi here.)
Model Number________________________________________________________________
(Write the Model Number of your Combi here.)
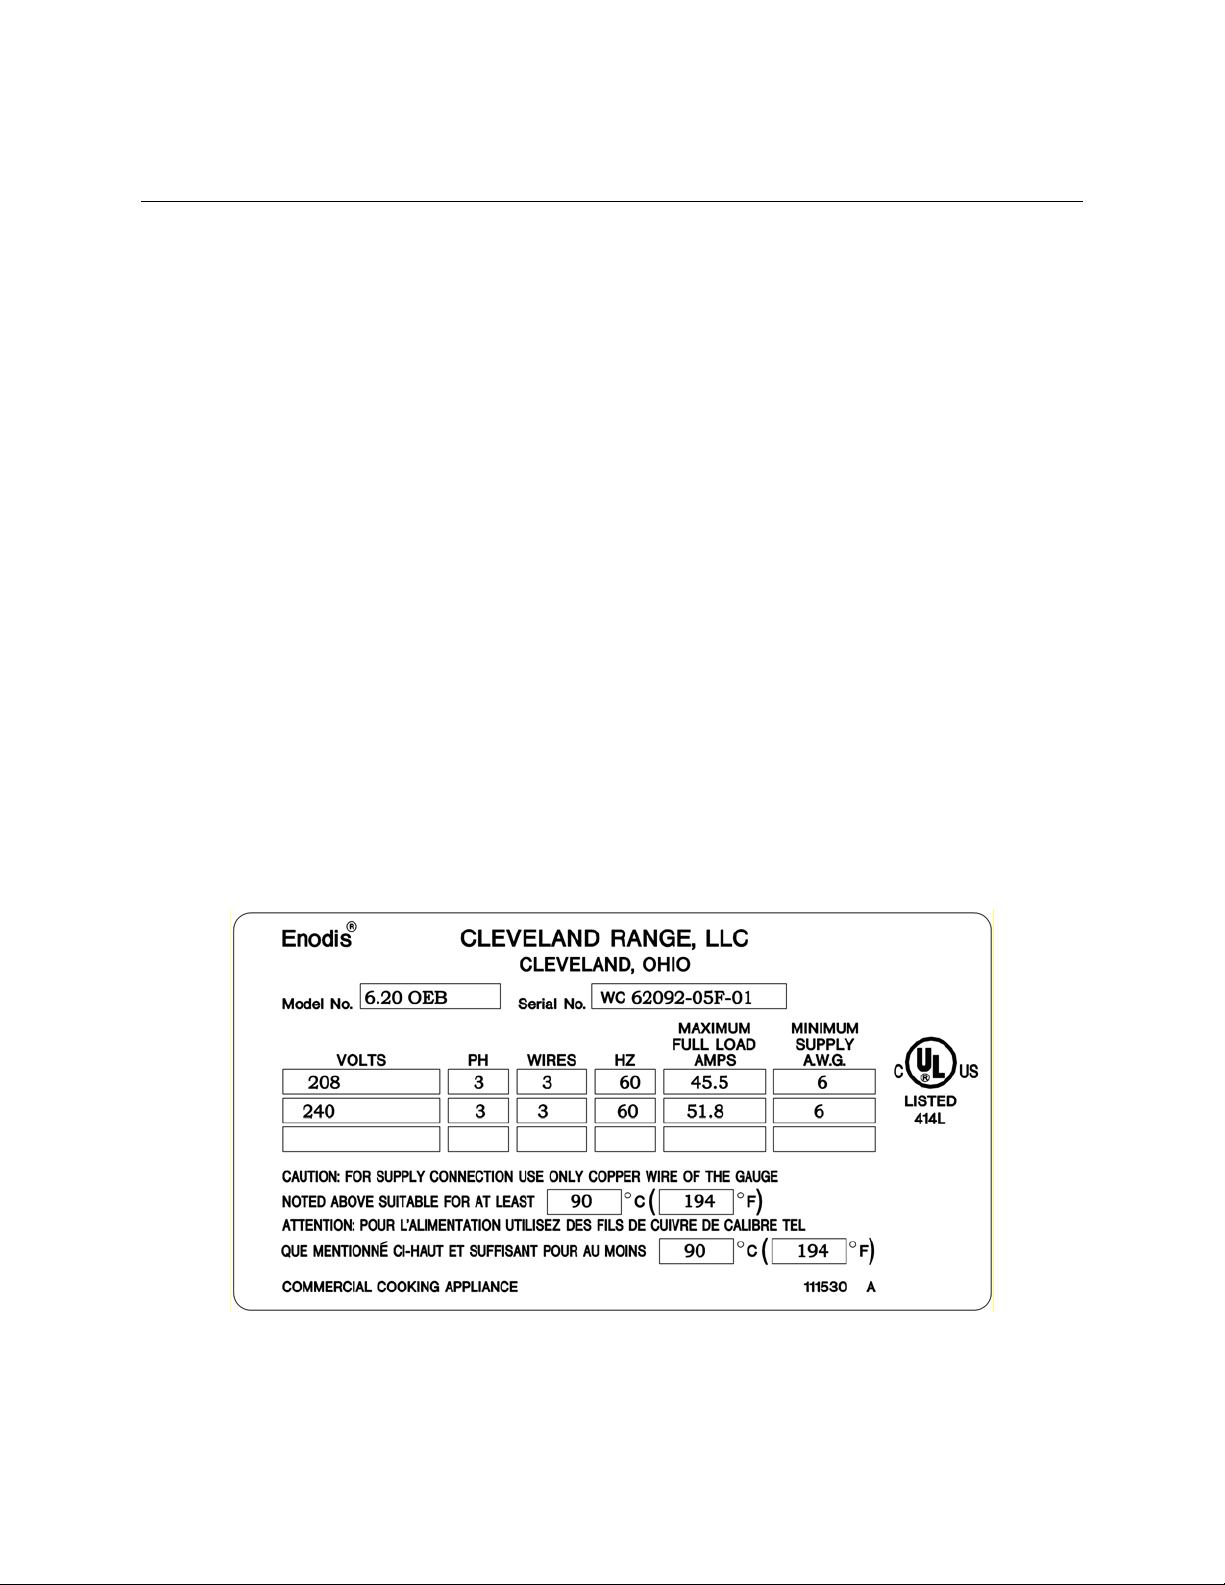
3. Product Information Plate
The Product Information Plate on the left side of the unit lists the model, serial number, electric, and
wiring requirements of the steamer. Figure 1-1 illustrates a typical Product Information Plate.
Figure 1-1
Typical Product Information Plate
Page 7

4
INSTALLATION INSTRUCTIONS
A. GENERAL
This equipment should be installed only by qualified, professional plumbers, pipe fitters, and electricians.
1. The installation of this Combi must conform with:
a. The National Electrical Code, ANSI/NFPA 70 (latest edition), or the Canadian Electrical
Code, CSA C22.2 as applicable.
b. The Food Service Sanitation Manual of the Food and Drug Administration (FDA).
c. All applicable national, state, and local laws, codes, and regulations.
2. This equipment is to be installed to comply with the applicable federal, state, or local
plumbing codes.
3. Installation instructions must be read in their entirety before starting installation of a Combi.
4. Install the Combi according to the policies and procedures outlined in this manual.
Improper installation, adjustment, alteration, service, or maintenance of a Combi, or
installation of a damaged Combi can result in DEATH, INJURY, EQUIPMENT DAMAGE, and
void the warranty.
NEVER install damaged Combis.
ALWAYS have qualified Cleveland Range authorized personnel install and service Combis.
5. Inspect the Combi for shipping damage.
a. Check carton and packing for shipping damage.
b. Note any damage on the shipping paperwork as soon as the carton arrives.
c. Unpack the Combi and check for shipping damage.
d. If the Combi is damaged or damage is suspected:
1) Inform your dealer at once.
2) Inform Cleveland Range in writing within 3 days.
3) Submit a Damage Claim to the shipper.
DANGER
Page 8

5
B. INSTALLATION OF THE COMBI – General Instructions
General Instructions:
1. Select the Combi’s operating location.
2. Complete the water, drain, and electric lines before positioning and leveling the Combi.
3. Position and level the Combi.
4. Connect the utility lines after
5. Call Cleveland Range at 216-481-4900 for the Free Start-Up Program’s Performance
Checkout.
6. After Setup and Performance Checkout, the Combi should provide years of reliable
operation.
positioning and leveling the Combi.
DANGER
Improper lifting can result in DEATH, INJURY, AND EQUIPMENT DAMAGE.
Use enough workers with training and experience lifting heavy equipment to place
Combis on supporting surfaces, and lift and handle Combis and accessories.
DANGER
WARNING
A
Operating an out of level Combi can cause DEATH, INJURY, and EQUIPMENT DAMAGE.
clearance requirements above, below, and around the Combi are the same for non-
combustible locations as for combustible locations.
Failure to maintain required clearances and additional distances as needed can result
INJURY and EQUIPMENT DAMAGE.
Consult manufacturers’ literature, and sales and service agencies as needed.
Combis must be level both front-to-back and side-to-side in all installations.
NEVER operate an out of level Combi.
If a Combi is suspected to be out of level, shut it down at once and call you qualified
Cleveland Range authorized service agency at once.
Page 9

6
C. SPECIAL INSTRUCTIONS FOR CASTER EQUIPPED COMBI STANDS AND COMBIS
1. Read all instructions before beginning installation.
2. Level the floor if needed.
3. NOTE: Combis on caster-equipped stands have less adjustment for level than adjustable
foot equipped stands.
4. The front wheels of caster-equipped stands and Combis have locks. Check the caster
locks for function and position before installation.
5. Follow the separate instructions included with the Stand, Stacking Kit, or Caster Kit.
6. Make sure the Stand, Stacking Kit, or Caster Kit matches the Combi(s).
7. Use only genuine Cleveland Range Stands, Stacking Kits, Caster Kits, and replacement
parts.
8. Use of Stands, Stacking Kits, Caster Kits, and replacement parts other than genuine
Cleveland Range Stands, Stacking Kits, and Caster Kits and replacement parts can
result in injury and / or catastrophic equipment failure, and voids the Warranty.
9. The appliance must be secured to building structure, to prevent any strain on the utility
connections, and to help reduce the risk of electric shock.
10. The strain relief (restraining device) must be installed to limit the movement of the
appliance without depending on the water and electric connectors or their associated
piping (water or electric). See separate instructions for attachment location and other
details.
11. Connect the strain relief (restraining device) BEFORE starting the Combi
12. If the strain relief (restraining device) must be disconnected, it must be reconnected
after the Combi has been returned to its originally installed position BEFORE restarting
the Combi.
13. Prepare the installation location as described in the Combi Installation Manual.
14. The Combi shall be installed using flexible conduit.
15. Mechanically secure the flexible conduit to the Combi’s electrical access hole.
Page 10
1333 East 179th St., Cleveland, Ohio, U.S.A. 44110
Ph: 1-216-481-4900 Fx: 1-216-481-3782 Web Site: www.clevelandrange.com
Cleveland Range,
LLC
SINCE 1922
INNOVATIVE STEAM COOKING SOLUTIONS
by
7
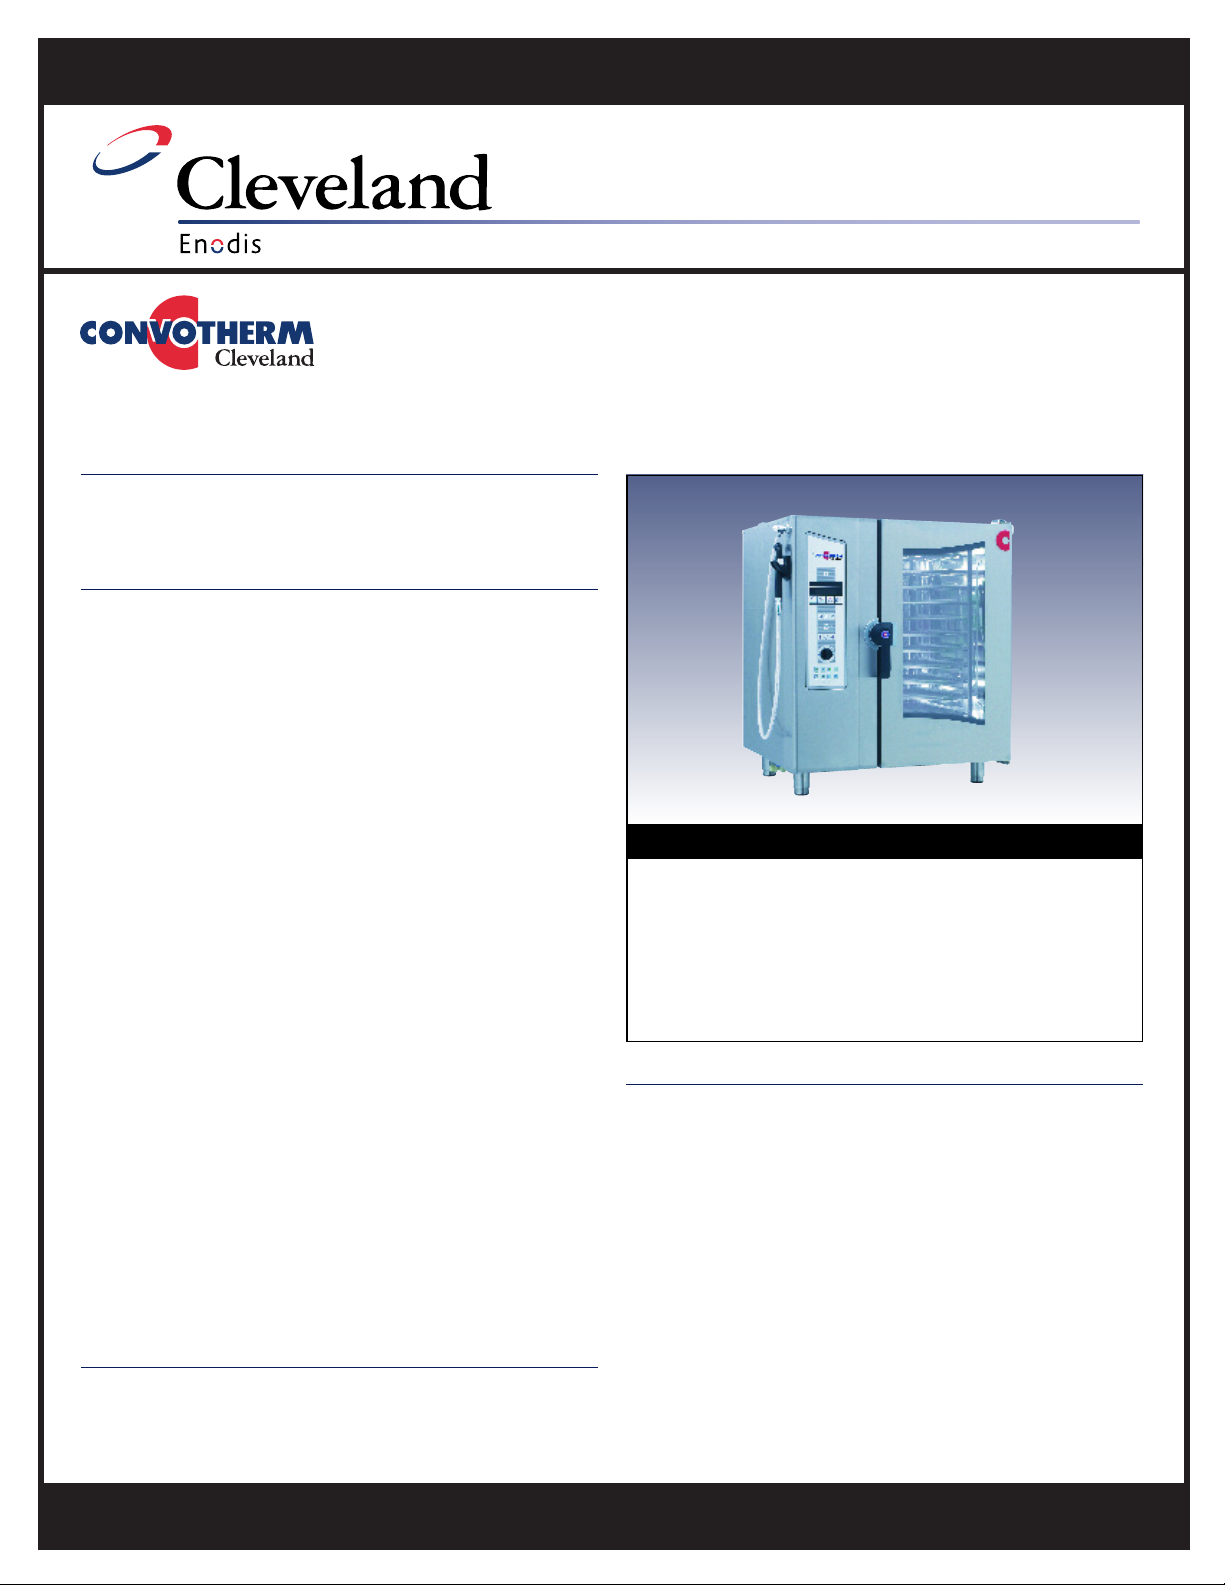
COMBI OVEN-STEAMER
Featuring the
"Advanced Closed
MODEL: c OEB-10.10
CAPACITY: TEN (10) – 12" by 20" by 2 1/2" steam table pans
System +3"
ELECTRIC HEATED – with Steam Generator
Cooking Modes:
■
■
Hot Air
■
■
Steam
■
■
Combi
Cleveland Standard Features:
■
■
"Advanced closed system" with "Crisp & Tasty" de-moisturizing feature
■
■
Efficient heating system for hot air and steam generator saves
energy and provides fast heat up times
■
■
Fully insulated steam generator and cooking compartment for
maximum energy savings
■
■
Polished cooking compartment with coved corners for easy cleaning
■
■
Three (3) 12" x 20" wire shelves
■
■
Hinged fan guard and hinged removable pan racks
■
■
Two (2) speed auto reversing convection fan for even heat distribution
■
■
Space saving, easy to close "Disappearing Door"
■
■
Door latch with safety vent position and wear-free door switch
■
■
Vented, double glass door with integrated door stop and self
draining condensate drip pan
■
■
Easy to change, press-fit door seal
■
■
Oven light with shock resistant safety glass
■
■
Multipoint core temperature probe
■
■
Easy to use electronic controls for all operational functions
■
■
Self diagnostic system with full text message display
■
■
Easy to understand menu icons with bright graphics display
■
■
User friendly selector dial
■
■
Exclusive "Smart Key" for selecting option settings
■
■
Digital controls for temperature, time and core probe settings
■
■
Eight (8) "Press & Go" one step, recipe start buttons
■
■
Cook book library for up to 250 stored recipe programs, each
recipe capable of 20 steps
■
■
RS 232 connection for controlling one unit with a PC (personal computer)
■
■
Memory module automatically saves unit settings and recipes
■
■
Manual program override feature for operational settings
■
■
Smooth action hand shower for compartment cleaning
Electric Steam Generator
■
■
Built-in automatic rinse system
■
■
Automatic fill and water level control
■
■
Automatic generator drain
■
■
Retherm
■
■
"Cook & Hold"
■
■
"Delta T" slow cooking
■
■
"Crisp & Tasty"
IT EM NUMBE R __________________________________________
JOB NAME / NUMBER __________________________________
Shall be Cleveland Model: OEB-10.10 Combination Convection Oven / Steamer
with simple to operate electronic programmable controls for Hot Air, Convection
Steam, and Combination cooking modes, "Cook & Hold" and "Delta
cooking capabilities, "Advanced Closed System" with "Crisp & Tasty" de-
moisturizing feature.
multipoint core temperature probe, "Press & Go", one-step recipe start buttons,
"Smart Key" for selecting option settings, Two (2) speed auto reversing
convection fan. Electric steam generator with automatic drain. "Disappearing
Door". Capacity for ten (10) 12" x 20" x 2 1/2" pans.
Options and Accessories
❐ ConvoClean automatic compartment washing system
❐ PC-HACCP software for establishing "HACCP controls" and automatic
documentation of the cooking process
❐ Equipment stand(s)
❐ Equipment stand(s) with Casters
❐ Stacking kit for mounting one (1) OEB-6.10 model on top of
one (1) OEB-10.10
❐ Lockable cover over operating controls for prison installations
❐ USB or RS 485 connection for networking and controlling up to 32 units
with a personal computer
❐ Plate rack for banquet operations
❐ Plate rack cart
❐ Thermal cover for plate or pan rack
❐ ConvoClean compartment cleaning solution
❐ ConvoCare concentrate for compartment rinse cycle
❐ "Dissolve" generator descaling solution
❐ Chicken Grill Rack
❐ 12" x 20" Wire Baskets for frying products
❐ Additional 12" x 20" Wire Shelves
Short Form Specifications
T" slow-
Multiple cooking stage programs, stored recipe library,
SECT. IIC PAGE 3
0406
Page 11
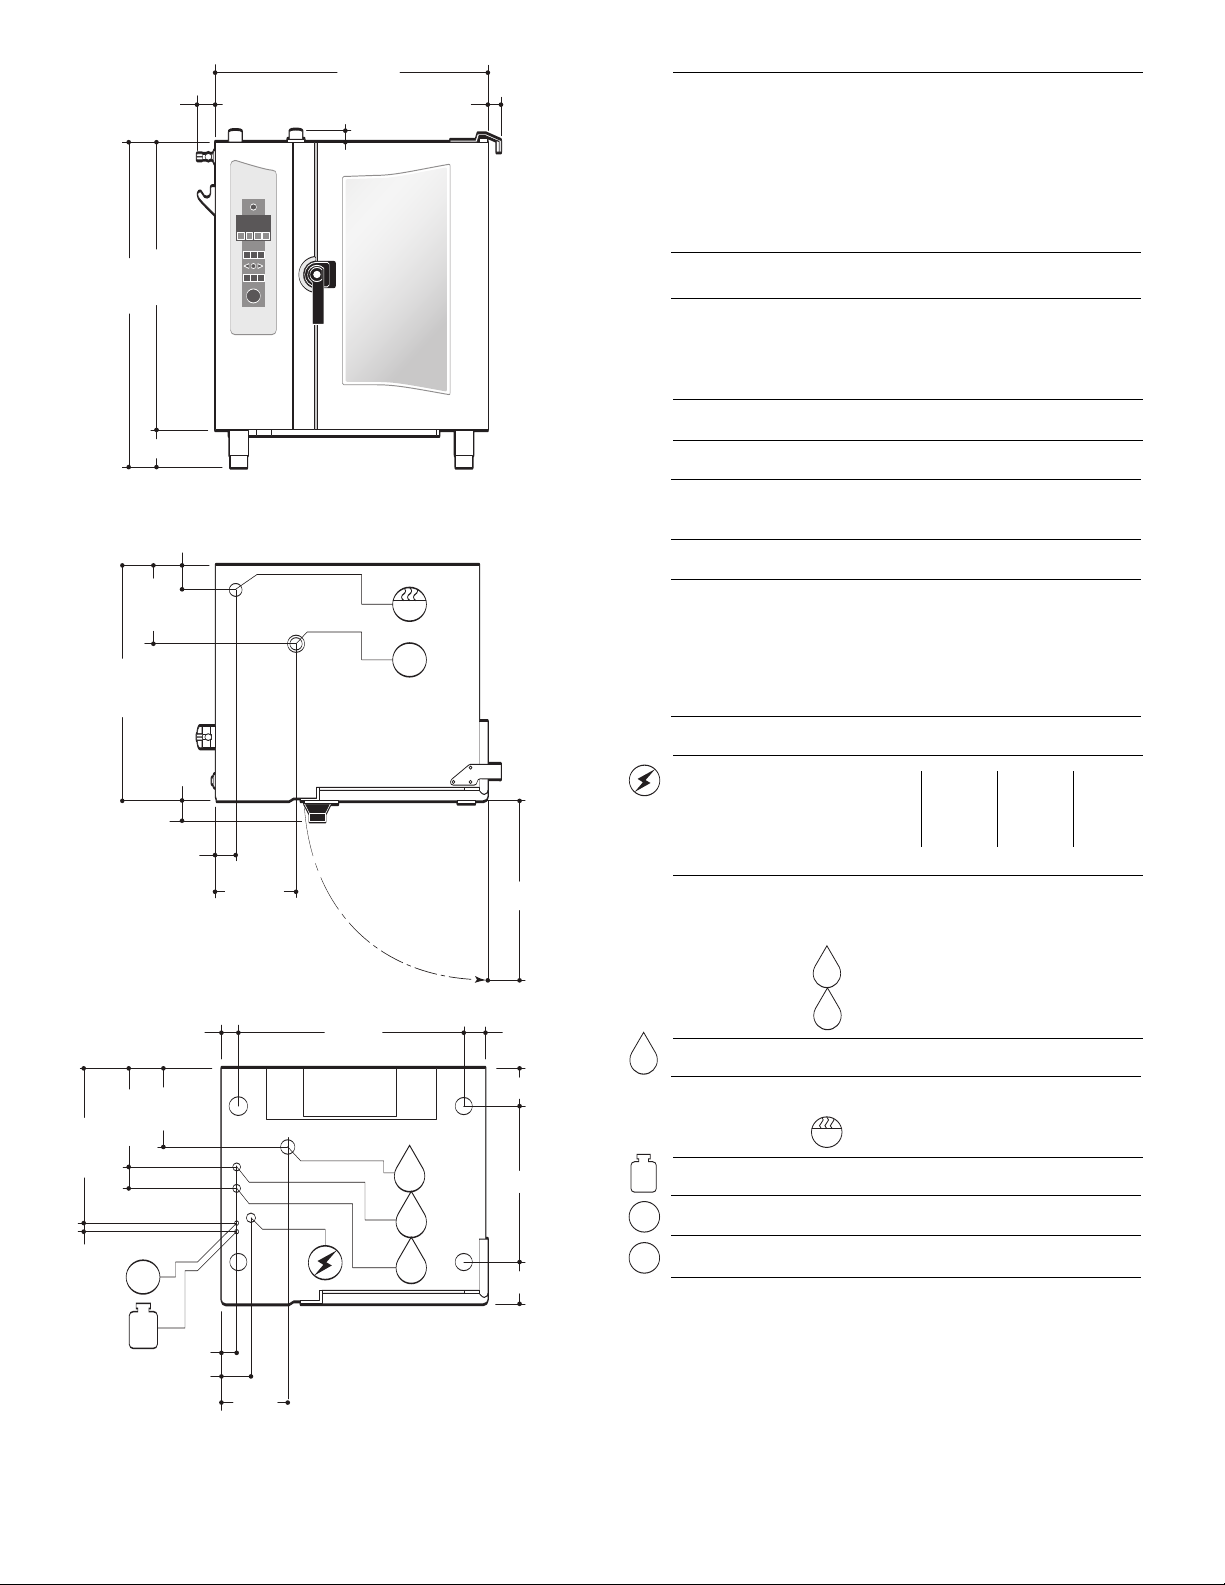
W1
W2
D
RC
W1
W2
D
RC
CS
W1
W2
D
RC
S
CS
AV
36.70"
2.52"
1.58"
38.98"
6.00"
1.82"
44.98"
31.70"
2.80"
11. 11"
2.80"
3.39"
10.79"
3.23"
9.45"
9.30"
30.20"
3.27"
6.07"
12.45"
2.96"
17.60"
1.19"
19.30"
6.34"
3.00"
4.97"
S
AV
RC
CS
W1
W2
D
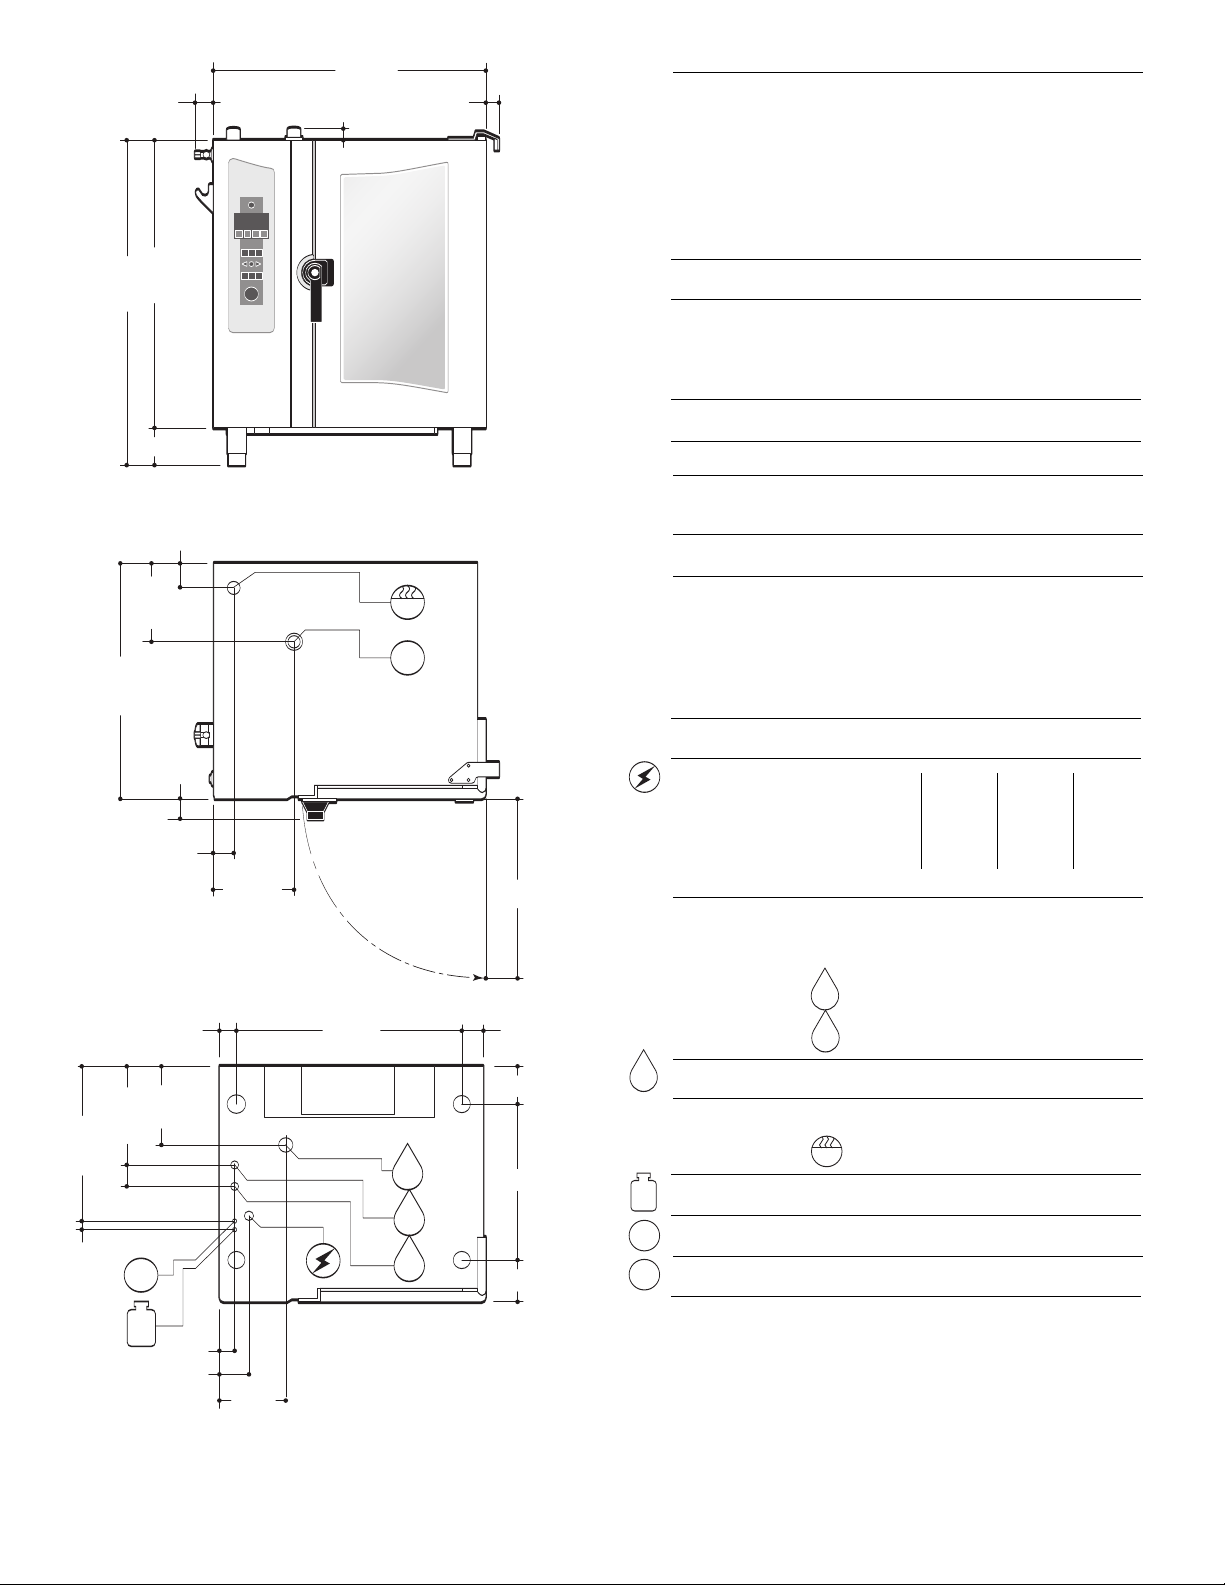
FRONT VIEW
TOP VIEW
BOTTOM VIEW
23.63"
W1
W2
D
W1
W2
D
W1
W1
W2
W1
W2
D
RC
CS
AV
8
The "Advanced Closed System" offers the following advantages:
■
■
Saves energy
■
■
Automatic moisture level adjustment
■
■
Low heat and steam emission to the kitchen
■
■
Automatically regulated steam injection
■
■
Enables immediate change into the steam mode
■
■
"Crisp & Tasty" demoisturizing function
Model: OEB-10.
10
Pan Capacity [
10 (12" x 20" x 2 1/2") steam table pans 11 (12" x 20" x 1") steam table pans
11 (13" x 20") half size wire racks 11 (13" x 18") half size sheet pans
10 (12" x 20") frying baskets - (no wire racks needed)
Unit has 11 slide rails at 2.64" (67mm) apart
]:
For Banquet Operations: Optional Plate Rack holds 32 plates
Unit Dimensions:
Width - 41.04", Depth - 34.50", Height - 45.68"
Shipping Dimensions: Width - 47", Depth - 41", Height - 54"
(including packaging)
Shipping Weight: 475 Lbs
Required Clearances:
Rear - 2", Left Side - 4", Right Side - 2 1/2"
• Allow for sufficient distance if a "high heat source" (i.e. Broiler) is located
next to the unit.
• Allow for sufficient clearance on left side for service access (contact the
factory service department for recommendations).
• Installation must comply with all local fire and health codes.
Agency Approvals: UL, UL - Sanitation (NSF Standards)
Electrical Requirements: 208/3/60 240/3/60 440/3/60 480/3/60
Total Connected Load: 16.4 KW 21.6 KW 18.5 KW 22 KW
Hot Air: 14.7 KW 19.6 KW 16.5 KW 19.6 KW
Steam Generator: 12.8 KW 17.1 KW 14.3 KW 17.1 KW
Amps per Phase: 45.5 51.8 24.2 26.4
Do not connect to a G.F.I. outlet
Water Connections: Cold Water (drinking water quality)
NOTES:
Cleveland Range reserves right of design improvement or modification, as warranted.
Many regional, state and local codes exist and it is the responsibility of the owner and installer to comply with the codes.
Cleveland Range equipment is built to comply with applicable standards for manufacturers.
Flow Pressure: 30 - 60 PSI
Water Inlets: 3/4" GHT-F (Female Garden Hose Connection)
Treated Water for Steam Generator
Untreated Water for Condenser and Hand Shower
Drain Connection: 2" Tube
Venting: Exhaust Hood
required
Air Vent
*Connection for Cleaning Solution
*Connection for Rinse Cycle
Low Pressure Safety Valve
*Available as an option
SECT. IIC PAGE 4
0406
Page 12

1333 East 179th St., Cleveland, Ohio, U.S.A. 44110
Ph: 1-216-481-4900 Fx: 1-216-481-3782 Web Site: www.clevelandrange.com
Cleveland Range,
LLC
SINCE 1922
INNOVATIVE STEAM COOKING SOLUTIONS
by
9
COMBI OVEN-STEAMER
Featuring the
"Advanced Closed
MODEL: c OES-10.10
CAPACITY: TEN (10) – 12" by 20" by 2 1/2" steam table pans
System +3"
ELECTRIC HEATED – Boilerless
Cooking Modes:
■
■
Hot Air
■
■
Steam
■
■
Combi
Cleveland Standard Features:
■
■
"Advanced closed system" with "Crisp & Tasty" de-moisturizing feature
■
■
Efficient heating system saves energy and provides fast heat up times
■
■
Fully insulated cooking compartment for maximum energy savings
■
■
Polished cooking compartment with coved corners for easy cleaning
■
■
Three (3) 12" x 20" wire shelves
■
■
Hinged fan guard and hinged removable pan racks
■
■
Two (2) speed auto reversing convection fan for even heat distribution
■
■
Space saving, easy to close "Disappearing Door"
■
■
Door latch with safety vent position and wear-free door switch
■
■
Vented, double glass door with integrated door stop and self
draining condensate drip pan
■
■
Easy to change, press-fit door seal
■
■
Oven light with shock resistant safety glass
■
■
Multipoint core temperature probe
■
■
Easy to use electronic controls for all operational functions
■
■
Self diagnostic system with full text message display
■
■
Easy to understand menu icons with bright graphics display
■
■
User friendly selector dial
■
■
Exclusive "Smart Key" for selecting option settings
■
■
Digital controls for temperature, time and core probe settings
■
■
Eight (8) "Press & Go" one step, recipe start buttons
■
■
Cook book library for up to 250 stored recipe programs, each
recipe capable of 20 steps
■
■
RS 232 connection for controlling one unit with a PC (personal computer)
■
■
Memory module automatically saves unit settings and recipes
■
■
Manual program override feature for operational settings
■
■
Smooth action hand shower for compartment cleaning
■
■
Injection system for steam
Options and Accessories
❐ ConvoClean automatic compartment washing system
❐ PC-HACCP software for establishing "HACCP controls" and
automatic documentation of the cooking process
❐ Equipment stand(s)
❐ Equipment stand(s) with Casters
■
■
Retherm
■
■
"Cook & Hold"
■
■
"Delta T" slow cooking
■
■
"Crisp & Tasty"
IT EM NUMBE R __________________________________________
JOB NAME / NUMBER __________________________________
Shall be Cleveland Model: OES-10.10 Combination Convection Oven /
Steamer with simple to operate electronic programmable controls for Hot Air,
Convection Steam, and Combination cooking modes, "Cook & Hold" and
"Delta T" slow-cooking capabilities, "Advanced Closed System" with "Crisp
& Tasty" de-moisturizing feature. Multiple cooking stage programs, stored
recipe library, multipoint core temperature probe, "Press & Go", one-step
recipe start buttons, "Smart Key" for selecting option settings, two (2) speed
auto reversing convection fan, boilerless. "Disappearing Door". Capacity for
ten (10) 12" x 20" x 2 1/2" pans. pans.
❐ Stacking kit for mounting one (1) OES-6.10 model on top of
one (1) OES-10.10
❐ Lockable cover over operating controls for prison installations
❐ USB or RS 485 connection for networking and controlling up to 32
units with a personal computer
❐ Plate rack for banquet operations
❐ Plate rack cart
❐ Thermal cover for plate or pan rack
❐ ConvoClean compartment cleaning solution
❐ ConvoCare concentrate for compartment rinse cycle
❐ "Dissolve" generator descaling solution
❐ Chicken Grill Rack
❐ 12" x 20" Wire Baskets for frying products
❐ Additional 12" x 20" Wire Shelves
Short Form Specifications
SECT. IIC PAGE 31
0406
Page 13
W1
W2
D
RC
W1
W2
D
RC
CS
W1
W2
D
RC
S
CS
AV
W1
W2
D
W1
W2
D
W1
W1
W2
W1
W2
D
RC
CS
AV
36.70"
2.52"
1.58"
38.98"
6.00"
1.82"
44.98"
31.70"
2.80"
11. 11"
2.80"
3.39"
10.79"
3.23"
9.45"
9.30"
30.20"
3.27"
6.07"
12.45"
2.96"
17.60"
1.19"
19.30"
6.34"
3.00"
4.97"
S
AV
RC
CS
W1
W2
D
FRONT VIEW
TOP VIEW
BOTTOM VIEW
23.63"
10
The "Advanced Closed System" offers the following advantages:
■
■
Saves energy
■
■
Automatic moisture level adjustment
■
■
Low heat and steam emission to the kitchen
■
■
Automatically regulated steam injection
■
■
Enables immediate change into the steam mode
■
■
"Crisp & Tasty" demoisturizing function
Model: OES-10.
10
Pan Capacity [
10 (12" x 20" x 2 1/2") steam table pans 11 (12" x 20" x 1") steam table pans
11 (13" x 20") half size wire racks 11 (13" x 18") half size sheet pans
10 (12" x 20") frying baskets - (no wire racks needed)
Unit has 11 slide rails at 2.64" (67mm) apart
]:
For Banquet Operations: Optional Plate Rack holds 32 plates
Unit Dimensions:
Width - 41.04", Depth - 34.50", Height - 45.68"
Shipping Dimensions: Width - 47", Depth - 41", Height - 54"
(including packaging)
Shipping Weight: 475 Lbs
Required Clearances:
Rear - 2", Left Side - 4", Right Side - 2 1/2"
• Allow for sufficient distance if a "high heat source" (i.e. Broiler) is located
next to the unit.
• Allow for sufficient clearance on left side for service access (contact the
factory service department for recommendations).
• Installation must comply with all local fire and health codes.
Agency Approvals: UL, UL - Sanitation (NSF Standards)
Electrical Requirements: 208/3/60 240/3/60 440/3/60 480/3/60
Total Connected Load: 16.4 KW 21.6 KW 18.5 KW 22 KW
Hot Air: 14.7 KW 19.6 KW 16.5 KW 19.6 KW
Amps per Phase: 45.5 51.8 24.2 26.4
Do not connect to a G.F.I. outlet
Water Connections: Cold Water (drinking water quality)
Flow Pressure: 30 - 60 PSI
Water Inlets: 3/4" GHT-F (Female Garden Hose Connection)
Treated Water for Steam Production
Untreated Water for Condenser and Hand Shower
Drain Connection: 2" Tube
Venting: Exhaust Hood
required
Air Vent
*Connection for Cleaning Solution
NOTES:
Cleveland Range reserves right of design improvement or modification, as warranted.
Many regional, state and local codes exist and it is the responsibility of the owner and installer to comply with the codes.
Cleveland Range equipment is built to comply with applicable standards for manufacturers.
*Connection for Rinse Cycle
Low Pressure Safety Valve
*Available as an option
SECT. IIC PAGE 32
0406
Page 14

1333 East 179th St., Cleveland, Ohio, U.S.A. 44110
Ph: 1-216-481-4900 Fx: 1-216-481-3782 Web Site: www.clevelandrange.com
Cleveland Range,
LLC
SINCE 1922
INNOVATIVE STEAM COOKING SOLUTIONS
by
11
COMBI OVEN-STEAMER
Featuring the
"Advanced Closed
MODEL: c OEB-6.20
CAPACITY: Seven (7) – 18" by 26" full size sheet pans or
System +3"
ELECTRIC HEATED – with Steam Generator
Cooking Modes:
■
■
Hot Air
■
■
Steam
■
■
Combi
Cleveland Standard Features:
■
■
"Advanced closed system" with "Crisp & Tasty" de-moisturizing feature
■
■
Efficient heating system for hot air and steam generator saves
energy and provides fast heat up times
■
■
Fully insulated steam generator and cooking compartment for
maximum energy savings
■
■
Polished cooking compartment with coved corners for easy cleaning
■
■
Three (3) 26" x 20" wire shelves
■
■
Hinged fan guard and hinged removable pan racks
■
■
Two (2) speed auto reversing convection fan for even heat distribution
■
■
Space saving, easy to close "Disappearing Door"
■
■
Door latch with safety vent position and wear-free door switch
■
■
Vented, double glass door with integrated door stop and self
draining condensate drip pan
■
■
Easy to change, press-fit door seal
■
■
Oven light with shock resistant safety glass
■
■
Multipoint core temperature probe
■
■
Easy to use electronic controls for all operational functions
■
■
Self diagnostic system with full text message display
■
■
Easy to understand menu icons with bright graphics display
■
■
User friendly selector dial
■
■
Exclusive "Smart Key" for selecting option settings
■
■
Digital controls for temperature, time and core probe settings
■
■
Eight (8) "Press & Go" one step, recipe start buttons
■
■
Cook book library for up to 250 stored recipe programs, each
recipe capable of 20 steps
■
■
RS 232 connection for controlling one unit with a PC (personal computer)
■
■
Memory module automatically saves unit settings and recipes
■
■
Manual program override feature for operational settings
■
■
Smooth action hand shower for compartment cleaning
Electric Steam Generator
■
■
Built-in automatic rinse system
■
■
Automatic fill and water level control
■
■
Automatic generator drain
■
■
Retherm
■
■
"Cook & Hold"
■
■
"Delta T" slow cooking
■
■
"Crisp & Tasty"
IT EM NUMBE R __________________________________________
JOB NAME / NUMBER __________________________________
Shall be Cleveland Model: OEB-6.20 Combination Convection Oven /
Steamer with simple to operate electronic programmable controls for Hot Air,
Convection Steam, and Combination cooking modes, "Cook & Hold" and
"Delta T" slow-cooking capabilities, "Advanced Closed System" with "Crisp
& Tasty" de-moisturizing feature. Multiple cooking stage programs, stored
recipe library, multipoint core temperature probe, "Press & Go", one-step
recipe start buttons, "Smart Key" for selecting option settings, Two (2) speed
auto reversing convection fan. Electric steam generator with automatic drain.
"Disappearing Door". Capacity for seven (7) 18" x 26" full size sheet pans, or
fourteen (14) 12" x 20" x 2 1/2" pans.
Options and Accessories
❐ ConvoClean automatic compartment washing system
❐ PC-HACCP software for establishing "HACCP controls" and automatic
documentation of the cooking process
❐ Equipment stand(s)
❐ Equipment stand(s) with Casters
❐ Stacking kit for stacking two (2) OEB-6.20 models
❐ Stacking kit for mounting one (1) OEB-6.20 model on top of
one (1) OEB-10.20
❐ Universal pan-rack system to hold full size sheet pans without the use of wire
shelves
❐ Lockable cover over operating controls for prison installations
❐ USB or RS 485 connection for networking and controlling up to 32 units with a
personal computer
❐ Plate rack for banquet operations
❐ Plate rack cart
❐ Thermal cover for plate or pan rack
❐ ConvoClean compartment cleaning solution
❐ ConvoCare concentrate for compartment rinse cycle
❐ "Dissolve" generator descaling solution
❐ Chicken Grill Rack
❐ 12" x 20" Wire Baskets for frying products
❐ Additional 26" x 20" Wire Shelves
❐ Special Baking Rack System
Fourteen (14) – 12" by 20" by 2 1/2" steam table pans
Short Form Specifications
SECT. IIC PAGE 7
0406
Page 15
W1
W2
D
RC
W1
W2
D
RC
CS
W1
W2
D
RC
S
CS
AV
47.92"
2.52"
1.58"
30.12"
6.00"
1.82"
36.12"
40.44"
2.80"
12.68"
2.80"
31.50"
3.39"
10.79"
3.23"
14.26"
10.87"
41.42"
3.27"
6.93"
21.19"
2.96"
27.29"
1.19"
29.61"
3.90"
3.00"
4.97"
S
A
V
RC
CS
W1
W2
D
FRONT VIEW
TOP VIEW
BOTTOM VIEW
W1
W2
D
W1
W2
D
W1
W1
W2
W1
W2
D
RC
CS
AV
12
The "Advanced Closed System" offers the following advantages:
■
■
Saves energy
■
■
Automatic moisture level adjustment
■
■
Low heat and steam emission to the kitchen
■
■
Automatically regulated steam injection
■
■
Enables immediate change into the steam mode
■
■
"Crisp & Tasty" demoisturizing function
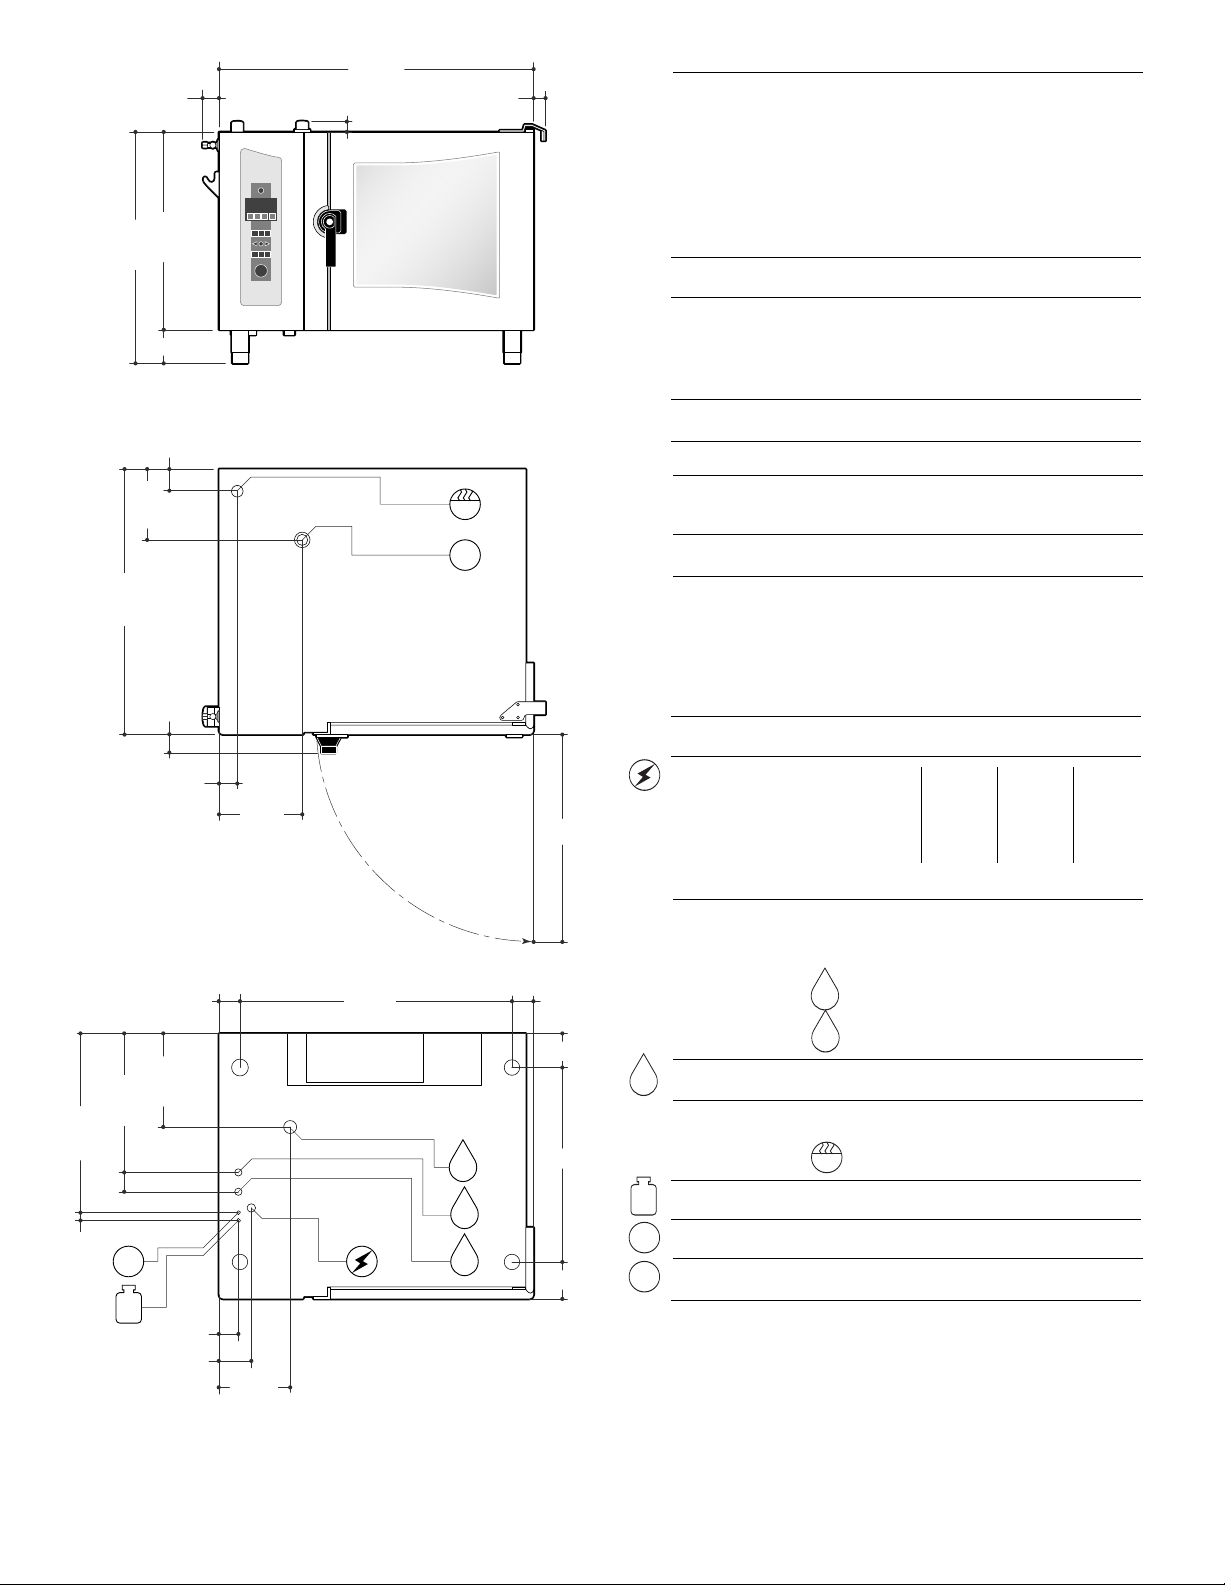
Model: OEB-6.20
Pan Capacity [
7 (20" x 26") full size wire racks 7 (18" x 26") full size sheet pans - on wire racks
(13" x 18") half size sheet pans - on wire racks 14 (12" x 20" x 2 1/2") steam table pans
14
14 (12" x 20" x 1") steam table pans 14 (12" x 20") frying Baskets - (no wire racks needed)
Unit has 7 slide rails at 2.64" (67mm) apart
]:
For Banquet Operations: Optional Plate Rack holds 42 plates
Unit Dimensions:
Shipping Dimensions: Width - 58", Depth - 49", Height - 45"
(including packaging)
Width - 52.26", Depth - 43.24", Height - 36.82"
Shipping Weight: 485 Lbs
Required Clearances:
Rear - 2", Left Side - 4", Right Side - 2 1/2"
• Allow for sufficient distance if a "high heat source" (i.e. Broiler) is located
next to the unit.
• Allow for sufficient clearance on left side for service access (contact the
factory service department for recommendations).
• Installation must comply with all local fire and health codes.
Agency Approvals: UL, UL - Sanitation (NSF Standards)
Electrical Requirements: 208/3/60 240/3/60 440/3/60 480/3/60
Total Connected Load: 16.4 KW 21.6 KW 18.5 KW 22 KW
Hot Air: 14.7 KW 19.6 KW 16.5 KW 19.6 KW
Steam Generator: 12.8 KW 17.1 KW 14.3 KW 17.1 KW
Amps per Phase: 45.5 51.8 24.2 26.4
Do not connect to a G.F.I. outlet
Water Connections: Cold Water (drinking water quality)
Flow Pressure: 30 - 60 PSI
Water Inlets: 3/4" GHT-F (Female Garden Hose Connection)
Treated Water for Steam Generator
Untreated Water for Condenser and Hand Shower
Drain Connection: 2" Tube
Venting: Exhaust Hood
NOTES:
Cleveland Range reserves right of design improvement or modification, as warranted.
Many regional, state and local codes exist and it is the responsibility of the owner and installer to comply with the codes.
Cleveland Range equipment is built to comply with applicable standards for manufacturers.
Air Vent
*Connection for Cleaning Solution
*Connection for Rinse Cycle
Low Pressure Safety Valve
*Available as an option
required
SECT. IIC PAGE 8
0406
Page 16
1333 East 179th St., Cleveland, Ohio, U.S.A. 44110
Ph: 1-216-481-4900 Fx: 1-216-481-3782 Web Site: www.clevelandrange.com
Cleveland Range,
LLC
SINCE 1922
INNOVATIVE STEAM COOKING SOLUTIONS
by
13
COMBI OVEN-STEAMER
Featuring the
"Advanced Closed
MODEL: c OES-6.20
CAPACITY: Seven (7) – 18" by 26" full size sheet pans or
System +3"
ELECTRIC HEATED – Boilerless
Cooking Modes:
■
■
Hot Air
■
■
Steam
■
■
Combi
Cleveland Standard Features:
■
■
"Advanced closed system" with "Crisp & Tasty" de-moisturizing feature
■
■
Efficient heating system saves energy and provides fast heat up times
■
■
Fully insulated cooking compartment for maximum energy savings
■
■
Polished cooking compartment with coved corners for easy cleaning
■
■
Three (3) 26" x 20" wire shelves
■
■
Hinged fan guard and hinged removable pan racks
■
■
Two (2) speed auto reversing convection fan for even heat distribution
■
■
Space saving, easy to close "Disappearing Door"
■
■
Door latch with safety vent position and wear-free door switch
■
■
Vented, double glass door with integrated door stop and self
draining condensate drip pan
■
■
Easy to change, press-fit door seal
■
■
Oven light with shock resistant safety glass
■
■
Multipoint core temperature probe
■
■
Easy to use electronic controls for all operational functions
■
■
Self diagnostic system with full text message display
■
■
Easy to understand menu icons with bright graphics display
■
■
User friendly selector dial
■
■
Exclusive "Smart Key" for selecting option settings
■
■
Digital controls for temperature, time and core probe settings
■
■
Eight (8) "Press & Go" one step, recipe start buttons
■
■
Cook book library for up to 250 stored recipe programs, each
recipe capable of 20 steps
■
■
RS 232 connection for controlling one unit with a PC (personal computer)
■
■
Memory module automatically saves unit settings and recipes
■
■
Manual program override feature for operational settings
■
■
Smooth action hand shower for compartment cleaning
■
■
Injection system for steam
Options and Accessories
❐ ConvoClean automatic compartment washing system
❐ PC-HACCP software for establishing "HACCP controls" and
automatic documentation of the cooking process
❐ Equipment stand(s)
❐ Equipment stand(s) with Casters
■
■
Retherm
■
■
"Cook & Hold"
■
■
"Delta T" slow cooking
■
■
"Crisp & Tasty"
IT EM NUMBE R __________________________________________
JOB NAME / NUMBER __________________________________
Shall be Cleveland Model: OES-6.20 Combination Convection Oven /
Steamer with simple to operate electronic programmable controls for Hot Air,
Convection Steam, and Combination cooking modes, "Cook & Hold" and
"Delta T" slow-cooking capabilities, "Advanced Closed System" with "Crisp
& Tasty" de-moisturizing feature. Multiple cooking stage programs, stored
recipe library, multipoint core temperature probe, "Press & Go", one-step
recipe start buttons, "Smart Key" for selecting option settings, two (2) speed
auto reversing convection fan, boilerless. "Disappearing Door". Capacity for
seven (7) 18" x 26" full size sheet pans, or fourteen (14) 12" x 20" x 2 1/2" pans.
❐ Universal pan-rack system to hold full size sheet pans without the
use of wire shelves
❐ Stacking kit for stacking two (2) OES-6.20 models
❐ Stacking kit for mounting one (1) OES-6.20 model on top of
one (1) OES-10.20
❐ Lockable cover over operating controls for prison installations
❐ USB or RS 485 connection for networking and controlling up to 32
units with a personal computer
❐ Plate rack for banquet operations
❐ Plate rack cart
❐ Thermal cover for plate or pan rack
❐ ConvoClean compartment cleaning solution
❐ ConvoCare concentrate for compartment rinse cycle
❐ "Dissolve" generator descaling solution
❐ Chicken Grill Rack
❐ 12" x 20" Wire Baskets for frying products
❐ Additional 26" x 20" Wire Shelves
❐ Special Baking Rack System
Fourteen (14) – 12" by 20" by 2 1/2" steam table pans
Short Form Specifications
SECT. IIC PAGE 35
0406
Page 17
W1
W2
D
RC
W1
W2
D
RC
CS
W1
W2
D
RC
S
CS
AV
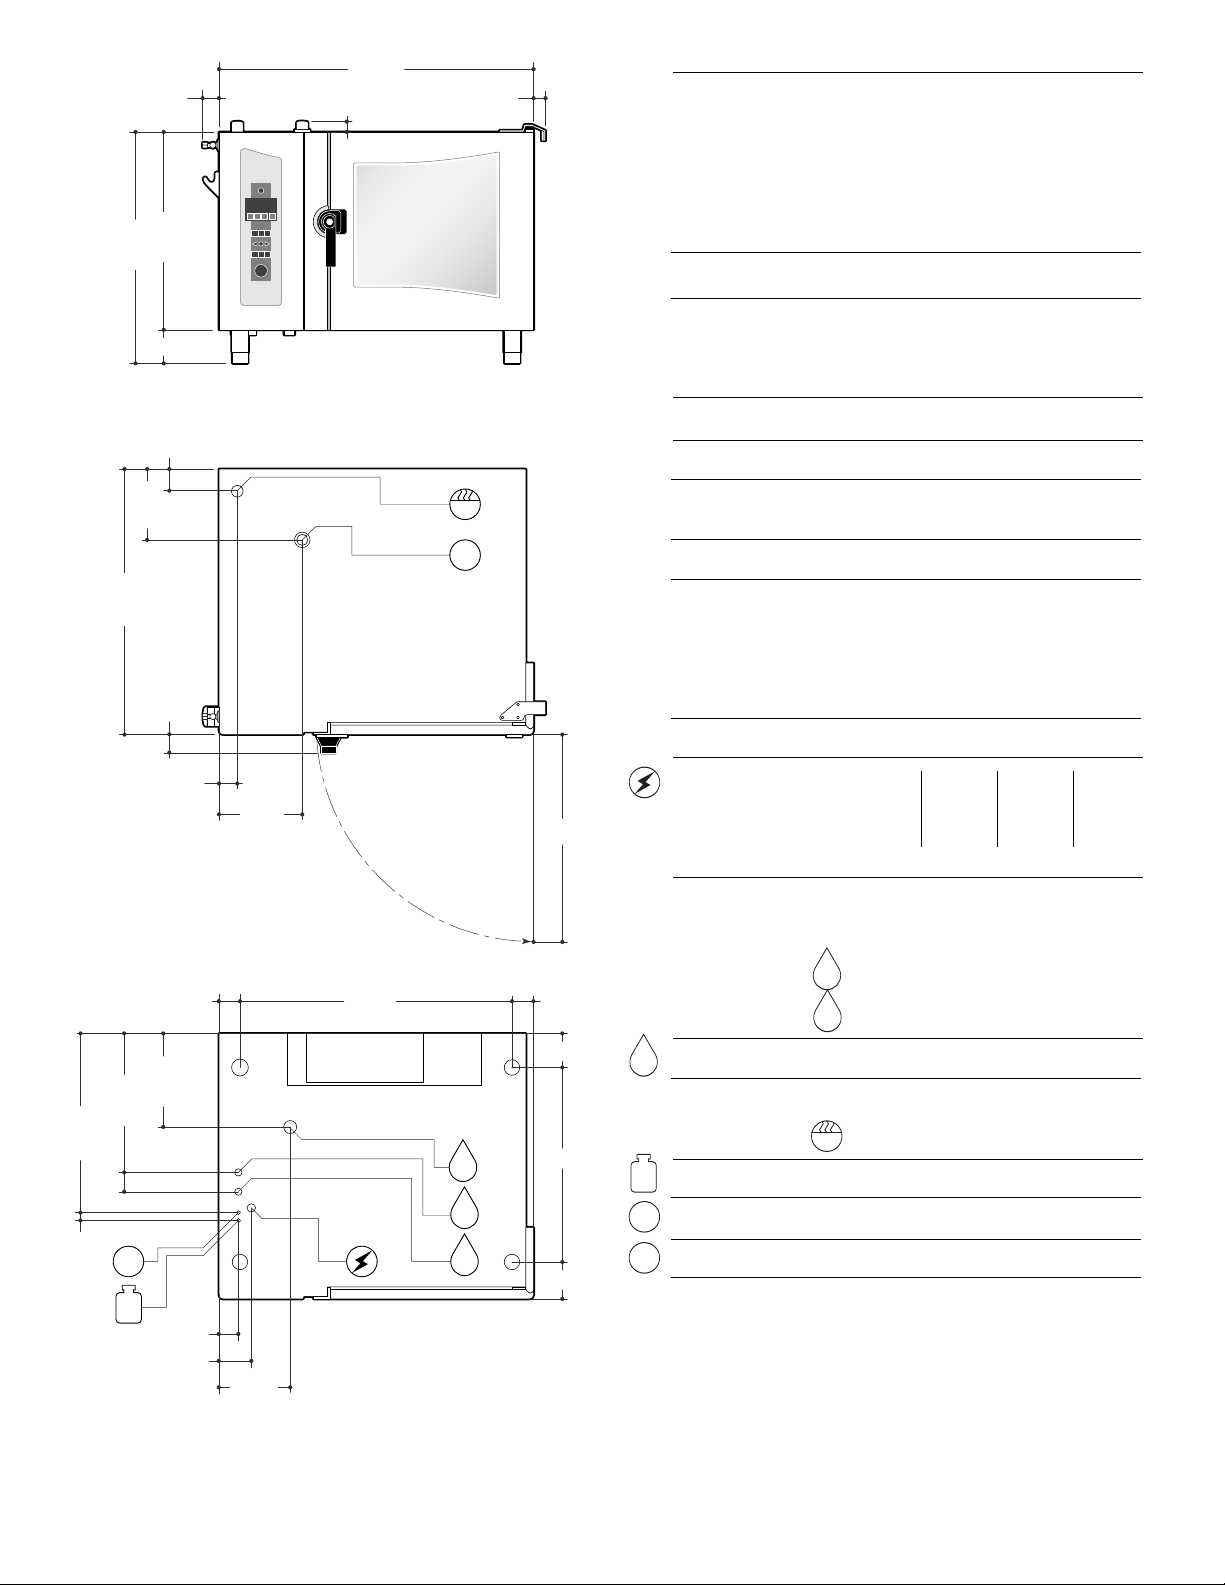
47.92"
2.52"
1.58"
30.12"
6.00"
1.82"
36.12"
40.44"
2.80"
12.68"
2.80"
31.50"
3.39"
10.79"
3.23"
14.26"
10.87"
41.42"
3.27"
6.93"
21.19"
2.96"
27.29"
1.19"
29.61"
3.90"
3.00"
4.97"
S
A
V
RC
CS
W1
W2
D
FRONT VIEW
TOP VIEW
BOTTOM VIEW
W1
W2
D
W1
W2
D
W1
W1
W2
W1
W2
D
RC
CS
AV
14
The "Advanced Closed System" offers the following advantages:
■
■
Saves energy
■
■
Automatic moisture level adjustment
■
■
Low heat and steam emission to the kitchen
■
■
Automatically regulated steam injection
■
■
Enables immediate change into the steam mode
■
■
"Crisp & Tasty" demoisturizing function
Model: OES-6.20
Pan Capacity [
7 (20" x 26") full size wire racks 7 (18" x 26") full size sheet pans - on wire racks
(13" x 18") half size sheet pans - on wire racks 14 (12" x 20" x 2 1/2") steam table pans
14
14 (12" x 20" x 1") steam table pans 14 (12" x 20") frying Baskets - (no wire racks needed)
Unit has 7 slide rails at 2.64" (67mm) apart
]:
For Banquet Operations: Optional Plate Rack holds 42 plates
Unit Dimensions:
Shipping Dimensions: Width - 58", Depth - 49", Height - 45"
(including packaging)
Width - 52.26", Depth - 43.24", Height - 36.82"
Shipping Weight: 485 Lbs
Required Clearances:
Rear - 2", Left Side - 4", Right Side - 2 1/2"
• Allow for sufficient distance if a "high heat source" (i.e. Broiler) is located
next to the unit.
• Allow for sufficient clearance on left side for service access (contact the
factory service department for recommendations).
• Installation must comply with all local fire and health codes.
Agency Approvals: UL, UL - Sanitation (NSF Standards)
Electrical Requirements: 208/3/60 240/3/60 440/3/60 480/3/60
Total Connected Load: 16.4 KW 21.6 KW 18.5 KW 22 KW
Hot Air: 14.7 KW 19.6 KW 16.5 KW 19.6 KW
Amps per Phase: 45.5 51.8 24.2 26.4
Do not connect to a G.F.I. outlet
Water Connections: Cold Water (drinking water quality)
Flow Pressure: 30 - 60 PSI
Water Inlets: 3/4" GHT-F (Female Garden Hose Connection)
Treated Water for Steam Production
Untreated Water for Condenser and Hand Shower
Drain Connection: 2" Tube
Venting: Exhaust Hood
NOTES:
Cleveland Range reserves right of design improvement or modification, as warranted.
Many regional, state and local codes exist and it is the responsibility of the owner and installer to comply with the codes.
Cleveland Range equipment is built to comply with applicable standards for manufacturers.
*Connection for Cleaning Solution
*Connection for Rinse Cycle
Low Pressure Safety Valve
*Available as an option
Air Vent
required
SECT. IIC PAGE 36
0406
Page 18

CONTROL PANEL
15
BASIC OPERATION
A. QUICK START GUIDE
ALWAYS PRE-HEAT THE OVEN CHAMBER!
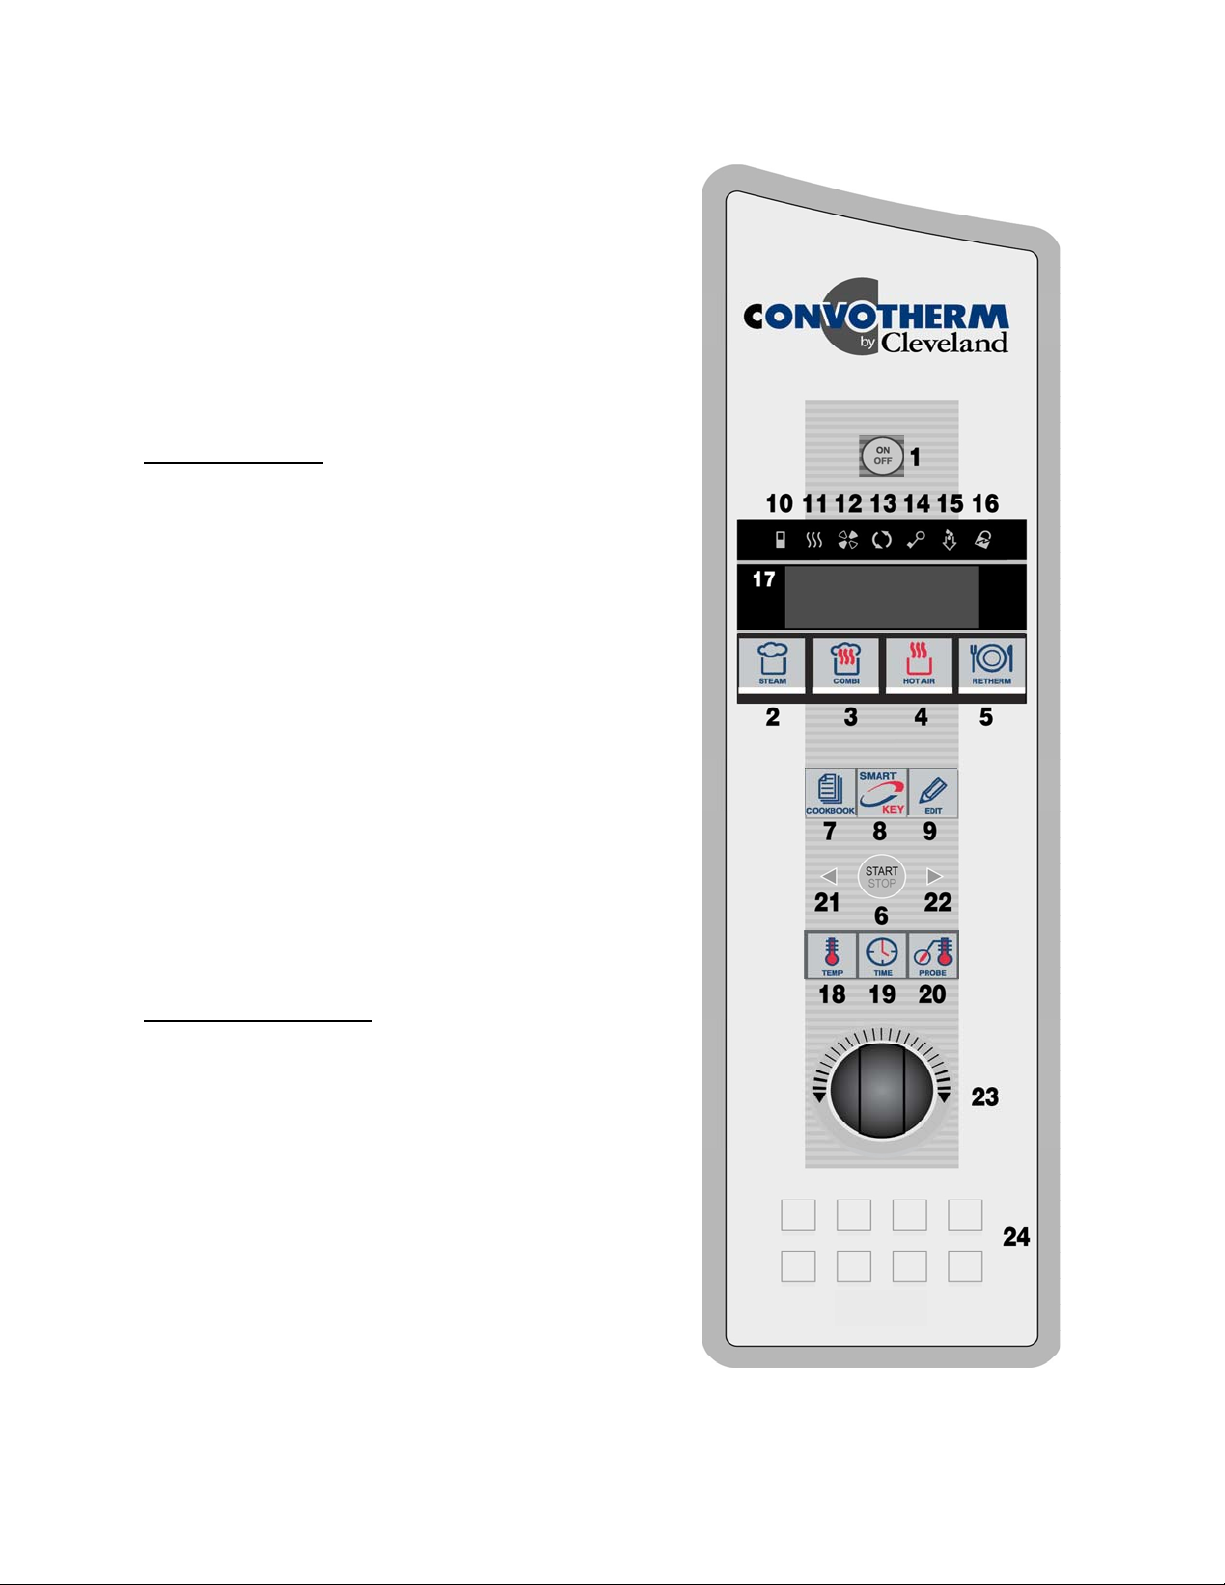
1. Switch on with key (1).
2. Select cooking mode with keys (2-5).
3. Press key (6) to start.
OR
1. Press key (18) and rotate Selector Dial (23) to set oven
temperature.
2. Press key (19) and rotate Selector Dial (23) to set
cooking time.
OR
1. Press key (20) and rotate Selector Dial (23) to set core
temperature.
ALL
1. Press key (6) to start the Combi.
2. To change the settings while cooking: press keys (18)
OR (19) OR (20) and adjust the settings with the
Selector Dial (23).
3. When the buzzer sounds press key (6) or open the
door.
NOTES: See “CONTROL PANEL DETAIL VIEW” in
Chapter 4, Section B for detailed descriptions of control
panel functions.
Figure 4-1a
Control Panel
Page 19
B. CONTROL PANEL DETAIL VIEW
16
Note: Item numbers correspond to numbers on the
control panels in Figure 4-1b
1. ON/OFF
When the Combi is turned ON:
• Self-diagnosis is performed.
• Oven light turns on.
• Steam generator fills and heats (OEB and OGB
models).
Cooking Modes
2. Steam
• Oven temperature is continuously variable between
86°F and 248°F.
3. Combi Hot Air and Steam
• Oven temperature is continuously variable between
212°F and 482°F.
4. Hot Air
• Oven temperature is continuously variable between
86°F and 482°F.
5. Retherm
• Oven temperature is continuously variable between
248°F and 320°F.
6. Start/Stop
• Start cooking modes and recipes.
• Stop the cooking activity.
• Escape or Exit Smart Key functions
Programming / Help
7. Cookbook
• Call up, exit cookbook.
• View a list of stored recipes in the display.
8. Smart Key
• Set Extra Functions.
• Set-Up the Combi.
• Enter Sub-Menus.
9. Edit
• Create, change, copy, and delete recipes.
Figure 4-1b
Control Panel
Page 20

Function Indicators
17
• Light up when function or activity is engaged:
10. Reduced Power
11. Burner or Electric Heating ON
12. Reduced Fan Speed
13. Cooking Mode Engaged
14. Button Lock
15. Crisp & Tasty Engaged
16. Program Protection
17. Display
• Display in normal mode:
• Date.
• Time.
• Oven Temperature.
• Cooking Time
• Core Probe Temperature.
• Display in programming mode:
• Clear text.
• Memory.
• Symbols.
Settings
18. Oven Temperature
• Set the nominal oven temperature.
• View the actual or nominal oven
temperature.
19. Cooking Time
• Set the cooking time from 1 minute to 9
hours, 59 minutes using the Selector Dial.
• Set Continuous Mode
1. At 9:59 or 0:01, release the Selector Dial.
2. Turn the Selector Dial again to the left
or right.
• See the actual or nominal cooking time.
• See elapsed cooking time when using
Core Temperature mode.
20. Core Temperature
• Set the nominal core temperature.
• See the actual or nominal core
temperature.
• See the actual core temperature during
cooking time mode.
21 & 22. Scroll Left and Scroll Right
• Page / Scroll one step forward or
back in programming mode.
23. Selector Dial
• Set: Oven temperature, cooking time, core
temperature, recipe name, recipe number.
• Select Smart Key functions, editing
functions and recipes in the cookbook.
24. Press & Go Keys
• Start saved recipes with one key.
• LED below key lights up when
corresponding recipe is started.
Notes:
• Magnetic door switch
If the oven door is opened during
operation, the magnetic door switch
automatically interrupts the recipe. The
timer stops. After closing the oven door,
the Combi automatically continues the
recipe. If the oven door is opened when
the buzzer sounds at the end of a
recipe, it automatically switches off.
• Operate controls with hands only!
Page 21

AT THE END OF THE DAY OR SHIFT
18
A. Cleaning the Oven Chamber
1. Cleaning – General
a. Regular cleaning of the Combi after use, inside and out, helps guarantee many years of
b. Clean and maintain the Combi ONLY when the Combi is cold.
c. Use the hand shower only inside the oven chamber.
d. Clean the outside the Combi by hand.
e. Never use the hand shower, hose, pressure washer or similar device on the outside of
f. NEVER spray anything on or into the air intakes or outlets of the Combi.
g. Do NOT use hoses, pressure washers, high-pressure cleaners, or water jets to clean
h. Do NOT spray water into a hot oven chamber.
i. Use only genuine Convotherm by Cleveland and Cleveland Range cleaning and
j. Never use irritant, acidic, highly alkaline cleaners, high-alcohol, chlorine, chlorinated, or
k. Poor water quality can cause discoloration inside the oven chamber. Remove these
l. Damage caused as a result of improper cleaning voids the warranty.
2. Semi-Automatic and Automatic Cleaning - General
a. If the oven chamber is very heavily soiled, additional manual cleaning may be necessary.
b. Depending on the level of soiling of the oven chamber, the engaging frames and grills
c. Do NOT interrupt the semi-automatic or automatic cleaning process.
Clean the oven chamber at least once per day or more frequently as needed
Failure to clean the Combi properly and regularly can cause equipment damage.
Damage caused by improper cleaning will invalidate the Warranty!
satisfaction from your Combi.
the Combi.
inside the Combi oven chamber.
descaling products. Follow the instructions and heed and obey the warnings on the
labels. Other products can cause injury, present heath hazards, and damage the Combi.
abrasive cleaning agents, scrapers, or abrasive materials to clean the Combi.
discolorations with CONVOCare. Spray CONVOCare on the affected surfaces in a COLD
oven chamber, wait 10 minutes, wipe off with a soft cloth or sponge, and begin cleaning
as usual.
may be left in the oven during the automatic cleaning process.
CAUTION
Page 22
WARNING
19
When working with cleaning agents, nozzle rinsing fluid and spray bottles: Wear
suitable clothing, protective gloves and protective goggles to help protect from
splashes and spills. Failure to do so can result in chemical burns on skin and in eyes.
3. Manual Cleaning of the Oven Chamber
Read, understand, and heed and obey all instructions and safety
information found on cleaning agent labels, Material Safety Data Sheets,
and related documents and sources. Failure to do so can result in death,
injury, and equipment damage.
a. Clean the Combi daily to prevent discoloration and corrosion of the stainless steel.
1) Avoid scratching the oven chamber or engaging frame.
2) Scratches can collect soil and / or allow corrosion to begin.
3) Do NOT use harsh or abrasive cleaning agents, scouring pads, or scrapers.
b. Clean the fan guard and the fan area behind the fan guard at the same time.
1) Release the quick-action locks on the oven racks and fan guard.
2) Pivot the oven racks and fan guard out into the oven chamber.
3) After cleaning, push the oven racks and fan guard closed and fix them in place with
the quick-action locks.
WARNING
CAUTION
Do NOT use U-Shaped racks that are bent or otherwise damaged in any
way. Pans and accessories placed in damaged racks can tip and spill,
causing burns, injuries and/or equipment damage
4) Make sure that the U-Shaped racks do not become bent; otherwise grills, racks,
containers and accessories will no longer be safely supported. If U-Shaped racks
become bent then remove the Combi from service and contact your qualified
Cleveland Range authorized service representative at once.
c. Clean the interior of the of the double glass doors daily.
1) Release the quick-action locks on the door glass.
2) Clean the glass with a non-abrasive cleaner and a soft cloth.
3) Do not use harsh or abrasive cleaning agents, scouring pads, or scrapers because
they will damage the glass.
d. Regular cleaning of the hygienic plug-in gasket (door gasket) increases service life.
1) Wait for the gasket to cool.
2) Clean the gasket with mild, scent free dish detergent and a soft cloth.
3) Do not use harsh or abrasive agents, scouring pads or scrapers because they will
damage the gasket.
4) Air dry the gasket.
Page 23
20
e. Clean the Bypass Measuring Aperture. (Opening in the oven
chamber on the left-hand side, slightly below the door latch.
See diagram.)
1) Spray with CONVOClean.
2) Rinse clean with the hand shower.
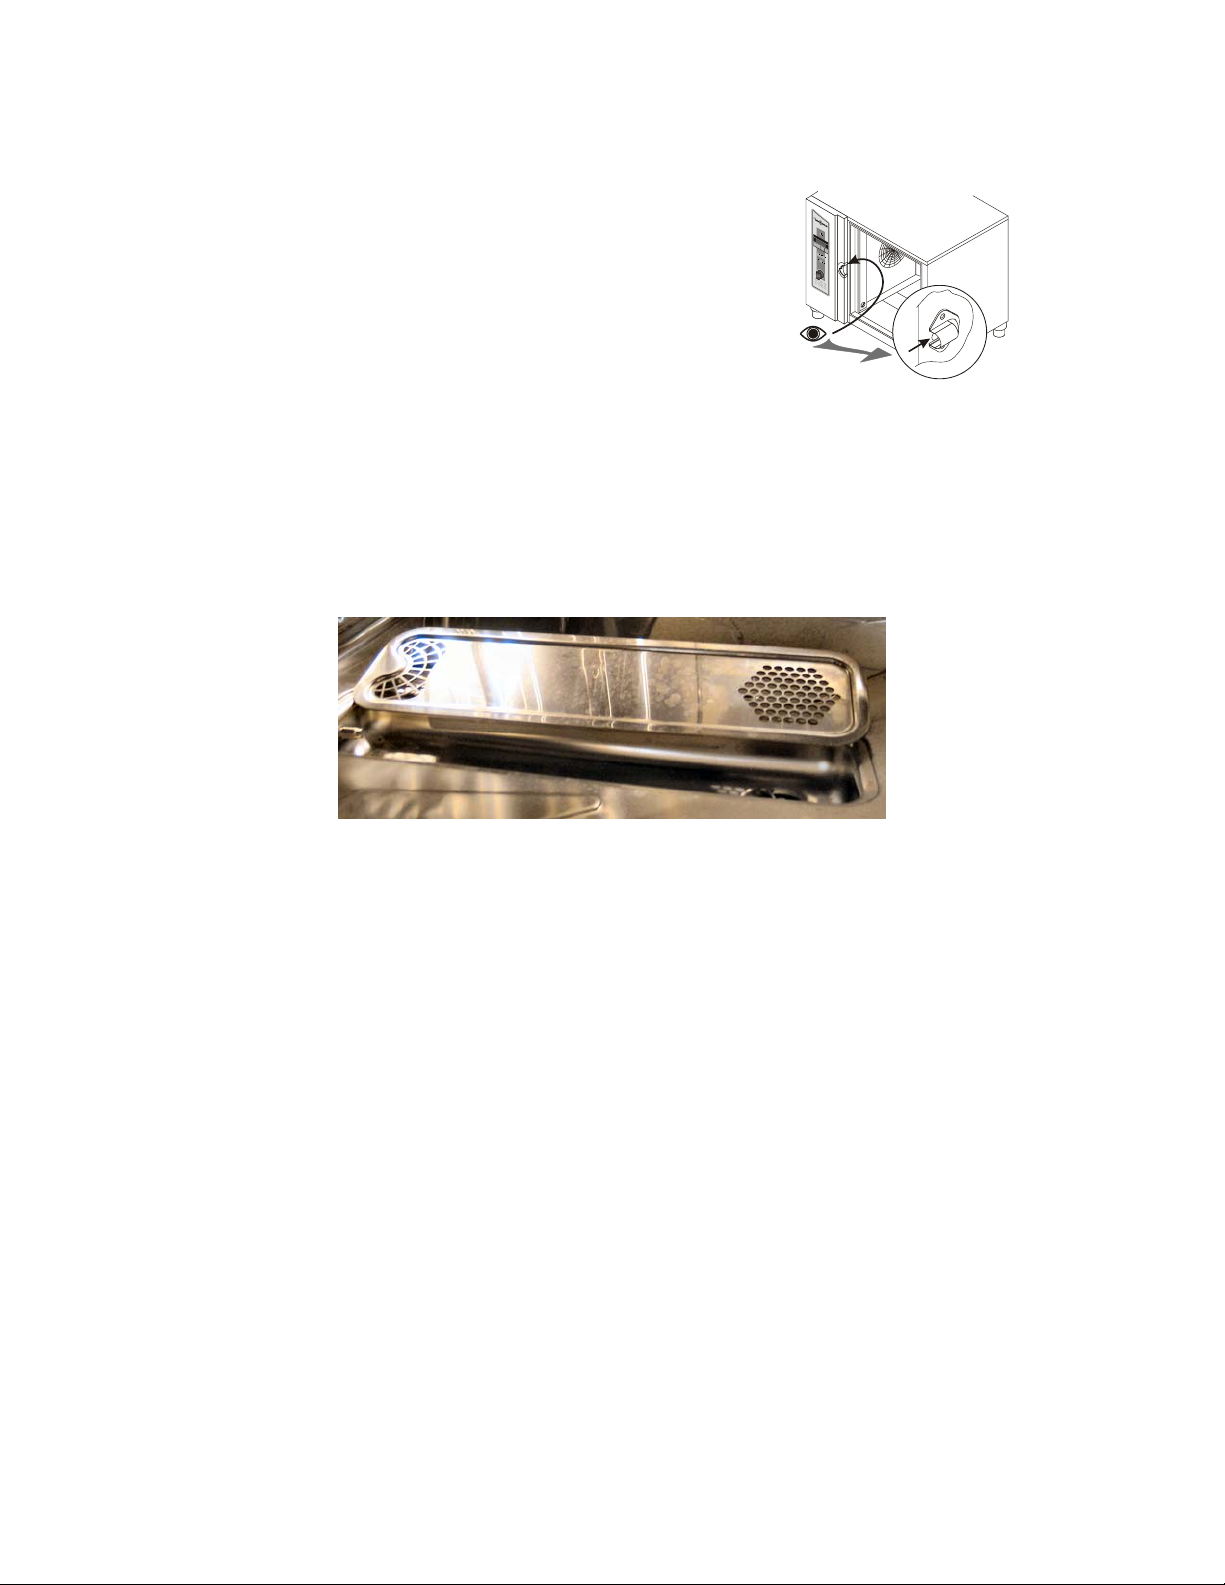
f. Remove and clean the drain cover.
1) Clean food residue and drippings from the tray and
drain in the oven chamber.
2) Spray on original CONVOClean oven chamber cleaner and
allow it to take effect.
3) Rinse thoroughly with the hand shower.
g. Clean the drain and make sure that it is not
blocked.
h. Clean the demoisturizing tray (trough shaped area
under the drain cover).
Bypass
i. Clean the door drip tray, appliance drip trays and accessory drip trays.
NOTES:
• If a white deposit forms inside the oven chamber, the water treatment system is not
correctly set, or the addition of a water treatment system is required. To remove this
deposit, use vinegar and a soft cloth.
• Ask your qualified Cleveland Range authorized service representative about adding or
setting a water treatment system.
Drain Cover and Drain
Page 24

B. Semi-Automatic Cleaning of the Oven Chamber
21
NOTE: Do NOT press the Start/Stop key while using the Semi-automatic Cleaning process.
This stops the cleaning process.
WARNING
The Semi-Automatic Cleaning process is designed to be started when the
oven chamber temperature is at or below 158°F. Death, injury, and equipment
damage can result from starting the Semi-Automatic Cleaning process when
the oven chamber is above 158°F.
1. Before starting the Semi-Automatic Cleaning process, make sure the oven chamber is below
158°F by stopping all processes and pressing the Temperature key twice to view the actual
temperature.
a. If the oven chamber is above 158°F then open the Combi door and wait 15 minutes.
b. Check the oven temperature again.
1) If the oven temperature is at or below 158°F then go to Step 2.
2) If the oven temperature is still above 158°F then wait 15 more minutes and check the
oven chamber temperature. Repeat this step as needed until the oven chamber
temperature is at or below 158°F and then go to Step 2.
2. See separate instruction sheet P/N 260AYM, “One-Hand Sprayer with Telescoping Wand,” for
safety information, detailed instructions for using the sprayer, P/N 111598, and other
information.
3. Always wear appropriate protective clothing and equipment when using this Sprayer, including
protective gloves and goggles.
4. Close and latch the Combi door.
5. If the Combi is OFF, turn it ON.
6. Press the Smart Key. Various options appear in the display.
7. Use the Selector Dial to select “Cleaning”
8. Confirm by pressing the Smart Key.
9. Confirm “Yes” with the Smart Key. The semi-automatic cleaning process starts.
10. Semi-automatic cleaning uses cooking modes to assist the cleaning process. The display
shows the nominal values for the cooking modes.
a. The first step is Hot Air mode at 158°F for 10 minutes, followed by a Signal Tone.
11. After the first Signal Tone, open the oven door, and follow instruction sheet in P/N 260AYM to
spray the oven chamber, drain, grills, plates etc. with original Convotherm by Cleveland
CONVOClean.
12. Close and latch the Combi door and allow the CONVOClean to take effect. The Semi-
Automatic Cleaning mode continues to run.
a. The second step is Steam mode at 86°F for 10 minutes, followed by a Signal Tone.
13. After the second Signal Tone, clean behind the fan guard and the fan area.
a. Release the quick-action locks on the oven racks and fan guard.
b. Swing the oven racks and fan guard into the oven chamber.
c. After cleaning, swing the oven racks and fan guard closed and fix it in place with the quick-action
locks.
14. Close and latch the Combi door. The Semi-Automatic Cleaning mode continues automatically.
.
Page 25

a. The third step is Steam mode at 86°F for 1 minute. No action is needed.
22
b. The fourth step is Steam at 212°F for 10 minutes, followed by a Signal Tone.
15. Turn OFF the Combi when the Signal Tone sounds.
16. Use the hand shower to rinse thoroughly the oven chamber, accessories, and behind the fan guard.
17. In the case of severe staining or soiling, repeat the cleaning process.
18. After use or after cleaning, leave the Combi door open.
Page 26
C. CONVOClean Automatic Cleaning System (optional):
23
NOTES:
• Do NOT interrupt the automatic cleaning process. Interrupting and restarting the
Automatic Cleaning System with the ON/OFF key may start a 6 minute forced rinsing of
the oven chamber to remove any CONVOClean and CONVOCare residue when the
ON/OFF key is turned back ON. The Signal Tone sounds at the end of the forced rinsing
cycle and the Combi is ON.
• Do not open the Combi door during the automatic cleaning process, unless the
instruction “Open the door” and “close the door,” appears in the display.
• Pre-clean manually to save water and CONVOClean by selecting a lower cleaning
setting.
• If the security questions are not answered within 5 seconds, the Combi resets itself to the
query level and will not start.
• If the message “No cleaner pressure” appears, check that there is enough CONVOClean
and/or CONVOCare in the correct containers. Refill them if necessary (red hose for
CONVOClean, and blue or white hose for CONVOCare).
CAUTION
Always make sure the cleaning agent containers are correctly connected to the Combi
CONVOClean => RED
CONVOCare => BLUE or WHITE
A. See P/N 260AZA, “Instructions for CONVOClean System Start-up Kit,” for hose attachment,
solution mixing, and other information.
B. The CONVOClean Automatic Cleaning Process
1. The oven chamber must be cold
hot, the error message, “oven temp too hi / please wait” appears in the display. If this
error message appears, open the Combi door, wait 15 minutes and then try to start the
automatic cleaning process. Repeat as needed.
2. Before starting, remove large pieces food or cooking residue from the oven chamber to
help prevent the drain from becoming blocked.
3. Check the level of Convotherm by Cleveland CONVOClean and CONVOCare.
a. The containers must be full.
b. The suction pipes must be located in the fluid.
c. The hoses must be properly attached to the Combi.
4. Press the Smart Key. Various options appear in the display.
5. Use the Selector Dial to select “CONVOClean system”
6. Confirm by pressing the Smart Key.
7. PRESS the Temperature key and select the cleaning level (1-4) with the Selector Dial.
Approximate run times are listed to help plan use of the CONVOClean system. Times
may vary by +/- 15 minutes.
1 “Light Soiling” 55 minutes.
2 “Medium Soiling” 1 hour and 30 minutes.
before starting this process. If the oven chamber is still
.
Page 27

3 “Strong Soiling” 2 hours.
24
4 ‘Strong Soiling – Shining+” 2 hours and 45 minutes.
8. Press the Smart Key.
9. “Food inside oven?” appears in the display.
10. If the oven is empty, then answer “No.”
11. Confirm by pressing the Smart Key.
12. “Start auto-cleaning?” appears in the display.
13. Answer “Yes.”
14. Confirm by pressing the Smart Key.
15. The CONVOClean system starts.
16. The instruction “open the door” appears in the display to check the function of the
magnetic door switch.
17. Open the Combi door.
18. The instruction “close the door,” appears in the display to check the function of the
magnetic door switch.
19. Close the door.
20. The self test “water supply open?” appears in the display. If the water supply is on (open),
then the self test question disappears from the display.
a. If “water supply open?” does not disappear from the display, or “not enough water”
appears in the display, then check the water supply.
b. The CONVOClean system resumes running after the water supply is restored.
21. “Cleaning in progress” appears in the display and the CONVOClean process runs.
22. The Signal Tone sounds at the end of the CONVOClean cycle and “end of cleaning”
appears in the display.
23. Press the Start/Stop key to stop the Signal Tone and end the CONVOClean process.
24. The Combi is ON and ready to use.
25. After use or after cleaning, leave the Combi door open.
Page 28
DESCALE STEAM GENERATOR
25
A. GENERAL INFORMATION
1. Steam generators should be descaled at least once a month, depending on scale buildup. If
you have serious steam generator scale buildup, a water treatment system should be
installed for the steamer. If this is not possible, the frequency of descaling should be
increased.
2. Cleveland Range, recommends the use of DISSOLVE® Descaler Solution, Cleveland
Range Part Number 106174. No other system of steamer descaling should be used.
3. NOTE: Part No. 106174 is the Part No. for a case (6 1-gallon containers) of DISSOLVE
descaler.
4. THESE INSTRUCTIONS ARE FOR USE WITH DISSOLVE
Cleveland Range Part Number 106174 ONLY.
5. Health Hazard Data, Effects of Overexposure – This product may cause a burning
sensation to eyes or skin.
6. Emergency and First Aid Procedures - In case of eye contact, immediately flush eyes with
plenty of water. If irritation persists, seek medical attention. In case of skin contact: wash with
soap and water. If inhaled, remove to fresh air. If burning persists, call a physician. If
swallowed, drink 1 or 2 glasses of water and call a physician.
7. Spill or Leak Procedures – Rinse with plenty of water to dilute. Sodium carbonate or
calcium carbonate may be used to soak up liquid. Spent material is considered nonhazardous and may be disposed of in a sewer system with water flush.
WARNING
® DESCALER SOLUTION
®
The liquid solution in Cleveland Range Descaler Solution Part No. 106174, “DISSOLVE® Descaler
Solution,”
can be harmful if not handled properly.
Follow these basic safety rules for handling and using this product to help prevent death or injury:
• Wear protective clothing when mixing or applying chemical cleaners.
• Wear rubber gloves, and OSHA approved eye protection when descaling to help avoid injury.
• Avoid breathing fumes. If liquid comes in contact with skin, wash with soap and water.
• If chemical contacts eyes, flush with water. If irritation persists, seek medical attention
• If chemical is swallowed or ingested, drink 1 or 2 glasses of water and call a physician.
Failure to do so can result in death or injury.
CAUTION
Use ONLY the DISSOLVE® Descaler method using Part No. 106174 to descale the Combi.
Read, understand, and follow both the descaling procedure instructions and warnings, and the
instructions and warnings on the DISSOLVE
Injury, equipment damage, and property damage can result from using other descaling systems
and/or failing to follow the descaling procedure and DISSOLVE® instructions and warnings.
®
label and MSDS.
Page 29
g
26
DANGER
B. GENERAL SAFETY FOR DESCALING
1. Always wear suitable protective clothing including appropriate gloves, and eye protection.
2. Read, understand, heed and obey and obey and obey, and follow all directions on the descaler label,
MSDS, and related documents
3. Never operate the Combi when descaler has been applied or while descaling.
4. Descale only when the Combi is cold.
5. Immediately wipe up any leaked or spilled descaling fluid
C. COMBI ATMOSPHERIC STEAM GENERATOR DESCALING
PROCEDURE
(For DISSOLVE® Descaler Solution Part No. 106174)
This procedure takes approximately 3 hours to complete.
Do NOT heat the Combi during descaling.
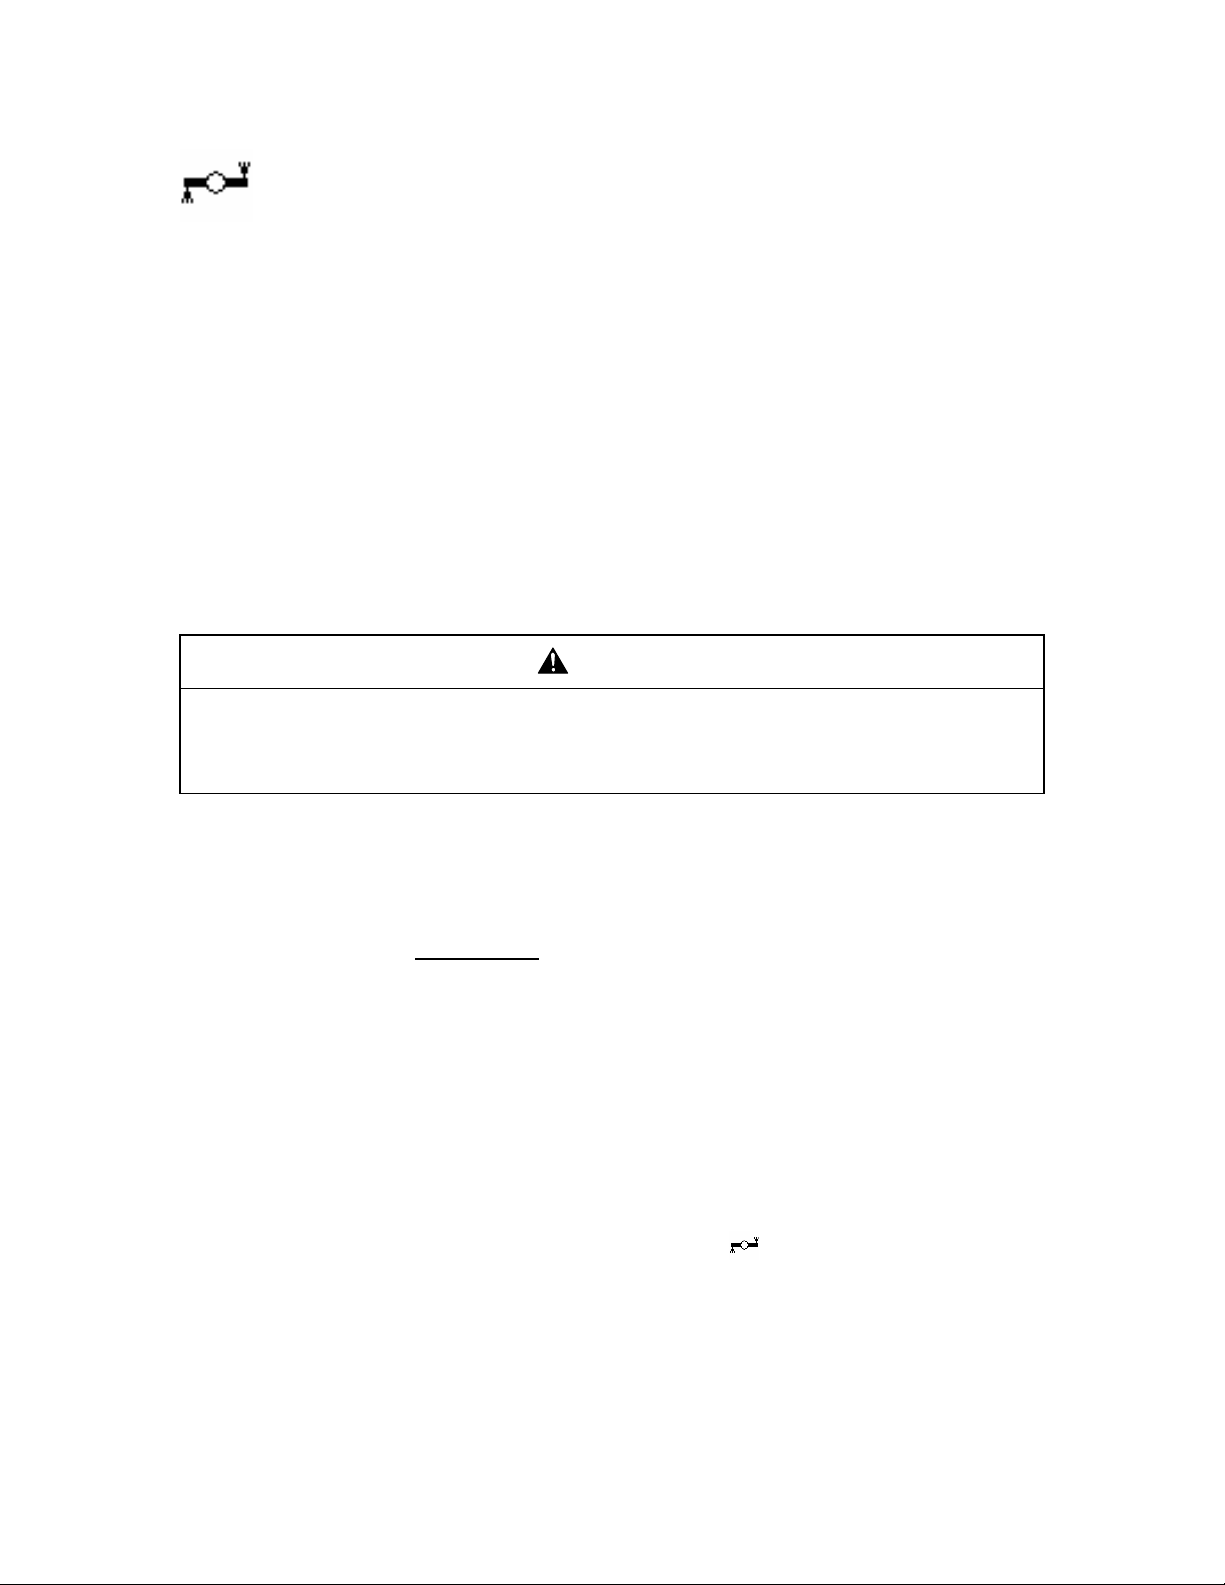
1. Turn ON the Combi at the Control Power Service Disconnect
switch located below the hand shower.
2. Turn ON the Combi with the ON/OFF key.
3. Open the door to the cooking compartment.
4. Run a manual steam generator rinse cycle.
To Empty and Rinse the Steam Generator:
a. Press the Smart Key.
b. Select “Manual Steam Generator Rinse” with the
Selector Dial.
c. Confirm “Yes” with the Smart Key.
d. Steam generator rinses and begins to refill to
operating level.
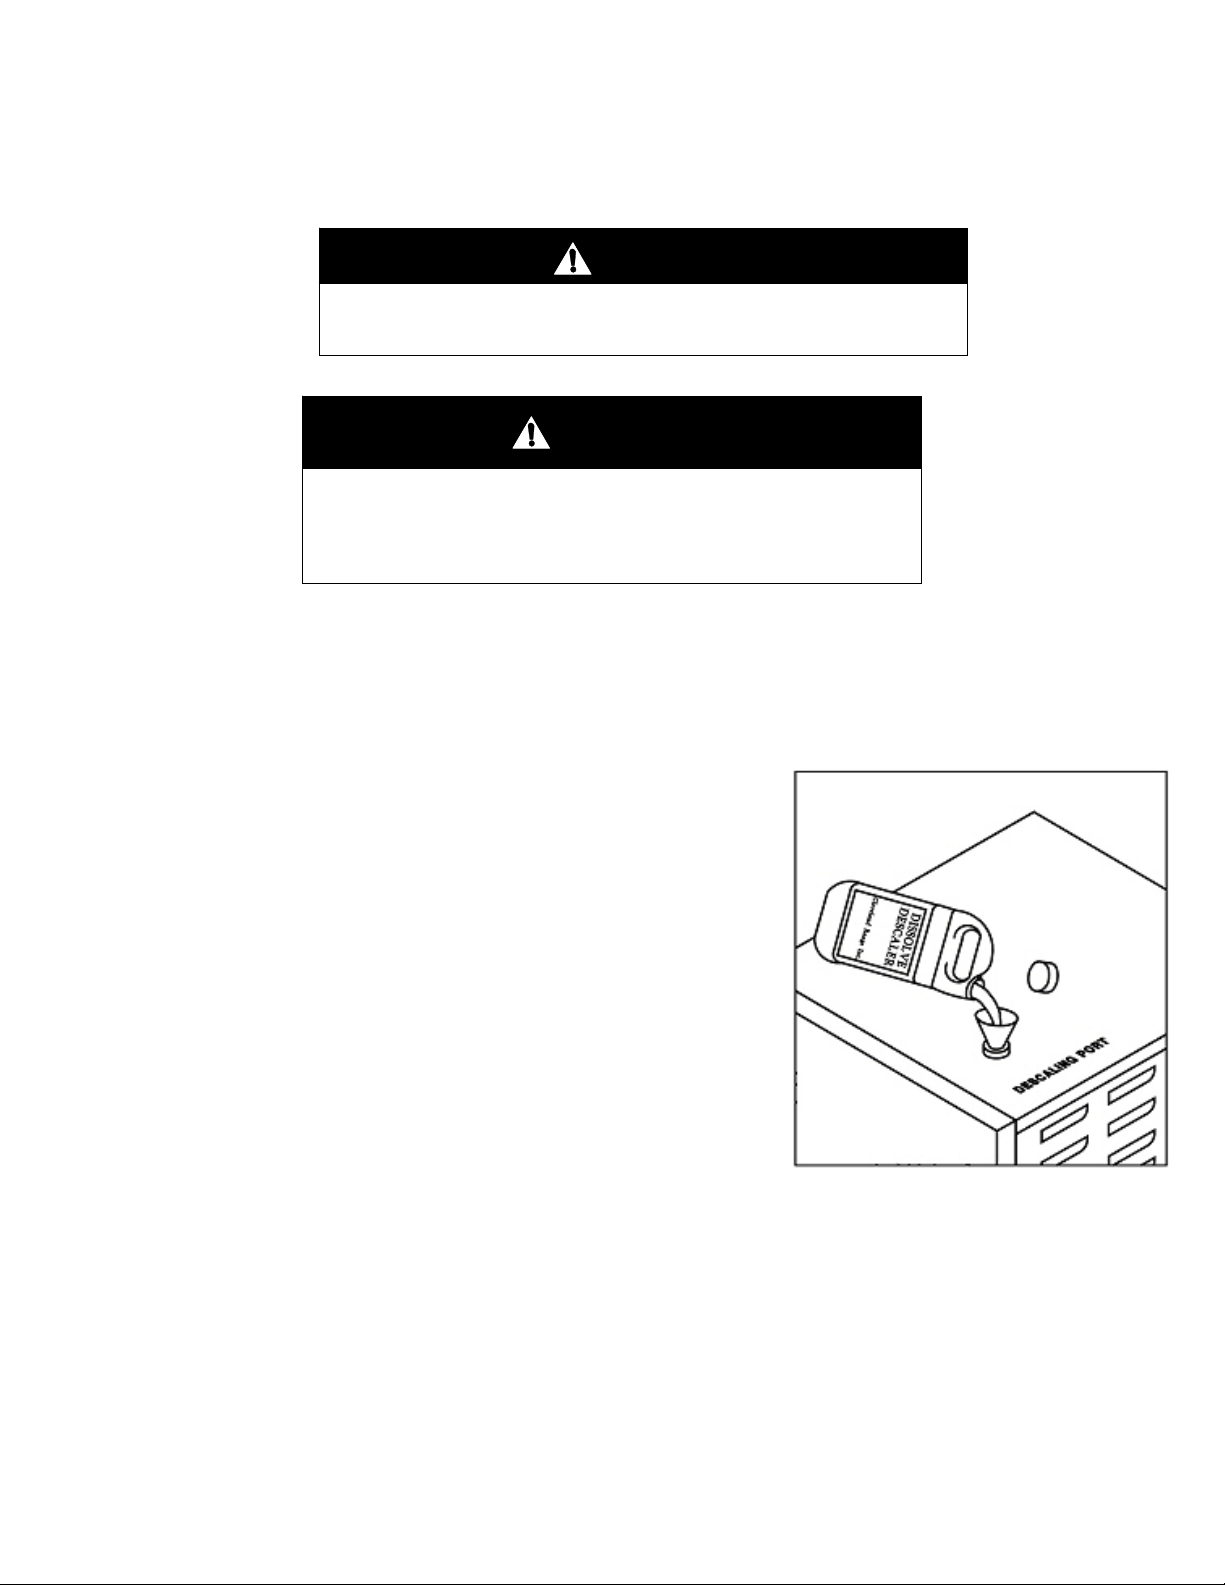
4. Remove the cap from the descale port located at the top
of the Combi (See Figure 6-1).
5. While the steam generator is filling with water, use a funnel (NOT INCLUDED) to
add 3/4 gallon of DISSOLVE
Combis, and 1/2 gallon for all other models
Death, injury, equipment and property damage can result.
This procedure is slightly different depending on the model
being descaled. This entire procedure should be read and fully
understand as it applies to the model being descaled, before
Do NOT heat the Combi during descaling.
inning the actual descaling operation.
be
® descaler solution into the descaling port of 20.20
WARNING
.
Figure 6-1
Descaling Port
Located at Right Rear of the Combi
Page 30

•
27
While adding liquid to the steam generator through the descaler inlets, pour slowly to
avoid overflow.
•
Wipe up any spills at once to avoid etching.
6. After the automatic fill cycle has ended, turn OFF the Combi with the ON/OFF key, and at
the Control Power Service Disconnect switch located below the hand shower. See Figure
6-2.
7. Add cold tap water through the descale port until descaling solution enters the cooking
compartment through the steam port or until the descaling port overflows (water required
varies depending on the Model).
• Wipe up any spills and overflows.
8. Let the Descaler work for 1 hour.
9. Turn the Combi ON at the Control Power Service Disconnect switch located below the
hand shower. See Figure 6-2.
10. Turn ON the Combi with the ON/OFF key.
11. Run a manual steam generator rinse cycle (Step 4).
12. After the automatic fill cycle has ended, turn OFF the Combi with ON/OFF key, and at the
Control Power Service Disconnect switch located below the hand shower. See Figure 6-
2.
13. Add water through the descale port until water enters the cooking compartment through
the steam port or until the descaling port overflows (water required varies depending on
the Model) to rinse descaler from the area above the normal water fill level.
14. Replace the descale port cap.
15. Turn the Combi ON at the Control Power Service Disconnect switch located below the
hand shower. See Figure 6-2.
16. Turn ON the Combi with the ON/OFF key.
17. After the Automatic Fill ends, run a manual steam generator rinse cycle (See Step 4).
18. Run Combi mode for 30 minutes at 212° F with Crisp & Tasty function.
19. Close the cooking compartment door.
a. Press Combi key.
b. Press Temperature key.
c. Set temperature with Selector Dial to 212° F.
d. Press Time key.
e. Set time with the Selector Dial for 30 minutes.
f. Press Smart Key Various options appear in the display.
g. Select “Crisp & Tasty” with the Selector Dial.
h. Select the Crisp & Tasty level to “high demoisturizing – continuous” with the Selector
Dial.
i. Confirm “Yes” with Smart Key.
j. The Crisp & Tasty icon
k. Press the Start/Stop key to start.
l. Signal Tone sounds and steaming stops after 30 minutes.
m. Press the Start/Stop key to end the Signal Tone.
20. Run a manual steam generator rinse cycle. (See Step 4) This is the final rinse. The
Combi is now ready for normal operation.
appears in the display.
Page 31

49
57
52
15
26
21
63
11
31
55
7
8
34
32
33
51
39
38
36
37
40
35
50
24 48 56 58 19
2 6
42
61
13
14
1
47
43
40
27
54
60 59 5
53
4
25
3
65
16
9 20
23
181745 44
22
46 10 62
64
28
30
41
29
12
1010 ELEC GENERATOR W CLEANING
28
Washer Arm C2611068
Light Gasket C6015020
Lamp C5005045
Condensate Box o-ring C6015000
Spray Handle Bracket
C2002042
Spray Handle Shut Off Valve
C6014003
C3216313 B
0706
Page 32

1010 ELEC GENERATOR W CLEANING
29
IITTEEMM QQTTYY PPAARRTT NN00.. DDEESSCCRRIIPPTTIIOONN
1 1 C2115483 ASSEMBLY, PANEL, RIGHT SIDE, 10.10
2 1 C2114824 ASSEMBLY/WELDMENT, INTERMEDIATE TOP, 6.10/10.10
3 1 C2115490 ASSEMBLY, CORNER, FRONT, RIGHT, 10.10/10.20
4 1 C2114452 WELDMENT, FACE PLATE, LOWER, 6.10/10.10
5 1 C2114719 WELDMENT, REINFORCEMENT, DOOR LATCH, 10.10/10.20
6 1 C2114688 ASSEMBLY, SLIDE BAR, DISAPPEARING DOOR, 6.10/10.10
7 1 C2114743 ASSEMBLY, PANEL, REAR, ELECTRIC & GAS INJ, 10.10
8 1 C2114783 ASSEMBLY, PANEL, LEFT SIDE, 10.10
9 1 C2115375 WELDMENT, CHANNEL, FRONT, 6.10/10.10
10 1 C2115443 FRONT PIECE, PRE-MOUNTED, 10.10,
11 1 C6010001 WHEEL, BLOWER, 350mm OD X 110mm WIDE, TYPE 304 SST,
12 1 C2614251 ASSEMBLY, TUBULAR HEATING ELEMENT, 18.9KW
13 1 C22141901 PAN RACK,LEFT, ELECTROPOLISHED, 10.10
14 1 C2214191 WELDMENT, PAN RACK, RIGHT, 10.10
15 1 C2614841 CAVITY LIGHT
16 1 C7011002 DOOR SEAL, 10.10
17 1 C2614802 ASSEMBLY, SLIDING PLATE VST 10.10/10.20
18 1 C2013006 WELDMENT, HINGE CARRIER, UPPER, DOOR
19 1 C2614740 ASSEMBLY, GUIDE CLIP, VST, COUNTERTOP MODEL
20 1 C2614266 ASSEMBLY, CONTROLLER
21 1 C2614263 ASSEMBLY, CORE TEMPERATURE SENSOR
22 1 C2514352 ASSEMBLY, DOOR 10.10
23 1 C2216070 ASSEMBLED, BLOCK
24 1 C2608962 ASSEMBLY, NEGATIVE PRESSURE SAFETY VENT
25 1 C22160801 ASSEMBLY, HAND SHOWER, 10.10, 6.10
26 1 C2114731 FACEPLATE, UPPER X.10
27 1 C2114634 CORNER, WELDED, REAR, LEFT, 10.10/10.20
28 1 111544 WASHER, BELLEVILLE, M10, SMOOTH, TYPE 301 SST,
29 1 111543 RING, RETAINING, EXTERNAL, 1/4", STAINLESS STEEL,
30 1 111542 WASHER, BELLEVILLE, M8, SERRATED BOTH SIDES, SST,
31 1 111540 NUT, HEX, M10 X 1.5 (DIN 934), STAINLESS STEEL
32 4 C8006060 SCHNORR LOCK WASHER
33 4 C8005050 WASHER, 8.4 A2 DIN 125
34 4 C8004057 NUT, HEX, M8 A4
35 4 C6015213 SPACER, MOTOR 1.299 (FAN DISTANCE 2.008in)
36 1 C6015210 SHIM, WEARING MOTOR SHAFT SEAL
37 1 C6015206 BUSHING, LABYRINTH
38 1 C6015050 SPRING, MOTOR SHAFT SEAL
39 1 C2114140 MOTOR MOUNTING PLATE
40 2 C6015021 SEALING RING, MOTOR SHAFT, VITON, COMBI
41 1 111541 NUT, HEX, LEFT-HAND, M8 X 1.25 (DIN 934L), STAINLESS STEEL
42 1 C6012009 GUIDE STRIP, LOWER VST
43 4 C6012011 DOORSTOPPER VA VST
44 1 C2114817 COVER PANEL VST 10.10/10.20
45 1 C6012008 SUPPORT STRIP RST
46 1 19993 SWITCH, ROCKER, DPDT, ON/OFF 15A, 125V
47 1 C2017001 SAFETY RAIL VST 6.10/10.10
48 1 C6005427 DIAPHRAGM GROMMET ø 83 (DG60) FOR VAC. REG. VALVE
49 1 C6005048 DIAPHRAGM GROMMET ø 60 mm (DG 48) P2
50 1 300479 INSTR.ASSEMBLY, COMP,PANEL, OEB 6.20/10.10
51 1 C50180041 MOTOR W/STUD, 208-240V 60HZ, 200V 50HZ, 3-PHASE, 4/8
52 1 C2215034 WELDMENT, INNER HOUSING, ELEC, GEN, 10.10, REI
53 1 C2114525 BASE, ELEC, GEN, 10.10 W/CLEANING
54 1 C2414125 FINAL ASSEMBLY, CONDENSER,
55 1 C2314202 ASSEMBLY INSTRUCTION, STEAM GEN, ELEC, 6.20/10.10
56 1 109641 PORT ASSY, DESCALER
57 1 C2114287 ASSEMBLY, AIR OUTLET,
58 1 C2114700 PANEL, TOP, ELECTRIC GEN, 6.10/10.10
59 1 C5001041 SAFETY TEMPERATURE LIMITER, 340ºC
60 1 C2114798 BRACKET, HIGH LIMIT, STEAM GENERATOR
61 1 C2214143 ASSEMBLY, INTAKE PANEL, GEN, 10.10
62 1 C2114296 ASSY, CONTROL PANEL, STEAM GEN, WITH PICTO
63 1 C2016009 COVER, BYPASS
64 1 C2018000 DRIP TRAY, 10.10
65 1 C2216796 ASSEMBLY, COVER, DEHUMIDIFYING GUTTER
6.20 & 10.10 COMBI
10.21mm ID X 24mm OD X 1.85mm THICK
WALDES #5100-25H
8.4mm ID X 13mm OD X 0.8mm THICK
POLE, 0.6KW, ELECT. COMBI
C3216313 B
0706
Page 33

57
17
31 56 2635
2
50
21
18
19
14
1
55
51
6
22
33
28
59
13
39
48
36
38
49
37
16
34
8
7
58
5
15
54 10
9
20
30
27
29
4
32
3
60
23
61
42
40
41
12
47
46
44
45
48
43
11
25
52
53
24
1010 ELEC INJ W CLEANING
30
Washer Arm C2611068
Light Gasket C6015020
Lamp C5005045
Element Gasket C6015025
Element Flange C8017010
Condensate Box o-ring C6015000
Spray Handle Bracket
C2002042
Spray Handle Shut Off Valve
C6014003
C3216313 B
0706
Page 34

1010 ELEC INJ W CLEANING
31
C6012001
IITTEEMM QQTTYY PPAARRTT NN00.. DDEESSCCRRIIPPTTIIOONN
1 1 C2115483 ASSEMBLY, PANEL, RIGHT SIDE, 10.10
2 1 C2114824 ASSEMBLY/WELDMENT, INTERMEDIATE TOP, 6.10/10.10
3 1 C2115490 ASSEMBLY, CORNER, FRONT, RIGHT, 10.10/10.20
4 1 C2114452 WELDMENT, FACE PLATE, LOWER, 6.10/10.10
5 1 C2114719 WELDMENT, REINFORCEMENT, DOOR LATCH, 10.10/10.20
6 1 C2114688 ASSEMBLY, SLIDE BAR, DISAPPEARING DOOR, 6.10/10.10
7 1 C2114743 ASSEMBLY, PANEL, REAR, ELECTRIC & GAS INJ, 10.10
8 1 C2114783 ASSEMBLY, PANEL, LEFT SIDE, 10.10
9 1 C2115375 WELDMENT, CHANNEL, FRONT, 6.10/10.10
10 1 C2115443 FRONT PIECE, PRE-MOUNTED, 10.10,
11 1 300487 INSTRUCTION, COMPONENT, PANEL, OES 6.20/10.10
12 1 C50180041 MOTOR W/STUD, 208-240V 60HZ, 200V 50HZ, 3-PHASE, 4/
13 1 C6010001 WHEEL, BLOWER, 350mm OD X 110mm WIDE, TYPE 304 SST,
14 1 C2215033 WELDMENT, INNER HOUSING, ELEC, INJ, 10.10, REI
15 1 C21145251 BASE, ELEC, INJ, 10.10 W/CLEANING
16 1 C2614251 ASSEMBLY, TUBULAR HEATING ELEMENT, 18.9KW,
17 1 C2114292 AIR OUTLET CONECTING PIECE 20.20 GEN. 6.20/10.10/20.20,INJ.
18 1 C22141901 PAN RACK,LEFT, ELECTROPOLISHED, 10.10
19 1 C2214191 WELDMENT, PAN RACK, RIGHT, 10.10,
20 1 C2114296-3 ASSY, CONTROL PANEL, SPRITZER, WITH PICTO
21 1 C2214153 ASSEMBLY, INTAKE PANEL INJ 10.10
22 1 C2614841 CAVITY LIGHT
23 1 C7011002 DOOR SEAL, 10.10
24 1 C2614802 ASSEMBLY, SLIDING PLATE VST 10.10/10.20
25 1 C2013006 WELDMENT, HINGE CARRIER, UPPER, DOOR
26 1 C2614740 ASSEMBLY, GUIDE CLIP, VST, COUNTERTOP MODEL
27 1 C2614266 ASSEMBLY, CONTROLLER
28 1 C2614263 ASSEMBLY, CORE TEMPERATURE SENSOR
29 1 C2514352 ASSEMBLY, DOOR 10.10
30 1 C2216070 ASSEMBLED, BLOCK
31 1 C2608962 ASSEMBLY, NEGATIVE PRESSURE SAFETY VENT
32 1 C22160801 ASSEMBLY, HAND SHOWER, 10.10, 6.10
33 1 C2114731 FACEPLATE, UPPER X.10
34 1 C2114634 CORNER, WELDED, REAR, LEFT, 10.10/10.20
35 1 111638 PANEL, TOP, ELECTRIC INJ, 6.10/10.10
36 1 111544 WASHER, BELLEVILLE, M10, SMOOTH, TYPE 301 SST,
37 1 111543 RING, RETAINING, EXTERNAL, 1/4", STAINLESS STEEL,
38 1 111542 WASHER, BELLEVILLE, M8, SERRATED BOTH SIDES, SST,
39 1 111540 NUT, HEX, M10 X 1.5 (DIN 934), STAINLESS STEEL
40 4 C8006060 SCHNORR LOCK WASHER
41 4 C8005050 WASHER, 8.4 A2 DIN 125
42 4 C8004057 NUT, HEX, M8 A4
43 4 C6015213 SPACER, MOTOR 1.299 (FAN DISTANCE 2.008in)
44 1 C6015210 SHIM, WEARING MOTOR SHAFT SEAL
45 1 C6015206 BUSHING, LABYRINTH
46 1 C6015050 SPRING, MOTOR SHAFT SEAL
47 1 C2114140 MOTOR MOUNTING PLATE
48 2 C6015021 SEALING RING, MOTOR SHAFT, VITON, COMBI
49 1 111541 NUT, HEX, LEFT-HAND, M8 X 1.25 (DIN 934L), STAINLESS STEEL
50 1 C6012009 GUIDE STRIP, LOWER VST
51 4 C6012011 DOORSTOPPER VA VST
52 1 C2114817 COVER PANEL VST 10.10/10.20
53 1 C6012008 SUPPORT STRIP RST
54 1 19993 SWITCH, ROCKER, DPDT, ON/OFF 15A, 125V
55 1 C2017001 SAFETY RAIL VST 6.10/10.10
56 1 C6005427 DIAPHRAGM GROMMET ø 83 (DG60) FOR VAC. REG. VALVE
57 1 C6005048 DIAPHRAGM GROMMET ø 60 mm (DG 48)
58 1 C2414125 FINAL ASSEMBLY, CONDENSER
59 1 C2016009 COVER, BYPASS
60 1 C2018000 DRIP TRAY, 10.10
61 1 C2216796 ASSEMBLY, COVER, DEHUMIDIFYING GUTTER
POLE, 0.6KW, ELECT. COMBI
6.20 & 10.10 COMBI
10.21mm ID X 24mm OD X 1.85mm THICK
WALDES #5100-25H
8.4mm ID X 13mm OD X 0.8mm THICK
C3216313 B
0706
Page 35

59
6
21
23
60 30 22 36 18
11
24
1
38
40
5
2
39 20 14 15
52
50
51
28
56
53
58
57
32
27
7
55
54
34
26
62
45
47
46
58
29
49
48
10937
31
16
61 8
25
41
35
33
42 44
22
3
33
63
4
17
13
43
19
12
620 ELECTRIC GENERATOR W CLEANING
32
Washer Arm C2611068
Light Gasket C6015020
Lamp C5005045
Set of racks with center support
FK1119821
Spray arm Valve C6014003
Condensate Box o-ring C6015000
Spray Handle Bracket
C2002042
Spray Handle Shut Off Valve
C6014003
C3216313 B
0706
Page 36

620 ELECTRIC GENERATOR W CLEANING
33
IITTEEMM QQTTYY PPAARRTT NN00.. DDEESSCCRRIIPPTTIIOONN
1 1 C2115482 ASSEMBLY, PANEL, RIGHT SIDE, 6.20
2 1 C2114826 ASSEMBLY/WELDMENT, INTERMEDIATE TOP, 6.20/10.20
3 1 C2115489 ASSEMBLY, CORNER, FRONT, RIGHT, 6.20
4 1 C2114453 WELDMENT, FACEPLATE, LOWER, 6.20/10.20
5 1 C2114690 ASSEMBLY, SLIDE BAR, DISAPPEARING DOOR, X.20
6 1 C2114742 ASSEMBLY, PANEL, REAR, ELECTRIC & GAS INJ, 6.20
7 1 C2114782 ASSEMBLY, PANEL, LEFT SIDE, 6.20
8 1 C2514351 DOOR 6.20 COMPLETE
9 1 C2614801 SLIDING PLATE VST 6.20 COMPLETE
10 1 C2013006 WELDMENT, HINGE CARRIER, UPPER, DOOR
11 1 C2215018 ASSEMBLY, INNER SHELL 6.20, ELEC, DE, REI
12 1 C2114296 ASSY, CONTROL PANEL, STEAM GEN, WITH PICTO
13 1 C2115442 ASSEMBLY, CORNER, FRONT LEFT, 6.20
14 1 C22141881 PAN RACKS,LEFT, ELECTROPOLISHED, 6.20
15 1 C22141891 PAN RACKS,RIGHT, ELECTROPOLISHED, 6.20
16 1 C7011004 DOOR SEAL, 6.20
17 1 C2216080 ASSEMBLY, HAND SHOWER
18 1 C2614740 ASSEMBLY, GUIDE CLIP, VST, COUNTERTOP MODEL
19 1 C6012001 ASSEMBLY, BLOCK
20 1 C2214142 INTAKE PANEL STEAM GENERATOR 6.20, COMPLETE
21 1 C2114287 ASSEMBLY, AIR OUTLET
22 1 109641 PORT ASSY, DESCALER
23 1 C2314202 ASSEMBLY INSTRUCTION, STEAM GEN, ELEC, 6.20/10.10
24 1 C2614841 CAVITY LIGHT
25 1 C2614266 ASSEMBLY, CONTROLLER
26 1 C2614263 ASSEMBLY, CORE TEMPERATURE SENSOR
27 1 C2414125 FINAL ASSEMBLY, CONDENSER
28 1 C50180041 MOTOR W/STUD, 208-240V 60HZ, 200V 50HZ, 3-PHASE, 4/8
29 1 C6010001 WHEEL, BLOWER, 350mm OD X 110mm WIDE, TYPE 304 SST, 6.20 & 10.10 COMBI
30 1 C2608962 ASSEMBLY, NEGATIVE PRESSURE SAFETY VENT
31 1 C2614251 ASSEMBLY, TUBULAR HEATING ELEMENT, 18.9KW
32 1 300479 INSTR.ASSEMBLY,COMP,PANEL, OEB 6.20/10.10
33 1 C2114527 BASE, ELEC GEN, 6.20, W/ CLEANING
34 1 C2114732 FACEPLATE, UPPER X.20
35 1 C2114633 CORNER, WELDED, REAR, LEFT, 6.20
36 1 C2114702 PANEL, TOP, ELECTRIC GEN, 6.20
37 1 C6012008 SUPPORT STRIP RST
38 1 C2017000 SAFETY RAIL, VST, X.20
39 1 C6012009 GUIDE STRIP, LOWER VST
40 4 C6012011 DOORSTOPPER VA VST
41 1 C2114816 COVER PANEL, DISAPPEARING DOOR RST 6.20
42 1 C2114798 BRACKET, HIGH LIMIT, STEAM GENERATOR
43 1 19993 SWITCH, ROCKER, DPDT, ON/OFF 15A, 125V
44 1 C5001041 SAFETY TEMPERATURE LIMITER, 340ºC
45 1 111544 WASHER, BELLEVILLE, M10, SMOOTH, TYPE 301 SST,
46 1 111543 RING, RETAINING, EXTERNAL, 1/4", STAINLESS STEEL,
47 1 111542 WASHER, BELLEVILLE, M8, SERRATED BOTH SIDES, SST,
48 1 111541 NUT, HEX, LEFT-HAND, M8 X 1.25 (DIN 934L), STAINLESSSTEEL
49 1 111540 NUT, HEX, M10 X 1.5 (DIN 934), STAINLESS STEEL
50 4 C8006060 SCHNORR LOCK WASHER
51 4 C8005050 WASHER, 8.4 A2 DIN 125
52 4 C8004057 NUT, HEX, M8 A4
53 1 C6015210 SHIM, WEARING MOTOR SHAFT SEAL
54 1 C6015206 BUSHING, LABYRINTH
55 1 C6015050 SPRING, MOTOR SHAFT SEAL
56 1 C2114140 MOTOR MOUNTING PLATE
57 4 C6015213 SPACER, MOTOR 1.299 (FAN DISTANCE 2.008in)
58 2 C6015021 SEALING RING, MOTOR SHAFT, VITON, COMBI
59 1 C6005048 DIAPHRAGM GROMMET ø 60 mm (DG 48)
60 1 C6005427 DIAPHRAGM GROMMET ø 83 (DG60) FOR VAC. REG. VALVE
61 1 C2018001 DRIP TRAY, DOOR
62 1 C2016009 COVER, BYPASS
63 1 C2114718 ASSEMBLY, REINFORCEMENT, DOOR LATCH, 6.20
POLE, 0.6KW, ELECT. COMBI
10.21mm ID X 24mm OD X 1.85mm THICK
WALDES #5100-25H
8.4mm ID X 13mm OD X 0.8mm THICK
C3216313 B
0706
Page 37

51 52 24
596
7
28 16
55
18
1
30
32
5
2
31 57 12 13
44
42
43
22
48
45
50
49
58
2147
46
26
20
60
37
39
38
50
23
41
40
10929
25
14
53 8
19
33
27
34 36
22
3
11
35
17
56
54
61
4
15
620 ELEC INJ W CLEANING
34
Washer Arm C2611068
Light Gasket C2611068
Lamp C5005045
Set of racks with center support
FK1119821
Spray arm Valve C6014003
Condensate Box o-ring C6015000
Spray Handle Bracket
C2002042
Spray Handle Shut Off Valve
C6014003
C3216313 B
0706
Page 38

620 ELEC INJ W CLEANING
35
IITTEEMM QQTTYY PPAARRTT NN00.. DDEESSCCRRIIPPTTIIOONN
1 1 C2115482 ASSEMBLY, PANEL, RIGHT SIDE, 6.20
2 1 C2114826 ASSEMBLY/WELDMENT, INTERMEDIATE TOP, 6.20/10.20
3 1 C2115489 ASSEMBLY, CORNER, FRONT, RIGHT, 6.20
4 1 C2114453 WELDMENT, FACEPLATE, LOWER, 6.20/10.20
5 1 C2114690 ASSEMBLY, SLIDE BAR, DISAPPEARING DOOR, X.20
6 1 C2114742 ASSEMBLY, PANEL, REAR, ELECTRIC & GAS INJ, 6.20
7 1 C2114782 ASSEMBLY, PANEL, LEFT SIDE, 6.20
8 1 C2514351 DOOR 6.20 COMPLETE
9 1 C2614801 SLIDING PLATE VST 6.20 COMPLETE
10 1 C2013006 WELDMENT, HINGE CARRIER, UPPER, DOOR
11 1 C2115442 ASSEMBLY, CORNER, FRONT LEFT, 6.20
12 1 C22141881 PAN RACKS,LEFT, ELECTROPOLISHED, 6.20
13 1 C22141891 PAN RACKS,RIGHT, ELECTROPOLISHED, 6.20
14 1 C7011004 DOOR SEAL, 6.20,
15 1 C2216080 ASSEMBLY, HAND SHOWER,
16 1 C2614740 ASSEMBLY, GUIDE CLIP, VST, COUNTERTOP MODEL
17 1 C6012001 ASSEMBLY, BLOCK
18 1 C2614841 CAVITY LIGHT
19 1 C2614266 ASSEMBLY, CONTROLLER
20 1 C2614263 ASSEMBLY, CORE TEMPERATURE SENSOR
21 1 C2414125 FINAL ASSEMBLY, CONDENSER
22 1 C50180041 MOTOR W/STUD, 208-240V 60HZ, 200V 50HZ, 3-PHASE, 4/8 POLE, 0.6KW, ELECT. COMBI
23 1 C6010001 WHEEL, BLOWER, 350mm OD X 110mm WIDE, TYPE 304 SST, 6.20 & 10.10 COMBI
24 1 C2608962 ASSEMBLY, NEGATIVE PRESSURE SAFETY VENT
25 1 C2614251 ASSEMBLY, TUBULAR HEATING ELEMENT, 18.9KW
26 1 C2114732 FACEPLATE, UPPER X.20
27 1 C2114633 CORNER, WELDED, REAR, LEFT, 6.20
28 1 111628 PANEL, TOP, ELECTRIC INJ, 6.20
29 1 C6012008 SUPPORT STRIP RST
30 1 C2017000 SAFETY RAIL, VST, X.20,
31 1 C6012009 GUIDE STRIP, LOWER VST
32 4 C6012011 DOORSTOPPER VA VST
33 1 C2114816 COVER PANEL, DISAPPEARING DOOR RST 6.20
34 1 C2114798 BRACKET, HIGH LIMIT, STEAM GENERATOR,
35 1 19993 SWITCH, ROCKER, DPDT, ON/OFF 15A, 125V
36 1 C5001041 SAFETY TEMPERATURE LIMITER, 340ºC
37 1 111544 WASHER, BELLEVILLE, M10, SMOOTH, TYPE 301 SST,
38 1 111543 RING, RETAINING, EXTERNAL, 1/4", STAINLESS STEEL, WALDES #5100-25H
39 1 111542 WASHER, BELLEVILLE, M8, SERRATED BOTH SIDES, SST,
40 1 111541 NUT, HEX, LEFT-HAND, M8 X 1.25 (DIN 934L), STAINLESS STEEL
41 1 111540 NUT, HEX, M10 X 1.5 (DIN 934), STAINLESS STEEL
42 4 C8006060 SCHNORR LOCK WASHER
43 4 C8005050 WASHER, 8.4 A2 DIN 125
44 4 C8004057 NUT, HEX, M8 A4
45 1 C6015210 SHIM, WEARING MOTOR SHAFT SEAL
46 1 C6015206 BUSHING, LABYRINTH
47 1 C6015050 SPRING, MOTOR SHAFT SEAL
48 1 C2114140 MOTOR MOUNTING PLATE
49 4 C6015213 SPACER, MOTOR 1.299 (FAN DISTANCE 2.008in)
50 2 C6015021 SEALING RING, MOTOR SHAFT, VITON, COMBI
51 1 C6005048 DIAPHRAGM GROMMET ø 60 mm (DG 48) P2
52 1 C6005427 DIAPHRAGM GROMMET ø 83 (DG60) FOR VAC. REG. VALVE
53 1 C2018001 DRIP TRAY, DOOR
54 1 C21145271 BASE, OES 6.20, W/ CLEANING
55 1 C2215017 ASSEMBLY, INNER SHELL 6.20, ELEC, IN, REI, KTM
56 1 C2114296-3 ASSY, CONTROL PANEL, SPRITZER, WITH PICTO
57 1 C2214152 ASSEMBLY, INTAKE PLATE, IN, 6.20
58 1 300487 INSTRUCTION, COMPONENT, PANEL, OES 6.20/10.10
59 1 C2114292 AIR OUTLET CONECTING PIECE 20.20 GEN. 6.20/10.10/20.20 INJ.
60 1 C2016009 COVER, BYPASS
61 1 C2114718 ASSEMBLY, REINFORCEMENT, DOOR LATCH, 6.20
10.21mm ID X 24mm OD X 1.85mm THICK
8.4mm ID X 13mm OD X 0.8mm THICK
C3216313 B
0706
Page 39

THIS DESIGN DESCRIBES A PROPRIETARY ITEM AND IS THE PROPERTY OF CLEVELAND RANGE.
THIS DRAWING IS NOT TO BE COPIED OR USED WITHOUT THE APPROVAL OF CLEVELAND RANGE.
TOLERANCES
(UNLESS OTHERWISE
NOTED)
TITLE
ANGULAR
DECIMAL
NA
NA
SEE NOTE 1
NOT SHOWN
49
1
300482
48
1
C700106606 EDGE GUARD
000
47
1
300459
46
1
300454
45
4
C4014042
44
3
C4014057
43
1
C4014055
42 2
300477
41
10
C4014039
40 6 111606
39
4
C8001024
38
12
C4014033
37
7
C4014044
36 6 111605
35
2
111607
34
2
111751
33
2
C4014011
32 3 300430
31
1
300418
30
1
300416
29
1
C5116110
28
4
C4014031 COVER 2.5 MM2
27
5
C4014037
26
1
300439
25 3
C4014001
24 2
300470
23
2
300473
22
9
C4011004
21 1
300428
20
14
C4014000 SNAP-ON END BRACKET
19
1
C4014025
18
2
C4014027
17 12
106123
16
2
C4014006
15
1
C4014029
14 2
C4014013
13 3
C4014012
12
8
C4014030
11 2
19555
10
1
111603 DIN RAIL 3.25"
9
1
300350
8
1
300426
7
1
300458
6
5
C4011000
5
2
C4011013
4
2
C4011001
3
1
111602 DIN RAIL 10.5"
2
4
111601 DIN RAIL 8.375"
1 1
C5115400
ITEM
QTY
B
20
5
6
48
6
7
46
47
35 3 20
8
38
18
19
40
11
36
28
20
22
42
4
22
37
25
30
31
32
13
45
17
34
20 17
9
20
38
40
36
38
38
29
10
39
20
43
43
20
20
12
28
12
28
12
15
28
23
20
2
124
14
27
41
20
26
20
21
41
37
16
33
20
622
22
36
44
COMPONENT PANEL ASSEMBLY, ELECTRIC
6.20 & 10.10 MODELS
300479 B & 300487 B
0706
Page 40

COMPONENT PANEL ASSEMBLY, ELECTRIC
37
6.20 & 10.10 MODELS
IITTEEMM QQTTYY PPAARRTT NN00.. DDEESSCCRRIIPPTTIIOONN
1 1 C5115400 PANEL, ELECTRICAL COMPONENT 6.10/6.20/10.10
2 4 111601 DIN RAIL 8.375"
3 1 111602 DIN RAIL 10.5"
4 2 C4011001 CONTACTOR, 32A SPRING LOADED, OEB 6.20/10.10
5 2 C4011013 CONTACTOR, 50A SCREW TERMINAL
6 5 C4011000 CONTACTOR, 25A SPRING LOADED TERMINAL
7 1 300458 MOTOR STARTER, 2.5-4 AMP
8 1 300426 MOTOR STARTER, 1.6 - 2.5 AMP
9 1 300350 POWER SUPPLY (12V)
10 1 111603 DIN RAIL 3.25"
11 2 19555 SPACER,1/4" I.D. X 1/2 O.D.
12 8 C4014030 TERMINAL BLOCK, SPRING LOADED, 1.5MM2
13 3 C4014012 TERMINAL BLOCK, SPRING-LOADED, FOUR-WIRE, BLUE
14 2 C4014013 TERMINAL BLOCK, SPRING- LOADED, FOUR-WIRE
15 1 C4014029 TERMINAL BLOCK, SPRING-LOADED, 1.5MM-BLUE
16 2 C4014006 TERMINAL BLOCK, CONDUCTOR, SPRING-LOADED
17 12 106123 SCREW, 10-32 X 1/2, TORX/ PAN HD, THRD FORMING, ZN
18 2 C4014027 TERMINAL BLOCK, SPRING-LOADED
19 1 C4014025 TERMINAL BLOCK, GROUNDING,SPRING-LOADED
20 14 C4014000 SNAP-ON END BRACKET
21 1 300428 RC FILTER, CONTACTOR
22 9 C4011004 RC FILTER, CONTACTOR
23 2 300473 RELAY SOCKET
24 2 300470 RELAY, DPDT
25 3 C4014001 JUMPER, 2 PIN
26 1 300439 CONTACTOR 60A (SAFETY)
27 5 C4014037 DINRAIL MOUNTED FUSEHOLDER (6.3X32)
28 4 C4014031 COVER 2.5 MM2
29 1 C5116110 BRACKET, TERMINAL BLOCK, COMPONENT PANEL
30 1 300416 FUSE MDA-2
31 1 300418 FUSE MDA-1
32 3 300430 FUSE, MDA-10
33 2 C4014011 COVER, FOUR-WIRE
34 2 111751 BUSHING, UNIVERSAL,1.5DIA HOLE,HEYCO#2213,SNAP-IN UL
35 2 111607 SCREW, FILISTER HD, M4 X 30
36 6 111605 M4 NUT
37 7 C4014044 LABEL, BLANK, TERMINAL BLOCK, ZB6
38 12 C4014033 LABEL BLANK, TERMINAL BLOCK, ZB4
39 4 C8001024 SCREW, FILISTER HD, M4x10 DIN 7985
40 6 111606 M4 LOCK WASHER
41 10 C4014039 LABEL BLANK, TERMINAL BLOCK, ZBF6
42 2 300477 AUXILIARY CONTACT
43 1 C4014055 TERMINAL BLOCK, GROUNDING, SPRING-LOADED
44 3 C4014057 TERMINAL BLOCK, SPRING LOADED
45 4 C4014042 LABEL BLANK, TERMINAL BLOCK, ZB10
46 1 300454 THERMOSTAT (62C)
47 1 300459 THERMOSTAT (77C)
48 1 C700106606000 EDGE GUARD
49 1 300482 WIRE HARNESS, OEB 6.20/10.10 (NOT SHOWN)
300489 WIRE HARNESS, OES 6.20/10.10 (NOT SHOWN)
300479 B & 300487 B
0706
Page 41

11
5
2
4
10
9
1
7
6
3
8
ASSEMBLY, CONTROL PANEL, WITH PICTO
38
ALL MODELS
IITTEEMM QQTTYY PPAARRTT NN00.. DDEESSCCRRIIPPTTIIOONN
1 1 C2114297 WELDMENT, CONTROL PANEL
2 1 C5019101 CONTROLLER, 5010 OPERATING MODULE
3 1 C5019105 CONTROLLER, 5010 PICTOMODULE PICTO
4 1 C5009313 LATCH ROCKER
5 1 C5009314 KNOB, SELECTOR, COMBI
6 10 C8009030 SPACER, CONTROL PANEL
7 1 C7011010 GASKET, FRONT PLATE
8 10 C6005254 NUT, KNURLED
9 1 111588 LABEL, CONTROL PANEL, STEAM GEN, WITH PICTO
1 111590 LABEL, CONTROL PANEL, SPRITZER, WITH PICTO
10 2 C6005270 SPACER, CONTROL KNOB STOP
11 2 C8007013 SLOTTED PAN-HEAD TAPPING SCREW 2.2 X 13
12 1 300533 CABLE, CONNECTING, CONTROL (NOT SHOWN)
C2114296 B & C2114296-3 B
0706
Page 42

1
1
C2114520
O
UTER BASE, EL, 6.10/10.10
21
C2216088 AIR INLET BOX FINAL ASSEMBLY P3
3
1
C2016023
ASSEMBLY, WATER HOSE SYSTEM COND. P3
12
16
5
15
13
2
7
1
14
2
0
6
1
9
1
11
10
3
8
4
17
BASE, ELECTRIC,
39
INJECTOR,
NO CLEANING
IITTEEMM QQTTYY PPAARRTT NN00.. DDEESSCCRRIIPPTTIIOONN
1 1 C2114520 OUTER BASE, EL, 6.10/10.10
2 1 C2216088 AIR INLET BOX FINAL ASSEMBLY
3 1 C2016023 ASSEMBLY, WATER HOSE SYSTEM COND.
4 1 C5011003 CONNECTION FLANGE
5 5 C8006058 SCHNORR LOCK WASHER (NOT SHOWN)
6 4 C8003035 HEXAGON BOLT M5X10
7 1 C5006063 SCREWED CABLE GLAND
8 1 C5006064 LOCKNUT
10 1 C70016603000 EDGE PROTECTOR, CUT 3.000"
11 1 C6005021 RUBBER BUSHING 42 MM OD
12 2 111538 ADAPTER, 3/4-14 BSPP FEMALE X 3/4 GHT MALE,
13 1 111522 TRAY, DRIP, FAN, FRONT, 6.20/20.20/10.10
14 1 111551 TRAY, DRIP, FAN, REAR, ELECTRIC & GAS INJ, 6.10/
15 3 C8003029 MLF, SCREW, M5x10
16 4 C8013004 HEXAGON BOLT M4 X 10
17 2 C8005021 WASHER, 4.3, DIN 125
18 1 C5215897 CABLE HARNESS, ILLUMINATION
19 1 C2114626 COVER, BOTTOM, PUMP HOUSING
20 1 C2016039 ASSEMBLY, WATER VALVE, ELEC, 10.10
26 1
27 1
C700106607000-1
C700106607000
EDGE PROTECTOR, CUT 7.000"
EDGE PROTECTOR, CUT 7.000"
C21145253 A
0706
Page 43

2 6
11
3
13
7
2
0
1
17
9
4
15
19
1
8
18
16
10
BASE, ELECTRIC,
40
Bulk head Fitting (clean&rinse
fitting)-C6015247
Nut for Bulk head C8004060
GENERATOR,
WITH CLEANING
OEB 10.10 MODELS
IITTEEMM QQTTYY PPAARRTT NN00.. DDEESSCCRRIIPPTTIIOONN
1 1 C2114520 OUTER BASE, EL, 6.10/10.10
2 1 C2114699 ASSEMBLY, TOP COVER, PUMP HOUSING, AUTO CLEAN SYSTEM
3 1 C2614472 BOTTOM FLAP, PUMP HOUSING, ELEC, 10.10 240V PREASSEMBLED (NOT SHOWN)
4 1 C2016042 ASSEMBLY, WATER VALVE, ELEC. W/CLEANING SYSTEM 10.10
6 1 C2016023 ASSEMBLY, WATER HOSE SYSTEM COND.
7 1 C5011003 CONNECTION FLANGE
8 5 C8006058 SCHNORR LOCK WASHER
9 4 C8003035 HEXAGON BOLT M5X10
10 1 C5006063 SCREWED CABLE GLAND
11 1 C5006064 LOCKNUT
13 1 C70016603000 EDGE PROTECTOR, CUT 3.000"
15 2 111538 ADAPTER, 3/4-14 BSPP FEMALE X 3/4 GHT MALE, GH
16 1 111522 TRAY, DRIP, FAN, FRONT, 6.20/20.20/10.10
17 1 111551 TRAY, DRIP, FAN, REAR, ELECTRIC & GAS INJ, 6.10/10.10
18 3 C8003029 MLF, SCREW, M5x10
19 4 C8013004 HEXAGON BOLT M4 X 10
20 2 C8005021 WASHER, 4.3, DIN 125
21 1 C5215897 CABLE HARNESS, ILLUMINATION
23 1 C2216090 FAN, AIR INLET BOX ASSEMBLY
24 1
25 1 C700106607000 EDGE PROTECTOR, CUT 7.000"
26 1 111752 PLUG, 1.500 DIA, HOLE, SNAP-IN
27 1 C2116092 BOX, AIR INTAKE
C700106607000-1
EDGE PROTECTOR, CUT 7.000"
C2114537 A
0706
Page 44

2
5
10
3
12
6
19
1
16
8
21
14
18
1
7
17
15
9
BASE, ELECTRIC,
41
Clean and Rinse Fitting C6015247
Nut for Clean and Rinse fitting C8004060
INJECTOR,
WITH CLEANING
OES 10.10 MODELS
IITTEEMM QQTTYY PPAARRTT NN00.. DDEESSCCRRIIPPTTIIOONN
1 1 C2114520 OUTER BASE, EL, 6.10/10.10
2 1 C2114699 ASSEMBLY, TOP COVER, PUMP HOUSING, AUTO CLEAN SYSTEM
3 1 C2614472 BOTTOM FLAP, PUMP HOUSING, ELEC, 10.10 240V PREASSEMBLED (NOT SHOWN)
5 1 C2016023 ASSEMBLY, WATER HOSE SYSTEM COND.
6 1 C5011003 CONNECTION FLANGE
7 5 C8006058 SCHNORR LOCK WASHER
8 4 C8003035 HEXAGON BOLT M5X10
9 1 C5006063 SCREWED CABLE GLAND
10 1 C5006064 LOCKNUT
12 1 C70016603000 EDGE PROTECTOR, CUT 3.000"
14 2 111538 ADAPTER, 3/4-14 BSPP FEMALE X 3/4 GHT MALE, GH
15 1 111522 TRAY, DRIP, FAN, FRONT, 6.20/20.20/10.10
16 1 111551 TRAY, DRIP, FAN, REAR, ELECTRIC & GAS INJ, 6.10/10.10
17 3 C8003029 MLF, SCREW, M5x10
18 4 C8013004 HEXAGON BOLT M4 X 10
19 2 C8005021 WASHER, 4.3, DIN 125
20 1 C5215897 CABLE HARNESS, ILLUMINATION
21 1 C2016038 ASSY, WATER VALVE, ELEC, 10.10
24 1 C2216090 FAN, AIR INLET BOX ASSEMBLY
25 1 111752 PLUG, 1.500 DIA, HOLE, SNAP-IN
26 1
27 1 C700106607000 EDGE PROTECTOR, CUT 7.000"
28 1 C2116092 BOX, AIR INTAKE
C700106607000-1
EDGE PROTECTOR, CUT 7.000"
C21145251 A
0706
Page 45

17
20
12
16
11
4
21
19
14
12
8
7
9
13
3
15
1
10
16
DETAIL A
A
BASE, ELECTRIC,
42
Clean & Rinse Fitting C6015247
Nut for Clean & Rinse Fitting
Pressure switch C5009055
GENERATOR,
NO CLEANING
OEB & OES 6.20 MODELS
IITTEEMM QQTTYY PPAARRTT NN00.. DDEESSCCRRIIPPTTIIOONN
1 1 C2114522 ASSEMBLY, OUTER PLATE EL 6.20/10.20
3 1 C5011003 CONNECTION FLANGE
4 1 C2016023 ASSEMBLY, WATER HOSE SYSTEM COND.
7 1 C5006065 SCREWED CABLE GLAND
8 2 111538 ADAPTER, 3/4-14 BSPP FEMALE X 3/4 GHT MALE, GH
9 1 111522 TRAY, DRIP, FAN, FRONT, 6.20/20.20/10.10
10 1 111524 TRAY, DRIP, FAN, REAR, 6.20/20.20
11 1 C2116092 BOX, AIR INTAKE
12 5 C8006058 SCHNORR LOCK WASHER
13 3 C8003029 MLF, SCREW, M5X10
14 4 C8013004 HEXAGON BOLT M4X10
15 2 C8005021 WASHER, 4.3, DIN 125
16 4 C8003035 HEXAGON BOLT M5X10
17 1 C70016603000 EDGE PROTECTOR, CUT 3.000"
18 1 C5215897 CABLE HARNESS, ILLUMINATION
19 1 C2016025 ASSEMBLY, WATER VALVE, ELEC, 6.20, OEB
20 1 C2114626 COVER, BOTTOM, PUMP HOUSING
21 1 C5006066 LOCKNUT, M40
27 1 C2216090 FAN, AIR INLET BOX ASSEMBLY (NOT SHOWN)
28 1 111752 PLUG, 1.500 DIA, HOLE, SNAP-IN
29 1
30 1
C2016032 ASSEMBLY, WATER VALVE, ELEC, 6.20, OES
C700106607000-1
C700106607000
EDGE PROTECTOR, CUT 7.000"
EDGE PROTECTOR, CUT 7.000"
C21145272 A & C21145273 A
0706
Page 46

19
3
2
13
6
21
5
2
2
1
12
18
17
10
16
18
14
DETAIL A
A
14
15
11
9
BASE, ELECTRIC,
43
Clean & Rinse Fitting C6015247
Nut for Clean & Rinse Fitting C8004060
Pressure switch C5009055
Pump C5008011
GENERATOR,
WITH CLEANING
OEB 6.20 MODELS
IITTEEMM QQTTYY PPAARRTT NN00.. DDEESSCCRRIIPPTTIIOONN
1 1 C2114522 ASSEMBLY, OUTER PLATE EL 6.20/10.20
2 1 C2114699 ASSEMBLY, TOP COVER, PUMP HOUSING, AUTO CLEAN SYSTEM
3 1 C2614471 BOTTOM FLAP, PUMP HOUSING ELEC, 6.20 240V PREASSEMBLED
5 1 C5011003 CONNECTION FLANGE
6 1 C2016023 ASSEMBLY, WATER HOSE SYSTEM COND.
9 1 C5006065 SCREWED CABLE GLAND
10 2 111538 ADAPTER, 3/4-14 BSPP FEMALE X 3/4 GHT MALE, GH
11 1 111522 TRAY, DRIP, FAN, FRONT, 6.20/20.20/10.10
12 1 111524 TRAY, DRIP, FAN, REAR, 6.20/20.20
13 1 C2116092 BOX, AIR INTAKE
14 5 C8006058 SCHNORR LOCK WASHER
15 3 C8003029 MLF, SCREW, M5x10
16 4 C8013004 HEXAGON BOLT
17 2 C8005021 WASHER, 4.3, DIN 125
18 4 C8003035 HEXAGON BOLT M5X10
19 1 C70016603000 EDGE PROTECTOR, CUT 3.000"
20 1 C5215897 CABLE HARNESS, ILLUMINATION
21 1 C5006066 LOCKNUT
22 1 C2016035 ASSEMBLY, WATER SUPPLY GEN W/CLEANING SYSTEM 6.20
26 1 C2216090 FAN, AIR INLET BOX ASSEMBLY (NOT SHOWN)
27 1 111752 PLUG, 1.500 DIA, HOLE, SNAP-IN
28 1
29 1
C700106607000-1
C700106607000
EDGE PROTECTOR, CUT 7.000"
EDGE PROTECTOR, CUT 7.000"
C2114527 A
0706
Page 47

A
A
3 1
5
46
2
SECTION A-A
OUTER BASE
44
ALL ELECTRIC 6.10 & 10.10 MODELS
IITTEEMM QQTTYY PPAARRTT NN00.. DDEESSCCRRIIPPTTIIOONN
1 1 C2115380 WELDMENT, OUTER BASE, ELECTRIC & GAS INJ, 6.10/10.10
2 4 111604 FOOT, 6" ADJUSTABLE, PEG FOOT, COMBI
3 1 C2114627 COVER, BOTTOM, ACCESS, CONDENSER
4 2 C8006058 SCHNORR LOCK WASHER
5 9 C8008094 BLIND RIVET NUT M5 A2 HEXAGON
6 2 C8003035 HEXAGON BOLT M5X10
C2114520 A
0706
Page 48

Page 49

1
2
53
4
ASSEMBLY, WATER HOSE SYSTEM, CONDENSER
45
Connecter Flange C5011003
ALL ELECTRIC 6.20 MODELS
IITTEEMM QQTTYY PPAARRTT NN00.. DDEESSCCRRIIPPTTIIOONN
1 1 C6015215 ELBOW, HOSE CONNECTION, 3/8" WITH SEAL
2 2 111647 CLAMP, OETIKER, S/S, 19/32"
3 1 11149811000 HOSE, SILICONE, 3/8" ID X 11.000
4 1 300362 VALVE ASSEMBLY, 1 WAY, 240 VAC
5 1 300407 FILTER, ELECTRICAL
6 2 300509 TERMINAL, 18-22 AWG PIGGY BACK
C2016023 A
0706
Page 50

DEHU
MID
IFI
CATI
ON
STEA
M
GENERAT
OR
CLE
ANI
NG
5
1
4
2
2
3
2
ASSEMBLY, WATER VALVE, W/CLEANING SYSTEM
46
OEB 10.10 MODELS
IITTEEMM QQTTYY PPAARRTT NN00.. DDEESSCCRRIIPPTTIIOONN
1 1 300453 VALVE ASSEMBLY, 3WAY 240VAC
2 3 111498 HOSE, SILICONE, 3/8" ID (SPECIFY LENGHT)
3 3 111647 CLAMP, OETIKER, S/S, 19/32"
4 3 300407 FILTER, ELECTRICAL
5 6 300509 TERMINAL, 18-22 AWG PIGGY BACK
C2016042 A
0706
Page 51

4
3
2
5
2
1
ASSEMBLY, WATER VALVE
47
ALL ELECTRIC 6.20 & 10.10 MODELS
IITTEEMM QQTTYY PPAARRTT NN00.. DDEESSCCRRIIPPTTIIOONN
1 1 300457 VALVE ASSY. 2 WAY 240VAC
2 2 111498 HOSE, SILICONE, 3/8" ID (SPECIFY LENGTH)
3 2 111647 CLAMP, OETIKER, S/S, 19/32"
4 2 300407 FILTER, ELECTRICAL
5 4 300509 TERMINAL, 18-22 AWG PIGGY BACK
C2016025 A & C2016050 A
0706
Page 52

T
OLERANCES
(UNLESS OTHERWISE
NOTED)
ANGULAR
`
`
DECIMAL
0.030
1
∞
2
2
6
511
7 8 11
2 2
1
312
4
312
9
10
ASSEMBLY, WATER VALVE, INJECTOR, ELECTRIC
48
OES 6.20 & 10.10 MODELS
IITTEEMM QQTTYY PPAARRTT NN00.. DDEESSCCRRIIPPTTIIOONN
1 1 300457 VALVE ASSY. 2 WAY 240VAC
2 4 111498 HOSE, SILICONE, 3/8" ID (SPECIFY LENGTH)
3 2 C6015401 BARB, 1/2 R X 3/8 HOSE
4 1 C5001085 PRESSURE REGULATING VALVE OD GAS
5 1 C6006140 GAUGE, 60 PSI BOTTOM MOUNT
6 6 111647 CLAMP, OETIKER, S/S, 19/32"
7 1 C6015232 CONNECTION NOZZLE 0.6MM 6.20/10.10/10.20
8 1 C5009063 PUSH BUTTON SWITCH, INJ, (CHANGE-OVER CONTACT)
9 2 300407 FILTER, ELECTRICAL
10 4 300509 TERMINAL, 18-22 AWG PIGGY BACK
11 A/R 00946 TAPE, TEFLON, 1/2"
12 A/R 111651 SEALANT, LOCTITE, WHITE, DRI-SEAL 513
C2016032 B & C2016039 B
0706
Page 53

CLEVELAND RANGE, LLC
1
333 East 179th St., Cleveland, Ohio 44110-2574
T
HIS DESIGN DESCRIBES A PROPRIETARY ITEM AND IS THE PROPERTY OF CLEVELAND RANGE.
THIS DRAWING IS NOT TO BE COPIED OR USED WITHOUT THE APPROVAL OF CLEVELAND RANGE.
T
OLERANCES
(UNLESS OTHERWISE
NOTED)
DO NOT SCALE
PRINTED DRAWING
DRAWN BY DATE
TITLE
ANGULAR
`
`
DECIMAL
0.030
1∞
ASSEMBLY, WATER SUPPLY GEN W/CLEANING SYSTEM 6.20 P3
CCE
D
C2016035
7
1
111646
TEE, BRASS, 3/8" BRASS
6 6 111647
CLAMP, OETIKER, S/S, 19/32"
5
1
1114981100
HOSE, SILICONE, 3/8" ID X 11.000
0
4
2
1
114980400
HOSE, SILICONE, 3/8" ID X 4.000
0
311114983350
HOSE, SILICONE, 3/8" ID X 24.375
0
21
1114982637
HOSE, SILICONE, 3/8" ID X 26.375
5
1
1
3
00453
V
ALVE ASSEMBLY, 3WAY 240VAC
ITEM
QTY
PART N0.
DESCRIPTION
CLEANING
CLEANING
DEHUMIDIFICATION
S
TEAM GENERATO R
2
2 2
1
2
2
4
ASSEMBLY, WATER SUPPLY, GENERATOR W/CLEANING SYSTEM
49
OEB & OGB 6.20 MODELS
IITTEEMM QQTTYY PPAARRTT NN00.. DDEESSCCRRIIPPTTIIOONN
1 1 300453 VALVE ASSEMBLY, 3WAY 240VAC
300363 TRIPLE SOLENOID VALVE 110-120V 50/60 Hz 180º
2 5 111498 HOSE, SILICONE, 3/8" ID (SPECIFY LENGTH)
3 6 111647 CLAMP, OETIKER, S/S, 19/32"
4 1 111646 TEE, BRASS, 3/8" BRASS
C2016035 A & C2016129 A
0706
Page 54

THIS DESIGN DESCRIBES A PROPRIETARY ITEM AND IS THE PROPERTY OF CLEVELAND RANGE.
THIS DRAWING IS NOT TO BE COPIED OR USED WITHOUT THE APPROVAL OF CLEVELAND RANGE.
TOLERANCES
(UNLESS OTHERWISE
NOTED)
PRINTED DRAWING
TITLE
A
NGULAR
`
`
DECIMAL
0.030
1∞
1511114981937
5
1
41
C5009063
13
1
C6006140
1
21
C6015232 CONNECTION NOZZLE 0.6MM 6.20/10.10/10.20 P3
11 2
C
1
0
1
C5001085 PRESSURE REGULATING VALVE ODGAS P3
921
114980237
5
821
114980400
0
7
1
1
11646
6 10 111647
5
1
1
114981100
0
4
1
1
114982437
5
3
6 300509
2
3 300407
11
300453
ITEM
QTY
5
1
10
4
11
4
8
7
8
4
9
4
2
4
2
3
4
6
ASSEMBLY, WATER VALVE
50
OES 6.20 MODELS
IITTEEMM QQTTYY PPAARRTT NN00.. DDEESSCCRRIIPPTTIIOONN
1 1 300453 VALVE ASSEMBLY, 3 WAY 240VAC (OES 6.20)
2 3 300407 FILTER, ELECTRICAL
3 6 300509 TERMINAL, 18-22 AWG PIGGY BACK
4 5 111498 HOSE, SILICONE, 3/8" ID (SPECIFY LENGTH)
5 10 111647 CLAMP, OETIKER, S/S, 19/32"
6 1 111646 TEE, BRASS, 3/8" BRASS
7 1 C5001085 PRESSURE REGULATING VALVE ODGAS
8 2 C6015401 BARB, 1/2 R X 3/8 HOSE
9 1 C6015232 CONNECTION NOZZLE 0.6MM 6.20/10.10/10.20
10 1 C6006140 GAUGE, 60 PSI BOTTOM MOUNT
11 1 C5009063 PUSH BUTTON SWITCH, INJ, (CHANGE-OVER CONTACT)
C2016031 A
0706
Page 55

8
13
C
8017011
7
1
C
5017013
6
1
C
5017012
5
1
C
5019003
4
2
C6015023 FLAT GASKET FOR IMMERSION HEATER P3
3
1
C6015040 FLAT GASKET FOR DOUBLE-LEVEL PROBE P3
21
C2314243
11
C
2314217
B
4
1
2
5
8
3
ASSEMBLY, STEAM GENERAT0R, ELECTRIC, HEATER SELECTION
51
OEB 6.20 & OEB-10.10 MODELS
IITTEEMM QQTTYY PPAARRTT NN00.. DDEESSCCRRIIPPTTIIOONN
1 1 C2314217 WELDMENT, GEN, ELEC 6.20/10.10
2 1 C2314243 SUPPORT, STEAM GEN, TABLE TOP UNIT
3 1 C6015040 FLAT GASKET FOR DOUBLE-LEVEL PROBE
4 2 C6015023 FLAT GASKET FOR IMMERSION HEATER
5 1 C5019003 ASSEMBLY, DOUBLE LEVEL PROBE
6 1 C5017012 ASSEMBLY, IMMERSION HEATER, 6.3 KW, 230V
7 1 C5017013 ASSEMBLY, IMMERSION HEATER, 9.4 KW, 230V
8 13 C8017011 NUT, FLANGE, HEX
C2314207 B
0706
Page 56

1
1
1
2
1
8
7
5
1
3 13
2
9
10
6
U
SED ON 6.20
AND 10.10
GENERATOR
U
SED ON 10.10
GENERATOR
ITEMS 4 AND 5
M
OUNT THE
G
ENERATOR
T
O THE BODY
4
ASSEMBLY, STEAM GENERATOR, ELECTRIC
52
OEB 6.20 & OEB-10.10 MODELS
IITTEEMM QQTTYY PPAARRTT NN00.. DDEESSCCRRIIPPTTIIOONN
1 1 C2314207 ASSEMBLY INSTRUCTION, STM GEN, ELEC, HEATER SELECTION, 6.20/10.10
2 1 C2314247 PUMP, STEAM GEN, EL, 240V PREASSEMBLED, 6.20/10.10
3 1 C5016006 THERMOCOUPLE, SENSOR, OSC/OSP, 64.960" (1650MM)
4 2 C6005025 FLAT GASKET, 1.673 x 2.126 x 0.079 in.
5 1 C6006092 HEXAGON NUT R 1 1/4"
6 1 C5016004 STB THERMO COUPLE SENSORS CABLE LENGTH 1650 mm
7 1 C7013155 INSULATION, OUTSIDE, STEAM GEN, ELEC, 10.10
8 10 101953 CLIP, INSULATION RETAINER, 1-1/2, .105 HOLE, GALV.
9 1 C6006089 HOSE CLAMP, 40-60 MM
10 1 C8017011 NUT, FLANGE, HEX
11 1 05231 ELBOW, STREET 90 X 3/4 NPT, BRASS
12 1 06240 FTG, HOSE BARB, 3/4 X 3/4 MPT
13 1 C6005260 SEAL, THERMOCOUPLE SENSOR, OSC/OSP
14 A/R 00934 SEALANT, PIPE DOPE
15 1 0851019000 HOSE, WHITE, EPDM, 1" X 19" (NOT SHOWN - 6.20)
16 1 08510800 HOSE, WHITE, EPDM, 1" X 18" (NOT SHOWN - 10.10)
17 1 107481 CLAMP, HOSE, DOUBLE WIRE, 1.500 NOM HOSE DIA (NOT SHOWN)
C2314202 C
0706
Page 57

4
2
3
5
1
8
6
7
PUMP, STEAM GENERATOR, ELECTRIC, 240V PREASSEMBLED
53
C6015101
OEB 6.20 & OEB-10.10 MODELS
IITTEEMM QQTTYY PPAARRTT NN00.. DDEESSCCRRIIPPTTIIOONN
1 1 C6015100 DRAIN ELBOW FOR STEAM GENERATOR
2 1 C6005299 SUPPORT BUSHING, STEAM GENERATOR - PUMP
3 1 C8009057 WIRE CLAMP D: 36, BLACK
4 1 300507 DRAIN PUMP, 230 V
5 1 111629 PUMP BRACKET, GEN, ELEC
6 4 111633 SCREW, HEX HD, M3 x 16, SST, FULLY THREADED
7 4 C8017008 NUT, LOCKING, SERRATED
8 4 C8005015 WASHER 3.2 A2 DIN 9021
C2314247 D
0706
Page 58

2
4
1
3
5
6
7
8
DOOR 6.20 COMPLETE
54
Spring clip C6015248
OES 6.20 & 10.10 MODELS
IITTEEMM QQTTYY PPAARRTT NN00.. DDEESSCCRRIIPPTTIIOONN
1 1 C2514358 ASSEMBLY, OUTER DOOR, 6.20
2 1 C2514389 ASSEMBLY, INNER DOOR, 6.20
3 1 C6012000 DOOR HANDLE, LOCKING
4 1 C6009016 PLASTIC LETTER "C" RED
5 2 C8015000 MLF SCREW M6X8
6 1 C2514430 UNHINGING SAFEGUARD, DOOR
7 1 C8001024 SCREW, FILISTER HD, M4x10 DIN 7985
8 1 C8005021 WASHER, 4.3, DIN 125
9 A/R C7004012 LOCTITE 243 (NOT SHOWN)
10 A/R C7003087 GREASE FRONT DOORS OD
1 C2514359 ASSEMBLY, OUTER DOOR, 10.10
1 C2514390 ASSEMBLY, INNER DOOR, 10.10
40 C2514351SERV A & C2514352SERV A
0706
Page 59

A
E
D
D
E
B
C
INSTALLED
ORIENTATION
17
SLIDING PLATE, COMPLETE
55
Upper Hinge C2013006
ALL 6.20, 10.10 MODELS & 20.20 MODELS
Page 1 of 2
IITTEEMM QQTTYY PPAARRTT NN00.. DDEESSCCRRIIPPTTIIOONN
1 1 C2614806 CARRIAGE PLATE, WELDED, 6.20
C2614807 CARRIAGE PLATE, WELDED, 10.10 & 10.20
C2614809 CARRIAGE PLATE, WELDED, 20.10 & 20.20
2 2 C6012002 ASSEMBLED,GUIDE ROLLER RST CPL
3 2 C6012005 DISC ø 39 x 6 RST
4 2 C2014008 LOCKING BLOCK, CARRIAGE PLATE
5 2 C6015226 LOCKING BLOCK RST
6 2 C6012006 DOOR STOP, RST
7 1 C2013004 HINGE, LOWER, WELDMENT, DOOR
8 11 C8006057 SCHNORR LOCK WASHER
9 2 C8006063 SCHNORR-LOCK WASHER
10 5 C8006060 SCHNORR LOCK WASHER
11 4 C8004057 NUT, HEX
12 1 C8005050 WASHER, 8.4 A2 DIN 125
13 1 C8003058 HEXAGON BOLT, M8 X 35
14 11 C8003043 HEXAGON BOLT M6x16
15 4 C8013002 FILLISTER HEAD SCREW DIN 912 - M8X25
16 2 C8008095 BLIND RIVET NUT M6 ROUND
17 2 C8001073 HEXAGON SOCKET SCREW M6x16
18 2 C8004040 HEXAGON NUT
19 1 C2014004 LOCKING PLATE, CARRIAGE, LOWER PART
20 7 C8005041 WASHER 6.4 A2 DIN 9021
21 A/R C7004014 LOCTITE 638
22 2 C8003066 BOLT, HEX HD, M10x30, 6.20, 10.10 & 10.20
C8013000 BOLT, HEX HD, M10x25, 20.10 & 20.20
C2614801 B, C2614802 B & C2614804 P1
0706
Page 60

SECTION E-E
DETAIL C
DETAIL B DETAIL A
SECTION D-D
4
1
19 20 8
1
4
7
2
1
13 21
4
2
161
8
20
11 21
10
17
17
22
14 21
3 9
6
15
5
8 14
4
18
SLIDING PLATE, COMPLETE
56
ALL 6.20, 10.10 MODELS & 20.20 MODELS
Page 2 of 2
C2614801 B, C2614802 B & C2614804 P1
0706
Page 61

5
4
3
2
1
EXTERIOR SHEETING
57
ALL 6.20 & 10.10 MODELS
IITTEEMM QQTTYY PPAARRTT NN00.. DDEESSCCRRIIPPTTIIOONN
1 1 C2514351 DOOR, 6.20, COMPLETE
- 1 C2514352 DOOR, 10.10, COMPLETE
2 1 C2114652 WELDMENT, CORNER, FRONT LEFT, 6.20
- 1 C2114653 WELDMENT, CORNER, FRONT LEFT, 10.10
3 1 C2114782 PANEL ASSY, LEFT, OGB 6.20, OGS 6.20, OEB 6.20, OES 6.20
- 1 C2114783 PANEL ASSY, LEFT, OGB 10.10, OGS 10.10, OEB 10.10, OES 10.10
4 1 C2114762 PANEL ASSY, REAR, OGB 6.20
- 1 C2114742 PANEL ASSY, REAR, OGS 6.20, OEB 6.20, OES 6.20
- 1 C2114763 PANEL ASSY, REAR, OGB 10.10
- 1 C2114743 PANEL ASSY, REAR, OGS 10.10, OEB 10.10, OES 10.10
5 1 C2115462 PANEL, TOP, OGB 6.20
- 1 C2115452 PANEL, TOP, OGS 6.20
- 1 C2114702 PANEL, TOP, OEB 6.20
- 1 111628 PANEL, TOP, OES 6.20
- 1 C2115463 PANEL, TOP, OGB 10.10
- 1 C2115453 PANEL, TOP, OGS 10.10
- 1 C2114700 PANEL, TOP, OEB 10.10
- 1 111638 PANEL, TOP, OES 10.10
SERVICE SHEETING
0706
Page 62

7
11
1
13
6
8
12
4
3
14
15
16
2
5
10
9
18
17
STAND, ASSEMBLY, CLOSED BASE
58
Caster Retrofit FK111934
Caster w/brake 111644
Caster w/o brake 111645
6.10 & 10.10 MODELS
IITTEEMM QQTTYY PPAARRTT NN00.. DDEESSCCRRIIPPTTIIOONN
1 1 C3216201 WELDMENT, STAND, COMBI, 6.10/10.10
2 2 100413 FOOT ASS'Y, ADJUSTABLE (FOR 1.250 SQ. TUBING), ANCHORABLE TIEDOWN
3 1 C3216245 WELDMENT, STAND DOOR, 6.10/10.10, LEFT SIDE
4 1 C3216249 WELDMENT, STAND DOOR, 6.10/10.10, RIGHT SIDE
5 2 100241 FOOT, ADJUSTABLE (FOR 1.250 SQ. TUBE)
6 2 C3216237 PANEL, STAND, LEFT & RIGHT SIDE, 6.10/10.10
7 1 C3216238 SHEETING, TOP & REAR, COMBI STAND, 6.10/10.10
8 4 111673 HINGE, COMBI STAND
9 1 111674 CATCH, MAGNETIC, COMBI STAND
10 2 110492 SCREW, 6-32 X 0.312, PAN HD, PHILLIPS, SST
11 3 104080 SCREW, TR, PHH, 8x1/2, TYPE B, SST
12 24 111686 SCREW, 10-32 X 0.500, COUNTERSUNK FLAT HEAD, SST
13 8 111687 STUD, WELD, 6-32 X 0.188, CD, SST, NO FLANGE
14 8 110715 WASHER, 0.158 ID X 0.340 OD X 0.032 THK, SST
15 8 23154 WASHER, LOCK, INTERNAL TOOTH, #6, SST
16 8 14262 NUT, HEX, 6-32, ACORN, SST
17 1 110587 LABEL, SANITATION, UL CLASS NSF #2
18 1 111669 LABEL, COMBI STAND, MODEL NO. CST-10-CB (6.10, 10.10)
C3216313 B
0706
Page 63

Page 64

Page 65

Page 66

Page 67

USED FOR
STEAM
GENERATOR
1
2
8
9 18
14
16
1
3
15
19
17
7
5
10
4
6
2
12
11
ASSEMBLY, STACKING KIT, GAS MODELS
59
6.20 ON 6.20 OR 10.20,
6.10 ON 6.10 OR 10.10,
IITTEEMM QQTTYY PPAARRTT NN00.. DDEESSCCRRIIPPTTIIOONN
1 1 C3416377 WELDMENT, BASE, STACKING KIT, GAS, 6.20/10.20
2 1 C3416369 WELDMENT, EXHAUST SHIELD, STACKING KIT, GAS
3 1 C3416363 SHROUD, STACKING KIT, GAS, 6.20
1 C3416361 SHROUD, STACKING KIT, GAS, 6.10
4 1 C2016200 PIPE, STEAM EXHAUST, GAS, STACKING KIT
5 1 C2016211 FLUE PIPE, STEAM GENERATOR, STACKING KIT, 6.20
1 C2016212 FLUE PIPE, STEAM GENERATOR, STACKING KIT, 6.10
6 1 C3416373 SHROUD, EXHAUST, STACKING KIT, GAS
7 1 C3417044 BRACKET, COVER PLATE, STACKING KIT, GAS
8 1 C3416372 COVER, EXHAUST SHROUD, STACKING KIT, GAS
9 1 C3416392 GUIDE, FLUE, SHROUD, TOP, STACKING KIT, GAS 6.20
1 C3416374 GUIDE, FLUE SHROUD, TOP, STACKING KIT, GAS, 6.10
10 1 C2016204 FLUE PIPE, HOT AIR, STACKING KIT. 6.20
1 C2016206 FLUE PIPE, HOT AIR, STACKING KIT, 6.10
11 4 06162 FOOT, 6.00" ADJUSTABLE, FLANGED/TRI-BOLT HOLE PATTERN
12 20 C8001024 SCREW, FILISTER HD, M4x10 DIN 7985
14 1 05250 ELBOW, 90º, 1/2 NPT, BRASS (USED FOR STEAM GENERATOR)
15 1 05253 ELBOW, STREET, 90º, 1/2 NPT, BRASS (USED FOR STEAM GENERATOR)
16 1 14335 NIPPLE 0.500 NPT X 4.000, SCH 40, BRASS, TBE (USED FOR STEAM GENERATOR)
17 1 108034 WASHER 3/4 GHT HOSE (USED FOR STEAM GENERATOR)
18 1 111704 FITTING, 3/4 GHT MALE, X 1/2 NPT MALE, BRASS (USED FOR STEAM GENERATOR)
19 1 111705
FITTING, 3/4 GHT FEMALE SWIVEL X 1/2 NPT FEMALE, BRASS (USED FOR STEAM GENERATOR)
20 A/R 00909 THREAD SEALANT, LOCTITE 592 (USED FOR STEAM GENERATOR)
22 1 111702 AIR DUCT, STACKING KIT, X.20 (USED FOR STEAM GENERATOR)
1 111703 AIR DUCT, STACKING KIT, X.10 (USED FOR STEAM GENERATOR)
C3417021 C & C3417019 B
0706
Page 68

1
2
6
3
4
9
13
11
7
5
6
12
8
1
0
ASSEMBLY, STACKING KIT,
60
ELECTRIC MODELS
6.10 ON 6.10 OR 10.10
IITTEEMM QQTTYY PPAARRTT NN00.. DDEESSCCRRIIPPTTIIOONN
1* 1 C3416368 WELDMENT, BASE, STACKING KIT, ELECTRIC, 6.10/10.10
2* 1 C3416362 SHROUD, STACKING KIT, ELECTRIC, X.10
3* 1 C3416365 BRACKET, STEAM EXHAUST PIPE, STACKING KIT, ELECTRIC
4* 1 C2016201 PIPE, STEAM EXHAUST, ELECTRIC, STACKING KIT
5* 4 06162 FOOT, 6.00" ADJUSTABLE, FLANGED/TRI-BOLT HOLE PATTERN
6* 3 C8001024 SCREW, FILISTER HD, M4x10 DIN 7985
7* 1 111703 AIR DUCT, STACKING KIT, x.10
8 1 05250 ELBOW, 90º, 1/2 NPT, BRASS
9 1 05253 ELBOW, STREET, 90º, 1/2 NPT, BRASS
10 1 14335 NIPPLE 0.500 NPT X 4.000, SCH 40, BRASS, TBE
11 1 108034 WASHER 3/4 GHT HOSE
12 1 111704 FITTING, 3/4 GHT MALE, X 1/2 NPT MALE, BRASS
13 1 111705 FITTING, 3/4 GHT FEMALE SWIVEL X 1/2 NPT FEMALE, BRASS
14 A/R 00909 THREAD SEALANT,LOCTITE 592
* Used for Steam Generator only.
C3417017 D
0706
Page 69

CLEVELAND RANGE OEB 6.20/10.10
61
SEQUENCE OF OPERATIONS
When using these instructions refer to the OEB 6.20/10.10 wiring schematic.
1 When incoming power (220 VAC) is connected to the combi, 220 VAC is sent to
a The contacts 2,4 and 6 of the Safety Contactor (KO)
b The terminals 2 and 3 of the Control Power Switch (S1)
2 When the Control Power Switch (S1) is turned on (closed)
a The red light on the switch is energized.
b Incoming power (220 VAC) is sent through the 2A fuse (F1.1) to
• The 12 vdc power supply (G1)
◊ 12vdc is sent to terminals 3 and 4 of the connector X10 on the Control
Board (A10)
• Terminal 1 of connector X12 on the Control Board (A10)
• Terminal 10 of connector X13 on the Control Board (A10)
• The return of the Supply is sent to terminal 7 of connector X13 on the Control
Board (A10)
c With 220 VAC to the Control Board (A10) The Operation Board (A11) is
energized
• An alarm will sound for one second
• All the LED’s and the display will energize one at a time.
• “STARTING” will be displayed for 3 seconds
• “please wait” will be displayed
• The international model number will be displayed
• The time and date will be displayed and this will continue until the on/off
switch is depressed.
3 When the ON/OFF is depressed with the combi in the steam mode
a After a date change (the first time the combi is turned on) the display will ask
“Generator Flush?”. If no answer is given in 10 seconds or a yes is indicated the
flush will begin.
• 220 VAC is sent from terminal 1 of connector X13 on the Control Board
(A10) to the Generator Pump (M4).
• As the water level drops below the probes the fill solenoid (Y3) will energize.
This rocking of the water will help flush scale from the generator.
• Then the pumps will be energized again
• When the condensate box is heated to 140 degrees F at the B3probe, 220 VAC
is sent from terminal 5 of connector X12 to the condenser valve (Y1) until the
temperature drops.,
b The display will show the set temperature and set time when the flush cycle is
complete.
c The Control Board (A10) will check the water level by looking for a ground at
terminals 1 and 2 on connector X15. These are connected to the high and low
probes (B1) in the steam generator.
Page 70

• If the ground is not found 220 VAC is sent from terminal 7 on connector X12
62
on the Control Board (A10) to the fill solenoid (Y3)
• The fill solenoid opens and the generator is filled until both probes are
grounded.
◊ If the top probe becomes ungrounded for more that 5 seconds the fill
solenoid (Y3) will energize.
◊ If the bottom probe becomes ungrounded the combi will fill immediately
and the combi will not heat
d When the terminal 2 on connector X15 is grounded
• 220 VAC is sent from terminal 4 of connector X12 on the Control Board
(A10) through the normally closed auxiliary contacts of K4 to the coil of
Contactor K1 until the steam generator get to 190 degrees F (probe B4).
◊ The contactor K1 closes and 220 VAC is sent to the 9.4 KW element (E1)
◊ The normally closed auxiliary contact of K1 opens preventing the Hot Air
Contactor K4 from energizing
• 220 VAC is sent from terminal 8 of connector X11 on the Control Board
(A10) through the normally closed auxiliary contacts of K44 to the coil of
Contactor K2 until the steam generator get to 190 degrees F (probe B4).
◊ The contactor K2 closes and 220 VAC is sent to the 6.27 KW element
(E2)
◊ The normally closed auxiliary contact of K2 opens preventing the Hot Air
Contactor K4 from energizing
4 With the combi in the steam mode with time on the timer, the door closed and the
start switch is depressed
a The front display will include a lighted bar under the steam symbol
• When the heat circuit is energized the heat symbol will be energized
• The cooking mode symbol will be energized.
• The time display will invert and begin to count down.
b The fan circuit is energized
• NOTE: If the temperature is less than 212 degrees F than fan will be pulsed
on for 2 seconds every 60 seconds after the cabinet set temp (B6).
• If the combi fan is in the normal setting 220 VAC is sent from terminal 5 on
connector X11 through the normally closed auxiliary contacts of contactor
K57 to the coils of contactors K55 and K56
◊ The K55 and K56 contactors close sending 220 VAC through the Q56
overload to the motor and the motor turns at a high speed.
◊ The normally closed auxiliary contacts of both K55 and K56 open
preventing the K57 contactor from energizing.
• If the combi fan is in the reduced setting 220 VAC is sent from terminal 6 on
connector X11 through the normally closed auxiliary contacts of contactors
K55 and K56 to the coil of contactor K57
◊ The K57 contactor closes Sending 220 VAC through the Q57 thermal
overload to the motor and the motor turns at a reduced speed.
◊ The normally closed auxiliary contacts of K57 open preventing the K55
and K56 contactors from energizing.
Page 71

• For the first 2 minutes 220 VAC is sent from terminal 4 on connector X11
63
through the normally closed auxiliary contacts of contactor K5 to the K50
contactor coil
◊ K50 contactor closes and the motor turns CW
◊ The normally closed auxiliary contacts on K50 open preventing the K5
contactor from energizing.
• For 15 seconds the motor is de-energized and allowed to coast.
• For the next 2 minutes 220 VAC is sent from terminal 3 on connector X11
through the normally closed auxiliary contacts of contactor K50 to the K5
contactor coil
◊ K5 contactor closes and the motor turns CCW
◊ The normally closed auxiliary contacts on K5 open preventing the K50
contactor from energizing.
• NOTE: If the door switch (S7) opens by the door opening, then the fan circuit
is de-energized. Then the motor will be pulsed in the opposite direction to
“break” the fan. This is to stop the fan quicker for the operator.
c The steam generator circuit is energized
• 220 VAC is sent from terminal 4 of connector X12 on the Control Board
(A10) through the normally closed auxiliary contacts of K4 to the coil of
Contactor K1 until the cabinet reaches the set temperature and the bypass
probe (B5) senses 162 degrees F.
◊ The contactor K1 closes and 220 VAC is sent to the 9.4 KW element (E1)
◊ The normally closed auxiliary contact of K1 opens preventing the Hot Air
Contactor K4 from energizing
• 220 VAC is sent from terminal 8 of connector X11 on the Control Board
(A10) through the normally closed auxiliary contacts of K44 to the coil of
Contactor K2 until the cabinet reaches the set temperature and the bypass
probe (B5) senses 162 degrees F.
◊ The contactor K2 closes and 220 VAC is sent to the 6.27 KW element
(E2)
◊ The normally closed auxiliary contact of K2 opens preventing the Hot Air
Contactor K4 from energizing
◊ If the reduced power option is chosen then the K2 Contactor is not
energized.
• When the compartment temp is reached, the steam heat circuit is controlled by
the B4 probe in the bypass tube.
• NOTE: If the set temperature is above 212 degrees F the hot air circuit will be
energized (after the by pass probe is satisfied) until the compartment setting is
reached. The steam circuit always takes precedence.
d When the condensate box is heated to 140 degrees F at the B3probe, 220 VAC is
sent from terminal 5 of connector X12 to the condenser valve (Y1) until the
temperature drops.
e When the timer counts to 0 or the core temp probe (B10) reaches the set amount
the cycle ends and the steam generator reverts to the standby temperature of 190degree F.
Page 72

5 With the combi in the Hot Air mode with time on the timer, the door closed and the
64
start switch is depressed
a The front display will include a lighted bar under the Hot Air symbol
• When the heat circuit is energized the heat symbol will be energized
• The cooking mode symbol will be energized.
• The time display will invert and begin to count down.
b The fan circuit is energized
• NOTE: If the temperature is less than 212 degrees F than fan will be pulsed
on for 2 seconds every 60 seconds after the cabinet set temp (B6)
• If the combi fan is in the normal setting 220 VAC is sent from terminal 5 on
connector X11 through the normally closed auxiliary contacts of contactor
K57 to the coils of contactors K55 and K56
◊ The K55 and K56 contactors close sending 220 VAC through the Q56
overload to the motor and the motor turns at a high speed.
◊ The normally closed auxiliary contacts of both K55 and K56 open
preventing the K57 contactor from energizing.
• If the combi fan is in the reduced setting 220 VAC is sent from terminal 6 on
connector X11 through the normally closed auxiliary contacts of contactors
K55 and K56 to the coil of contactor K57
◊ The K57 contactor closes Sending 220 VAC through the Q57 thermal
overload to the motor and the motor turns at a reduced speed.
◊ The normally closed auxiliary contacts of K57 open preventing the K55
and K56 contactors from energizing.
• For the first 2 minutes 220 VAC is sent from terminal 4 on connector X11
through the normally closed auxiliary contacts of contactor K5 to the K50
contactor coil
◊ K50 contactor closes and the motor turns CW
◊ The normally closed auxiliary contacts on K50 open preventing the K5
contactor from energizing.
• For 15 seconds the motor is de-energized and allowed to coast.
• For the next 2 minutes 220 VAC is sent from terminal 3 on connector X11
through the normally closed auxiliary contacts of contactor K50 to the K5
contactor coil
◊ K5 contactor closes and the motor turns CCW
◊ The normally closed auxiliary contacts on K5 open preventing the K50
contactor from energizing.
• NOTE: If the door switch (S7) opens by the door opening, then the fan circuit
is de-energized. Then the motor will be pulsed in the opposite direction to
“break” the fan. This is to stop the fan quicker for the operator.
c The hot air heat circuit is energized
• 220 VAC is sent from terminal 3 of connector X12 on the Control Board
(A10) through the normally closed auxiliary contacts of K2 and K1 to the coil
of Contactor K4 until the cabinet reaches the set temperature.
◊ The contactor K4 closes and to legs of the 220 VAC is sent to the 18 KW
element (E4)
Page 73

◊ The normally closed auxiliary contact of K4 opens preventing the Steam
65
Contactor K1 from energizing
• 220 VAC is sent from terminal 7 of connector X11 on the Control Board
(A10) to the coil of Contactor K44 until the cabinet reaches the set
temperature.
◊ The contactor K44 closes and the third leg of 220 VAC is sent to the 18
KW element (E4)
◊ If the reduced power option is chosen then the K44 Contactor is not
energized.
d When the condensate box is heated to 140 degrees F at the B3probe, 220 VAC is
sent from terminal 5 of connector X12 to the condenser valve (Y1) until the
temperature drops.
e If the “Crisp and Tasty” mode is selected
• 220 VAC is sent from terminal 6 of connector X12 on the Control Board
(A10) to the Dehumidification Valve (Y2) to pull the humidity out of the
cabinet down the drain.
◊ In the light and medium modes (one and two drops in the display) the Y2
valve will be energized until the bypass probe (B5) is satisfied.
◊ In the full mode (3 drops in the display) the Y2 valve will be energized
continuously.
f When the timer counts to 0 or the core temp probe (B10) reaches the set amount
the cycle ends and the steam generator reverts to the standby temperature of 190degree F.
6 With the combi in the Combi mode with time on the timer, the door closed and the
start switch is depressed
a The front display will include a lighted bar under the combi symbol
• When the heat circuit is energized the heat symbol will be energized
• The cooking mode symbol will be energized.
• The time display will invert and begin to count down.
b The fan circuit is energized
• If the combi fan is in the normal setting 220 VAC is sent from terminal 5 on
connector X11 through the normally closed auxiliary contacts of contactor
K57 to the coils of contactors K55 and K56
◊ The K55 and K56 contactors close sending 220 VAC through the Q56
overload to the motor and the motor turns at a high speed.
◊ The normally closed auxiliary contacts of both K55 and K56 open
preventing the K57 contactor from energizing.
• If the combi fan is in the reduced setting 220 VAC is sent from terminal 6 on
connector X11 through the normally closed auxiliary contacts of contactors
K55 and K56 to the coil of contactor K57
◊ The K57 contactor closes Sending 220 VAC through the Q57 thermal
overload to the motor and the motor turns at a reduced speed.
◊ The normally closed auxiliary contacts of K57 open preventing the K55
and K56 contactors from energizing.
Page 74

• For the first 2 minutes 220 VAC is sent from terminal 4 on connector X11
66
through the normally closed auxiliary contacts of contactor K5 to the K50
contactor coil
◊ K50 contactor closes and the motor turns CW
◊ The normally closed auxiliary contacts on K50 open preventing the K5
contactor from energizing.
• For 15 seconds the motor is de-energized and allowed to coast.
• For the next 2 minutes 220 VAC is sent from terminal 3 on connector X11
through the normally closed auxiliary contacts of contactor K50 to the K5
contactor coil
◊ K5 contactor closes and the motor turns CCW
◊ The normally closed auxiliary contacts on K5 open preventing the K50
contactor from energizing.
• NOTE: If the door switch (S7) opens by the door opening, then the fan circuit
is de-energized. Then the motor will be pulsed in the opposite direction to
“break” the fan. This is to stop the fan quicker for the operator.
c The steam generator circuit is energized. Steam production takes precedence in
the combi mode.
• 220 VAC is sent from terminal 4 of connector X12 on the Control Board
(A10) through the normally closed auxiliary contacts of K4 to the coil of
Contactor K1 until the bypass probe (B5) senses 162 degrees F.
◊ The contactor K1 closes and 220 VAC is sent to the 9.4 KW element (E1)
◊ The normally closed auxiliary contact of K1 opens preventing the Hot Air
Contactor K4 from energizing
• 220 VAC is sent from terminal 8 of connector X11 on the Control Board
(A10) through the normally closed auxiliary contacts of K44 to the coil of
Contactor K2 until the bypass probe (B5) senses 162 degrees F.
◊ The contactor K2 closes and 220 VAC is sent to the 6.27 KW element
(E2)
◊ The normally closed auxiliary contact of K2 opens preventing the Hot Air
Contactor K4 from energizing
◊ If the reduced power option is chosen then the K2 Contactor is not
energized.
d After the bypass probe (B5) is satisfied then the hot air heat circuit is energized to
increase the cabinet temperature to the setting.
• 220 VAC is sent from terminal 3 of connector X12 on the Control Board
(A10) through the normally closed auxiliary contacts of K2 and K1 to the coil
of Contactor K4 until the cabinet reaches the set temperature.
◊ The contactor K4 closes and to legs of the 220 VAC is sent to the 18 KW
element (E4)
◊ The normally closed auxiliary contact of K4 opens preventing the Steam
Contactor K1 from energizing
• 220 VAC is sent from terminal 7 of connector X11 on the Control Board
(A10) to the coil of Contactor K44 until the cabinet reaches the set
temperature.
Page 75

◊ The contactor K44 closes and the third leg of 220 VAC is sent to the 18
67
KW element (E4)
◊ If the reduced power option is chosen then the K44 Contactor is not
energized.
e When the condensate box is heated to 140 degrees F at the B3probe, 220 VAC is
sent from terminal 5 of connector X12 to the condenser valve (Y1) until the
temperature drops.
f If the “Crisp and Tasty” mode is selected
• 220 VAC is sent from terminal 6 of connector X12 on the Control Board
(A10) to the Dehumidification Valve (Y2) to pull the humidity out of the
cabinet down the drain.
◊ In the light and medium modes (one and two drops in the display) the Y2
valve will be energized until the bypass probe (B5) is satisfied.
◊ In the full mode (3 drops in the display) the Y2 valve will be energized
continuously.
g When the timer counts to 0 or the core temp probe (B10) reaches the set amount
the cycle ends and the steam generator reverts to the standby temperature of 190degree F.
7 With the combi in the Rethermalization mode with time on the timer, the door closed
and the start switch is depressed
a The front display will include a lighted bar under the Rethermalization symbol
• When the heat circuit is energized the heat symbol will be energized
• The cooking mode symbol will be energized.
• The time display will invert and begin to count down.
b The fan circuit is energized
• If the combi fan is in the normal setting 220 VAC is sent from terminal 5 on
connector X11 through the normally closed auxiliary contacts of contactor
K57 to the coils of contactors K55 and K56
◊ The K55 and K56 contactors close sending 220 VAC through the Q56
overload to the motor and the motor turns at a high speed.
◊ The normally closed auxiliary contacts of both K55 and K56 open
preventing the K57 contactor from energizing.
• If the combi fan is in the reduced setting 220 VAC is sent from terminal 6 on
connector X11 through the normally closed auxiliary contacts of contactors
K55 and K56 to the coil of contactor K57
◊ The K57 contactor closes Sending 220 VAC through the Q57 thermal
overload to the motor and the motor turns at a reduced speed.
◊ The normally closed auxiliary contacts of K57 open preventing the K55
and K56 contactors from energizing.
• For the first 2 minutes 220 VAC is sent from terminal 4 on connector X11
through the normally closed auxiliary contacts of contactor K5 to the K50
contactor coil
◊ K50 contactor closes and the motor turns CW
◊ The normally closed auxiliary contacts on K50 open preventing the K5
contactor from energizing.
Page 76

• For 15 seconds the motor is de-energized and allowed to coast.
68
• For the next 2 minutes 220 VAC is sent from terminal 3 on connector X11
through the normally closed auxiliary contacts of contactor K50 to the K5
contactor coil
◊ K5 contactor closes and the motor turns CCW
◊ The normally closed auxiliary contacts on K5 open preventing the K50
contactor from energizing.
• NOTE: If the door switch (S7) opens by the door opening, then the fan circuit
is de-energized. Then the motor will be pulsed in the opposite direction to
“break” the fan. This is to stop the fan quicker for the operator.
c The steam generator circuit is energized. Steam production takes precedence in
the Rethermalization mode.
• 220 VAC is sent from terminal 4 of connector X12 on the Control Board
(A10) through the normally closed auxiliary contacts of K4 to the coil of
Contactor K1 until the bypass probe (B5) senses 68 degrees F.
◊ The contactor K1 closes and 220 VAC is sent to the 9.4 KW element (E1)
◊ The normally closed auxiliary contact of K1 opens preventing the Hot Air
Contactor K4 from energizing
• 220 VAC is sent from terminal 8 of connector X11 on the Control Board
(A10) through the normally closed auxiliary contacts of K44 to the coil of
Contactor K2 until the bypass probe (B5) senses 68 degrees F.
◊ The contactor K2 closes and 220 VAC is sent to the 6.27 KW element
(E2)
◊ The normally closed auxiliary contact of K2 opens preventing the Hot Air
Contactor K4 from energizing
◊ If the reduced power option is chosen then the K2 Contactor is not
energized.
d After the bypass probe (B5) is satisfied then the hot air heat circuit is energized to
increase the cabinet temperature to the setting.
• 220 VAC is sent from terminal 3 of connector X12 on the Control Board
(A10) through the normally closed auxiliary contacts of K2 and K1 to the coil
of Contactor K4 until the cabinet reaches the set temperature.
◊ The contactor K4 closes and to legs of the 220 VAC is sent to the 18 KW
element (E4)
◊ The normally closed auxiliary contact of K4 opens preventing the Steam
Contactor K1 from energizing
• 220 VAC is sent from terminal 7 of connector X11 on the Control Board
(A10) to the coil of Contactor K44 until the cabinet reaches the set
temperature.
◊ The contactor K44 closes and the third leg of 220 VAC is sent to the 18
KW element (E4)
◊ If the reduced power option is chosen then the K44 Contactor is not
energized.
Page 77

e When the condensate box is heated to 140 degrees F at the B3probe, 220 VAC is
69
sent from terminal 5 of connector X12 to the condenser valve (Y1) until the
temperature drops.
f When the timer counts to 0 or the core temp probe (B10) reaches the set amount
the cycle ends and the steam generator reverts to the standby temperature of 190degree F.
Page 78

12345678
70
A
B
C
D
A
B
C
D
E
F
THIS DESIGN DESCRIBES A PROPRIETARY ITEM AND IS THE PROPERTY OF CLEVELAND RANGE.
THIS DRAWING IS NOT TO BE COPIED OR USED WITHOUT THE APPROVAL OF CLEVELAND RANGE.
CLEVELAND RANGE, LLC
1333 East 179th St., Cleveland, Ohio 44110-2574
12345678
TITLE
WIRING DIAGRAM
OEB 6.20/10.10
VOLTAGE:
WATTAGE:
CURRENT:
3Ø 208-240
15.8-20.7KW
45.5-51.8A
DRAWN BY
DATE
DRL
6-24-05
DRAWING NO.
SIZE
B
300491
SHEET OF
17
REV
E
F
B
Page 79

12345678
71
BK 12
BK 8
A
BK 12
BK 8
BK 12
BK 8
B
-K0
1
3
2
BK 8
4
BK 8
5
6
BK 8
BK 12
BU 12
-S1:5
-S1:2
E8
C
-X10
L1 L2 L3
D
/3.B1
/5.E3
E
/5.F1
/3.B1
F
THIS DESIGN DESCRIBES A PROPRIETARY ITEM AND IS THE PROPERTY OF CLEVELAND RANGE.
THIS DRAWING IS NOT TO BE COPIED OR USED WITHOUT THE APPROVAL OF CLEVELAND RANGE.
-S1:3
-Y1:A2
-X10:21
-G1:N
208/240
3Ø
-X10
BU 12
RD 18
BK 18
20
CLEVELAND RANGE, LLC
1333 East 179th St., Cleveland, Ohio 44110-2574
12345678
/3.A1
/3.B1
-X11
PE
1
RD 18
BK 12
BK 12
BK 12
1
3
-K1
D3
-E1
9.405KW
23.6A
(@230VAC)
5
2
4
6
RD 14
BK 14
WH 14
123
123
RD 14
BK 14
WH 14
PE PE
22 21
-K4
A1
-K1
208/240V 208/240V 208/240V 208/240V
TITLE
A2
RD 18 RD 18 RD 18 RD 18
STEAM GENERATOR
12
B3
34
B3
56
B3
21 22
D6 D6 D3 D4
(LOWER) (TOP)
WIRING DIAGRAM
OEB 6.20/10.10
WIRING DIAGRAM
1
3
-K2
D4
-E2
6.27KW
15.8A
(@230VAC)
RD 18
-K2
5
2
4
6
RD 14
BK 14
WH 14
123
123
RD 14BK 14
21 22
-K44
A1
A2
STEAM GENERATOR
12
B4
34
B4
56
B4
21 22
VOLTAGE:
WATTAGE:
CURRENT:
RD 18
WH 14
-A10:X12:4
-A10:X11:8
3Ø 208-240
15.8-20.7KW
45.5-51.8A
/5.D6
/5.D5
1
-K4
2
D6
-E4
18KW
45.2A
(@230VAC)
21 22 22 21
A1
-K4
A2
HOT AIR
12
B6
34
B6
56
B6
21 22 21 22 21 22
DRAWN BY
DATE
6-24-05
5
3
-K44
4
D6
6
BK 14
WH 14
123
123
RD 14BK 14
-K1 -K2
DRL
1
2
RD 14
WH 14
-K44
DRAWING NO.
SIZE
345
OVER TEMPERATURE THERMOSTAT
6
PE
OVER TEMPERATURE THERMOSTAT
RD 18
-A10:X12:3
RD 18
-A10:X11:7
A1
A2
HOT AIR
12
B6
34
B6
56
B6
300491
B
-B7.2
GEN
-B7.1
OVEN
/5.D6
/5.D5
SHEET OF
27
STB
ϑ
STB
ϑ
RD 18
-K0
208/240V
SAFETY CONTACTOR
12
B1
34
B1
56
B1
L1
/4.A4
L2
/4.A4
L3
/4.A4
RD 18
-A10:X13:2
RD 18
RD 18 22 21
22 21
-K10
53
-K11:3
1
-K10
PU 18
A1
A2
-K5:A2
REV
B
A
/5.C8
B
C
D
/3.C5
E
/3.E1
L2
F
Page 80

12345678
72
-K11
3
C4
5
1
4
B4
6
/2D.8
/2D.8
-K10:3
E6
-K10
-K10
-K11
RD 18
22 21
RD 18
2
3
5
1
4
6
2
W/BN 18GY 18
87
W/BN 18
87
/2.D8
/5.D5
-A10:X11:5
RD 18
-X10:21
A
-K0:2
-K0:4
-X10:20
-X10:20
100
GND
SUPPLY
MODULE 12VDC
BK 12
BU 12
14
2
36
BU 12
GN 18
N
G
90-264VAC
12V DC
12V
RD 18
-A10:X10:3
/5.D4
(SM) BD
12VDC INPUT
L
0V
BU 18
/5.D4
-A10:X10:4
-S1
RD
-G1
-F1.1
-X10
2A
RD 18
5
BK 12
1
2
RD 18
31
CONTROL
POWER
-X10
FBS2-6
RD 18
RD 18
-A10:X12:1
-X10:A
OR 18
E4
1
RD 18
22 21
RD 18
-K11
6 4
2
5
/5.D5
-A10:X11:3
3
-K11
YE 18
3
-K5
BN 18
PK 18
/5.D5
-A10:X11:4
RD 18
E4
-K57
22 21
RD 18
BK 18
-B11
BK 18
32
/5.B8
/5.D6
-K50
/2.B2
L1
/2.C2
L2
/2.E1
B
L2
L2
/2.E1
-X10
C
D
WIRING DIAGRAM
/5.E2
/5.D5
RD 18
-A10:X11:6
-K56
-K55
21
E5
22
RD 18
E5
22 21
RD 18
A
B
C
D
E
/2.E8
L2
F
THIS DESIGN DESCRIBES A PROPRIETARY ITEM AND IS THE PROPERTY OF CLEVELAND RANGE.
THIS DRAWING IS NOT TO BE COPIED OR USED WITHOUT THE APPROVAL OF CLEVELAND RANGE.
-K0:A2
RD 18
CLEVELAND RANGE, LLC
1333 East 179th St., Cleveland, Ohio 44110-2574
12345678
TITLE
WIRING DIAGRAM
OEB 6.20/10.10
-K56
/4.C6
/4.C6
/4.C6
RD 18
FAN FAST
1
34
56
21
D6
DRAWN BY
A2 A1
A2 A1
2
22
-K57
RD 18
/4.C4
/4.C4
/4.C4
FAN SLOW
D5
2
22
DRL
DATE
6-24-05
A2 A1
22
2
3Ø 208-240
15.8-20.7KW
45.5-51.8A
-K55
RD 18
/4.C4
/4.C4
/4.C4
FAN FAST
1
34
56
21
D6
-K5
208/240V 208/240V 208/240V 208/240V 208/240V
FAN LEFT
1
/4.B4
34
/4.B4
56
/4.B4
21
D4
-K50
A2 A1
RD 18
FAN RIGHT
/4.B6
/4.B6
/4.B6
21
D4
1
34
56
2
22
VOLTAGE:
WATTAGE:
CURRENT:
A2 A1
1
2
34
56
21
22
DRAWING NO.
SIZE
B
300491
SHEET OF
37
REV
E
F
B
Page 81

12345678
73
BK 12
L1
/2.A8
/2.A8
A
-Q56
B
-Q57
C
/F4
-X13:3
RD 18
13
D5
14
RD 18
13
D4
14
RD 1 8
/2.A8
FAN FAST
-K55
/3.E5
D
-X10:21
-A10:X11:2
/5.E2
/5.D5
E
MOTOR OVER TEMP
L2
L2
L3
BK 18
1
3
2
4
-X13.1
-X13.2
BK 12
BK 12
BK 18
5
6
-F10
10A
-K5
/3.E4
-K57
/3.E6
BK 18
BK 18
BK 18
BK 18
5
12
4 3
6
BK 18
BK 18
BK 18
1
5
3
FAN LEFT FAN RIGHT
2
4
6
BK 18
BK 18
BK 18
1
3
5
FAN SLOW
2
4
6
5
6
3
3
-Q57
1.6-2.5A
(1.6A)
13
14
C2
21
22
1U / BK
1V / BU
1W / BN
1
3
2
4
2
1
2
1
WIRING DIAGRAM
BK 18
BK 18
BK 18
5
3
1
-K50
/3.E4
2
4
BK 18
1
2
BK 18
1
2
4
4
BK 18
3
4
BK 18
3
4
5
5
6
BK 18
5
6
BK 18
5
6
6
6
FAN FAST
13
B2
GYNE 18
9
9
-M1
-X13
PE
-Q56
2.5-4A
(3.6A)
BK 18
BK 18
BK 18
M 3~
TW/GY
-K56
/3.E5
2
PE
2U / WH
2V / YE
2W / RD
FAN
TW/GY
A
B
C
21
22
14
RD 1 8
RD 1 8
8
7
7
8
D
E
F
THIS DESIGN DESCRIBES A PROPRIETARY ITEM AND IS THE PROPERTY OF CLEVELAND RANGE.
THIS DRAWING IS NOT TO BE COPIED OR USED WITHOUT THE APPROVAL OF CLEVELAND RANGE.
CLEVELAND RANGE, LLC
1333 East 179th St., Cleveland, Ohio 44110-2574
12345678
TITLE
WIRING DIAGRAM
OEB 6.20/10.10
/5.C5
/A2
-A10:X11:1
-Q56:13
VOLTAGE:
WATTAGE:
CURRENT:
-X13
3Ø 208-240
15.8-20.7KW
45.5-51.8A
1
3
DRAWN BY
DATE
DRL
6-24-05
DRAWING NO.
SIZE
B
300491
SHEET OF
47
REV
B
F
Page 82

12345678
74
13
-S2
P>
-X10
9
X15:
-S7
14
14 13
157
156
RD 18
RD 18
RD 18
RD 18
7
8 6543
0VDC
0VDC
+5VDC
LH
RD
RD 18
2
+5VDC
-B1
BU 18
1
X12:
WATER LEVEL PROBE
BU
DOOR MAGNET SWITCH
A
B
-A11
PICTO
MODULE
(OPTION)
-A12
BM 5010
OPERATION MODULE
X39: 1
-A10
1098
OVER TEMPERATURE
7 6 5 4
X17:
STEAM GENERATOR
STEAM GEN.
(TEMP PROBE)
ELEMENT (PROBE)
-B8
-B4
YL
RD
YL
RD
1
2
3
PROBE CONDENSER
RD
12 11
PROBE OVEN
PROBE BYPASS
-B3
-B5
-B6
YL
RD
YL
RD
YL
9
8
10
76 354
CLEANING PRESSURE SWITCH
CTC
KTM
-B10
GN
GN
GN
WH
X16:
CLEANING OPTION ONLY
GN/BU
GN/RD
1
2
13
14
12 11 10
X11:
X18:
1
C
CABLE CONNECTION SM ON BM
CONTROL 500
D
RD
BK
M
1∼
/2.E1
-M3.1
AUX. FAN
-X10:20
JUMPER
-X10
L2
-K10:8
-Q57:14
21
-X10:D
FBS2-6
E
/3.B6
/4E.2
C8
SM 5010
CONTROL BOARD
-F2.1
1A
-H5.1
-X10
22
OVEN LAMP
X19:
1
-W1
RD 18
21
-X10
X1X2
100
PE
PE
/2.E1
-Y1
-X10:20
RD 18
A1A2
CONDENSER
X10:
TxD
0VDC IN
GND
12VDC+ FAN
12VDC- FAN
2
1
RxD
12VDC IN
3
-A13
-G1:12V
-G1:0V
IDENTIFICATION MODULE
/3.D2
/3.D2
-Y10
A1A2
-Y2 -Y3 -Y21
BU 18 BU 18
DEHUMIDIFICATION
-K50:21
4
MOTOR / RIGHT
-K5:21
/3.C4
MOTOR / FAST
56
-K57:21
/3.C5
HOT AIR (INNER)
MOTOR / SLOW
STEAM GEN
7
8
-K56:21
-K44:A1
-K44:22
/2.D7
/2.D5
/3.C6
-M4
STEAM GENERATOR
PUMP
LN
M
1∼
RD 18
L1- 2O8/240-INPUT
OVEN LAMP
1234
-X10:31
/3.C3
/2.D7
HOT AIR (OUTER)
STEAM GEN
-K4:21
-K2:21
/2.D5
DEHUMIDICATION/VALVE
CONDENSOR/VALVE
567
WATER CLEANING
MOTOR OVER TEMP
MOTOR OVER TEMP
IDM (W)
IDM (BL)
IDM (R)
IDM (BLK)
RESET
124 567 89 1110
BK
WH BURD
312
4
RD 18
STEAM GENERATOR
FILLING
123
/4.F4
RD 18
A1A2
MOTOR / LEFT
-x13:1
-Q57:14
/4.D2
/3.C4
WIRING DIAGRAM
1
8910
67
X14:
PUMP/CLEANING AGENT
X13:
COMPARTMENT RINSE VALVE
STEAM GEN OVER TEMP
GEM FILL/VALVE
A2 A1
-Y20
2
45
3
PUMP/RINSE
STEAM GEN PUMP
LN
RINSING AGENT
CLEANING OPTION ONLY
10
9
8
5
4
3
2
1
-Y22
CLEANING AGENT
A
B
-X10
RD 18
RD 18
RD 18
RD 18
7
6
-K0:A1
/2.B8
-X10
A
B
C
D
RD 18
RD 18
-X10:31
-X10:21
/3.C3
F2
C
RD 18
RD 18
RD 18
133
134
136
D
RD 18
LN
E
-Y23
NL
CLEANING AGENT
F
THIS DESIGN DESCRIBES A PROPRIETARY ITEM AND IS THE PROPERTY OF CLEVELAND RANGE.
THIS DRAWING IS NOT TO BE COPIED OR USED WITHOUT THE APPROVAL OF CLEVELAND RANGE.
CLEVELAND RANGE, LLC
1333 East 179th St., Cleveland, Ohio 44110-2574
12345678
TITLE
WIRING DIAGRAM
OEB 6.20/10.10
VOLTAGE:
WATTAGE:
CURRENT:
3Ø 208-240
15.8-20.7KW
45.5-51.8A
DRAWN BY
DATE
DRL
6-24-05
DRAWING NO.
SIZE
B
300491
SHEET OF
57
REV
F
B
Page 83

1 2 34 5 6 78
75
(R
L2
TN)
A
L1
0
12
V
D
C
12
GN
D
0V
12
V
1
2
VDC
90-
L2
264
POW
SU
PPLY
V
A
E
C
R
2A
L1
2
36
-F1.
1
1
2
5
-S
14
20
1
8/
RD
24
0
V
(S
ER
VICE
)
PO
CONTR
WE
R
O
L
A
B
FA
N
2W
/
R
D
2V / Y
E
2U
/
W
H
-Q56
(3
2.5.6
A
4
A
C
)
14
22
13
21
F
A
N FAST
-K5
6
4
2
6
5
3
1
D
FA
N RI
G
H
T
-K5
6
4
2
0
5
3
1
E
3Ø
-M1
1W /
B
N
1V /
B
U
1U /
B
K
-Q57
1.6-
(1
.6
2
A
.
)
5
A
14
22
13
21
FA
N SL
O
W
-K5
6
4
2
5
3
1
6
4
2
5
3
1
1
3
5
6
7
5
FA
-K
N
5
L
E
F
T
-F1
10
A
0
F
-K5
A
4
2
N FAST
5
3
1
2
6
4
1
3
5
(
@
230V
45
18KW
.2
A
A
C
)
1
3
3
2
2
-K4
4
HOT A
I
R
-K
4
6
4
2
3
5
1
-E4
1
HOT A
I
R
6
5
(
@
230V
A
C
)
3
3
6.27
15
.8
K
A
W
1
2
-K2
4
2
3
1
(TOP)
(
@
230V
A
C
)
6
5
9.
-E
23
40
.
5K
6
1
W
A
1
3
1
3
2
2
-K
1
4
2
3
1
STEAM GEN
E
R
A
(L
T
OWE
O
R
R
)
6
4
2
5
3
1
-X
1
0
20
L1
L2
L3
8/
24
0V
A
C
-K0
M
A
I
N
C
O
N
T
A
C
T
O
R
(
SAFETY)
-E
2
1
2
STEAM GEN
E
R
A
T
O
R
B
LADDER DI
C
A
G
RA
D
M
E
F
THIS DESIGN DESCRIBES A PROPRIETARY ITEM AND IS THE PROPERTY OF CLEVELAND RANGE.
THIS DRAWING IS NOT TO BE COPIED OR USED WITHOUT THE APPROVAL OF CLEVELAND RANGE.
CLEVELAND RANGE, LLC
1333 East 179th St., Cleveland, Ohio 44110-2574
1 2 34 5 6 78
TITLE
WIRING DIAGRAM
OEB 6.20/10.10
VOLTAGE:
WATTAGE:
CURRENT:
3Ø 208-240
15.8-20.7KW
45.5-51.8A
DRAWN BY
DATE
DRL
6-24-05
DRAWING NO.
SIZE
B
300491
SHEET OF
67
REV
F
B
Page 84

1 2 34 5 6 78
76
(R
L2
-K
-Y2
A
0
-K1
0
-Y2
-Y2
3
B
C
10
9
8
7
FRE
E
6
L2
PU
MP / C
L
EAN
A
G
E
N
T
L1
FRE
E
D
:
X14
43
5
76
2
1
8
1
-Y2
2
-B1
-K1
1
1
1
2
24
3
21
3
5
4
PUMP / RI
C
O
MPAR
TMEN
N
S
E
10
9
:
T R
I
NS
E
V
.
X13
E
-K1
-K
0
1
-K1
1
-K1
0
14
12
-K1
11
0
11
14
11
-M4
M
-B7.
1
22
-B7.
2
22
21
1
2
SAFTEY C
STEAM GEN
O
N
PUM
T
A
C
T
P
O
R
1
BU
H
-K5
2
7
-K5
-K4
5
4
22
21
-K4
-K5
4
6
22
22
21
21
8
7
STEAM GE
HOT A
MOTOR
I
R
/
S
N
L
O
:
W
+5
0V
V
D
D
C
C
3
54
2
RD
L
-B
1
14
13
-K5
-K5
6
5
-K5
7
22
21
56
M
O
T
O
R
/
FAST
X11
+5
0V
V
D
D
C
C
6
87
15
15
6
7
0
14
13
H
7
-S
-K5
0
-Q57
-Y2
13
-K
14
5
-Y
1
MOTOR
OVER
T
E
M
P
-M1
TEMP SWI
T
C
H
3
6
7
GEM FILL/VA
DEHUMIDIFICATIO
L
V
E
N
/
V
A
L
V
E
3
2
1
GN
GN
GN
/B
/R
U
D
-Q56
-K
-K5
5
22
21
M
O
T
O
R
/
RIGHT
:
10
9
13
0
14
22
21
3
24
MOTOR
MOTOR
OVER
/
L
E
F
T
T
E
M
P
X15
11
12
14
13
-X1
-B1
0
KTM
CT
ESSU
C
CLEANING OPTI
G PR
IN
L
EAN
C
Y
L
N
O
N
P>
2
-S
C
I
T
W
S
O
CH
T
I
W
S
RE
DOOR MAGNET
5
CONDE
NS
OR/V
A
L
V
E
GN
-Y
1
STEAM GE
N
:
54
GN
-K1
-K4
22
21
4
WH
:
X16
76
YL
3
HOT A
I
R
-B6
PR
OBE OV
E
N
-K
-H5.
4
1
X2
X1
-K
1
21
22
-K
-F2.
2
1
22
21
21
OVEN
L
A
M
P
X12
8
9
RD
YL
-B5
PR
OBE BYPAS
S
12
L1 2O8/24
0
I
NP
U
T
10
11
RD
YL
-B3
PR
OBE C
O
N
D
E
N
S
E
R
-M3.
9
MOD
U
L
E
2
1
2
V
D
C
+
F
A
N
(COOLING)
:
10
PIC
T
O
1
M
13
1
2
V
D
C
-
CONTROL B
F
SM 5
A
N
-A1
(
C
OOLING)
0
010
O
A
R
D
X18
:
X19
1
1
X
39:
1
-A1
2
OPER
ATION
B
O
A
R
D
BM 5
010
E
L
U
D
O
M
N
4
3
RD
BU
2
1
1
IDM (
ID
ID
M (B
M (W
R
L
)
)
)
12
RD
12
WH
BK
10
91
8
R
ID
ESE
M (BK
T
)
2
1
YL
RD
-B4
(TEMP PR
STEAM GEN
OBE
E
R
)
A
T
O
R
IDENTIFICATIO
3
7
6
Rx
Tx
D
D
:
:
3
4
YL
RD
-B
8
EL
STEAM GEN.
OVER
EMEN
TEMPER
T (PR
O
AT
B
E
URE
)
-A1
GN
D
X10
X17
5
45
12V
0V
DC
D
C
I
I
N
N
7
86
(OPTIO
N)
TN)
L1
O
1
2
V
DC
12
LADDER DI
A
G
RA
M
-A1
1
A
B
C
D
E
F
THIS DESIGN DESCRIBES A PROPRIETARY ITEM AND IS THE PROPERTY OF CLEVELAND RANGE.
THIS DRAWING IS NOT TO BE COPIED OR USED WITHOUT THE APPROVAL OF CLEVELAND RANGE.
CLEVELAND RANGE, LLC
1333 East 179th St., Cleveland, Ohio 44110-2574
1 2 34 5 6 78
TITLE
WIRING/LADDER DIAGRAM
OEB 6.20/10.10
VOLTAGE:
WATTAGE:
CURRENT:
3Ø 208-240
15.8-20.7KW
45.5-51.8A
DRAWN BY
DATE
DRL
6-24-05
DRAWING NO.
SIZE
B
300491
SHEET OF
77
REV
F
B
Page 85

CLEVELAND RANGE OES 6.20/10.10
77
SEQUENCE OF OPERATIONS
When using these instructions refer to the OES 6.20/10.10 wiring schematic.
1 When incoming power (220 VAC) is connected to the combi, 220 VAC is sent to
a The contacts 2,4 and 6 of the Safety Contactor (KO)
b The terminals 2 and 5 of the Control Power Switch (S1)
2 When the Control Power Switch (S1) is turned on (closed)
a The red light on the switch is energized.
b Incoming power (220 VAC) is sent through the 2A fuse (F1.1) to
• The 12 vdc power supply (G1)
◊ 12vdc is sent to terminals 3 and 4 of the connector X10 on the Control
Board (A10)
• Terminal 1 of connector X12 on the Control Board (A10)
• Terminal 10 of connector X13 on the Control Board (A10)
• The return of the Supply is sent to terminal 7 of connector X13 on the Control
Board (A10)
c With 220 VAC to the Control Board (A10) The Operation Board (A11) is
energized
• An alarm will sound for one second
• All the LED’s and the display will energize one at a time.
• “STARTING” will be displayed for 3 seconds
• “please wait” will be displayed
• The international model number will be displayed
• The time and date will be displayed and this will continue until the on/off
switch is depressed.
3 When the ON/OFF is depressed with the combi in the steam mode
a The display will show the set temperature and set time when the flush cycle is
complete.
4 With the combi in the steam mode with time on the timer, the door closed and the
start switch is depressed
a The front display will include a lighted bar under the steam symbol
• When the heat circuit is energized the heat symbol will be energized
• The cooking mode symbol will be energized.
• The time display will invert and begin to count down.
b The fan circuit is energized
• If the combi fan is in the normal setting 220 VAC is sent from terminal 5 on
connector X11 through the normally closed auxiliary contacts of contactor
K57 to the coils of contactors K55 and K56
◊ The K55 and K56 contactors close sending 220 VAC through the Q56
overload to the motor and the motor turns at a high speed.
◊ The normally closed auxiliary contacts of both K55 and K56 open
preventing the K57 contactor from energizing.
Page 86

• If the combi fan is in the reduced setting 220 VAC is sent from terminal 6 on
78
connector X11 through the normally closed auxiliary contacts of contactors
K55 and K56 to the coil of contactor K57
◊ The K57 contactor closes Sending 220 VAC through the Q57 thermal
overload to the motor and the motor turns at a reduced speed.
◊ The normally closed auxiliary contacts of K57 open preventing the K55
and K56 contactors from energizing.
• For the first 2 minutes 220 VAC is sent from terminal 4 on connector X11
through the normally closed auxiliary contacts of contactor K5 to the K50
contactor coil
◊ K50 contactor closes and the motor turns CW
◊ The normally closed auxiliary contacts on K50 open preventing the K5
contactor from energizing.
• For 15 seconds the motor is de-energized and allowed to coast.
• For the next 2 minutes 220 VAC is sent from terminal 3 on connector X11
through the normally closed auxiliary contacts of contactor K50 to the K5
contactor coil
◊ K5 contactor closes and the motor turns CCW
◊ The normally closed auxiliary contacts on K5 open preventing the K50
contactor from energizing.
• NOTE: If the door switch (S7) opens by the door opening, then the fan circuit
is de-energized. Then the motor will be pulsed in the opposite direction to
“break” the fan. This is to stop the fan quicker for the operator.
c The hot air heat circuit is energized
• 220 VAC is sent from terminal 3 of connector X12 on the Control Board
(A10) through the normally closed auxiliary contacts of K2 and K1 to the coil
of Contactor K4 until the cabinet reaches the set temperature as sensed at
probe B6.
◊ The contactor K4 closes and to legs of the 220 VAC is sent to the 18 KW
element (E4)
• 220 VAC is sent from terminal 7 of connector X11 on the Control Board
(A10) to the coil of Contactor K44 until the cabinet reaches the set
temperature.
◊ The contactor K44 closes and the third leg of 220 VAC is sent to the 18
KW element (E4)
◊ If the reduced power option is chosen then the K44 Contactor is not
energized.
d The steam circuit is energized
• 220 VAC is sent from terminal 4 of connector X12 on the Control Board
(A10) to the coil of the Y3 solenoid allowing water to be thrown against the
element until the bypass probe (B5) senses 183 degrees F.
• NOTE: If the set temperature is above 212 degrees F the hot air circuit will be
energized (after the by pass probe is satisfied) until the compartment setting is
reached.
Page 87

e When the condensate box is heated to 140 degrees F at the B3 probe, 220 VAC is
79
sent from terminal 5 of connector X12 to the condenser valve (Y1) until the
temperature drops.
f When the timer counts to 0 or the core temp probe (B10) reaches the set amount
the cycle ends.
5 With the combi in the Hot Air mode with time on the timer, the door closed and the
start switch is depressed
a The front display will include a lighted bar under the Hot Air symbol
• When the heat circuit is energized the heat symbol will be energized
• The cooking mode symbol will be energized.
• The time display will invert and begin to count down.
b The fan circuit is energized
• NOTE: If the temperature is less than 212 degrees F than fan will be pulsed
on for 2 seconds every 60 seconds after the cabinet set temp (B6)
• If the combi fan is in the normal setting 220 VAC is sent from terminal 5 on
connector X11 through the normally closed auxiliary contacts of contactor
K57 to the coils of contactors K55 and K56
◊ The K55 and K56 contactors close sending 220 VAC through the Q56
overload to the motor and the motor turns at a high speed.
◊ The normally closed auxiliary contacts of both K55 and K56 open
preventing the K57 contactor from energizing.
• If the combi fan is in the reduced setting 220 VAC is sent from terminal 6 on
connector X11 through the normally closed auxiliary contacts of contactors
K55 and K56 to the coil of contactor K57
◊ The K57 contactor closes Sending 220 VAC through the Q57 thermal
overload to the motor and the motor turns at a reduced speed.
◊ The normally closed auxiliary contacts of K57 open preventing the K55
and K56 contactors from energizing.
• For the first 2 minutes 220 VAC is sent from terminal 4 on connector X11
through the normally closed auxiliary contacts of contactor K5 to the K50
contactor coil
◊ K50 contactor closes and the motor turns CW
◊ The normally closed auxiliary contacts on K50 open preventing the K5
contactor from energizing.
• For 15 seconds the motor is de-energized and allowed to coast.
• For the next 2 minutes 220 VAC is sent from terminal 3 on connector X11
through the normally closed auxiliary contacts of contactor K50 to the K5
contactor coil
◊ K5 contactor closes and the motor turns CCW
◊ The normally closed auxiliary contacts on K5 open preventing the K50
contactor from energizing.
• NOTE: If the door switch (S7) opens by the door opening, then the fan circuit
is de-energized. Then the motor will be pulsed in the opposite direction to
“break” the fan. This is to stop the fan quicker for the operator.
c The hot air heat circuit is energized
Page 88

• 220 VAC is sent from terminal 3 of connector X12 on the Control Board
80
(A10) through the normally closed auxiliary contacts of K2 and K1 to the coil
of Contactor K4 until the cabinet reaches the set temperature as sensed at
probe B6.
◊ The contactor K4 closes and to legs of the 220 VAC is sent to the 18 KW
element (E4)
• 220 VAC is sent from terminal 7 of connector X11 on the Control Board
(A10) to the coil of Contactor K44 until the cabinet reaches the set
temperature.
◊ The contactor K44 closes and the third leg of 220 VAC is sent to the 18
KW element (E4)
◊ If the reduced power option is chosen then the K44 Contactor is not
energized.
d When the condensate box is heated to 140 degrees F at the B3probe, 220 VAC is
sent from terminal 5 of connector X12 to the condenser valve (Y1) until the
temperature drops.
e If the “Crisp and Tasty” mode is selected
• 220 VAC is sent from terminal 6 of connector X12 on the Control Board
(A10) to the Dehumidification Valve (Y2) to pull the humidity out of the
cabinet down the drain.
◊ In the light and medium modes (one and two drops in the display) the Y2
valve will be energized until the bypass probe (B5) is satisfied.
◊ In the full mode (3 drops in the display) the Y2 valve will be energized
continuously.
f When the timer counts to 0 or the core temp probe (B10) reaches the set amount
the cycle ends and the steam generator reverts to the standby temperature of 190degree F.
6 With the combi in the Combi mode with time on the timer, the door closed and the
start switch is depressed
a The front display will include a lighted bar under the combi symbol
• When the heat circuit is energized the heat symbol will be energized
• The cooking mode symbol will be energized.
• The time display will invert and begin to count down.
b The fan circuit is energized
• If the combi fan is in the normal setting 220 VAC is sent from terminal 5 on
connector X11 through the normally closed auxiliary contacts of contactor
K57 to the coils of contactors K55 and K56
◊ The K55 and K56 contactors close sending 220 VAC through the Q56
overload to the motor and the motor turns at a high speed.
◊ The normally closed auxiliary contacts of both K55 and K56 open
preventing the K57 contactor from energizing.
• If the combi fan is in the reduced setting 220 VAC is sent from terminal 6 on
connector X11 through the normally closed auxiliary contacts of contactors
K55 and K56 to the coil of contactor K57
Page 89

◊ The K57 contactor closes Sending 220 VAC through the Q57 thermal
81
overload to the motor and the motor turns at a reduced speed.
◊ The normally closed auxiliary contacts of K57 open preventing the K55
and K56 contactors from energizing.
• For the first 2 minutes 220 VAC is sent from terminal 4 on connector X11
through the normally closed auxiliary contacts of contactor K5 to the K50
contactor coil
◊ K50 contactor closes and the motor turns CW
◊ The normally closed auxiliary contacts on K50 open preventing the K5
contactor from energizing.
• For 15 seconds the motor is de-energized and allowed to coast.
• For the next 2 minutes 220 VAC is sent from terminal 3 on connector X11
through the normally closed auxiliary contacts of contactor K50 to the K5
contactor coil
◊ K5 contactor closes and the motor turns CCW
◊ The normally closed auxiliary contacts on K5 open preventing the K50
contactor from energizing.
• NOTE: If the door switch (S7) opens by the door opening, then the fan circuit
is de-energized. Then the motor will be pulsed in the opposite direction to
“break” the fan. This is to stop the fan quicker for the operator.
c The hot air heat circuit is energized
• 220 VAC is sent from terminal 3 of connector X12 on the Control Board
(A10) through the normally closed auxiliary contacts of K2 and K1 to the coil
of Contactor K4 until the cabinet reaches the set temperature as sensed at
probe B6.
◊ The contactor K4 closes and to legs of the 220 VAC is sent to the 18 KW
element (E4)
• 220 VAC is sent from terminal 7 of connector X11 on the Control Board
(A10) to the coil of Contactor K44 until the cabinet reaches the set
temperature.
◊ The contactor K44 closes and the third leg of 220 VAC is sent to the 18
KW element (E4)
◊ If the reduced power option is chosen then the K44 Contactor is not
energized.
d The steam circuit is energized
• 220 VAC is sent from terminal 4 of connector X12 on the Control Board
(A10) to the coil of the Y3 solenoid allowing water to be thrown against the
element until the bypass probe (B5) senses 183 degrees F.
e When the condensate box is heated to 140 degrees F at the B3probe, 220 VAC is
sent from terminal 5 of connector X12 to the condenser valve (Y1) until the
temperature drops.
f If the “Crisp and Tasty” mode is selected
• 220 VAC is sent from terminal 6 of connector X12 on the Control Board
(A10) to the Dehumidification Valve (Y2) to pull the humidity out of the
cabinet down the drain.
Page 90

◊ In the light and medium modes (one and two drops in the display) the Y2
82
valve will be energized until the bypass probe (B5) is satisfied.
◊ In the full mode (3 drops in the display) the Y2 valve will be energized
continuously.
g When the timer counts to 0 or the core temp probe (B10) reaches the set amount
the cycle ends.
7 With the combi in the Rethermalization mode with time on the timer, the door closed
and the start switch is depressed
a The front display will include a lighted bar under the Rethermalization symbol
• When the heat circuit is energized the heat symbol will be energized
• The cooking mode symbol will be energized.
• The time display will invert and begin to count down.
b The fan circuit is energized
• If the combi fan is in the normal setting 220 VAC is sent from terminal 5 on
connector X11 through the normally closed auxiliary contacts of contactor
K57 to the coils of contactors K55 and K56
◊ The K55 and K56 contactors close sending 220 VAC through the Q56
overload to the motor and the motor turns at a high speed.
◊ The normally closed auxiliary contacts of both K55 and K56 open
preventing the K57 contactor from energizing.
• If the combi fan is in the reduced setting 220 VAC is sent from terminal 6 on
connector X11 through the normally closed auxiliary contacts of contactors
K55 and K56 to the coil of contactor K57
◊ The K57 contactor closes Sending 220 VAC through the Q57 thermal
overload to the motor and the motor turns at a reduced speed.
◊ The normally closed auxiliary contacts of K57 open preventing the K55
and K56 contactors from energizing.
• For the first 2 minutes 220 VAC is sent from terminal 4 on connector X11
through the normally closed auxiliary contacts of contactor K5 to the K50
contactor coil
◊ K50 contactor closes and the motor turns CW
◊ The normally closed auxiliary contacts on K50 open preventing the K5
contactor from energizing.
• For 15 seconds the motor is de-energized and allowed to coast.
• For the next 2 minutes 220 VAC is sent from terminal 3 on connector X11
through the normally closed auxiliary contacts of contactor K50 to the K5
contactor coil
◊ K5 contactor closes and the motor turns CCW
◊ The normally closed auxiliary contacts on K5 open preventing the K50
contactor from energizing.
• NOTE: If the door switch (S7) opens by the door opening, then the fan circuit
is de-energized. Then the motor will be pulsed in the opposite direction to
“break” the fan. This is to stop the fan quicker for the operator.
c The hot air heat circuit is energized
Page 91

• 220 VAC is sent from terminal 3 of connector X12 on the Control Board
83
(A10) through the normally closed auxiliary contacts of K2 and K1 to the coil
of Contactor K4 until the cabinet reaches the set temperature as sensed at
probe B6.
◊ The contactor K4 closes and to legs of the 220 VAC is sent to the 18 KW
element (E4)
• 220 VAC is sent from terminal 7 of connector X11 on the Control Board
(A10) to the coil of Contactor K44 until the cabinet reaches the set
temperature.
◊ The contactor K44 closes and the third leg of 220 VAC is sent to the 18
KW element (E4)
◊ If the reduced power option is chosen then the K44 Contactor is not
energized.
d The steam circuit is energized.
• 220 VAC is sent from terminal 4 of connector X12 on the Control Board
(A10) to the coil of the Y3 solenoid allowing water to be thrown against the
element until the bypass probe (B5) senses 154 degrees F.
e When the condensate box is heated to 140 degrees F at the B3probe, 220 VAC is
sent from terminal 5 of connector X12 to the condenser valve (Y1) until the
temperature drops.
f When the timer counts to 0 or the core temp probe (B10) reaches the set amount
the cycle ends and the steam generator reverts to the standby temperature of 190degree F.
Page 92

12345678
84
A
B
C
D
A
B
C
D
E
F
THIS DESIGN DESCRIBES A PROPRIETARY ITEM AND IS THE PROPERTY OF CLEVELAND RANGE.
THIS DRAWING IS NOT TO BE COPIED OR USED WITHOUT THE APPROVAL OF CLEVELAND RANGE.
CLEVELAND RANGE, LLC
1333 East 179th St., Cleveland, Ohio 44110-2574
12345678
TITLE
WIRING DIAGRAM
OES 6.20/10.10
VOLTAGE:
WATTAGE:
CURRENT:
3Ø 208-240
15.8-20.7KW
45.5-51.8A
DRAWN BY
DATE
DRL
7-14-05
DRAWING NO.
SIZE
B
300492
SHEET OF
17
REV
E
F
A
Page 93

12345678
85
BK 12
BK 8
A
BK 12
BK 8
BK 12
BK 8
B
1
3
2
4
BK 8
BK 8
1
2
L1 L2 L3
208/240
3Ø
5
6
BK 8
3
BU 12
RD 18
JUMPER
BK 18
BK 12
BU 12
4
-X10
-S1:5
-S1:2
PE
20
-K0
D8
C
-X10
D
/3.B1
-S1:3
/5.E3
E
F
-Y1:A2
/5.F1
-X10:21
/3.B1
-G1:N
THIS DESIGN DESCRIBES A PROPRIETARY ITEM AND IS THE PROPERTY OF CLEVELAND RANGE.
THIS DRAWING IS NOT TO BE COPIED OR USED WITHOUT THE APPROVAL OF CLEVELAND RANGE.
CLEVELAND RANGE, LLC
1333 East 179th St., Cleveland, Ohio 44110-2574
12345678
WIRING DIAGRAM
1
3
-K4
D6
/3.A1
/3.B1
-E4
18KW
45.2A
(@230VAC)
-X11
-K4
208/240V 208/240V
RD 18
L2 L2
TITLE
WIRING DIAGRAM
OES 6.20/10.10
VOLTAGE:
WATTAGE:
CURRENT:
3Ø 208-240
15.8-20.7KW
45.5-51.8A
DRAWN BY
DATE
5
2
1
PE
HOT AIR (OUTER)
12
B6
34
B6
56
B6
21 22 21 22 21 22
-K44
4
6
BK 14
WH 14
123
123
RD 14BK 14
A1
A2
DRL
7-14-05
345
1
D6
2
6
RD 14
WH 14
PE
-K44
RD 18 RD 18
HOT AIR (INNER)
B6
B6
B6
DRAWING NO.
OVER TEMPERATURE THERMOSTAT
RD 18
-A10:X12:3
RD 18
-A10:X11:7
A1
A2
12
34
56
300492
SIZE
B
SHEET OF
-B7.1
OVEN
STB
/5.D6
/5.D5
208/240V
SAFETY CONTACTOR
27
-K10
-K0
ϑ
RD 18
B1
B1
B1
L1
L2
L3
RD 18
-A10:X13:2
RD 18
22 21
53
1
PU 18
A1
A2
-K5:A2
12
34
56
/4.A4
/4.A4
/4.A4
-K11:3
REV
A
A
/5.C8
B
C
D
/3.C5
E
/3.E1
F
Page 94

12345678
86
-K11
3
BN 18
-K57
/3C.4
/3B.4
/2D.8
/2D.8
-K10:3
E6
-K10
-K10
-K11
RD 18
22 21
5
1
4
6
2
3
5
1
4
6
2
W/BN 18GY 18
87
W/BN 18
87
/2.D8
/5.D5
-A10:X11:5
-X10:21
/5.E2
-K56
-K55
E5
/5.D5
-A10:X11:6
RD 18
21
E5
22
RD 18
22 21
A
B
C
D
WIRING DIAGRAM
A
-K0:2
-K0:4
-X10:20
-X10:20
100
GND
SUPPLY
MODULE 12VDC
BK 12
BU 12
-S1
2
RD
36
BU 12
-F1.1
2A
-X10
GN 18
G
N
90-264VAC
12V DC
12V
RD 18
-A10:X10:3
/5.D4
L
0V
BU 18
-A10:X10:4
/5.D4
RD 18
-G1
5
BK 12
1
2
RD 18
31
CONTROL
POWER
-X10
FBS2-6
RD 18
RD 18
-A10:X12:1
-X10:A
-K11
BK 18
BK 18
32
/5.B8
/5.D6
-K50
E4
-B11
OR 18
1
RD 18
22 21
6 4
2
5
/5.D5
-A10:X11:3
3
-K11
YE 18
3
-K5
PK 18
/5.D5
-A10:X11:4
RD 18
E4
22 21
/2.B2
L1
/2.C2
L2
/2.E1
L2
B
/2.E1
L2
-X10
C
D
(SM) BD
12VDC INPUT
RD 18
RD 18
RD 18
RD 18
RD 18
E
/2.E8
L2
F
THIS DESIGN DESCRIBES A PROPRIETARY ITEM AND IS THE PROPERTY OF CLEVELAND RANGE.
THIS DRAWING IS NOT TO BE COPIED OR USED WITHOUT THE APPROVAL OF CLEVELAND RANGE.
-K0:A2
RD 18
CLEVELAND RANGE, LLC
1333 East 179th St., Cleveland, Ohio 44110-2574
12345678
TITLE
WIRING DIAGRAM
OES 6.20/10.10
-K56
RD 18
FAN FAST
/4.C6
/4.C6
/4.C6
D6
A2 A1
1
34
56
21
DRAWN BY
A2 A1
2
22
-K57
RD 18
2
22
FAN SLOW
/4.C4
/4.C4
/4.C4
D5
DRL
DATE
7-14-05
2
22
-K55
RD 18
FAN FAST
/4.C4
/4.C4
/4.C4
21
D6
3Ø 208-240
15.8-20.7KW
45.5-51.8A
1
34
56
-K5
208/240V 208/240V 208/240V 208/240V 208/240V
FAN LEFT
/4.B4
/4.B4
/4.B4
D4
A2 A1
1
34
56
21
-K50
A2 A1
RD 18
FAN RIGHT
/4.B6
/4.B6
/4.B6
D4
1
34
56
21
2
22
VOLTAGE:
WATTAGE:
CURRENT:
A2 A1
1
2
34
56
21
22
DRAWING NO.
SIZE
B
300492
SHEET OF
37
REV
E
F
A
Page 95

12345678
87
BK 18
1
3
2
4
-X13.1
-X13.2
BK 12
BK 12
BK 12
BK 18
5
6
-F10
10A
-K5
/3.E4
-K57
BK 18
BK 18
BK 18
/3.E6
BK 18
WIRING DIAGRAM
5
12
4 3
6
BK 18
BK 18
BK 18
1
3
5
FAN LEFT FAN RIGHT
2
4
6
BK 18
BK 18
BK 18
1
3
5
FAN SLOW
2
4
6
5
6
3
3
-Q57
1.6-2.5A
(1.6A)
13
14
C2
21
22
1U / BK
1V / BU
1W / BN
1
3
2
4
2
1
2
1
-M1
BK 18
BK 18
BK 18
1
/3.E4
/3.E5
2
BK 18
1
2
BK 18
1
2
4
4
3
4
BK 18
3
4
BK 18
3
4
5
5
-K50
BK 18
BK 18
BK 18
-K56
-X13
2
GN
-Q56
2.5-4A
(3.6A)
9
9
GND
2U / WH
M 3~
2V / YE
2W / RD
FAN
GY
GY
5
6
BK 18
5
FAN FAST
6
BK 18
5
13
6
6
6
A
B
C
21
22
14
B2
RD 18
RD 18
8
7
7
8
D
E
L1
/2.A8
L2
/2.A8
L3
/2.A8
A
/F4
-X13:3
RD 18
-Q56
13
-Q57
D4
D6
14
RD 18
13
14
RD 18
FAN FAST
-K55
/3.E5
B
C
D
-X10:21
-A10:X11:2
/5.E2
/5.D5
E
MOTOR OVER TEMP
L2
F
THIS DESIGN DESCRIBES A PROPRIETARY ITEM AND IS THE PROPERTY OF CLEVELAND RANGE.
THIS DRAWING IS NOT TO BE COPIED OR USED WITHOUT THE APPROVAL OF CLEVELAND RANGE.
CLEVELAND RANGE, LLC
1333 East 179th St., Cleveland, Ohio 44110-2574
12345678
TITLE
WIRING DIAGRAM
OES 6.20/10.10
/5.C5
/A2
-A10:X11:1
-Q56:13
VOLTAGE:
WATTAGE:
CURRENT:
-X13
3Ø 208-240
15.8-20.7KW
45.5-51.8A
1
3
DRAWN BY
DATE
DRL
7-14-05
DRAWING NO.
SIZE
B
300492
SHEET OF
47
REV
A
F
Page 96

12345678
88
-S7
P>
14 13
157
RD 18
9
7
8 6543
HOT AIR (INNER)
MOTOR / SLOW
7
8
-K56:21
-K44:A1
/2.D7
/3.C6
156
RD 18
0VDC
X12:
-S3
P>
+5VDC
13
RD 18
0VDC
N.O. COM
14
RD 18
RD 18
+5VDC
L1- 2O8/240-INPUT
1234
-X10:31
/3.C3
WIRING DIAGRAM
A
BU 18
1
2
8910
67
X14:
PUMP/CLEANING AGENT
X13:
COMPARTMENT RINSE VALVE
STEAM GEN OVER TEMP
HOT AIR (OUTER)
INJECTION
OVEN LAMP
DEHUMIDICATION/VALVE
CONDENSOR/VALVE
567
-K4:A1
/2.D7
1
2
45
3
PUMP/RINSE
STEAM GEN PUMP
-X10
RD 18
10
RD 18
9
RD 18
8
RD 18
7
6
5
4
3
2
-K0:A1
1
/2.B8
-X10
A
-X10:31
B
RD 18
C
RD 18
D
-X10:21
RD 18
RD 18
133
134
B
/3.C3
F2
C
RD 18
136
D
INJECTION
PRESSURE SWITCH
A
B
-A11
PICTO
MODULE
(OPTION)
-A12
BM 5010
OPERATION MODULE
X39: 1
-A10
1098
7 6 5 4
X17:
CLEANING PRESSURE SWITCH
PROBE CONDENSER
RD
1
2
3
12 11
PROBE OVEN
PROBE BYPASS
-B3
-B5
-B6
WH
YL
RD
YL
RD
YL
9
8
10
76 354
CLEANING OPTION ONLY
CTC
KTM
-B10
GN
GN
GN
GN/RD
2
X16:
GN/BU
1
DOOR MAGNET SWITCH
-S2
-X10
13
12 11 10
14
X15:
X11:
X18:
1
C
CABLE CONNECTION SM ON BM
CONTROL 500
D
SM 5010
CONTROL BOARD
-W1
X19:
1
RD 18
X10:
MOTOR OVER TEMP
MOTOR OVER TEMP
MOTOR / RIGHT
MOTOR / LEFT
TxD
0VDC IN
GND
12VDC+ FAN
12VDC- FAN
2
1
RxD
12VDC IN
3
-A13
-G1:12V
-G1:0V
IDENTIFICATION MODULE
/3.D2
/3.D2
IDM (BLK)
RESET
BKWHBU
IDM (W)
IDM (BL)
IDM (R)
124 567 89 1110
123
RD
312
4
/4.F4
MOTOR / FAST
56
4
-K5:21
-x13:1
-Q57:14
-K57:21
-K50:21
/3.C5
/4.D2
/3.C4
/3.C4
RD
BK
M
1~
E
-M3.1
AUX. FAN
-X10
/2.E1
JUMPER
-X10:20
F
THIS DESIGN DESCRIBES A PROPRIETARY ITEM AND IS THE PROPERTY OF CLEVELAND RANGE.
THIS DRAWING IS NOT TO BE COPIED OR USED WITHOUT THE APPROVAL OF CLEVELAND RANGE.
L2
CLEVELAND RANGE, LLC
1333 East 179th St., Cleveland, Ohio 44110-2574
12345678
-F2.1
1A
21
-Y1
-X10:20
RD 18
A1A2
BU 18 BU 18
-X10
X1X2
-H5.1
/3.B6
-K10:8
/4E.2
-Q57:14
C8
-X10:D
21
FBS2-6
-X10
OVEN LAMP CONDENSER
TITLE
100
/2.E1
22
WIRING DIAGRAM
OES 6.20/10.10
RD 18
-Y10
A1A2
-Y2 -Y3 -Y21
DEHUMIDIFICATION
VOLTAGE:
WATTAGE:
CURRENT:
RD 18
A1A2
INJECTION
3Ø 208-240
15.8-20.7KW
45.5-51.8A
DRAWN BY
DATE
DRL
7-14-05
A2 A1
WATER CLEANING
DRAWING NO.
SIZE
B
-Y20
300492
LN
RINSING AGENT
CLEANING OPTION ONLY
SHEET OF
57
-Y22
CLEANING AGENT
LN
-Y23
NL
CLEANING AGENT
REV
E
F
A
Page 97

12345678
89
A
3
5
1
10A
-F10
1
5
B
C
208/240VAC
D
LADDER DIAGRAM
MAIN CONTAC TOR (SAFETY)
1
3
5
2
4
6
-K0
L1 L3L2
-X10
HOT AIR
3
1
2
4
-K4
2
2
1
1
18KW
-E4
HOT AIR
5
6
1
3
5
4
2
6
-K44
1
3
5
2
4
6
-K55
FAN FAST
3
3
45.2A
(@230VAC)
3
2
4
6
-K5
FAN LEFT
1
3
5
2
4
6
-K57
FAN SLOW
21
13
22
14
1.6-2.5A
-Q57
1U / BK
1V / BU
1W / BN
(1.6A)
2U / WH
2V / YE
3Ø
2W / RD
-M1
FAN
5
1
3
2
4
6
-K50
FAN RIGHT
1
3
5
2
4
6
-K56
FAN FAST
21
13
22
14
2.5-4A
(3.6A)
-Q56
A
B
C
D
E
F
THIS DESIGN DESCRIBES A PROPRIETARY ITEM AND IS THE PROPERTY OF CLEVELAND RANGE.
THIS DRAWING IS NOT TO BE COPIED OR USED WITHOUT THE APPROVAL OF CLEVELAND RANGE.
CLEVELAND RANGE, LLC
1333 East 179th St., Cleveland, Ohio 44110-2574
12345678
TITLE
POWER
208/240V
-S1
CONTROL
WIRING DIAGRAM
OES 6.20/10.10
5
RD
14
2
2
1
2A
-F1.1
36
L1
POWER
L2
90-264VAC
VOLTAGE:
WATTAGE:
CURRENT:
12VDC
SUPPLY
3Ø 208-240
15.8-20.7KW
45.5-51.8A
12V
E
REV
12VDC
L1 0 12
L2
(RTN)
F
A
0V
GND
DRAWN BY
DATE
DRL
7-14-05
DRAWING NO.
SIZE
B
300492
SHEET OF
67
Page 98

12345678
90
-S3
COM
PRESSURE SWITCH
GN/BU
1
DOOR MAGNET SWITCH
-S2
P>
-X10
141312 11 10
X15:
A
PICTO
(OPTION)
MODULE
-A12
-A11
BM 5010
OPERATION BOARD
X39: 1
B
1
1
X19:
1
X18:
9
10
X17:
2
3
47865
PROBE CONDENSER
-B3
12 1011
PROBE BYPASS
-B5
YL
RDRDYL
9
PROBE OVEN
-B6
RD
YL
8
X16:
CLEANING PRESSURE SWITCH
CLEANING OPTION ONLY
CTC
KTM
-B10
GN
GNWHGN
GN/RD
2
35476
P>
N.O.
13
-S7
A
14
14 13
157
156
B
1
9
687 54
0VDC
2
3
0VDC
+5VDC
+5VDC
5
761098
43
X14:
1
2
-A10
SM 5010
C
CONTROL BOARD
13
LADDER DIAGRAM
D
-M3.1
E
L1 OL2 12
(RTN) 12VDC
F
THIS DESIGN DESCRIBES A PROPRIETARY ITEM AND IS THE PROPERTY OF CLEVELAND RANGE.
THIS DRAWING IS NOT TO BE COPIED OR USED WITHOUT THE APPROVAL OF CLEVELAND RANGE.
CLEVELAND RANGE, LLC
1333 East 179th St., Cleveland, Ohio 44110-2574
12345678
12VDC+ FAN (COOLING)
12VDC- FAN (COOLING)
2
M
12VDC IN
X10:
0VDC IN
GND
45
-A13
TxD
IDM (W)
IDM (BL)
IDM (BLK)
RxD
RESET
6
10911128
7
4
312
IDENTIFICATION MODULE
TITLE
L1- 2O8/240-INPUT
IDM (R)
12
21
-F2.1
X1X2
-H5.1
WIRING DIAGRAM
OES 6.20/10.10
X12:
HOT AIR
OVEN LAMP
3
-K4
X11:
X13:
C
INJECTION
CONDENSOR/VALVE
DEHUMIDIFICATION/VALVE
7
5
64
MOTOR OVER TEMP
MOTOR OVER TEMP
24
1
TEMP SWITCH
14
-M1
13
MOTOR / LEFT
3
21
21
22
22
-K5
-K50
MOTOR / FAST
MOTOR / RIGHT
56
21
22
-K57
-Q56-Q57
-Y1
1413
-K55
-K5
HOT AIR
MOTOR / SLOW
7
8
21
22
-K56
21
22
-K44
-K56
-K55
-Y2
-Y3
-K57
DRAWN BY
DATE
VOLTAGE:
WATTAGE:
CURRENT:
-K50
3Ø 208-240
15.8-20.7KW
45.5-51.8A
SAFTEY CONTACTOR
2
1
21
24
ϑ
22 21
-B7.1
11
12
-K10
-K0
DRL
7-14-05
11
14
-K10
-K11
-K11
11
14
-K11
-K10
DRAWING NO.
SIZE
2
-B11
B
COMPARTMENT RINSE V.
3
31
-Y21
300492
PUMP / RINSE
4
-Y22
-Y20
SHEET OF
FREE
FREE
L2
PUMP / CLEAN AGENT
765
8
-Y23
77
L1
109
D
E
REV
F
A
 Loading...