

Page 1
Cleveland Range
UNITED STATES
CANADA
REPAIR MANUAL
PEM24/36/48-2/3J
PEM160/200/250/300-2/3J
PDL/PDM/PDP-2/3J
Model NO. PSM-2/3J
Cleveland Range, Inc.
1333 East 179th St.
Cleveland, Ohio 44110
Phone: (216) 481-4900 • FAX: (216) 481-3782
Garland Commercial Ranges • 1777 Kamato Rd.
Mississauga Ontario CN L4W 1X4
Phone: (416) 624-0260 • FAX: (416) 624-0623
PS-01
Page 2
Installation Instructions For Steam Generators, Steamers,
Steamer/Kettles: Gas — Electric — Steam Coil
Installation Instructions For All Models
1) These instructions must be retained by the owner/user for future reference. For installation only in noncombustible locations. Gas units
are only to be installed in areas that have provisions for adequate air supply.
2) Position: For proper operation and drainage, steam generator must be level. It must be set near a floor drain. Attach 1 1/2" piping all drain
connections to carry exhaust steam away from the cabinet. Ends of drain lines must vent to atmosphere to avoid back pressure. Allow a
MINIMUM of 6" clearance to the rear and sides of the equipment. The surrounding area must be free and clear of combustibles.
3) Install in accordance with local codes and/or the National Electric Code ANSI/NFPA No. 70-1984. Installation in Canada shall be in
accordance with the Canadian Electric Code CSA Standard C22-1. A unit that is connected to electricity must be grounded. A wiring
diagram is provided inside the relay box.
4) Connect supply lines for 140° — 160° hot water, and cold water, to the unit. Water pressure must be maintained between 35 and 60 psi.
Locations.and presswre data are shown on the connection drawing. Long hot water lines should be at least 1/2" IPS. Flush water supply
lines thoroughly before connecting. Use water which is low in total solids content and low in gas content, to prevent internal scaling,
pitting and corrosion of the steam generator and carry-over of minerals into the steam.Water which is fit to drink can still contain highly
detrimental impurities. Refer to Water Quality Requirements page.
5) Turn on water supply to steam generator. Water valve is inside of base.
6) Connect fuel supply.
FOR YOUR SAFETY
Do not store or use gasoline or other flammable vapors and liquids
in the vicinity of this or are, other appliance.
For Steam Coil Steam Generators —
— Connect steam supply: Location is shown on the connection drawing. Incoming steam pressure must be regulated
between 35 and 45 psi (30 — 45 psi for pressure steamers). Install a Strainer ahead of the regulating valve. Flush line
thoroughly before connecting.
— Connect the outlet end of the steam coil to an inverted bucket trap. Fill trap with water before installing.
— Connect electricity if unit is equipped with electrical controls. Permanent connection is required. Junction box
location is shown on the connection drawing. Unit must be electrically grounded by the installer.
For Gas Fired Generators —
— Post in a prominent location, instructions to be followed in the event the user smells gas. This information shall be
obtained by consulting the local gas supplier.
— Connect gas: Location and pressure data are shown on the connection drawing. Installation shall be in accordance with
local codes, or in the absence of local codes, with the National Fuel Gas Code. ANSI Z223.1 —1984. Installation in Canada
shall be in accordance with Installation Codes for Gas Burning Appliances and Equipment B149.1 and B149.2. Use a gas pipe
joint compound which is resistant to LP gas. Test all pipe joints for leaks with soap and water solution. Allow 12 inch
clearance on right side of all Gas Fired Steam Generator models for servicing gas burners and for proper operation. This 12"
clearance also provides adequate air openings into the combustion chamber. Never obstruct the flow of combustion and
ventilation air. The appliance and its individual shutoff valve must be disconnected from the gas supply piping system during
any pressure testing of that system at test pressures in excess of 1/2 psig (3.45 kPa). The appliance must be isolated from the
gas supply piping system by closing its individual manual shutoff valve during any pressure testing of the gas supply piping
system at test pressure equal to or less than 1/2 psig (3.45 kPa).
— Connect electricity if unit is equipped with electrical controls. Permanent 115V connection is required. Junction box
location is shown on the connection drawing. Unit must be electrically grounded by the installer.
— Lighting and Shutdown Instructions: Rip electrical switch on. Open water valve. Open gas valve. Slightly depress
and turn control knob to "off" for 5 minutes before lighting gas. Turn control knob to "pilot", depress it completely
and light pilot burner. Continue to hold knob in for about 60 seconds, then release. Pilot burner is lighted through
hole in panel at bottom of steam generator. Never leave panel off as this will damage controls. Turn control knob to
"on". Depress electrical "reset" switch for main burner ignition. Burners will not light without water in the steam
generator. For main burner off. with pilot on, turn control knob to "pilot". For main and pilot burner off, slightly
depress and turn control knob to "off". Flip electrical switch off.
For Electrical Steam Generators
— Connect electric power. Location is shown on the connection drawing. Provide connection as required by your unit.
Electric supply must match power requirements specified on data plate attached to base. Wiring must be adequate to carry
required current at rated voltage. A separate fused disconnect must be supplied and installed. Unit must be electrically grounded
by the installer.
CLEVELAND RANGE CO., 1333 EAST 179th ST., CLEVELAND, OHIO 44110
1086 LITHO IN U.S.A. Manufacturer reserves right of design improvement or modification, as warranted.
Page 3
7) Turn on electricity at control circuit switch on steamer console. A red light glows when electricity is on. If water level is correct, steam
generator will operate by pressing the "reset" button. Heaters will not work without water in the steam generator This manual reset button
must be pressed to start up the generator initially, and to restart the steam generator after every shut oft. or power interruption. No attempt
should be made to operate the equipment during a power failure.
8) Check to make sure that the water in the sight; gauge glass automatically stays at about 2/3 full when the unit is started up
9)When installation is complete and tree of leaks, refer to Operating Procedures sheet Instructions For Steam
Generator Care
Protect your steam generator, prolong its life and preserve its performance by giving it the required daily attention, on a regular schedule.
Follow servicing instructions for your steam generator which are printed on Data Sheet 260-LC in your Owner s Manual, and also on an
adhesive label attached to the unit To obtain an additional data sheet or label carrying servicing instructions, write to the Cleveland Range
Company.
No work should be done on the steam generator while it is pressurized or hot Service of the steam generator should only be
WARNING
performed by a trained and experienced service technician, thoroughly familiar with servicing steam generators. When
maintenance or repairs are required, contact a local food service equipment service agency, or call the factory, or a factory
representative, for the name and address of one in your area.
Steam Generator (Boiler) Safety
Rigid regulations govern the design and construction of a boiler. However, the responsibility for the safe and efficient operation
of a boiler shifts to the owner/user after the boiler leaves the factory.
A sound boiler, if improperly installed, or if improperly maintained, or if improperly repaired, will create a dangerous situation
and may cause injury to personnel.
Most states, provinces and some cities have a boiler safety law. Many underwriters require that their clients' boilers comply with
these boiler safety laws. These safety laws call for action by the boiler manufacturer and action by the boiler owner / user.
As a manufacturer. The Cleveland Range Company delivers steam generators built to the ASME Boiler Code. Section IV. which
have been inspected by a National Board inspector. Also. each Cleveland Range Company boiler is built to comply with the
boiler safety law of the state to which it is sent
Safe and Efficient Boiler Operation Depends on Proper Installation
Install the boiler in compliance with following regulations, where they apply:
— The National Fuel Gas Code. ANSI Z223-1-1984 — The local and municipal building code (plumbing and electrical)
--Installation Codes for Gas Burning Appliances and — The state and city boiler laws
Equipment B149.1 and 8149.2
— The Cleveland Range Company Installation Instruc- — The recommendations of the owner/user's underwriters
tions
— The National Electrical Code ANSI / NPPA No. 70-1984
The water for the boiler should be analyzed by a reputable boiler water specialist, to see if the quality will permit safe and
efficient boiler operation. Water treatment is becoming increasingly necessary because the quality of water sources is
deteriorating, although treatment will not be required in every case. A boiler will not operate properly for very long if the water
causes boiler corrosion or scale. Even water which is safe to drink may be detrimental to a boiler. Refer to Water Quality
Requirements page for details.
Safety Requires Periodic Inspection and Maintenance
Any leaks around the boiler's hand hole plate must be quickly stopped. Small leaks, if unchecked, cause corrosion and
pitting on the boiler face, around the hand hole gasket making it unsealable.
Application of undue stress on the parts that are used to seal the boiler's hand hole opening, in an attempt to seal an
unsealable. opening, by sledging the handle of the wrench, by increasing the leverage of the wrench by a length of pipe.
or by other means, is dangerous because it may result in the breakage of parts, or injury. No attempts should be made to
tighten up the nut on the retaining stud beyond the recommended 15 foot pounds of torque.
When a repair affecting the safety of the boiler is necessary, call a National Board Inspector for consultation and advice
as to the best method of making the repair, so that the completed work will get his approval. Repairs to the boiler must
conform to the applicable provisions in the ASME Code or the National Board Rules for Repairs.
A boiler will last many years before it has to be retired from service. Periodic inspection will reveal the approaching
retirement time. It is better to schedule a convenient replacement time than to wait for the boiler to fail.
When a boiler older than 10 years is replaced, the entire steam generator base assembly should be replaced for a
number of reasons:
— Replacement parts become increasingly difficult to obtain for older controls.
— Dependable performance of the new controls can be assured for a longer time
— The new steam generator, including controls, will comply with the latest industry and safety standards.
CLEVELAND RANGE CO, 1333 EAST 179th ST., CLEVELAND, OHIO 44110
1086 LITHO IN U.S.A. Manufacturer reserves right of design improvement or modification, as warranted.
Page 4

PRESSURE STEAMER OPERATING INSTRUCTIONS
NOTE: These instructions pertain to steamers equipped with self-contained steam generators (boilers). For steamers directconnected to a remote (in-house) steam source, disregard those instructions which are directly and solely related to the selfcontained steam generator. These instructions are to be retained by the owner/user for future reference.
1A. Open the cabinet base door and close the drain valve if it is open.
B Make sure the hot and cold water supply valves are open
C. For steamers equipped with a gas-fired steam generator (boiler) follow the lighting instructions noted on the instruction
label displayed on the unit before continuing to instruction in item 2.
2. Flip the toggle switch on from of the cabinet console to "ON". The red console light should then glow and the boiler will
automatically begin filling with water (if it is not already full).
3. After approximately five minutes (after water appears in the sight gauge), depress the "START" reset button on the
console. This will energize the electric healer elements or ignite the gas burners. This cannot be accomplished until the
boiler is full of water.
4 in approximately 15 minutes you will notice the console's steam pressure gauge register 5 pounds. (10 pounds if the boiler
is also supplying steam to a kettle. The upper pressure gauge will register 5 pounds.) You can now preheat the cooking
compartments.
5 Compartments should be preheated before use and should be kept hot between loads. If a kettle and steamer are to be used
at the same time, always heat the kettle unit first. When kettle contents begin to simmer, preheat the steamer
compartments. When pressure on the boiler gauge returns to 10 pounds, cooking may begin in the steamer
6. Close and latch door securely. Turn bar handle clockwise until the door gasket just touches the compartment face
7. Start steam supply by pulling steam valve handle out. If fitted with automatic timer, set timer for 5 minutes. At the start,
compartment thermostatic traps should release air and wet steam for about two minutes, then shut off.
8. Seal compartment door by turning bar handle clockwise just until steam leakage stops. DO NOT OVERTIGHTEN
9. At the completion of the 5 minute preheating cycle, push steam valve slowly in, to avoid boilovers. This shuts off the steam
supply and also depressurizes and drains the compartment. If fitted with an automatic timer, the steam shuts off
automatically and a bell rings when the timer reaches zero. Setting the timer to "Off" stops the bell.
10. To open compartment door, turn bar handle counter-clockwise and delatch.
11. Cooking can now begin by following the above operating steps #6 through #10, but setting the timer tor the required
cooking time. At the end of a cooking cycle 40 minutes long or longer, or when defrosting frozen foods, wait at least two
minutes for the compartments) to depressurize and drain before opening the compartment door.
CAUTION: After each cooking cycle, ensure that all water is draining, and not accumulating in the
compartment. Should a drain become obstructed, it must be cleared before attempting to cook in that
compartment.
12. At the end of each day's operation, flip the console toggle switch to the "Blowdown" position, open the door in the cabinet
base and open the boiler drain valve, (red handle). This "Blowdown" drains the boiler and helps to keep it dean. When the
boiler is empty, flip the console toggle switch to the "OFF" position and dose the boiler drain valve.
13. It is recommended that the boiler be refilled with water after the "Blowdown" is performed. This can be accomplished by
flipping the toggle switch to the "ON" position for a period of five minutes and then returning the switch to the "OFF"
position.
TO PROLONG LIFE AND MINIMIZE SERVICE REQUIREMENTS
1. Blow down the steam generator daily.
2. A periodic boiler inspection must be performed by a qualified serviceman to prolong its life and to minimize service calls.
3. At the end of each day's operation, wash the pan slides, drain screen covers, door gaskets, and compartment interiors with
mild detergent and warm water. Thoroughly rinse with dean water. Rinse water should drain freely through the compartment
drain openings. if it does not the drain must be cleaned before using the steamer.
4. Once a week, flush each compartment drain with a food service equipment drain cleaner and a deliming solution
5. Once every three months, shut off the water supply (hot and cold), and clean the water line strainers.
6. Compartment thermostatic traps can be disassembled and cleaned, by hand or in a mechanical dishwasher. This procedure is
recommended if the traps act sluggishly, as they may if contaminated by grease or other film. If cleaning fails to restore the
trap's proper functioning, replace the trap. For more detailed thermostatic trap servicing instructions, refer to Data Sheet
260-LH.
LITHO IN U.S.A. 0388
CLEVELAND RANGE, INC., 1333 EAST 179th ST., CLEVELAND, OHIO 44110
Manufacturer reserves right of design improvement or modification, as warranted.
Page 5
7 Shelves, drain screens, and pan slides are stainless steel, and car be washed safely in a mechanical dishwasher.
8. Exterior Care: Allow steamer to cool before washing. Use the same cleaners and cleaning procedures as for other kitchen
surfaces of stainless steel and aluminum. Mild soapy water, with a clear water rinse, is recommended. Do not allow water to
run into electrical controls. Always turn off equipment power before using water to wash equipment.
9 Compartment Door Care:
3 When doors are closed for preheating or cooking, turn bar handle just enough to stop steam leakage. Over-tightening
shortens gasket life.
a. When doors are open or unlatched, do not turn bar handle
b. Always leave compartment doors ajar when not in use, to extend gasket Iife and to prevent gaskets from adhering to the
steamer. Unnecessary compression of a gasket shorten its life.
c Keep bar handle screws clean. Lubricate frequently but not excessively.
d. Door gaskets provide many months of service when care is taken to operate doors properly. When a gasket finally wears
and does not maintain an effective seal, it must be replaced. Door gaskets can be replaced easily without special tools or
cement, and the steamer may be used immediately afterwards. Remove the old gasket and clean the channel, being careful
not to damage the channel. The new gasket can then be pressed into place. Insert the gasket in the comers of the channel
first, adjusting the slack evenly between the comers. Then work from the corners to the center. Ridges hold the gasket
firmly. The gasket is designed to be oversize, so once it is compressed into the door's channel, it remains firmly in place.
PRESSURE STEAMER SAFETY
FOR YOUR SAFETY
Do not store or use gasoline or other
flammable vapors and liquids in the
vicinity of this or any other appliance.
Being the owner of a steamer carries with it the responsibility for keeping it in as safe a condition as when it was shipped from the
factory. Safe steamer operation dictates that every pressure steamer must have the following safety inspection at least every 12
months.
1 Steam Valve Linkages
Have a qualified serviceman examine the steam valve linkages which are attached to the inlet and exhaust valves' operating
handles on the left side of the steamer. This pivoted linkage, which is attached to both the steam inlet valve and the steam
exhaust valve, must prevent the door's latch from disengaging from its catch when the steamer compartment is pressurized. It is
important that the linkage operates as described so that the steamer door cannot be opened when the compartment is
pressurized.
It is also important that when the steam valve is closed, the exhaust valve should open. The proper operation of the steam inlet
valve and the steam exhaust valve should be confirmed and observed white the steam is on.
2. Pressure Gauge Check each pressure gauge. Gauge pointer must return to zero when the steam generator is shut down. Look
for signs of water, rust, corrosion, or scale, inside the pressure gauge A faulty pressure gauge should be replaced immediately
3. Door Gaskets
Inspect and replace compartment door gaskets once a year, or sooner if they are torn or hardened. The use of a hardened gasket
produces undue stress in the parts which comprise the door enclosure and may result in breakage and injury.
4. Compartment Thermostatic Trap
Observe compartment thermostatic traps for proper operation. A good compartment trap, at start-up of a cooking cycle, is
normally open and releases air and wet steam briskly for a few minutes, then holds steam within compartment If brisk venting
doesn't begin immediately at start-up, or if brisk venting continues without stopping, and the compartment trap is over a year
old, it should be cleaned, or a new one installed. Refer to data sheet 260-LH for details.
5. Compartment Steam Exhaust Valves and Drain Valves
Make sure that the compartment steam exhaust valves, and the drain lines attached to them, are free of food build-up internally
and are venting freely to the atmosphere. If drain lines from other steam-consuming equipment. have been connected to the
drain line from the steamer, the other drain lines should be disconnected. Never operate a compartment without the drain screen
cover in place.
6. Refer to separate data sheets for steam generator operation, maintenance, and safety procedures.
WARNING
Service of steam cooking equipment should only be performed by a trained and experienced service technician,
thoroughly familiar with servicing steam equipment. No work should be performed on the steamer while it is
pressurized or hot Be sure all energy sources are shut off before the start of any work When maintenance or repairs
are required, contact a local food service equipment service agency, or call the factory, or a factory representative, for
the name and address of one in your area.
CLEVELAND RANGE, INC., 1333 EAST 179th ST., CLEVELAND, OHIO 44110
Manufacturer reserves right of design improvement or modification, as warranted.
Page 6
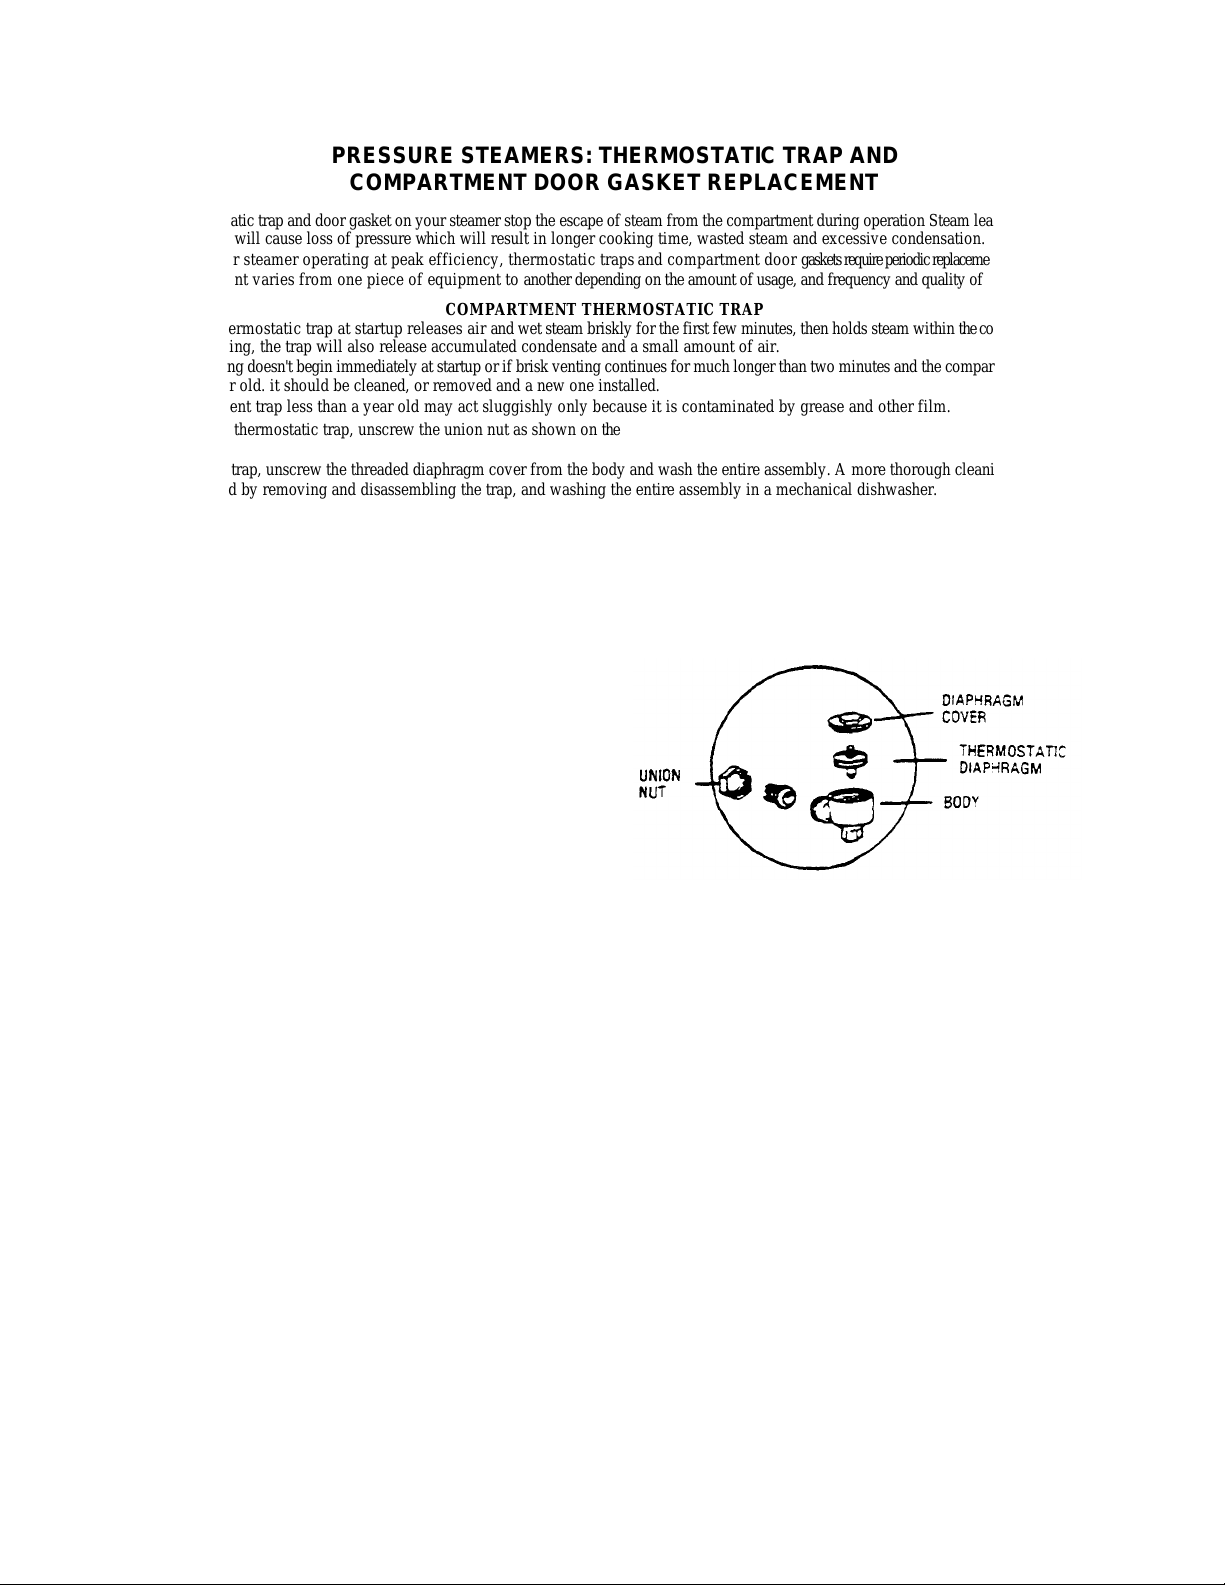
PRESSURE STEAMERS: THERMOSTATIC TRAP AND
COMPARTMENT DOOR GASKET REPLACEMENT
The thermostatic trap and door gasket on your steamer stop the escape of steam from the compartment during operation Steam leakage from
either source will cause loss of pressure which will result in longer cooking time, wasted steam and excessive condensation.
To keep your steamer operating at peak efficiency, thermostatic traps and compartment door gaskets require periodic replacement. Frequency
of replacement varies from one piece of equipment to another depending on the amount of usage, and frequency and quality of maintenance.
A normal thermostatic trap at startup releases air and wet steam briskly for the first few minutes, then holds steam within the compartment.
During cooking, the trap will also release accumulated condensate and a small amount of air.
If brisk venting doesn't begin immediately at startup or if brisk venting continues for much longer than two minutes and the compartment trap
is over a year old. it should be cleaned, or removed and a new one installed.
A compartment trap less than a year old may act sluggishly only because it is contaminated by grease and other film.
To remove a thermostatic trap, unscrew the union nut as shown on the
sketch.
To clean the trap, unscrew the threaded diaphragm cover from the body and wash the entire assembly. A more thorough cleaning can be
accomplished by removing and disassembling the trap, and washing the entire assembly in a mechanical dishwasher.
With proper tools, the threaded diaphragm cover can be unscrewed from the body, and the thermostatic diaphragm can be unscrewed from the
diaphragm cover. If the trap does not work properly after thorough cleaning. install a new one.
If the steamer is used heavily for cooking foods contain ing large amounts of fat or starch, periodic cleaning is recommended as a routine
procedure.
Replace the gaskets on compartment doors once
a year, or sooner if they are torn or hardened.
Door gaskets can be replaced easily without
special tools or cement, and the steamer may be
used immediately afterwards.
Remove the old gasket and clean the channel, being
careful not to damage the channel. The new gasket can
then be pressed into place.
Insert the gasket in the comers of the channel first adjusting
the slack evenly between the corners. Then work from the
comers to the center. Ridges hold the gasket firmly.
The gasket is designed to be oversize, so once it is
compressed into the door's channel, it remains firmly in place.
COMPARTMENT THERMOSTATIC TRAP
COMPARTMENT DOOR GASKET REPLACEMENT
WARNING
Service of steam cooking equipment should only be performed by a trained and experienced service technician,
thoroughly familiar with servicing steam equipment. No work should be performed on the steamer while it is
pressurized or hot. Be sure all energy sources are shut off before the start of any work. When maintenance or repairs
are required, contact a local food service equipment service agency, or call the factory, or a factory representative, for
the name and address at one in your area.
CLEVELAND RANGE CO., 1333 EAST 179th ST., CLEVELAND, OHIO 44110
Manufacturer reserves right of design improvement or modification, as warranted.
LITHO IN U.S.A.
Page 7
MECHANICAL COMPARTMENT CONTROLS MODEL J PRESSURE
STEAMERS-JAN. 1982 THRU PRESENT
Page 8
MECHANICAL COMPARTMENT CONTROLS MODEL J PRESSURE
2 22130
Valve. Safely,
8
PSI 3 70411
Tee, Special 3/4"
4
22140
Air Vent
6
42276
Inlet Manifold Ass'y.
—2-
Compt.
—
Mech. "J", Less Valves
42277
Inlet Manifold Ass'y,
—3-
Compt,
—
Mech. "J", Less Valves
6
07173
Gauge. Pressure. Rear Mount,
0-30
PSI
7 42288
Exhaust Manifold Ass'y.
—2-
Compt, Model "J". Less Valves
42289
Exhaust Manifold Ass'y.
—3-
Compt,, Model "J
", Less Valves
8 02146
"Y"Bend
9 05263
Ell,3/4
"
Radiator Union
10
20551
Thermostatic Trap
—
Plain End
11 05252
Ell, 1/2" Street
13
22213
Valve,
1"
Bullerlly, Exhaust Steam
14 41100
Drain Cover Screen
A 43765
Bus
hing Ass'y.,
B
40679
Linkage Ass'y., Model "J"
C
42697
Conversion Kit, Inlet Valve
—
"J" Mech., Includes:
1/2" Inlet Steam Valve,1/3" Street Elbow,1/2" x
6"
Nipple,1/2" x 2 1/4"
Special Nipple,
(2)
Locknuts,
(2)
Sealing Washers
D 40710
Conversio
n Kit, Exhaust Valve, Includes:
1"
Exhaust Steam Valve,
(2) 1"
x 3/4" Bushings,
3/4" Close Nipple, Drain
Cover Screen.
STEAMERS-JAN. 1982 THRU PRESENT
REFERENCE
NUMBER
1 4065O Pull Rod Handle
12 22212
PART NUMBER DESCRIPTION
Valve, 1/2" Ball, Inlet Steam
NOTE: FOR SAFETY PURPOSES, DRAIN SCREEN COVER MUST BE IN PLACE WHEN OPERATING
EQUIPMENT.
Page 9
AUTOMATIC COMPARTMENT CONTROLS
MODEL J PRESSURE STEAMERS-DEC. 1977
THRU PRESENT
Page 10
AUTOMATIC COMPARTMENT CONTROLS MODEL J PRESSURE
Ftng..
(2) 1/2" Close Nipples,
1/2"
x
2 1/4
Special Nipple,
1/2" x
1/2" x
3
/8
STEAMERS-DEC. 1977 THRU PRESENT
REFERENCE NUMBER PART NUMBER DESCRIPTION
1 40860 Pull Rod Handle
2 22130 Valve, Safely. 8 PSI
3 70411 Tee, Special 3/4"
4 22140 Air Vent
5 42296 Inlet Manifold Ass'y.—2-Compt.—Auto "J", Less Valves
42297 Intel Manifold Ass'y.—3-Compt.—Auto "J", Less Valves
6 22115 Valve,1/2" Steam Inlet Solenoid
7 03278 Valve, Steam By-Pass
8 42288 Exhaust Manifold Ass'y.—2-Compt., Model "J", Less Valves
42289 Exhaust Manifold Ass'y.—3-Comt„ Model "J", Less Valves
9 43764 "Y" Bend—with 1/4" Tapped Hole
10 05263 Ell, 3/4" Radiator Union
11 20551 Thermostalic Trap—Plain End
12 22199 1/4" Solenoid Valve, Auto Exhaust, 115 Volt, For Use With 40518 Timer
22185 1/4" Solenoid Valve, Auto Exhaust, 115 Volt, For Use With 40540 Timer
13 07172 Gauge, Pressure, Bottom Mount, 0-30 PSI
14 40518 Timer, 60 MIn, Mechanical (Mfg. #70000)
15 19977 Switch—SPST
16 12161 Light, Signal
17 07173 Gauge, Pressure, Rear Mount, 0-30 PSI
18 41350 Buzzer
19 40540 Timer, 105 MIn. (Mfg 601)
20 22212 Valve, 1/2" Ball, Inlet Steam
21 22213 Valve, 1" Butterlly. Exhaust Steam
22 41100 Drain Cover Screen
A 43765 Bushing Ass'y.,
B 40879 Linkage Ass'y., Model "J"
C 40712 Conversion Kit, Inlet Valve—"J" Auto, Includes;
1/2 Inlet Steam Valve,1/2" Street Elbow, 3/8" Tube Ftng , 3/8 — 90° Tube
D 40710 Conversion Kit, Exhaust Valve, Includes:
NOTE: FOR SAFETY PURPOSES, DRAIN SCREEN COVER MUST BE IN PLACE WHEN OPERATING EQUIPMENT
3/8" x 12" Tube, (2) Locknuts, (2) Sealing Washers
1" Exhaust Steam Valve, (2) 1" x 3/4" Bushings, 3/4" Close Nipple, Drain
Cover Screen.
Page 11
MODEL J DOOR AND DOOR ARM ASSEMBLY
1 253021
Door Arm W/Bushings, Polished
2 02568
Door Ann Hinge Bushing
(2
Required)
3
41370
Standard Door Arm Screw With Ball
(1" x 8
thread)
41371
Oversize Door Arm Screw W
ith Ball (1 3/32" x
8
thread)
4
081001
Screw Handle Bar, Polished
5
16305
Pin 6 15250
Oil Cup
7
41360
Striker Plate and Pin
8
43723
Door Hanger w/Screws and Washers
(2
Required)
9
53035
Door Ann Insert. Stainless
10
04162
Polished Aluminum Door, Les
s Gasket
11
07136
Door Gasket
— Rubber
12
68140
Retainer, Yoke Hanger
(2
Required)
13
19228
Screw
14
23182
Washer
15
122001
Door Ann Latch, Chrome Plated
16
163141
Door Arm Latch Pin, Chrome Plated
17
18306
Retainer Clip,
(2
Required)
18
023001
Doo
r Ann Hinge Post Bolt (Upper)
— Concentric Type
— 19
023061
Door Ann Hinge Post Bolt (Lower)
— Eccentric Type
— 20
14643
Nut, For Lower Hinge Post Bolt
21
23181
Shim Washers
REFERENCE
NUMBER
PART NUMBER DESCRIPTION
CLEVELAND RANGE CO., 1333 EAST 179th ST., CLEVELAND, OHIO 44110
Manufacturer reserves right of design improvement or modification, as warranted.
Page 12
MODELS B, C, F, K PRESSURE STEAMERS DOOR
25304
Door Arm With Bushings
— Model F
&
K, Polished
2
02568
Door Ann Hinge Bushing
(2
Re
quired)
3
41370
Standard Door Ann Screw With Ball
(1" x 8
thread)
41371
Oversize Door Arm Screw With Ball 1 3/32" x
8
thread)
4
081001
Screw Handle Bar, Polished
5
16305
Pin 6 15250
Oil Cup
7
122011
Door Ann Latch
— Model B, C,
&
F Chrome Plated
122021
Door Ann Latch
— Model K Chrome Plated
8
101018
Door Ann Latch Pin
— Model B, C, F,
&
K Brass
163101
Door Ann Latch Pin
— Model B, C, F,
&
K Chrome Plated
9
081031
Door Retainer
— Model B, C, F,
&
K Chrome Plated
10
19291
Screw
11
041631
Doo
r, Model B Polished
04164
Door, Model C Polished
04165
Door, Model F
&
K Polished
12
07132
Door Gasket
— Rubber, Model B
07134
Door Gasket
— Rubber, Model C, F, K
13
023001
Door Arm Hinge Post Bolt (Upper)
— Concentric Type
— 14
023061
Door Ann
Hinge Post Bolt (Lower)
— Eccentric Type
— 15
14643
Nut, For Lower Hinge Post Bolt
16 23181
Shim Washer
17 40547
60 Minute Bell Timer Assembly
18
08601
Timer Housing
— Model B
&
C Polished (Not Available)
AND DOOR ARM ASSEMBLY
REFERENCE
NUMBER
1 25303 Door Ann With Bushings — Model B & C, Polished
PART NUMBER DESCRIPTION
08606 Timer Housing — Model F Polished (Not Available)
CLEVELAND RANGE CO., 1333 EAST 179th ST., CLEVELAND, OHIO 44110
Manufacturer reserves right of design improvement or modification, as warranted
Page 13
MODELS J AND K PRESSURE STEAMER
SLIDE SETS
REFERENCE NUMBER PART NUMBER DESCRIPTION
1 41440 Pan Support Slide Set, Model J Complete
41442 Pan Support Slide Set, Model K Complete
2 41430 Right or Left Side Slide Rack. 2 Per Compt Req'd. Model J
41432 Right or Left Side Slide Rack, 2 Per Compt Req'd, Model K
3 41435 Center Slide Rack Model J, 1 Req'd Per Compt
41437 Center Slide Rack Model K, 1 Req'd Per Compt
4 19909 Replacement Top Studs (Screw-In) J or K (Set of 6)
CLEVELAND RANGE, INC., 1333 EAST 179th ST., CLEVELAND, OHIO 44110
Manufacturer reserves right of design improvement or modification, as warranted.
Page 14
START-UP MAINTENANCE PROCEDURES — STEAM GENERATOR
IMPORTANT: These instructions must be
followed in order to prevent premature failure of
the steam generator.
START -UP:
1) Open the cabinet base door and close the drain valve if it is
open. (Red handle lever marked "blowdown".)
2) Rip the toggle switch on front of the cabinet console to
"ON" (up position). The red console light should then glow
and water will automatically begin filling the generator.
3) When the water level in the sight gauge glass (on the
generator) reaches approximately 2/3 full (after approximately
five minutes), depress the "ON" reset button or the console.
This will energize the electric heater elements or ignite the gas
burner, If the sight gauge glass shows no stabilized water
level, i.e.. the gauge glass is completely empty or completely
filled, have the generator serviced.
4) In approximately ten minutes you will notice the steam
pressure gauge, on the console, register the steam pressure
contained inside the generator.
5) Cooking may now begin. Refer to "Cooking" and
"Operating Procedure" data sheets for specific instruc tions.
MAINTENANCE:
1) At the end of each day's operation, while the generator is
pressurized, flip the console toggle switch to the "Blowdown "
position, open the door in the cabinet base and open the
generator's drain valve, (red handle). This "Blowdown"
procedure drains the water out of the generator and helps to
prevent lime scale formation. When the generator is empty,
flip the console toggle switch to the "OFF" position and dose
the generator's drain valve. It is recommended that the
generator be refilled with water after the "Blowdown" is
performed. This can be accomplished by flipping the toggle
switch to the "ON" position for a period of five minutes and
then returning the switch to the "OFF" position.
CAUTION: Service on the generator should only be
performed by a trained and experienced service
technician, thoroughly familiar with servicing steam
generators. No work should be done on the steam
generator while it is pressurized or hot. Be sure all energy
sources are shut oft before the start of any work.
2) Even though the "Blowdown" is performed faithfully each day,
it will still be necessary to periodically inspect the inside of the
generator. The generators hand hole plate should be removed at
regular intervals, so that it and the inside can be inspected. The
hand hole plate should be cleaned and examined each time it is
removed. If the hand hole plate is chipped or cracked, or over three
years old. install a new one. Replace the corrosion resistor(s) if
necessary, and chemically de scale the generator if it is coated with
lime scale. A new hand hole gasket should always be installed.
3) It will be necessary to periodically have scale accumulations
removed from the inside of the steam generator. by a qualified
service technician. Generator descaling instructions are provided
on a separate data sheet Failure to periodically remove scale from
the inside of the generator will result in greatly reduced generator
life.
4) Every steam generator is equipped with at least one corrosion
resistor to reduce generator shell corrosion and scaling. This
corrosion resistor is sacrificial and must be replaced at regular
intervals just before it is entirely consumed. In areas where the
water is very hard. the feedwater must also be treated to remove the
harmful mineral content
Refer to separate data sheets for corrosion resistor servicing
instructions, feed water treatment information. and hand hole plate
servicing instructions.
5) Check the safety valve once a week while steam generator is
pressurized. Test by pulling safety valve extension wire. Valve
must open freely and snap closed when released. If it does not or if
it drips constantly, a new safety valve is needed.
6) If the steam generator is to be left idle for three months or more,
it should be drained and dried out and the hand hole plate left on.
7) Water level in the sight gauge normally should be about 2/3 full.
This level is maintained automatically.
Refer to separate data sheet or either mechanical or water fill
servicing instructions.
8) If gas fired. the lighting instructions are on the AGA rating plate.
Pilot burner is lit through hole in panel at bottom of steam
generator. This panel should never be left off as this will damage
the controls. Burners will not light without water in the steam
generator.
CLEVELAND RANGE CO., 1333 EAST 179th ST., CLEVELAND, OHIO 44110
Manufacuter reserves right of design improvement or modification, as warranted.
Page 15
WATER QUALITY REQUIREMENTS — STEAM
GENERATOR PROTECTION AND MAINTENANCE
A steam generator, or broiler, unlike other types of water-using
kitchen equipment, distills the water in order to make steam.
Nearly all feed-water sources contain dissolved minerals in
varying degrees of concentration. As this water is boiled, pure
steam rises from it's surface, upward to the cooking
compartment(s), leaving minerals behind that can become
harmful to the steam generator. If minerals are allowed to
accumulate inside t he steam generator, they will solidify as a
scale. Then, malfunctioning will occur, and serious equipment
damage may result.
The use of good quality generator feed water is the responsibility
of the owner/user. The use of poor quality feed water could void
equipment warranties. The minimum treatment required in most
areas is water softening,although local water conditions may
require more intensive pretreatment than simply a water softener.
Scale problems occur when feed water is high in hardness,total
dissolved solids,silica,and alkalinity. Watersoftening will only
reduce the water's hardness, which is the presence of dissolved
salts of magnesium and calcium. Water softening will not affect
the multitude of other minerals found in most water supplies.
Because generator scale is the result of of the precipitation of
many minerals. the best property to control, for the generator feed
water, is total dissolved solids, not just hardness.
The recommended minimum water quality standards,
wheter untreated or pre-treated, based upon 10 hours of
use per day, and a Daily Blowdown, are as follows:
TOTAL DISSOLVED SOLIDS — less than 60 parts per million
TOTAL ALKALINITY less than 27 parts per million
SILICA less than 13 parts per million
pH FACTOR greater than 7.5
Consult a local water treatment specialist for an on-the-premises
water analysis and tor recommendations concerning steam
generator feed water treatment (If required). in order to remove or
reduce harmful concentrations of minerals.
If the recommended water quality requirements are met without
supplemental treatment, or if treatment is applied, resulting in
teed water quality meeting the prescribed standards, the steam
Generator will need to be blown down only once each day. In
addition, the inside of the generator requires an inspection (for
excessive lime accumulation and consumed corrosion resistors)
only once every six months. Replace the corrosion resistors s) ana
chemically descale the generator as required.
If a pre-treatment unit cannot be installed and the recommended
water quality requirements are not met. the following procedures
should be followed, in order to achieve maximum steam
generator service life. The steam generator should be blown down
after each 6 hours of use. Have the steam generator inspected,
inside ana outside, by a qualified technician every 3 months. If
the corrosion resistor(s) is totally, or nearly consumed. replace it.
If the inside of the generator is heavily coated with scale, have if
chemically descaled by a qualified service technician
INSTRUCTIONS FOR CHEMICALLY
DESCALING STEAM GENERATORS.
WARNING: Steam under pressure may
cause serious injury and bodily harm when
it is accidently or carelessly released.
Improper handeling of acid could cause
serious, permanent injury. Therefore,
service of the steam generator should only
be performed by trained and experienced
personnel, thoroughly familiar with
servicing generators.
There are a number of commercial descaling chemicals
available. produced by various manufacturers. Those
utilizing a sulfamic acid base. which can be identified py its
powdered form, are safe and compatible with our food
preparation equipment, It is imperative that the acid used
for descaling be FDA approved, for use in food preparation
equipment. Various manufacturers may include additional
chemicals to increase potency and therfore, Instructions for
a specific brand should be followed— carefully. If
instructions are not provided with the deliming chemical
you purchase. the following general guidelines— may be
followed.
WARNING: Exercise care when handeling acid. Avoid
contact with skin, eyes, or clothing. Wear safety
glasses or face shield, along with rubber gloves and
rubber apron In case of exposure to clothing, remove
clothing and flush with water. In case of exposure to
skin or eyes, flush with water tor 15 minutes end get
immediate medical attention. Don not take internally.
Keep out of reach of children.
Be sure the generator has been drained, depres-surized,
and is cool. Open the hand hole access plate on me front of
the generator place approximately 8-10 pounds of sulfamic
acid inside the generator. Put a new hand note gasket on the
hand hole plate, and replace the hand hole plate, tightening
the bar and nut assembly to a maximum of 15 foot pounds
torque. The generator must be completely filled with hot
water (fill the generator beyond its normal, automatic fill point
of 2/3 up in (he sight gauge). On mechanical fill generators.
this can be accomplished by adding weight to the float. or
removing the float, and regulating the fill level with a hand
valve in the water supply plumbing. On electric fill generators
(with probes), this can be accomplished by temporarily
jumpering terminals #3 & #4 of the water control relay. Turn
the main on-off toggle switch to the "ON" position, then turn
the switch to the "OFF" position when the generator is
completely filled. Let the solution stand for several hours,
then flush with water Rinse with a solution of bicarbonate of
soda to neutralize any acid residue, and again, flush with
water.
CAUTION: Never tighten the hand hole plate nut when
the steam generator is in use, hot or otherwise
pressurized. Never tighten nut over 15 pounds torque.
Overtightening may cause uneven stress, which may
result in the weakening and possible breakage of the
plate.
CLEVELAND RANGE CO., -1333 EAST 179th ST.. CLEVELAND, OHIO 44110
Manuafcturer reserves right of design improvement or modification as warranted.
Page 16
MAINTENANCE INSTRUCTIONS FOR
Distribution of hard water in the
0-60 parts per
million
WARNING: Steam under pressure may cause
serious Injury and bodily harm when It is acciden tally
or carelessly released. Therefore, service of the steam
generator should only be performed by trained and
experienced personnel, thoroughly familiar with
servicing steam generators.
CAUTION: Never work on the steam generator when
It is hot or pressurized.
Every steam generator shipped is equipped with at least
one corrosion resistor (cathodic). The larger capacity
steam generators will have two corrosion resistors
The hand hole plate and gasket on your steam genera tor
stops the escape of steam through the hand hole
opening during operation.
1) Turn of all energy sources to steam generator.
Drain steam generator
2) Remove hand hole cover plate from steam
generator.
3) Hang corrosion resistor from the right side of the front
stay rod. away from the probes. Clean scale and rust off
a portion of the stay rod. so the hanger will rest on the
bright, bare metal
4) Re-install the hand hole plate, along with a new
gasket.
The hand hole plate should be cleaned and examined
every time it is removed. If the hand hole plate is chipped
or cracked, or over three years old. install a new one.
Because continuous use and possible abuse cause
metal fatigue which weakens the hand hole plate. a new
one should be installed at least every three years.
CAUTION: Never tighten the hand hole plate nut
when steam generator is in use, hot, or otherwise
pressurized. Never tighten nut over 15 footpounds
torque. Overtightening may cause uneven stress,
which may result In the weakening and possible
breakage of the plate.
U.S. is shown on map. right. Areas
shown in black have hardest
water, while relatively soft water is
found in white areas. Shaded areas
require supplemental teed water
treatment to remove or to reduce
the hardness.
This map is a general representation and exceptions do exist.
Consult a local water treatment
specialist for a water sample test.
60-120 parts per million
120-180 parts per million
above 180 parts per million
Manufacturer reserves right of design improvement or modification as warrantee
STEAM GENERATORS
(EXCEPT THOSE EQUIPPED WITH TWO PROBES)
Replace the gasket whenever the hand hole plate is
removed or replaced. Keep a spare gasket on hand at all
times.
Replace the gasket at least once a year. or sooner if it is
cracked, torn or hardened.
Leakage of water past the hand hole plate should not be
allowed to continue, as this will cause pitting of the
metal in contact with the gasket.
5) After re-installing the hand hole plate, close the steam
generator drain valve. Turn on energy sources.
6) Start up and operate steam generator long enough to
observe that it is operating properly.
The corrosion resistor is sacrificial and must be replaced
at regular intervals just before it is entirely consumed.
Frequency of replacement can only be established by a
regular inspection for how much of the protector remains
and whether scaling or pitting has begun. Scaling
indicates a very hard water condition Pitting indicates an
excess acid condition. In either case. more protectors or
more frequent replacement of them is necessary. The best
way to reduce servicing time and to assure long generator
life is to provide feed water that is low in solids content
and low in gas content. Water that is fit to drink can still
be high in impurities that are highly detrimental to a steam
generator Consult a water treatment specialist in your
area for recommendations concerning steam generator
feed water treatment.
Under average conditions, the corrosion resistor provides
about six months of service. An average condition would
meet each of the following tests:
1) Less than 8 hours of steam generation a day.
2) One generator blowdown every day.
3) Moderately hard water. Less than 85 ppm.
4) Water containing less than 60 ppm Total Dissolved
Solids.
CLEVELAND RANGE CO., 1333 EAST 179th ST., CLEVELAND, OHIO 44110
Page 17
STEAM GENERATOR (BOILER) IDENTIFICATION
SERVICE NOTE
The above drawings showing the sight
gauge location and method of mounting
are tor assisting in determining the
proper part number tor replacement
generators. When ordering, please
provide both the proper part number
and the equipment's serial number.
Page 18
STEAM GENERATOR (2 PROBE TYPE) MAINTENANCE PROCEDURES
CAUTION: Service on the generator must be performed only by a trained
and experienced service technician, thoroughly familiar with servicing
steam generators. No work should be done on the steam generator while it
is pressurized or hot. Be sure all energy sources are shut off before the
start of any work.
The steam generator must be drained under pressure (blowdown) after a maximum of 8 hours of use. If the generator's
feedwater contains more than 300 parts per million of total dissolved solids, the generator must have a blowdown after each
4-6 hours of use. "Blowdown" means the generator must be drained under pressure.
THE GENERATOR "BLOWDOWN" IS PERFORMED BY SHUTTING OFF THE UNITS RED-LIGHTED "POWER"
SWITCH WHILE THE GENERATOR IS AT NORMAL OPERATING PRESSURE- WHEN THE BOTTOM OF THE
"POWER" ROCKER SWITCH IS PUSHED, ITS RED LIGHT GOES OUT. AND THE DRAIN VALVE
AUTOMATICALLY OPENS. DRAINING THE GENERATOR- AN AUTOMATICALLY-TIMED SOLENOID VALVE
WILL FLUSH THE DRAIN FOR 3 MINUTES. THEN SHUT OFF. AFTER 3 MINUTES, THE UNIT CAN BE
RESTARTED.
Even though the "Blowdown" is performed faithfully each day. it will still be necessary to have a qualified service technician
periodically inspect the inside of the generator for scaling or pitting. The generator's hand hole plate should be removed at
regular intervals, so that it and the inside of the generator can be inspected The hand hole plate should be cleaned and
examined each time it is removed. If the hand hole plate is chipped or cracked, or over three years old, install a new one. A
new hand hole gasket should always be installed.
Scaling indicates a high concentration of dissolved minerals in the feed water. Pitting indicates an excess acid condition. The
best way to reduce servicing time and to assure a long generator life is to provide feed water that is low in mineral content
arid low in gas content Water that is fit to drink can still be high in impurities that are highly detrimental to a steam
generator. Consult the state department of water for an on the premises water analysis and for recommendations concerning
steam generator feed water treatment (if required), in order to remove or reduce harmful concentrations of minerals.
CAUTION: Never tighten the hand hole plate nut when the steam
generator is in use, hot, or otherwise pressurized. Never tighten
nut over 15 foot-pounds torque. Overtightening may cause
uneven stress, which may result in the weakening and possible
breakage of the plate.
The "Blowdown" procedure will not completely remove the mineral deposits that adhere to the top of the
generator.
It will be necessary to periodically have scale accumulations removed from the inside of the steam generator
by a qualified service technician. Only a U.S.D.A. approved acid cleaner should be used to descale the
generator.
Descaling should be done once a year, but in poor water (highly mineralized) areas it may be needed two or three times a
year.
Failure to periodically remove scale from the inside of the generator will result in greatly reduced generator
life.
Check the safety valve once a month while the steam generator is pressurized- Test by pulling the safety valve
lever. The valve must open freely and snap closed when released- If it does not, or if it drips constantly, a new
safety valve is needed.
If the steam generator is to be left idle for three months or more. it should be drained and dried out and the
hand hole plate left off.
CLEVELAND RANGE, INC. 1333 EAST 179th ST., CLEVELAND, OHIO 44110
0485 LITHO IN U.S.A. Manufacturer reserves right of design improvement or modification, as warranted.
Page 19
WATER QUALITY REQUIREMENTS — 2-PROBE
TYPE STEAM GENERATOR PROTECTION
AND MAINTENANCE
A steam generator, or boiler, unlike other types of water-using
kitchen equipment, distills the water in order to make steam.
Nearly all feed-water sources contain dissolved minerals in
varying degrees of concentration. As this water is boiled, pure
steam rises from its surface, upward to the cooking
compartments), leaving minerals behind, that can become harmful
to the steam generator. If minerals are allowed to accumulate
inside the steam generator, they will solidify as a scale. Then,
malfunctioning will occur, and serious equipment damage may
result.
The use of good quality generator feed water is the responsibility
of the owner/user. The use of poor quality feed wat er could void
equipment warranties. The minimum treatment required in most
areas is water softening, although local water conditions may
require more in tensive pretreatment than simply a water softener.
Scale problems occur when feed water is high in hardness, total
dissolved solids, silica and alkalinity. Water softening will only
reduce the water's hardness, which is the presence of dissolved
salts of magnesium and calcium. Water softening will not affect
the multitude of other minerals found in most water supplies.
Because generator scale is the result of the precipitation of many
minerals, the best property to control, for generator feed water, is
total dissolved solids, not just hardness.
The recommended minimum water quality standards. whether
untreated or pre-treated, based upon 8 hours of use per day. and a
Daily Blowdown , are as follows:
TOTAL DISSOLVED SOLIDS less than 60 parts per million
TOTAL ALKALINITY less than 27 parts per million
SILICA less than 13 parts per million
pH FACTOR greater man 7.5
Consult the state department of water or a local water treatment
specialist for an on-the-premises water analy sis and for
recommendations concerning steam generator teed water treatment
(if required), in order to remove or reduce harmful concentrations
of minerals.
If the recommended water quality requirements are met without
supplemental treatment or if treatment is applied. resulting in feed
water quality meeting the prescribed standards, the steam generator
will need to be blown down only once every 8 hours. In addition,
the inside of the generator requires an inspection (for excessive
lime accumulation) only once every six months. Chemically
descale the generator as required.
If a pre-treatment unit cannot be installed, and the recommended
water quality requirements are not met the following procedures
should be followed, in order to achieve maximum steam generator
service life. The steam generator should be blown down after each
4-6 hours of use, have the steam generator inspected, inside and
outside, by a qualified technician every three months. If the inside
of the generator is heavily coated with scale, have it chemically
descaled by a qualified service technician.
INSTRUCTIONS FOR CHEMICALLY DESCALING
2-PROBE TYPE STEAM GENERATORS
WARNING: Steam under pressure may cause serious
injury and bodily harm when it is accidentally or
carelessly released. Improper handling of acid could
cause serious, permanent injury. Therefore, service of
the steam generator should only be performed by
trained and experienced personnel, thoroughly familiar
with servicing generators.
There are a number of commercial descaling chemicals available,
produced by various manufacturers. Those utilizing a sulfamic acid
base, which can be identified by its powdered form. are safe and
compatible with our food preparation equipment It is imperative
that the acid used for descaling be FDA approved, for use in food
preparation equipment Various manufacturers may include
additional chemicals to increase potency, and therefore.
instructions for a specific brand should be followed carefully. If
instructions are not provided with the deliming chemical you
purchase, the following general guidelines may be followed.
WARNING: Exercise care when handling acid. Avoid
contact with skin, eyes, or clothing. Wear safety glasses
or face shield, along with rubber gloves and rubber
apron. In case of exposure to clothing, remove clothing
and flush with water. In case of exposure to skin or eyes,
flush with water for 15 minutes and get immediate
medical attention. Do not take internally. Keep out of
the reach of children.
Be sure the generator has been drained, de -pressurized. and is cool.
Open the hand hole access plate on the front of the generator and
place approximately 8-10 pounds of sulfamic acid inside the
generator. Put a new hand hole gasket on the hand hole plate, and
replace the hand hole plate, tightening the bar and nut assembly to
a maximum of 15 foot pounds torque. The generator must be com-
pletely filled with water (fill t he generator beyond its normal,
automatic fill point of 2/3 up in the sight gauge). This can be
accomplished by temporarily disconnecting the wire from the water
level probe at the water level control board. The board is marked
"HI" at this connection point Turn the main on-off rocker switch to
the "ON" position, then close the manual water feed valve when
the generator is completely filled. Leave the on-off rocker switch in
the "on" position to prevent the generator from automatically
draining. Reconnect the probe wire to the "HI" terminal of the
water level control board. Let the solution stand for several hours,
then flush with water. Rinse with a solution of bicarbonate of soda
to neutralize any acid residue, and again, flush with water. Be sure
to reconnect the wire to the water level control board and to open
the manual water teed valve.
CAUTION: Never tighten the hand hole plate nut when
the steam generator is in use, hot, or otherwise
pressurized. Never tighten nut over 15 toot-pounds
torque. Overtightening may cause uneven stress, which
may result in the weakening and possible breakage of
the plate.
Page 20
Descaling Procedure for Two-Probe Steam Generators
The steam generator should be descaled at least once
a month, depending on scale buildup. If you have
serious steam generator scale buildup, install a water
treatment system for the steamer. Cleveland Range
recommends use of the descaling kit, part number
40891, which consists of powdered sulfamic acid. Full
descaling may take several hours, or more than one
add process. Perform des caling until all scale buildup
is cleaned out.
(50-50). Mis and add water if necessary to form slurry.
Scoop up slurry and wash residue down drain with excess
water. Wash site with soda ash solution.
WARNING
The powdered sulfamic acid in descaling kit
40891 can be harmful if not handled properly.
Follow these basic safety rules for handling
and using add.
Follow hazard and leak cleanup procedures on add
container label. If the label is not readable or has been
removed, refer to the following hazard and emergency
instructions as a minimum safety precaution.
THESE INSTRUCTIONS ARE FOR USE WITH
POWDERED SULFAMIC ACID ONLY.
• Health Hazard Data, Effects of Overexposore -
Product is extremely irritating to the eyes and may
result in eye burns. Product is severely irritating to
skin and can result in skin burns; repeated or
prolonged contact with more dilute solutions may
result in dermatitis. Aerosol mist or vapors are
irritating to respiratory tract, eyes and throat.
Prolonged exposure to high concentration may result
in pulmonary edema If ingested, may result in
abdominal hemorrhage with severe abdominal pain,
nausea, vomiting or loss of consciousness; necrosis
of stomach and gastrointestinal tract may also occur.
• Emergency and First Aid Procedures - In
case of eye contact, immediately flush eyes with
plenty of water for at least 15 minutes. Seek medical
aid. In case of skin contact immediately wash with
soap and plenty of water for at least 15 minutes while
removing contaminated clothing. Seek medical aid. If
inhaled, remove to fresh air. If not breathing, give
artificial respiration. If breathing is difficult, give
oxygen. Seek medical aid. If swallowed, do not
induce vomiting. Give large quantities of water- Seek
medical aid. Never give anything by mouth to an
unconscious person.
•Spill or Leak Procedures - Contain spill Cover the
contaminated surface with sodium bicarbonate or a
soda ash-slaked lime mixture
Wear protective clothing when mixing or
applying chemical cleaners . Wear rubber
gloves, mask and approved cup-type goggles.
Avoid breathing fumes. If add comes in
contact with skin, flush immediately with large
quantities of cold water. Remove contaminated clothing.
If chemical contacts eyes, flush with cold
water for a minimum of 15 minutes. Get
immediate medical attention.
If chemical is swallowed or ingested, follow
instructions on the chemical container. Get
immediate medical attention.
CAUTION
Do not scrape heating elements with a solid
tool.
If the steamer is turned off, energize the steamer by
pressing the POWER switch to on. Allow time for the
steam generator to fill (3 to 4 minutes). This assures
that blowdown occurs.
1. Press the POWER switch to off.
2. Press the TIMED/MANUAL switch to TIMED.
Set timer to 0.
3. After completion of blowdown (3 minutes), turn
off power at the main disconnect switch.
4. Allow time for the steam generator and compart ment to cool down.
Page 21

Descaling Procedure (continued)
5. Turn off power at main disconnect switch.
6. Remove handhole plate.
7. Pour powdered sulfamic add into the steam gen-
erator.
8. Replace handhole plate.
9. Turn water off at manual 1/4-inch ball valve on base.
10. Remove control box cover.
11. Disconnect black probe wire from water board.
12. Turn power on at the main disconnect switch.
13. Turn POWER switch on base unit to on.
14. Turn water on at manual 1/4-inch ball valve.
15. Let steam generator fill to proper level (2/3 the way
up the sight glass), then turn off the manual fill
valve to stop generator fill
16. Start steam generator heat cycle. Let generator
heat up until it is hot to the touch.
17. When the steam generator is hot turn off the gas
package valve.
18. Turn on the generator fill. manual valve and, while
holding open the safety valve (pop off valve), let the
generator keep filling until water comes out the
safety valve.
19. Turn off the manual ball valve to the fill assembly
20. Let steam generator descale overnight or for any
eight (8) hour period.
After eight hour period:
21. Drain the generator with the manual 3/4-inch ball
valve.
22. Turn off electric power at the main disconnect
switch.
23. Remove handhole plate.
24. Pour in neutralizer (3 or 4 tablespoons of baking
soda).
25. Install handhole plate and tighten the bar and nut
assembly to a maximum of 15 foot pounds torque.
26- Close the 3/4-inch manual drain valve.
27. Open 1/4-inch manual ball valve to fill assembly.
28- Turn electrical power on at main disconnect switch.
29. Turn POWER switch on base unit to on.
30- Let unit fill until water comes out the safety valve.
31. Close 1/4-inch manual ball valve on fill assembly.
32. Let unit set for 5 minutes.
33. Open the 3/4-inch drain valve to blow down and drain
the steamer.
34. Turn POWER switch on base unit to off.
35. Turn power off at the main disconnect switch
36. Reconnect black probe wire to water board.
37. Replace control box cover.
38. Turn on manual ball valve to fill assembly.
39. Close 3/4-inch drain ball valve.
40.Turn power on at the main disconnect switch.
41. Turn POWER switch on base unit to on.
42. An amber light on the STEAM switch will light when
the water reaches the low cut -off probe.
43. Turn. on the STEAM switch to start the steam
generator for a test.
44. When pressure reaches 9 psi on the pressure gage
located on the steam generator console, open the
manual drain valve to blow down the generator under
pressure and test the low water cut -off.
45. Close the manual drain valve.
46. Refill generator and when amber light comes on, turn
on the steam switch to start the steam generator for
a test.
47. When the unit reaches 9 psi, turn off POWER switch
on console to test blowdown.
48. After blowdown has completed, refill generator and
restart heat cycle.
49. Unit is now ready for use.
Page 22

SERVICING INSTRUCTIONS STEAM
PRESSURE ADJUSTMENTS
WARNING: Adjustments must be made only by trained and experienced service personnel.
Normally there is no need to make pressure adjustments on a new steamer, because the proper settings are made at the factory.
In some cases however, the factory setting may shift due to shaking in transit, and resetting will be required after installation. The
factory pressure settings shown on the accompanying chart should never be exceeded.
For Gas and Electric Steam Generator
Steam pressure is controlled with two pressure switches,
located toward the upper-front of the cabinet, either to the
extreme left or extreme right
The left switch is the operating pressure switch. This switch
controls the pressure in the steam generator, which is the
pressure indicated on the steam generator pressure gauge.
The right switch is a high-limit, pressure safety control. It
breaks an electric circuit to shut off the energy source if the
steam pressure rises above a safe level. Each
switch has a screw on top of the case, to permit the pressure
set point to be adjusted without removing the cover. The
correct settings are shown in the accompanying chart The
pressure switch indicator scale is for reference only. Actual
pressure should be read on the pressure gauge, and the
pressure switch adjusted to produce the proper pressure
gauge reading.
Some models may also have a pressure reducing valve to
control the pressure in the steam line to the steamer. The
adjustment of this is discussed further on.
For Steam Coil Steam Generator
The steam supply to steam coil generators is controlled by
one of two methods. Steam generator pressure may be
controlled by a pilot operated pressure regulating valve. The
steam generator pressure can be adjusted by turning the
adjusting collar, identified on the sketch. A steel rod is
provided to turn the collar. The correct settings are shown in
the accompanying chart.
On steam coil generators equipped with an electric solenoid
valve to control the steam supply to the steam generator,
one or two pressure switches control the steam generator
pressure. To adjust the switch(es), turn the screw on the top
of the case to achieve the pressure reading shown in the
accompanying chart.
Pressure Reducing Valve — Adjustment and Care
A screw at the top of the valve body, as shown on the sketch, permits the pressure set point to
be adjusted. The locknut must be loosened before adjustment is made, and tightened after.
Turning adjustment screw into housing raises pressure. If excessively high or tow pressure
can't be corrected by adjustment, install a new valve.
To eliminate erratic performance, the internal steam strainer should be cleaned periodically The
strainer can be reached by unscrewing the large hex head plug at the bottom of the valve body.
(CONTINUED ON THE REVERSE SIDE)
Page 23

GAUGE PRESSURE READING WITH HO STEAM FLOW (STATIC PRESSURE)
Self-Contained Steam Generator Direct-Connect
Gas or Electric
Self-Contained
Steam Coil Generator
(To "House" Steam Supply)
Equipment
Steam Generator Only
5 PSI
Pressure Steamer N/A 5 psi 10 psi N/A 5 psi 5 psi N/A
Pressure Steamer
With Any Kettle(s))
Steam Generator Only
10 PSI
Kettle Only—All N/A 10 psi 15 psi N/A N/A N/A 20psi
Convection Steamer.
Super Steamcraft. or "D"
Series Defroster With or
Without Kettles
Steamer's
Pressure
Reducing
Valve
N/A 5 psi 10 psi N/A 5 psi N/A N/A
5 psi 10 psi 15 psi 5 psi 10 psi 5 psi 20 psi
N/A 10 psi 15 psi N/A 10psi N/A N/A
N/A 10 psi 15 psi N/A 10 psi 10 psi 20 psi
Operating
Pressure
Switch
High Limit
Safety
Pressure
Switch
Steamer's
Pressure
Reducing
Valve
Pressure
Regulating
Valve or
Pressure
Switch
Steamer's
Pressure
Reducing
Valve
Kettle's
Pressure
Reducing
Valve
Page 24

PROBE SYSTEM: ELECTRIC WATER FILL AND
SERVICING
INSTRUCTIONS
ELECTRIC LOW WATER FUEL CUT OFF FOR STEAM
GENERATOR — 3 PROBE TYPE
WARNING: Service of the steam generator must be performed only
During operation of the steam generator, the water level is maintained automatically by unequal length probe
extensions inside The probes and extensions must be Kept clean ana free of scale deposits in order to function
properly
The probe extensions are sensors in a control system
which monitors and maintains the water level between
the end of the short probe extension and the end of the
intermediate extension.
by trained and experienced service technicians.
The long probe, called "Low Water." is a safety sensor which shuts off the fuel supply if there is insufficient water in the steam
generator.
Since the control system is all electric and these parts don't move or wear. they can be expected to have a long life. If they do
malfunction, it is generally because untreated hard feedwater is being used in the steam generator. This forms scale on the
submerged ends of the probe extensions and on the top horizontal surfaces of the probes. After this scale is removed, the parts
will function properly.
To eliminate the cause of scaling, refer to separate data sheets for feedwater treatment information and corrosion protector
servicing instructions. Probes and probe extensions should be wiped clean each time the corrosion protector is replaced.
Erratic operation may result from loose connections on either end of the probe. The external end of the probe has a nut to hold
the wiring terminal snugly to the probe. This nut, if loose, may be tightened, firmly but gently. Too much torque will turn the
center piece of the probe and misalign the attached probe extension inside, causing the probe to become inoperative.
Inside the steam generator, the screw which holds the probe extension to the probe may be loose, allowing the probe extension
to swing or rest against some part of the steam generator. This can be corrected by removing the hand hole plate and reaching
inside to align and hold the probe extensions vertically while tightening the screws.
To Service the Probes or the Probe Extensions
1) Turn off all utilities and fuel to steam generator. Drain Steam generator.
CAUTI ON: Never work on the steam generator when it is hot or pressurized.
2) Remove probe cover on outside of steam generator to expose probe terminals. Examine for loose wiring terminals.
3) Remove hand hole cover plate from steam generator. See separate data sheet for instructions.
4) Remove probe extensions from probes on inside of steam generator, clean off scale, and re-install. Or, install new probe
extensions if preferred.
5) Remove scale from the probe (see sketch above). Do not use an abrasive on the teflon insulator. If the old probe needs
replacement, install a new one.
(CONTINUED ON THE REVERSE SIDE)
Page 25

SERVICING PROBE SYSTEM: ELECTRIC WATER FILL AND
INSTRUCTIONS ELECTRIC LOW WATER FUEL CUT OFF FOR
STEAM GENERATOR-- 3 PROBE TYPE
6) Assemble probe extensions to probes on inside of steam generator so they hang vertically, parallel to each other-
Malfunctioning will occur if an extension touches any part of the steam generator or another probe extension
7) If insulation on electrical wires to the probe snows signs of being broken, cut or deteriorated, the wires should be replaced.
8) Connect wire terminals on outside of steam generator to probe terminals as follows:
Red wire to the shortest probe. Turns water off
Black wire to the intermediate probe: Turns water on.
White wire to the longest probe- Shuts off fuel (low water safety fuel shut-off).
9) Re-install hand hole plate and install a new gasket.
The hand hole plate should be cleaned and examined each time it is removed. If the plate is chipped or cracked, it should be
replaced immediately. Because continuous use and possible abuse can cause metal fatigue which weakens the hand hole plate,
a new one should be installed at least every three years. Replace the gasket at least once a year —or sooner if it is cracked or
hardened.
10) Replace probe cover and check to make sure that the cover does not contact probes.
11) Close steam generator drain valve. Turn on utilities and fuel supply to steam generator.
12) Operate and observe steam generator long enough to insure that it is functioning properly
Low Water Fuel Cut Off Test
Proper operation of the "Low Water" probe extension should be checked periodically, by someone who is
thoroughly familiar with the equipment.
To Test: Open the drain of the steam generator while fuel is on. When the water has drained below the "Low Water" probe, the
fuel should shut off automatically. Indication of fuel shut off should occur just as the water level in the sight gauge drops from
view. If it does, close the drain, allow the steam generator to refill, and resume normal operations, if the fuel does not shut off.
immediately turn the on-off toggle switch to the "off" position, and follow the steps outlined under "To Service the Probes or the
Probe Extensions" as given on the reverse side of this sheet.
For specific information pertaining to the operation of the electric water fill controls, and electric low water safety fuel cut-off,
refer to the following data sheets:
Electric Steam Generators
Gas-Fired Steam Generators
Steam Coil (electric operated) Generators
Page 26

STANDING PILOT-IGNITION TYPE GAS CONTROLS
FOR GAS-FIRED STEAM GENERATORS
CAUTION: The following procedures, as well as other work on the gas controls, should be performed only by a trained and
experienced service technician, thoroughly familiar with gas controls.
Built in gas controls assure sate and automatic operation of the pilot and main burners of the steam Generator
The controls consist of a pilot generator (thermocouple; and a unit called the combination gas control. This latter unit consists of a gas
valve operator and servo gas pressure regulator.
Generally, there is no need to make an adjustment to any portion of the gas system. The main burner orifices and the pilot burner
orifice installed at the factory are correct for the kind of gas specified on the purchase order. Also. the primary air supply to the main
burner is properly adjusted for complete combustion.
Lighting and Shutdown Instructions
Flip electrical switch on. Open water valve. Open gas valve. Slightly depress and turn control knob to "off" for 5 minutes before lighting
gas. Turn-control knob to "pilot," depress it completely and light pilot burner. Continue to hold knob in for about 60 seconds, then
release. Pilot burner is lighted through hole in panel at bottom of steam generator Never leave panel off, as this will damage controls.
Turn control knob to "on". Depress electrical switch for main burner ignition. Burners will not light without water in the steam generator.
For main burner off. with pilot on, turn control knob to "pilot". For main and pilot burner off, slightly depress and turn control knob to
"off". Flip electrical switch off.
Occasionally, due to regional differences in the gas
supply, the pilot burner flame may require
adjustment.
A normal flame is mostly blue and steady, and
envelops 3/8" to 1/2 of the tip of the pilot generator,
as illustrated at right.
The pilot gas adjusting screw can be found under a
cover screw located near the gas control knob,
illustrated below.
To adjust the pilot flame:
1) Remove the pilot adjustment cover screw.
2) Turn PILOT FLOW ADJUSTMENT SCREW clockwise to
decrease or counterclockwise increase pilot flame.
3) WARNING: Be sure to replace cover screw after
adjustment to prevent possible gas leakage.
Electrical connections in the pilot generator circuit must be clean and secure.
Because the pilot generator operates in a severe environment, it may eventually need a replacement The time before replacement will
vary from one piece of equipment to another, depending on the amount of usage. The pilot generator (thermocouple) should generate
450-750 MV in an open circuit condition.
When a malfunction is traceable to the combination gas control unit. it is recommended that the entire unit be replaced with a new one,
rather than attempting repairs to the old unit.
WARNING: To prevent the danger of possible gas leakage, the installer must be a trained and experienced service
technician, thoroughly familiar with gas controls.
Page 27

HOW THE ELECTRIC (WARRICK
RELAY) WATER LEVEL CONTROLS
OPERATE — ON GAS FIRED STEAM
GENERATORS (WITH 3 PROBES)
Inside Cleveland Range Co. boilers which have electric
water level controls, there are three probe extensions
vertically oriented above the water with their lower ends
positioned at various levels.
Water is admitted to the boiler and is shut off in response to
the water level sensed by the tips of the short and the
medium length probe extensions. The electncal conductance
of the water is used in this system for controlling its level.
The third probe extension is a low water safety cutout sensor
and operates on the same principle.
Operation Sequence — Water Level Control
Assume an empty boiler. To fill. dose Switch S for the
following operations:
1) Solenoid SV² is energized allowing the boiler to fill with
water at the same time the primary circuit of Transformer
T²is also energized.
2) The boiler will continue to fill until the water level
reaches the Water Off probe extension completing the T²
secondary circuit and energizing Relay Coil RC².
3) When Relay Coil RC² is energized the normally closed
contact opens, de-energizing Solenoid SV²
stopping the water fill. The normally open contact is closed,
completing the circuit to the Water On probe.
When the water boils away below the end of the Water On
probe extension the following occurs:
1) The secondary circuit of Transformer T² is broken and the
Relay Coil RC² is de energized.
2) When Relay Coil RC² is de-energized the normally open
contact opens, breaking the circuit to the Water Off probe
extension. And. the normally closed contact closes,
energizing Solenoid SV² allowing the boiler to fill as in Step
2 above.
Operation — Low Water Safety Cutout
When Switch S is dosed the following operations
Occur:
1) The primary circuit of Transformer T² is energized.
2) When the water level reaches the low water safety cutout
probe extension and the momentary reset switch is manually
dosed. Relay Coil RC² is energized.
3) When Relay Coil RC², is energized the normally open
contacts close, completing the low water safety circuit
through Contacts 7 and 8 and completing the circuit through
Contacts 3 and 4. completing the 750 millivolt pilot
generator circuit and allowing the gas control package valve
to operate.
if the water level drops below the Low Water Safety Cutout
probe extension, the following occurs:
1) The secondary circuit of Transformer T² is broken and the
Relay Coil RC, is de-energized. Contacts 7 and 8 and 3 and 4
open. breaking the 750 millivolt circuit
which shuts oft the flow of gas to the burnersThe burners will not operate until water level in the boiler
is normal and the reset switch is operated.
Operation-Boiler Drain Condenser
To activate the Boiler Drain Condenser System dose switch
S by placing toggle in the down position.
To drain boiler, open boiler drain ball valve. The heat from
the boiler drain water will close the normally open thermal
switch TS and energize the condenser solenoid valve SV³
To de-activate the Boiler Drain Condenser System open
switch S by moving toggle to center off position.
Page 28

HOW THE ELECTRIC (WARRICK
RELAY) WATER LEVEL CONTROLS
OPERATE — ON ELECTRIC STEAM
GENERATORS (WITH 3 PROBES)
Inside Cleveland Range Co. boilers which have electric water
level controls, there are three probe extensions vertically
oriented above the water with their lower ends positioned at
various levels. Water is admitted to the boiler and is shut off
in response to the water level sensed by the tips of the short
and the medium length probe extensions. The electrical
conductance of the water is used in this system for controlling
its level.
The third probe extension is a low water safety cutout sensor
and operates on the same principle.
Operation Sequence — Water Level Control
Assume an empty boiler. To fill dose Switch S for the following
operations:
1) Solenoid SV² is energized allowing the boiler to fill with
water at the same time the primary circuit of Transformer T² is
also energized.
2) The boiler will continue to fill until the water level reaches the
Water Off probe extension completing the T, secondary circuit,
and energizing Relay Coil RC².
3) When Relay Coil RC² is energized the normally closed
contact opens, de-energizing Solenoid SV², stopping the water
fill. The normally open contact is closed, completing the
circuit to the Water On probe.
When the water boils away below the end of the Water On
probe extension the following occurs:
1) The secondary Circuit of Transformer T² is broken and the
Relay Coil RC, is de energized.
2) When Relay Coil RC² is de-energized the normally open
contact opens, breaking the circuit to the Water Off probe
extension. And. the normally closed contact closes, energizing
Solenoid SV² allowing the boiler to fill as in Step 2 above.
Operation — Low Water Safely Cutout
When Switch S is closed the following operations occur
1) The primary circuit of Transformer T² is energized.
2) When the water level reaches the low water safety cutout
probe extension and the momentary reset switch is manually
closed. Relay Coil RC² is energized.
3) When Relay Coil RC, is energized the normally open
contacts close, completing the low water safety circuit through
Contacts 7 and 8. and completing the circuit through Contacts
3 and 4, energizing Contactor Coil C which closes the heater
circuit.
If the water level drops below the Low Water Safety Cutout
probe extension, the following occurs:
1) The secondary circuit of Transformer T² is broken and
the Relay Coil RC² is de-energized. Contacts 7 and 8 and
3 and 4 open. breaking the circuits to Contactor C.
thereby turning off the heaters.
Page 29

ELECTRIC STEAM GENERATOR (BOILER) ASSEMBLY - 3 PROBE TYPE
24KW, 36KW, & 48KW (2, 3, & 4 HEATER ELEMENTS) — 1968 to PRESENT
Page 30

ELECTRIC STEAM GENERATOR (BOILER) ASSEMBLY
NUMBER
NUMBER
2
3
4
5
6
7
8
9
10
11
12
13
14
1/4
15
1/4"
16
1/2"
17
1/4
18
19
20
21
22
23
24
25
26
27
28
29
30
31
32
33
3/4'
34
35
36
37
24KW, 36KW, & 48KW (2, 3, & 4 HEATER ELEMENTS) -
REFERENCE
1
20A
43936
43936
43895
40445
07108
23132
07302
40462
101467
40421
43748
07106
08165
08166
08167
08214
08215
08216
08175
08176
08177
07128
07115
53250
03504
03514
03276
22102
44095
19870
03509
03506
20533
02193
02196
20535
03202
19947
22130
22131
19968
19944
19967
12161
12169
07173
07168
03277
22140
40471
52568
22122
19945
22104
19979
22106
PART
DESCRIPTION
Boiler shell only. with legs, hand hole plate assembly, mounting studs tor 3 square-flanged heater elements.
Boiler shell (43937) above, also including two corrosion resistors, sight gauge, three probes and
extensions with cover box.
Corrosion resistor, with hanger.
Water gauge set with glass.
Fibre washer (2 required)
Gauge glass washer (2 required).
Glass only 6" long.
Probe with lock washer and screw.
Probe extension set (3).
Hand hole plate ass'y.. including bar. nut. and gasket.
Hand hole plate-only.
Hand hole gasket, flat. 4" x 6" oval.
Electric immersion heater, with gasket. 3" flange. 12KW. 208/220 volt, 3 phase.
Electric immersion heater, with gasket. 3" flange. 12KW. 230/240 volt, 3 phase.
Electric immersion heater, with gasket. 3" flange. 12KW, 440/480 volt. 3 phase.
Electric immersion heater, with gasket, 3" flange. 12KW. 208/220 volt. 1 phase.
Electric immersion heater, with gasket. 3" flange. 12KW, 230/240 volt. 1 phase.
Electric immersion heater, with gasket. 3" flange. 12KW, 440/480 volt. 1 phase.
Electric immersion heater, with gasket, 2 1/2' flange, 12KW, 208/220 volt. 3 phase.
Electric immersion heater, with gasket, 2 1/2' flange, 12KW, 230/240 volt. 3 phase.
Electric immersion heater, with gasket. 2% ' flange, 12KW, 440/480 volt, 3 phase.
Heater gasket — 3" square.
Heater gasket — 2 1/2 square.
Probe cover.
Water control relay. 115 volt (1D1DO).
Low water cut-off relay, 115 volt, (1C1DO).
ball valve water supply shutoff.
check valve.
water feed solenoid valve
line strainer.
Contactor — 50 amp.
Contactor — 75 amp.
Transformer, 75VA, (All. except Convection Steamers).
Heavy duty terminal block — use with more than one contactor (125 amp size)
Heavy duty terminal block — use with more than one contactor (250 amp size).
24KW, 220 volt. single phase and 48KW. 208 220 & 240 volt. three phase.
Transformer, 150VA, (Convection Steamers only).
Circuit breaker for 20535.
Pressure switch (Models after 1-70).
Safety valve — 8 psi
Safety valve — 15 psi
Reset switch.
On-Off power switch. 115/220 volt DPST (before 1-78).
On-Off power switch, 115 volt 3PDT (after 1-78) and all auto blowdown.
Signal light, 115/220 volt, 1"
Signal light, 115/220 volt, 1/2' (Pressure Steamers only).
Steam pressure gauge, rear mount. 0-30 psi, 2 1/2.
Steam pressure gauge, rear mount, 0-30 psi, 2" (Pressure Steamers only)
Generator drain valve — ball type.
Air vent.
Control enclosure.
Cover, control enclosure.
pressure reducing valve, 3-15 psi output (optional).
Float switch with gasket — low water cut off (California only).
1/4' solenoid valve — boiler condenser water supply.
Thermal switch — boiler condenser.
Valve, solenoid. 1/2" boiler auto blowdown, 115 volt (optional)
- 3 PROBE TYPE 1968
to PRESENT
CLEVELAND RANGE CO, 1333 EAST 179th ST., CLEVELAND, OHIO 44110
Manufacturer reserves right of design improvement or modification, as warranted.
Page 31

ELECTRIC STEAM GENERATOR (BOILER) ASSEMBLY 18KW, 27KW, and
36KW (3 ELEMENTS — 6, 9, or 12KW EACH) — PRIOR TO 1968
Page 32

REFERENCE NUMBER PART NUMBER DESCRIPTION
1 40425 Hand Hole Plate Assembly
16650 Hand Hole Plate Only
2 07116 Hand Hole Gasket
3 40446 Water Gauge Set With Glass
07108 Fiber Washer (2 Required)
23132 Gauge Glass Washer (2 Required)
4 07301 Glass Only — l0 1/2 Long
5 43720 Water Regulator Valve Assembly
6 06300 Float Only
7 43740 Float Arm and Block Assembly
8 02411 Float Pivot Bracket
9 23130 Sealing Washer
10 43735 Float Plunger Assembly. 3 1/2
11 16833 Plunger Disc
12 43724 Water Regulator Valve Sub-Assembly
13 43895 Corrosion Resistor
14 22130 Safety Valve — 8 psi
22131 Safety Valve — 15 psi
15 22140 Air Vent
16 16820
17 19947 Pressure Switch
18 12161 Signal Light. 115/220 Volt
19 19944 On-Off Power Switch. 115/220 Volt DPST
20 03503 Contactor tor Side Heater. 50 amp. 208/240 Volt Coil
03505 Contactor tor Side Heater. 75 amp. 208/240 Volt Coil
21 20532 Transformer — Optional (480/240/120 Volt Only)
22 08170 Electric Immersion Heater. Screw Type. 6KW. 208 Volt
08171 Electric immersion Heater. Screw Type. 6KW. 240 Volt
08184 Electric Immersion Heater. Screw Type. 6KW. 480 Volt
08172 Electric Immersion Heater. Screw Type. 9KW. 208 Volt
08180 Electric Immersion Heater. Screw Type. 9KW. 240 Volt
08185 Electric Immersion Heater. Screw Type. 9KW. 480 Volt
08182 Electric Immersion Heater. Screw Type. 12KW. 208 Volt
08181 Electric Immersion Heater. Screw Type. 12KW. 240 Volt
08183 Electric Immersion Heater. Screw Type. 12KW. 480 Volt
23 08201 Heater. Screw Type. With Thermostat 6KW. 208 Volt (Not Available)*
08200 Heater. Screw Type. With Thermostat 6KW. 240 Volt
08204 Heater. Screw Type. With Thermostat 6KW. 480 Volt
08203 Heater. Screw Type. With Thermostat 9KW. 208 Volt (Not Available)*
08202 Heater. Screw Type. With Thermostat 9KW. 240 Volt (Not Available)*
08205 Heater. Screw Type. With Thermostat 9KW. 480 Volt (Not Available)*
24 19945 Float Switch With Gasket — Low Water Cut-Off
Pigtail. 1/4" ips
• Consult factory for conversion to a low water cut-off float switch type of safety circuit.
Page 33

STEAM COIL GENERATOR (BOILER) ASSEMBLY
2 PROBE TYPE
Page 34

STEAM COIL GENERATOR (BOILER) ASSEMBLY 2 PROBE
1 43977
Steam Coil Boiler Shell with Legs, Sight Gauge, Steam
TYPE
REFERENCE NUMBER PART NUMBER DESCRIPTION
Coil, Hand Hole Plate Assembly, 2 Probes and
Extensions with Cover Box.
2 100636 Hand Hole Plate Assembly
2a 16545 Hand Hole Plate Only
3 07116 Hand Hole Gasket
4 40401 Steam Coil Assembly
5 14612 1/4" Brass Locknut
6 23135 3 1/4" Square Rat Washer
7 14611 1/4" Steel Locknut
8 40446 Water Gauge Set with Glass
07108 Fiber Washer (2 required)
23132 Gauge Glass Washer (2 required)
9 07301 Glass Only—10 1/2" Long
10 52305 Probe Cover Box
11 40462 Probe with Lockwasher and Screw
12 101466 Probe Extension Set (2)
13 22130 Safety Valve—8 psi
22131 Safety Valve—15 psi
14 22232 Safety Valve—55 psi
15 03277 3/4" Ball Valve
16 22193 3/4" Steam Solenoid Valve
17 19872 3/4" Line Strainer
18 20555 3/4" Bucket Trap
19 19870 1/4" Line Strainer
20 06226 Brass Elbow, 90°, Special
21 22223 Solenoid Valve. Water Feed
22 22102 Check Valve. 1/4"
23 03276 1/4" Ball Valve. Water Supply Shut Off
24 22221 Solenoid Valve, Boiler Drain
25 03277 3/4" Ball Valve, Manual Drain
26 03616 Reducing Bell
27 13252 Drain Manifold
28 05292 Street Elbow, 90°
29 05238 Elbow, 90°
30 23198 Control Board, Water Level and LWCO
31 44165 Terminal Block, 4-pole
32 03525 Relay Socket
33 03524 Relay
34 20478 Interval Timer, 3 Minute
35 19947 Pressure Switch
36 19993 DPDT Power Switch
37 19994 SPST Momentary Contact Reset Switch
38 07168 Pressure Gauge, Back Mount, 0-30 psi
39 07166 Pressure Gauge, Back Mount, 0-100 psi
40 45006 Low Water Cut Off Assembly (California Only)
41 41943 LWCO Mounting Plate (California Only)
42 07128 Gasket (California Only)
43 05253 Brass Street Elbow (California Only)
44 02623 1/2 "-1/4" Brass Reducing Bushing (California Only)
45 19995 Float Switch, LWCO (California Only)
Page 35

ELECTRIC STEAM GENERATOR (BOILER) ASSEMBLY - 2
PROBE TYPE
1 43894 Elect
ric Boiler Shell only. with legs. hand hole
08216 Heater,
12 KW. 440/480
volt, 1 phase
flanged heater elements
10 07128 Heater Gasket
44149 Electric Boiler
Shell
(43894)
above, also include
11
16546 3- Block-Off Plate
18 KW, 27 KW, 36 KW, & 48 KW (2, 3, & 4 HEATER ELEMENTS)
REFERENCE
NUMBER
2 40421 Hand Hole Plate Assembly including oar. nut. 13 19947 Pressure Switch
2a 43748 Hand Hole Plate only
3 07106
&
5 101466 Probe Extension Set (set of two) 17 03525 Relay Socket
6 52305 Probe Cover Box 18 44168 Terminal Block. 2 pole
7 40445 Water Gauge Set with Glass 19 03202 Circuit Breaker, 1 amp
8 07302 Gauge Glass Only. 6' long 22 22102
9 08235 Heater. 9 KW. 208 volt. 3 phase 23 03276 1/4 " Ban Valve, water supply shut-off
PART
NUMBER
40462 Probe 16 03524 Relay
07108 Fibre Washer (2 required) 20 20478 interval Timer. 3 minute
23132 Gauge Glass Washer (2 required) 21 20535 Transformer. 150 VA
08236 Heater. 9 KW. 220/240 volt. 3 phase 24
08237 Healer. 9 KW. 440/480 volt 3 phase 25 19870 Line Strainer. 1/4 "
08234 Healer. 9 KW. 600 volt. 3 phase 26 03277 3/4" Ball Valve, manual drain
08241 Healer. 9 KW. 208 volt. 1 phase 27 22221 Solenoid Valve. boiler dram
08242 Heater. 9 KW. 220/240 volt 1 phase 28 13252 Drain Manifold
08243 Heater. 9 KW. 440/480 volt 1 phase 29 45006 Low Water Cut-Off Assembly (California only)
08244 Healer. 9 KW. 600 volt. 1 phase 30 41943 LWCO Mounting Plate (California only)
08165 Heater. 12 KW. 208/220 volt. 3 phase 31 05253 Brass Street Elbow (California only)
08166 Heater. 12 KW. 230/240 volt. 3 phase 32 02623
08167 Heater. 12 KW. 440/480 volt. 3 phase 33 19995 Float Switch. LWCO (California only
08163 Heater. 12 KW. 600 volt. 3 phase 34 19993 DPDT Power switch
08214 Heater. 12 KW. 208/220 volt. 1 phase 35 19994 SPST Momentary contact reset switch
08215 Heater. 12 KW. 230/240 volt. 1 phase 36 07167 Pressure gauge. 0-30 psi. 1 1/2"
DESCRIPTION REFERENCE
plate assembly, mounting studs tor 3' square
ing sigh t gauge, two probes and extensions with 12 22131 15 psi Safety Valve
cow box.
and gasket. 14 03509 Contactor 50 amp
Hand Hole Gasket. 4' x 6' oval
NUMBER
15 23198 Control Board, water level ana LWCO
PART
NUMBER
08217 Heater. 12 KW. 600 volt. 1 phase
22130 8 psi Safety Valve
03506 Contactor. 75 amp
22223
DESCRIPTION
Check valve, 3/4. •
Solenoid Valve, water feed
Reducing Bushing. 1/2" - 1/4' (California only)
Manufacturer reserves right of design improvement or modification, as warranted.
Page 36

HEATER AND CONTACTOR WIRING SCHEMATICS FOR SOLID
STATE ELECTRIC STEAM GENERATORS
Page 37

Electric Models
Page 38

Electric Models with Secondary Low Water Cutoff Built to California Code
Page 39

GAS STEAM GENERATOR (BOILER) ASSEMBLY - NO PROBES
100,000 BTU (2 BURNER) & 150,000 BTU (3 BURNER)
Page 40

GAS STEAM GENERATOR (BOILER) ASSEMBLY — NO PROBES
100,000 BTU (2 BURNER) & 150,000 BTU (3 BURNER)
REFERENCE
NUMBER
2 40425 Hand Hole Plate Assembly Including Bar. Nut. Gasket, and Hand Hole Plate
2a 16545 Hand Hole Plate Only
3 07116 Hand Hole Gasket
4 43895 Corrosion Resistor
5 40446 Water Gauge Set With Glass
6 07301 Glass Only —10 1/2" Long
8 06300 Float Only
9 43740 Float Arm and Block Assembly
10 02411 Float Pivot Bracket
11 23130 Sealing Washer
12 43735
13 16833 Plunger Disc
14 43724 Water Regulator Valve Sub-Assembly
15 22112 Water Shut Off Angle Valve
16 22150
17 16621 Fusible Plug With Bushing
18 19945 Float Switch With Gasket—Low Water Cut-Off
19 02498 Main Gas Burner—24" Long
20 15453 Main Burner Orifice—Natural Gas
21 19632 Orifice Holder (After 7/76)
22 63150 Gas Manifold —100,000 BTU—2 Burner
23 22182 1/2 Combination Natural Gas Control Valve
24 43651 Pilot Generator Assembly With 02505 Burner. 20410 Thermocouple. 52449 Bracket and 15460
25 20410 Pilot Thermocouple
26 02505 Pilot Burner—Natural Gas
27 15460 Pilot Burner Orifice—Natural Gas
28 52449 Pilot Bracket (After 7/76)
28A 52450 Pilot Bracket (Before 7/76)
29 07173 Pressure Gauge. Rear Mount—0 to 30 psi
30 19967 On-Off Power Switch. 115/220 Volt. 3 PDT
31 19968 Reset Switch
32 12161 Signal Light 115/220 Volt
33 19947 Pressure Switch
34 22140 Air Vent
35 22130 Safety Valve—8 psi
36 22122 3/4" Pressure Reducing Valve. 3-15 psi Output (Optional)
37 69934 Rear Baffle and Burner Support —100.000 BTU—2 Burner
38 52171 Burner Compartment Front Baffle —100.000 BTU—2 Burner
39 70920 Twister
PART
NUMBER
40300 Boiler Shell Only. With Legs, Studs. Hand Hole Plate Assembly, and Top Flue Bracket.
40307 Boiler Shell Only With Clip Locks. Studs. Hand Hole Plate Assembly, and Top Flue Bracket.
43826 Boiler Shell 40300 Above. Also Including One Corrosion Resistor, Sight Gauge. Low Water Cut-Off
43828 Boiler Shell 40307 Above. Also Including One Corrosion Resistor. Sight Gauge, Low Water Cut-Off
07108 Fiber Washers (2 Req'd.)
23132 Gauge Glass Washers (2 Req'd.)
43720 Water Regulator Valve Assembly
02499 Main Gas Burner—20" Long
02501 Main Gas Burner Used on Units Built Before 7/76 (not shown). Replace With Burner 02498 (24"
15450 Main Burner Orifice—LP Gas
19631 Orifice Holder (Before 7/76)
63151 Gas Manifold —150,000 BTU—3 Burner
22096 1/2" Combination LP Gas Control Valve
43653 Pilot Generator Assembly with 02523 Burner. 20410 Thermocouple. 52449 Bracket, and 15461
02523 Pilot Burner—LP Gas
15461 Pilot Burner Orifice—LP Gas
22131 Safety Valve—15 psi
69935 Rear Baffle and Burner Support —150.000 BTU—3 Burner
52172 Burner Compartment Front Baffle —150.000 BTU—3 Burner
DESCRIPTION
Switch, and Water Regulator
Switch, and Water Regulator.
Float Plunger Assembly. 3 1/2"
Long) or 02499 (20" Long). 1963 Orifice Holder, and One 52450 Pilot Bracket (If Pilot's Burner is
Replaced.)
Orifice.
Orifice.
Page 41

GAS STEAM GENERATOR (BOILER) ASSEMBLY — 3 PROBE TYPE
210,000 BTU (5 BURNERS)
Page 42

GAS STEAM GENERATOR (BOILER) ASSEMBLY — 3 PROBE TYPE
REFERENCE
PART
1 40302
Boiler Shell Only. With Legs, Studs. Hand Hole Plate Assembly, and Top Flue Bracket.
40309
Boiler Sh
ell Only, With Angle Iron Mounting Bar, Studs. Hand Hole Plate Assembly, and
Top Flue Bracket.
43632
Boiler Shell
40302
Above. Also Including: Two Corrosion Resistors. Sight Gauge, Three
Probes and Extensions With Cover Box.
43833
Boiler Sh
ell
40309
Above, Also Including: Two Corrosion Resistors, Sight Gauge. Three
Probes and Extensions With Cover Box.
2
40425
Hand Hole Plate Assembly Including Bar. Nut, and Gasket
2A
16545
Hand Hole Plate Only
3
07116
Hand Hole Gasket
4
43895
Corro
sion Resistor
(2
Req'd.)
5
40446
Water Gauge Set With Glass
07108
Fiber Washers
(2
Req'd.)
23132
Gauge Glass Washers
(2
Req'd.)
6
07301
Glass Only,
10 1/2" Long
7
40462
Probe With Lockwasher and Screw
8
40455
Probe Extension Set
9
52350
Probe Co
ver 10 19870
1/4" Line Strainer
11
44095
12
02499
Main Gas Burner
02500
Main Gas Burner Used on Units Built Before
7/76
(Not Shown). Replace With Burner
02498
—
24"
Long or
02499
—
20"
Long,
19632
—
Orifice Holder, and O
ne
52450
—
Pilot Bracket (If Pilot's Burner Is Replaced.)
13
15453
Main Burner Orifice
—
Natural Gas
15450
Main Burner Orifice
—
LP Gas
14
19632
Orifice Holder (After
7/76)
19631
Orifice Holder (Before
7/76)
15
63152
Gas Manifold
—
210,000 BTU
—5 Burn
er 16 22183
3/4" Combination Natural Gas Control Valve
16A 22189
3/4" Combination LP Gas Control Valve
17 43651
Pilot Generator Assembly With
02505
Burner.
20410
Thermocouple,
52449
Bracket, and
15460
Orifice.
43653
Pilot Generator Assembly With
02523
Burner,
20410
Thermocouple.
52449
Bracket, and
15461
Orifice.
18
20410
Pilot Thermocouple
19
02505
Pilot Burner
—
Natural Gas
02523
Pilot Burner
—
LP Gas
20
15460
Pilot Burner Orifice
—
Natural Gas
15461
Pilot Burner Orifice
—
LP Gas
21
52449
Pilot Bracket (After
7/76)
21A 52450
Pilot Bracket (Before
7/76)
22
52177
Burner Compartment Front Baffle
23
69933
Burner Compartment Rear Baffle
24
07173
Pressure Gauge, Rear Mount
—0 to
30
psi 25 19941
On-Off Power Switch.
115/220
Volt, 4 PDT 26 19
968 Reset Switch
27
12161
Signal Light
115/220
Volt 28 19947
Pressure Switch
29
22140
Air Vent
30
22130
Safety Valve
—8 psi 22131
Safety Valve
—15 psi 31 22122
3/4" Pressure Reducing Valve.
3-15
psi Output (Optional)
32 19945
Float Switch With Gaske
t—Low Water Cut
-
Off 33 03504
Water Control Relay.
115
Volt
(1
D1DO)
34
03514
Low Water
Cut-Off
Relay,
115
Volt (1C1DO)
35
22150
36
16621
Fusible Plug With Bushing
37
70920
Twister
210,000 BTU (5 BURNERS)
NUMBER
NUMBER
DESCRIPTION
Page 43

GAS STEAM GENERATOR (BOILER) ASSEMBLY — 3 PROBE TYPE
160,000 BTU (3 BURNER) & 200,000 BTU (4 BURNER)
Page 44

GAS STEAM GENERATOR (BOILER) ASSEMBLY — 3 PROBE TYPE 160,000 BTU
REFERENCE
PART
DESCRIPTION
1 43872
Boiler shell only. with legs, studs, hand hole plate assembly, and top flue bracket
40298
Boil
er shell
43872
above, also including two corrosion resistors, sight gauge, insulation panels, top flue
collector with insulation and cover plate, three probes and extensions with cover box.
2
40421
Hand hole plate assembly, including bar. nut and gas
ket 2A 43748
Hand hole plate only.
3
07106
Hand hole gasket flat
4x6
oval. 4 43941
Left side insulating panel assembly
5
43943
Right side insulating panel assembly
6
56320
Top flue collector.
7
40115
Top insulation baffle assembly (flat).
40116
Top insulation baffle assembly (with flange).
8
42360
Internal flue riser assembly.
9
40462
Probe with lock washer and screw.
10
40455
Probe extension set
(3). 11 52350
Probe cover.
12
43895
Corrosion resistor.
13
40445
Water gauge set with glass.
07108
Fibre washer
(2
required).
23132
Gauge glass washer
(2
required).
14
07302
Glass only
— 6" long.
15
43851
3-
burner front baffle assembly
— Natural Gas.
43855
3-
burner front baffle assembly
— LP. Gas.
16
43852
4-
burner front baffle assembly
— Natural Gas.
43856
4-
burner front baffle assembly
— LP. Gas.
17
41365
3-
burner rear burner support (after
7-76).
69952
3-
burner rear burner support (before
7-76). 18 41366
4-
burner rear burner support (after
7-76).
69953
4-
burner rear burner su
pport (before
7-76). 19 19870
1/4" line strainer.
20
44095
1/2"
water feed solenoid valve.
21
22102
1/4" check valve.
22
03276
1/4" ball valve
— water supply shut
-
off. 23 03277
Generator drain valve
— bail type.
24
02499
Main gas burner.
25
15453
Main burner orifice
— Natural Gas.
15450
Main burner orifice
— LP. Gas.
26
40901
Gas manifold assembly
— 3
burner (after
7-76).
40905
Gas manifold assembly
— 3
burner (before
7-76). 27 40902
Gas manifold assembly
— 4
burner (after
7-76).
40906
Gas
manifold assembly
— 4
burner (before
7-76). 28 19632
Orifice holder (after
7-76).
19631
Orifice holder (before
7-76). 29 43651
Pilot generator assembly with
02505
burner.
20410
thermocouple.
52449
bracket, and
15460
orifice.
43653
Pilot generator
assembly with
02523
burner.
20410
thermocouple,
52449
bracket, and
15461
orifice.
30
20410
Pilot thermocouple.
31
02505
Pilot burner
— Natural Gas
-
02523
Pilot burner
— LP. Gas.
32
52449
Pilot bracket
33
15460
Pilot burner orifice
— Natural Gas.
15461
Pilot burner orifice
— LP. Gas.
34
22182
1/2
" combination gas control valve
— Natural Gas.
34A 22096
1/2 combination gas control valve
— LP. Gas.
35
22122
3/4 pressure reducing valve,
3-15
psi output (optional).
36
22130
Safety valve
— 8
psi.
22131
Safety valve
— 15
psi. 37 22140
Air vent
38
19947
Pressure switch.
39
03514
Low water cut
-
off relay.
115
volt. (1C1DO).
40
03504
Water control relay.
115
volt. (1D1DO).
41
07173
Steam pressure gauge, rear mount
0-30
psi. 42 19967
On-
Off power s
witch.
115/220
volt. 3 PDT. 43 19968
Reset switch.
44
12161
Signal light.
115/220
volt 45 19945
Float switch with gasket
— low water cut
-
off (California only).
46 22104
1/4 solenoid valve
— boiler condenser water supply.
47 19979
Thermal switch
— boil
er condenser.
48
22106
Valve, solenoid.
1/2" boiler auto blowdown,
115
volt (optional).
49
05263
Radiator Ell.
3
/4 union.
(3 BURNER) & 200,000 BTU (4 BURNER)
Page 45

GAS STEAM GENERATOR (BOILER) ASSEMBLY — 3 PROBE TYPE
250,000 BTU (5 BURNERS) & 300,000 BTU (6 BURNERS)
Page 46

GAS STEAM GENERATOR (BOILER) ASSEMBLY — 3 PROBE TYPE
REFERENCE
NUMBER
PART
NUMBER
1 43873
Boiler shell only. with legs. Studs. tend hole plate assembly, and top flue bracket
40297
Boiler shell
43873
above, also including two corrosion resistors, sight gauge, insulation panels. top flue
collector with insulation and cover plate, three probes and extensions with cover box
2
40421
Hand hole Plate Assembly including bar.
nut ana gasket
2A
43748
Hand hole plate only
3
07106
Hand hole gasket, flat
4x6
oval. 4 43942
Left side insulating panel assembly
5
43943
Right side insulating panel assembly
6
56321
Top flue collector.
7
40117
Top insulation baffle assembly (flat).
40118
Top insulation baffle assembly (with flange)
8
42361
Internal flue riser assembly.
9
40462
Probe with lock washer and screw
10
40455
Probe extension set
(3). 11 - 52350
Probe Cover.
12
43895
Corrosion resistor.
13
40445
Water gauge set with
glass
07108
Fiber washer
(2
Required).
23132
Gauge glass washer
(2
Required)
14
07302
Glass Only
— 6"
long. 15 43853
5 burner front baffle assembly
— Natural Gas
43857
5 burner front baffle assembly
— L.P. Gas.
16
43854
6 burner front baffle a
ssembly
— Natural Gas
43858
6 burner front baffle assembly
— L.P. Gas.
17
41367
5 burner rear burner support (after
7-76).
69954
5 burner rear burner support (before
7-76). 18 41368
6 burner rear burner support (after
7-76).
69955
6 burner rear
burner support (before
7-76). 19 19870
1/4" line strainer.
20
44095
1/2" water feed solenoid valve.
21
22102
1/4" check valve.
22
03276
1/4 ball valve
— water supply shut off.
23
02499
Main gas burner.
24
15453
Main burner orifice
— Natural Gas
15
450 Main burner orifice
— L.P.
Gas 25 19632
Orifice Holder (after
7-76).
19631
Orifice Holder (before
7-76) 26 03277
Generator drain valve
— ball type.
27
40903
Gas manifold assembly
— 5
burner (after
7-76).
40907
Gas manifold assembly
— 5
burner
(before
7-76). 28 40904
Gas manifold assembly
— 6
burner (after
7-76).
40908
Gas manifold assembly
— 6
burner (before
7-76). 29 43652
Pilot generator assembly with
02505
burner.
20411
thermocouple, and
52449
bracket
30
20411
Pilot thermocouple.
31 02505 Pilot burner
— Natural Gas.
02523
Pilot burner
— L.P.
Gas- 32
52449
Pilot bracket.
33
22183
3/4 combination gas control valve
— Natural Gas.
33A 22189
3/4" combination gas control valve
— L.P.
Gas. 34 15460
Pilot burner orifice
— Natural Gas.
15461
Pilot burner orifice
— L.P.
Gas. 35 22122
3/4 pressure reducing valve.
3-15
psi output (optional).
36
22130
Safety valve
— 8
psi.
22131
Safety valve
— 15
psi. 37 22140
Air Vent
38
19947
Pressure Switch.
39
03514
Low water cut
-
off relay.
115
volt.
(1
C1DO).
40
03504
Water control relay.
115
volt, (1D1DO).
41
07173
Steam pressure gauge, rear mount.
0-30
psi 42 19967
On-
Off power switch.
115/220
volt, 3 PDT.
43
19968
Reset switch.
44
12161
Signal light,
115/220
volt. 45 19945
Float switch
with gasket
— low water cut off (California only).
46
22104
1/4" solenoid valve
— boiler condenser water supply.
47
19979
Thermal switch
— boiler condenser.
48
22106
Valve, solenoid.
1/2" boiler auto blowdown.
115
volt (optional).
49
05263
Radiator E
ll. 3/4" union.
250,000 BTU (5 BURNERS) & 300,000 BTU (6 BURNERS)
DESCRIPTION
Page 47

WIRING DIAGRAM FOR 100,000 and 150.000 BTU STEAM GENERATORS, WITH PILOT IGNITION,
WIRING DIAGRAM FOR 210,000 BTU STEAM GENERATORS, WITH PILOT IGNITION, WITH
WITH AND WITHOUT SAFETY RESET CIRCUIT
MANUAL SAFETY RESET CIRCUIT
Page 48

WIRING DIAGRAM FOR 100,000 and 150,000 BTU STEAM GENERATORS. WITH PILOT IGNITION,
WITH MECHANICAL LOW-WATER FUEL CUTOFF, WITH AND WITHOUT SAFETY RESET CIRCUIT
Page 49

GAS STEAM GENERATOR (BOILER) ASSEMBLY - 2 PROBE TYPE
SMALL: 100,000 BTU (2 Burners) & 200,000 BTU (4 burners)
LARGE: 250,000 BTU (5 burners) & 300,000 BTU (6 burners)
Page 50

GAS STEAM GENERATOR (BOILER) ASSEMBLY - 2 PROBE TYPE
BTU). with
1
"
'
SMALL: 100,000 BTU (2 Burners) & 200,000 BTU (4 burners)
LARGE: 250,000 BTU (5 burners) & 300,000 BTU (6 burners)
REFERENCE
NUMBER
2 40421
2a 43748 Hand hole plate only 20 05101 Ignitor electrode
3 07106 Hand hole gasket. 4' x 6" oval 21 40918 Gas manifold. 2-burner
4 40462 Probe
5 101466 Probe extension set (set of two)
6 52305 Probe cover box
7 40445 Water gauge set with glass 22 52602 Manifold alignment bracket
8 07302 Gauge glass only. 6" long
9 44043 Left side insulation panel assembly 25 02497 Burner
10 44042 Right side insulation panel assembly 28 20478 Interal timer. 3 minute
1
13 44134 2-bumer front baffle assembly - natural gas 38 22221 Solenoid valve, boiler drain
14 44153 2-burner rear burner support 46 19993 DPDT Power switch
PART
NUMBER
43898 Small boiler. shell only (100.000/200.000
43899
44173 Small boiler shell (43898) above, also includ 17 22228 Gas control valve, natural gas. small boiler
44172 72
07108 Fibre washer (2 required) 23 19632 Orifice holder
23132 Gauge glass washer (2 required) 24 15453 Burner orifice, natural gas
440431 Left side insulation panel assembly for LP 26 03546 Spark ignition control module
440421 Right side insulation panel assembly (or LP 29 44164 Terminal block. 4 pole
42398 Top flue collector with insulation, for small 31 03524 Relay
42399 Top flue collector with insulation, lor large 32 23198 Control board. water level and IWCO
42360 Internal flue riser assembly for small boiler 34
42361 Internal flue riser assembly for large boiler 36
44135 4-burner from baffle assembly - natural gas 39 13252 Drain manifold
40840 5-bumer front baffle assembly - natural gas 40
40842 6-bumer front baffle assembly - natural gas 41 41943 LWCO mounting plate (California only)
44150
44170
44171 Left side burner baffle assembly for L.P. gas -
44155 4-bumer rear burner support 47 19994 SPST Momentary contact reset switch
DESCRIPTION REFERENCE
BTU). with legs. studs. hand hole plate
assembly and top flue bracket. 15 22130 Safety valve. 8 psi
Large boiler shell only (250.000/300.000
assembly, and top flue bracket 16 19947 Pressure switch
ing insulation panels, lop flue collector with
insulation sight gauge, two probes and
extensions with cover box -
Large boiler shell (43899) above, also includ
ing insulation panels, top flue collector with
insulation, sight gauge, two probes and extensions
Hand hole plate assembly including bar. nut. and
gas - 100,000/200,000 BTU boiler only 27 20528 24 volt transformer
gas - 100.000/200.000 BTU boiler only 30 03525 Relay socket
boiler (100.000/200.000 BTU)
boiler (250.000/300.000 BTU) 33
(100,000/200,000 BTU) 35 22223 Solenoid valve. water teed
(250.000/300.000 BTU) 37 03277 3/4' Ball valve, manual drain
Front burner baffle assembly for LP. gas -
100.000/200.000 BTU boiler only (not shown)
Right side burner baffle assembly for LP. gas •
100.000/200.000 BTU boiler only (not shown)
100.000/200.000 BTU boiler only (not shown) 45 19995 Float switch. IWCO (California only)
NUMBER
18 44169 Ignitor cable
19 44096 Ignitor box assembly with ignitor
42 07128 Gasket (California only)
43
44
48 07167 Pressure gauge. 0-30 psi. 1 1/2"
PART NUMBER DESCRIPTION
44156 5-burner rear burner support
44157 6-burner rear burner support
22131 Safety valve. 15 psi
(100.000/200.000 BTU)
22230 Gas control, valve. natural gas. large boiler
(250/300,000 BTU)
22231 Gas control valve. LP. gas. small and
large boilers (100,000/200,000 and
250.000/300.000 BTU)
40920 Gas manifold. 4-burner
40921 Gas manifold. 5-burner
40922 Gas manifold, 6-burner
15450 Burner orifice. LP. gas
22102 Check valve. 1/4
03276 1/4' Ball valve, water supply shut off
19870 Line strainer. 1/4
45006 Low water cut-off assembly (California
05253 Brass street elbow (California only)
02623 1/2' - 1/4" Brass reducing bushing
Page 51

Gas Models
Page 52

Gas Models with Secondary Low Water Cutoff
Page 53

STEAM COIL GENERATOR (BOILER) ASSEMBLY
WITH VARIOUS CONTROL OPTIONS
(INCLUDES BOILERS EQUIPPED WITH 0, 1, or 3 PROBES)
Page 54

STEAM COIL GENERATOR (BOILER) ASSEMBLY WITH VARIOUS
3/4" Steam solenoid valve
CONTROL OPTIONS
(INCLUDES BOILERS EQUIPPED WITH 0, 1, or 3 PROBES)
REFERENCE
NUMBER
2 100636 Hand note plate assembly, incl. bar. nut. and gasket
3 07116 Hand note gasket
4 40401 Steam coil assembly
5 14612 1 1/4" Brass locknut
6 23135 3 1/4" Square flat washer
7 14611 1 1/4" Steel locknut
8 40446 Water gauge set with glass
9 07301 Glass only -10% * long
10 43720 Water regulator valve assembly (used before
11 06300 Float only
12 43740 Float arm and block assembly
13 100655 Float pivot bracket
14 23130 Sealing washer
15 43735 Float plunger assembly
16 16833 Plunger disc
17 43724 Water regulator valve sub-assembly (seat)
18 40462* Probe with lockwasher and screw
REFERENCE PART
NUMBER Number
PART
NUMBER
43700 Steam coil boiler shell with legs. sight gauge.
43782 Steam coil boiler shell (43700) above, also in
439881 Steam coil boiler shell only. with legs and hand
43989 Steam coil boiler shell (43988) above. also
16545 Hand note plate only
07108 Fibre Washer (2 required)
23132 Gauge Glass Washer (2 required)
DESCRIPTION
water regulator, steam coil. one corrosion
resistor, hand hole plate assembly. (For use with
mechanical pressure regulating valve for
controlling the steam supply.)
cluding one probe and extension with cover box.
tor electric operation of the steam supply con
trols (solenoid valve in lieu of the mechanical
pressure regulating valve).
hole plate assembly. (Equipped with 3 probe
holes, for use with electrically controlled water
and steam supplies).
including sight gauge, steam coil. 3 probes and
extensions with cover box (for use with
electrically controlled water and steam supplies).
April, 1964)
DESCRIPTION
19 62453* Probe extension (for use only with single probe
20 101468 Probe extension set (3) (for use only with three
21 43895 Corrosion resistor (not used with 3 probe
22 22200
23 07169 Pressure gauge, bottom mount (0-100 psi)
24 03277
2S 22151
26 22193*
27 22140 Air vent
28 100075 Safety valve - 50 psi
29 22106 1/2" Solenoid valve, boiler auto blowdown. 115
30 22112 Water shut-off angle valve
31 19872 3/4" Line strainer
32 20555 3/4" Bucket trap
33 03276 1/4" Ball valve
34 22102 1/4" Check valve
35 44095" 1/2" Water teed solenoid valve
36 19870
37 07173 Pressure gauge, rear mount. 0-30 psi. 2 1/2"
07168 Pressure gauge, rear mount 0-30 psi. 2" (Pressure
38 19944* On - off power switch. 115/220 volt DPST
39 19968* Reset switch
40 12161- Signal light, 115/220 volt. 1"
12169* Signal light, 115/220 volt, 1/2" (Pressure Steamers
41 19947- Pressure switch
42 03514- Low water cut-off relay. 115 volt (1CIDO)
43 03504" Water control relay. 115 volt (1D1D0)
44 19020*** 3/4" Moisture separator (ball float trap)
45 19945* Float switch with gasket - tow water cut-off
boilers)
probe boilers)
boilers)
3/4' Pressure reducing valve - 30 to 50 psi
(optional)
3/4" Ball valve
3/4" Steam control valve
volt (optional)
1/4' Line strainer
Steamers only)
only)
(California only)
*Required for electric steam control and electric low water cut-off safety circuit Through November 1982, these components were used
in lieu of the #22151 steam control valve as standard equipment on all 24" and 60" wide cabinets and all California units, but optional on
36" and 42" wide cabinets. After November 1982, the #22151 was not used and the electric controls became standard equipment on all
steam coil generators.
**Required for electric (solenoid valve) water fill, used in lieu of the #43720 water regulator valve, beginning April 1984.
***Optional, if steam supply is wet.
Page 55

STEAM COIL WIRING DIAGRAM
HOW THE ELECTRIC LOW WATER SAFETY SHUT -OFF OPERATES ON STEAM
COIL (ELECTRIC OPERATED) STEAM GENERATORS
Operation — Low Water Safety Shut-Off
When Switch S is closed the following operations occur:
1. The primary circuit of Transformer T is energized.
2. When the water level reaches the low water safety cutout
probe extension and the momentary reset switch is
manually closed, Relay Coil RC is energized.
3. When Relay Coil RC is energized, the normally open
contacts close, completing the low water safety circuit
through Contacts 7 and 6. and completing the circuit
through Contacts 3 and 4, energizing Solenoid SV2,
allowing steam to flow into the boiler's steam coil.
If the water level drops below the Low Water Safety Cutout
probe extension, the following occurs:
1. The secondary circuit of Transformer T is broken and the
Relay Coil RC is de-energized. Contacts 7 and 8 and 3 and
4 open, breaking the circuits to Solenoid SV2, thereby
shutting off the flow of steam to the boiler's steam coil.
The steam Solenoid SV2 will not operate until water level in the
boiler is normal and the reset switch is operated.
Operation — Boiler Drain Condenser
To activate the Boiler Drain Condenser System close Switch S
by placing toggle in the down position.
To drain the boiler, open the boiler drain ball valve. The heat
from the boiler drain water will close the normally open Thermal
Switch TS and energize the condenser Solenoid Valve SV3. To
deactivate the Boiler Drain Condenser System open Switch S
by moving toggle to the center off position.
Page 56

SERVICING INSTRUCTIONS — MECHANICAL WATER FILL
FOR STEAM GENERATOR
The water level in the sight gauge should normally be about
2/3 full. If it is not. then (1) the water valve may be scaled up or
(2) the water valve plunger disc is in need of replacement or
(3) the adjusting screw at the top of the valve plunger is set
incorrectly or (4) the float needs to be replaced.
WARNING: Steam under pressure may cause serious
injury and bodily harm when it is accidentally or
carelessly released. Therefore, service of the steam
generator should only be performed by trained and
experienced personnel, thoroughly familiar with
servicing steam generators.
To service the water valve:
1. Turn oft all utilities and fuel to steam generator. Drain
steam generator.
CAUTION: Never work on the steam generator while It is
hot or pressurized.
2. Remove hand hole plate from steam generator. Refer to
separate data sheet for proper procedures and cautions.
3. (Inside the steam generator as shown on the diagram).
Remove the float arm pivot screw. Disengage float arm
assembly.
4. Lift out valve plunger disc and install new plunger disc.
5. Remove scale from valve seat and other internal valve
surfaces.
6. Re-insert plunger in valve.
7. Install float arm assembly and check the adjustment. Float
travel should be approximately 6 inches.
8. To increase the travel, turn adjusting screw clockwise. To
decrease, reverse.
9. Re-install hand hole plate, never applying more than 15
ft./lbs. torque to the nut. The hand hole plate should be
cleaned and examined every time it is removed. If the
hand hole plate is chipped or cracked, or over three years
old, install a new one. Because continuous use and
possible abuse cause metal fatigue which weakens the
hand hole plate, a new one should be installed at least
every three years. Replace the gasket at least once a year
or sooner if it is cracked or hardened. Replace the hand
hole gasket when re-installing the hand hole plate.
10. Close steam generator drain valve. Turn on utilities and
fuel.
11. Check the water level. Proper level in the sight gauge is
about 2/3 full.
12. Start up and observe steam generator long enough to see
that it is operating properly.
13. After the valve plunger disc is installed, order more to have
spares on hand at all times.
If hard water scale created the problem, the use of more
corrosion resistors or more frequent replacement of them is
required. Refer to separate data sheets for maintenance
instructions pertaining to scale problems.
Page 57

Steam Coil Models
Page 58

Steam Coil Models with Secondary Low Water Cutoff
Page 59

WATER LEVEL CONTROL SYSTEM
TROUBLESHOOTING AND REPAIR
General Description of Operation:
The Cleveland Range water level control, P/N 23198, is designed to maintain operating water
level in Cleveland Range steam generators and to ensure that the heat source is only
operated when the generator water level is above a specified minimum level. The sensing
technique for the control relies on the fact that tap water is conductive to electricity; if
two metal electrodes are immersed in a bath of water, electric current can flow between the
electrodes using the water as a conductor. Water is not a good conductor, like copper, but
is conductive enough to be measured using appropriate electronic circuitry.
The Cleveland Range control is a two probe system having two metallic probes (LOW and HI)
for sensing water in the generator; a COM terminal is placed on the tank. The LOW probe is
placed so that it will come in contact with the water when the water level is just above the
desired water level, enough to protect the heat source. If the water is of sufficient level
and the LOW probe is in the water, a small electrical current provided by the level control
electronics will flow between the probe and COM; this flow will be sensed by the electronics
which in turn will activate the "HEAT" relay to apply AC power to the HEAT terminal on the
control circuit board.
Similarly, the HI probe is located at the desired water level fill (above the LOW probe
level) so that when the water level has reached the desired fill level electrical current
will flow between the HI probe and COM. The action of this probe is reversed from the
previous situation so that when water reaches the HI probe, the WATER fill relay is
deactivated so that AC power to the WF is turned off. When the water level drops below the
HI probe, the WF terminal will be re-energized after a five second delay. The time delay
is to prevent bubbling or turbulence in the generator from chattering to WATER fill relay or
the water valve solenoid.
The control runs on 120 vac and is transformer isolated so that the probes and the
electronics are run at low voltage and are not common to the AC power line.
Note that in many Cleveland Range generators both sensing probes are inserted from the front
top of the unit down into the generator. In this case, the LOW probe will be the longest
and the HI probe will be the shortest.
Page 60

STEP
TEST
RESULT
REMEDY
nect ohmmeter to control board power terminals. Is
(inoperative
A) SYMPTOMS OF WATER LEVEL CONTROL RELATED PROBLEMS:
1) Boiler overfills or floods
2) Boiler dry fires (system underfills or doesn't fill)
3) Boiler doesn't fill at all
4) Water fill solenoid chatter
5) Heater contactor chatter
6) Fills but cuts out on LOW WATER before filling again
7) Overfills but does not heat
8) Fills but does not heat
B) POSSIBLE CAUSES:
1) Inoperative water level control circuit board (P/N 23198)
2) Incorrect or damaged wiring to probes
3) Incorrect or damaged wiring from water leve l board to loads
4) Damaged probes
5) Probes snorted together
6) Scale build-up on probes
C) FAULT ISOLATION PROCEDURE:
Equipment Required: Volt/Ohmmeter (VOM) or Multimeter
1. Is power applied to the control circuit board? Measure
L1-L2 at the board to be 120 VAC + 15V.
2. Remove two AC power wires from control board and
con
resistance between 100-1000 ohms?
3. Visually inspect probe wiring for damaged or broken
wires or loose or missing terminals at either end. Is
wiring visually OK?
Yes
No
Yes
No
Yes
No
Go to Step #2
Correct external supply problem
Reconnect power and go to Step #3
Replace control board P/N 23198
transformer)
Go to Step #4
Replace wiring as required
Page 61

Step
TEST
RESULT
REMEDY
Correct probe wiring as required (see
Temporarily disconnect the wire from the HTR
onnect the
trol
board. Measure the AC line voltage between the
trol board. Is
vac? NOTE: Digital meters may
nals on the control
board. Does the AC line voltage between the
vac (line
LOW wires and go to
terminals on the control board and short the
COM terminals together. Measure the AC
nals.
4. Are the following connections made correctly? Yes Go to Step #5
5.
6. With HTR still disconnected, disc
7. Short the LOW and COM termi
A) COM input on board to boiler ground No
B) LO input on board to long length "LO" probe
C) HI input on board to short "HI" probe
terminal so that the heat source will not
operate. Is the heat source off?
LOW wire at the LOW terminal of the con
HTR and L2 terminals on the con
the voltage 0
read a few volts due to their high input
impedance; this should be considered as 0 vac.
HTR and L2 terminals now read 120
voltage)?
Yes
No
Yes
No
Yes
No
Figure 1)
Go to Step #6
Check heat source and wiring in cooker
Go to Step #7
Replace water level control P/N 23198
Reconnect HTR &
Step #8
Replace water level control P/N 23198
8. Disconnect the wires from the HI and COM
HI &
line voltage between the WF and L2 termi
Is the voltage 0 vac?
Yes
No
Go to Step #9
Replace water level control P/N 23198
Page 62

Remove the short from the HI and COM terminals on the
erator. Disconnect the wires
disconnected
Disconnect the HI wire at the water sensing probe on the
STEP TEST RESULT REMEDY
9.
control board. Does the AC line voltage between WF
and L2 stay at 0 vac for about five seconds, then jump to
120 vac?
Yes
No
Reconnect El & COM wires and go to Step
#10
Replace water level control P/N 23198
10. Drain all water form the gen
from the LO, HI, & COM termi nals at the control board.
11. Disconnect the LO wire at the water sensing probe on
12. Reconnect the ohmmeter across each end of the
13. Connect an ohmmeter across the HI and COM wires
Connect an Ohmmeter across the LO and COM vires
leading to the generator. Does the Ohmmeter read
greater than 100,000 ohms?
the generator. Does the Ohmmeter connected in the
previous step now read greater than 100,000 ohms?
LO wire. Does the ohmmeter read less than 10 ohms? No Replace wire
leading to the generator. Does the ohmmeter read
greater than 100,000 ohms?
Yes Go to Step #12
No Go to Step #11
Yes
No
Yes Go to Step #13
Yes
No
Go to Step #12
Replace probe wiring
Go to Step #15
Go to Step #14
14.
generator. Does the ohmmeter connected in the
previous step now read greater than 100,000 ohms?
15. Reconnect the ohmmeter across each end of the
disconnected HI wire. Does the ohmmeter read less than
10 ohms?
Yes
No
Yes
No
Replace probe wiring
Go to Step #16
Go to Step #16
Replace probe wiring
Page 63

STEP TEST RESULT
REMEDY
16. Reconnect one lead of the ohmmeter to the COM wire at the
control board and connect the other ohmmeter lead to
generator ground. Does the ohmmeter read less than 10
ohms?
17. Reconnect the ohmmeter across the LOW terminal at the
sensing probe & generator ground. Does the ohmmeter read
greater than 100,000 ohms?
18. Reconnect the ohmmeter across the HI terminal at the sensing probe & generator ground. Does the ohmmeter read
greater than 100,000 ohms?
19. Remove probe and check for scale buildup on or across
probes. Replace probe assembly as required.
Yes
No
Yes
No
Yes
No
Reconnect HI LOW & COM wires
at control board only. Go to Step #17.
Replace probe wiring
Go to Step #18
Replace probe assembly
Go to Step #19
Replace probe assembly
Page 64

FIGURE 1 TWO-PROBE & COMMON WATER LEVEL CONTROL
Page 65

WIRING DIAGRAM ELECTRIC STEAM
WIRING DIAGRAM FOR ELECTRIC STEAM GENERATORS WITH
WIRING DIAGRAM FOR ELECTRIC STEAM GENERATORS WITH
GENERATORS
ELECTRICAL LOW-WATER HEATER CUTOFF, WITHOUT
MANUAL SAFETY RESET CIRCUIT PRIOR TO JANUARY, 1978
ELECTRICAL LOW-WATER HEATER CUTOFF. WITH MANUAL
SAFETY RESET CIRCUIT AFTER JANUARY, 1978
Page 66

0882 LITHO IN U.S.A
CLEVELAND RANGE CO., 1333 EAST 179th ST., CLEVELAND, OHIO 44110
Manufacturer reserves right of design improvement or modification, as warranted.
 Loading...