

Cleral Pro Series, SENTINEL PS2 User Manual

SENTINEL
PS2
Wireless, Pro Series
User Manual
1
rev #3 Oct 2012

Warning 4
Version and Revision 4
Weigh bridge (certified) 4
Pneumatic connections 4
Lift Axles 4
Fuel 4
Air Leaks 4
Recalibration 4
Batteries (2 X AA) 4
Technical Support 4
Warranty 4
Manufacturer 4
Keypad description 5
Sentinel PS2 Flow chart 5
Navigating in the menus 6
Communication Address 6
Automatic sensor acquiring 7
Selecting and Validating the channel 7
Changing channel 8
Releasing a channel 8
Exiting the Acquire mode 8
WIFi Ch Config 9
Manual sensor acquiring 10
Acquiring weights for straight body trucks 11
Acquiring trailer weights 11
Acquiring tractor and semi-trailer weights 12
Acquiring additional semi-trailer weights 12
Acquiring steering axle weights 12
Calibration Empty 13
Calibration Full 14
Multi-calibration 15
Slide FW 17
Net / Gross Weight 18
Language 18
Units 18
Increment 18
Displaying in tons 19
Number of decimals 19
Cycle time 19
Auto Zero 19
Pause Option 20
Battery saver 21
Auto Shut off 21
2

Shut off time 21
RS 232 21
No N/A 22
Controller 22
Choose truck 23
Steering axle 24
Nb channel 24
Suspension Configuration 25
TAG Axle (AUTO MODE) 27
TAG Axle (MAN MODE) 27
No Air limit 28
Hide No Air 28
Safety Menu 29
Printer address 31
SensorAdd 33
Sensor Name 34
MulConfiguration 34
PS2 Name 35
Date and Time 36
Technical information and trouble shooting 37
ERREUR Codes 37
Positioning wireless devices 39
Air connections 39
Recommended power supply 40
Batteries (2 X AA) Hand held 40
Wire connections 40
Pressure Stress 41
Zeros 42
Factors 43
Multi-point Factor 44
Errors Register 44
Err Cal 45
Europe EMC 45
LevelNoise 45
Mem Flags 46
Version 46
Revision 46
Factory reset 47
Precision problems? 48
Data before calling 49
3

Warning
Your Cleral onboard weighing system is a
tool. Learning to work with it can only make
it more efficient. Read this manual before
using your Sentinel PS2.
Version and Revision
Some functions described in this manual
may not be present in your PS2. This will
depend on the version and revision of your
device.
Batteries (2 X AA)
Do not invert battery position. CLERAL
recommends the following batteries:
Duracell : Power Pix ™
Energizer: Ultimate Lithium ™
Technical Support
For technical help, consult your local
authorized Cleral dealer.
Weigh bridge (certified)
Acquire the weights needed to calibrate
using a certified weigh bridge (Platform
scale). Whenever possible, record the
weights while sitting on the weigh bridge.
Pneumatic connections
Make sure that all air connections be made
according to the installation diagrams.
Lift Axles
Lift axles should always be in the UP
position while acquiring and recording the
weights in the PS2. If the vehicle is
equipped with an automatic lift axle
activation device, then you must acquire
and record the weights while the lift axle is
engaged (touching the ground) for both
empty and heavy calibration. And use the
system with lift axle down.
Fuel
To enhance the performance, fuel tanks
must be full to acquire and record the
weights.
Air Leaks
Leaks in the pneumatic system can
cause erratic and false weight readings.
Recalibration
Recalibration is necessary if you have
adjusted or replaced a leveling valve or if
you’ve replaced a mechanical sensor, air
transducer, or flexmeters.
Slopes
A slightly sloped terrain will not affect the
accuracy of your scale, but the bigger the
inclination the higher the error margin.
Learning to work with your Cleral system
will ultimately give you better precision in
these conditions.
Warranty
Cleral products are warranted against
defects in workmanship for a period of one
year from the original date of purchase.
The defective covered product will be
repaired or replaced by the manufacturer.
The defective product needs to be sent by
your local dealer to Cleral with proof of
purchase. This warranty does not cover
injury or damages caused by the use of
this product. It also does not cover all costs
connected with the replacement part
(labor, shipping and handling or other).
Cleral will not be liable for fines issued for
overweight violations while using its
products.
Contact your local Cleral dealer for repairs
and replacement parts.
Thank you for choosing and trusting
CLÉRAL CANADA
Manufacturer
CLÉRAL INC.
90, des Distributeurs
Val-d’or (Quebec) Canada
J9P 6Y1
Tel: (819) 825-5553
fax: (819) 825-5556
email: info@cleral.com
Web: www.cleral.com
4

Keypad description
On/Off
Weights Display
Calibration
Empty
Full
Multi Cal 00
Acquire
Acquire
Manual Mode
Wifi Channel configuration
Options
FW Slide
Net weight
Language
MeasureUnits
Increment
TonDisplay
Nb Decimal
Cycle Time
Auto Zero
Opt Pause
EnergySave
AutoShutOf
ShutOffTim
RS232
No N/A
Controller
Configuration
Choose Truck
Nb channel
SuspensionCfg
Tag Axle
Adjust Tag
NoAirLimit
Hide NoAir
Safety Menu
Sensor add
Sensor Name
Mul Config
Printer add
Nom PS2
Time and date
RS232 add
Technician
Pressure Stress
Zeros
Factors
Errors Register
Err Cal
Europe Wifi
LevelNoise
Mem Flags
Version
Revision
!
On/Off
Access calibration mode.
Confirm or advance in
menus.
Tare when empty.
Back one step.
Decrease.
Scroll down.
Sentinel PS2 Flow chart
Increase.
Scroll up
Change channel.
Advance in the menu
Back light On/Off
Print.
Transmit data.
or Pause.
Acquiring sensors.
Simultaneously to
access menu.
Simultaneously to Freeze
5
Navigating in the menus
PN: SA-W04-PS CH: A B C D
SN: S24-0906
ID: 403DC11A
CLERAL Onboard Scales/Pesages
embarquées
90 Des Distributeurs,Val-d’Or, Quebec, Canada, J9P 6Y1
Communication Address
Sentinel PS2 allows easy access to
menus and sub-menus. Refer to the
flow chart on previous page.
Being familiar with the flow chart will
facilitate the navigation and make your
system comprehension better. Here is
the principal behind the PS2
navigation.
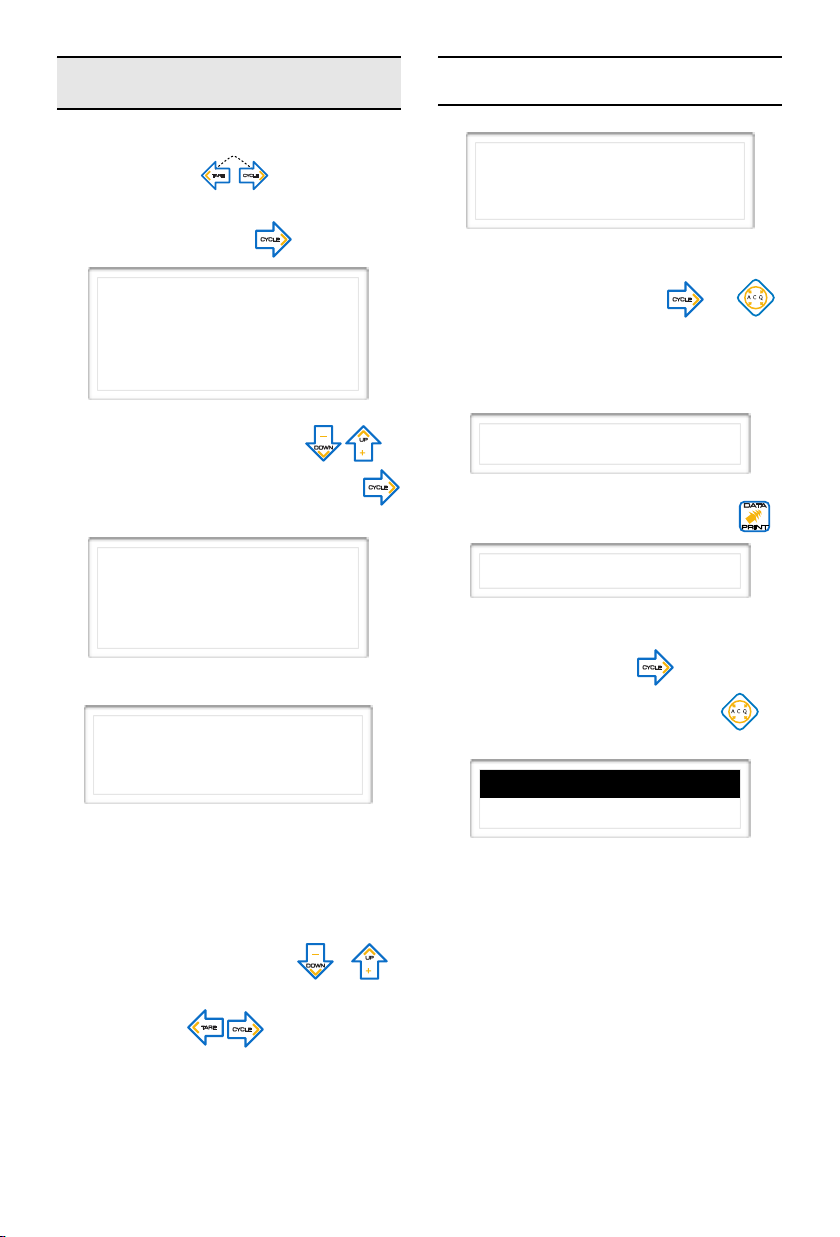
To enter the menu, press Tare and
Cycle simultaneously.
You will see:
➔Acquire
!Options
! Configuration
! Technician
The curser indicates the position. The
arrows are used to scroll
down or up as well as decreasing or
increasing a given value.
Every PS2, and wireless components,
have a unique communication
address. This «ID» is indicated on the
sticker on the back of your PS2 hand
held unit.
PN: MST-W05-PS2
SN: CS-590-3216
ID: 403D813E
CLERAL
Onboard Scales-Pesages embarquées
90 Des Distributeurs
Val-d’Or, Quebec, Canada
J9P 6Y1
819 825-5553
www.cleral.com
MADE IN CANADA
FABRIQUE AU CANADA
The air transducer «ID» is located on
the sticker that is on top of the
devices.
The multiplexer «ID» is also found on
the sticker on top of the device.
The right arrow is used to enter
(move forward) in the menu and the
left arrow to move one step
backward.
B
INPUT
CLERAL Onboard Scales/Pesages embarquées
90 Des Distributeurs,Val-d’Or, Quebec, Canada, J9P 6Y1
819 825-5553 www.cleral.com
PN: TMA-W04-PS SN: 4MQ-MS-5906
A
INPUT
ID: 403FB2DE
INPUT
D
MADE IN CANADA
FABRIQUE AU CANADA
INPUT
C
6
Automatic sensor acquiring
Before calibrating, each activated
channel needs to be associated with a
sensor (s). To do so you need to
acquire the sensors or multiplexers
that are connected to that specific
vehicle. Each device has a unique
address.
has changed, refer to the Acquiring
problems section.
Important!
If a sensor is Fixed on a channel, it
does not appear in the search results
when acquiring. To see if your channel
is fixed, refer to the section Fixing a
channel.
Automatic Acquiring
Press ACQ !.
The PS2 will display «Search».
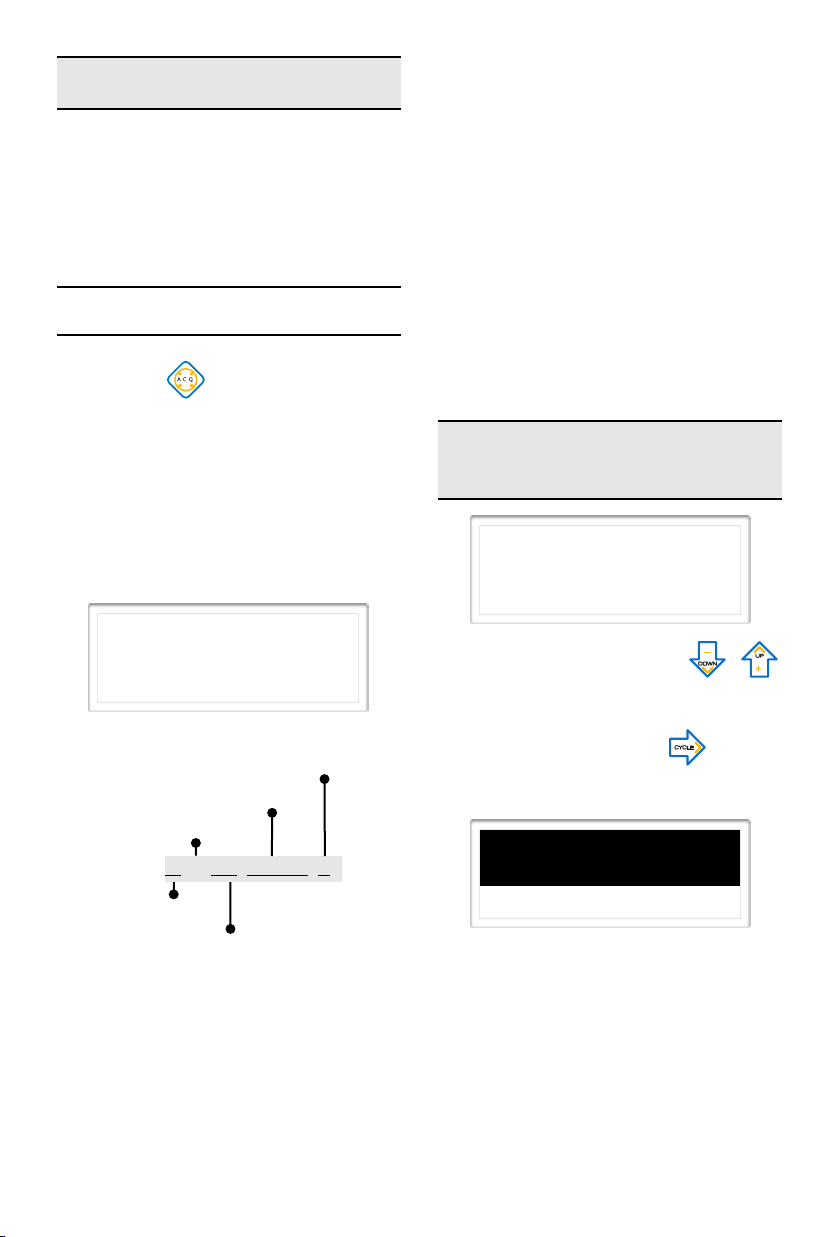
Here is an example of what the PS2
will have found. The curser points to
the first device found. Displayed is the
type of device (Air-mechanical-or
flexmeter), the «ID» and the channel
associated with the given device.
➔1: Air 4BCE56 A
2: Mec 4A11F8 C
3: Flx DD1258 X
Explanation:
Sensor channel (a/b/c/d/e/f/g/h/x)
Sensor «ID»
Order of reception
➔ 1: Air 01872F B
Curser
Acquiring procedures:
↳Validate and anchor the channel
↳Changing the channel
↳Exit
Selecting and Validating the
channel
➔1: Air 4BCE56 A
2: Mec 4A11F8 C
3: Flx DD1258 X
Use the Down and Up
arrows to select all the sensors that
are associated to the appropriate
channels, press the right arrow to
hi-light them.
➔1: Air 4BCE56 A
2: Mec 4A11F8 C
3: Flx DD1258 X
Type of sensor(Air/Mec/Flx)
Note!
If the PS2 displays «None» this
means that it has not found any
device. If this happens, try an
automatic acquiring again. If this fails,
try a manual acquiring. In case nothing
7
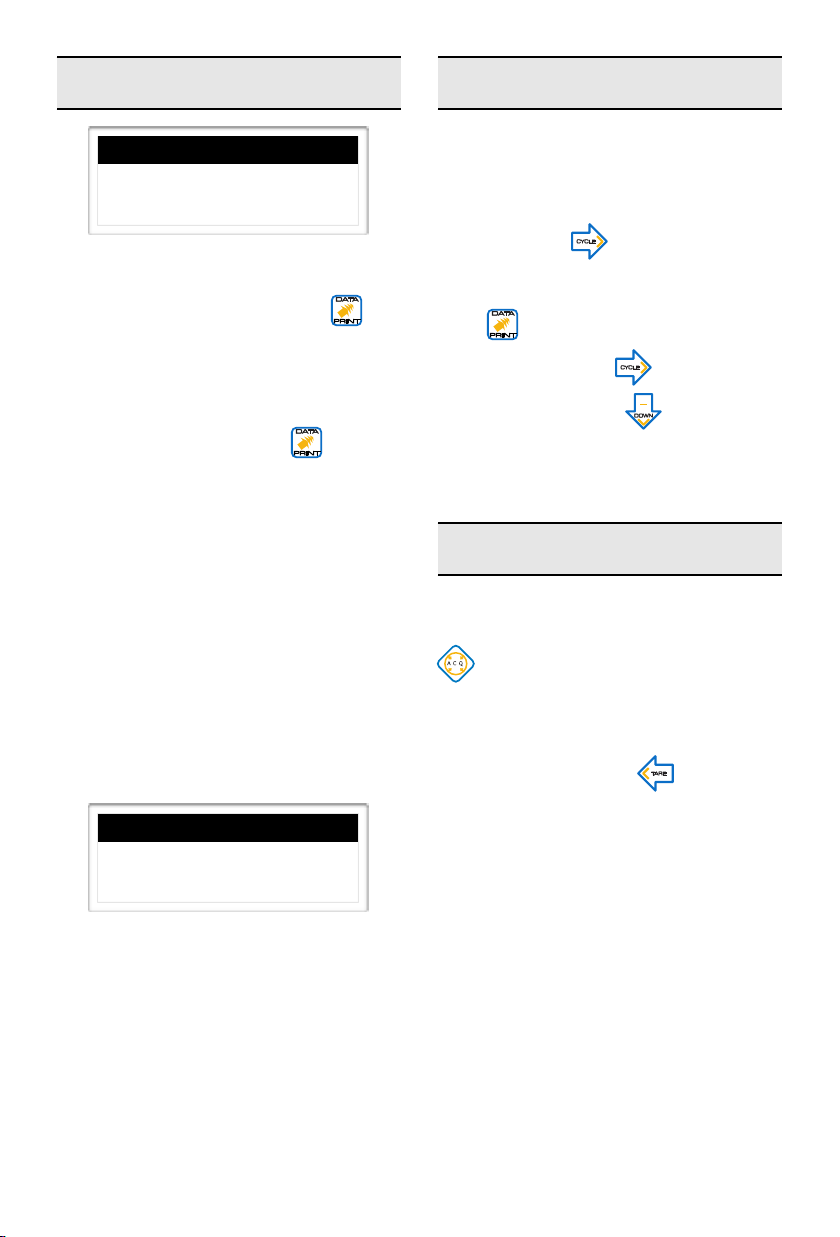
Changing channel
!
Releasing a channel
1: Air 4BCE56 A
➔2: Mec 4A11F8 C
3: Flx DD1258 X
If a sensor is not associated to the
correct channel, bring the curser to
select it and press Data/Print until
the channel is correct. Then press the
right arrow to hi-light it.
Note!
When pressing Data/Print , you will
only see the possible channels
according to your configuration (A B C
D E F G H X), can be displayed. The X
means that it is not associated to any
channel.
Important!
A configuration cannot have duplicated
channels. The PS2 will not allow you
to do so. In the example below, it is not
possible to anchor the second sensor
Air in A because channel A is already
associated to a sensor. Every other
channel is possible except channel A.
1: Air 4BCE56 A
➔2: Air 4A11F8 C
3: Air DD1258 A
Note that sensor can be identified to a
channel that is already associated to a
sensor, but that is only displayed, it
cannot be high lighted, thus it cannot
be acquired.
If you have mistakenly anchored a
channel, you can release while you
still in the menu. Replace the curser
on the channel to be released and
press Cycle to release the
channel. The address is no longer
highlighted. Presser repeatedly on
Data to select the appropriate
channel and Cycle to anchor the
new channel. Press to go to the
next address.
Exiting the Acquire mode
Once you have selected and hi-lighted
the appropriate sensors, press ACQ
.
If you have made a mistake or you are
not sure that you selected the correct
sensors, press Tare «Cancel».
will be displayed and will take you
back to the screen without validating
any sensors.
Once you press the Acquire button,
the PS2 searches for the sensors and
will display «anchor data» indicating
that it has loaded the sensors with the
corresponding addresses and
channels.
8
WIFi Ch Config
To set an address in memory to a
given channel. Setting a channel
where the address is permanent. This
can be d one for two channels
maximum. This feature is mostly
useful for two cases:
CASE 1- When the hand held is
always dedicated to the same two
sensors on a vehicle (channel A & B).
Press to go to B and t o
come back to A.
IMPORTANT !
The fixed channels will not appear
when acquiring. If you need to see the
fixed sensors, you need to change
them to Free.T
Acquiring in Fleet mode
CASE 2- For tractor-trailer fleets, we
usually fix the tractor and leave the
semi-trailers free for multiple swapping
possibilities. The fleets of tractortrailer, tractor sets the sensor (Channel
A) and left the other free channels for
frequent switching trailers.
IMPORTANT !
To fix a sensor it must previously be
acquired.
Acquire
Manual Mode
➔ Wifi Ch Config
With the curser on Wifi Ch Config
press Cycle to enter the menu.
The following appears showing the
channels that are free.
To fix the channel, press Cycle ,
When acquiring in the presence of
multiple instrumented tractors with
fixed sensors, only the semi-trailers
with free sensors will appear. You only
need to select the desired semi and
anchor it.
Use to select the desired
semi to anchor. Use to high light
and , ACQ ! to confirm and exit.
IMPORTANT !
It is not possible to anchor a sensor on
a fixed channel.
Free will change to Fix.
➔A: 4BCE56 Fix
➔B: 4A11F8 Free
9
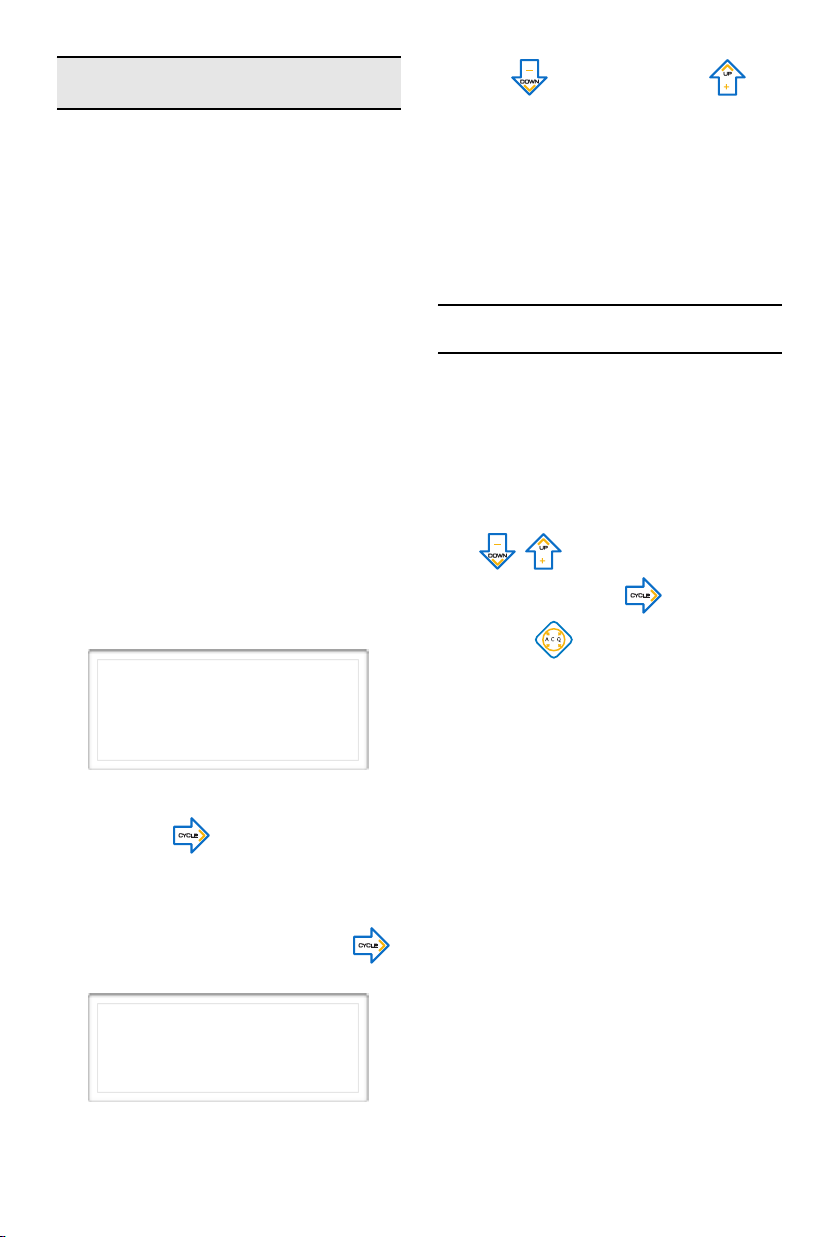
Manual sensor acquiring
!
!
↑
Enter address
To manually acquire a sensor, press
Tare and Cycle simultaneously
to access the menu. Scroll to select
Acquire. Press Cycle to enter.
➔Acquire
Options
Configuration
Technician
Use the Up or Down arrow to
select Manual Mode. Press Cycle
to enter.
Acquire
➔Manual Mode
Wifi Ch Config
This screen will appear.
Enter Address
40000000
↑
The address that needs to be entered
is located on the sticker that is on the
device. This number is preceded by
«ID». The curser points to the first digit
that you may have to change. Using
the Down and Up arrows ,
select the desired digit then using the
Left and Right arrows, move
Enter Address
403D817E
Once the last digit entered make sure
to press the right arrow or
acquire. The PS2 will «Search» and
then will indicate «Found 1» if it has
found it and the device «ID» will be
displayed.
➔1: Air 3D817E A
To c h an ge th e c ha n ne l p re ss Da t a .
➔1: Air 3D817E B
Once the device has the correct
channel, press Cycle to hi-light
and confirm. Then press ACQ
validate.
to
➔1: Air 3D817E B
If no device is found, try again. If still
no success, you may have entered the
wrong «ID». There can also be no or
not enough power to the device.
Check trouble shooting section.
to the next digit.
10

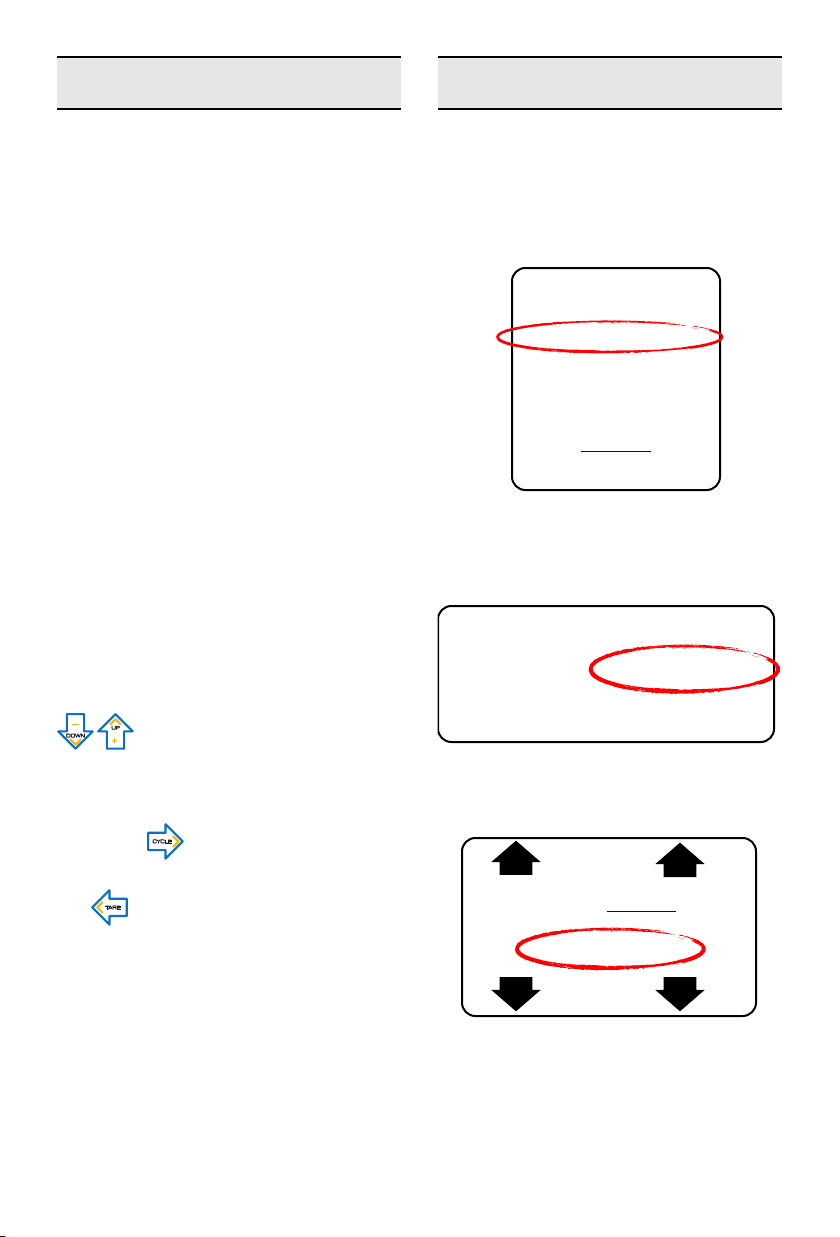
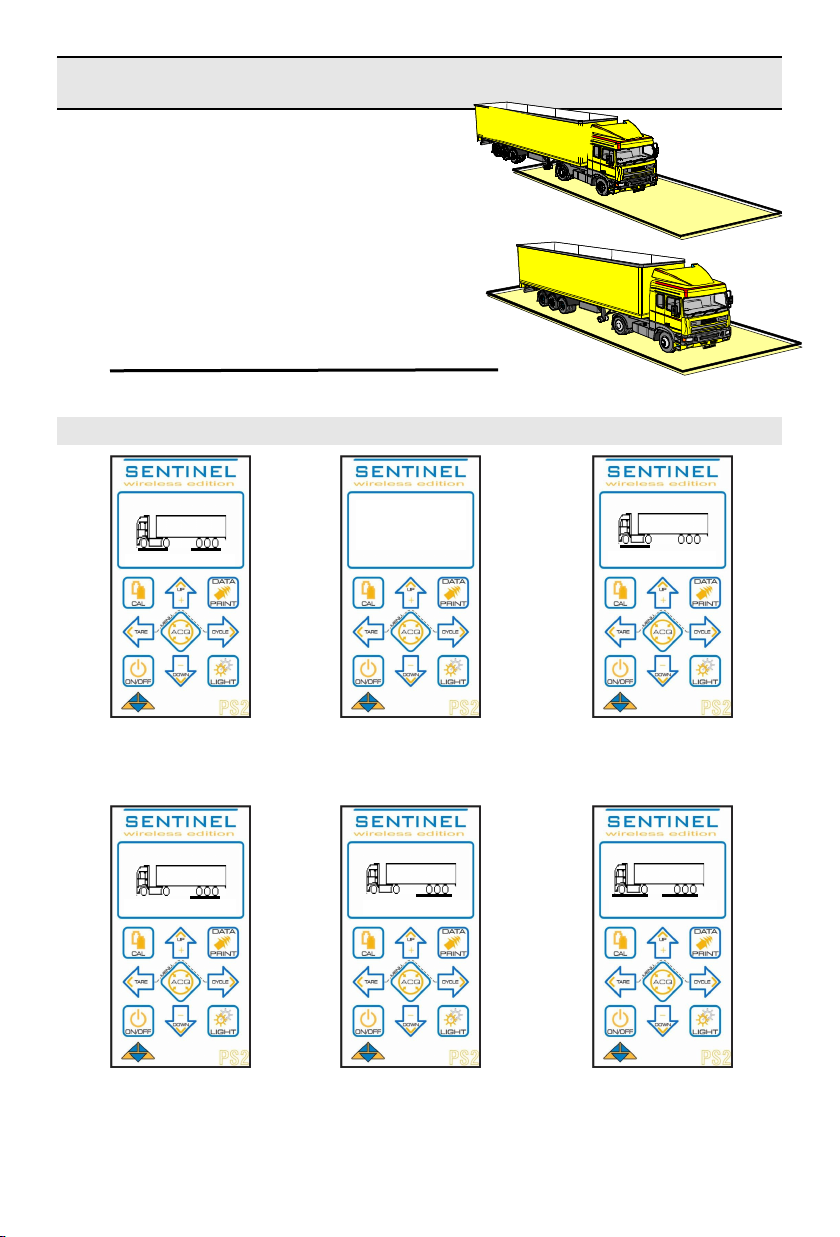
Acquiring weights for straight body trucks
Weigh
Weigh bridge
The first step in calibrating your PS2 is getting the weight information for each
axle groups. Get the steer axle weight for channel A and then weigh the entire
vehicle and subtract the channel A weight from the total weight to get the channel
B weight.
Channel «A» Channel «B»
Weigh bridgeWeigh bridge
Weigh bridge
Weigh bridge Weigh bridge
Weigh bridge
To ta l
(-) Channel A
= Channel B
Acquiring trailer weights
Once the weights of the tractor are taken, the next step is to acquire the trailer
axle group weights. Weigh the whole tractor and then the rear axle group
(channel D) and subtract D from the whole trailer weight to get channel C weight.
Channel Channel«D»
If the trailer has central axles, as illustrated below, just acquire the whole axle
group weight only.
C+D
(-) Channel D
= Channel C
Channel
Weigh bridge
11

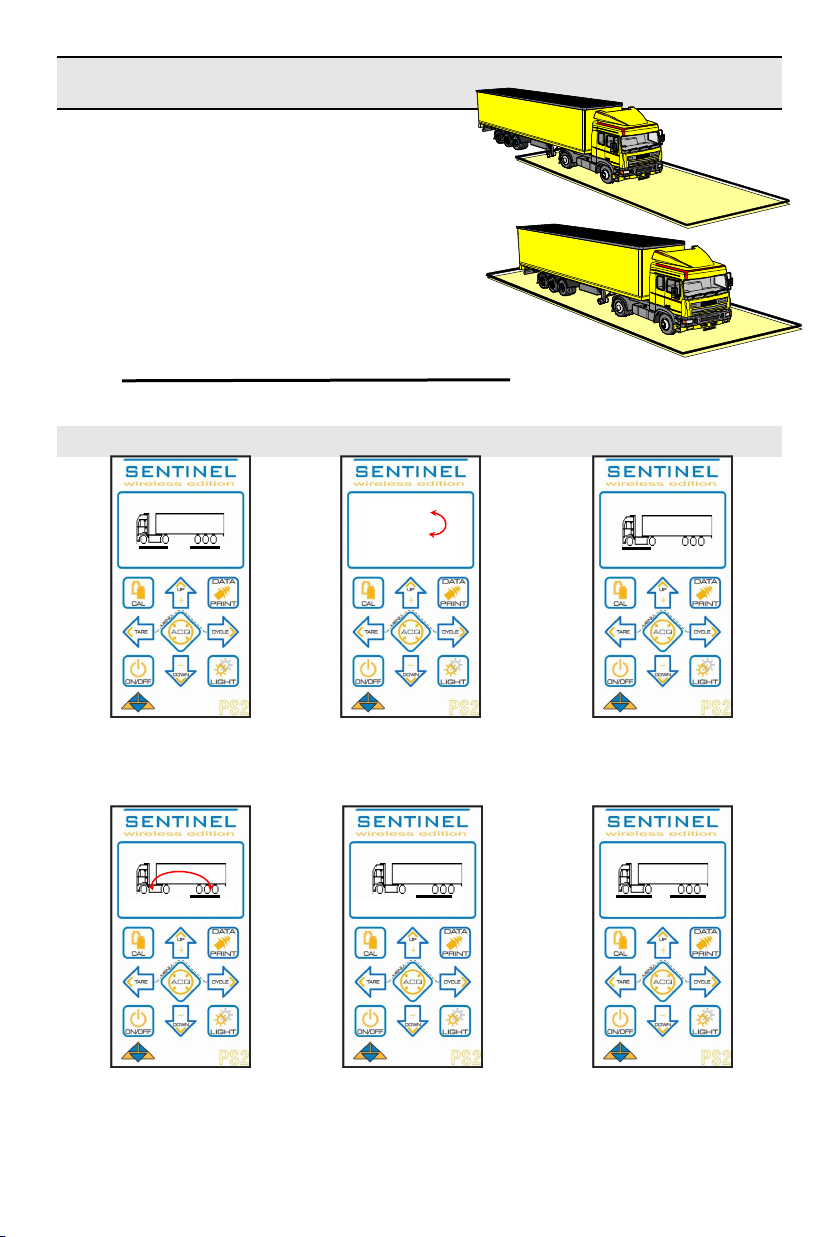
Acquiring tractor and semi-trailer weights
Weigh the tractor only (Channel A) then weigh the whole rig (Total). Subtract the
tractor weight from the Total weight to determine the weight of the semi-trailer
(Channel B).
Channel «A»
Weigh bridge Weigh bridge
Channel «B»
Acquiring additional semi-trailer weights
Any additional axle groups should be weighed individually.
Channel
Weigh bridge
Acquiring steering axle weights
In the case where the steering weight is required, acquire by making sure that
only the steer axle is on the weigh bridge. To acquire the drive axle weight, weigh
the whole tractor and subtract the steer axle weight.
If the steer axle is instrumented : Channel A B C
If the steer axle is not instrumented (Virtual): Channel S A B
Channel «A» or «S»
Weigh
bridge
Channel «B» or «A» Channel «C» or «B»
Weigh bridge Weigh
12
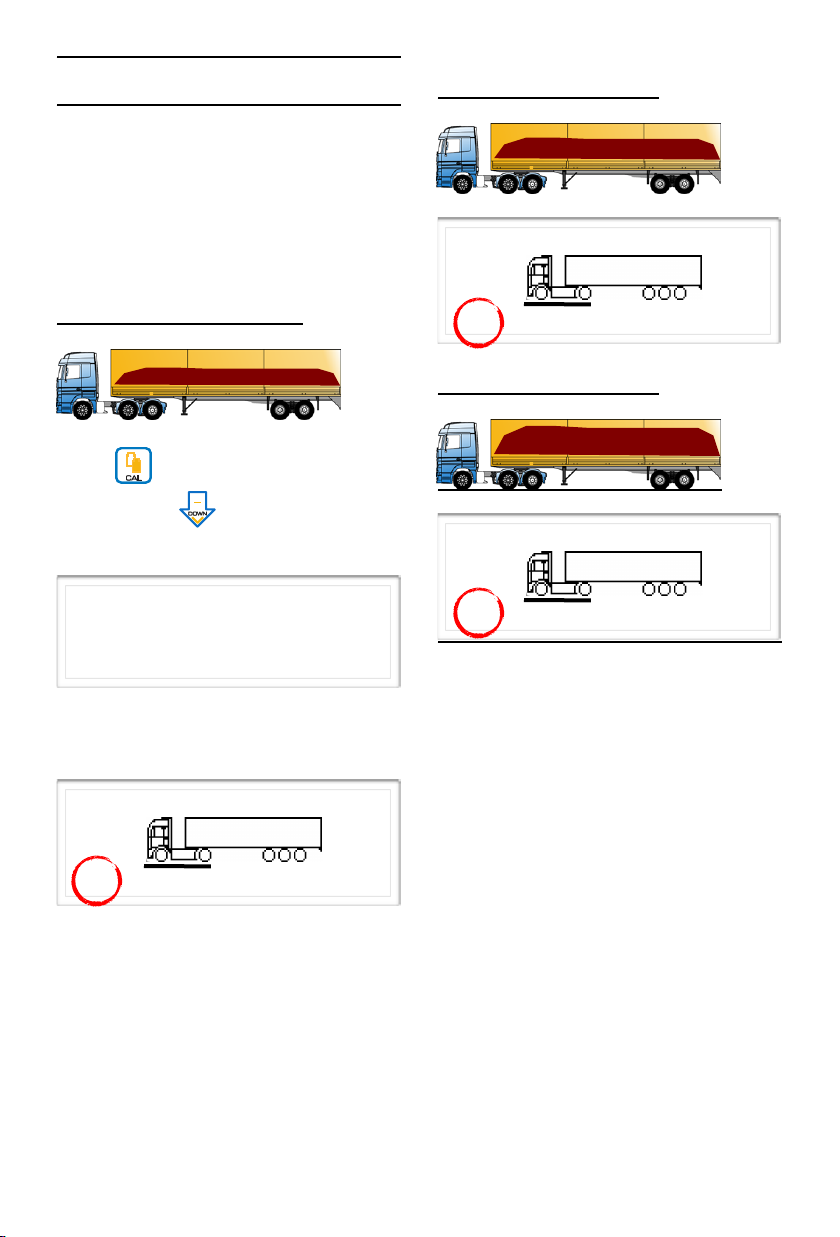
Calibration Empty
3000 3000
☞
☞
☞
☞
☞
☞
Ex: 20500
Ex: 7500
Acquire vehicle weights
Advance the empty tractor only on the weigh
bridge. Make sure that the semi-trailer wheels
are not on the weigh bridge.
EMPTY
Note the tractor empty weight:__________Kg
Advance the entire rig on the weigh bridge.
Total Empty weight :_________kg
Tractor Empty weight (-) :_________kg
Note the semi-trailer empty weight :_________kg
Recording the empty weights
GWT T: 6000 Kg
Press Cal to enter the
Calibration menu
Empty T:16000 Kg
Ex: 13000
Ex: 13000
➔Empty
Full
Multi Cal 00
With the curser pointing
Empty, press the right
arrow
Empty T:20500 Kg
Empty
③②①
Empty T:16000 Kg
13000
Use down or up arrow to
record channel A weight
⑥⑤④
GWT T: 20500Kg
13000 3000
Press the right arrow
to change channel
7500
Use down or up arrow
to record channel B
weight
13000 7500
Press right arrow to exit
13
Calibration Full
Ex: 57000
Ex: 24000
☞
☞
☞
☞
☞
☞
☞
Full
Acquire vehicle weights
Advance the Full tractor only on the weigh bridge.
Make sure that the semi-trailer wheels are not on
the weigh bridge.
Note the tractor empty weight:__________Kg
Advance the entire rig on the weigh bridge.
To ta l F u ll we i gh t :_________kg
Tractor Full weight (-) :_________kg
Note the semi-trailer Full weight :_________kg
Recording Full weights
① ② ③
GWT T: 20500 Kg
13000 7500
Ex: 23000
Ex: 23000
➔Empty
➔ Full
Multi Cal
Full
Full T: 30500 Kg
23000
❷
Press Cal to enter the
Calibration menu
④
Full T: 30500 Kg
23000 7500
Press right arrow to
change channel
Use down arrow to move the
curser to Full
Press Right arrow
⑤ ⑥
Full T: 57000 Kg
24000
Use down or up arrow to
record channel B weight
14
❶
Use down or up arrow to
record channel A weight
GWT T: 57000 Kg
23000 24000
Press right arrow to exit

Multi-calibration
Vide
Plein
➔ Multi Cal 0 0
➔ Multi Cal A 0
➔ Multi Cal A B
Determining the calibration points
When the suspension has a nonlinear
effect Multi-calibration function is used.
The algorithm of this function
increases the accuracy.
Press CAL to enter the calibration
menu. Press to select Multi Cal.
With the curser on Multi Cal, press
Cycle . The first letter blinks.
Press to change the 0 (non
activated) to channel A (activated
Multi-Cal on this channel).
Press Cycle to go to the next
channel and press to change the
0 to channel B. Only the activated
channels will appear.
This feature forces you to make three
full calibration points instead of one.
Here is the method for determining the
optimal multi-curve calibration.
First, determine the average weight
that you carry on the channel to be
calibrated (Fa2 = 14000kg). Then
determine the average weight greater
than the weight that will never be
exceeded (F3 = 17000kg). Finally,
determine the weight lower than
average weight in which you do not
carry (Fa1 = 11000kg). Thereafter it is
necessary to calibrate these three
points.
Note!
You must respect the legal weight
limits at any time.
FYI
In the case of our example, the curve
Cs suspension illustrates the
deformation of the suspension by
weight. The segment Dp1 represents
the calibration curve at a single point.
As can be seen, there are differences
in weight between this line and the
curve Dp1 Cs. Cp3 curve is the curve
of multi-calibration. We note that the
differences are significantly reduced.
Weight
Fa3
To exit, press to stop the blinking
and press ACQ ! to exit.
Cp3
Dp1
Fa2
Fa1
Cs
STRESS
15
Multi-Cal 3 Point Calibration
Empty
➔ Full
Multi Cal 00
Total : 31000
1 11000 20000
Total : 34000
2 14000 20000
Total : 37000
3 17000 20000
Following the determination of the 3point loading, load and calibrate point
1, 2 and 3. It important to follow the
progress of loading the lightest to the
heaviest.
Channel A Example
Loading Point 1 : 11000 kg
Press to enter the calibration
menu. Press , to bring curser to
Full.
Load Point 2 : 14000 kg
Load Point 3 : 17000 kg
With the curser on the desired
channel, use the arrows to record the
weight of point 1.
The display shows, at the bottom left
corner, the point of calibration that you
are recording.
Repeat these steps for Point 2 and 3.
Important!
If your calibration is not good, you
must repeat the entire calibration of
the three calibration points.
Important!
If you disabled the Multi-Cal, the factor
will that will be used is Point 2, it is
determined by the maximum legal
weight.
16
 Loading...