

Page 1
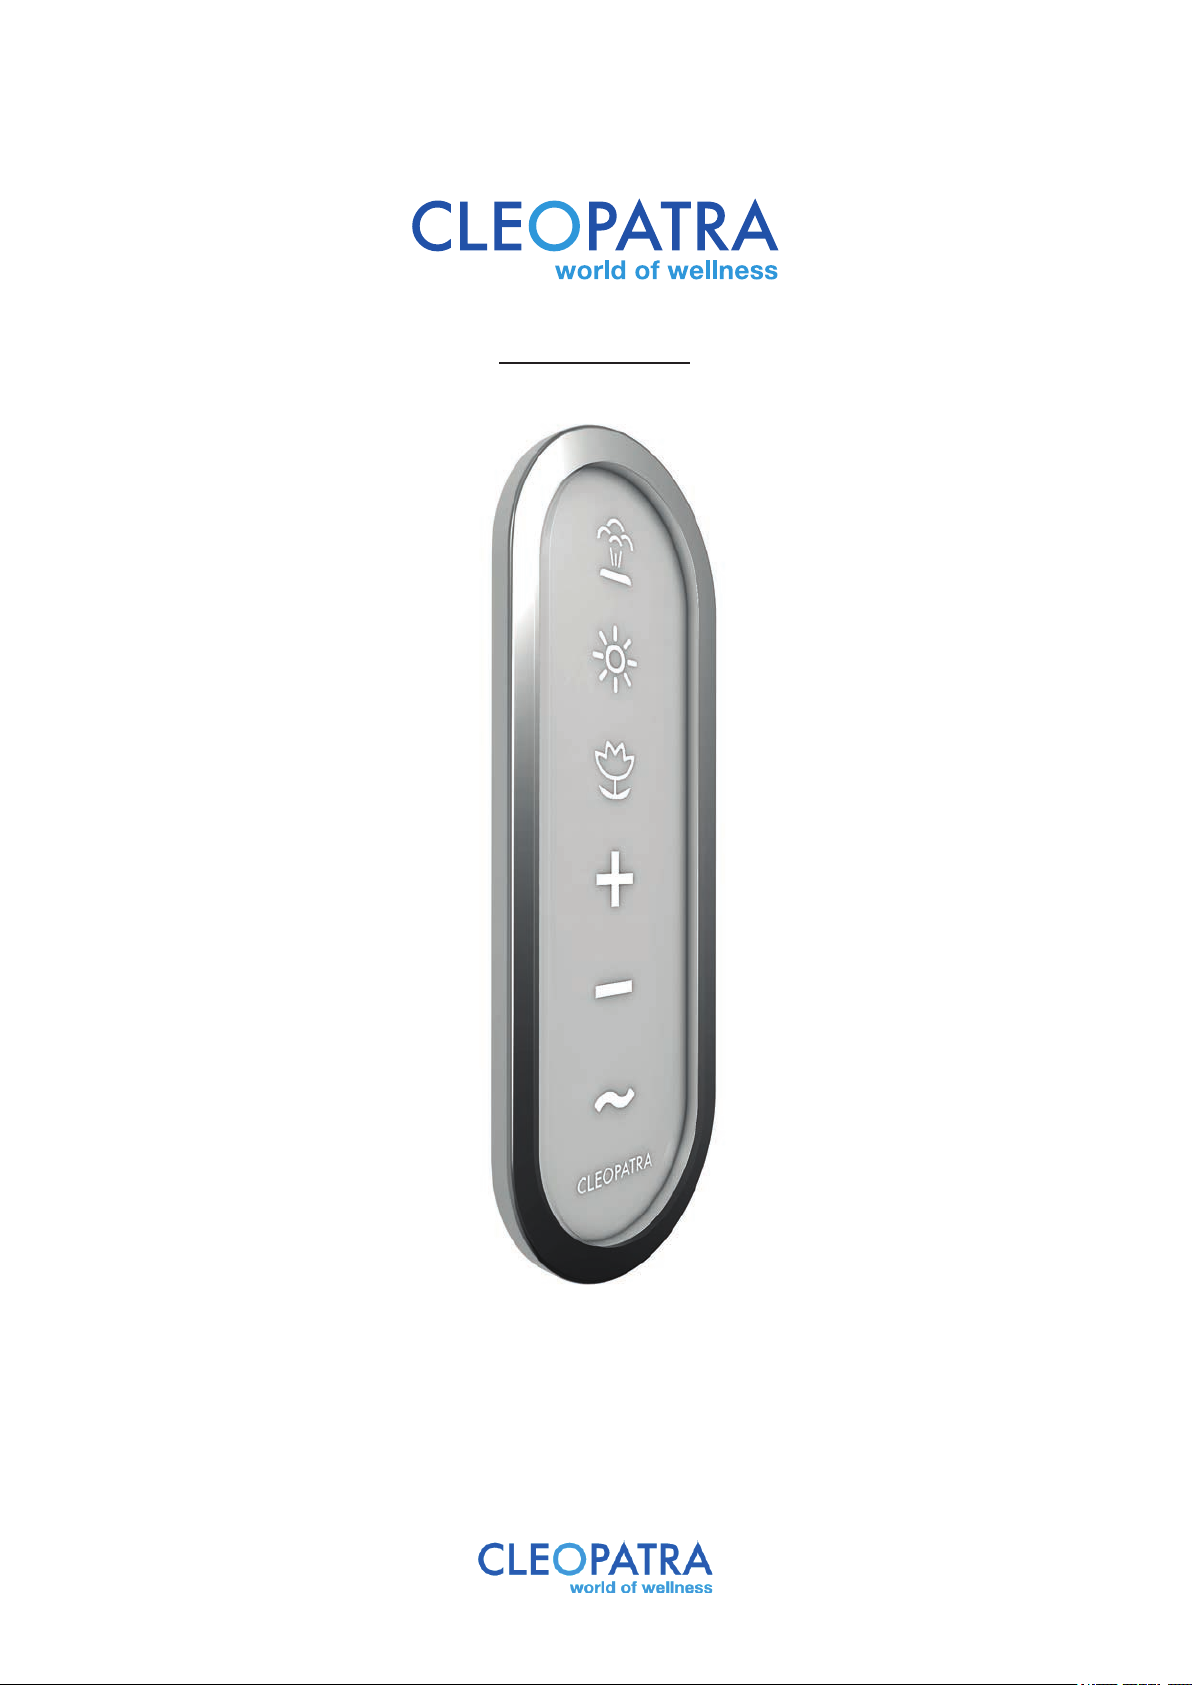
Steam Smart
Item no: 90187001
NL2017/07 R01
EN2017/07 R01
Gebruikershandleiding (p.2)
User manual (p.16)
NL
EN
1
Page 2

Cleopatra B.V.
Oostzijde 295
1508 EN Zaandam
Nederland
Copyright
Alle informatie in dit technische document, evenals de tekeningen en technische beschrijvingen
beschikbaar gesteld door Cleopatra B.V., blijven het eigendom van Cleopatra B.V. en mogen
niet worden gekopieerd zonder toestemming. Cleopatra B.V. behoudt het recht voor om
wijzigingen aan te brengen in het belang van verdere ontwikkelingen.
Actueel op: 20-07-2017
2
Page 3

Inhoudsopgave
Gebruikershandleiding
1 Waarschuwingen ......................................................................................................4
2 Bediening ...............................................................................................................5
3 Bediening Stoom .......................................................................................................6
4 Bediening licht ..........................................................................................................7
5 Bediening van de geurstof dosering ............................................................................8
6 Storingen ...............................................................................................................9
7 Geurstof .............................................................................................................10
7.1 Bijvullen van de geurstof (BackWall uitvoering) .................................................11
7.2 Bijvullen van de geurstof ..................................................................................12
8 Onderhoud .............................................................................................................14
3
Page 4
1 Waarschuwingen
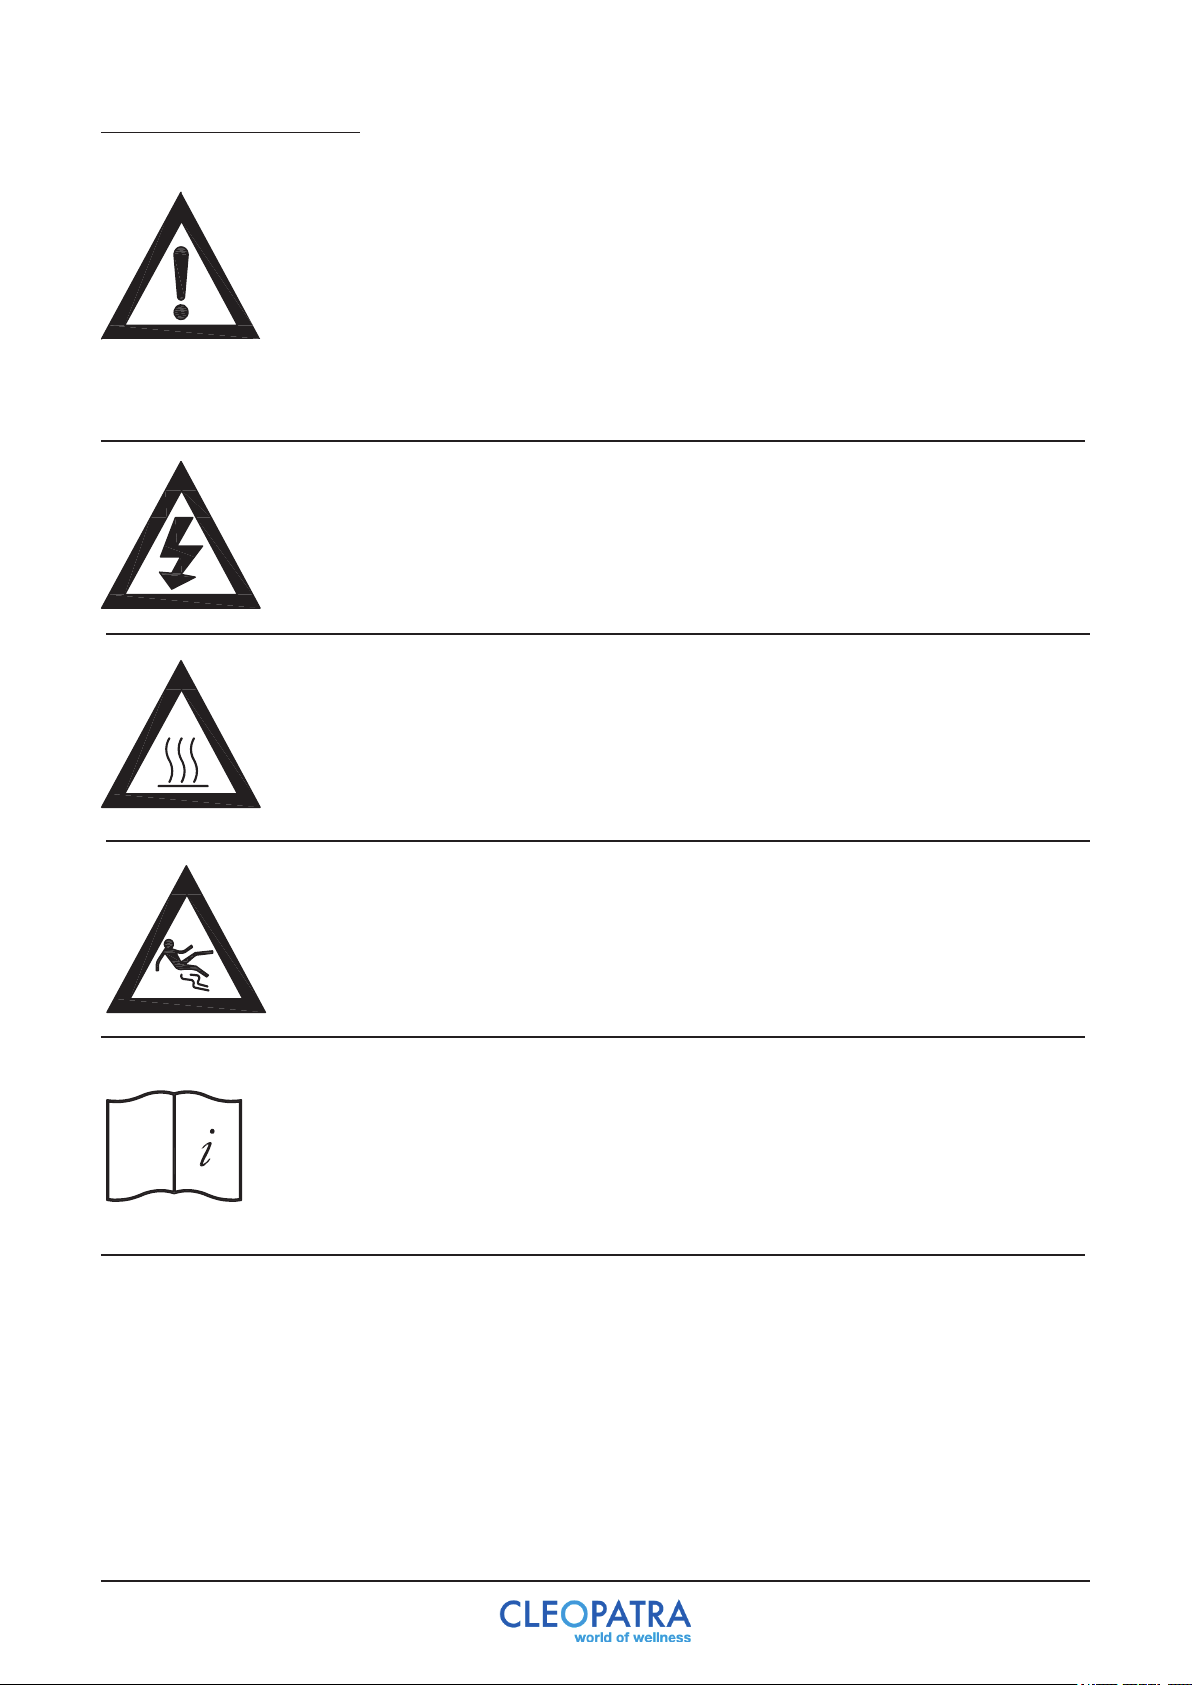
Zonder toestemming en zonder aanwijzingen is het gebruik van de stoomcabine
voor de volgende personen verboden:
- Kinderen
- Volwassenen met beperkingen
- Personen die niet geïnstrueerd zijn, over waar de stoomcabine voor
bedoeld is.
- Personen onder invloed mogen geen gebruik van de
stoomcabine maken.
Het meebrengen van elektrische apparaten in de cabine is verboden!
Waarschuwing hete oppervlakken.
De stoominlaat, maar ook de nabije omgeving hiervan zijn heel heet. Niet
aanraken i.v.m. verbrandingsgevaar. Niet direct de hete damp aanraken i.v.m.
verbrandingsgevaar.
Waarschuwing voor uitglijden.
De bodem van de cabine kan glad zijn.
Voor het gebruik van de stoomcabine moet de gebruikshandleiding zorgvuldig
worden doorgelezen!
Maximale verblijfstijd in de cabine: 15 min
Luchtvochtigheid in de cabine: 100%
Maximale temperatuur in de cabine: 60 ˚C
4
Page 5
2 Bediening
Kinderen mogen de stoomcabine alleen onder begeleiding gebruiken. Wanneer kinderen het
apparaat gebruiken zonder begeleiding, wordt dit als oneigenlijk gebruik beschouwd.
Gebruik alleen geurstoffen die bij de Voedsel en Waren Autoriteit bekend zijn.
Voorbereiding
De stoomgenerator moet volgens de aanwijzingen in de installatiehandleiding zijn aangesloten
voordat het systeem wordt aangezet. Verzeker u ervan dat de installatie juist is uitgevoerd.
- Draai de stopkraan open
- Schakel de stroom in
De stoomgenerator is nu klaar voor gebruik.
Stomen
Het is noodzakelijk dat de voorbereidingen zoals hierboven omschreven uitgevoerd worden
voordat er gestoomd gaat worden.
A
B
C
D
E
F
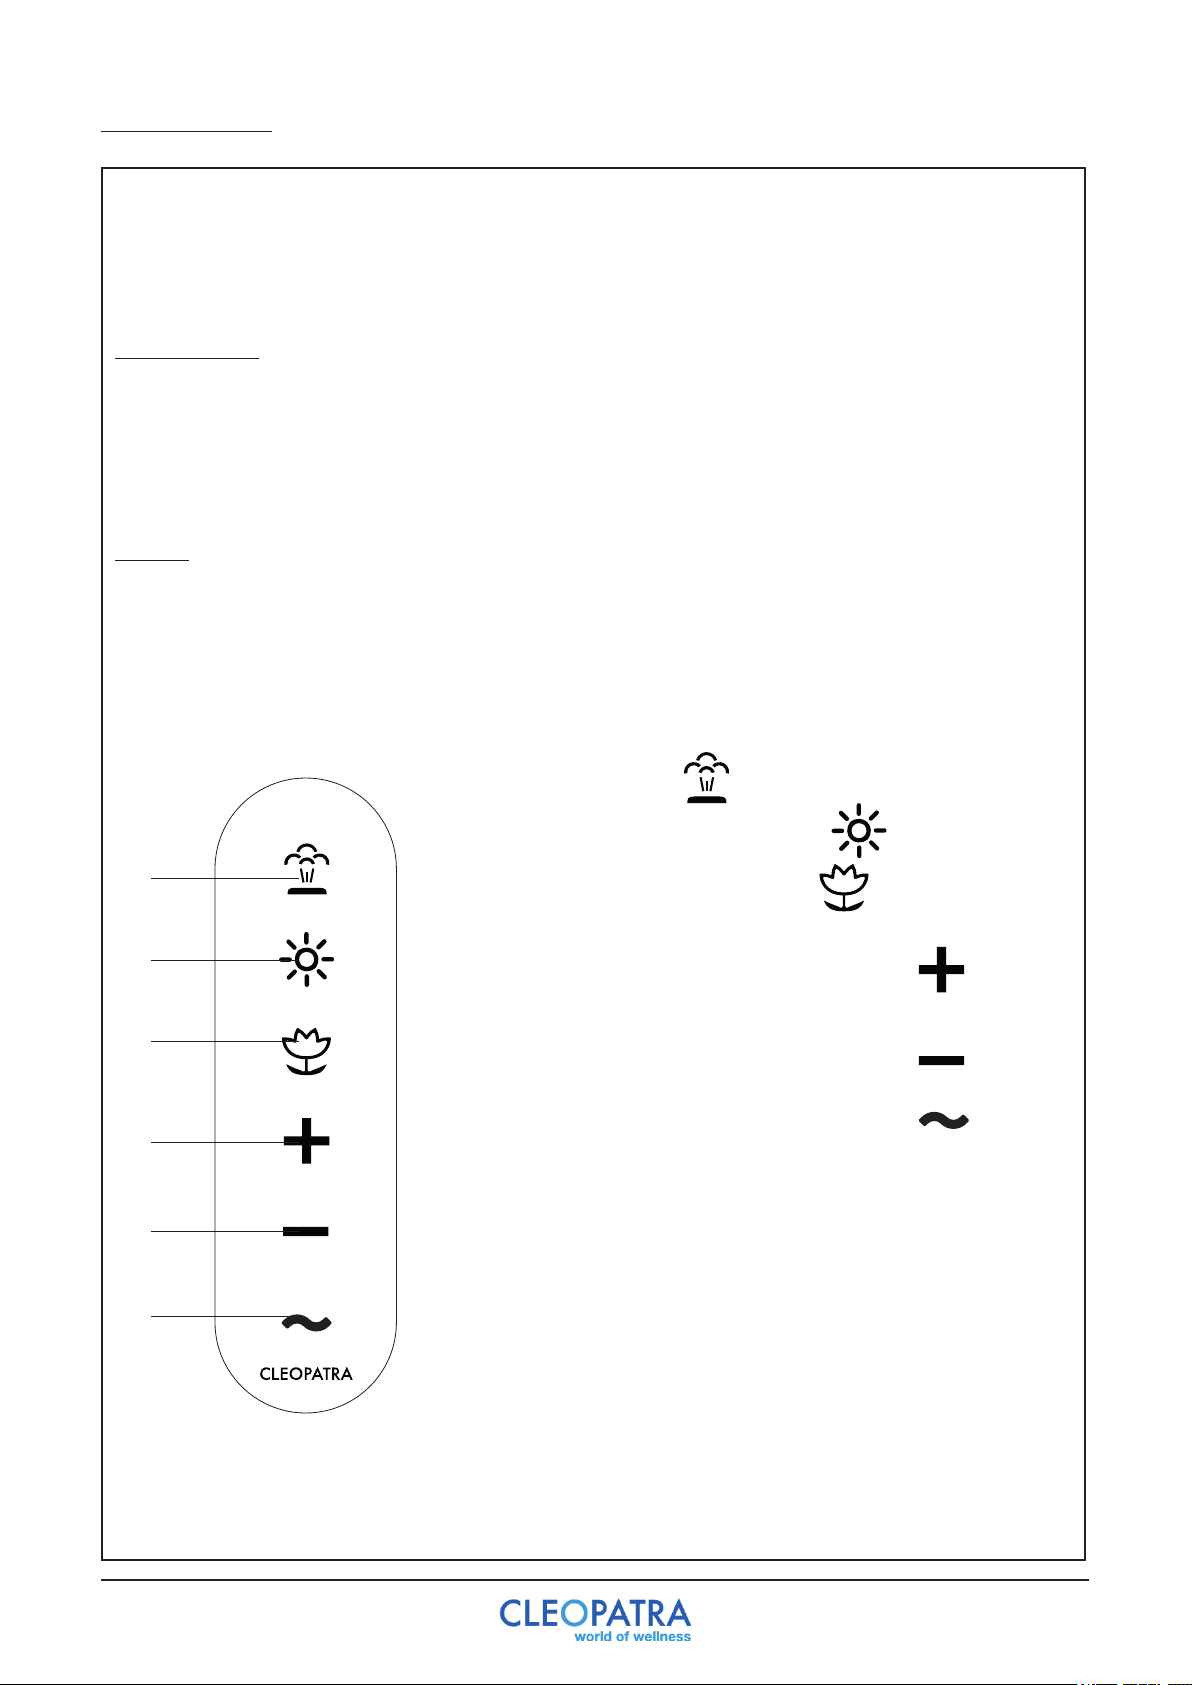
A. Stoomtoets (aan / uit)
B. Licht toets (licht / kleurlicht aan/uit)
C. Geurstof toets (geurstof aan / uit)
D. + Keuzetoets (aanpassing stoom capaciteit /
geurstof instelling / kleurlichtprogramma)
E. - Keuzetoets (aanpasssing stoom capaciteit /
geurstof instelling / kleurlichtprogramma)
F. Interval kleurlichtprogramma
Druk toets A 2x (stoom) om de stoomgenerator te activeren.
De A (stoom) toets is nu helder verlicht.
De eerste stoom is na 5 minuten zichtbaar. Druk toets A (stoom)
nogmaals 2x om de generator uit te schakelen. Voor keuzetoets
D, E of F drukt u eerst op de functie (A, B of C) om te selecteren.
Als de functie niet goed werkt, controleer dan de bedrading
en/of de watertoevoer.
Afbeelding 1
5
Page 6
3 Bediening Stoom
A
D
E
Afbeelding 2 Afbeelding 4Afbeelding 3
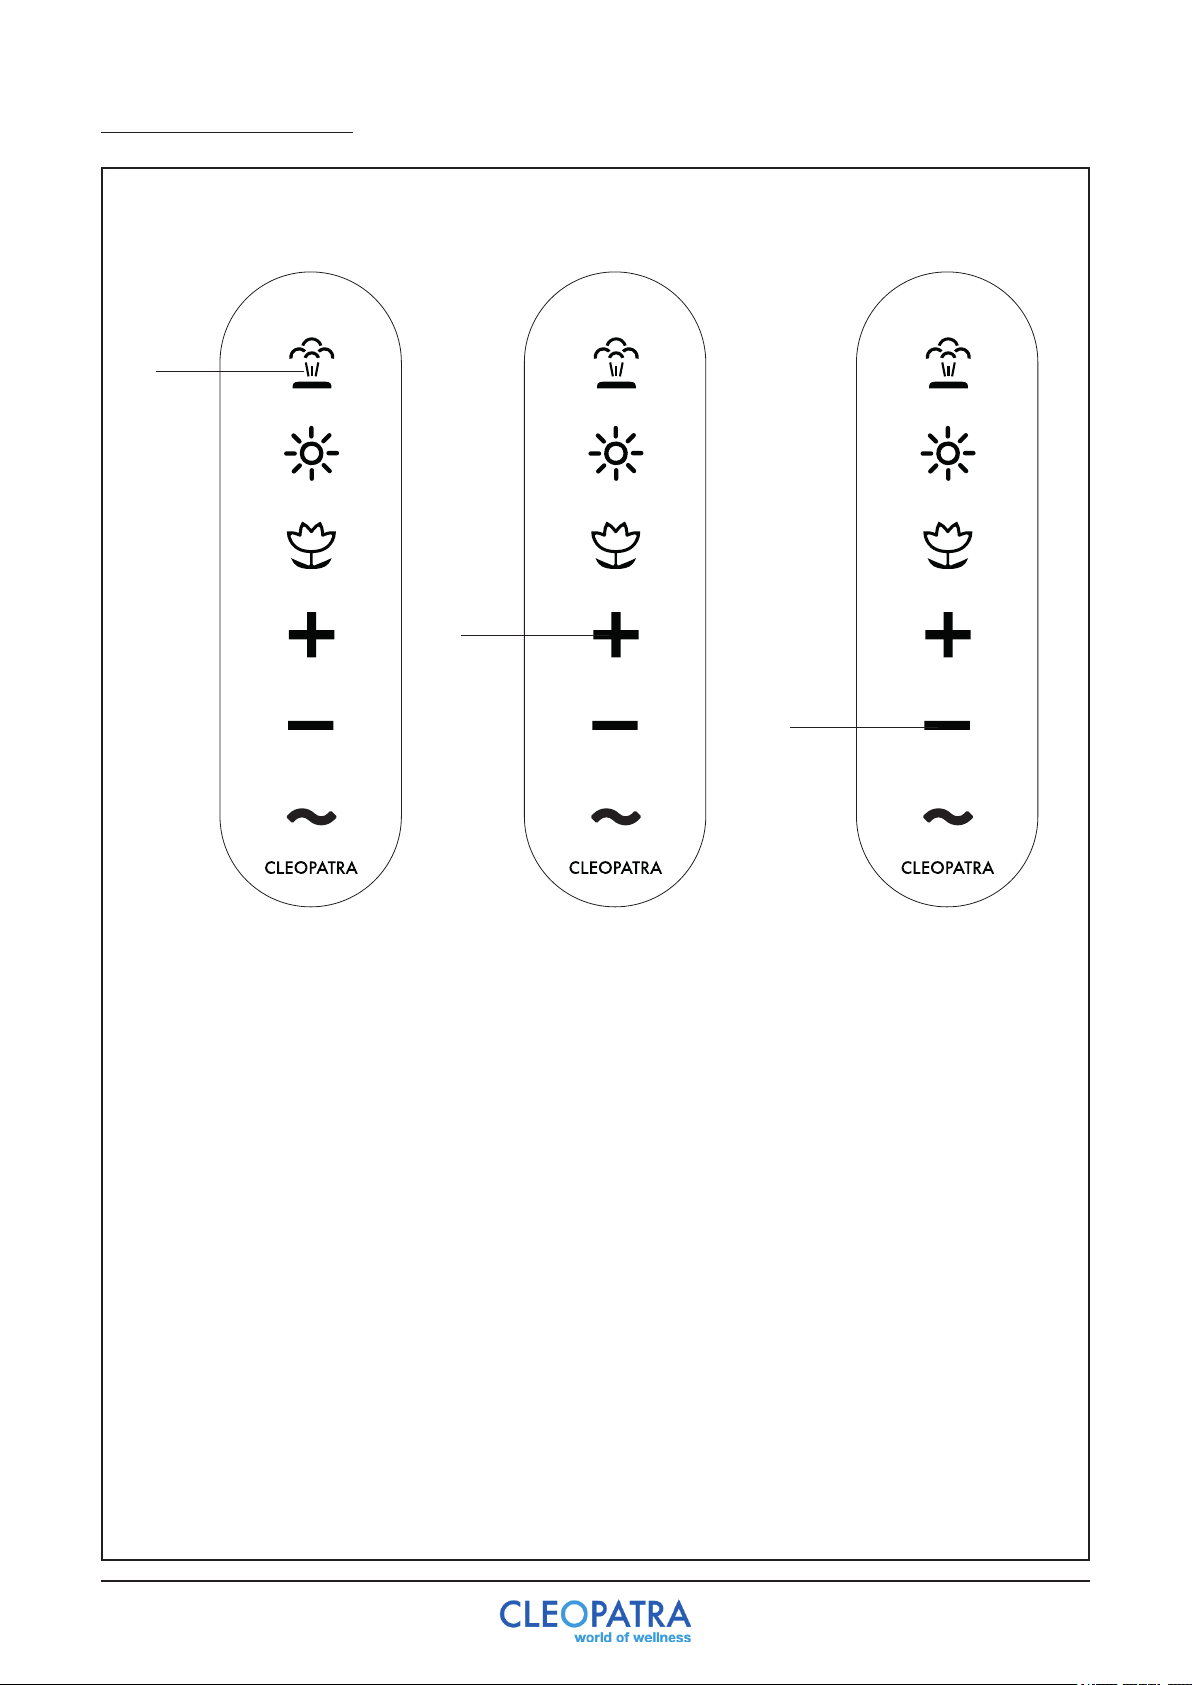
Stoom functie (A):
Druk toets A in om de stoomtoets te activeren (de toets is helder verlicht) of te deactiveren, de
toets is niet verlicht (zie afbeelding 2). Druk nogmaals om de stoom aan /uit te zetten.
Stoomcapaciteit aanpassen:
Druk toets A in om de toets te activeren. Druk hierna toetsen D/E in om de stoomcapaciteit
aan te passen. De stoomcapaciteit kent 3 standen: laag, midden en hoog. Bij de laagste
stand knippert de stoomtoets 1x, bij de middelste stand 2x en bij de hoogste stand 3x.
6
Page 7
4 Bediening licht
B
D
E
F
Afbeelding 5 Afbeelding 6
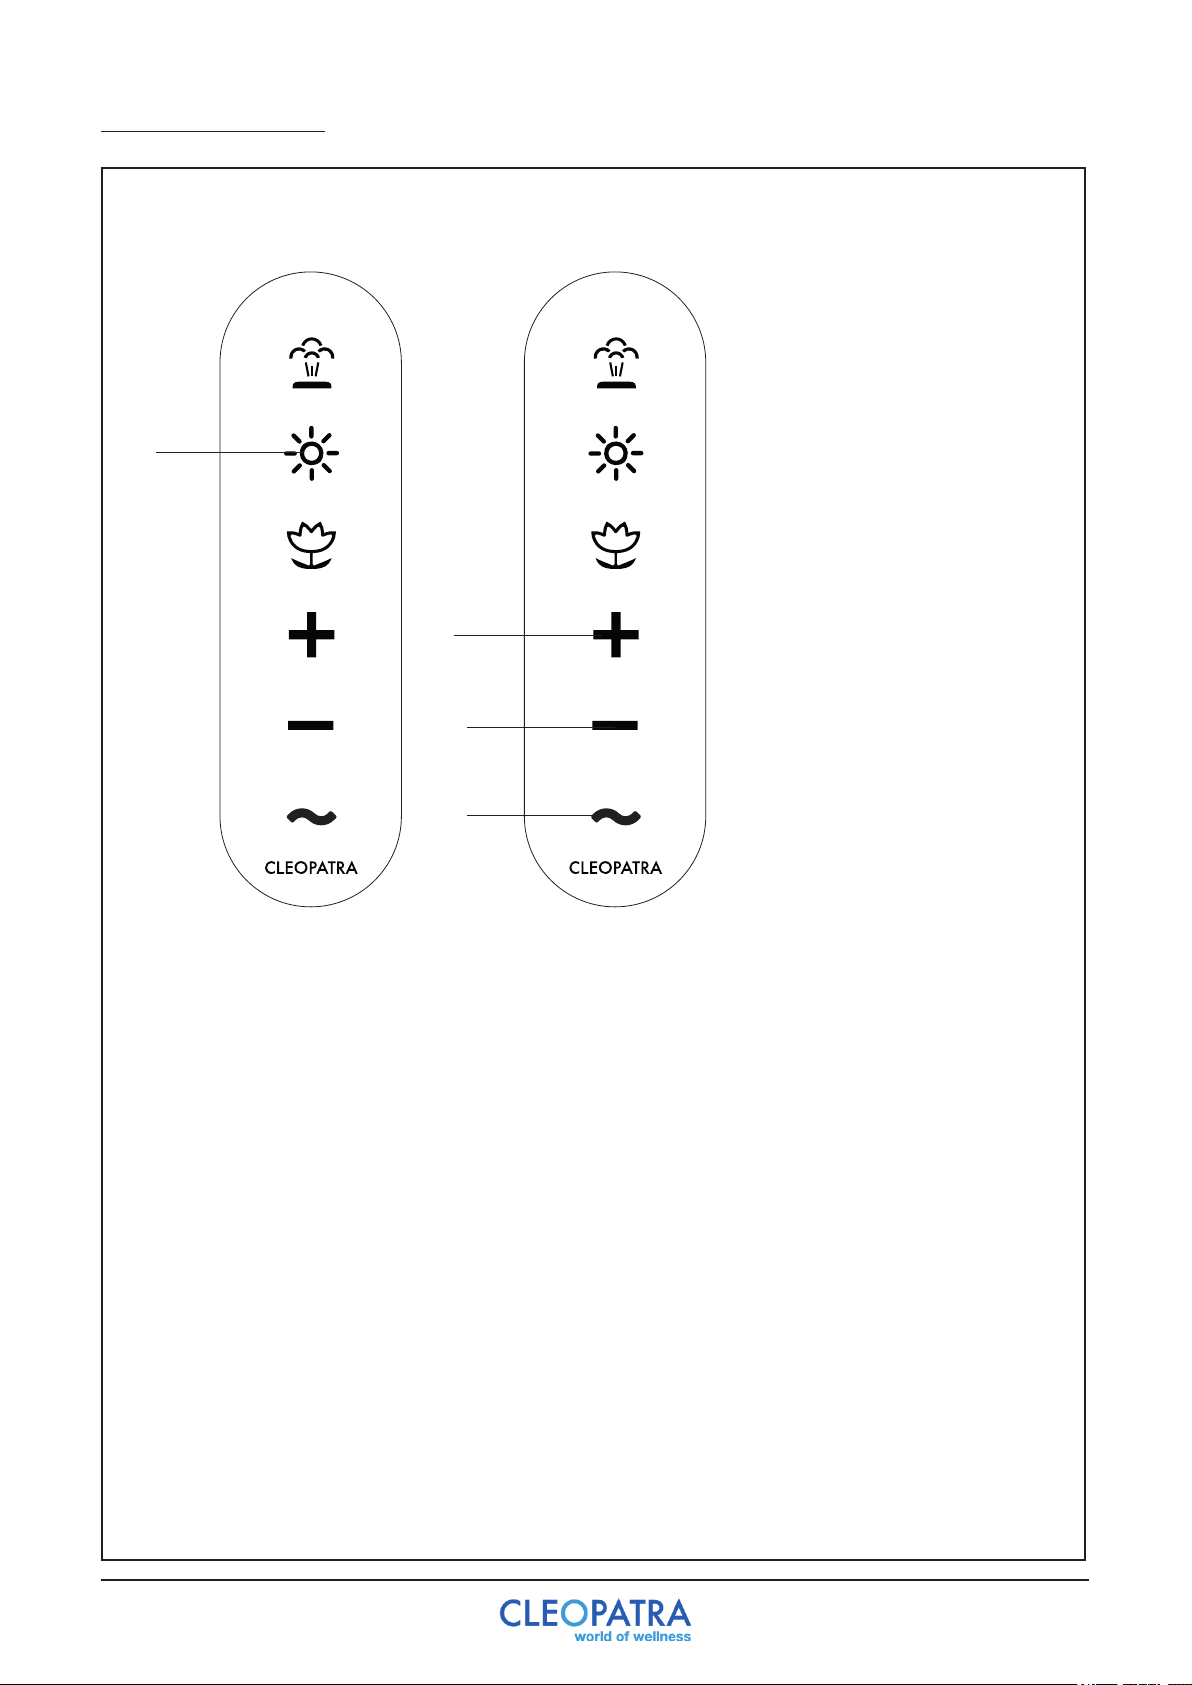
Verlichting activeren (B):
Druk toets B in om de verlichtingstoets te activeren, de toets is helder verlicht, of te deactiveren,
de toets is niet verlicht (zie afbeelding 5). Druk nogmaals om de verlichting aan /uit te
schakelen.
Verlichting aanpassen:
Druk toets B in om de toets te activeren. Druk hierna op de D/E toets om de verlichting aan
te passen. Wanneer er op toets F wordt gedrukt, zal het systeem automatisch van kleur
veranderen. Dit kan alleen wanneer er kleurlicht aanwezig is (zie afbeelding 6).
Het licht gaat na 60 minuten automatisch uit of druk 2x op toets B.
7
Page 8
5 Bediening van de geurstof dosering
C
D
E
Afbeelding 7 Afbeelding 9Afbeelding 8
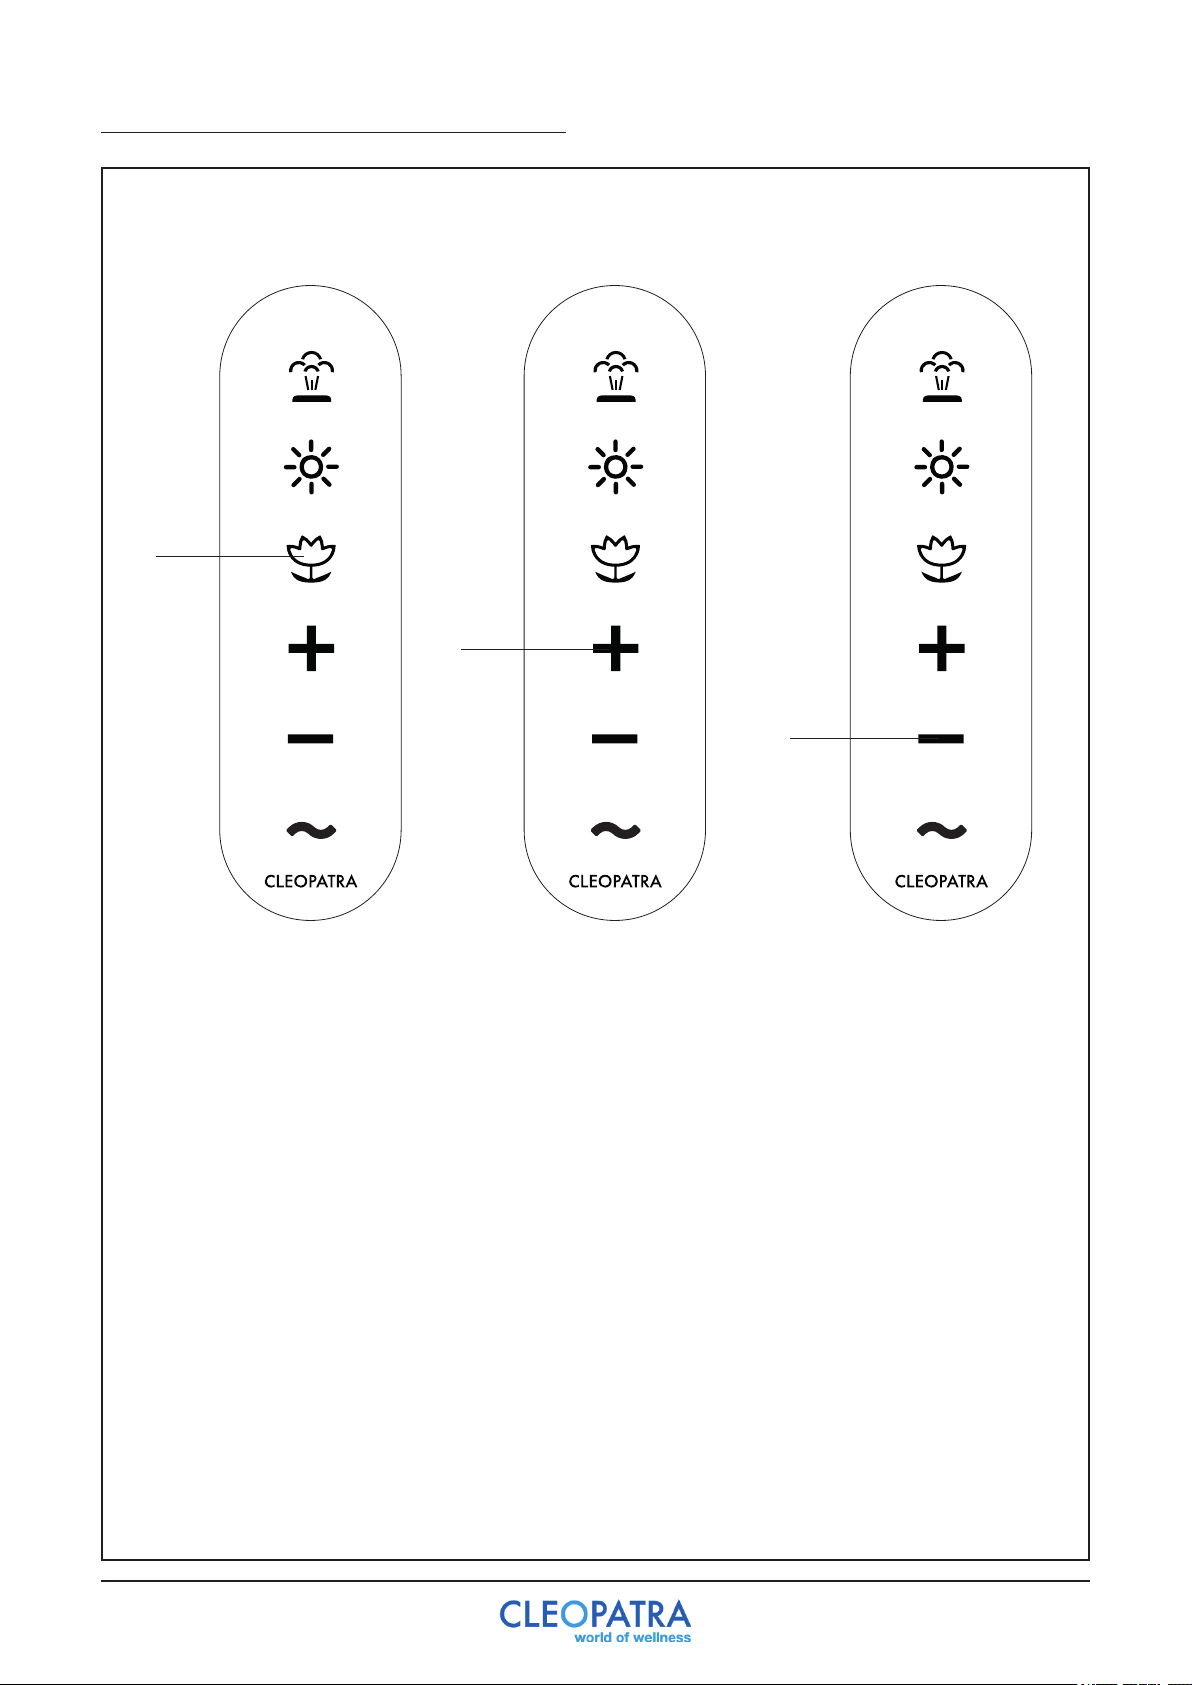
Geurstof activeren (C):
Druk toets C in om de geurstoftoets te activeren, de toets is helder verlicht, of te deactiveren,
de toets is niet verlicht (zie afbeelding 7). Druk nogmaals om de geurstof in/uit te schakelen.
De geurstof toevoer werkt niet gedurende de eerste 3 minuten van de stoomcyclus.
Geurstof capaciteit aanpassen:
Druk toets C in om de toets te activeren. Druk hierna toetsen D/E in om de geurstof capaciteit
aan te passen. De geurstof capaciteit kent 3 standen: laag, midden en hoog. Bij de laagste
standknippert de toets 1x, bij de middelste stand 2x en bij de hoogste stand 3x.
(zie afbeelding 8,9)
8
Page 9
6 Storingen
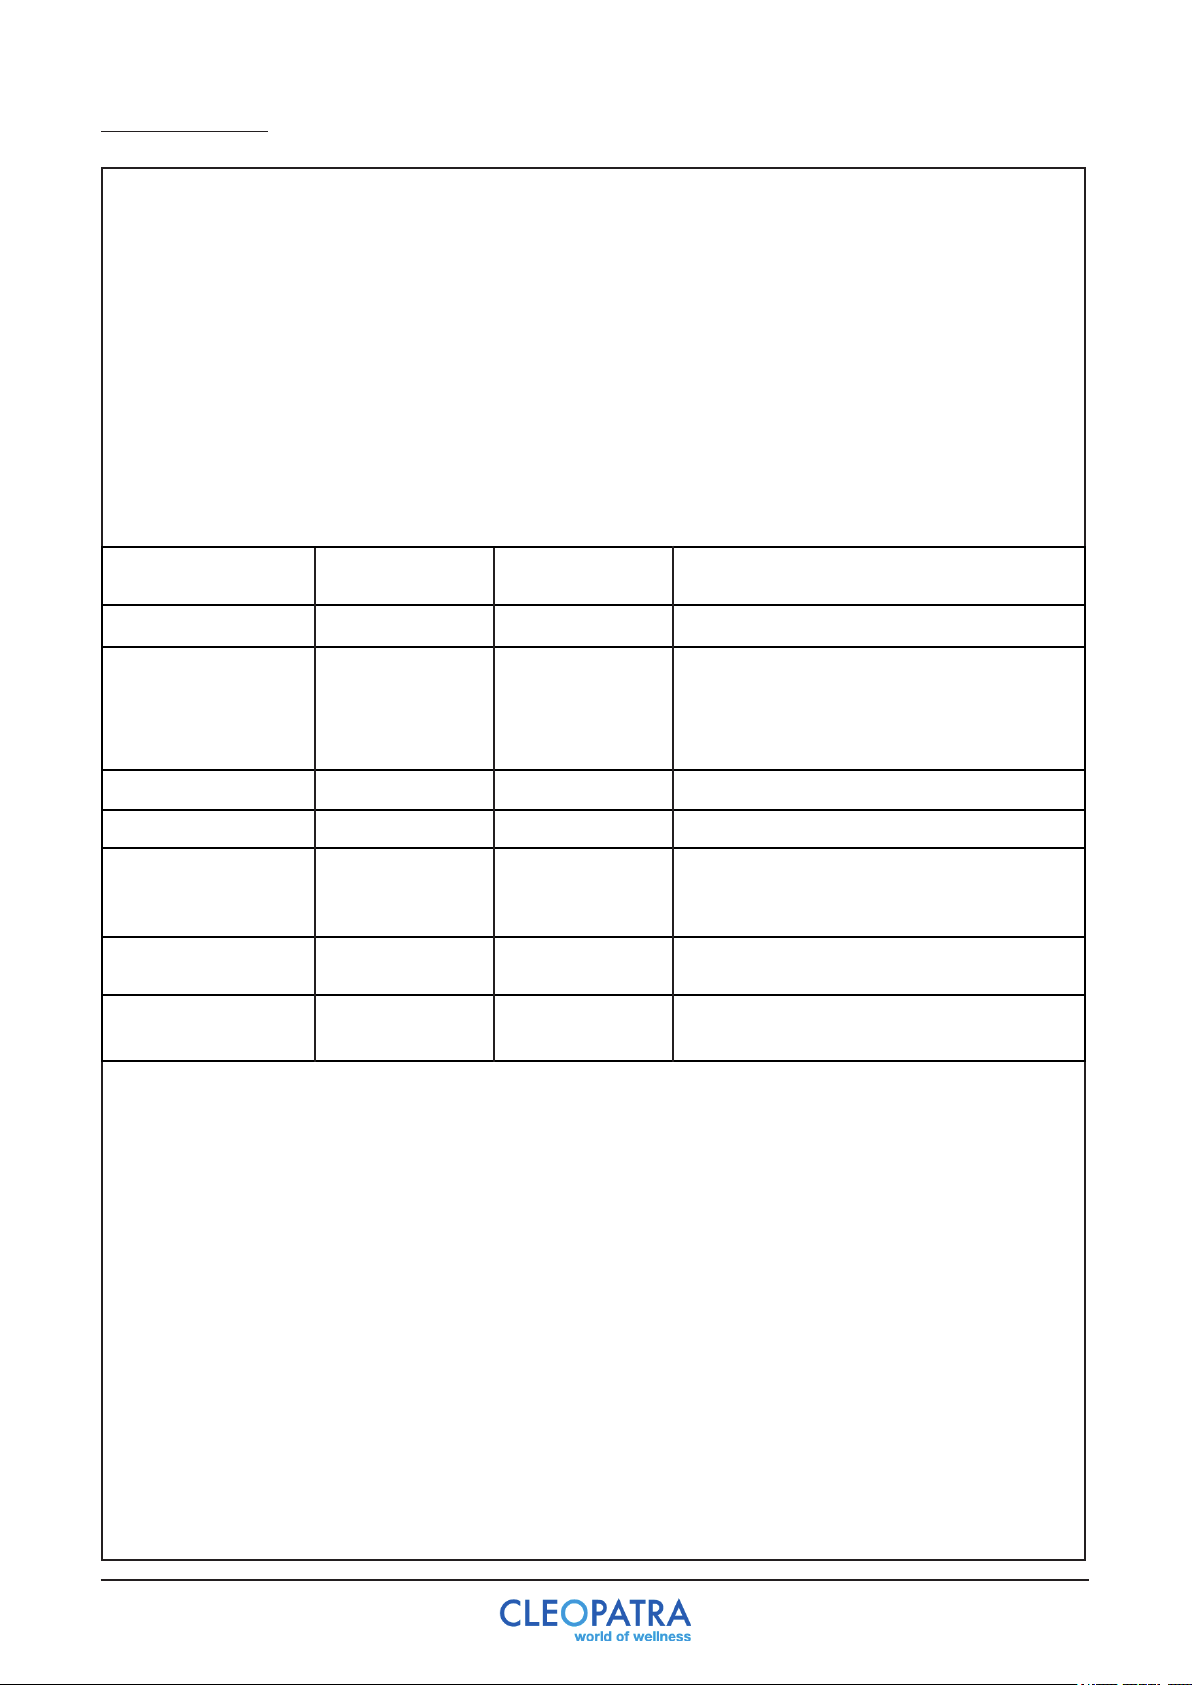
Een storing wordt gemeld door het display.
Door het aantal LED’s welke oplichten te tellen, wordt duidelijk welke storing wordt gemeld. Hieronder
een aantal voorbeelden:
-Wanneer er 2 LED’s oplichten, code 2
-Wanneer er 5 LED’s oplichten, code 5
Om een storing te resetten, moet de stoomknop 5 seconden worden in gehouden. Natuurlijk moet wel
eerst de storing worden verholpen, anders keert deze steeds terug. Het display wordt na de handeling
volledig donker.
Foutcode LED Intervall 1 LED Interval 2 Omschrijving
Foutcode-1 100000 100000 Reserve
Foutcode-2 110000 110000 Te weinig water - oorzaak:
- Inlaat ventiel opent niet
- Watertoevoer gesloten / te klein
- Inlaattijd te klein (configuratie)
Foutcode-3 1110 0 0 111000 Safety Sensor in uitgeschakeld
Foutcode-4 11110 0 111100 Temperatuursensor geeft geen signaal
Foutcode-5 111110 111110 Functie / foutcode nog niet in gebruik.
Gereserveerd: “Cabine komt niet op
temperatuur”
Foutcode-6 111111 111111 Waterinlaat defect / lekt
Waterniveau bij start op max.
Foutcode-7 111111 100000 Watersensor min/max werkt niet:
- Kabel verwisseld?
9
Page 10
7 Geurstof
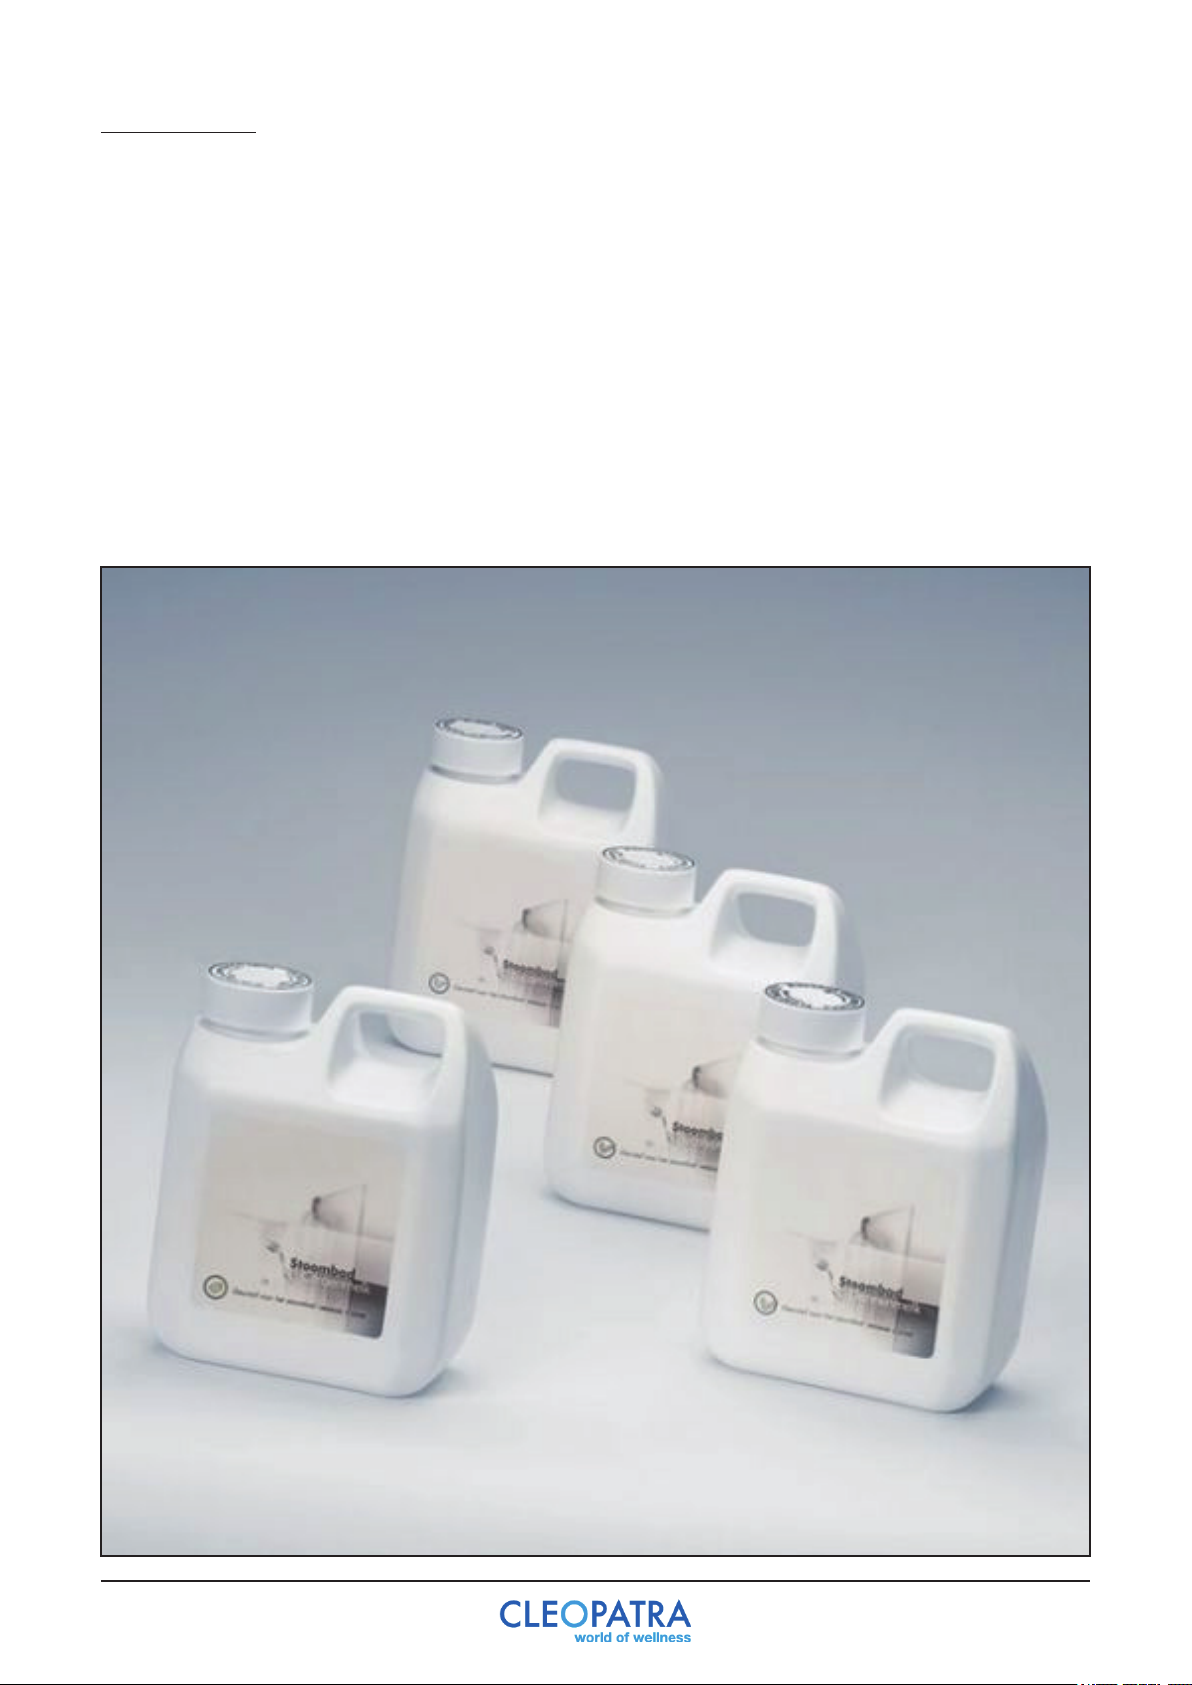
De Cleopatra stoombad geuren zijn hoogwaardige stoombad melken die zowel voor particulieren
als door professionele partijen gebruikt worden. Aromatherapie gegarandeerd!
De volgende geuren zijn verkrijgbaar:
- Eucalyptus (1 liter en 5 liter verpakking)
- Eucamint (1 liter en 5 liter verpakking)
- Dennen (1 liter)
- Citroen (1 liter)
Dosering: verdun met water (1 deel geurstof op 4 delen water)
10
Page 11
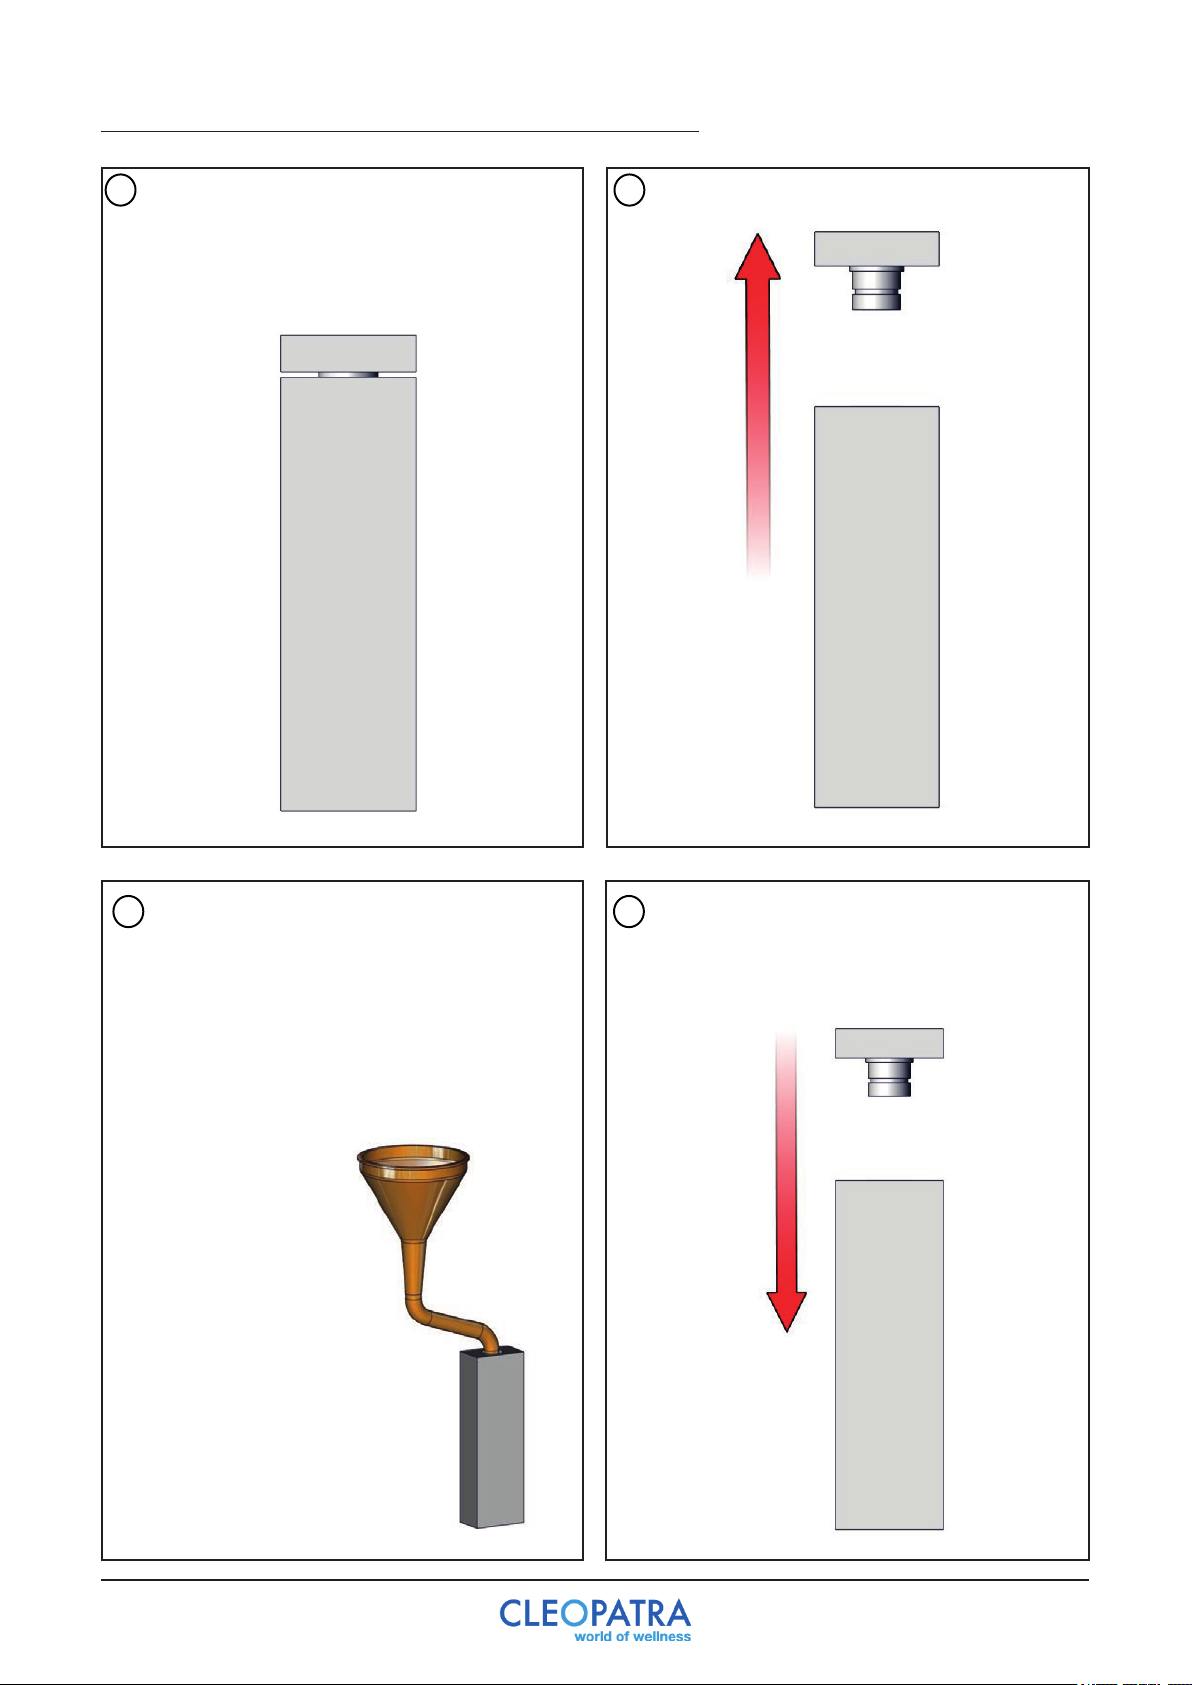
7.1 Bijvullen van de geurstof (BackWall uitvoering)
Gebruik alleen producten die specifiek zijn
1
ontwikkeld voor gebruik in stoomcabines.
Lees de aanwijzingen op de verpakking
aandachtig.
Trek de dop van de fles.
2
Gebruik de bijgeleverde trechter om de
3 4
geurstof in te schenken. Schenk rustig de
vloeistof in de trechter. Gemorste geurstof
moet met de handdouche worden
weggespoeld.
Druk de dop weer op de fles.
Gemorste geurstof dient weggahaald te
worden.
11
Page 12
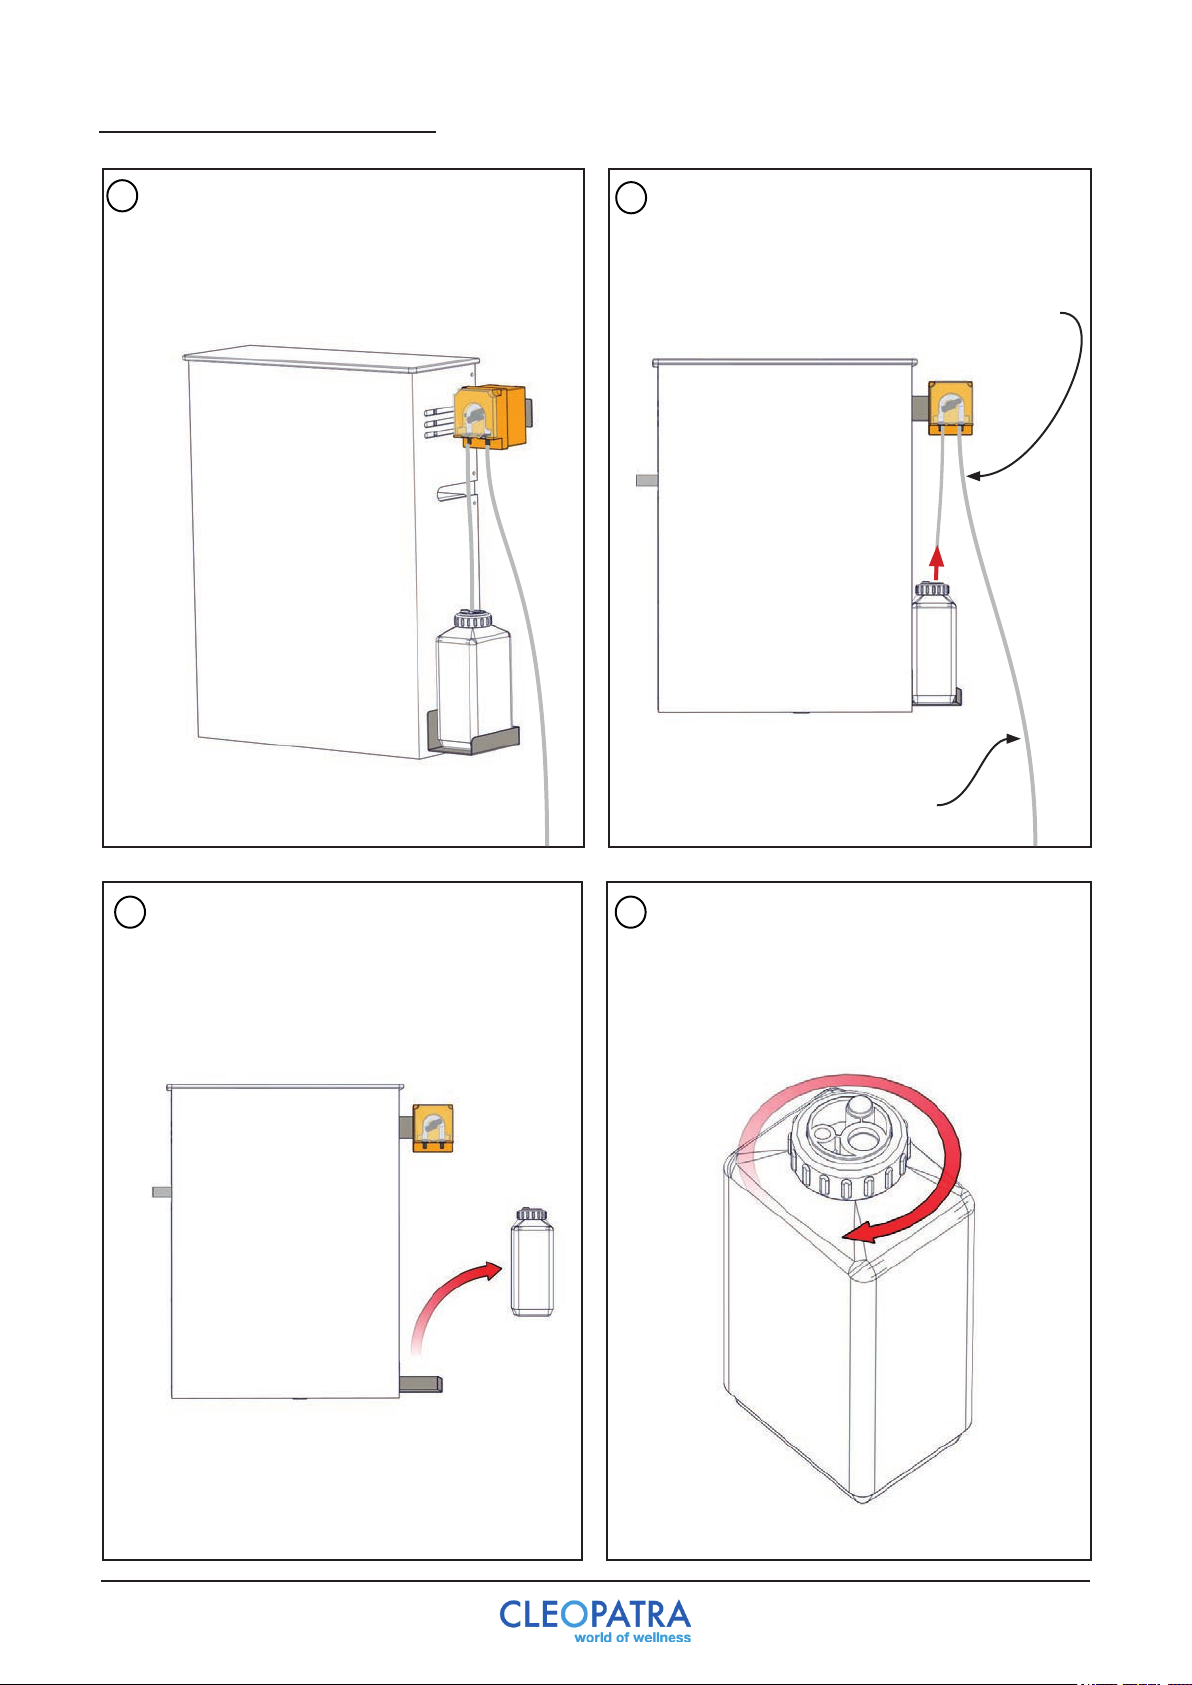
7.2 Bijvullen van de geurstof
Gebruik alleen producten die specifiek zijn
1
ontwikkeld voor gebruik in stoomcabines.
Lees de aanwijzingen op de verpakking
aandachtig.
2
Haal de slang naar de geurstof pomp
en de slang naar de stoomuitlaat uit het
reservoir.
Slang naar de geurstof pomp
3 4
Slang naar de stoominlaat
Draai de dop van de fles.Verwijder het reservoir van de houder.
12
Page 13
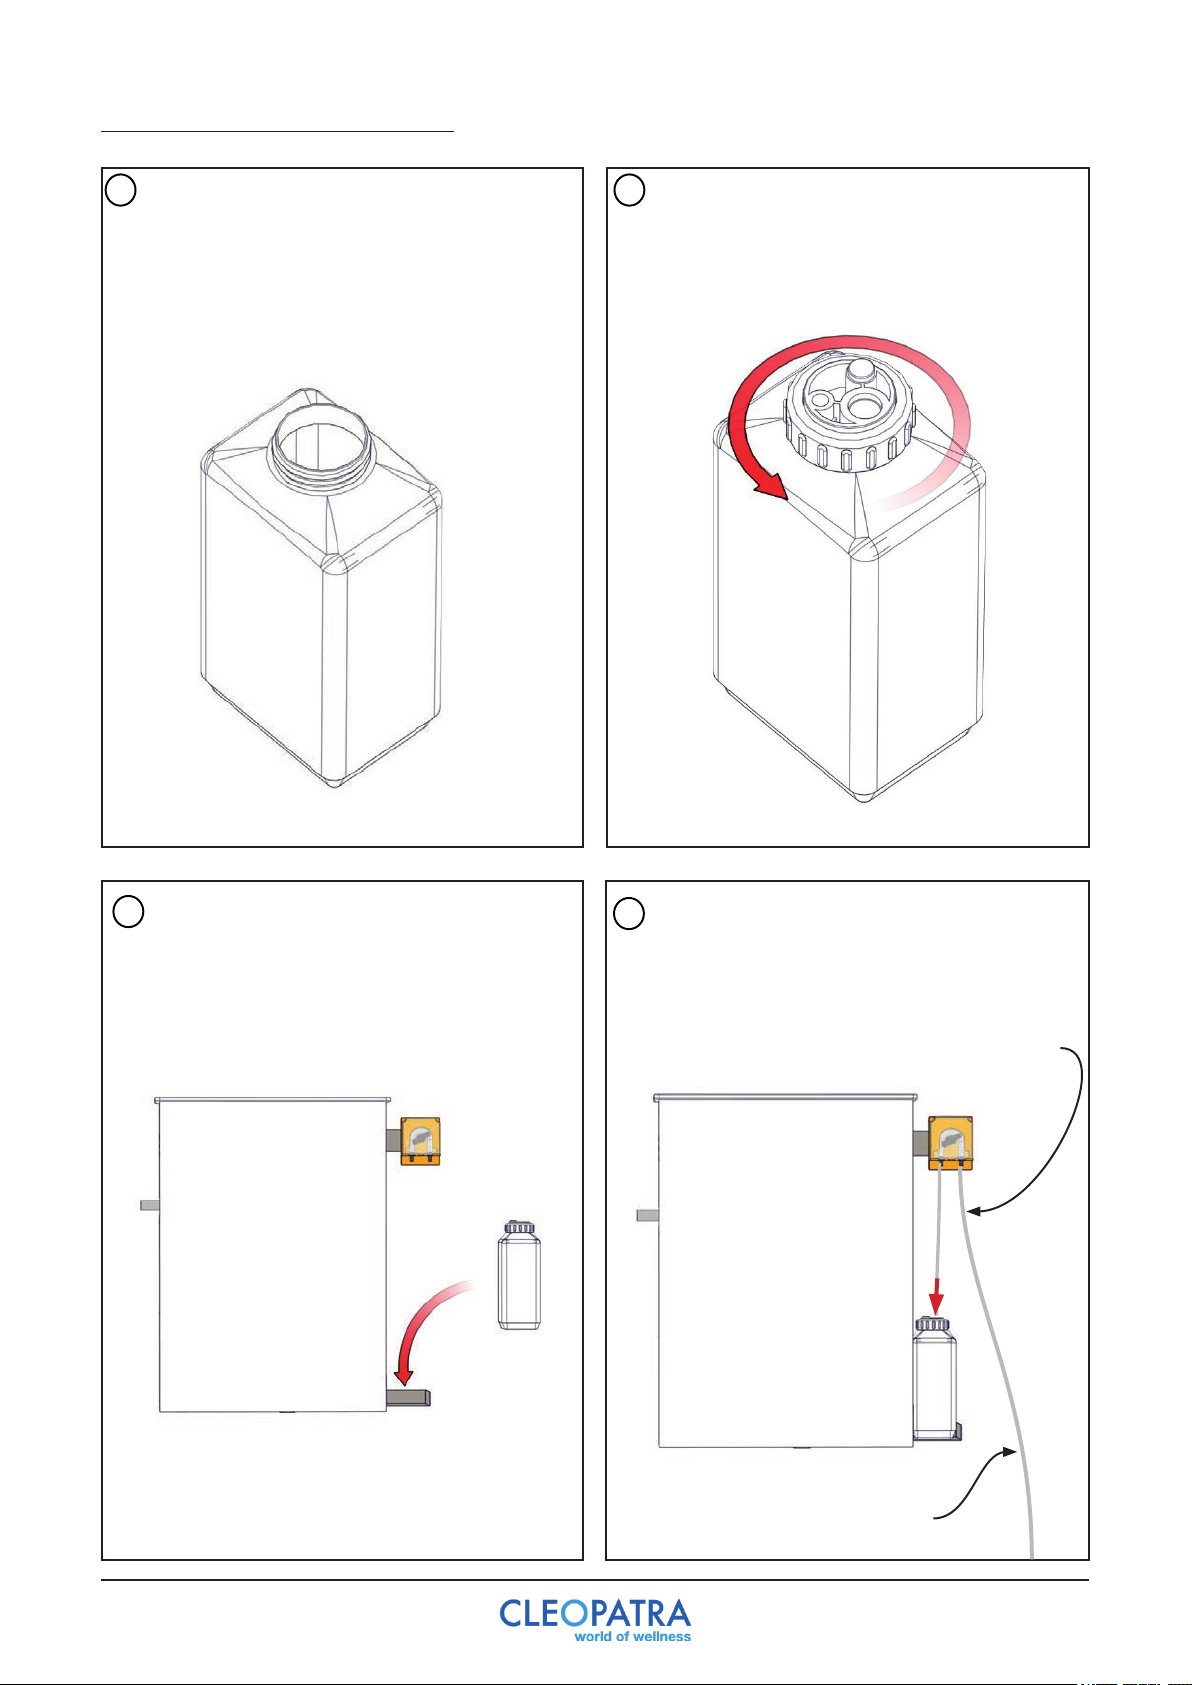
7.2 Bijvullen van de geurstof
Meng de geurstof en water in de juiste
5
verhoudingen voordat deze in de tank
wordt gegoten.
Deze tank is 1 liter wat betekend:
- Geurstof: 0.25 L
- Water: 0.75 L
Draai de dop weer op de fles.
6
Plaats het reservoir terug in de houder.
7
Plaats de slangen terug in het reservoir.
8
Gemorste geurstof dient weggehaald te
worden.
Slang naar de geurstof pomp
Slang naar de stoominlaat
13
Page 14

8 Onderhoud
Stoomunit ontkalken:
Kalkafzetting in de stoomunit kan de volgende gevolgen hebben:
- Het duurt langer voordat de stoom in de cabine komt.
- De cabine komt niet goed op temperatuur.
- De stoomunit maakt een hard bubbelend geluid.
Bij de bovenstaande symptomen is onderhoud aan de stoomunit gewenst. Vraag bij uw
dealer naar de mogelijkheden.
14
Page 15

User manual
15
Page 16

Cleopatra B.V.
Oostzijde 295
1508 EN Zaandam
Netherlands
Copyright
All information in this technical document, together with the drawings and technical
specifications made available by Cleopatra B.V., remain the property of Cleopatra B.V. and
may not be copied without permission. Cleopatra B.V. reserves the right to make changes in the
interest of further developments.
Up to date on: 20-07-2017
16
Page 17

Table of contents
User manual
1 Warnings .............................................................................................................18
2 Control .............................................................................................................19
3 Steam control ..........................................................................................................20
4 Light control ............................................................................................................21
5 Fragrance dispenser control .....................................................................................22
6 Defects .............................................................................................................23
7 Fragrance .............................................................................................................24
7.1 Refilling the fragrance (BackWall version) ..........................................................25
7.2 Refilling the fragrance......................................................................................26
8 Maintenance ...........................................................................................................28
17
Page 18
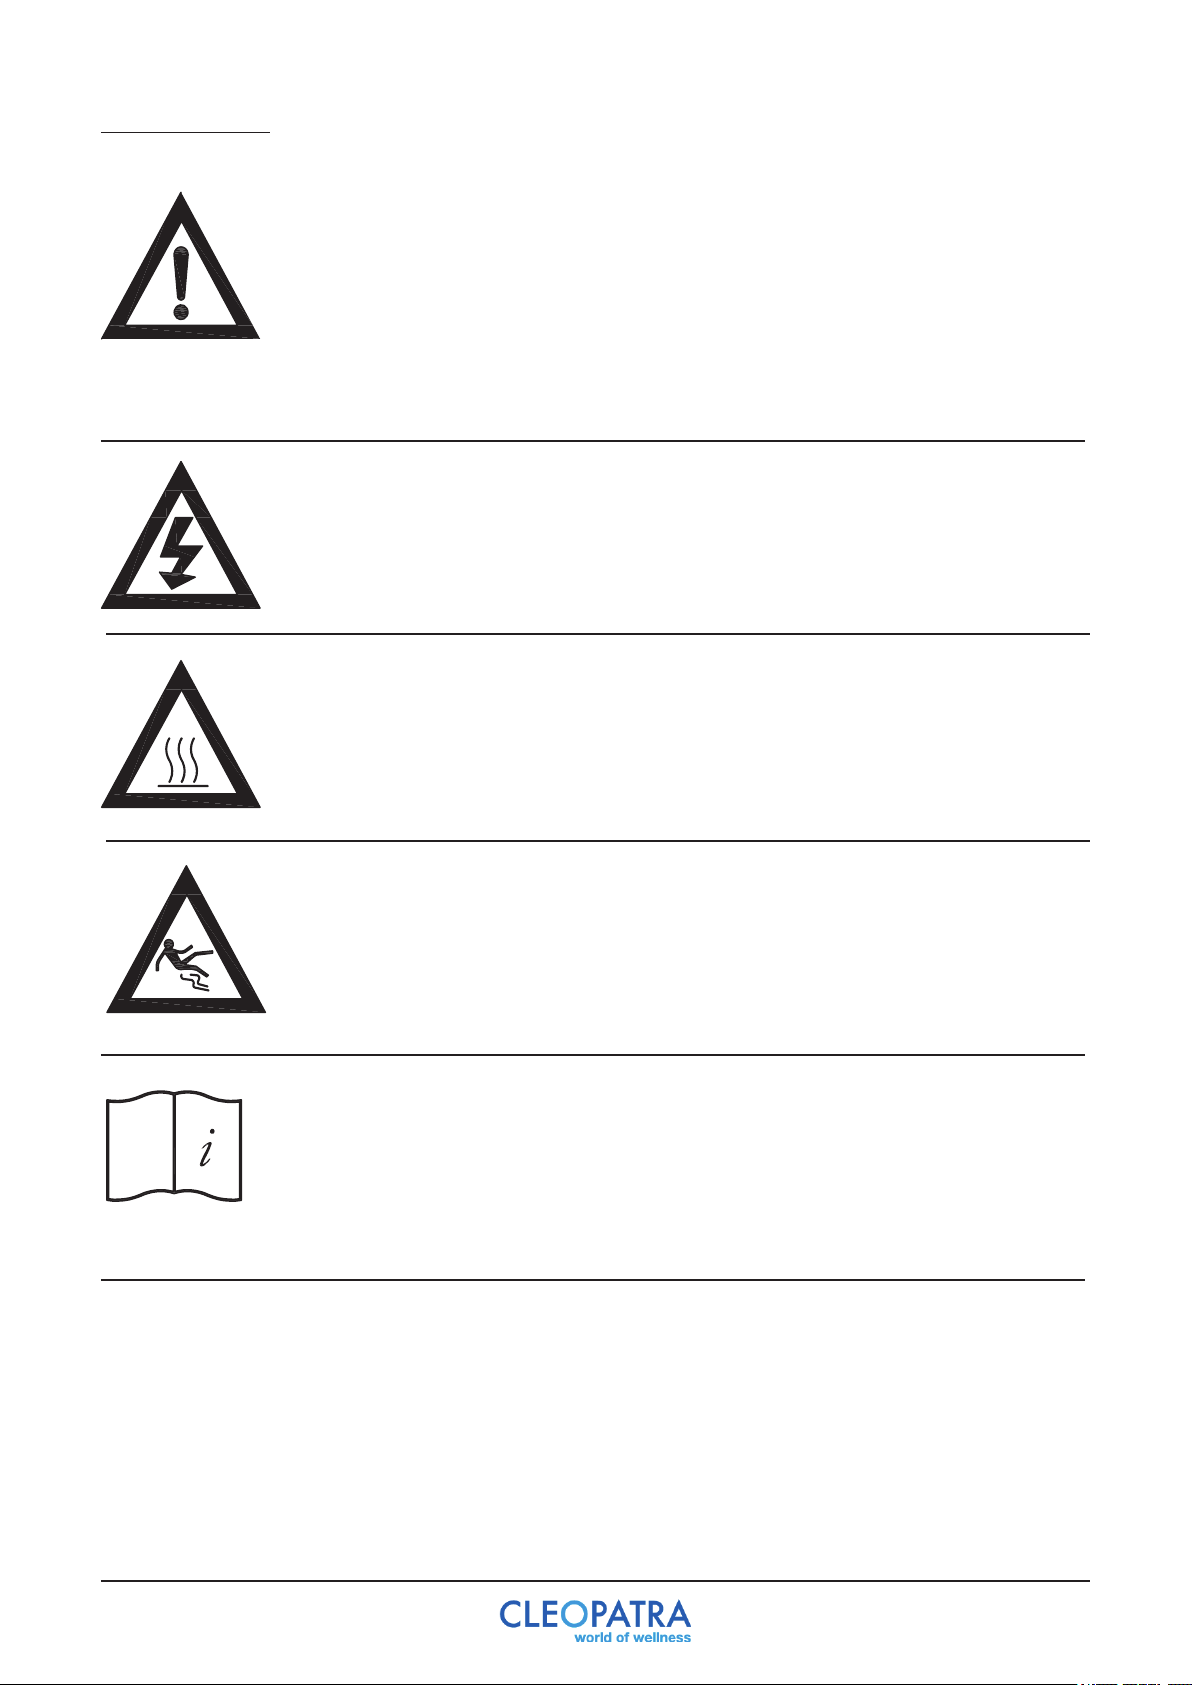
1 Warnings
Without permission and without instructions, the use of the steam cabin is
forbidden for the following persons:
- Children.
- Adults with disabilities.
- Persons who have not been instructed about what the steam cabin is
meant for.
- Persons who are intoxicated.
Bringing electrical devices in the cabin is forbidden!
Warning hot surfaces.
The steam inlet, but also the surrounding area are very hot. Do not touch
because of danger of burns. Do not touch the hot vapor directly, because of
danger of burns.
Warning for slipping.
The floor of the cabin can be slippery.
Read the user manual carefully before using the steam cabin!
Maximum time to stay in the cabin: 15 min
Humidity in the cabin: 100%
Maximum temperature in the cabin: 60 ˚C
18
Page 19
2 Control
Children may only use the steam cabin under supervision. When children use the device
without supervision, this is considered improper use.
Use only fragrances that are known from the Food and Consumer Product Safety Authority.
Preparation
The steam generator must be connected in accordance with the instructions in the installation
manual before the system is switched on. Ensure that the installation has been carried out
correctly.
- Open the safety valve
- Turn on the power
The steam generator id ready for use.
Steaming
It is necessary that the preparations as described above are carried out before steaming.
A
B
C
D
E
F
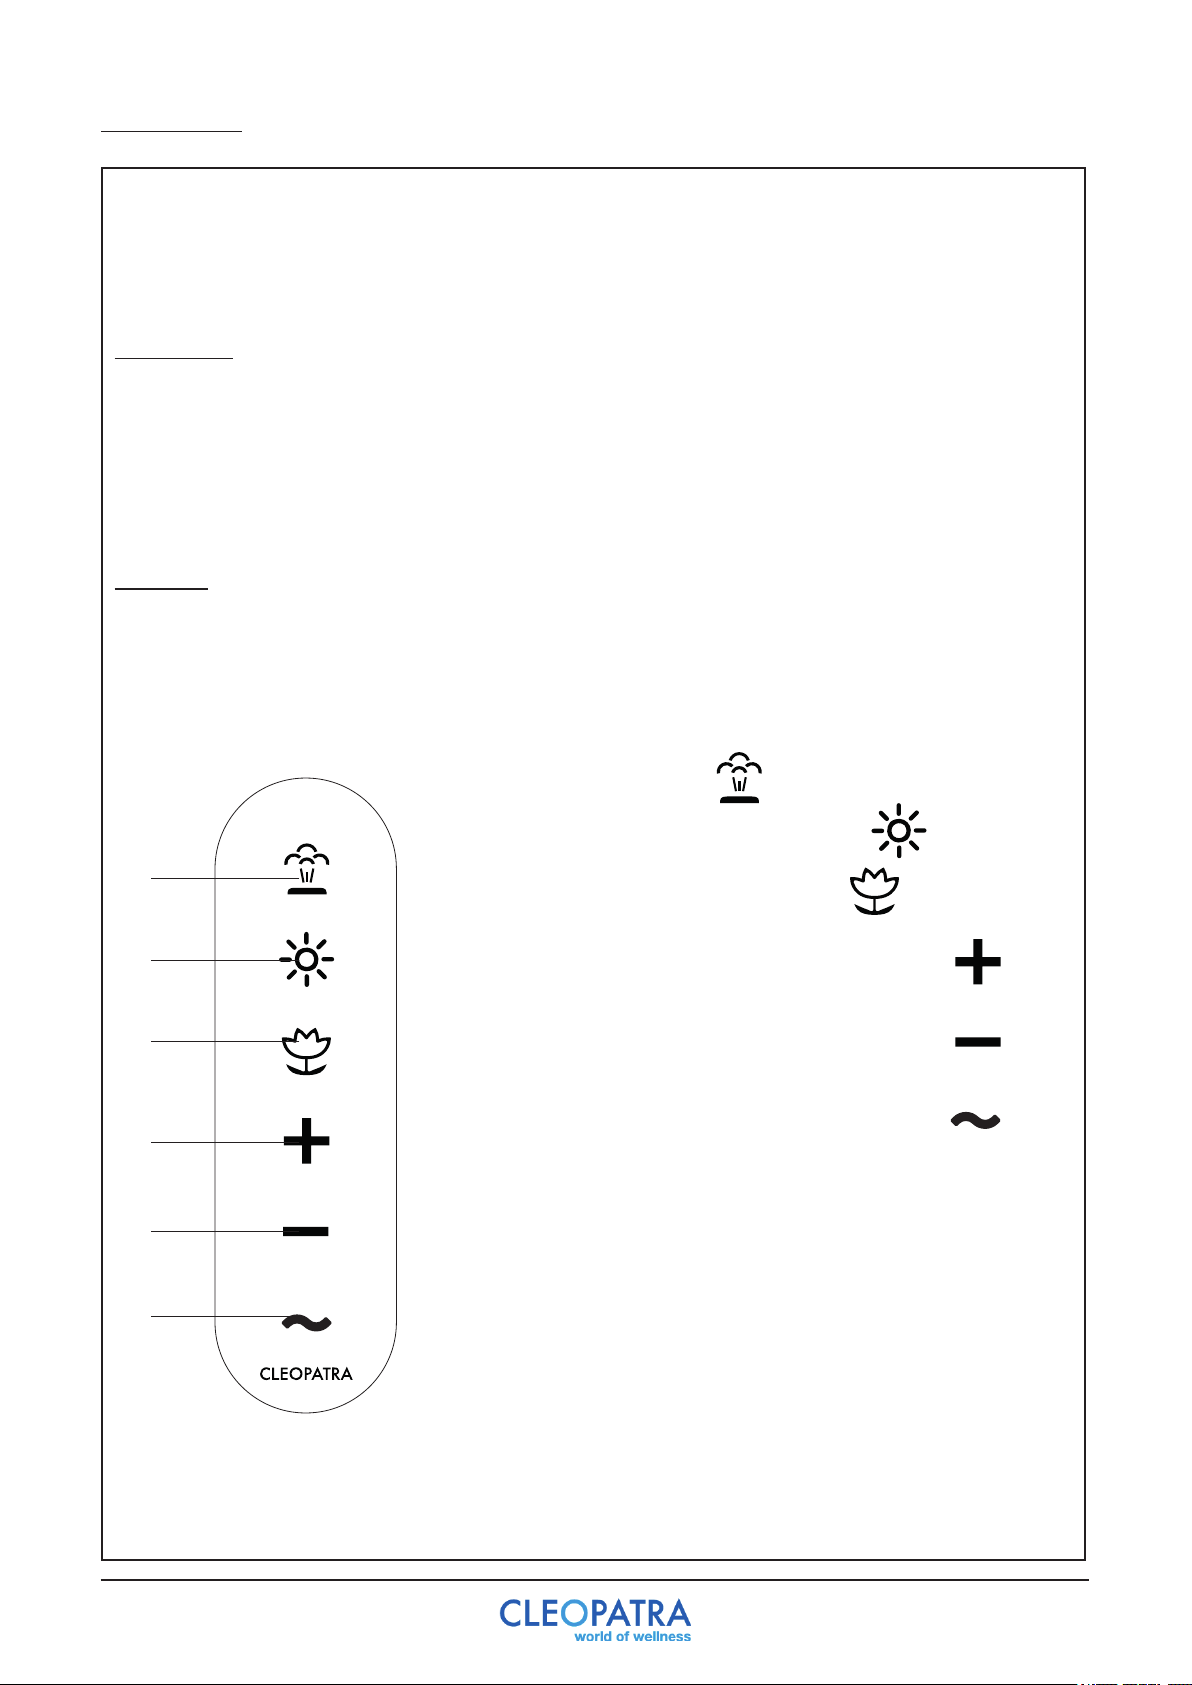
A. Steam button (on / off)
A. Stoomtoets (aan / uit)
B. Light button (light / color light on / off)
B. Licht toets (licht / kleurlicht aan/uit)
C. Fragrance button (fragrance on / off)
C. Geurstof toets (geurstof aan / uit)
D. + Selection button (adjustment steam capacity /
D. + Keuzetoets (aanpassing stoom capaciteit /
fragrance setting / color light programm)
geurstof instelling / kleurlichtprogramma)
E. - Selection button (adjustment steam capacity /
E. - Keuzetoets (aanpasssing stoom capaciteit /
fragrance setting / color light programm)
geurstof instelling / kleurlichtprogramma)
F. Interval color light program
F. Interval kleurlichtprogramma
Press button A 2x (steam) to activate the steam generator.
The A (steam) button is lightened now.
The first steam is visible after 5 minutes. Press button A (steam)
2x again to turn off the generator. For selection buttons
D, E or F press first the function (A, B or C) to select.
If the function does not work properly, check the wiring and / or
the water supply.
Image 1
19
Page 20
3 Steam control
A
D
E
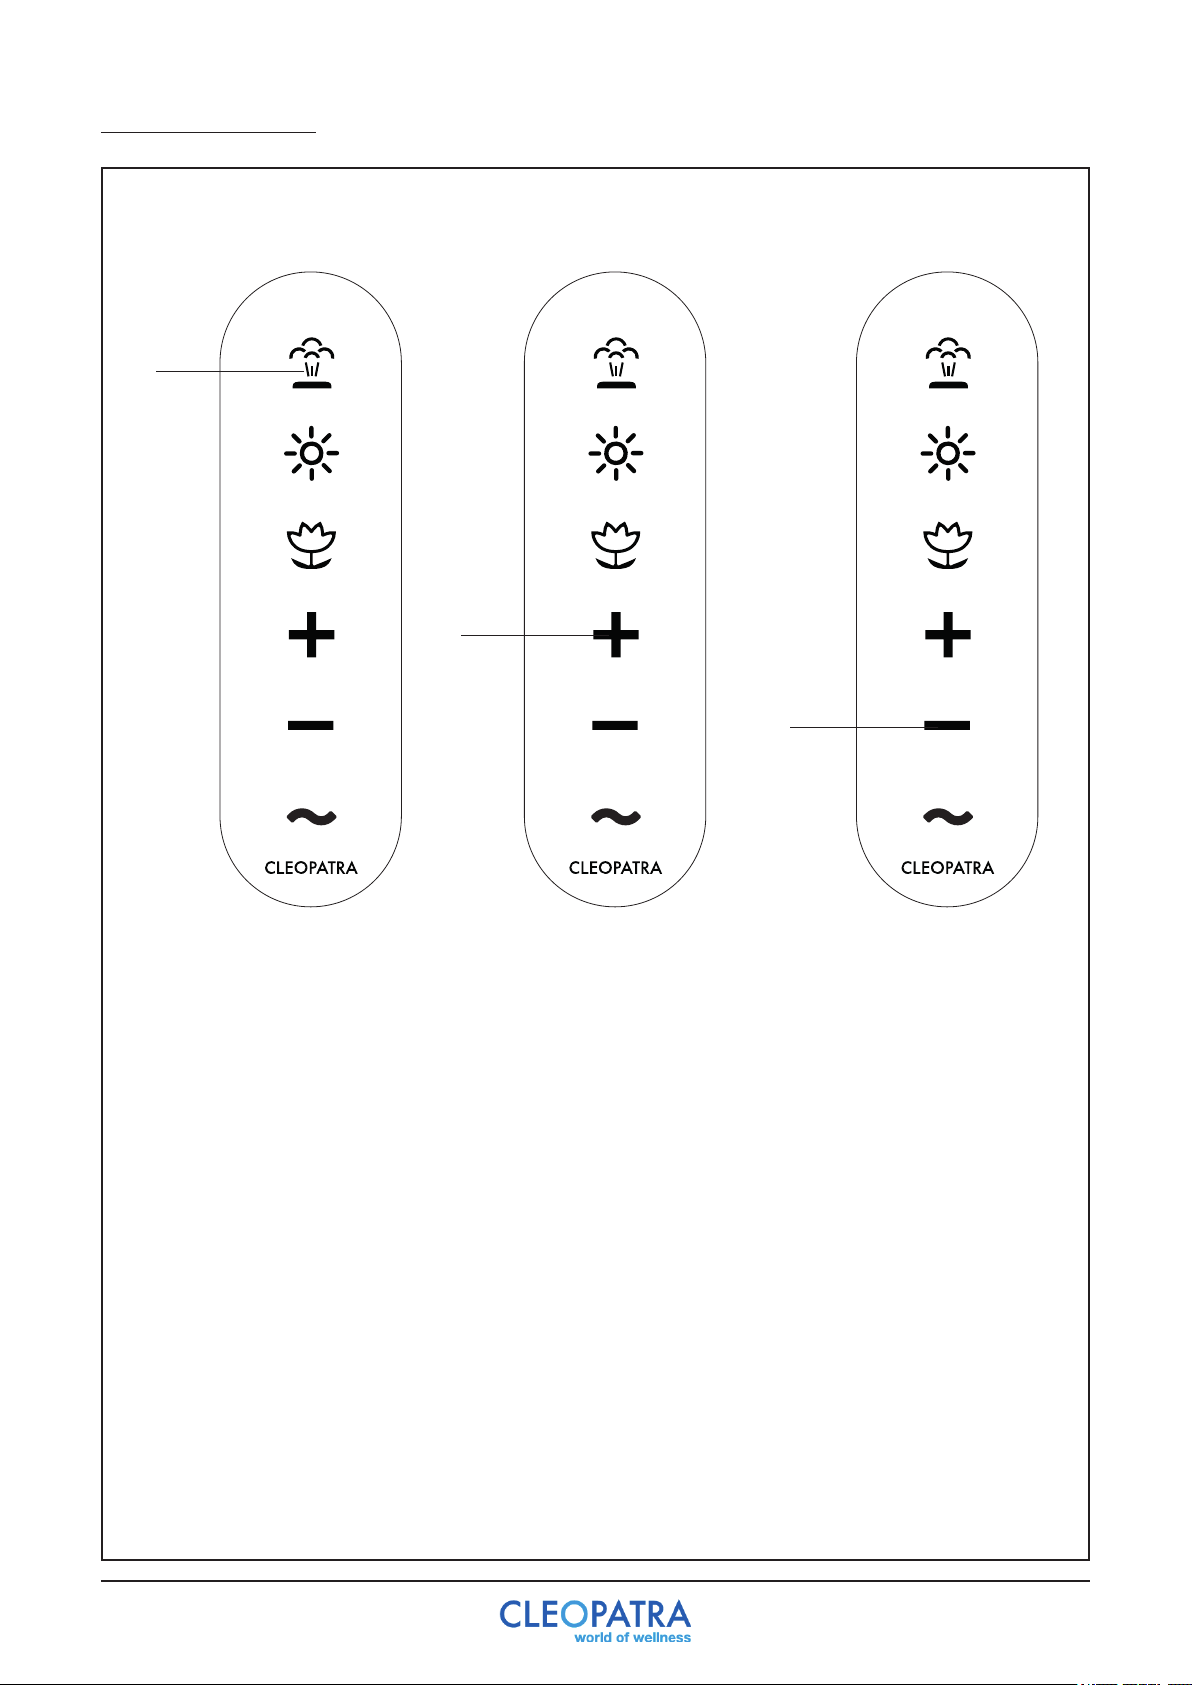
Image 2 Image 4Image 3
Steam function (A):
Press button A to activate the steam button (the button is lightened) or to deactivate, the button
is not luminous (see image 2). Press again to turn the steam on / off.
Adjust steam capacity:
Press button A to activate the button. Then press buttons D / E to adjust the steam capacity. The
steam capacity has 3 levels: low, middle and high. At the lowest level the steam button flashes
1x, at the middle level 2x and at the highest level 3x.
20
Page 21
4 Light control
B
D
E
F
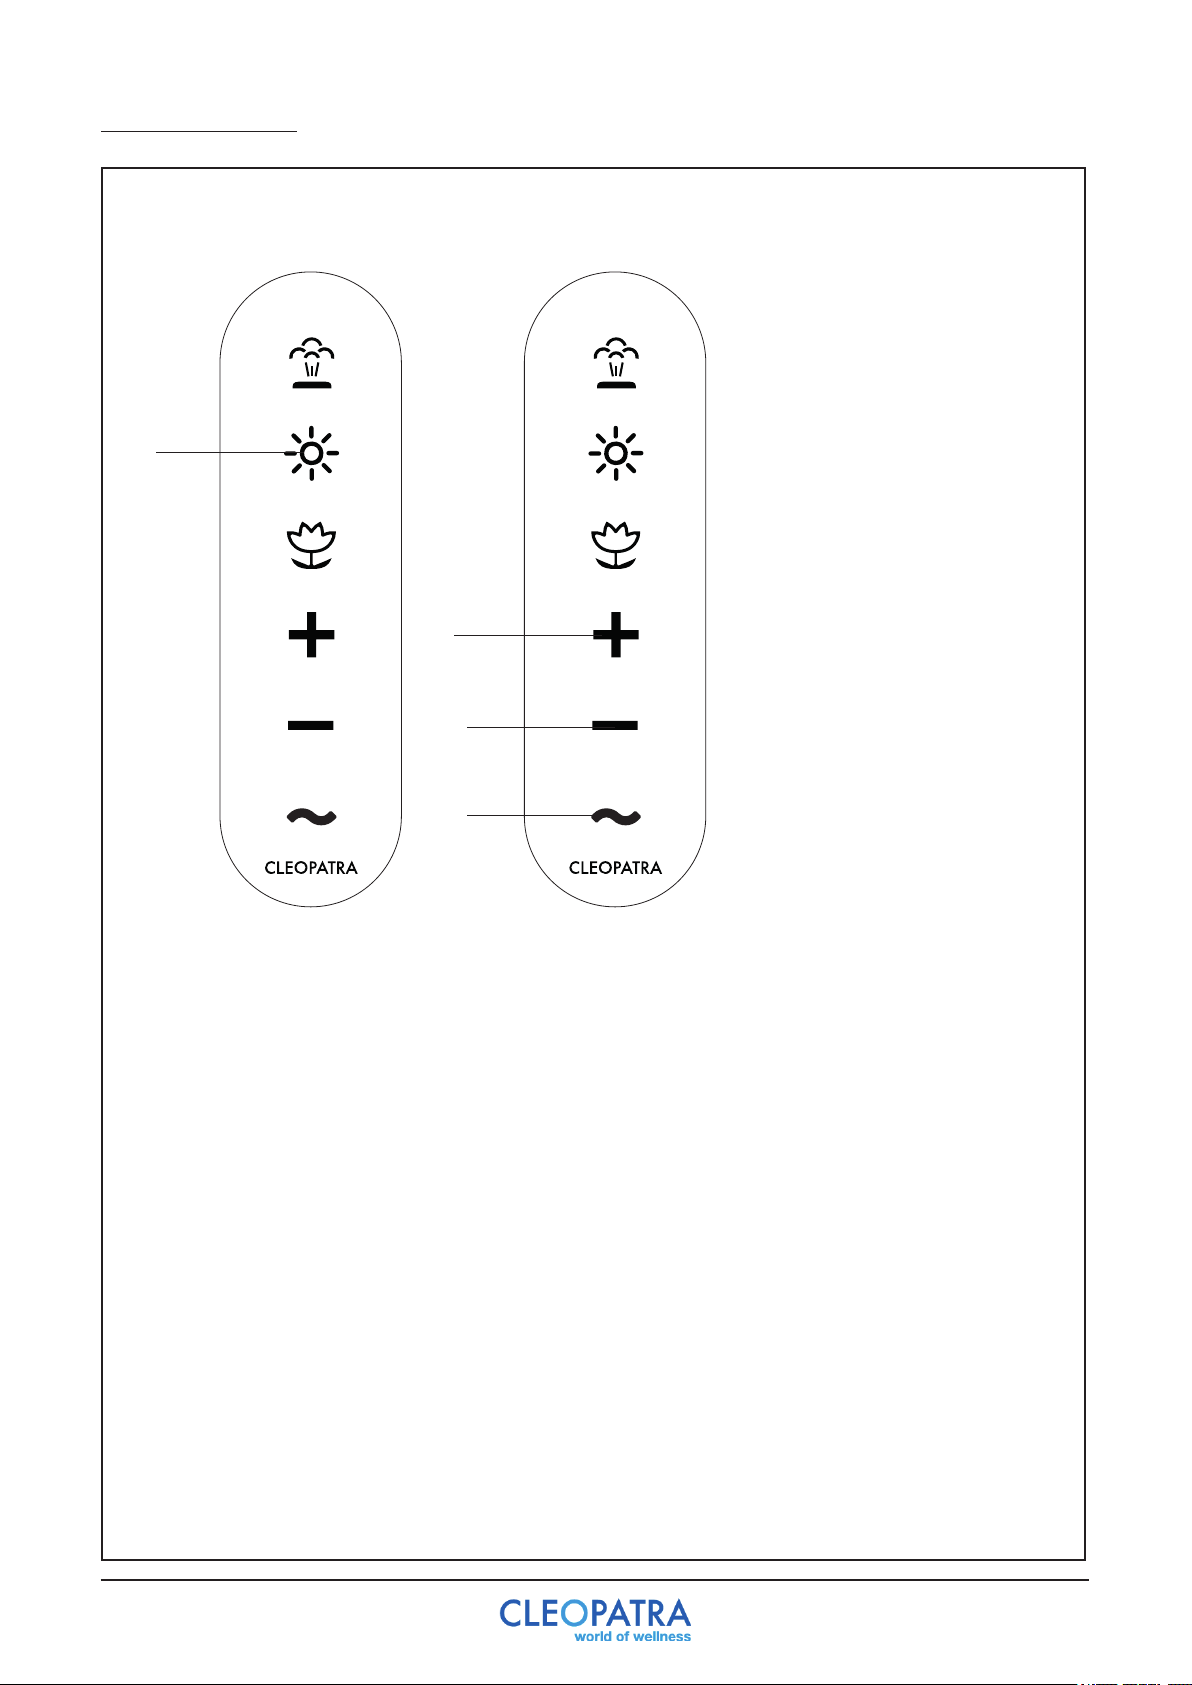
Image 5 Image 6
Activate lighting (B):
Press button B to activate the light button, the button is lightened, or to deactivate, the button is
not luminous (see image 5). Press again to turn the lighting on / off.
Adjust lighting:
Press button B to activate the button, then press buttons D / E to adjust the lighting. When the F
key is pressed, the system will automatically change color. This is only possible when color light
is present (see image 6).
The light switches off automatically after 60 minutes or press button B twice.
21
Page 22
5 Fragrance dispenser control
C
D
E
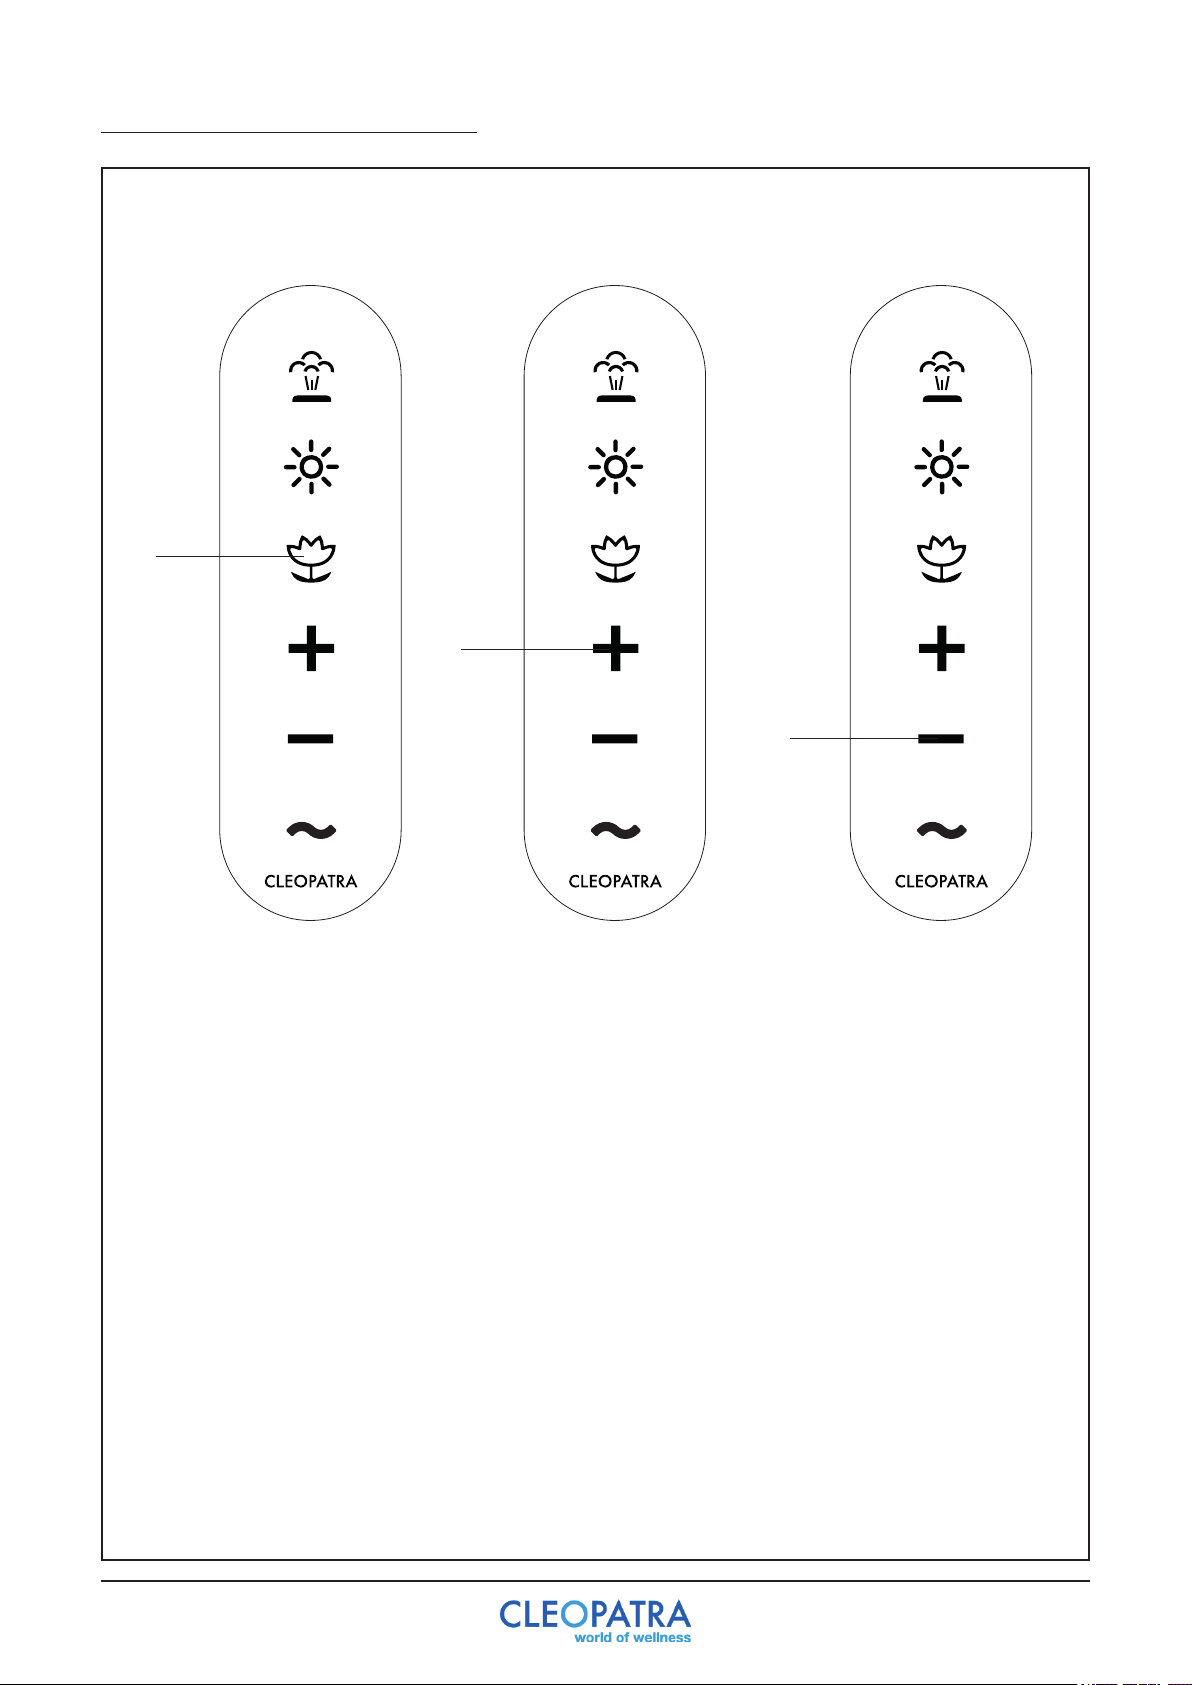
Image 7 Image 9Image 8
Activate fragrance dispenser (C):
Press button C to activate the fragrance button, the button is lightened, or to deactivate,
the button is not luminous (see image 7). Press again to turn the fragrance dispenser on / off.
The fragrance supply does not work during the first 3 minutes of the steam cycle.
Adjust fragrance capacity:
Press button C to activate the button. Then press buttons D / E to adjust the fragrance capacity.
The fragrance capacity has 3 levels: low, middle and high. At the lowest level the fragrance
button flashes 1x, at the middle level 2x and at the highest level 3x (see images 8, 9).
22
Page 23
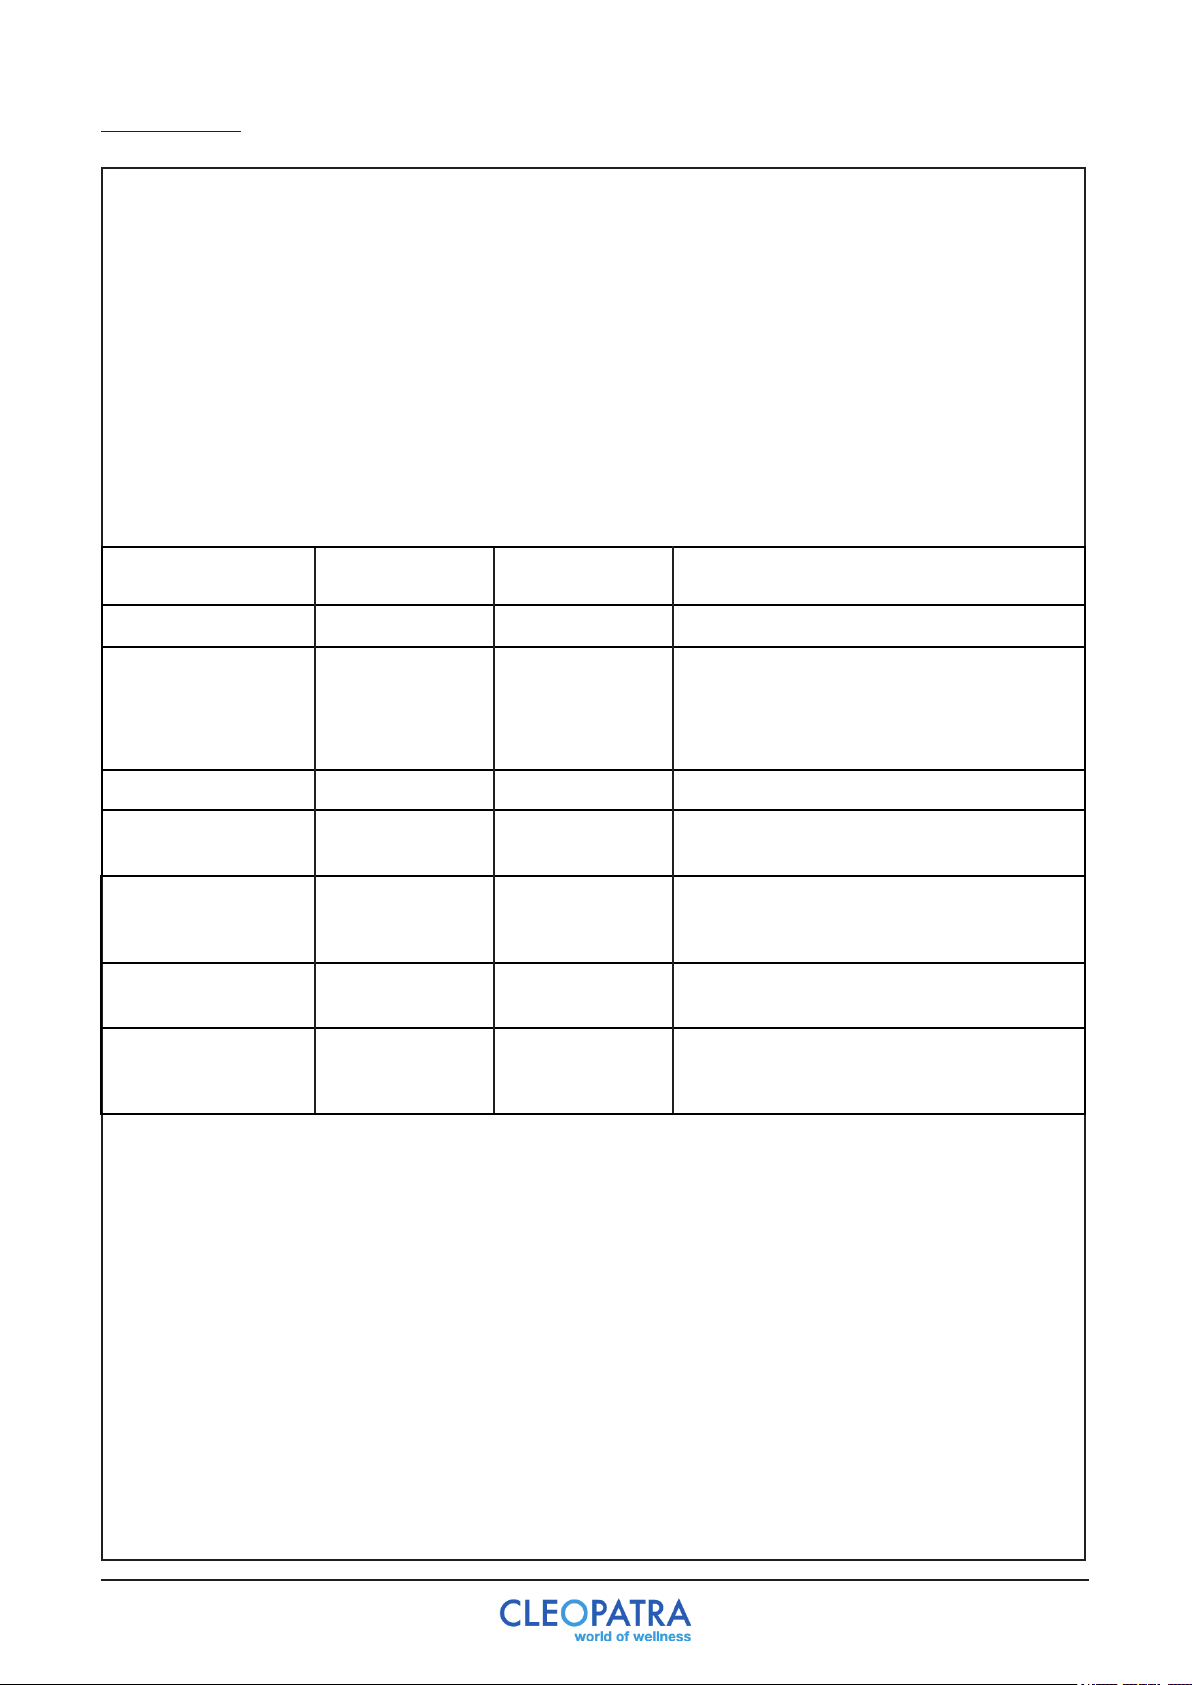
6 Defects
A defect is shown on the display.
By counting the number of LEDs that light up, it becomes clear which defect is reported. Below a few
examples:
-When 2 LEDs light up, code 2
-When 5 LEDs light up, code 5
To reset the defect, the steam button must be pressed for 5 seconds. Of course, the defect must be
repared, otherwise it will return. The display goes completely dark after this action.
Defect code LED Intervall 1 LED Interval 2 Description
Defect code-1 100000 100000 Reserve
Defect code-2 110000 110000 To little water - cause:
- Inlet does not open
- Water supply closed / too little
- Inlet time too little (configuration)
Defect code-3 1110 0 0 111000 Safety Sensor switched off
Defect code-4 11110 0 111100 Temperature sensor does not show a
signal
Defect code-5 111110 111110 Function / defect code is not in use
Reserved: “Cabin does not reach
temperature”
Defect code-6 111111 111111 Water inlet defect / leaking
Water level at start at max
Defect code-7 111111 100000 Water sensor min / max does not
work
- Cable has been changed?
23
Page 24
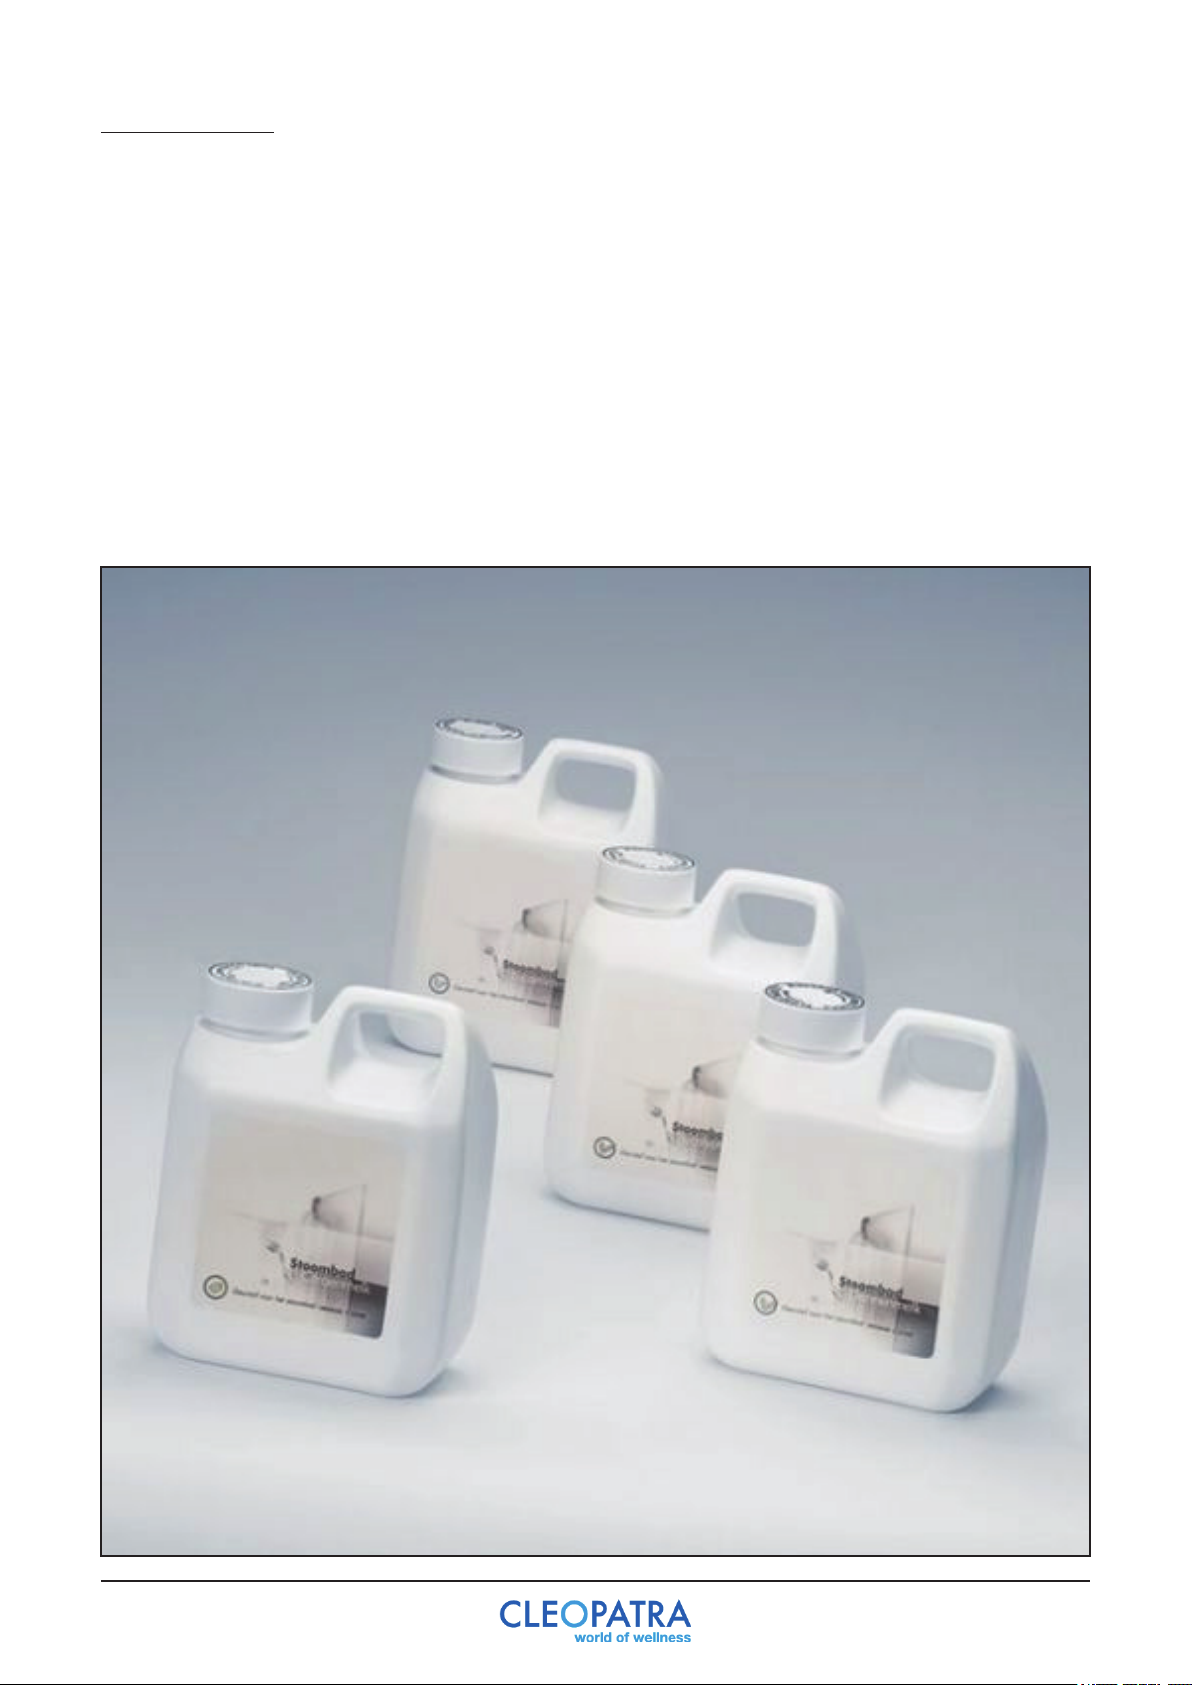
7 Fragrance
The Cleopatra steam bath fragrances are high-quality steam bath milks that are used for both
private and professional parties. Aromatherapy guaranteed!
The following fragrances are available:
- Eucalyptus (1 liter and 5 liters)
- Eucamint (1 liter en 5 liters)
- Pine (1 liter)
- Lemon (1 liter)
Dosage: mix with water (1 part fragrance on 4 parts water)
24
Page 25
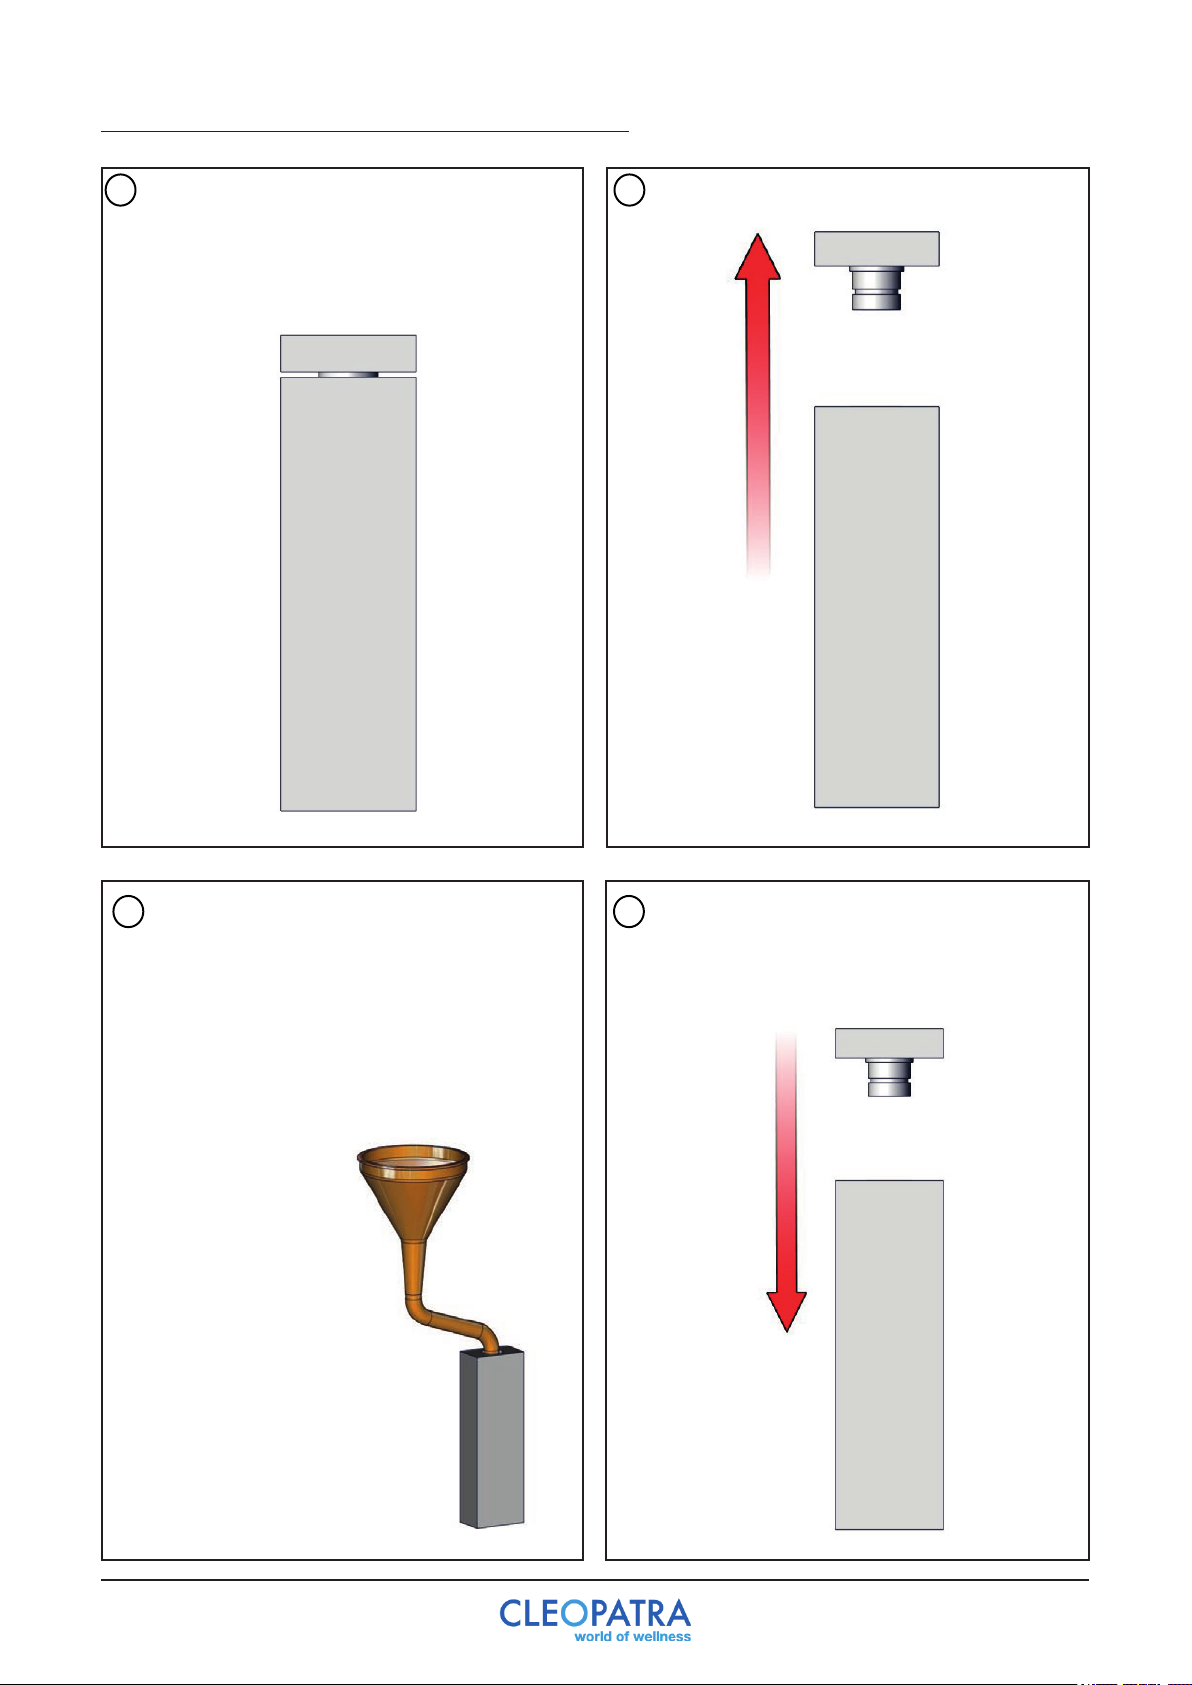
7.1 Refilling the fragrance (BackWall version)
Only use products that have been specifically
1
developed for use in steam cabins.
Read the instructions on the packaging
accurately.
Remove the cap from the bottle.
2
Use the supplied funnel to pour in the
3 4
fragrance. Gently pour the liquid into the
funnel. Spilled fragrance should be washed
away with the hand shower.
Press the cap back on the bottle.
Spilled fragrance should be washed away.
25
Page 26
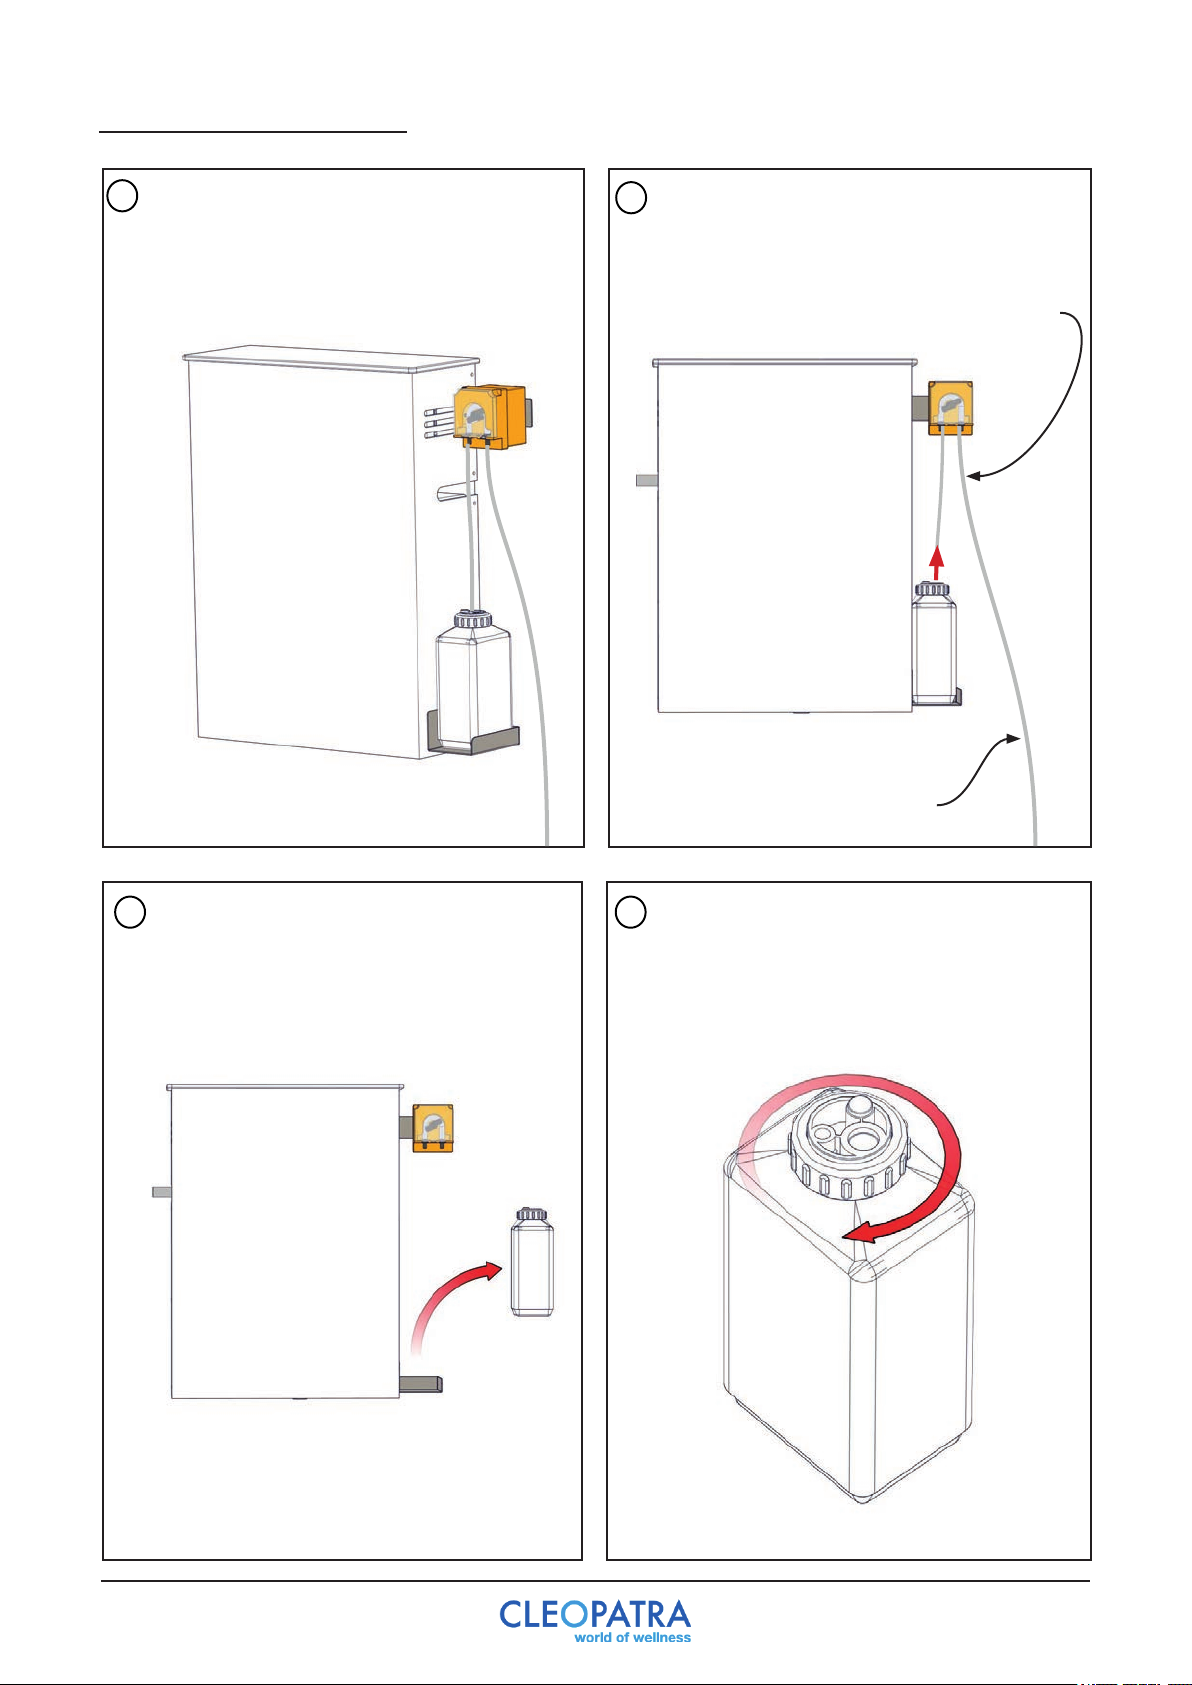
7.2 Refilling the fragrance
Only use products that have been specifically
1
developed for use in steam cabins.
Read the instructions on the packaging
accurately.
2
Remove the hose to the fragrance pump
and the hose to the steam outlet from the
reservoir.
Hose to the fragrance pump
3 4
Hose to the steam inlet
Remove the cap from the bottle.Remove the reservoir from the holder.
26
Page 27
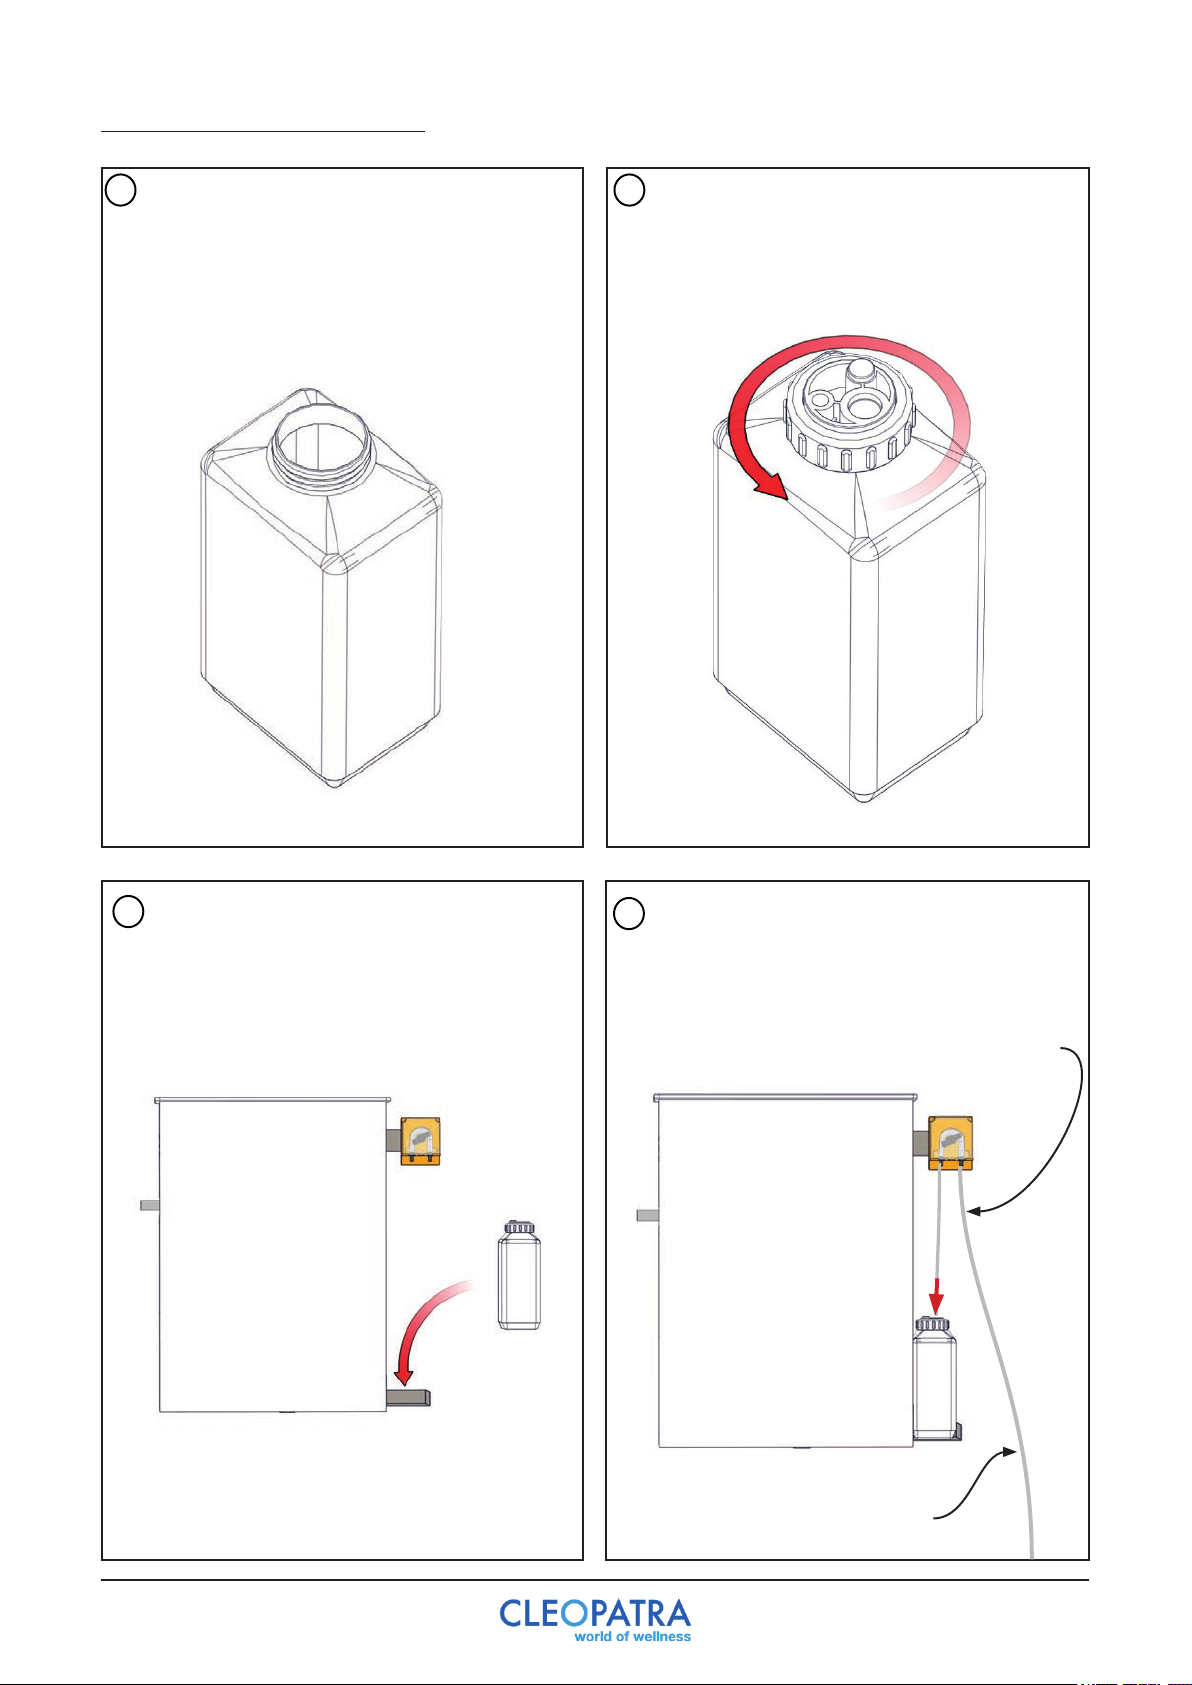
7.2 Refilling the fragrance
Mix the fragrance and water in the right
5
proportions before poured in the tank.
This tank is 1 liter which means:
- Fragrance: 0.25 L
- Water: 0.75 L
Turn the cap back on the bottle.
6
Return the reservoir in the holder.
7
Return the hoses in the reservoir.
8
Spilled fragrance should be washed
away.
Hose to the fragrance pump
Hose to the steam inlet
27
Page 28

8 Maintenance
Descaling the steam unit:
Lime deposits in the steam unit can have the following consequences:
- It takes longer for the steam to enter the cabin.
- The cabin does not reach the right temparature.
- The steam unit makes a loud bubbling sound.
You steam unit has the symptoms above? Maintenance of the steam unit is desirable. Ask your
dealer for the possibilities.
28
Page 29

29
Page 30

Wij behouden het recht voor en om technische veranderingen en printing-gerelateerde kleurafwijkingen aan te passen.
07-2017
Cleopatra B.V. Oostzijde 295, 1508 EN Zaandam
T: +31-75-6478200, [email protected], www.cleopatra.nl
We reserve the right and to adjust technical changes and printing-related color deviations.
07-2017
Cleopatra B.V. Oostzijde 295, 1508 EN Zaandam
T: +31-75-6478200, [email protected], www.cleopatra-wellness.com
90187001
90187001
 Loading...