

Clements Orbital 360 User Manual
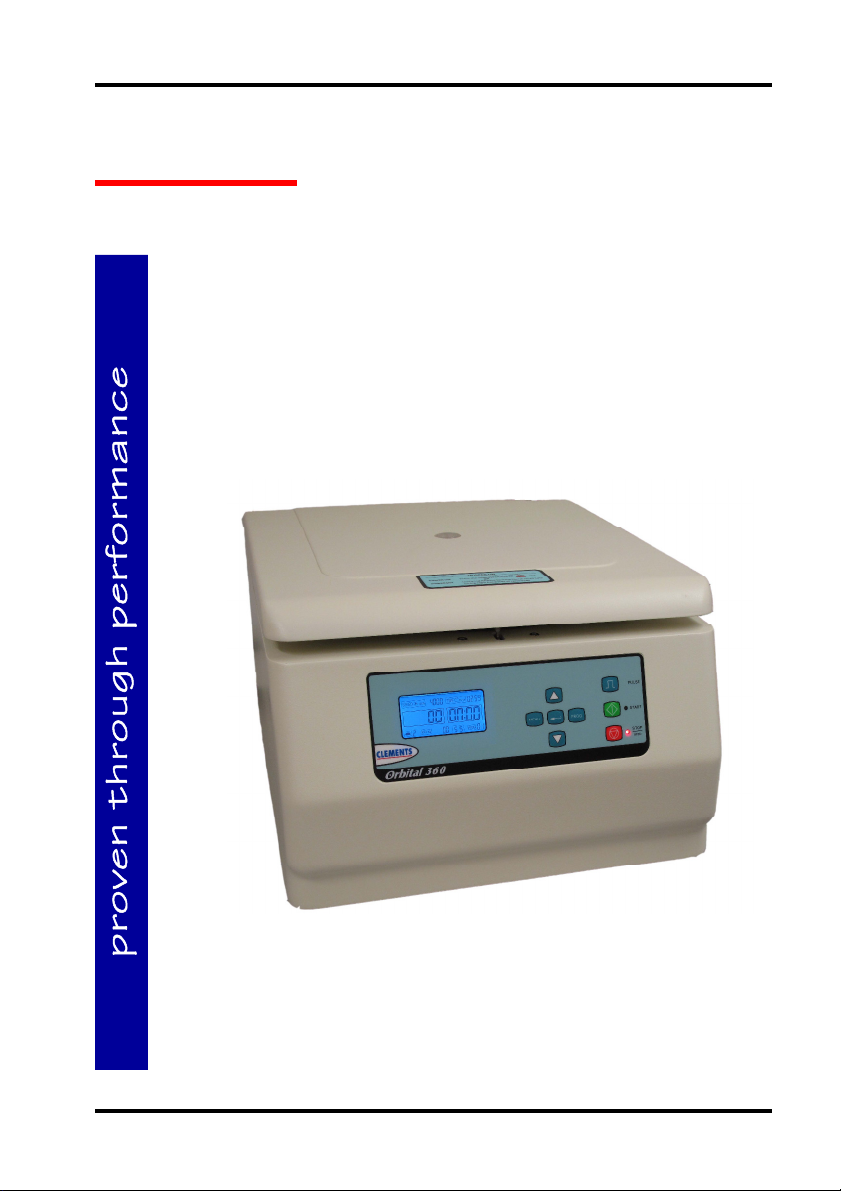
CLEMENTS
Orbital 360
Benchtop Centrifuge
CEN 91705
220-240V 50/60Hz
User Manual
Manual No. CEN 91705 017
Issue 1

CLEMENTS
Safety
Thank you for purchasing this Clements Orbital 360
Centrifuge For your safety it is imperative that this unit
only be operated by authorised personnel in accordance
with the instructions as described in this manual. Operated
in this way, the Orbital 360 Centrifuge will provide the
standard of service specified.
Due to continual improvements in product design, the
Orbital 360 Centrifuge may vary in detail from the
descriptions in this manual. In the event of further
questions please contact your local distributor or BMDi
TUTA Healthcare direct.
User Manual Orbital 360 Centrifuge
Manual Number CEN 91705 017 Issue 1
Copyright © 2014 BMDi TUTA Healthcare Pty Ltd
The information in this manual was originated by, and is the exclusive
property of BMDi TUTA Healthcare Pty Ltd. It is furnished for customer
information only, and is not an authorisation or licence to make this
product or to furnish this information to others.
BMDi TUTA Healthcare Pty Ltd
Unit 4B, 128-130 Frances St
Lidcombe NSW 2141
Australia
Phone: +61 2 9466 5300
Website: www.medaust.com
2

CLEMENTS
Contents
Description and Features .................................................... 4
Specifications ..................................................................... 5
Warnings and Cautions ...................................................... 6
Installation .......................................................................... 7
Controls .............................................................................. 8
Operation ..........................................................................10
Parameter Setting Menu ....................................................12
Operation Summary ..........................................................14
User Programs ..................................................................16
Rotors ................................................................................17
Accessories and Spares ....................................................19
Cleaning and Maintenance ................................................20
Fuse Replacement and Error Codes ..................................21
Troubleshooting .................................................................22
RCF Graphs ......................................................................23
Warranty ............................................................................26
Contents
3

CLEMENTS
Description
The Orbital 360 Centrifuge is a versatile, compact and reliable
benchtop centrifuge. It is designed for clinical and small
laboratory applications where precise digital control of speed and
time is required.
Features
• Brushless DC motor technology for low maintenance
operation
• Accurate digital control of speed and time for repeatable
processing
• High visibility backlit LCD display with touch control panel
• Electronic lid interlock to ensure that centrifuge can be
started and run only with lid locked
• Stainless steel bowl
• Adjustable acceleration and deceleration for sensitive
samples
• Concurrent display of rpm and RCF
• 25 user programs
• Simultaneous display of all parameters
• Previous parameters maintained through power off/on
4
Description and Features

Specifications
Speed Range 100 to 5000 rpm
Maximum RCF 4100 x g
Speed Accuracy ±50 rpm
Time Range 1 to 99 minutes
Angle Rotors 24 x 10 ml
Swing-out Rotors 4 x 50 ml
12 x 15 ml
24 x 5 ml
Power Requirement 220-240V 50/60Hz 5A
Electrical Protection Class I
Noise < 65dB(A)
Dimensions 370 (W) x 250 (H) x 432 (D) mm
Weight 15kg
Environment Indoor
10 to 35°C, RH < 85%
CLEMENTS
Package Contents
Item
CEN 91705 Cell Cycle 360 Centrifuge 240V 50Hz 1
CEN 91700 036 Tool, Rotor Screwdriver, Philips Head,
CEN 91700 037 Tool, Lid Release Screwdriver, Philips
CEN 91700 038 Lead, Mains Power, IEC Socket –
CEN 91700 040 Kit, Fuse, 5 x 20mm, T5.0A 250V
Description
110 x 5.5mm
Head, 120 x 2.9mm
Earthed Australian Plug
(Pack 4)
Specifications
Qty
1
1
1
1
5

CLEMENTS
Warnings and Cautions
For safe operation ensure that users read, understand and
observe the instructions and recommendations in this user
manual.
Power
Ensure that the mains power supply matches that shown on the
rating label of the centrifuge.
Flammable Samples
The centrifuge is not flameproof. Do not use flammable samples in
the centrifuge. Do not store flammable or volatile material within
300mm of the centrifuge.
Biohazardous Samples
Local protocols must be observed when handling potentially
biohazardous materials. Carriers with aerosol protection are to be
used.
Fluid Spill
Do not allow fluids to enter the centrifuge. If a spill occurs wipe
clean, paying attention to the nature of the material.
Balancing
The centrifuge must always be run with a full complement of
buckets or carriers. Balance samples either by eye or by weighing.
Fill unused tubes with an equivalent amount of fluid as in sample
tube.
Operating
Do not stand within 300mm of centrifuge while it is running.
Do not move centrifuge while the rotor is spinning.
Do not open lid while rotor is spinning.
Do not attempt to stop rotor by hand.
6
Warnings and Cautions

CLEMENTS
Installation
Unpacking
Keep centrifuge horizontal while removing it from carton. Retain
packaging for transporting centrifuge. With power off, release lid
lock by inserting manual release tool in small hole on top right
hand side of centrifuge. Keep tool parallel to front of panel and
press release plate. Remove tool.
Remove packing, carriers etc from centrifuge bowl. Ensure that
bowl is clean.
Location
The centrifuge should be placed on a solid level surface in a well
ventilated area. The back of the centrifuge must be at least 10cm
away from any wall or vertical surface.
Power Requirements
Before connecting the centrifuge to the mains power supply,
ensure that the electricity supply conforms to the requirements for
voltage and frequency shown on the rating label on the back of the
unit.
The power supply should be stable, clean and free of surges and
brownouts.
Connect the centrifuge to the mains power supply using the
supplied earthed power cable.
For extended periods of non-use, switch off main power switch on
rear panel of centrifuge.
Installation
7
CLEMENTS
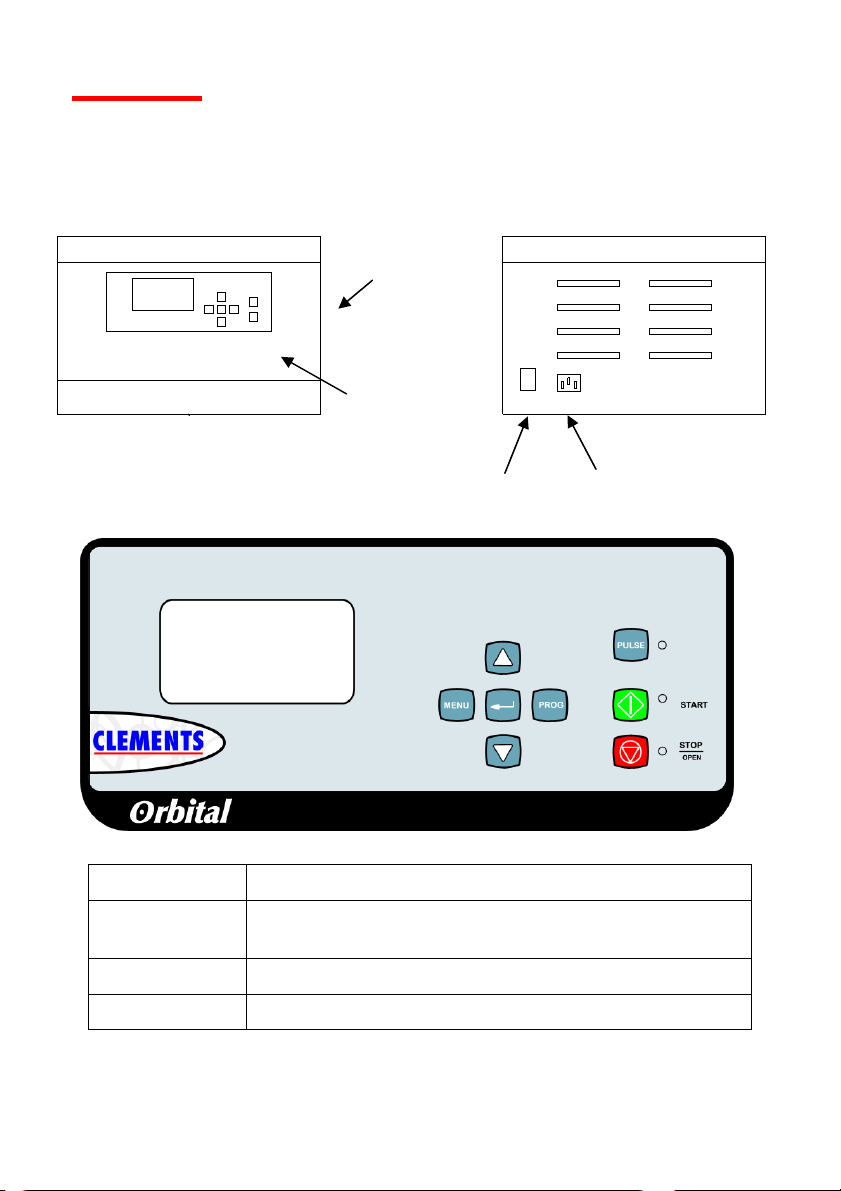
Controls
Front View
Manual
Lid release
access hole
Control panel
On/Off Switch
Rear View
IEC power inlet
Fuse holder
360
Condition LCD Display Shows
In Spin Cycle Actual and Set Values of Speed / RCF and Time
Remaining
Setting Mode Set Values of Parameter
Error Error code n of form En
8
Controls

CLEMENTS
Controls
Item Function
On/Off Switch Switches mains power to centrifuge.
IEC Inlet Mains power inlet. Also contains fuse holder.
Lid release access hole Access for manual lid release tool. Centrifuge
must be disconnected from power.
TOP
/ O
PEN
S
Button Stops spin cycle. When rotor has stopped acts
as lid release button. Cancels error condition.
S
TART
Button Starts spin cycle.
P
ULSE
Button Spins rotor when held down.
E
NTER
Button Enters and saves changed parameters.
Exits parameter setting mode.
Selects user program. Exits program mode.
INC Button Increases value of set parameters.
DEC Button Decreases value of set parameters.
P
ROG
Button Enters user program mode.
Times out after 5 seconds.
M
ENU
Button Steps through parameter change menu in
circular fashion. Times out after 5 seconds.
S
PIN
LED (Green) Indicates that spin cycle is in progress.
S
TOP
LED (Red) Flashing - indicates that spin cycle is stopping.
Continuous - indicates that rotor has stopped.
Controls
9
 Loading...