

Clemas & Co TENNANT 7100 Operator's Manual
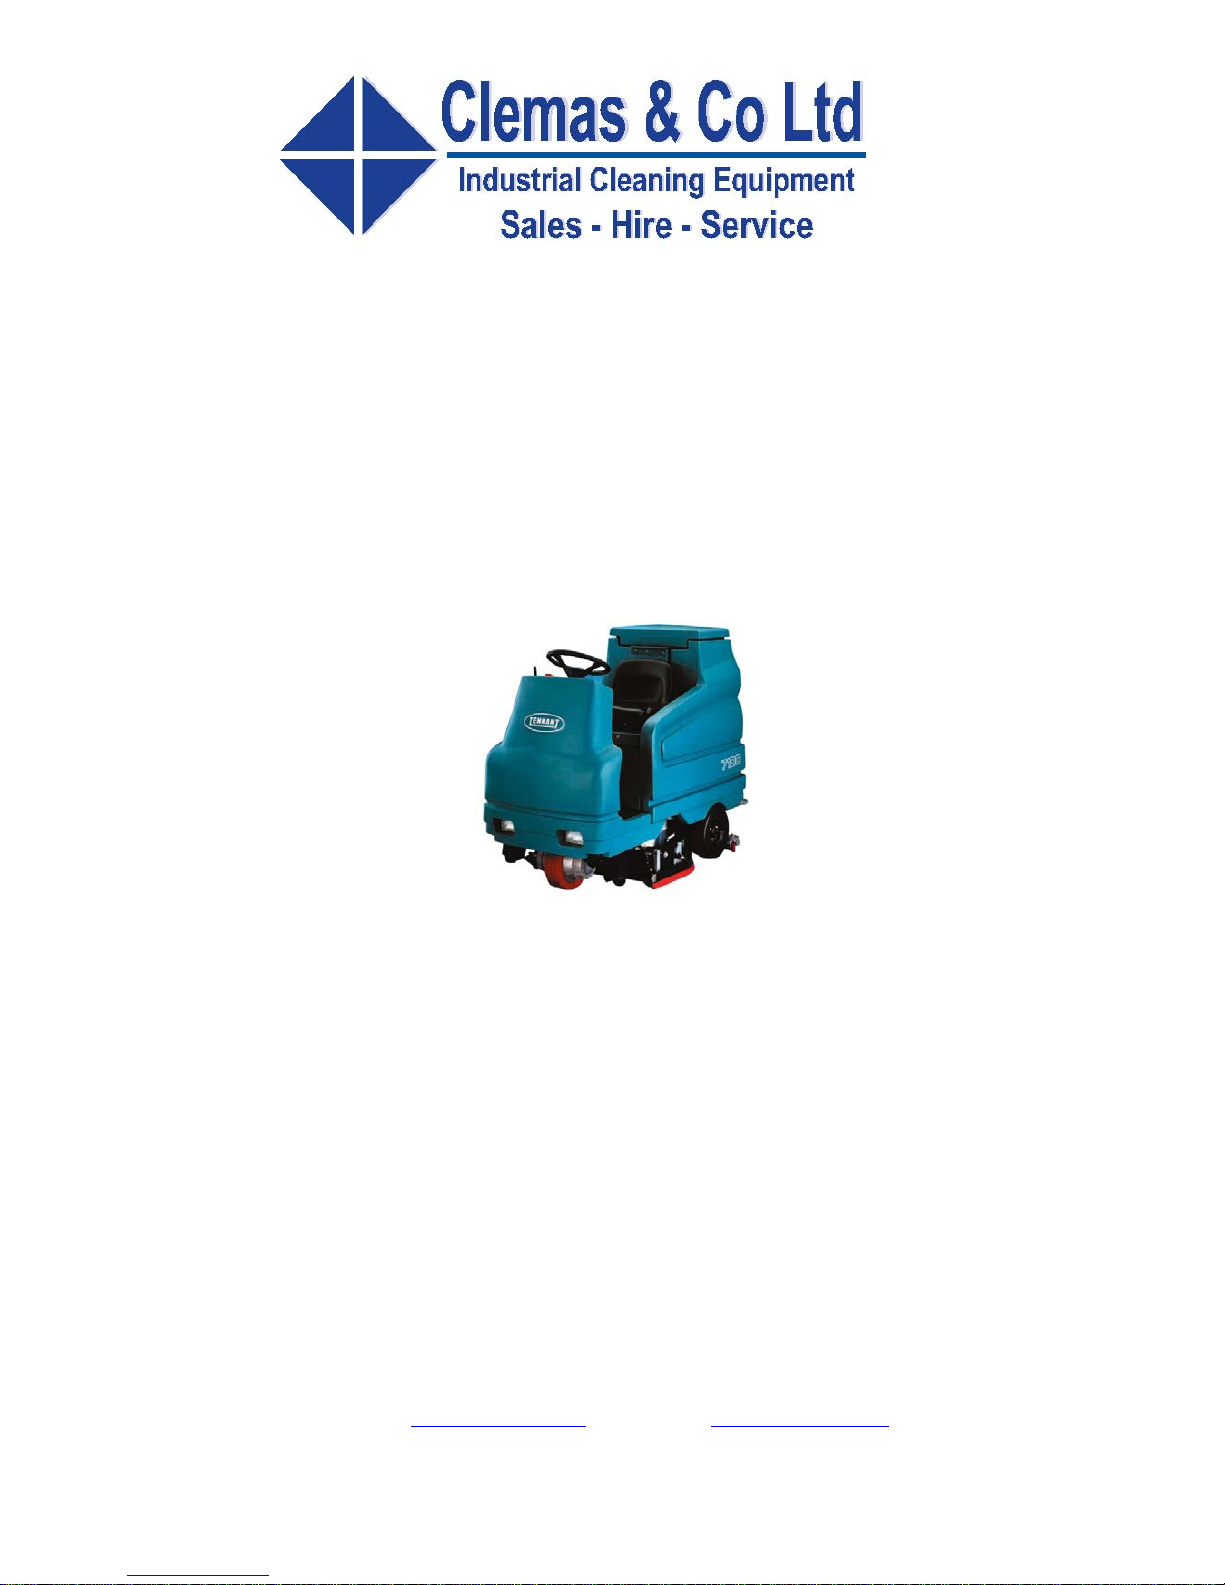
TENNANT 7100
SCRUBBER DRYER
OPERATOR MANUAL
Clemas & Co. Unit 5 Ashchurch Business Centre, Alexandra Way, Tewkesbury,
Gloucestershire, GL20 8NB.
Tel: 01684 850777 Fax: 01684 850707
Email: info@clemas.co.uk Web: www.clemas.co.uk

SAFETY PRECAUTIONS
3
7100 330699 (6--02)
SAFETY PRECAUTIONS
The following symbols are used throughout this
manual as indicated in their description:
WARNING: To warn of hazards or unsafe
practices that could result in severe
personal injury or death.
FOR SAFETY: To identify actions that
must be followed for safe operation of
equipment.
This machine is designed solely for scrubbing dirt
and dust in an indoor environment. Tennant does
not recommend using this machine in any other
environment.
The following information signals potentially
dangerous conditions to the operator or
equipment. Read this manual carefully. Know
when these conditions can exist. Locate all safety
devices on the machine. Then, take necessary
steps to train machine operating personnel.
Report machine damage or faulty operation
immediately. Do not use the machine if it is not in
proper operating condition.
WARNING: Batteries emit hydrogen gas.
Explosion or fire can result. Keep
sparks and open flame away . Keep
covers open when charging.
WARNING: Flammable materials can
cause an explosion or fire. Do not use
flammable materials in tank(s).
WARNING: Flammable materials or
reactive metals can cause explosion or
fire. Do not pick up.
FOR SAFETY:
1. Do not operate machine:
-- Unless trained and authorized.
-- Unless operation manual is read and
understood.
-- In flammable or explosive areas unless
designed for use in those areas.
2. Before starting machine:
-- Make sure all safety devices are in
place and operate properly.
-- Check brakes and steering for proper
operation (if so equipped).
3. When using machine:
-- Go slow on inclines and slippery
surfaces.
-- Use care when backing machine.
-- Follow mixing and handling
instructions on chemical containers.
4. Before leaving or servicing machine:
-- Stop on level surface.
-- Set parking brake.
-- Turn off machine and remove key.
5. When servicing machine:
-- Avoid moving parts. Do not wear loose
jackets, shirts, or sleeves when
working on machine.
-- Block machine tires before jacking
machine up.
-- Jack machine up at designated
locations only. Block machine up with
jack stands.
-- Use hoist or jack that will support the
weight of the machine.
-- Wear eye and ear protection when
using pressurized air or water.
-- Disconnect battery connections before
working on machine.
-- Avoid contact with battery acid.
-- Use Tennant supplied or equivalent
replacement parts.
6. When loading/unloading machine
onto/off truck or trailer:
-- Turn off machine.
-- Use truck or trailer that will support
the weight of the machine.
-- Use winch. Do not drive the machine
onto/off the truck or trailer unless the
load height is 380 mm (15 in) or less
from the ground.
-- Set parking brake after machine is
loaded.
-- Block machine tires.
-- Tie machine down to truck or trailer.
SAFETY PRECAUTIONS
7100 330699 (12--00)
4
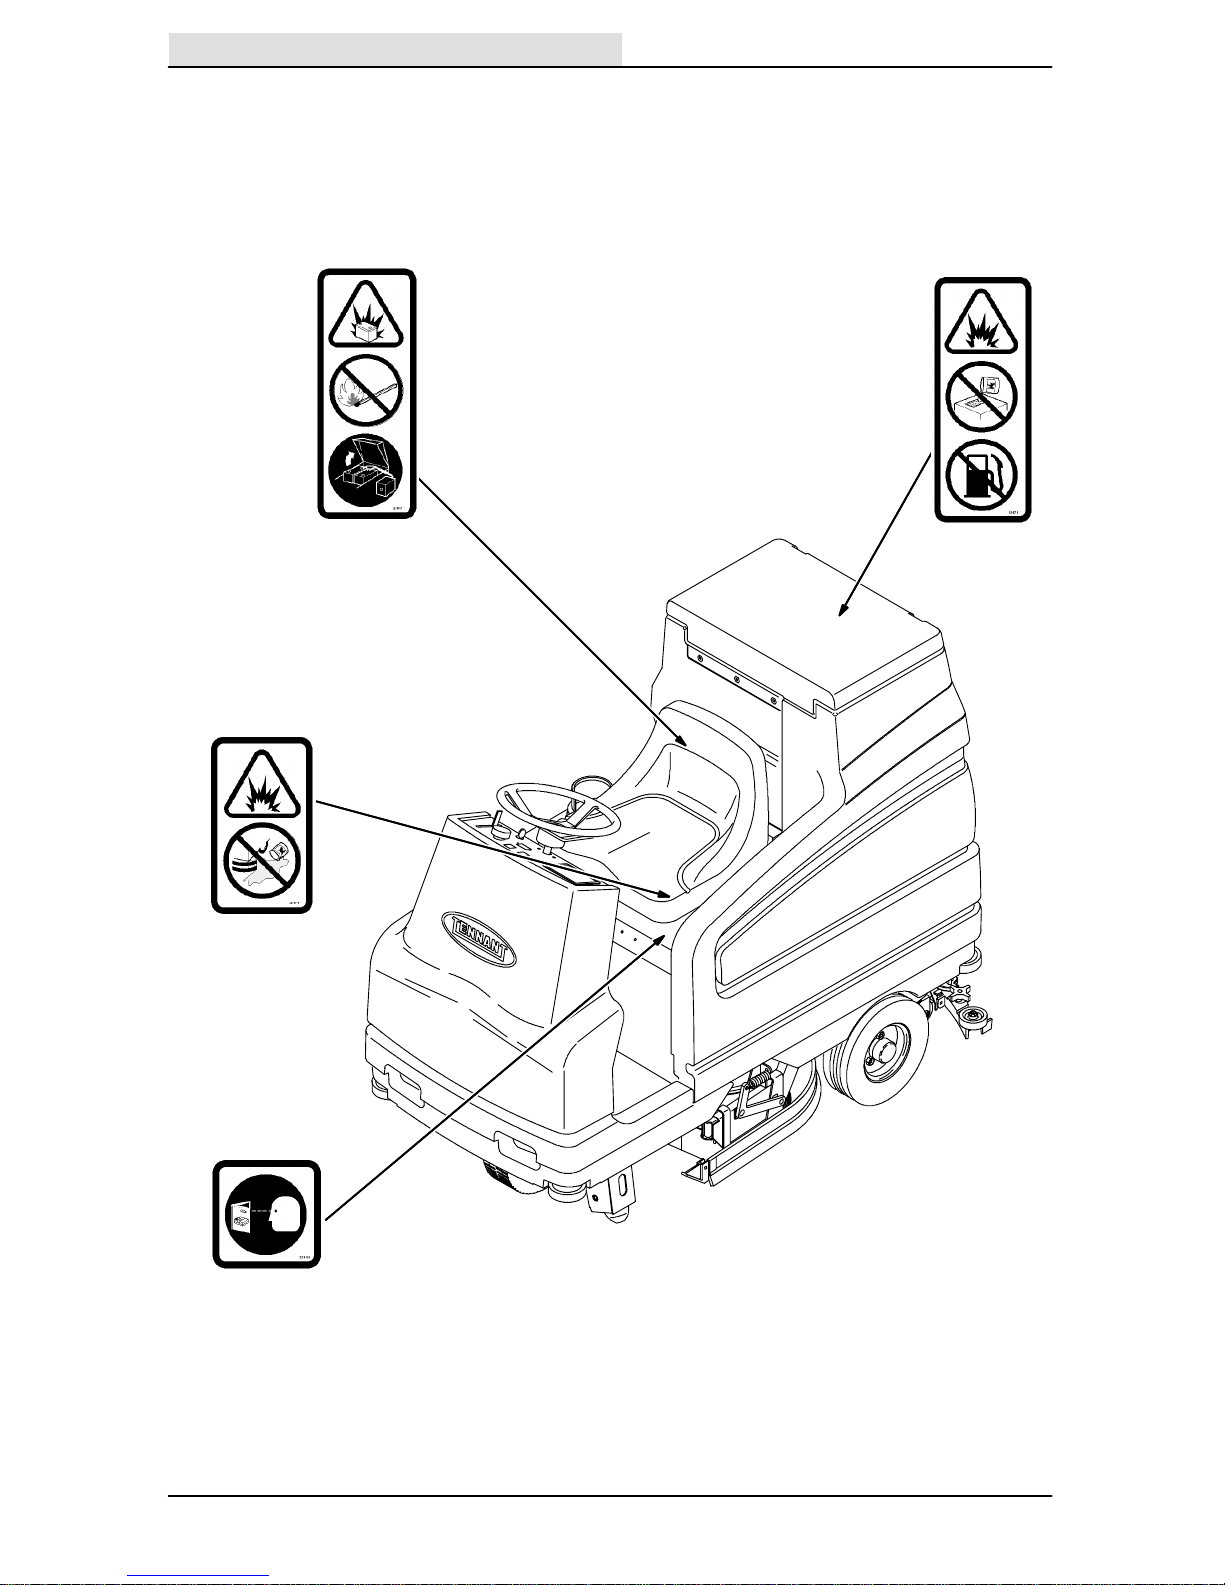
The safety labels appear on the machine in the
locations indicated. If these or any label becomes
damaged or illegible, install a new label in its
place.
BA TTER Y CHARGING LABEL -- LOCATED ON
AND UNDERNEATH THE SEAT SUPPORT.
FLAMMABLE SPILLS LABEL -LOCATED ON THE SEAT SUPPORT.
FOR SAFETY LABEL -- LOCATED ON THE
SEAT SUPPORT.
FLAMMABLE MATERIALS LABEL -- LOCATED
ON THE UNDERSIDE OF THE TANK COVER
AND ON THE LEFT SIDE OF THE OPERATOR
COMPARTMENT.
353450
OPERATION
5
7100 330699 (12--00)
OPERATION
OPERATOR RESPONSIBILITY
- The operator’s responsibility is to take care
of the daily maintenance and checkups of
the machine to keep it in good working
condition. The operator must inform the
service mechanic or supervisor when the
maintenance intervals are required as stated
in the MAINTENANCE section of this
manual.
- Read this manual carefully before operating
this machine.
FOR SAFETY: Do not operate machine,
unless operation manual is read and
understood.
- Check the machine for shipping damage.
Check to make sure machine is complete
per shipping instructions.
- Keep your machine regularly maintained by
following the maintenance information in this
manual. We recommend taking advantage of
a regularly scheduled service contract from
your TENNANT representative.
- Order parts and supplies directly from your
authorized TENNANT representative. Use
the parts manual provided when ordering
parts.
07324
OPERATION
7100 330699 (3--04)
6
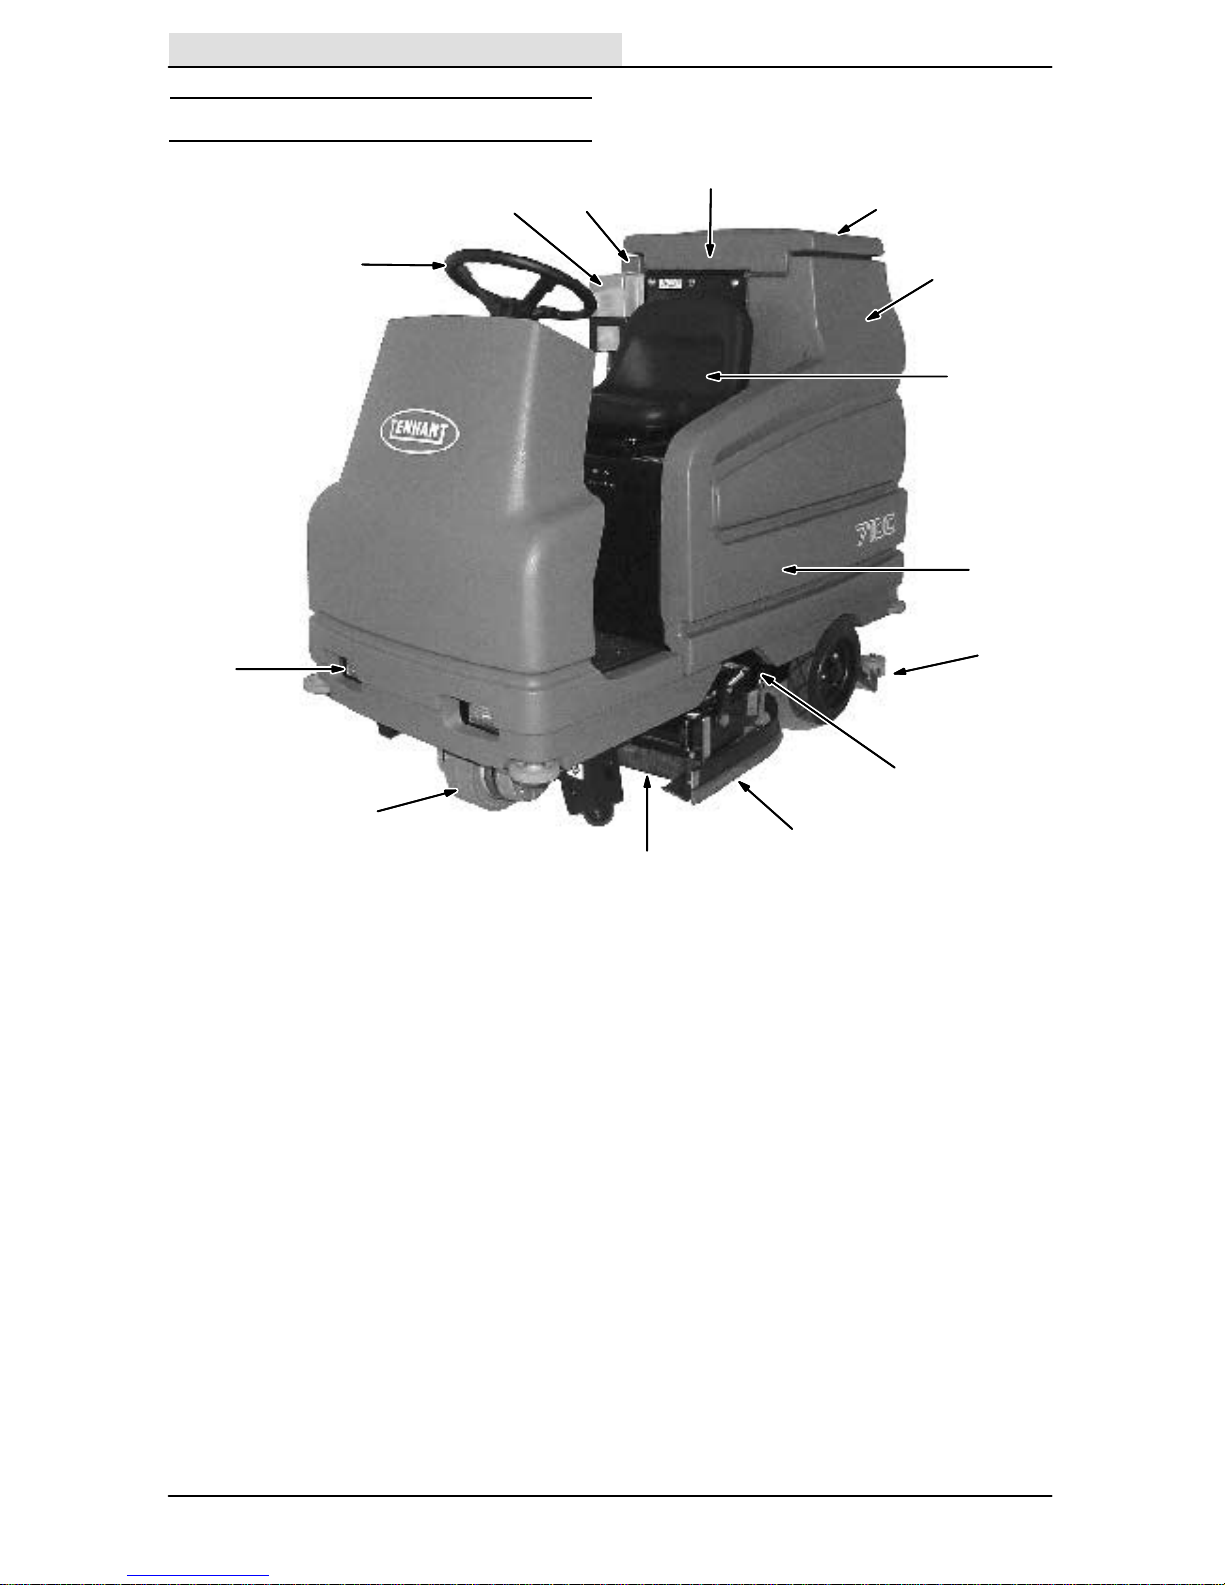
MACHINE COMPONENTS
A
B
C
D
E
F
G
H
I
J
K
L
M
N
A. Vacuum fan inlet screen
B. Tank Cover
C. Solution tank
D. Operator’s seat
E. Batteries
F. Rear squeegee
G. Side squeegee
H. Scrub head
I. Front wheel
J. Operating lights
K. Steering wheel
L. Recovery tank
M. F aSTtttt PAK (option)
N. FaSTtttt solution system (option)
OPERATION
7
7100 330699 (3--04)
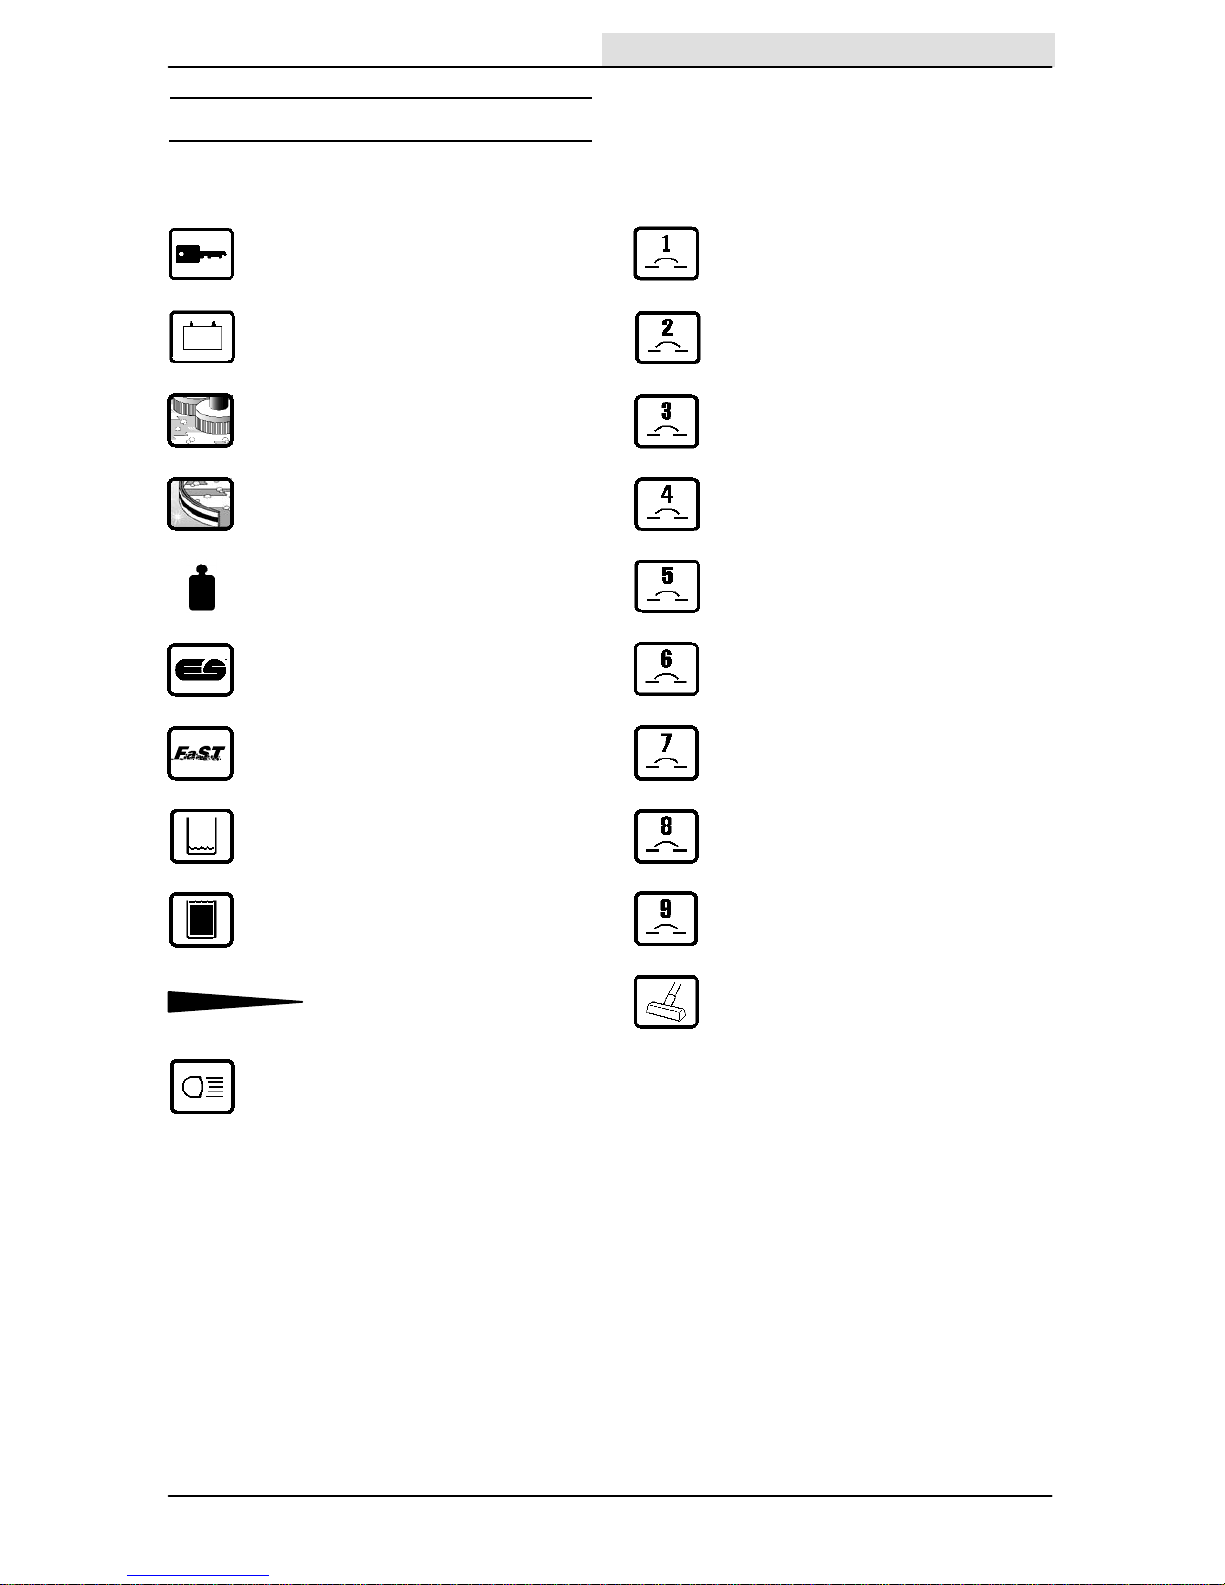
CONTROL PANEL SYMBOLS
These symbols identify controls and displays on
the machine:
Key switch Circuit breaker #1
Battery charge Circuit breaker #2
Scrub Circuit breaker #3
Squeegee Circuit breaker #4
Brush pressure Circuit breaker #5
ESt (Option) Circuit breaker #6
FaSTt (Option) Circuit breaker #7
Solution tank low Circuit breaker #8
Recovery tank full Circuit breaker #9
Solution flow Power wand switch (option)
Operating lights switch
OPERATION
7100 330699 (3--04)
8
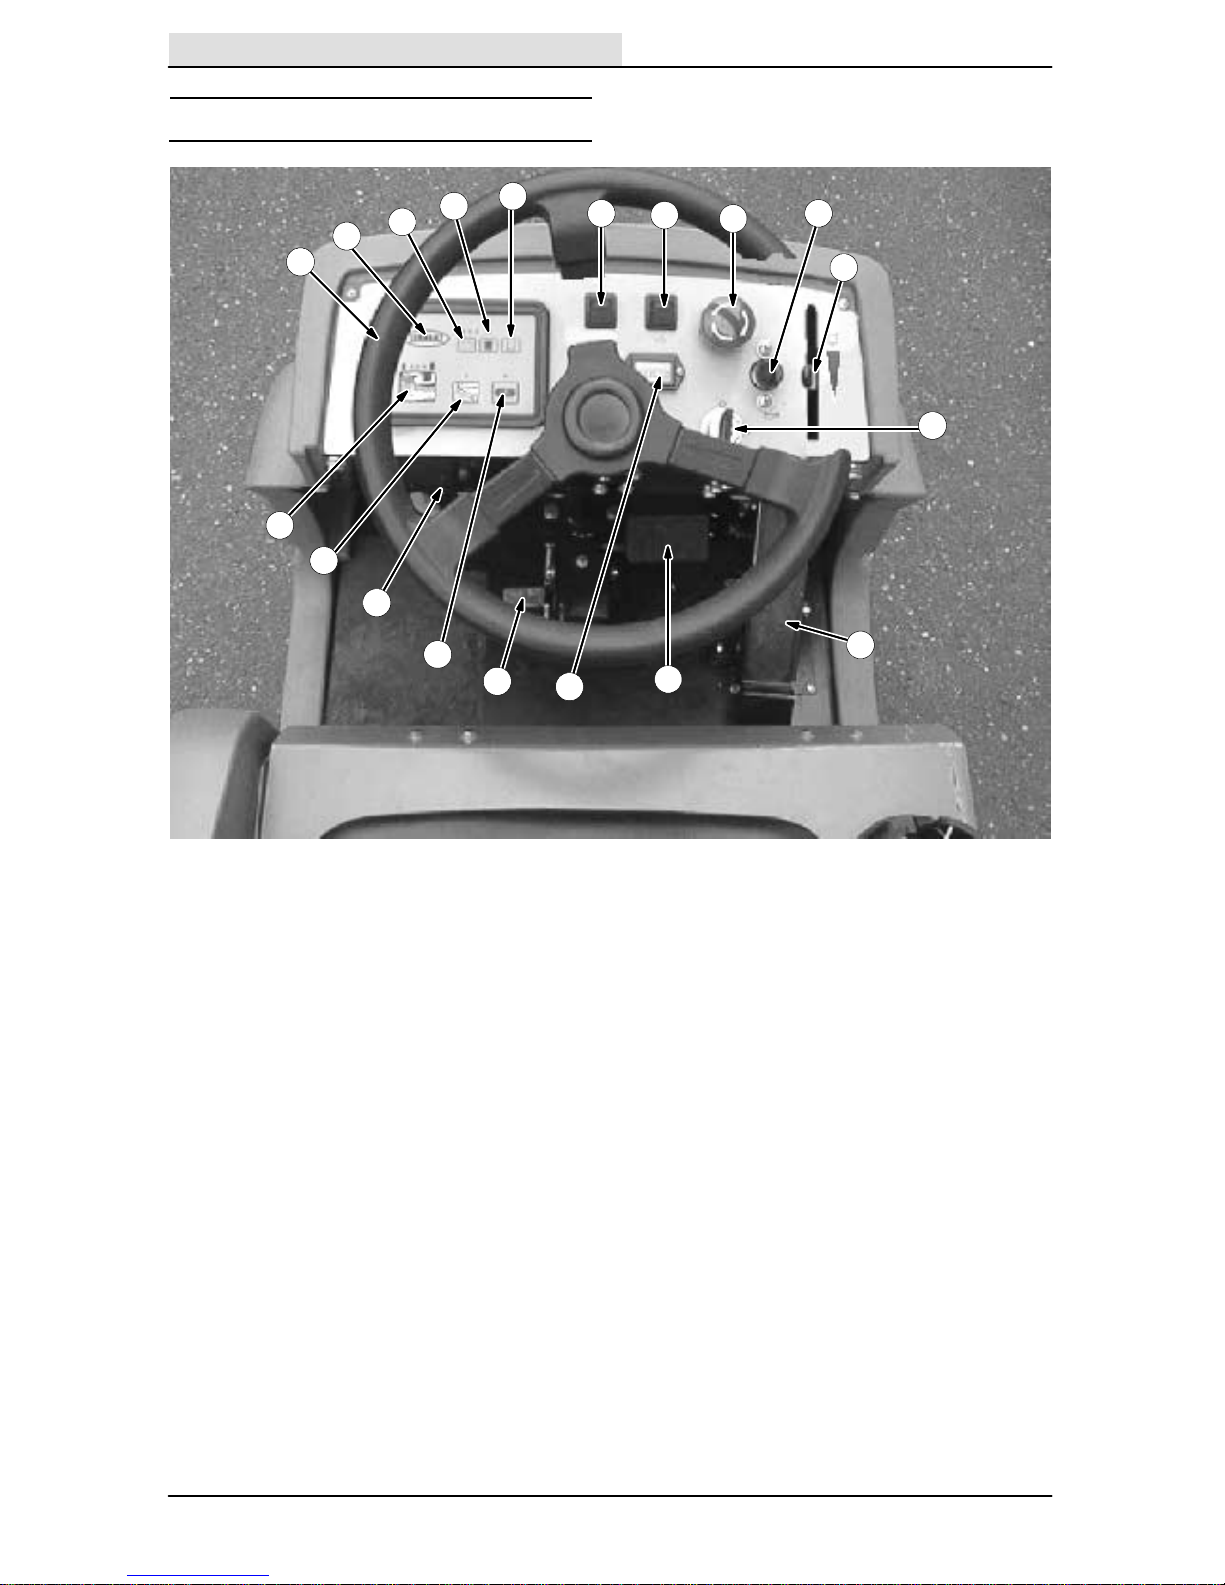
CONTROLS AND INSTRUMENTS
A
B
C
D
E
F
G
H
L
J
I
K
M
N
O
P
S
R
Q
A. Steering wheel
B. Control panel
C. Battery discharge indicator
D. Recovery tank full indicator
E. Solution tank empty indicator
F. Operating lights switch
G. Power wand switch (option)
H. Power kill switch
I. Horn button
J. Solution flow lever
K. On/Off key switch
L. Directional pedal
M. Brake pedal
N. Hourmeter
O. Parking brake pedal
P. E St switch (option)
or FaSTt switch (option)
Q. Circuit breaker panel
R. Rear squeegee switch
S. Scrub switch
OPERATION
9
7100 330699 (12--00)
OPERATION OF CONTROLS
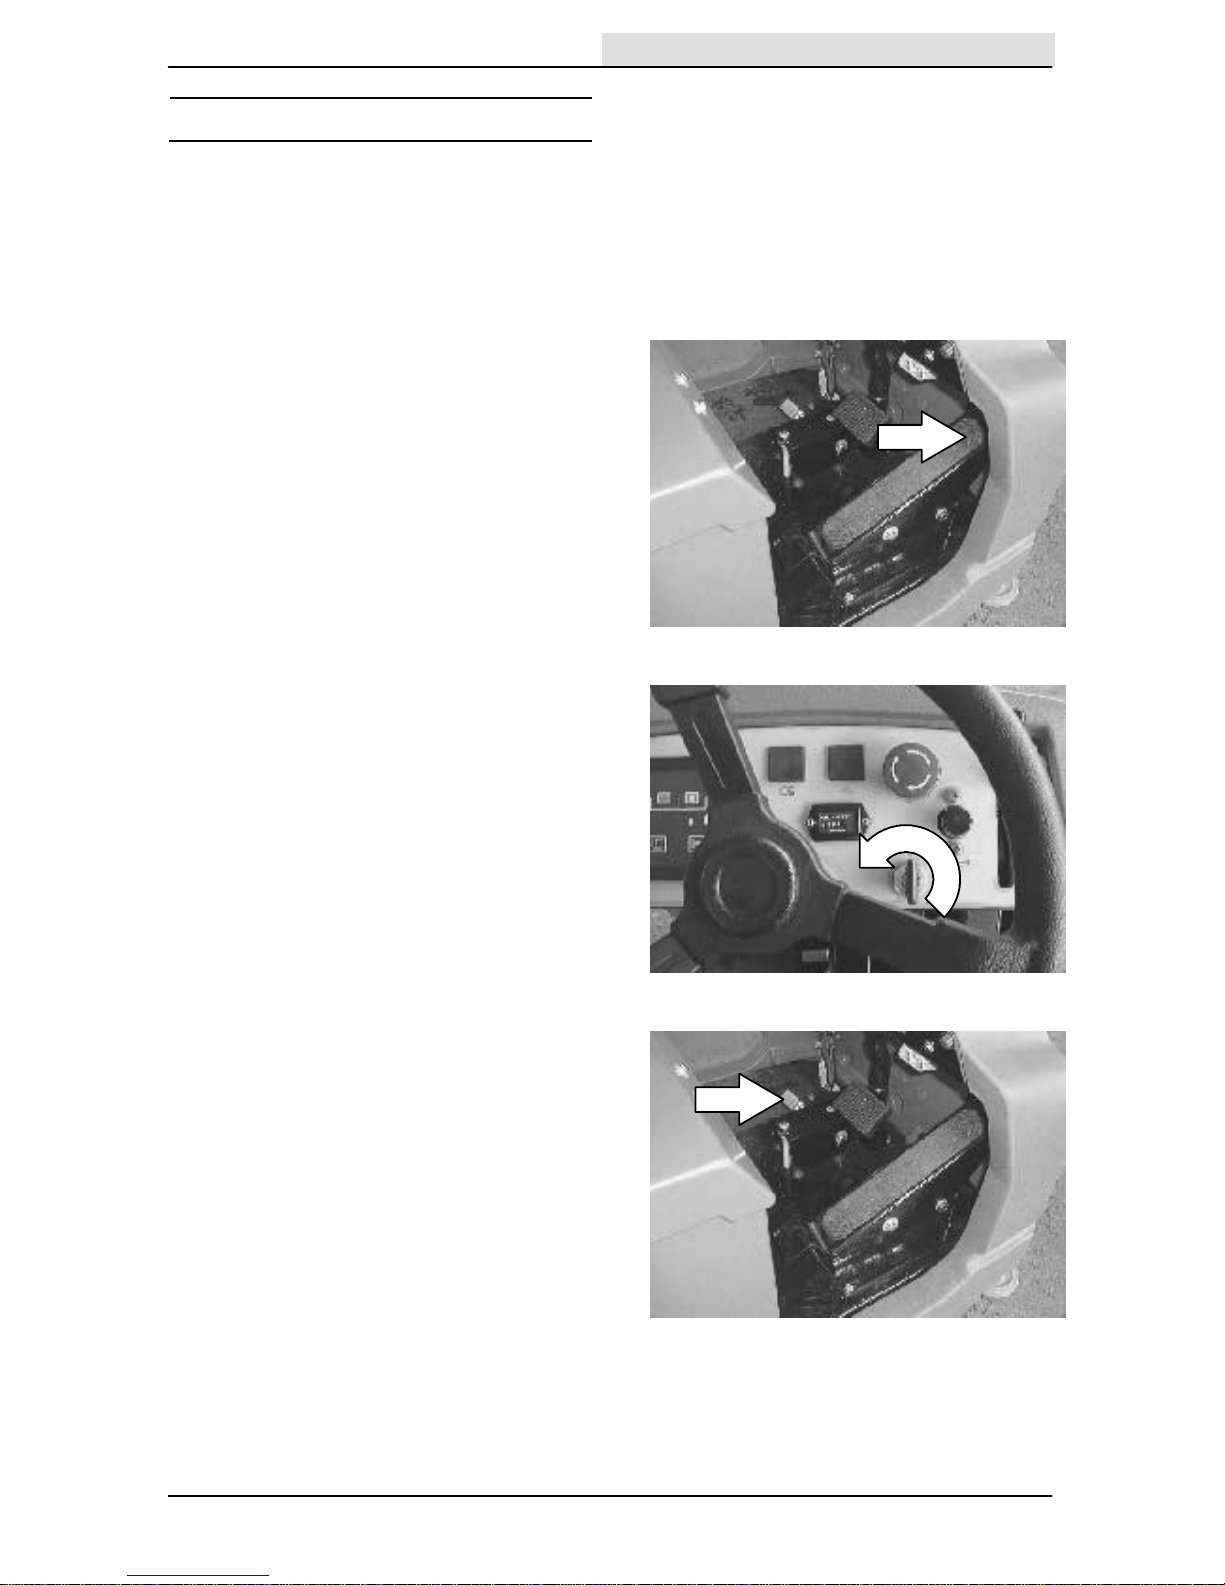
BRAKE PEDAL
The brake pedal stops the machine.
Stop: Take your foot off the directional pedal and
allow it return to the Neutral position. Step on the
brake pedal.
PARKING BRAKE PEDAL
The parking brake pedal sets the front wheel
brake.
Set: Press the brake pedal down as far as
possible, then press on the parking brake pedal
with the toe of your foot to lock the parking brake
pedal in place.
FOR SAFETY: Before leaving or
servicing machine, stop on level
surface, set parking brake, turn off
machine, and remove key.
Release: Press down on the brake pedal until the
parking brake releases.
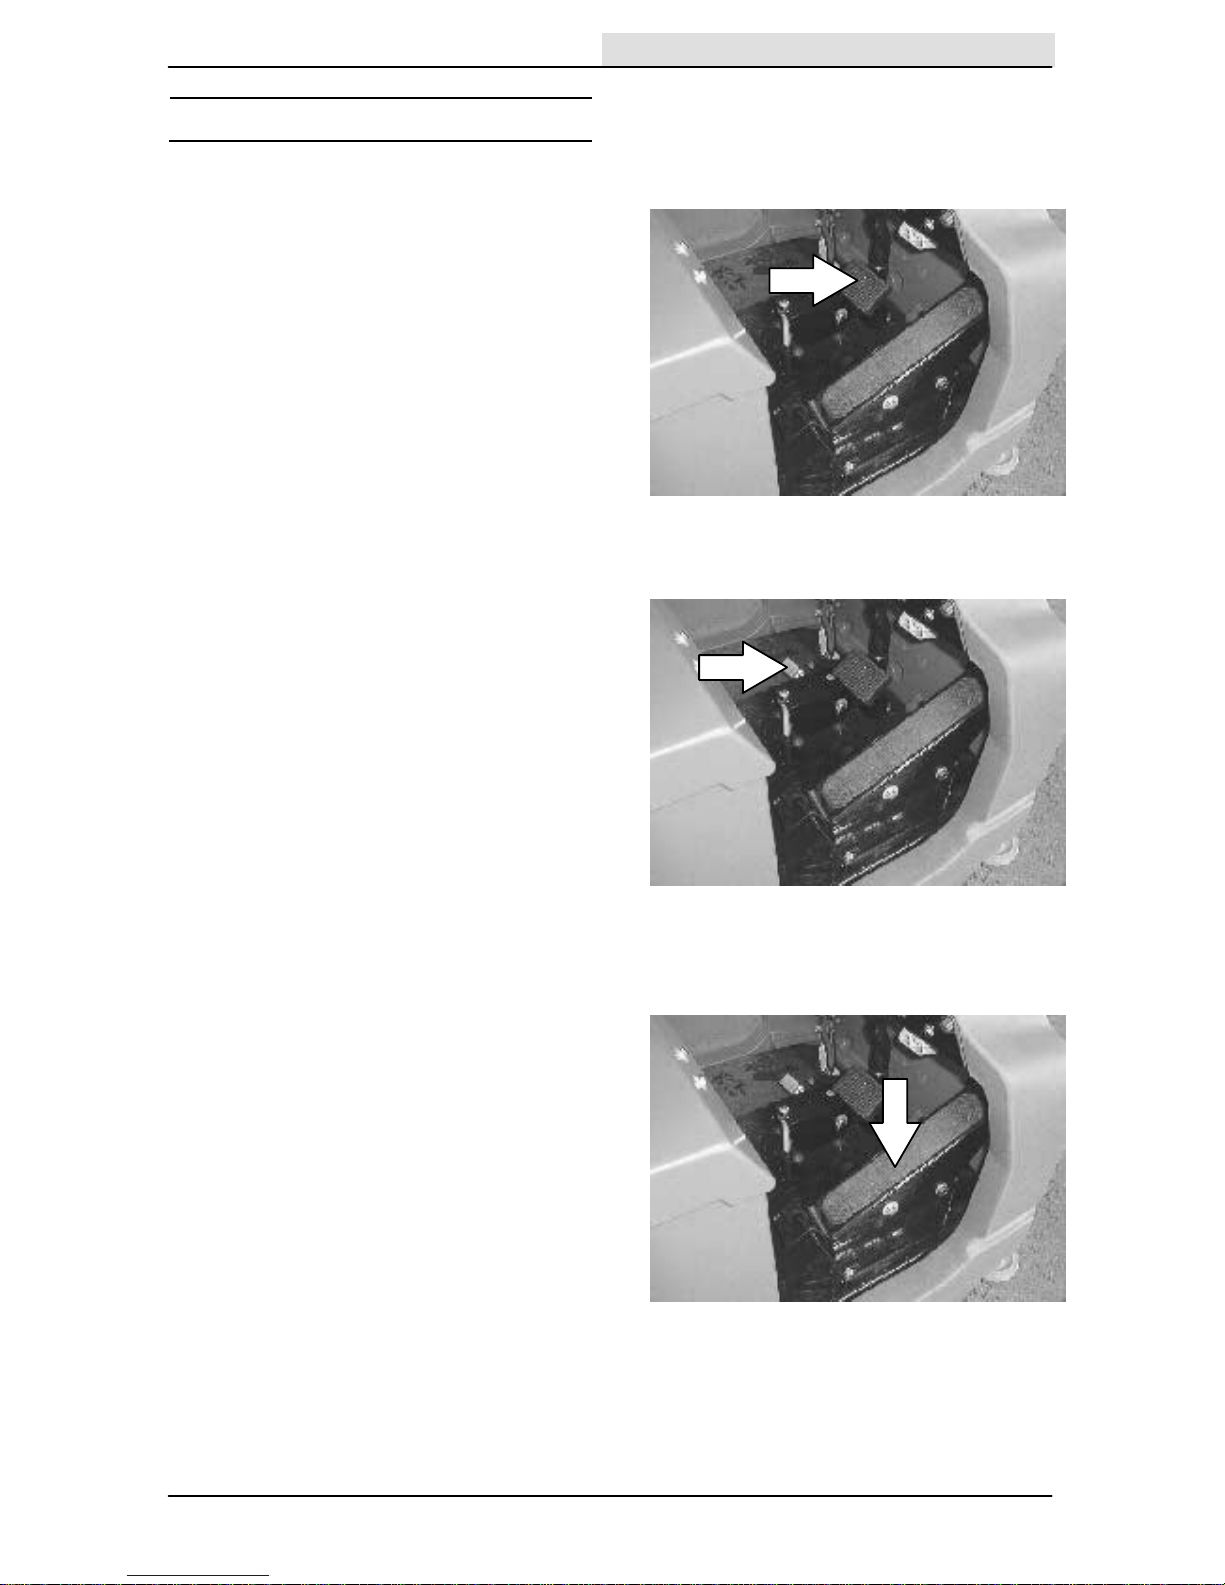
DIRECTIONAL PEDAL
The directional pedal controls direction of travel
and the propelling speed of the machine. You
change the speed of the machine with the
pressure of your foot; the harder you press the
faster the machine travels.
When the machine is moving forward and the
directional pedal is reversed, the machine will
coast for a short distance before changing
direction. Use the brake pedal to stop the
machine.

OPERATION
7100 330699 (12--00)
10
Forward: Press the top of the directional pedal
with the upper part of your foot.
NOTE: The machine will not travel unless the
operator is sitting in the operator’s seat.
Reverse: Press the bottom of the directional
pedal with the heel of your foot.
When the directional pedal is placed into the
reverse position, the rear squeegee will
automatically raise. After a short delay, the
vacuum will stop.
Neutral: Take your foot off the directional pedal
and it will return to the neutral position.
When the directional pedal returns to the neutral
position, the scrub brushes will stop and after a
short delay, the scrub head will raise.
STEERING WHEEL
The steering wheel controls the machine’s
direction of travel.
Left: Turn the steering wheel to the left.
Right: Turn the steering wheel to the right.
OPERATION
11
7100 330699 (12--00)
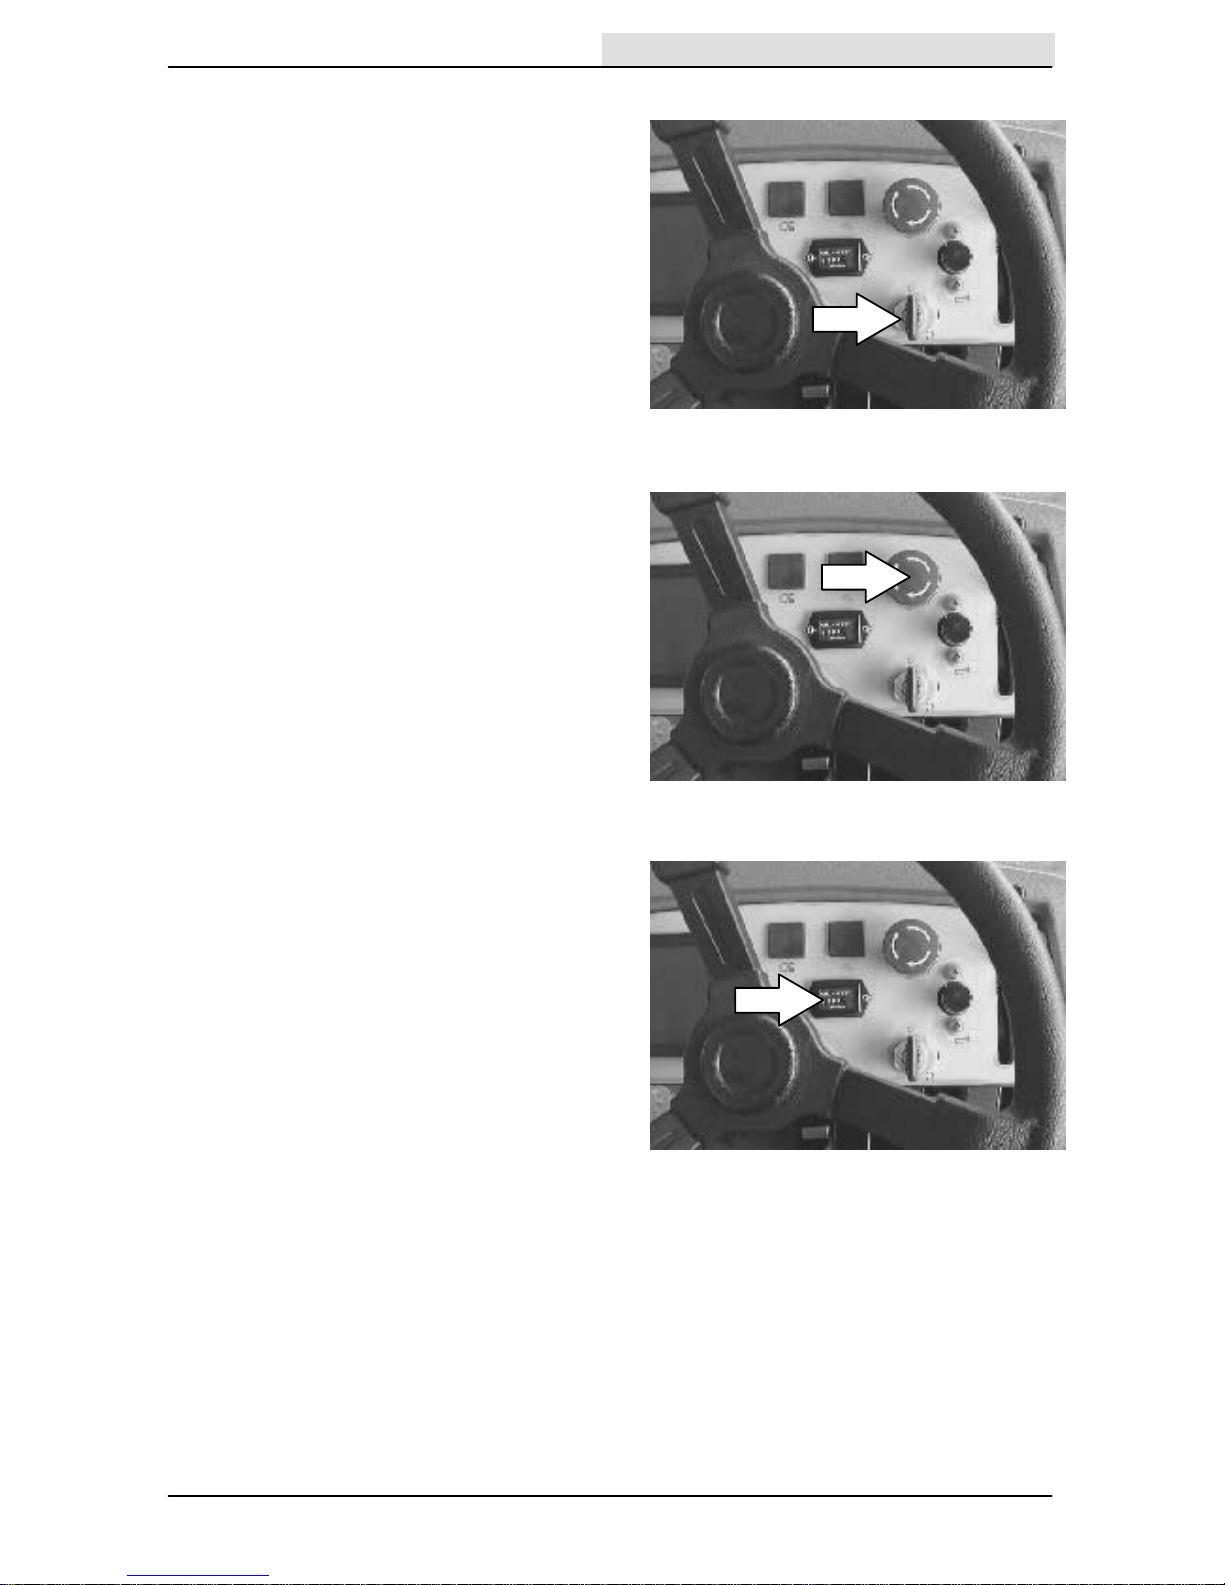
ON-OFF KEY SWITCH
The on-off key switch controls machine power with
akey.
FOR SAFETY: When starting machine,
keep foot on brake and directional pedal
in neutral.
On: Turn the key all the way clockwise and
release it to the on position.
Off: Turn the key all the way counterclockwise
until it clicks into the off position.
POWER KILL SWITCH
The power kill switch halts all power to the
machine.
Stop machine power: Press the power kill switch.
Restart: Turn off the machine with the on/off
switch. Turn the power kill switch to the right to
release the switch. Turn on the machine with the
on/off key switch.
HOURMETER
The hourmeter records the number of hours the
machine has been operated. Check the hourmeter
regularly; this information is used to determine
when to perform routine machine maintenance.

OPERATION
7100 330699 (12--00)
12
OPERATING LIGHTS SWITCH
The operating lights switch powers the headlights
and the hazard lights (option) on and off.
On: Press the top of the operating lights switch.
Off: Press the bottom of the operating lights
switch.
POWER WAND SWITCH (OPTION)
The power wand switch (option) powers the power
wand on and off.
On: Press the top of the power wand switch.
Off: Press the bottom of the power wand switch.
HORN BUTTON
The horn button operates the horn.
Sound: Press the horn button.
OPERATION
13
7100 330699 (12--00)
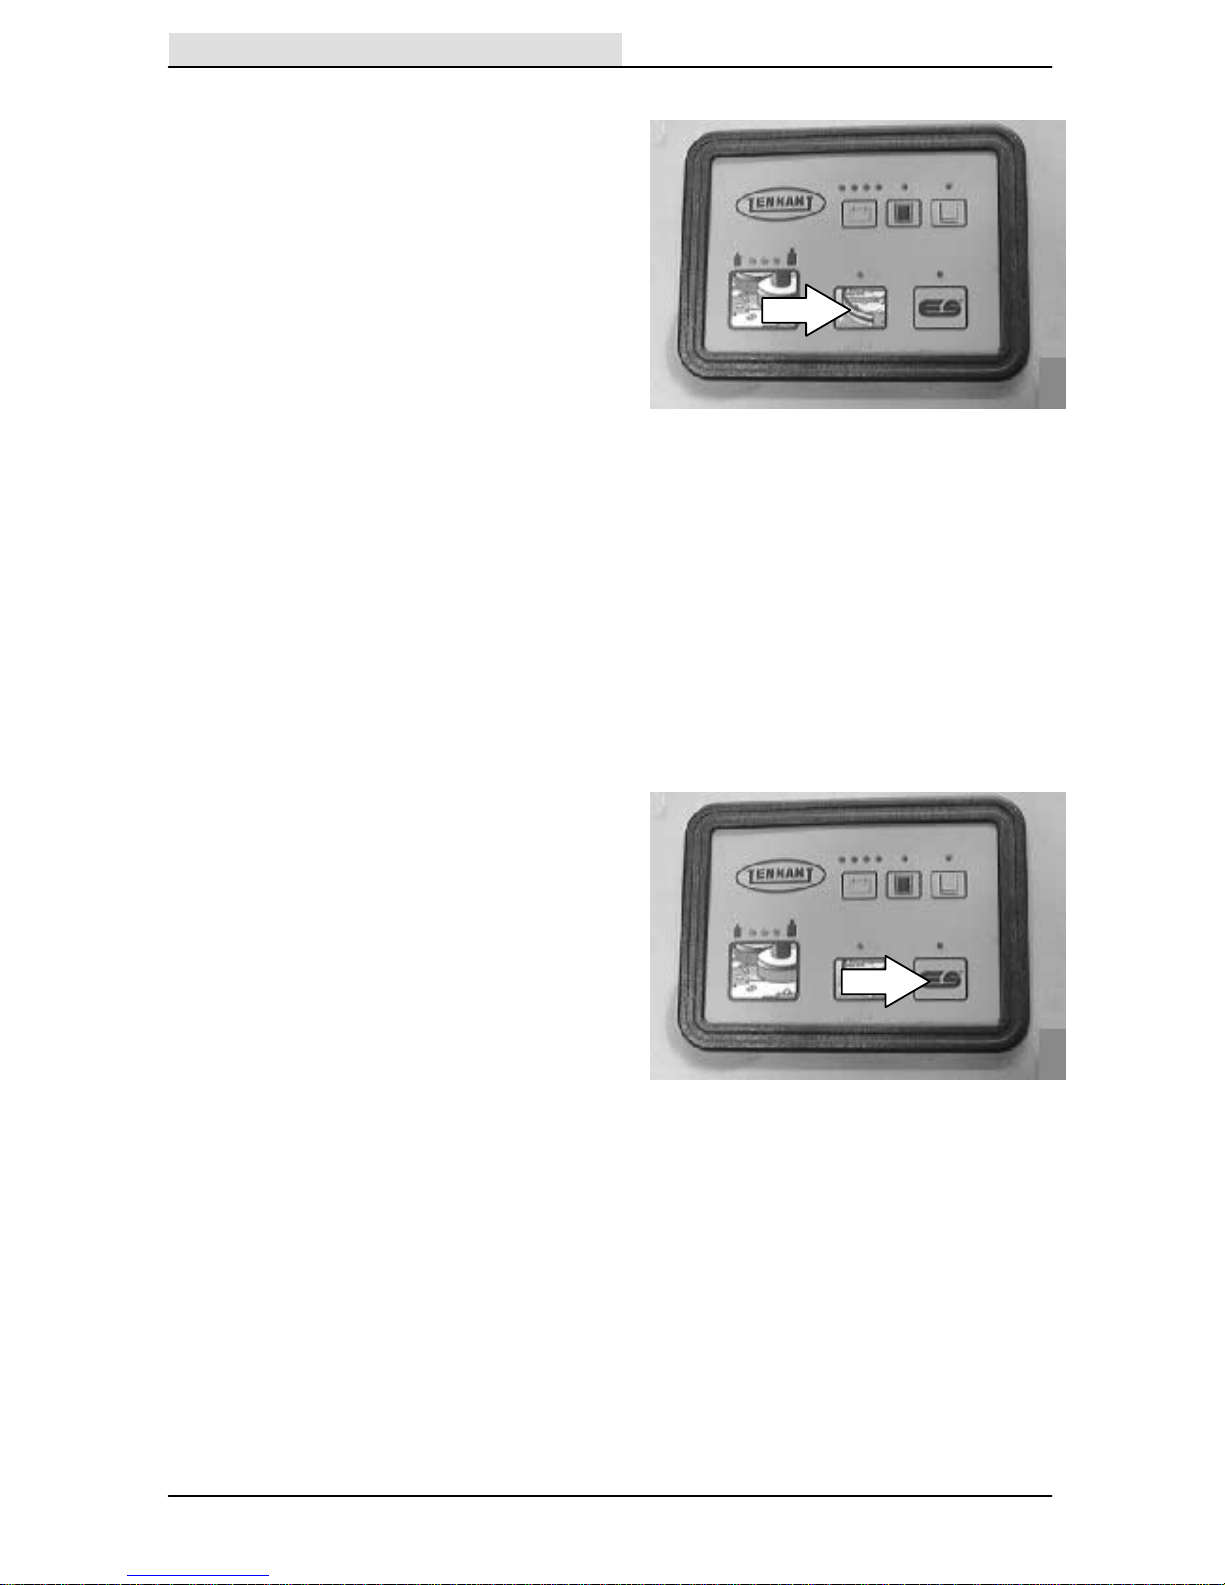
SCRUB SWITCH
The scrub switch controls the scrub head, scrub
brushes, squeegee, and vacuum fan. The scrub
switch is also used to set the scrub brush
pressure.
Start scrubbing: Press the scrub switch.The
indicator light will illuminate, the squeegee will
lower, and the vacuum fan will start. The
scrubbing system and solution flow will start when
the directional pedal is pressed and the machine
begins to move forward.
Stop scrubbing: Press the scrub switch.The
pressure indicator light will go out. The scrub
brushes will stop, the scrub head will raise, and
the solution flow will stop. After a short delay, the
rear squeegee will automatically raise. After
another delay, the vacuum will stop.
The brush down pressure indicators display the
pressure selection. The brush pressure indicator
has three positions. Brush pressure increases as
the indicator light moves to the right across the
display. Travel speed and floor conditions will
affect the scrubbing performance. Under normal
conditions, the brush pressure should be set in
one of the minimum settings. Set the brush
pressure in one of the maximum settings to scrub
a heavily soiled floor.
Change brush pressure: Press and hold the scrub
switch. T he pressure indicator light will cycle
through the three brush pressure settings. When
the switch is pressed and held, the brush pressure
will increase until it reaches the maximum setting.
The pressure will then return to the minimum
setting. Release the scrub switch when the
desired setting is indicated on the display.
NOTE: When the machine power is turned off, the
brush pressure will remain in the last setting used.
OPERATION
7100 330699 (12--01)
14
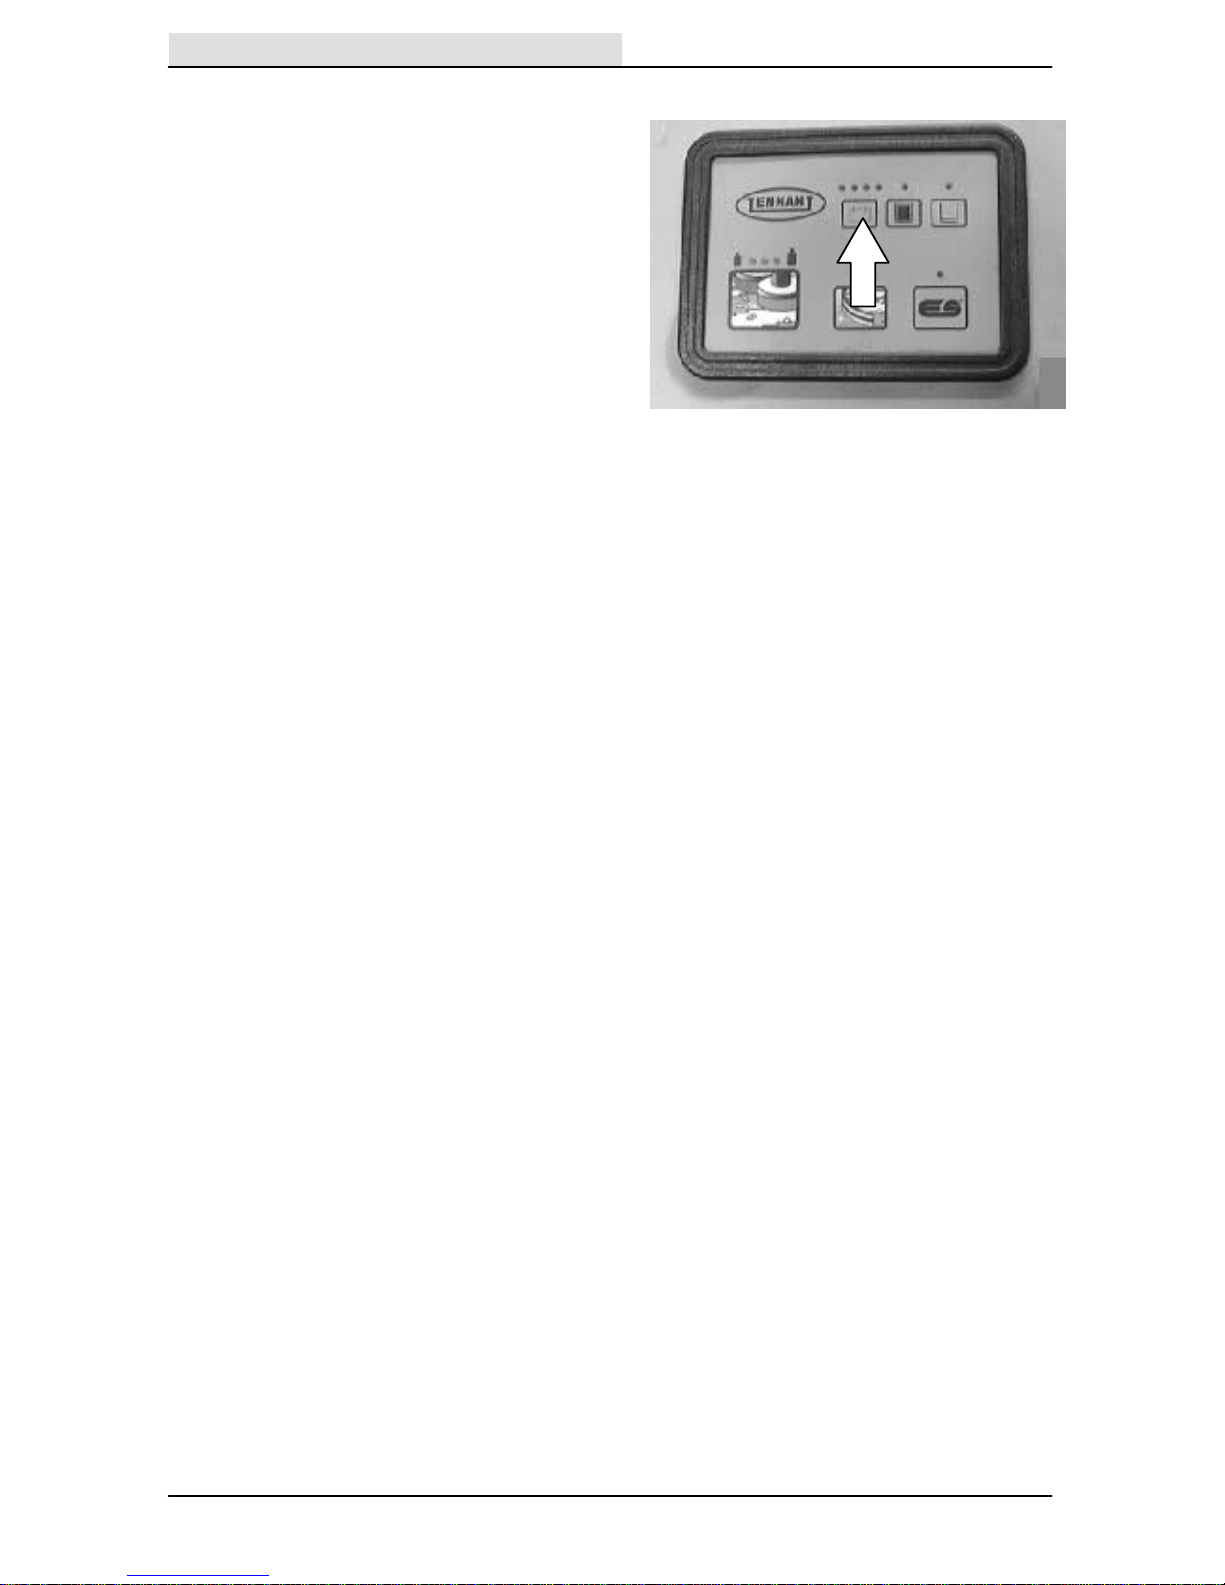
REAR SQUEEGEE SWITCH
The rear squeegee switch controls the vacuum
fan and the position of the rear squeegee. The
rear squeegee can be operated separately from
the scrub brushes for the purpose of picking-up
excess water without scrubbing, or double
scrubbing without water pick up
Lower squeegee and start the vacuum fan: Press
the rear squeegee switch. The indicator light
above the switch will illuminate.
Raise squeegee and stop the vacuum fan: Press
the squeegee switch. The indicator light above the
switch will go off. There will be a slight delay
before the vacuum shuts off.
NOTE: The rear squeegee lowers and the
scrubbing vacuum starts automatically, when the
scrubbing operations start.
NOTE: The rear squeegee will raise and the
scrubbing vacuum will shut off after a short delay
when the machine travels in reverse.
NOTE: The rear squeegee will raise and the
scrubbing vacuum fan will shut off after a short
delay when the scrubbing operations are shut off.
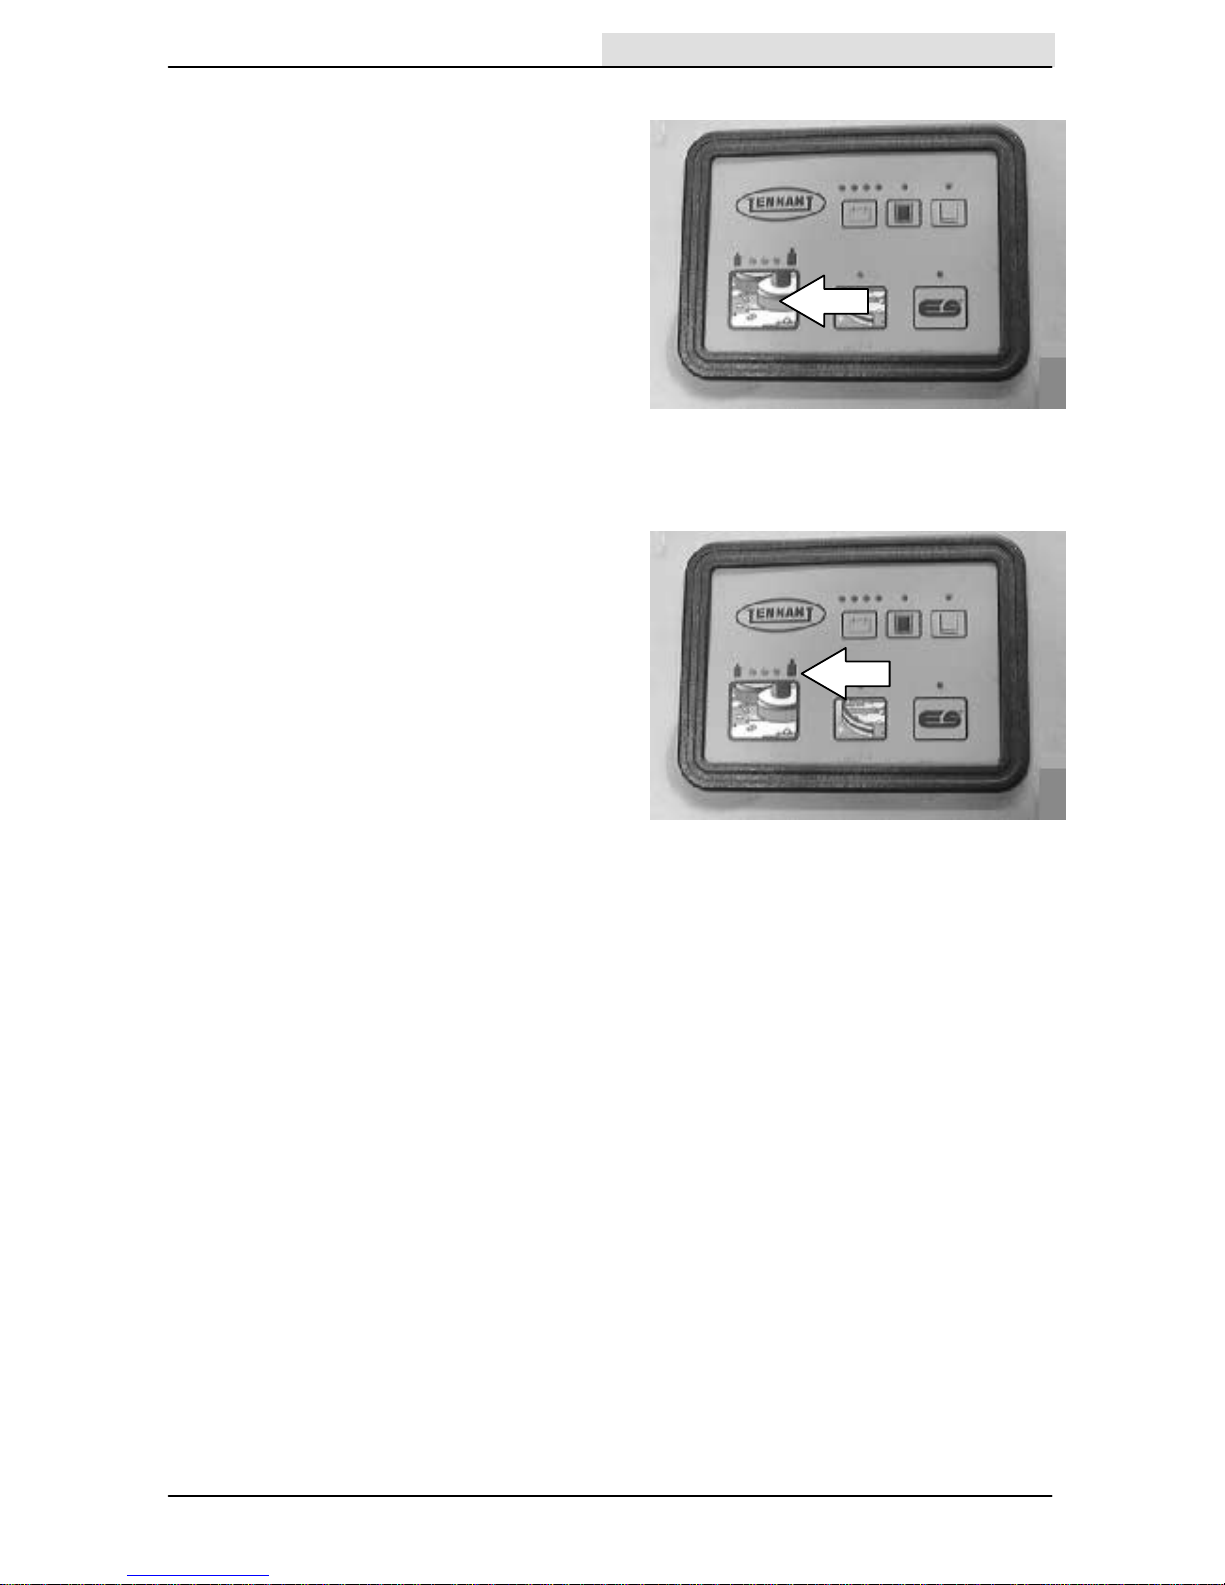
ESt SWITCH (OPTION)
The ES
t
(Extended Scrub) switch turns on and
off the solution recycling system. When the
scrubbing functions have started, the ESt will
default to the last setting used.
On: Press the ES
t
switch. The indicator light
above the switch will illuminate.
Off: Press the ES
t
switch. The indicator light
above the switch will turn off.
NOTE: The solution tank empty indicator light
will not illuminate with machines equipped with
the ES
t
option.

OPERATION
15
7100 330699 (3--04)
FaSTt SWITCH (OPTION)
The FaSTt switch (option) enables the FaSTt
(Foam Scrubbing Technology) system. When the
FaSTt system is enabled, it is turned on and off
with the scrub switch.
On: Press the FaST
t
switch. The indicator light
above the switch will illuminate.
Off: Press the FaST
t
switch. The indicator light
above the switch will turn off.
NOTE: The FaST system will not start until the
directional pedal is pressed.
NOTE: To use the machine for conventional
scrubbing, disable the FaST
t
system by turning
the FaST
t
switch off.
NOTE: Do not enable the FaST
t
system with
conventional cleaning detergents in the solution
tank. Drain, raise and refill the solution tank with
clear cool water only before operating the FaST
t
system. Conventional cleaning detergents/
restorers may cause failure to the FaST
t
solution
system.
SOLUTION TANK EMPTY INDICATOR
The solution tank empty indicator will illuminate
when the solution tank is empty.
NOTE: Machines with the ES
t
option do not have
this feature.
RECOVERY TANK FULL INDICATOR
The recovery tank full indicator will illuminate
when the recovery tank is full.
NOTE: When the indicator illuminates, all
scrubbing functions will shut off automatically.
OPERATION
7100 330699 (12--00)
16
BA TTER Y DISCHARGE INDICATOR
The battery discharge indicator displays the
charge level of the batteries while the machine is
operating.
When the batteries are fully charged, all four
indicator lights are lit. As the batteries discharge,
the indicator lights will go out from right to left. The
batteries should be recharged when the indicator
on the left flashes. When the indicator flashes, all
scrubbing functions will shut off automatically.
Drive the machine to the battery charging area
and charge the batteries immediately after the
battery discharge indicator begins to flash.
NOTE: The battery discharge indicator will not
stop flashing until the batteries have been fully
charged.
NOTE: Do not charge the batteries more often
than is necessary to prolong the life of the
batteries. Do not charge the batteries with a “top
off” charge if there is enough remaining charge in
the batteries for the next machine use. Discharge
the batteries to a 20% level, when the battery
discharge indicator segments shut off, before fully
charging the batteries. Do not allow the batteries
to become completely discharged as this will also
damage the batteries. See BATTERIES in the
MAINTENANCE section.
OPERATION
17
7100 330699 (3--04)
CIRCUIT BREAKERS
Circuit breakers are resetable electrical circuit
protection devices designed to stop the flow of
current in the event of a circuit overload. Once a
circuit breaker is tripped, reset it manually by
pressing the reset button after the breaker has
cooled down.
If the overload that caused the circuit breaker to
trip is still present, the circuit breaker will continue
to stop current flow until the problem is corrected.
The circuit breakers are located on the operator
console.
Circuit
Breaker
Rating Circuit Protected
CB1 5A Machine power
CB2 10 A Lights
CB3 10 A Horn
CB4 10 A Power wand/
Back up alarm
CB5 10 A Control panel
CB6 20 A Vacuum Fan (single)
CB6 40 A Vacuum Fan (dual)
CB7 10 A ESt System (option)
FaSTt System (option)
CB8 25 A Left brush motor
CB9 25 A Right brush motor
The chart below shows the circuit breakers and
the electrical components they protect.
FUSE
The fuse is a one-time protection device designed
to stop the flow of current in the event of a circuit
overload.
NOTE: Always replace the fuse with a fuse of the
same amperage.
The fuse is located behind the operator console.
Access t he fuse by lowering the operator console.
Fuse
Rating Circuit Protected
FU-1 40 A Propelling
OPERATION
7100 330699 (3--04)
18
SOLUTION FLOW LEVER
The solution flow lever controls the amount of
solution that flows to the floor while scrubbing.
Increase solution flow: Push the lever forward.
Decrease solution flow: Pull the lever backward.
NOTE: The machine is equipped with a solenoid
valve that automatically stops the solution flow
when the directional pedal is in the neutral position
or when the scrub head is raised.
NOTE: When using the FaST
t
system (option),
the solution flow lever is nonfunctional. The
FaST
t
system flow rate is pre--set.
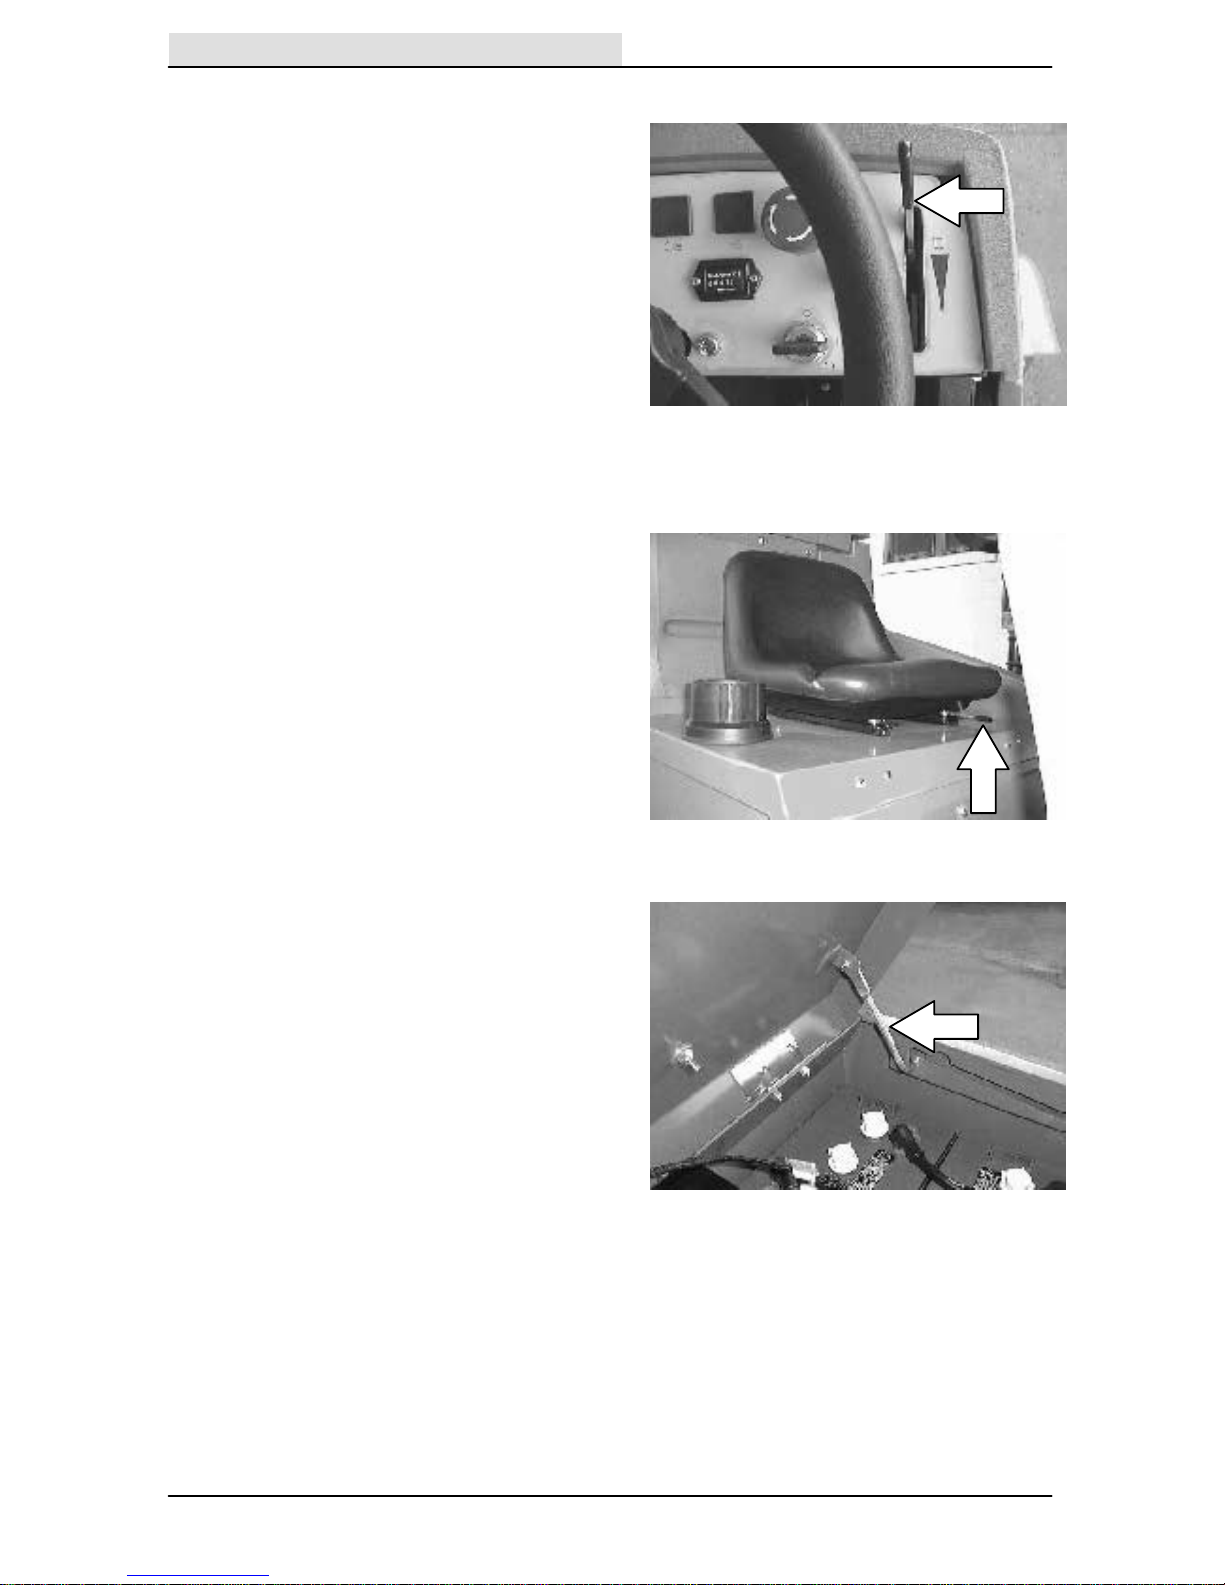
OPERATOR SEAT
The operator seat is a fixed back style with a
forward--backward adjustment.
Adjust: Pull the lever outward and slide the seat
to the desired position, then release the lever.
NOTE: The machine will not travel unless the
operator is sitting in the operator’s seat.
SEAT SUPPORT ARM
The seat support arm holds the seat up to allow
access to the batteries. The seat support arm
automatically engages when the seat is lifted all
the way up. Lower the seat support by slightly
raising it while pushing the support arm inward.
OPERATION
19
7100 330699 (12--00)
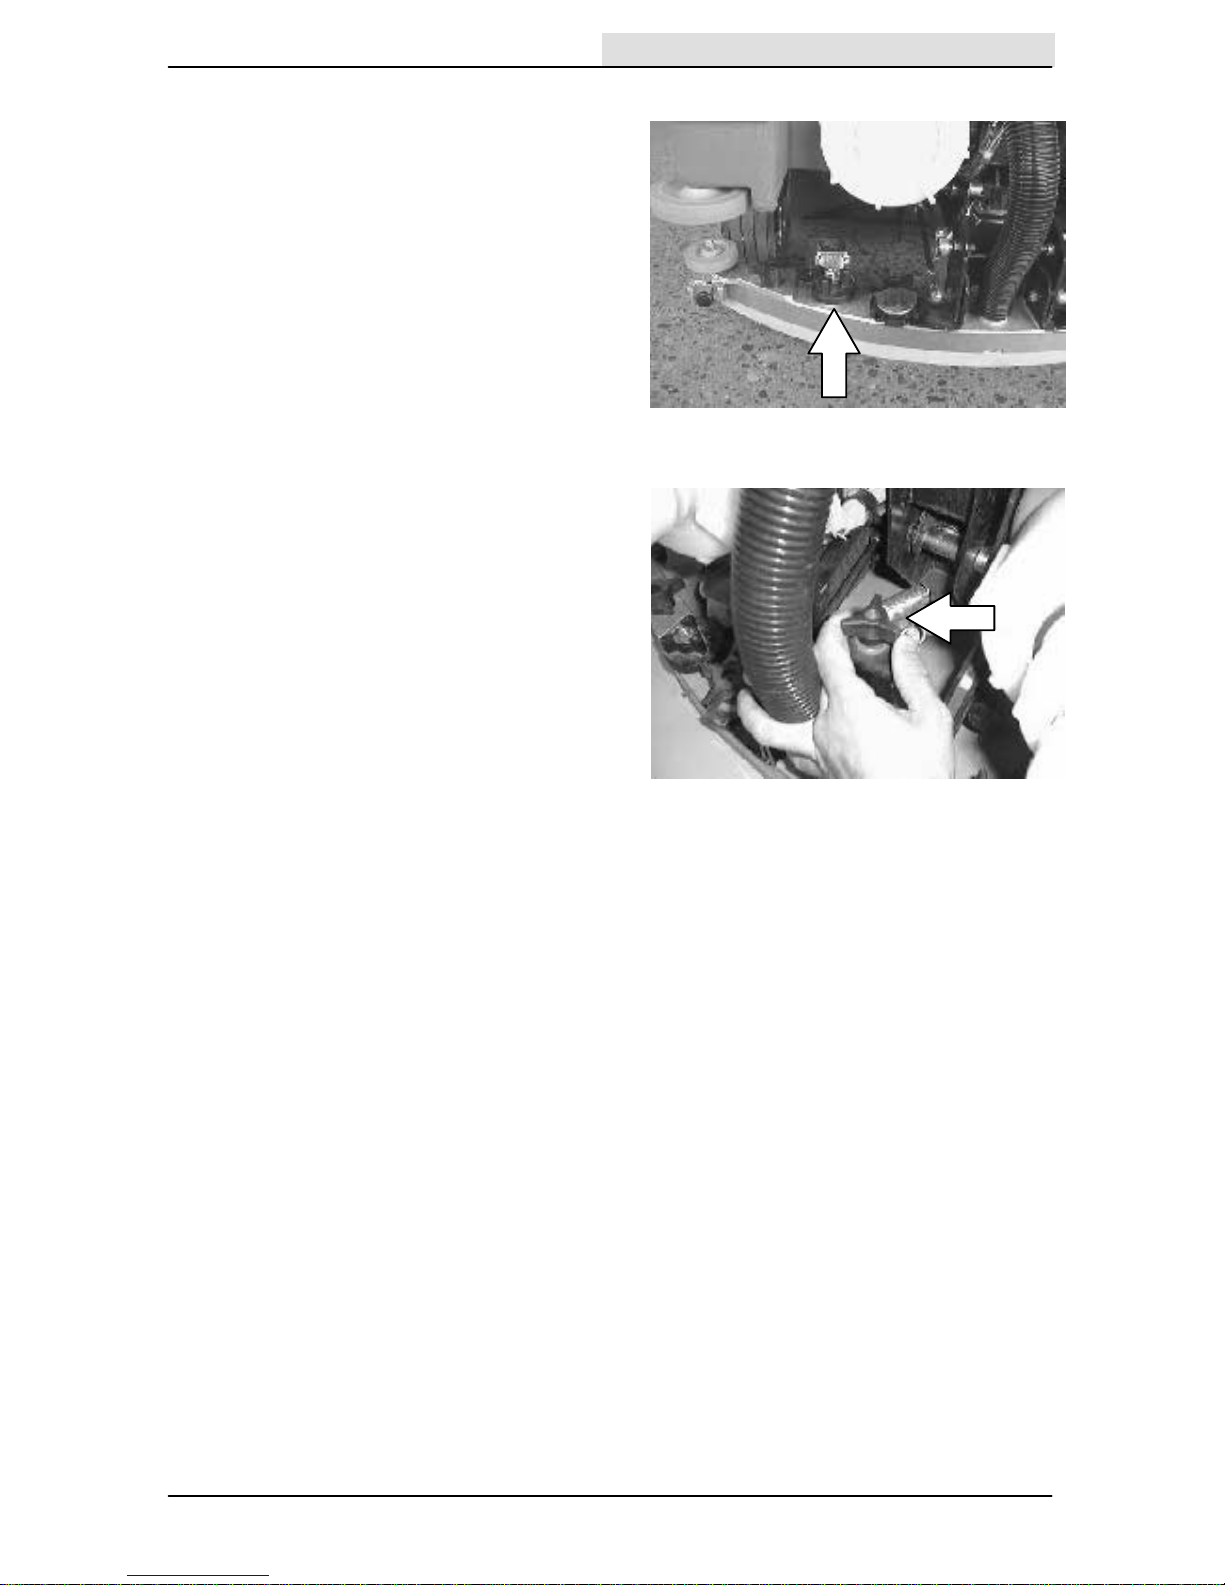
SQUEEGEE WHEEL CAMS
The squeegee wheel cams adjust the rear
squeegee deflection along the entire length of the
rear squeegee. There are wheel cams at either
end of the squeegee.
Increase deflection: Turn the cams
counterclockwise.
Decrease deflection: Turn the cams clockwise.
SQUEEGEE LEVELING KNOB
The squeegee leveling knob adjusts the deflection
at the ends of the rear squeegee.
The squeegee leveling knob is located directly
behind the squeegee suction hose. DO NOT
disconnect the suction hose from the squeegee
frame when leveling the squeegee.
Increase end deflection: Turn the squeegee
leveling knob counterclockwise to increase the
deflection at the end of the squeegees.
Decrease end deflection: Turn the squeegee
leveling knob clockwise to decrease the deflection
at the end of the squeegees.

OPERATION
7100 330699 (12--00)
20
HOW THE MACHINE WORKS
The following machine components work together
to effectively clean dirty floors: solution tank, scrub
brushes, squeegee, vacuum fan, and recovery
tank.
Water and detergent from the solution tank flow to
the floor through a solution valve. The brushes
use the detergent and water solution to scrub the
floor clean. As the machine propels forward, the
squeegee wipes the dirty solution from the floor.
The suction created by the vacuum fan then
draws the dirty solution from the squeegee into
the recovery tank.
The steering wheel controls the direction of
machine travel.The directional pedal controls the
speed and direction of the machine. The brake
pedal slows and stops the machine.
When using the ESt mode (option), the dirty
solution in the recovery tank is filtered and
returned to the solution tank to be reused for
extended scrubbing.
The four available scrub head types use disk or
cylindrical brushes.
Two different widths of scrub heads are available
for each type. Both the cylindrical and disk scrub
heads are available in 700 mm and
800 mm widths.
NOTE: The amount and type of soilage play an
important role in determining the type of brushes
to be used. For specific recommendations, contact
your Tennant representative.
When finished scrubbing, clean the recovery tank.
If using the ESt system, drain and clean the
solution tank, and clean the ESt filter.
OPERATION
21
7100 330699 (3--04)
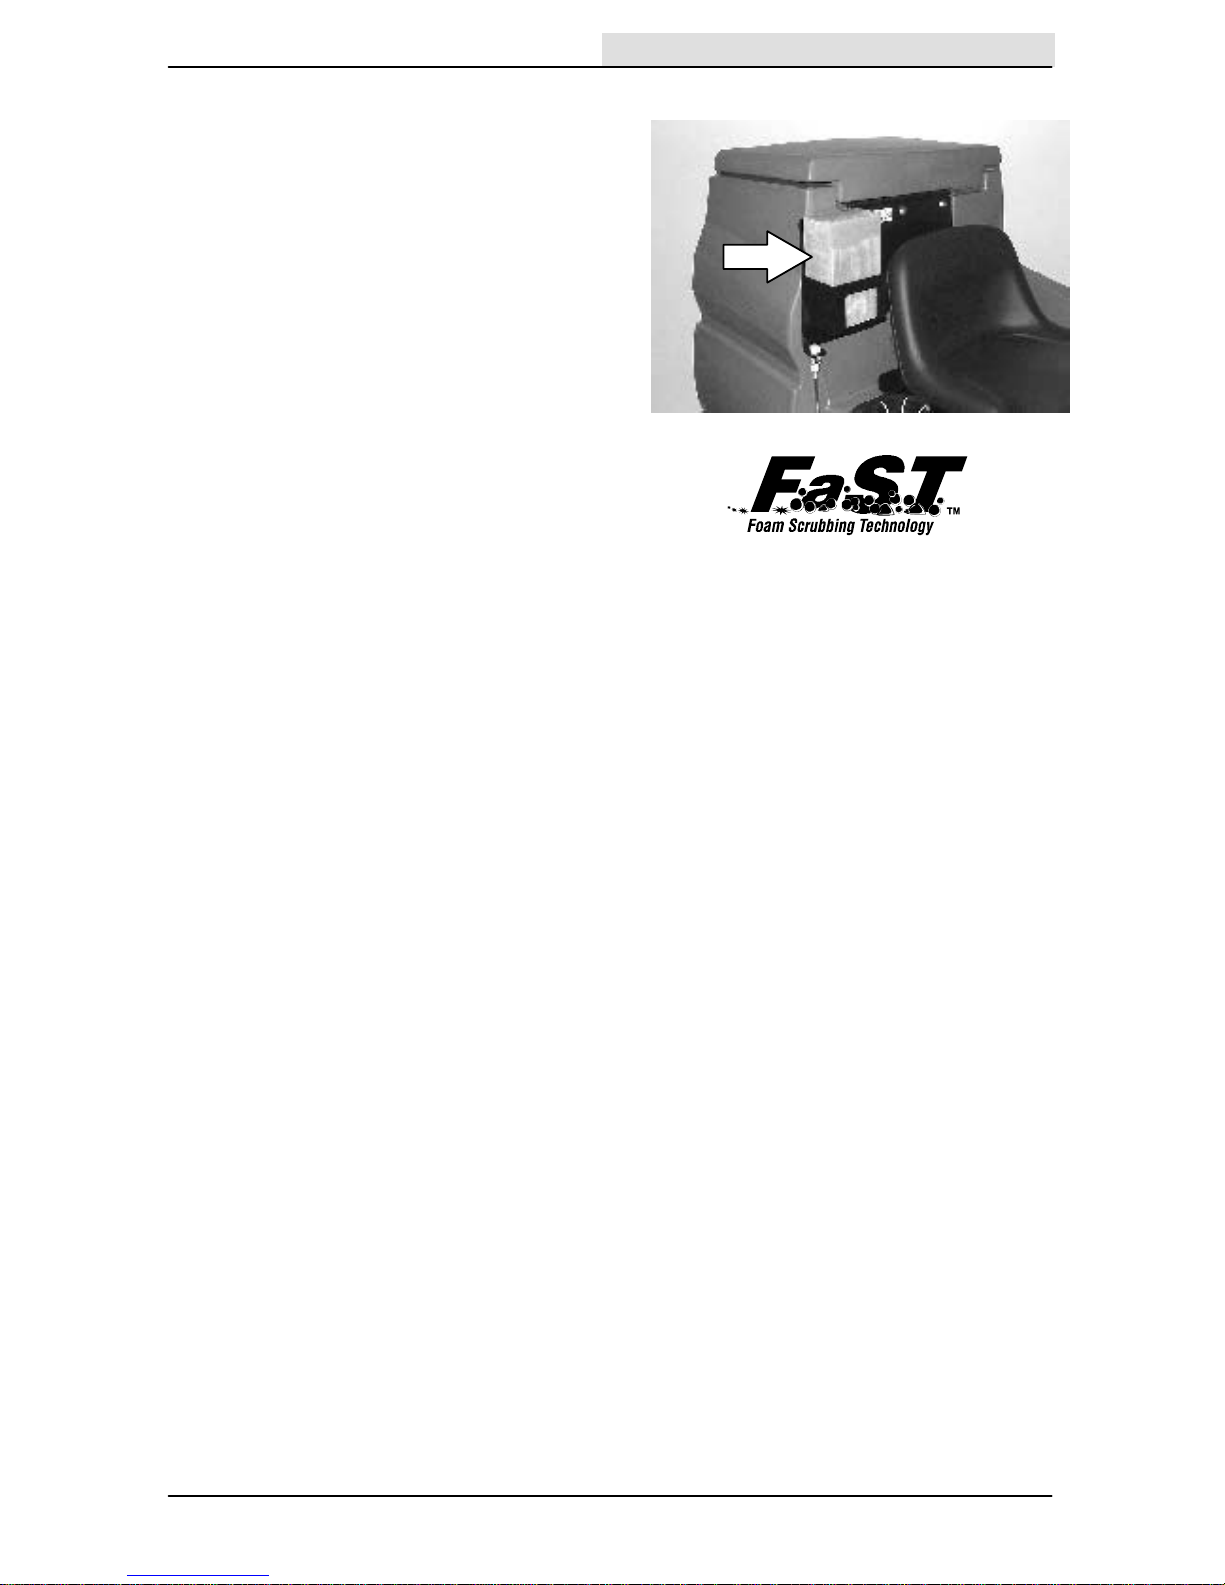
FaSTtttt SCRUBBING SYSTEM (OPTION)
Unlike conventional scrubbing, the FaSTt (Foam
Scrubbing Technology) system operates by
injecting the FaSTt PAK concentrate agent into
the system with a small amount of water and
compressed air. This mixture creates a large
volume of expanded wet foam.
The expanded foam mixture is then dispersed
onto the floor while the machine is scrubbing.
When the squeegee picks up the mixture, the
patented foaming agent has collapsed and is
recovered into the recovery tank.
The FaSTt system can be used with all double
scrubbing and heavy duty scrubbing applications.
Using the FaSTt system can increase
productivity by 30% by reducing your dump/fill
cycle. It will also reduce chemical usage and
storage space. One FaSTt PAK of concentrated
agent can scrub up to 1 million sq. ft.
NOTE: Do not enable the FaST
t
system with
conventional cleaning detergents in the solution
tank. Drain, raise and refill the solution tank with
clear cool water only before operating the FaST
t
system. Conventional cleaning detergents/
restorers may cause failure to the FaST
t
solution
system.
The safe scrubbing alternative
tttt

OPERATION
7100 330699 (3--04)
22
PRE-OPERATION CHECKLIST
Check over this list of items before operating the
machine:
- Check under the machine for leaks.
- Check the brakes and steering for proper
operation.
- Check for wire, string, or twine wrapped
around the scrub brushes.
- Check the squeegees for wear or damage.
- Check the squeegee suction hose for
obstructions.
- Cylindrical brushes: Check that the debris
tray is empty and clean.
- ESt machines. Check that the ESt filter is
clean.
- Check the recovery tank cover seals for
wear or damage.
- Check that the vacuum fan inlet filter is
clean.
- FaSTt Scrubbing: Check the FaST PAK
(option) concentrate agent level, replace
carton as needed. See the INSTALLING
THE FaSTt PAK AGENT section of the
manual.
- FaSTt Scrubbing: Check that all
conventional cleaning agents/restorers are
drained and rinsed from the solution tank.
- FaSTt Scrubbing: Check that solution tank
is filled with clear cool water only.
OPERATION
23
7100 330699 (3--04)
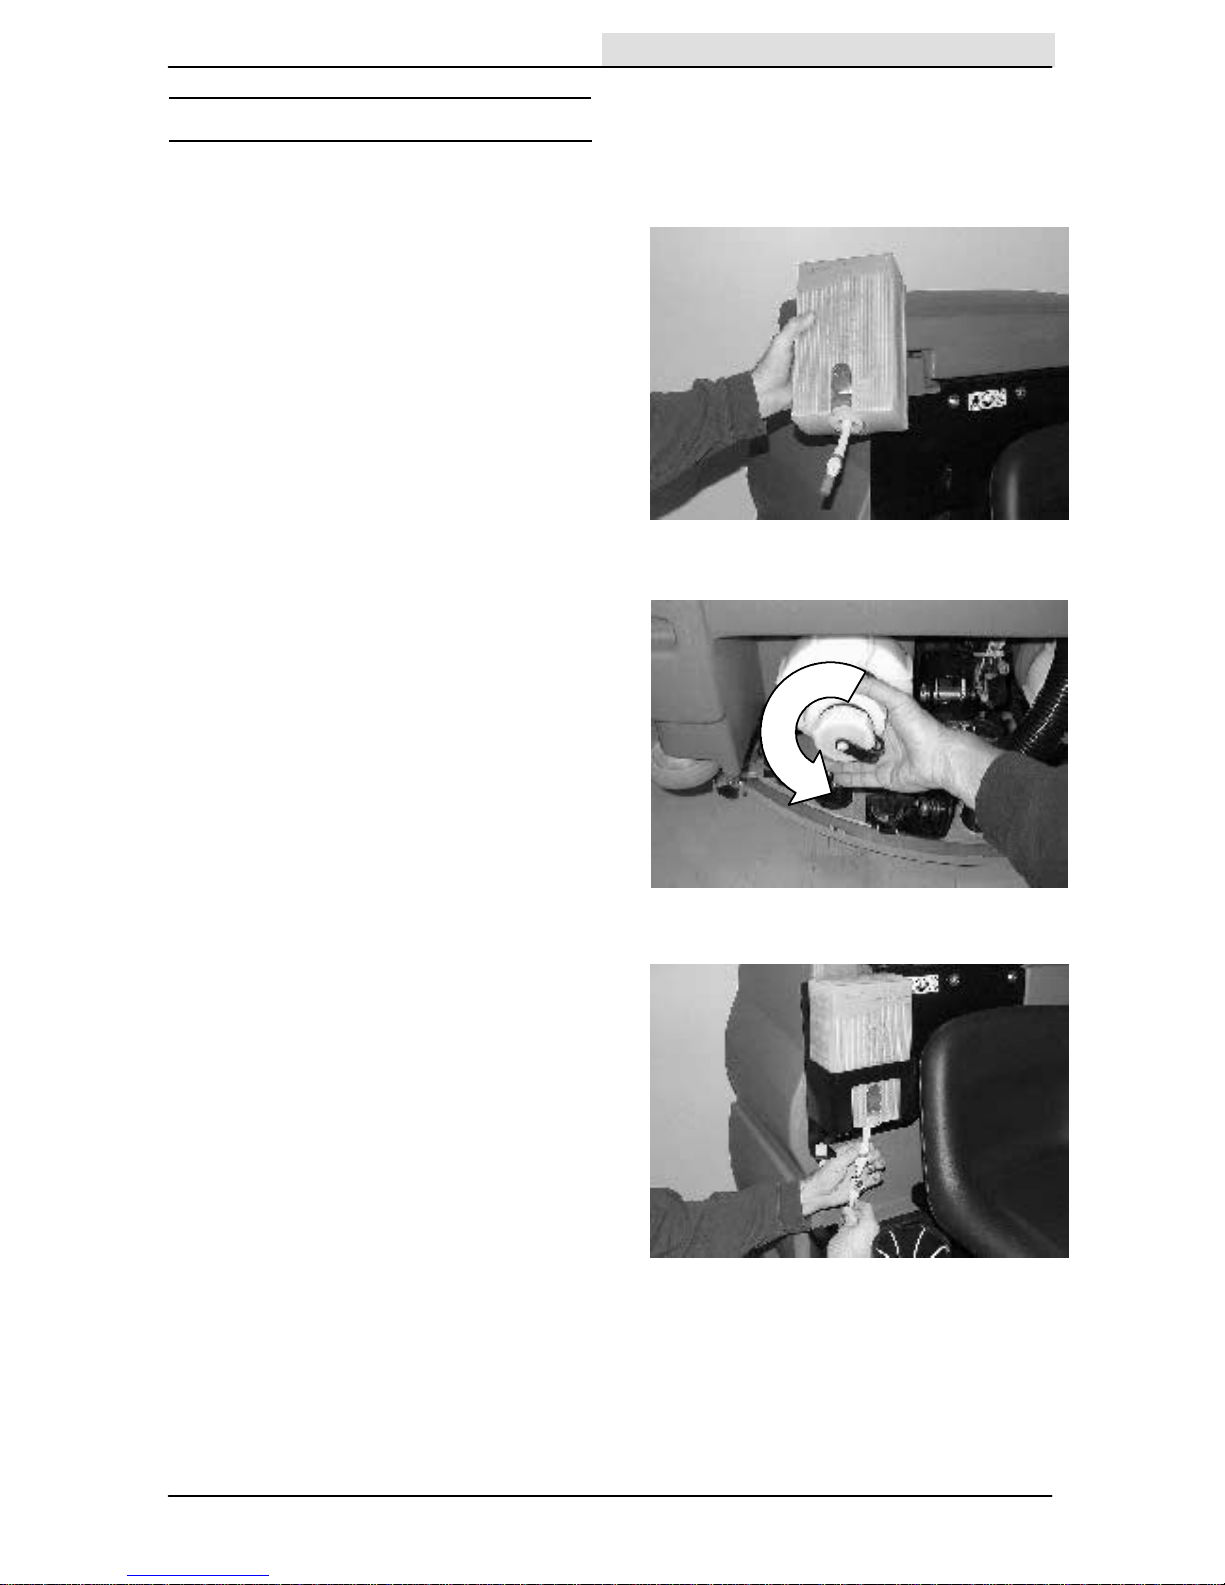
INSTALLING FaSTtttt PAK AGENT (OPTION)
NOTE: Machine must be equipped with the FaST
option.
1. Remove the perforated knock--outs from the
FaSTt PAK Floor Cleaning Concentrate
carton. Do not remove the bag from the
carton. Pull out the bag’s hose connector on
the bottom of the bag and remove the hose
cap from the connector.
NOTE: The FaST
tttt
PAK Floor Cleaning
Concentrate is specially designed for use with
the FaST
tttt
system scrubbing application.
NEVER use a substitute, machine damage will
result.
FOR SAFETY: When using machine,
always follow the handling instructions
on chemical container.
2. Empty the solution tank. See DRAINING
AND CLEANING THE TANKS section of the
manual.
NOTE: When scrubbing with the FaST
t
system
option, use clean water only. Do not add cleaning
agents in the solution tank. Conventional cleaning
agents/restorers may cause failure to the FaST
solution system..
3. Place the FaSTt PAK carton in the carton
holder located next to the seat. Connect the
supply hose to the FaSTt PAK bag.
NOTE: If any dried concentrate is visible on the
supply hose connector or the on the FaST
t
PAK
connector, soak and clean with warm water.

OPERATION
7100 330699 (3--04)
24
4. Make sure to connect the supply hose onto
the hose storing plug when the supply hose
is not connected to the FaSTt PAK. This
will prevent the FaSTt solution system from
drying out and clogging up the hose.
5. FIRST TIME USE: The FaSTt solution
system is protected against freezing during
shipment. You must operate the FaSTt
system for 10 minutes to disperse the
mixture of RV anti--freeze/FaST detergent
before you achieve maximum foaming.
6. When replacing an empty FaSTt PAK
carton, allow the new FaSTt PAK detergent
to gravity feed into the system for several
minutes prior to operating the FaSTt
system. If the detergent does not flow out of
the FaSTt PAK, simply squeeze and
release the hose several times. If the
previous FaSTt PAK was run dry, it may
take up to 5--10 minutes of operation to
remove any air pockets in the system before
you achieve maximum foaming.
STARTING THE MACHINE
1. You must be in the operator’s seat with the
directional pedal in neutral, and your foot on
the brake pedal or with the parking brake
set.
FOR SAFETY: When starting machine,
keep foot on brake and directional pedal
in neutral.
2. Turn the machine power on.
3. Release the machine parking brake.
4. Drive the machine to the area to be cleaned.
NOTE: The machine will not travel unless the
operator is sitting in the operator’s seat.
OPERATION
25
7100 330699 (12--00)
FILLING THE TANKS
1. Turn the machine power on. See the
STARTING THE MACHINE section of the
manual.
FOR SAFETY: When starting machine,
keep foot on brake and directional pedal
in neutral.
2. Drive the machine to the tank filling site.
3. Turn the machine power off. See the STOP
THE MACHINE section of the manual.
4. Set the machine parking brake.
FOR SAFETY: Before leaving or
servicing machine, stop on level
surface, set parking brake, turn off
machine, and remove key.

OPERATION
7100 330699 (3--04)
26
5. CONVENTIONAL SCRUBBING: Open the
solution tank cover. Measure and pour in the
correct amount of detergent. Fill the rest of
the solution tank with water up to the FULL
line near the top of the tank.
NOTE: Floor conditions, water condition, amount
of soilage, type of soilage, and brush pressure all
play an important role in determining the type and
concentration of detergent used. For specific
recommendations, contact your Tennant
representative.
WARNING: Flammable materials can
cause an explosion or fire. Do not use
flammable materials in tank(s).
FOR SAFETY: When using machine,
follow mixing and handling instructions
on chemical containers.
6. ESt (option): Fill the recovery tank with
water and detergent up to the lower sensor
float to extend scrub time. Make sure the
ESt system is on.
WARNING: Flammable materials can
cause an explosion or fire. Do not use
flammable materials in tank(s).
FOR SAFETY: When using machine,
follow mixing and handling instructions
on chemical containers.
NOTE: If you DO NOT want to use the ESt
mode (option), DO NOT put water in the recovery
tank and make sure the ESt system is off.
7. FaSTt SCRUBBING (option): Open the
solution tank cover and fill the solution tank
to the FULL line near the top of the tank with
cool clear water only. Do not add cleaning
detergents.
NOTE: When cleaning using FaST
tttt
option,
USE CLEAR COOL WATER ONLY. DO NOT add
cleaning detergents in solution tank.
Conventional cleaning detergents/restorers
may cause failure to the FaST
tttt
solution
system.
8. Lower the tank cover.
OPERATION
27
7100 330699 (12--00)
SCRUBBING AND BRUSH INFORMATION
Pick up oversized debris before cleaning. Pick up
pieces of wire, string, twine, etc., which could
become wrapped around the scrub brushes.
Plan the scrubbing in advance. Try to arrange long
runs with minimum stopping and starting. Do an
entire floor or section at one time.
Drive as straight a path as possible. Avoid
bumping into posts or scraping the sides of the
machine. Overlap the scrub paths by several
centimeters.
Avoid turning the steering wheel too sharply when
the machine is in motion. The machine is very
responsive to the movement of the steering wheel.
Avoid sudden turns, except in emergencies.
When scrubbing dead end aisles, start at the
closed end of the aisle and scrub your way out.
Adjust the machine speed, scrub brush pressure,
and solution flow as required when scrubbing. Use
minimum scrub brush pressure and solution flow
required for the best results.
If you see poor scrubbing performance, stop
scrubbing and refer to MACHINE
TROUBLESHOOTING.
For best results, use the correct brush type for
your cleaning application. The following are
recommended brush applications.
Non-scuff polypropylene scrub brush -- T h i s
brush uses a softer, general purpose
polypropylene bristle to lift lightly compacted
soilage without scuffing high-gloss coated floors.
Nylon scrub brush -- Recommended for
scrubbing coated floors. Cleans without scuffing.
Super abrasive bristle scrub brush -- N y l o n
fiber impregnated with abrasive grit to remove
stains and soilage. Strong action on any surface,
performing well on buildup, grease, or tire marks.
07218
05939

OPERATION
7100 330699 (12--00)
28
Heavy duty stripping pad -- This black pad is for
stripping floors. Cuts through old heavy finishes
easier, to prepare the floor for re-coating.
Stripping pad -- This brown pad is for stripping
floors. Quickly and easily cuts through old finish to
prepare the floor for re-coating.
Scrubbing pad -- This blue pad is for scrubbing
floors. Removes dirt, spills and scuffs, leaving a
clean surface ready for re-coating.
Buffing pad -- This red pad is for buffing floors.
Quickly cleans and removes scuff marks while
polishing the floor to a high gloss.
Polishing pad -- This white pad is for polishing
floors. Maintains a high gloss. Use for buffing very
soft finishes and lower traffic areas, or use for
polishing soft waxes on wood floors.
Cylindrical polypropylene scrub brush -- T h i s
cylindrical brush uses a softer, general purpose
polypropylene bristle to lift lightly compacted
soilage without scuffing high-gloss coated floors.
Cylindrical nylon scrub brush -- This cylindrical
brush is recommended for scrubbing coated
floors. Cleans without scuffing.
Cylindrical super abrasive bristle scrub brush
-- Nylon fiber impregnated with abrasive grit to
remove stains and soilage. Strong action on any
surface, performing well on buildup, grease, or tire
marks.
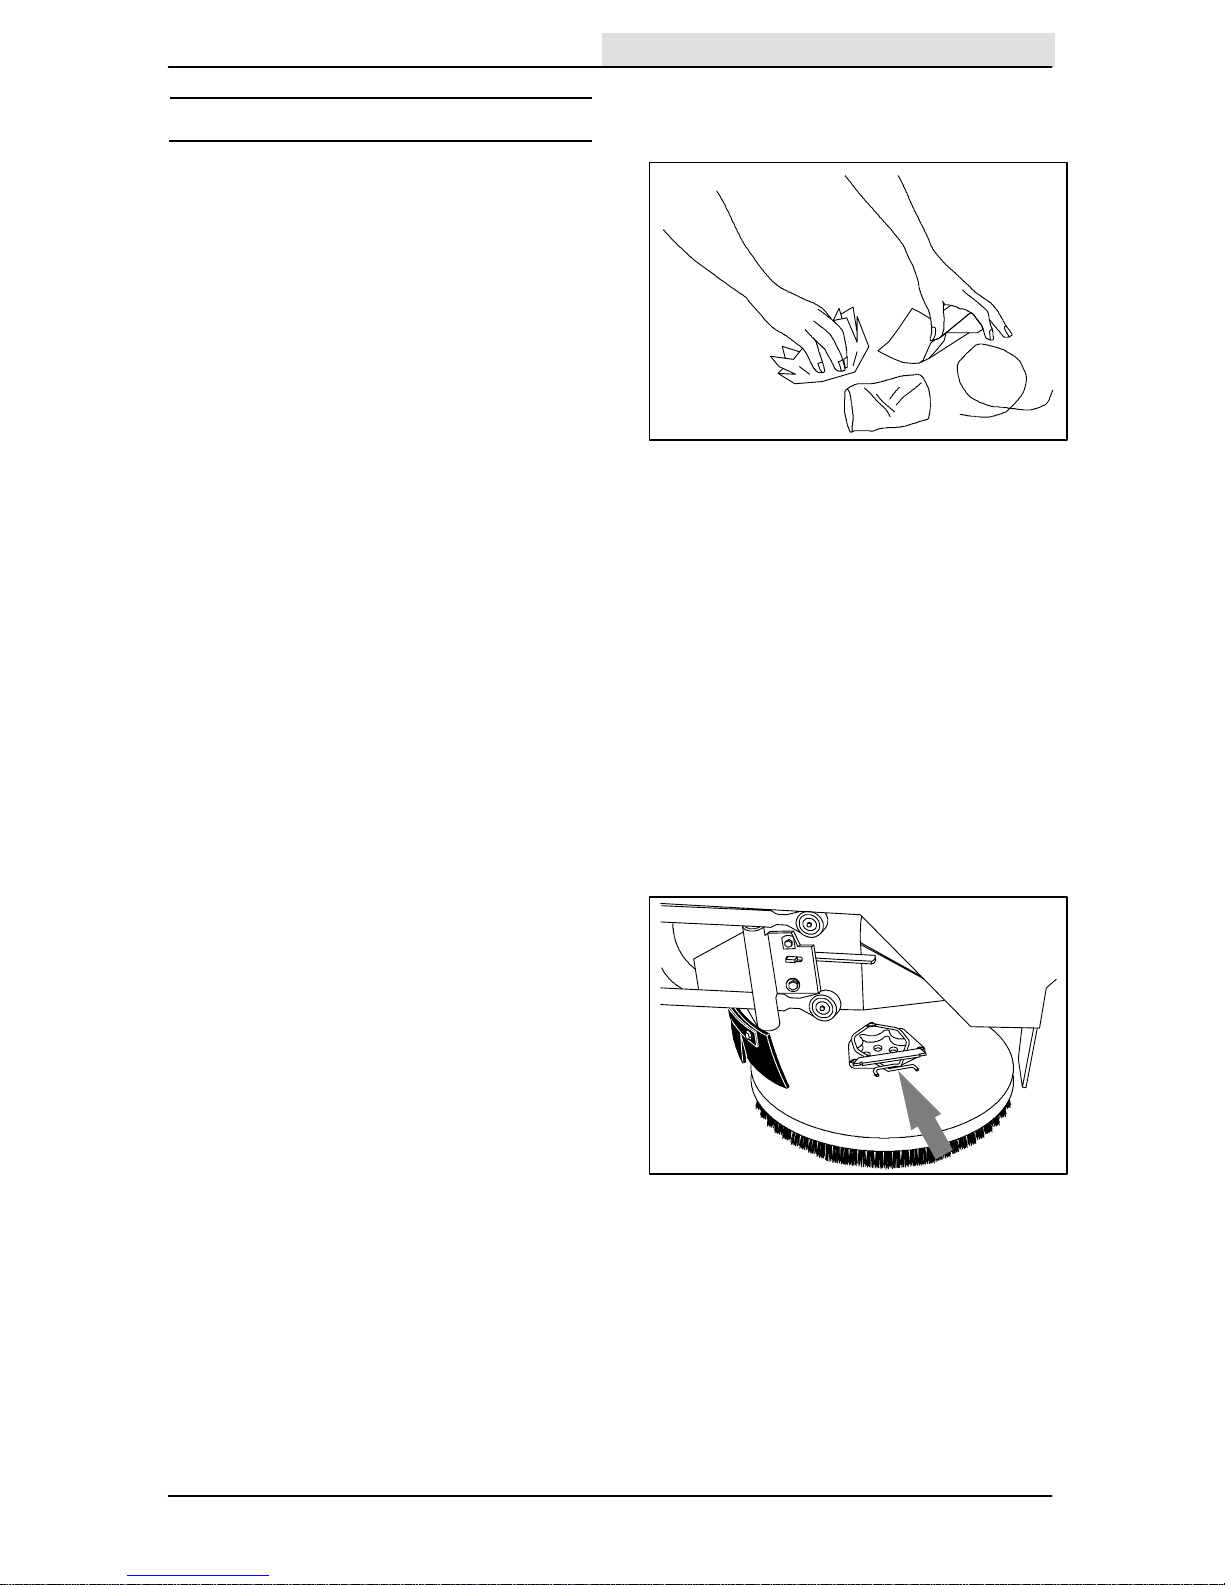
NOTE: Cylindrical scrub brushes must be installed
with the herringbone patterns on the brushes
pointing towards each other for best debris pick
up.
 Loading...