

Clemas & Co KV90/2, KV200/2, KV200/3 Operator's Manual

GOBBLEVAC
KV90/2 & KV200/2 & 3
VACUUM CLEANER
OPERATOR MANUAL
Clemas & Co. Unit 5 Ashchurch Business Centre, Alexandra Way, Tewkesbury,
Gloucestershire, GL20 8NB.
Tel: 01684 850777 Fax: 01684 850707
Email:
info@clemas.co.uk Web: www.clemas.co.uk

IMPORTANT USER INFORMATION
It is most important that this instruction book should be retained with the appliance for future
reference. Should the appliance be sold or transferred to another user, always ensure that the book
is supplied with the appliance in order that the new user can be acquainted with the functioning of
the appliance and the relevant warnings. These warnings are provided in the interest of safety. You
must read them carefully before installing or using the appliance.
This appliance is designed to be operated by adults.
It is dangerous to alter the specifi cation or modify the product in any way.
CAUTION: This machine is not a dust-extractor.
CAUTION: This machine must not be used unattended and is not for continous operation.
CAUTION: This machine is not suitable for picking up health endangering dust.
CAUTION: This machine is for dry use only and shall not be used or stored outdoors in wet
conditions.
This machine is also suitable for commercial use, for example in hotels, schools, hospitals, factories,
shops and offi ces for other than normal housekeeping purposes.
If the supply cord is damaged, it must be replaced by a special cord or assembly available from the
manufacturer or its service agent.
Do not use in the presence of fl ammable gases.
Do not use for picking up dust that may have a potential risk of explosion.
Never leave the appliance running unattended.
Remove the plug from the wall socket before attempting any form of user maintenance specifi ed
in this instruction book.
Do not carry or drag this vacuum cleaner by the mains supply cable.
Do not tug at the mains supply cable to remove the plug from the wall socket.
Keep the mains supply cable away from heat, oil, sharp edges and rough surfaces.
Always ensure that the cable is not damaged in any way.
Never pick up hot cinders or lighted cigarette ends.
Filters should be cleaned at regular intervals as stated in this instruction book.
Do not suck up liquids or use on wet surfaces.
Do not use with the fi lters removed.
When fi tting and changing the accessories always follow the instructions in this user instruction
book.
Under no circumstances should you attempt to repair this vacuum cleaner yourself. Repairs undertaken
by unauthorised or inexperienced persons may cause injury and/or serious malfunctioning.
This vacuum cleaner should be serviced by authorised Kerstar personnel and only genuine Kerstar
spare parts should be used.
ELECTRICAL INFORMATION
This vacuum cleaner has been designed for dry vacuum cleaning only and
must not be used to pick up any liquids.
Kerstar declines any liability should this or any of the following measures not be observed.
Cable & Plug
This Vacuum Cleaner is an earthed appliance and has 10 metres of 3-core fl ex with a moulded on
impact resistant 13amp 3-pin plug (to BS 1363A). The fuse fi tted (ASTA Approved) is rated at
13amps. Only 13amps fuses must be used. (Not applicable to 110V models – these are fi tted with
a yellow 3-pin plug suitable for 110V).
Should the moulded on plug be damaged please follow this procedure:
Switch off supply at socket, remove damaged plug from socket, cut plug off from fl ex.
Make sure the damaged plug is disposed of immediately so as there is no chance of the damaged
plug being used.
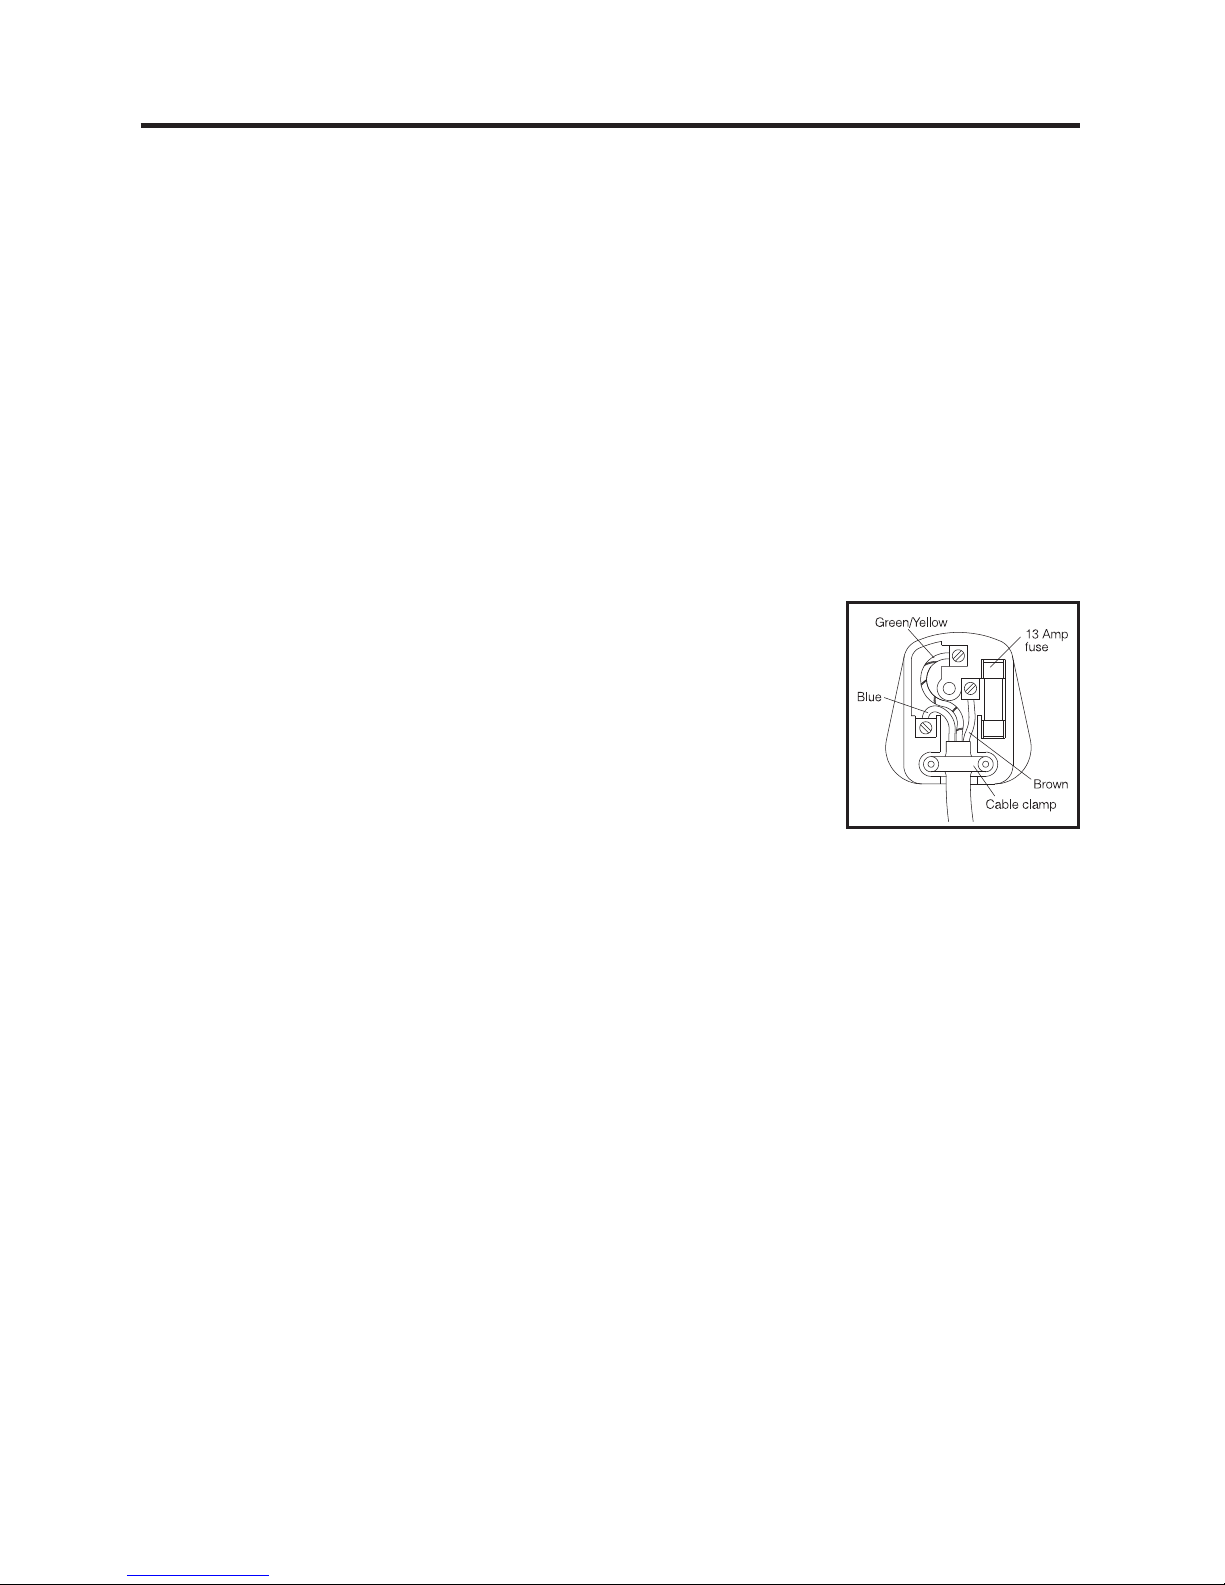
Fitting a Replacement Plug
Use only a 13amp (approved) plug. To fi t proceed as follows:
1) Ensure that the lengths of wire to be fi tted inside the plug have
been cut to the correct length and the end correctly prepared. When
preparing the cable ends take care not to damage the out sheath, or
the insulation surrounding the inner conductors.
2) Connect the blue (NEUTRAL) wire to the terminal in the plug which
is marked with the letter “N” or coloured black.
3) Connect the brown (LIVE) wire to the terminal in the plug which is
marked with the letter “L” or coloured red.
4) Connect the green/yellow (EARTH) wire to the terminal in the plug which is marked with the
letter “E” or coloured green.
5) Tighten all screws. Ensure that all conductor strands have entered into the terminal posts and
that the mains lead is securely held in place by the cable clamp.
6) Ensure that the plug is fi tted with a 13amp ASTA approved BS 1362 fuse. Replace the top
cover of the plug and secure.
Extension Cable
If using an extension cable at any time, always ensure that the insulation sheath is in good condition
and is not damaged in any way. Make sure that the socket is fi tted to the extension cable correctly,
if in doubt have it checked by a qualifi ed electrician. Always use the extension cable in accordance
with the manufacturers instructions.
 Loading...