

KV20, 25, 30, 45 & 50 / 1 & 2 H
HAZARDOUS VACUUM
CLEANER
OPERATOR MANUAL
Clemas & Co. Unit 5 Ashchurch Business Centre, Alexandra Way, Tewkesbury,
Gloucestershire, GL20 8NB.
Tel: 01684 850777 Fax: 01684 850707
Email:
info@clemas.co.uk Web: www.clemas.co.uk
IMPORTANT USER INFORMATION
It is most important that this instruction book should be retained with the appliance for future
reference. Should the appliance be sold or transferred to another user, always ensure that the book
is supplied with the appliance in order that the new user can be acquainted with the functioning of
the appliance and the relevant warnings. These warnings are provided in the interest of safety. You
must read them carefully before installing or using the appliance.
This appliance is designed to be operated only by adults.
It is dangerous to alter the specifi cation or modify the product in any way.
CAUTION: This machine is for dry use only and shall not be used or stored outdoors in wet
conditions.
This machine is also suitable for commercial use, for example in hotels, schools, hospitals, factories,
shops and offi ces for other than normal housekeeping purposes.
If the supply cord is damaged, it must be replaced by a special cord or assembly available from
Kerstar or our service agent.
Do not use the appliance in the presence of fl ammable gases.
Never leave the appliance running unattended.
Remove the plug from the wall socket before attempting any form of user maintenance specifi ed
in this instruction book.
Do not carry or drag your Vacuum Cleaner by the mains supply cable.
Do not tug at the mains supply cable to remove the plug from the wall socket.
Keep the mains supply cable away from heat, oil, sharp edges and rough surfaces.
Always ensure that the cable is not damaged in any way.
Never pick up hot cinders or lighted cigarette ends.
Dust bags and fi lters should be changed at regular intervals as stated in this instruction book.
Do not use the appliance to suck up liquids or use on wet surfaces.
Do not use the appliance for dry vacuuming with the fi lters removed.
When fi tting and changing the accessories always follow the instructions in this instruction book.
Under no circumstances should you attempt to repair the appliance yourself. Repairs undertaken by
unauthorised or inexperienced persons may cause injury and/or serious malfunctioning.
This appliance should be serviced by authorised
personnel and only genuine spare
parts should be used.
Always replace the dustbag when full ensuring that the cloth fi lter is not blocked with dust.
Never use the appliance without the full fi ltration system fi tted.
ELECTRICAL INFORMATION
This appliance has been designed for dry vacuum cleaning only and must
not be used to pick up any liquids.
Kerstar declines any liability should this or any of the following measures not be observed.
Cable & Plug
This Vacuum Cleaner is an earthed appliance and has 10 metres of 3 core fl ex with a moulded on
impact resistant 13amp 3 pin plug (to BS 1363A). The fuse fi tted (ASTA Approved) is rated at
13amps. Only 13amps fuses must be used (Not applicable to 110V models – these are fi tted with a
yellow 16 amp 3-pin plug suitable for 110V).
Should the moulded on plug be damaged please follow this procedure:
Switch off supply at socket, remove damaged plug from socket, cut plug off from fl ex.
Make sure the damaged plug is disposed of immediately so as there is no chance of the damaged
plug being used.
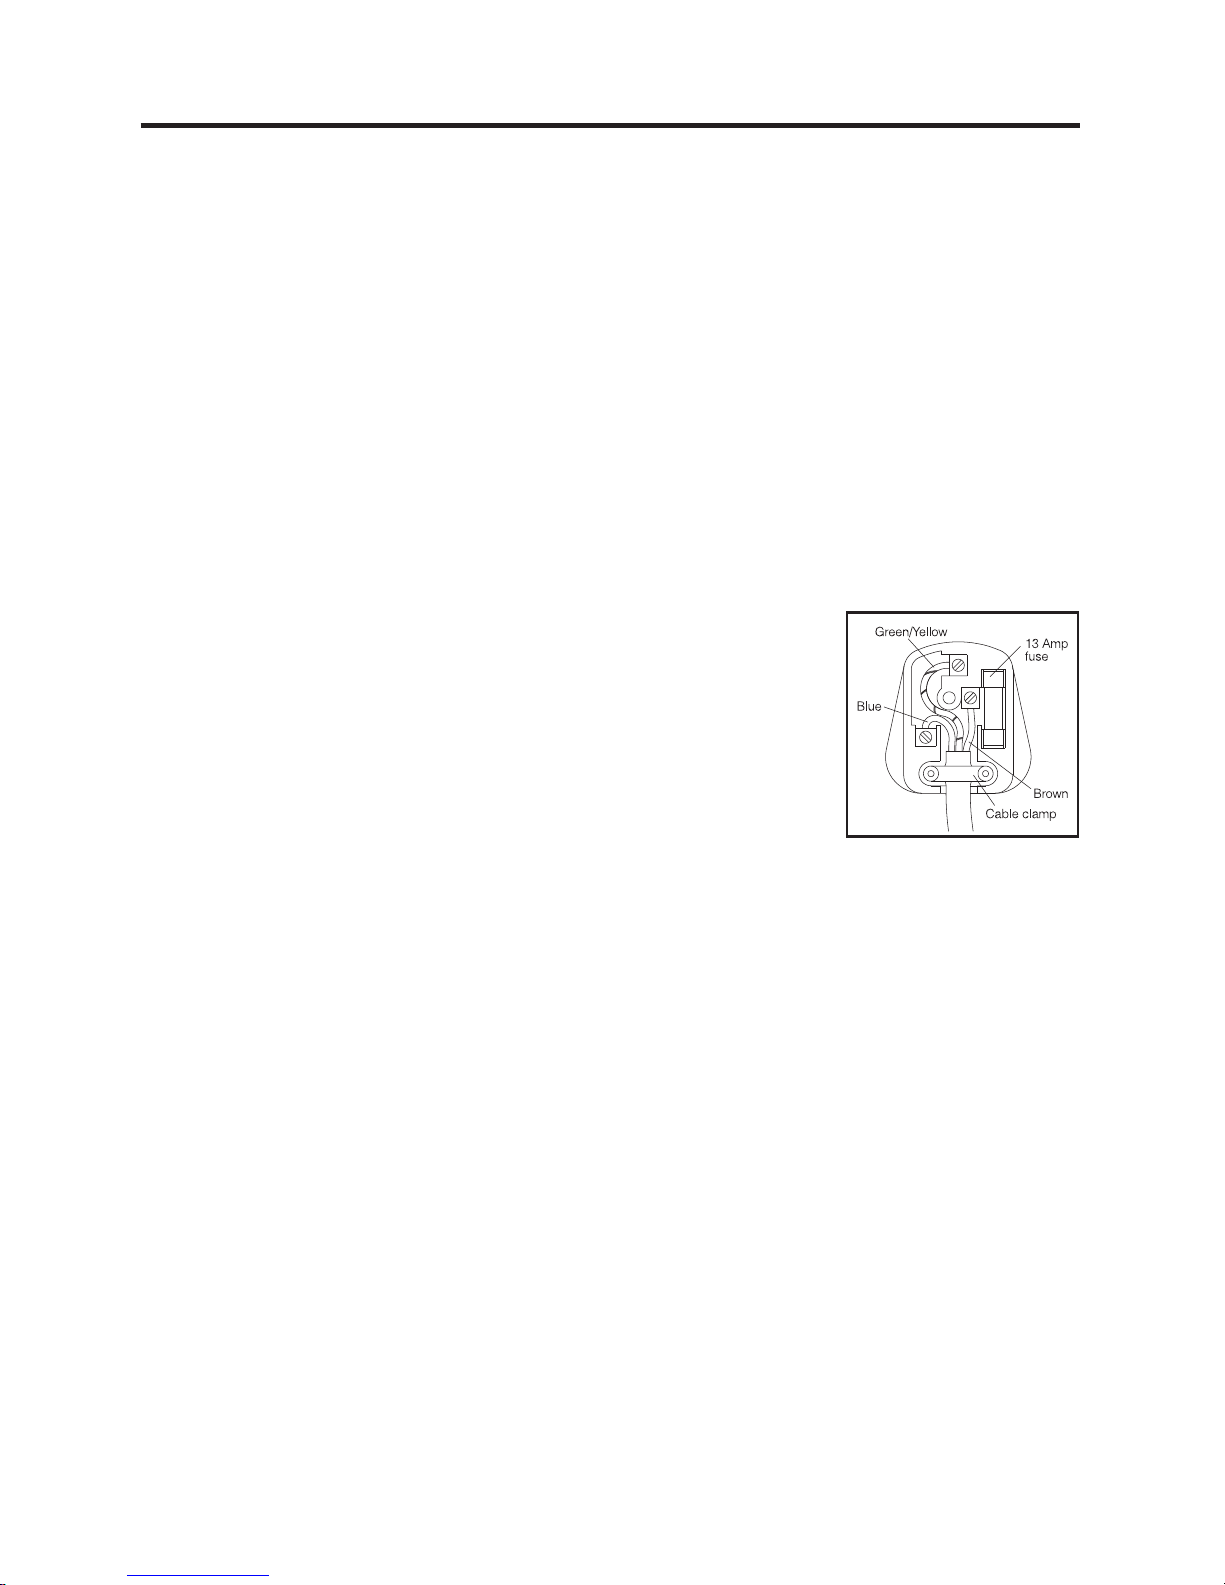
Fitting a Replacement Plug
Use only a 13amp (BEAB approved) plug. To fi t proceed as follows:
1) Ensure that the lengths of wire to be fi tted inside the plug have
been cut to the correct length and the end correctly prepared. When
preparing the cable ends take care not to damage the out sheath, or
the insulation surrounding the inner conductors.
2) Connect the blue (NEUTRAL) wire to the terminal in the plug which
is marked with the letter “N” or coloured black.
3) Connect the brown (LIVE) wire to the terminal in the plug which is
marked with the letter “L” or coloured red.
4) Connect the green/yellow (EARTH) wire to the terminal in the plug which is marked with the
letter “E” or coloured green.
5) Tighten all screws. Ensure that all conductor strands have entered into the terminal posts and
that the mains lead is securely held in place by the cable clamp.
6) Ensure that the plug is fi tted with a 13amp ASTA approved BS 1362 fuse. Replace the top cover
of the plug and secure.
Extension Cable
If using an extension cable at any time, always ensure that the insulation sheath is in good condition
and is not damaged in any way. Make sure that the socket is fi tted to the extension cable correctly,
if in doubt have it checked by a qualifi ed electrician. Always use the extension cable in accordance
with the manufacturers instructions.

UNPACKING YOUR CLEANER
Unpack your cleaner and ensure that you have the items listed below:
5 K4 Disposable Microfi bre Bags
1 14" High Effi ciency (H.E.) Filter Assembly
HOSE AND ACCESSORIES
Supplied separately to customer requirements
We recommend 32mm or 38mm hose and tools for single motor models (KV20, 30, 45 & 50/1H).
For twin motor models (KV20, 30, 45 & 50/2H) we recommend 38mm or 51mm hose and tools.
Do not use 32mm hose and tools on twin motor models.
OPERATING INSTRUCTIONS
WARNING Before use, operators must be provided with information, instruction and training for
the use of the appliance and the substances for which it is to be used, including the safe method of
removal and disposal of the material collected.
1. Connection to the Electricity Supply
Insert the mains plug into a suitable socket outlet and switch on. When you have fi nished cleaning,
switch off the supply at the outlet socket and unplug. When coiling the mains cable make sure that
any twists or knots in the cable come out at the plug end. DO NOT coil cable from the plug end as
all twists and knots remain in the cable and considerably shorten its life.
2. Cleaner Controls
The following control is provided:
The on/off switch is situated at the front of the motor head. To switch the appliance on fi rmly press
the part of the switch marked “1”. To switch off press the part of the switch marked “0”.
3. Carrying and Storing
The assembled cleaner should only be moved by the carrying handle on top of the motor head (not
applicable to models on a caddy). Do not attempt to lift or drag the machine by the mains lead.
The cleaner must be stored indoors and in a dry environment.
All
Type H vacuum cleaners are supplied with screw-on blanking caps. These are designed
to seal the inlet and exhaust ports to prevent the escape or ingress of hazardous dust during transport
or storage. Whenever this vacuum cleaner is not in use these blanking caps should be used. They
must be removed before use.

FILTRATION SYSTEM
This is a Type H Vacuum Unit. It is fi tted with 3 stages of fi ltration on the negative pressure side of
the motor (that is before the motor, so that the motor always receives clean fi ltered air).
1st Stage - K4 Disposable Microfi bre Bag (with sealing cap)
2nd Stage - High Effi ciency (HE) Filter Assembly specially for Type H cartridges
3rd Stage - Type H HEPA (High Effi ciency Particulate Air) Cartridge Filter
Note: The HEPA cartridge fi lter fi tted to Kerstar KV20–50 Type H models has a very
large surface area compared to other models available and will therefore give improved
performance and a greatly increased fi lter life.
Access to the Microfi bre Bag and Filtration System
a) To remove the motor head and HEPA cartridge unit, unclip the LOWER set of toggle clips.
Ensure that the toggle clips are hinged clear of the rim of the HEPA unit. Lift the motor head
and HEPA unit clear of the bottom can.
b) To refi t the motor head and HEPA unit, align the head so that the cable entry lies directly
opposite the hose entry on the can. Locate the toggle clips over the rim of the HEPA unit and
fi rmly press down both toggle clips until they have locked into position.
Note: The upper set of toggle clips between the HEPA unit and motor head have a
lock-down device to prevent the separation of the motor head from the HEPA unit.
Only authorised and trained personnel should separate the motor head from the HEPA unit.
WARNING
The appliance may contain dust hazardous to health. Emptying and maintenance operations including
removal and renewal of dust collection bag shall only be carried out by authorised personnel wearing
suitable approved personal protection.
WARNING
Do not use the appliance unless the full fi ltration system is fi tted – Type H cartridge, high effi ciency
cloth fi lter and Microfi bre bag. Failure to fi t the complete system may cause premature clogging of
the Type H cartridge and may also endanger health.
WARNING
Do not use this appliance for the collection of explosive dusts (a list of which can be obtained from
your local fi re prevention offi cer).
Do not use this appliance in a corrosive or fl ammable environment.
IMPORTANT
The vacuum unit is designed to collect hazardous dusts: Therefore any dust found within the machine
or on its fi lters may be dangerous to your health. Always take precautions.

YELLOW FLASHING WARNING LIGHT
This model is fi tted with a yellow fl ashing LED warning light. When this light is fl ashing the
airspeed in the hose has dropped below 20 metres per second. This would indicate that there is an
impediment to the airfl ow.
1. Remove hose. If LED stops fl ashing, the hose is blocked. Unblock the hose and try again.
2. If LED fl ashes with no hose connected, there is a restriction in the air fi ltration system. Using
the following sequence, check, replace or clean the following:
a) Disposable Microfi bre bag
b) High Effi ciency Cloth fi lter assembly
c) HEPA Cartridge fi lter (also known as the absolute or essential fi lter)
<20 m/s
b
c
2
1
1 5
2
3
4
3
1
a
2
3

EMPTYING AND DISPOSAL
When emptying always wear suitable approved personal protection. The Microfi bre bag should be
carefully removed and sealed into a non-porous bag, e.g. a polythene bag. Airborne hazardous dust
may be created during dust bag or fi lter changing. The person who carries out these operations should
be provided with approved respiratory protective equipment and suitable protective clothing, and
be clearly instructed in the hazards associated with the works and safety procedures to be followed.
Portable equipment should preferably be taken away from occupied area for dust bag or fi lter changing.
DECONTAMINATION
For ease of maintenance we recommend that a stock of paper bags and a second stage fi lter should
be held in stock at all times so that the appliance can be used to clean itself and also the spare fi lter.
(Note: 5 disposable Microfi bre bags and a spare second stage fi lter assembly are supplied from
new with this model).
Always clean the outside of the machine before removing from a contaminated area or for storage,
using the suction hose.
THERMAL CUTOUT
This vacuum cleaner is fi tted with thermal cutout switch which automatically stops the motor if it
overheats. This may be caused by a blocked hose or wands, a full Microfi bre bag, or a blocked fi lter.
If your vacuum cleaner cuts out check for the above. The cutout switch will automatically reset itself
when the motor temperature drops.
SERVICING & SPARES
Should your
VACUUM CLEANER need any servicing, repair or spares please contact your
nearest
dealer or contact UK Ltd directly:
Tel: +44 (0)1604 760455
Fax: +44 (0)1604 701022
Please make a note of the model and serial number before contacting
UK Ltd.
Before attempting any servicing of this appliance, decontaminate in accordance with current best
practice and make sure you are protected from any dust which may still be present on or around the
machine or any dust which may have collected on internal components.
The Type H cartridge fi lter is not reusable or cleanable and should be disposed of safely. When it
becomes excessively clogged and the vacuum performance of the appliance suffers or is no longer
acceptable fi t a new unit. Be careful when handling and fi tting Type H cartridges as damage to the
pleated element will affect the performance and may cause a leakage through the fi lter of unfi ltered
air.
 Loading...