

Cleer Wifi Speaker Cleer Inc.
1
Cleer WiFi Speaker User Guide
powered by Amazon Alexa
2018 Sept 21st
Revision 1.0

Cleer Wifi Speaker Cleer Inc.
2
Versions
Date
Modify
Author
1.0
2018 /9/ 21
Editio princeps
Lianping Yang

Cleer Wifi Speaker Cleer Inc.
3
Table of Content
Summary .......................................................................................................................... 4
LED Behavior .................................................................................................................... 4
Power on operation .......................................................................................................... 6
WI-FI Setup ...................................................................................................................... 6
OTA operation ................................................................................................................ 16
Audio mode operation ................................................................................................... 19

Cleer Wifi Speaker Cleer Inc.
4
Summary
Cleer WiFi has three connection modes, Wi-Fi mode, Bluetooth mode and line-in.
LED Behavior
There are two groups of LEDs, Bluetooth LED at the bottom and mic interaction LEDs
on top.
Bluetooth LED
Bluetooth LED is for the indication of three connection status, Bluetooth connected
with white LED solid on, Bluetooth disconnected with LED off and Bluetooth connecting with
white LED flash.
MIC Interaction LEDs
Twelve LEDs on top are for the indication of various interactions of cleer Wi-Fi speaker
so that users can intuitively control or use the device. And various lighting indications are
introduced as below and many are referred to Amazon Alexa, as the link,
(https://developer.amazon.com/zh/docs/alexa-voice-service/ux-design-attention.html#alert
s)
1. Power on:
Two LEDs in cyan rotate clockwise in the background of the remaining 10 blue LEDs,
with a period of 1.2 seconds, see image as below. After it is powered on, LED is off and
device is to enter interaction.
Pic 1. Power on lighting
2. RECOVERY Mode
Three groups of LEDs, each group placed as “十”, rotate and breathe.

Cleer Wifi Speaker Cleer Inc.
5
3. IDLE mode:Refer to Amazon
Pic 2. Recovery lighting
4. LISTEN trigger mode:Refer to Amazon
5. THINKING mode:Refer to Amazon
6. SPEAKING mode:Refer to Amazon
7. FADE mode:Refer to Amazon
8. SYSERR mode:12 LEDs in yellow solid on
9. WIFIOFF mode:12 LEDs in yellow solid on
10. MICOFF mode:Refer to Amazon
11. ALARM mode:Refer to Amazon
12. VOLUME adjustment:
Number and brightness of LEDs in white get increased per volume up from 0 to 12,
decreased per volume down from 12 to 0 and the first LED flashes in white for three times
when min volume.
13. OTA upgrading:
Twelve LEDs light up in green and then go to lighting mode of RECOVERY mode.
14. NETSET setup mode:
Three LEDs in yellow rotate clockwise with the period of 0.75 seconds.
15. NO_DISTURB mode:
Cleer Wifi Speaker Cleer Inc.
6
Twelve LEDs in purple breathe once.
15. NOTIFICATION mode: refer to Amazon
16. TIMER mode:refer to Amazon
17. REMINDER mode:refer to Amazon
`Power on elaboration
After power-on, the LEDs on the top in cyan go out, refer to pic 1. When the system is
initialized, the LED will go out and the device will start to enter the interaction mode. At this
moment, if the device has already set up the WIFI network, the user can perform the
"Alexa" wake-up operation; if the device has not been equipped with the WIFI network,
after the booting is completed, the system enters the WIFIOFF mode, and the top MIC LEDs
will be solid on in yellow, reminding the user to set up the WIFI network.
WIFI setup elaboration
Long tap the mode button “ ” on touch panel to enter Wi-Fi setup mode, and there
will be three LEDs light up in yellow and rotate clockwise. Then open the app for other
operations,as below:
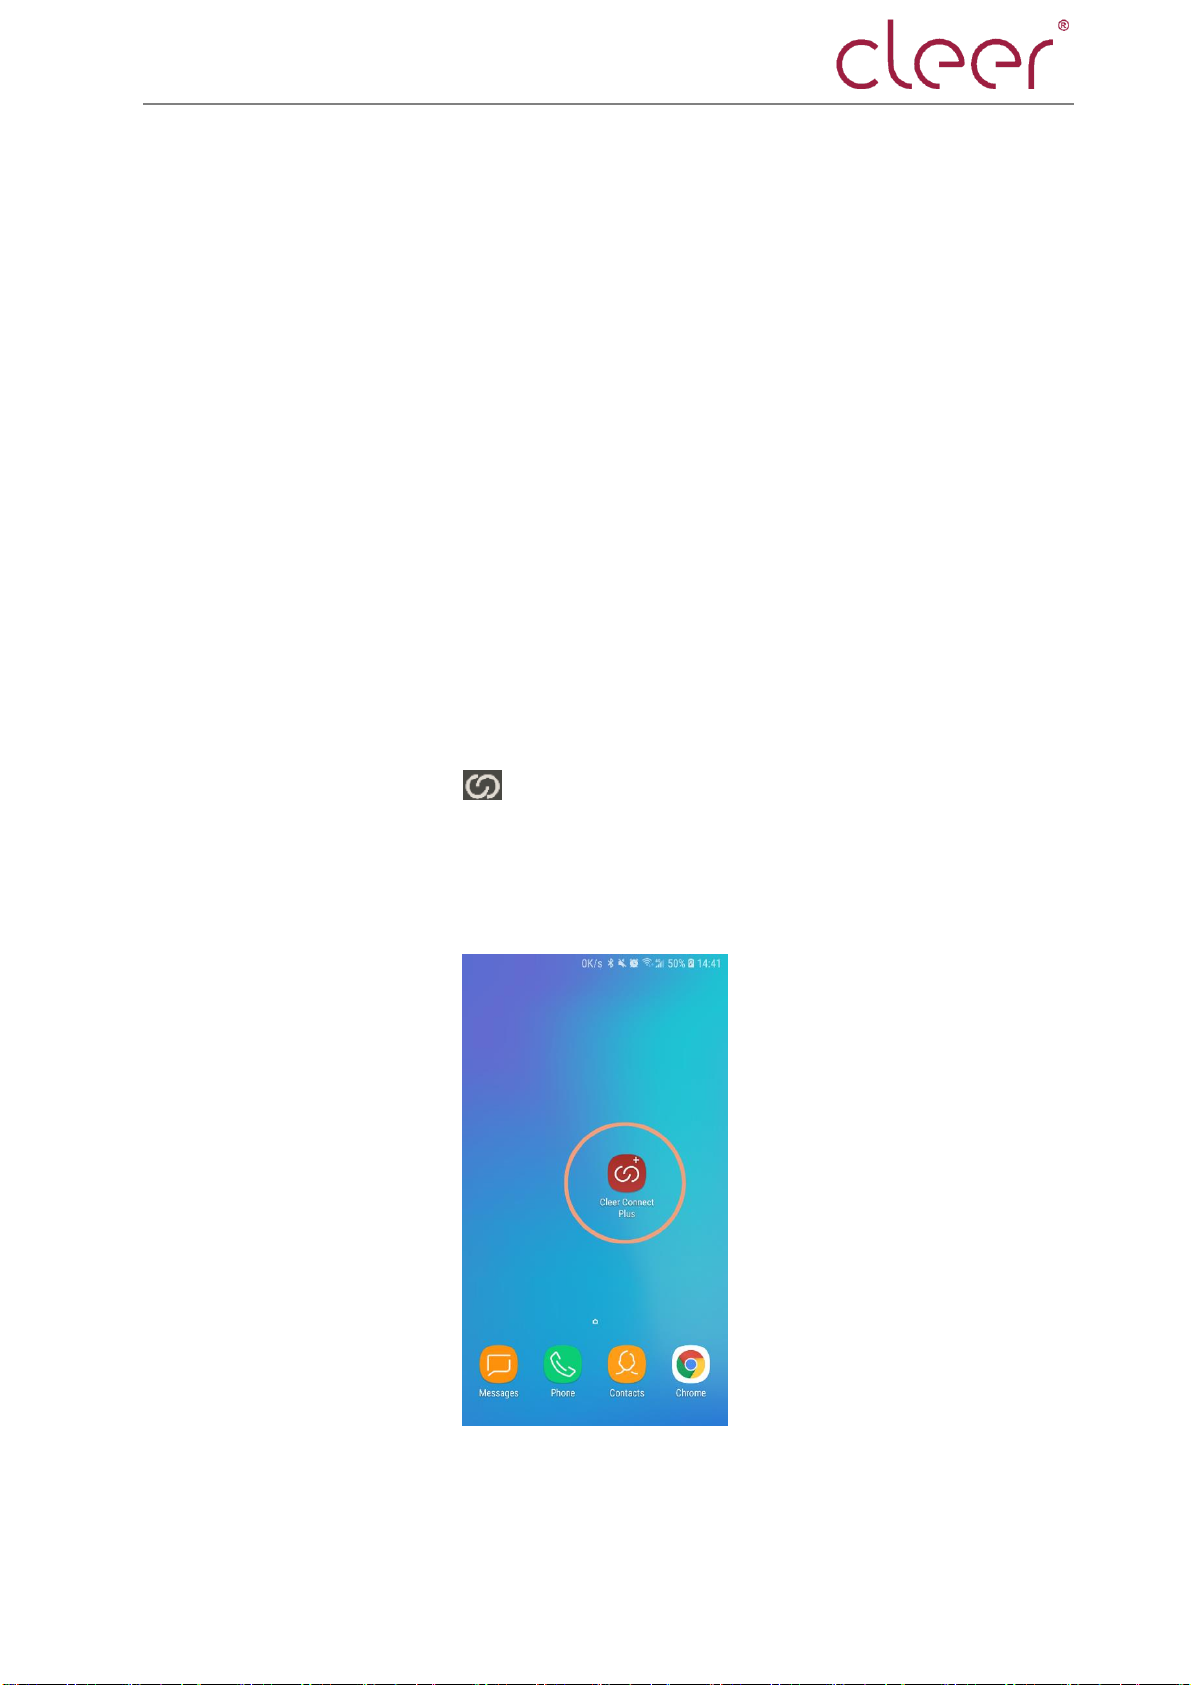
1. click the icon of Cleer Connect Plus
2. If it is the first time to use the app, it will enter the setup guide interface directly.
Cleer Wifi Speaker Cleer Inc.
7
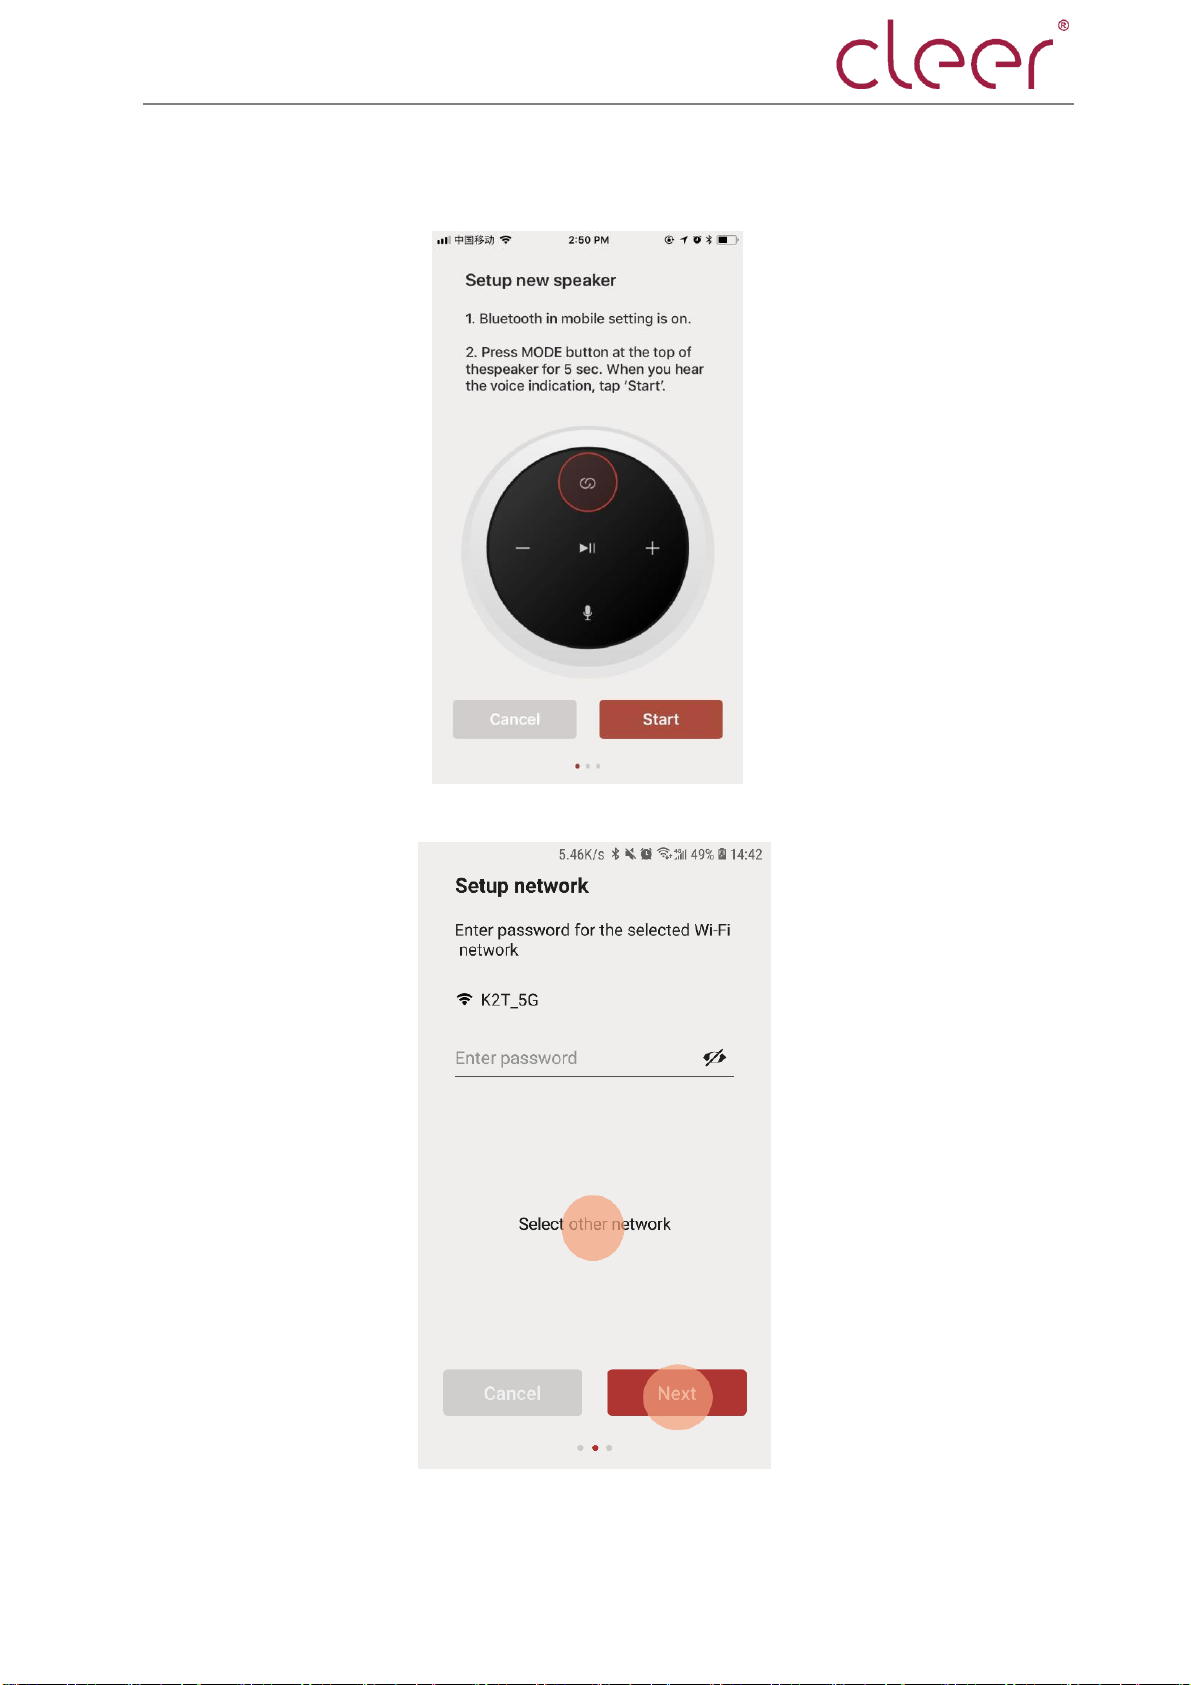
2-1. Firstly, it prompts to long tap the MODE button for about 5s to enter setup mode,
then click Start to next interface.
2-2. Enter the correct Wi-Fi password and then click next to start Wi-Fi setup

Cleer Wifi Speaker Cleer Inc.
8
2-3. If user wants to change the Wi-Fi, click “Select other network”,then “AGREE” to
change the Wi-Fi selection.
2-4. “Next”, for device to get setup, and wait for the setup result

Cleer Wifi Speaker Cleer Inc.
9
2-5. If there are several devices found for setup, there will be a selection page for user
to choose.
2-6. Once you choose the device in the list, this device will response with a voice
prompt. If it is right one the user wants to set up, click “NEXT” for next step.

Cleer Wifi Speaker Cleer Inc.
10
2-7. If the device is set up successfully, it will go to the interface where user can select a
name for the device among the list or create a name, then click “Done”.
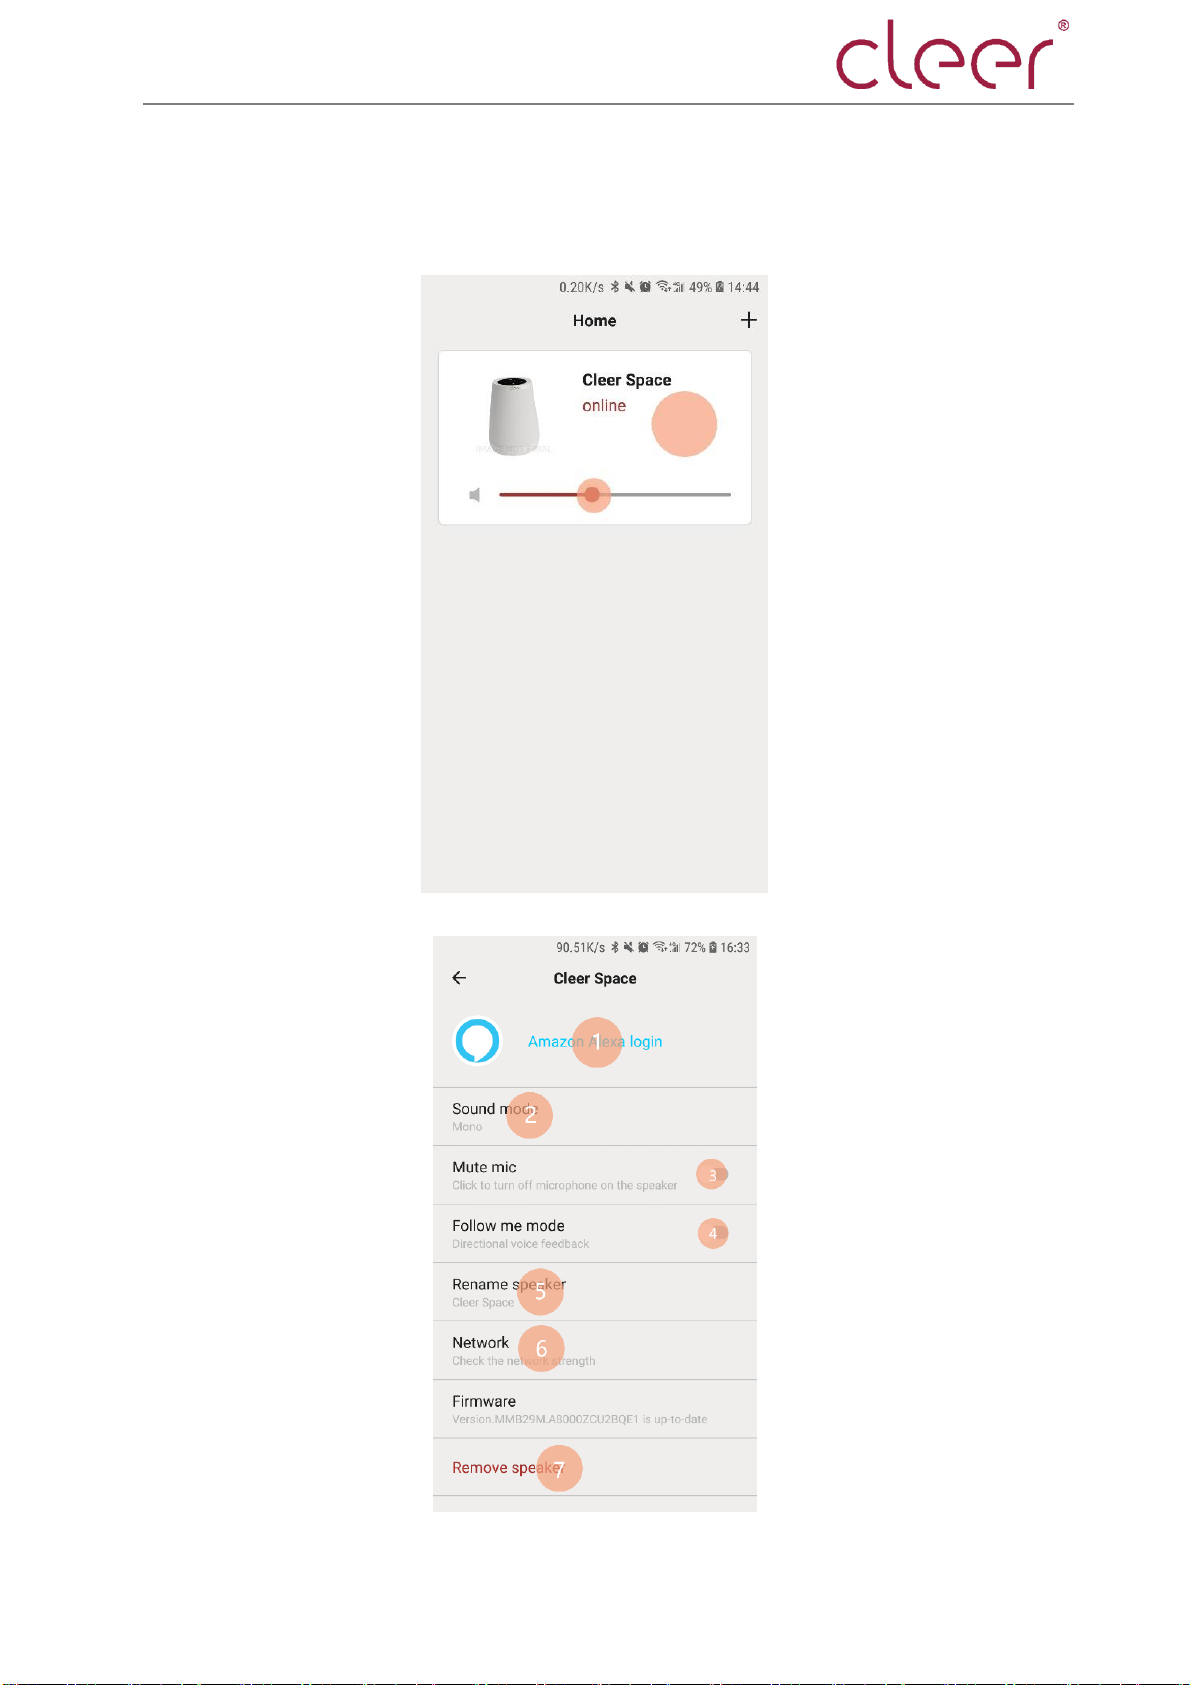
3. With setup done successfully, it will go back to the home page and the setup device
will be shown here.
Cleer Wifi Speaker Cleer Inc.
11
4. For the device online, user can drag the volume button on the interface to adjust the
volume or user can click the item to enter the detail page, where user can delete the online
device.
5. Enter detail page

Cleer Wifi Speaker Cleer Inc.
12
5-1. click item 1, user can enter Alexa set up page
5-2. Item 2, user can select the sound mode.

Cleer Wifi Speaker Cleer Inc.
13
5-3. Item 3, to trigger or mute mic
5-4. Item 4, open or close follow me mode

Cleer Wifi Speaker Cleer Inc.
14
5-5. Item 5, rename the device.
5-6. Item 6, check the network details
Cleer Wifi Speaker Cleer Inc.
15
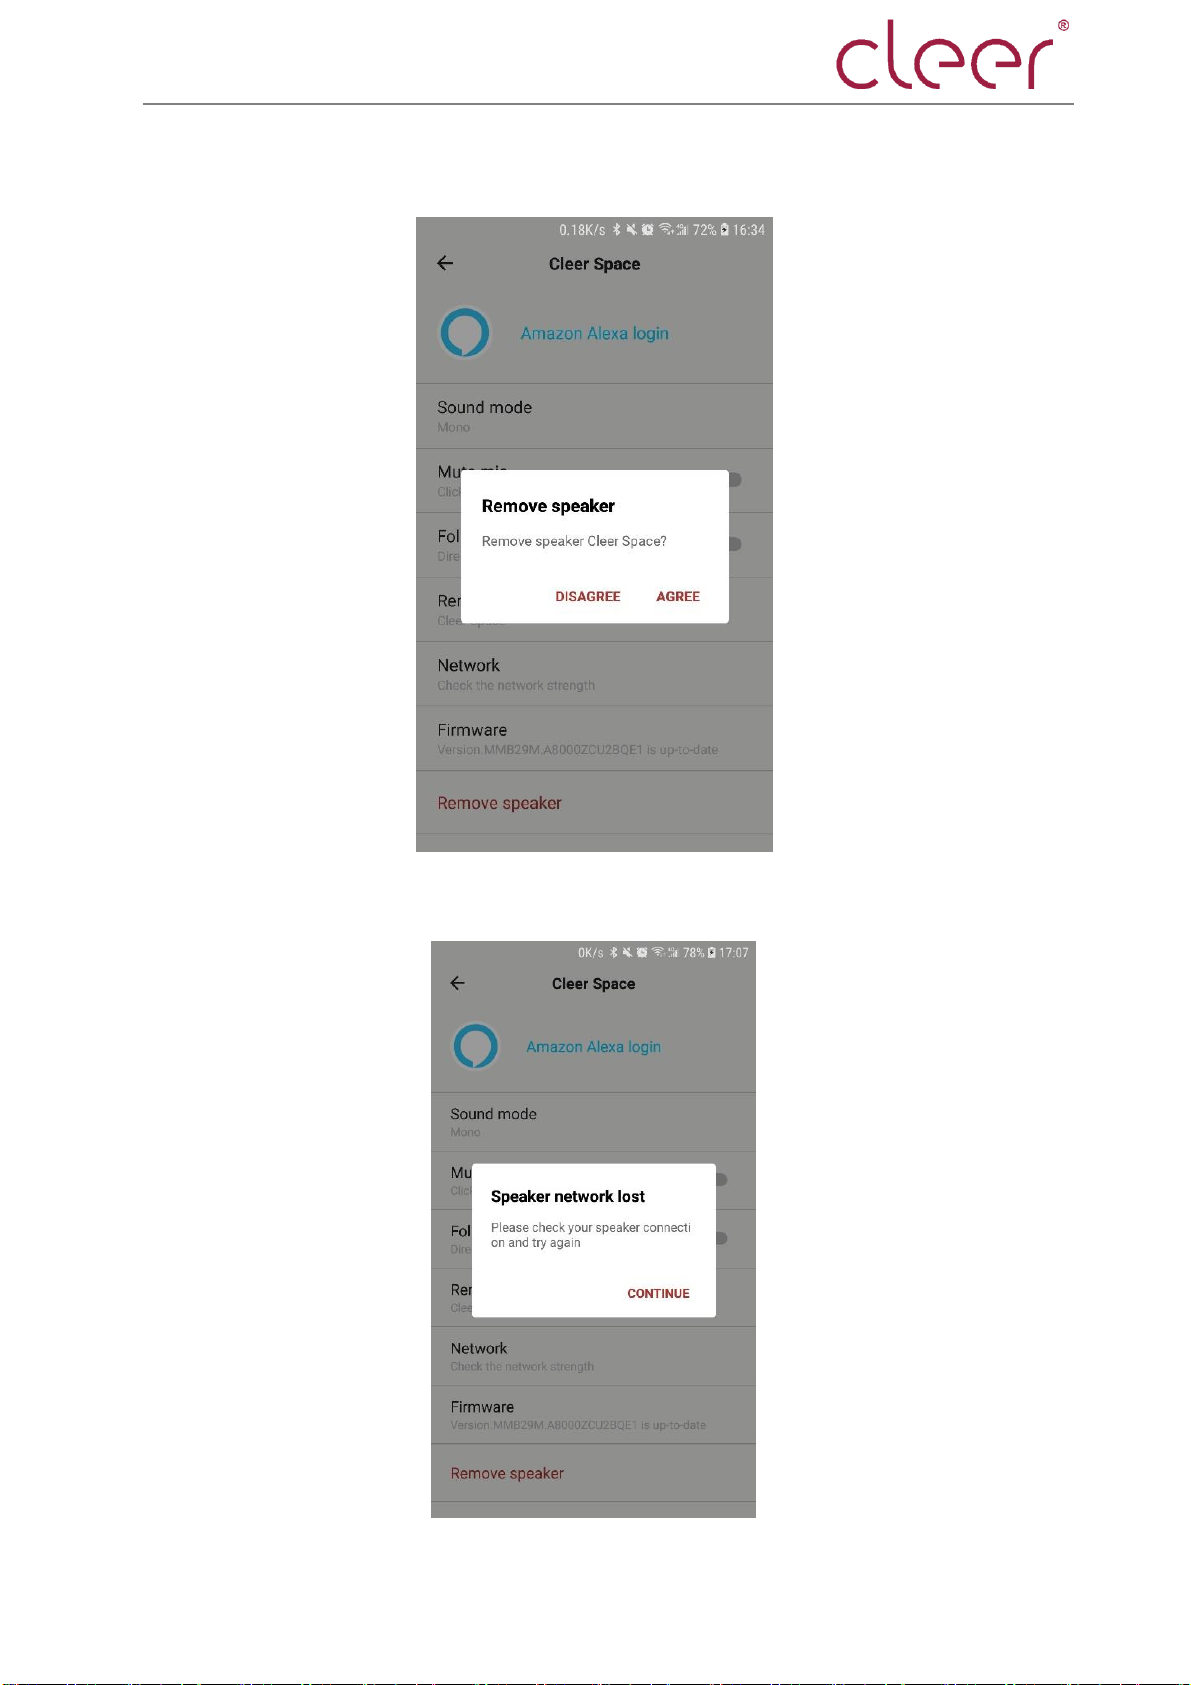
5-7. Item 7, agree or disagree to delete the device.
6. when the device is offline, it will pop up the offline dialog box, click "Continue" to go
back to the home page.

Cleer Wifi Speaker Cleer Inc.
16
OTA upgrading elaboration
In the detail page of the app, user can check the firmware version, and if it is the latest
version, it will be shown at the Firmware column;
If there is an new version, there will be a prompt in red to show the firmware info.

Cleer Wifi Speaker Cleer Inc.
17
When there is an up-to-date firmware version, click the Firmware column and then
“AGREE” to upgrade the device.
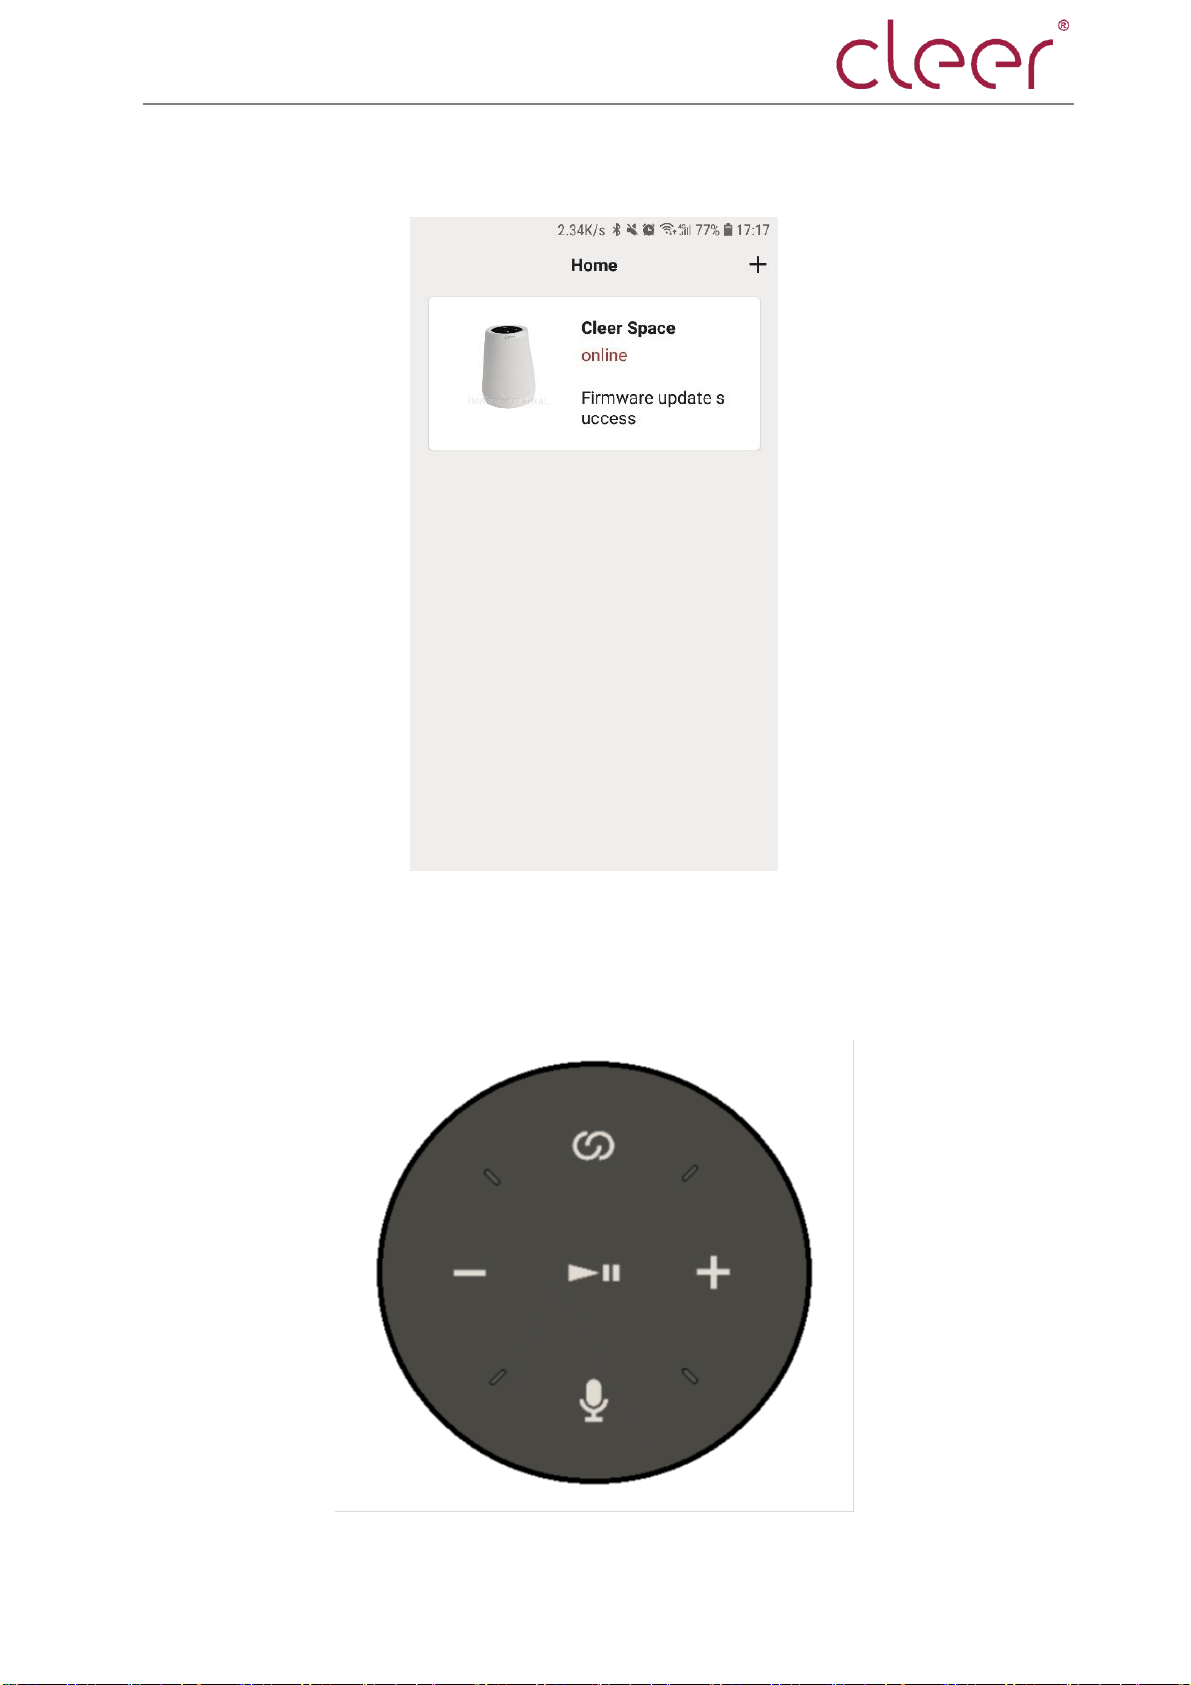
After upgrading complete, it will go to the home page with the prompt of the
upgrading.
Cleer Wifi Speaker Cleer Inc.
18
After OTA complete, it will have the info as below.
Audio mode operation elaboration
Touch panel
There are five function buttons on the Touch panel.

Cleer Wifi Speaker Cleer Inc.
19
Volume button: “ ” & “ ” for volume adjustment, long tap or short tap, with LED
indication.
Mute button: “ ”, for muting and initiating mic array; when muted, the mute button
will be indicated in red lighting and the LED array will also be in red; when initiated, the LEDs
are off.
Mode switch button: “ ”, short tap for audio modes switch; long tap for NETSET
setup mode, with LED indication.
Play/pause button: “ ” for music play or pause.
WiFi speaker audio mode switch
After power on, the default connection mode of Cleer Wi-Fi Speaker is Wi-Fi mode, and
there are three audio modes, that is:
360 mode:with voice prompt “three sixty mode”
Movie mode: with voice prompt “stereo mode”
Stereo mode: with voice prompt “movie mode”
User can short tap on the mode switch button to change the modes.
BT connection
Short press the physical button at the bottom of the device to enter Bluetooth pairing
mode, and Bluetooth LED will flash together with voice prompt “looking for device”, and
after paired successfully, the device will enter BT AD2P if user stream music with mobile
phone
Line-in connection for streaming
Plug in the line-in cable, the device will switch to line-in mode automatically, with voice
prompt “auxiliary mode”.
Please note that line-in is the least prioritized mode, so it will be closed if more
prioritized connection is initiated, like Bluetooth, Wi-Fi or Alexa, etc. But it will be resumed if
no more prioritized audio playback options.
NOTE: see Alexa functions in webpage, https://alexa.amazon.com

Cleer SPACE Cleer Inc.
FCC Statement
This equipment has been tested and found to comply with the limits for a Class B
digital device, pursuant to Part 15 of the FCC Rules. These limits are designed to
provide reasonable protection against harmful interference in a residential
installation. This equipment generates uses and can radiate radio frequency energy
and, if not installed and used in accordance with the instructions, may cause
harmful interference to radio communications. However, there is no guarantee
that interference will not occur in a particular installation. If this equipment does
cause harmful interference to radio or television reception, which can be
determined by turning the equipment off and on, the user is encouraged to try to
correct the interference by one or more of the following measures:
-- Reorient or relocate the receiving antenna.
-- Increase the separation between the equipment and receiver.
-- Connect the equipment into an outlet on a circuit different from that to which
the receiver is connected.
-- Consult the dealer or an experienced radio/TV technician for help.
Any Changes or modifications not expressly approved by the party responsible for
compliance could void the user's authority to operate the equipment.
This device complies with part 15 of the FCC Rules. Operation is subject to the
following two conditions: (1) This device may not cause harmful interference, and (2)
this device must accept any interference received, including interference that may
cause undesired operation.
During operation, the separation distance between user and the antenna shall be at
least 20cm, this separation distance will ensure that there is sufficient distance from a
properly installed externally-mounted antenna to satisfy the RF exposure
requirements.
 Loading...