

CLEBO FD20 User Manual
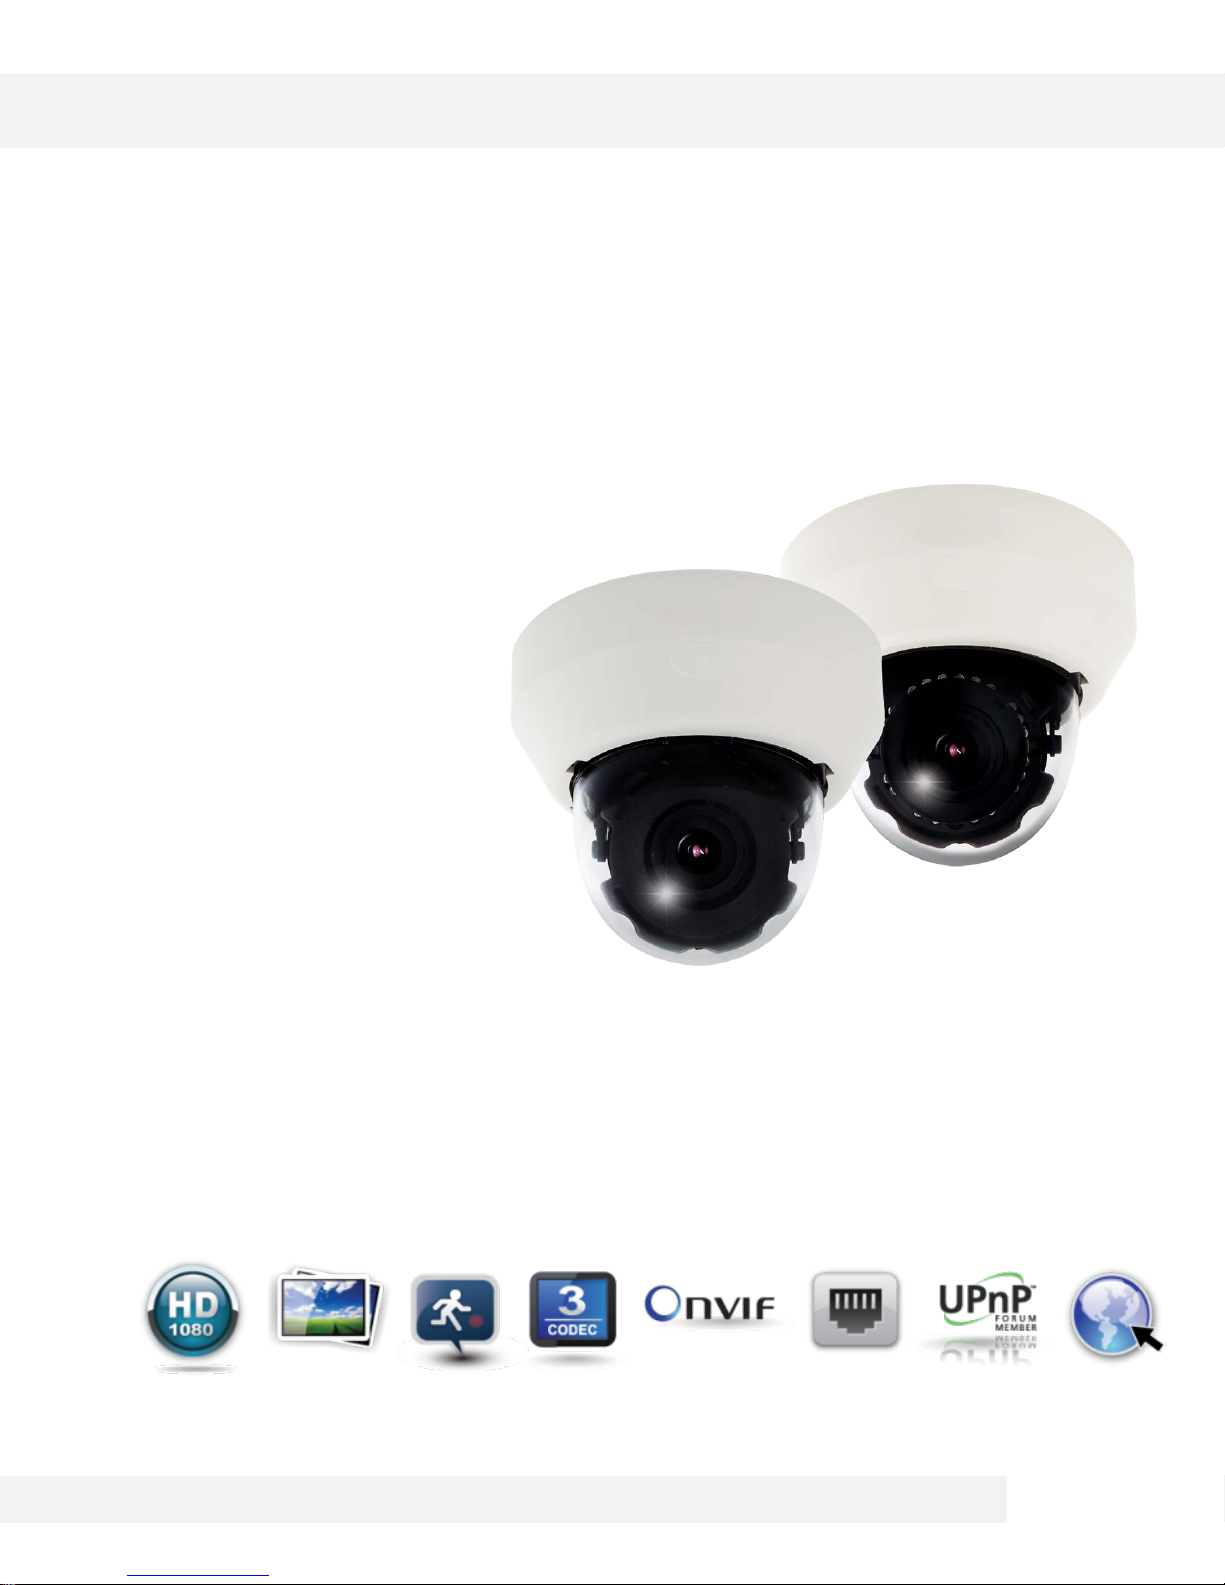
Clebo FD20
IP 2.1MP Indoor Dome Camera
User Manual
Before installing and using the Clebo Camera, please read this manual carefully.
Be sure to keep it handy for future reference.
06202012

PRECAUTIONS
Do not open or modify.
Do not open the cas e except during maintenanc e and installation, for it may be danger ous
and can cause damages.
Do not put objects int o the uni t.
Keep metal objects and flammable substanc es from enter ing the camera. It can cause fire,
short-circuits, or other damages.
Be careful w hen handli ng the unit.
To prevent damages, do not drop the camera or subject it to shock or vibration.
Do not install near electric or magnetic fields.
Protect from humidity and dust.
Protect from high temperature.
Be careful w hen ins tal l ing near the ceili ng of a kitchen or a boiler room, as the temper atur e
may rise to high levels.
Cleaning: T o r emov e dirt from the case, moisten a soft c lot h with a soft detergent soluti on and
wipe.
Mounting Surface: The material of the mounting surface must be strong enough to support
the camera.
FCC COMPLIANCE
This equipment has been tested and found to comply w i th the limi ts for a Cl ass B dig i tal dev i c e,
pursuant to Part 15 of the F CC rules. These limits ar e desi g ned to provide reasonable protectio n
against harmful interference, when the equipment is operated in a residential envi ronment. This
equipment gener ates, uses, and r adiates radi o frequency ener gy, and if it is not installed and used
in accordance with the instruction manual, it may cause harmful interference to radio
communications.
WARNING: Changes or modification s are not expressly approved by the manufactu r er.
2

TABLE OF CONTENTS*
Introduction.......................................................................................................................................................4
Features........................................................................................................................................................4
Inside the Box...............................................................................................................................................5
Parts.............................................................................................................................................................6
Camera Control Board.................................................................................................................................7
Dimensions...................................................................................................................................................8
Installation.........................................................................................................................................................9
Network Connection................................................................................................................................9-10
Mounting the Camera...........................................................................................................................11-15
Storage Device Installation........................................................................................................................16
Adjusting the 3-Axis G imbal.......................................................................................................................17
Clebo Camera Setup......................................................................................................................................18
Installing the IP Finder...............................................................................................................................18
Using IP Finder Software......................................................................................................................19-20
Network Options.........................................................................................................................................21
Camera Reboot..........................................................................................................................................22
Clebo Camera Web Viewer............................................................................................................................23
Accessing the Web Viewer via Internet Explorer.......................................................................................23
Accessing the Web Viewer via Google Chrome, Mozilla Firefox and Safari............................................24
First & Second Stream...............................................................................................................................25
Export Image..............................................................................................................................................26
Print Image.................................................................................................................................................27
Panic Recording....................................................................................................................................28-29
Clebo Camera Setup......................................................................................................................................30
Video.....................................................................................................................................................30-34
Event.....................................................................................................................................................35-38
Network.................................................................................................................................................39-43
Record & Remote Backup....................................................................................................................44-47
System..................................................................................................................................................48-54
Specifications............................................................................................................................................55-56
Troubleshooting........................................................................................................................................57-60
Warranty..........................................................................................................................................................61
Limits & Exclusions.......................................................................................................................................62
3

FEATURES*
ONVIF Support (V1.02)
Local SDHC Card Backup
Sony 1/2.8” CMOS Sensor
Highest Resolution 2.1 Megapixels
1080P (1920x1080) at 30fps
4x Auto-Focus 3.5~16mm Lens
Triple Codec H.264, MPEG4, MJPEG
Double Shutter WDR (Wide Dynamic Range) at 15fps Settings
70ft Range IR with Intelligent Camera Sync (FD20IR)
True Day and Night (FD20IR)
3D-DNR (3D Digital Noise Reduction)
Web Server Built-in
Dual Streaming
Programmable Privacy Zones (30)
Mirror
Remote Client Setup & Upgrade
Digital Zoom
FTP Upgrade Support
Power over Ethernet [PoE] & DC12V
UPnP Support
4
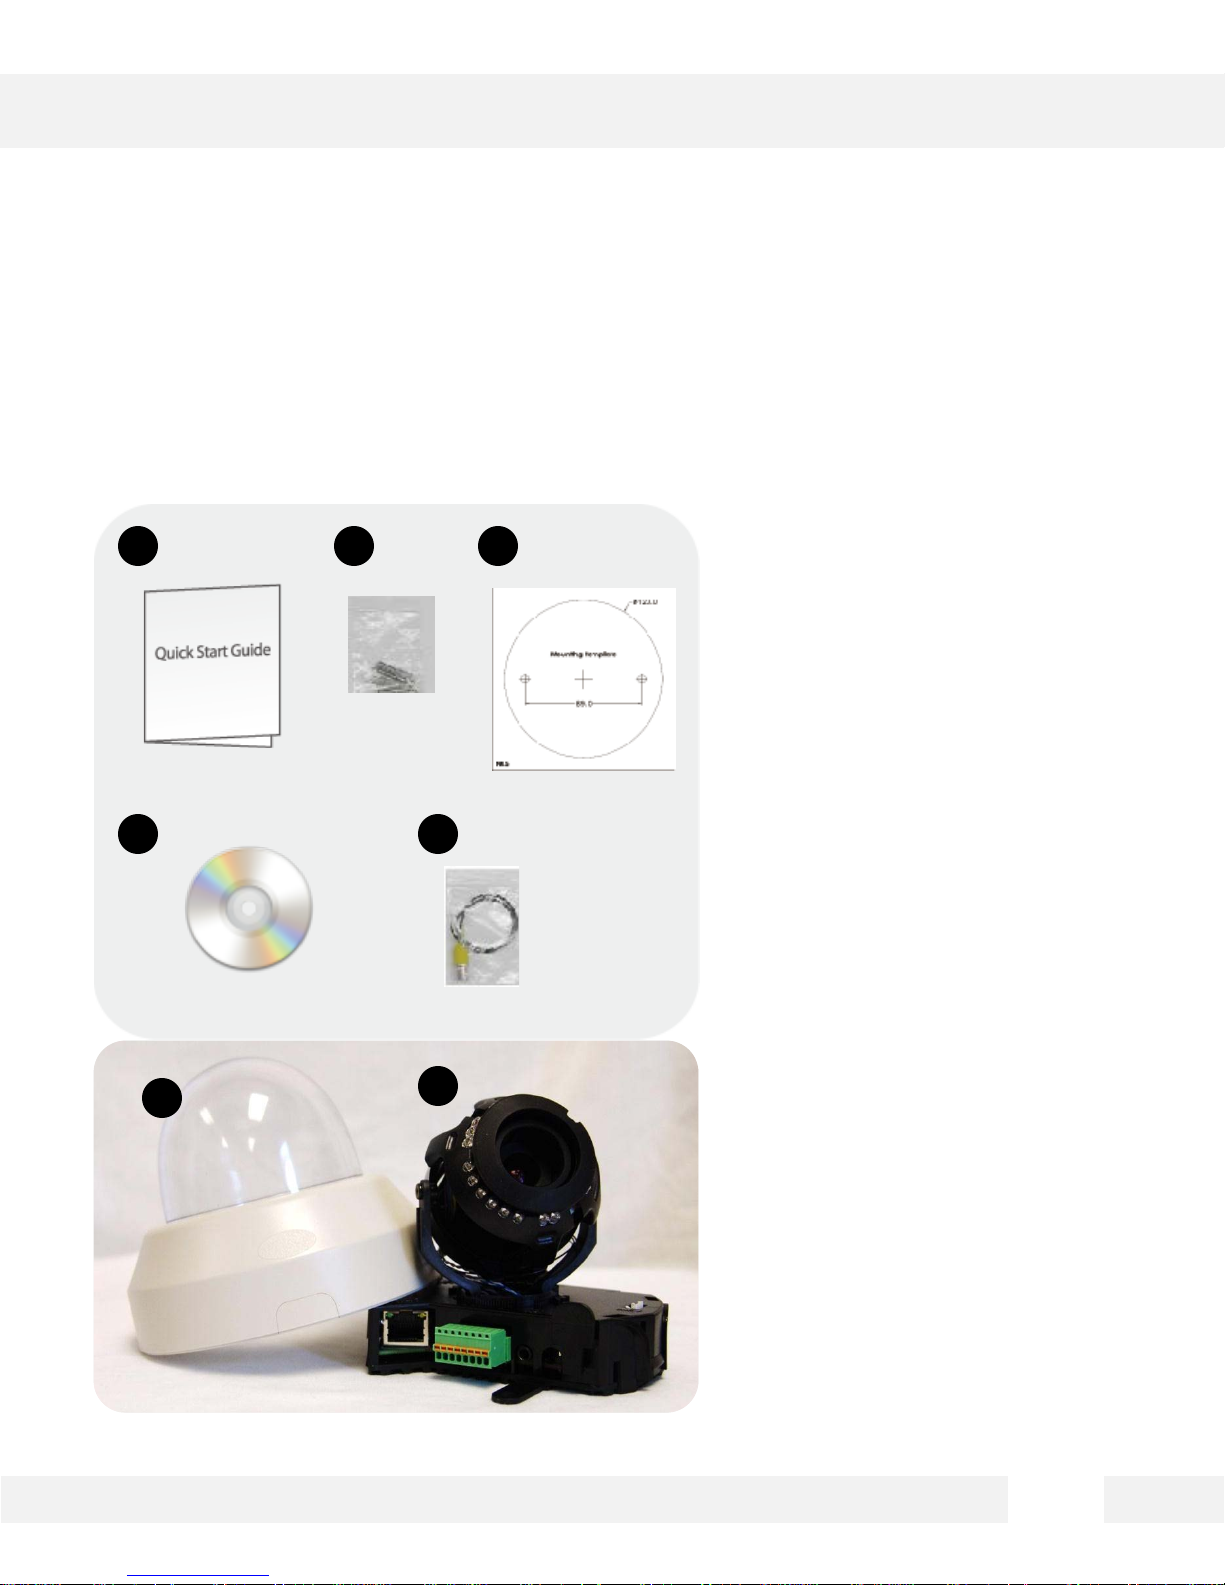
INSIDE THE BOX*
The following items are included with the MEGAPIXEL Camera
3 2 1
1. Quick Start Guide
7
5 4
6
2. 2 Screws & 2 Dry
Wall Anchors
3. Mounting Template
4. CD (Manual +
Software)
5. Second Video Jack
6. Camera Module
7. Snapit Indoor
Housing
5

PARTS & DESCRIPTIONS*
1. Lens
2. Bubble
3. Cover Dome
4. Camera Control Board
5. SD Card Slot
6. Mounting Screws
7. RJ45 Connector
8. Audio In/Out
9. Terminal Blocks (See page 7
for more information)
6
6
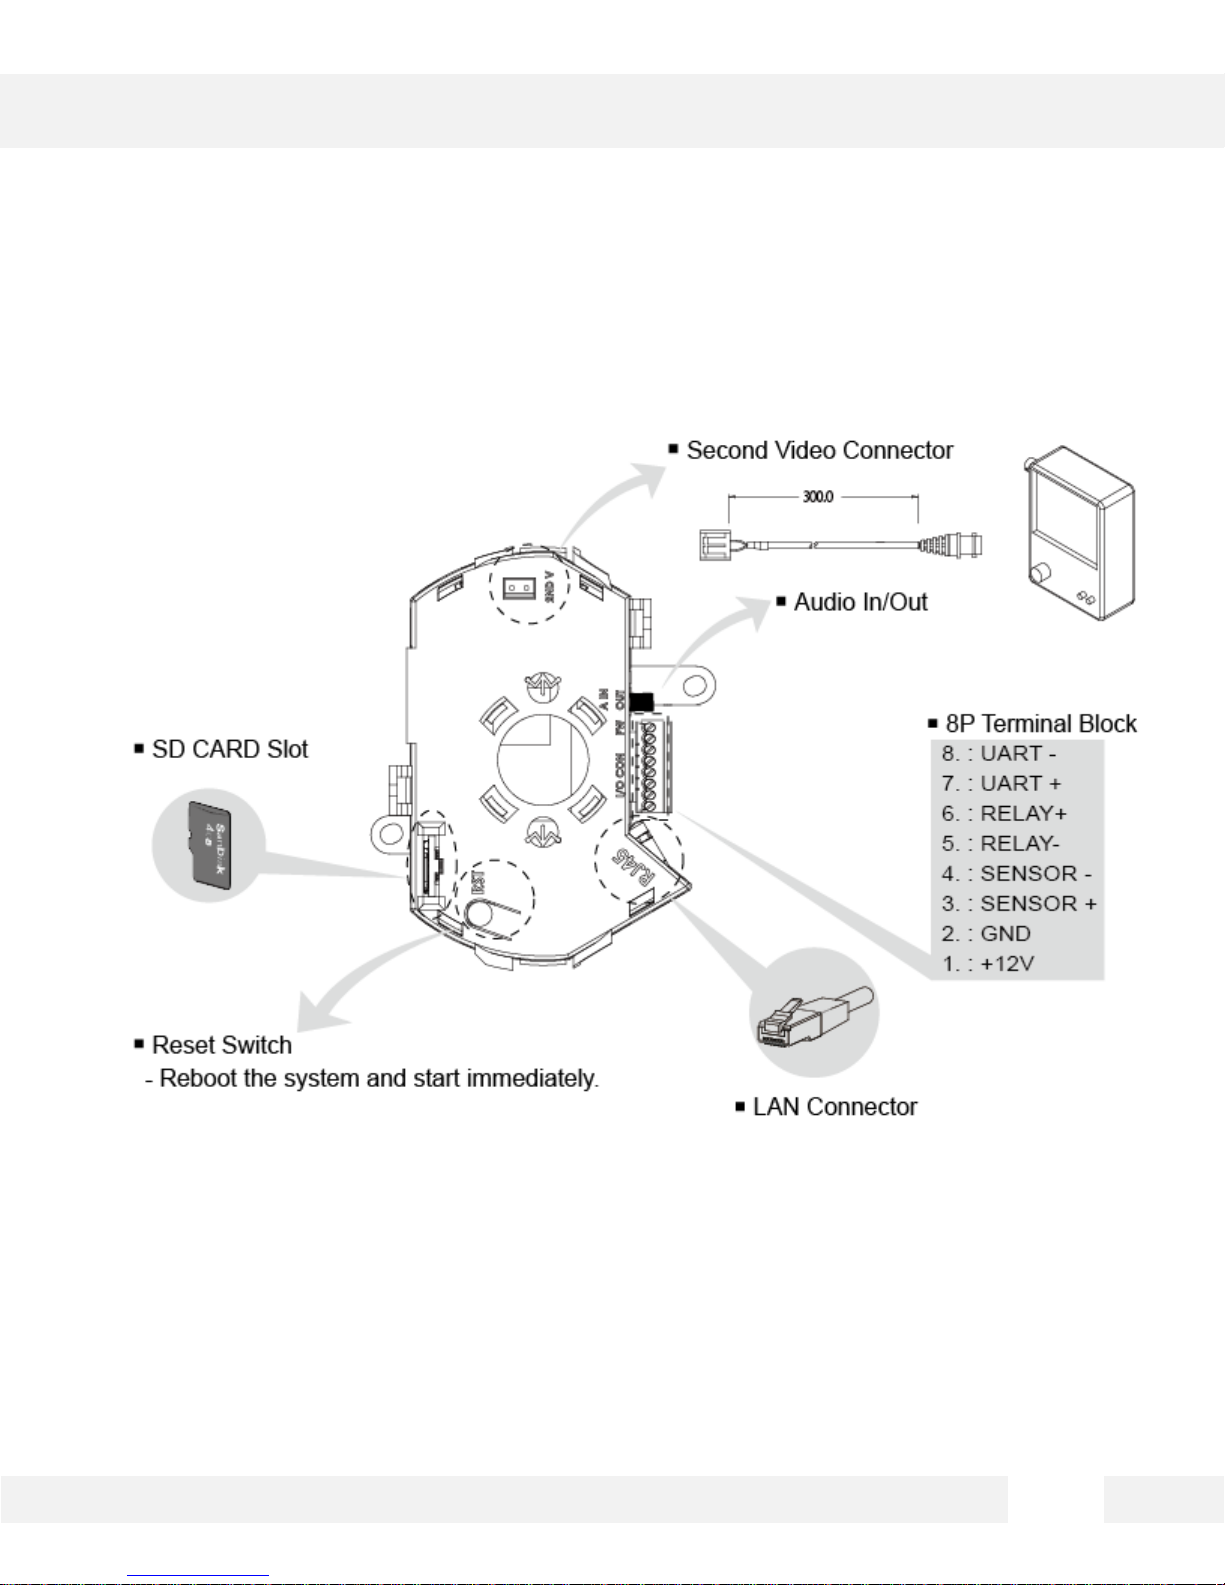
CAMERA CONTROL BOARD*
7

DIMENSIONS*
8

NETWORK CONNECTION*
Two Options
Use a PoE-enabled switch to connect data and power through a single cable and begin viewing and recording images
instantly. A non-PoE switch will require an adaptor for power transmission.
1. Using a PoE-Enabled Switch
The Clebo Camera is PoE-Compliant, allowing transmission of power and data via a single Ethernet cable. PoE
eliminates the need for the different cables used to power, record, or control the camera. Follow the illustration below to
connect the camera to a PoE-enabled switch using an Ethernet cable.
9
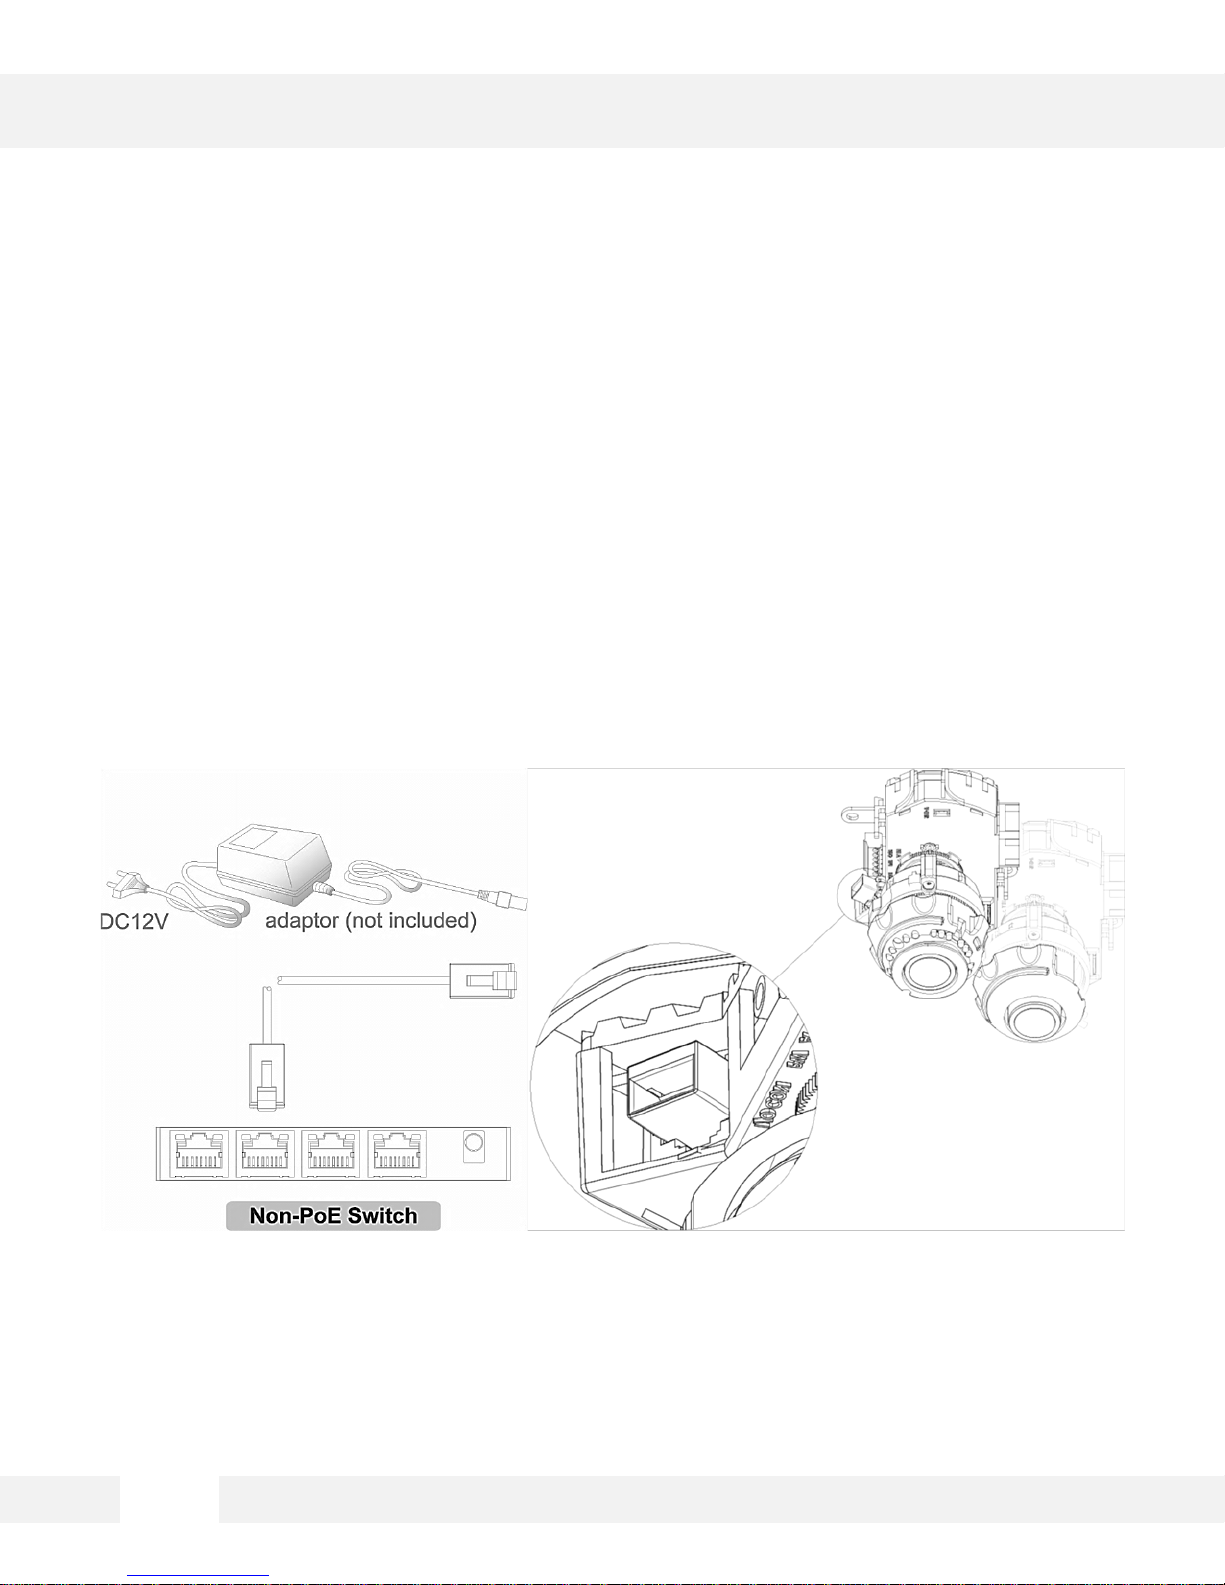
NETWORK CONNECTION*
2. Using a Non-PoE Switch
If a PoE-enabled switch is not used, use a power adaptor for power transmission and non-PoE switch for data
transmission. Follow the illustrations below to connect the camera without a PoE-Enabled Switch.
10
INSTALLATION*
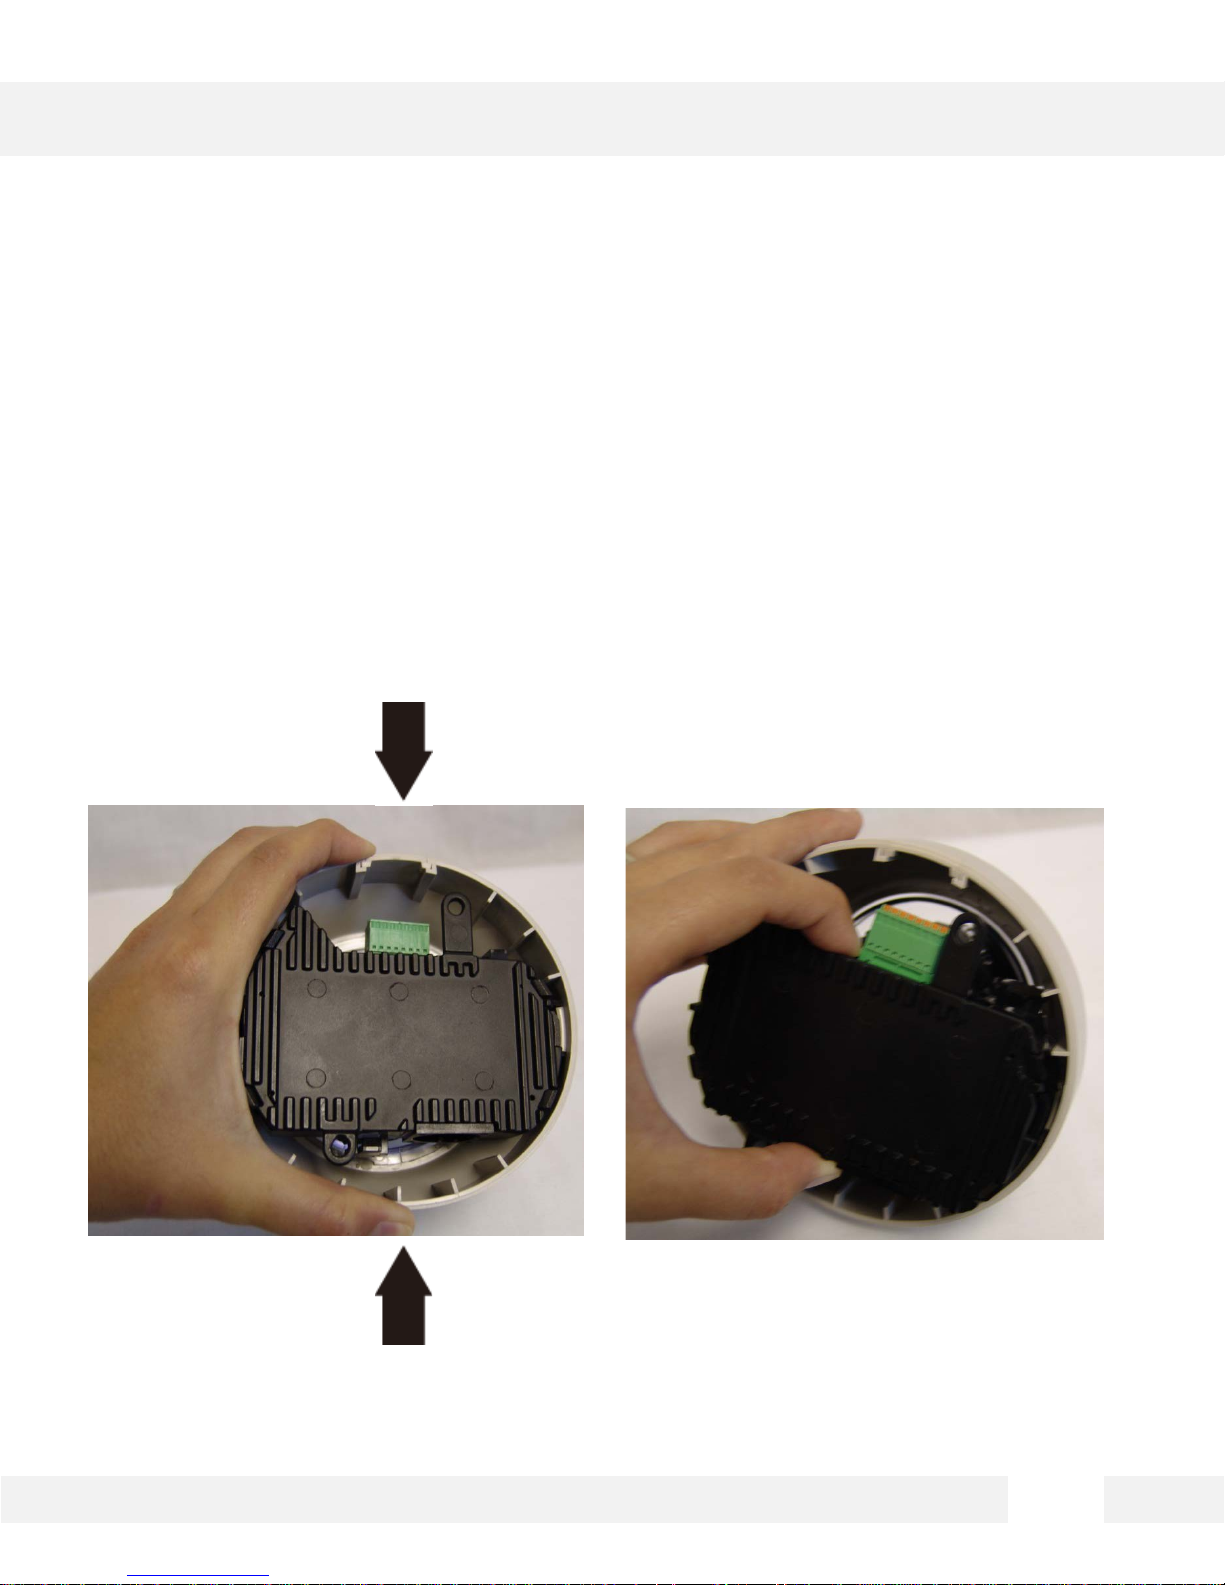
Snapit Easy Installation
To remove the camera’s protective bubble dome, hold the camera and squeeze on both sides of the cover dome to
loosen the hold on the camera module.
While squeezing, hold the camera module and gently remove it from the bubble dome.
If the camera doesn’t snap out easily, try squeezing the cover dome a little tighter
.
11
INSTALLATION*
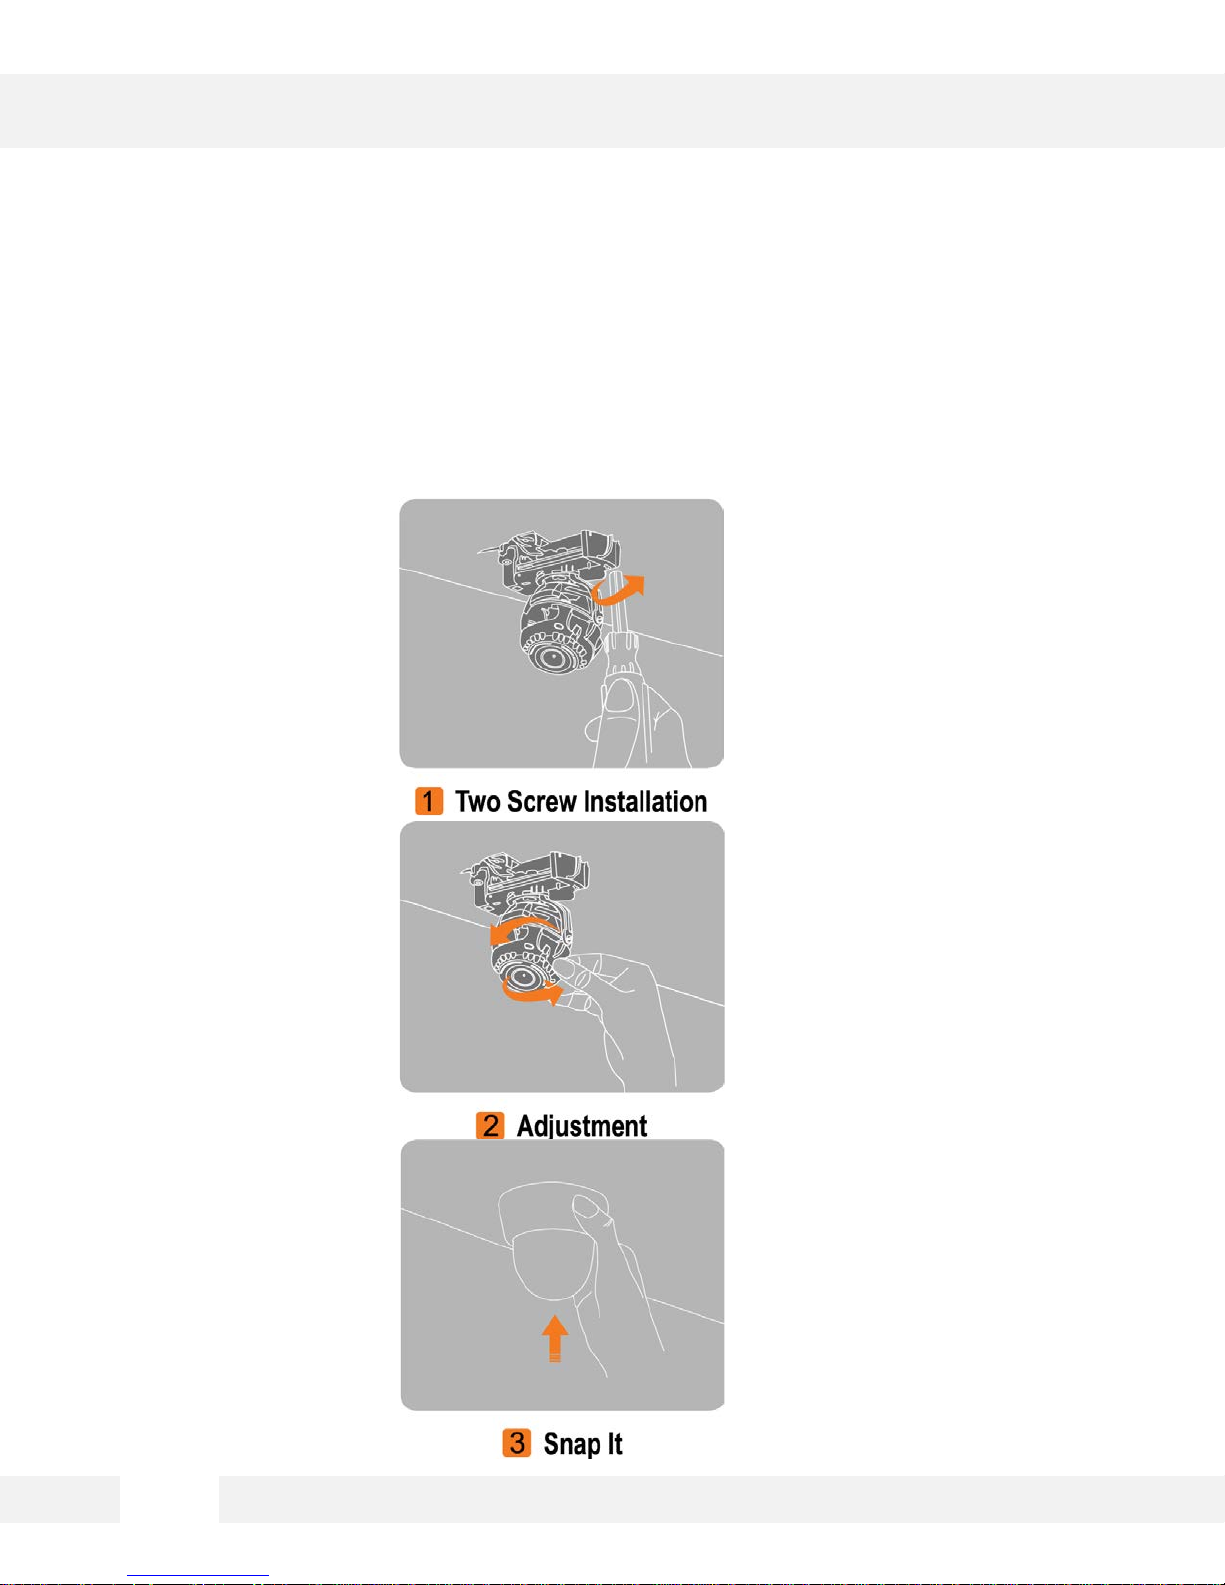
Snapit Easy Installation
The Snapit easy installation is a unique technology that allows you to install the camera in three easy steps.
12
INSTALLATION*
2 1
3
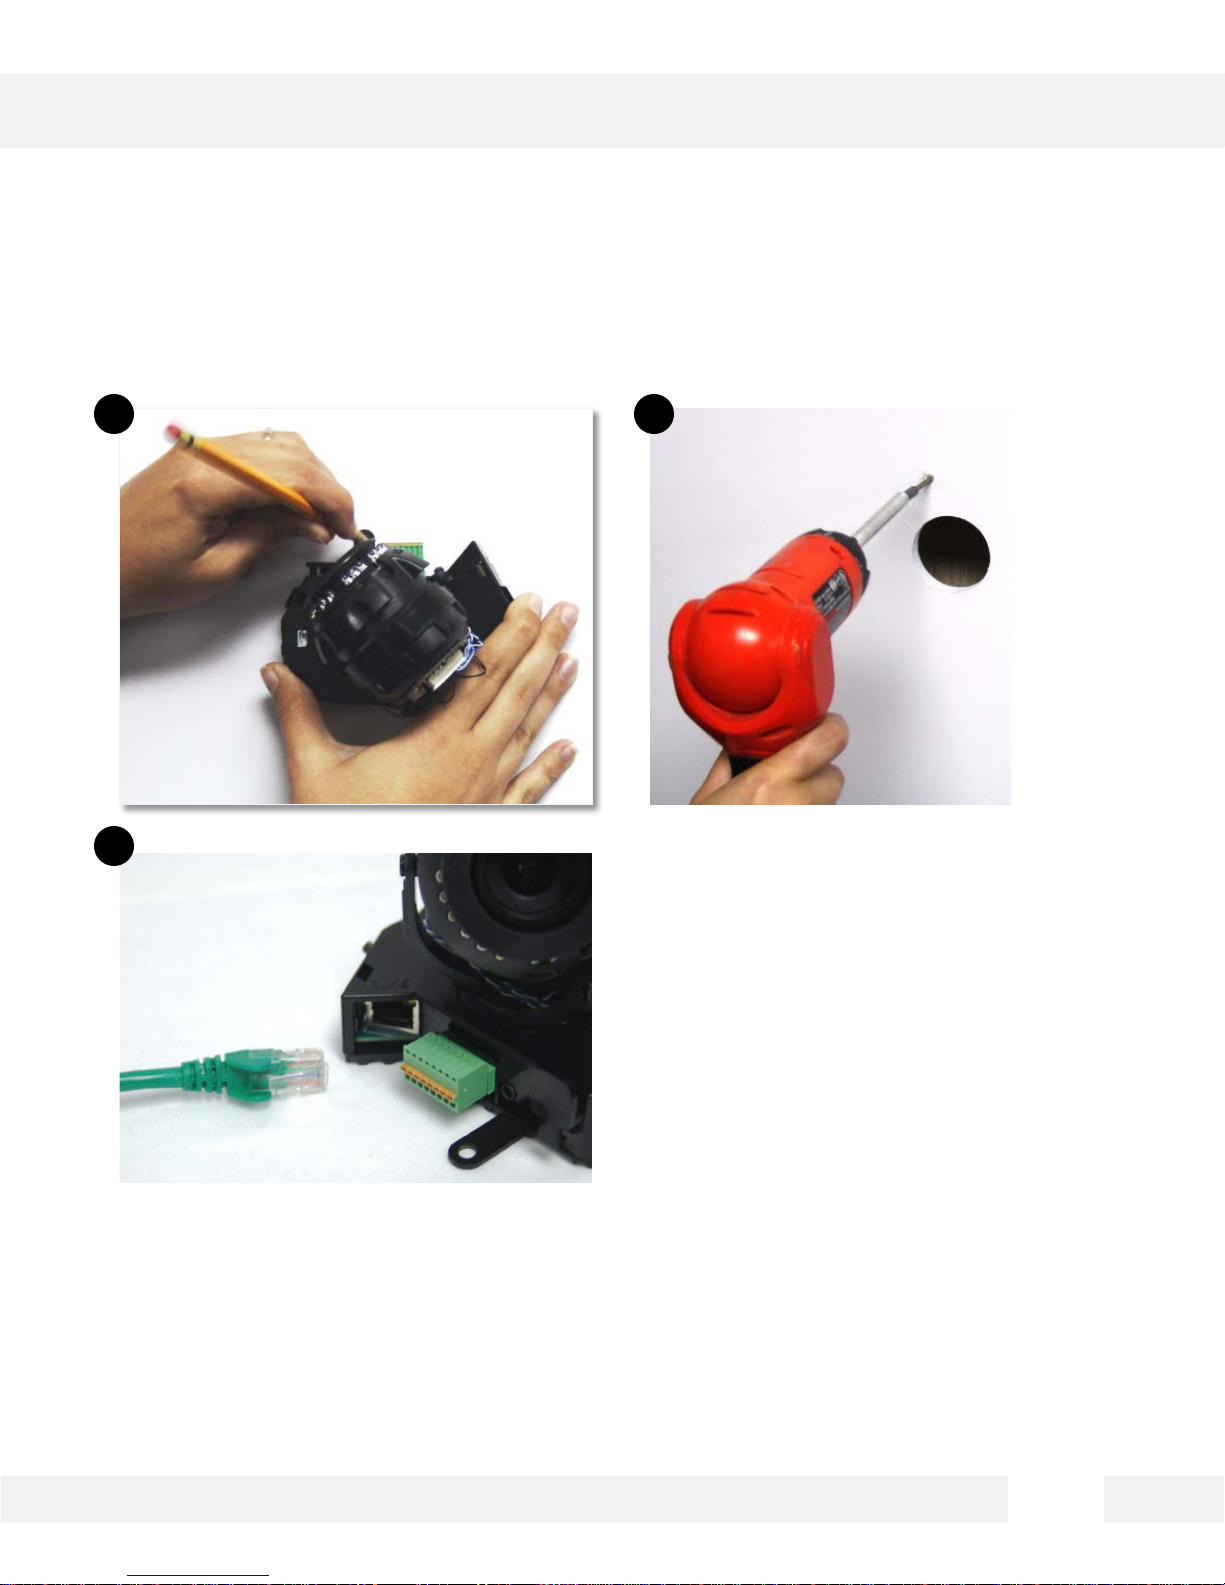
1. Use the camera’s mounting template or
your camera to mark the holes as
required.
2. Drill holes into the dryw al l and insert the
drywall mounts into the holes.
3. Pull wires through and make
connections. Connect the RJ45 to a
CAT5 cable or a power adaptor. Refer to
“Network Connection” for further
explanation.
13
INSTALLATION*
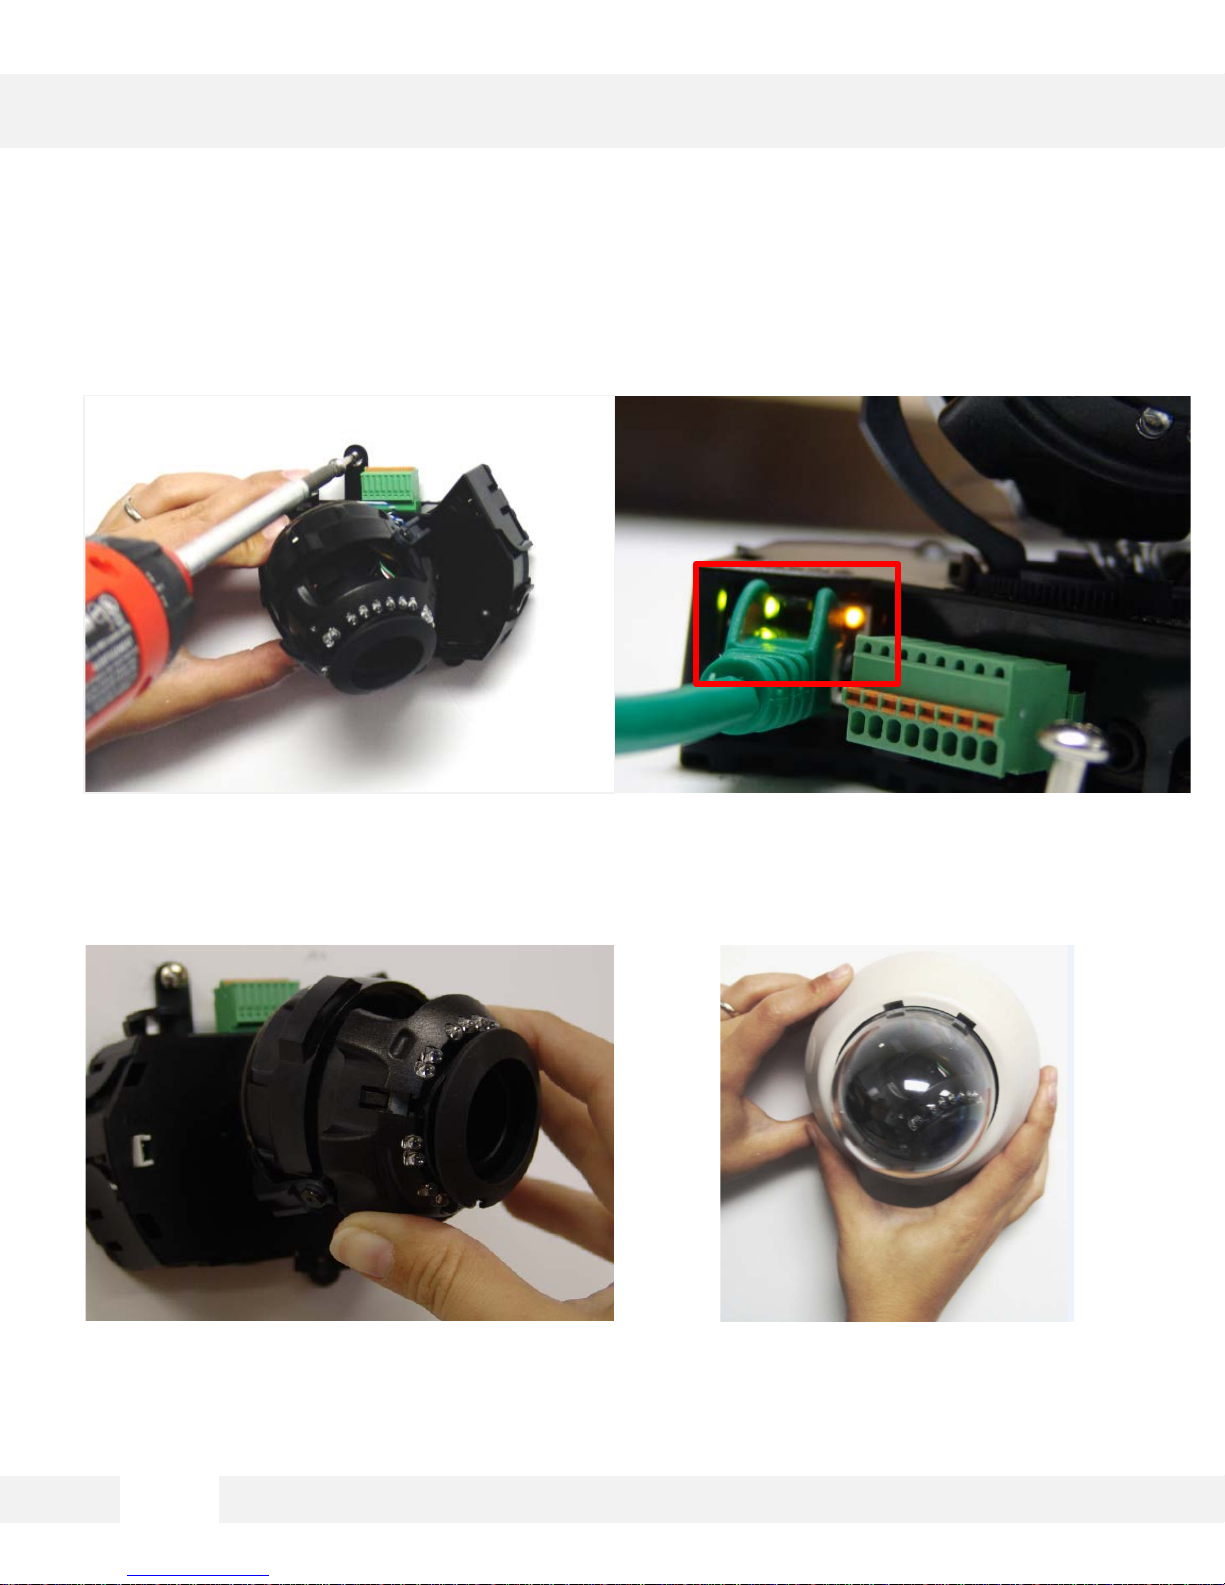
1. Mount the camera to the wall or
ceiling, us i ng the s cr ews provided
with the camera.
3. Adjust the camera’s position using the 3-
Axis Gimbal.
2. Check the LED light. Green light
flickers for booting. Red li ght turns on
when booting is complete.
4. Snap the cover dome back over the
camera to complete the installation.
14
INSTALLATION*
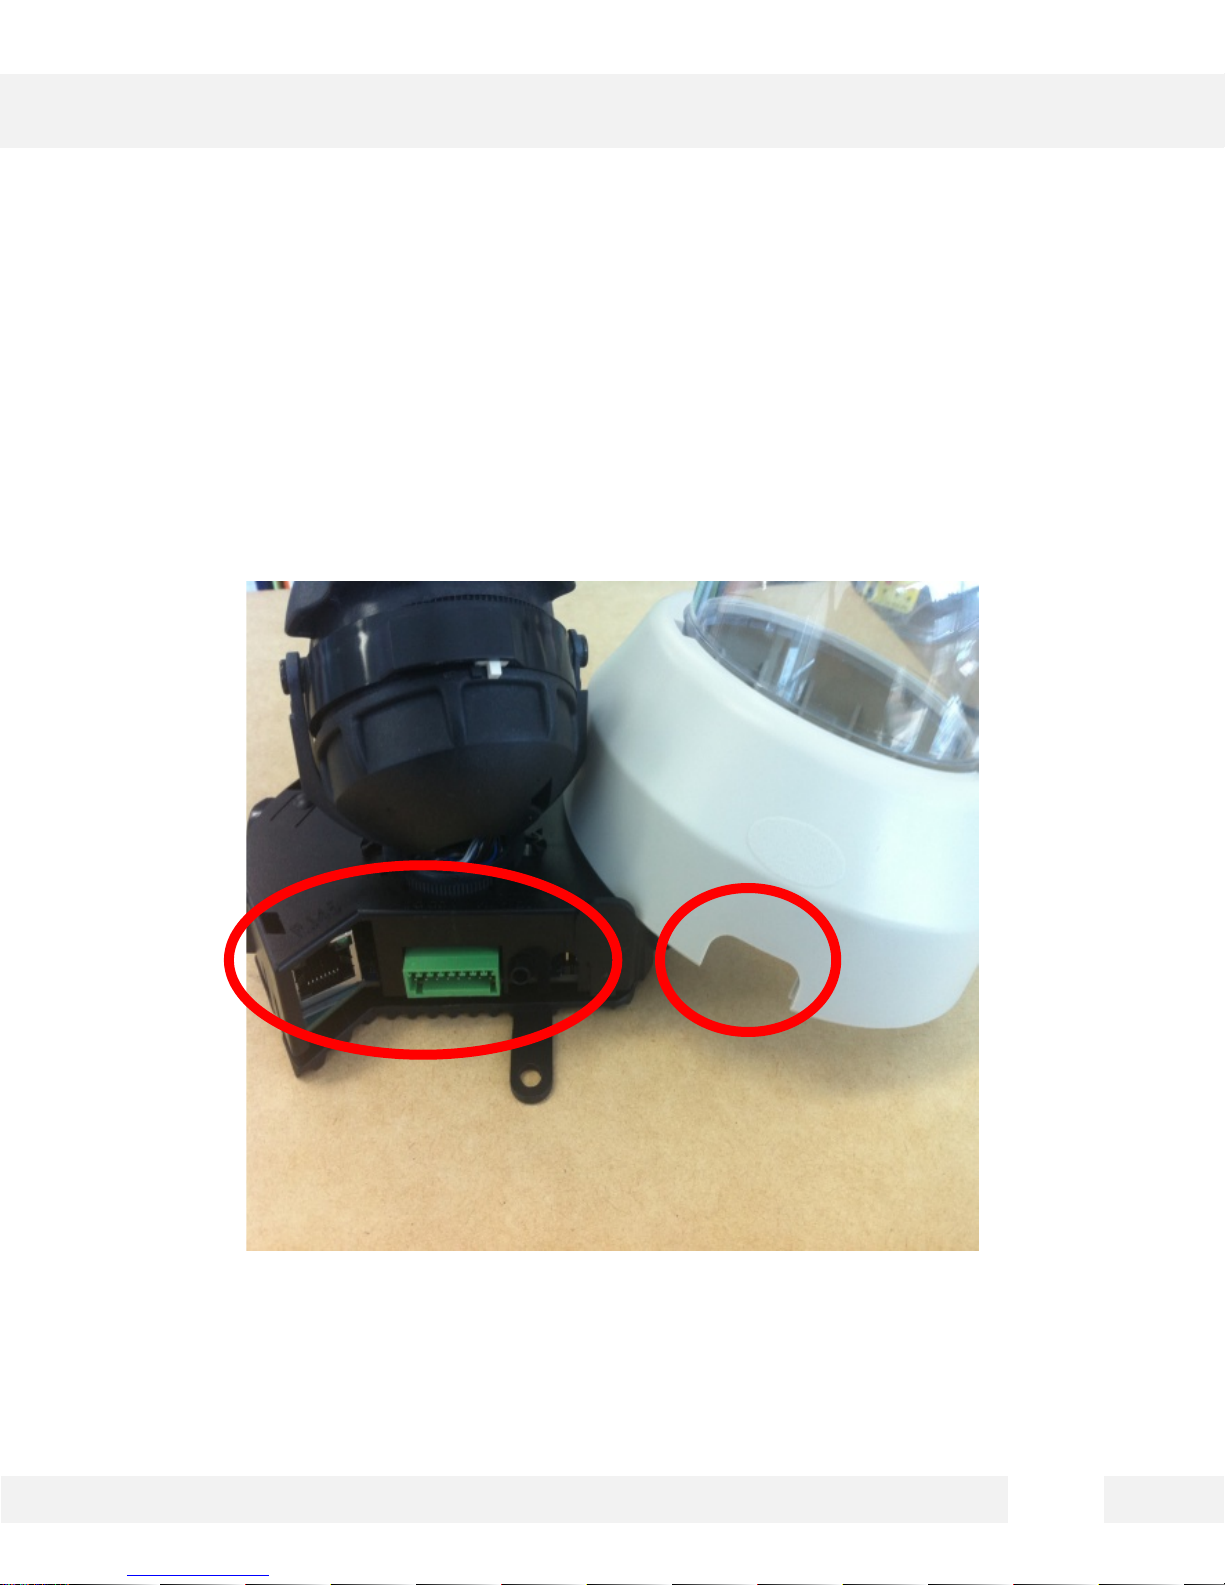
How to Snap the Cover Dome over the Camer a Modul e
To snap the cover back into place, align the small indentation in the cover dome with the RJ45 connector in
the camera module as seen below.
15
INSTALLATION*
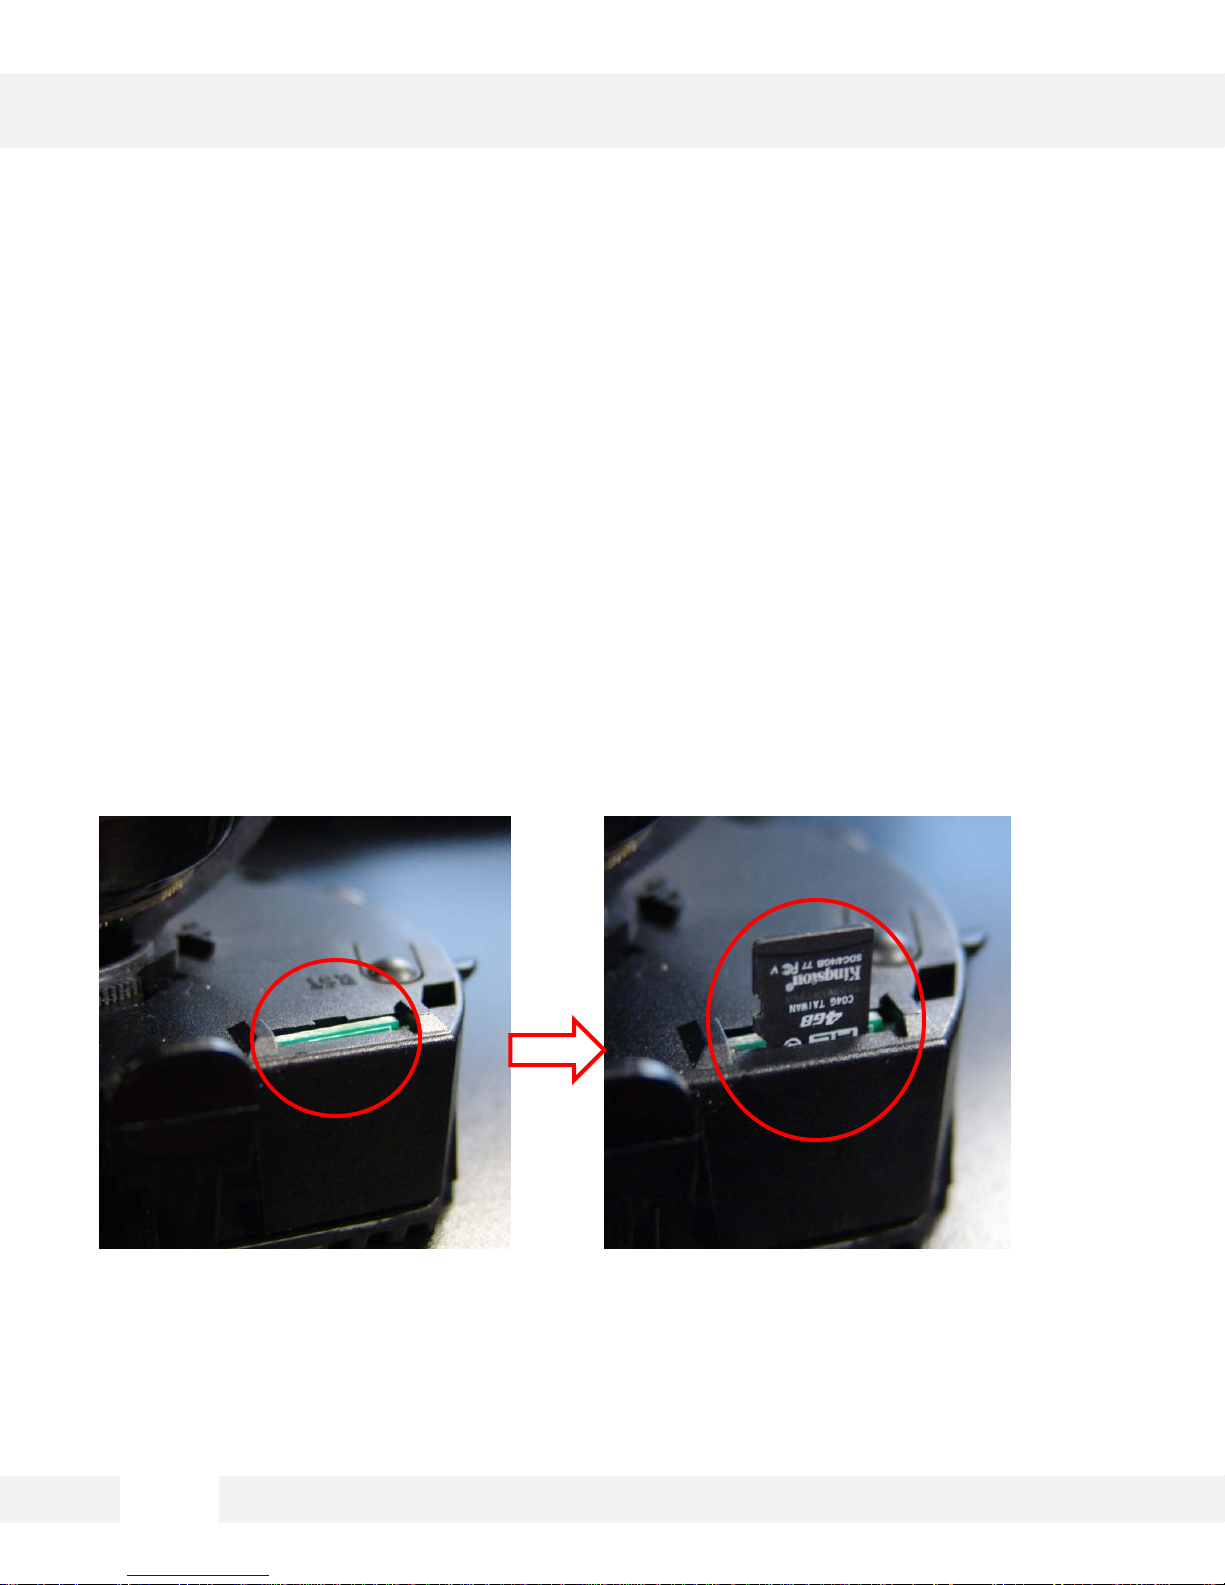
Storage Device
The FD20 Megapixel Cameras offer the option of local emergency backup in
case of network loss.
To install the SD card:
1. Locate the SD card slot in the back of the camera module.
2. Insert the SD card in the slot and push it down, until you hear a ‘click’ sound.
3. To remove SD card, press the SD card down until you hear a ‘click.’ The SD card will eject from the slot.
4.
When you are complete, go to the camera’s web viewer. (See page 44 for more information)
16
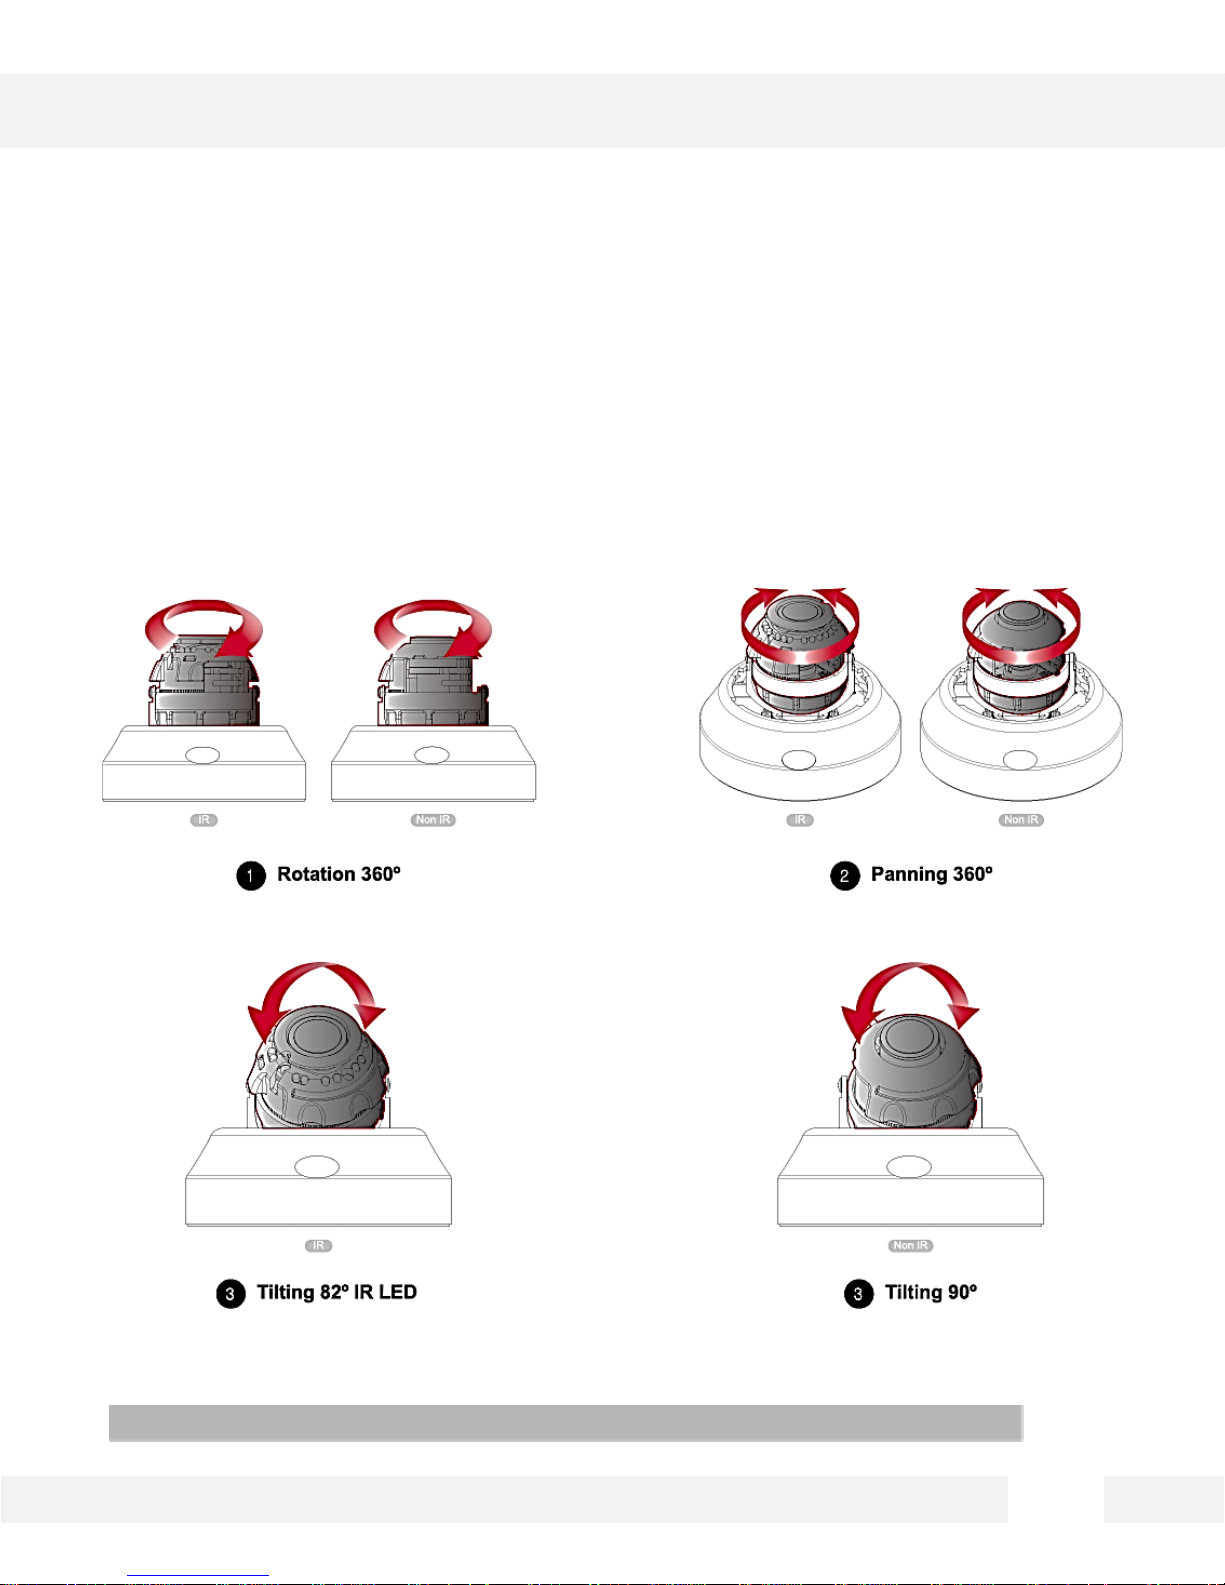
ADJUSTING THE 3-AXIS GIMBAL*
The Gimbal mechanism yields maximum rotation and placement as
shown below.
Do not over rotate the lens. Doing so will damage the camera lens module.
17
IP FINDER SOFTWARE*
Installing IP Finder Software
IP Finder searches for all the available ip devices currently connected to your network.
1. Install IP Finder to find the Clebo camera on your local network. The software can be found on the included User
Manual CD. Run IP Finder and install onto your PC.
2. When setup is complete, launch IP Finder .
3. To find your Clebo camera, click the Search button. Your Clebo camera will appear as ”Clebo-FD20” or “Clebo-
FD20IR”
4. Select the desired device and select Web Connect to access the camera directly via Internet Explorer.
*Be sure to install the IP Finder to a computer located on the same network segment (Subnet Mask) as the Clebo camera.
18
IP FINDER SOFTWARE*
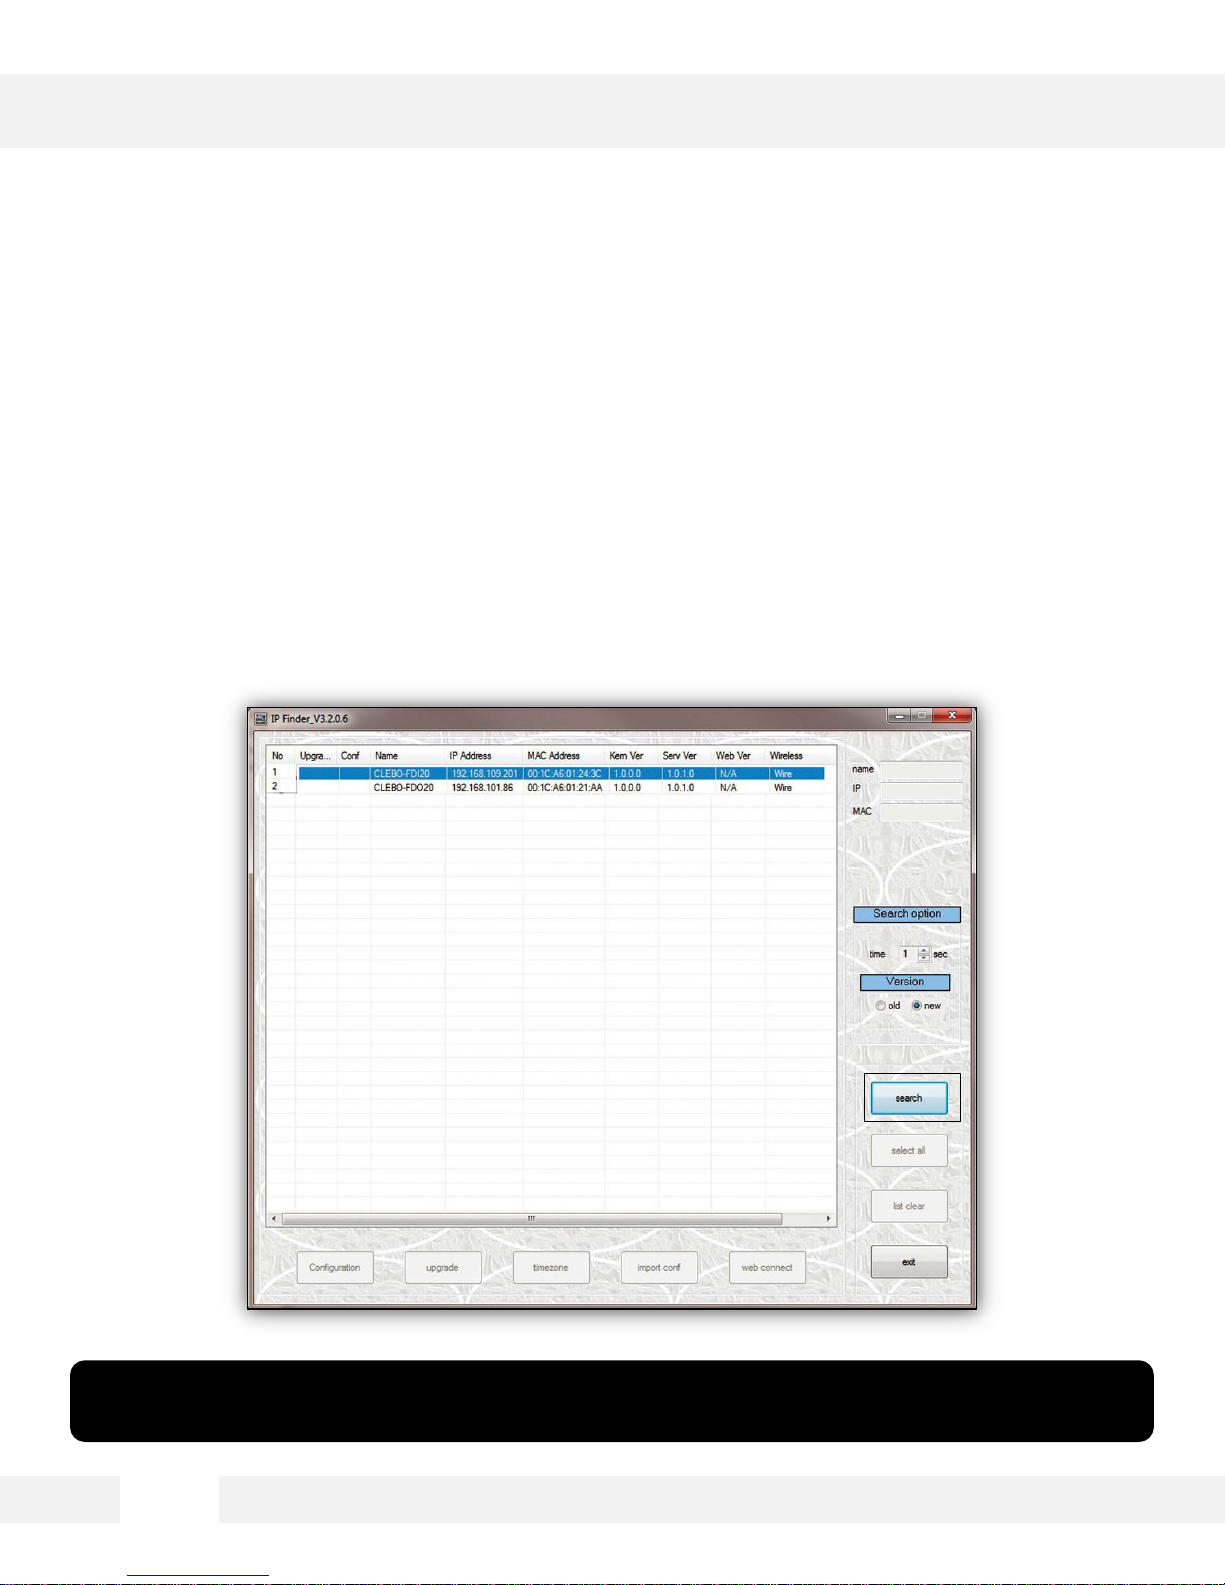
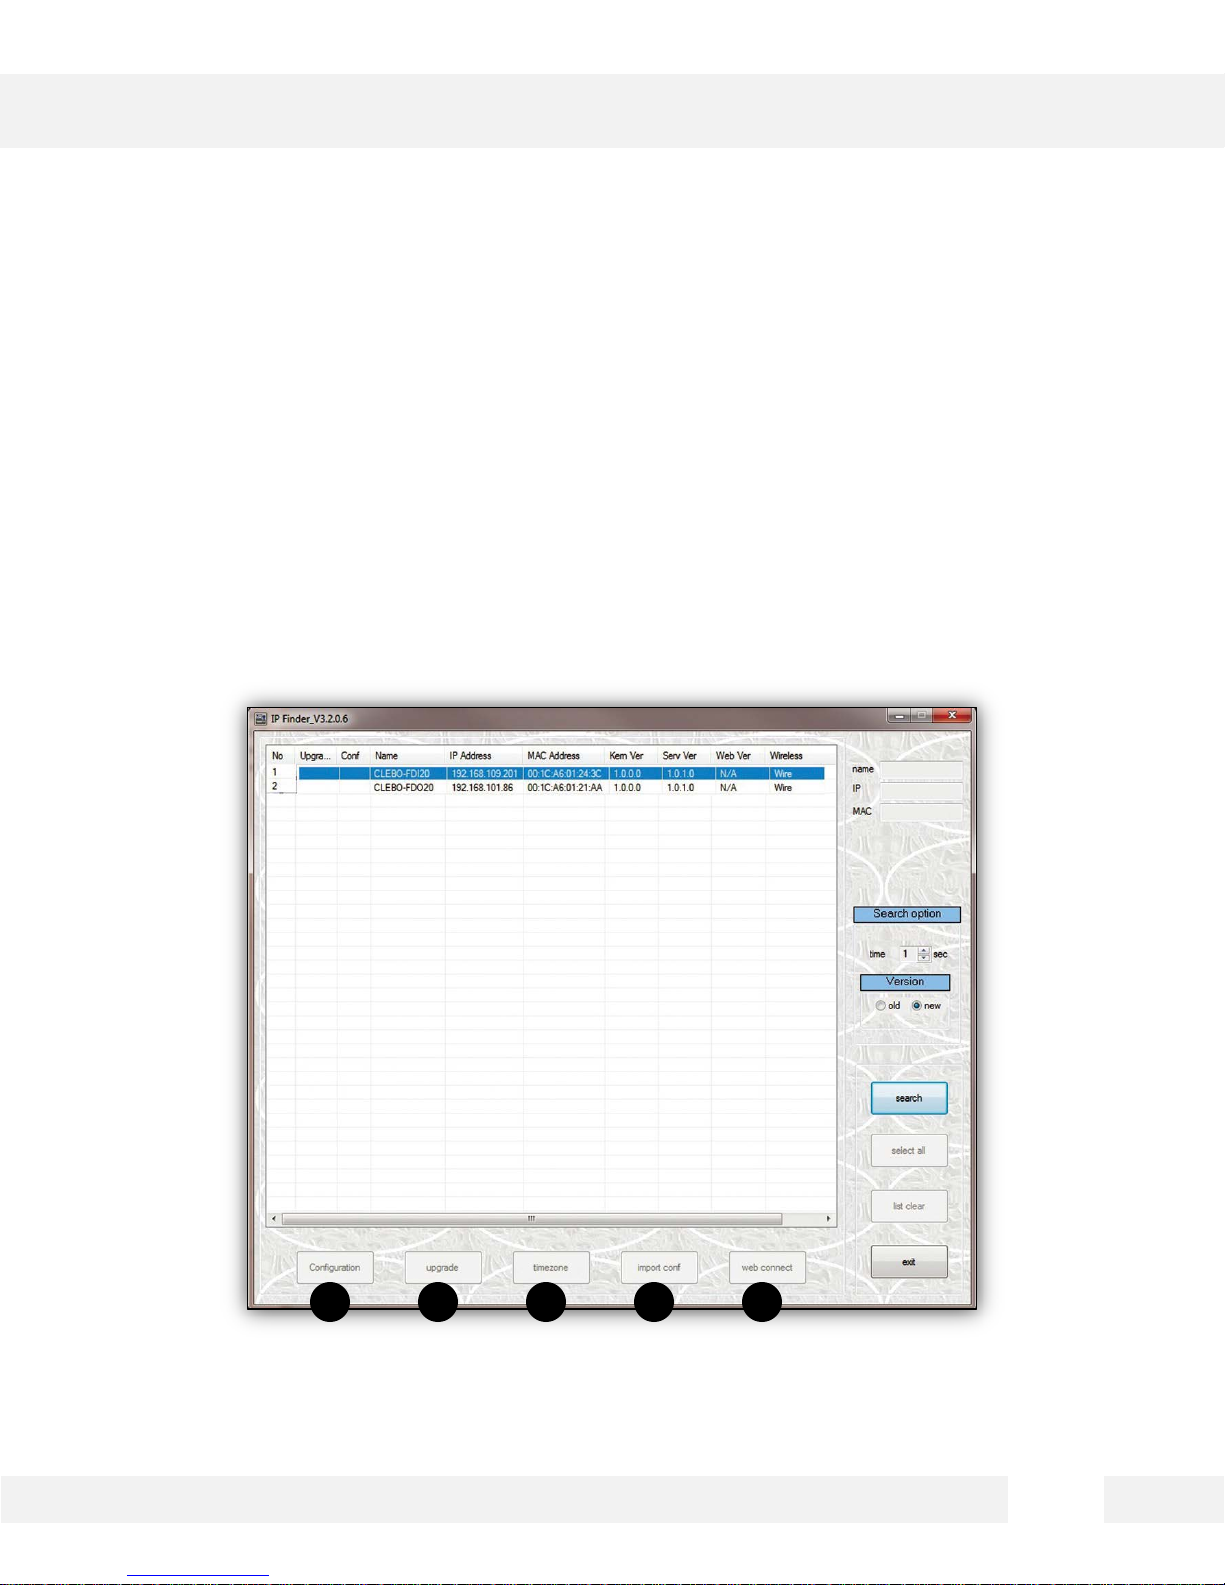
Using IP Finder Software
Use IP Finder to change the basic settings of your Clebo camera or to connect to your Clebo camera.
1. Configuration: Change the device’s connection type and/or IP address information. Please see the next page
for further explanation.
2. Upgrade: Upgrade the device’s firmware.
3. Time Zone: Change the time zone.
4. Import Config: Import setup configuration for a specific device.
5. Web Connect: Connect to the Clebo camera through Internet Explorer.
1 2 3 4 5
19
 Loading...