

Cleaver Scientific OmniPAGE Series, OmniPAGE Mini, omniPAGE Mini Wide, omniPAGE Maxi, omniPAGE VS30 Instruction Manual
Page 1
Version 1
OmniPAGE Vertical Electrophoresis Systems
OmniPAGE Mini
Instruction Manual
Catalogue No: CVS10D
CVS10DSYS
CVS10PRE
CVS10DSYS-CU
Page 2

Page 2
Table of Contents
Page
Section 1 Safety Information 3
1.1 Safety Precaution 3
Section 2 General Information 4
2.1 Introduction 4
2.2 Product Description 4
2.3 Packing Lists 5
2.4 Specifications 6
2.5 Care and Maintenance 7
Section 3 Operating Instructions 8
3.1 Setting up the omniPAGE Gel Tank 8
3.2 Gel casting 8
3.3 omniPAGE module assembly and Sample loading 13
3.4 Gel Running 14
3.5 Gel Removal 14
Section 4 Gel Preparation 14
4.1 Gel Selection 14
4.2 Volumes required per gel 15
4.3 Gel Preparation 16
4.4 Stacking Gel Preparation 16
4.5 Buffer Volume 17
4.6 Gel Running Conditions 17
4.7 Preparation of denatured protein samples for loading 18
4.8 Stock Solutions 19
Section 5 Trouble Shooting Guide 20
Section 6 Product Information 23
6.1 Catalogue numbers and product descriptions 23
6.2 Combs 24
6.3 Catalogue numbers and product descriptions for CSL Related products 26
Section 7 Warranty 27
Page 3

Page 3
Section 1 Safety Information
1.1 Safety Precaution
When used correctly, these units pose no health risk. However, these units can deliver dangerous levels of
electricity and are to be operated only by qualified personnel following the guidelines laid out in this
instruction manual. Anyone intending to use this equipment should read the complete manual thoroughly.
The unit must never be used without the safety lid correctly in position. The unit should not be used if there is
any sign of damage to the external tank or lid.
Acrylamide is a powerful neurotoxin in solution form. Polymerized gels can contain some unpolymerized
solution and protective gloves and clothing must be worn.
These units comply with the following European directives:
2006/95/CE Low Voltage Directive and 2014/30/UE (official Title 2004/108/EC) EMC Electromagnetic
Compatibility
By virtue of the following harmonised standards:
BS EN IEC 61010-1: 2010 Safety Testing of Lab Equipment
BS EN IEC 61326-1:2013 EMC Electro Magnetic Compatibility
Page 4

Page 4
Section 2 General Information
2.1 Introduction
Cleaver Scientifics’ omniPAGE range of Vertical Gel Units combines ease of use with high resolution
separations. Four sizes, Mini 10 x 10cm, Mini Wide 20 x 10cm and Maxi 20 x 20cm, VS 30 x 30cm share a host
of common features including a guaranteed leak proof seal required for trouble free, rapid and uncomplicated
gel casting. Utilising a built in gel running module eliminates time consuming transfer of glass plates during
casting, a process which can cause gel damage and misalignment. Glass plates with permanently bonded
spacers guarantee perfect spacer alignment. The glass plate sandwich is then simply inserted between
pressure bars and the new zero screw slide clamps clicked into position. This ensures fast set up times while
even pressure bars and ultra soft seals guarantee leak proof casting. Once the gel has polymerised, the gel
running module is just inserted into the gel tank for electrophoresis.
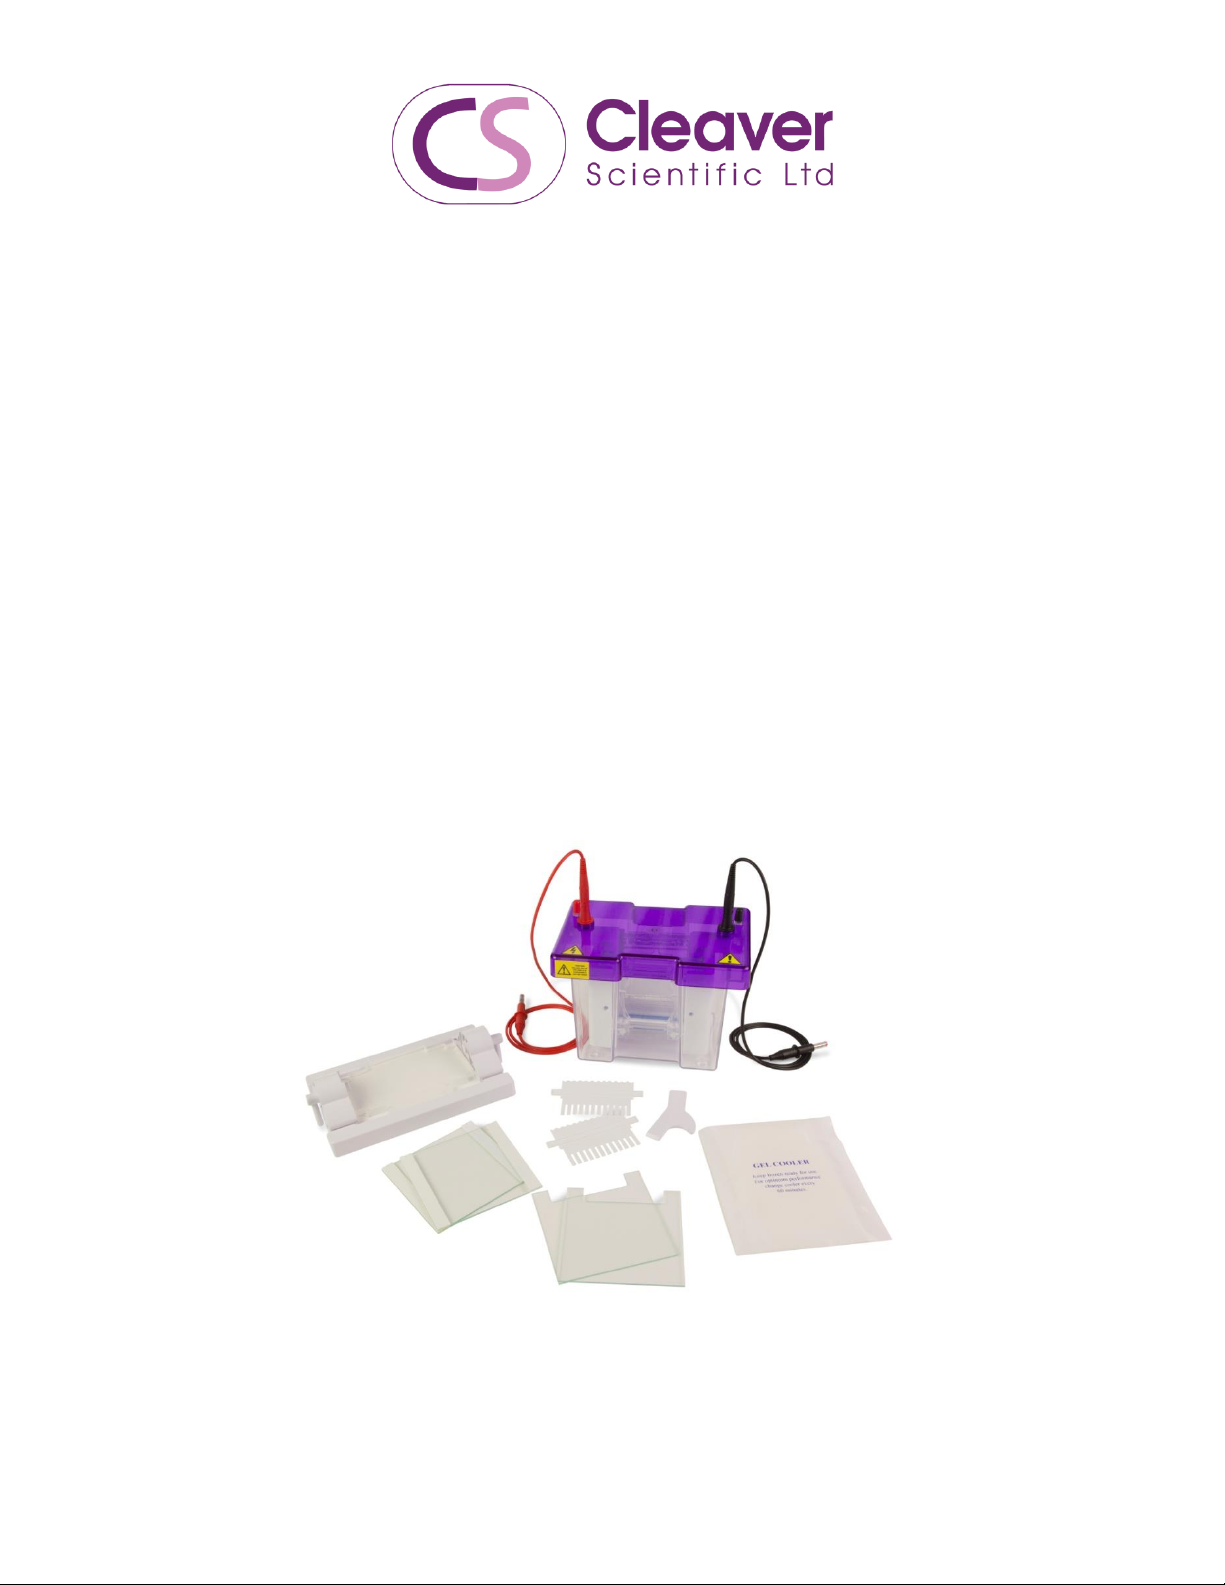
2.2 Product Description
Cleaver Scientifics’ vertical electrophoresis units comes as a complete package including Gel Tank, Safety Lid,
Gel Casting Inner Module, Glass plates with bonded spacers, Combs, Multipurpose Key, Power Cables and
Cooling pads. Detailed description of all the components is written below.
Gel Tank and Safety
Lid
Injection moulded gel tank and safety lid provides a sealed electrophoresis system
which is compatible with all major types of 8 X 10cm and 10 x 10cm precast gel. All
omniPAGE tanks are equipped with specially designed thumb locators for lifting up
the safety lid easily. All safety lids are designed to accommodate the polarity
design of the unit. They have special tapped holes which connect with the leading
edge of the power cables.
Inner Module
Injection moulded inner module gives a twofold effectiveness for gel casting and
running, thus no need of transferring the glass plates after casting the gel.
Glass Plates
2mm thick glass plates for the omniPAGE mini and 4mm thick glass plates for rest
of the range prevents breakage and have bonded spacers for convenience. All our
spacers are colour coded depending upon their thickness.
Multipurpose Key
CVS10KEY or the multipurpose key can be easily used to separate your notched
and plain glass plate to release the gel. The same key can be used to open the
CVS10 clamping doors.
Power Cables
Cleaver Scientifics’ power cables are designed with protective retractable
connectors which are compatible with most power supplies.
Cooling Pads
Rapid set up cooling packs enhance resolution eliminating the need of a chiller.
Combs with special
gel loading guides
Special combs (Combicombs) are designed with special oval shaped gel loading
guides on the other end of an ordinary comb which can be used.
Page 5
Page 5
2.3 Packing Lists
CVS10D, CVS10DSYS, CVS10PRE, CVS10DSYS-CU
Each unit includes a tank, lid, internal module, electrodes and the following accessories:
Glass Plates
Combs
Casting base
Cooling Pack
Cables
Screws
CVS10D
VS10NG – Notched,
Pk/2
VS10PGS1 – Plain with
bonded 1mm spacers,
Pk/2
VS10-DP – Dummy
Plate
2 of VS10-12-1
1mm thick, 12
sample
VS10ICB
CSL-CAB
VS10-SCREW x 4
CVS10DSYS
VS10NG – Notched,
Pk/2
VS10PGS1 – Plain with
bonded 1mm spacers,
Pk/2
VS10-DP – Dummy
Plate
2 of VS10-12-1
1mm thick, 12
sample
VS10DCAST
VS10DCASTM –
Mat
VS10ICB
CSL-CAB
VS10-SCREW x 4
CVS10PRE
VS10-DP – Dummy
Plate
VS10ICB
CSL-CAB
VS10-SCREW x 4
CVS10DYS-CU
See CVS10DYSYS
CVS10EXCASTER
See
CVS10DYSYS
See CVS10DYSYS
VS10ICB
CSL-CAB
VS10-SCREW x 4
Packing list checked by ________________________ Date ____________
The packing lists should be referred to as soon as the units are received to ensure that all components have
been included. The unit should be checked for damage when received.
Please contact your supplier if there are any problems or missing items.
Page 6

Page 6
2.4 Specifications of OmniPAGE Vertical Electrophoresis Units
omniPAGE Mini
omniPAGE Mini
Wide
omniPAGE Maxi
omniPAGE VS30
Plate
Dimensions
Gel Dimensions
(WxL)
10x10cm
7.5x8cm
20 X 10cm
18 X 8cm
20 X 20CM
16 X 17.5CM
30 X 22cm
28 X 20cm
Unit Dimensions
19x13x15cm
(W x D x H)
26 X 16 X 16cm
(W X D X H)
26 X 16 X 28CM
(W X D X H)
36 X 33 X 18CM
(W X H X D)
Max Sample
Capacity
80 Samples
20 Samples per Gel
192 Samples
48 Samples per Gel
192 Samples
48 Samples per Gel
300 Samples per
Run
75 Samples per Gel
Buffer Volume
Min 250ml,
Max 1200ml
Min 600ml
Max 2800ml
Min 1200ml
Max 5600ml
Min1800ml
Max 8400ml
Combs Available
No. of Teeth
Thickness
1, 5, 8MC, 9, 10,
12, 16MC, 20
0.75, 1, 1.5, 2mm
1, 5, 10, 18MC, 24,
30, 36MC, 48
0.75, 1, 1.5, 2mm
1, 5, 10, 18MC, 24,
30, 36MC, 48
0.75, 1, 1.5, 2mm
1, 2, 4, 28MC,
56MC, 75
0.25, 0.35, 0.5, 1,
1.5, 2.0mm
Environmental
Operating
Conditions
Maximum Altitude
2,000 m
Temperature
Range 4°C - 65°C
Humidity
Upto 80%
Not for outdoor
Use
Maximum Altitude
2,000 m
Temperature
Range 4°C - 65°C
Humidity
Upto 80%
Not for outdoor
Use
Maximum Altitude
2,000 m
Temperature
Range 4°C - 65°C
Humidity
Upto 80%
Not for outdoor
Use
Maximum Altitude
2,000 m
Temperature
Range 4°C - 65°C
Humidity
Upto 80%
Not for outdoor
Use
This apparatus is rated POLLUTION DEGREE 2 in accordance with IEC 664.
POLLUTION DEGREE 2, states that: “Normally only non-conductive pollution occurs.
Occasionally, however, a temporary conductivity caused by condensation must be expected”.
Page 7

Page 7
2.5 Care and Maintenance
Cleaning Large Format Vertical Units
Units are best cleaned using warm water and a mild detergent. Water at temperatures above 600 C can cause
damage to the unit and components.
The inner module should be thoroughly rinsed with warm water or distilled water to prevent buildup of salts
but care should be taken not to damage the enclosed electrode and vigorous cleaning is not necessary or
advised. Air drying preferably before use.
The units should only be cleaned with the following:
Warm water with a mild concentration of soap or other mild detergent.
Compatible detergents include dishwashing liquid, Hexane and Aliphatic hydrocarbons. The units should not
be left in detergents for more than 30 minutes.
The units should never come into contact with the following cleaning agents, these will cause irreversible
and accumulative damage:
Acetone, Phenol, Chloroform, Carbon tetrachloride, Methanol, Ethanol, Isopropyl alcohol, Alkalis.
RNase Decontamination
This can be performed using the following protocol:Clean the units with a mild detergent as described above.
Wash with 3% hydrogen peroxide (H2O2) for 10 minutes.
Rinsed with 0.1% DEPC- (diethyl pyrocarbonate) treated distilled water.
Caution: DEPC is a suspected carcinogen. Always take the necessary precautions when using. RNaseZAP™
(Ambion) can also be used. Please consult the instructions for use with acrylic gel tanks.
Page 8

Page 8
Section 3 Operating Instructions
3.1 Setting up the omniPAGE Gel Tank
Note: Before setting up the Gel Tank please ensure that it has been properly cleaned and dried.
1. Note the position of the lid on the unit. This shows the correct polarity and the correct orientation of the
cables, black is negative and red positive.
2. Remove the lid from the unit.
Note: If the lid is not removed, fitting the cables may result in un-tightening of the gold plug and damage
the electrode.
3. Screw the cables into the tapped holes as fully as possible so that there is no gap between the lid and the
leading edge of the cable fitting.
4. Refit the lid and the unit is now ready to be used.
3.2 Gel casting
Cleaning the Glass Plates
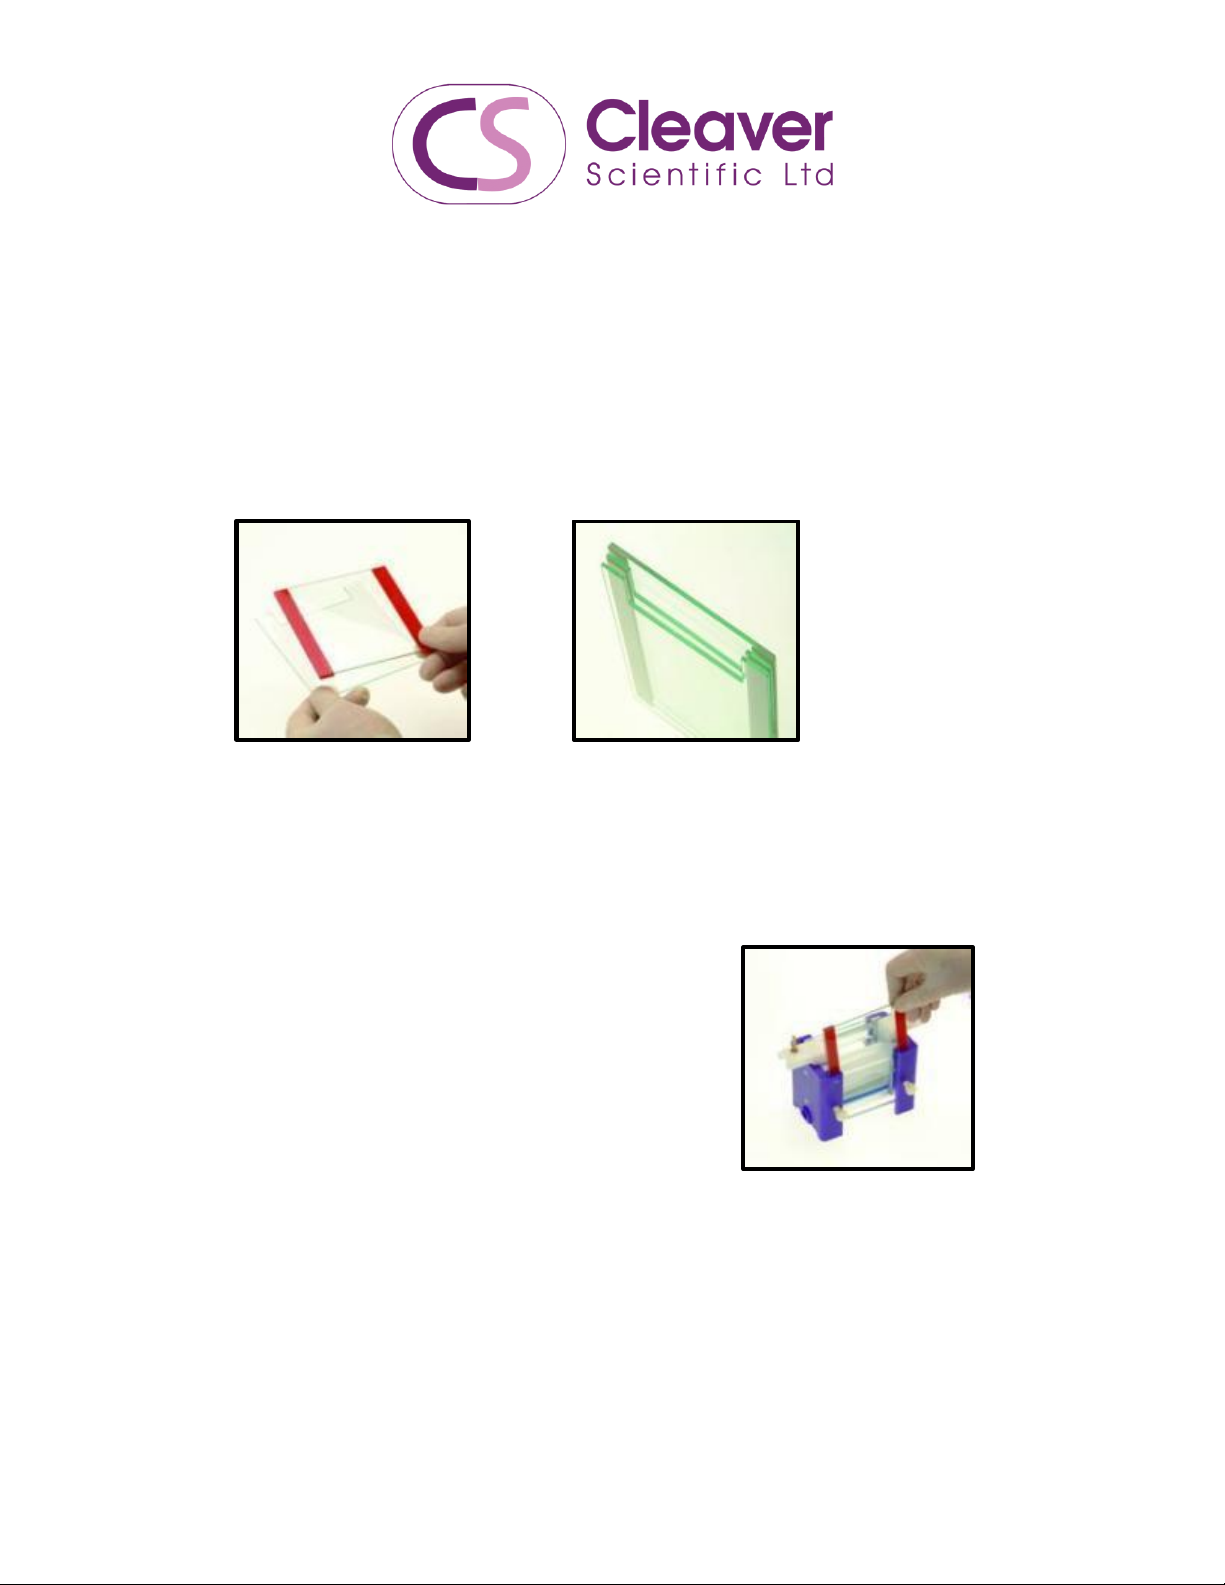
Clean a set of glass plates for each gel first with distilled water and then with 70 % ethanol.
One set of glass plates constitutes one notched glass plate and one plain glass plate with bonded spacers.
When using a triple glass plate sandwich, two notched glass plates are required, one set of free spacers and a
set of plain glass plates with bonded spacers. The plain glass plate is positioned outermost, then a notched
glass plate, free spacers and second notched glass plate. Alternatively, accessory notch glass plates with
bonded spacers are available.
Note: All glass plates, gel casting modules, casting base and accessories must be completely dry before the
set – up. Wet components are more likely to miss-align and cause leaks.
Page 9
Page 9
Glass cassette Assembly
Assemble the glass plates so that the bottom of the glass plates and the spacers are perfectly aligned.
For triple plate sandwiches, the free spacers Need to be perfectly aligned which is best performed using a
small spacer or comb to push the spacers apart. Notched glass plates with bonded spacers do not need
manual alignment.
NOTE: The glass plates with bonded spacers have an arrow in the top of the spacers which are slightly
longer than the glass plate to indicate the top.
Casting Stand Assembly
Position the Slab Gel Insert on a flat surface.
Insert the glass plates into the Slab Gel Insert
between the pressure bar and the blue gasket.
The Slab Gel Insert contains pressure bars
which impart even pressure onto the glass plates
and allow even screw pressure transfer onto the
sealing edge of the glass plate, ensuring complete sealing. Ensure that the pressure bars are adequately open
for the thickness of spacer used. The bar can be opened by loosening the screws or by sliding the clamps.
When using a triple glass plate sandwich, the pressure bars will need to be in the completely open position.
Then fully tighten the pressure bar screws in the order top then bottom.
Page 10

Page 10
Fully tighten the screw for the Mini vertical and the screws sequentially and in an even manner for the maxi
vertical in the order middle two, top then bottom, making sure not to wobble the unit. When using the Slide
Clamp Mini version, simply slide both gates outwards until fully tightened. When only one gel is being run, the
dummy plate must be used in the second position and fully tightened.
NOTE: At this stage, check that the bottom edges of the spacers and glass plates are perfectly aligned.
Position the Slab Gel Insert in the casting base such that the Cam pins have handles pointing downwards and
are located in the insert holes. The top of the GRM may need to be pushed down very slightly to locate the
cam pins.
With the cam pin handles facing directly downwards, turn the cam pins fully through 1800 or until the insert has
tightened onto the silicone mat.
SCREW VERSION
SCREW VERSION
SLIDING CLAMP VERSION
SLIDING CLAMP VERSION
Page 11

Page 11
NOTE: It is best to turn the cams in opposite directions to each other. Do not overturn as this will cause the
glass plates to push upwards and the assembly will be more likely to leak. The unit is now ready for gel
preparation and pouring.
Always reverse the silicone mat after casting to avoid indentations from persisting. Never leave the casting
up-stand with glass plates tightened into the casting base for long periods of time as this will also cause
indentations in the silicone mat.
The slide clamp version CVS10 also includes screws. This system can be used either with the slide clamps or
screws as preferred by the user. For those that prefer to use the screws rather than clamps, the screws can
be simply inserted into the screw holes. The clamps can be removed by placing each clamp in the fully open
position and gently bending the clamp upwards from the slanted end. The holding pin will then slowly
release and the clamp can be removed.
Gel Pouring
Casting a gel with stacking layer
1. Place a comb into the gel cassette assembly with any gel and mark the glass plate below the comb teeth.
This is the reference level to which the resolving gel should be poured.
2. Prepare the resolving gel solution. Mix well and avoid generating air bubbles.
3. Fill the glass plates smoothly till the mark avoiding generating any air bubbles. Filling must be performed
quickly before the TEMED causes the gel to become too viscous.
4. Overlay the gel extremely carefully with 1 ml of Isobutanol, Isopropanol or distilled water. When using
distilled water extra care must be taken to ensure there is no mixing with the gel solution.
5. Let the resolving gel polymerize. Usually this takes around 15 to 30 minutes but this can vary due to the
freshness of the reagents used. If polymerization is taken a lot longer than this, use fresher stock solutions
or add more APS and TEMED.
Page 12

Page 12
6. Let the resolving gel polymerize. Usually this takes around 15 to 30 minutes but this can vary due to the
freshness of the reagents used. If polymerization is taken a lot longer than this, use fresher stock solutions
or add more APS and TEMED.
7. Prepare the stacking gel solution.
8. Before casting the stacking gel, insert a piece of filter paper to dry the area in between the glass plates
above the resolving gel. Take care not to touch the surface of the gel.
9. Carefully pour the stacking gel solution, avoiding generating air bubbles.
10. Carefully insert the comb making sure that no air bubbles get trapped under the ends of the comb teeth as
these will inhibit sample progression.
11. Allow the stacking gel polymerize.
12. Once the gel is polymerized it is ready for the electrophoresis run.
Casting a gel without stacking layer
1. Prepare the resolving gel solution. Mix well and avoid generating air bubbles.
2. Pour the solution smoothly into the glass plates avoiding any air bubbles until the top of the notched glass
plate is reached.
3. Carefully insert the comb making sure that no air bubbles get trapped under the ends of the comb teeth as
these will inhibit sample progression.
4. Let the gel polymerize. Usually this takes from 15 to 30 minutes but this can vary due to the freshness of
the reagents used. If polymerization is taken a lot longer than this, use fresher stock solutions or add more
APS and TEMED.
5. Once the gel is polymerized it is ready for the electrophoresis run.
Page 13

Page 13
Using Precast Gels
1. omniPAGE mini is compatible with all the precast gels available in the market.
2. Simply remove the precast gel from the storage pouch.
3. Gently remove the comb.
4. Keep the Inner module upstand on a flat surface and place the precast gel between the pressure bar and
the blue gasket.
3.3 omniPAGE module assembly and Sample loading
1. If desired, fit the cooling pack(s) into the end of the tank. These should be pre-frozen and fitted with the
longest side positioned sideways with the end(s) of the tank and pressed into the recess. Or these can be
fitted down the front of the tank.
Note: NEVER FIT THESE UNDERNEATH THE MODULE IN THE BOTTOM OF THE TANK AS THIS WILL PREVENT
THE FLOW OF CURRENT THROUGH THE GEL AND CAUSE SLOW RUNS AND OVER-HEATING.
Note one pack is supplied as standard. Additional packs can be purchased.
2. Transfer the Inner gel module containing cast gels into the main tank in the correct orientation as
indicated - +ve on the module aligned with +ve on the tank, -ve on the module aligned with –ve on the
tank.
3. Fill the outer tank with 1 x reservoir buffer. See Page 22 for recommended running buffer solution. Table 7 shows
the volume of buffer required.
4. Load the samples into the wells using a pipette tip taking care not to damage the wells or induce any air bubbles.
5. Fill any unused wells with 1 X sample buffer.
6. It is a good idea to note the orientation and order the samples were loaded in. This can be done by noting which
samples were loaded adjacent to each electrode.
Page 14

Page 14
3.4 Gel Running
1. Fit the lid and connect to a power supply.
2. Consult Table 8 for details on recommended power supply voltage settings.
3.5 Gel Removal
1. Turn the power supply off when the loading dye reaches the bottom of the gel, sooner if your proteins are
below 4Kd in size.
2. Remove the gel running module, first emptying the inner buffer into the main tank. Buffer can be re-used
but this may affect run quality if continued.
3. Unscrew the glass plates with the Screw version. To open the sliding door version insert the CVS10KEY into
the recess arch of the clamping door. Twist key applying pressure to both the clamping door and the
CVS10D side cheek. The door will now click open. Repeat this process until you have opened both the
doors.
4. Remove the glass plates. Then using CSLKEY separate notched and the plain glass plates. Place the wedged
end of the key between the two plates and gently twist until the plates pull apart. The gel will usually stick
to one of the plates and can be removed by first soaking in buffer and then gently lifting with a spatula.
5. The gel is now ready to be stained with Coomassie or silver stain or the proteins in the gel can be
transferred to a membrane by electroblotting for specific band identification and further analysis.
Section 4 Gel Preparation
4.1 Gel Selection
Care should be taken when selecting the pore size of the gel to be used. The pore size or % of gel determines
the resolving ability given different sizes of protein.
Page 15

Page 15
See Table 1 below explaining which percentage of gel to use to separate the sizes of proteins indicated.
Table 1 Acrylamide percentages
Acrylamide Percentage
Separating
Resolution
5 %
60 - 220 KD
7.5 %
30 - 120 KD
10 %
20 - 75 KD
12%
17 – 65 KD
15 %
15 -45 KD
17.5%
12 – 30 KD
4.2 Volumes required per gel
Table 2 shows the total amount of gel solution required.
omniPAGE Mini
CVS10D, CVS10DSYS, CVSPRE, CVS10DSYS-CU
Number of gels
Gel Thickness
(mm)
Volume (ml)
Single – one gel, one
dummy plate
O.5
1.0
1.5
2.0
3.8
7.5
11.3
15.0
Double – two gels
O.5
1.0
1.5
2.0
7.5
15.0
22.5
30.0
Using a Triple Plate
sandwich – four gels
O.5
1.0
1.5
2.0
10.0
30.0
45.0
60.0
Page 16

Page 16
4.3 Gel Preparation
Prepare gel solutions as per tables below. These give the volumes of solutions from the standard stock
solutions. These should be gently mixed avoiding generation of bubbles which will inhibit polymerization by
removing free radicals.
Table 3 Preparation of the separating gel solution for two 10 x 10cm CVS10D gels using 1 mm spacers.
Solution
5 %
7.5%
10 %
12%
15 %
17.5%
Distilled Water
8.7ml
7.5ml
6.3ml
5.25ml
3.75ml
2.5ml
30 % Stock Acrylamide
Solution
2.5ml
3.75ml
5ml
6ml
7.5ml
8.75ml
4 X Resolving Tris Solution
3.75ml
3.75ml
3.75ml
3.75ml
3.75ml
3.75ml
10 % Ammonium Persulphate
150µl
150µl
150µl
150µl
150µl
150µl
Add 15µl of TEMED to the resolving gel solution for CVS10D sized gels.
4.4 Stacking Gel Preparation
Table 4 A guide to preparing the stacking gel
Solution
CVS10D
Distilled Water
4.2ml
30 % Stock Acrylamide Solution
0.65ml
4 X Stacking Gel Tris Solution
1.6ml
10 % Ammonium Persulphate
67µl
Page 17

Page 17
4.5 Buffer Volume
Table 5 Buffer Volumes
Buffer Volume
CVS10D
Minimum – Inner tank is filled to above the wells. Outer Tank is
filled to just flood the bottom of the glass plates. Cooling
potential is at a minimum which may affect resolution.
250ml
500ml
Maximum – Inner tank is filled to above the wells. Outer Tank is
filled to the maximum fill line. Cooling is high offering good
resolution of samples.
1200ml
2.8 Litres
Using the cooling packs – Inner tank is filled to above the wells.
Cooling packs are inserted behind the gels. Outer Tank is filled to
the maximum fill line. Cooling is at a maximum.
1000ml
2.3 Litres
4.6 Gel Running Conditions
Table 6 Gel Running Conditions
Recommended Voltages and Resultant Current for 1mm thick, 12%
gels.
CVS10D
One gel
90-225V
20-45mA
Two gels
90-225V
40-90mA
Three gels
90-225V
60-135mA
Four gels
90-225V
80-180mA
Page 18

Page 18
4.7 Preparation of denatured protein samples for loading
The instructions given below are for denatured samples. For Native samples, please consult a laboratory
handbook.
1. Prepare the protein samples for loading. The volume of sample depends on the capacity of the wells (See
Comb specifications section 6.2).
2. Using a 0.5 ml micro-centrifuge tube or other convenient receptacle, combine the protein sample and 4 X
sample buffer. It is always advisable to use protein markers in one of the end lanes to indicate sizes of
bands. These should be prepared according to the manufacturer’s instructions.
3. Heat the samples in a water bath or heating block for 2 minutes to denature the samples.
4. Centrifuge the samples in a micro-centrifuge for 20 seconds at 12,000 rpm. The protein samples are now
ready to load.
Page 19

Page 19
4.8 Stock Solutions (For SDS PAGE gels)
Stock 30% Acrylamide Gel Solution:
30.0 g acrylamide
0.8 g methylene bisacrylamide
Distilled Water to 100ml
Stock 4 X Resolving Gel Tris (1.5 M Tris.HCl pH8.8, 0.4 % SDS)
To 110ml Distilled Water add 36.4 g of Tris base
Add 8ml of 10 % SDS
Adjust pH to 8.8 with 1N HCl
Adjust the final volume to 200ml with Distilled Water.
Stock 4 X Stacking Tris (0.5 M Tris.HCL pH6.8, 0.4 % SDS)
To 110ml Distilled Water add 12.12 g of Tris base
Add 8ml of 10 % SDS
Adjust pH to 6.8 with 1N HCl
Add Distilled Water to a final volume of 200ml
Stock 4 X Tris-glycine tank buffer - SDS
36 g Tris base
172.8 g glycine
Distilled Water to 3 L
1 x Tris-glycine tank buffer - SDS
750ml of 4 X Tris-glycine reservoir buffer - SDS
30ml of 10 % SDS
Distilled Water to 3L
10 % AP (ammonium persulphate solution)
0.1 g ammonium persulphate
1ml Distilled Water
TEMED Stock 4 X Sample Buffer
4ml glycerol
2ml 2-mercaptoethanol
1.2 g SDS
5ml 4 X Stacking Tris
0.03 g Bromophenol blue
Aliquot into 1.5ml micro centrifuge tubes. Store at -20°C.
Page 20

Page 20
Section 5 Troubleshooting Guide
Problem: Sample Preparation
Cause
Solution
Laemmil sample buffer turns yellow
Sample buffer too acidic
Add Tris base until buffer turns blue again.
Sample very viscous
High DNA or carbohydrate content
Fragment DNA with ultrasonic waves during cell
lysis and protein solubilization.
Add endonucleases (for each benzonases).
Precipitate protein with TCA/acetone to diminish
carbohydrate content.
Problem: Gel casting and
sample loading
Cause
Solution
Poor well formation
Incorrect catalyst used
Monomer solution not degassed
(oxygen inhibits polymerization)
Prepare Fresh catalyst solution.
Increase catalyst concentration of stacking gel to
0.06% APS and 0.12% TEMED.
Degas monomer solution immediately prior to
casting stacking gel.
Webbing; excess acrylamide behind
the comb
Incorrect catalyst concentration
Prepare fresh catalyst solution.
Increase catalyst concentration of stacking gel to
0.06% APS and 0.12% TEMED.
Gel does not polymerize
Too little or too much APS or TEMED
Failure to degas
Temperature too low
Poor quality acrylamide or bis
Old APS
Use 0.0.05% APS and 0.05% TEMED.
Degas monomer solutions 10-15min.
Cast at room temperature, warming glass plates if
necessary.
Use electrophoreses-grade reagents
Prepare fresh APS.
Swirls in the gel
Excess catalysts; polymerization time
< 10min
Gel inhibition; polymerization time
>2hr
Reduce APS and TEMED by 25% each.
Increase APS and TEMED by 50%; degas.
Gel feels soft
Low %T
Poor quality acrylamide or bis
Too little cross-linker
Use different %T.
Use electrophoresis- grade reagents.
Use correct %C.
Gel turns white
Bis concentration too high
Check solutions or weights.
Gel brittle
Cross-linker too high
Use correct % cross-linker
Sample floats out of the well
Sample is not dense enough
Pipetting, loading error
Induce 10% glycerol in sample to make it denser
than surrounding buffer.
Slowly pipet sample into well. Do not squirt sample
quickly into well as it may bounce off bottom or
sides and flow into next well. Do not pipet tip from
well before last of sample has left the tip.
Page 21

Page 21
Problem: Electrophoresis
Cause
Solution
Current zero or less than expected
and samples do not migrate into gel
Tape at the bottom of precast gel
cassette not removed
Insufficient buffer in inner buffer
chamber
Insufficient buffer in outer buffer
chamber
Electrical disconnection
Remove tape.
Fill buffer chamber with running buffer.
Fill inner and outer buffer chambers to ensure
wells are completely covered.
Check electrodes and connections.
Gels run faster than expected
Running buffer too concentrated and
gel temperature too high; incorrect
running buffer concentration or type
used
Running or reservoir buffer too
dilute
Voltage too high
Check buffer composition and type.
Check buffer protocol and concentrate if
necessary.
Decrease voltage by 25-50%.
Gels run slower than expected
Incorrect running buffer composition
or type
Excessive salt in sample
Check buffer composition and type.
Desalt sample.
Buffer leaking from inner chamber
Incomplete gasket seal
Set up again with sliding clamps tighter.
Problem: Total Protein
Staining
Cause
Solution
Bands not visible
No protein in gel
Imaging system malfunctioning
Incorrect imaging parameters were
used
Stain with another method to confirm there is
protein.
Check instrument manual for troubleshooting or
contact imaging instrument manufacturer.
Check Instrument manual.
Poor staining sensitivity
Dirty staining trays
Insufficient stain volume
Insufficient staining time
Reuse of staining solution
Clean staining trays and other equipment with
laboratory glassware cleaner.
Follow recommendations for stain volume
(appropriate to gel size).
Increase staining time.
Repeat staining protocol with fresh staining
solution.
High or uneven background staining
Staining trays or equipment dirty
Too much time in staining solution
Reagent impurities
Clean staining trays and other equipment with
laboratory glassware cleaner.
Restrict duration of incubation in staining solutions
as recommended in protocol.
Wash gel in water or retrospective destaining
solution for >30min.
Use high-purity water and reagents for staining.
Speckles or blotches in gel image
Particulate material from reagents,
staining tray, dust or gloves
Clean staining trays thoroughly.
Decrease time that gels and staining solution are
exposed to open air.
Use dust-free gloves and handle gels only by
edges.
Uneven staining
Insufficient shaking during staining
Agitate gel during staining.
Gel shrinkage
Gel dehyrated
Transfer gel to water for rehydration.
Page 22

Page 22
Problem: Evaluation of
Separation
Cause
Solution
Diffuse or broad bands
Poor quality acrylamide or bisacrylamide incomplete
polymerization
Old SDS or sample buffer
Gel temperature too high
Use electrophoresis-grade reagents.
Check polymerization conditions.
Prepare fresh solutions.
Use external cooling during run or run out a lower
voltage.
Bands ‘smile’ across gel, band
pattern curves upward at both sides
of gel
Excess heating of gel; center of gel
runs hotter than either end
Power conditions excessive
Insufficient buffer
Check buffer compostion; buffer not mixed well, or
buffer in upper chamber too concentrated.
Prepare new buffer, ensuring thoroughly mixing,
especially when diluting 5x or 10x stock.
Do not exceed recommended running conditions.
Decrease power setting from 200V to 150V or fill
lower chamber to within 1cm of top of short plate.
Fill inner and outer buffer chambers to ensure that
wells are completely covered.
Smiling or frowning bands with gel
lane
Overloaded proteins
Sample preparation/ buffer issues
Incorrect running conditions
Load less protein.
Minimize salts, detergents and solvents in sample
preparation and sample buffers.
Use correct voltage.
Skewed or distrorted bands, lateral
band spreading
Excess salt in samples
Ionic strength of sample lower than
that of gel
Insufficient sample buffer or wrong
formulation
Diffusion prior to turning on current
Diffusion during migration through
stacking gel
Uneven gel interface
Remove salts, from sample by dialysis or desalting
column prior to sample preparation.
Use same buffer in samples as in gel.
Check buffer composition and dilution
instructions.
Minimize time between sample application and
power startup.
Increase %T of stacking gel to 4.5% or 5%T.
Increase current by 25% during stacking.
Decrease polymerization rate.
Overlay gels carefully.
Rinse wells after removing comb to remove
residual acylamide.
Vertical streaking
Overloaded samples
Sample precipitation
Dilute sample.
Selectively remove predominant protein in sample
(fractionate).
Reduce voltage by 25% to minimize streaking.
Centrifuge samples to remove particulate prior to
sample loading.
Dilute sample in sample buffer.
Fuzzy or spurious artefactual bands
Concentration of reducing agent too
low
Use 5% BME or 1% DTT.
Protein bands do not migrate down
as expected
Bands of interest may be neutral or
positively charged in buffer used; pH
of bands must be -2pH units more
negative than pH of running buffer
Use SDS-PAGE or a different buffer system in
native PAGE or IEF.
Page 23

Page 23
Section 6 Product Information
6.1 Catalogue numbers and product descriptions
Catalogue No.
Product description
CVS10D
omniPAGE Mini, 10 x 10cm Dual, 2 sets of Glass Plates, 1mm thick bonded Spacers, 2 x 12
sample, 1mm thick combs. CLAMP VERSION
CVS10DSYS
omniPAGE Mini, 10 x 10cm Dual, 2 sets of Glass Plates, 1mm thick bonded Spacers, 2 x 12
sample, 1mm thick combs including caster. CLAMP VERSION
CVS10PRE
omniPAGE Mini, 10 x 10cm Dual. No accessories. CLAMP VERSION
CVS10DSYS-CU
omniPAGE Mini, 10 x 10cm Dual, 2 sets of Glass Plates, 1mm thick bonded Spacers, 2 x 12
sample, 1mm thick combs including caster. CLAMP VERSION, External casting upstand
CVS10EXCASTER
External Casting Stand - No Casting Base
CVS10EXCASTERSYS
External Casting System - Upstand+ Base
VS10DCAST
10 x 10cm Casting Base
VS10DCASTM
Replacement Silicone Mat for 10 x 10cm Casting Base
CVS10DIRM
Inner Running Module
VS10ICB
Mini Cooling Pack
VS10NG
10 x 10cm Notched Glass Plates 2mm thick (pk/2)
VS10PG
10 x 10cm Plain Glass Plates 2mm thick (pk/2)
VS10NGS0.75
10 x 10cm Notched Glass Plates with 0.75mm Bonded Spacers (pk/2)
VS10PGS0.75
10 x 10cm Plain Glass Plates with 0.75mm Bonded Spacers (pk/2)
VS10NGS1
10 x 10cm Notched Glass Plates with 1mm Bonded Spacers (pk/2)
VS10PGS1
10 x 10cm Plain Glass Plates with 1mm Bonded Spacers (pk/2)
VS10NGS1.5
10 x 10cm Notched Glass Plates with 1.5mm Bonded Spacers (pk/2)
VS10PGS1.5
10 x 10cm Plain Glass Plates with 1.5mm Bonded Spacers (pk/2)
VS10NGS2
10 x 10cm Notched Glass Plates with 2mm Bonded Spacers (pk/2)
VS10PGS2
10 x 10cm Plain Glass Plates with 2mm Bonded Spacers (pk/2)
VS10DP
Dummy Plate, 10 x 10cm
VS10S0.75
10cm Spacers - 0.75mm (pk/2)
Page 24

Page 24
VS10S1
10cm Spacers - 1mm thick (pk/2)
VS10S1.5
10cm Spacers - 1.5mm thick (pk/2)
VS10S2
10cm Spacers - 2mm thick (pk/2)
RPW-0.2
Replacement Platinum Wire - 0.2mm, 50cm
Multiple Minigel Casting
CSL-6CAST
6 gel caster for 8 x 10cm or 10 x 10cm gels
CSL-12CAST
12 gel caster for 8 x 10cm or 10 x 10cm gels
CSL-24CAST
24 gel caster for 8 x 10cm or 10 x 10cm gels
6.2 Combs – MC Denotes Multi Channel Pipette compatible
Code
Description
Sample Volume µl for a 5mm thick gel
VS10-1-0.75
Comb 1 Prep, 1 Marker, 0.75mm thick
500
VS10-5-0.75
Comb 5 sample, 0.75mm thick
70
VS10-8MC-0.75
Comb 8 sample MC, 0.75mm thick
40
VS10-9-0.75
Comb 9 sample, 0.75mm thick
35
VS10-12-0.75
Comb 12 sample, 0.75mm thick
25
VS10-16MC-0.75
Comb 16 sample MC, 0.75mm thick
20
VS10-20-0.75
Comb 20 sample, 0.75mm thick
15
VS10-1-1
Comb 1 Prep, 1 Marker, 1mm thick
650
VS10-5-1
Comb 5 sample, 1mm thick
100
VS10-8MC-1
Comb 8 sample MC, 1mm thick
60
VS10-9-1
Comb 9 sample, 1mm thick
50
VS10-10-1
Comb 10 sample, 1mm thick
40
VS10-12-1
Comb 12 sample, 1mm thick
35
VS10-16MC-1
Comb 16 sample MC, 1mm thick
25
VS10-20-1
Comb 20 sample, 1mm thick
20
VS10-1-1.5
Comb 1 Prep, 1 Marker, 1.5mm thick
1000
VS10-5-1.5
Comb 5 sample, 1.5mm thick
140
VS10-8MC-1.5
Comb 8 sample MC, 1.5mm thick
80
VS10-9-1.5
Comb 9 sample, 1.5mm thick
70
VS10-10-1.5
Comb 10 sample, 1.5mm thick
30
VS10-12-1.5
Comb 12 sample, 1.5mm thick
50
Page 25

Page 25
VS10-16MC-1.5
Comb 16 sample MC, 1.5mm thick
40
VS10-20-1.5
Comb 20 sample, 1.5mm thick
30
VS10-1-2
Comb 1 Prep, 1 Marker, 2mm thick
1300
VS10-5-2
Comb 5 sample, 2mm thick
200
VS10-8MC-2
Comb 8 sample MC, 2mm thick
120
VS10-9-2
2 Comb 9 sample, 2mm thick 100
100
VS10-10-2
Comb 10 sample, 2mm thick
80
VS10-12-2
Comb 12 sample, 2mm thick
70
VS10-16MC-2
Comb 16 sample MC, 2mm thick
50
VS10-20-2
Comb 20 sample, 2mm thick
40
Page 26

Page 26
6.3 Catalogue numbers and product descriptions for CSL Related Products
Catalogue No.
Product description
CSL-PPL
CSL Pink Plus Prestained Protein Ladder, 10-175kDa, with 10, 40 & 90kDa reference
bands, 1x 500μL vial.
CSL-BBL
CSL BLUE Wide Range Prestained Protein Ladder, 10-245kDa, with 25 & 75kDa
reference bands, 1x 500μL vial.
CSL-TGSDSP
Powdered Tris-Glycine-SDS Running buffer - 10 Pouches(10 litres/pk)
CSL-TGP
Powdered Tris-Glycine Running buffer - 10 Pouches(10 litres/pk)
CSL-TTSDSP
Powdered Tris-TRICINE-SDS Running buffer - 10 Pouches(10 litres/pk)
CSL-MSDSP
Powdered MOPS-SDS buffer Running buffer - 10 Pouches(10 litres/pk)
TG10X1L
Cleaver Buffer Tris-Glycerine 10 x 1litre
TG10x5L
Cleaver Buffer Tris-Glycerine 10 x 5litre
TG-SDS10X1L
Cleaver Buffer Tris-Glycerine SDS 10 x 1litre
TG-SDS10X5L
Cleaver Buffer Tris-Glycerine SDS 10 x 5litre
CSL-GELX4
4mm x 1mm, Gel Cutting Tips, 250/ bag
CSL-GELX4RACK
4mm x 1mm, Gel Cutting Tips, 5 racks of 48
CSL-GELX6.5
6.5mm x 1mm, Gel Cutting Tips, 250/ bag
CSL-GELX6.5RACK
6.5mm x 1mm, Gel Cutting Tips, 5 racks of 48
CS-300V
OmniPAC, MIDI 300V 700mA 150W - 110/230V
CS-500V
OmniPAC, MAXI 500V 400mA 200W - 110/230V
VS10BI
OmniBlot Mini Insert - including 4 cassettes, 16 foam pads
VS10DCi
omniPAGE Mini Tube Gel Insert - including 10 glass tubes
OMNIDOCIPROSAFE
OMNIDOC-i plus Blue LED Epi-illumination Module (OMNIDOC-BL), and 520, 560 & 580nm filters (OMNIDOCSYBR, -AF560 & -AF580); and White Light Table (OMNIDOC-WLT)
CVS10CBS
Complete system for Mini Vertical Electrophoresis & Blotting including: Vertical unit, Blotting insert &
accessories. CLAMP VERSION.
SB10
OmniBlot Mini, 10 x 10cm Blotting System, including 4 cassettes
SB20
OmniBlot Maxi, 20 x 20cm Blotting System, including 4 cassettes
CV20
Cleaver Pipette - Volume; 2 - 20ul
CSLVORTEX
Cleaver Vortex Mixer with general purpose head, 230V
CSLQSPIN
Mini Centrifuge complete with 1.5/2.0 ml rotor, strip tube rotor, 0.5 and 0.4 ml adapters, 230V, Purple lid
TCDB-01
The Cube Dry Bath Incubator (one block unit); without block 220V
CSL-UVCAB
UV sterilisation cabinet with timer, four UV lights and white light, no Tray - 230V
SD20
Semi Dry Maxi, 20 x 20cm System
VS10WD
omniPAGE Mini Wide, 20 x 10cm Dual, 2 sets of Glass Plates with 1mm thick bonded Spacers, 2 x 24 sample,
1mm thick combs, cooling pack
VS10WDSYS
omniPAGE Mini Wide, 20 x 10cm Dual, 2 sets of Glass Plates with 1mm thick bonded Spacers, 2 x 24 sample,
1mm thick combs, cooling pack including caster
VS10WDSYS-CU
omniPAGE Mini Wide, 20 x 10cm Dual, 2 sets of Glass Plates, 1mm thick bonded Spacers, 2 x 24 sample, 1mm
thick combs including caster, External casting upstand
VS20WAVESYS
VS20WAVE Maxi, 20 x 20cm Dual with Glass Plates with bonded 1mm thick spacers, 2x 24
sample combs, cooling coil, dummy plate and Casting Base
VS20WAVESYS-CU
VS20WAVE Maxi, 20 x 20cm Dual, 2 sets of Glass Plates, 1mm thick bonded Spacers, 2 x 24 sample, 1mm thick
combs, cooling coil, dummy plate;includes caster and External casting upstand
VS20WAVE-EC
VS20WAVE External Casting Stand - No Casting Base
Page 27

Page 27
Section 7 Warranty
The Cleaver Scientific Ltd. (CSL) Electrophoresis units have a warranty against manufacturing and material faults of
twelve months from date of customer receipt.
If any defects occur during this warranty period, CSL will repair or replace the defective parts free of charge.
This warranty does not cover defects occurring by accident or misuse or defects caused by improper operation.
Units where repair or modification has been performed by anyone other than CSL or an appointed distributor or
representative are no longer under warranty from the time the unit was modified.
Units which have accessories or repaired parts not supplied by CSL or its associated distributors have invalidated
warranty.
CSL cannot repair or replace free of charge units where improper solutions or chemicals have been used. For a list of
these please see the Care and Maintenance subsection.
If a problem does occur then please contact your supplier or CSL:
Cleaver Scientific Ltd.
Unit 41
Somers Road Industrial Estate
Rugby
Warwickshire
CV22 7DH
Tel: +44 (0)1788 565300
Fax: +44 (0)1788 552822
Email: info@cleaverscientific.com
Record the following for your records:
Model __________________________
Catalogue No. ____________________
Date of Delivery __________________
Warranty Period __________________
Serial No. _______________________
Invoice No. ______________________
Purchase Order No. _______________
 Loading...