

Page 1
1
gelLITE manual
Page 2

2
Contents
Chapter One- Introduction....................................................................................
1.1 Applications supported.....................................................................
1.2 Hardware..........................................................................................
1.2.1 Specifications...................................................................................
1.2.2 System Components..................................................................................
1.2.2.1 Darkroom..........................................................................................
1.2.2.2 UV transilluminator...........................................................................
1.2.2.3 Filter Draw........................................................................................
1.2.3 Accessories......................................................................................
1.2.3.1 Blue and Visible Light Converters....................................................
1.2.3.2 proBLUEVIEW LED transilluminator................................................
1.2.3.3 Thermal Printer................................................................................
1.2.3.4 Analysis Software......................................................................................
1.2.4 Set-up..............................................................................................
1.2.4.1 Installing genePIX Image Capture Software..................................
1.2.4.2 Minimum system requirements.......................................................
1.2.4.3 Software Installation........................................................................
1.2.4.4 Installation of hardware information................................................
1.2.4.5 Select Destination Location.............................................................
1.2.4.6 Select Start Menu folder..................................................................
1.2.4.7 Device Driver Installation wizard.....................................................
1.3 Enabling secure user accounts.......................................................
1.4 Setting up hardware........................................................................
Chapter Two- Auto Capture and Manual Image Acquisition.............................
2.0 Auto Capture..................................................................................
2.0.1 Sample Selection............................................................................
2.0.2 Dye Selection..................................................................................
2.0.3 Protocol Selection...........................................................................
2.0.4 Sample Positioning..........................................................................
2.0.5 Capture Screen...............................................................................
2.1 Capturing an image of an agarose EtBr or similar gel.....................
2.2 Capturing an image of protein gel (Coomassie, sliver stained) or
other white light image (colony plate, Microtitre plate
etc.).................................................................................................
2.3 Manual Capture..............................................................................
Chapter Three-Exporting, Saving and Printing Images....................................
3.1 Saving Images................................................................................
3.1.1 Saving Annotations.........................................................................
3.2 Printing Images...............................................................................
3.3 Exporting images to geneQUANT analysis software.....................
Chapter Four- Browse, Edit and View Screens..................................................
4.1 Edit Screen.....................................................................................
4.2 Annotation Tools.............................................................................
4.3 Image Rotation..............................................................................
4
4
4
4
5
5
6
6
6
6
6
6
6
7
7
7
7
7
9
9
10
10
11
13
13
14
14
14
14
14
14
16
20
25
26
26
26
27
28
28
28
31
Page 3

3
4.4 Image Source................................................................................
4.5 Saturation Button..........................................................................
4.6 Enhancement Tools......................................................................
4.7 3D view.........................................................................................
4.8 View Images screen......................................................................
4.9 Load Images screen.....................................................................
Chapter Five- Configurations.............................................................................
5.1 Saving Configurations...................................................................
5.1.1 Saving Configurations in Autocapture mode................................
5.1.2 Saving Configurations in Manual mode.......................................
5.1.3 Opening Configurations................................................................
Chapter Six- Troubleshooting and General Information................................
6.1 Technical Information....................................................................
6.2 Technical Assistance....................................................................
6.3 Troubleshooting............................................................................
Glossary..............................................................................................................
31
32
32
33
36
38
40
40
40
41
41
42
42
42
43
44
Page 4

4
Chapter One- Introduction
The gelLITE system supports multiple applications including DNA/RNA gel
imaging such as EtBr, SYBR Gold, UltraSafe Blue, RunSAFE and visible stained
gels i.e. Coomassie blue and silver stain.
The gelLITE gel imaging system is a dedicated UV transilluminator-based system
with a small footprint. The gelLITE image capture software genePIX has been
designed for ease of use and is application driven.
gelLITE is the perfect choice for a low budget gel documentation system. It
features a compact darkroom which has a sliding front door and an internal white
light.
1.1 Applications supported
Transilluminator
UV
White Light Pad
Blue LED
Transilluminator
Ethidium Bromide
RunSAFE
SYBR Green
SYBR Gold
SYBR Safe
Gel Green
Gel Red
RubyPRO
SYPRO Ruby
UltraSafe Blue
Coomassie blue stain
Copper stain
Zinc stain
Silver stain
RunSAFE
GelGreen
SYBR Gold
SYBR Green
SYBR Safe
UltraSafe Blue
1.2 Hardware
1.2.1 Specification
Camera
3.0MP, 12/16 bit
Filter holder
Yes (UV filter as standard)
Max gel size
20x20cm
Data types
SGD, BMP, TIFF and JPEG
CMOS resolution
3.0M pixels
Image storage
USB, hard disk and network capabilities
Image enhancements
Annotation, rotation, inversion and many
more
Illumination
Slide in and out UV transilluminator, Epi
white LED light. Blue LED transilluminator
Page 5

5
1.2.2 System components
1.2.2.1 Darkroom
The darkroom has a sliding door. The darkroom features:
• Slide out mid wave 302nm UV transilluminator
• Internal LED white light
• Safety switch to protect from accidental UV exposure
LENS
Superior zoom lens for
exceptional image quality
CAMERA
CMOS Digital camera
• USB2 connection
FILTER DRAWER
Use a range of filters for
extensive choice of
fluorescent applications
SAFETY SWITCH
Protects from accidental
UV exposure when opening
the door
INTERNAL WHITE LIGHT
For sample positioning and
focusing
TRANSILLUMINATOR (option)
For UV, visible light and blue light
• UV transilluminator slides in
and out of darkroom
• Blue LED light (Ultraslim LED)
‒ sits on a slide in and
out tray
SLIDING DOOR
Space saving sliding door
Page 6
6
1.2.2.2 UV transilluminator
The UV transilluminator will excite many fluorescent stains such as Ethidium
bromide, RunSAFE, SYBR™ stains, Gel Red™. The standard wavelength is
302nm. The transilluminator can be slid easily in and out of the cabinet.
1.2.2.3 Filter Draw
Interchange a range of filters for extensive choice of fluorescent applications.
1.2.3 Accessories
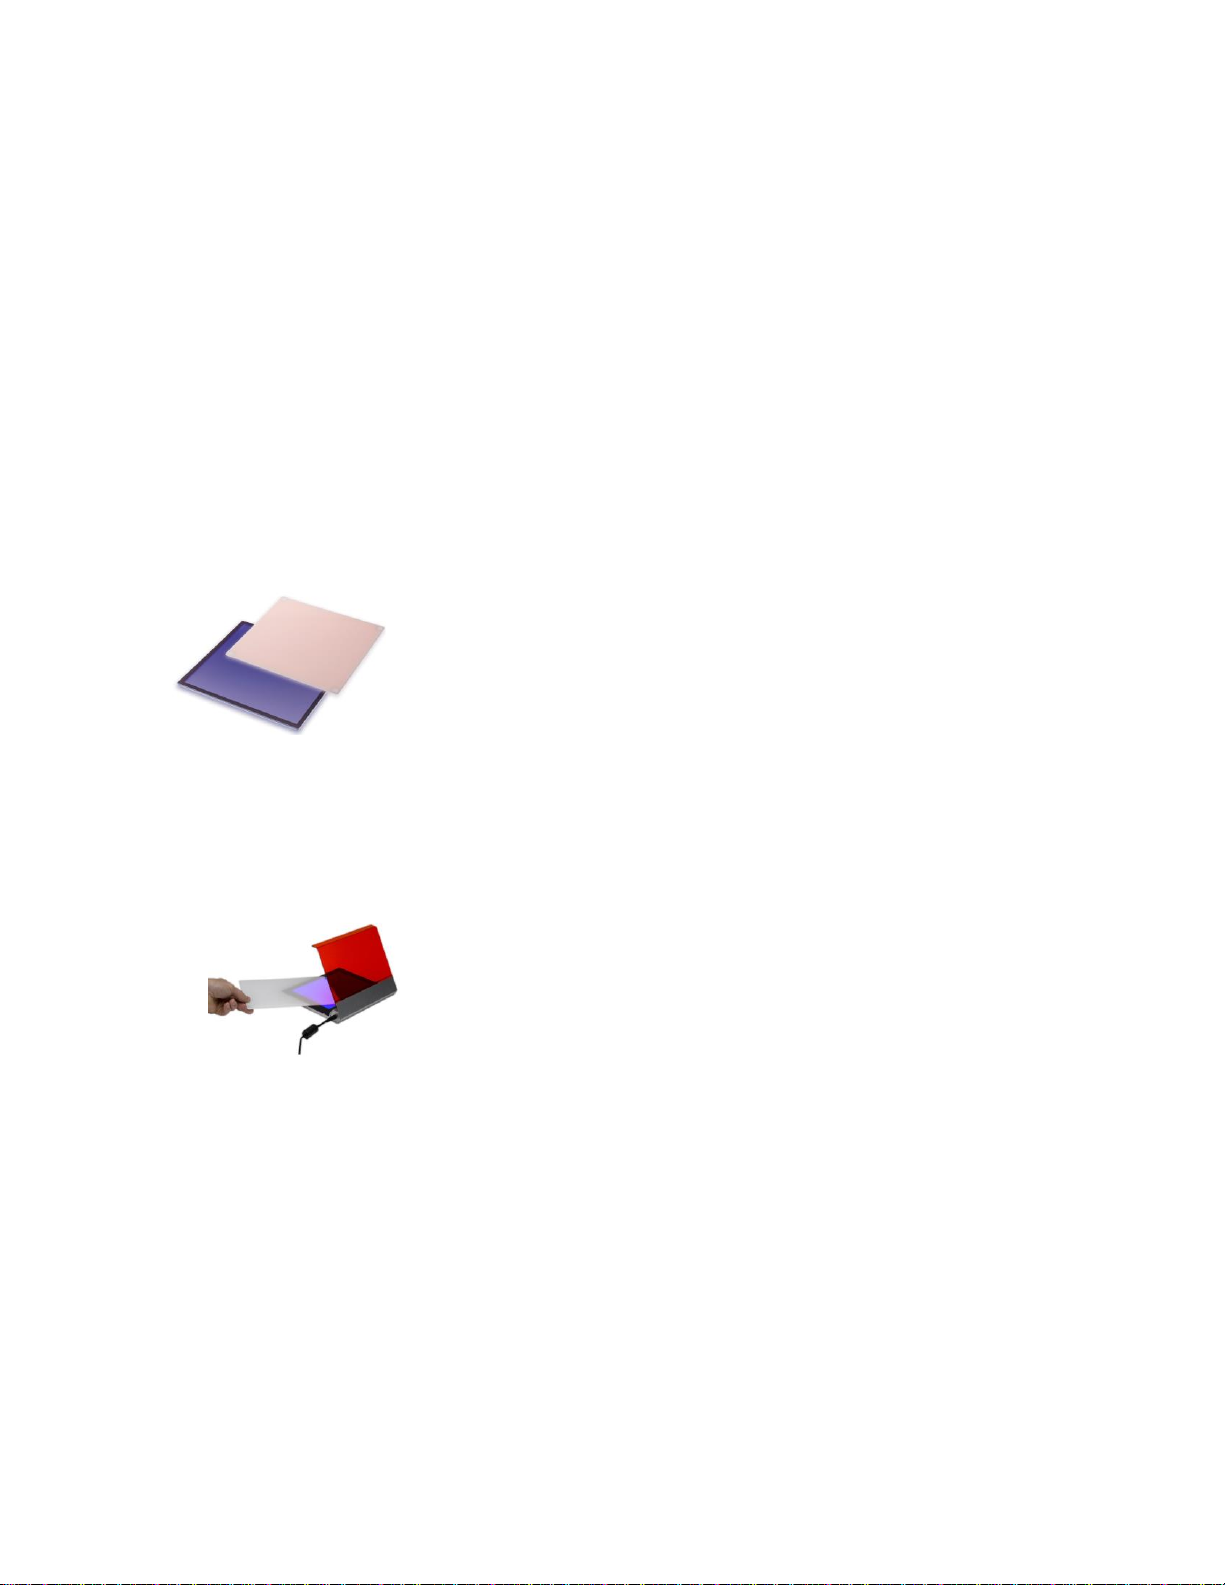
1.2.3.1 Blue and Visible light converters
Cleaver Scientific offer blue and visible light converters that
can be placed on top of the UV transilluminator for imaging
DNA gels stained with fluorescent stains such as RunSAFE,
SYBR Safe, Gold and Green, GelGreen and UltraSafe blue
as well as protein gels stained with colorimetric stains such
as Coomassie and Silver stains
1.2.3.2 proBLUEVIEW transilluminator
The proBLUEVIEW transilluminator is ideal for safely
imaging DNA gels stained with fluorescent stains such as
RunSAFE, SYBR Safe, Gold and Green, GelGreen and
UltraSafe blue as well as protein gels stained with
Coomassie, Silver stains.
1.2.3.3 Thermal printer
You may connect a thermal printer CSL-PRINTUSB Mitsubishi USB Thermal
Printer P95DW directly to the PC/laptop and install the software following
manufacturer recommendation to print straight after image acquisition.
1.2.3.4 Analysis software
The gelLITE system is supplied with a copy of geneQUANT analysis software
from Cleaver Scientific. This may be loaded on a PC of your choice from the USB
memory stick supplied with the system.
Page 7

7
1.2.4 Set-up
Please refer to the Installation quick guide on how to set up the camera and
darkroom.
1.2.4.1 Installing genePIX image capture software
1.2.4.2 Minimum system requirements
genePIX can operate on the following Operating Systems Windows XP
Professional SP3 (32 bit version only) or Windows 7 Professional, Window 8
Professional and Window 10 Professional.
Please note that Home versions of Windows operating systems are not
supported.
1.2.4.3 Software Installation
This section provides information regarding the installation of genePIX image
capture software.
You will need to install the software from an account that has Administrator
rights.
Installation is performed in the following sequence
1. Hardware Information
2. Select destination location
3. Select Start Menu Folder
4. Device Driver Installation Wizard
1.2.4.4 Installation of Hardware Information
Insert the USB memory stick supplied with the system and install and run the
genePIX set-up program on a PC/laptop.
Page 8

8
Click ‘Next’
Select from the list the hardware that you have then click ‘Next’
Specify CFR settings you would like to enable. If you are not working within a
CFR compliant environment leave all boxes unchecked. Click ‘Next’
Page 9
9
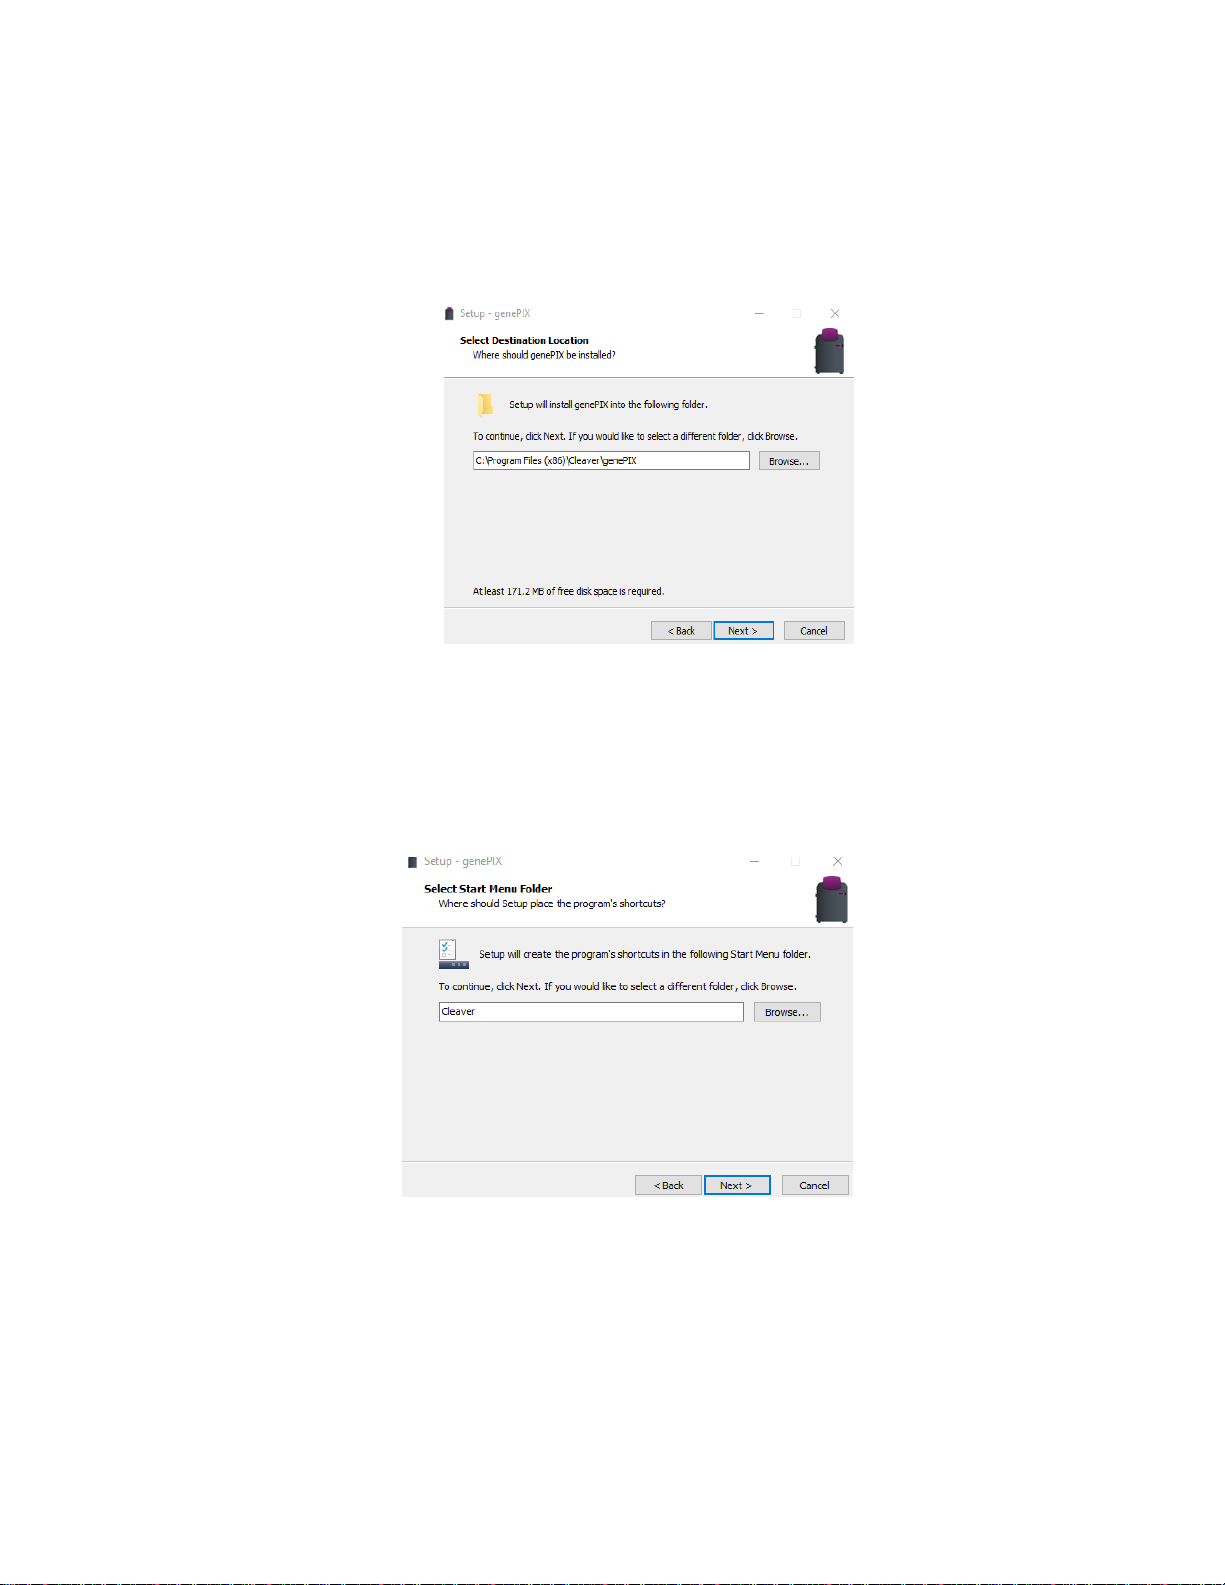
1.2.4.5 Select Destination Location
Please select the folder in which you would like genePIX to be installed. Select
Browse to explore more folder options. Click ‘Next’
1.2.4.6 Select Start Menu Folder
Please select where you would like to create the shortcuts for the program. To
select a different folder click the browse button. Click ‘Next’.
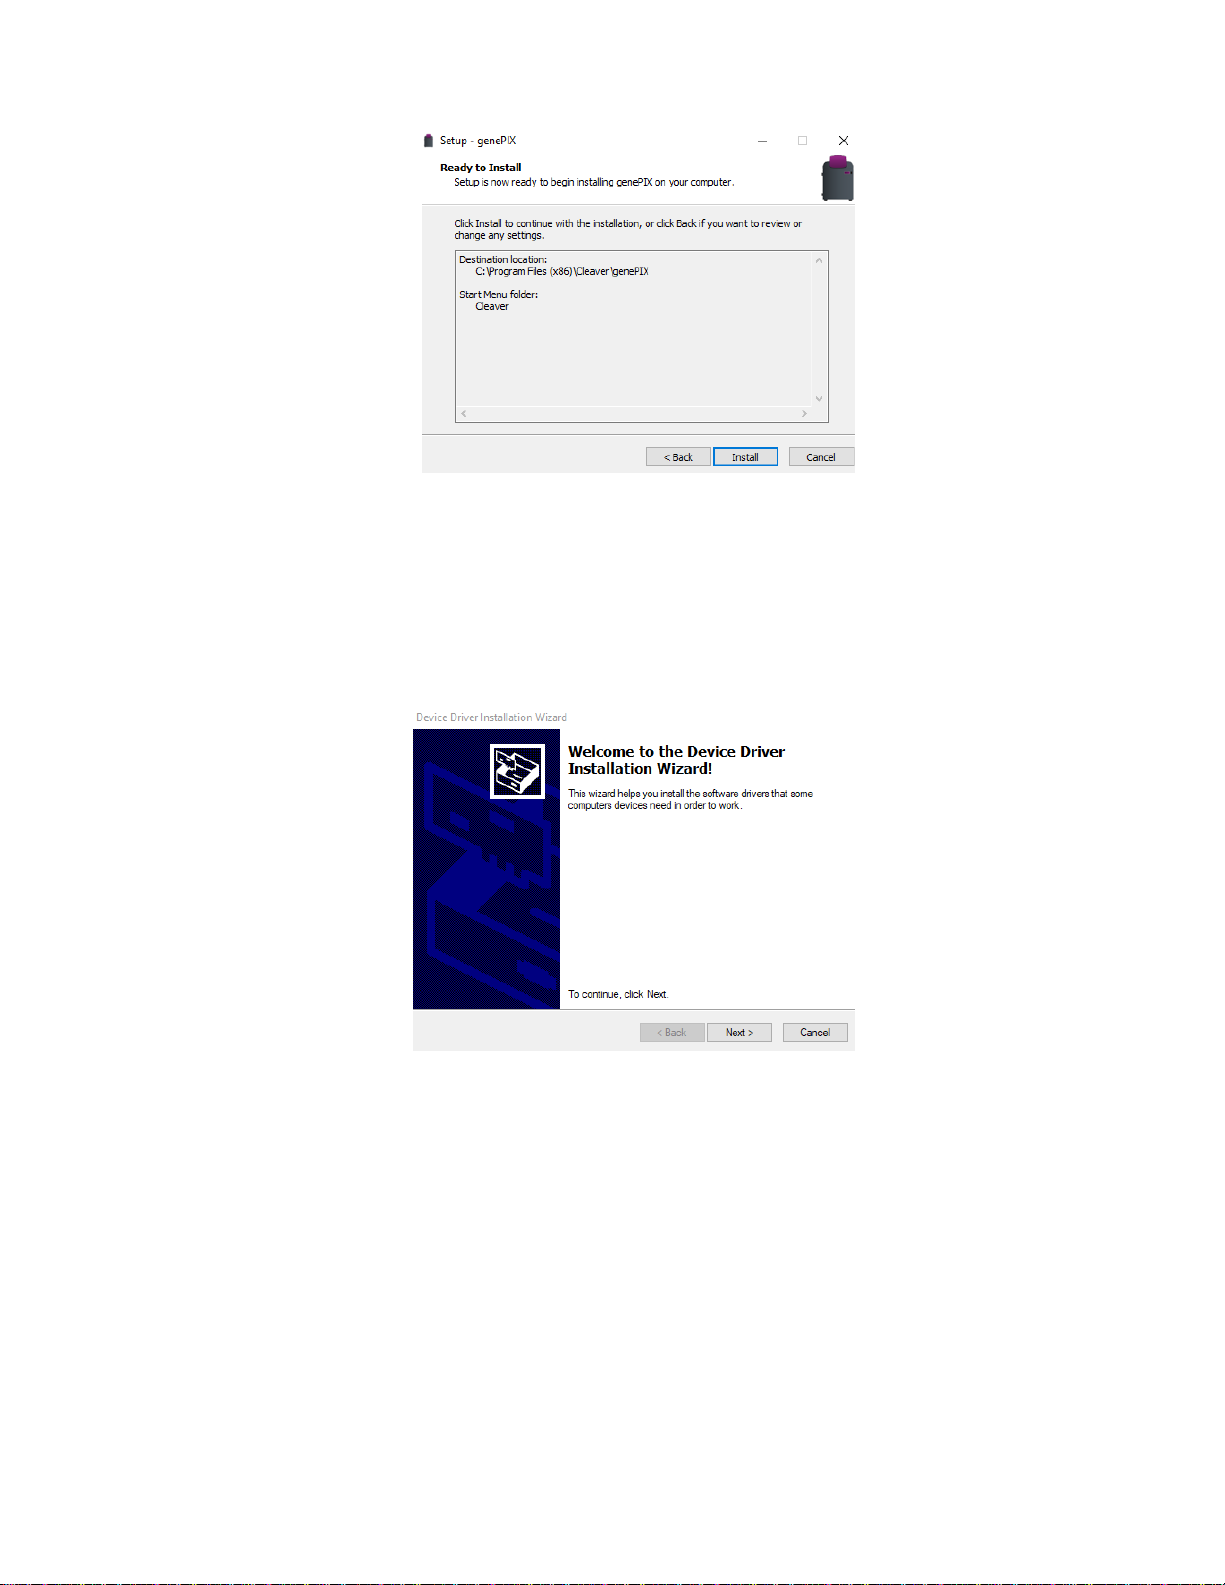
The software is now ready to install. Click ‘Install’ to continue the Installation
process. Click ‘Finish’ to complete the software set up.
Page 10
10
1.2.4.7 Device Driver Installation Wizard
This wizard will now install the software drivers that some computer devices need
in order to complete the installation. Click ‘Next’.
Click ’Finish’ to complete the Device Driver Installation Wizard.
1.3 Enabling secure user accounts
To enable a secure user account you must use your Microsoft Windows account
log in. Secure user accounts provide you with the full functionality of the software
but will only show the configurations set up by you or the configurations which
have been made public.
Page 11

11
1.4 Setting up hardware
When using genePIX software for the first time or when you have purchased
additional accessories such as converter screens you need to tell genePIX
software this information.
To enter this information click on the ‘View available hardware’ icon
from the home page. Once this information has been entered by
selecting the appropriate buttons the selected items will turn purple.
Ensure that you click Save.
Figure 1- Hardware page
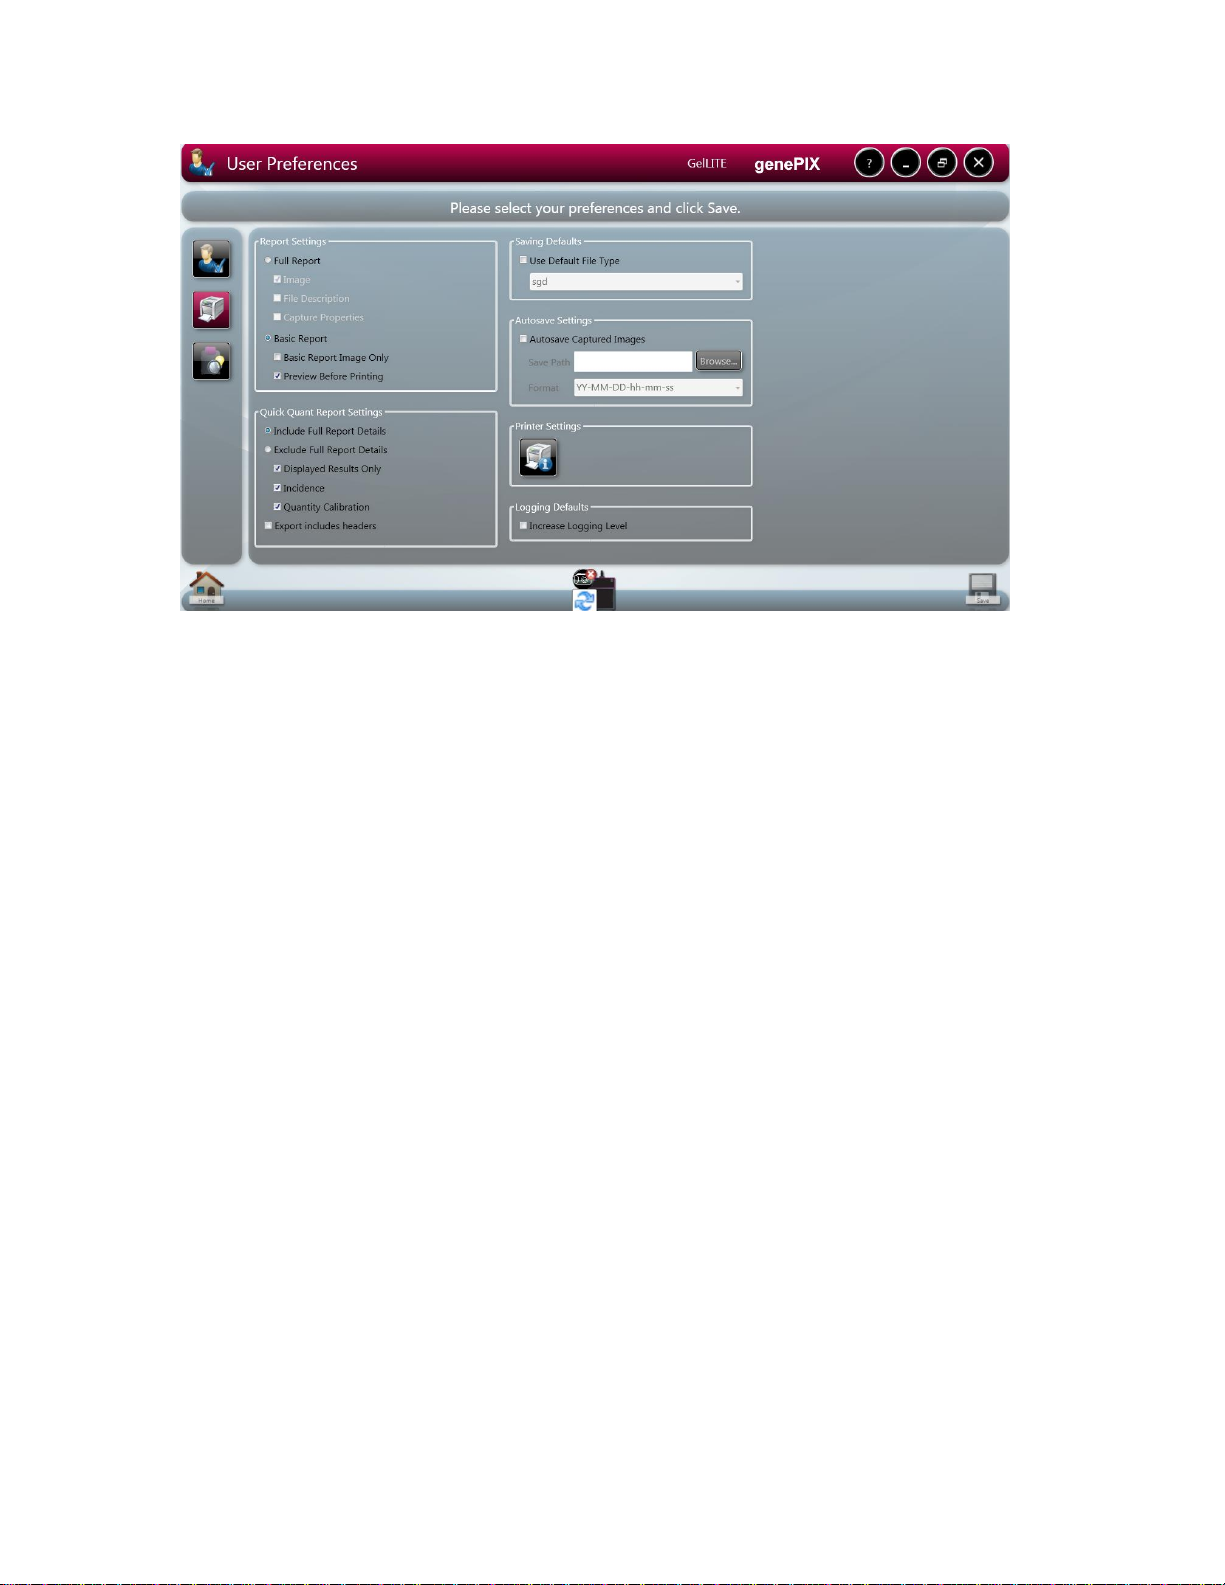
You can select your preferences on the type of report settings that you would
like. You can select to view or print the full report (Image, File description and
capture properties) or the basic report (image and capture settings).
To change the settings of the printer use this icon.
genePIX software default setting for captured images is to save them as a .sgd
file type. If you prefer you can select from the drop down list to change the saving
default to any of the following file types Tif, Tif-compressed, bmp and jpg.
You can also select to remove screen prompts for converter screens,
automatically hide light and filter messages, reset dynamic field data and select
your regional power frequency.
Page 12
12
Figure 2- User Preferences page
Page 13
13
Chapter Two- Auto Capture and Manual Image
Acquisition
2.0 Auto Capture
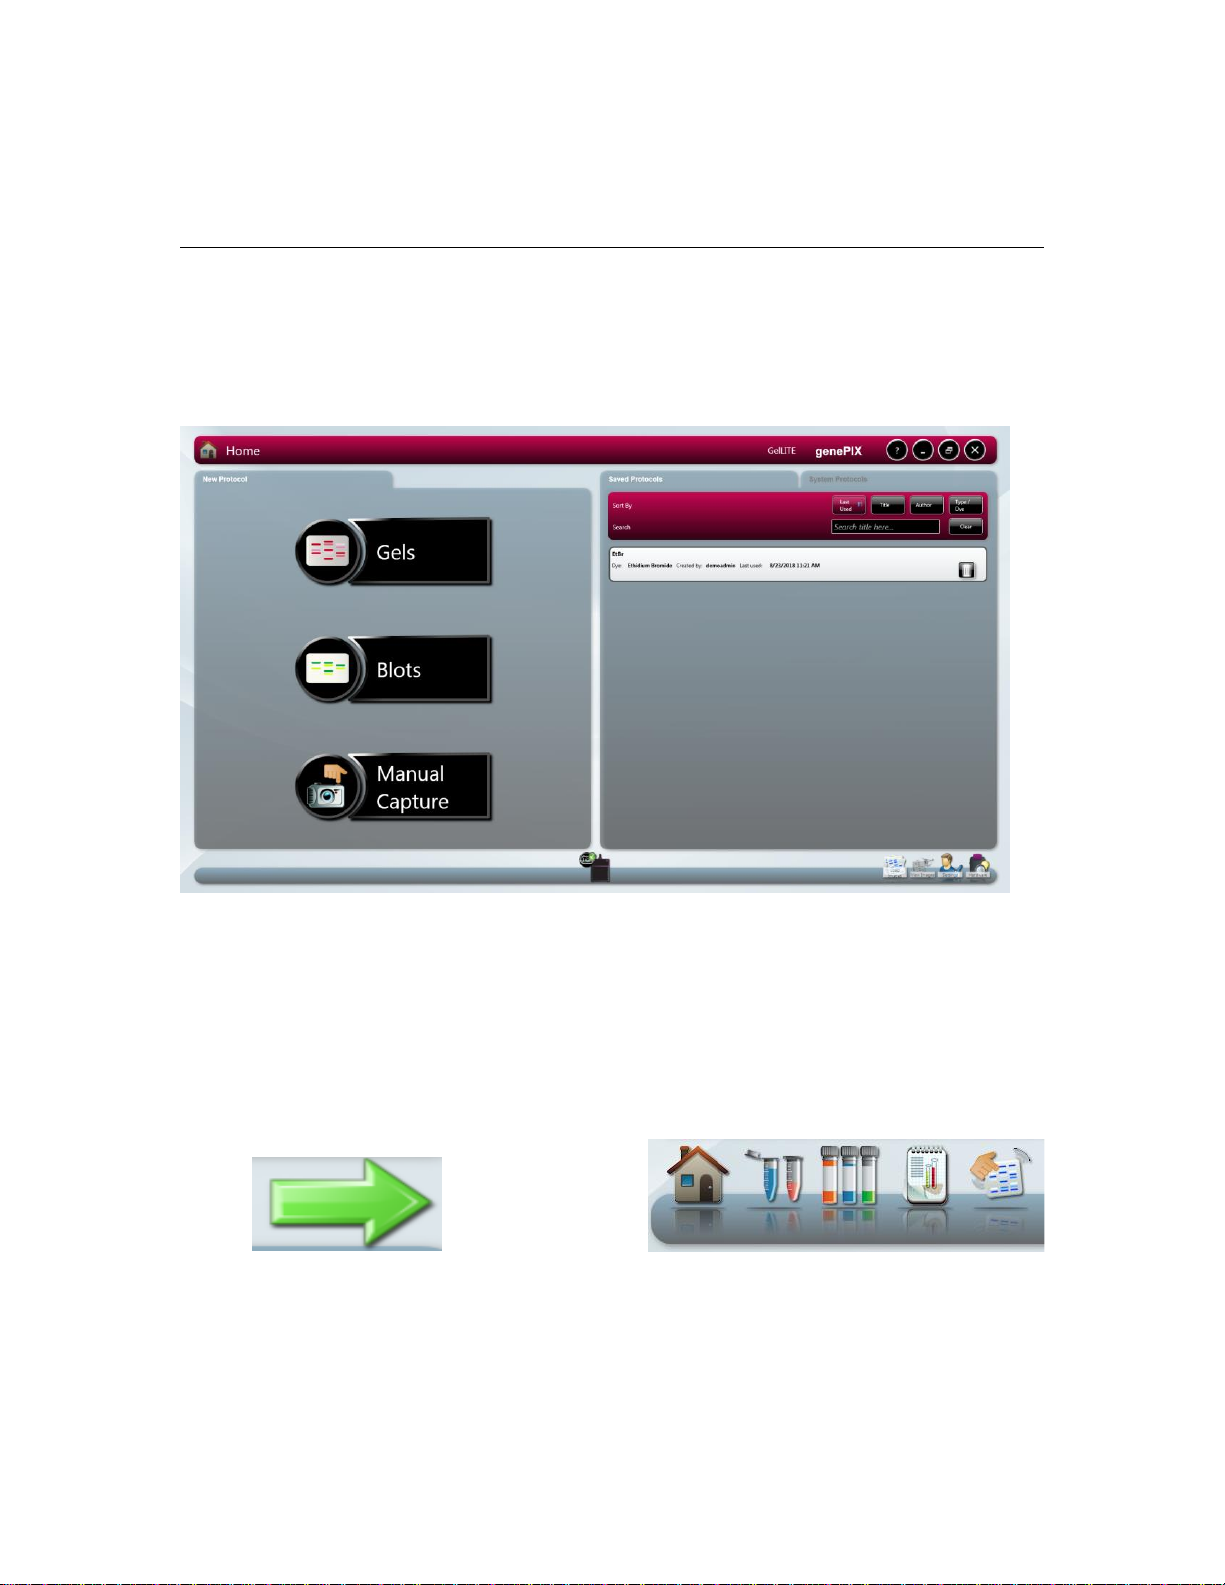
Once the genePIX software has started up the home screen will appear. At first
start up the genePIX software defaults to standard view. The display can be
changed from Standard View to Classic View on the user Preferences screen.
Standard Screen
The basis of auto capture mode is a series of steps that form a structured
workflow. The workflow is very easy to navigate through by using the green
bouncing arrow present in the bottom right hand corner of the screen to move
forward to the next screen (Figure 3). The grey status bar shows the progress of
the workflow, select any of the icons to move between any of the stages that
make up the workflow (Figure 4).
Figure 3- Navigation arrow Figure 4- Workflow status bar
The first step of the workflow is Sample Selection followed by Dye Selection,
Protocol Selection and Sample Positioning. The final stage is the Capture
screen.
Page 14

14
2.0.1 Sample Selection
Select from Gels, blots or manual capture from the home screen.
2.0.2 Dye Selection
genePIX software has an extensive database containing a vast list of dyes
covering a variety of applications from fluorescence, chemiluminescence,
chemifluorescence and visible stains (N.B. gelLITE cannot capture
chemiluminescence or chemifluorescence).
2.0.3 Protocol selection
genePIX software has an extensive database which calculates the optimal
imaging conditions for your sample based on the excitation and emission curves
of the majority of dyes currently commercially available.
2.0.4 Sample Positioning
The sample positioning screen shows a live image of your sample.
2.0.5 Capture screen
The capture screen offers a wide range of functions including the ability to save,
print, edit images and analyse the captured image (geneQUANT is required).
The captured image appears in the main window with the summary of the
protocol used present on the right hand side.
2.1 Capturing an image of an agarose EtBr or similar gel
(For rapid capture see Quick Guide-Capture)
Step One
Select Auto Capture from the home screen.
Page 15

15
Step Two
From the home screen screen select the following DNA Agarose.
Step Three
From Dye Selection screen select the dye that you are using either from your
recent selections only or by searching for a dye (N.B. untick recent selections
only to search the full list).
Step Four
Check the ‘Select Light and Filter box’ to see the best imaging condition for your
hardware set-up.
To see more options check the ‘ More Options’ box. To view the non-UV
protocols check the ‘Non-UV protocols only’ box.
Page 16

16
Step Five
Place your sample on top of the transilluminator and close the door. The Sample
Positioning screen will allow you to manually adjust the Lens controls (focus,
zoom and iris settings).
N.B. Opening the aperture too far may result in areas of the sample being
saturated, generating a very bright image.
If you wish to perform EDR, please check the EDR box.
Step Six
The captured image will appear in the main window. The image can now be
saved in various file formats (.sgd, TIFF, JPG and BMP) or printed. You can also
export the image to geneQUANT analysis software.
2.2 Capturing an Image of a protein gel (Coomassie, silver stained) or
other white light image (colony plate, autorad, microtitre plate etc.)
Step One
Select Auto Capture from the home screen.
Save
Print
geneQUANT
Aperture
Zoom
Focus
Page 17

17
Step Two
From the Sample Selection screen select the following Gel as Sample Format,
the sample type is Protein and then select that your gel is visibly stained.
Step Three
From Dye Selection screen select the dye that you are using either from your
recent selections only or by searching for a dye (N.B. untick recent selections
only to search the full list).
Step Four
Check the ‘Select Light and Filter box’ to see the best imaging condition for your
hardware set-up
Step Five
If you have a white light converter then place your sample on top of the converter
then place the converter on top of the transilluminator and close the door.
The Sample Positioning screen will allow you to manually adjust the Lens
controls (focus, zoom and iris settings).
Page 18

18
N.B. Opening the aperture too far may result in areas of the sample being
saturated, generating a very bright image.
If you wish to perform EDR, please check the EDR box.
Step Six
The captured image will appear in the main window. The image can now be
saved in various file formats (.sgd, TIFF, JPG and BMP) or printed. You can also
export the image to geneQUANT analysis software.
To ensure that the image you are capturing is not saturated select the ‘Show
Saturation button’ (Figure 5). Saturation will only show when the slider bars have
been moved to each end of the brightness/contrast slider. Over-exposed
(saturated) white bands will show red and over-exposed black areas in blue
(Figure 6).
Figure 5- Show Saturation button
Figure 6- Image of a gel showing saturation. The
bands coloured red show that these bands are saturated
Save
Print
geneQUANT
Aperture
Zoom
Focus
Page 19

19
genePIX software also has the ability to dynamic field. The dynamic field function
is based on powerful algorithms which corrects for uneven illumination. This
results in an image with a flat, even background whilst maintaining GLP
compliance. To Dynamic field check the box for dynamic fielding (Figure 7) and
then follow the on-screen instructions (Figure 8).
Figure 7- Dynamic Fielding check box
Depending on which type of sample (UV, epi lights or transilluminator white light)
you would like to Dynamic field you may get either of the bottom two messages
shown below.
Or
Figure 8- Dynamic Fielding Dialog boxes
To freeze the image press (if you have a touch screen monitor) or click the
Capture button (Figure 9). The image is no longer Live. If you wish to abort
capture you can press the ‘Stop’ button at any time (Figure 9).
Figure 9- Capture and Stop buttons
Page 20

20
2.3 Manual Capture
Manual capture offers you the ability to take complete control of every function of
the system. The manual mode is particularly useful for the more unusual
applications and if you have known imaging parameters that you wish to use.
Once Manual capture has been selected the camera is live. To be able to
position your sample the appropriate lighting and filter combination need to be
selected. Both the lighting and filter menus have a drop-down menu where you
can select from all the available lighting and filters present in your system
(Figure 10).
Figure 10 – Filter/Light selection
Once you have selected a light and filter you need to set the exposure time. Use
the +/- buttons to increase or decrease the exposure time (Figure 11). The
exposure time can be entered manually by typing a number directly into the box.
Please enter the exposure time in the following format
hours:minutes:seconds:milliseconds (h:m:s:ms). There is a default exposure time
of 80ms for fluorescent gels.
Figure 11 - Setting Exposure times
Auto Capture is designed to capture the maximum available grey scales of the
sample without actually allowing saturation. Therefore, this feature is ideal for
quantifying data (Figure 12).
Figure 12- Auto Capture button
Page 21

21
To ensure that the image you are capturing is not saturated select the ‘Show
Saturation button’ (Figure 13). Saturation will only show when the slider bars
have been moved to each end of the brightness/contrast slider. Over-exposed
(saturated) white bands will show red and over-exposed black areas in blue
(Figure 14).
Figure 13- Show Saturation button
Figure 14- Image of a gel showing saturation
The bands coloured red show that these bands are saturated
genePIX software also has the ability to Dynamic field. The dynamic field function
is based on powerful algorithms which corrects for uneven illumination. This
results in an image with a flat, even background whilst maintaining GLP
compliance. To Dynamic field check the box for dynamic fielding (Figure 15) and
then follow the on-screen instructions (Figure 16).
Figure 15- Dynamic Fielding check box
Depending on which type of sample (UV, epi lights or transilluminator white light)
you would like to Dynamic field you may get either of the bottom two messages
shown below.
Page 22

22
Or
Figure 16- Dynamic fielding Dialog boxes
To freeze the image press (if you have a touch screen monitor) or click the
Capture button (Figure 17). The image is no longer Live. If you wish to abort
capture you can press the ‘Stop’ button at any time (Figure 17).
Figure 17- Capture and Stop buttons
The histogram tool is very useful for illustrating the distribution of grey scales
within the image (Figure 18). The level of grey scales produced is dependent on
exposure time - up to 65536 grey scales will be displayed (Figure 19).
Figure 18- Manual Histogram tool button
Figure 19- Graphical representation of the number of greyscale levels
captured.
The red lines on the histogram are moveable allowing you to adjust the
brightness and contrast by using the histogram.
Page 23

23
The slider bars present on the left hand side of the screen can be used to adjust
the brightness and contrast of an image and to digitally zoom in or out (Figure
20). Adjust the brightness and contrast by moving the slider tabs up and down.
To return to original settings press the reset button (green arrows). To zoom in
move the slider bar towards the (+) sign and to zoom out move the slider bar
towards the (–) sign.
Figure 20- Manual capture slider bars for brightness and contrast and
digital zoom
To view more information about the captured image select the image information
icon. Once selected the pop up window will display information on dye, filter, light
source, Iris F number, exposure time and the image size. The image information
button also provides information on the range of black and white levels. You can
also point the mouse arrow over a band and the black and white levels and XY
coordinates appear in this box (Figure 22).
Figure 21- Image Information Icon
genePIX software can be used to set up custom protocols containing system
settings (lighting, filter and camera settings) which can be repeated and retrieved
at any time. These repeatable custom protocols are configurations, to save a
configuration select the following icon (refer to chapter 5 for more information on
how to set up a configuration).
Figure 22- Configuration Icon
The image pool present on the right hand side of the screen contains saved and
unsaved images that have been recently captured in this session. The images
outlined in red are images that have not been saved; images outlined in green
are images which have been saved and the file name will be present (Figure 23).
Page 24

24
Figure 23- Saved and unsaved images
To remove an image from capture screen image pool, select the Close button.
N.B. This will remove the image from every image pool. If the image has not
been saved the software will prompt you to save the image before
removing it.
Figure 24- The Close button
The image pool also permits the user to select multiple images by checking the
Multi Select Mode box (Figure 25).
Figure 25- Multi Select Mode check box
Page 25

25
Chapter Three- Exporting, Saving and Printing
Images
The most convenient way to archive or document the complete information about
your experiments is to generate reports.
However, you may just want to export only your gel or blot image(s) for
presentation or publication purposes.
This chapter describes all the ways you can export an image, save and print
images.
3.1 Saving Images
Images captured with genePIX software can be saved in several formats. To
save an image simply press (touch-screen) or click on the following icon (Figure
26).
Figure 26- Save icon
A dialog box will pop up where you can enter a file name for your image. You can
also use the ‘Save as type’ drop down menu and select to save the image as a
Data (*sgd), TIFF image file (*tif), Windows Bitmap image file (*bmp) or a JPEG
image file (*jpg) (Figure 27).
Figure 27- Saving dialog box
Page 26

26
The default is set to Data (*.sgd) which is a secure file and GLP compliant. These
files can only be opened or altered in Cleaver Scientific software packages such
as geneQUANT. SGD files contain all the capture information such as lighting,
filter, exposure times and many more complex details i.e. the camera serial
number.
You can select to save the raw image as a TIFF (16 bit uncompressed or 8 bit
compressed). This format is used when you require all the image data to be
retained. This file option creates a larger file, but will allow you to analyse the
image in other software packages.
To save the displayed image select between *.bmp and *.jpg formats N.B. *.BMP
and *.jpg formats will save as 8-bit files and you will therefore lose quantitative
data. This format should only be used for the export of visual information to
presentation or word processing software, such as Microsoft Powerpoint or
Microsoft Word.
3.1.1 Saving Annotations
Annotations can be saved as a .sgd file format. Select the Save/Load
annotations icon to add annotations to an image from a saved .ANN file using the
Load Annotation button (ANN. Annotation file) (Figure 28).
Figure 28- Saving Annotations icon
3.2 Printing Images
Images captured with genePIX software can be printed using a thermal printer or
any other printer. To print an image you need to press (touch-screen) or click the
following icon (Figure 29).
Figure 29- Print icon
Page 27

27
A dialog box will appear showing a print preview. Select Print to print the image
(Figure 30).
Figure 30- Print preview
3.3 Exporting Images to geneQUANT analysis software
Various file formats can be exported from genePIX to geneQUANT. Cleaver
Scientific recommends uncompressed TIFF or .sgd to maintain quantification.
To export a captured or saved image simply select the ‘open selected images in
geneQUANT’ button (Figure 31).
Figure 31- Send to geneQUANT icon
Page 28

28
Chapter Four- Browse, Edit and View Screens
4.1 Edit screen
The Edit screen offers a variety of functions ranging from image enhancement
and 3D view to changing the resolution of the image for publication purposes
(Figure 32).
Figure 32- Image Edit screen
The Edit screen has a panel of 3 buttons present on the top left hand side of the
screen allowing you to switch between annotation, enhancement tools and 3D
view (Figure 33).
Figure 33- screen annotation, enhancement and 3D icons
The icons from left to right are annotation, enhancement and 3D.
4.2 Annotation tools
There are several annotation tools currently available with genePIX software.
The annotation tools will appear automatically when you enter the Edit screen to
access the Enhancement and 3D tools you will need to select the appropriate
icon (Figure 34).
Page 29

29
Figure 34- Annotation Tools
Use the mouse arrow as an selection tool
Use the Abc button to add text to your image. Simply click on the
image where you wish to write. Now you can type your text directly
onto the image. To edit the text, double click on it. A window will
appear enabling selection of font, size and style. The text box can
be dragged around the screen as can all the annotation.
This tool can be used when you wish to draw a filled shape. Press
the Fill button then select the shape you wish to draw from the
icons shown in figure 35.
To draw rectangles, circles, freehand shapes, lines and arrows click the
appropriate icon shown below (Figure 35).
Page 30

30
Figure 35- Draw icons
The colour of any annotation can be changed using the colour drop-down menu.
N.B. When using the black and white thermal printer it is recommended to use
white or black annotation for clarity (Figure 36).
Figure 36- Select line and shape colour drop-down menu
The style of annotated objects i.e. the line thickness and style can be altered
using the drop-down menu.
Any annotations made will be automatically saved when images are in SGD
format. When saving in other formats, you must check the engrave box to ensure
annotations are saved. See section 3.1 for more information on saving images.
To save any annotation that you have made to your image in a separate file that
can be re-opened over another image, press on (touchscreen) or click the
following icon (Figure 37).
Page 31

31
Figure 37- Save/Load Annotations icon
When you have selected the icon the following dialog box will appear. Select to
save, load or cancel (Figure 38).
Figure 38- Save/Load Annotations dialog box
4.3 Image Rotation
The rotate function is available when the annotation and enhancement tools have
been selected. To use the rotate function select the following icon (Figure 39a).
Once this button has been selected the mouse cursor will change to show two
arrows. This cursor can then be used to freely rotate the image (b). To finalise
(fix) the rotation click button (a). To reset the orientation of the image press (c).
Figure 39- Rotation icons
a) rotation/fix button , b) arrow cursor permitting free rotation and c) reset button
4.4 Image source
If you have made enhancements to your image such as sharpening, smoothing
and cropping an area this will alter the image source and the image will now be
processed (Figure 40). To view the original image press original image button
.(Figure 40a). To go back to the processed image press the processed image
button (Figure 40 b)
Figure 40- Image source icons
a) Original image and b) Processed image
a)
c)
b)
a)
b)
Page 32

32
4.5 Saturation button
To show saturation move the slider bars to each end of the brightness/contrast
slider. Over-exposed (saturated) white bands will show red and over-exposed
black areas in blue.
Figure 41- Saturation button
genePIX offers a range of enhancement tools. Select this icon
to access the enhancement tools.
4.6 Enhancement tools
The image enhancement tools allows the user to invert, smooth, sharpen, flip
and crop the image (Figure 42).
Figure 42- Image Enhancement tools
Click on this icon to apply a sharpening filter to your image. When this
filter has been applied band edges should become more pronounced
but you may also observe an increase in the graininess of the image.
Click on this icon to apply a smoothing filter. This is useful when the
image has specks of dust or bubbles present. However, this will make
bands appear less sharp.
The Reversal icon will reverse the image to give black bands on a
white background or vice versa. This icon is particularly useful when
trying to see faint bands.
Page 33

33
Speckle correction icon will remove white speckles or ‘hot pixels’ from
the image.
Flip vertical will mirror the image on the vertical plane. This is useful if
the sample has been placed in the cabinet the wrong way round.
Flip horizontal will mirror the image on the horizontal plane. This is
useful if the sample has been placed in the cabinet the wrong way
round.
Select icon allows you to select an area of interest within the captured
image.
The crop icon will crop the selected area of interest and paste into a
separate window; when used together the select and crop processes
will reduce the image size.
4.7 3D View
3D view is a function which enables the user to see a 3D view of their image,
revealing gel thickness and the constrast between peaks on a gel. The 3D view
can be used with any sample type.
To turn on the 3D viewer select this icon.
Page 34

34
Figure 43- 3D View screen
To control the view use the following controls
Figure 44- 3D View controls
Use the blue circles to rotate the image and the green arrows to move the image
left to right and up and down the screen. The buttons in the middle reset to the
original position.
The 3D image can also be controlled by clicking and dragging with a mouse to
position as required.
Use the Gamma slider to adjust the gamma of the image to see fainter bands
(Figure 45).
Figure 45- 3D View gamma slider
Adding a false colour wash can improve the contrast. Select the ‘Default’ button
and from the menu select the colour wash you wish to apply to the 3D image
(Figure 46).
The colour wash button can also be used to emulate different dyes, select the
green colour wash to emulate a SYBR Green DNA gel, the yellow colour wash
imitates a SYBR Gold DNA gel. The Orange, blue and red makes a protein gel
Page 35

35
appear silver, Coomassie blue and SYPRO red stained respectively. The false
colour can be used to better illustrate faint bands.
Figure 46- Colour Wash
The Image pool present on the right hand side of the Edit screen shows the
images that you have brought into the Edit screen from the Browse screen or
from any of the capture screens. To remove any of the images from this pool
simply select the ‘Remove’ button. If you wish to remove all the images from the
image pool select the ‘Remove All’ button (Figure 47)
Figure 47- Remove image buttons
The selected image(s) can then be saved, printed, sent to the View screen for
comparison or to the Edit screen for further enhancement (Figure 48).
Figure 48- Save, print, view and edit image icons
a) Save icon, b) print icon, c) View images icon and d) Edit screen icon
Single images can be sent to geneQUANT for analysis (Figure 49).
a)
b)
c)
d)
Page 36

36
Figure 49- Send to geneQUANT icon
4.8 View Images Screen
The View Images screen allows you to view and compare the images that you
have captured whether they are saved or unsaved and any images brought in
from the Browse Images screen (Figure 50).
Figure 50- View Images Screen
The zoom slider can be used to increase or decrease the size of the image
(Figure 51).
Figure 51- View Screen digital zoom slider bar
The View images screen also enables you to compare up to four images. To
compare images simply highlight the images you wish to compare then select the
icon with the magnifying glass (Figure 52).
Figure 52- Change Layout icons
Page 37

37
Once you have clicked the ‘Change Layout’ icon the following screen will appear
(Figure 53).
Figure 53- Change Layout Screen
The default setting is set to link all images that are being compared allowing the
zoom and brightness and contrast all images to be altered to the same degree
(Figure 54).
Figure 54- Change Layout screen Zoom and Range slider bars
To adjust the zoom setting of the image(s) use the slider on the left hand side.
Move the slider bar towards the (+) to zoom in and towards the (–) to zoom out.
To adjust the brightness and the contrast use the slider bar on the right hand
side.
To alter the zoom, brightness and contrast of individual images the images will
need to be unlinked. To do this select the numbered icon of the image you wish
to alter under the Link heading (Figure 55). To link images again select the
linked chains icon (Figure 55).
Page 38

38
Figure 55- Linking and Unlinking images
The key identifies which image you have selected and the position of each of the
images that you are comparing (Figure 56).
Figure 56- Change Layout screen image key
To exit from the comparison screen simply select the icon without the magnifying
glass from the change layout heading.
4.9 Load Images screen
The Load images screen allows you to open files that are already saved on your
computer and to open files from external devices such as USB keys.
Use the left hand side of the screen to explore folders on your computer. All
images will be organised by date (Figure 57).
To select images simply click or press (touchscreen) on the image thumbnails
which will turn green when selected. Then select the View images icon to
compare or edit images.
Page 39

39
Figure 57- Browse screen
Page 40

40
Chapter Five- Configurations
genePIX software can be used to run specific applications with repeatable
workflows and to design custom configurations with a wide variety of settings that
are easily accessable, adaptable and re-usable at any time.
5.1 Saving Configurations
5.1.1 Saving configurations in Auto Capture mode
Set up your Protocol by working through the following screens Sample selection,
Dye selection, Protocol selection and Sample positioning. Once you have
captured an image you can save this as a configuration by selecting the following
icon (Figure 58).
Figure 58- Configuration Icon
A pop-up window will appear where you enter a name for the configuration. You
can at this point select to save the configuration as ‘Lock’ or ‘Make public’. A
‘locked’ configuration means you cannot make any adjustments to the protocol
.‘Make public’ configurations allow you to share configurations with other users
(Figure 59).
Figure59- Save Configuration box
You can also modify an existing protocol by selecting the configuration you wish
to edit from the ‘Save Configuration’ dialog box.
Page 41

41
5.1.2 Saving Configurations in Manual mode
Once you have selected the lighting and filter options you wish to use, position
your sample so it is zoomed in and in focus then capture the image. Once you
have captured an image select the configurations icon (Figure 58).
Then enter a name for your configuration and select if you want to ‘Lock’ or
‘Make public’ the configuration (Figure 59).
5.1.3 Opening Configurations
From the home page you can open saved configurations by simply pressing or
selecting the configuration you wish to open. Once selected the notebook will
enlarge (Figure 60a) enabling you to select whether to open the file (Figure 60b)
or delete the file (Figure 60c).
Figure 60- Opening User Configurations
a) Enlarged configuration b) Open configuration and c) Delete configuration
Once the configuration has been opened you will be taken to the Sample
Positioning screen.
Page 42

42
Chapter Six- Troubleshooting and General
Information
If your dye/reagent is not listed then please contact
support@Cleaverscientific.com
6.1 Technical Information
genePIX software hardware installation guide
Please visit the Cleaver Scientific website to download the gelLITE technical
literature (This is also available on your genePIX USB memory stick).
Quick Guides
gelLITE Installation
gelLITE Image Capture
6.2 Technical Assistance
Cleaver Scientific Ltd.
Unit 41,Somers Road Industrial Estate
Rugby
CV22 7DH
Tel: +44 (0)1788 565300
Fax: +44 (0)1788 552822
Email: support@cleaverscientific.com
Page 43

43
6.3 Troubleshooting
PROBLEM
POSSIBLE CAUSE
SOLUTION
Camera not connected
or not responding
Camera power cable not
plugged in
Software driver for the
camera is missing
Make sure all cables are
connected as shown in the
Installation quick guide
Install Camera driver
Press the refresh button on the
gelLITE icon
‘Hardware not available’
You do not have the
correct filter or lighting for
the dye you have
selected
Check the ‘hardware list’
on the hardware screen
Contact
support@Cleaverscientific.com
to upgrade your system
Programme in any extra lights
or filters that you may have on
the hardware screen
Dye not in list
Your dye is not in the
database
Contact
support@Cleaverscientific.com
Dye name is greyed out
You do not have the
appropriate hardware to
image that particular dye
Check the ‘hardware list’
on the hardware screen
Contact
‘support@Cleaverscientific.com’
to upgrade your system
Programme in any extra lights
or filters that you may have on
the hardware screen
Transilluminator will not
turn on
Make sure the
transilluminator switch is
in the ‘on’ position
Make sure the darkroom
cabinet is completely
closed
If the transilluminator will not
turn on then please contact
support@Cleaverscientific.com
Transilluminator will not turn on
when the cabinet door is open
for safety reasons
The tubes may need replacing
Page 44

Index
44
Glossary
The following glossary defines words used in this manual.
Auto Capture- the software will configure the optimal exposure time for your
sample using the maximum number of greyscales from your camera.
Histogram- A graphed representation of brightness, or grey value, of an image.
Image source- there are two types of image sources, original and processed. If
you have made enhancements to your image such as sharpening, smoothing
and cropping an area this will alter the image source and the image will now be
processed.
Iris- On a CMOS camera the iris is an adjustable aperture used to control the
amount of light coming through the lens.
Dynamic fielding- The dynamic field function corrects for uneven illumination of
light sources.
Speckle correction- will remove white speckles or ‘hot pixels’ (bright spots)
from the image.
 Loading...