

Page 1
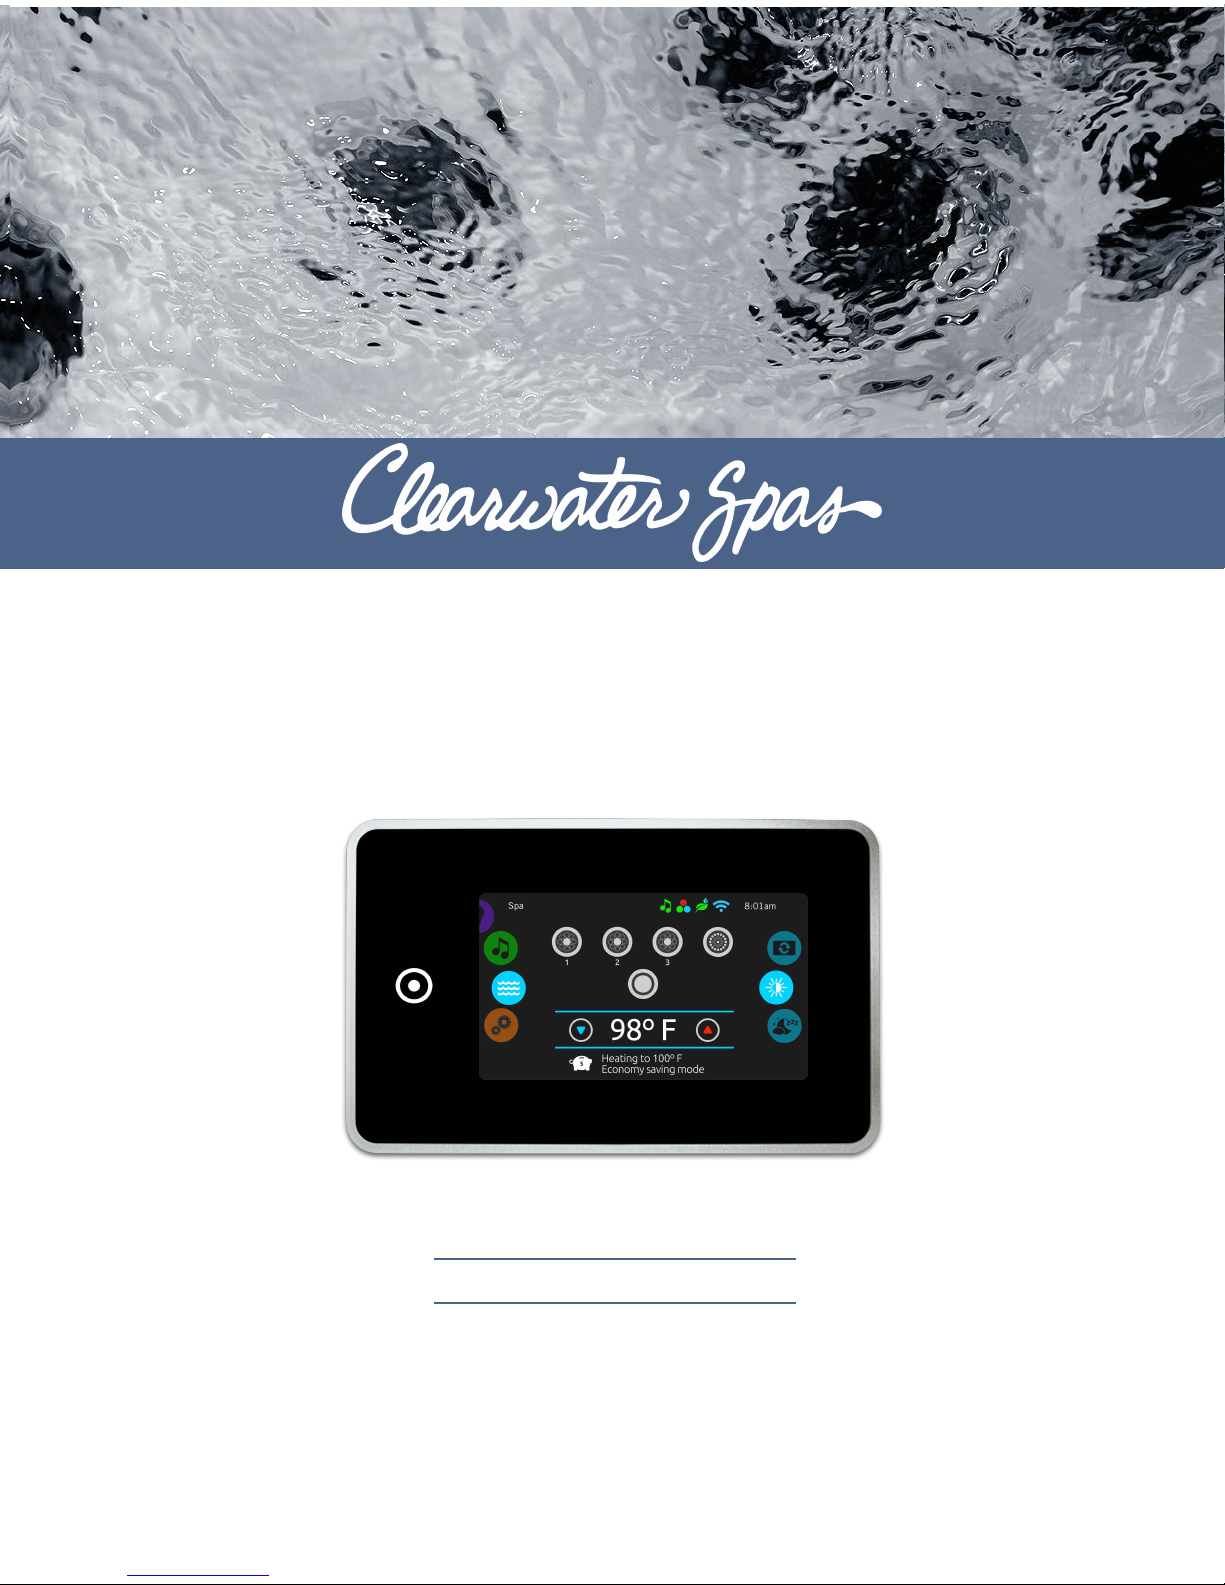
K1000
full-featured color capacitive
touchscreen display keypad for spas
Fun, simple, engaging
Truly interactive control
Larger, faster and cooler
Page 2

Table of contents
Warning ��������������������������������������������������������������������������������������������������������������������������������������������������������������������������� 2
Introduction ��������������������������������������������������������������������������������������������������������������������������������������������������������������������� 3
Overview
- in�k1000 dimensions ������������������������������������������������������������������������������������������������������������������������������������������ 4
Installation
- Installation of in�k1000 ��������������������������������������������������������������������������������������������������������������������������������������� 5
- Drilling template ������������������������������������������������������������������������������������������������������������������������������������������������� 6
- Installation notes ������������������������������������������������������������������������������������������������������������������������������������������������� 8
- Connecting in�k1000 to the spa pack ����������������������������������������������������������������������������������������������������������������� 8
Keypad functions
- in�k1000 keypad layout ������������������������������������������������������������������������������������������������������������������������������������ 10
- Power ��������������������������������������������������������������������������������������������������������������������������������������������������������������� 10
- Main screen ����������������������������������������������������������������������������������������������������������������������������������������������������� 10
- Start or stop accessories ����������������������������������������������������������������������������������������������������������������������������������� 11
- Notifications ������������������������������������������������������������������������������������������������������������������������������������������������������ 11
- Water temperature ������������������������������������������������������������������������������������������������������������������������������������������� 12
- Spa menu ��������������������������������������������������������������������������������������������������������������������������������������������������������� 12
- Display page ����������������������������������������������������������������������������������������������������������������������������������������������������� 12
- Contrast page ��������������������������������������������������������������������������������������������������������������������������������������������������� 13
- Settings ������������������������������������������������������������������������������������������������������������������������������������������������������������� 13
- Water care �������������������������������������������������������������������������������������������������������������������������������������������������������� 14
- Modifying schedules ����������������������������������������������������������������������������������������������������������������������������������������� 15
- Maintenance ���������������������������������������������������������������������������������������������������������������������������������������������������� 15
- Error Log ����������������������������������������������������������������������������������������������������������������������������������������������������������� 15
- Date and time ��������������������������������������������������������������������������������������������������������������������������������������������������� 16
- Keypad settings ������������������������������������������������������������������������������������������������������������������������������������������������ 17
- Temperature units �������������������������������������������������������������������������������������������������������������������������������������������� 17
- Display page ����������������������������������������������������������������������������������������������������������������������������������������������������� 17
- Contrast page ��������������������������������������������������������������������������������������������������������������������������������������������������� 18
- Language Select ����������������������������������������������������������������������������������������������������������������������������������������������� 18
- Electrical configuration ������������������������������������������������������������������������������������������������������������������������������������� 18
- Wi-Fi ����������������������������������������������������������������������������������������������������������������������������������������������������������������� 19
- About ���������������������������������������������������������������������������������������������������������������������������������������������������������������� 19
- Wipe screen ����������������������������������������������������������������������������������������������������������������������������������������������������� 20
- in�stream 2 functions ���������������������������������������������������������������������������������������������������������������������������������������� 20
- in�clear functions ���������������������������������������������������������������������������������������������������������������������������������������������� 21
Error messages �������������������������������������������������������������������������������������������������������������������������������������������������������������� 23
Feature matrix ��������������������������������������������������������������������������������������������������������������������������������������������������������������� 24
Specifications ���������������������������������������������������������������������������������������������������������������������������������������������������������������� 25
1
1
Page 3

1
Warning
RNING :
WA
FAILURE TO COMPLY WITH THE FOLLOWING WARNINGS MAY SIGNIFICANTLY SHORTEN THE PRODUCT’S LIFE TIME,
AND LEAD TO FAILURES AS WELL AS HAZARDOUS CONDITIONS*
USING ANY ELECTRONIC CONTROL�
*ONLY QUALIFIED PERSONNEL ARE TO SERVICE THIS UNIT�
THERE ARE NO USER SERVICEABLE PARTS INSIDE�
*
THE GASKET ON THE BACK OF THE UNIT WILL PREVENT WATER INFILTRATION INSIDE, BEHIND THE MOUNTED
SURFACE� IF THE GASKET IS DAMAGED, SEAL THE BACK OF THE UNIT WITH SILICONE TO AVOID ANY LEAKAGE
BEHIND THE MOUNTED SURFACE�
* HAZARDOUS CONDITION:
A CONDITION THAT IS POTENTIALLY DAMAGING AND/OR DANGEROUS TO THE OPERATOR OR SURROUNDINGS�
� COMMON SENSE MUST ALWAYS PREVAIL WHEN
MAINTENANCE
IF YOU HAVE PROBLEMS, DO NOT ATTEMPT TO REPAIR THE UNI
SERVICING�
T YOURSELF� RETURN IT TO YOUR DEALER FOR
2
Page 4

Introduction
n�k1000
i
full-featured color capacitive
touchscreen display keypad for spas
Fun, simple, engaging one level menu interface Parting
ways with physical buttons, keys and overlays,
Clearwater's k1000 touchscreen keypad is fun to use,
simple to learn and features an intuitive and engaging
one level menu interface�
Truly interactive control of all spa and accessory
functions and settings
Mode and function selection wheels, all-on or all-off one
touch activation key of last used settings, interactive
display icons and on-screen reminders and messages
make for a unique user interface� Control and get
direct feedback and seamless interaction with your spa
equipment.
1
Larger, faster, and cooler touch screen display
Driven by a powerful 400 MHz processor, the k1000
keypad features an eye-catching 4�3 inch 256K color
LCD capacitive touchscreen display resting within a thin
and beautiful enclosure that houses its cutting-edge
electronics� The in�k1000 keypad fits perfectly on
the edge of any spa�
3
Page 5
1
Keypad functions
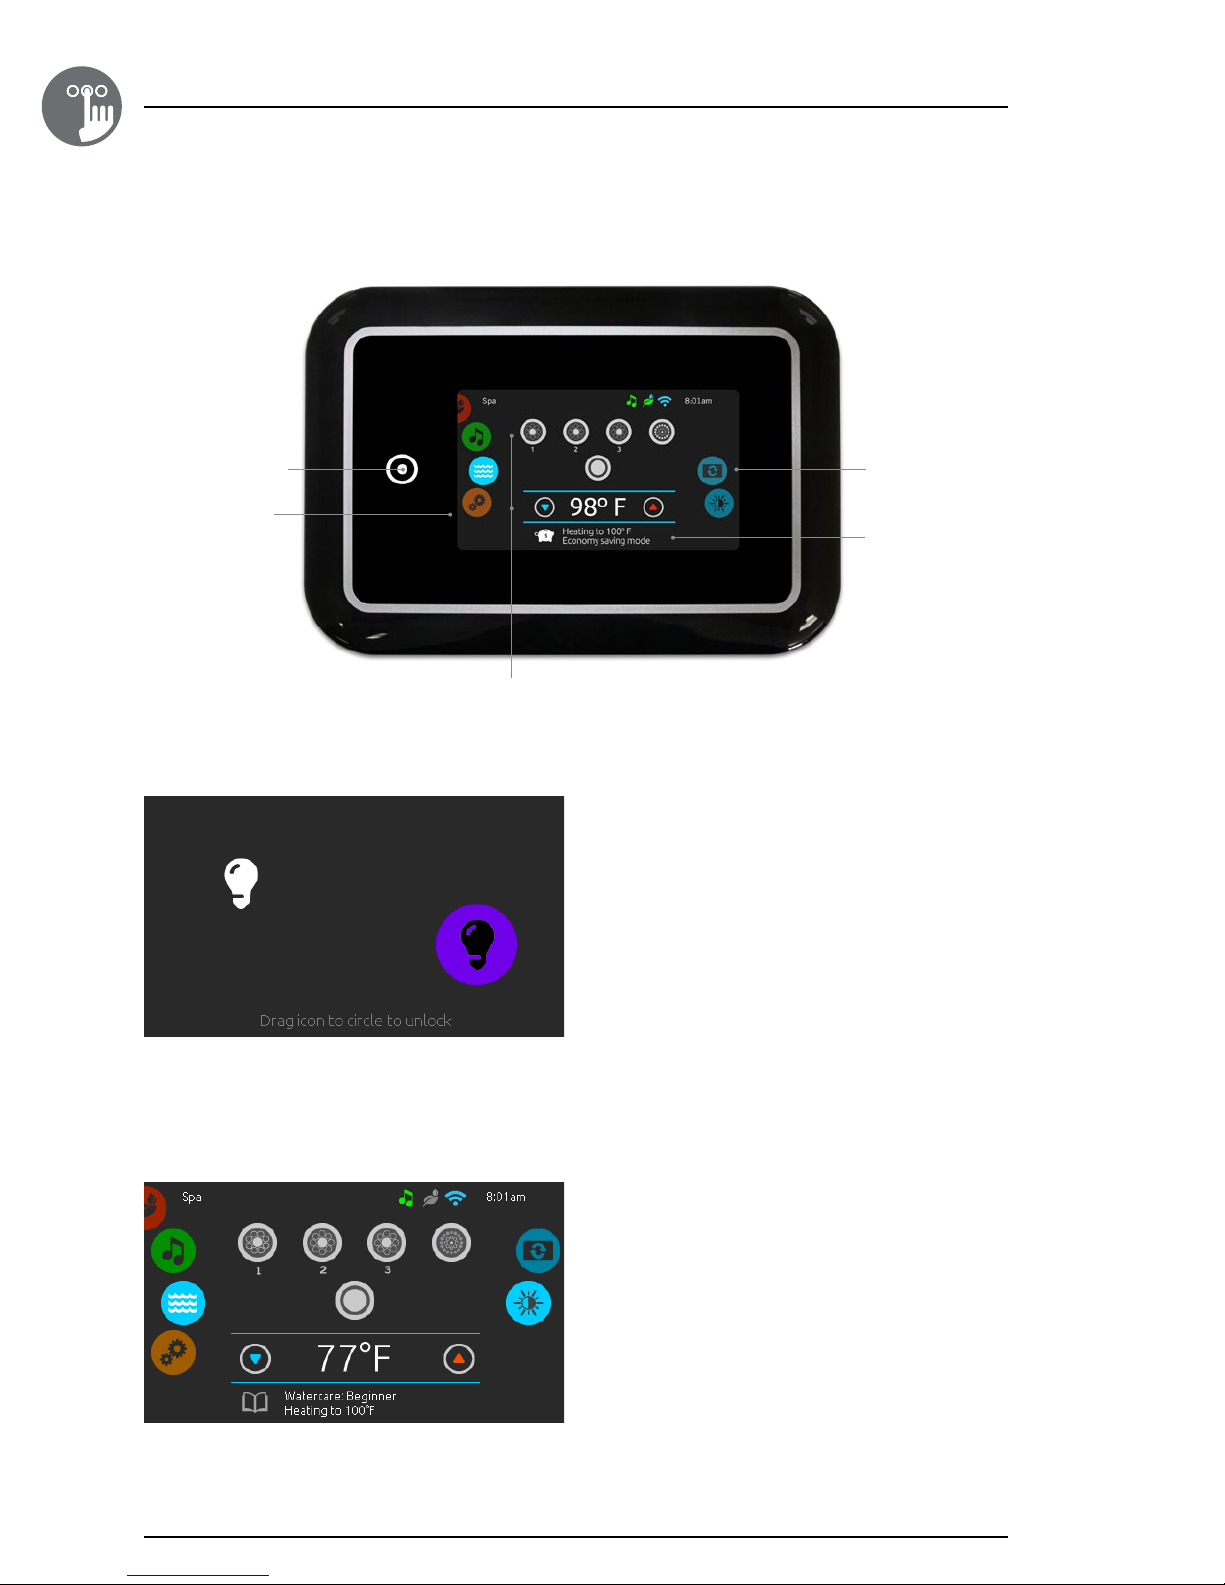
in.k1000 keypad layout
direct to function
selection wheel
all-on or all-off key
(one touch activation)
mode selection
wheel (settings and
accessories)
(settings and
additional options)
on-screen
system messages
and reminders
interactive display icons
(main spa functions)
Power
Touch the screen to turn on the keypad� 3 minutes after
the last pump is turned off, the screen will shut off if there
is no touch activity�
Then follow the instructions on the screen to access the
main screen�
Main screen
The main screen gives you access to your accessories
and water temperature� At the bottom of the screen
you will see any error or maintenance messages that
are present�
10
Page 6
Keypad functions
1
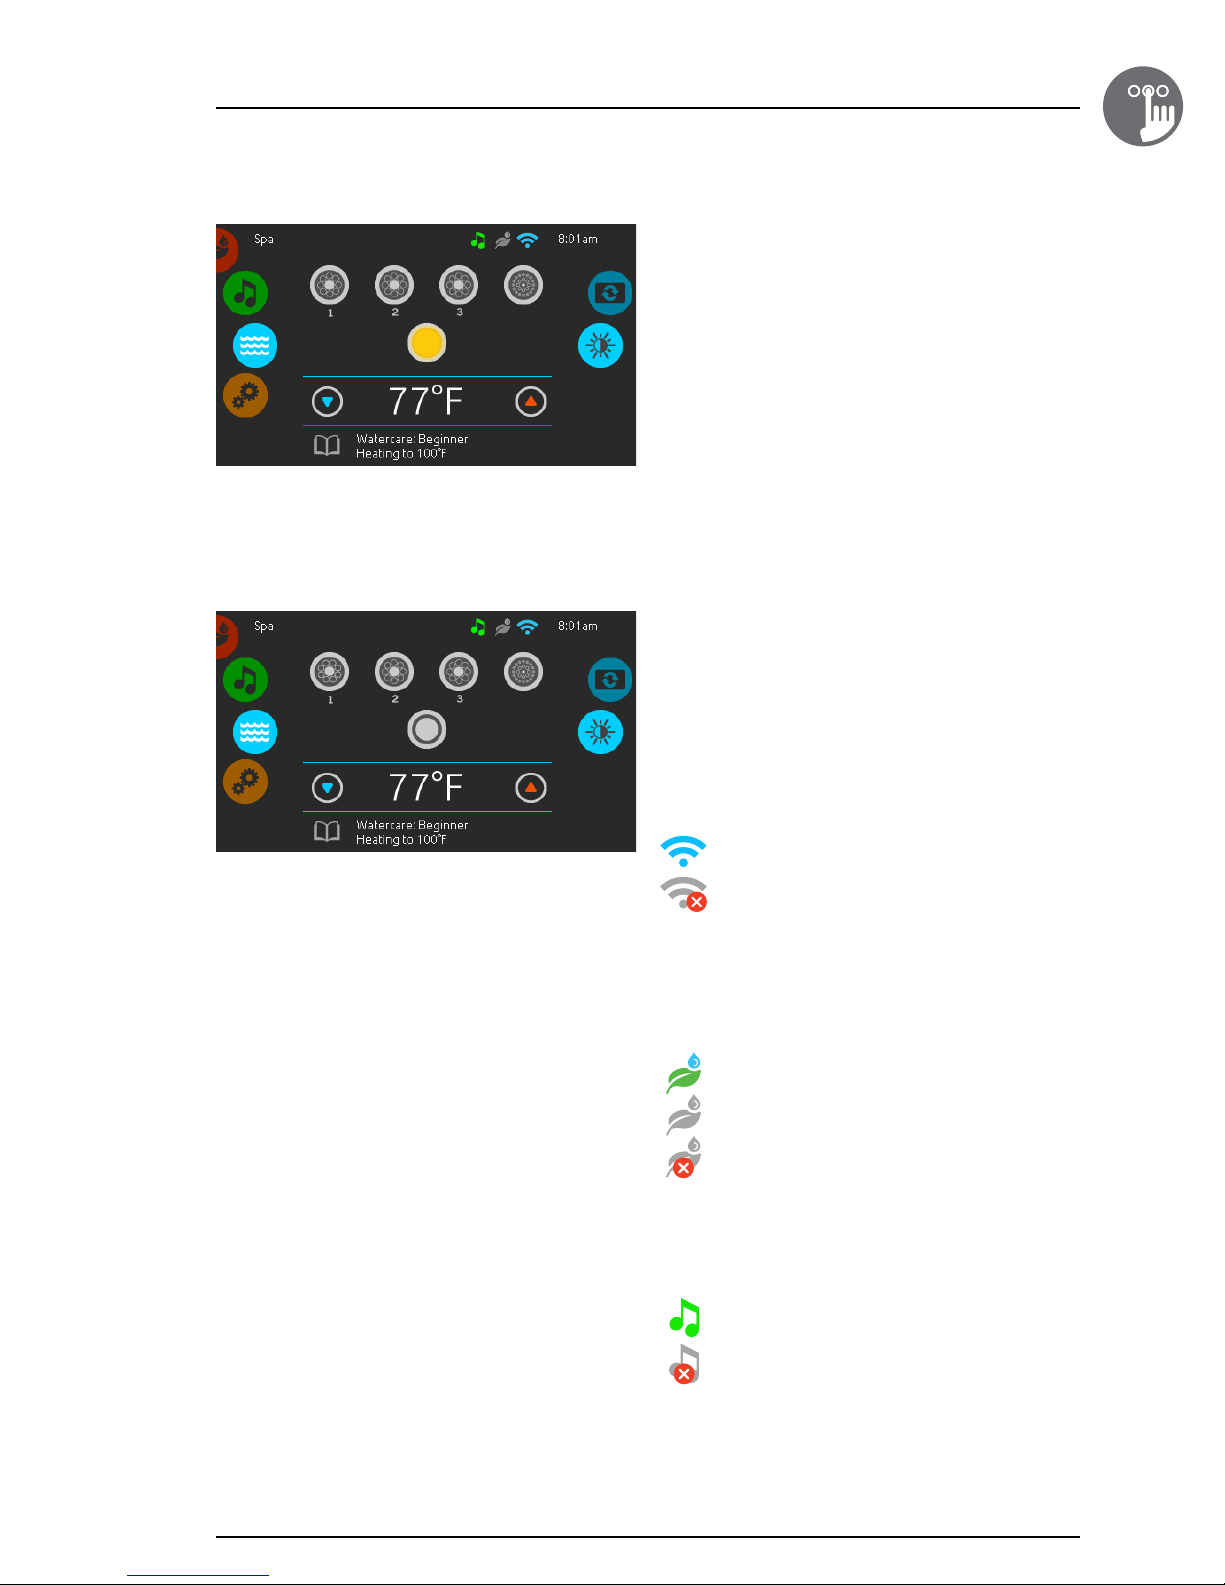
Start or stop accessories
To start or stop an accessory, touch the associated icon�
Icons will become animated when their accessory is
turned on, and animation will stop when turned off�
Icons on the screen will reflect the speed or state of
the devices running on your spa� When an accessory has
more than two speeds press the button until it reaches
the desired speed�
Notifications
A notification area at the top right-hand side of the screen
shows the state of certain accessories installed in the spa�
Notification icons
in.touch:
• Indicates that the in�touch module is detected
and connected to a Wi-Fi network�
• A red cross indicates that the in�touch module
is detected but isn't connected to a Wi-Fi network�
• An animated icon indicates that the in�touch
module is connecting to a Wi-Fi network�
For more information about the in�touch,
refer to the Wi-Fi section�
in.clear:
• The icon is green when the in�clear is
generating bromine�
• The icon is grey when the in�clear isn't
generating bromine�
• A red cross indicates that the in�clear is
turned off�
For more information about the in�clear,
refer to the in�clear functions section�
in.stream 2:
• The icon is green when the in�stream 2 is on�
• The icon is grey when the in�stream 2 is off�
For more information about the in�stream 2,
refer to the in�stream 2 functions section�
11
Page 7
1
Keypad functions
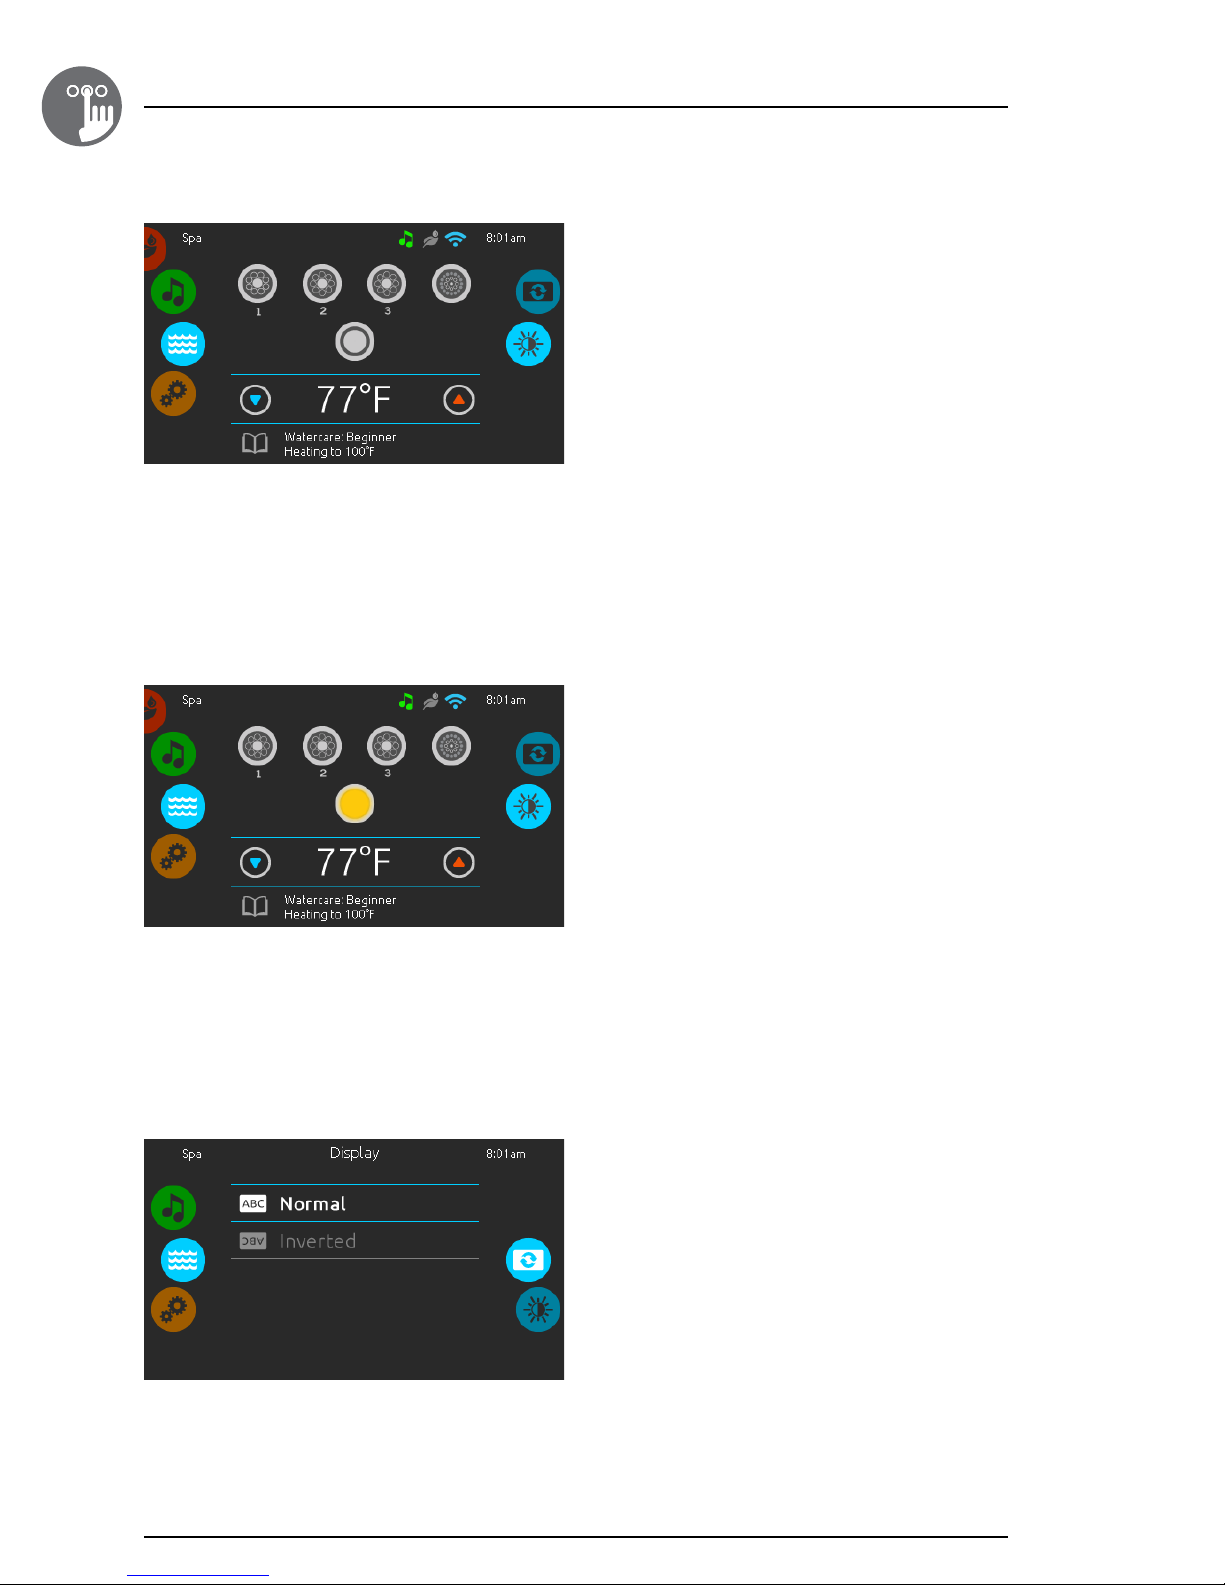
Water temperature
The temperature shown at the bottom of the screen shows
the current water temperature� Use the Up and Down
icon to set the desired temperature� The set point will
appear in blue� After 3 seconds without any change to the
set temperature value, the current water temperature will
reappear�
When the set value is lower than the current temperature
Cooling to xx�x will appear below� When the set value is
higher than the current temperature, Heating to xx�x will
be indicated under the value� Normally there is a short
delay before the heating starts, during which Heating
Suspended is indicated under the value�
Spa menu
From the home page you can access the following:
in�clear (if installed)
•
•
in�stream 2 (if installed)
•
spa menu
•
settings
To select an option, slide the left wheel up or down until
the desired icon menu is highlighted in the middle�
On the right side is a menu for access to the Display and
Contrast pages�
Display page
Use this page to change the display orientation�
12
Page 8
Keypad functions
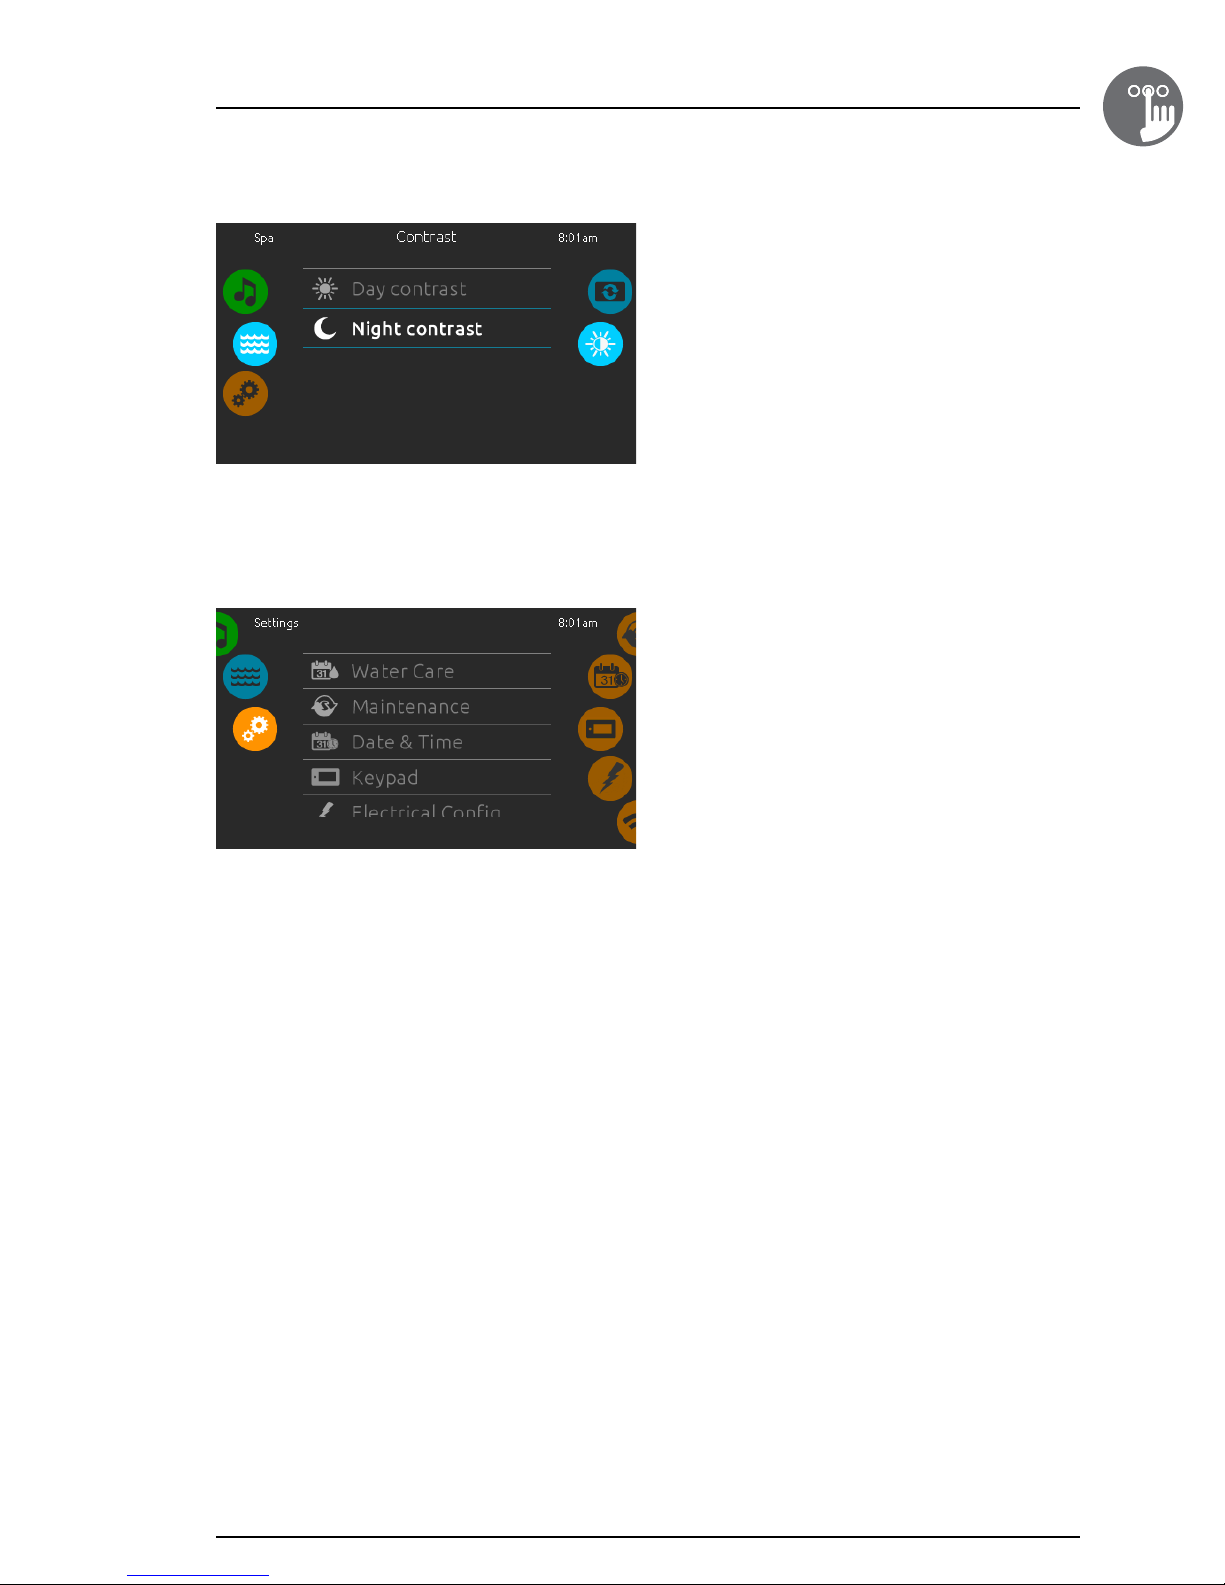
Contrast page
Use this page to change the display contrast�
Settings
In the Settings page you can access the following:
WaterCare
•
•
Maintenance
• Date & Time
•
Keypad
•
Electrical Config
•
Wi-Fi
•
About
1
To select an item, slide the right wheel until the desired
icon is highlighted in the middle or press on the menu
name�
13
Page 9
1
Keypad functions
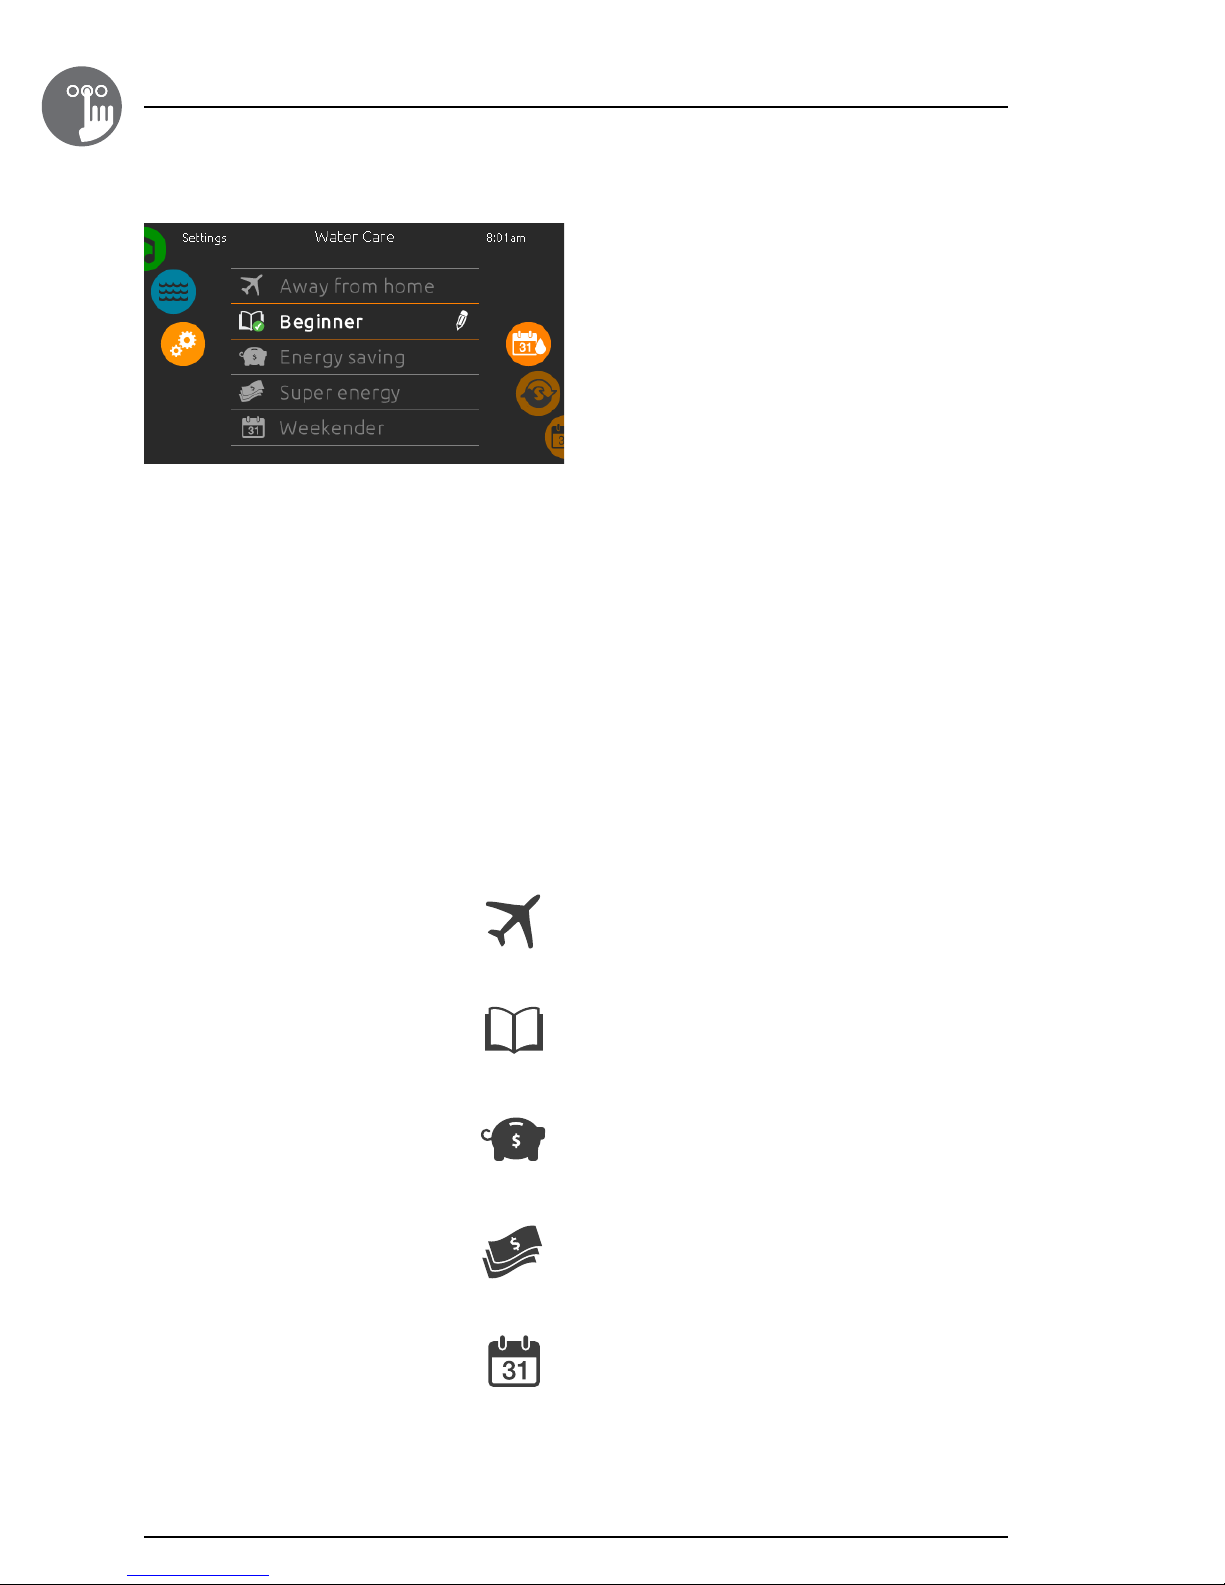
Water care
The Water Care page will help you set up your ideal
filtration and heating settings� Choose between Away from
Home, Beginner, Energy Savings, Super Energy and
Weekender, depending on your need� Touch the Water
care name to choose your setting� A green checkmark will
appear on the selected icon to confirm your choice �
In Economy mode, the set point will be reduced by 20°F*,
which means that the heating system will not be engaged
unless the temperature falls to 20°F below the spa's set
temperature�
The filtration schedule shown on the screen will apply to
the main filtration pump, most likely pump 1� If your spa
uses a circulation pump configured to run 24 hours, the
screen will show you the purge setting instead of filtration�
The purges are pre-programmed for a fixed number of
minutes, therefore the duration will be set to N/A on the
screen, and only the start time can be modified�
* Default pack value
Water care modes
Away:
In this mode the spa will always be in economy;
the set point will be reduced by 20° F�
Beginner:
The spa will never be in economy mode and will be
filtering according to the pack's low level configuration�
Energy Savings:
The spa will be in economy mode during the peak hours
of the day and resume normal mode on the weekend�
Super Energy Savings:
The spa will always be in economy mode during peak
hours, every day of the week�
Weekender:
The spa will be in economy mode from Monday
to Friday, and will run normally on the weekend�
14
Page 10
Keypad functions
1
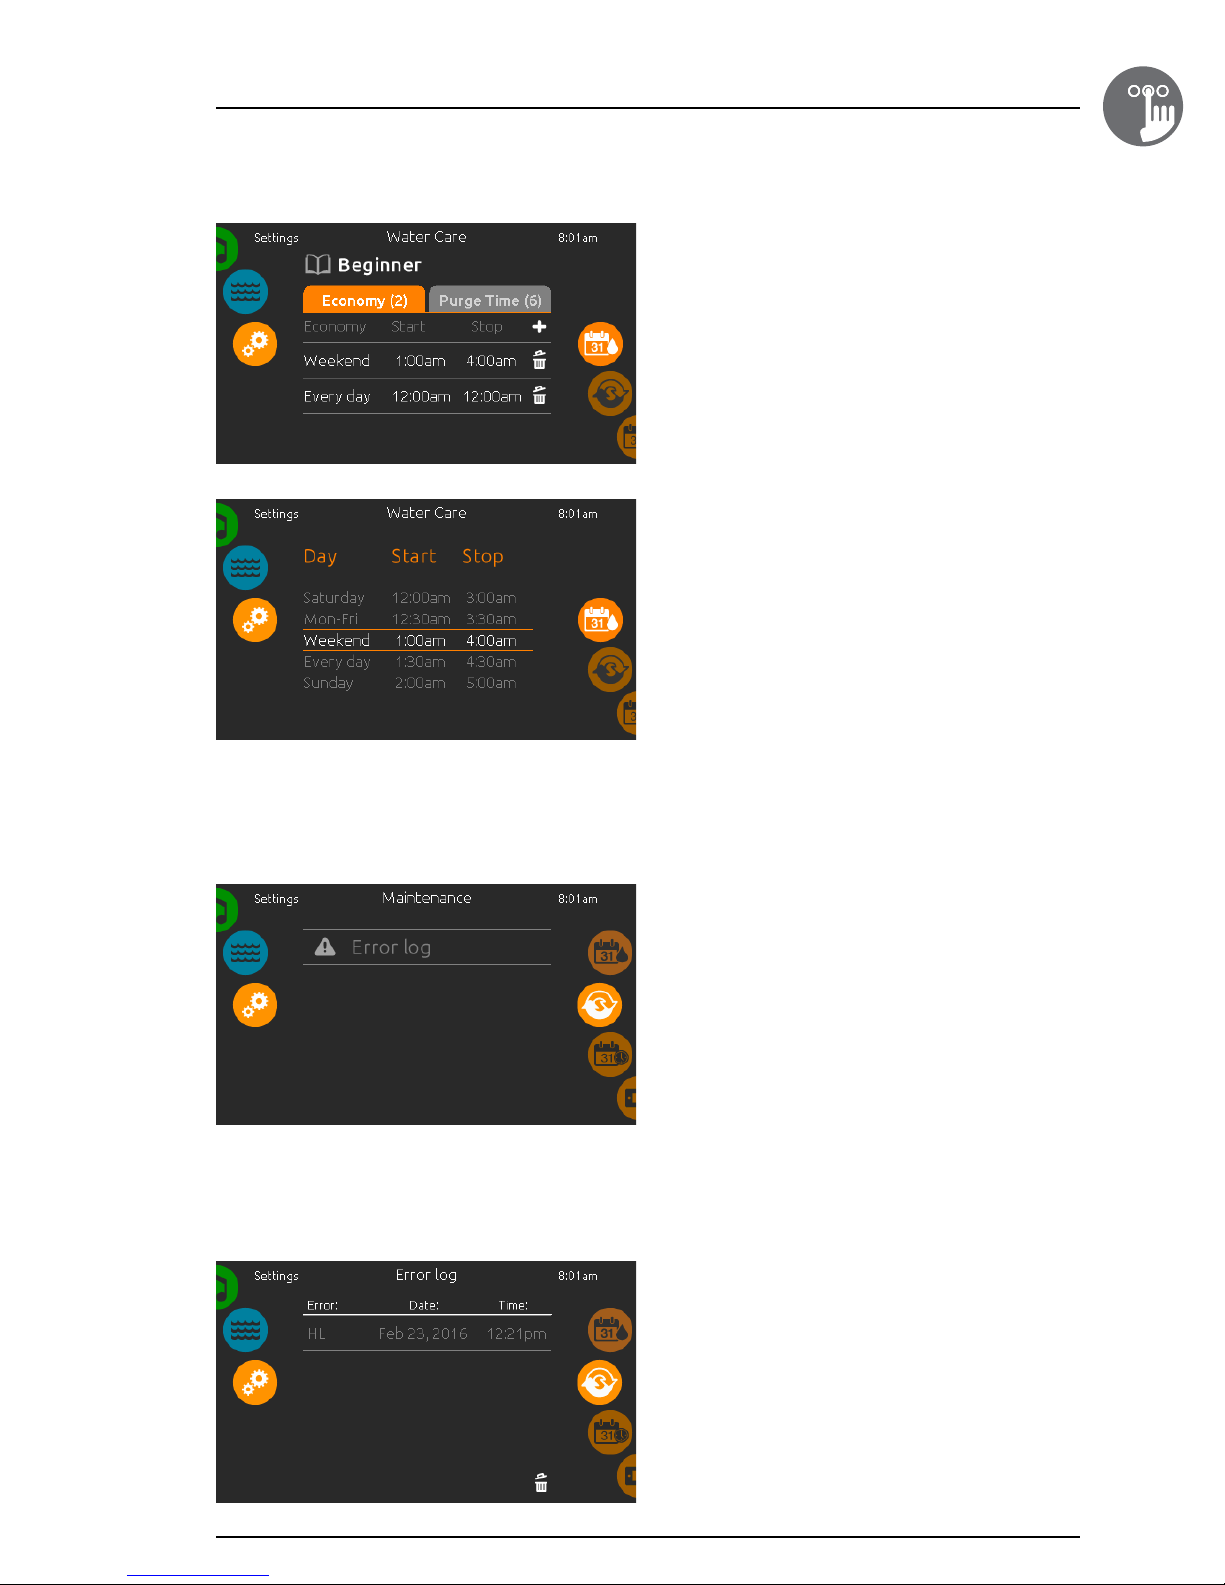
Modifying schedules
To modify a Water Care category, touch the pen icon at
the right end of the desired watercare to open the selected
Water Care menu�
Touch the Economy tab to change the economy setting
and filter cycle tab for the filtration settings (or schedules)�
You can add economy or filtration schedules by touching
the « + » symbol �
To delete a schedule, touch the garbage can icon at the
right end of the desired line�
You can modify the programmed schedules by selecting
one and adjusting the schedule�
You have several possibilities for the schedule (Mon-Fri,
weekend, every day, or single days)� The schedules will
be repeated every week� The time and duration are set in
30 minute increments� Once you have set the schedule,
use the calendar icon to go back� Ensure that you have
selected the desired Water Care mode in the main Water
Care menu�
Maintenance
From the Maintenance page you can access the following:
• Error log
To acces the desired option simply touch the desired
menu item�
Error Log
In this section you can see errors that have been archived
by the system� Drag the list Up and Down to move through
the list� Errors are archived chronologically, from the most
recent at the top to the oldest at the bottom�
The Error log page shows the error code, the date
of the error, and the time� Touching the garbage can icon
will delete the Error log (with a confirmation)�
For more information, see the Error messages section�
15
Page 11
1
Keypad functions
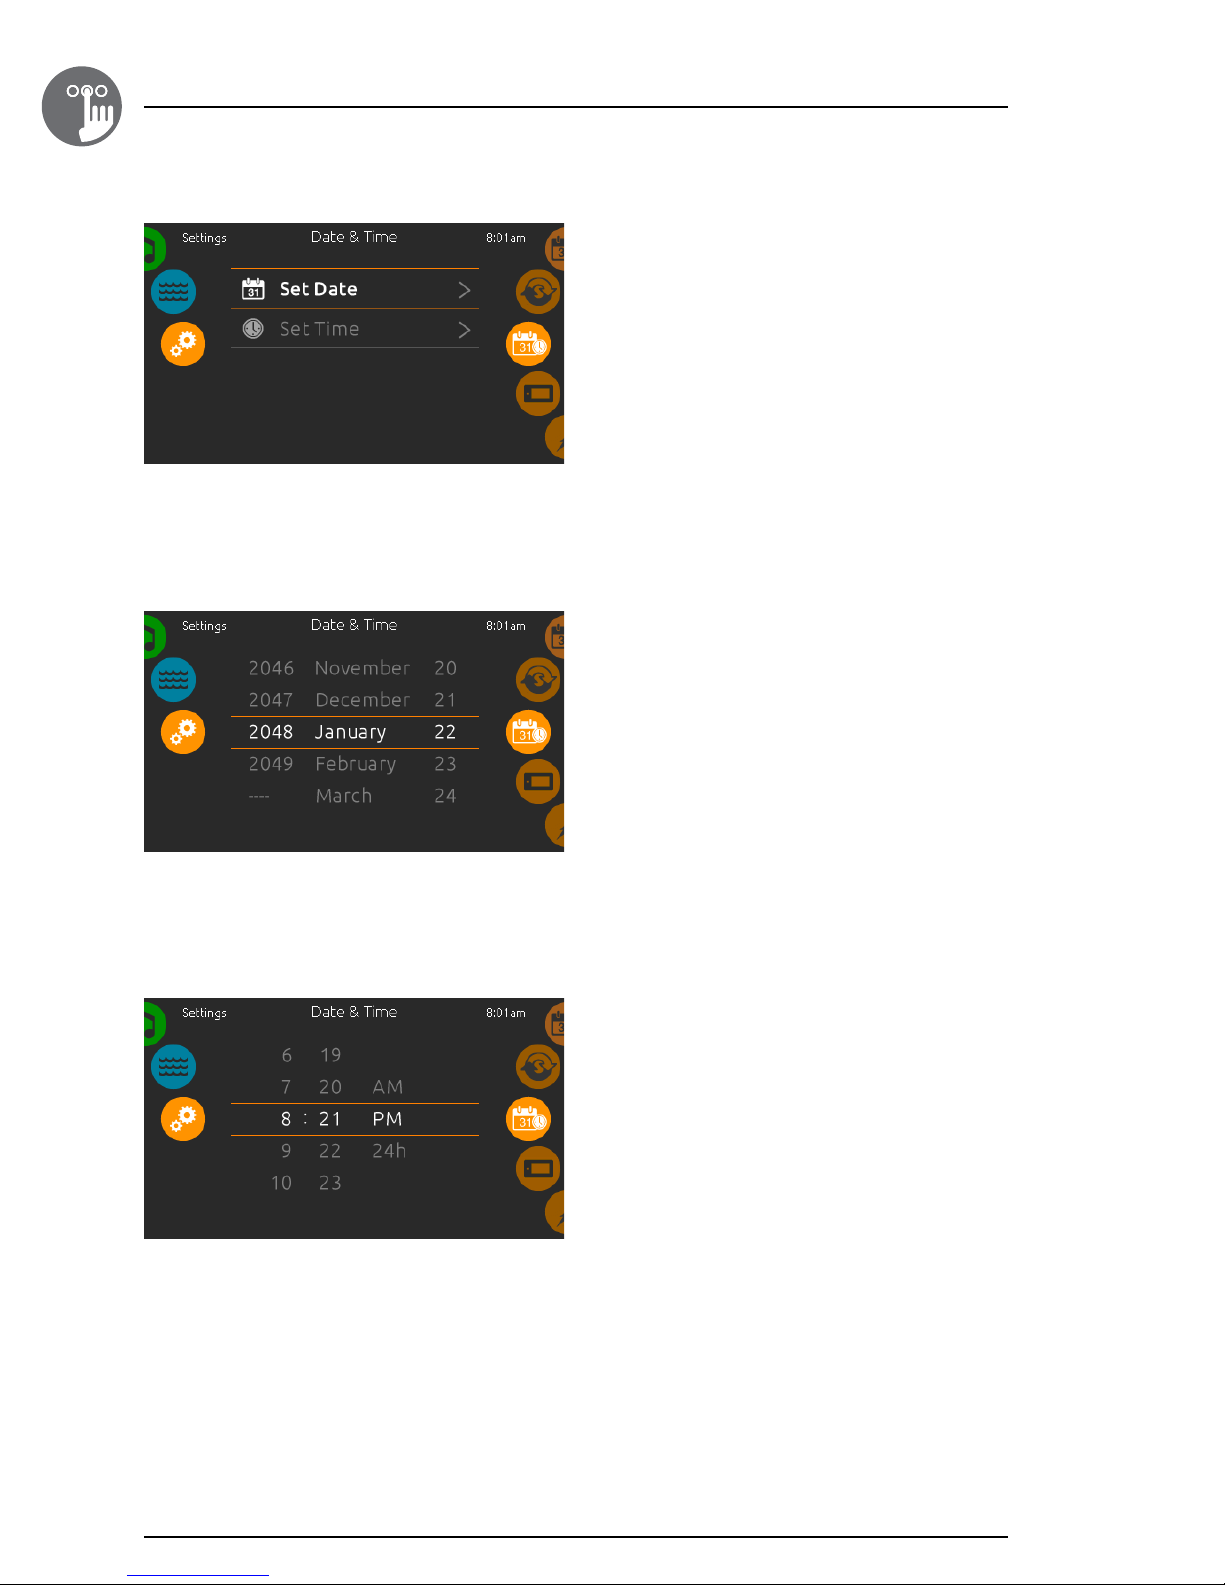
Date and time
Simply touch the item you want to change�
Set date
Here you can adjust the year, month and day�
Simply swipe up and down the column you want to
change, and select the desired value� When done,
touch the calendar icon at the right of the screen�
Set time
Here you can change the hour, minute and time format�
Simply swipe up and down the column you want to
change, and select the desired value� When done,
touch the calendar icon at the right of the screen�
16
Page 12
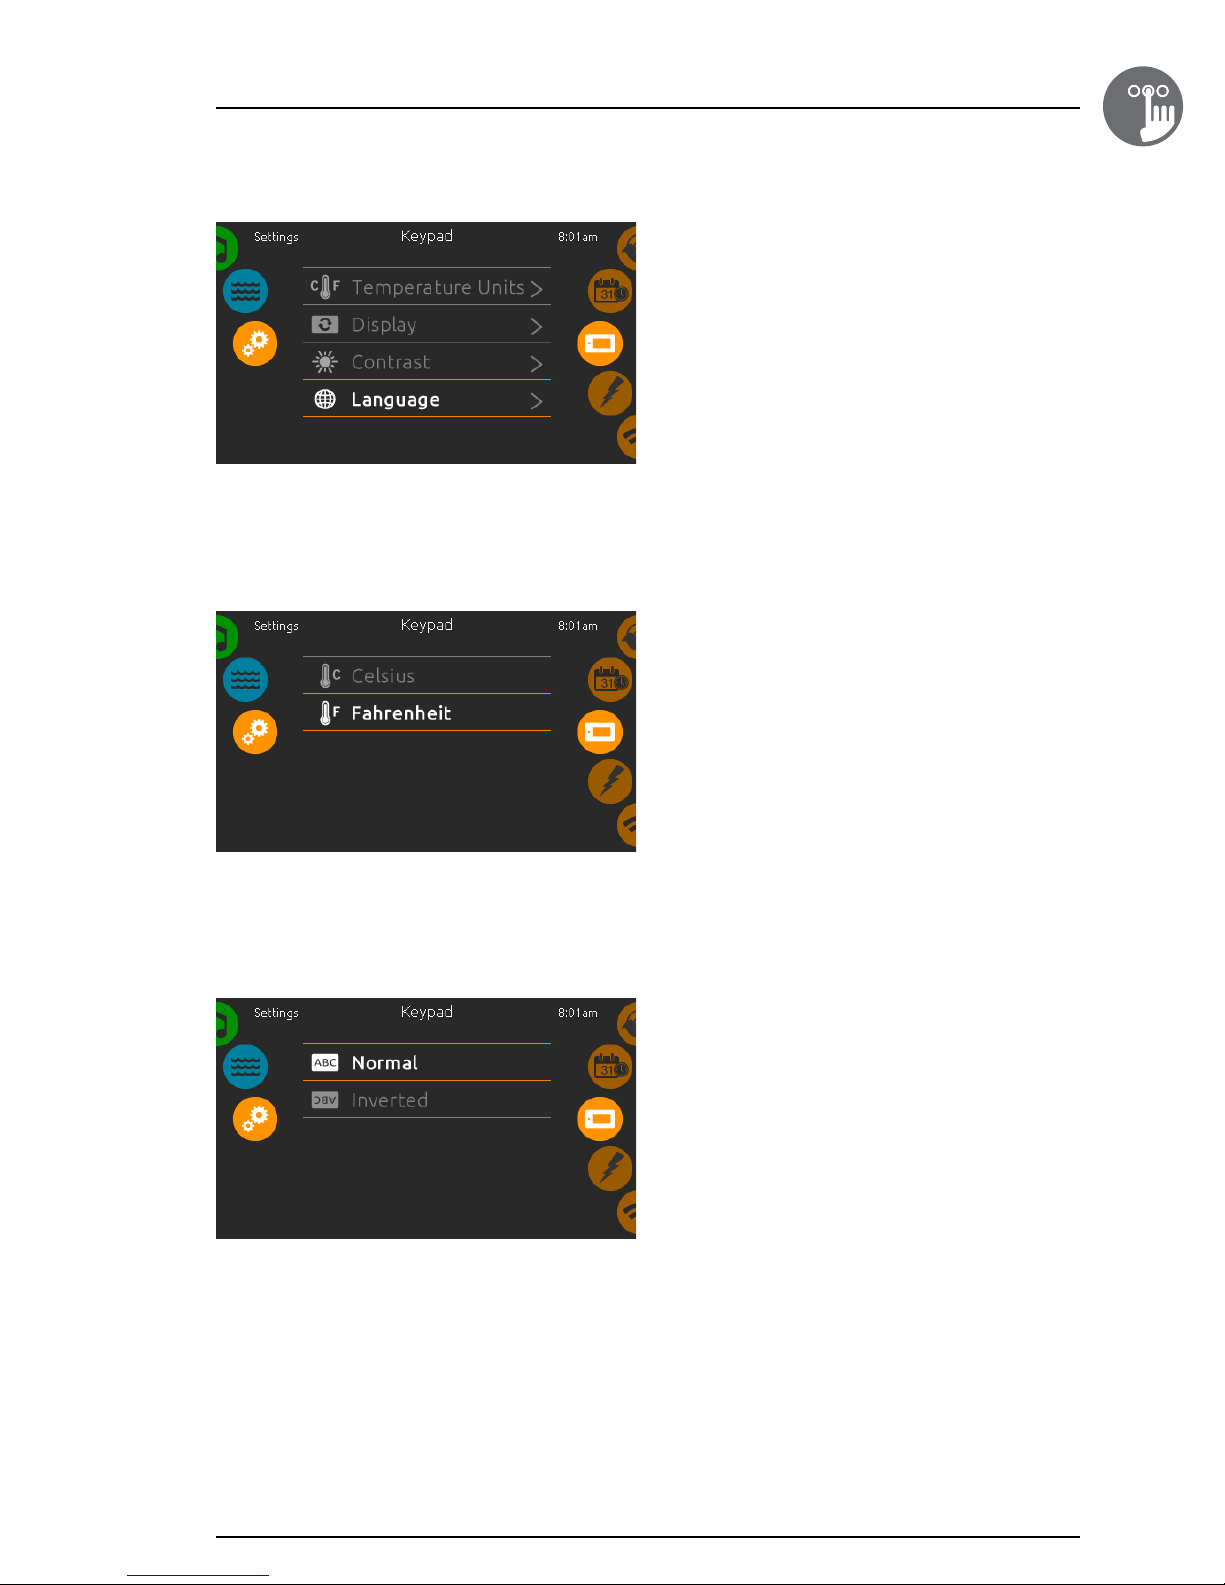
Keypad settings
Here you can adjust the Temperature Units, Day/Night
contrast, and Display orientation and language�
Simply touch the item you want to change�
Temperature units
Choose the appropriate units to display temperatures�
1
Display page
Use this page to change the display orientation�
17
Page 13
1
Keypad functions
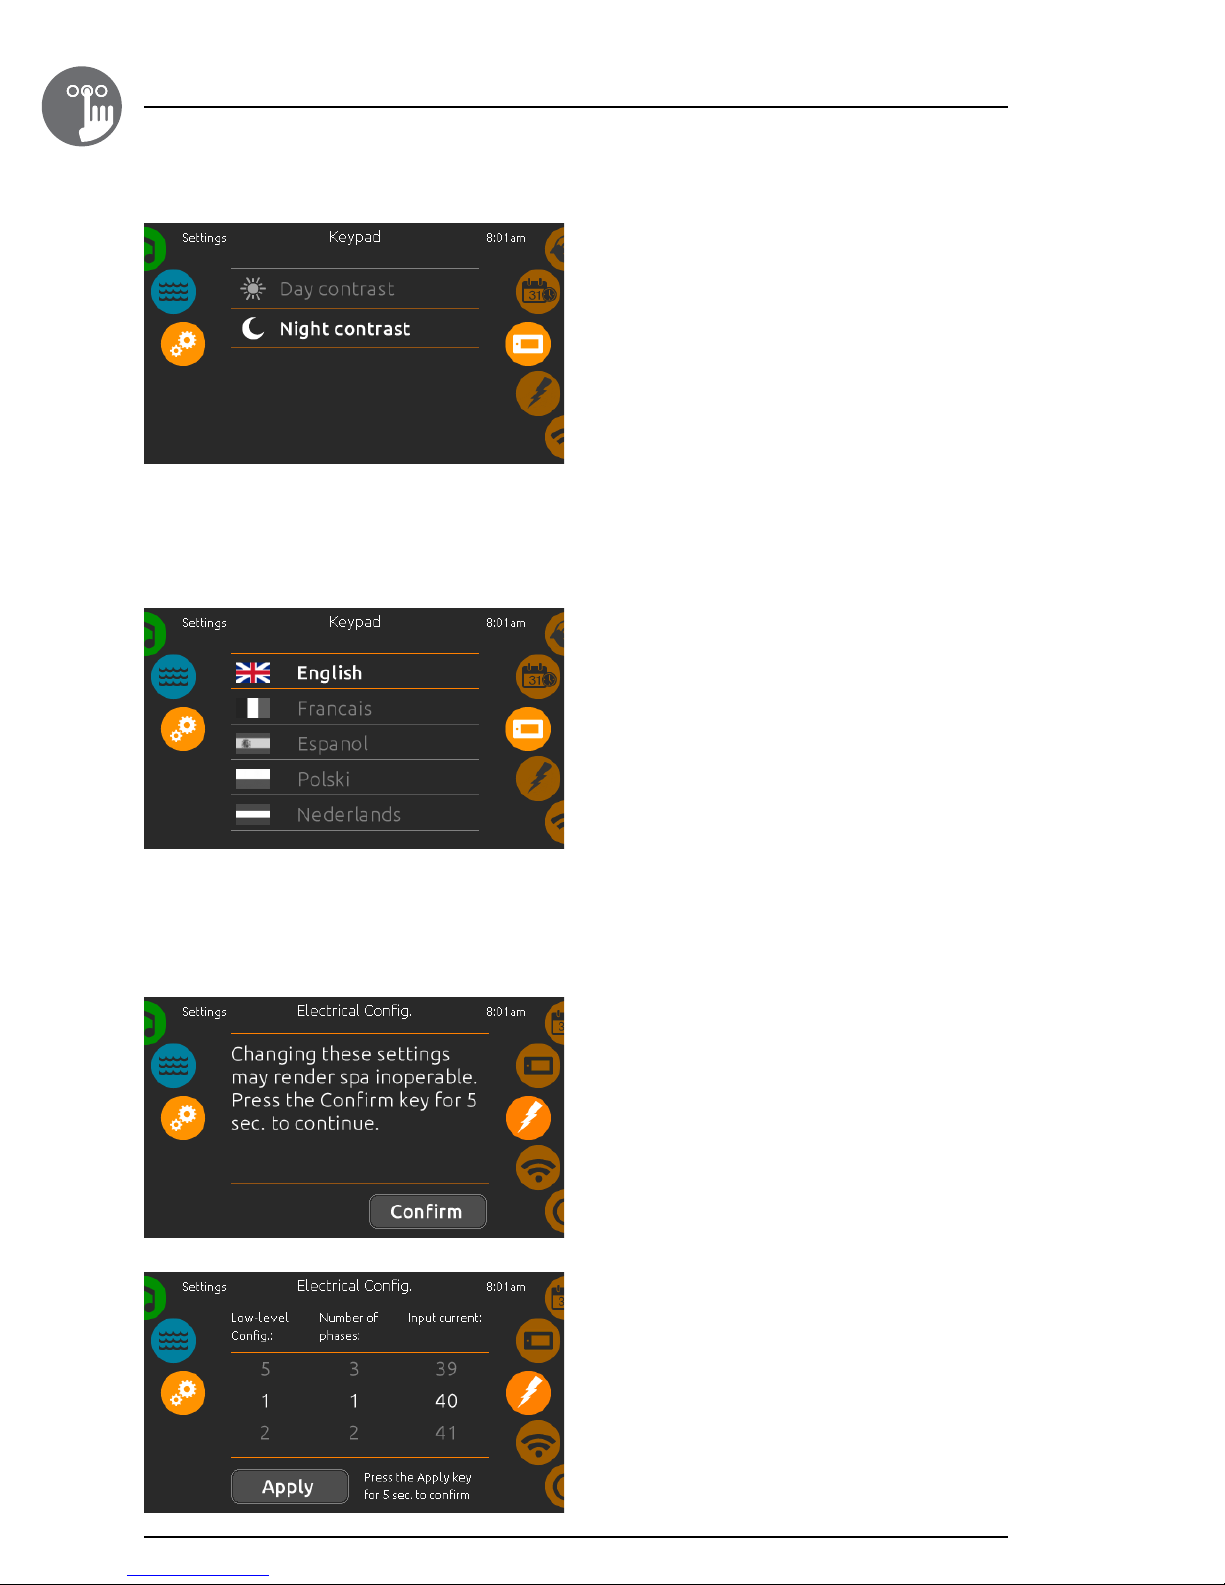
Contrast page
Simply touch the item you want to change�
Language Select
Use this page to select the display language of the
in�k1000 keypad�
18
Electrical configuration
Please do not make changes in this section unless you
are a qualified electrician.
In this section you can change the low-level configuration,
as well as modify the number of phases and the input
current�
Please note that if there are two spa packs in the system
(i�e� a SwimSpa installation), the master unit’s chosen
configuration must support a slave unit� If, after re-booting,
the chosen configuration does not support SwimSpa
installations, the in�k1000 will return (after about
45 seconds) to this configuration menu and prompt the
user to select a configuration number again�
Page 14
Keypad functions
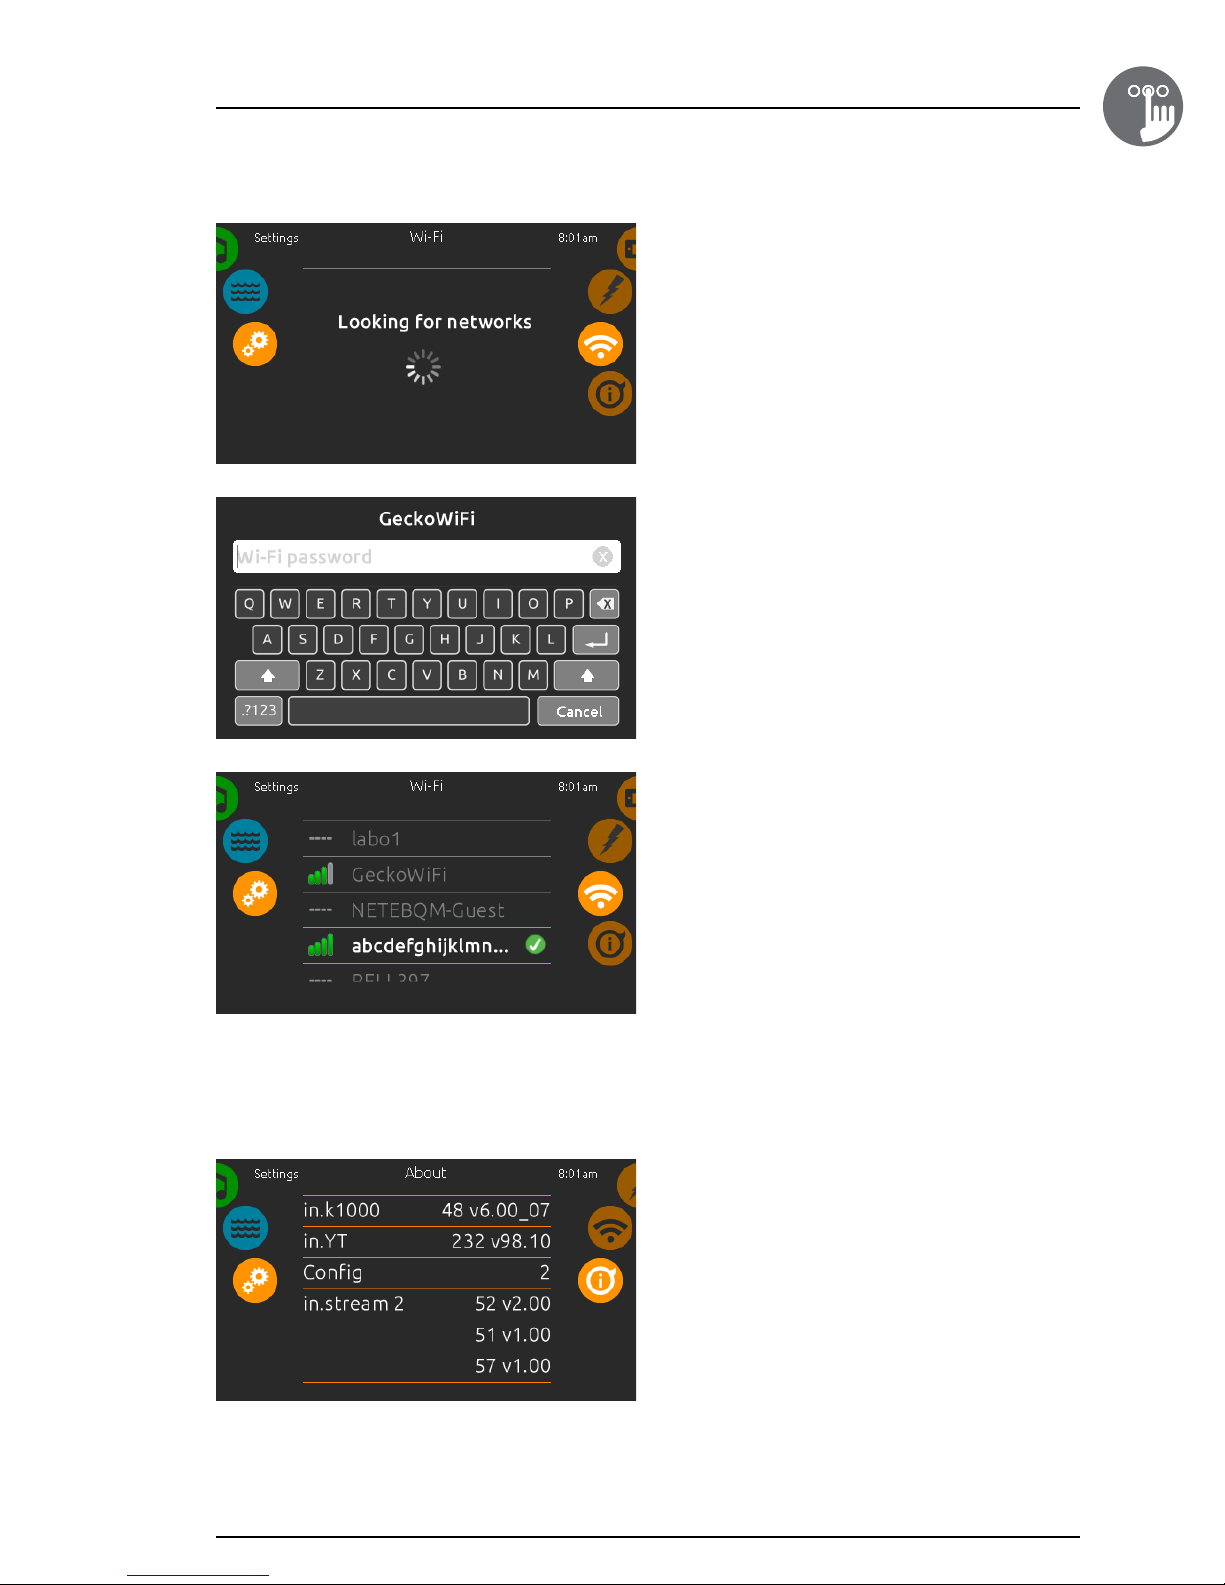
Wi-Fi
This menu is present if the in�touch module is present�
This page allows you to connect your in�touch module to a
Wi-Fi network or to change its network�
For more details about other in�touch connection methods
please see the in�touch techbook�
After a few seconds the available networks will appear on
the screen, as well as their signal strength�
Swipe Up or Down the list to select your network�
If the Wi-Fi network is password protected enter it when
prompted� Use Enter to validate the password�
If no password is required the in�touch will connect
automatically�
Once the in�touch module is connected to a
Wi-Fi network a green check mark will appear in
the Wi-Fi menu, and the network name will appear
in the
Settings
menu�
1
About
This section shows information about the in�k1000
software number, and the revision numbers of the
different components of your system�
19
Page 15
1
Keypad functions
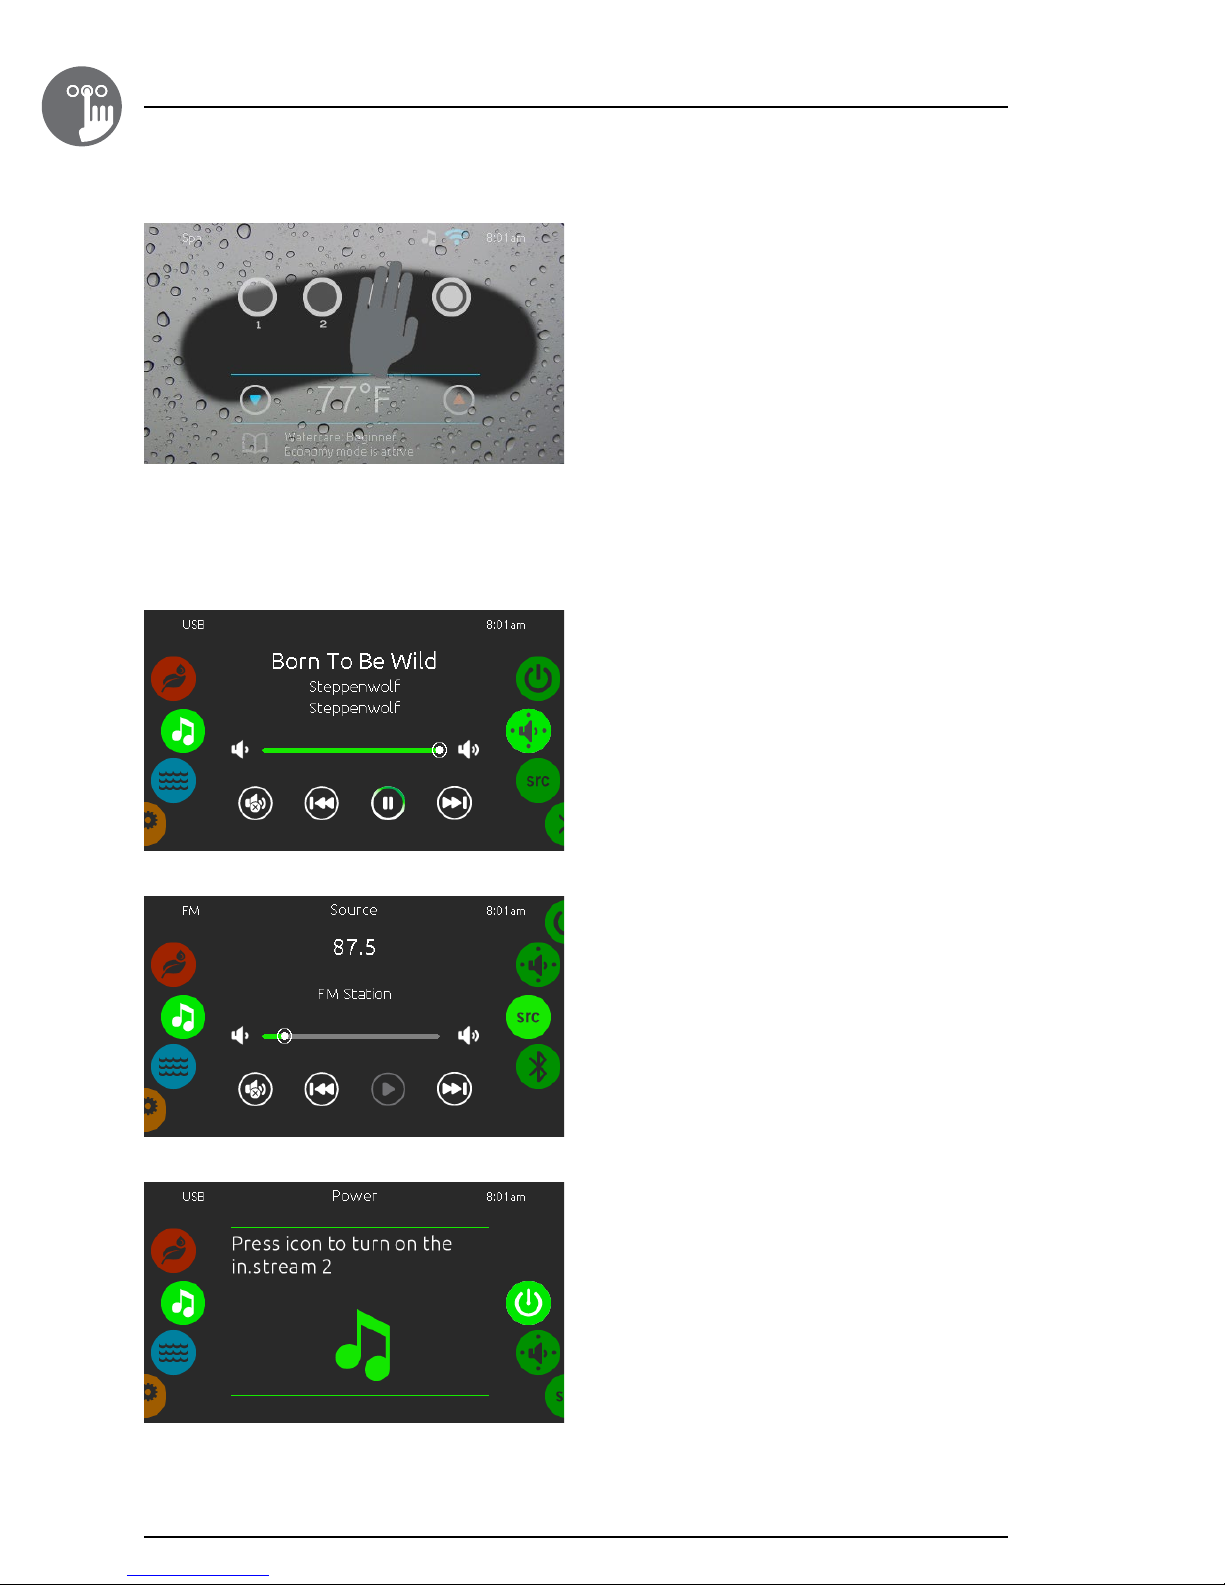
Wipe screen
This message appears when too much water is detected
on the touch screen� Simply wipe away excess water�
in.stream 2 functions
This menu is available only if the in�stream 2 audio station
is detected in the spa accessories�
The audio page will allow you to control the active audio
source� Note that only the functions that apply to the
selected source will be available� From this page, you can
also access the following:
• in.stream 2 on/off
• speaker settings
• audio source selection
• disconnect bluetooth
To select an item, slide the right wheel until the desired
icon is highlighted in the middle�
For more information about the in�stream 2 audio station,
please refer to the in�stream 2 techbook�
Power
To turn the in�stream 2 on or off, tap the icon located in
the center of the screen�
20
Page 16

Keypad functions
1
Speakers Settings
Move the sliders to adjust the Balance, Fader and
subwoofer settings�
The Fader and Subwoofer sliders will only appear in the
Speaker menu if the corresponding speakers are installed
on the in�stream 2�
Source Menu
To change the audio source, simply tap on the desired one�
Note that only the sources installed on the in�stream 2 will
be displayed in the source menu�
Disconnect Bluetooth
If a device with Bluetooth technology is connected to
the in�stream 2, you can disconnect it by pressing the
Disconnect button at the bottom of the screen�
Doing so will also prevent the in�stream 2 from
automatically reconnecting to this specific device until it
has been reconnected using the device itself�
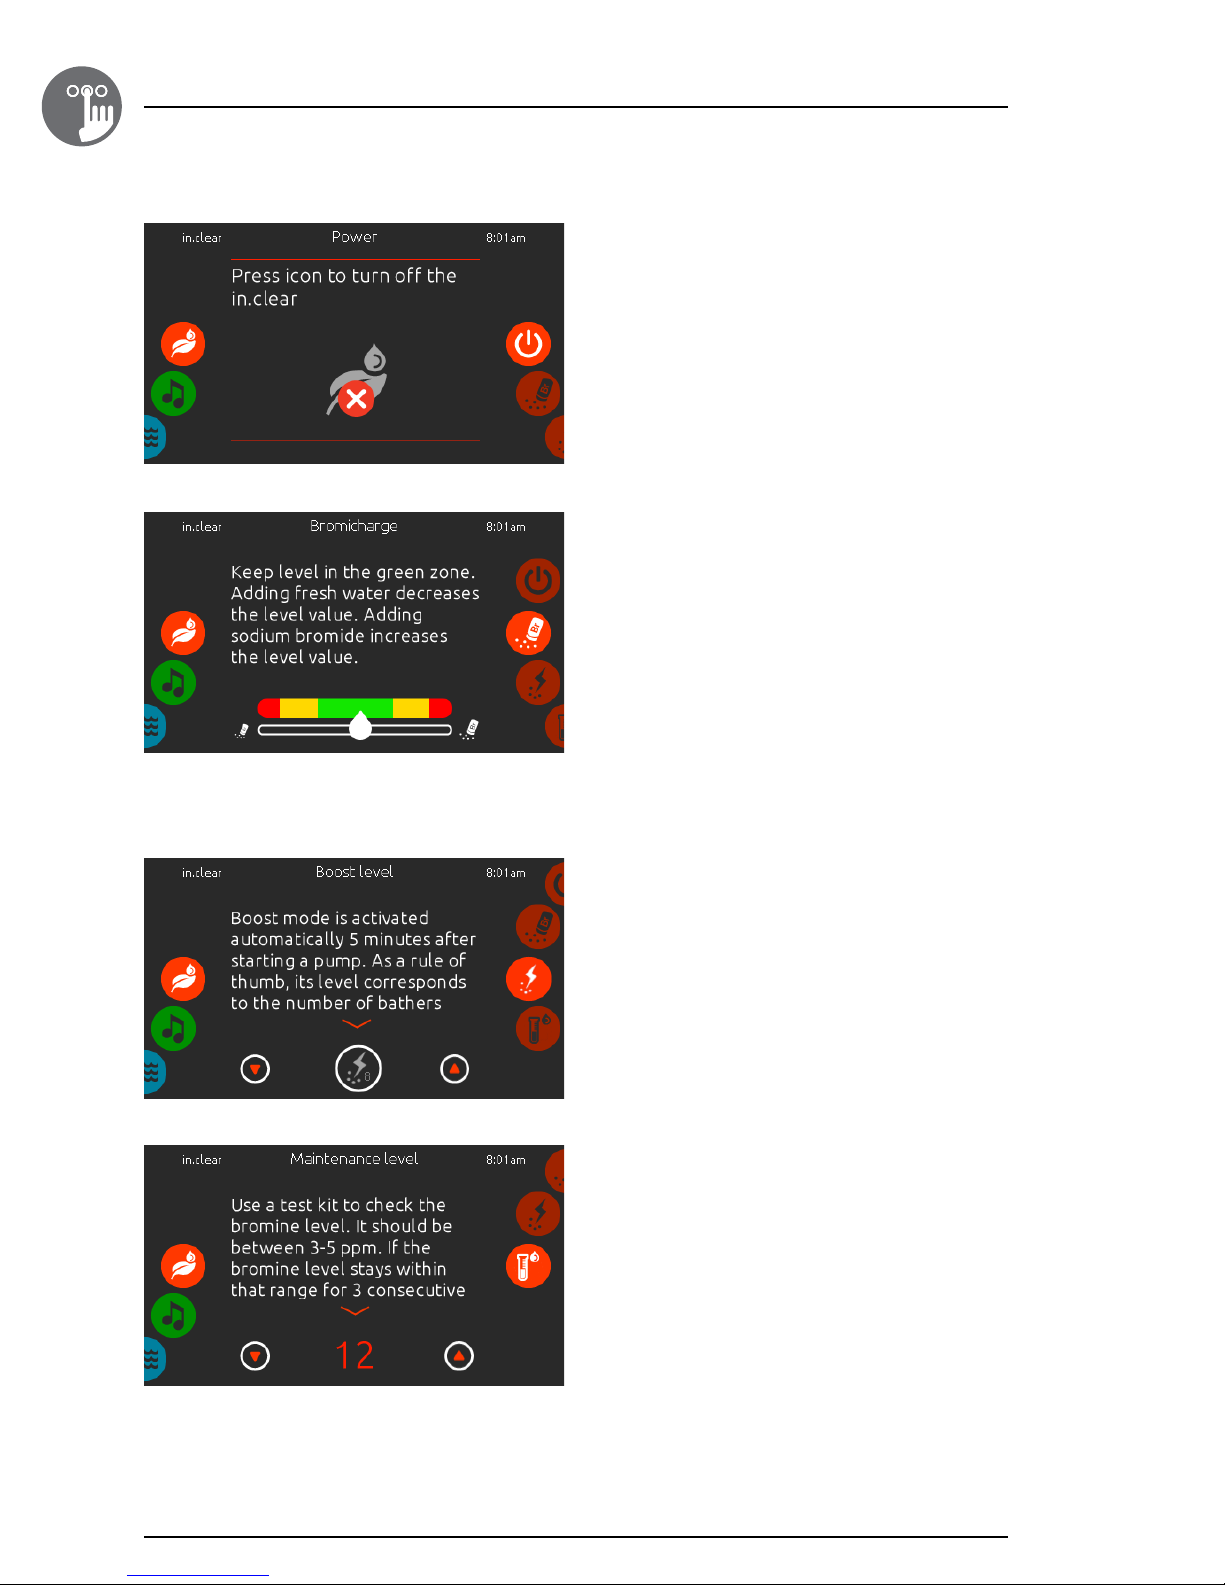
in.clear functions
This menu is available only if the in�clear is detected in the
spa accessories�
The k1000 keypad can be used with the in�clear
sanitation system�
The in.clear menu allows you to configure your
maintenance settings and boost levels� The main in.clear
menu shows the current status of the sanitation system,
whether it's on, and if it's generating bromine or not�
For more information about the in�clear, bromine levels,
and other settings, please refer to the in�clear user manual�
21
Page 17
1
Keypad functions
in.clear on/off
Use the On/Off submenu to turn on or off the in�clear
sanitation system�
Bromicharge™ level
The Bromicharge page allows you to see the current level
of sodium bromide in the water� Ideally, you should aim to
be near the center of the green area of the gauge�
Follow the instructions given on the screen to increase or
reduce the level�
Note that it may take a few moments to obtain a reading
from the in�clear, during which time the wait icon is
displayed on the gauge�
There are no settings to change on this page,
it is informative only�
Modify the Boost level
The Boost level is used to set amount of boost required�
As a rule, enter the number of bathers in the bath�
Boost mode is automatically activated 5 minutes after
starting a pump�
Modify the maintenance level
The maintenance level can be changed, and must be
tested with a bromine level tester� The tester should report
between 3-5 ppm� If the bromine level is within this range
for 3 consecutive days, your maintenance level is correctly
adjusted� If you adjust the Maintenance level by more
than 2, you will be asked to confirm this�
22
Page 18

Error messages
The list below shows the different error messages that can appear on the home screen�
Refer to the troubleshooting and error codes section of the TechBook for your spa pack system�
Please note that if you are in a swim spa configuration, the message may be followed by "Master" or "Slave" to designate
from which pack the error is coming from�
Code Message
HL High Limit circuit has tripped!
FLO No Flow condition for more than 2 hours
FLO No Flow condition
HR A hardware error was detected (Relay stuck)
OH Spa temperature is too high
Pr Temp probes or detection circuit are defective
AOH Elevated internal temperature
FLC The pressure switch is closed
SP in Input voltage issue
RH NC Comm� error between in�xm2 - in�therm
RH ID in�xm2 and in�therm incompatible
SC ER Error detected during the learning mode
F1 in�xm2 Fuse # 1 is blown
F2 in�xm2 Fuse # 2 is blown
F3 in�xm2 Fuse # 3 is blown
ER1 SwimSpa config� : slave unit is missing
Hr Hardware error was detected (Thermal fuse)
UPL The spa pack does not have valid software�
Please insert valid in�stick to reprogram spa pack�
CFLO No Flow condition
HIBr Add fresh water to the spa
HiBr Add fresh water to the spa
LoBr Add BromiCharge to spa water
NoBr Add BromiCharge to spa water
Comm Verify cable connections
Supp Connect power cord to 240 V source
1
23
Page 19

1
Feature matrix
The following table presents the features and/or options available for the in�k1000 keypad, and the earliest software version
at which this feature/option is available� All versions greater than the earliest version continue to support the feature�
Keypad functions
Power 5�00
Main screen 5�00
Start or stop accessories 5�00
Notifications 5�00
Water temperature 5�00
Spa menu 5�00
Settings 5�00
Water care 5�00
Water care modes 5�00
Modifying schedules 5�00
Maintenance
Error log 5�00
Date and time
Set date 5�00
Set time 5�00
Keypad settings
Temperature unit 5�00
Display 5�00
Contrast 5�00
Language
English 5�00
Français 5�00
Español 5�00
Polski 5�00
Nederlands 5�00
Deutsch 5�00
Norsk 5�00
Svenska 5�00
Magyar 5�00
Italiano 5�00
Português 5�00
Electrical configuration 5�00
Wi-Fi 5�00
About 5�00
Wipe screen 6�00
in�stream 2 functions 5�00
in�clear functions 7�00
Support for AC Light output 8�00
Support for in�xe-2 and in�ye-2 packs 8�00
Earliest support
24
Page 20

Specifications
Part number
0607-005024
Model
IN�K1000-BK-GE1
Environmental
Operating temperature: -4°F (-20°C) to 149°F (65°C)
Storage temperature: -22°F (-30°C) to 185°F (85°C)
Water ingress protection: IPX5
Mechanical
Weight: 1�05 lbs (0�48 kg)
Dimensions (W x H x D): 7,49" x 5,17" x 1,93"
(190 mm x 1031 mm x 49 mm)
Audio specifications
Audio source supported: in�stream 2
1
Compatibility
in�yt, in�ye, in�yj, in�xe, or in�xm2 spa packs with appropriate software revision
Specifications are subject to change without prior notice.
25
Page 21

00 manual 03.11.19
K10
 Loading...