

Page 1
TECH BOOK
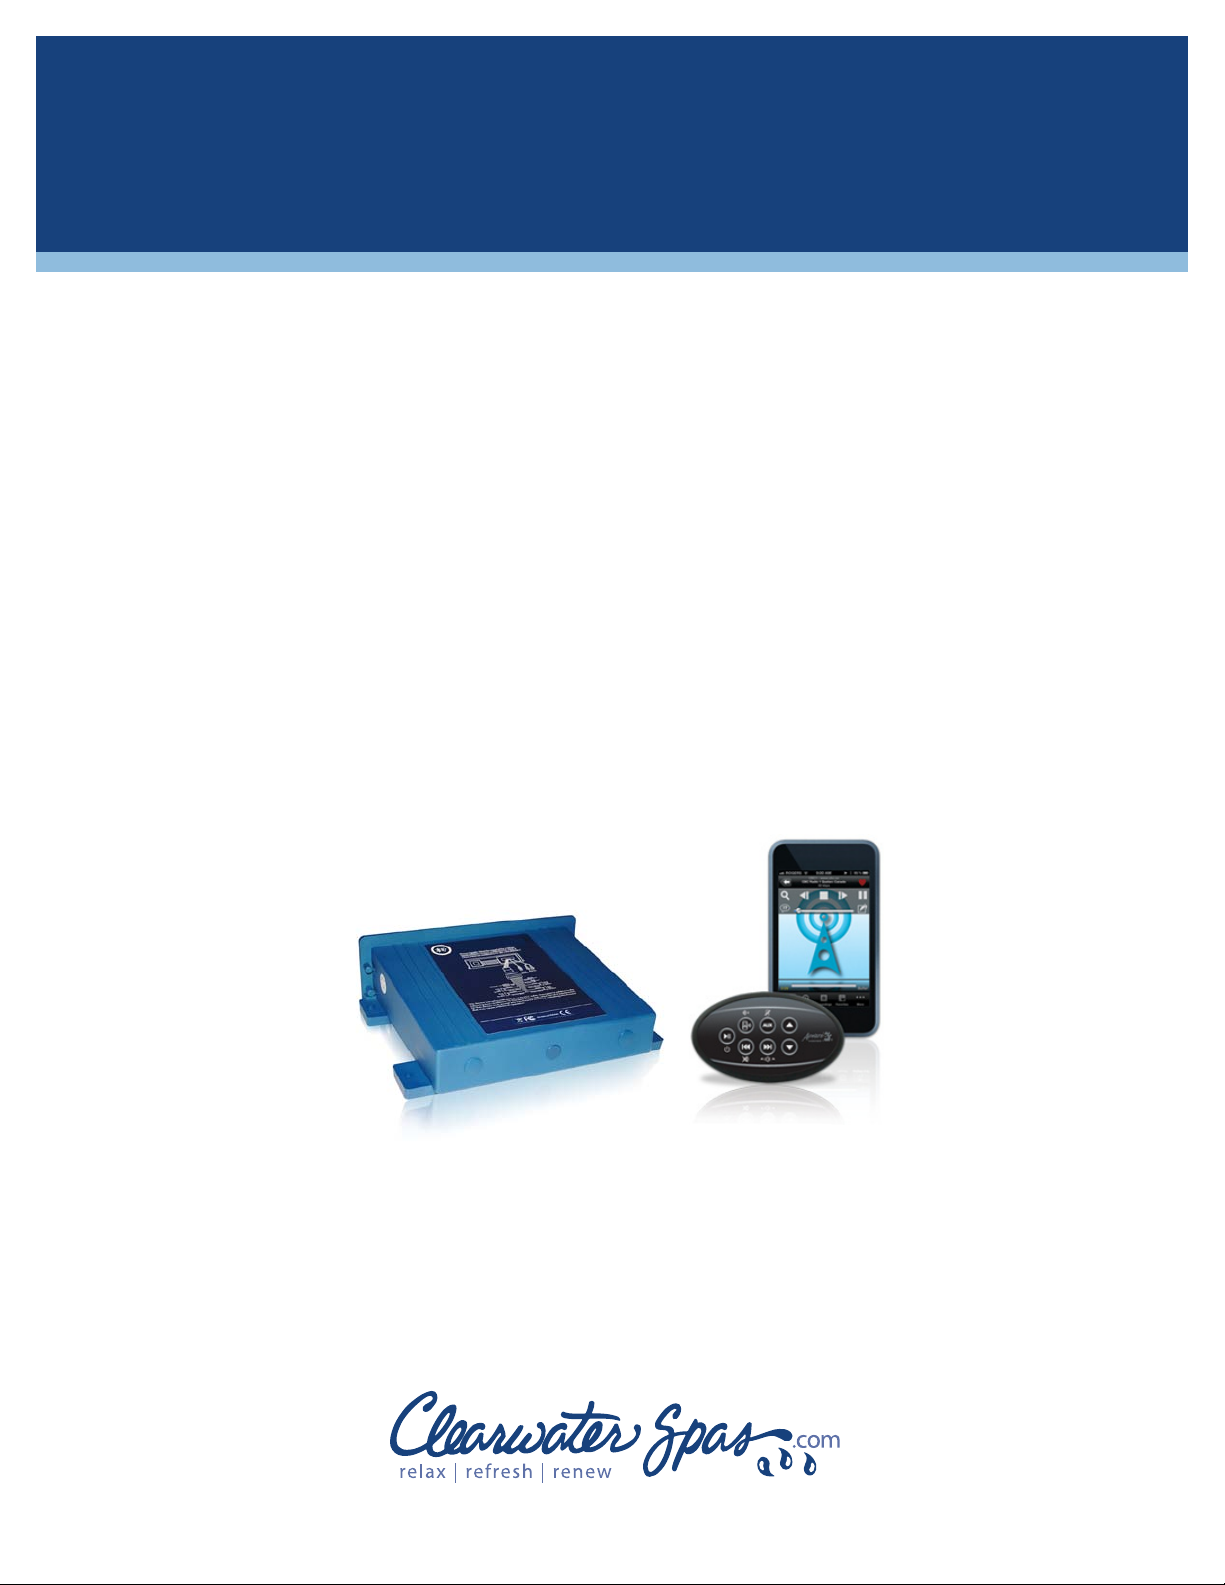
ClearStream™ Audio System by Gecko
ClearStream™
Audio System
(in.stream™ by Gecko®)
wireless music streamed into your yard
®
Use Bluetooth® wireless technology to
listen to music in your spa
ClearStream manual | 1-13
Page 2

in.stream TechBook
Table of contents
Warnings ............................................................................................................................................................... 2
Introduction ......................................................................................................................................................... 5
Overview .............................................................................................................................................................. 6
Mount on a horizontal or vertical surface ......................................................................................................... 7
Installation of in.k113 single switch ..................................................................................................................... 7
Installation of in.k175 keypad with adhesive .................................................................................................... 8
Wiring diagram .................................................................................................................................................... 9
Speakers and supply ........................................................................................................................................... 9
Connecting the keypad to in.stream ............................................................................................................... 10
Wireless set-up ................................................................................................................................................... 11
Basic operation/in.k175 .................................................................................................................................... 12
Basic operation/in.k113 ...................................................................................................................................... 13
Specifications ..................................................................................................................................................... 14
11
Page 3
Warnings
WARNINGS:
Before installing or connecting the unit, please read the following.
DO NOT DISASSEMBLE OR ALTER.
Doing so may result in an accident, fire or electrical shock.
USE THE CORRECT AMPERE RATING WHEN REPLACING FUSES.
Failure to do so may result in fire or electrical shock.
DO NOT BLOCK RADIATOR PANEL.
Doing so may cause heat to build up inside and may result in fire.
DO NOT PLACE HANDS OR FINGERS ON RADIATOR PANEL.
Doing so may result in personal injury.
DO NOT USE FOAM TO ISOLATE THE UNIT.
Doing so may cause heat to build up inside and may result in fire.
INSTALL UNIT 1" AWAY FROM OTHER SURFACES.
Make sure to leave a clearance of at least 1" from other surfaces.
MAINTENANCE
in.stream TechBook
If you have problems, do not attempt to repair the unit yourself. Return it to your dealer or service
station for servicing.
ACCESSORY PARTS
Be sure to use only the specified accessory parts. Use of other than designated parts may damage
this unit internally or may not securely install the unit in place. This may cause parts to become loose
resulting in hazards or product failure.
DISPOSAL OF THE PRODUCT
The appliance (or the product) must be disposed of separately
in accordance with t
he local waste disposal legislation in force.
WARNINGS:
When this equipment is provided as an audio/video component for spas, UL 1563 - 6th
edition requires that the following instructions (or equivalent) be provided as part of the
instruction manual for the spa equipment.
PREVENT ELECTROCUTION
Do not connect any auxiliary components (for example cable, additional speakers, headphones,
additional audio/video components, etc) to the system.
Do not service this product yourself as opening or removing covers may expose you to dangerous
voltage or other risk of injury. Refer all servicing to qualified service personnel.
When the power supply connections or power supply cord(s) are damaged; if water is entering the
audio/video compartment or any electrical equipment compartment area; if the protective shields or
barriers are showing signs of deterioration; or if there are signs of other potential damage to the unit,
turn off the unit and refer servicing to a qualified service personnel.
Aeware®, Gecko®, and their respective logos are Registered Trademarks of Gecko Alliance Group.
in.k175™, In.k113™, and in.stream™, and their respective logos are Trademarks of Gecko Alliance Group.
The Bluetooth® word mark and logos are registered trademarks owned by Bluetooth SIG, Inc. and any
se of such marks by Gecko Alliance is under license.
u
All other product or company names that may be mentioned in this publication are tradenames,
2
trademarks or registered trademarks of their respective owners.
Page 4

in.stream TechBook
FCC WARNING:
This device complies with Part 15 of the FCC Rules. Operation is subject to the following two conditions:
(1) this device may not cause harmful interference, and
(2) this device must accept any interference received, including interference that may cause undesired
operation. Changes or modifications not expressly approved by the party responsible for compliance
could void the user's authority to operate the equipment.
NOTE: This equipment has been tested and found to comply with the limits for a Class B digital device,
pursuant to Part 15 of the FCC Rules. These limits are designed to provide reasonable protection against
harmful interference in a residential installation. This equipment generates, uses and can radiate radio
requency energy and, if not installed and used in accordance with the instructions, may cause harmful
interference to radio communications. However, there is no guarantee that interference will not occur
in a particular installation. If this equipment does cause harmful interference to radio or television
reception, which can be determined by turning the equipment off and on, the user is encouraged to try
to correct the interference by one or more of the following measures:
Reorient or relocate the receiving antenna.
Increase the separation between t
Connect the equipment into an outlet on a circuit different from that to which the receiver is connected.
Consult the dealer or an experienced radio/TV technician for help.
he equipment and receiver.
FCC RF WARNING STATEMENT:
The device has been evaluated to meet general RF exposure requirement.
The device can be used in portable exposure condition without restriction.
3
Page 5

in.stream TechBook
RTTE WARNING
RTTE Warning (2.4G)
National Restrictions
This device is intended for home and office use in all EU countries (and other countries following
the EU directive 1999/5/EC) without any limitation except for the countries mentioned below:
Country Restriction Reason/remark
France Outdoor use limited to 10 mW
e.i.r.p. within the band
2454-2483.5 MHz.
Italy None For private use, a general
Norway Implemented This subsection does not apply for
Russian Federation None Indoor applications
Military Radiolocation use.
Refarming of the 2.4 GHz has been
ongoing in recent years to
allow current relaxed regulation.
Full implementation planned 2012.
authorisation is required if WAS/
RLAN’s are used outside own
premises. For public use, a general
authorisation is required.
the geographical area within a radius
of 20 km from the centre of
Ny-Ålesund.
RTTE STATEMENT:
Hereby, Gecko Alliance, 450 des Canetons, Quebec City (QC) G2E 5W6 Canada, declares that this Bluetooth device,
in.stream, is in compliance with the essential requirements and other relevant provisions
of Directive 1999/5/EC.
IC WARNING
This device complies with Industry Canada licence-exempt RSS standard(s). Operation is subject
to the following two conditions: (1) this device may not cause interference, and (2) this device
must accept any interference, including interference that may cause undesired operation of the device.
2. Changes or modifications not expressly approved by the party responsible for compliance could void the user's
authority to operate the equipment.
RSS-102 STATEMENT:
This equipment complies with Industry Canada radiation exposure limits set forth for an uncontrolled environment.
4
Page 6
in.stream TechBook
Introduction
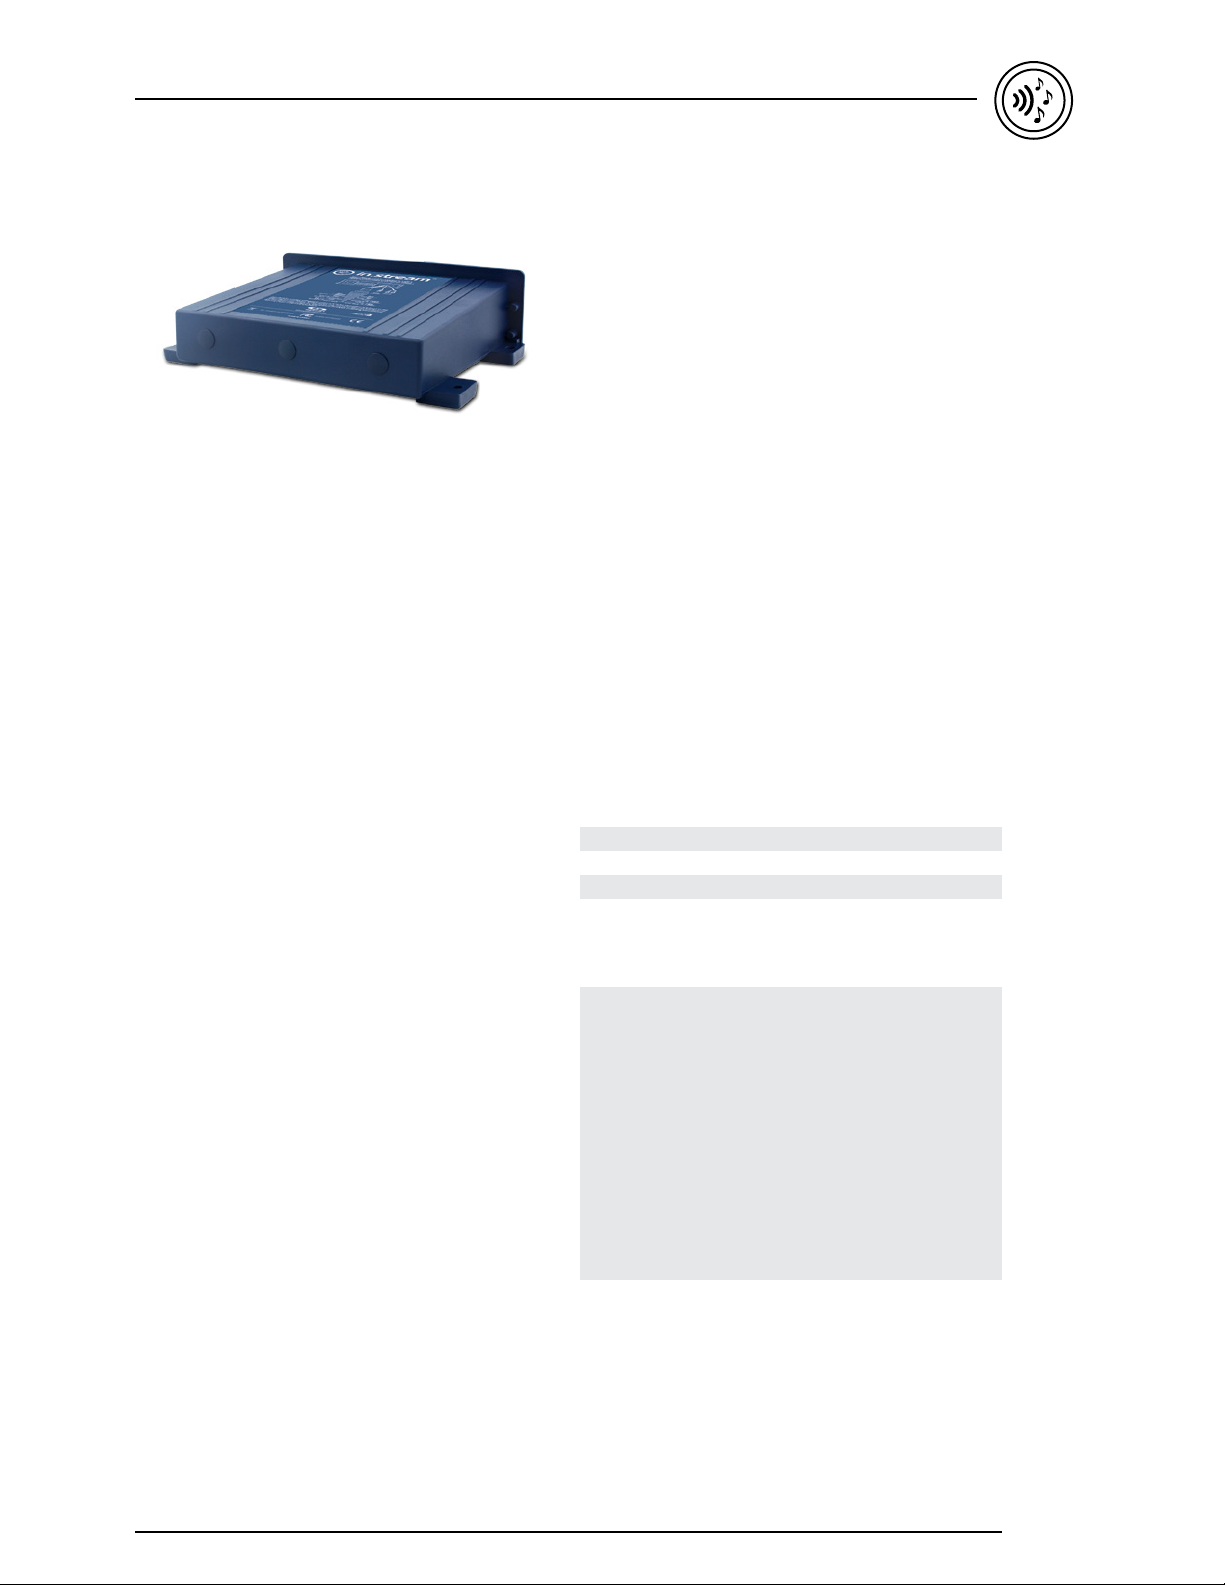
in.stream
Wireless music streamed into
your yard!
The in.stream audio system provides the perfect way
to bring music to your spa. In.stream is simple to install
and compatible with many audio sources, such as iPods
and smart phones equipped with Bluetooth wireless
technology.
The in.stream design is based on its predecessor,
the in.chant, and it shares the same sleek enclosure
that has been thoroughly used and proven in the spa
environment.
Just pair your device and start playing your favorite
music. Digital music files or internet radio from your
phone will be sent wirelessly to the in.stream device
located under the spa.
The in.stream system is equipped with a transceiver and
an amplifier to host your speakers.
Main features
Fully waterproof
Speaker outputs 40 Watts x 4 ch.
Auxiliary input
Transceiver for Bluetooth wireless technology
Accessories
In order to use the in.stream system you must
also have either the in.k175 keypad or the in.k113
single switch.
Product numbers
in.k175
0707-005012: IN.K175-BK-SPA-AE3
in.k113
0707-008001: IN.K113-CL-20-AE1
5
Page 7
Overview
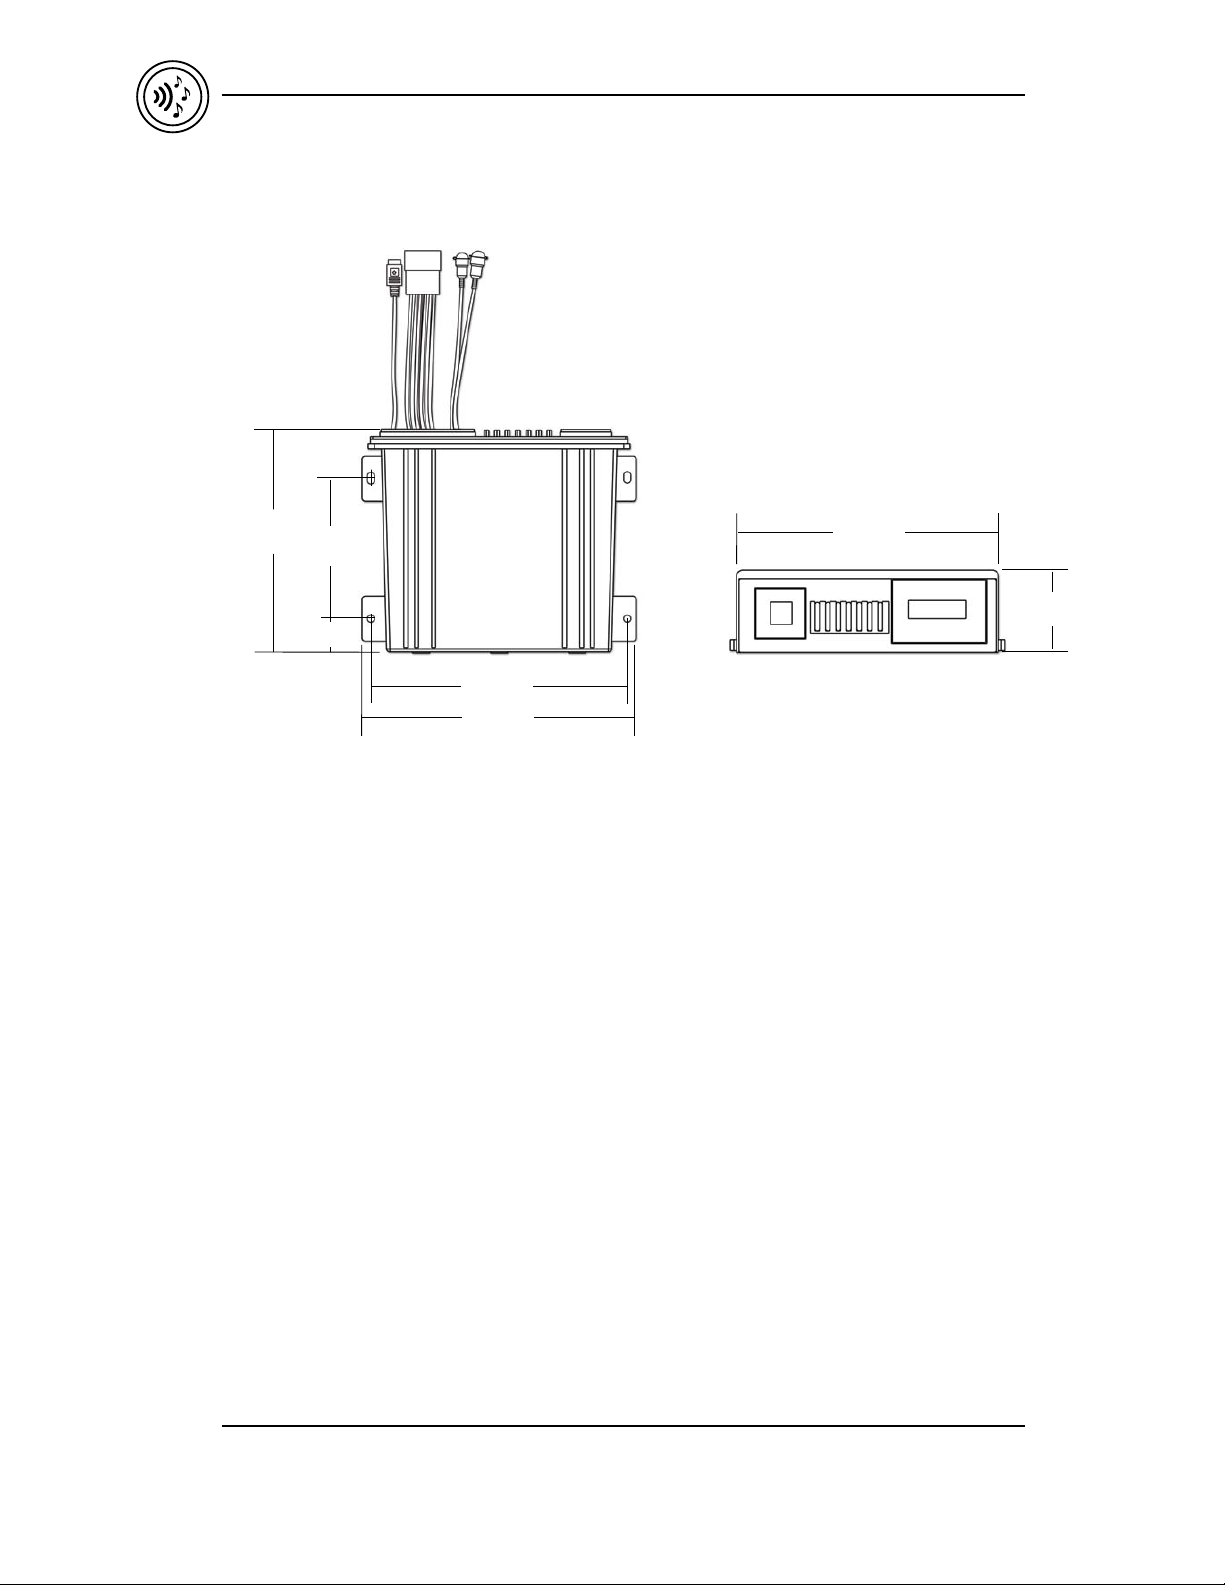
In.stream dimensions:
in.stream TechBook
6.75"
(171 mm)
4.210"
(107 mm)
0.992"
(25 mm)
7.650"
(194 mm)
8.25"
(210 mm)
7.810"
(198 mm)
2.5"
(64 mm)
6
Page 8
in.stream TechBook
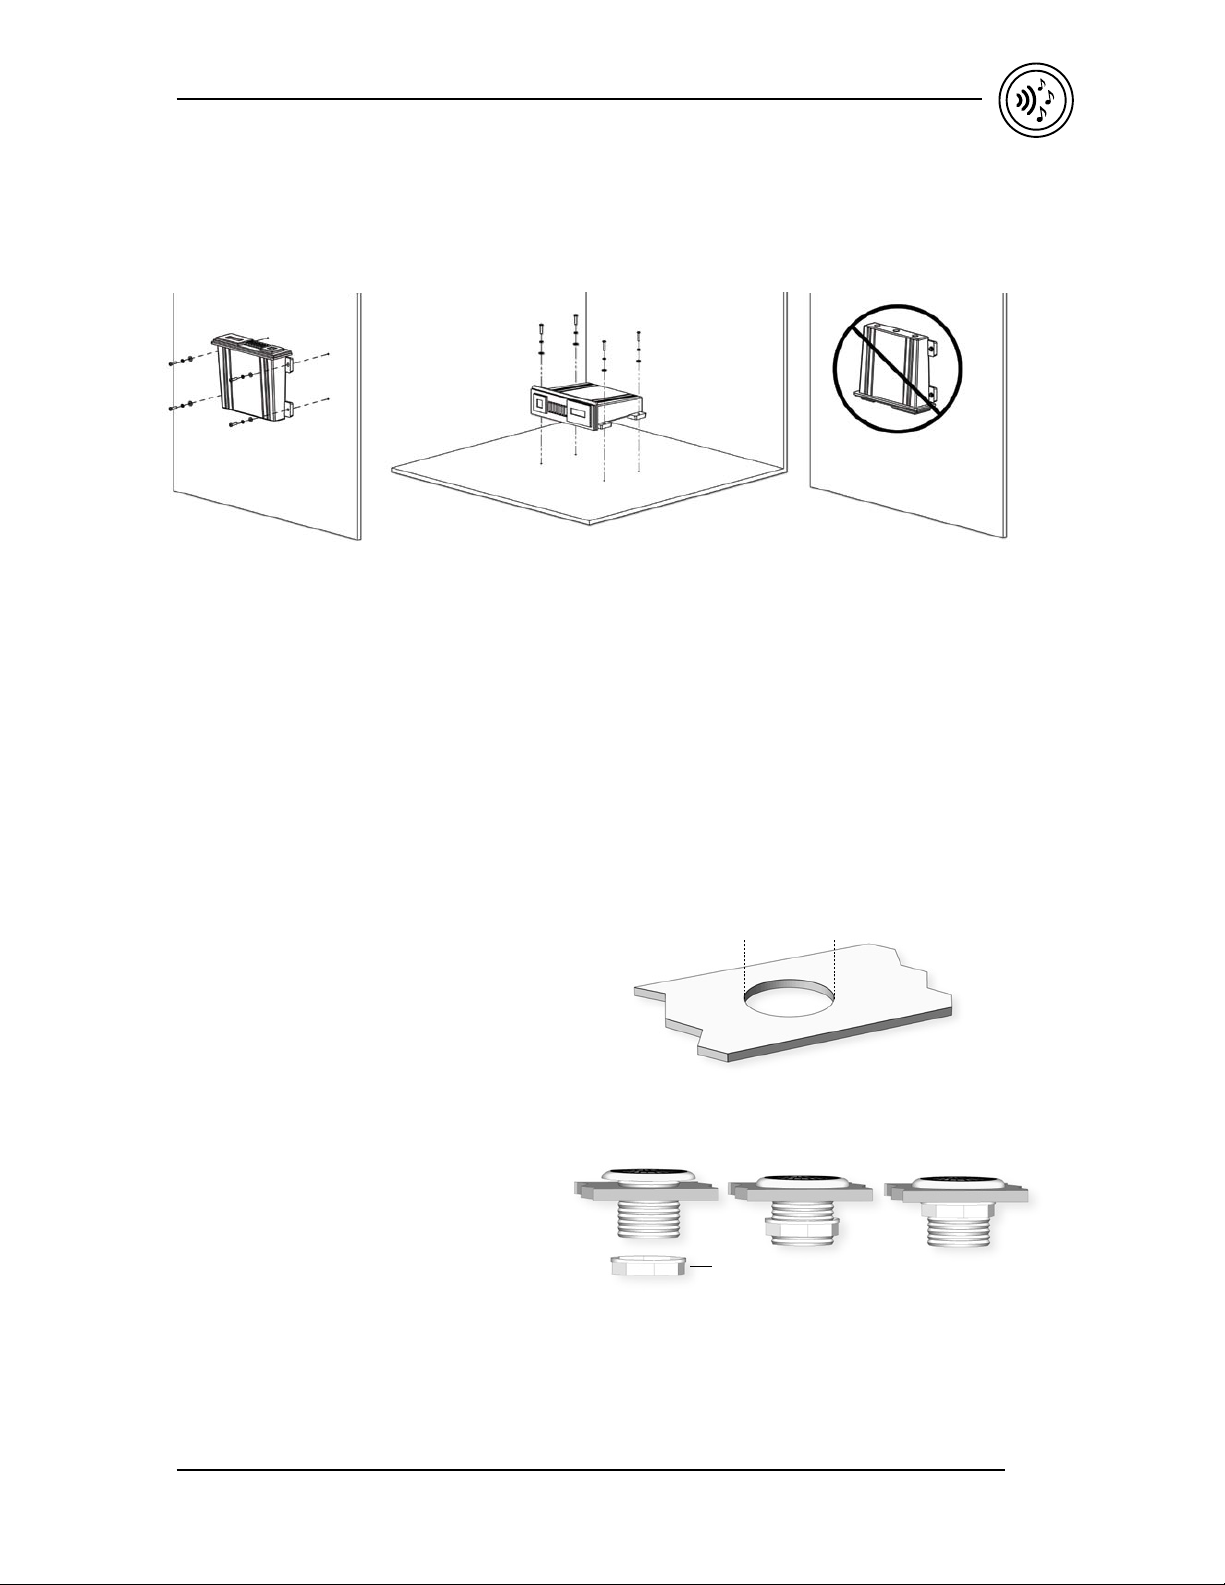
Mount on a horizontal or vertical surface
The in.stream system should be installed on an even
horizontal or vertical surface.
Whether horizontal or vertical, this unit should be
installed at a location above the flood level of the spa.
Installation of in.k113 single switch
To install the in.k113 single switch, select the most
appropriate location for the control switch and drill a
7/8" (22 mm) hole. Insert control switch into the hole.
Tighten the nut to attach firmly (see illustration).
Do not install in.stream in
the upright position as
illustrated above.
7/8"
22 mm
Nut
7
Page 9
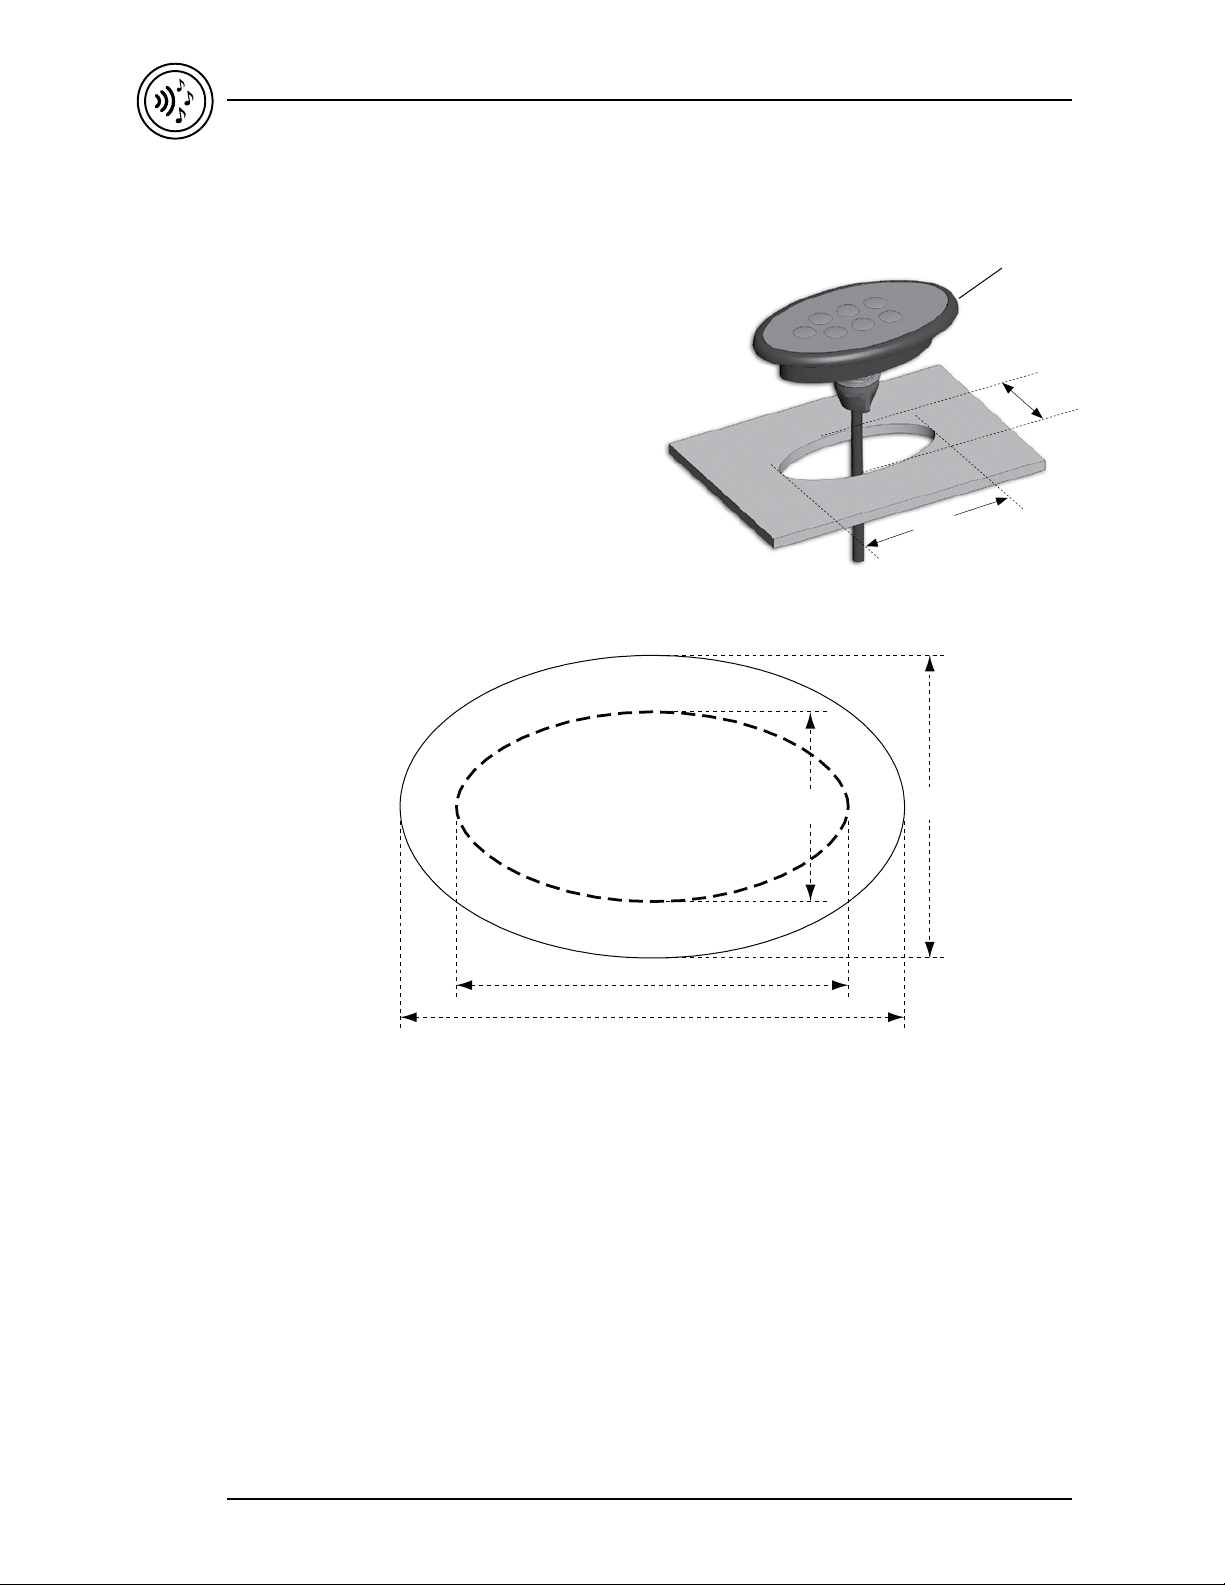
Installation of in.k175 keypad with adhesive
in.stream TechBook
To install the in.k175, select the most appropriate
location for the keypad and use the drilling template
to cut the surface. Clean the surface, peel the backing
paper from the adhesive on the keypad and insert the
in.k175 into the hole (see illustration).
Cut along
Dashed line
1.35 "
Gasket with adhesive
1.35"
2.78"
2.15 "
2.78 "
3.58 "
8
Page 10
in.stream TechBook
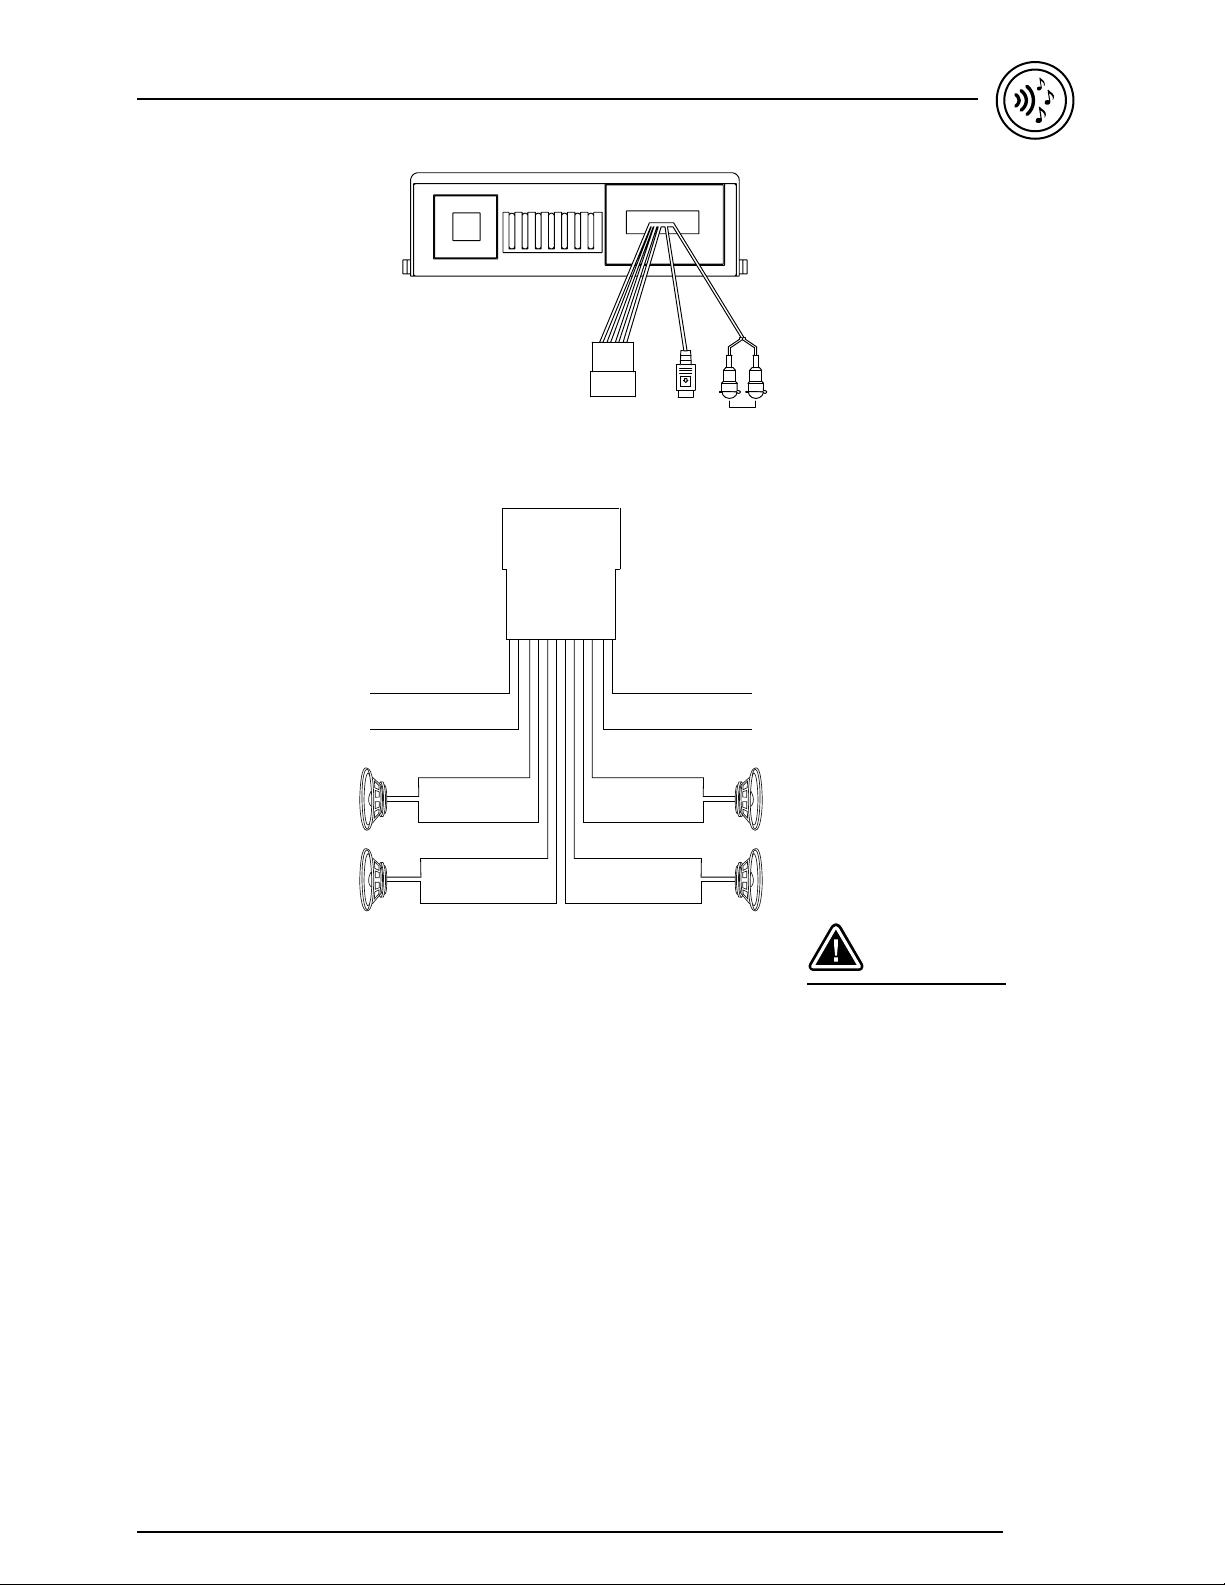
Wiring diagram
black
Speakers and supply
speaker
speaker
Important note:
This unit must be supplied
by a +12 V DC Limited
Power source certified to
UL 1585-3, Class 2 Wet or
certified to UL/IEC/EN
60950-1.
Yellow Wire (w/fuse)
Connect this wire to a
constant +12 V DC power
source.
Red Wire
Connect this wire to a
constant +12 V DC power
source.
Black Wire
Connect this wire to the
ground of the power
source.
Blue Wire
Do not connect this wire.
Unused wire.
blue
not used
yellow
12 V DC
front
left
rear
left
+
-
white/black grey/black
+
-
green/black violet/black
White wire
Connect this wire to
the left front speaker (+)
positive terminal or wire.
White wire with Black
stripe
Connect this wire to
the left front speaker (-)
negative terminal or wire.
Grey wire
Connect this wire to the
right front speaker (+)
positive terminal or wire.
Grey wire with Black
stripe
Connect this wire to the
right front speaker (-)
negative terminal or wire.
Green wire
Connect this wire to
the left rear speaker (+)
positive terminal or wire.
main
harness
connector
connector
white grey
green violet
Green wire with Black
stripe
Connect this wire to
the left rear speaker (-)
negative terminal or wire.
Purple wire
Connect this wire to the
right rear speaker (+)
positive terminal or wire.
Purple wire with Black
stripe
Connect this wire to
the r
ight rear speaker (-)
negative terminal or wire.
Notes:
This unit is designed to
connect 4 speakers: If
the installation requires
only 2 speakers, use the
white and grey wire sets to
connect the speakers.
wire remote
black
ground -
red
12 V DC
input
auxiliary
in.k175 or in.k113
front
+
right
-
speaker
rear
+
right
speaker
-
WARNING
Any wires left
unconnected must be
taped off or capped off to
prevent shorting.
DO NOT connect speaker
ground wires together.
DO NOT connect speaker
ground wires to the chassis
or to the power supply
ground.
DO NOT connect front
and rear speaker wires
together.
FAILURE TO FOLLOW
ANY OF THESE
WARNINGS WILL RESULT
IN DAMAGE TO THIS
UNIT AND VOIDS THE
WARRANTY.
9
Page 11
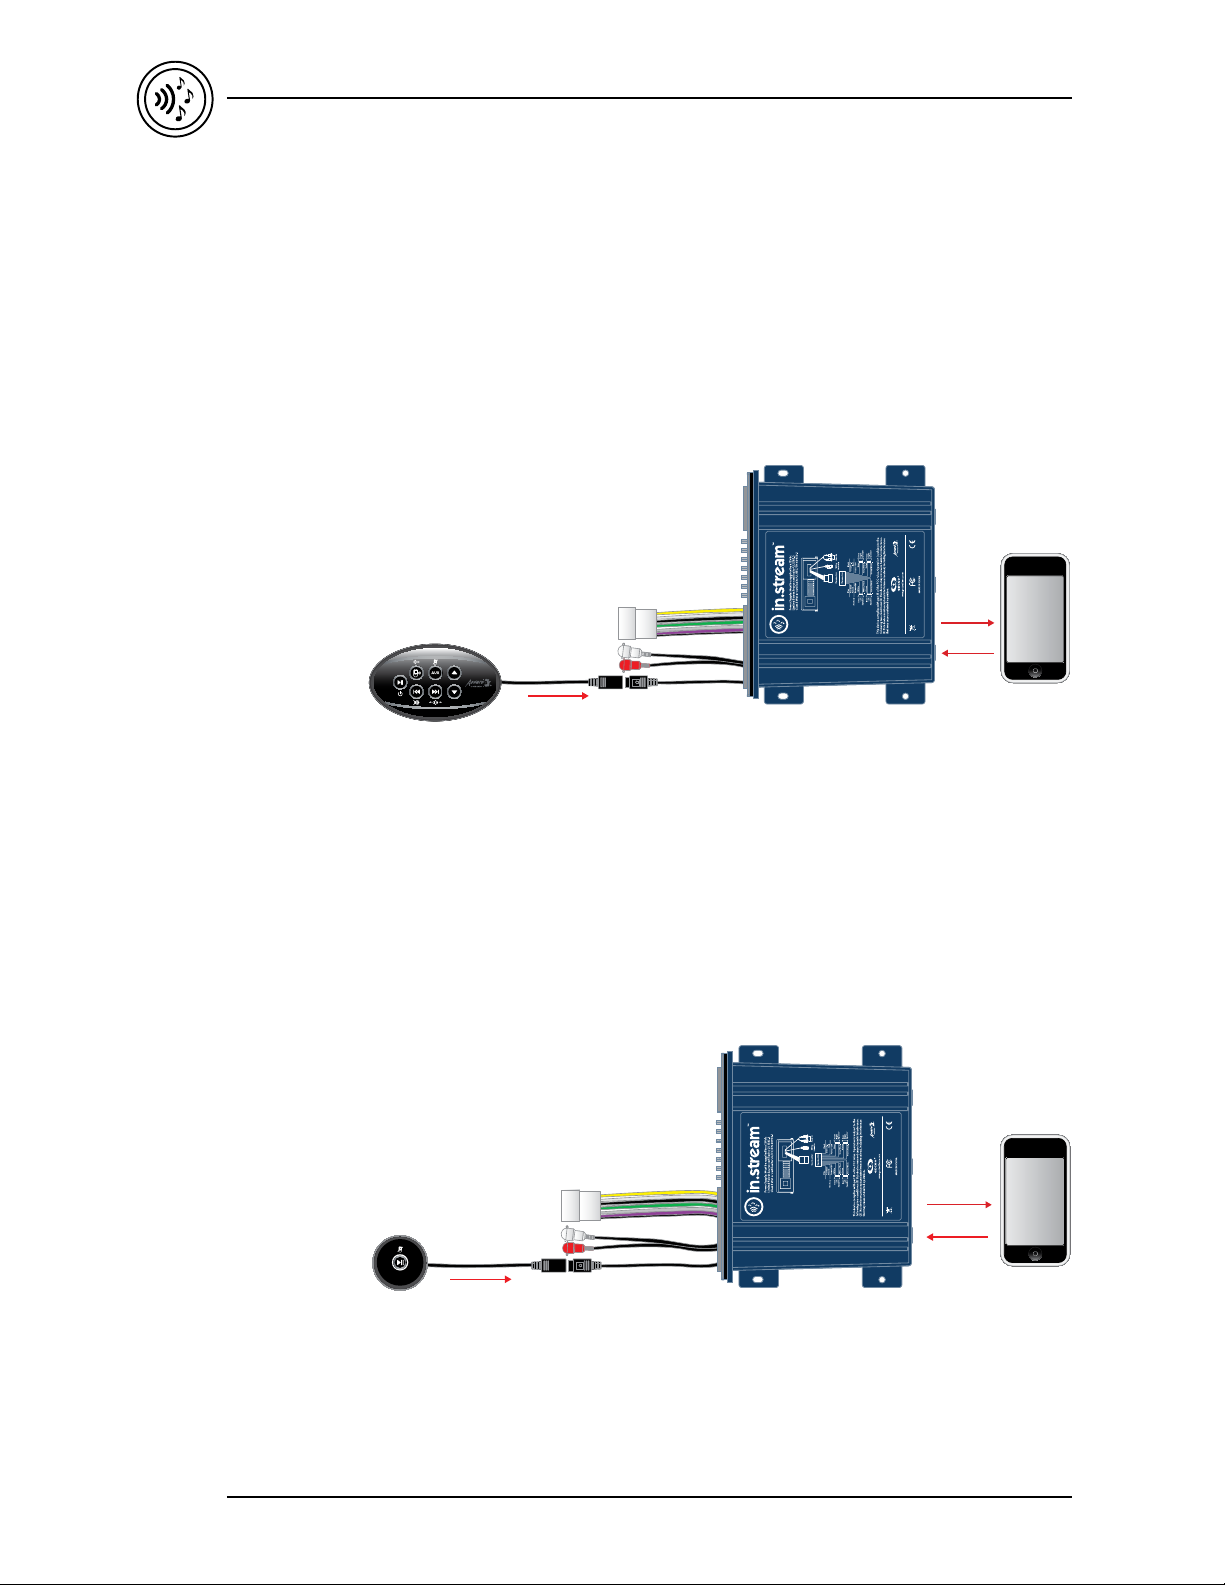
Connecting the keypad to in.stream
In.k175 configuration
The in.stream system can be connected to an in.k175
keypad. This keypad allows control of volume, mute,
play, pause and track changes. The in.stream also has an
auxiliary audio input, so it can provide the audio output
for other, wired, accessories such as MP3 players or TVs.
The in.k175 keypad comes with a 20' cable with an 8-pin
mini-DIN male connector.
To connect the keypad, simply insert the male 8-pin
mini-DIN connector into the receiving 8-pin mini-DIN
labelled "wire remote connector" in the illustration.
in.k175
Power & speakers
Aux. input
in.stream TechBook
NV8IN-STREAM
Command
IC: 10440A-IN.STREAM
Audio stream
Wire remote
in.k175 to 8 pin mini-DIN
connector
In.k113 configuration
The in.stream system can also be used without an in.k175
keypad. A simple in.k113 single switch can be used for
the pairing function and to play/pause. All the other
functions can be adjusted directly from your phone or
iPod. Note that the auxiliary audio input is not available
when the in.k113 switch is used.
To connect the single switch, simply insert the male
8-pin mini-DIN connector from the attached cable into
the receiving 8-pin mini-DIN labelled "wire remote
connector" in the illustration.
Single switch
Power & speakers
Aux. input (Not use)
NV8IN-STREAM
IC: 10440A-IN.STREAM
Command
Audio stream
10
in.k113 to 8 pin mini-DIN
Wire remote
connector
Page 12
in.stream TechBook
Wireless set-up
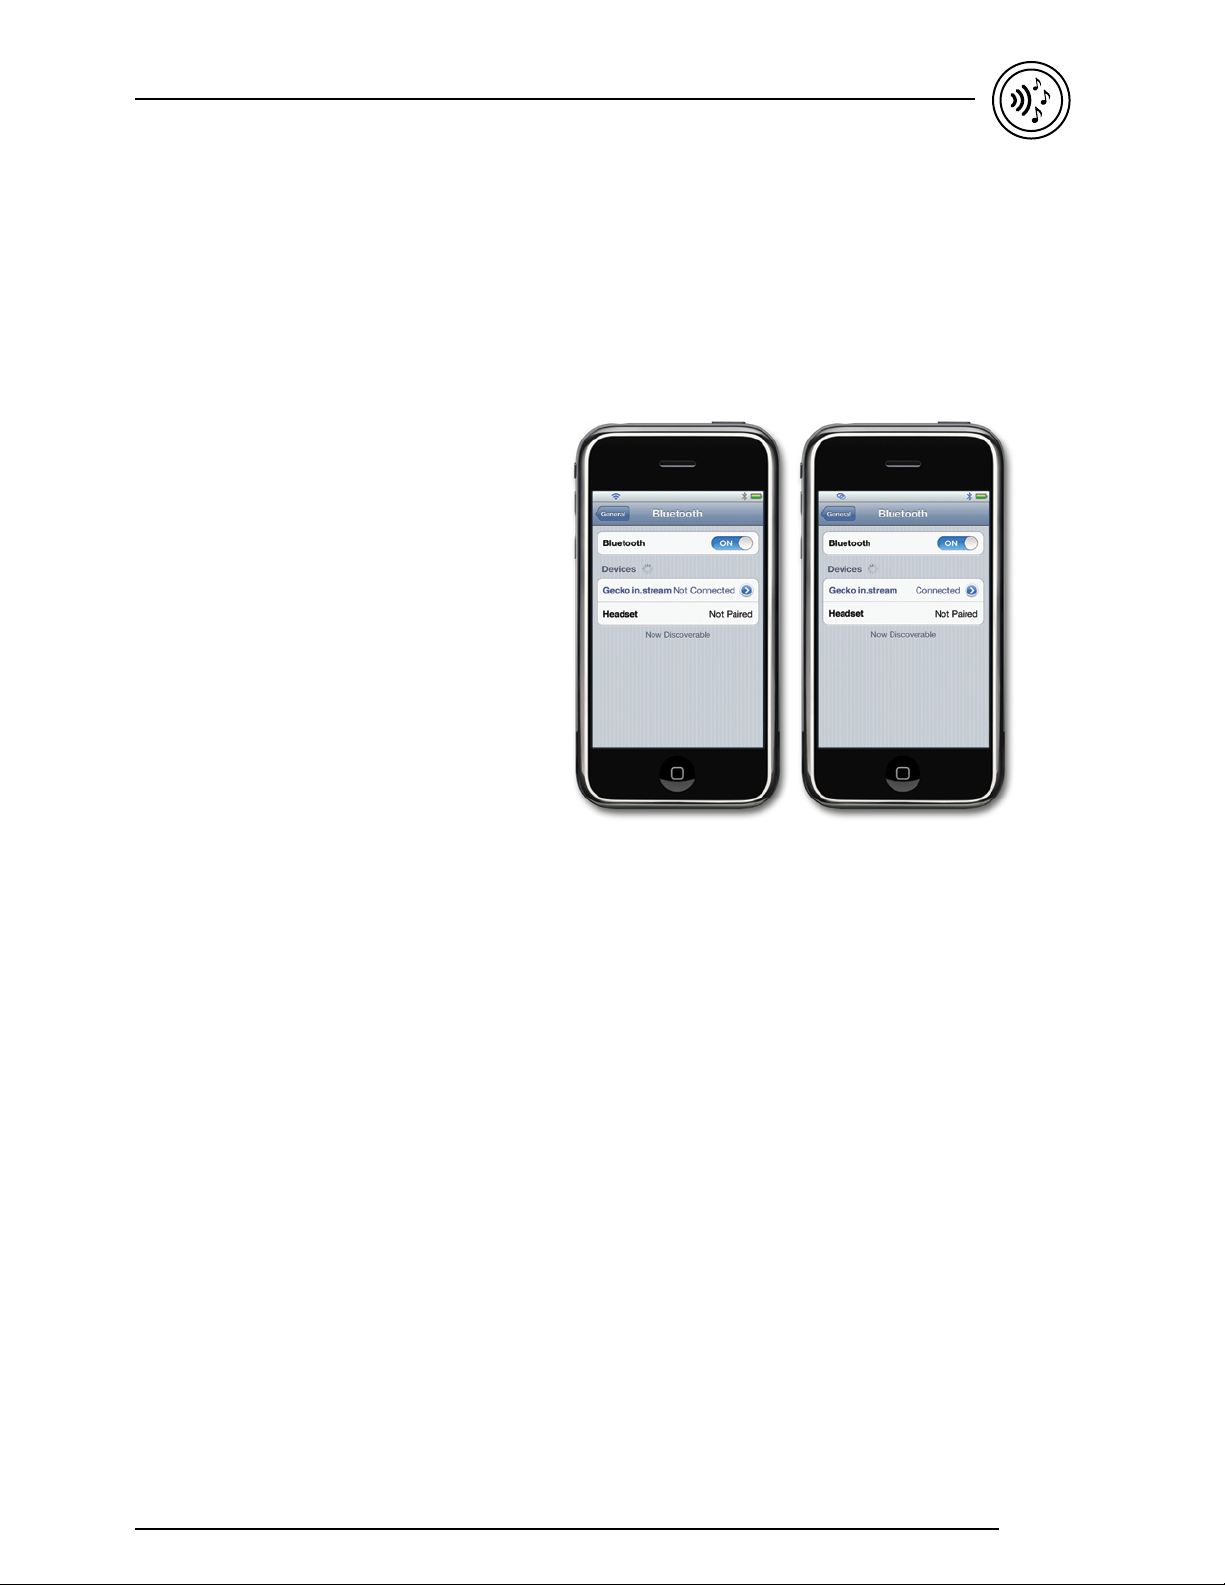
Pairing with a Bluetooth technology enabled device
The in.stream system is ready to pair when it is not
already connected to another device. To pair your
device with the in.stream, first make sure you are close
enough to the in.stream system, and that it is turned on.
1. Open the Bluetooth settings on your device.
The location of the settings will depend on the device
you are using.
2. In these settings, turn Bluetooth on, if it is not already.
3. Choose "Gecko in.stream" from the list of
available devices.
4. When prompted, enter 5555 as the password.
Your device should now be paired with the in.stream
system, and ready to use.
The in.stream will keep up to 8 devices in its memory.
If one of these devices is in range and has its Bluetooth
turned on it will automatically pair with in.stream. If the
number of devices used with your in.stream exceeds
8 the first device in its memory will automatically
be erased. The device can easily be added again by
following the steps for pairing.
It is possible to erase all pairing information from the
memory by holding down the AUX button or t
switch for 10 seconds and then releasing.
If more than one device tries to connect to the in.stream
system, the priority goes to the first device that is
available during searching.
he single
Connecting to a Bluetooth technology enabled device
Once the pairing is done and connection has been
established between the devices, the in.stream will be
ready to start playing the selected audio.
If the device moves out of range and loses connection
it should reconnect automatically as soon as it is close
enough. This should happen without going through the
menu again.
Not Connected Connected
11
Page 13
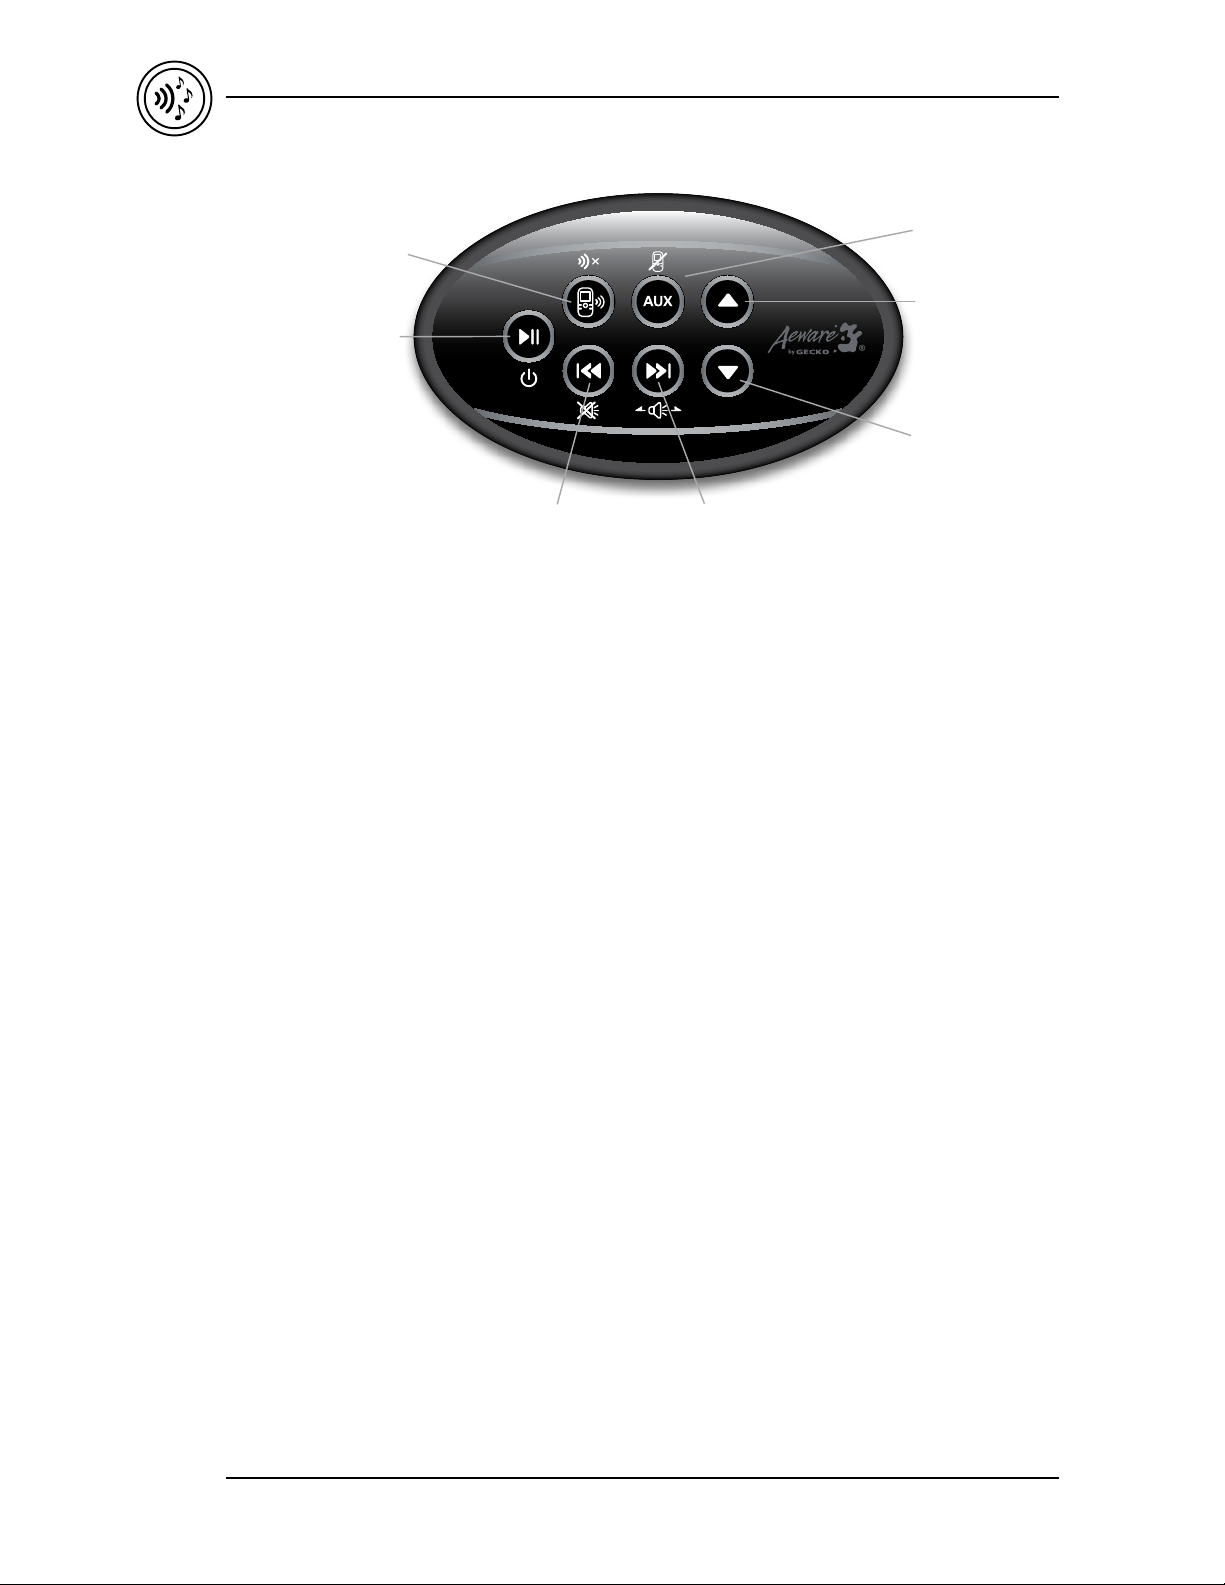
Basic operation/in.k175
Bluetooth
(Disconnect)
Play/Pause
(Power)
in.stream TechBook
AUX
(Unpair)
Volume Up
Volume Down
Last Track
(Mute)
If you are using a device with Bluetooth technology, it
must be connected for functions to work.
Please note that the Play/Pause and Change Track
functions apply to devices using Bluetooth technology
only, and will not work when AUX is selected as the
source.
Turning power on/off
When connected to a power source the unit will
automatically be ON. Pressing and holding the Play/
Pause button will turn the unit off. Once the unit is off,
press any button to turn it back on.
Selecting the source
Press the Bluetooth button to select a device using
Bluetooth wireless technology.
Press the AUX button to use a device connected to the
auxiliary cable.
If no source is selected, the in.stream system will use the
last selected source.
Play/Pause audio
Press the Play/Pause button to start or pause the audio.
Next Track
(Fade)
Adjusting the volume
Press the Volume Up or the Volume Down keys to
increase or decrease the volume.
Mute
Hold down the Last Track key to mute, and again
to unmute.
Changing tracks
Press the Last Track or the Next Track keys to change tracks.
Erase pairing
Press and hold the AUX key for 10 seconds to erase all
pairings stored in the system.
Disconnect current device
Press and hold the Bluetooth key for 10 seconds to
disconnect the current wireless device from the in.stream
system. Note that this will not erase the pairing from the
system's memory.
Fader
Press and hold the Next Track key to adjust fader settings
ront, All)
(Rear, F
12
Page 14

in.stream TechBook
Basic operation/in.k113
Single switch operation
It is possible to connect a single switch instead of a full
keypad. The single switch can be used to play/pause,
and erase pairings.
Operation with the single switch:
Play/Pause
The first single press on the key will send the wireless
play/pause command to the remote device. A second
press on the key will send the command again, so the
user can play and pause with successive presses.
Erase all pairings
Press and hold the the key for 10 seconds to erase all
pairings from the in.stream memory.
Turning power On/Off
Please note that the unit will remain ON while being
used in single switch mode. There will be no way
to turn it OFF.
13
Page 15

Specifications and design are subject to change without prior notice.
Specifications
Part number
0704-100002
Environmental:
Operating temperature: 140°F (60°C) to -4°F (–20°C)
Storage temperature: 185°F (85°C) to -22°F (–30°C)
Humidity: Up to 70% condensing
Water ingress protection: IPX-5
Mechanical:
Weight: 1.3 lb (0.6 kg)
Dimensions (W x H x D): 8 ¼” x 6 ¾” x 2 ½” (210mm x 171mm x 64mm)
Electrical specifications
Input voltage: 13.8 V DC typical (10-14.5 V DC)
Max input current: Up to 10 A
Speaker impedance: 4Ω or 8Ω.
1
The current must be limited at the in.stream input with 5A fuse.
1
in.stream TechBook
Audio specifications
Audio source supported: Bluetooth streaming and Auxiliary input
Maximum power output: 40W x 4 ch (160W total)
Auxiliary input specification
Stereo: Yes
Connection type: 2 x RCA L + R
Compatibility
Portable devices with Bluetooth v2.0 A, AVDTP
Applicable standards
FCC - NV8IN-STREAM
ROHS
CE
Industry Canada - 10440A-INSTREAM
AS/NZS -Pending
14
Page 16

9919-101176-D
Rev. 08-2012
© Groupe Gecko Alliance Inc., 2012
All trademarks or registered trademarks
are the property of their respective owners.
450 des Canetons, Quebec City (Qc), G2E 5W6 Canada, 1.800.78.GECKO
Gecko Alliance
9225 Stellar Court, Corona, CA 92883 USA, 951.667.2000
www.geckoalliance.com
Printed in China 08-2012
ClearStream manual | 1-13
 Loading...