

ClearView 10.2-inch Combo Digital Video Recorder Quick Start Manual

10.2-inch Combo Digital Video Recorder
Quick Start Guide
V 3.0.0

i
Table of Contents
1 Hardware Installation and Connection..........................................................................1
1.1 Check Unpacked Combo DVR ............................................................................1
1.2 About Front Panel and Rear Panel.....................................................................1
1.3 Device Installation..................................................................................................1
1.4 Data Cable Connection.........................................................................................1
1.5 HDD Installation .....................................................................................................2
1.6 Dimensions .............................................................................................................3
1.7 Front Panel, Side Panel and Rear Panel...........................................................4
1.8 Connection Sample ...............................................................................................5
1.9 Alarm Input and Output Connection ...................................................................6
1.9.1 Alarm Input and Output Details.................................................................6
1.9.2 Alarm Input Port...........................................................................................7
1.9.3 Alarm Output Port........................................................................................7
2 Overview of Navigation and Controls............................................................................8
2.1 Login, Logout & Main Menu .................................................................................8
2.1.1 Login..............................................................................................................8
2.1.2 Main Menu....................................................................................................9
2.1.3 Shutdown......................................................................................................9
2.1.4 Auto Resume after Power Failure ..........................................................10
2.1.5 Replace Button Battery ............................................................................10
2.2 Live Viewing..........................................................................................................10
2.3 Schedule ...............................................................................................................11
2.4 Manual Record.....................................................................................................12
2.5 Encode ..................................................................................................................12
2.5.1 Snapshot.....................................................................................................14
2.5.2 Image FTP..................................................................................................15
2.6 Search and Playback ..........................................................................................15

ii
2.7 Network Setup......................................................................................................18
2.8 Pan/Tilt/Zoom .......................................................................................................19
2.8.1 PTZ Setup ..................................................................................................19
2.8.2 PTZ Operation ...........................................................................................20
2.8.3 3D Intelligent Positioning Key .................................................................21
3 Web Operation................................................................................................................22
3.1 Network Connection ............................................................................................22
3.2 Login ......................................................................................................................22
3.3 Main Window ........................................................................................................22
4 Appendix Toxic or Hazardous Materials or Elements ..............................................24

iii
Welcome
Thank you for purchasing our combo DVR!
This quick start guide will help you become familiar with our combo DVR in a very short time.
Here you can find hardware installation,cable connection information and general operations
such as system setup, record, search, backup, alarm setup, PTZ operation, also here you can
find web operation instruction.
Before installation and operation, please read the following safeguard and warning carefully!

iv
Important Safeguards and Warnings
1.Electrical safety
All installation and operation here should conform to your local electrical safety codes.
We assume no liability or responsibility for all the fires or electrical shock caused by improper
handling or installation.
2.Transportation security
Heavy stress, violent vibration or water splash are not allowed during transportation, storage and
installation.
3.Installation
Keep upwards. Handle with care.
Do not apply power to the combo DVR before completing installation.
Do not place objects on the combo DVR.
4.Qualified engineers needed
All the examination and repair work should be done by the qualified service engineers.
We are not liable for any problems caused by unauthorized modifications or attempted repair.
5.Environment
This series product working temperature ranges from -5℃ to 55℃.
The combo DVR should be installed in a cool, dry place away from direct sunlight, inflammable,
explosive substances and etc.
Please unplug the power cable in case there is strong wind or lightning.
6. Accessories
Be sure to use all the accessories recommended by manufacturer.
Before installation, please open the package and check all the components are included.
Contact your local retailer ASAP if something is broken in your package.
7. About the LCD
During the installation, do not push or squeeze the LCD or its rim; it may result in LCD damage.
During the operation or storage, please avoid the hard object to scuff the screen.
Please keep the LCD clean. Use the soft cloth to clean regularly. Do not use gasoline, alcohol or
other chemical reagent to clean the screen.
Do not allow the LCD video standstill for a long time; it may result in permanent damage.
7. Lithium battery
Improper battery use may result in fire, explosion, or personal injury!
When replace the battery, please make sure you are using the same model!
1
1 Hardware Installation and Connection
Note: All the installation and operations here should conform to your local
electric safety rules.
1.1 Check Unpacked Combo DVR
When you receive the combo DVR from the forwarding agent, please check whether there is any
visible damage. The protective materials used for the package of the combo DVR can protect
most accidental clashes during transportation. Then you can open the box to check the
accessories.
Please check the items in accordance with the list on the warranty card. Finally you can remove
the protective film of the combo DVR.
Note
Remote control is not a standard accessory and it is not included in the accessory bag.
1.2 About Front Panel and Rear Panel
The model in the front panel is very important; please check according to your purchase order.
The label in the rear panel is very important too. Usually we need you to represent the serial
number when we provide the service after sales.
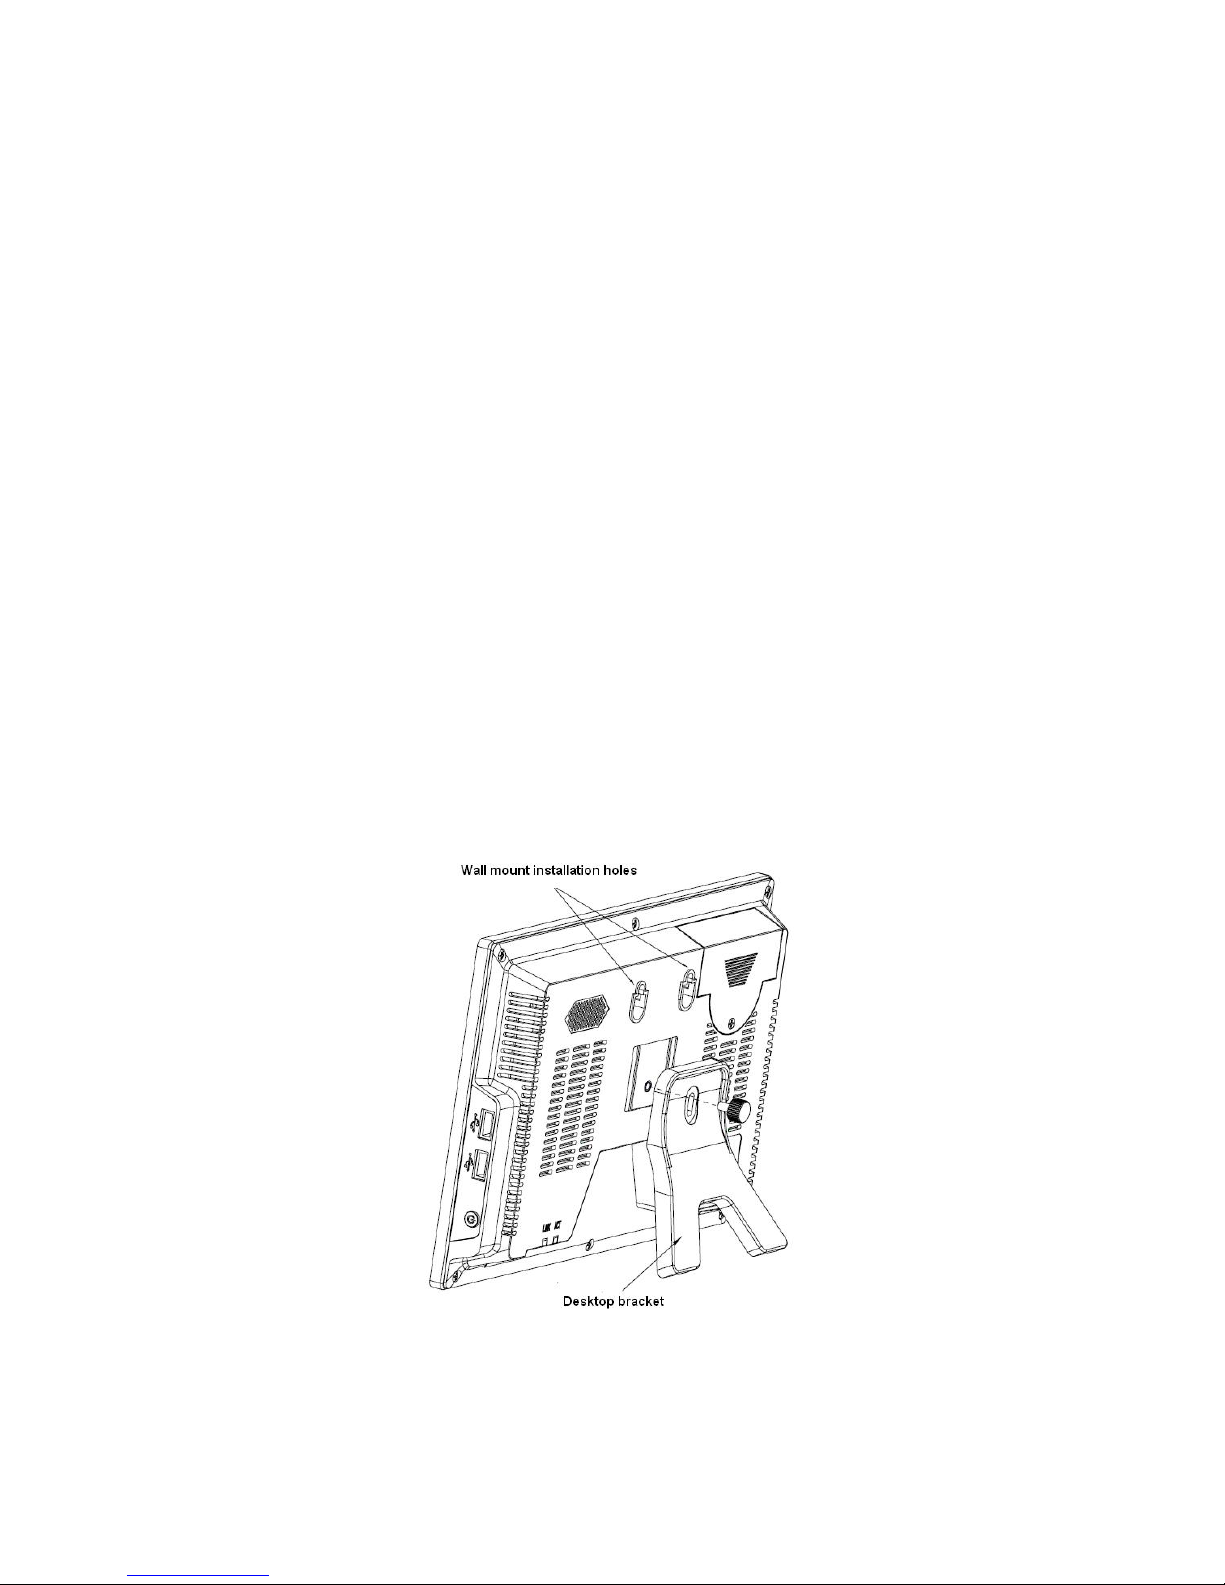
1.3 Device Installation
The series product supports two installation modes: desktop/ wall-mount. The default installation
is the desktop type. Please refer to the following figure. See Figure 1-1.
Figure 1-1
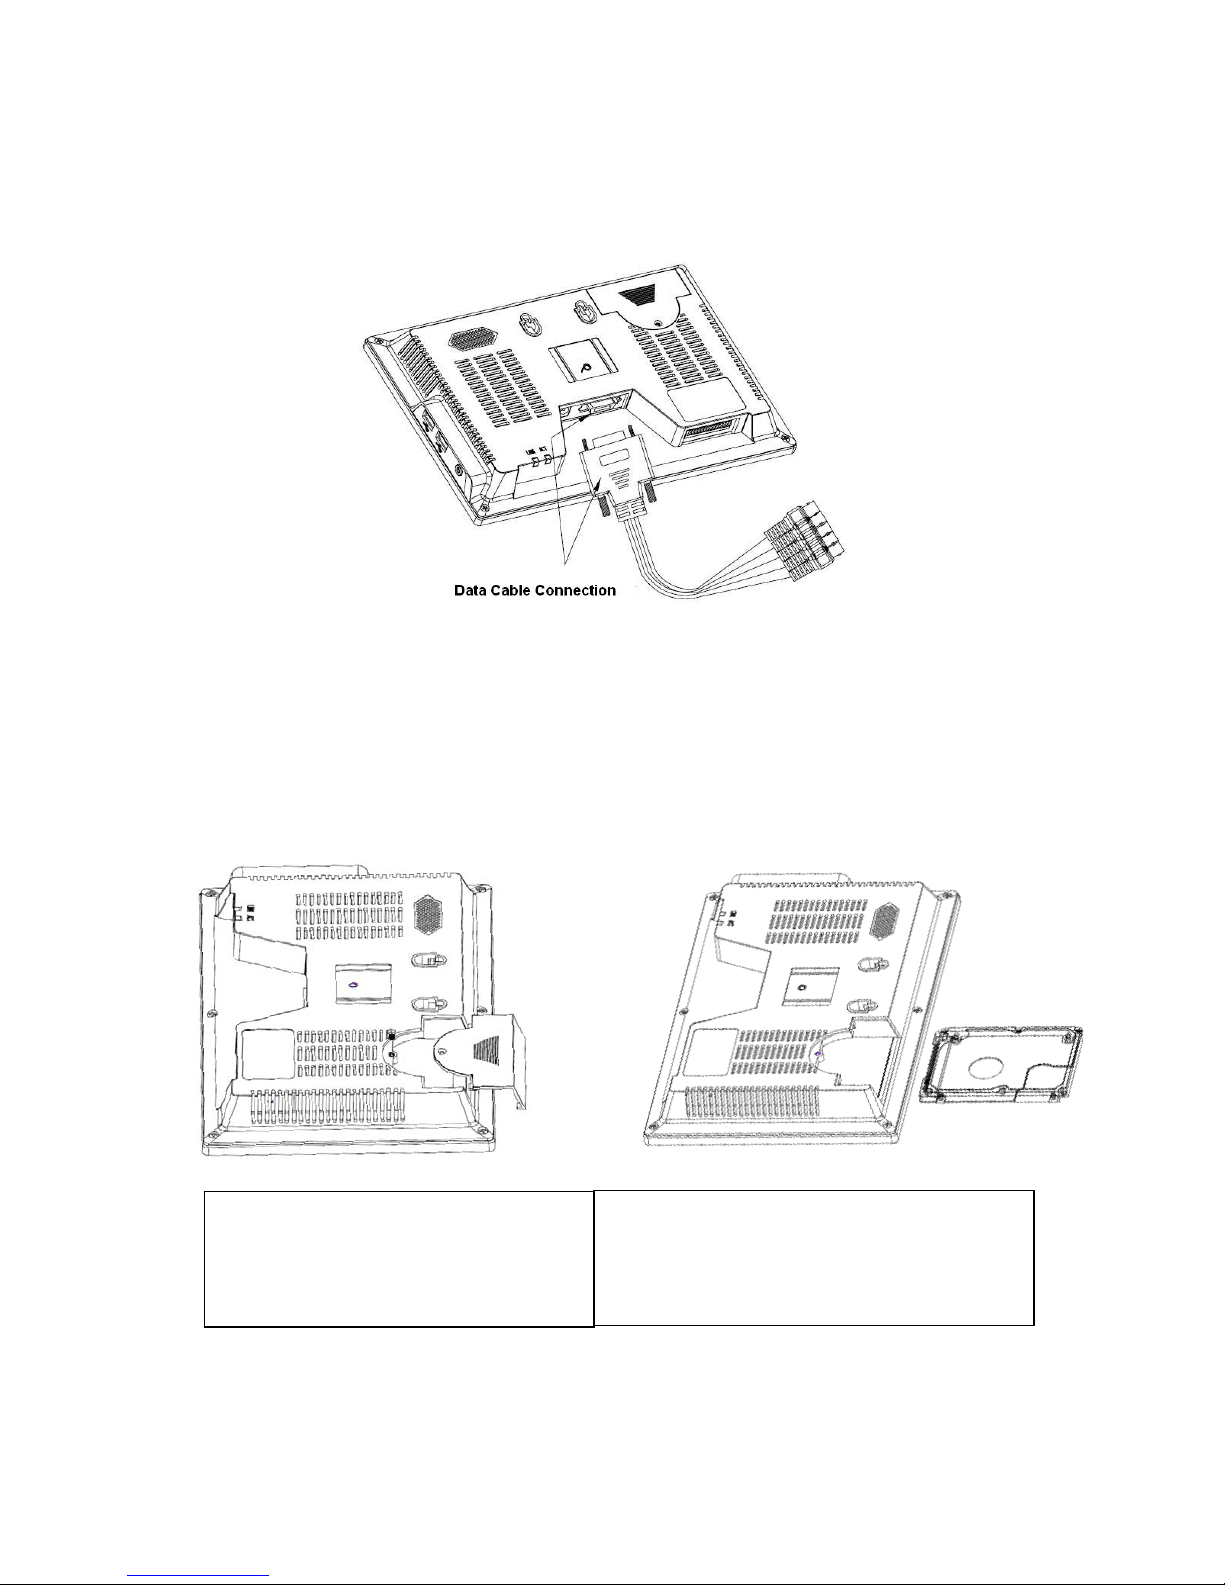
1.4 Data Cable Connection
2
You can refer to the following figure for cable connection. See Figure 1-2.
Please use the screwdriver to secure the data cable and the combo DVR cable socket. Please
make sure it is firm otherwise it may result in network problem and etc. Then you can use the
Ping command to test the network cable connection status. You need to check the cable
connection if the request time is out.
Figure 1-2
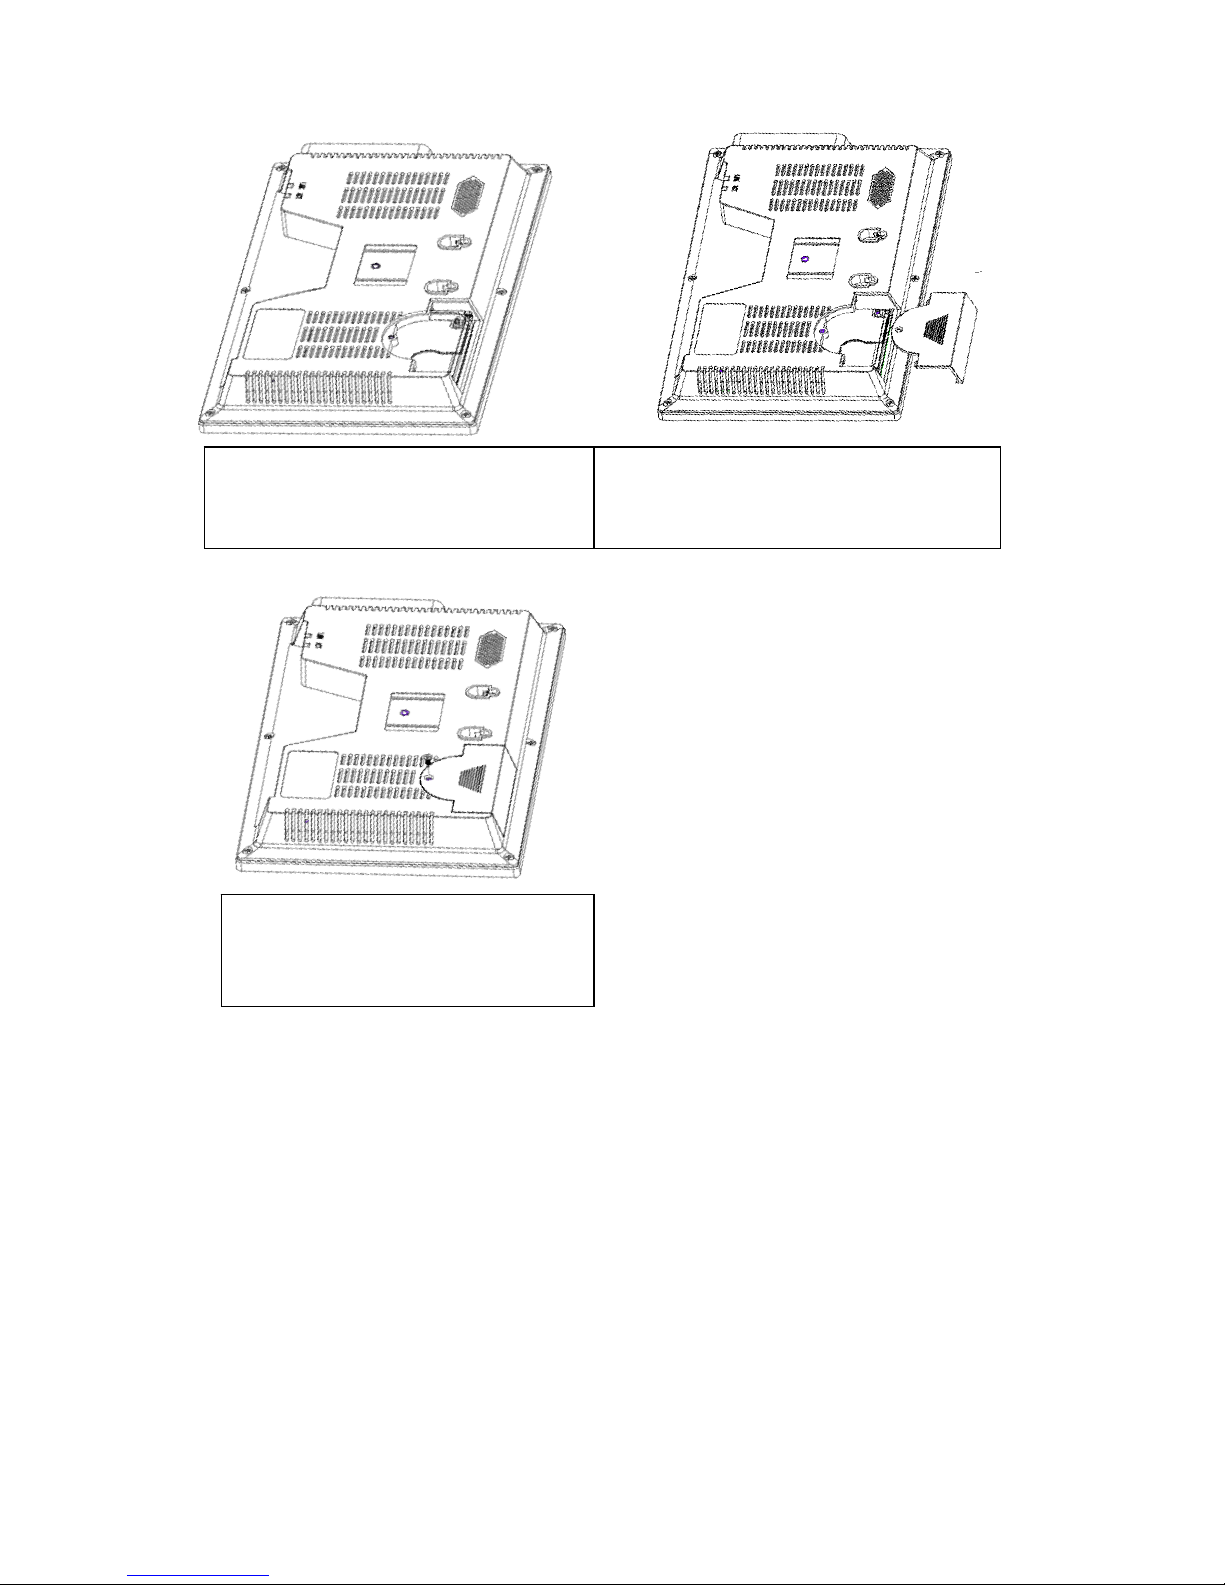
1.5 HDD Installation
This series 10.2-inch combo DVR has only one 2.5-inch SATA HDD.
You can refer to the Appendix in the user’s manual for recommended HDD brand. You can select
the capacity as your requirement.
Please follow the instructions below to install the HDD.
1. Turn the screw of the HDD cover and
then remove the HDD cover
2. Line up the HDD to the HDD slot and then
install
3
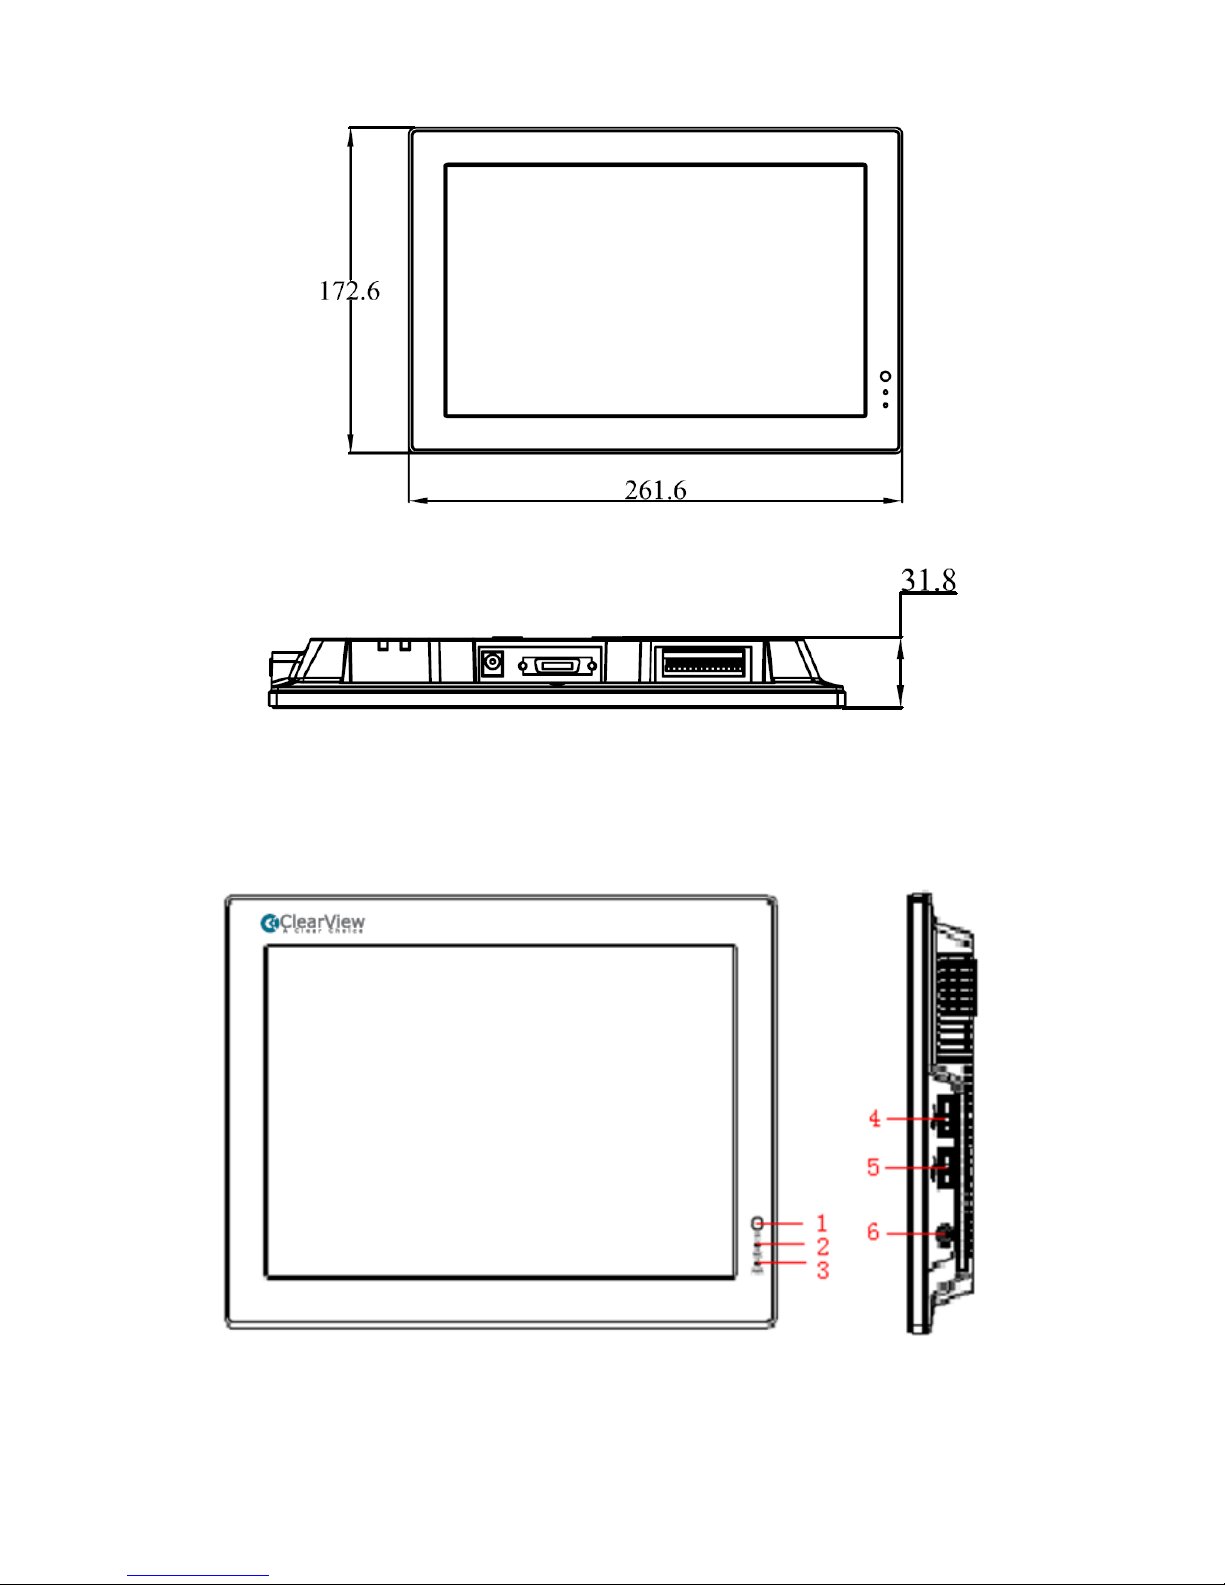
1.6 Dimensions
You can refer to the following two figures for dimension information. The unit is mm. See Figure
1-3 and Figure 1-4.
3. Fix the HDD
4. Install the HDD cover.
5. Secure the screw of the HDD cover.
Now the installation completed
4
Figure 1-3
Figure 1-4
1.7 Front Panel, Side Panel and Rear Panel
The front panel and side panel is shown as in Figure 1-5.
Figure 1-5
The rear panel is shown as below. See Figure 1-6.
 Loading...