

Page 1

Clearswift SECURE ICAP Gateway
Installation & Getting Started Guide
Version 4.5.0
Document Revision 1.0
Page 2

Copyright
Revision 1.0, November, 2016
Published by Clearswift Ltd.
© 1995–2016 Clearswift Ltd.
All rights reserved.
The materials contained herein are the sole property of Clearswift Ltd. unless
otherwise stated. The property of Clearswift may not be reproduced or
disseminated or transmitted in any form or by any means electronic, mechanical,
photocopying, recording, or otherwise stored in any retrievable system or
otherwise used in any manner whatsoever, in part or in whole, without the express
permission of Clearswift Ltd.
Information in this document may contain references to fictional persons,
companies, products and events for illustrative purposes. Any similarities to real
persons, companies, products and events are coincidental and Clearswift shall not
be liable for any loss suffered as a result of such similarities.
The Clearswift Logo and Clearswift product names are trademarks of Clearswift
Ltd. All other trademarks are the property of their respective owners. Clearswift Ltd.
(registered number 3367495) is registered in Britain with registered offices at 1310
Waterside, Arlington Business Park, Theale, Reading, Berkshire RG7 4SA, England.
Users should ensure that they comply with all national legislation regarding the
export, import, and use of cryptography.
Clearswift reserves the right to change any part of this document at any time.
Click here to read Copyright and Acknowledgments in full.
Page 3

Contents
Copyright ii
Contents iii
1. About this guide 4
1.1 Who is this guide for? 4
2. Before installing 5
2.1 Types of installation 5
2.2 Obtaining the software 5
2.3 Prerequisites 5
Hardware requirements 5
Installation media 6
Browser support 6
3. Installing the Clearswift SECURE ICAP Gateway 7
3.1 Installing the Clearswift SECURE ICAP Gateway 7
3.2 Installing from the ISO image 7
3.3 Running the Clearswift First Boot Console 8
Notes on using the Clearswift SECURE ICAP Gateway installation wizard 12
3.3.1 How to re-enable TLS v1.0 on the 4.5.0 Gateway and update ciphers: 12
3.4 Enabling access to the Clearswift online repositories 13
4. Upgrading from version 3.2 of the Clearswift SECURE ICAP Gateway15
4.1 Back up your original system 15
4.2 Install the 4.5.0 Gateway 16
4.3 Restore the system backup 16
5. Upgrading from an earlier version 4 release to version 4.5.0 17
Appendix A: Software install process 19
Post installation considerations 20
Appendix B: USB installation media preparation 20
Page 4

1. About this guide
This guide provides information for administrators installing the Clearswift SECURE
ICAP Gateway onto a virtual machine or physical server. It covers the procedures
and requirements necessary for a full installation.
1.1 Who is this guide for?
This guide is intended for use by:
n New customers installing the Clearswift SECURE ICAP Gateway for the first
time.
n Existing customers upgrading from the most up to date version 3.2 release of
the Clearswift SECURE ICAP Gateway to a 4.5.0 release.
If you are upgrading from an earlier version 4 release of the Clearswift SECURE
ICAP Gateway, see the 4.5.0 Readme. for guidance.
- 4 -
Page 5
2. Before installing
This section outlines prerequisites and considerations you need to make before
installing the Clearswift SECURE ICAP Gateway. TheGateway runs on 64 bit
RedHat Enterprise Linux (RHEL 6.8). You can install the product on a physical
server or virtual machine. See Prerequisites for more information on supported
platforms.
2.1 Types of installation
You can install the Clearswift SECURE ICAP Gateway using one the following
processes:
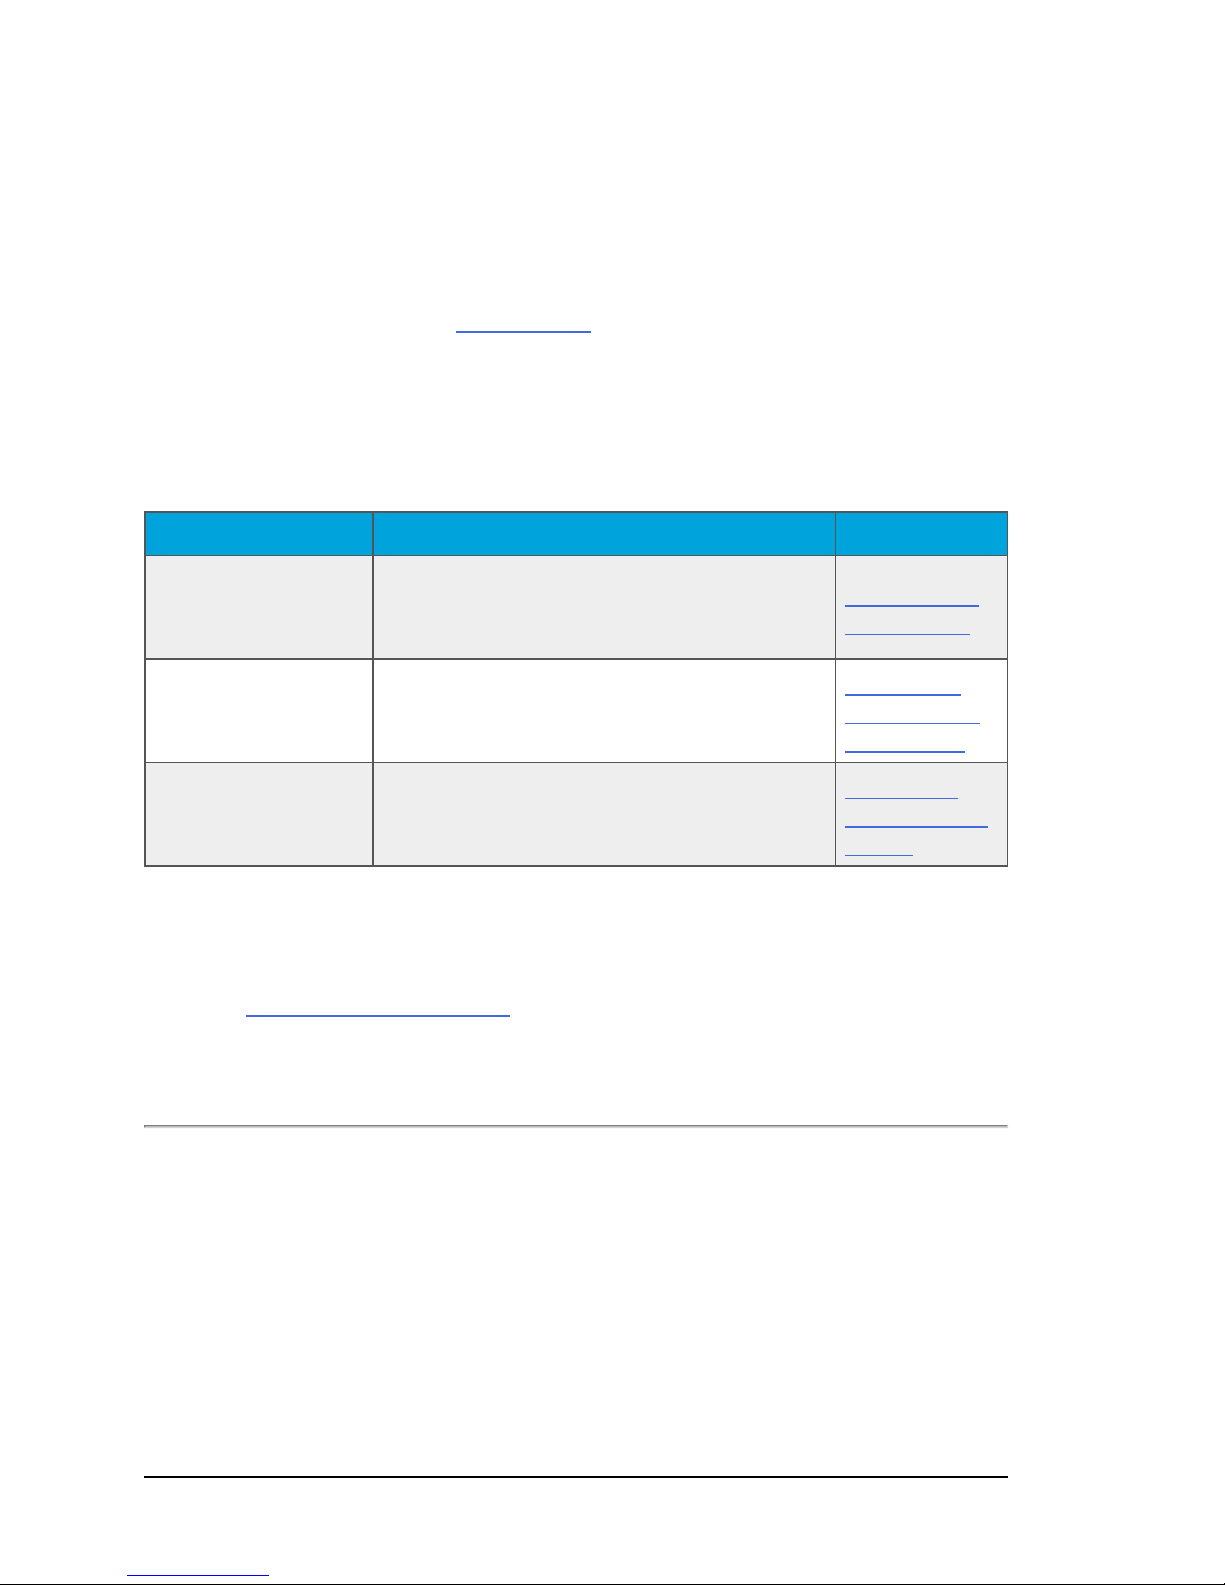
Installation process Description Where to start
Standard install
process
Hardware install
process
Software install
process
Applies to users installing the product from an
ISO image that contains both RHEL 6.8 and the
Clearswift software.
Applies to users deploying the product using preinstalled hardware supplied by Clearswift.
Applies to users installing the product on an
existing RHEL 6.8 platform.
Installing from
the ISO image
Running the
Clearswift First
Boot Console
Appendix A:
Software Install
Process
2.2 Obtaining the software
You can obtain the Clearswift SECURE ICAP Gateway software from:
n The Clearswift download area where you can download the Clearswift
SECURE ICAP Gateway ISO image.
n Clearswift, with your pre-installed hardware.
2.3 Prerequisites
Before installing, you should check that you have the following:
Hardware requirements
Your computer or virtual machine requires a minimum of 6GB RAM and a 60GB
hard drive for use in testing and demonstration environments. Clearswift
- 5 -
Page 6

recommends a minimum of 8 GB RAM and 200GBhard drive for use in a
production environment based on your storage and processing requirements.
Installation media
Please ensure you are using the correct version of the ISO image: WEB_450.iso.
After you download a copy of the ISO image from the online Clearswift Repository,
there are a number of ways you can use it to install the software:
n Copying the ISO image to DVD. Clearswift recommends using this option
when installing the Clearswift SECURE ICAP Gateway software.
n Copying the ISO image to USB media. See Appendix B of this guide for
instructions.
n Attaching the ISO image as a virtual DVD drive. This applies to virtual
machines only.
Browser support
The Clearswift SECURE ICAP Gateway supports connections using TLS 1.2 ciphers
and has been tested with the following browsers:
n Internet Explorer IE10 (Windows 7)
n Internet Explorer IE11 (Windows 7 , Windows 8)
n Mozilla Firefox 17, 24, 30, 36+
n Google Chrome 40+
n Microsoft Edge (Windows 10)
- 6 -
Page 7
3. Installing the Clearswift SECURE ICAP
Section 3.2 Installing from the ISO image only applies if you are
performing a standard installation using the ISO image containing both
RHEL 6.8 and the Clearswift software.
If you are performing the hardware install, go to Section 3.3 Running the
Clearswift System Configuration wizard.
If you are installing onto an existing RHEL 6.8 server, use the instructions
in Appendix A of this guide to perform the installation. Then refer to
Phase 2 of installing the Clearswift SECURE ICAP Gateway.
Gateway
You can install the Clearswift SECURE ICAP Gateway software from the ISO image
that you downloaded from the Online Clearswift Repository.
The installation process includes the following phases:
1. Combined installation of Red Hat Enterprise Linux 6.8 operating system and the
Clearswift SECURE ICAP Gateway from the installation media.
2. Running the console-based System Configuration wizard to adjust default
system values, including network configuration.
3. Enable access to the Clearswift online repositories containing the latest software
updates.
Once the Gateway has been installed, you will need to complete the Clearswift
Installation Wizard.
3.1 Installing the Clearswift SECURE ICAP Gateway
The following steps describe how to install the Clearswift SECURE ICAP Gateway.
3.2 Installing from the ISO image
1. Insert the media containing the ISO image into the drive and power on the
server.
The Welcome to Clearswift Web Solutions should be displayed. If the load device
can not be found you might need to adjust your system boot sequence in the
BIOS.
- 7 -
Page 8

2. Use the arrow keys or keyboard shortcuts to select Install Secure ICAP
Gateway from the menu. Press the Enter key to select the installation.
The install process begins and runs automatically.
The entire install process, including post-installation scripts, takes
between 10-15 minutes to complete. After Package Installation
completes, the install process displays the message "Running postinstallation scripts" for a period of up to 5 minutes. When this message
is on screen, the install process still runs in the background and you
should not interrupt it. At the end of the install process, the system
reboots automatically. The Welcome to Clearswift Web Solutions boot
screen appears again and Boot from local drive triggers
automatically after a timeout of 60 seconds.
3.3 Running the Clearswift First Boot Console
Complete the following steps in the First Boot Console:
- 8 -
Page 9

1. Log in as cs-admin using the default credentials:
The Gateway derives its system time and locale settings from the
selections made at this point. It is important that you set these
correctly during installation as you cannot change system time and
locale later.
n Login: cs-admin
n Password: password
The First Boot Console appears and you can start the configuration process.
2. Follow the on-screen instructions to select:
n Locale Configuration
n Keyboard Configuration
n Timezone Configuration
3. On the Network Configuration page update the following settings:
n System Hostname: Enter the new Hostname and press Save.
n Network Adapters: Select a network adapter and press Edit. Press IPv4
Addresses and then Edit your selected IP address. After you have made
your edits, press Save.
n DNS Servers: Select a DNS entry and press Edit. Add Search Domains if
required or leave blank.
After you have made your edits, press Save.
4. Configure your repository settings on the Repository Configuration page.
5. On the cs-admin password page enter a new password for your cs-admin
account. The complexity of this password depends on the password policy that is
being enforced. The Clearswift password policy applies by default to standard
installations from the ISO image. This policy requires you to set passwords that
are a minimum of eight characters in length, do not resemble dictionary words
(example: Pa55word), do not include sequences (example: 1234), and include at
- 9 -
Page 10

least one from three of the following:
To check your IPaddress, log in to the console using the default
credentials.
Select View System Status and click OK.
n Uppercase letters
n Lowercase letters
n Digits
n Symbols
See Clearswift password policy requirements in the online help for more
information, including examples. The online help also provides information on
how to disable the password policy.
6. Apply your settings and confirm to reboot the server.
7. Following the reboot, open a browser and navigate to the Gateway IP address:
https://<ip-address>/Appliance
The Clearswift SECURE ICAP Gateway installation wizard is displayed.
- 10 -
Page 11

If the Clearswift installation media has been ejected following the
reboot, you must ensure that it is re-inserted before configuring the
Clearswift Installation Wizard. The wizard requires access to the
installationmedia to complete the setup of your Gateway.
- 11 -
Page 12

Notes on using the Clearswift SECURE ICAP Gateway installation wizard
The network settings displayed by the wizard reflect the settings you
created when configuring Red Hat Enterprise Linux. These settings are
displayed as read-only.
We recommend configuring the wizard immediately after the install and
before configuring any additional network adapters. However, if you need
to reboot the machine before configuring the installation wizard, you
should disable your firewall as root user when your reboot is complete.
To disable your firewall, run the service iptables stop command. After you
complete the wizard, the firewall starts again automatically.
The system might take around 5-10 minutes to apply the settings before you can
use the Clearswift SECURE ICAP Gateway. We recommend visiting the First Steps
topic in the online help when the Gateway interface is accessible.
Peering between v3 and v4 Clearswift Gateways
Due to security hardening on v4 Clearswift Gateways, we no longer
provide support for the TLS v1.0 protocol for peering. Only TLS v1.2 is
supported.
If you wish to peer v3 Gateways (for example, using PMM or Web
Gateway Reporter) with your v4 Gateway, you must re-enable TLS
v1.0 on the 4.5.0 Gateway and update the ciphers.
These instructions should be applied after installing the 4.5.0 Gateway,
and after configuring the Gateway using the Clearswift Installation
Wizard.
3.3.1 How to re-enable TLS v1.0 on the 4.5.0 Gateway and update ciphers:
1. Search for the sslEnabledProtocols attribute in the following files:
/opt/tomcat/conf/
server-bind.xml
server-bind2.xml
2. Change the value of each protocol from 'TLSv1.2' to 'TLSv1,TLSv1.2'.
- 12 -
Page 13

There are two instances in server-bind2.xml.
3. Search for the ciphers attribute in the same files:
/opt/tomcat/conf/
server-bind.xml
server-bind2.xml
4. Add 'TLS_RSA_WITH_AES_256_CBC_SHA' to the end of the comma separated list
in each file.
There are two instances in server-bind2.xml.
5. Restart the UI using the following command:
cs-servicecontrol restart tomcat
3.4 Enabling access to the Clearswift online repositories
When you have installed the Clearswift SECURE ICAP Gateway, you need to enable
access to the Clearswift online repositories containing the latest software updates.
This is done in the Clearswift Server Console application:
1. From the Clearswift Server Console main menu, select Configure System >
Select Update Repositories.
Clearswift Server Console checks the status of your YUM repositories and the
Select YUM Repositories page appears.
2. Select the option to Enable online repositories. When the operation
completes, press Done.
Clearswift Server Console rechecks the status of your YUM repositories and
returns you to the Select YUM Repositories page where your online
repositories will now appear as enabled:
- 13 -
Page 14

3. Press Back to return to the Configure System page of the Clearswift Server
Console.
- 14 -
Page 15

4. Upgrading from version 3.2 of the Clearswift
Migrating from a V3 Gateway does not preserve network settings such as
static hosts, static routes and DNS settings. Use the Server Console to reapply your network settings when you have upgraded your Gateway.
SECURE ICAP Gateway
If you are installing the Clearswift SECURE ICAP Gateway for the first time,
please ignore this section.
If you are installing version 4.5.0 from an earlier version 3 Clearswift SECURE ICAP
Gateway, please ensure your Gateway is fully upgraded to the latest 3.2 release and
use the following instructions.
This section describes how to import your policy configuration and system settings
from version 3.2 of the Clearswift SECURE ICAP Gateway to version 4.5.0. You
should perform the backup steps before installing Clearswift SECURE ICAP
Gateway 4.5.0.
4.1 Back up your original system
The system backup on an FTP server includes only the most recently
applied configuration. If you require an earlier policy configuration along
with audit and tracking data and logs, you should first restore from the
system backup and then restore the .bk file to your new Gateway, when
installed.
1. Apply your configuration. This ensures that you are migrating the most up-todate version.
2. Using your existing Gateway system, navigate to the System Center > Backup
& Restore page.
3. Perform a System Backup using the Backup System Now option in the task
panel.
We strongly recommend that you backup all available System Areas.
- 15 -
Page 16

We recommend that you use system backups for a means of disaster
recovery and for when planning to upgrade your system. Do not use
them for any other purpose, for example, as a method of cloning
Gateways when creating a peer group. For purposes other than
disaster recovery and system upgrades you should use Configuration
Backup and Restore.
4.2 Install the 4.5.0 Gateway
Follow the steps in section 3 of this installation guide to install the Clearswift
SECURE ICAP Gateway.
When you have installed the Clearswift SECURE ICAP Gateway, you need to
configure access to the Clearswift online repositories containing the latest software
updates. See Enabling access to the Clearswift online repositories for more
information.
4.3 Restore the system backup
1. Using the new, installed Gateway, navigate to the System Center > Backup &
Restore page.
2. Select Restore System using the option in the task panel. Enter the FTPsettings
and click Connect.
The system restore includes all the areas you selected when you created
your back-up, potentially including configurations and audit logs. The
Gateway reboots after the system restore is complete.
- 16 -
Page 17

5. Upgrading from an earlier version 4 release
to version 4.5.0
If you are installing the Clearswift SECURE ICAP Gateway for the first time,
please ignore this section.
Perform the following steps to download and apply software updates when you
upgrade to Clearswift SECURE ICAP Gateway 4.5.0.
Open an SSH session and access the Clearswift Server Console. Log in using your
cs-admin access credentials.
Online or Offline mode?
Offline mode is designed for installations that operate in a closed
environment, disconnected from the Internet. Unless this is a specific
requirement for your system, you should install the Clearswift
SECURE ICAP Gateway in online mode.
To perform an offline upgrade you require a copy of the latest release
ISO mounted to suitable media (DVD/USB). Please contact Clearswift
Technical Support if you need additional guidance on how to
complete this step.
1. Confirm the upgrade is available:
a. If you are performing an offline upgrade, insert the physical media
(DVD/USB).
b. Confirm the required repositories are enabled and available:
Online mode:
Configure System > Select UpdateRepositories >Enable online
repositories
Offline mode:
Configure System > Select Update Repositories >Enable offline
repositories
- 17 -
Page 18

c. Check the upgrade is ready to install:
View System Status
If the expected upgrade is listed as the next "Available Upgrade", go directly to
step 3. If it is not listed, refresh the status and it should appear.
2. Download update:
a. From the Clearswift Server Console main menu, select:
Configure System > View and Apply Software Updates> Download
New Updates >OK
b. All available updates will now be downloaded. This process may take several
minutes. A rolling progress log will be displayed. When the Operation
Complete message appears, select Done to complete the download.
3. Apply software updates:
a. From the Clearswift Server Console main menu, select:
Configure System > View and Apply Software Updates > Apply
Updates >OK
b. Confirm that you want to apply the updates by selecting Yes.
All downloaded updates will now be installed. This process can take several
minutes. A rolling progress log will be displayed. When the Operation
Complete message appears, select Done to complete the install process.
- 18 -
Page 19

Appendix A: Software install process
The following steps describe how to install the Clearswift SECURE ICAP Gateway
on top of an existing Red Hat Enterprise Linux (RHEL) 6.8 Server using the ISO
image.
You should install RHEL 6.8 as a Minimal server installation, with a
separate /(root) and /var partition. The root partition should be 20GB
(minimum) and /var should use a minimum of 40GB for test
environments and 120GB for production environments.
To install the Clearswift SECURE ICAP Gateway:
1. Assume root role at the command line.
2. Insert the media containing the ISO image and mount it onto /media/os:
mkdir –p /media/os
mount /dev/cdrom /media/os
3. Manually install the cs-repo-conf package. The cs-repo-conf package configures
your system to be ready for you to install the Clearswift SECURE ICAP Gateway:
rpm –ivh /media/os/cs-repo/Packages/cs-web-repo-conf...
4. Forcibly remove postfix, rsyslog and samba V3:
yum –y remove postfix rsyslog samba-common
5. Install the required product using the following command:
yum install cs-sig
If Step 5 fails due to additional conflicts, you might need to remove
additional packages during Step 4.
6. Log out completely, and log back in as cs-admin. Refer to Phase 2 of installing
the Clearswift SECURE ICAP Gateway to continue.
- 19 -
Page 20

Post installation considerations
Do not use the standard version of Rufus for this process. Please
ensure it is the portable version.
After completing the software install process, the install process might have
modified the following parts of your system:
1. Firewall configuration is now under Gateway control. If SSH access is required
you need to re-enable it through the Clearswift SECURE ICAP Gateway user
interface. See Configuring SSH Access in the Clearswift SECURE ICAP Gateway
online help for more information.
2. All network configuration is now under Server Console control. You should
avoid changing network configuration at the command line as the Gateway is
not notified of these changes. If changing network configuration at the
command line is necessary, please contact Clearswift Support for more
information.
3. crontab configuration is modified. Pre-existing root cronjobs might be lost, but
you can re-add them.
Appendix B: USB installation media preparation
The following steps describe how to copy the Clearswift SECURE ICAP Gateway
software ISO image to USB media.
1. Download the Clearswift SECURE ICAP Gateway software ISO image from the
Clearswift download area.
Please ensure you are using the correct version of the ISO image: WEB_
450.iso.
2. Download a USB tool that maintains drive volume name. Clearswift
recommends using Rufus Portable.
- 20 -
Page 21

Although you can use USB tools other than Rufus, the following USB
tools will not work with the Clearswift SECURE ICAP Gateway software
ISO image:
n YUMI
n Universal USB Installer
n Fedora liveusb-creator
The below steps assume that you are using Rufus 2.11 Portable.
3. Run rufus-2.11p.exe.
4. Insert your USB media and select it from the Device drop-down menu.
5. Under Format Options, select Create a bootable disk using and click the
disk icon to choose the Clearswift SECURE ICAP Gateway ISO you want to
burn. Once Rufus scans the ISO, it fills in other options automatically.
6. Click Start. The ISOHybrid image detected dialog box appears. Select Write
in ISO Image mode (Recommended) and then click OK. A dialog box
appears to warn you that any existing drive date will be removed. Click OK if
you are happy to proceed.
7. Return to Installing the Clearswift SECURE ICAP Gateway to complete the
installation process.
- 21 -
 Loading...