

ClearSound CL7150 User Manual
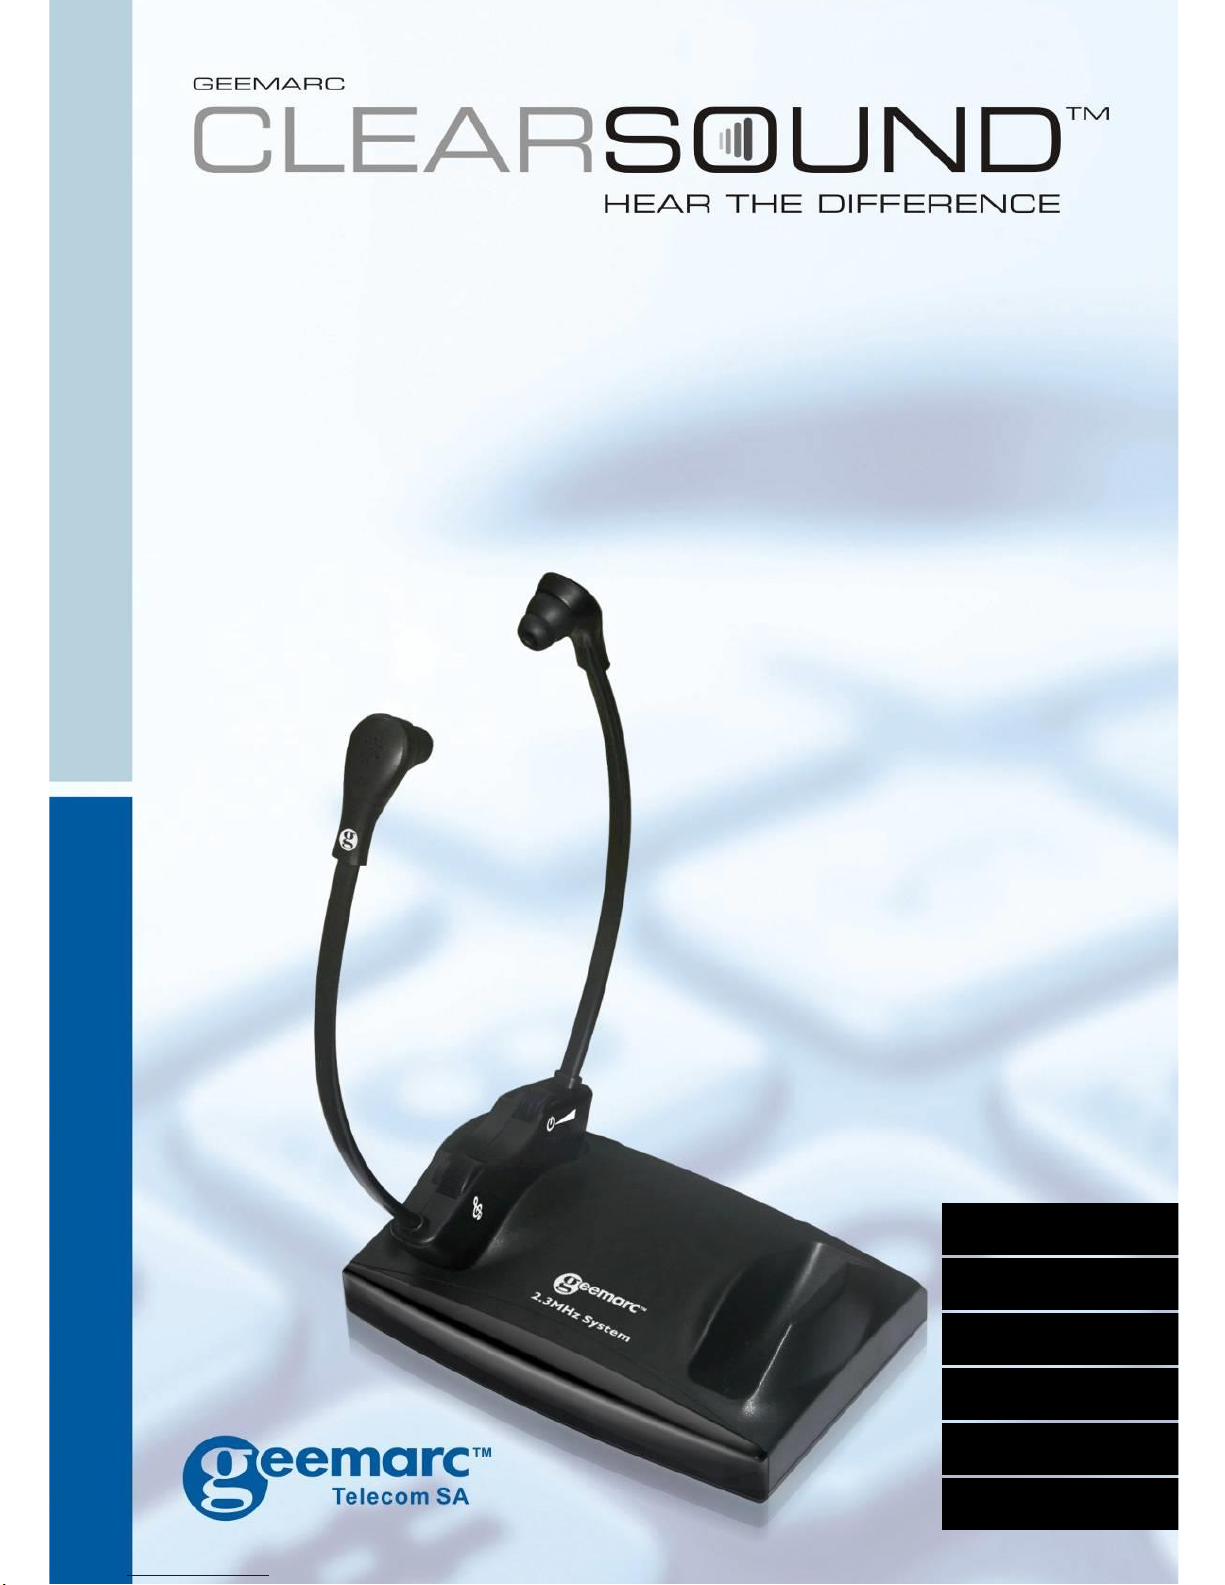
CL7150
2.3 MHz Wireless TV listener with Digital Connection
Casque TV infrarouge avec entrée analogique,optique et coaxiale
Infrarot TV-Kopfhörer 2,3 MHz mit einem digitalen Eingang
2,3 MHz draadloze TV luisteraar met digitale verbinding
Auricular inalámbrico de TV de 2,3 MHz con conexión digital
Ascoltatore TV a 2,3 MHz wireless con collegamento digitale
English P1
Français P15
Deutsch P29
Nederlands P44
Italiano P73
Español P58

1
INTRODUCTION
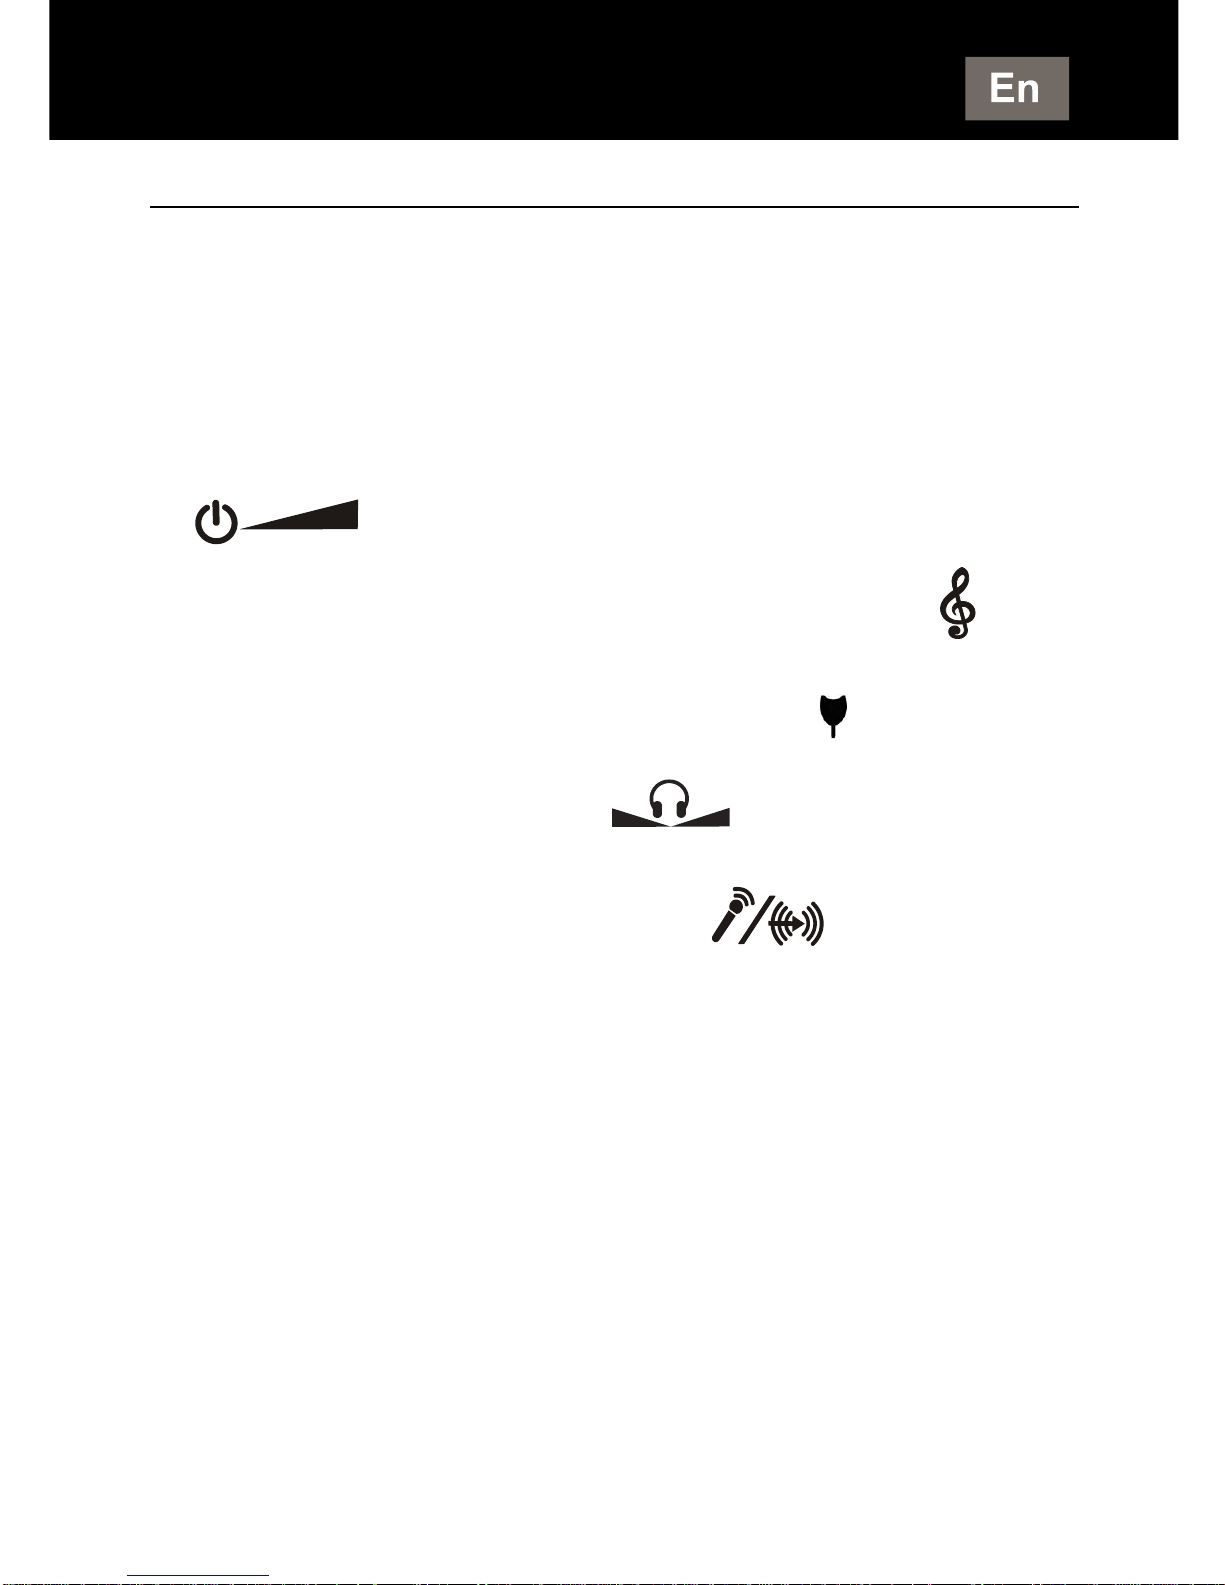
The CL7150 is a Personal Sound Amplifier which can be
used by people with impaired hearing or normal hearing.
It can be used to listen to TV or other audio equipment
without disturbing others.
It uses a 2.3MHz Infra-red(IR) system.
This product will accept the following audio inputs:
A) Analog Audio (RCA type output terminals).
B) Optical Digital Audio.
C) Coaxial Digital Audio.
WARNING: This product can produce high sound
pressure levels in order to assist people with impaired
hearing. Excessive sound pressure levels can cause
hearing damage so it is recommended to initially set the
volume to a low level and gradually increase it to a
comfortable level.
INTRODUCTION
2
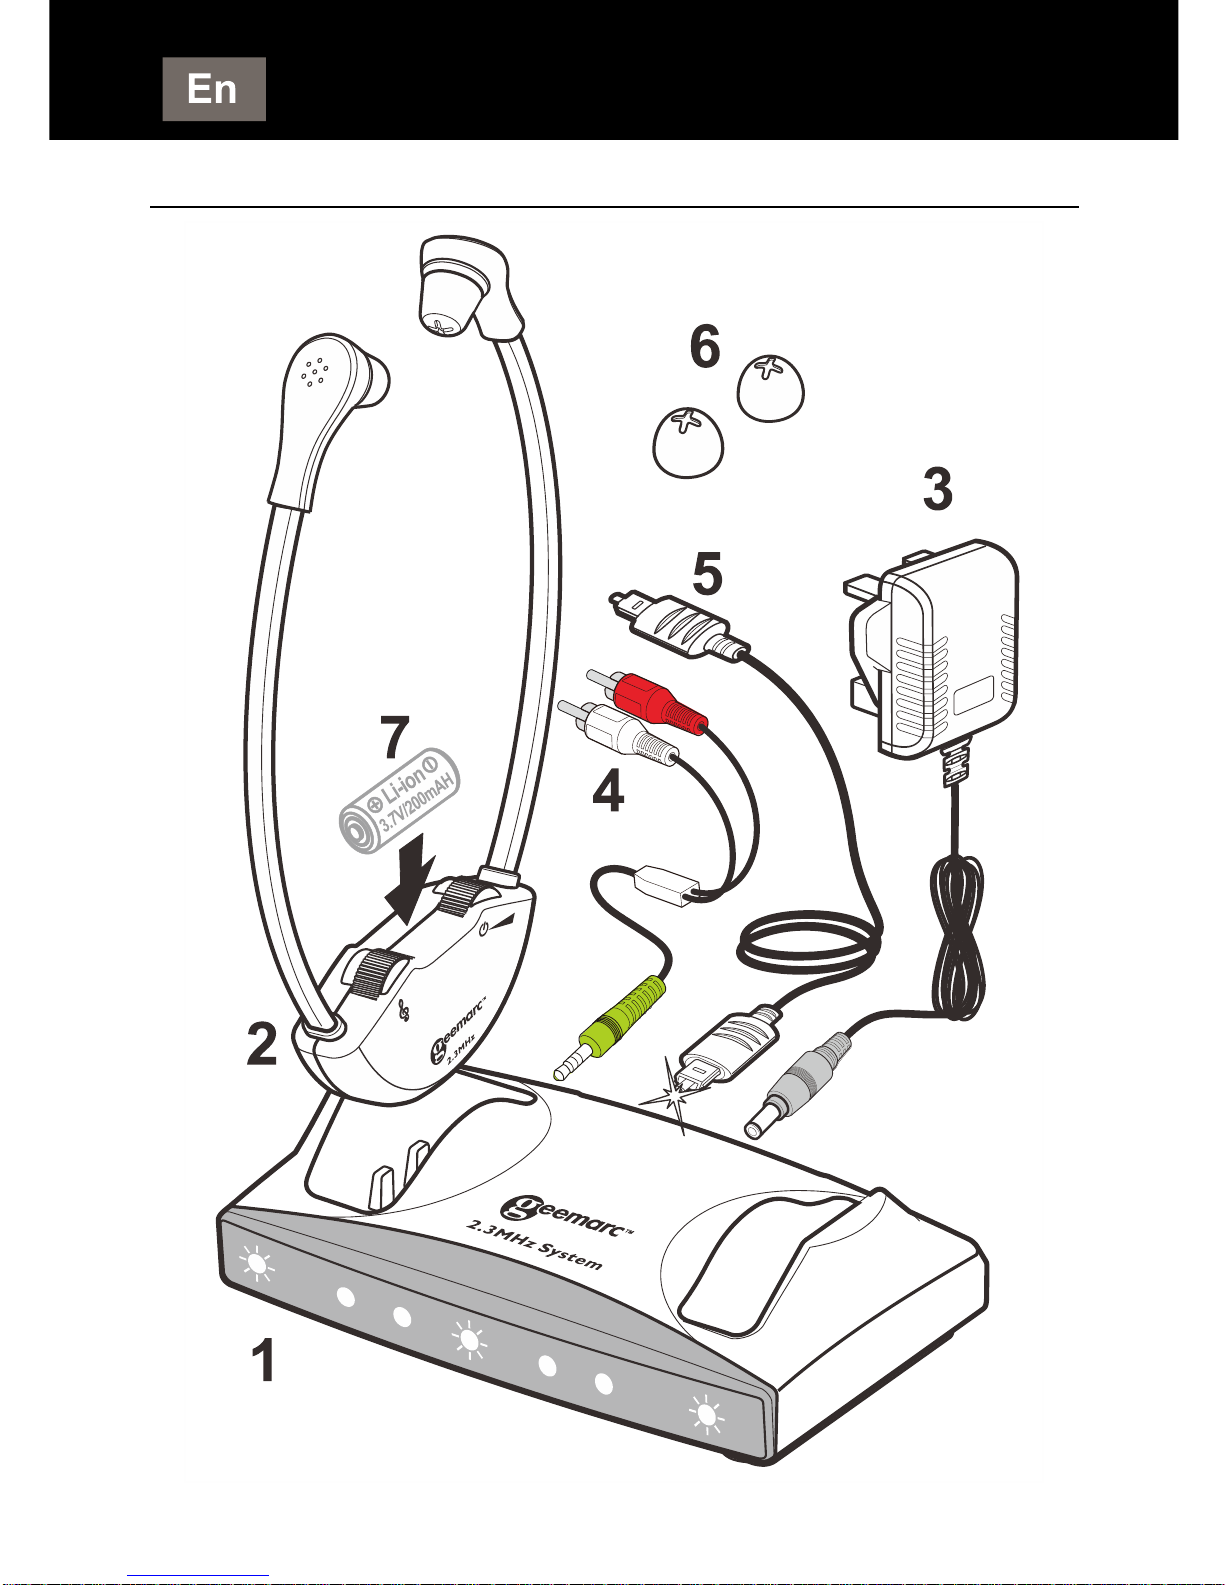
PRODUCT CONTENTS
PRODUCT CONTENTS
3
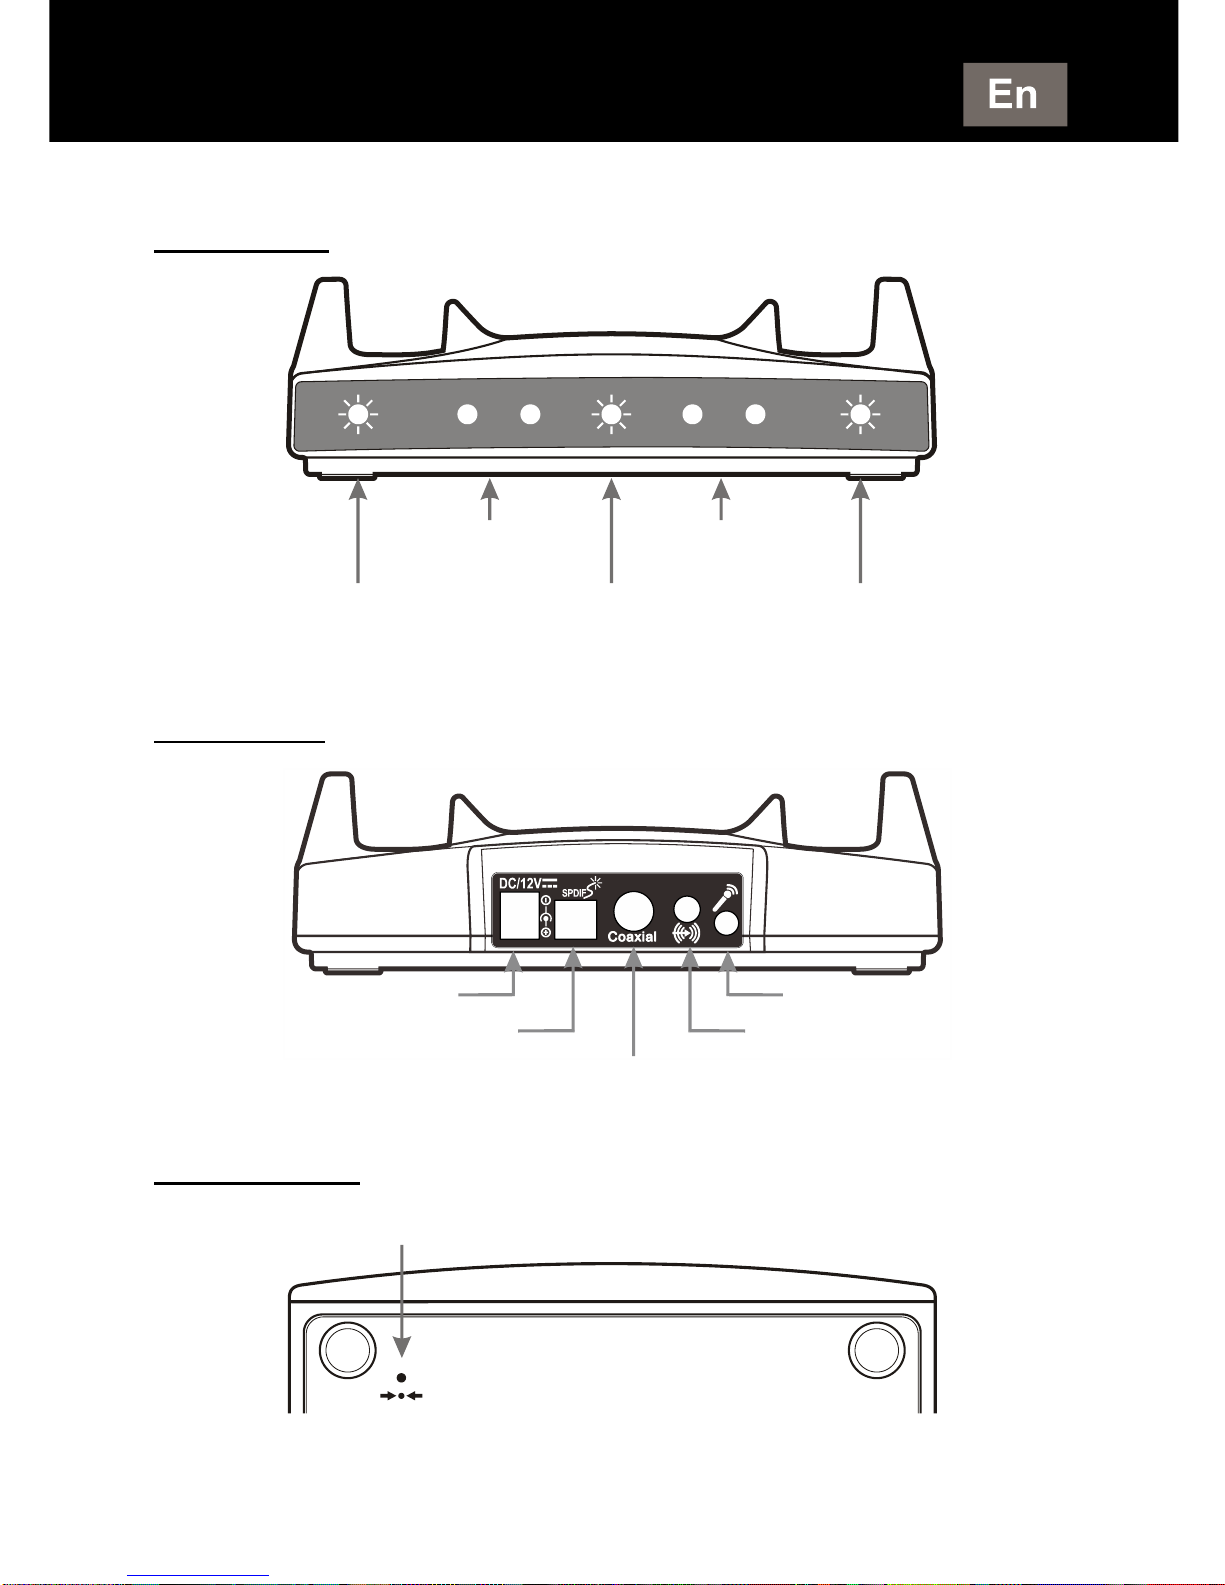
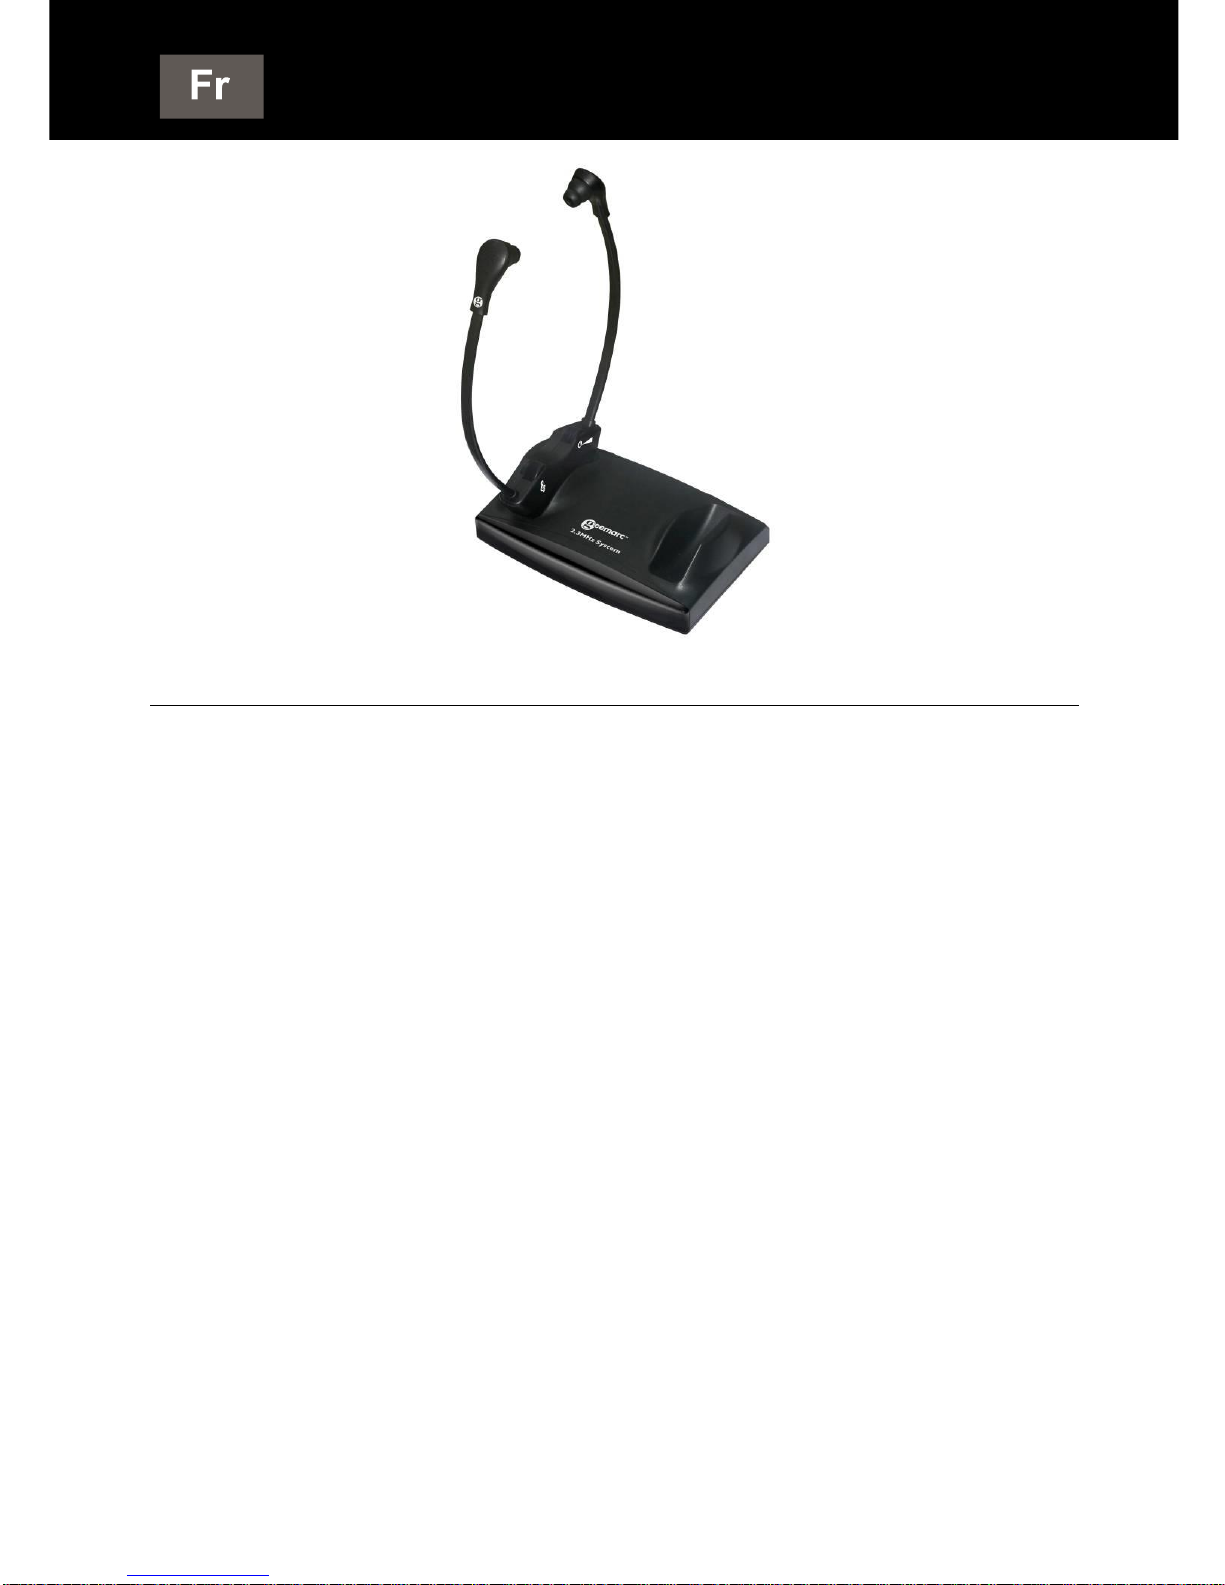
(1) Transmitter / Charger
Front View
Back View
Bottom View
NOTE: The transmitter/charger can charge one or two headsets.
PRODUCT CONTENTS
Left Cradle Charging
indicator (RED)
Power and
Emission indicator
Right Cradle Charging
indicator (RED)
IR EMITTER
IR EMITTER
DC 12V Power Jack
Microphone Input Jack
Digital Audio Coaxial Input
Digital Audio Optical Input
Analog Audio Input Jack
Reset

4
(2) Headset
NOTE: Depending on the model purchased there may be either
one or two headsets in the box.
(3) Power Supply (AC – DC Adapter, 100 - 240V)
(4) RCA(red/white) to 3.5mm audio cable
(5) Toslink cable (optical digital).
IMPORTANT: Before using the cable remove the
clear plastic protective covers from both ends.
(6) Spare ear tips. There are 2 styles of ear tip.
(7) Lithium Polymer Rechargeable battery(Sealed
inside the headset) 3.7V/200mAH
Replaceable
Silicone Ear Tips
TONE Control
ON / OFF/ Volume
Control
PRODUCT CONTENTS
Microphone/
Line-IN input
Balance Adjust
(Use tool )
Not included

5
NOTE:
1. This type of battery should last for many years and normally
should not need replacing.
2. We recommend that the battery be charged for about 2 hours
before the system is used for the first time.
3. Place the headset in the charging cradle. Verify that the LED
charging indicator (RED) is lit. The LED turns off when the
battery is fully charged.
4. It is not possible to overcharge the battery. We recommend that
the headset be placed in the charging cradle when not in use.
BATTERY WARNINGS
Do not attempt to change or remove the battery
Do not dispose in fire
Keep away from children
Do not short circuit the charging terminals in the
bottom of the headset.
Note: This series of CL7150 products comes in 2 model variations
and spare headsets as below. This Instruction Manual covers all
of them.
1) CL7150 Wireless Single Headset System
2) Extra Wireless Headset
PRODUCT CONTENTS
Right cradle
charging
indicator
Left cradle
charging
indicator
6
INSTALLATION
INSTALLATION

7
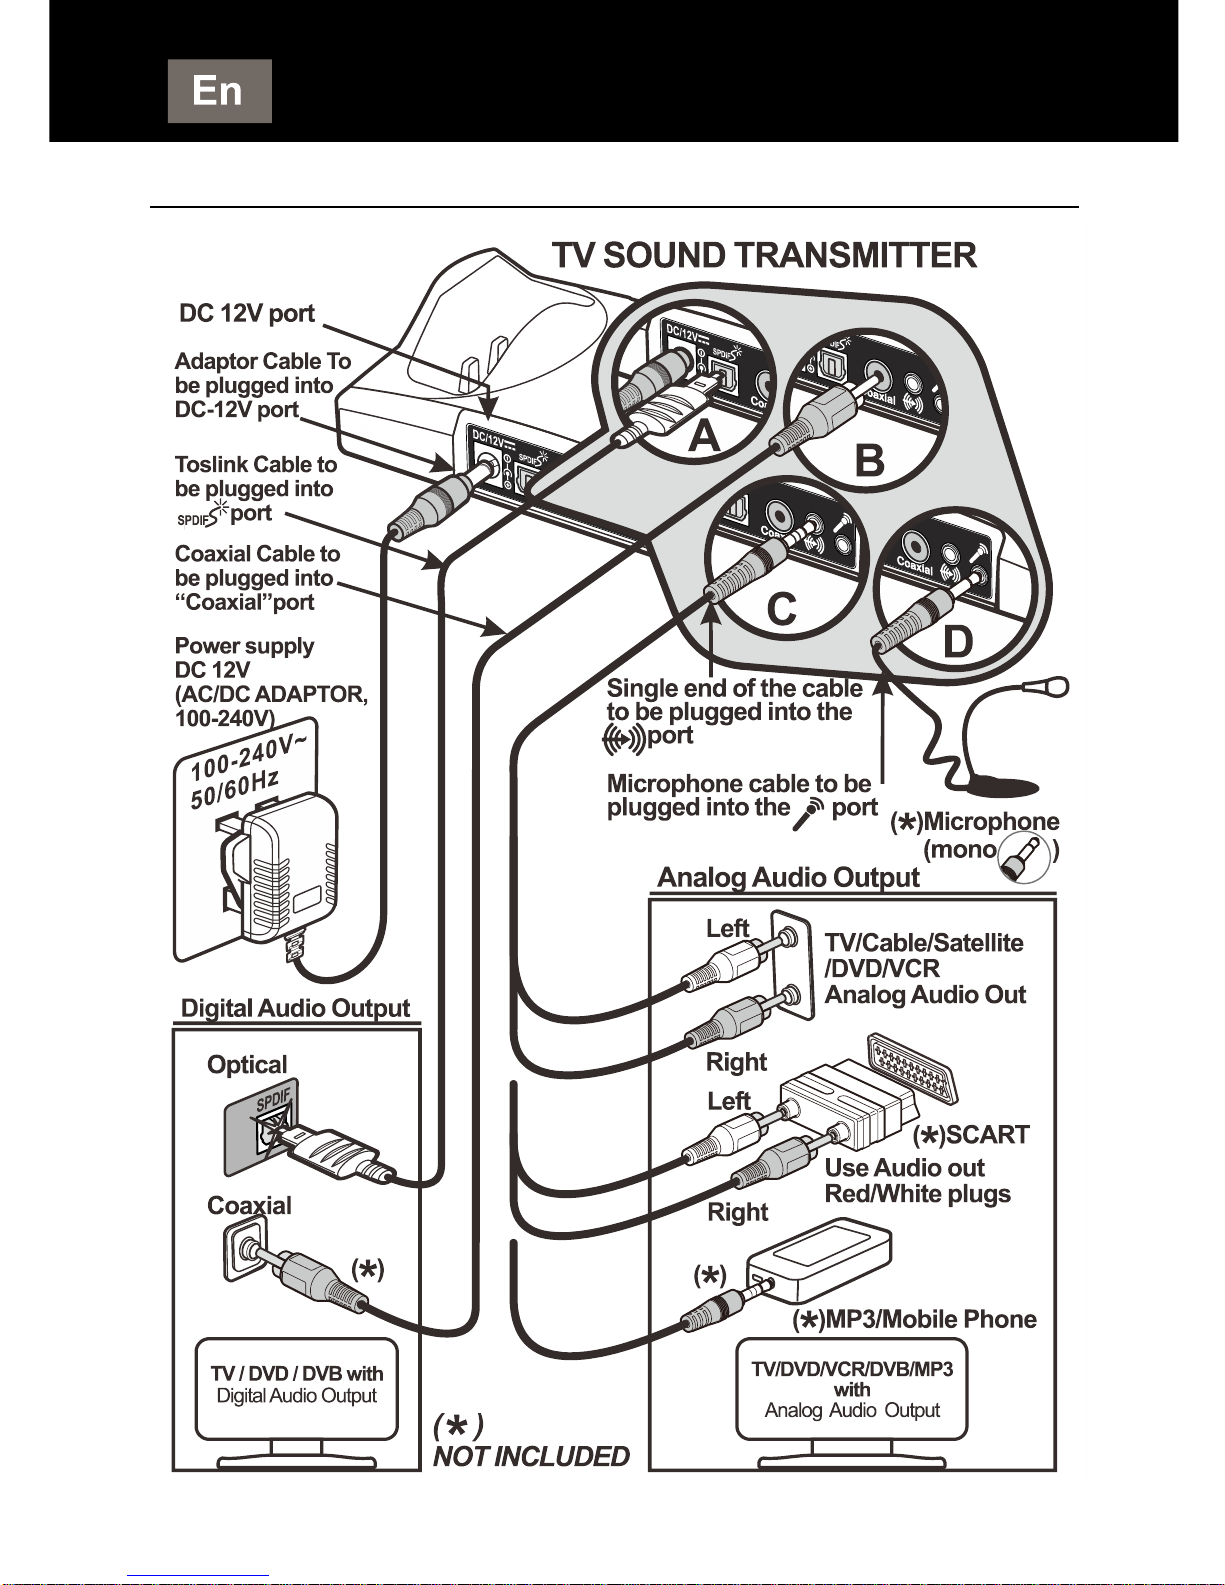
(1) Connect the power supply as shown in the diagram
(2) The transmitter/charger must be connected to the audio
OUTPUT sockets of the TV, audio equipment, cable or
satellite box, DVD or VCR player, etc. When an RCA type
cable is used the outputs jacks are red and white. Refer to
the diagram.
A Scart adapter(not included) may also be used. Use only
the red and white terminals.
NOTE: If the system is connected to a cable or satellite box
and to a DVD or VCR player it is necessary to turn off the
device which is not in use at the time. When using the DVD
or VCR player turn off the cable or satellite box. When
watching TV turn off the DVD and VCR player.
(3) Connecting a microphone
If needed, connect a condenser microphone using the
microphone socket located on the rear of the Transmitter
/charger.
When connecting to a TV or other equipment which has
digital audio output terminals, use either the included Toslink
cable (optical digital) or a coaxial cable, depending on which
type of output terminals are provided on the equipment.
Please refer to the connection diagram on page 6 or to the
user manuals of your TV and other equipment.
NOTE: When using CL7150 with a digital audio input signal
the TV audio output must be set to PCM mode. CL7150 is
not compatible with Dolby Digital. The PCM setting can
normally be done using the audio menu settings of the TV.
Please refer to your TV/DVD/Satellite/Cable Box user’s
manual for instructions for setting to PCM mode.
NOTE: If you wish to use the system to listen to TV while
the CL7150 is muted so as not to disturb others, the TV
audio output must be set to FIXED. Refer to the user manual
of your TV for instructions as to how to set to FIXED.
INSTALLATION

8
POSITIONING
The infra-red(IR) signals need a direct line-of-sight
connection between the transmitter and the headset.
Position the transmitter such that there is a direct line-ofsight connection with the headset when in use. The IR
signals may be blocked by objects such as walls, doors,
furniture, newspapers, books, etc. The IR diodes are lit
during use.
NOTE: When there is no audio input to the
transmitter/charge, transmission is turned off
automatically and the blue LED goes off. This is
resumed automatically when audio signal is restored.
POSITIONING
9
OPERATION
1. Make sure that the transmitter/charger is correctly
connected to the mains supply using the adapter
supplied.
2. Put on the headset such that the front(silkscreened)
part of the headset is facing the transmitter.
3. Turn on the headset using the ON/ OFF/ VOLUME
control and adjust the volume.
4. Use the tone control wheel to adjust the tone
frequency to suit your needs.
5. Use the included balance control tool ( ) to adjust the
volume balance between the left and right ears. This
control is on the headset
.
6. If needed, insert a condenser (electret) microphone
jack into the Mic/Line In socket on the
headset or connect the audio output of a cell phone
into the same socket using a cable with a 3.5mm jack.
7. When you are finished using the system carefully
place the headset in the charging cradle making sure
that it fits snugly. Check that the charging light turns
on.
OPERATION

10
SAFETY, CARE AND MAINTENANCE
▪ The system is designed to operate from a 100-240V
AC supply and does not have an integral on/off switch.
To disconnect the power switch the mains power point
switch to OFF or unplug the power supply (AC-DC
adapter);
▪ Clean the headset and ear tips regularly ----- use a
damp cloth for the headset and warm water and a mild
detergent for the ear tips(after removal from the
headset);
▪ Keep away from heat sources such as hot-plates, and
heat generating appliances;
▪ Keep away from water and other fluids;
▪ Repairs must be carried out by qualified personnel;
▪ We suggest that a power surge protector is connected
between the mains supply power point and the AC-DC
adapter.
SAFETY, CARE AND MAINTENANCE

11
PROBLEMS AND SOLUTIONS
The sound is not clear (static/interference)
▪ Check the line-of-sight connection.
▪ Make sure that the Blue LEDs is lit.
▪ Check the transmitter location (height above the floor).
▪ Keep away from any windows or interfering device.
▪ Check if the audio cable is connected to an analogue
(RCA) audio-OUT jack on TV, cable or satellite
decoder /receiver.
▪ Check that the audio cable is NOT connected to a
digital audio-out jack.
▪ The power outlet may already be in use with another
device.
▪ Audio cable is connected to the transmitter’s audio
jack.
The transmitter’s LED lights are not on.
▪ Check the connection to the wall socket or power
outlet.
▪ Check the connection to the CL7150 12V jack.
The charging lights do not come on when the
earphone set is in the cradle.
▪ Realign earphone set; if necessary, move around in
the cradle.
▪ Ensure that the charging cradle is connected to mains
power.
PROBLEMS AND SOLUTIONS

12
PRODUCT SPECIFICATIONS
General data :
Frequency: 2.3MHz
Modulation: Infrared, mono
Approx. range: 55 sq.m (approx. 600 sq. ft.)
Audio frequency response: 100-16,000 Hz
Total harmonic distortion: < 1%
Signal to noise Ratio: 70 dB
Auto ON/OFF
Headset :
Max. sound pressure level (SPL): 120 dB
Battery requirement: Lithium Polymer Rechargeable
battery, 3.7V / 200mAH
Operating time: Max.10 hrs.
Weight: approx. 58 – 60 g
Transmitter :
Audio connection: 3.5mm input jack/RCA type
cable/optical digital/coaxial digital/microphone input.
Power Supply: DC Power Supply 12V, 500mA
Weight: Approx. 180 g
Dimensions (H x W x D): 4.8 x 10.5 x 15.4 cm
RESET SWITCH: Sometimes computers malfunction due
to electrostatic discharge or other electrical disturbances, or
when DC Jack is plugged. If this happens push a thin rod
into the RESET hole in the base of transmitter unit
and press down for about one second. This Resets the
PRODUCT SPECIFICATIONS

13
transmitter unit, clears its memory and returns it to normal
operation.
General information
Guarantee
From the moment your Geemarc product is purchased, Geemarc
guarantee it for the period of one year. During this time, all repairs
or replacements (at our discretion) are free of charge. Should you
experience a problem then contact our Helpline or visit our
website at www.geemarc.com.
The guarantee does not cover accidents, negligence or breakage
to any parts.
The product must not be tampered with or taken apart by anyone
who is not an authorised Geemarc representative.
The Geemarc guarantee in no way limits your legal rights.
Important: YOUR RECEIPT IS PART OF YOUR GUARANTEE
AND MUST BE RETAINED AND PRODUCED IN THE EVENT
OF A WARRANTY CLAIM.
Please note: The guarantee applies to the United Kingdom only.
EEC Declaration
Geemarc Telecom SA hereby declares that this product is in
compliance with the essential requirements and other relevant
provisions of the Radio and Telecommunications Terminal
Equipment Directive 1999/5 EEC.
The declaration of conformity may be consulted at
www.geemarc.com
GENERAL INFORMATION

14
Disposal information
Disposal of old electrical & electronic equipment (applicable
in the European Union and other European countries with
separate collection systems)
The symbol on the product or its packaging indicates that this
product may not be treated as household waste. Instead it should
be handed over to the applicable collection point for the recycling
of electrical and electronic equipment.
By ensuring this product is disposed of correctly, you will help
prevent potential negative consequences for the environment and
human health, which could otherwise be caused by inappropriate
waste handling of this product.
For more detailed information about recycling this product, please
contact your local council office, your household waste disposal
service or the shop where the product was purchased.
Customer support
For product support and help, visit our website at
www.geemarc.com
For our Customer Helpline
Telephone:
01707 384438
Fax: 01707 832529
GENERAL INFORMATION

15
INTRODUCTION
Le CL7150 est un casque qui permet d’amplifier toutes
sources audio comme par exemple un téléviseur ou une
chaine HI-FI équipés d’une sortie RCA.
Ce casque permet de ne pas géner les autres
personnes présentes dans la même piéce.
Il utilise un système infrarouge (IR) de 2.3 MHz.
Ce produit est compatible avec les signaux d’entrée
audio suivants :
A) Audio analogique (sorties de type RCA).
B) Audio numérique optique.
C) Audio numérique coaxiale.
AVERTISSEMENT: Un niveau sonore trop important
diffusé par un casque d’écoute peut provoquer des
pertes d’audition. Il est donc recommandé de régler le
volume au minimum avant de mettre le casque, puis de
monter progressivement le volume jusqu’à un niveau
d’écoute confortable.
INTRODUCTION
16
CONTENU DE L’EMBALLAGE
CONTENU DE L’EMBALLAG
17
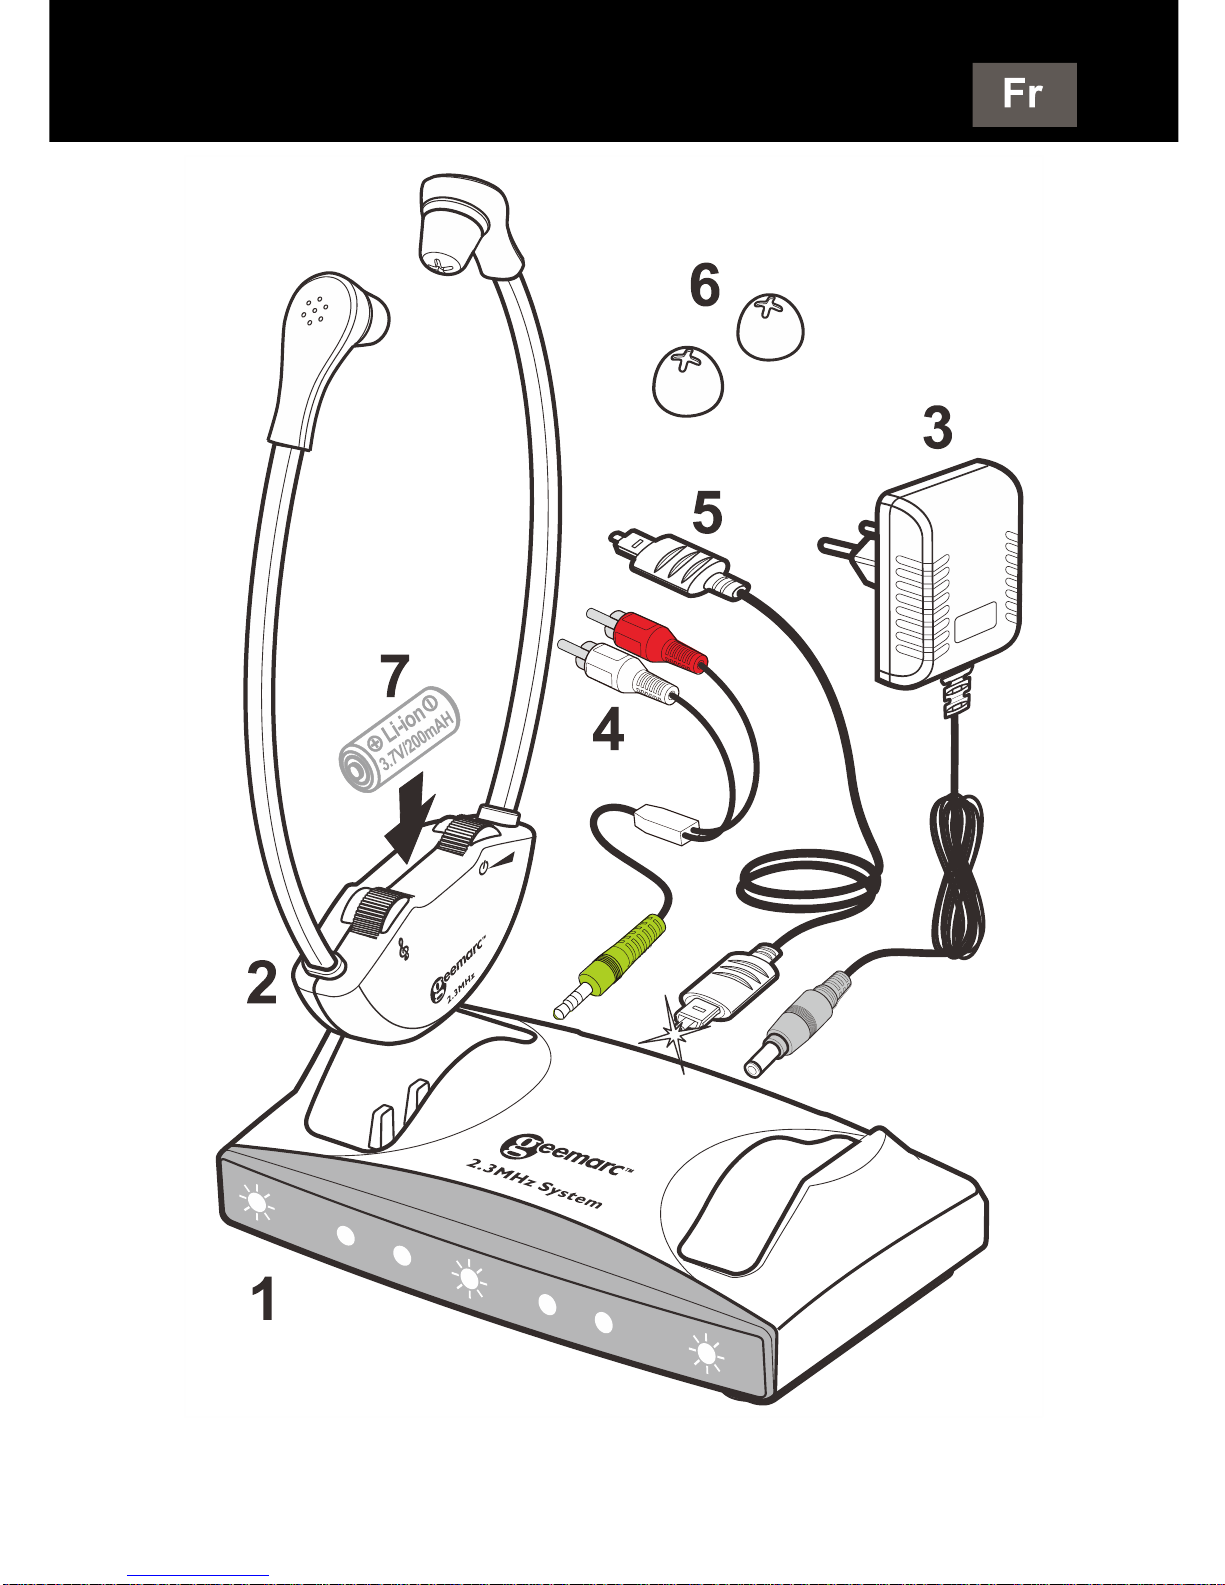
(1) Base
CONTENU DE L’EMBALLAGE
18
REMARQUE: La base permet de recharger un ou deux casques
simultanément.
(2) Casque
CONTENU DE L’EMBALLAGE
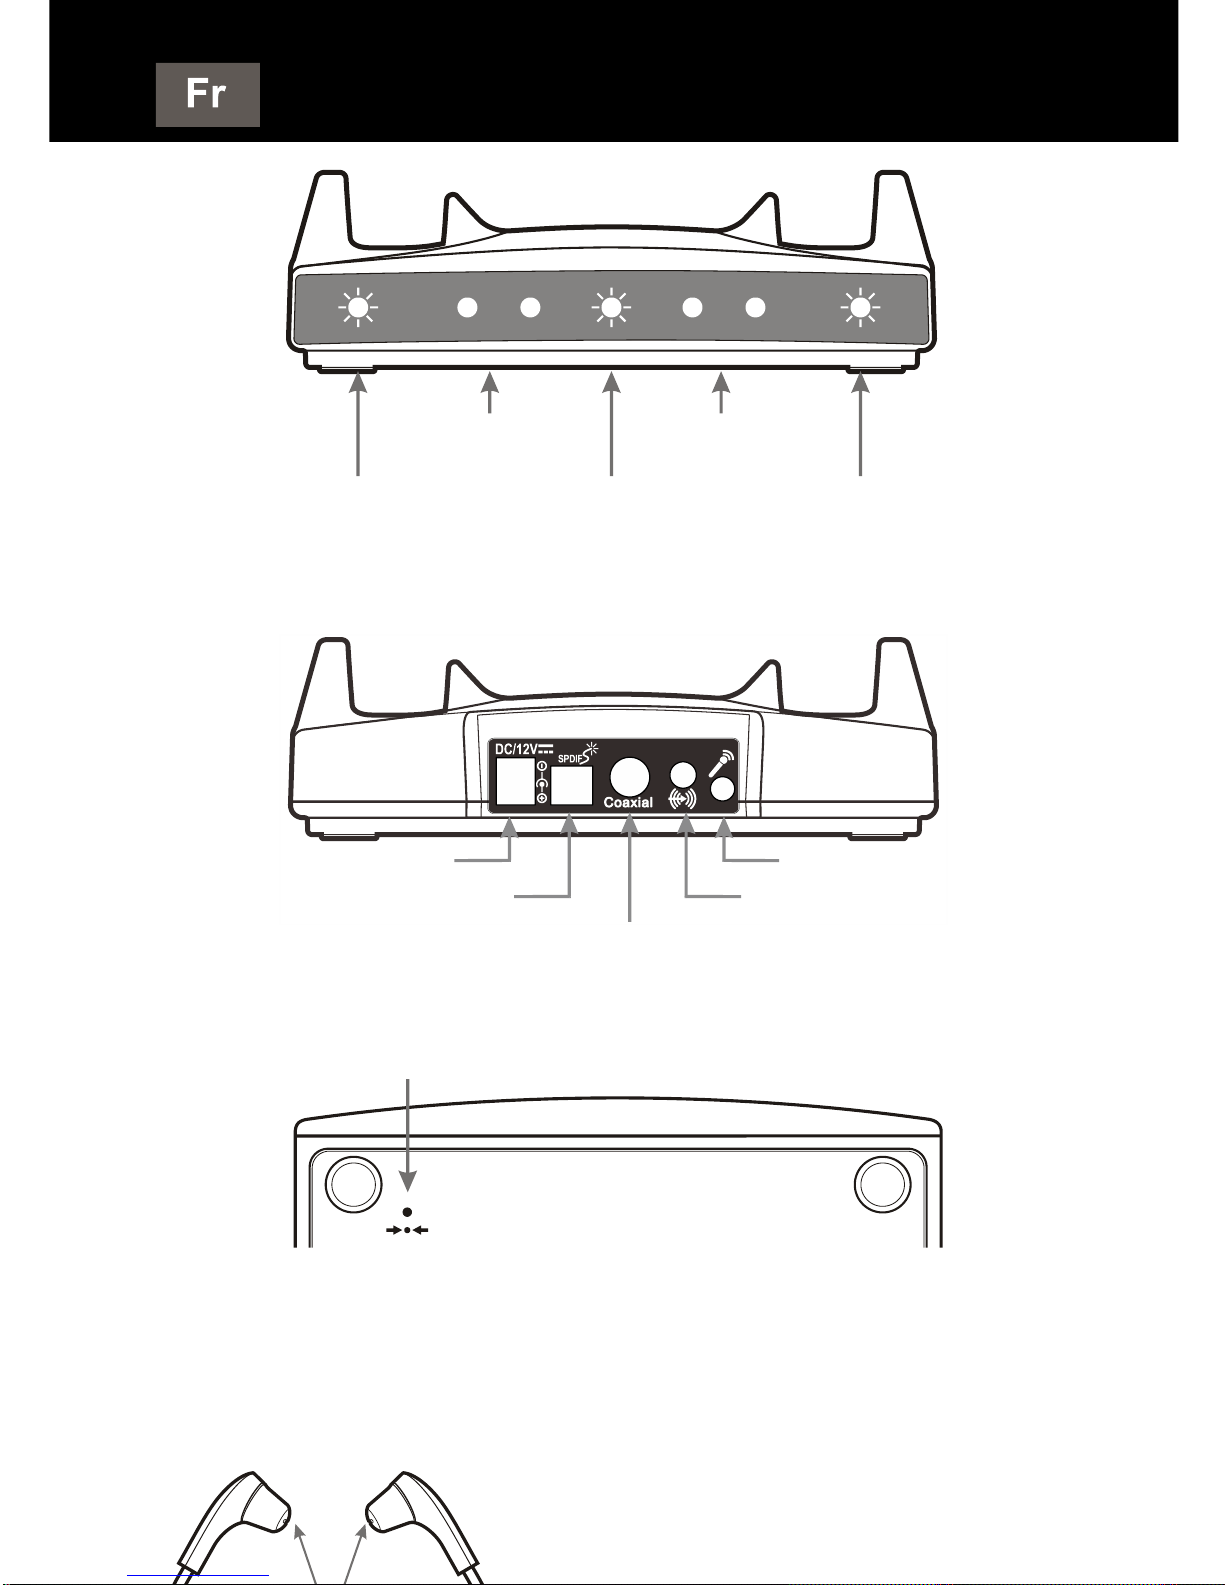
Voyant (ROUGE) de
recharge gauche du
chargeur
Voyant
d’alimentation et
de transmission
Émetteur
infrarouge
Émetteur
infrarouge
Voyant (ROUGE) de
recharge droit du
chargeur
Prise d’alimentation CC 12V
Entrée micro
Entrée audio
numérique coaxiale
Entrée audio numérique
optique
Entrée audio analogique
Remise
19
REMARQUE: En fonction du modèle acheté, un ou deux
casques sont fournis.
(3) Alimentation (adaptateur secteur, 12V DC).
(4) Câble audio RCA 3,5 mm (rouge/blanc).
(5) Câble (numérique optique) Toslink.
Remarque : Avant toute utilisation du câble Toslink
(numérique optique), veuillez retirer les protections
en plastique aux deux extrémités.
(6) Embouts d’écoutes de rechange. 2 styles
d’embouts sont fournis.
(7) Batterie rechargeable lithium-polymère (scellée à
l’intérieur du casque). 3,7V/200mAH.
REMARQUE:
CONTENU DE L’EMBALLAGE
Entrée audio
/Micro
Réglage de la
balance
(Utiliser )
non inclus

20
1. Ce type de batterie peut généralement être utilisé pendant
plusieurs années et n’a normalement pas à être remplacé.
2. Nous vous recommandons de recharger la batterie 2 heures
environ avant d’utiliser l’appareil pour la première fois.
3. Placez le casque sur son chargeur. Vérifiez que le voyant LED
de recharge (ROUGE) est allumé. La LED s’éteint quand la
batterie est complètement rechargée.
4. Un dispositif de protection empêche la surcharge de la batterie.
Nous vous recommandons de toujours placer le casque sur le
chargeur quand vous ne l’utilisez pas.
MISES EN GARDE CONCERNANT LA BATTERIE
N’essayez pas de changer ou de retirer la batterie. Ne
jetez pas l’appareil dans un feu.
Veillez à ce que l’appareil reste hors de portée des
enfants.
Ne court-circuitez pas les contacts de recharge
présents au bas du casque.
Remarque: La gamme des produits CL7150 comprend 2
modèles :
1) Casque sans fil d’écoute CL7150
2) Casque additionnel sans fil CL7150
Cette notice d’utilisation fourni les instructions d’utilisation pour
tous ces modèles
INSTALLATION
Voyant de
recharge
Voyant de
recharge
21
INSTALLATION

22
(1) Branchez l’appareil sur une prise électrique en procédant
comme décrit sur le schéma.
(2) La base doit être connectée sur la SORTIE RCA (audio
output/ Sortie audio) d’un téléviseur, appareil audio,
décodeur satellite ou câble, lecteur DVD, magnétoscope,
etc.
Dans le cas de l’utilisation d’un câble RCA, branchez-le sur
les sorties rouge et blanche. Consultez le schéma.
Vous pouvez également utiliser une prise péritel (non fourni).
Utilisez uniquement les prises rouge et blanche.
REMARQUE: En utilisant la connection par la prise péritel,
des perturbations peuvent provenir d’autres appareils tels
qu’un lecteur DVD, magnétoscope. Veillez à mettre en veille
les sources non utilisées.’
(3) Connexion d'un microphone.
Si nécessaire, connecter un microphone à condensateur à
l'aide de la prise microphone située à l'arrière de la base.
Lors du branchement sur un téléviseur ou un autre appareil
pourvu de sorties audio numériques, utilisez le câble
(numérique optique) Toslink fourni ou un câble coaxial en
fonction du type de sorties audio dont l’appareil est équipé.
Reportez-vous au schéma de branchement de la page 20 ou
à la notice d’utilisation de votre téléviseur/appareil.
REMARQUE: Lors de l’utilisation d’un signal audio d’entrée
numérique, la sortie audio du téléviseuri doit être réglée en
mode PCM. Le CL7150 n’est pas compatible avec le Dolby
digital. Le réglage en PCM s’effectue normalement en
passant par les paramètres audio du téléviseur. Veuillez
vous reporter aux modes d’emploi de vos autres appareils
(téléviseur, lecteur DVD, décodeur satellite, box Internet, etc)
pour obtenir les instructions de réglage du mode PCM.
REMARQUE: Si vous utilisez la sortie casque de votre
télévision, le son des haut-parleurs du téléviseur est coupé
afin de ne pas gêner les autres personnes. Consultez la
INSTALLATION

23
notice d’utilisation de votre téléviseur pour en savoir plus sur
la sortie casque.
POSITIONNEMENT
Les signaux infrarouges (IR) sont transmis en ligne droite
par l’émetteur au casque. Positionnez l’émetteur en sorte
qu’il soit visuellement en ligne directe avec le casque
pendant l’utilisation. Les signaux infrarouges sont bloqués
par les objets tels que les murs, portes, meubles, journaux,
livres, etc. Les diodes infrarouges s’allument pendant la
transmission des signaux.
REMARQUE: Quand aucun signal audio n’est transmis à la
base par la connexion filaire, la transmission infrarouge
s’arrête automatiquement. Elle reprend quand la base reçoit
à nouveau un signal audio.
POSITIONNEMENT

24
UTILISATION
1. Veillez à ce que la base soit correctement branchée
sur une prise électrique avec l’adaptateur fourni.
2. Portez le casque en dirigeant sa partie frontale
(portant des inscriptions) vers la base.
3. Allumez le casque avec son bouton MARCHE /
ARRÊT / VOLUME et réglez le volume.
4. Réglez la tonalité en fonction de vos préférences
avec la molette de réglage de la tonalité .
5. Réglez la balance entre les oreillettes droite et
gauche avec le dispositif de réglage ( ) de la
balance . Celui-ci se trouve sur le casque.
6. Si nécessaire, branchez la fiche d’un micro à un
condensateur (électret) dans l’entrée ligne/micro
du casque ou branchez la sortie audio d’un
téléphone portable dans une entrée audio avec un
câble audio muni d’une fiche de 3.5 mm (Non fourni).
7. Lorsque vous avez fini d’utiliser le système, remettez
précautionneusement le casque sur la base en
veillant à le positionner correctement. Vérifiez que le
voyant rouge de recharge s’allume.
UTILISATION

25
SÉCURITÉ, ENTRETIEN ET MAINTENANCE
• Le système est conçu pour être branché sur une prise
secteur de 100 à 240V, il ne comporte pas
d’interrupteur marche/arrêt. Pour l’éteindre,
débranchez-le de la prise électrique (adaptateur
secteur) ou mettez la prise électrique hors tension en
actionnant son interrupteur.
• Nettoyez le casque et les embouts auriculaires
régulièrement. Utilisez un chiffon humidifié pour
nettoyer le casque, ou de l’eau tiède et un détergent
doux pour nettoyer les embouts auriculaires (après les
avoir retirés du casque).
• Veillez à ce que l’appareil soit toujours éloigné des
sources de chaleur, par exemple des tables de cuisson
et des appareils dégageant de la chaleur.
• Veillez à ce que l’appareil ne soit jamais exposé à de
l’eau, ni à aucun autre liquide.
• Les réparations doivent être confiées à un
professionnel qualifié.
• Nous vous conseillons d’utiliser un parasurtenseur
entre la prise électrique et l’adaptateur secteur.
SÉCURITÉ, ENTRETIEN ET MAINTENANCE

26
DÉPANNAGE
Le son n’est pas clair (interférences/parasites).
• Vérifiez qu’il n’y ai aucun obstacle entre la base et le
casque, et qu’ils soient dirigés l’un vers l’autre.
• Vérifiez que les LED soient allumées.
• Vérifiez que l’emplacement de l’émetteur soit
approprié (hauteur par rapport au sol).
• Veillez à ce que le produit reste éloigné des fenêtres et
de tous les appareils générant des interférences.
• Vérifiez que le câble audio soit branché sur les
SORTIES audio (RCA) analogiques d’un téléviseur,
d’un décodeur/récepteur satellite ou câble.
• Vérifiez que le câble audio NE SOIT PAS BRANCHÉ
sur une sortie audio numérique.
• Vérifiez que la sortie du téléviseur ne soit pas déjà
utilisée par un autre appareil.
• Vérifiez que le câble audio ne soit pas branché sur la
prise audio de la base.
Les LED de l’émetteur ne sont pas allumées.
• Contrôlez le branchement sur la prise murale ou
électrique.
• Contrôlez le branchement sur la fiche DC 12V de la
base CL7150.
Les voyants de recharge ne s’allument pas quand le
casque est posé sur la base.
• Réalignez le casque. Si nécessaire, déplacez-le sur le
deuxième emplacement de la base.
DÉPANNAGE

27
• Vérifiez que la base soit branchée sur une prise
secteur.
SPÉCIFICATIONS TECHNIQUES
Spécifications générales:
Fréquence: 2,3 MHz
Modulation: Infrarouge, mono
Portée: 55 m2 environ
Réponse en fréquence: 100-16,000 Hz
Distorsion harmonique totale: < 1%
Rapport signal/bruit: 70 dB
Allumage et extinction automatiques
Casque:
Niveau de pression acoustique max. (SPL): 120 dB
Batterie: Batterie rechargeable lithium-polymère
3,7V/200 mAh
Autonomie: 10h environ
Poids: 58-60g environ
Émetteur:
Connexion audio: 3.5mm entrée jack/câble RCA,
optique digital, coaxial digital, entrée microphone.
Alimentation: 12V CC, 500 mA
Poids: 180g environ
Dimensions (HxLxP): 4,8x10,5x 15,4 cm
RÉINITIALISATION (Reset): Les décharges
électrostatiques, les autres perturbations électriques et le
branchement de la fiche d’alimentation peuvent provoquer
un dysfonctionnement. Si cela se produit, enfoncez un objet
fin dans le trou de RÉINITIALISATION (Reset)
présent au dos de la base et appuyez pendant une seconde
SPÉCIFICATIONS TECHNIQUES
 Loading...