

Page 1

This product may be purchased from Connevans Limited
secure online store at www.DeafEquipment.co.uk
DeafEquipment.co.uk
Offering you choice
Helping you choose
Connevans.info
Solutions to improve the quality of life
Page 2
AMPLIDECT 350
Page 3

CONTENTS
CONTENTS 1
INTRODUCTION 4
Unpacking 5
DESCRIPTION 6
General Description 6
Keys Description 11
LCD Window Icons Description 14
INSTALLATION 15
Connecting Lines 15
Installing Batteries 16
Charging Handset 18
Using Handset Carrying Clip 19
Using Headset (optional) 20
Base Ringer Volume Switch 20
HANDSET SETTINGS 21
Turning Handset On/Off 21
BASIC FUNCTIONS 23
Making a call 23
1
Page 4

CONTENTS
Receiving a call 24
Muting the Microphone 25
Amplification Function 26
Menu Navigation 27
Menu Map 28
Handset Ringer Setting 29
Last Number Redial 30
CID Book 32
Torch 35
Key Lock 35
Auto Answer 36
Selecting a Language 37
HS Name 38
Range Alarm 39
Paging 40
Dial Mode 41
Handsfree 42
Flash Signal 43
ADVANCED FUNCTIONS 44
Phone Book 44
One-Touch Memories 49
HS Settings 51
2
Page 5

CONTENTS
BS Settings 59
Registration 62
Calling with more than one Handset 63
Caller ID on call waiting 65
FEATURE LIST 66
TROUBLESHOOTING 68
TECHNICAL SPECIFICATIONS 69
SAFETY INFORMATION 71
GUARANTEE 73
RECYCLING DIRECTIVES 75
3
Page 6
INTRODUCTION
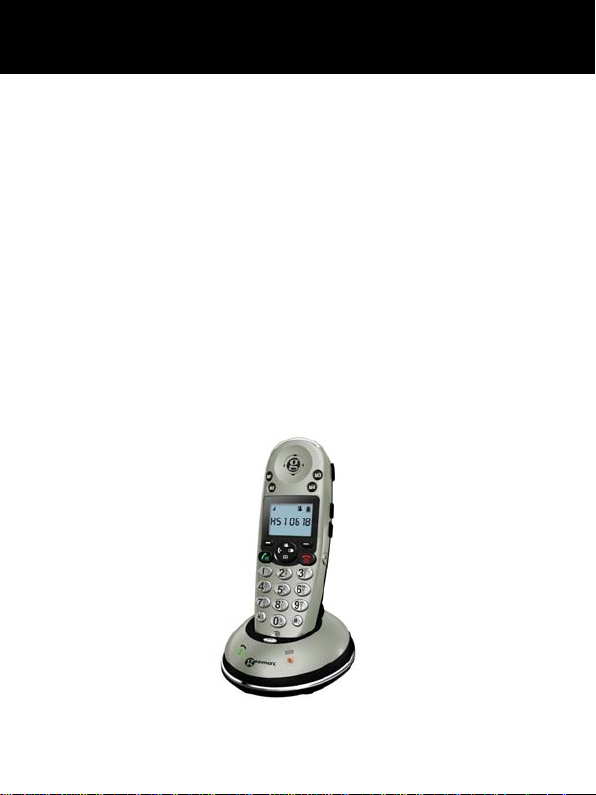
Congratulations on purchasing your Geemarc AD350
telephone. This telephone offers all the advantages of
cordless technology (compliant with Digitally Enhanced
Cordless Telecommunications-DECT st andard) together
with an easy to see big button keypad, ideal for those
who suffer with poor sight. This telephone is also
hearing aid compatible.
Its is important that you read the instructions below in
order to use your Geemarc telephone to its full potential.
Keep this user guide in a safe place for future reference.
This guide explains how to use the following telephone:
AD350
4
Page 7

INTRODUCTION
Unpacking
When unpacking the telephone, you should find the
following in the box:
y 1 AD350 handset
y 1 AD350 base
y 1 Mains power adaptor
y 3 AAA Ni-MH Batteries
y 1 Telephone line cord
y 1 Carrying clip
y 1 User Guide
* The shape of the plugs can vary according to each country’s
specification.
For product support and help visit our website at
www.geemarc.com
Telephone 01707 384438
Or fax 01707 832529
5
Page 8
DESCRIPTION
General Description
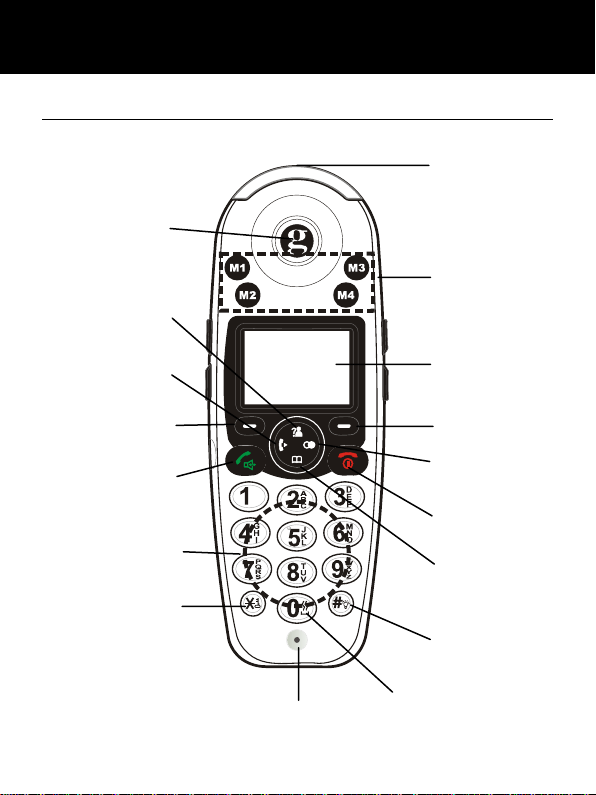
Handset Description (front)
Earpiece
Up/CID key
Visual ringer
One-touch
Memories
M1 to M4
Int key
Left soft key
Dial/
Speaker key
Alphanumeric
keys
key
Keypad
locked
function
*
Microphone
6
Display
Right soft key
Redial key
End key
Down
/Phonebook
key
# key
Torch function
Vibrator Function
Page 9
DESCRIPTION
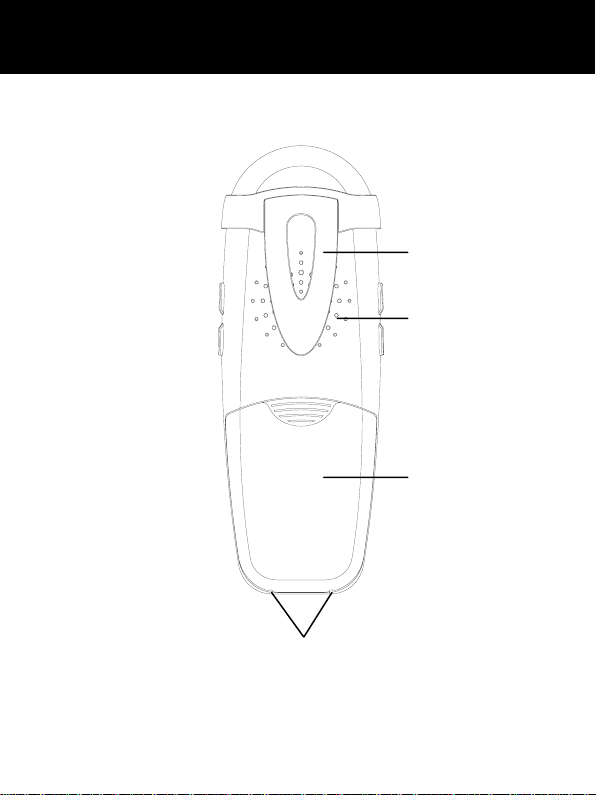
Handset Description (Rear)
Charging contacts
Carrying clip
Speaker
Battery
compartment
cover
7
Page 10
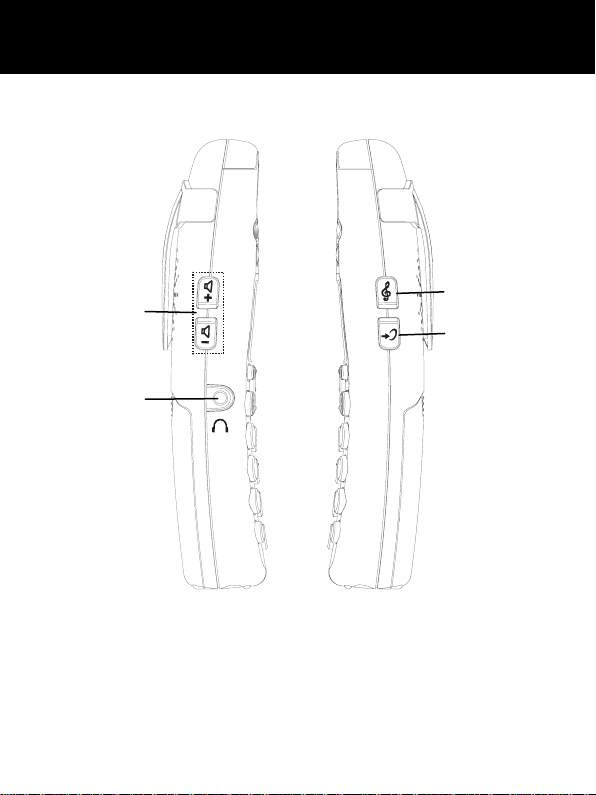
DESCRIPTION
PRIOR TO USE
Handset Description (Side)
Volume
Control
Headset
Tone Control
Amplify
(AMP)
Button
Jack
8
Page 11
DESCRIPTION
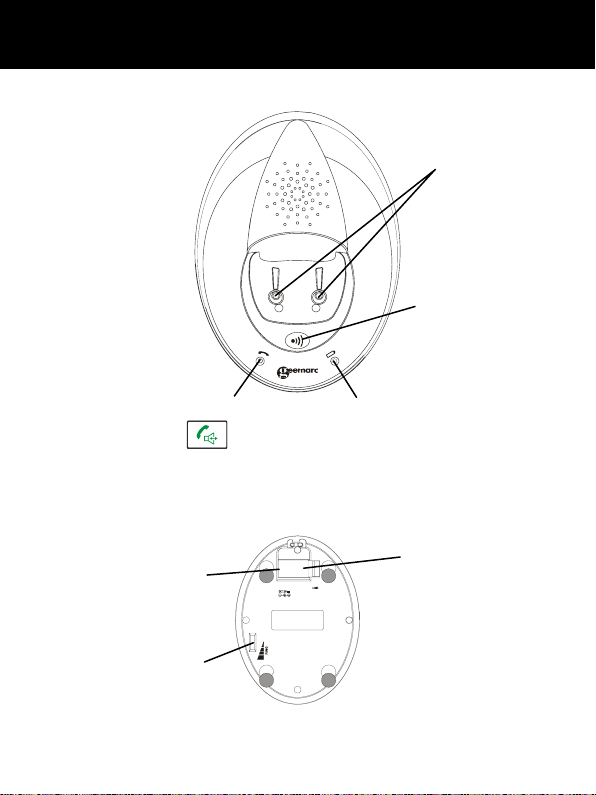
Base Description (Top) : AMPLIDECT350
In use indicator flashes when
you press
It also flashes when you page
the handset.
Base Description (Base)
the key.
Mains
power
adaptor
Ringer
volume
switch
9
Charge indicator
lights steadily
while the handset
is charging.
Phone
Line
Jack
Charge pins
Page
botton
Page 12
DESCRIPTION
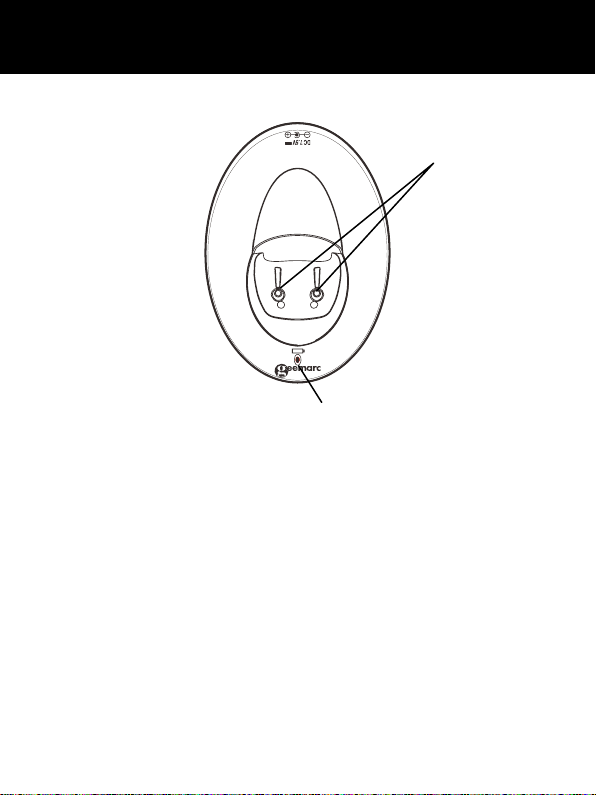
Base Description (Top) : AMPLIDECT350 HS
Charge pins
Charge indicator
lights steadily
while the handset
is charging.
10
Page 13
DESCRIPTION
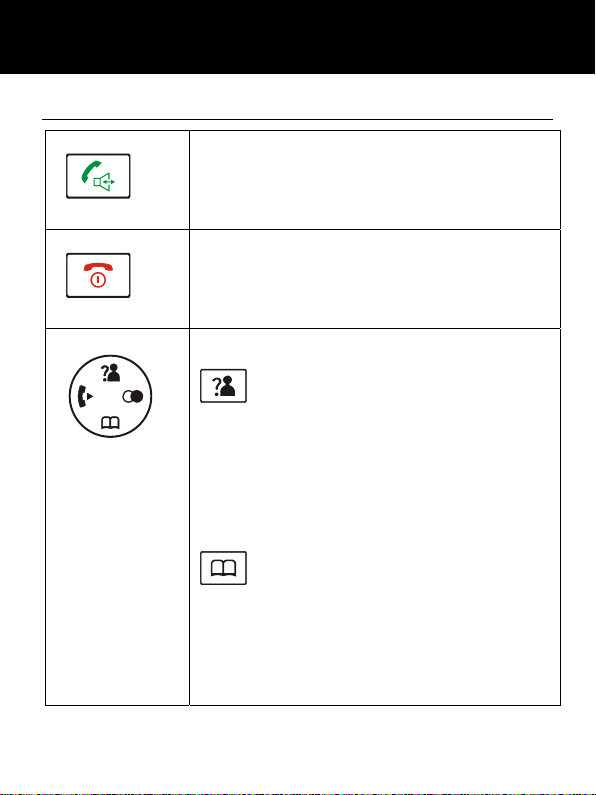
Keys Description
Dial/Speaker key
Make/Answer a call.
Activates the speakerphone if pressed
during a call, as described in page 41.
End key
End a call.
Long press to activate power on/off, as
described in page 20.
Navigation key:
Up/CID key
Scroll up through lists and menu
options.
Increase the earpiece/speakerphone
volume during a call.
Enter the CID book, as described in
page 31.
Down/Phonebook key
Scroll down through lists and menu
Decrease the earpiece/speakerphone
volume during a call.
Enter the Phonebook, as described in
page 44.
11
Page 14
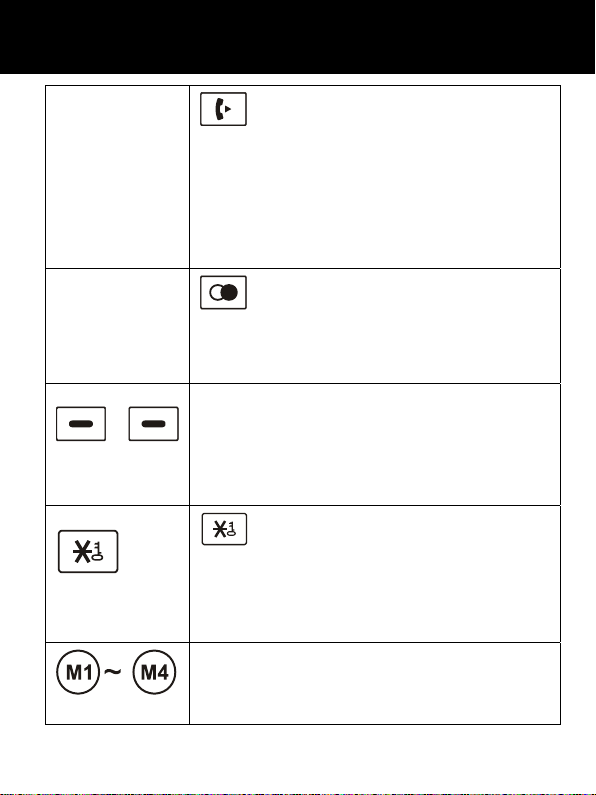
DESCRIPTION
Set up an internal call to another
handset.
Transfer an incoming call to another
handset.
Set up a conference call with an
external line and an internal handset.
Enter the redial book, as described in
page 29.
Insert a pause when pre-dialing a number.
Left/Right soft key
Perform the functions indicated by the
text immediately over it (on the bottom
line of the display) which changes time
by time.
Press and hold to turn on/off keypad
lock function.
Set up a conference call, as described
in page 63.
One-touch memories
You can store up to 4 numbers in
One-touch memories (M1 to M4).
Int key
Redial key
key
12
Page 15
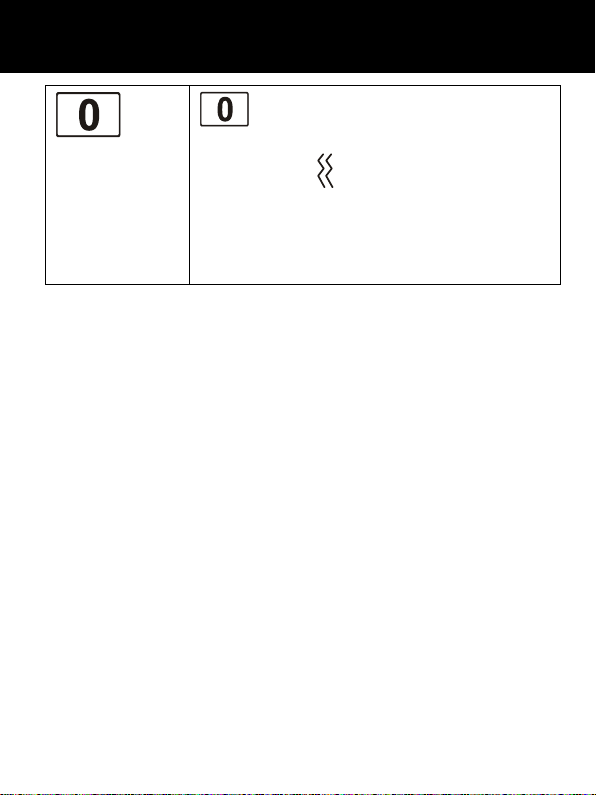
DESCRIPTION
key
In standby mode press and hold this
key until the
activate the shaker and visual ringer
function. Press and hold this key again
until the icon disappears to deactivate
it.
icon appears to
13
Page 16
DESCRIPTION
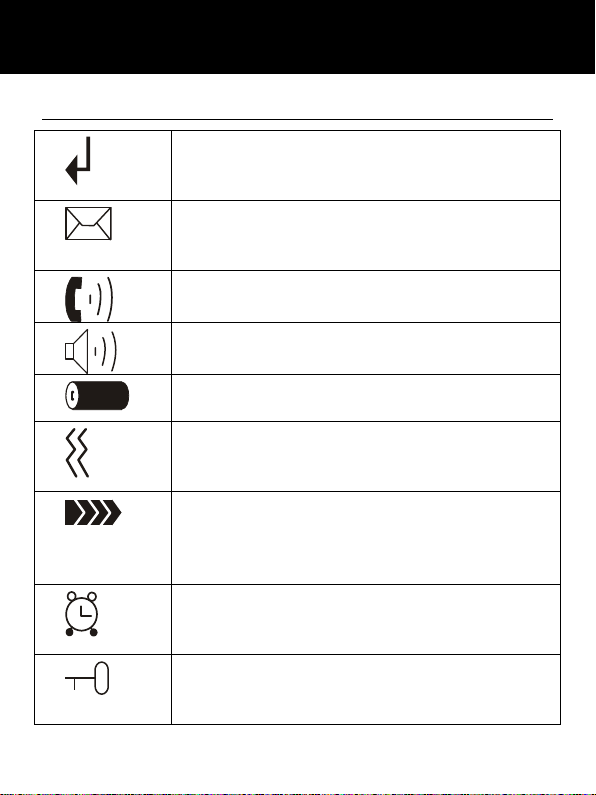
LCD Window Icons Description
New Call
Indicates you have missed one or more
calls.
MSG Waiting
Indicates you have one or more voice
messages.
Off Hook
Indicates the line is engaged.
Hands-free
Indicates the handsfree function is enabled.
Battery Icon
Indicates battery charge level.
Shaker Icon
Indicates the shaker and visual ringer is
enabled.
Signal Icon
Indicates whether the current signal
exists or not. If the handset is too far from
the base, this icon will blink on the LCD.
Alarm Icon
This icon appears when you set an alarm
to ring at a specified time.
Keypad Lock
This icon appears when the keypad is
locked.
14
Page 17
INSTALLATION
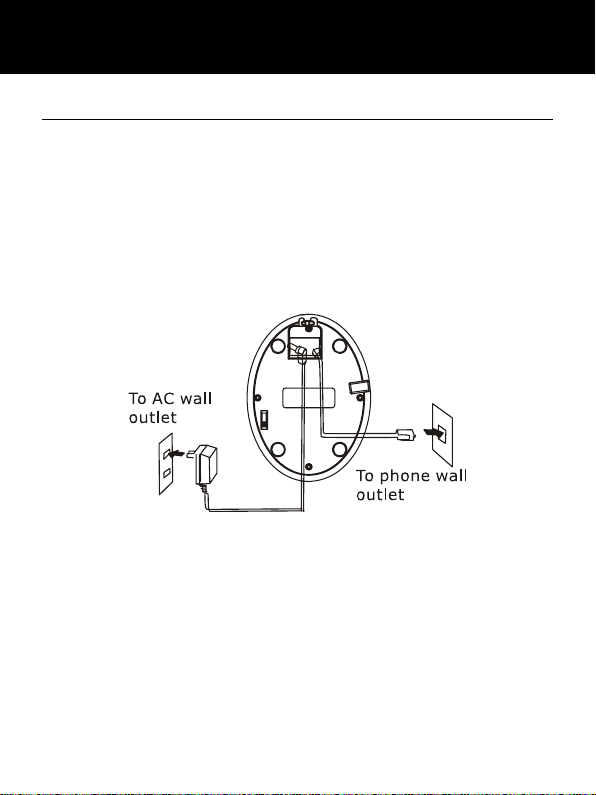
Connecting Lines
1. Connect one end of the phone line cord to the phone
line jack of the base, and the other end to a standard
phone wall outlet.
2. Connect the modular end of the AC power adapter to
the power jack of the base, then plug the AC adapter into
a standard AC wall outlet.
CAUTION : During a mains power failure there is no
manner to receive or make any calls; including the SOS
call number (112 )
15
Page 18
INSTALLATION
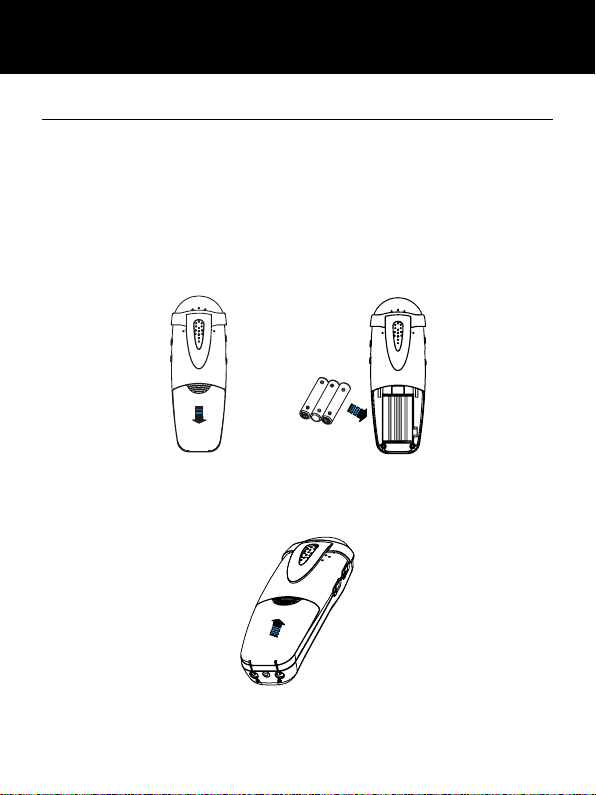
Installing Batteries
The rechargeable Ni-MH batteries (AAA size) come with
your phone. Install the battery before using your phone.
1. Slide the battery cover in the direction of the arrow and
pull it out.
2. Insert new batteries as indicated, matching correct
polarity (+,-).
Note: Reversing the polarity may damage the handset.
3. To replace the battery cover, slide the cover up until it
snaps in place.
16
Page 19

INSTALLATION
Notes:
The batteries need to be replaced if they do not recover
their full storage capacities after recharging.
When replacing the batteries, always use good quality
Ni-MH re-chargeable batteries. Never use other batteries
or conventional alkaline batteries.
17
Page 20

INSTALLATION
Charging Handset
! Important Note: Before initial operation, YOU
SHOULD FULLY CHARGE THE HANDSET for about 15
hours.
To charge the handset, you should place it on the base.
Result: When you place the handset on the base, the
handset automatically turns on and the Charge indicator
lights during the charge.
123
6
4
5
7
9
8
0
18
Page 21
INSTALLATION
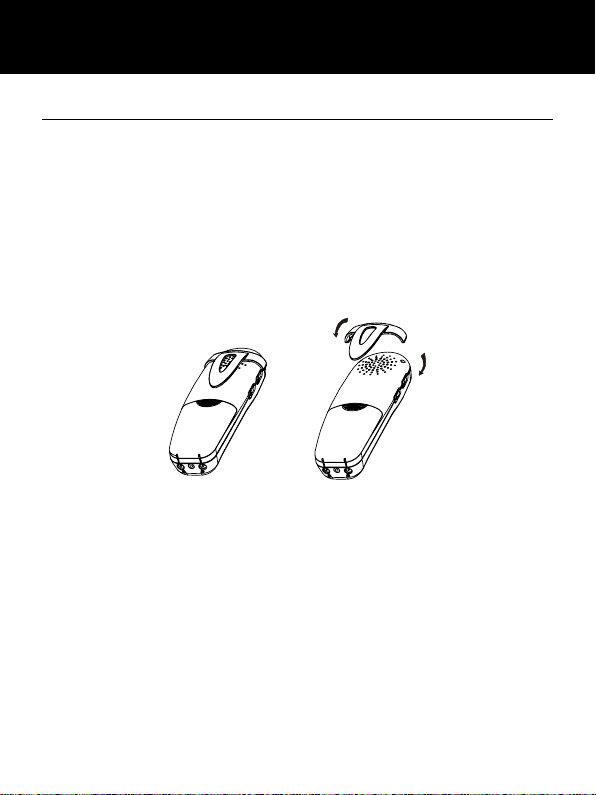
Using Handset Carrying Clip
The supplied handset carrying clip allows you to
conveniently carry the handset with you. It clips easily to
your belt, waist band, or shirt pocket.
If you want to remove the carrying clip:
Insert a screw driver along the edge of one of its arms
and release the clip. Then lift it off.
19
Page 22
INSTALLATION
p
p
p
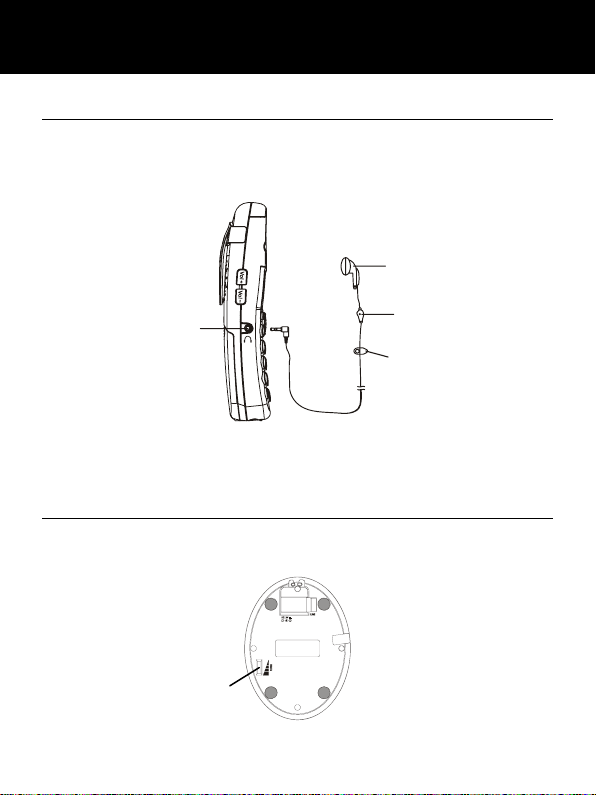
Using Headset (optional)
The headset jack is located in the left side of the handset
and is a 2.5mm standard plug. Simply plug the headset
into this jack and the headset will be activated.
Ear
hone
hone
Headset Jack
Micro
Cli
Note: When the headset is plugged into the headset jack
the microphone on the handset will be deactivated.
Base Ringer Volume Switch
The switch located on the bottom of the base unit allows
the ringer to be switched to High, Medium, Low or Off.
Ringer
volume
switch
20
Page 23
HANDSET SETTINGS
Turning Handset On/Off
If the handset is in power off mode, when you place the
handset on the base, it automatically turns on. To turn
the handset on or off in standby mode, follow these
steps:
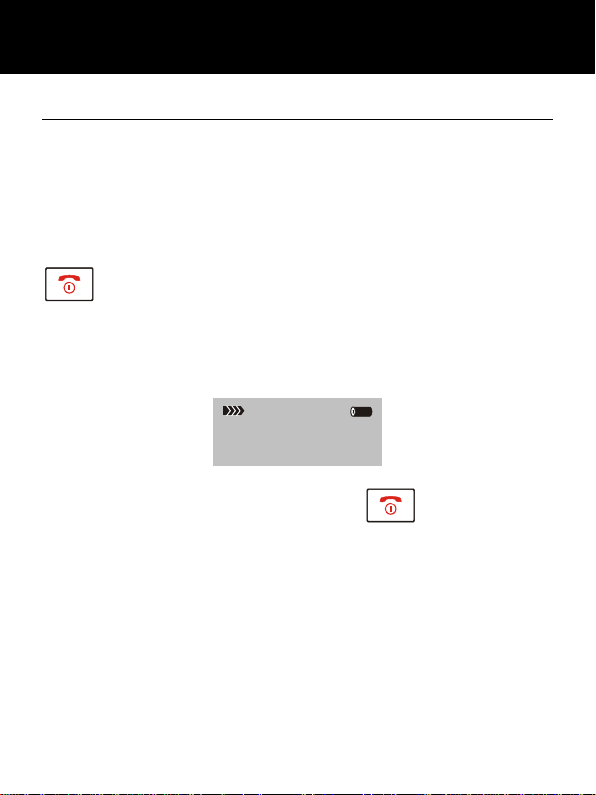
1. To turn on the handset when it's off, press and hold the
key until you switch the display on. On power up,
the handset will enter subscription mode and search for a
registered base. A message as shown below will be
displayed to the user, and the signal icon will flash.
Searching...
2. To turn off the handset, keep the
until the display disappears.
If the handset is successful in finding a base, the handset
will enter the standby mode, the display will show
handset number and the handset name (if you have one
saved as described on page 37), signal icon, battery icon
and current time. If the handset is unsuccessful in finding
a base, the handset will behave according to the Out of
Range condition.
21
key pressed
Page 24

HANDSET SETTINGS
Note:
When battery power is very low, if you place the handset
on the base, the display will show as below. YOU
SHOULD FULLY CHARGE THE HANDSET BEFORE
USING.
Charging...
22
Page 25
BASIC FUNCTIONS
All descriptions in this manual assume that the handset is
in standby mode. Set the telephone to standby mode by
pressing the
key.
Making a Call
1. Pick up the handset and press the key.
Result: The In use indicator flashes and the
appears on the LCD.
2. Dial a telephone number.
3. To end the call, either press the
the handset on the base.
Note: To make a call to the last number you dialed, use the
Redial feature. For details, see page 29.
You can enter the desired phone number in standby
mode, which allows you to make corrections before
dialing. Follow these steps:
1. Enter a telephone number (up to 32 digits). Check it.
You can also use the
Note: If you make a mistake while entering a number,
press the Erase soft key to clear the last digit.
2. When the number appears correctly, press the
key.
key to insert a pause.
23
key or replace
icon
Page 26
BASIC FUNCTIONS
Receiving a Call
When a call is received, the New Call information will
appear. If the caller can be identified, the caller's phone
number is displayed. If the caller cannot be identified,
only the New Call information displays. If you have a
voice message, the
be shown on the LCD.
icon and "MSG WTG ON" will
1. To answer the call, press the
activated the Auto Answer function, when the handset is
on the base, simply lift it up to answer.
2. To end the call, either press the
the handset on the base.
Result: After you hang up the call, the LCD displays the
call duration.
Notes: You can select the ringer volume by using the
or key when the phone rings with an
incoming call.
If you want to deactivate the
key in standby mode, then press and hold the
After that, press the
(The handset must be registered to the base.)
key to return to standby mode.
24
key. If you have
key or replace
icon, press the
key.
Page 27

BASIC FUNCTIONS
If the polyphonic ring tone (Melody 8~10) is set, the ring
tone may continue for 4 seconds after the caller's
hang-up or after the parallel phone had answered the
call.
Muting the Microphone
During a conversation, you can temporarily switch your
phone's microphone off, so that the other party cannot
hear you.
Example: You want to say something to another person
in the room but do not want the other party to hear you.
To mute your microphone, press the Mute soft key during
the conversation. The "Call Muted" appears on the LCD.
To unmute the microphone, press the Mute soft key
again. You will return to your caller.
25
Page 28

BASIC FUNCTIONS
Amplification Function
Your phone is equipped with a specialized amplification
function designed to fit your needs. During a
conversation you can adjust the Vol+ or Vol- control on
the left side of the handset and use the AMP key on the
right side. You can also adjust the Tone control to fit the
levels to your hearing requirements. The selected volume
will be displayed on the LCD.
When you press the AMP key in receiver mode during a
conversation, the Amplify indicator on the handset lights
up. If you press the AMP key again, the indicator will go
out.
You can also select the earpiece volume or the speaker
volume by the Audio Setup in Menu under HS Settings,
as described in page 51.
26
Page 29
BASIC FUNCTIONS
You can also use the Vol+ or Vol-
control in standby mode to adjust the
ringer volume. Menu Navigation
To access a menu option:
1. To display menu items, press the Menu soft key.
2. To scroll through menu options, press the
key repeatedly.
3. To select a menu, press the Select soft key when the
desired menu appears on the LCD.
4. Repeat if necessary.
or
To return to standby mode:
If you press the Back soft key from any menu, the phone
returns to the previous screen.
To return to standby mode, press the
Also, the phone will automatically return to standby mode,
from any menu if a key is not pressed within 40 seconds.
Note: In standby mode, you can press
switch the backlight on/off.
27
key.
key to
Page 30

BASIC FUNCTIONS
Menu Map
1. CID Book (see page 31)
2. Phonebook
New (see page 43)
Edit (see page 46)
Delete (see page 47)
Delete All (see page 47)
PB Status (see page 47)
3. BS Settings
Terminate HS (see page 59)
Dial Mode (see page 40)
Flash Time (see page 60)
Modify PIN (see page 60)
BS Reset (see page 61)
4. HS Settings
Alarm (see page 50)
Audio Setup (see page 51)
Ring Setup (see page 28)
Tone Setup (see page 52)
Language (see page 36)
HS Name (see page 37)
Auto Answer (see page 35)
LCD Contrast (see page 53)
Date & Time (see page 53)
Select Base (see page 55)
HS Reset (see page 56)
Amplified (see page 57)
Talk Keypad (see page 57)
5. Registration (see page 62)
28
Page 31
BASIC FUNCTIONS
Handset Ringer Setting
You can select your own external (from the telephone
Network) or internal (from other handsets registered to
the same base) ring tone and adjust the volume.
1.Press the Menu soft key.
2.Press
menu, then press the Select soft key.
3.Press
press the Select soft key.
4.Press the Select soft key to choose INT Ring or press
the
key.
5.Press
Volume, press the Select soft key.
Result: You can select the ring tone from Melody 1 to 10
or adjust the volume from Volume 1 to 5, or off. When
you adjust the ring tone or volume, the phone plays the
selected melody or sounds the selected loudness.
6.Press the Save soft key to confirm.
Notes: If you set the volume to "Off", when a call comes
in, only the New Call information appears on the LCD.
or key to choose HS Settings
or key to choose Ring Setup,
key to choose EXT Ring, press the Select soft
or key to choose Melody or
29
Page 32
BASIC FUNCTIONS
Last Number Redial
1. Press the key or the Redial soft key in standby
mode.
Result: The LCD displays the last number you dialed.
2. Press the
Your phone allows you to retrieve the last 10 numbers
you have dialed and recall them quickly.
key to dial out the number.
Search for and dial a number in Redial Book
1. Press the Redial soft key in standby mode.
2. If you want to scroll through the memory, press
or
you want to dial.
3. Press the
Notes: If no numbers are found, "Empty" is displayed.
When the redial book is full, each time you dial a new
number, the oldest number stored in the redial book is
automatically erased.
key repeatedly until you find out the number
key to dial out the number.
30
Page 33

BASIC FUNCTIONS
Use Redial Book options
Using the redial book options, you can add a number to
phone book or delete a number in the redial book.
1. Press the Redial soft key.
2. Scroll to the desired number by using the
key.
3. When the number appears on the display, press the
More soft key to choose the desired option:
Add to PB: allows you to add the number to the phone
book. Complete storing the entry by starting from step 4
described in part."Adding the Phone Book Entries"
(obviously, you will find the number already entered in
the appropriate field).
Delete: allows you to delete the selected number.
Delete All: allows you to delete the whole redial book.
4. To return to standby mode, press the
Note: At step 3, when you select Delete or Delete All
options, a message "Confirm ?" will further ask you to
confirm the deletion. To confirm press the Del or Del All
soft key, to escape press the Cancel soft key.
31
or
key.
Page 34

BASIC FUNCTIONS
CID Book
When you receive a call, if the caller's information is
transmitted from the network on which the call was made
(and the caller doesn't hide it), the caller's phone number
is displayed. Moreover, if you missed one or more calls,
icon will appear on the LCD. If the CID memory is
the
full, the
Out Of Area - This message will display when someone
calls from an area where the telephone company is not
offering the caller identification services or is not yet
providing number delivery to your area.
Private - If the caller has exercised the option to prevent
his name and number from being sent, the message will
show on the LCD.
icon will flash on the LCD.
View and dial any of the CID numbers
1. Press the Menu soft key.
2. Use the Select soft key to choose the CID Book, and
if available, the numbers are displayed. (You can
also access the CID book directly by pressing the
key in standby mode.)
32
Page 35
BASIC FUNCTIONS
3. Use or key to view the numbers, you
can make a call by pressing the
also add the entry to the phonebook.
Note: At step 3, each item of the incoming list is marked
with the
icon if the call hasn't been reviewed yet.
icon if the call has been reviewed or with the
key. You can
Add CID Number to Phone Book
1. Press the Menu soft key.
2. Use the Select soft key to choose the CID Book.
3. Use
the desired number displays on the LCD, press the More
soft key to enter Add to PB menu.
4. Press the Select soft key, you are prompted to enter
the name.
5. Enter the name and press the Next soft key, then you
can modify the number you want to store.
6. Press the Next soft key, you are able to select the ring
tone from Melody 1 to Melody 10, press the Save soft
key to confirm and exit, you will hear a beep to confirm.
or key to view the numbers, when
33
Page 36
BASIC FUNCTIONS
Delete a number in the CID Book
1. Press the Menu soft key.
2. Use the Select soft key to choose the CID Book.
3. Scroll to the number you want to delete by using
or
4. When the desired number appears on the display,
press the More soft key.
5. Use
Select soft key. The display will show "Confirm ?". Press
the Del soft key to confirm, you will hear a beep and the
LCD shows the next number.
key.
or key to choose Delete, press the
Delete all numbers in the CID Book
1. Press the Menu soft key.
2. Use the Select soft key to choose the CID Book.
3. Press the More soft key and use the
key to choose Delete All menu, then press the Select
soft key.
4. The display shows "Confirm ?", press the Del All soft
key to confirm.
Result: You hear a beep and the phone returns to the
standby mode after clearing all the CID numbers.
34
or
Page 37
BASIC FUNCTIONS
Torch
If you turn this feature on, the visual ringer will light
steadily. You can use the phone as a torch.
To turn on this feature, in the Standby mode just keep the
key pressed till the visual ringer lights up.
To turn off this function, keep the
again till the visual ringer goes out.
key pressed
Key Lock
If you turn on this feature, all keys will be locked except
M1~M4. You can answer calls by using the
But when you hang up, the phone returns to the locked
mode. This feature is useful to avoid pressing keys by
mistake.
To lock the keys, in the standby mode just keep the
key pressed till the display shows "HS Locked",
then the
icon appears.
35
key.
Page 38
BASIC FUNCTIONS
To unlock the keys, keep the key pressed again
till the key lock icon
Note: In locked mode, if you press any key, the phone
will generate a warning tone, and the "HS Locked"
message will be redisplayed.
disappears from the display.
Auto Answer
With this feature, you can answer a call by just picking up
the handset from the base without pressing any key.
1. Press the Menu soft key.
2. Press
Settings, press the Select key.
3. Use
then press the Select soft key.
4. Use the
enable/ disable the function, then press the Save soft key,
you will hear a beep to confirm.
or key repeatedly to choose HS
or key to choose Auto Answer,
or key to choose On/Off to
36
Page 39
BASIC FUNCTIONS
Selecting a Language
The handset supports up to 8 predefined languages:
English, French, Spanish, German, Italian, Dutch,
Russian and Polish. You can change the language used
to display the menu messages.
1. Press the Menu soft key.
2. Press
Settings, press the Select soft key.
3. Use
press the Select soft key.
4. The languages will be displayed. Use the
key to scroll through the options. Each language
will be displayed in its own native translation.
5. Press Save soft key to select the required language
and you will hear a beep to confirm.
or key repeatedly to choose HS
or key to choose Language, then
or
37
Page 40
BASIC FUNCTIONS
HS Name
Using this feature, you can define a name to the handset
in order to easily recognize your handset if you have
more than one registered to the same base, but when
you reset the handset, the handset name will be deleted.
1. Press the Menu soft key.
2. Press
Settings, press the Select soft key.
3. Use
press the Select soft key.
4. You can enter the handset name (up to 12 characters)
by using the alphanumeric keys (use the Erase soft key
to delete the incorrect characters), then press the Save
soft key to confirm and exit. The handset name will be
displayed above your handset number in standby mode.
or key repeatedly to choose HS
or key to choose HS Name, then
38
Page 41
BASIC FUNCTIONS
Range Alarm
A beep will sound when the handset is out of range of the
Base. You are able to select to enable/disable this
audible warning.
1. Press the Menu soft key.
2. Press
Settings, press the Select soft key.
3. Use
press the Select soft key.
4. Press the
press the Select soft key.
5. Use
enable/disable this audible warning, then press the Save
soft key, you will hear a confirm beep.
or key repeatedly to choose HS
or key to choose Tone Setup, then
key to choose Range Alarm, then
or key to choose On/Off to
39
Page 42

BASIC FUNCTIONS
Paging
You can page the handset from the base unit making it
ring with a special tone. It's useful to locate a lost
handset.
Press the key on the base unit (less than 5
seconds), all the handsets registered to the base will ring
for about 60 seconds.
To stop paging, press the key on the base again or
any key on the handset.
Note: On a long key press, more than or equal to 5
seconds, the base will enter subscription mode. For
details, see page 61.
40
Page 43
BASIC FUNCTIONS
Dial Mode
You can select to change the dial mode by the following
steps:
1. Press the Menu soft key.
2. Press
Settings, and press the Select soft key.
3. Press the
the Select soft key.
4. You can press
required dial mode options (Tone/Pulse) and press the
Save soft key. A confirm beep will be heard.
Note: If you are not sure which dialing mode to select,
please contact your local service provider.
or key repeatedly to choose BS
key to choose Dial Mode, then press
or key to select the
41
Page 44
BASIC FUNCTIONS
Handsfree
During a call, you may turn on the speakerphone built in
the handset. In this mode you can simply put your
handset on a surface (e.g. a desk) and enjoy the comfort
of the handsfree conversation.
To turn the feature on, press the
during a call (line engaged). The
the LCD.
To turn the feature off, and keep on talking in normal
mode, press the
icon will disappear.
Notes: Before putting the handset near your ears, be
sure you have turned the speakerphone off.
To adjust the speakerphone volume, page 25 or page 51.
key again. The
42
key
icon appears on
Page 45

BASIC FUNCTIONS
Flash Signal
When the line is engaged, pressing the Flash soft key
sends the Flash signal. This key is used in conjunction
with special services (e.g. call waiting) which can be
available from your phone network. For further details
please contact your network telephone company.
To use the said special services, just press the Flash soft
key while the line is engaged: the display will show R.
43
Page 46

ADVANCED FUNCTIONS
Phone Book
The phonebook built in your cordless phone allows you to
store frequently used numbers so that you can easily
make a call without having to remember or enter the
phone number.
Character Map
To enter a specific alphanumeric character, press one or
more times the relevant key for the required character
according to the following table: once for the first
character, twice for the second and so on.
Key Characters in the displayed order
0 (spc) 0 ? & / . , !
1 1 @ _ + 2 A B C a b c 2
3 D E F d e f 3
4 G H I g h i 4
5 J K L j k l 5
6 M N O m n o 6
7 P Q R S p q r s 7
8 T U V t u v 8
9 W X Y Z w x y z 9
( ) %
"
44
Page 47

ADVANCED FUNCTIONS
Adding the Phone book Entries
1. Press the Menu soft key.
2. Press the
the Select soft key.
3. Press the Select soft key to choose New.
4. The display shows "Name ?". Enter the name you
want to use, then press the Next soft key to confirm. The
display shows "Number ?". Enter the desired number (up
to 20 digits), press the Next soft key.
5.*Use
associate with the number, press the Save soft key to
confirm.
6. Repeat if necessary.
* If you want to set a VIP number, you should select a
special ring tone for it. The ring tone should be different
from the external ring you have set. You can set up to 9
VIP ring tones associate with 9 VIP numbers/groups.
key to choose the Phonebook, press
or key to select the ring you like to
Note:
If you make a mistake while entering a name or a number,
use the Erase soft key to correct it. Each time you press
the key, the last character or digit is deleted.
45
Page 48
ADVANCED FUNCTIONS
Using a Pause
A pause is useful when you access an interactive voice
response system, such as an automated banking system.
A pause provides a delay of 3 seconds. If you want to
insert a pause when you dial a number in standby mode
or store a number in memory, press the
letter P will appear at the pause entry.
key. The
Viewing the Phone book Entries
1. In the standby mode, press the
2. Press
entry is displayed.
or key repeatedly until the desired
key.
Dialing a Number from Phone book
Find out the number you want to dial. Refer to "Viewing
the Phone book Entries". Then press the
Dial soft key.
46
key or
Page 49
ADVANCED FUNCTIONS
Editing the Phone book Entries
1. Press the Menu soft key.
2. Press the
the Select soft key.
3. Press the
Select soft key.
4. Press
you want to edit displays, press the Select soft key to
confirm.
5. If necessary, press the Erase soft key to clear the
digit(s) then enter the desired name and number, press
the Next soft key to save.
6. Use
associate with the number, press the Save soft key to
confirm.
key to choose the Phonebook, press
key to choose Edit menu. Press the
or key repeatedly until the entry
or key to select the ring you like to
47
Page 50

ADVANCED FUNCTIONS
Deleting the Phone book Entries
1. Press the Menu soft key.
2. Press the
the Select soft key.
3. Press
Select soft key.
4. Press
you want to delete displays, then press the Select soft
key. The display shows "Confirm ?". You can press the
Del soft key to delete it or press the Cancel key to exit.
5. At step 3, if you choose Delete All menu and press the
Select soft key, the display will show "Confirm ?". You
can press the Del All soft key to delete all the entries or
press the Cancel key to exit.
key to choose the Phonebook, press
or key to choose Delete. Press the
or key repeatedly until the name
PB Status
The PB Status shows the number of phone book entries
already stored. When the PB Status shows on the LCD,
press the Select soft key to enter it.
48
Page 51
ADVANCED FUNCTIONS
One-Touch Memories
You can store up to 4 numbers in direct memories. All the
numbers will be stored in the phone book.
Storing Memory Numbers
1. Press the memory key (M1 to M4) in standby mode.
2. The display shows "Number ?". Enter the desired
number (up to 20 digits), press the Next soft key.
3. Use
associate with the number, press the Save soft key to
confirm.
or key to select the ring you like to
Viewing Memory Numbers
1. In the standby mode, press the
2. Press
number is displayed.
or key repeatedly until the desired
key.
Dialing from One-touch Memories
In the standby mode, press M1 to M4 to dial out the
corresponding number.
49
Page 52

ADVANCED FUNCTIONS
Editing Memory Numbers
Perform the steps of the “Editing the Phone book Entries”
paragraph. Please refer to page 46.
Note:
The memory default names are M1: to M4:, you can add
something following them but cannot delete the default
name. e.g. you can modify M1 to M1: home.
Deleting Memory Numbers
Perform the steps of the “Deleting the Phone book
Entries” paragraph. Please refer to page 47.
50
Page 53
ADVANCED FUNCTIONS
HS Settings
Setting Alarm
You are able to set the alarm on the handset and adjust
the alarm settings.
1. Press the Menu soft key.
2. Press
then press the Select soft key.
3. Press the Select soft key to choose Alarm menu.
4. The display shows the current set. Use the
key to select On/Off, press the Select soft key.
5. If you select On, the display
invites you to enter the time in HH:MM format. Use the
numeric keypad to enter.
6. Press the Next soft key, a beep sounds and the
display shows Snooze On/Off, you can press
key to enable or disable the snooze function on the
alarm and press the Save soft key.
7. When the alarm sounds, press any key to switch it off.
or key to choose HS Settings,
or
or
51
Page 54
ADVANCED FUNCTIONS
Notes:
At step 5 you need to enter the time in 24-Hour format.
If you press any key when the alarm rings, the alarm will
be silent.
If you choose Snooze On, the alarm will ring at regular
intervals of 11 minutes. If you press the
the alarm sounds, the option will be switched to Snooze
Off.
key when
Audio Setup
You can also use the menu to adjust the audio volume.
1. Press the Menu soft key.
2. Press
then press the Select soft key.
3. Press the
press the Select soft key.
4. Use
Earpiece V., press Select soft key.
5. The display shows the current setting. Use the
or
-Volume 5), press the Save soft key.
or key to choose HS Settings,
key to choose Audio Setup menu,
or key to choose Speaker V. or
key to choose the volume level (Volume 1
52
Page 55
ADVANCED FUNCTIONS
Key Tone
Every time you press a key, your handset acknowledges
it with a key tone. You can disable the key tones for a
silent use. In certain error conditions, a warning tone will
sound when an incorrect key is pressed.
1. Press the Menu soft key.
2. Press
then press the Select soft key.
3. Press
menu, press the Select soft key.
4. Press the Select soft key again to choose Key Tone.
5. You can use
to enable or disable the function.
6. Press the Save soft key.
Note:
For normal use, we recommend you leave the key tone
enabled. This makes the phone easier to use.
or key to choose HS Settings,
or key to choose Tone Setup
or key to choose On or Off
53
Page 56
ADVANCED FUNCTIONS
LCD Contrast Setting
The adjustment allows you to optimize the visibility of the
display by changing its contrast according to the
environment conditions.
1. Press the Menu soft key.
2. Press
then press the Select soft key.
3. Press
Contrast, then press the Select soft key.
4. Use
the 17 available contrast levels, then press the Save soft
key.
5. Press the
or key to choose HS Settings,
or key repeatedly to choose LCD
or key repeatedly to choose among
key to return to standby mode.
Setting Date & Time
Date & Time Format
1. Press the Menu soft key.
2. Press
then press the Select soft key.
3. Press
menu, press the Select soft key.
or key to choose HS Settings,
or key to choose Date & Time
54
Page 57
ADVANCED FUNCTIONS
4. Use or key to choose Date Format or
Time Format, press the Select soft key.
5. You can use
Format (DD-MM/MM-DD) or the Time Format
(12-Hour/24-Hour), press the Save soft key to save.
Setting date & time
1. Press the Menu soft key.
2. Press
then press the Select soft key.
3. Press
menu, press the Select soft key.
4. Press
Time menu, press the Select soft key.
5. Enter the current date/time by numeric keypad and
press the Save soft key to save and exit.
Notes:
If you select 12-Hour, AM/PM will appear on the right of
the time in standby mode.
At step 5 you need to enter the time in 24-Hour format.
or key to choose the Date
or key to choose HS Settings,
or key to choose Date & Time
or key to choose Set Date or Set
55
Page 58
ADVANCED FUNCTIONS
Selecting a Base
This function allows you to select a base from those
already registered to the handset. You can access the
options by scrolling the menu.
1. Press the Menu soft key.
2. Press
then press the Select soft key.
3. Press
menu, press the Select soft key.
4. You can use
you want, then press the Select soft key. If you select a
non-existent base, the handset will sound a warning
tone.
5. The display will show Selected BSX. Press the Select
soft key to confirm. A confirm tone will be heard.
or key to choose HS Settings,
or key to choose Select Base
or key to select the base
56
Page 59

ADVANCED FUNCTIONS
HS Reset
If you reset the handset, all the features under HS
Settings menu will be restored to the factory initial
setting: Alarm, Audio Setup, Ring Setup, Tone Setup,
Language, HS Name, Auto Answer and Date & Time. But
LCD Contrast can not be restored.
1. Press the Menu soft key.
2. Press
then press the Select soft key.
3. Press
menu, press the Select soft key. You will be prompted to
enter the PIN code.
4. Enter the PIN code (the default one is 0000), then
press the Reset soft key. If the PIN code is validated all
handset settings will return to the factory default,
otherwise a warning tone will be heard and the settings
will remain.
Result: After resetting, the handset will return to standby
mode.
or key to choose HS Settings,
or key to choose the HS Reset
57
Page 60

ADVANCED FUNCTIONS
Amplified
Your phone is equipped with a specialized amplification
function designed to fit your needs. If you switch this
function on, the handset receiver volume adjustment is
15-30dB. Otherwise the receiver volume adjustment is
0-15dB.
1. Press the Menu soft key.
2. Press
then press the Select soft key.
3. Press
menu, press the Select soft key.
4. You can use
to enable or disable the function.
5. Press the Save soft key.
or key to choose HS Settings,
or key to choose the Amplified
or key to choose On or Off
58
Page 61
ADVANCED FUNCTIONS
BS Settings
Terminate HS
This function allows you to delete a handset registration
from the base.
1. Press the Menu soft key.
2. Press
then press the Select soft key.
3. Press the Select soft key to choose the Terminate HS
menu. The display shows "PIN?" to prompt you to enter
the PIN Code (The default PIN Code is "0000"). Then
press the OK soft key.
4. Use
the Select soft key to confirm. Then the selected handset
will behave according to the unregistered condition. If
you select the current handset you are using or if you
select a non-existent handset, a warning tone will be
heard.
or key to choose BS Settings,
or key to select a handset, press
59
Page 62
ADVANCED FUNCTIONS
Flash Time
You can select to change the Flash time by the
following steps:
1. Press the Menu soft key.
2. Press
then press the Select soft key.
3. Use
Press the Select soft key.
4. The display shows the current setting. Use the
or
European countries) /Flash-2(300ms:France), press
the Save soft key.
or key to choose BS Settings,
or key to choose Flash Time menu.
key to select Flash-1(100ms:UK and
Modify PIN
This function allows you to change the PIN number of the
currently active Base. The default PIN is 0000.
1. Press the Menu soft key.
2. Press
then press the Select soft key.
3. Use
press the Select soft key.
or key to choose BS Settings,
or key to choose Modify PIN menu,
60
Page 63

ADVANCED FUNCTIONS
4. The display shows "PIN?". Enter the current PIN, then
press the Next key. If the old PIN code is correct, you will
be prompted to enter a new PIN code, otherwise a
warning beep will sound and the handset will return to the
Modify PIN menu.
5. Enter the new PIN, press the Next key. You will be
requested to confirm the PIN code. Enter the new PIN
again then press the Save soft key to confirm and exit.
BS Reset
If you reset the base, all the features under BS Settings
menu will be restored to the factory initial setting: Dial
Mode and Flash Time.
1. Press the Menu soft key.
2. Press
then press the Select soft key.
3. Press
press the Select soft key. You will be prompted to enter
the PIN code.
4. Enter the PIN code (the default PIN is 0000), then
press the Reset soft key. If the PIN code is validated all
Base settings will be reset to the factory default,
otherwise the settings will remain.
Result: After resetting, the handset will return to standby
mode.
or key to choose BS Settings,
or key to choose BS Reset menu,
61
Page 64
ADVANCED FUNCTIONS
Registration
The supplied handset is already registered with the
number 1. You can register up to 5 handsets to the same
base in order to share the same line with other people.
Before registering a handset to the base, you should
press and hold the
seconds then release it when you have eared an Beep.
1. Press the Menu soft key.
key on the base for about 5
2. Press
Registration, then press the Select soft key.
3. Use
names list, press the Select soft key to choose a base.
The handset will search for the requested base and the
relevant information will flash on the LCD.
4. If the base is found, you will be prompted to enter the
PIN code (the default one is 0000). Enter it then press the
Select soft key. If the PIN code is correct, the
Registration tone will sound and then the base assigns a
number to the handset, otherwise a warning tone will
sound, and then the handset returns to the previous
registration state.
5. If the base is not found, the handset will behave
according to the Out of Range condition.
or key repeatedly to choose the
or key to scroll through the Base
62
Page 65
ADVANCED FUNCTIONS
Calling with more than one Handset
If you have more than one handset registered to the
same base, you can make internal calls and transfer an
external call between the registered handsets.
Making an internal call
1. Press the
then input the number of the handset you want to call.
2. If the destination handset is not available, the handset
will return to standby mode. If the handset entered is
valid, the called handset will ring and display HSX
Calling. The handset user can press the
answer the internal call.
3. At the end of your conversation, press the
Note:
During the internal call, if an external call comes in, the
LCD will show the caller's number. You should press the
key to end the internal call first then press the
key to answer the call.
key, the LCD displays as follows,
key to
key.
63
Page 66
ADVANCED FUNCTIONS
Call transfer between handsets
You can transfer an external call between the handsets
that are registered to the same base.
1. During an external call, press the
the number of the handset you want to transfer the call
to.
2. If the called party can answer your call, he/she can
press the
inform him/her of the incoming call.
3. When the called party answers, press the
key or replace the handset to the base to complete the
transfer.
key to talk with you. At this time you can
key then input
Setting up a 3-way conference call
When you have both an external call and an intercom call
in progress, you can set up a three-way conference call,
like this:
1. During an external call, press the
input the number of the handset you want to join the
3-way call.
2. The called party press
3. The calling party can press the
3-way call.
key to answer.
64
key and then
key to start the
Page 67
ADVANCED FUNCTIONS
4. Either of the two internal handsets can press the
key to leave the conference call at any time.
Note: If one of the handsets drops the conference call,
the remaining handsets will continue the conference.
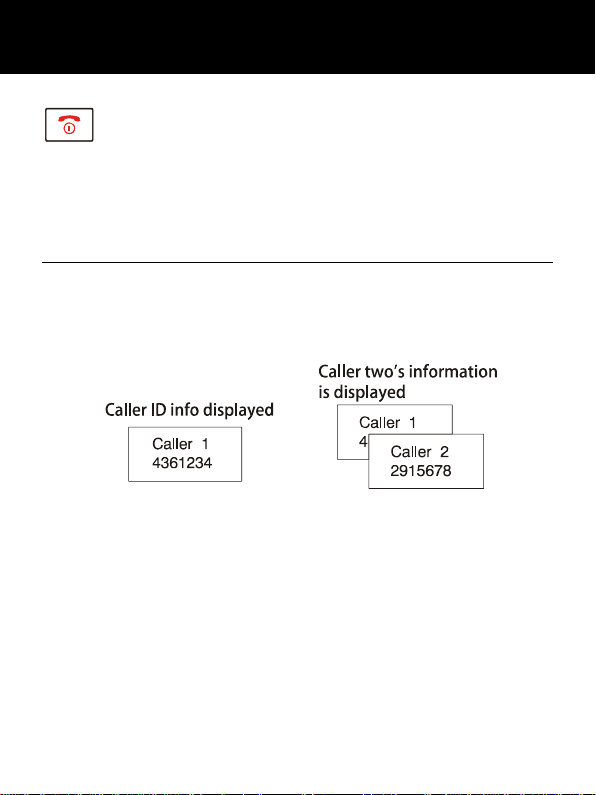
Caller ID on call waiting
When you subscribe to Call Waiting service from your
local telephone company, the telephone will display the
name and number of the second caller while you are
having a conversation.
1.When you are on the line, the telephone will
automatically display the name and number of the
second caller.
2.Press the Flash soft key + 2 to answer the second
caller.
3.When you have finished, press the Flash soft key + 2
to continue with your conversation with the first caller.
Note: If you have transferred an external call to another
Handset, you cannot use the call waiting function via the
second handset
65
Page 68

FEATURE LIST
y 1.8GHz DECT technology with GAP
y 2.0" large LCD display (128 x 64 dots matrix display)
y Up to 5 handsets to one base
y Up to 4 bases to one handset
y LCD contrast adjustable
y Phonebook with up to 50 entries
y 9 VIP ring tones setting for phonebook entries
y Redial book with up to 10 entries
y 10 handset ring tones and volume selectable (5
levels+off)
y Base ringer volume switch (3 levels+off)
y Vibrating loud ring signaler
y Headset compatible
y 4 one-touch memory speed dial buttons
y Full handsfree speakerphone
y Internal call
y Call transfer
y 3-way conference call
y Audio volume & tone adjustable
y PIN protection
y Redial, Flash, Pause, Mute
y TONE/PULSE dialing mode selectable
y FLASH time selectable
y Call duration display
y Real time clock (set time)
y Keypad lock
y 8 languages selectable
66
Page 69

FEATURE LIST
y Auto answer ON/OFF selectable
y Alarm clock include snooze option
y Handset Name setting
y Backlit LCD screen and keypad
y Low radiation (optional)
Caller ID
y FSK and DTMF dual system Caller ID
y Caller ID / Call Waiting
y Caller ID list with up to 40 entries
y Incoming calls can be called back/added to
phonebook/deleted
y New call indicator
y Message waiting
67
Page 70

TROUBLESHOOTING
Symptom Check & Remedy
No operation y Check that the power adapter is properly
connected.
y Check that the telephone line cord is
properly connected.
y Check that the handset batteries have full
power.
y Check that the handset batteries are
installed properly.
No dial tone y Check that the telephone line cord is
properly connected.
y Check that the power adapter is properly
connected.
Nothing
appears
on the display
Handset
seems
to have very
short
battery life
Caller’s
number
is not
displayed
y Check that the handset batteries are
installed properly.
y Check that the handset batteries have full
power.
y Check that the handset is on.
y Check the charge contacts.
y Consistently short battery life may indicate
that replacement of the batteries is
necessary.
y Make sure the correct batteries are used.
y Make sure you have subscribed to a Caller
ID service via your network provider.
y The caller may have withheld their details.
y Let the phone ring a couple of times as
there may be a delay in receiving the
Caller ID information.
68
Page 71

TECHNICAL SPECIFICATIONS
Frequency Range 1.88~1.90GHz
Channels 120 Duplex channels
Carrier Power <250mW
Modulation GFSK
Frequency Stability < ± 50 KHz
Charging time 15 hours
Ambient
temperature
Humidity 0%~90%
Dimensions (mm) Base: 136 x 100 x 59; Handset:
Power Supply Base input: 7.5V, 500mA; Handset
Design and specifications are subject to change without
notice.
Normal: 15℃ ~ 35℃, Extreme: 0℃
~ 40℃
160 x 58 x 38
input: Ni-MH: 1.2V x 3, 600mAh
69
Page 72
TECHNICAL SPECIFICATIONS
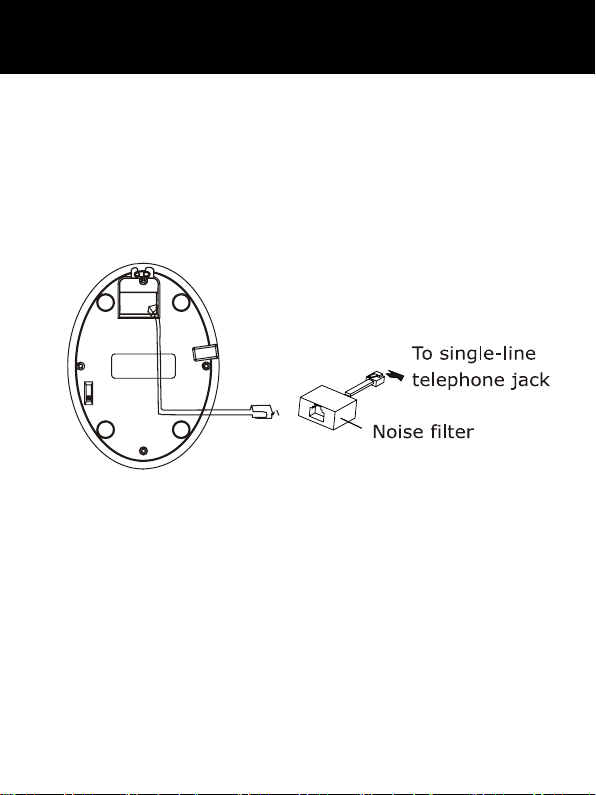
If you subscribe to a DSL service
Please attach a noise filter (contact your DSL provider) to
the telephone line between the base unit and the
telephone line jack in the event of the following:
- Noise is heard during conversations.
- Caller ID features do not function properly.
70
Page 73

SAFETY INFORMATION
General
Only use the power supply included with the product.
Only use the approved rechargeable batteries supplied.
Do not open the handset (except to replace the handset
batteries) or base. Contact the helpline for all repairs.
Never dispose of batteries in a fire. There is a serious risk
of explosion and/ or the release of toxic chemicals.
Do not place objects on the line cord or power cable that
may cause damage.
If you are sure you are not going to use the telephone for
over a month, remove the batteries.
Cleaning
Unplug the telephone. Clean the telephone with a soft
cloth. Keep the base and handset charging contacts
clean. Never use polishes or cleaning agents - they could
damage the finish or the electrics inside.
71
Page 74

SAFETY INFORMATION
Environmental
Do not expose to direct sunlight.
Always ensure there is a free flow of air over the surfaces
of the telephone.
Do not place any part of your product in water and do not
use it in damp or humid conditions e.g. bathrooms.
Do not expose your product to fire or other hazardous
conditions.
Unplug your phone from the telephone socket during
thunderstorms because it could damage your telephone.
Your guarantee does not cover thunderstorm damage.
The telephone is designed for working within a
temperature range of 5°C to 45°C.
72
Page 75
GUARANTEE
From the moment your Geemarc product is purchased,
Geemarc guarantee it for the period of one year. During
this time, all repairs or replacements (at our discretion)
are free of charge. Should you experience a problem
then contact our help line or visit our website at
www.geemarc.com.
accidents, negligence or breakages to any parts. The
product must not be tampered with or taken apart by
anyone who is not an authorized Geemarc representative.
The Geemarc guarantee in no way limits your legal
rights.
IMPORTANT: YOUR RECEIPT IS PART OF YOUR
GUARANTEE AND MUST BE RETAINED AND
PRODUCED IN THE EVENT OF AWARRANTY CLAIM.
Please note: The guarantee applies to
DECLARATION: Geemarc Telecom SA hereby declares
that this product is in compliance with the essential
requirements and other relevant provisions of the Radio
and Telecommunications Terminal Equipment Directive
1999/5/EEC and in particular article 3 section 1a, 1b and
section 2. The telephone does not operate if the line
current is lower than 18 mA.
The declaration of conformity may be consulted at
www.geemarc.com
The guarantee does not cover
the United Kingdom only
73
Page 76

GUARANTEE
Electrical connection: The apparatus is designed to
operate from a 230V 50Hz supply only. (Classified as
‘hazardous voltage’ according to EN60950 standard).
The apparatus does not incorporate an integral power
on/off switch. To disconnect the power, either switch off
supply at the mains power socket or unplug the AC
adaptor. When installing the apparatus, ensure that the
mains power socket is readily accessible.
Telephone connection: Voltages present on the
telecommunication network are classified TNV-3
(Telecommunication Network Voltage) according to the
EN60950 standard.
74
Page 77

RECYCLING DIRECTIVES
The WEEE (Waste Electrical and Electronic Equipment)
has been put in place for the products at the end of their
useful life are recycled in the best way.
When this product is finished with, please do not put it in
your domestic waste bin.
Please use one of the following disposal options:
- Remove the batteries and deposit them in an
appropriate WEEE skip. Deposit the product in an
appropriate WEEE skip.
- Or, hand the old product to the retailer. If you purchase
a new one, they should accept it.
Thus if you respect these instructions you ensure human
health and environmental protection.
For product support and help visit our website at
www.geemarc.com
Telephone 01707 384438
Or fax 01707 832529
75
UGAD350_En_v1.4
Page 78

UGAD 350_ En_V.1. 4
GERMANY
Walter K olb Str . 9-11
6059 4 Fran kfurt a m Main
Deut schl and
Tel: 069 / 96 2 17 635
Fax: 0 69 / 96 21 7 620
www. geem arc. com
 Loading...