

Page 1

Users Manual
CP-427-USB
Enjoy the Show!™
PLEASE READ THIS MANUAL CAREFULLY BEFORE OPERATING THIS UNIT
Page 2

Page 3

IMPORTANT INFORMATION
HAVE A PROBLEM?
IF YOU EXPERIENCE ANY PROBLEMS WITH THIS DVD
PLAYER, PLEASE CALL CLEARPLAY AT 888 4253270 OR
VISIT CUSTOMER SUPPORT AT WWW.CLEARPLAY.COM.
WE WILL BE GLAD TO ASSIST YOU.
PLEASE DO NOT CONTACT THE RETAILER OR STORE
WHERE IT WAS PURCHASED.
IMPORTANT INFORMATION
Page 4

Page 5

LIMITED 90-DAY WARRANTY
This warranty gives you specic legal rights. You may also have other rights, which vary from state to state.
ClearPlay warrants this product to the original purchaser to be free from defects in material and workmanship, under normal conditions, for
a period of 90 days from the date of the original purchase.
ClearPlay agrees, during the warranty period, at our option, to repair any defect in material or workmanship, or to furnish an equal, new or
renewed product in exchange without charges, subject to verication of the defect or malfunction.
During the 90-day Warranty Period: For the rst ninety (90) days from the date of purchase, if your product becomes defective or
inoperative, it will be replaced with a new, renewed or comparable product (whichever is deemed necessary). Your cost is limited to the
prepaid cost of shipping the product to the customer service center. Replacement products are warranted for the balance of the original
warranty period.
Who is covered? This warranty is extended to the original retail purchaser for products purchased from Authorized Dealers in the 48
continental states of the U.S.A.
Limitations: The 90-Day Warranty period is limited to defective or malfunctioning products. Products damaged while in the possession of
the consumer by unreasonable use, improper handling, lack of maintenance, acts of nature (such as but not limited to lightning damage),
or due to improper packaging and shipping are not covered under Warranty. Products that are used for commercial purposes, or have been
modied or repaired by anyone other than ClearPlay, are not covered under Warranty.
REPAIR OR REPLACEMENT AS PROVIDED UNDER THIS WARRANTY IS THE EXCLUSIVE REMEDY OF THE CONSUMER. CLEARPLAY INC. SHALL
NOT BE LIABLE FOR INCIDENTAL OR CONSEQUENTIAL DAMAGES RESULTING FROM THE USE OF THIS PRODUCT OR ARISING OUT OF ANY
BREACH OF ANY EXPRESS OR IMPLIED WARRANTY ON THIS PRODUCT. THIS DISCLAIMER OF WARRANTIES AND LIMITED WARRANTY ARE
GOVERNED BY THE LAWS OF THE STATE OF UTAH. EXCEPT TO THE EXTENT PROHIBITED BY APPLICABLE LAW, ANY IMPLIED WARRANTY OF
MERCHANTABILITY OR FITNESS FOR A PARTICULAR PURPOSE ON THIS PRODUCT IS LIMITED TO THE APPLICABLE WARRANTY PERIOD SET
FORTH ABOVE.
THE WARRANTY STATED ABOVE IS THE ONLY WARR ANTY APPLICABLE TO THIS PRODUCT. ALL OTHER WARRANTIES, EXPRESS OR IMPLIED
(INCLUDING ALL IMPLIED WARRANTIES OF MERCHANTABILITY OR FITNESS FOR A PARTICULAR PURPOSE) ARE HEREBY DISCLAIMED. NO
VERBAL OR WRITTEN INFORMATION GIVEN BY CLEARPLAY INC., IT ’S AGENTS OR EMPLOYEES SHALL CREATE A GUARANTY OR IN ANY WAY
INCREASE THE SCOPE OF THIS WARRANTY.
What to do?
Before contacting Customer Service, please check your instruction booklet and the FAQ section at www.clearplay.com. A slight 1.
adjustment of the custom controls may save you a service call.
If you require additional assistance, please contact Customer Service at www.clearplay.com/support or (888) 425-3270.2.
Defective products must be returned to the retail store where the product was purchased for returns or exchanges, in accordance 3.
with the store’s return policy.
Defective products that are not within the retail store’s return period can be shipped to Customer Service. Carefully package the 4.
product and ship prepaid to the Customer Service address listed below. Proof of purchase dated within 90 days of the return date is
required.
Describe your problem in writing and include your name, return address, daytime telephone number, and a copy of the store 5.
receipt.
When the product is received, it will be replaced with a new or renewed product, which meets ClearPlay high quality standards, and 6.
shipped back.
How to get service on your product after the 90-Day Warranty?
Out-of-Warranty service can be obtained at a nominal cost for replacement and handling under the following arrangement:
Contact Customer Service as listed above to obtain the cost of an out-of-warranty replacement for your product.1.
Carefully package the product and ship prepaid to the Customer Service address listed above. Include a check or money order made 2.
payable to ClearPlay for the service fee.
Describe your problem in writing and include your name, return address, daytime telephone number, and check or money order 3.
made payable to ClearPlay for the service fee.
When the product is received, it will be replaced with a new or renewed product, which meets ClearPlay high quality standards, and 4.
shipped back.
ClearPlay Customer Support
5284 South 320 West Suite C134
Salt Lake City, UT 84107, U.S.A.
Tel: (888) 425-3270
Web: www.clearplay.com/support
- 1 -
Page 6
- 2 -
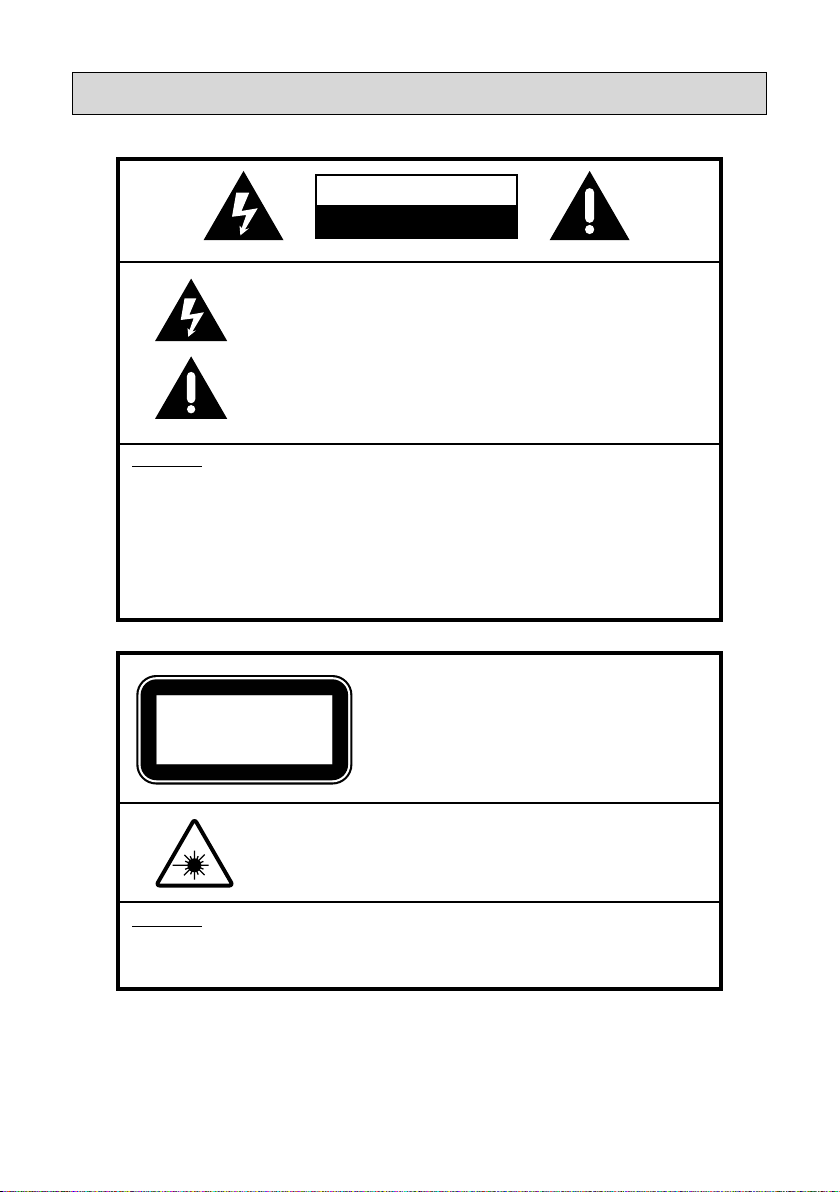
SAFETY
CAUTION
RISK OF ELECTRIC SHOCK
DO NOT OPEN
The lightning ash with arrowhead symbol, within an equilateral triangle, is
intended to alert user to the presence of un-insulated “dangerous voltage”
within the products enclosure that may be of sucient magnitude to
constitute a risk of electric shock to persons.
The exclamation point within an equilateral triangle is intended to alert the
user to the presence of important operating and maintenance (servicing)
instruction in the literature accompanying the appliance.
WARNING:
To reduce the risk of re or electric shock, do not expose this appliance to rain or
moisture.
DO NOT REMOVE COVER or OPEN THE CABINET. Dangerous high voltages are present
inside the enclosure. No user serviceable parts inside. Refer servicing to qualied
personnel only.
Use of controls or adjustments or performance of procedures other than those
specied may result in hazardous radiation exposure.
LASER:
CLASS 1
LASER PRODUCT
INVISIBLE LASER RADIATION WHEN OPEN OR INTERLOCK
FAILED OR DEFEATED.
WARNING:
DO NOT STARE INTO BEAM. Avoid direct exposure to laser beam.
To prevent direct exposure to laser beam, do not try to open the enclosure.
To ensure proper use of this product, please read this owner manual carefully and
retain for future reference. Should the unit require maintenance, contact an authorized service location.
Type: Dual semiconductor laser GaAiAs
Wavelength: 650nm and 780nm
Output Power: 7mW
Beam Divergence: 60 degrees
Page 7
- 3 -
IMPORTANT SAFETY INSTRUCTIONS
CAUTION: RETAIN THIS BOOKLET FOR FUTURE REFERENCE.
This DVD player has been designed and manufactured to assure personal safety. Improper use can
result in electric shock or re hazard. The safeguards incorporated in this unit will protect you if you
observe the following procedures for installation, use and servicing. This unit does not contain any
parts that can be repaired by the user.
Read these instructions.•
Keep these instructions.•
Heed all warnings.•
Follow all instructions.•
Do not use this apparatus near water.•
Clean only with dry cloth.•
Do not block any ventilation openings. Install in accordance •
with the manufacturer’s instructions.
Do not install near any heat sources such as radiators, heat •
registers, stoves, or other apparatus (including ampliers)
that produce heat.
Do not defeat the safety purpose of the polarized or •
grounding-type plug. A polarized plug has two blades, one
wider than the other. A grounding type plug has two blades
and a third grounding prong. The wide blade or the third
prong is provided for your safety. If the provided plug does
not t into your outlet, consult an electrician for replacement of the obsolete outlet.
Protect the power cord from being walked on or pinched •
particularly at plugs, convenience receptacles and the point
where they exit from the apparatus.
Only use attachments/accessories specied by the manu-•
facturer.
Unplug this apparatus during lightning storms or when •
unused for long periods of time.
Use only with a cart, stand, tripod, bracket or table specied •
by the manufacturer, or sold with the apparatus. When a
cart is used, use caution when moving the cart/apparatus
combination to avoid injury from tip-over.
PORTABLE
CART
WARNING
S3125A
Refer all servicing to qualied service personnel. Servicing •
is required when the apparatus has been damaged in
any way, such as when the power supply cord or plug is
damaged, liquid has been spilled or objects have fallen into
the apparatus, the apparatus has been exposed to rain or
moisture, does not operate normally, or has been dropped.
Apparatus shall not be exposed to dripping or splashing •
and no objects lled with liquids, such as vases, shall be
placed on the apparatus.
Disc Tray •
Keep your ngers well clear of the disc tray as it is closing. It
may cause serious personal injury.
Burden •
Do not place a heavy object on, or step on the product. The
object may fall, causing serious personal injury and serious
damage to the product.
Disc •
Do not use a cracked, deformed, or repaired disc. These
discs are easily broken and may cause serious personal
injury and product malfunction.
Damage Requiring Service •
Unplug this product from the wall outlet and refer
servicing to qualied service personnel under the following
conditions:
a) When the power-supply cord or plug is damaged.
b) If liquid has been spilled, or objects have fallen into the
product.
c) I f the product has been exposed to rain or water.
d) If the product does not operate normally by following
the operating instructions. Adjust only those controls
that are covered by the operating instructions.
Improper adjustment of other controls may result in
damage and will often require extensive work by a
qualied technician to restore the product to its normal
operation.
e) If the product has been dropped or damaged in any
way.
f) When the product exhibits a distinct change in
performance - this indicates a need for service.
Servicing •
Do not attempt to service this product yourself as opening
or removing covers may expose you to dangerous voltage
or other hazards. Refer all servicing to qualied service
personnel.
Replacement Parts •
When replacement parts are required, be sure the service
technician has used replacement parts specied by the
manufacturer or have the same characteristics as the
original part. Unauthorized substitutions may result in re,
electric shock, or other hazards.
Safety Check •
Upon completion of any service or repairs to this product,
ask the service technician to perform safety checks
to determine that the product is in proper operating
condition.
USA & Canada versions comply with ETL requirements.•
Page 8
- 4 -
CONTENTS
Limited 90-day Warranty
Safety
Important Safety Instructions
Contents & Package
Installation
Remote Control
Front Panel
Display
Rear Panel
Connections
System Setup Menu
Playing DVD / VCD Disc
Playing MP3 / JPEG Disc
ClearPlay Operation
Formats You Can Play
Problems
Frequently Asked Questions on ClearPlay Functions
ClearPlay EULA
1
2
3
4
5
6
7
7
7
8
10
13
14
16
26
27
28
29
NOTE:
This equipment has been tested and found to comply with the limits for a Class B digital device, pursuant to part 15 of
the FCC Rules. These limits are designed to provide reasonable protection against harmful interference in a residential
installation. This equipment generates, uses and can radiate radio frequency energy and, if not installed and used
in accordance with the instructions, may cause harmful interference to radio communications. However, there is no
guarantee that interference will not occur in a particular installation. If this equipment does cause harmful interference
to radio or television reception, which can be determined by turning the equipment o and on, the user is encouraged
to try to correct the interference by one or more of the following measures:
Reorient or relocate the receiving antenna. Increase the separation between the equipment and receiver. Connect the equipment to a supply outlet dierent from that to which the receiver is connected. Consult the dealer or an experienced radio/TV technician for help. -
Software Licence and Copyright Notice
All software that is supplied as part of this equipment is
protected by copyright laws and international copyright treaties,
as well as other intellectual property laws and treaties. This
software is licensed, not sold and is intended for use on this
device only.
You may not reverse engineer, de -compile, or disassemble this
software for any purpose. No part of this software may be copied,
reproduced, loaned, rented, leased or transmitted in any form
or by any means electronic or mechanical, without the express
written permission of ClearPlay Inc. Also see the ClearPlay End
User License Agreement on page 29.
ClearPlay patent # 6,898,799 and others pending.
PACKAGE
Examine the contents of the box for your DVD player.
There should be the following:
DVD Player with attached power cord•
Remote Control•
2 batteries•
A/V Cable•
Instruction Book•
This product incorporates copyright protection technology that is protected by U.S. patents and
other intellectual property rights. Use of this copyright protection technology must be authorized
by Macrovision, and is intended for home and other limited viewing uses only unless otherwise
authorized by Macrovision. Reverse engineering or disassembly is prohibited.
U.S. Patent Nos. 4,631,603; 4,819,098; 4,907,093; 5,315,448; and 6,516,132.
Manufactured under license from Dolby Laboratories. “Dolby” and the double-D symbol are
trademarks of Dolby Laboratories.
Consumers should note that not all high denition television sets are fully compatible with this
product and may cause artifacts to be displayed in the picture. In case of 525 or 625 progressive
scan picture problems, it is recommended that the user switch the connection to the “standard
denition” output. If there are questions regarding our TV set compatibility with this model 525p
and 625p DVD player, please contact our customer service center.
See the ClearPlay End User License Agreement on page 29.
Page 9
- 5 -
1
Region 1
INSTALLATION
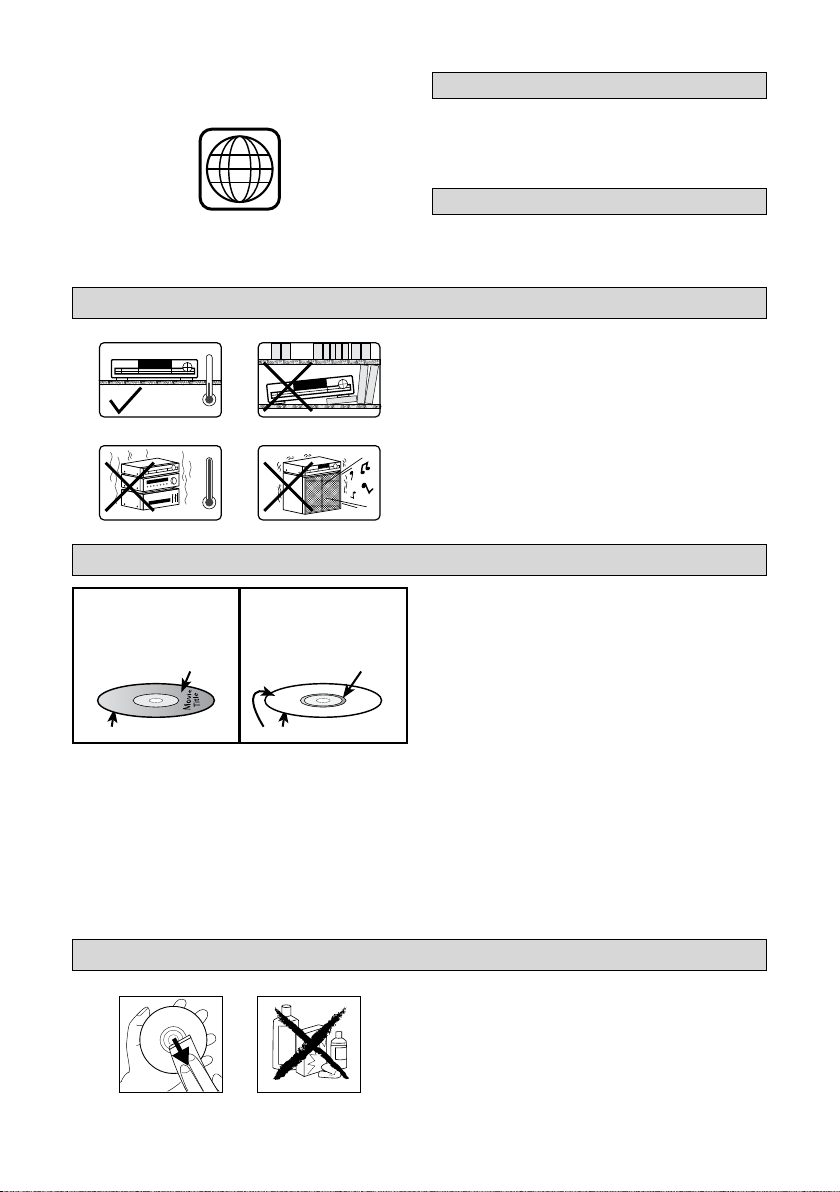
DVD DISCS
Single-sided DVD
Single-sided discs usually have the
title printed on the top side while
the bottom is the playing side.
Playing side down Playable on both sides
Title side facing up Title side facing up
CLEANING DISCS
Double-sided DVD
Double-sided discs have only a
thin title strip. The title you want
to view should be on the top.
le
C
Player Zones
For the purpose of distribution of DVD Discs, the world has been
separate d into 6 zones. The zone your un it is intended for is
indicated on the Zone Label. This should be the same as the label on
discs available in your region. If you have any diculties in playing a
disc, make sure that the disc is for the same zone as your player.
Anti-Copy Disc Protection
Some DVD discs have anti-copying devices.
With these discs the playback on a television will give the highest
quality picture, however you will not be able to record this signal
on a VCR.
Install your unit on a stable at sur face. There must be •
sucient room in front of the unit for the drawer to be
opened and the unit should be positioned so that it can
see the remote control.
Do not expose your unit to extremes of temperature o r •
humidity.
Avoid placing unit on a hot surface such as on top of other •
hot running equipment and ensure that there is adequate
ventilation to the unit.
Caution:
Do not install this equipment in conned space such
as a book case or similar unit!
There are several types of DVD Discs:
Disc Type
Single-sided
Single-sided with 2-layers
Double-sided
Double-sided with 2-layers on each side
DVD discs have Titles and Chapters:
There can be several Titles on one disc and each Title can contain •
several Chapters. Titles and Chapters are numbered, e.g. Title 1, Title
2, Chapter 1 etc.
Usually Title one will show the disc publisher and studio logos. The •
next Title will be the lm. Other Titles contain trailers for other lms,
production notes, or alternative endings for the lm. There are
many possibilities with Digital Versatile Disc.
Chapters within the main Title allow you to search quickly for a spe-•
cic point on the disc. Many discs have a Chapter Menu sometimes
called Scene Index or Scene Menu that displays the rst shot from
each Chapter, which allows you to select a shot and play the disc
from that point onwards.
DVD discs can be PAL or NTSC. This player can play both types
(if the player zone is correct).
DVD discs allow up to 8 Languages and 32 subtitles on a single disc. You
can select and change the language and subtitle to suit yourself and play
the whole disc or just part of it and view it from dierent angles.
Picture freezing & sound skipping or repeating can occur if the
disc inside the player is dirty.
When a disc becomes dirty, clean it with a cleaning cloth. Wipe the •
r
e
n
a
disc from the center out.
Do not wipe in a circular motion. Circular scratches can cause picture •
distortion or render the disc un-playable.
Approximate Play Time
2 Hours
4 Hours
4 Hours
8 Hours
Caution:
Do not use solvents, commercially available cleaners, or
anti-static spray intended for analog discs.
Page 10
- 6 -
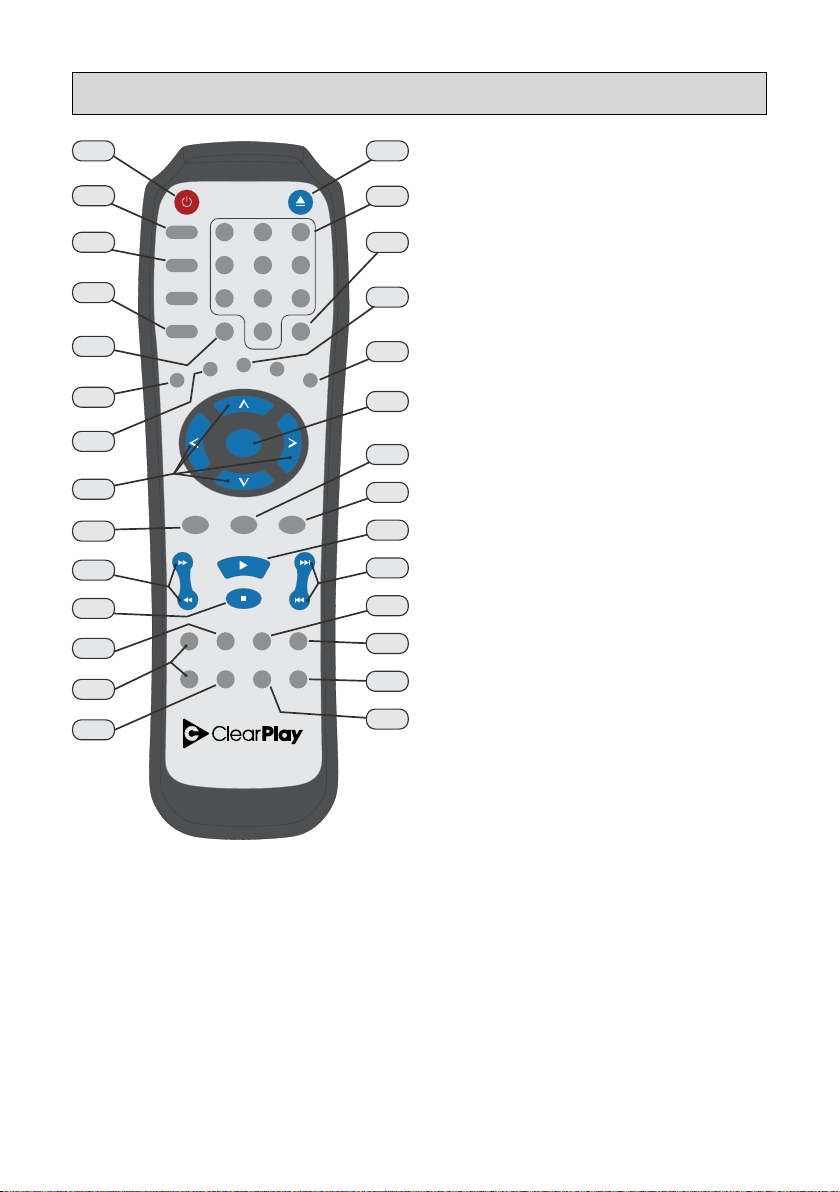
REMOTE CONTROL
1 15
2
3
4
5
6
7
8
9
10
11
12
13
14
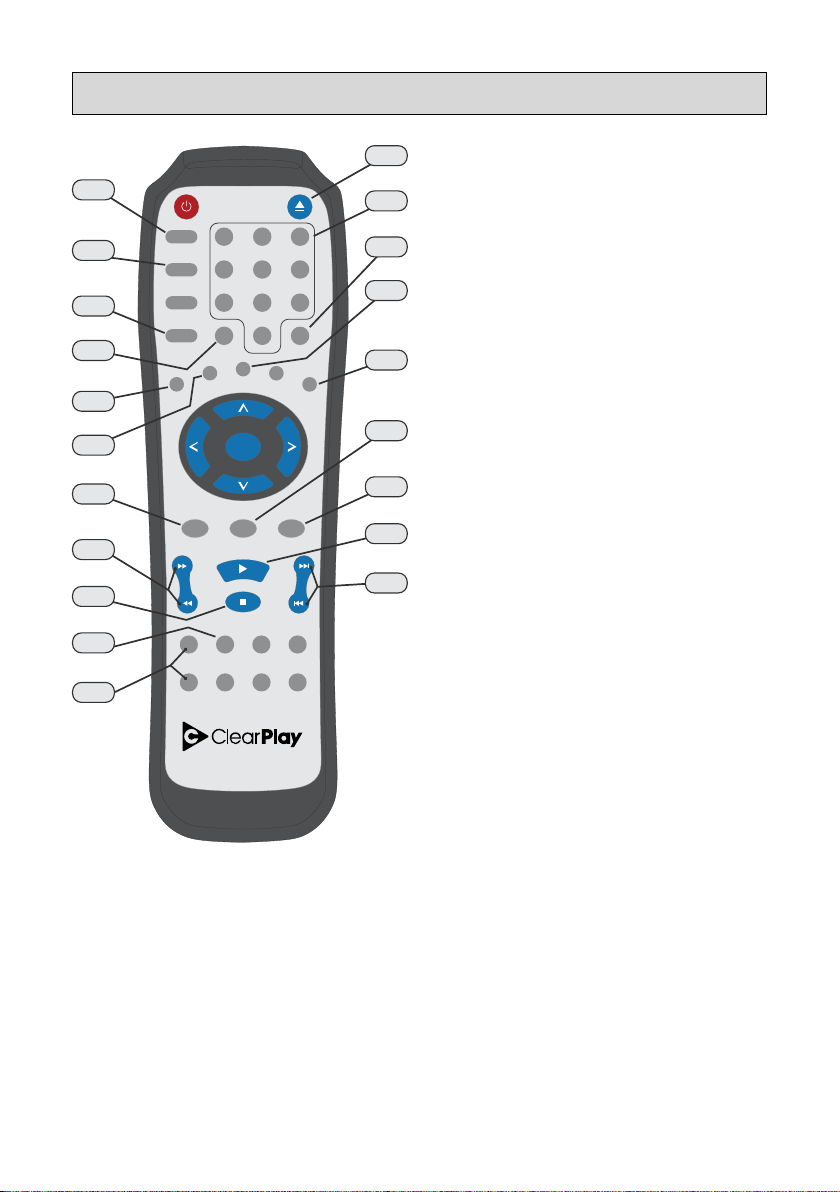
POWER ON/STANDBY1.
Switches the player between Standby and On.
MUTE 2.
Mutes and unmutes sound output.
AUDIO 3.
Switches between the dierent Audio modes during DVD
playback.
SUBTITLE 4.
Switches between the dierent Subtitle options during
DVD playback.
CLEAR 5.
- Exits menus and Active Navigation mode.
- Deletes the last selection in Program mode.
POWER
OPEN/CLOSE
1
1
MUTE
4 6
4 6
AUDIO
7 9
7
VIDEO
CLEAR GOTO
SUBTITLE
A-B
REPEAT
ANGLE
OK
MENU
PAUSE/STEP DISPLAY
+
VOL TITLE RETURN SETUP
-
En jo y th e Sh ow !
LOADBROWSE
CP-427-USB
2
2
5
5
8
809
0
EQ
CLEARPLAY
MENU
™
3
3
ZOOM
16
17
18
19
20
21
22
23
24
25
26
27
28
- Deletes the current Filter in the Parental Control Menu.
VIEW ANGLE SELECTION & ROTATE6.
- Displays angle menu if present on discs.
- Rotates images on JPEG discs.
REPEAT7.
Press to repeat a title, chapter, track or all content.
ACTIVE NAVIGATION KEYS 8.
Advance in the indicated directions for making selections
in menus and Active Navigation mode.
MENU9.
Access DVD menu during playback.
FAST SEARCH FORWARD & REVERSE10.
Plays backward and forward quickly.
STOP11.
Press to Stop playback
TITLE12.
Press to display Titles menu, if present on the disc.
VOLUME13.
Raises and lowers the sound output.
BROWSE14.
Press to browse inserted FilterStik™ or Flash Memory.
OPEN/CLOSE 15.
Opens or closes the disc loading tray.
NUMERIC KEYS 16.
0 - 9 are used for direct access of title, chapter, track and
time.
GOTO 17.
Advance to a certain time during DVD playback.
A-B18.
Mark a segment beginning and end time to repeat.
ZOOM19.
Press to enlarge the image during DVD playback.
OK20.
Press to conrm current selection.
PAUSE/STEP21.
Pause playback, or advance 1 frame.
DISPLAY22.
Display time elapsed during playback.
PLAY23.
Press to begin playback
SKIP FORWARD/BACK24.
-Press advance to the next chapter or track.
-Press to page up or down in Filter Selection.
CLEARPLAY MENU25.
Press to access ClearPlay menu.
Page 11
- 7 -
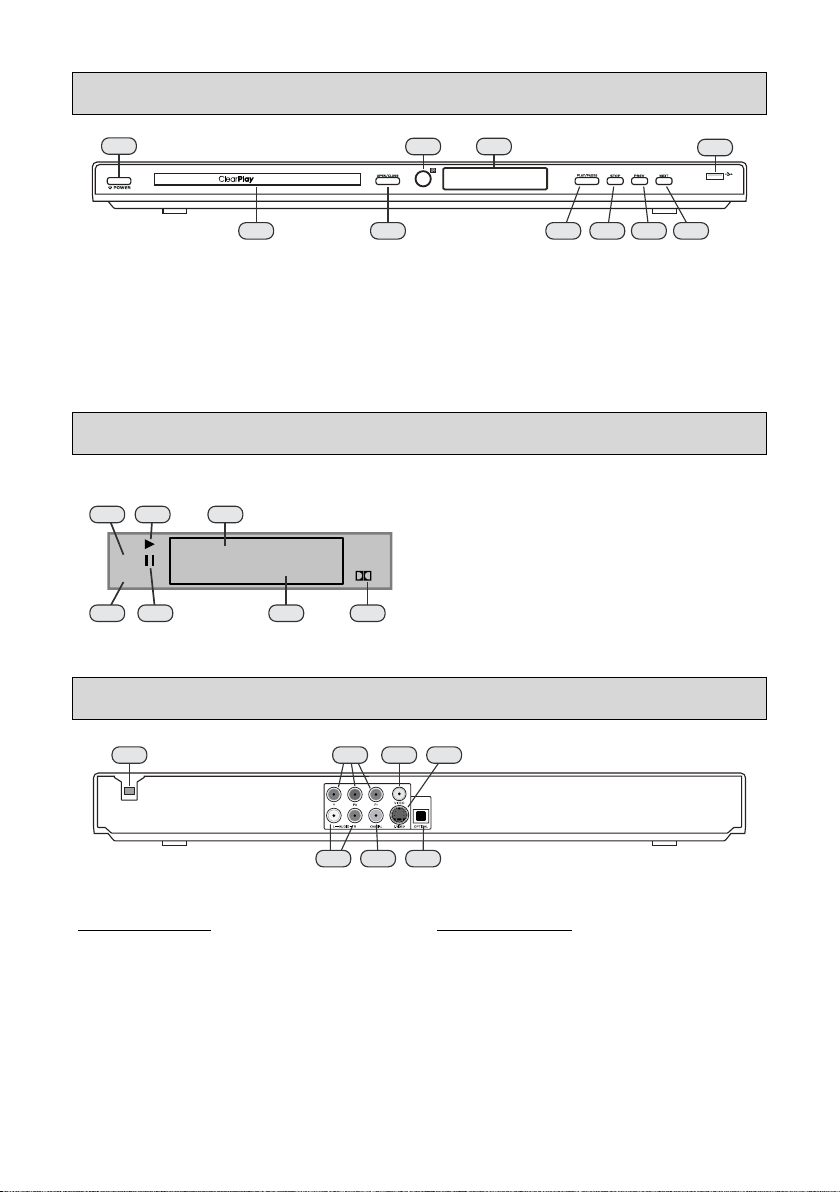
FRONT PANEL
1
On/O1.
Disc loading tray2.
Open/Close disc loading tray3.
Infrared receiver window4.
LED display area5.
Start playback6.
LED DISPLAY
1 3 5
VCD
MP3
88 8:88:88
2 4 76
REAR PANEL
4 5
DVD Player
2 3 6 7 8 9
Stop playback 7.
Move playback to previous chapter8.
Move payback to next chapter9.
USB ash reader (for your FilterStik™)10.
VCD playback indicator1.
MP3 playback indicator2.
Play status indicator3.
Pause status indicator4.
D
Current Chapter/Track5.
Current Time6.
Dolby Digital indicator7.
10
USB
1 2 3 4
5 6 7
Power Cord1.
Video Connections Audio Connections
Component Video Outputs2.
Composite Video Output3.
S-Video Output4.
Analog Left/Right Audio Output5.
Coaxial Digital Audio Output6.
Optical Digital Audio Output7.
Page 12
- 8 -
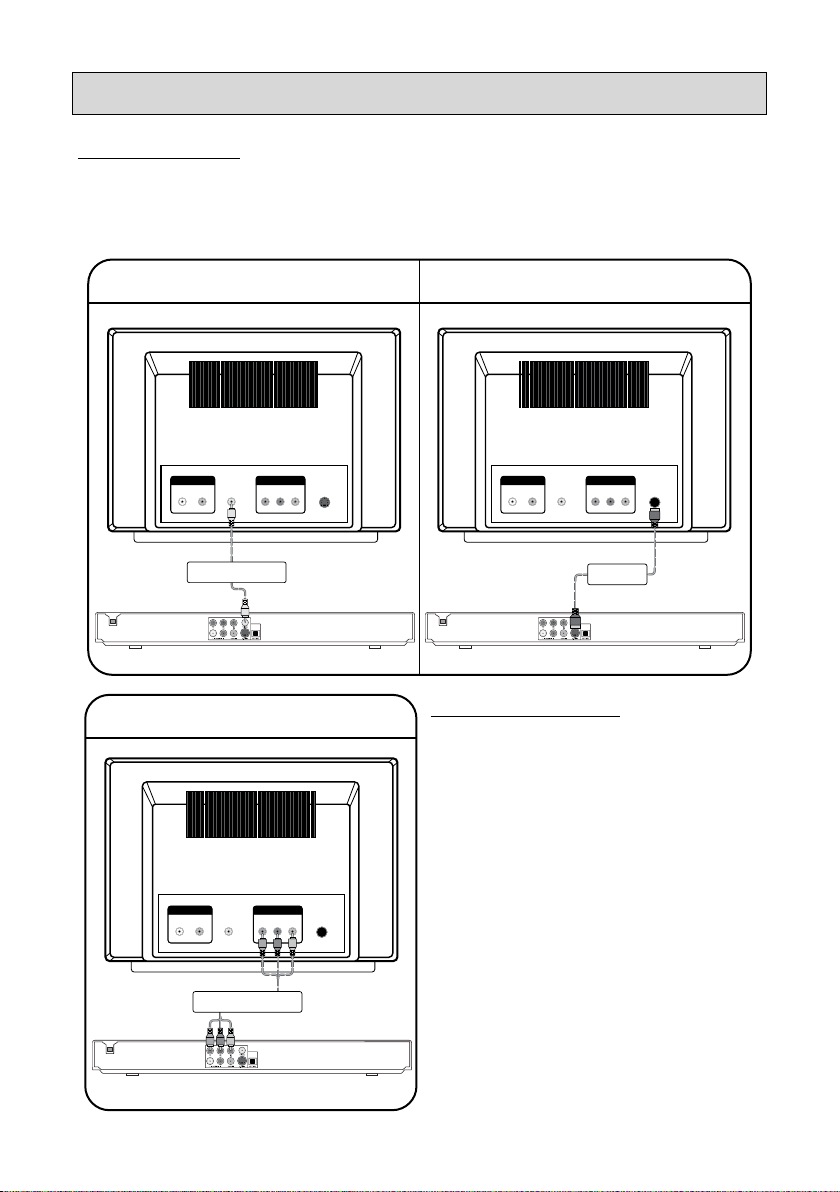
CONNECTIONS
Video Connections
The way in which you connect your DVD player and the kinds of cabling you choose can make a noticeable dierence in picture and sound quality. Before you select one of the options, please make sure
that your other equipment (e.g. TV, receiver) has the required input/output channel.
Use either of the options below:
For good picture quality, use
COMPOSITE VIDEO CABLE (included)
For better picture quality, use
S-VIDEO CABLE (not included)
TV
AUDIO COMPONENT
LR
COMPOSITE
COMPOSITE VIDEO CABLE
(Included)
For best picture quality, use
COMPONENT VIDEO cables (not included)
Y PbP
S-VIDEO
r
TV
AUDIO
LR
COMPONENT
Y PbP
COMPOSITE
COMPONENT VIDEO CABLE
(Not Included)
S-VIDEO
r
TV
AUDIO COMPONENT
LR
COMPOSITE
Notes on Progressive Scan:
If your TV can accept Progressive Scan 1.
feeds, your video connections should be
done as in the picture on the left to obtain
best possible picture quality from the
player.
Once connected see page 10 to set the 2.
connection type for the DVD Player.
Your T V may need adjustment to accept 3.
Progressive Scan feeds.
Do not substitute a component Video 4.
cable with an Audio/Video cable.
Although these types of cables do look
alike, the actual wires inside the cable in
which the signal passes along are very
dierent. Substituting cables will result in
poor picture quality and could damage
your equipment.
Y PbP
r
S-VIDEO CABLE
(Not Included)
S-VIDEO
Page 13
- 9 -
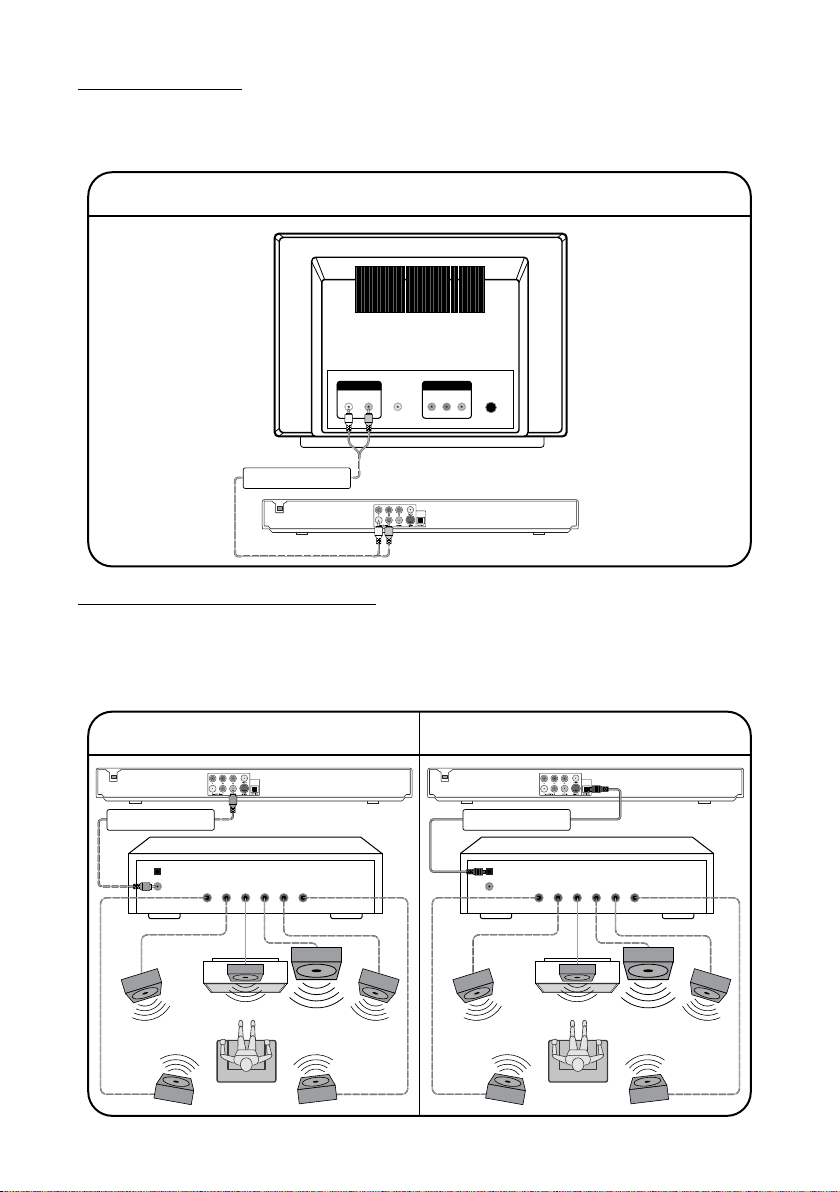
Audio Connections
Rear
Left
Front
Left
Center Subwoofer
Front
Right
Rear
Right
5.1 Channel Receiver
Digital Optical
Input
Digital Coaxial
Input
Rear Left
Front Left
Front Right
Rear Right
TV
Center
Subwoofer
DIGITAL COAXIAL AUDIO
CABLE (Not Included)
For better sound quality, use DIGITAL
COAXIAL AUDIO CABLE (not included)
Rear
Left
Front
Left
Center Subwoofer
Front
Right
Rear
Right
5.1 Channel Receiver
Digital Optical
Input
Digital Coaxial
Input
Rear Left
Front Left
Front Right
Rear Right
TV
Center
Subwoofer
DIGITAL OPTICAL AUDIO
CABLE (Not Included)
For best sound quality, use DIGITAL
OPTICAL AUDIO CABLE (not included)
Before you select one of the options, make sure that your other equipment (e.g. TV, receiver) has the
required input/output channel.
Use either options below:
For good sound quality, use COMPOSITE STEREO CABLES
TV
COMPOSITE STEREO CABLES
(Included)
AUDIO
LR
COMPOSITE
COMPONENT
Y PbP
S-VIDEO
r
Connecting a 5.1 Channel Receiver
Do not connect the Composite Stereo Cables Audio sockets to the TV (in case the Composite Stereo
Cables connections are made, you need to set the TV volume control to zero.)
Connect the Digital Audio Out socket from the DVD to the Input socket of your 5.1 Ch. Receiver. Use an
Optical or Coaxial Audio Cable. (not included)
Page 14
- 10 -
SYSTEM SETUP MENU
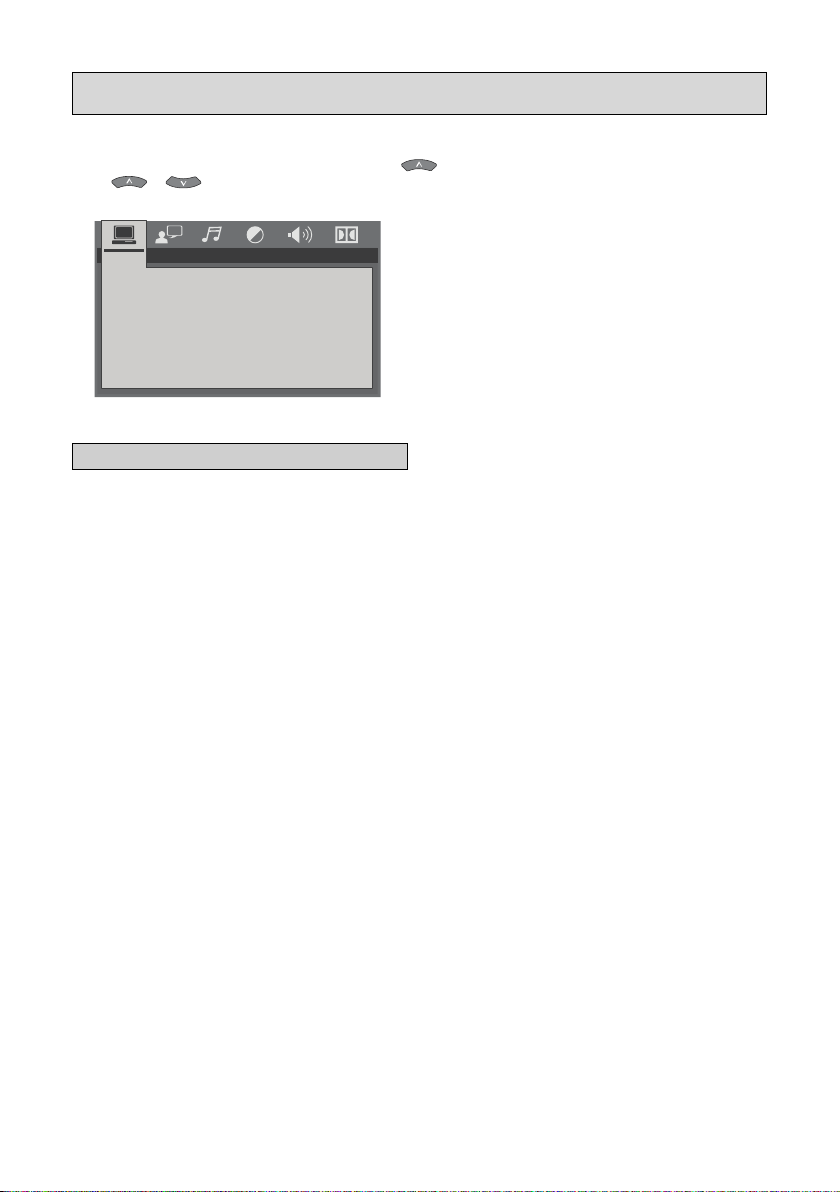
You may access your DVD players settings menu at any time by pressing the SETUP button on your remote control. If
pressed during playback the video will be paused. The setup menu consists of 6 categories displayed across the top
of the window. To switch between categories press the
press
CLEARPLAY
TV SYSTEM
AUTO PLAY
VIDEO
TV TYPE
PASSWORD
BLOCKING
DEFAULT
to change categories. Press the SETUP button again to exit the menu.
or
........
SYSTEM SETUP
SYSTEM
CLEARPLAY
Enters the ClearPlay Main Menu (see page 16 for more
information.) To access the ClearPlay menu you must
rst activate your player at www.ClearPlay.com/427.
TV SYSTEM
Sets the formatting for your television.
PAL - Most European televisions.
NTSC (Default) - Most American televisions.
AUTO - Attempts to automatically detect the best option.
AUTO PLAY
Sets whether or not the player will automatically play
the disc when inserted into the disc tray.
ON (Default) - Player will automatically play inserted disc.
OFF - User will have to press PLAY to start playback.
VIDEO
Selects between Progressive and Interlaced playback.
Progressive Scan playback requires a supported
television and the use of of component or S-Video
cables.
INTERLACE-YUV - Standard interlaced playback.
P-SCAN YPBPR - High quality progressive scan playback.
S-VIDEO (Default) - Used with an S-Video cable.
button until the current category is highlighted, then
TV TYPE
Sets how the image will be formatted onto your
television.
4:3PS (Default) - Designed for most standard denition
televisions. If the DVD Supports it, this mode will
automatically zoom in on the video frame (cutting o the
sides) and pan and scan when appropriate.
4:3LB - Designed for most standard denition televisions.
This mode will maintain the full aspect ratio of the original
video (adding black bars to the top and bottom of the
frame.
16:9 - Designed for widescreen televisions. This mode
will give proper aspect ratio when using a widescreen
television.
PASSWORD
Allows a password to be set to protect the blocking
feature. The default password is 0000.
BLOCKING
Allows DVDs to be blocked based on the rating
encoded on the disc. Some movies will not have a
rating on the disc, in these cases they will be blocked
at level 8.
DEFAULT
RESTORE - Restores DVD Player to default factory
settings.
Page 15
- 11 -
........
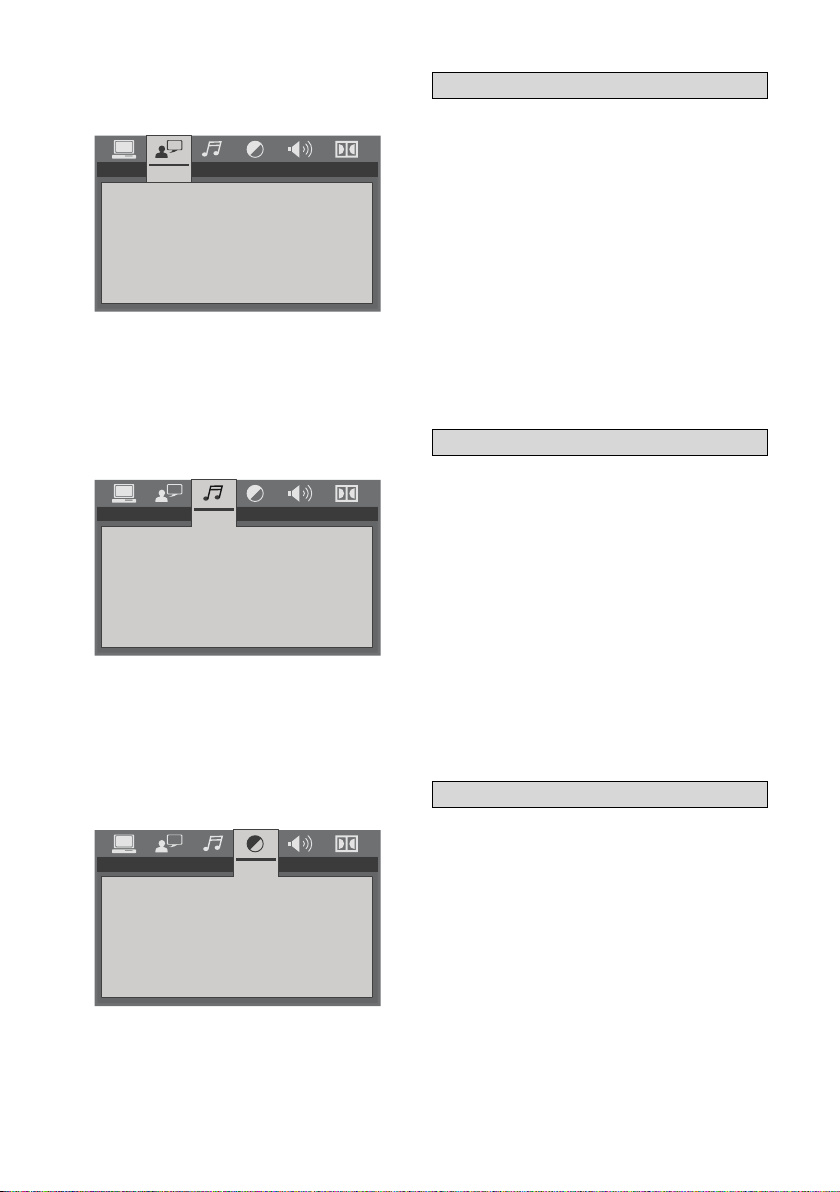
OSD LANGUAGE
AUDIO LANG
SUBTITLE LANG
MENU LANG
........
AUDIO OUT
KEY
LANGUAGE SETUP
AUDIO SETUP
LANGUAGE
OSD LANGUAGE
Sets the language used in the DVD Player SETUP and
CLEARPLAY menus.
AUDIO LANG
Sets the default language used for DVD Audio tracks (if
available).
SUBTITLE LANG
Sets the default language used for DVD subtitle tracks
(if available).
MENU LANG
Sets the default language used for DVD menus (if
available).
AUDIO
AUDIO OUT
Sets options for digital audio output.
SPIDF/OFF - Turns output o.
SPIDF/RAW (Default) - Attempts to use the raw audio
stream.
SPIDF/PCM - Attempts to use the PCM compressed audio
stream.
KEY
Changes the pitch of audio output during playback.
BRIGHTNESS
CONTRAST
HUE
SATURATION
SHARPNESS
........
VIDEO SETUP
VIDEO
BRIGHTNESS
Adjust to brighten or darken video playback.
CONTRAST
Adjust the visual dierence between colors.
HUE
Adjust to increase or decrease the green tones.
SATURATION
Adjust the intensity of colors.
SHARPNESS
Adjust the sharpness of the picture detail.
Page 16
- 12 -
........
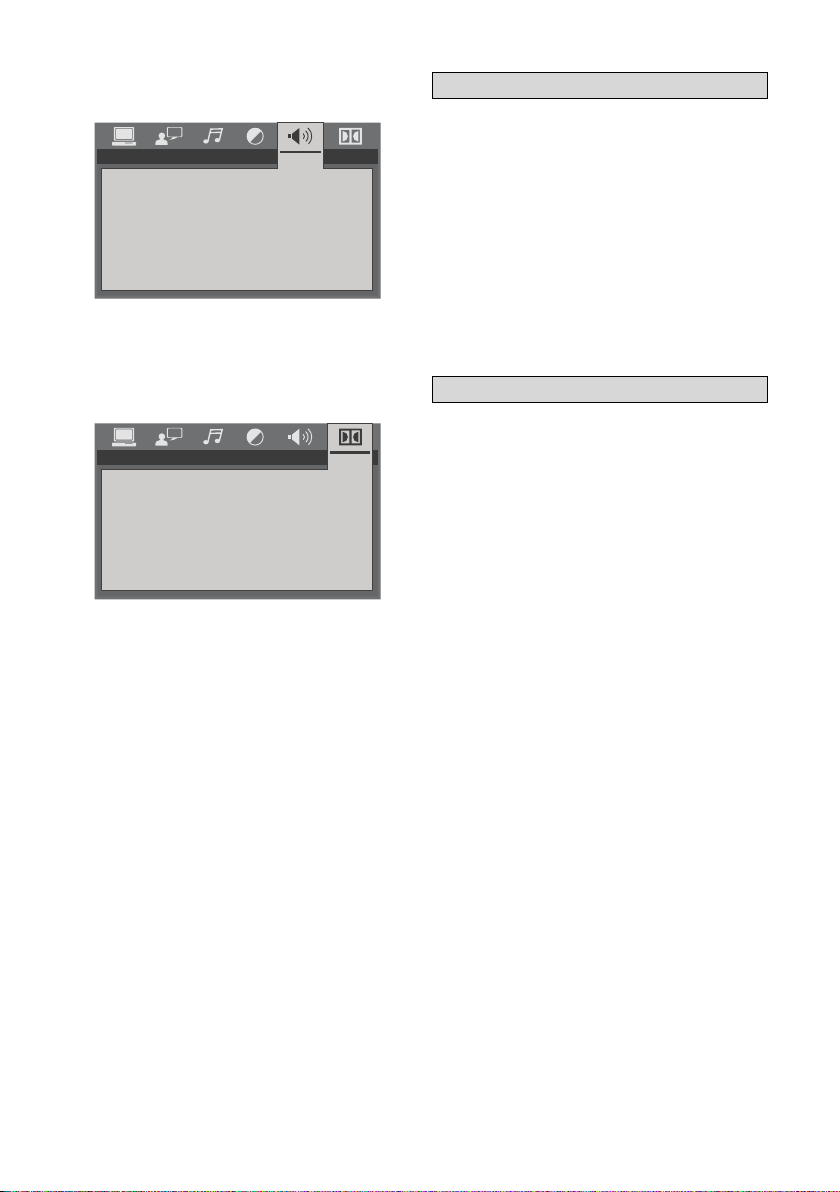
DOWNMIX
........
DYNAMIC RANGE
DUAL MONO
SPEAKER SETUP
DIGITAL SETUP
SPEAKER
DOWNMIX
Selects how audio is mixed for output.
LT/RT - Maintains original mixing. Used for Dolby Digital.
STEREO (Default) - Channels are downmixed into left and
right channels.
VSS - Stands for Virtual Surround System. This mode
simulates a surround sound system.
DIGITAL
DYNAMIC RANGE
Causes audio to normalize, this will lower the volume
when a sound would normally be very loud (such as
an explosion) and increase the volume when it would
be quiet (such as a person whispering). Full will cause
the audio peak to be lower, where O will disable the
feature.
DUAL MONO
Selects which audio channels to output during
playback.
STEREO - Output both channels to each speaker.
MONO L - Output left channel to all speakers.
MONO R - Output right channel to all speakers.
MIX MONO - Mix the channels together and output to all
speakers.
Page 17
- 13 -
PLAYING DVD / VCD DISCS
1
18
16
10
17
20
19
POWER
OPEN/CLOSE
2
2
3
5
5
8
809
0
EQ
3
ZOOM
1
1
8
9
7
4
MUTE
4 6
4 6
AUDIO
7 9
7
VIDEO
CLEAR GOTO
SUBTITLE
REPEAT
ANGLE
MENU
PAUSE/STEP DISPLAY
A-B
OK
6
+
VOL TITLE RETURN SETUP
-
En jo y th e Sh ow !
CP-427-USB
CLEARPLAY
LOADBROWSE
MENU
™
15
14
11
12
3
13
2
5
OPEN/CLOSE1.
Opens or closes the disc loading tray.
PLAY2.
Press to begin playback
PAUSE/STEP3.
Pause playback, or advance 1 frame.
FAST SEARCH FORWARD & REVERSE4.
Plays backward and forward quickly.
SKIP FORWARD/BACK5.
Press advance to the next chapter or track.
Press to page up or down in Filter Selection.
STOP6.
Press to Stop playback.
REPEAT7.
Press to repeat a title, chapter, track or all content.
AUDIO 8.
Switches between the dierent Audio modes.
SUBTITLE9.
Switches between the dierent Subtitle options.
VIEW ANGLE SELECTION10.
Displays angle menu if present on discs.
A-B11.
Mark a segment beginning and end time to repeat.
ZOOM12.
Press to enlarge the image during DVD playback.
DISPLAY13.
Display time elapsed during playback.
GOTO 14.
Advance to a certain time during DVD playback.
NUMERIC KEYS 15.
0 - 9 are used for direct access of title, chapter, track and
time.
CLEAR16.
Exits menus and Active Navigation mode.
Deletes the last selection in Program mode.
Deletes the current Filter in the Parental Control Menu.
MENU 17.
Access the DVD menu.
MUTE18.
Mutes and unmutes sound output.
VOLUME19.
Raises and lowers the sound output.
TITLE20.
Press to display Titles menu, if present on the disc.
Page 18
- 14 -
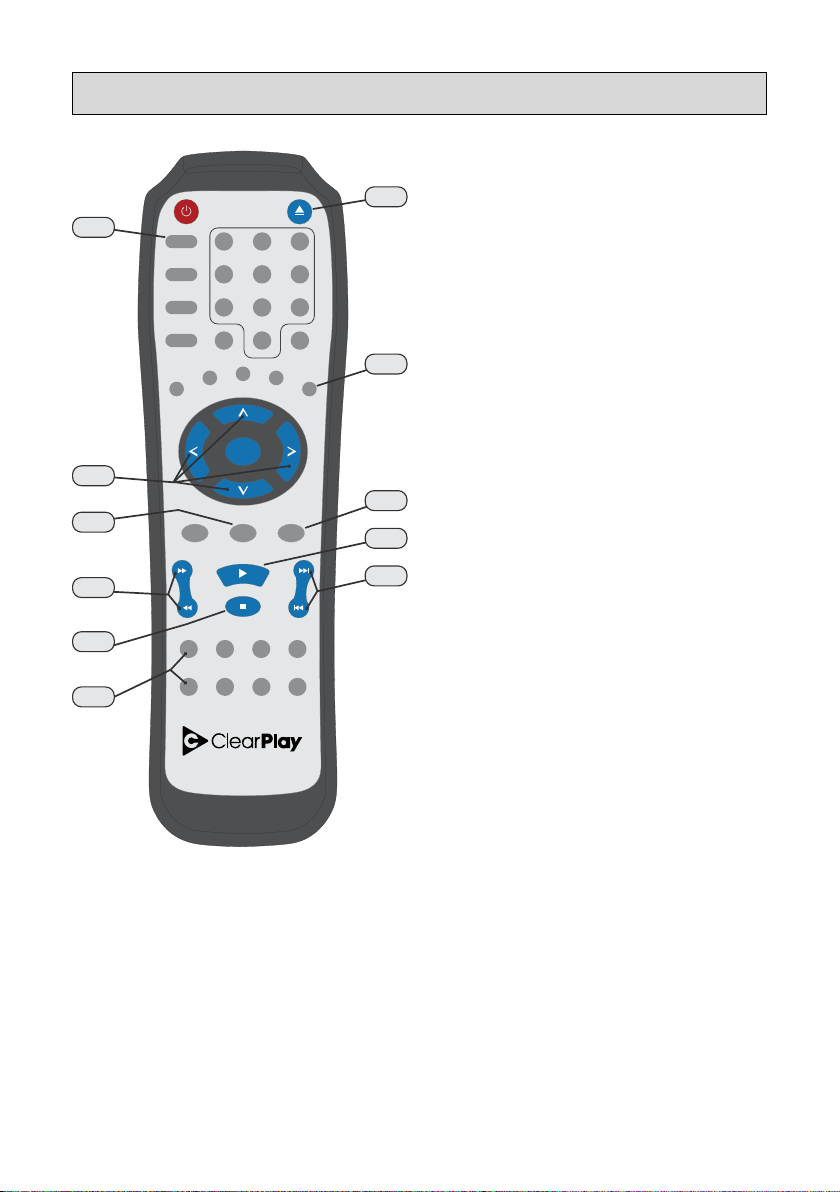
PLAYING MP3 / AUDIO / JPEG DISCS
OPEN/CLOSE1.
Opens or closes the disc loading tray.
PLAY2.
Press to begin playback / slideshow.
PAUSE/STEP3.
Pause playback / slideshow.
FAST SEARCH FORWARD & REVERSE4.
Plays backward and forward quickly.
SKIP FORWARD/BACK5.
Press advance to the next track / image.
STOP6.
Press to Stop playback / slideshow.
ZOOM 7.
Press to enlarge the image.
ACTIVE NAVIGATION KEYS8.
Pans the current image when zoomed.
DISPLAY9.
Display time elapsed / current image number.
MUTE10.
Mutes and unmutes sound output.
VOLUME11.
Raises and lowers the sound output.
10
11
POWER
1
1
MUTE
4 6
4 6
AUDIO
7 9
7
VIDEO
CLEAR GOTO
SUBTITLE
REPEAT
ANGLE
OPEN/CLOSE
2
2
5
5
8
809
0
A-B
OK
3
3
EQ
ZOOM
1
7
8
9
3
MENU
PAUSE/STEP DISPLAY
4
6
+
VOL TITLE RETURN SETUP
-
CLEARPLAY
LOADBROWSE
MENU
2
5
En jo y th e Sh ow !
CP-427-USB
™
Page 19

- 15 -
Page 20

- 16 -
CLEARPLAY OPERATION
To use the ClearPlay feature, it must rst be activated. To activate visit www.ClearPlay.com/427.
Your DVD player has the ClearPlay technology that allows you to watch your favorite movies free of
content you may consider oensive. With ClearPlay, you can load a ClearPlay Filter™ for each DVD
movie and then skip or mute objectionable content based on dierent Filter settings that you can
customize to your preference. For example, you can watch your favorite action movie without having
to hear oensive language or having to see dierent types of violence.
The Parental Control feature allows you to congure ClearPlay settings on your player, set movie
Blocking, and protect your settings with a password. See 24 27 for more details about Parental Control
options.
The ClearPlay menu has the following options:
Settings (Choose what content you want ltered, see page 20)•
Filters (View or delete ClearPlay Filters on the player, see page 23)•
Blocking (Blocks certain movies based on rating, see page 21)•
Password (Locks ClearPlay settings with a password, see page 21)•
For each movie you want to watch with ClearPlay ltering you will rst need to load a ClearPlay Filter
for that movie. For more information about how to receive new ClearPlay Filters, visit www.ClearPlay.
com or contact us at (888) 425-3270.
To watch your movies with ClearPlay ltering, just follow these simple steps:
Insert your FilterStik™* with the Filter for your DVD movie.1.
Insert your DVD movie.2.
Enjoy the Show!3.
(See more information on the following pages that explain each of these steps in detail).
*This player can use many types of USB ash drives and media cards to load new Filters, in place of the
ClearPlay FilterStik
The following pages will refer to options in the
ClearPlay menu. To access the ClearPlay menu you can
simply press the CLEARPLAY MENU button on your remote
control. Alternatively you can enter the SETUP menu
then press
on the CLEARPLAY option.
Adding New ClearPlay Filters to your playerAccessing the ClearPlay Menu
Obtain New Filters from ClearPlay
ClearPlay has Filters available for thousands of DVD
movies. See www.ClearPlay.com/427 or call us at
(888) 425-3270 for pricing and other information about
downloading new Filters.
Your DVD player can use a ClearPlay FilterStik to easily
download Filters from the internet. Simply download
new ClearPlay Filters from www.ClearPlay.com to your
computer, and then add the new ClearPlay Filters to the
FilterStik. You can then insert the FilterStik into the DVD
player to add the ClearPlay Filters to the DVD player
memory.
Note: If you are unable to copy Filters to the FilterStik or a
USB ash drive from a computer, you can also add Filters
to the player using a CD.
Page 21
- 17 -
New Releases
Alamo, Remember The
Language: English
Filter: 08/20/2005
Widescreen
Catalog Number: 99999
Alamo, Remem
Alfie and Emm
Alien vs E.T.
Analyze the Of
Aviationer, The
Boyz of Some
All Movies
Load
(63)
(1541)
Using the ClearPlay FilterStik to add
Filters to your player
ClearPlay provides convenient software options to
easily keep your FilterStik updated with Filters for the
latest movies. See www.ClearPlay.com for more details.
Updating your ClearPlay FilterStik with the
latest Filters from your computer.
Insert the FilterStik into an open USB port on 1.
your computer
Copy the ClearPlay Filter le from your computer 2.
to the FilterStik.
Note: This player supports CP2 les, or ClearPlay Filters
with the le extension .CP2
Auto Loading Filters from the FilterStik:
Insert the FilterStik into your DVD player.1.
When the FilterStik is inserted into the ClearPlay 2.
player, the Filter will load automatically for any
DVD movie that you insert.
Manually Loading Multiple Filters from the
FilterStik:
You can load Filters from the FilterStik directly onto
the player memory. To view the Filters that are on the
FilterStik:
Insert the FilterStik into your ClearPlay DVD 1.
player.
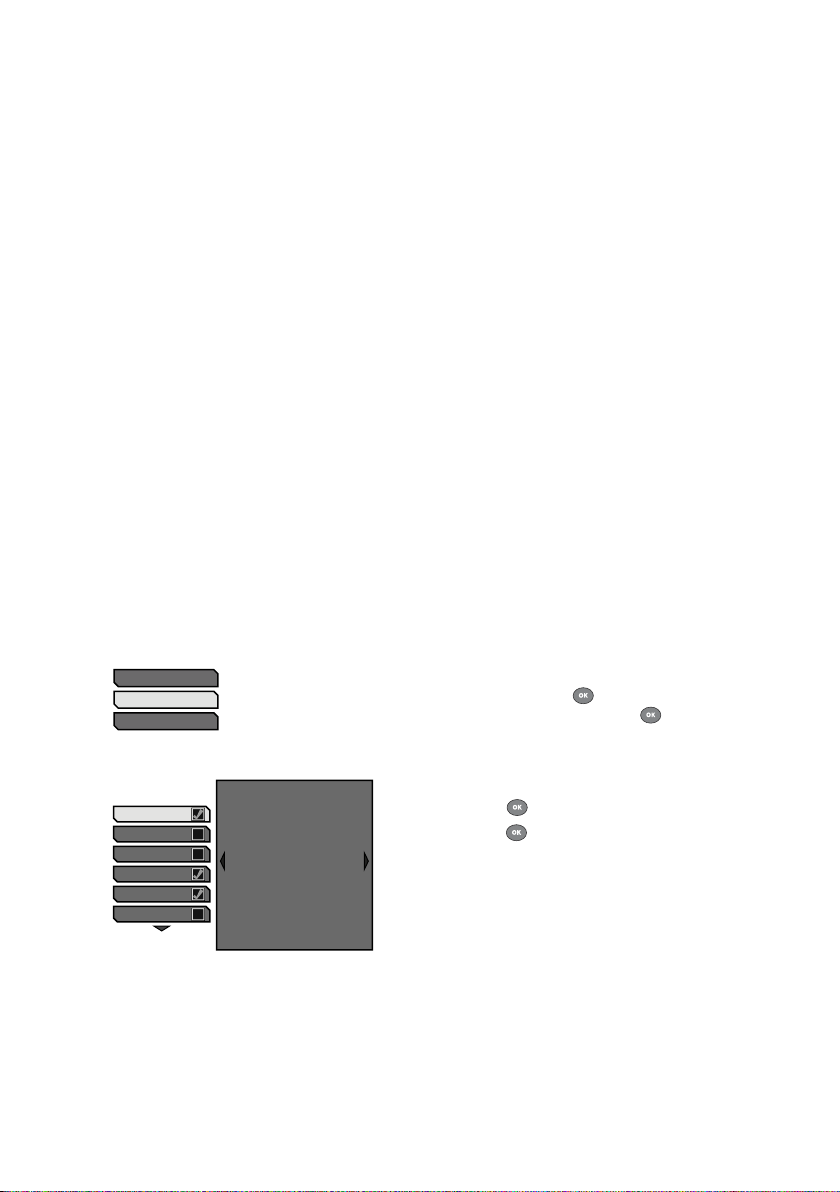
Press 2. BROWSE on your remote control.
To view the newly released Filters highlight 3. New
Release and press
highlight All Movies and press
To view a list of Filters highlight the group 4.
corresponding to the rst letter of your DVD
video’s title. (For example, if your title started
with a “G” then you would highlight Movies GHI and
press
.)
Press 5.
to check (add) or un-check (remove)
Filters from your DVD player. (a check will appear
in the box to the right of the movie)
After you have nished selecting Filters, press 6.
Load on your remote to nish loading the Filters
onto the player.
. To see all available Filters,
.
Page 22
- 18 -
Using a CD-R to add Filters to your
Player
The ClearPlay Filters can also be copied to a CD-R or
CD-RW. You may also order ClearPlay Filters to be sent
to you by mail. Shipping and handling charges may
apply.
There are two methods to add new Filters to the DVD
player using a disc:
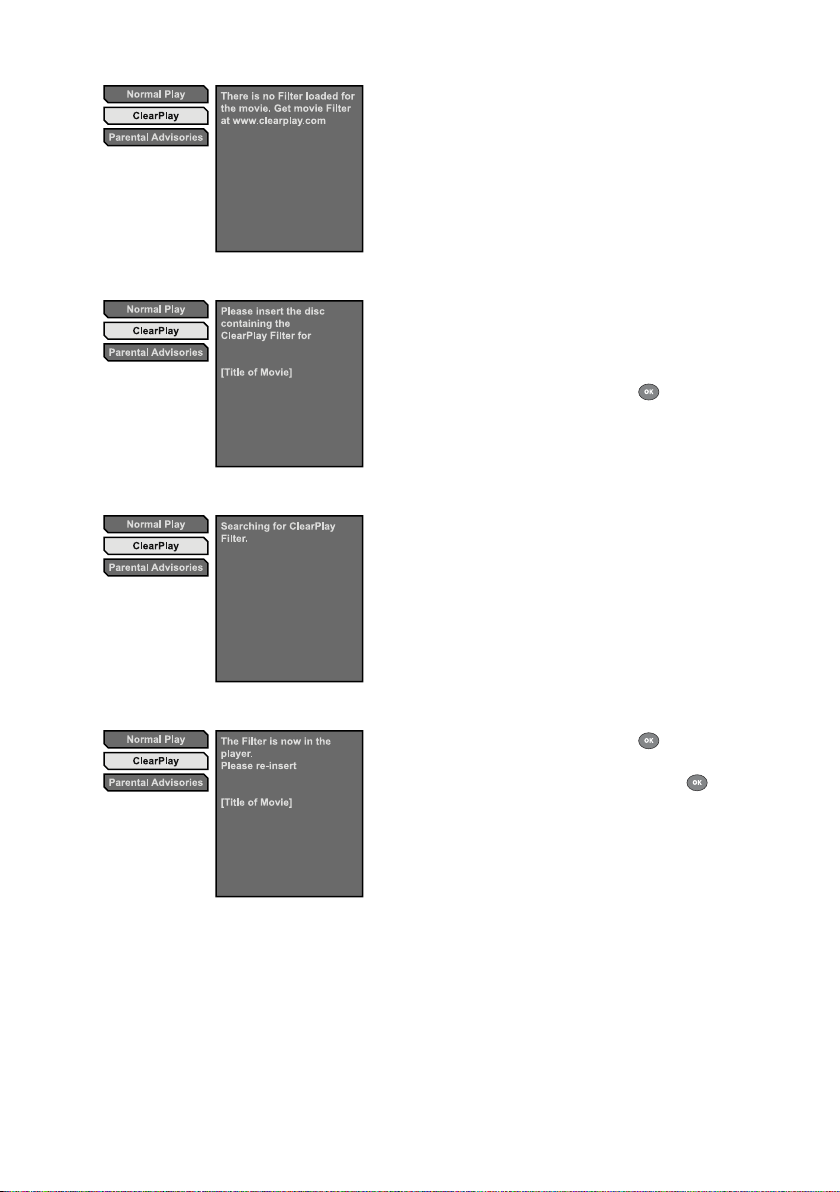
Loading a Single ClearPlay Filter:
Use this method to quickly load a single Filter.
Insert the DVD of the movie that you would like 1.
to view with ClearPlay ltering.
Highlight 2. ClearPlay and press
The disc tray will eject and prompt you for the 3.
Filter le. If you are loading the Filter from a CD,
insert it now and close the disc tray.
Wait while the DVD player loads the Filter from 4.
the CD.
After the Filter is loaded into the player the disc 5.
tray will eject.
Remove the Filter CD and insert the DVD you 6.
want to view.
Highlight 7. ClearPlay and press
movie.
You may select Parental Advisories and press
the Parental Advisories (see page 24 for viewing Parental
Advisories)
Note: If you need to cancel the Filter load, you can
highlight ClearPlay and press the Left arrow.
.
to start the
to view
Page 23
- 19 -
Loading Multiple ClearPlay Filters from a CD:
This method is useful if you would like to add multiple
Filters to your player. You may also remove Filters from
your player memory with this method.
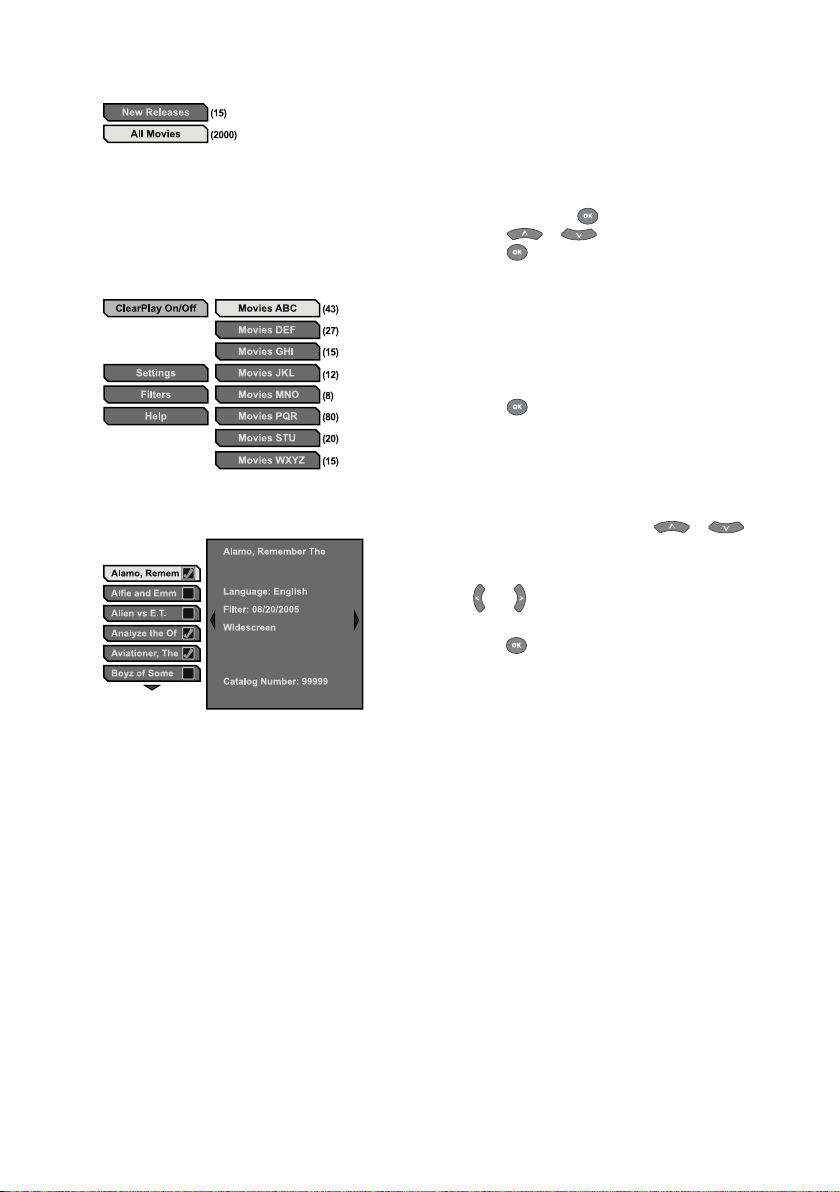
Insert the CD containing the Filter(s) that you 1.
wish to add into your DVD player.
To view newly released Filters highlight 2. New
Releases and press
press
.
press
To view a list of Filters highlight the group 3.
corresponding to the rst letter of your DVD
video’s title. (For example, if your title started
with a ‘G’ then you would highlight Movies GHI and
press
.)
. To see all available Filters,
to highlight All Movies and
or
The list of movies appears. Use 4.
to highlight dierent movie titles, The movie
information appears to the right side. More
information can be viewed by pressing
and (For more information about Filter
details, see page 24.)
Press 5.
to check (add) or un-check (remove)
Filters from your DVD player. (A check will appear
in the box to the right of the movie title.)
After selecting all the ClearPlay Filters you want 6.
to copy to your DVD player, eject the CD. The
player will display Please Wait while it adds and
removes the Filters that you have checked or
unchecked. See page 23 for more information
about deleting Filters.
or
Page 24
- 20 -
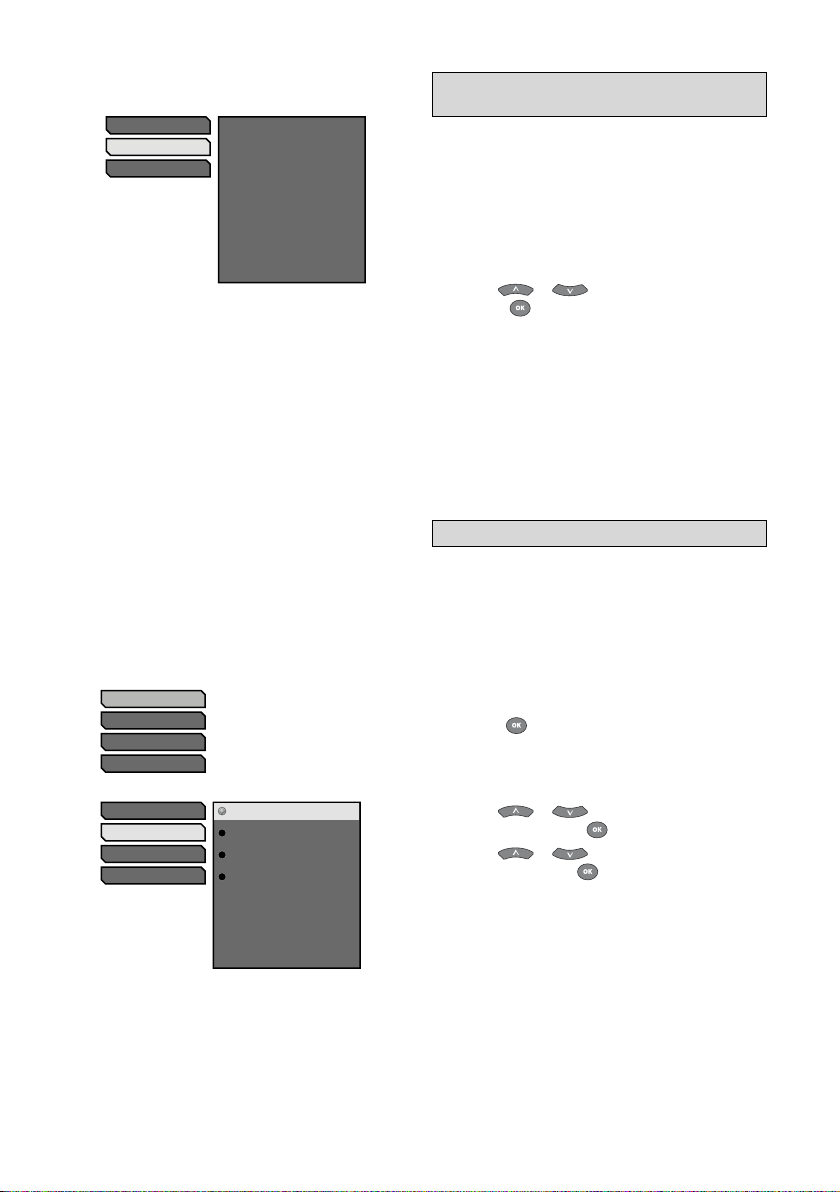
Parental Advisories
ClearPlay
Normal Play
Select ClearPlay to filter the
playback of the movie
according to your parental
control settings.
Filter Settings
Movies
Blocking
Password
Watching a DVD Movie with
ClearPlay Filtering
Note: The ClearPlay feature is active by default.
ClearPlay must be Activated to watch a DVD with
ClearPlay. See page 21 for details.
Begin with the DVD player powered ON, and the disc
tray empty.
Insert the DVD you wish to watch into the player.1.
Insert the FilterStik or CD with the correct Filters. 2.
See pages 17-19 for more details.
Use 3.
press
.
to highlight ClearPlay and
or
If the ClearPlay Filter for your DVD movie is 4.
available on your FilterStik, the movie will begin
playing with ClearPlay ltering activated.
If the ClearPlay Filter for your DVD movie is not 5.
available, the player will prompt you to load a
ClearPlay Filter.
Customize your Filter Settings
Use these instructions to adjust your ClearPlay Filter
Settings. You must activate ClearPlay, see page 21 for
details.
Your DVD player is set with default Filter Settings that
will accommodate most viewers. You can customize
your Filter Settings using the following steps:
Press 1. ClearPlay Menu on your remote control.
Press 2.
to select Filter Settings.
ClearPlay Feature
Setting 1
Setting 2
Setting 3
No Filtering
Least Filtering
Medium Filtering
Most Filtering
Use 3.
or to
category and press
Use 4.
or
Setting and press
Notes:
These Filter Settings will apply to all movies that you •
watch using ClearPlay Filters.
Your Filter Settings will remain in eect until you •
change them again.
Specic Filter Settings are not available for all •
movies.
select the desired
.
to highlight the desired Filter
.
Page 25
- 21 -
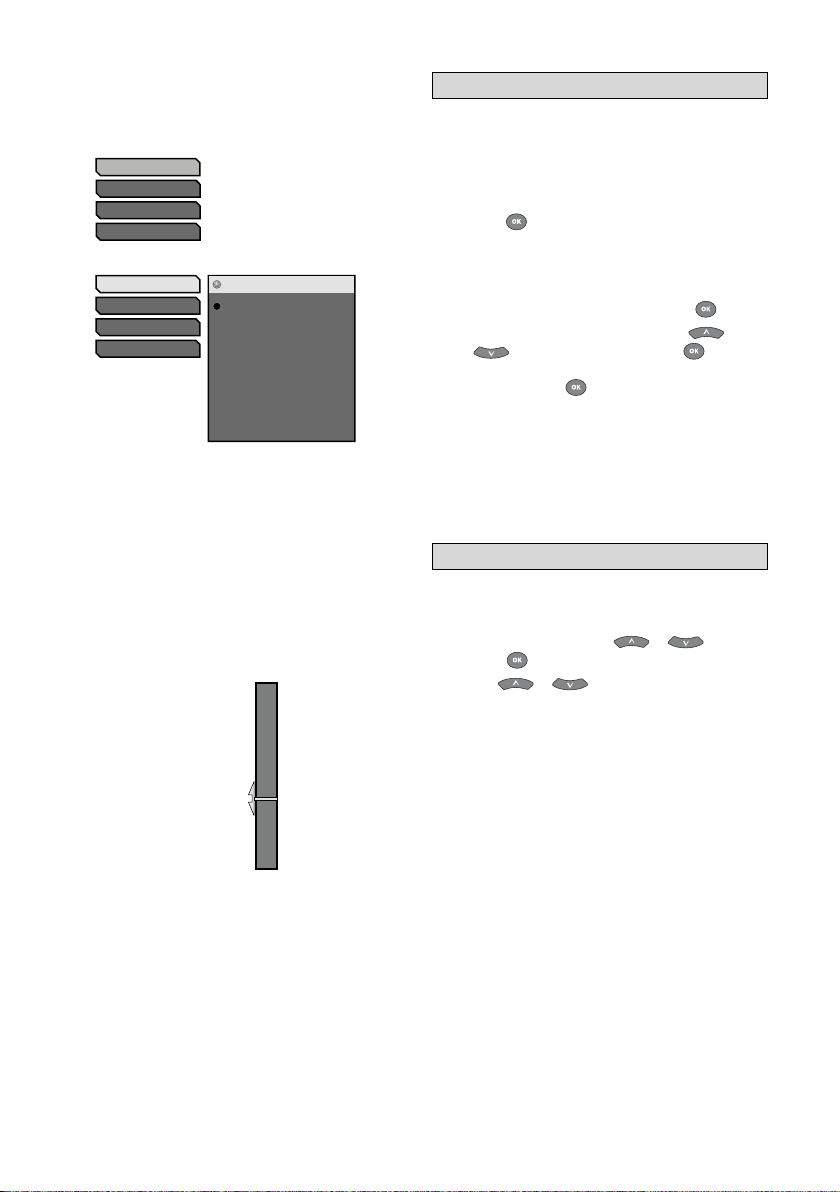
Filter Settings
Movies
Blocking
Password
Activating/Deactivating ClearPlay
For initial activation of the ClearPlay feature visit
www.ClearPlay.com/427
To enable the ClearPlay Feature:
Press 1. ClearPlay Menu on your remote control.
Press 2.
to select Filter Settings.
ClearPlay Feature
Setting 1
Setting 2
Setting 3
Enable
Disable
8
7 NC17
6 R
5
4 PG-13
3 PG
2
1 G
With 3. ClearPlay Feature highlighted press
To activate the ClearPlay feature, use 4.
to highlight Enable then press
wish to disable the ClearPlay feature, highlight
Disable and press
)
.
.
or
. (If you
Blocking Rated Movies
This feature allows you to block access to movies of a
specic rating.
Press 1. ClearPlay Menu on your remote control.
Highlight Blocking with 2.
press
.
Use 3.
blocking level.
or to set the players DVD
Parental levels are assigned to DVD discs. The 4.
range of parental control levels is from 1 to 8.
If the units rating limit is set to 8, it will play all
discs. if the player’s rating limit is set below 8,
only discs with a lower or equal parental level
will play.
Note: Some discs do not have a parental control level
assigned. For these discs, the parental control will block
them as if they were level 1.
Note: For this player, playback of a branching DVD with
multiple rating is not responsive to your parental control
level.
or and
Page 26
- 22 -
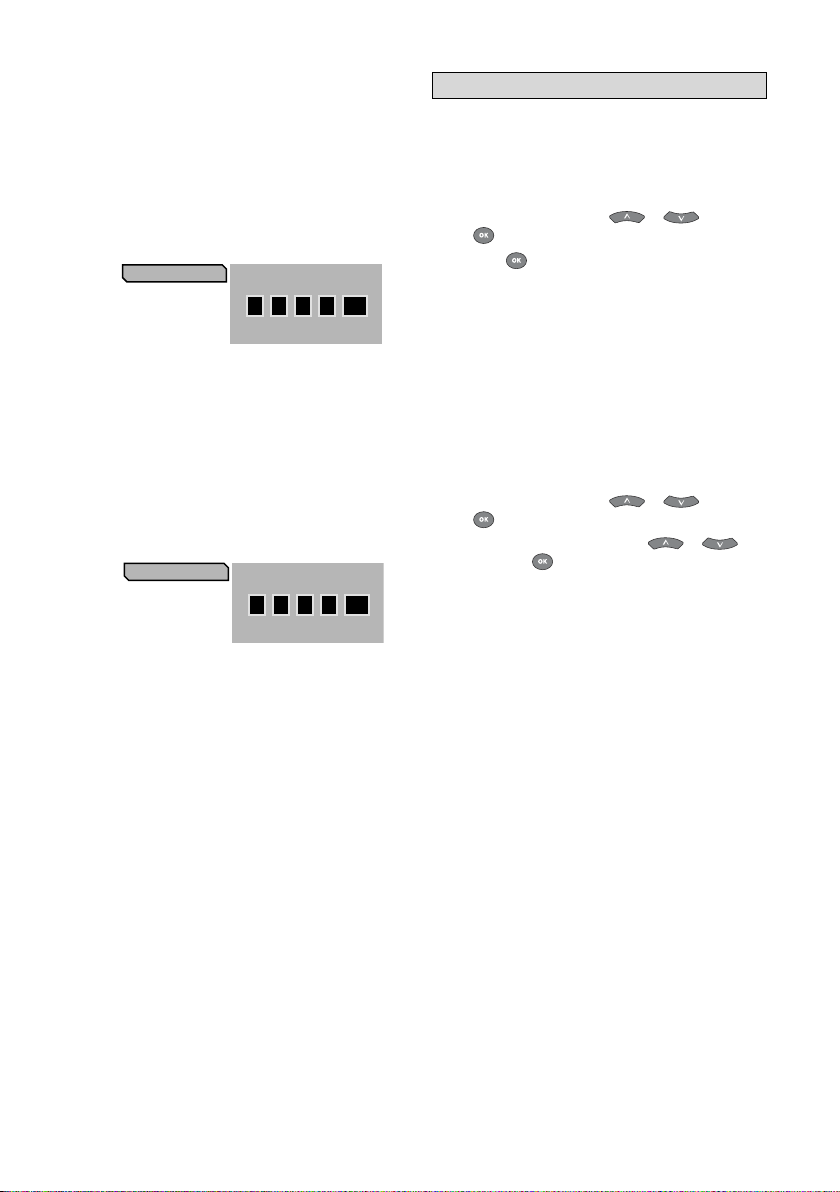
Password Protection
Change Password
Create New Password
OK
* *
Lock Player
Create New Password
OK
* *
Locking your player protects all of your ClearPlay
settings, preventing them from being modied without
the password.
Locking the Player
Press 1. ClearPlay Menu on your remote control.
Highlight 2. Password with
.
Press 3.
on Lock Player.
Enter a four digit password of your choice using 4.
the numeric keys on your remote control.
Re-enter the password.5.
or and press
Changing your Password
Press 1. ClearPlay Menu on your remote control.
Highlight 2. Password with
.
Highlight 3. Change Password with
and press
Enter a four digit password of your choice using 4.
the numeric keys on your remote control.
Re-enter the password.5.
.
or and press
or
Page 27
- 23 -
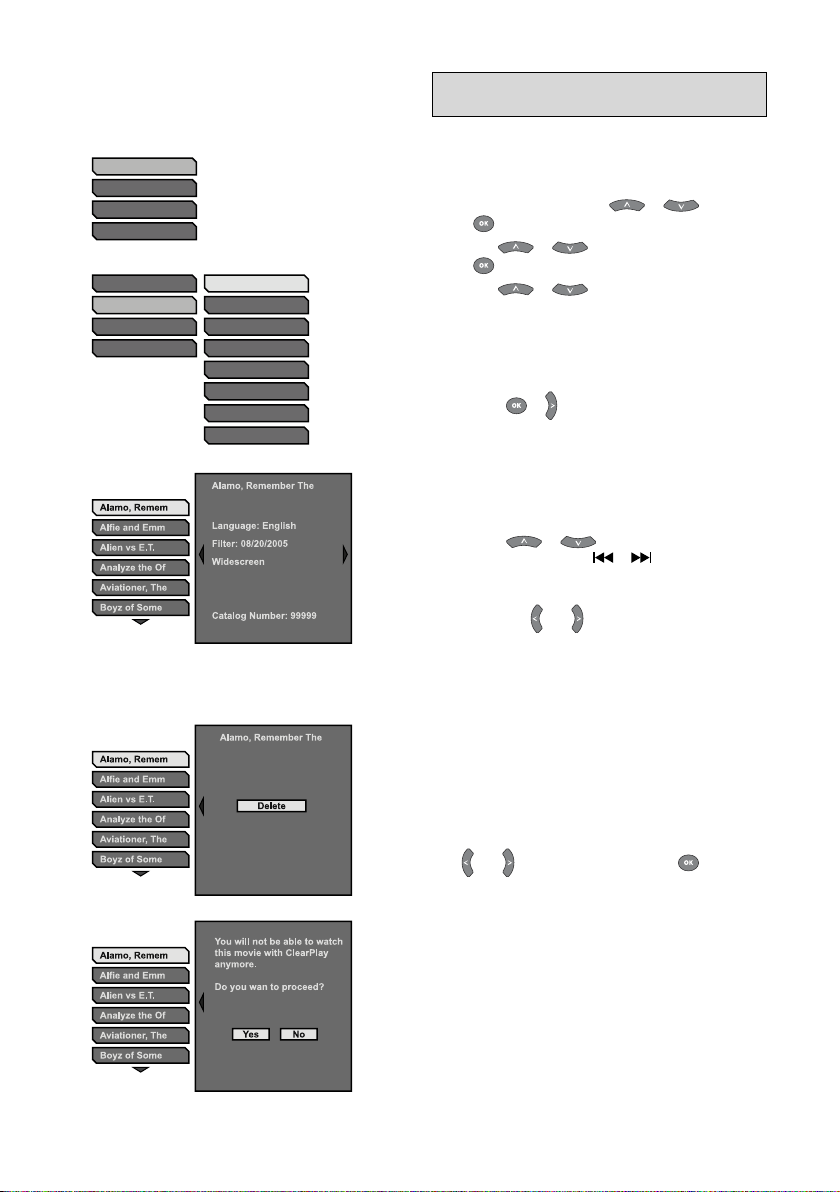
Filter Settings
Movies
Blocking
Password
Filter Settings
Movies
Blocking
Password
Movies ABC
Movies DEF
Movies GHI
Movies JKL
Movies MNO
Movies PQR
Movies STU
Movies WXYZ
(43)
(27)
(15)
(12)
(8)
(80)
(20)
(15)
Viewing/Deleting ClearPlay Filters from your
player
Use these instructions to view what Filter titles are
loaded onto your DVD player and delete them if
desired.
Press 1. ClearPlay Menu on your remote control.
Highlight 2. Password with
.
Use 3.
or
.
Use 4.
correspond to the rst letter of the movie title
or
you are looking for.
Note: The number next to the dierent letter selections
indicates how many movie Filters are on the player for
that particular letter selection.
Press 5.
or button on your remote control to
reveal all the movie Filters on the player whose
titles correspond to the letters you have selected.
or and press
to highlight Movies and press
to select the letters that
Press 6.
movie Filter or press
to choose a particular
or
or to jump forward
or backward by one page
Once you have highlighted a particular movie 7.
Filter, use
and to view specic information
about the Filter. See page 24 for details about
what information is available for each Filter.
TO DELETE THE FILTER:
If you wish to delete the Filter, press the Clear button
on your remote control.
and to select Yes or No and press .
Use
Note: You may also delete Filters while viewing the list of
movie titles on a CD or FilterStik.
Page 28
- 24 -
Parental Advisories
Alamo, Remember The
Language: English
Filter: 08/20/2005
Widescreen
Catalog Number: 99999
Alamo, Remem
Alfie and Emm
Alien vs E.T.
Analyze the Of
Aviationer, The
Boyz of Some
Specific Content NOT Filtered
Strong Action Violence
Alamo, Remem
Alfie and Emm
Alien vs E.T.
Analyze the Of
Aviationer, The
Boyz of Some
General Content Not Filtered
Intense Action / Adventure
Scary Moments
Comical Fighting / Action
Alcohol consumption
Alamo, Remem
Alfie and Emm
Alien vs E.T.
Analyze the Of
Aviationer, The
Boyz of Some
Filter Title Page
This page shows the title of the Filter, the Filter release
date, and gives general information about the DVD
movie that the Filter was created for, such as the
catalog number, the aspect ratio, etc.
Specic Content Not Filtered
This page shows specic content that will not be
available for ltering on this title, even with a ClearPlay
Filter loaded. Due to the nature of some movies,
there can be certain content that will not be filtered
regardless of your ClearPlay Filter settings. For example,
not all violence will be filtered in a movie about war
due to the pervasive amounts of strong action violence
in the movie. When you insert a DVD movie into the
player with ClearPlay Activated, it will display Parental
Advisories for any Specic Content Not Filtered.
General Content Not Filtered
This page shows general content in the movie that will
not be ltered, regardless of your Filter Settings. This
information is provided to help you make informed
decisions about what DVD movies you would like to
watch.
Page 29

- 25 -
Page 30

- 26 -
FORMATS YOU CAN PLAY
While advances have been made to ensure that your disc player is compatible with the largest number of discs
possible, it cannot be guaranteed that you will be able to play discs which might not be compliant with audio CD
standards. In the case of writable and re-writable discs, compatibility with this player depends on the CD/DVD writer,
the authoring/writing software and the disc used.
DVD-VIDEO MP3 Files
Digital video discs -12 cm and 8 cm, single or double
sided, single or dual layer. DVD’s are high-density
optical discs on which high quality picture and audio
are recorded by means of digital signals.
DVD±R/W
Digital video discs -12 cm and 8 cm, single or double
sided, single or dual layer. DVD’s are high-density
optical discs on which high quality picture and audio
are recorded by means of digital signals.
Video CD (VCD) / Super Video CD (SVCD)
VCD stands for Video Compact Disc which contains
video footage, still images, audio tracks and interactive
menus.
Audio CD’s / HDCD
Standard Red Book Audio CD’s (8 and 12cm). This DVD
Player is also capable of playing HDCD encoded discs,
these discs have an improved sampling rate for better
listening experience.
CD-R & CD-RW
Most CD-R (one recording only) and CD-RW discs
(re-writable). This player can play most CD-R discs.
CD-R’s written during a multi-session recording can also
be played, provided that the session has ended before
the disc is played (depending on the burning software).
However, depending on the CD writer, computer and
the disc used, you may nd that not all discs will play
successfully. When playing a CD-R disc, it is completely
normal for the unit to take up to 20 seconds to
recognize the disc before starting to play. If the disc is
not recognized after a period of 20 seconds, remove
the disc, and then insert it again.
Irrespective of the actual recording capacity of •
the CD-R, do not use its full capacity.
CD-R’s should be preferably used instead of •
CD-RW’s (re-writable CD’s) as, in certain cases,
CD-RW playback may be faulty.
Use reliable, good-quality CD burning software.•
Close all other applications on the computer to •
ensure reliable CD-R disc recording.
Files on the USB Flash Drive
This player is compatible with USB 2.0 devices. Only FAT
or FAT32 format is supported.
CD-R and CD-RW discs containing audio les in MP3
format. As for CD-R MP3 discs, please follow all the
recommendations for CD-R above, along with the
comments below:
Your MP3 les should be ISO 9660 or JOLIET •
format. ISO 9660 format and Joliet MP3 les are
compatible with Microsoft’s DOS and Windows,
as well as with Apple Mac. These two formats are
the most widely used.
MP3 lenames should not exceed 10 characters, •
and should end with the “.mp3” extension.
General name format: “Title.mp3”. When
composing your title ensure that you use 8
characters or less, have no spaces in the name,
and avoid the use of special characters including
( . / \ = +).
Use a decompression transfer rate of at least •
128 kb/sec (kilobytes/second) when recording
MP3 les. Sound quality with MP3 les
basically depends on the rate of compression
/ decompression you choose. Obtaining audio
CD quality sound requires an analog/digital
sampling rate, that is conversion to MP3 format,
of at least 32 kb/sec and up to 160 kb/sec. Files
with sampling rates below 32 kb/sec will not play
properly.
Do not try recording copyright-protected MP3 •
les. “Secured” les are encrypted and codeprotected to prevent illegal copying. You must
not copy such les
Important:
The above recommendations cannot be taken as a
guarantee that the DVD player will play MP3 recordings,
or as an assurance of sound quality. You should note that
certain technologies and methods for MP3 le recording
on CD-R’s prevent optimal playback of these les on your
DVD player (i.e. degraded sound quality and even, in some
cases, inability of the player to read the le).
JPEG Files
CD-R and CD-RW with JPEG les. JPEG is a compressed
image le format.
Note: Display time may vary according to the le size
of JPEG les.
Page 31

- 27 -
PROBLEMS
If it appears that your DVD-Video player is faulty, rst consult this checklist. It may be that something simple has been
overlooked.
Under no circumstances should you try to repair the player yourself; as this will invalidate the warranty. Only
qualied service personnel can remove the cover or service this player.
NO POWER
Check if the power button on the front of the •
player is set to on.
Check if power plug of the mains cord is properly •
connected.
Check if there is power at the AC outlet by •
plugging in another appliance.
NO PICTURE
Check if the TV is switched on.•
Select the correct AV input on the TV.•
Check the video connection or cable.•
Check if channel selector is set to AV on the TV. •
(See your TV manual for instructions).
DISTORTED PICTURE
Press the VIDEO button to select the correct •
video output mode.
Check the disc for ngerprints and clean with soft •
cloth, wiping from center to edge.
Sometimes a small amount of picture distortion •
may appear. This is not a malfunction.
Ensure that ONLY one video output is connected.•
If connected through a VCR or other recording •
device, try connecting directly to the television
(This may be a result of anti-piracy measures.)
NO COLOR IN PICTURE
Check the video settings in the setup menu.•
The disc format is not according to the TV-set •
used (PAL/NTSC).
Ensure DVD player is not connected through VCR.•
PICTURE SWING
Relocate the unit further away from possible •
interference or emission source (e.g. Radio, Power
Amplier, Radiator, powerful magnets, etc.).
DISC CANNOT BE PLAYED
Ensure disc is placed properly into the disc tray.•
NO AUDIO ON DIGITAL OUTPUT
Check the digital connections•
Check the Digital Out menu to make sure that •
the digital output is correctly set.
Check if the audio format of the selected audio •
language matches your unit capabilities.
THE PLAYER DOES NOT RESPOND TO THE
REMOTE CONTROL
Aim the remote control directly at the sensor on •
the front of the player.
Avoid all obstacles which may interfere with the •
signal path.
Inspect or replace the batteries.•
NO SOUND
Check audio connections.•
If using a Hi-Fi amplier, try another sound •
source.
Clean the disc.•
Check if the disc is defective by trying another •
disc
NO RETURN TO START-UP SCREEN WHEN DISC
IS REMOVED
Check to see if the program requires another disc •
to be loaded.
Reset by unplugging the player from the power, •
then connect the power again.
FUNCTION DISTURBED
The normal function of the product may be •
disturbed by external interference.
Disconnect and reconnect the power cord (may •
be required to resume normal operation).
Page 32

- 28 -
FREQUENT QUESTIONS ON CLEARPLAY FUNCTION
Q. If the movie Blocking is set below R, will the player
allow me to watch an R rated movie?
A. Yes, you can enter your password to override
movie Blocking, or if you load a ClearPlay Filter, it
will allow you to watch a movie that is above your
current movie Blocking setting.
Q. Why did the player allow me to watch my rated
R movie without a password when I had movie
Blocking set?
A. Movie Blocking checks the DVD authoring to
block a movie based on the DVD rating. If the DVD
manufacturer did not author a rating on the DVD,
it may not be blocked by your movie Blocking
settings.
Q. Do I have to create a password to use ClearPlay?
A. No, you can use ClearPlay without creating a
password. However, it is recommended that you
set a password to protect your settings.
Q. Do I have to have a ClearPlay Filter loaded in the
player in order to watch a movie with ClearPlay?
A. Yes, a ClearPlay Filter for the inserted DVD is
required to watch a movie with ClearPlay. A Filter is
not required to watch a DVD movie with ClearPlay
turned OFF, or Normal Play selected.
Q. Will the ClearPlay DVD player lter any content out
of DVD movies if I don’t have a Filter?
A. No, you must have a ClearPlay Filter for the title
that you want to watch with ClearPlay ltering.
Q. If I have ClearPlay ON, can I still watch a movie
without ClearPlay?
A. Yes, if ClearPlay is ON in the parental menu, each
time you insert a DVD, you will have the option
to watch the movie with ClearPlay or without
ClearPlay (“Normal Play”).
Q. What are the Parental Advisories on the Filter?
A. ClearPlay provides you with additional information
to help you decide if a movie is appropriate for
your home. The Parental Advisories listed are
themes that you might want to be aware of before
watching a movie, including specic content that
might not be ltered, even with a ClearPlay Filter
loaded. (See page 24)
Q. When I insert the CD or USB ash drive it says that
the DVD player memory is full.
A. If the DVD player memory is full, you will need
to delete some Filters from the player memory
before you can add new Filters. See page 23 for
information on Viewing/Deleting ClearPlay Filters.
Q. Where can I nd out what ClearPlay Filters are
available?
A. ClearPlay Filters are available for most popular
movies. You can look online at www.clearplay.com
to see what Filters are currently available.
Q. How can I know if ClearPlay is ON when I’m
watching a DVD movie?
A. If ClearPlay is ON in the Parental Control Menu,
At the beginning of the DVD movie, it will say
ClearPlay Filtering ON at the top of the screen. You
can see this message at any time during playback
by pressing the Info button on the remote control.
Q. How many ClearPlay Filters can my DVD player
hold?
A. Each Filter is a dierent size. In the Parental Control
Menu, you can see how much free space there is
available for adding new Filters. Your ClearPlay
DVD player can hold approximately 300 Filters at
one time, but your ClearPlay FilterStik™ can hold
thousands of Filters.
Q. Can I leave my FilterStik™ in the player to access
Filters?
A. Yes, if the FilterStik™ or other ash memory card
is in the player, each time you insert a DVD it will
automatically load the correct Filter from the
FilterStik™.
Q. I have the Filter for the DVD movie, but when I
insert the DVD it says there is no Filter loaded.
A. Make sure you have added the latest version of
the Filter for your DVD movie to your DVD player.
You can press Browse from the main player menu
to see what Filters are loaded on your FilterStik™.
To see which ClearPlay Filters are currently loaded
onto the player, see page 23 for Viewing/Deleting
ClearPlay Filter. If the Filter is not listed in this
menu, get the latest Filter from ClearPlay web site
and add it to the player. Often new versions of
DVD movies are released. We continually update
our web site with the latest DVD releases.
Q. I am watching a movie with ClearPlay, but it is not
ltering content.
A. Try deleting the Filter from the player, then
re-downloading the Filter from ClearPlay. If you
continue to have trouble with ClearPlay Filtering,
contact ClearPlay Customer Support at (888) 425-
3270.
Page 33

- 29 -
CLEARPLAY END USER LICENSE AGREEMENT
YOUR RIGHT TO USE THE CONTENT FILTERING SOFT WARE AND CONTENT FILTERS INSTALLED ON THIS DEVICE IS
GRANTED SOLELY PURSUANT TO THE TERMS OF THIS END USER LICENSE AGREEMENT (“AGREEMENT”). YOUR RIGHT
TO USE ADDITIONAL CONTENT FILTERS ON THIS DEVICE IS LIMITED SOLELY TO THOSE CONTENT FILTERS LICENSED
BY OR THROUGH CLEARPLAY INC. (AND/OR ITS SUPPLIERS) AND YOUR RIGHT TO USE SUCH ADDITIONAL CONTENT
FILTERS IS GRANTED SOLELY AND SHALL BE GOVERNED BY THE END USER LICENSE AGREEMENT ACCOMPANYING
SUCH CONTENT FILTERS. YOU UNDERSTAND AND AGREE THAT BY USING THE CONTENT FILTERING SOFTWARE AND /
OR THE CONTENT FILTERS INSTALLED ON THIS DEVICE, YOU (“LICENSEE”) HAVE AGREED TO BE BOUND BY THE TERMS
AND CONDITIONS OF THIS AGREEMENT.
Denitions.1.
Filters. The term “Filter” means each aggregated data set specic to a work of authorship, licensed by or through Cle arPlay Inc. A.
and or its suppliers, that permits the selection of the level and types of content management desired by Licensee with respect
to such work of authorship.
Software. The term “Software” means the proprietary combination of rmware and other code installed on this device that B.
is licensed by or through ClearPlay Inc. and /or its suppliers which enables a Filter to provided a specied level of content
management.
Device. The term “Device” means the electronic medium on which the software and Filters are bundled by ClearPlay Inc or its C.
authorized suppliers.
Internal Use Rights. Licensee is herby granted a limited, personal use only, non-exclusive, non-transferable, non-sub-licensable 2.
right and license to use the Software and Filters installed on the Device on the date of purchase of the Device by Licensee.
Licensee understands and agrees that the foregoing license that does not extend to use of any additional or dierent software,
technology or lters with such Software that performs the same or similar functionality as the rights in the Software and Filters.
Except for the foregoing limited license grant, Licensee obtains no other rights in the Software and Filters installed on this Device
(including any copies thereof) and the suppliers of such Software or Filters retain all right, title, interest, including all patent rights,
copyrights and other such rights in and to the Software and Filters installed on this Device. The foregoing license is not a sale of
such Software or Filters.
Restrictions. Licensee shall not, and shall not attempt to or permit any third party to, reverse engineer, reverse assemble, de-3.
compile, or otherwise attempt (i) to defeat, avoid, bypass, remove, deactivate or otherwise circumvent any software protection
mechanisms in the Software or Filters installed on this Device, including any used to restrict or control the use of the Software
solely with Filters licensed by or through ClearPlay Inc. and /or its supplier, or (ii) to derive the source code or the underlying
ideas, algorithms, structure or organization from such Software or Filters, except to the extent any of the foregoing restrictions are
prohibited by applicable law.
Termination. Licensee’s license may be immediately terminated upon any attempted violation of the terms of this Agreement.4.
NO WARRANTIES, NONE OF THE SUPPLIES OF THE SOFTWARE OR FILTERS INSTALLED ON THIS DEVICE MAKE ANY WARRANTIES OR 5.
CONDITIONS, EXPRESS, IMPLIED OR STATUTORY, REGARDING SUCH SOFTWARE OR FILTERS, INCLUDING WITHOUT LIMITATION THE
IMPLIED WARRANTIES OR CONDITIONS OF MERCHANTABILIT Y, FITNESS FOR A PARTICULAR PURPOSE, TITLE, NON-INFRINGEMENT
OR ACCURACY.
No Indirect Damages. None of the Suppliers of the Software and Filters installed on this device shall be liable to any party 6.
(including Licensee) for any loss of data, loss of prots, cost of cover or other special, incidental, punitive, consequential, or indirect
damages arising out of this Agreement or the use of the Software or Filters installed on this device.
Third Party Beneciary. ClearPlay Inc. shall be a direct and intended third party beneciary of this Agreement and may enforce it 7.
directly against any Licensee.
Government Restricted Rights. Programs delivered to the U.S. Defense Dept. are delivered with Restricted Rights and the following 8.
applies: “Restricted Rights Legend: Use, duplication or disclosure by Government is subject to restrictions as currently set forth
in subparagraph (c) (1) (ii) of DFARS 252-227-7013, Rights in Technical data and computer Software (October 1988). ClearPlay
Inc., 5284 South 320 West Suite C134, Salt Lake City Utah 84107. Programs delivered to a US Government Agency not within the
Defense, Dept. are delivered with “Restricted Rights” as dened in FAR 52.227-14, R ights in Data-General, including Alternate III
(June 1987),”
Export Control. Customer shall comply fully with all laws and regulations of the United States and other countries “Expor t Laws”) 9.
to assure that neither the Programs, nor any direct products thereof are (1) exported, directly or indirectly, in violation of Export
Laws, or (2) are used for any purpose prohibited by Export Laws, including, without limitation, nuclear, chemical, or biological
weapons proliferation.
General. This license is governed by the laws of the State of Utah without regard to its conict of law rules. This license is the 10.
entire agreement between the Suppliers and Licensee. Licensee may not assign this license except in connection with the sale
of the product accompanying this license. If any provision of this License Agreement is held to be invalid or unenforceable, the
remaining provisions of this License Agreement will remain in full force.
Patent 6.898.799. International patents pending.11.
Page 34

© ClearPlay Inc. All Rights Reserved.
 Loading...