

Page 1
CONNECT CobraNet and CONNECT AVB
Network Audio Bridge for CONVERGE PRO & SR Products
Quick-Start Guide
Page 2

Table of Contents
THE CONNECT COBRANET AND CONNECT AVB ..........................1
QUICK-START OVERVIEW
Quick-Start Summary ...........................................................................3
UPDATE THE CONVERGE PRO FIRMWARE
SET THE DEVICE ID
CONNECTING THE CONNECT COBRANET/AVB UNIT
UPDATING THE CONNECT COBRANET/AVB FIRMWARE
ADDING CONNECT NETWORK BRIDGES TO SITES
adding the Bridge ................................................................................7
editing the cOnnect netwOrk Bridge in Site ....................................7
cOBranet SettingS ..........................................................................8
aVB SettingS ................................................................................10
UPGRADING FROM OLDER VERSIONS
OF CONVERGE FIRMWARE
upgrading frOm cOnVerge prO 3.X firmware .................................12
upgrading frOm cOnVerge prO 2.X firmware .................................13
upgrading frOm cOnVerge prO 1.X firmware .................................13
PART NUMBERS
CLEARONE LOCATIONS
..............................................................................14
................................................................1
....................................3
..........................................................................4
..................5
..............6
......................7
...........................................................12
................................................................14
Page 3

QUICK-START GUIDE
THE CONNECT COBRANET AND CONNECT AVB
The CONNECT CobraNet® and CONNECT AVB network bridges add
networked audio capabilities to CONVERGE PRO and CONVERGE SR
products enabling them to transmit audio through Ethernet networks.
IMPORTANT: The CONNECT CobraNet and CONNECT AVB
bridges only can be used with CONVERGE Pro/SR systems
operating at version 4.2 or higher software and firmware.
The latest version of the CONVERGE Pro firmware can be found on the
ClearOne website at:
http://www.clearone.com/resources#professional_audio
QUICK-START OVERVIEW
Installing and using the CONNECT CobraNet and CONNECT AVB
bridges in your CONVERGE Pro/SR site is subject to the following rules:
1. The CONNECT CobraNet and CONNECT AVB can only be used
with CONVERGE Pro/SR systems operating at version 4.2.X or
greater, and requires that the firmware on the CONVERGE Pro/SR
be updated.
2. You must have a CONVERGE Pro 840T, 880, 880T, 880TA, 8i, TH20,
VH20 and/or SR1212, SR1212A in the site.
3. The CONNECT CobraNet and AVB bridges support only 8 Ethernet
audio channels in and 8 Ethernet channels out.
4. Either the CONNECT CobraNet or AVB can be used, depending on
the particular networks architecture.
1
Page 4
CONNECT NETWORK BRIDGES
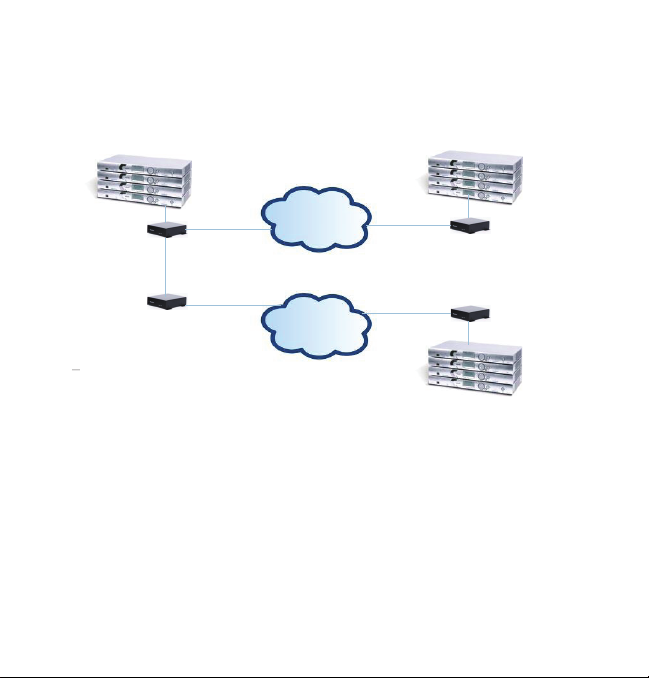
Both CobraNet and AVB networks can be audio sources to CONVERGE
Pro/SR mixers using the appropriate types of audio network bridges. The
following diagram shows how several CONVERGE Pro/SR stacks can
connect over AVB and CobraNet networks.
CONVERGE Pro/SR
CONVERGE Pro/SR
AVB
AVB
CONNECT
Network Bridge
CONNECT
Network Bridge
Connecting CONVERGE Pro/SR units in different
rooms that are on different networks using
multiple CobraNet
Network
Link IN
Connection
Link OUT
CobraNet
CobraNet
Network
Connection
Link IN
and AVB network bridges
Up to eight CONNECT units can be attached to a single CONVERGE
Pro/SR stack with each set to a unique Device ID using the DID selector
rotary switch
2
AVB
Ethernet LAN
Network 1
CobraNet
Ethernet LAN
Network 2
AVB
Network
Connection
CobraNet
Network
Connection
Link IN
CONNECT
Network Bridge
CONNECT
Network Bridge
Link IN
CobraNet
CONVERGE Pro/SR
AVB
Page 5
QUICK-START GUIDE
Quick Start Summary
These steps must be done in the following order to use the CONNECT
network audio bridge in your CONVERGE Pro Site:
1. Update the CONVERGE Pro firmware to version 4.2.X using
CONVERGE Console.
2. Set the Device ID of the CONNECT CobraNet and/or CONNECT
AVB using the Device ID rotary selector switch at the back of the
bridge.
3. Connect the CONNECT CobraNet and/or CONNECT AVB to the
updated CONVERGE Pro/SR via the Expansion bus (E-bus).
4. Update the CONNECT network bridge firmware
5. Configure the CONNECT CobraNet and CONNECT AVB with
CONVERGE Console.
UPDATE THE CONVERGE PRO FIRMWARE
Update your CONVERGE Console to version 4.2 or higher. CONNECT
CobraNet and CONNECT AVB network audio bridges are not recognized
by systems running older versions and the 4.2.X versions offer significant
upgrades from previous versions.
ClearOne strongly encourages users to upgrade all firmware to the latest
release version.
Instructions for updating from version 1.X 2.X and 3X are detailed later in
this document.
3
Page 6

CONNECT NETWORK BRIDGES
NOTE: Save the CONVERGE Console site file before performing
any firmware upgrade.
1. Download the 4.2.X firmware file to the stack of units.
2. The units will default and reboot after the download of 4.2.X
firmware.
3. Units are fully upgraded.
4. Verify units have been upgraded by checking the firmware version
on the front panel.
Reconnect all E-bus cables, if needed, to complete the stack of units.
SET THE DEVICE ID
Set each CONNECT CobraNet and CONNECT AVB unit to a unique ID
using the Device ID selector rotary switch on the back of the unit. (Range
0-7) Each CONNECT unit in any site needs a unique Device ID. Only 8
units are allowed in any site.
Device ID Rotary
Selection Switch
4
Page 7

QUICK-START GUIDE
CONNECTING THE CONNECT COBRANET/AVB UNIT
Connect the CONNECT CobraNet/AVB units to the CONVERGE Pro/
SR stack via the E-bus connections using CAT5/CAT6-24AWG solid
conductor RJ45 cables. Power to the CONNECT CobraNet/AVB is
supplied by a standard power adapter supplied with the unit.
Device ID
Switch
5V DC
Power
Input
E-bus LINK OUT
(Not required if the bridge
is at the end of the stack)
NOTE: The network connectors for the CONNECT CobraNet and
the CONNECT AVB appear to be identical but they are not. Each is
electronically unique to the type of network being bridged. Only use
the CONNECT CobraNet with CobraNet networks, and CONNECT
AVB with AVB networks.
E-bus LINK IN from Stack
Bridge connection
to Ethernet Network
(CobraNet shown)
5
Page 8

CONNECT NETWORK BRIDGES
UPDATING CONNECT COBRANET/AVB FIRMWARE
NOTE: All CONNECT CobraNet/AVB Pro units in the site must be
running firmware level 4.X to be compatible with the CONVERGE
Pro/SR units in the site.
1. Connect the E-bus cable between the CONVERGE Pro units and
the CONNECT audio network bridge.
2. Connect the CONVERGE Pro units with CONVERGE Console.
3. Open the Firmware Loader screen.
4. Browse for the CONNECT firmware file: cobranet.mdo for the
CONNECT CobraNet, and avb.mdo for the CONNECT AVB.
5. Download the CONNECT audio network bridge firmware.
6. The CONNECT audio network bridge will default and reboot after
the download of the firmware. (The version of the firmware can be
verified later using the Unit Properties screen for the CONNECT
network bridge.)
7. Units are fully upgraded. (All units connected via the E-bus on the
site are simultaneously updated.)
8. Restore the saved site file to the system using CONVERGE
Console.
6
Page 9

QUICK-START GUIDE
ADDING CONNECT NETWORK BRIDGES TO SITES
Each CONNECT CobraNet and/or AVB network bridge must be added
to the site using the CONVERGE Console 4.2.X and later software.
This software also provides the capability selecting the audio channels
and other characteristics. Refer to the online help available with the
CONVERGE Pro/SR software for adding devices.
Adding the Bridge
Using the CONVERGE Console software, ADD the CONNECT CobraNet
and/or AVB network bridge to the site using the drop-down menu.
Editing the CONNECT Network Bridge in Site
Select the CONNECT CobraNet and/or AVB audio network bridge from
the Site View tab in Console, and the device appears under the Site
button on the right-hand portion of the screen.
Click on the device box and the Unit Properties appear for the device.
7
Page 10

CONNECT NETWORK BRIDGES
CobraNet Settings
The next two figures show the Unit Properties tabs for the CONNECT
CobraNet bridge.
Set the Device ID (DID) to match that of the rotary selection switch of the
CONNECT CobraNet device.
8
Page 11

QUICK-START GUIDE
RX and TX Bundle Numbers
When a receiver on one interface is assigned the same bundle number
as that of a transmitter on another interface, the CobraNet protocol
automatically establishes a connection for transmitting audio data
between the interfaces.
ClearOne CobraNet is a single-bundle, eight-channel device with a
fixed 48 kHz sample rate. The eight channels of audio correspond to
E-bus assignments S through Z. Any audio placed on these busses will
be transmitted in the CobraNet bundle. Any audio received from the
CobraNet bundle can be taken off the S to Z bus on any CONVERGE Pro
Unit.
Latency
The buffering and transmission of audio data typically incurs a delay of
256 samples or 5 1/3 milliseconds called Bundle Latency. This delay can
be reduced by sending smaller packets more often but comes at the cost
of higher processing demands and greater network demands
Channel Assignment
Complete the audio channel assignments in the Matrix in CONVERGE
Console for the channels present in the network bridge. When a CobraNet
is added to the site any audio on the S Bus will automatically be placed on
the CobraNet transmit bundle on Audio channel 1.
9
Page 12

CONNECT NETWORK BRIDGES
AVB Settings
The next two figures show the Unit Properties tabs for the CONNECT AVB
bridge.
Set the Device ID (DID) to match that of the rotary selection switch of the
CONNECT AVB device.
10
Page 13

QUICK-START GUIDE
AVB Mode
“AVB” uses the AVB protocols for streaming of audio with AVB switches.
“Legacy” simplifies the AVB packets allowing them to pass through
“legacy” LAN switches and routers
Reset
Used to force initialization of audio streaming after Talker and Listener and
TX changes are made.
Talker and Listener Stream ID’s
AVB endpoints are able to pass streams between each other. The Talker
sends the stream and the Listener receives the stream. On a network,
each stream has a unique 64 bit (hex) ID. A Talker must be assigned a
unique ID. For the Listener to receive the stream is must be assigned the
same ID as the desired Talker. The CONVERGE AVB is both a Talker and
a Listener
Number of Audio Channels per AVB Talker
When the Converge AVB is a Talker it can set to use 2, 4, 6, or 8 audio
channels. On the E-bus connected CONVERGE Pro, the audio channels
start with the S Bus input.
Number of Audio Channels per AVB Listener
When the Converge AVB is a Listener it can receive 2, 4, 6, or 8 audio
channels. On the E-bus connected CONVERGE Pro the audio channels
start with the S Bus output.
11
Page 14

CONNECT NETWORK BRIDGES
Channel Assignment
Complete the audio channel assignments in the Matrix in CONVERGE
Console for the channels present in the network bridge. Eight audio
channels are supported and are assigned to E-bus channels S through Z.
UPGRADING FROM OLDER VERSIONS OF CONVERGE FIRMWARE
Please follow the steps listed below to upgrade your firmware:
NOTE: Save the CONVERGE Console site file before performing any firmware
upgrade.
Upgrading from CONVERGE Pro 3.X firmware
1. Remove any 1.X, 2.X and 4.X units from the stack by disconnecting the
expansion bus link cable from the 3.X units.
2. Re-connect to the 3.X stack with CONVERGE Console.
3. Download the 4.2.X firmware file to the stack of units.
4. The units will default and reboot after the download of 4.2.X firmware.
5. Units are fully upgraded.
12
Page 15

QUICK-START GUIDE
6. Verify units have been upgraded by checking the firmware version on the
front panel.
Reconnect all E-bus cables, if needed, to complete the stack of units.
Upgrading from CONVERGE Pro 2.X firmware
1. Remove any 1.X, 3.X and 4.X units from the stack by disconnecting the
expansion bus link cable from the 2.X units.
2. Re-connect to the 2.X stack with CONVERGE Console.
3. Download the 4.X firmware file to the stack of units.
4. The units will default and reboot after the download of 4.X firmware. The 2.X
to 4.X upgrade requires the firmware to be loaded twice to complete the
version upgrade.
5. Units are fully upgraded.
6. Verify units have been upgraded by checking the firmware version on the
front pane
Reconnect all E-bus cables, if needed, to complete the stack of units.
l.
Upgrading from CONVERGE Pro 1.X firmware
1. Remove any 2.X, 3.X and 4.X units from the stack by disconnecting the
expansion bus link cable from the 1.X units.
2. Re-connect to the 1.X stack with CONVERGE Console.
3. Download the 4.X firmware file to the stack of units.
4. The units will default and reboot after the download of 4.X firmware. The 1.X
to 4.X upgrade requires the firmware to be loaded twice to complete the
version upgrade.
13
Page 16

CONNECT NETWORK BRIDGES
5. Reconnect to the stack with CONVERGE Console. Download 4.X a second
time to the units. The units will reboot.
6. Units are fully upgraded.
7. Verify units have been upgraded by checking the firmware version on the
front panel.
Reconnect all E-bus cables, if needed, to complete the stack of units.
PART NUMBERS
910-151-805 CONNECT CobraNet Network Bridge
910-151-804 CONNECT AVB Network Bridge
CLEARONE CONTACTS
HEADQUARTERS:
Salt Lake City, UT USA
5225 Wiley Post Way
Suite 500
Salt Lake City, UT 84116
Sales: 800-705-2103
Toll Free: 800.945.7730
Fax: 801.977.0087
e-mail: sales@clearone.com
EMEA:
Tel: +44 (0) 1189 036 053
e-mail: global@clearone.co
LATAM:
Tel: 801-974-3621
e-mail: global@clearone.com
Information in this document is subject to change without notice. 800-000-000-20-01 Revision 1.0 June, 2013
© 2013 ClearOne, Inc. All rights reserved.
TechSales
Tel: 800.705.2103
e-mail: techsales@clearone.com
Technical Support
Tel: 800.283.5936
e-mail: tech.support@clearone.co
APAC:
Tel: +852 3590 4526
e-mail: global@clearone.com
Middle East:
Tel: +852 3590 4526
e-mail: global@clearone.com
14
 Loading...