

Page 1
CHAT® 150 | CHATAttach® 150 - Group Speakerphone
USER’S MANUAL
Page 2

Telephone 1.800.283.5936
FAX 1.801.974.3669
E-mail tech.support@clearone.com
On the Web www.clearone.com
CHAT 150 | CHATAttach 150 USER’S MANUAL
CLEARONE PART NO. 800-156-201, July 2014, Rev. 2.8
© 2014 ClearOne Inc. All rights reserved. No part of this document
may be reproduced in any form or by any means without written
permission from ClearOne. ClearOne reserves specific privileges.
Information in this document is subject to change without notice.
U.S. PATENTS: D539,274; D556,189; D531,999.
OTHER PATENTS PENDING.
Page 3

Table of ConTenTs
CHAPTER 1: INTRODUCTION
PRODUCT OVERVIEW .............................................................. 1
Service and Support ............................................................. 1
Technical Support .................................................................1
Sales and Customer Service ................................................ 1
Product Returns .................................................................... 1
UNPACKING ..............................................................................3
CHATAttach 150 USB Packout ............................................. 3
REPLACEMENT PARTS & ACCESSORIES ...............................4
CHATAttach Expansion Cable Packout ................................ 4
CHAT 150 CONFIGURATIONS .................................................4
CHAPTER 2: GETTING STARTED
CHAT 150 CONTROLS .............................................................5
LED InDIcators ....................................................................... 5
VoLumE anD mutE Buttons ....................................................... 5
HEaDsEt Button ...................................................................... 5
Vc BrEakout Box....................................................................5
INSTALLING THE CHAT SOFTWARE FOR WINDOWS ............6
CONNECTING THE CHAT 150 TO A PC .................................. 6
CONNECTING THE CHAT 150 TO EXTERNAL DEVICES ........ 7
connEctIng to a tELEpHonE .....................................................7
connEctIng to a VIDEo confErEncIng BrEakout Box (Vc BoB) .9
cHatattacH: connEctIng two cHat DEVIcEs ....................... 12
cHatattacH workIng moDEs................................................ 13
cHatattacH trouBLEsHootIng .............................................. 13
CHAPTER 3: CONFIGURING THE CHAT 150
CONFIGURING YOUR CHAT 150 ...........................................14
DEVICE SETUP ....................................................................... 14
MY DEVICES ........................................................................... 16
OPTIMIZING SOUND QUALITY ..............................................16
Using with Pre-Defined Device Settings ............................. 16
Applying Audio Settings to the CHAT 150 .......................... 16
CHAPTER 4: USING THE CHAT APPLICATION
USING THE CHAT APPLICATION ...........................................17
Using A Third-Party Application .......................................... 17
UPDATE FIRMWARE & DATABASE ........................................18
Check for Firmware Updates .............................................. 18
MANUAL UPDATES ................................................................21
HELP ....................................................................................... 22
ADVANCED ............................................................................. 22
ADVANCED SETTINGS: AUDIO SETTINGS ........................... 23
ADVANCED SETTINGS: DATABASE....................................... 24
EDIT CUSTOM AUDIO SETTING ............................................ 26
ADVANCED SETTINGS: LOG .................................................26
CHAPTER 5: MAINTENANCE
CARING FOR YOUR CHAT 150 ..............................................27
TROUBLESHOOTING ............................................................. 27
INTERRUPTED FIRMWARE UPDATE RECOVERY .................28
CHAPTER 6: APPENDIX
SPECIFICATIONS .................................................................... 29
systEm rEquIrEmEnts ............................................................29
connEctIons ......................................................................... 29
controLs .............................................................................. 29
auDIo .................................................................................... 29
EnVIronmEntaL ....................................................................... 29
procEssIng ...........................................................................29
powEr................................................................................... 29
mEcHanIcaL ...........................................................................29
compLIancE ...........................................................................29
moDEL numBErs ....................................................................29
accEssory part numBErs ...................................................... 29
EUROPEAN COMPLIANCE .................................................... 30
WWW.CLEARONE.COM/RESOURCES/EURODOC.PHP ......30
FCC PART 15/ICES-003 COMPLIANCE..................................30
FCC PART 15.19(A) (3) COMPLIANCE ...................................30
WARRANTY ............................................................................. 30
Page 4

CHAPTER 1: INTRODUCTION
PRODUCT OVERVIEW
Thank you for purchasing the ClearOne CHAT 150 group speakerphone. The CHAT 150 is a speakerphone for individual
or small group use. The CHAT 150 connects to telephones, PCs, and video conferencing systems for rich, full-duplex
audio communications.
You can use the CHAT 150 with a variety of devices and applications, including:
• Enterprise telephones, such as Avaya, Cisco, and others
• Video conferencing systems, such as Tandberg, Sony, Polycom, and others
• Internet telephony applications, such as Skype and Vonage
• VoIP softphones, such as Avaya, Cisco, CounterPath, and others
• Web conferencing, such as IBM/Lotus Workplace, Microsoft Live, and others
• Instant messaging applications with voice
• Audio playback, such as iTunes, Quicktime and others
Service and Support
If you need additional information on how to set up or operate your CHAT 150 group speakerphone, please contact us.
We welcome and encourage your comments so we can continue to improve our products and better meet your needs.
Technical Support
Telephone: 1.800.283.5936 (USA)
Fax: 1.801.977.0087
E-mail: tech.support@ClearOne.com
Web site: www.ClearOne.com
Sales and Customer Service
Telephone: 1.800.945.7730 (USA) or 1.801.975.7200
Fax: 1.800.933.5107 (USA) or 1.801.977.0087
E-mail: sales@ClearOne.com
Product Returns
All product returns require a return material authorization (RMA) number. Please contact ClearOne Technical Support
before attempting to return your product. Make sure you return all the items that shipped with your product.
Chapter 1: Introduction 1
Page 5
IMPORTANT SAFETY INFORMATION
Read the safety instructions before using this product. This personal speaker phone is not designed for making
emergency telephone calls when the power fails. You must make alternative arrangements for telephone access to
emergency services.
• Read and understand all instructions. Follow all warnings marked on the product.
• Unplug the product from the outlet before cleaning. Do not use liquid cleaners or aerosol cleaners. Use only a damp
cloth for cleaning.
• Do not use this product in or near water, for example, near a bathtub, kitchen sink, or swimming pool.
• Place this product on a flat, level, dry surface for ongoing operation.
• Never place product near heat radiators or registers. Allow adequate ventilation for heat dissipation.
• This product should only be operated using a power source specified on the product label. If you are not sure about
the power source at your location, consult your dealer or local power company.
• Do not overload wall outlets and extension cords; this can cause fires or electric shock.
• Never spill liquid on or into the product.
• Do not disassemble this product. Opening or removing covers can expose you to dangerous voltages and other
risks. Incorrect reassembly can cause electric shock during subsequent use. Disassembly voids the warranty.
• Unplug the product from the outlet and contact a qualified service technician under the following conditions:
a. When the power supply cord or plug is damaged or frayed.
b. If liquid has been spilled into the product.
c. If the product does not operate normally by following the operating instructions.
d. If the product has been dropped or damaged.
e. If the product exhibits a distinct change in performance.
• Avoid telephones during an electrical storm. There is a risk of electric shock from lightning.
• Do not use this product to report a gas leak in the vicinity of the leak.
• This product can interfere with electrical equipment such as answering machines, TV sets, radios, computers and
microwave ovens. Do not place the product in close proximity to any of these devices.
• Use only applicable up to 2000m altitude.
• Use only applicable in non-tropical climate conditions
2 Technical Support: 800.283.5936
AVIS: RISQUE DE CHOC
ELECTRIQUE - NE PAS OUVRIR
Save these instructions
Page 6
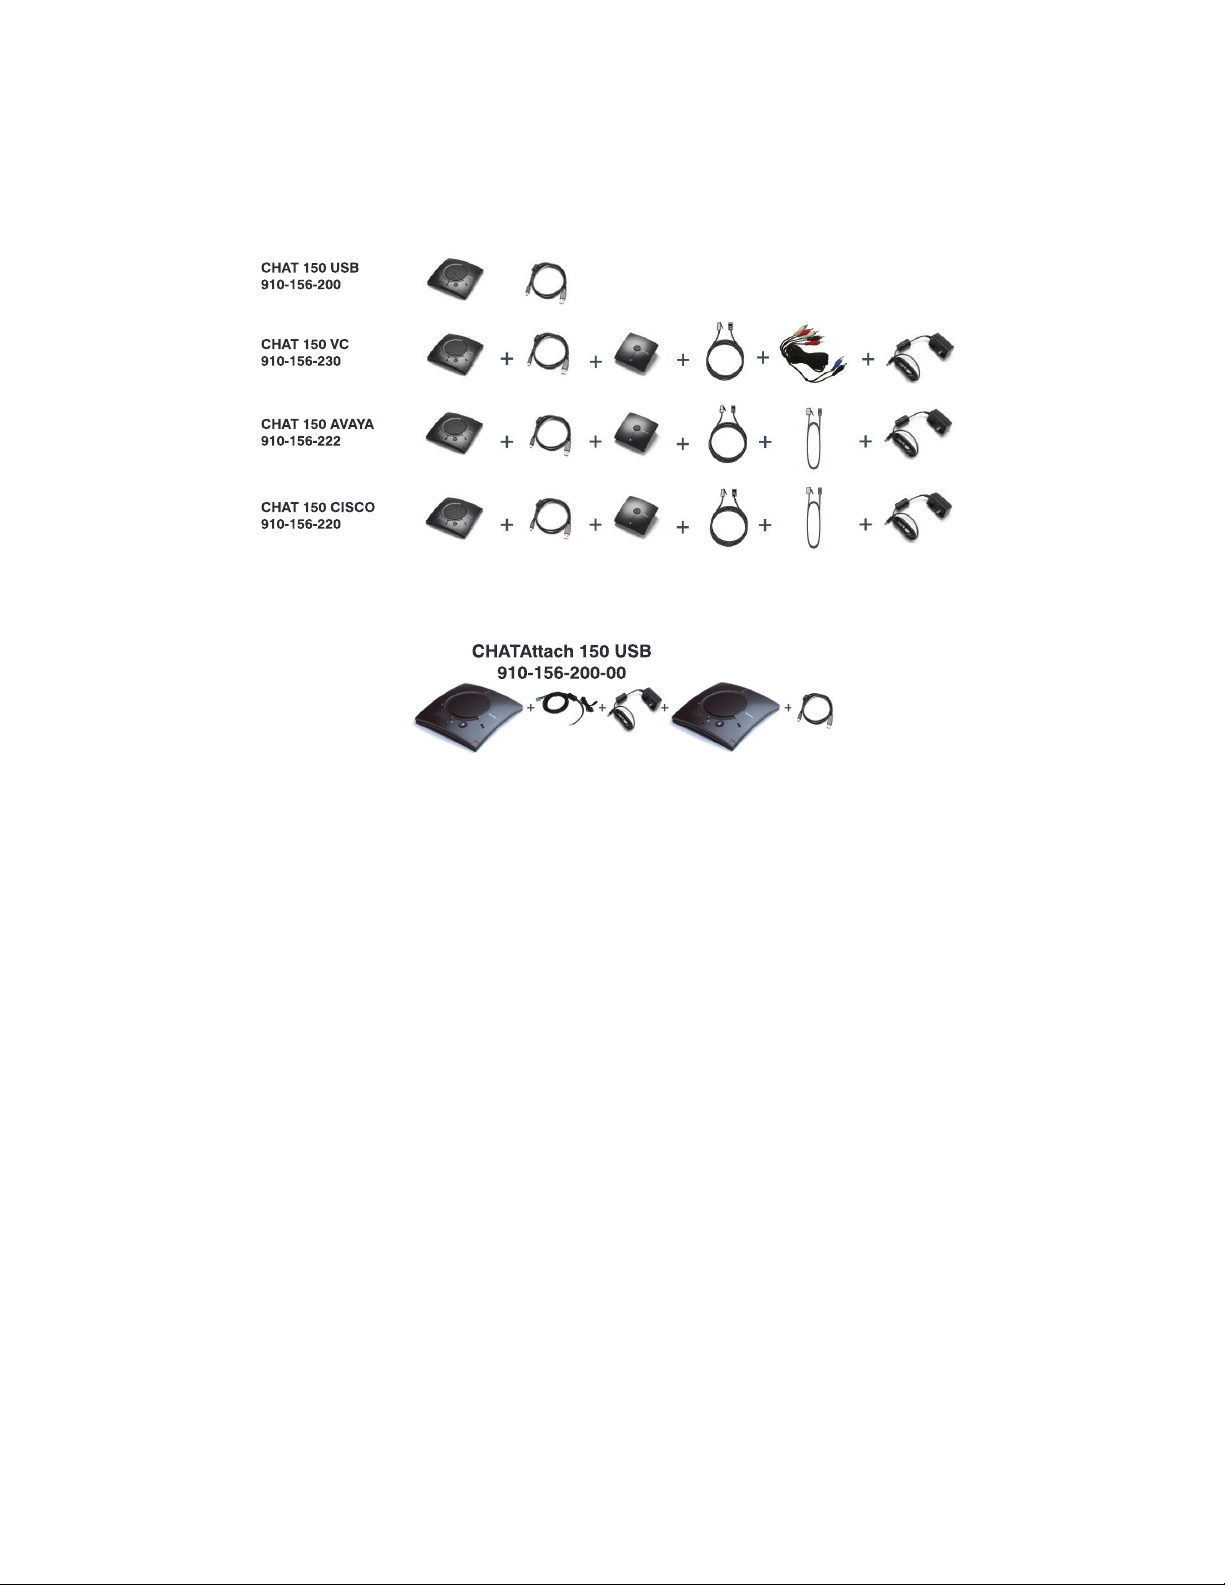
UNPACKING
The illustration below shows the parts that ship in the box with each model of the CHAT 150. Contact your dealer for
replacement parts and accessories.
CHATAttach 150 USB Packout
> NOTE: ClearOne is not responsible for product damage incurred during shipment. You must make
claims directly with the carrier. Inspect your shipment carefully for obvious signs of damage. If the
shipment appears damaged, retain the original boxes and packing material for inspection by the carrier.
Contact your carrier immediately.
To ensure safety and regulatory compliance, only use the power supply provided with your CHAT 150. Approved power
supplies include: Glob Tek Model: GT- 41052-1509, and Phihong Model: PSA05R-090. If your power supply is lost or
damaged, contact ClearOne Technical Support for an approved replacement.
Chapter 1: Introduction 3
Page 7
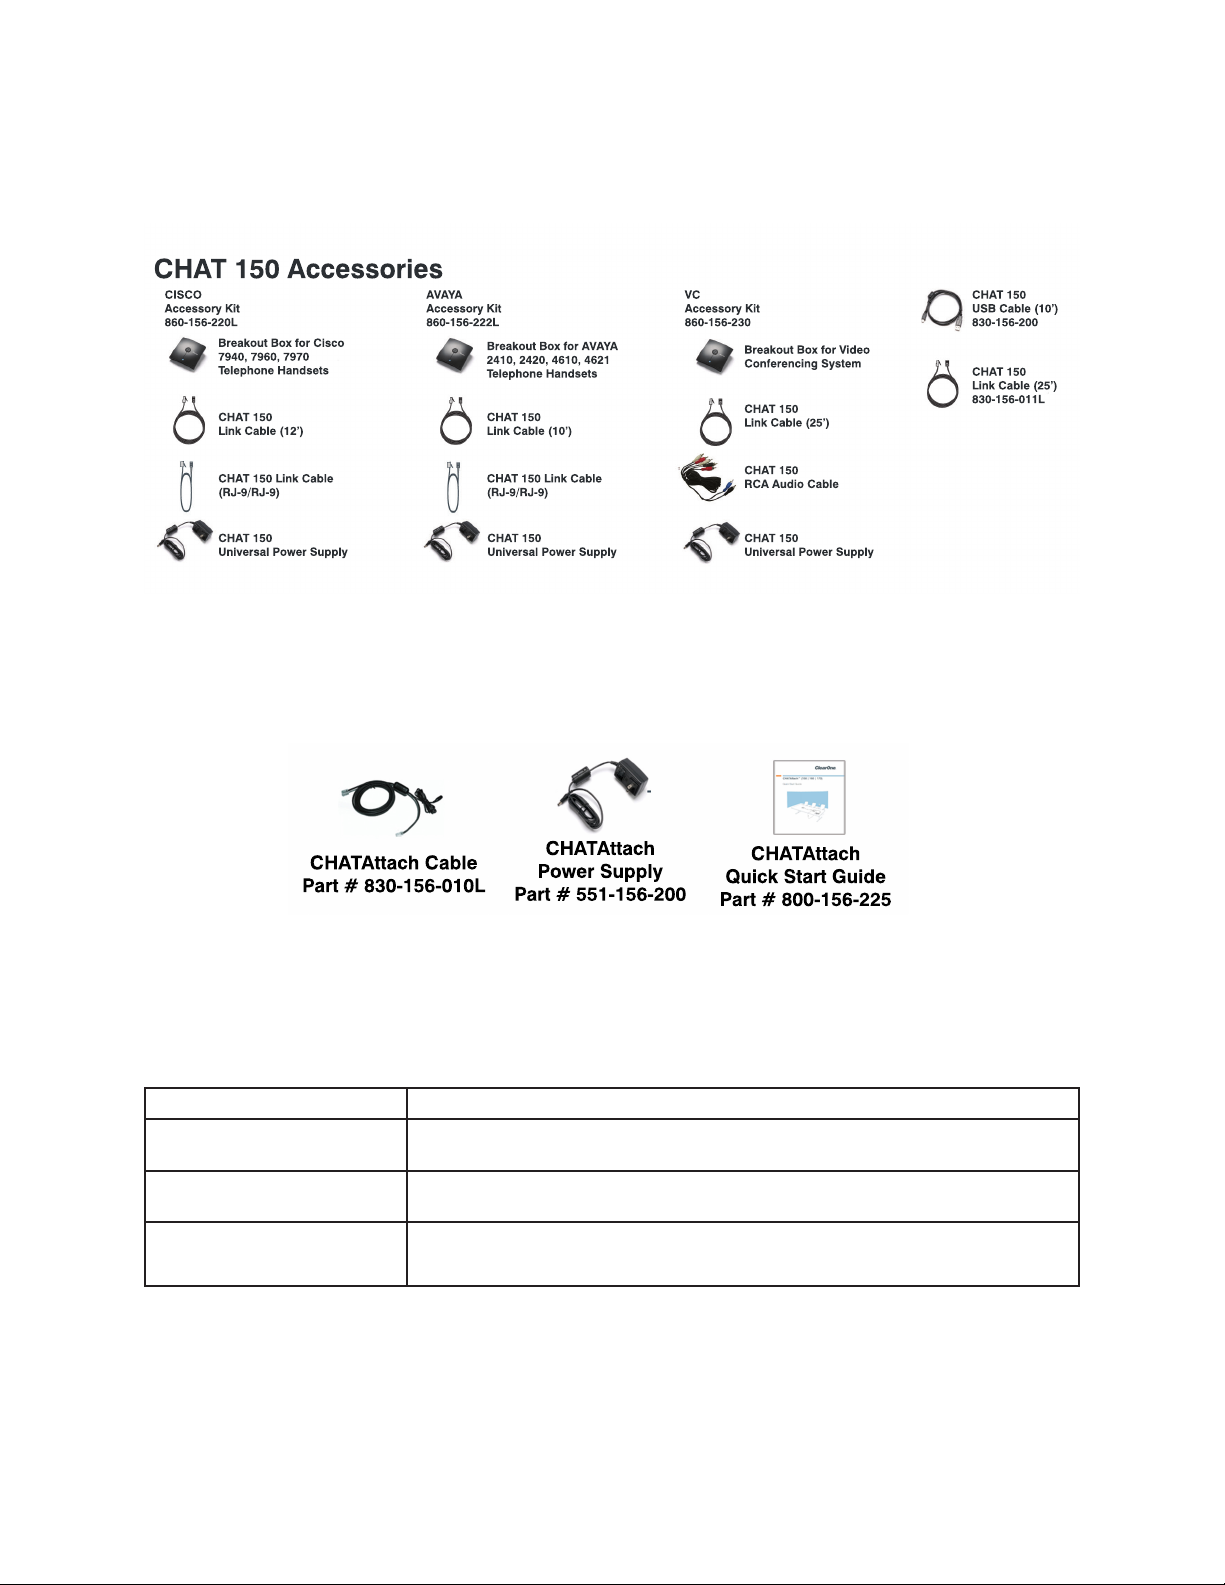
REPLACEMENT PARTS & ACCESSORIES
The illustration below shows all parts and accessories available for the CHAT 150. Contact your dealer for replacement
parts or accessories.
CHATAttach Expansion Cable Packout
CHAT 150 CONFIGURATIONS
The CHAT 150 comes in several configurations, as shown below. The CHAT 150 group speakerphone itself is the same
in all configurations; different accessories have been packaged with the unit to enable a variety of connections. All CHAT
150 units have a mini-USB port, so every configuration can connect to a PC.
Configuration Usage Profile
CHAT 150 for Avaya & Cisco
Telephone Handsets)
CHAT 150 USB
CHAT 150 VC Connects to any video conferencing system for full-duplex speaker phone capability.
4 Technical Support: 800.283.5936
Connects to the headset jack of the Avaya or Cisco handset for full-duplex speaker
phone capability.
Connects to the USB port of a PC (or laptop) for use with softphones, internet
telephony applications, web conferencing, instant messaging with audio, etc.
Page 8
CHAPTER 2: GETTING STARTED
MUTE ST
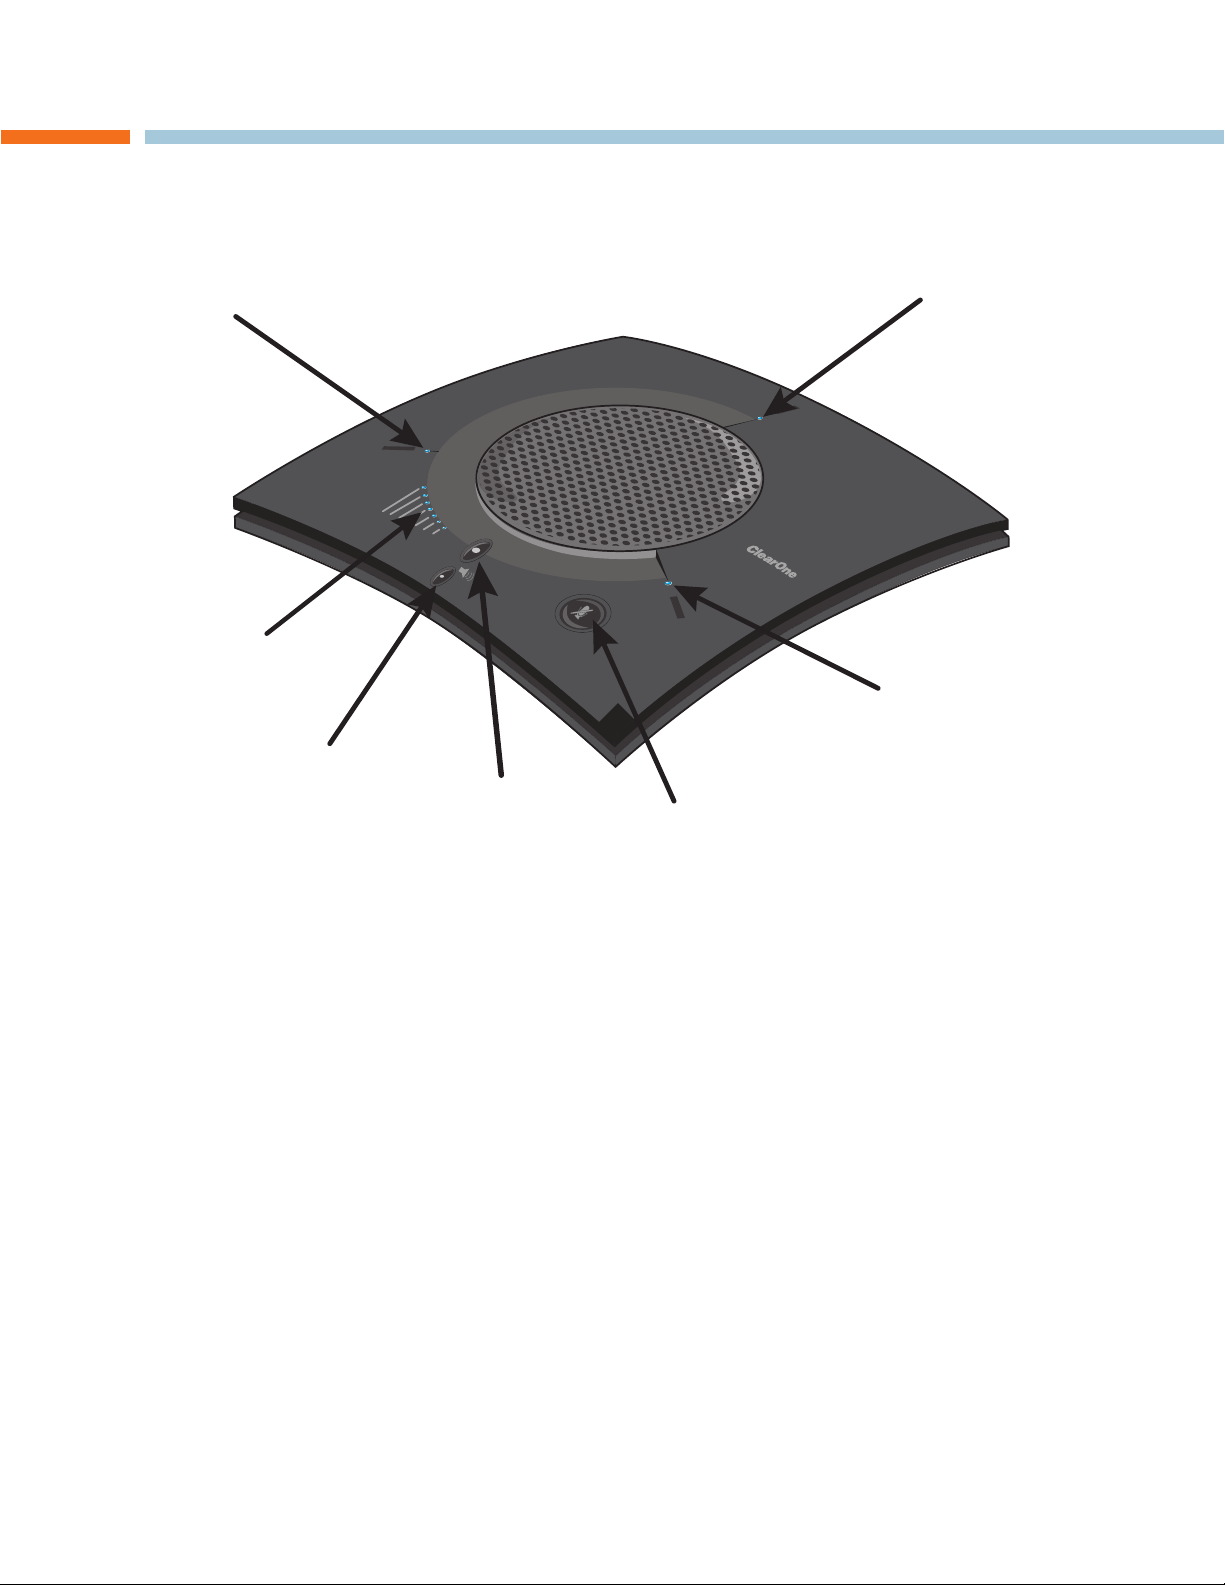
CHAT 150 CONTROLS
ATUS INDICATOR
VOLUME STATUS
INDICATOR
VOLUME DOWN
MUTE STATUS INDICATOR
MUTE STATUS INDICATOR
VOLUME UP
MUTE
LED Indicators
The three microphone LED indicators illuminate blue when the CHAT 150 microphones are active (unmuted). The
indicators illuminate red when the CHAT 150 microphone mute function is active. The seven volume LED indicators
illuminate blue to indicate the current volume setting—more lights indicate higher volume.
Volume and Mute Buttons
Use the Volume Up/Down buttons to adjust the volume level of the CHAT 150. Use the Mute button to mute the
CHAT 150’s microphones until the button is pressed again.
If you are using the CHAT 150 with a PC, you can also use the volume controls in Windows or in the CHAT software
application to make these adjustments.
> NOTE: If your CHAT 150 is connected to a PC, any changes you make to volume by pressing the CHAT
150’s buttons are reflected in the Speaker Volume Control in Windows and in the CHAT software.
Headset Button
Press the Headset button on the Phone Breakout Box to send audio from your phone to your headset connected to the
CHAT 150 Breakout Box. This will also disable audio going from the Breakout Box to the CHAT 150 — it is routed strictly
to the headset. The phone breakout box LED indicator illuminates indicating that the headset audio is activated and the
CHAT 150 LED indicators will remain lit. The audio is no longer routed to the CHAT 150 from the Breakout Box (USB
audio is still active). Press the Headset button again to disable the headset audio and reactivate the audio from the
Breakout Box to the CHAT 150. The LED dims out to indicate the change.
VC Breakout Box
Once you have properly connected the CHAT 150 VC Breakout Box to your video conferencing device and TV using the
included RCA Connection Cable, all settings changes such as mute, microphone and speaker level adjustments, etc.,
are controlled through the CHAT 150 software. The Breakout Box itself has no buttons and no functionality for making
settings changes. The LED indicates that the device has power.
Chapter 2: Getting Started 5
Page 9
INSTALLING THE CHAT SOFTWARE FOR WINDOWS
> NOTE: The install procedure is the same for all versions of Windows XP, Windows Vista and Windows 7
operating systems.
The CHAT 150 can be used right out of the box and there’s no software to download or install if it is to be used only with
a PC.
The following procedure can be used to download and install the CHAT software for the CHAT 150 if it is to be used with
other devices or if the CHAT 150 firmware requires updates.
1. Download the CHAT software by accessing the following:
http://www.clearone.com/resources#uc_voice
2. Select your device from the “BY PRODUCT” window and click SEARCH and the screen will display only those
downloads available for your specific device. Select the latest version of the CHAT 50/150 Software and the system
will display a confirmation window for the software to be downloaded to your computer.
3. Unzip the downloaded folder and run Setup.exe to begin the installation process.
4. Follow the on-screen prompts to complete the software installation.
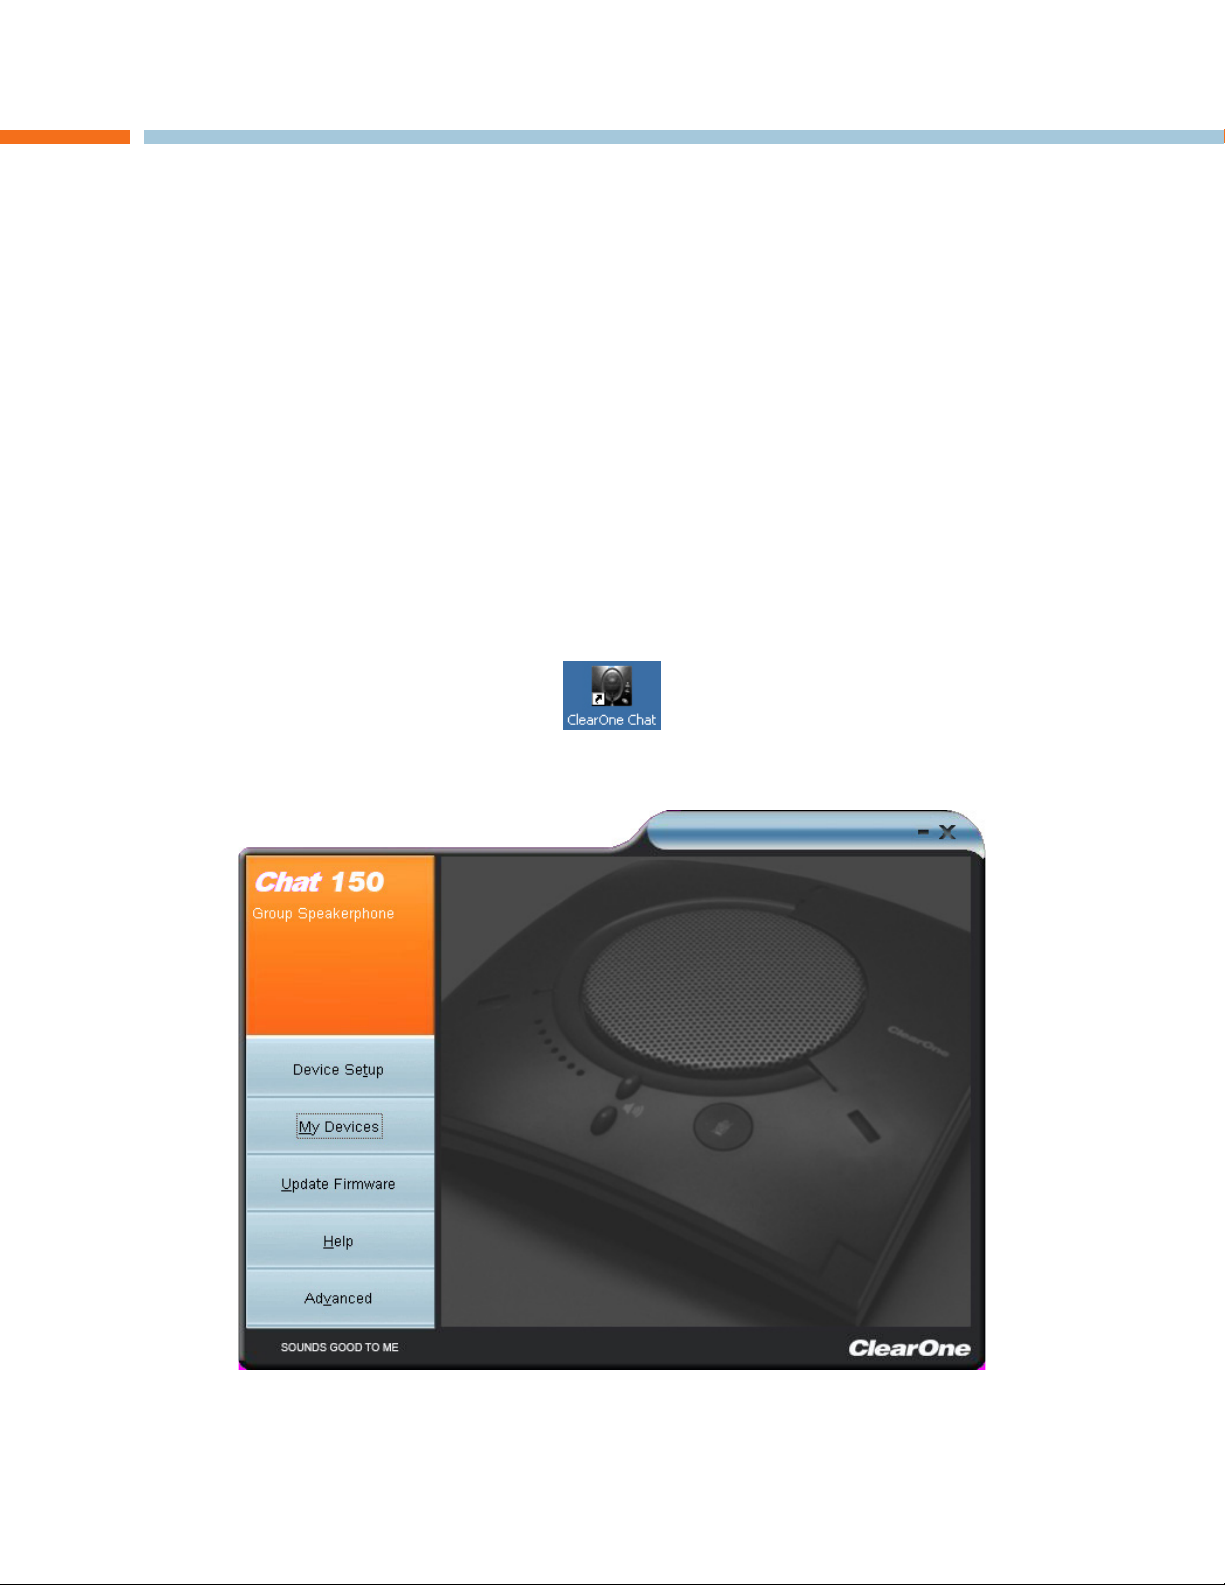
When the CHAT software installation is complete, start the CHAT software by double-clicking the ClearOne CHAT icon
that is now on your Windows desktop, or by clicking:
(Start > All Programs > ClearOne Communications > CHAT > ClearOne CHAT).
Before using the CHAT 150 for the first time, proceed with the audio settings configuration procedure
located in Chapter 4 under the Advanced section of this manual. This will ensure optimal sound quality
for each device and application you plan to use with the CHAT 150.
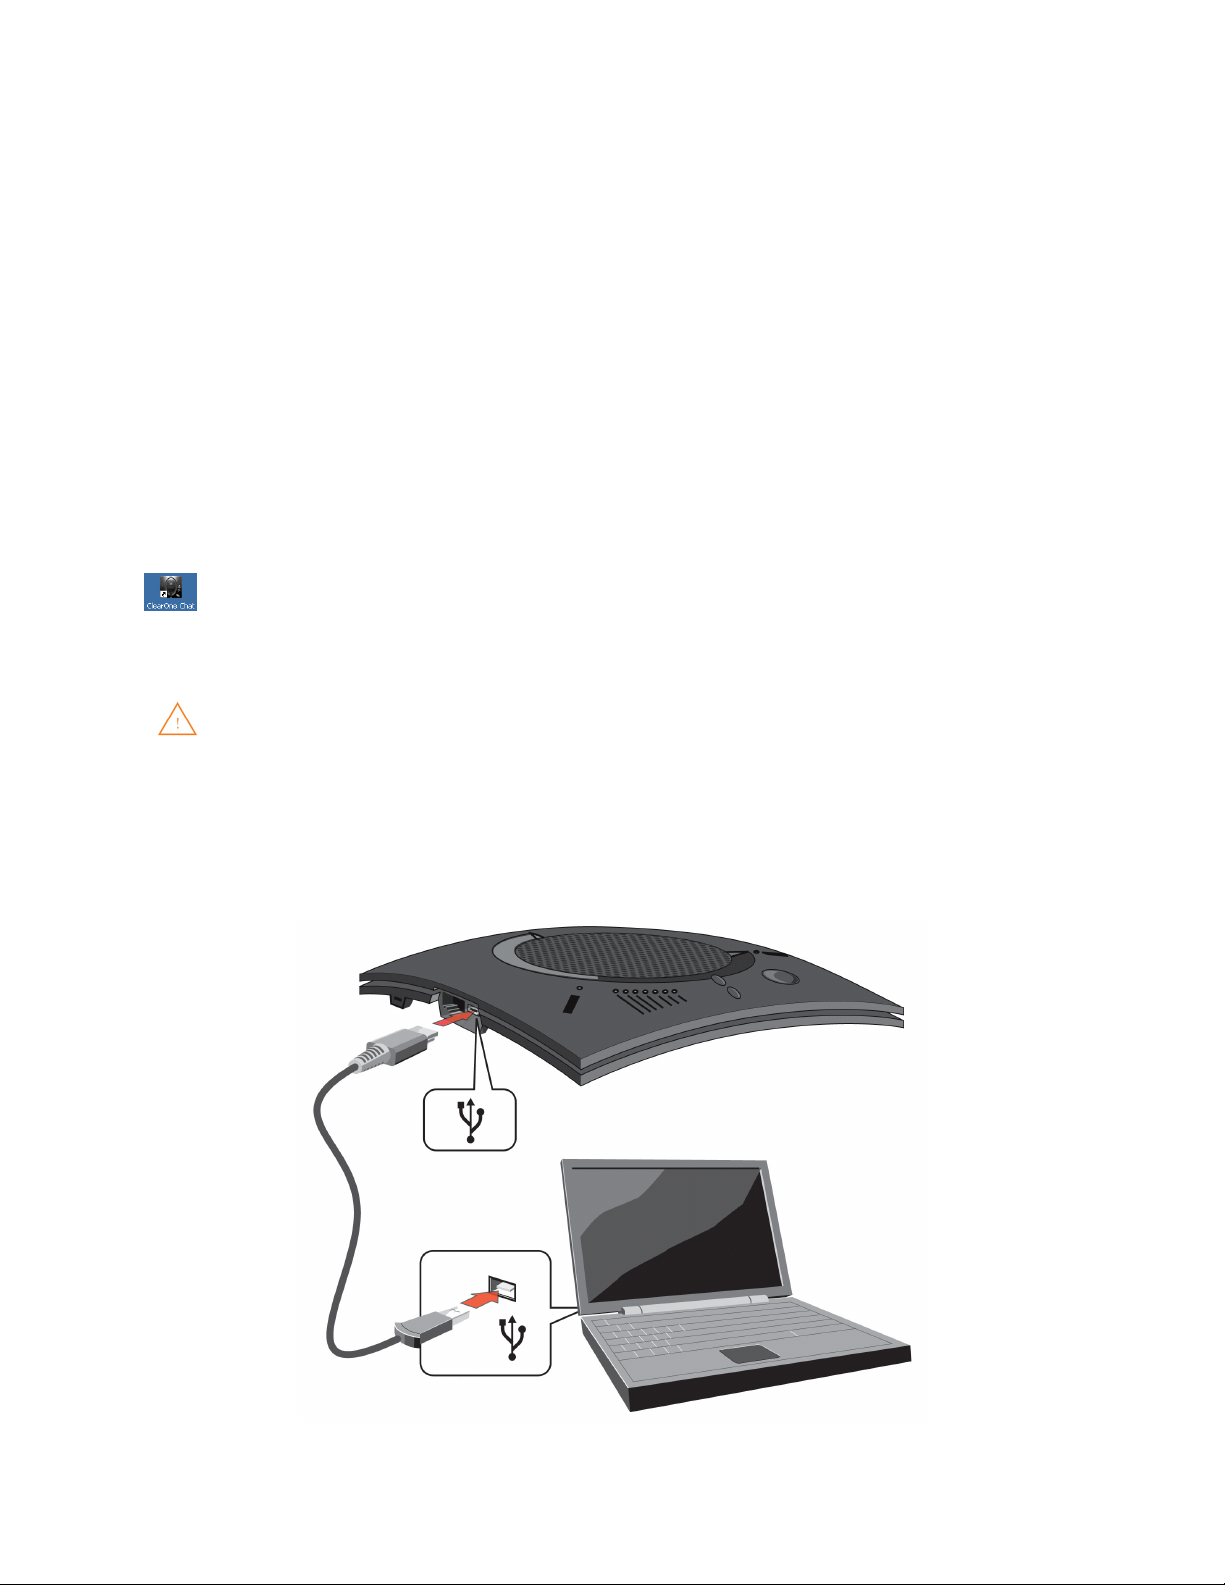
CONNECTING THE CHAT 150 TO A PC
1. Using the included USB cable, connect the CHAT 150 to your PC or laptop. The blue LED indicators on the CHAT
150 illuminate, indicating that the CHAT 150 is powered and ready for use.
6 Technical Support: 800.283.5936
Page 10
CONNECTING THE CHAT 150 TO EXTERNAL DEVICES
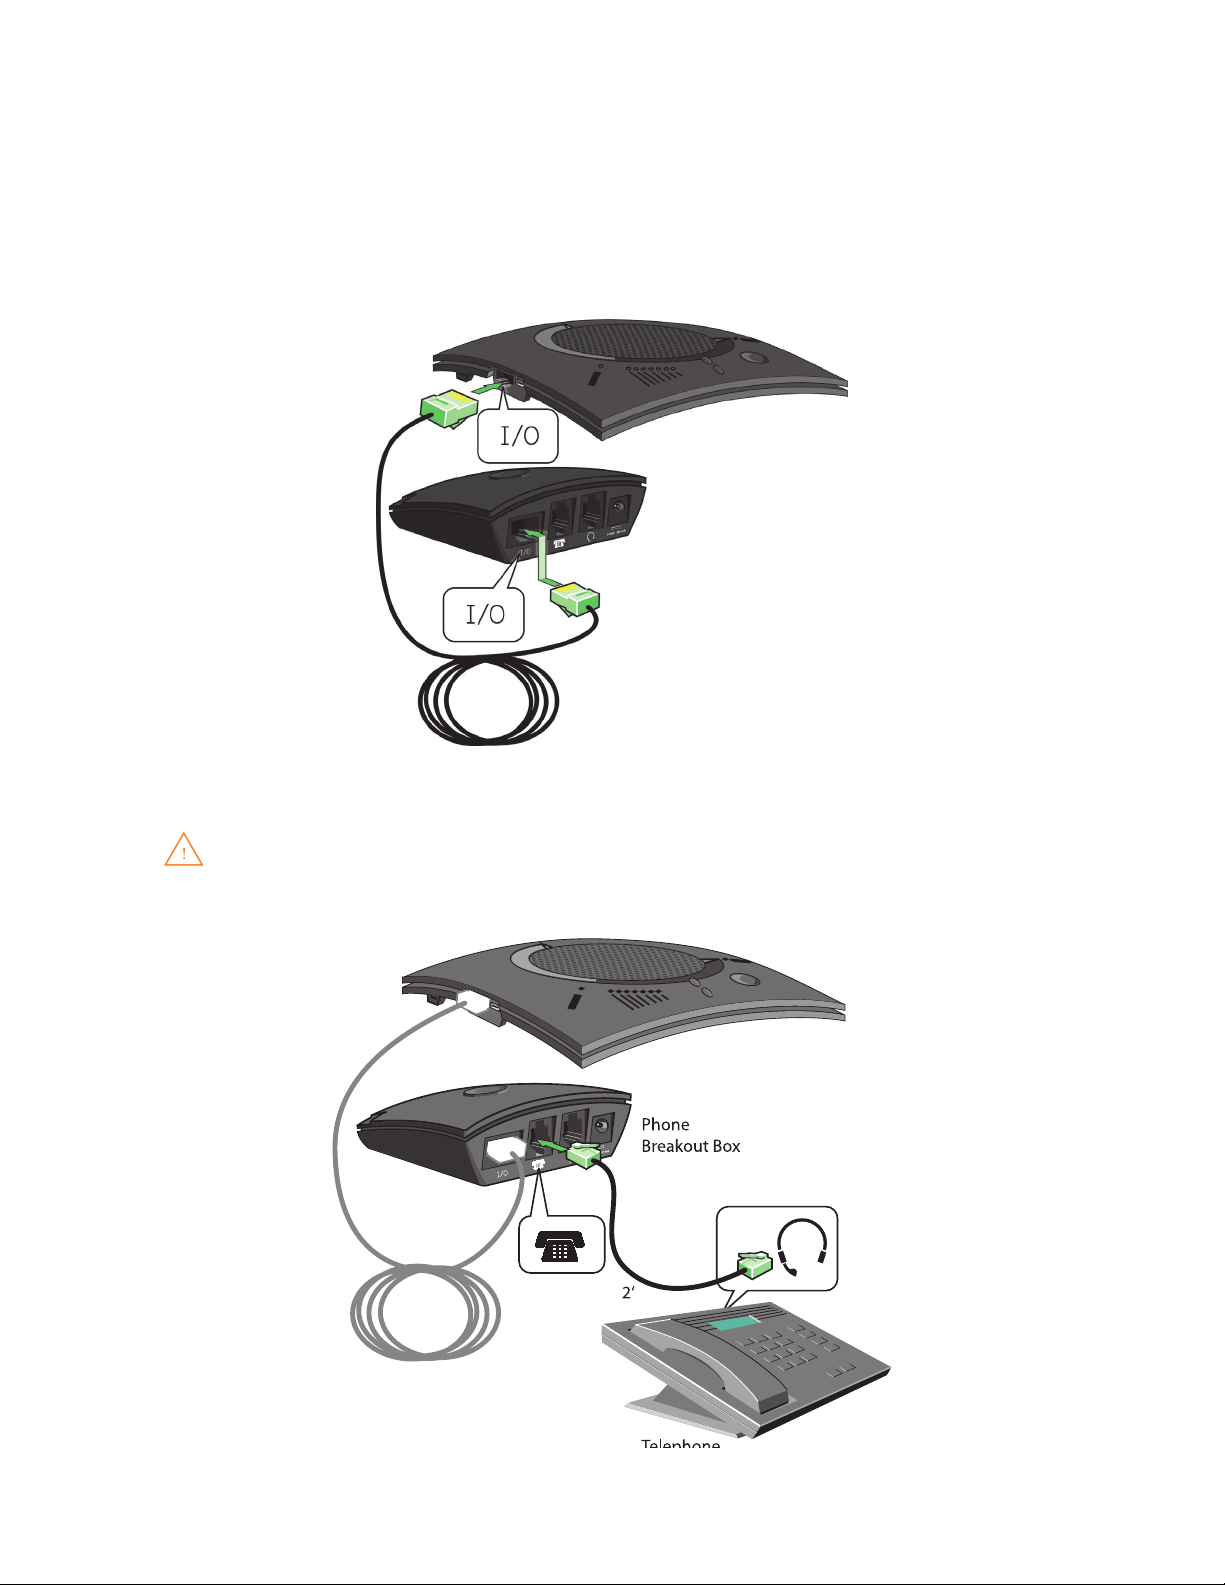
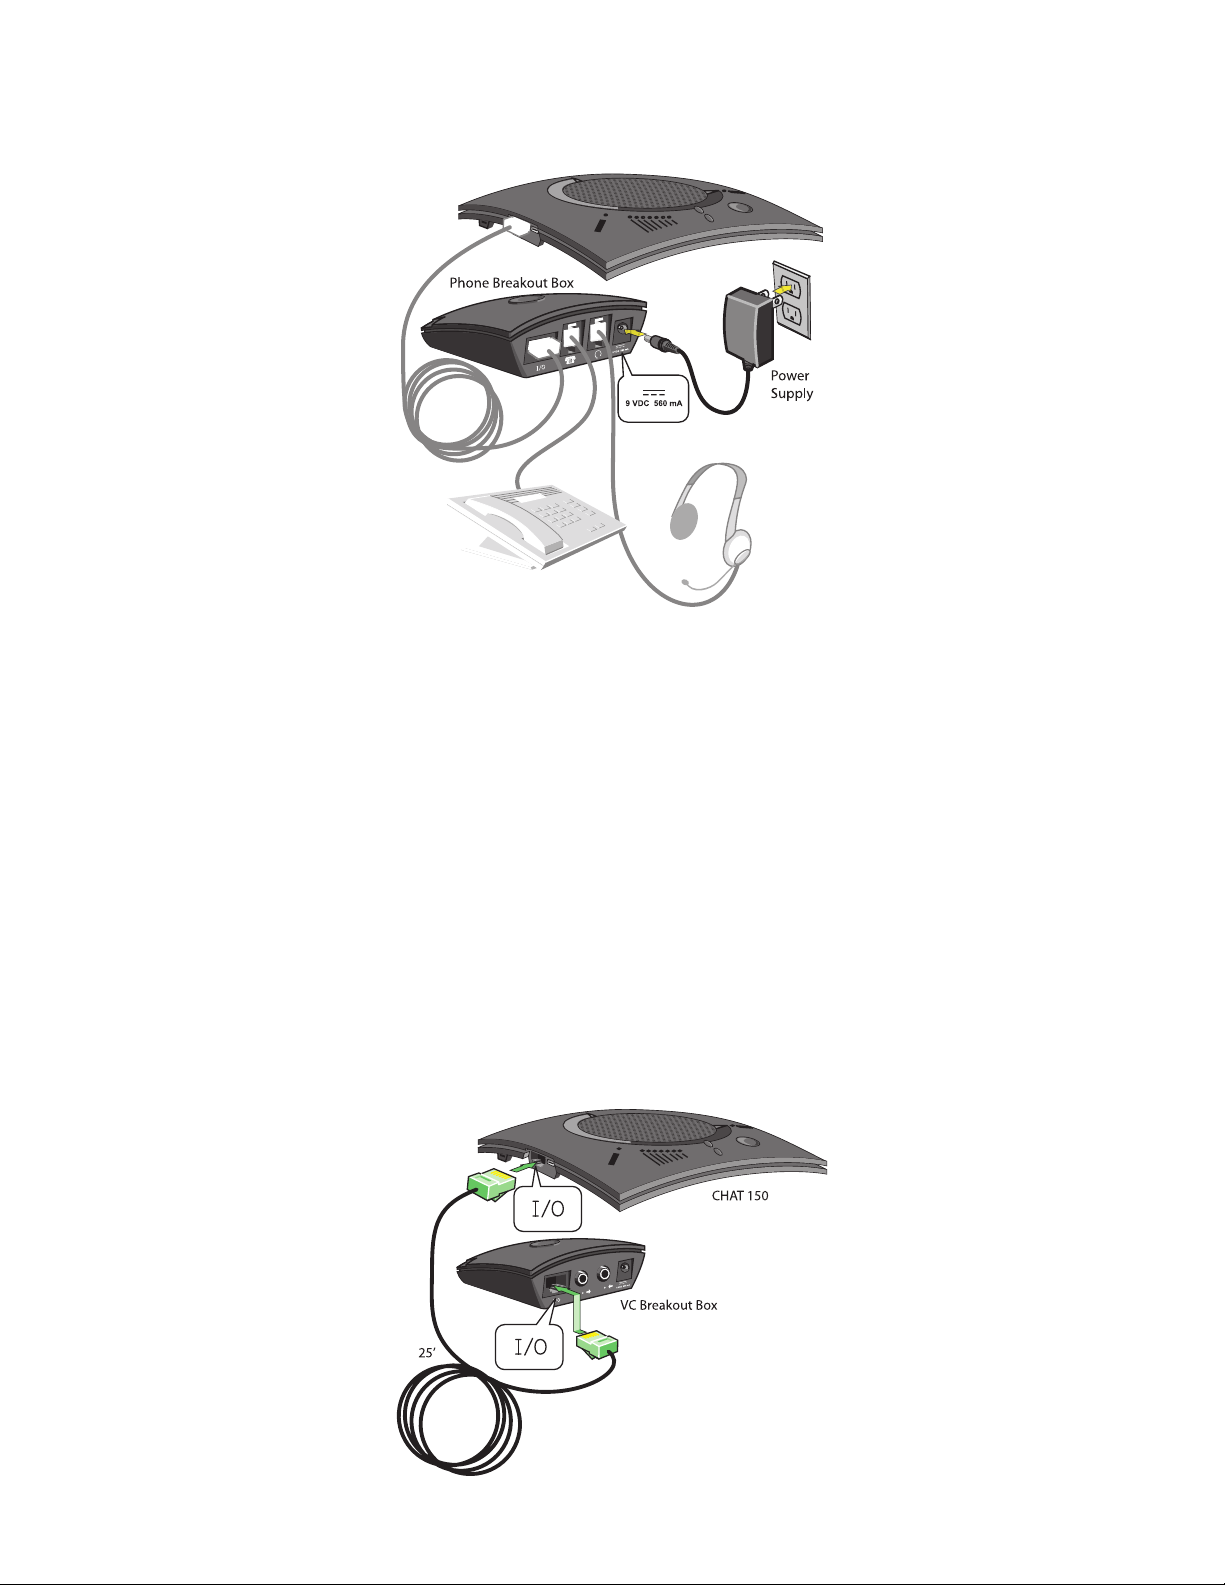
Connecting to a Telephone
ClearOne provides configurations of the CHAT 150 that make it possible to connect your CHAT 150 to enterprise
telephone handsets from Cisco and Avaya (see CHAT 150 Configurations in the Introduction to this manual). The
CHAT 150 phone Breakout Box is the interface between the CHAT 150 and the particular telephone.
1. Using the included 25’ RJ-45 cable, connect the Phone Breakout Box to your CHAT 150.
2. Using the included 2’ RJ-9 telephone cable, connect the Phone Breakout Box’s phone jack to your telephone’s
headset jack
DO NOT plug the cable into the telephone’s line jack, handset jack, or a telephone different from that
listed on the bottom of the Phone Breakout Box as damage to the telephone and/or CHAT 150 might
occur.
Chapter 2: Getting Started 7
Page 11
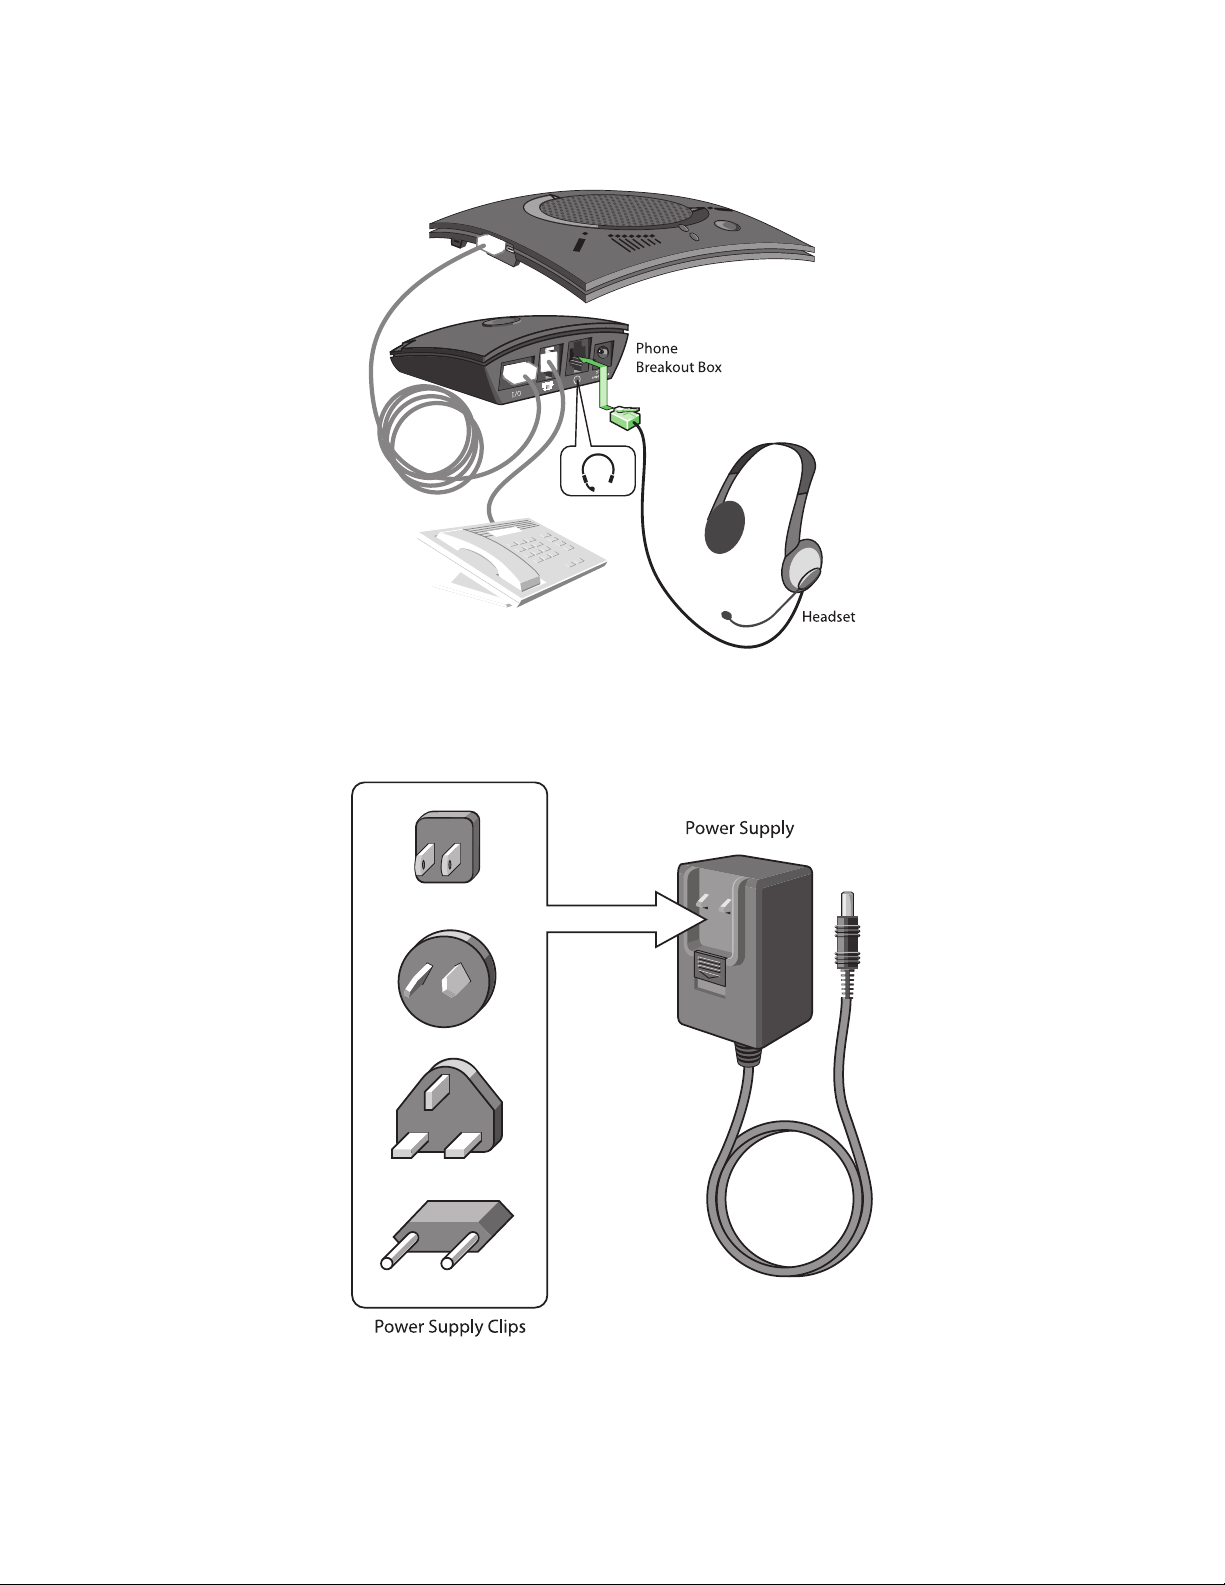
3. If you have a headset that you typically use with your telephone, connect it to the headset jack on the CHAT 150
Phone Breakout Box.
4. Slide the correct power supply clip for your country into the included power supply. The power supply may contain a
plastic shield that must be removed before inserting the clip.
8 Technical Support: 800.283.5936
Page 12
5. Using the included power supply, connect the CHAT 150 Phone Breakout Box to a power outlet.
6. The blue LED indicators on the CHAT 150 illuminate, indicating that the CHAT 150 is powered and ready for use.
7. Next, connect the CHAT 150 to your PC. This will allow you to use the CHAT software to configure the CHAT 150 for
use with your enterprise telephone. Refer to Connecting the CHAT to a PC section at the end of this chapter.
> NOTE: Press the Headset button on the phone Breakout Box to send audio from your phone to your
headset connected to the CHAT 150 Breakout Box. This will also disable audio going from the Breakout
Box to the CHAT 150—it will only be routed to the headset. The phone Breakout Box LED indicator
illuminates indicating that the headset audio is activated. The CHAT 150 LED indicators remain lit,
although audio is not routed to the CHAT 150 from the Breakout Box (USB audio is still active). Press
the Headset button again to disable headset audio and reactivate audio from the Breakout Box to the
CHAT 150. The LED dims out to indicate the change.
Connecting to a Video Conferencing Breakout Box (VC BoB)
ClearOne provides configurations of the CHAT 150 that make it possible to connect your CHAT 150 to video
conferencing systems. The CHAT 150 VC Breakout Box is the interface between the CHAT 150 and the video
conferencing device. Once you have properly connected the CHAT 150 VC Breakout Box to your video conferencing
device and TV (using the included RCA connection cable) all settings changes such as mute, microphone and speaker
level adjustments, etc., are controlled trough the CHAT software application. The Breakout Box itself has no buttons and
no functionality for making settings changes. The LED indicates only that the device has power.
1. Using the included RJ-45 cable, connect the VC Breakout Box to your CHAT 150.
)
)
(
(
)
)
(
(
Chapter 2: Getting Started 9
Page 13

2. Using the included 6’ RCA cable, connect the CHAT 150 VC Breakout Box to both your video conferencing device
)
)
)
)
and/or TV/monitor, as shown in the following illustration. The cable has two RCA connectors on one end, and five on
the other end, split into two groups with two and three connectors.
The end with two connectors goes to the VC Breakout Box. The blue connector connects to the Audio In port
(identified by the icon), and the black connector goes to the Audio Out port (identified by the icon).
On the other end of the cable, the group with the Red (Right) and White (Left or Mono) connector plugs into the
corresponding audio ports on your TV. This connection allows you to either use the speaker on your CHAT 150 for audio
from the far end, or alternatively you can use the speakers on the TV. See Advanced Settings: Audio Settings in
Chapter 4: Using The CHAT Application for details on using this option.
The group with three connectors goes to your video conferencing device. The Red (Right) and White (Left or Mono)
connectors go to the corresponding Audio Out ports. However, if your video conferencing device does not have left and
right audio out, but only has a single channel (mono), connect the white connector to send a mono audio signal to the
CHAT 150. The black connector is inserted into the Audio In port.
)
(
)
)
)
(
(
)
)
(
(
)
(
(
(
)
(
(
)
)
(
(
)
)
3. Slide the correct power supply clip for your country into the included power supply. The power supply may contain a
plastic shield that must be removed before inserting the clip.
10 Technical Support: 800.283.5936
Page 14
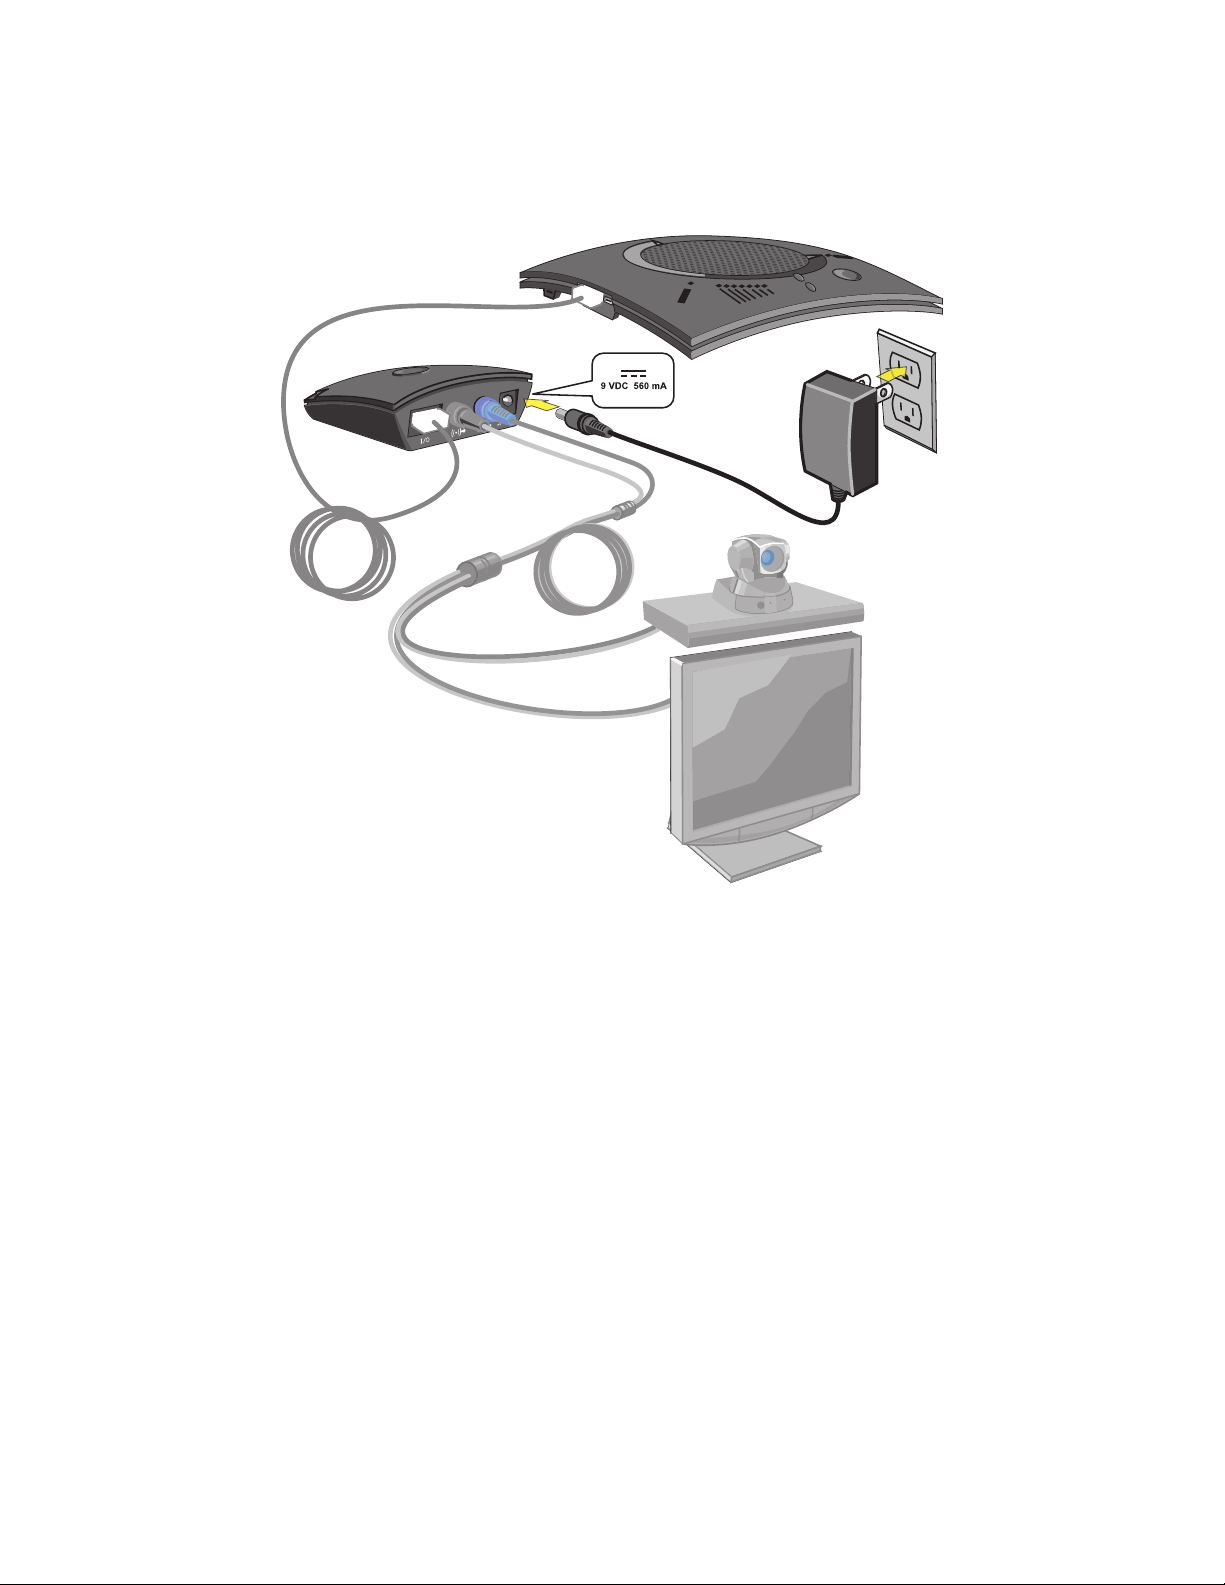
4. Using the included power supply, connect the CHAT 150 VC Breakout Box to a power outlet.
5. The blue LED indicators on the CHAT 150 illuminate, and the LED power indicator on the VC Breakout Box
illuminates, indicating that the CHAT 150 is powered and ready for use.
6. Next, connect the CHAT 150 to your PC (or USB device). This will allow you to use the CHAT software to configure
the CHAT 150 for use with your video conference system. Refer to Connecting to a PC section earlier in this
chapter.
Chapter 2: Getting Started 11
Page 15
CHATAttach: Connecting Two CHAT Devices
The CHATAttach makes it possible to connect two CHAT devices together for larger conference settings using the
CHATAttach accessory kit.
In order to use the CHATAttach accessory, the following criteria must be met:
1. Both CHAT devices must be the same model number - both CHAT 150, both CHAT 160 or both CHAT 170 devices -
mixing CHAT models using CHATAttach is not currently possible.
2. Both CHAT devices must have identical firmware versions installed. The firmware must be CHATAttach compatible.
To ensure this, download the latest version of the firmware from the Website and configure each device that will
be connected to the CHATAttach accessory with the latest firmware. All older CHAT 150 devices require firmware
updates in order to work with the CHATAttach accessory.
3. The CHAT device must be at least 5’ apart for best performance.
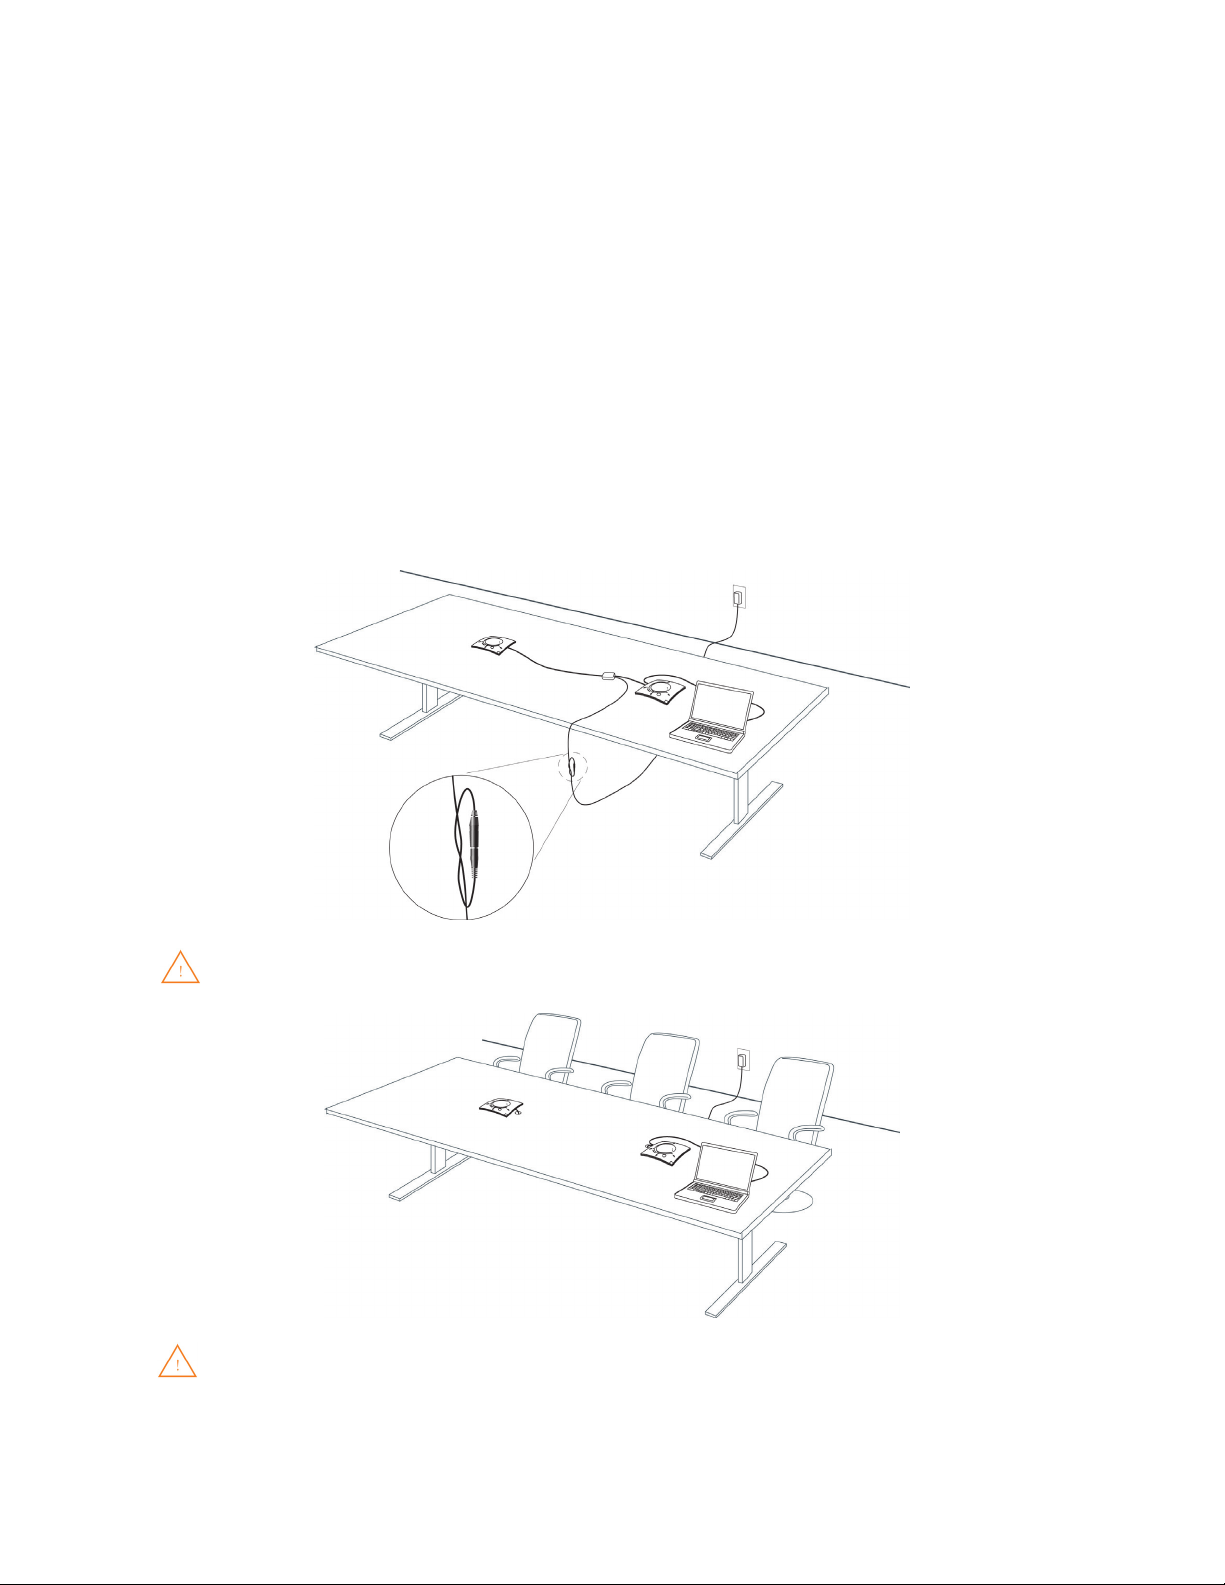
Use the following steps to connect the CHATAttach accessory.
1. Connect the two CHAT devices using the keyed CHATAttach cable.
2. Position the two CHAT 150 devices so they’re at least 5’ apart from each other.
3. Plug in the CHATAttach power supply.
To prevent the power cable from inadvertantly becoming unplugged before, during or after meetings, it
is recommended that the connector end of the cable be secured in some way. One approach is to knot
the male-female connection to prevent this from occurring as shown above.
A recommended professional approach to setting up a conference room utilizing the CHATAttach
accessory is to drill holes near where the CHAT devices will be placed, route the cabling through the
holes and secure them underneath the conference table as shown above.
4. Follow the instructions in the CHAT 150 User’s Manual to setup the CHAT device with a PC.
12 Technical Support: 800.283.5936
Page 16
CHATAttach Working Modes
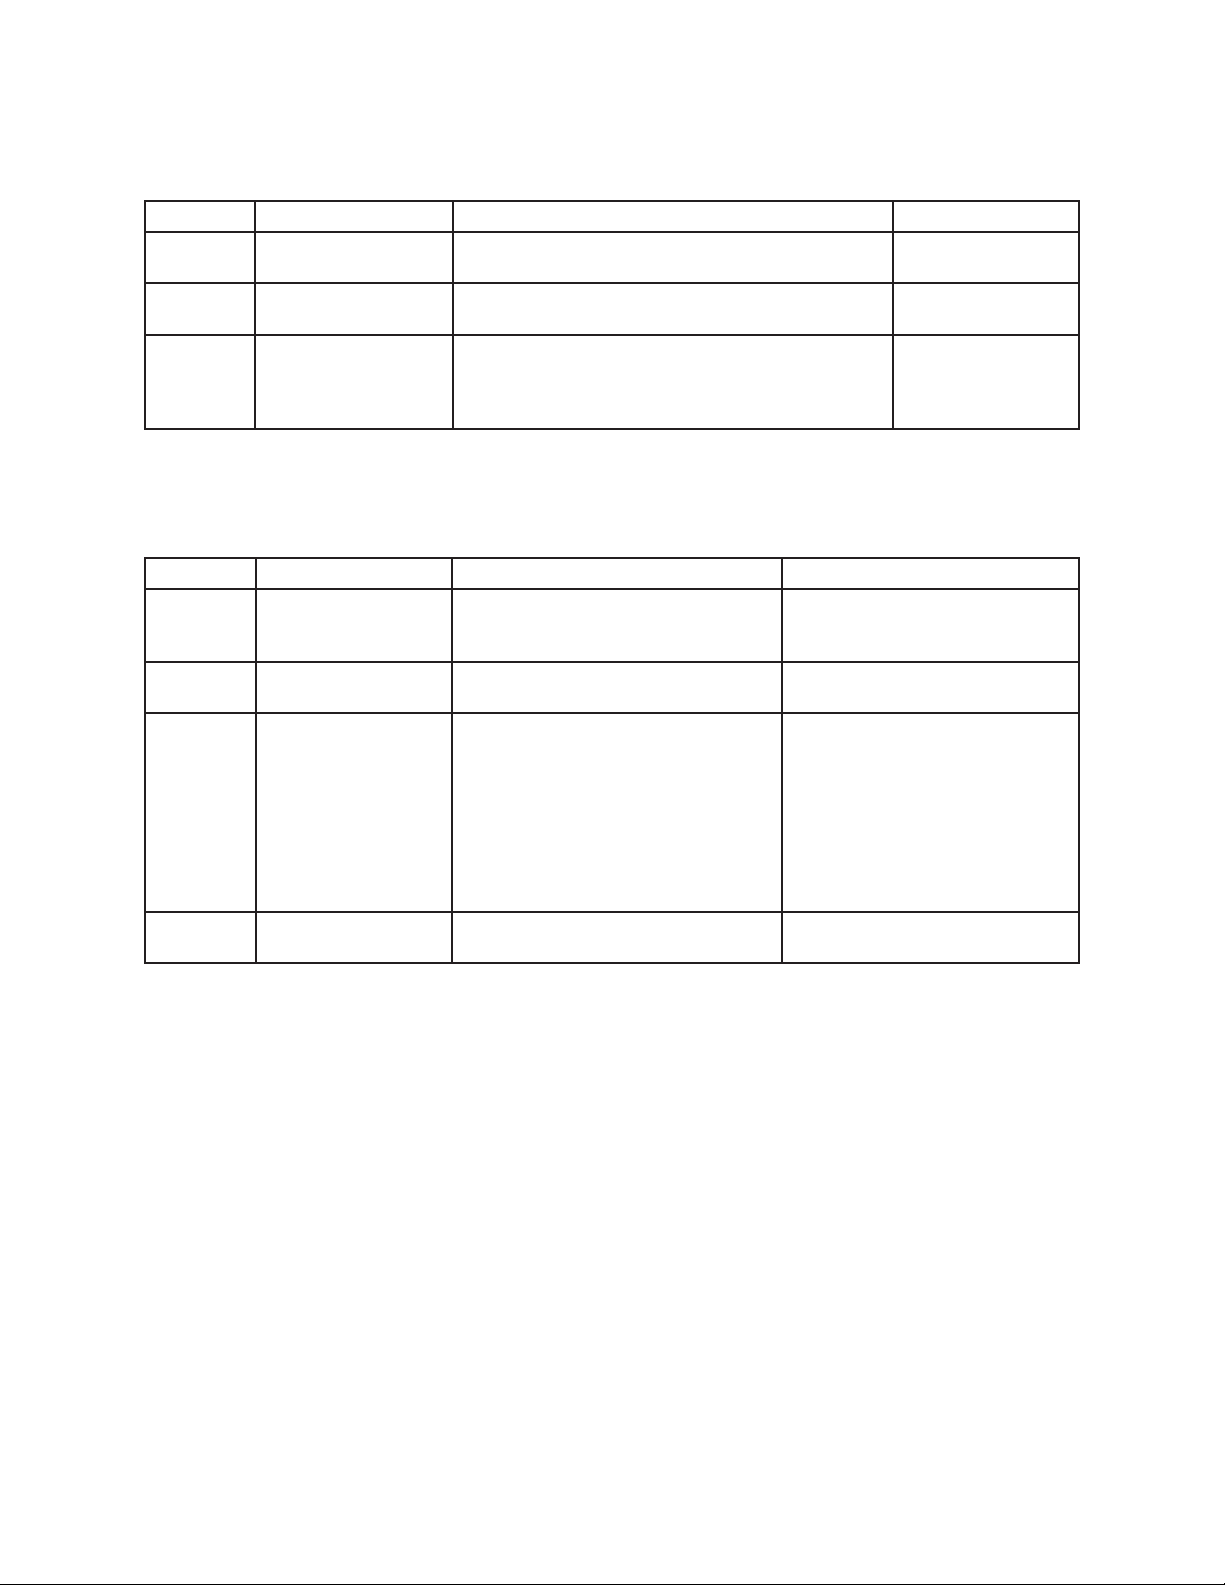
The following table outlines the CHATAttach working modes.
Mode # Mode Code Description Condition
1
2
3
Solid Red LED on both
CHAT devices
Solid Blue LED on both
CHAT devices
Single Blue Volume
light on both
CHAT devices
CHAT devices are in MUTE mode. Normal
CHAT devices are in UNMUTE mode. Normal
No PC attached. CHAT devices are in STAND-BY
mode and will WAKE-UP when a PC is reattached
to a device. All previous CHAT device settings will be
reinstated.
Normal
CHATAttach Troubleshooting
The following table describes issues that may occur and possible causes that may help identify and resolve problems
when using the CHATAttach accessory.
Error # Error Code Cause Resolution
1
2
3
4
Blinking Red LED’s on
both devices
Blinking Blue LED’s on
both devices
Blinking Red LED on a
single CHAT device
CHAT devices will not
synchronize
Firmware on CHAT devices support
CHATAttach but firmware versions are
not the same.
More than one PC connected at a time.
1. CHATAttach Power Supply not
plugged in
2. Only one CHAT device supports
CHATAttach
3. Only one CHAT device connected
to CHATAttach
The firmware on both devices does not
support the CHATAttach accessory.
Download and install the latest
firmware onto both CHAT devices
Connect ONLY one PC to the
CHAT device
1. Plug the CHATAttach Power
Supply into an active power
recepticle
2. Download and install the
latest firmware onto both
CHAT devices
3. Connect both CHAT devices to
the CHATAttach accessory
Download and install the latest
firmware onto both CHAT devices
> NOTE: Connecting the CHATAttach prevents the ability to connect external devices as the USB ports
are occupied by the CHATAttach cable.
Chapter 2: Getting Started 13
Page 17
CHAPTER 3: CONFIGURING THE CHAT 150
CONFIGURING YOUR CHAT 150
This section describes how you configure your CHAT 150 for the specific devices you are connecting to. The CHAT
software contains a database of pre-configured device settings that allows you to instantly select and apply optimal
settings for supported devices.
> NOTE: From time to time, ClearOne adds additional devices to the database. To update your CHAT
software to include all currently supported devices, see the Update Firmware & Database section
later in this chapter.
If the specific device you are using with the CHAT 150 is not listed in the database, you can create a custom device by
following the instructions described later in this chapter.
DEVICE SETUP
To configure the CHAT 150 for your devices, perform the following steps:
1. Using the included USB cable, connect the CHAT 150 to your PC or laptop. The blue LED indicators on the CHAT
150 illuminate, indicating that the CHAT 150 is powered and ready for use.
2. Start the CHAT software by double-clicking the ClearOne CHAT icon on your desktop, or by launching the
application from your PC’s Start menu.
The main screen of the CHAT software will be displayed.
14 Technical Support: 800.283.5936
Page 18
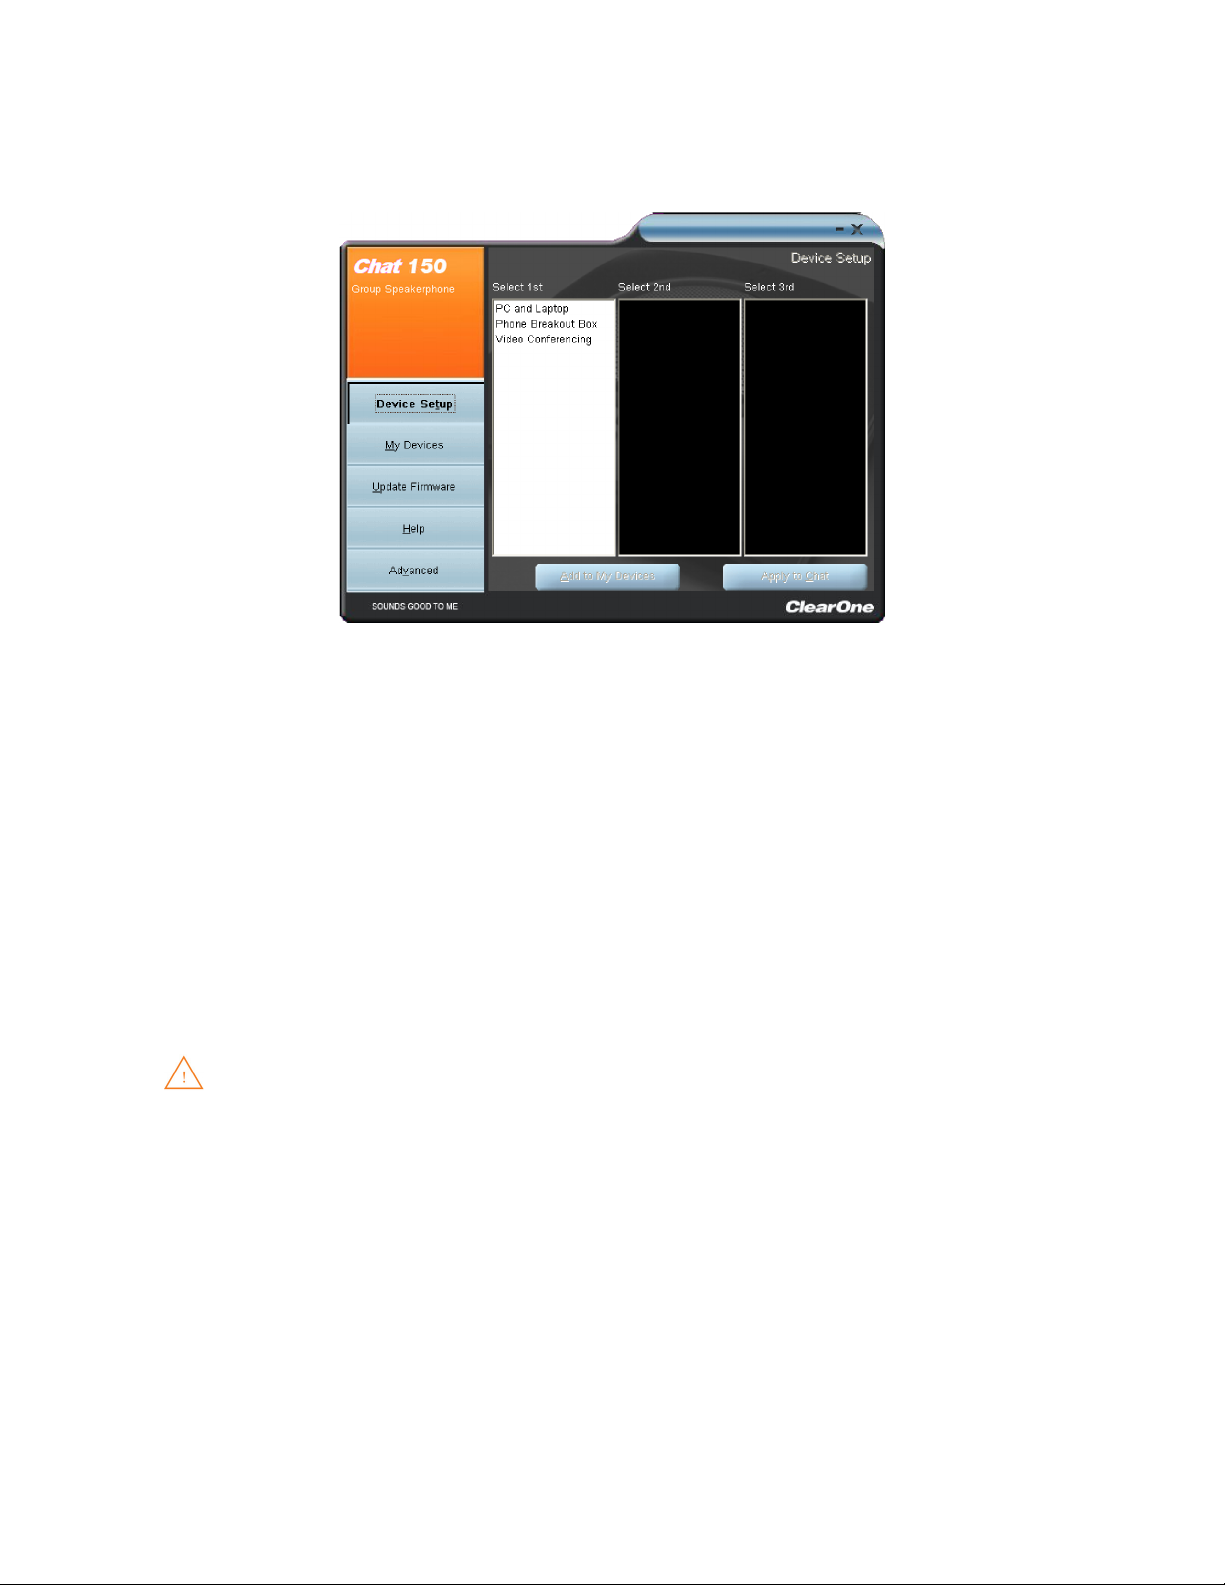
3. Click Device Setup from the buttons on the left. The Device Setup screen appears displaying the general types of
devices you can configure for use with the CHAT 150.
4. From the Select 1st column, select the type of device you are connecting to the CHAT 150.
5. In the Select 2nd column, select the manufacturer of your device. If you are selecting PC and Laptop, select All. If
you are connecting to a VC Breakout Box and your manufacturer is not listed, select Other.
6. Select the model of the device from the list in the Select 3rd column. If you selected PC and Laptop, select All. If
you selected VC Breakout Box and the specific model number is not listed, select Other.
7. Once all three selections have been made, the Add to My Devices and Apply to CHAT buttons at the bottom of
the screen will become active.
8. When you are satisfied with your selections in all three columns, click the Apply to CHAT button to apply these
settings to the CHAT 150. A message will appear indicating that the settings were successfully applied to your CHAT
150.
9. Click the Add to My Devices button and an entry containing these settings will be created in the My Devices
screen allowing you to instantly select and apply this configuration in the future. A message will appear indicating
that the device was successfully added.
10. Repeat steps 1 through 8 for any additional devices you will be using with your CHAT 150.
To ensure optimal sound quality, you need to customize the CHAT 150’s audio settings for every
application and device you will use. Refer to the tuning procedures provided in the Optimizing Sound
Quality section that follows.
Chapter 3: Configuring the CHAT 150 15
Page 19
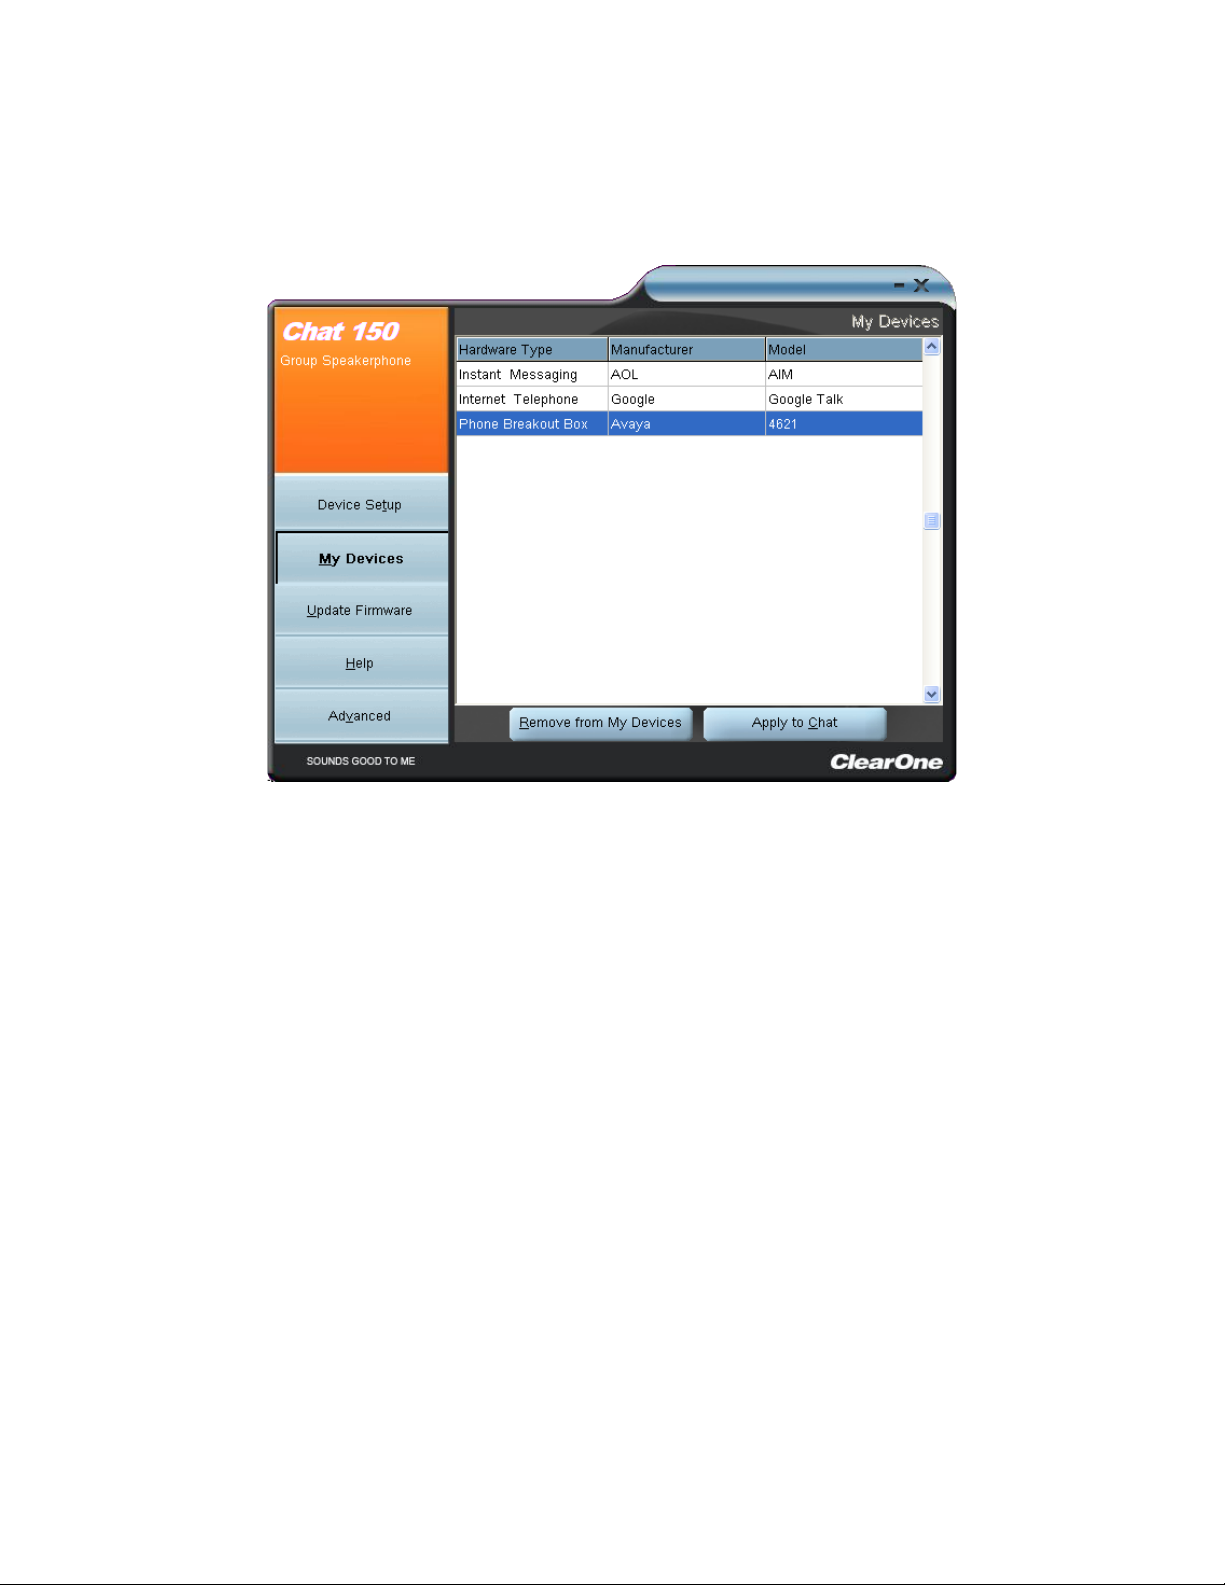
MY DEVICES
My Devices displays all of the devices that you have configured for use with your CHAT 150. This screen allows you to
easily switch between settings for your listed devices, including any saved custom configurations, if you have created
custom audio settings for your device (see Advanced Settings: Database later in this chapter for more information on
saving custom settings).
Select the device you wish to use with your CHAT 150, and click the Apply to CHAT button to apply the audio settings
to your CHAT 150.
To remove a device from your list of My Devices, select the device from the list and click the Remove from My
Devices button. Note that this only removes the device from the My Devices list. It does not remove it from the device
database (see the Advanced: Database section later in this chapter for more information.)
OPTIMIZING SOUND QUALITY
For optimal sound quality, you must adjust the CHAT 150’s audio settings for each device and application you will be
using as described in the procedures below.
> NOTE: The volume settings in the CHAT software are synchronized with the Windows volume settings.
Changing the volume using the CHAT software or the buttons on the CHAT 150 also changes the
volume settings in Windows. Conversely, changing the volume settings in Windows will change the
settings in the CHAT software.
Using with Pre-Defined Device Settings
The pre-defined device settings available in the CHAT application will provide good sound quality for many of the most
popular devices used with the CHAT 150. If you used the procedure in the previous section to configure the CHAT 150’s
settings for one of these devices, test the sound quality before performing any additional tuning. If you are satisfied with
the sound quality, no further adjustments are necessary.
Applying Audio Settings to the CHAT 150
Select the device you wish to use with the CHAT 150, then click the Apply to CHAT button to apply the custom audio
settings.
16 Technical Support: 800.283.5936
Page 20

CHAPTER 4: USING THE CHAT APPLICATION
USING THE CHAT APPLICATION
1. If not already open, start the CHAT application.
2. Click the My Devices button and select the device you want to tune (select the Other or All option if your device/
application is not listed), then click the Apply to CHAT button.
3. For external hardware devices, connect the device to the CHAT 150 using the appropriate connection diagrams
located in Chapter 2: Getting Started.
4. Adjust the speaker and volume settings on the external device or in the application to 50% (half volume).
5. Click the Advanced button to display the pre-defined audio settings for the device you selected in step 2. Use
the USB Audio section of the screen to tune applications; use the Line Audio section to tune external hardware
devices connected to the CHAT 150 breakout box.
> NOTE: In the Advanced screen, adjusting Microphone Level under USB Audio changes the CHAT
150 microphone volume for USB applications, while adjusting the Output Level under Line Audio
changes the microphone volume being sent to the device connected to the CHAT 150’s line audio jack.
Likewise, adjusting Speaker Level under USB Audio changes the CHAT 150 speaker volume, while
adjusting the Input Level under Line Audio changes the speaker volume being received from the
connected device.
6. Place a call using the device or application. Land lines provide the best audio for tuning purposes.
7. Ask the person on the other end of the call to count from 1 to 10 in a normal voice. While the person is counting,
click and move the Input slider in the CHAT application until the caller’s voice can be clearly heard. Repeat as
needed to find the optimal speaker volume for the device.
8. While the caller is still connected, count from 1 to 10 in a normal voice. Ask the caller if they can hear you clearly.
Click and move the Output slider until the caller can hear you clearly. Repeat the test count as needed to find the
optimal microphone volume for the device.
9. Click Save to Database to capture the optimized settings. The Add Settings to Database dialog appears. Enter
appropriate name in the Model field, then click the Save to Database button.
10. The optimal audio settings for the device or application are now ready for use. Repeat steps 1 through 9 for any
additional devices and applications.
To switch between audio settings for different devices and applications, click the My Devices button, select the desired
device or application, then click the Apply to CHAT button. The audio settings are instantly applied for the chosen
device or application.
Using A Third-Party Application
If you are using the CHAT 150 with an application other than CHAT−such as Cisco Communicator or Skype - ClearOne
recommends using the tuning wizard or audio configuration controls in that application to adjust audio settings. If the
application does not have a tuning wizard or audio settings, use the CHAT application to tune audio settings for optimal
sound quality as explained in the previous section. Audio setup information can also be found for the CHAT Application
in the next few pages.
Chapter 4: Using the Chat Application 17
Page 21

UPDATE FIRMWARE & DATABASE
The Update Firmware screen displays the current firmware version, unit name, and checks ClearOne’s website for
available firmware and device database updates. Update Firmware allows you to automatically update to the most
recent firmware and device database using the Check for updates button, or you can use the Select File button to
manually load an existing firmware file.
> NOTE: The computer your CHAT 150 is connected to must be connected to the Internet in order to use
the Check for updates option.
Check for Firmware Updates
Perform the following steps to update your firmware and device database:
1. Start up the CHAT 150 software as described earlier in this manual.
2. Click on the Update Firmware button located along the left side of the window.
3. Click the Check for updates button to check the Web site for available updates.
4. The following series of messages appears below the progress bar:
• “Locating website...”
• “Website found”
• “Click Update to load new firmware into device” (Appears only if a new firmware file is available.)
• “Click Update to load new database information” (Appears only if a new device database file is available.)
18 Technical Support: 800.283.5936
Page 22

> NOTE: If no new firmware or device database updates are available, the following messages will appear
below the progress bar:
“Your device contains the most recent firmware”
“Your database contains the most recent updates”
This indicates that your firmware and database are current. No updates are required.
5. Click the Update button to install available updates. The Update dialog box appears.
Any or all of the following actions can be performed by clicking the appropriate button:
Click Update Firmware to update firmware only.
Click Update Database to update the device database only.
Click Cancel to cancel the update procedure and return to the Update Firmware screen.
Chapter 4: Using the Chat Application 19
Page 23

When you click either of the update buttons, an Update dialog appears.
6. Click Yes to proceed with the firmware or device database update, or No to cancel.
7. A second Update dialog appears. Click Yes to proceed or No to cancel.
8. A series of messages appears below the progress bar indicating that the updates are in progress.
WARNING: Do not unplug the CHAT 150 while updates are in progress.
9. When the update is complete the following message appears below the progress bar:
• “Update Successful! The firmware for CHAT has been changed to <new revision level>”
where <new revision level> is the new firmware revision number.
• “Update Successful! The database has been updated to <new revision level>” where <new
revision level> is the new database version number.
10. Your CHAT 150 now has the most recent firmware and/or device database updates available.
20 Technical Support: 800.283.5936
Page 24

MANUAL UPDATES
> NOTE: This procedure is for advanced users, technical support purposes, and corporate environments
where IT security policies may prohibit automatic updates. Loading an incorrect firmware file can cause
unpredictable results. In most cases, you should use the automatic update procedure by pressing the
Check for updates button.
To manually change the firmware version or database package loaded into your CHAT 150, use the following procedure:
1. Press the Select File button in the Update Firmware screen. The Open dialog window is displayed.
2. From the List files of type drop-down menu, select either the Firmware or Database package to download.
3. A list of the appropriate CHAT files available on the system appears in the left-hand scroll list. Select the file to
upload and press the OK button. Select the Cancel button to cancel the update and return to the previous screen.
If the update file was downloaded directly off the Website, use the Folder list in the center-right side of this window to
navigate to the appropriate folder where the downloaded file was saved.
4. Once the file has been located and highlighted, click the Update button to update.
5. A warning dialog appears. Click Yes to manually load the selected firmware file or No to cancel.
6. A series of messages appears under the progress bar indicating the update is in progress.
WARNING: Do not unplug the CHAT 150 while the manual update is in progress.
When the update is complete, a message will appear below the progress bar stating that the update has been
successful with the appropriate revision level information if applicable.
> NOTE: If firmware programming was interrupted, such as by a power loss or an accidental cable dis-
connection, the CHAT 150 might become unstable. In this case, refer to Interrupted Firmware Update
Recovery in Chapter 5 of this manual.
Chapter 4: Using the Chat Application 21
Page 25

HELP
The Help button provides the following options:
• Click Help to activate the online help file.
• Click About to get information about your CHAT 150, including software and firmware revision numbers.
• Click ClearOne Homepage to visit the ClearOne website using your default web browser.
• Click Registration to register your CHAT 150 with ClearOne using your default web browser.
ADVANCED
Advanced displays the current audio settings for your CHAT 150.
You can also use the Advanced screen to adjust audio settings for your CHAT 150, save your settings as a custom
device, view and edit the CHAT 150 device database, and view the CHAT 150 log file. This section describes how to use
each of these functions.
22 Technical Support: 800.283.5936
Page 26

ADVANCED SETTINGS: AUDIO SETTINGS
Audio Settings displays the current audio settings and allows you to change them for the CHAT 150 currently
connected to your PC. You can also create custom audio settings for a device (see Advanced Settings: Database later
in this chapter for more information).
The audio settings are as follows:
• USB Audio: These controls affect the audio settings of the CHAT 150 when it is connected via USB to your
computer. Use the Mute buttons to mute either the microphone or speaker on the CHAT 150. Use the sliders to
adjust the microphone level and speaker level. Speaker and microphone level adjustments made in the CHAT
software will automatically change the speaker and microphone volume levels in Windows.
• Line Audio: These controls affect the audio settings of the CHAT 150 when it is connected to devices through
its I/O jack, such as handset telephones and video conferencing devices. These functions are unavailable if only
the USB is connected and appear grayed-out. Use the input slider to adjust the level of the incoming audio to the
speaker; use the output slider to adjust the level of the outgoing audio to the receiver side of the call.
• Speaker: These settings are only available when the VC Breakout Box is connected. The following options are
available:
• Normal: USB audio and line in audio from the VC Breakout Box are mixed through the CHAT 150 speaker.
• Video Mode: Select this option to allow the audio from the far end of the video conference call to come
through the TV speakers instead of the CHAT 150 speaker. Ensure that the CHAT 150 RCA connection
cable (included with the CHAT 150 VC configuration) is properly connected (see the section Connecting
CHAT 150 To A Video Conferencing Device in this manual for detailed instructions). USB audio still comes
through the CHAT 150 speaker in this mode.
• External Speakers: With this option selected, all audio (both USB and line in) is muted on the CHAT 150 and
routed to the line out jack on the CHAT 150 VC Breakout Box, to which you can connect external speakers and/
or an amplifier. In this mode, you are using the CHAT 150 as a microphone device only.
• USB/Analog Mix: Click this box to mix the audio coming into the CHAT 150 through the USB connection with
the audio coming through the I/O jack. For example, if this option is selected and you are talking to a colleague
via Skype on your PC connected to your CHAT 150, and you also initiated a video conference call through the VC
Breakout Box, all three parties would be joined together for a bridged call. The USB/Analog Mix setting is ignored
while the Speaker option (see above) is set to Video Mode or External Speakers.
• Line Echo Cancellation: Click this box to enable line echo cancellation. Line echo cancellation eliminates the
echo caused when the CHAT 150 is connected to a telephone. On a telephone, audio is normally routed from the
mouthpiece to the earpiece so that you can hear your own voice while talking, which causes feedback on a speaker
phone.
WARNING: Enabling line echo cancellation while not connected to a telephone may cause audio
problems, so only use this option while connected to a telephone.
Any settings changes that you make on this screen are instantaneously applied to the CHAT 150. In addition, you have
the option to click on Save to Database to capture the current settings and save them as a custom device as described
in the next section.
Chapter 4: Using the Chat Application 23
Page 27

ADVANCED SETTINGS: DATABASE
Database displays the devices configured for the CHAT 150 and allows you to edit them. The CHAT 150 device
database includes all of the audio settings for the devices pre-programmed by ClearOne (identified by the icon next
to each device) and any custom audio settings you set up and wish to save for later use.
The icon indicates that the device is in your My Devices list and can be edited.
To view the settings for a particular device, select the device and click the View button, or double-click the device name.
The View Database Record dialog appears.
24 Technical Support: 800.283.5936
Page 28

Click Ok to close the View Database Record dialog.
To create a custom audio settings for a device, perform the following procedure:
1. Click the New button from the Main Advanced screen shown above. The Add Settings to Database dialog
appears with the settings of the device you had selected in the database view.
2. Adjust the audio settings or click Upload from CHAT to upload and display the CHAT 150’s current settings.
3. Click the Select 1st drop-down box and select the desired device type. Or, you can type a custom name, if
necessary.
4. Click the Select 2nd drop-down box and select the desired manufacturer (or enter your own).
5. Type a name for the model of the new device in the Select 3rd field. The Ok button will appear as soon as the first
character is entered.
6. If you do not wish to add this device to your list of My Devices, de-select the Include in My Devices checkbox.
The default is to include new devices in your existing list.
7. When all selections are made, click Ok to save the custom audio setting.
8. The custom device is added to the CHAT 150 device database and is now available through Device Setup as an
available device.
> NOTE: In the device database, your custom device does not have the ClearOne icon next to it,
differentiating it from a pre-programmed device.
Chapter 4: Using the Chat Application 25
Page 29

EDIT CUSTOM AUDIO SETTING
1. To edit custom devices, click the Edit button (appears in the place of the View button for custom devices) after
selecting the custom device you wish to edit. The Edit Database Record appears.
2. Adjust the audio settings, or click Upload from CHAT to upload the CHAT 150’s current audio settings.
3. When you are finished editing, click Ok.
4. Click Yes to save the device with the new audio settings or click No to return to the Edit Database Record dialog.
To cancel your changes, click Cancel.
5. To delete custom devices from the device database, click the Delete button after selecting the device you wish to
delete.
You can only delete custom devices - you cannot delete pre-programmed devices (devices with the ClearOne icon
next to them).
ADVANCED SETTINGS: LOG
Log displays a list of actions taken by the CHAT 150, including a timestamp and a description of the action or even.
To save the log to a text file, click the Save button. A standard Windows save dialog appears. Name the file and choose
the directory in which you wish to save the file (the default directory is the CHAT 150 Log directory).
Click Clear to clear all entries in the log window.
26 Technical Support: 800.283.5936
Page 30

CHAPTER 5: MAINTENANCE
CARING FOR YOUR CHAT 150
• Follow all warnings and instructions in this manual.
• Unplug all cables from the CHAT 150 before cleaning.
• Unplug the power supply from the wall outlet (Phone/VC only) before cleaning.
• Do not use liquid or aerosol cleaners. Use a damp cloth moistened with water to clean the outside of your CHAT 150
and power supply.
TROUBLESHOOTING
If you are having trouble with the audio from your CHAT 150, it might not be optimized (tuned) for the specific hardware
device you are connected to. If you have not yet optimized the sound for this device, refer to the Optimizing Sound
Quality section in Chapter 3.
If you are still encountering problems, use the following procedure to troubleshoot the CHAT 150:
1. Activate the CHAT 150 software and verify the audio settings for the hardware device connected to the CHAT 150.
If this does not solve the problem, then look more closely at your hardware device for the problem (refer to the
hardware device’s User’s Manual or contact Technical Support).
2. Make sure all cables are properly and securely connected. Verify cable connections with the appropriate illustration
for your hardware device (see Chapter 2: Getting Started for more information).
3. If the CHAT 150 is connected through a USB hub, be sure that the USB hub is connected to an external power
source.
4. If another USB device such as a digital camera is connected to the computer on the same bus as the CHAT 150,
the Windows error message “USB Controller Bandwidth Exceeded” may be displayed. If this occurs, move the
other USB device to a separate USB bus. The CHAT 150 is a high-performance USB device and requires sufficient
bandwidth in order to operate properly.
If you are unable to resolve the problem using this procedure, please refer to the support pages on the ClearOne
Website or contact ClearOne Technical Support:
Phone: 1.800.283.5936 (USA)
Fax: 1.801.977.0087
E-mail: tech.support@ClearOne.com
Internet: www.ClearOne.com
Chapter 5: Maintenance 27
Page 31

INTERRUPTED FIRMWARE UPDATE RECOVERY
If firmware programming was interrupted (such as by a power loss or an accidental cable disconnection), the CHAT 150
might become unstable. The CHAT 150 software will boot into a generic mode and the Generic Mode screen will be
displayed.
To perform the firmware update, read and follow the instructions on the screen then click the Update Firmware button
(see the Update Firmware & Database section in Chapter 4: Using The CHAT Application for detailed instructions).
The messages “Initializing” and “Recovering” appear above the progress bar, followed by the typical messages that
appear during a firmware update. The update then continues to completion.
If the CHAT 150 attempts to recover from a programming error by booting up in the Generic (DFU) mode, a series of
instruction windows will be displayed. Follow the on-screen instructions to resolve this issue.
28 Technical Support: 800.283.5936
Page 32

CHAPTER 6: APPENDIX
SPECIFICATIONS
System Requirements
Windows XP
Windows Vista
Windows 7
Connections
USB:
Version 2.0 Compatible
Type: Mini-B Female
Keyed Connector:
Keyed RJ-45 (8-conductor)
Line Input through VC Breakout Box (BoB)
Frequency Response: 20 Hz - 20 kHz +/- 1 dB
Maximum Input Level: +6 dBu
Input Impedance: 10 kΩ
Line Output through VC Breakout Box (BoB)
Frequency Response: 20 Hz - 20 kHz +/- 1 dB
Maximum Output Level: +6 dBu
Output Impedance: 50 Ω
Controls
Volume Up
Volume Down
Microphone Mute
Audio
Speaker
Bandwidth: 190 Hz - 20 kHz
Max Output Level: 85 dB SPL @ 1 foot (0.30 meter)
Microphone
Bandwidth: 50 Hz - 7.75 kHz
Environmental
Operating Temperature:
41 - 104° F (5 - 40° C)
Processing
Full-Duplex
Distributed Echo Cancellation (D.E.C)
Noise Cancellation (NC)
Automatic Level Control (ALC)
Line Echo Cancellation (LEC) - Selectable
First Mic Priority
Power
USB:
5 VDC @ 500 mA Maximum
External:
Input: 100 - 240 VAC
Output: 9 VDC @ 560 mA
Mechanical
Dimensions (W x D x H):
7.4” x 7.4” x 1.8”
(18.8 cm x 18.8 cm x 4.6 cm)
Weight:
1.17 lbs (0.53 kg)
®
Compliance
RoHS
REACH
FCC Class A Part 15
ICES-003
CE Listed
UL Listed
Model Numbers
910-156-200 CHAT 150 USB
• Single CHAT 150 and Connecting Cable
910-156-200-00 CHATAttach 150
• Two (2) CHAT 150 Devices, Connecting Cables and Power
Supply
910-156-222 CHAT 150 Avaya
• CHAT 150 and Connecting Cable to Avaya Enterprise Phone
910-156-220 CHAT 150 Cisco
• CHAT 150 and Connecting Cable to Cisco Enterprise Phone
910-156-230 CHAT 150 VC
• CHAT 150 and Cable to Video Conference System
Accessory Part Numbers
860-156-230L CHAT 150 VC Accessory Kit
• Includes Video Conferencing Breakout Box, Power Adapter,
International Power Clips, RCA Connection Cable, 25’ Link
Cable
860-156-222L CHAT 150 Avaya Accessory Kit
• Includes Breakout Box for 2410, 2420, 4610 and 4621
Telephone Handsets, Power Adapter, International Power
Clips, RJ-9/RJ-9 Telephone Cable, 25’ Link Cable
860-156-220L Chat 150 Cisco Accessory Kit
• Includes Breakout Box for 7940, 7960, and 7970 Telephones,
Power Adapter, International Power Clips, RJ-9/RJ-9 Telephone
Cable, 25’ Link Cable
910-156-225 CHATAttach Expansion Kit
• Includes Cables, Power Supply and Quick Start Guide to
Update Two (2) CHAT 150 Devices to CHATAttach
Chapter 6: Appendix 29
Page 33

EUROPEAN COMPLIANCE
See the ClearOne Website for specific and most up-to-date European Compliance/Conformity-related information at:
http://www.clearone.com/resources#uc_voice
FCC PART 15/ICES-003 COMPLIANCE
This equipment has been tested and found to comply with the limits for a Class B digital device pursuant to Part 15 of the
FCC Rules and Industry Canada ICES-003. These limits are designed to provide reasonable protection against harmful
interference in a residential installation. This equipment generates, uses and can radiate radio frequency energy and,
if not installed and used in accordance with the instructions, may cause harmful interference to radio communications.
However, there is no guarantee that interference will not occur in a particular installation. If this equipment does cause
harmful interference to radio or television reception, which can be determined by turning the equipment off and on, the
user is encouraged to try to correct the interference by one or more of the following measures:
• Reorient or relocate the receiving antenna.
• Increase the separation between the equipment and receiver.
• Connect the equipment into an outlet on a circuit different from that to which the receiver is connected.
• Consult the dealer or an experienced Radio/TV technician for help.
FCC PART 15.19(A) (3) COMPLIANCE
This device complies with Part 15 of the FCC Rules. Operation is subject to the following two conditions: (1) this device
may not cause harmful interference, and (2) this device must accept any interference received, including interference
that may cause undesirable operation.
WARRANTY
ClearOne, Inc. (the Manufacturer) warrants that this product is free of defects in both materials and workmanship.
For complete warranty information including length, coverage, and limitations, visit ClearOne on the Web @ www.
ClearOne.com.
ClearOne, Inc.
Edgewater Corporate Park South Tower
5225 Wiley Post Way
Suite 500
Salt Lake City, Utah 84116 U.S.A.
30 Technical Support: 800.283.5936
Page 34

CHAT® 150 | CHATAttach® 150 —— 多方会议扬声器
用户手册
Page 35

电话 1 800 283 5936
传真 1 801 974 3669
电子邮件 tech.support@clearone.com
网址 www.clearone.com
CHAT 150 | CHATAttach 150 用户手册
CLEARONE PART NO. 800-156-201,2014 年 7 月,第 2.8 版
© 2014 ClearOne 公司保留所有权利。未经 ClearOne 公司的书面
许可,不得以任何形式或方式复制本文件的内容。ClearOne 公司
保留特权。
本文档中的信息如有更改,恕不另行通知。
美国专利:D539,274;D556,189;D531,999。
其他专利待批。
Page 36

目目录
第 1 章:介绍
产品概述.................................................................................... 1
服务和支持............................................................................ 1
技术支持 ............................................................................... 1
售后服务 ............................................................................... 1
产品退货 ............................................................................... 1
开箱 ........................................................................................... 3
CHATAttach 150 USB 拆包 ...................................................3
更换零配件 ................................................................................ 4
CHATAttach 扩展电缆拆包 ...................................................4
CHAT 150 配置 ..........................................................................4
第 2 章:入门
CHAT 150 控制 ..........................................................................5
LED 指示灯 ........................................................................... 5
音量和静音按钮 ....................................................................5
耳机按钮 ...............................................................................5
VC 接线盒 .............................................................................5
安装 CHAT 软件到 WINDOWS ..................................................6
连接 CHAT 150 到 PC ............................................................... 6
连接 CHAT 150 到外部设备 ...................................................... 7
连接到电话............................................................................ 7
连接到视频会议接线盒 (VC BOB) ........................................ 9
CHATATTACH™:连接两台 CHAT 设备 ................................ 12
CHATATTACH 工作模式 ......................................................... 13
CHATATTACH 故障排除 ......................................................... 13
第 3 章:配置 CHAT 150
配置您的 CHAT 150 ............................................................... 14
设备安装.................................................................................. 14
我的设备.................................................................................. 16
优化声音质量 .......................................................................... 16
使用预定义的设备设置 ....................................................... 16
为 CHAT 150 设置音频 ....................................................... 16
第 4 章:使用 CHAT 应用程序
使用 CHAT 应用程序 ...............................................................17
使用第三方应用程序 .......................................................... 17
更新固件和数据库 .................................................................. 18
检查固件更新 ...................................................................... 18
手动更新.................................................................................. 21
帮助 ......................................................................................... 22
高级设置.................................................................................. 22
高级设置:音频设置 ............................................................... 23
高级设置:数据库 .................................................................. 24
编辑自定义音频设置 ............................................................... 26
高级设置:日志 ..................................................................... 26
第 5 章:维护
保护您的 CHAT 150 ............................................................... 27
故障排除.................................................................................. 27
固件更新中断恢复 .................................................................. 28
第 6 章:附录
规格 ......................................................................................... 29
系统要求 .............................................................................29
连接 ..................................................................................... 29
控制 ..................................................................................... 29
音频 ..................................................................................... 29
环境 ..................................................................................... 29
处理 ..................................................................................... 29
电源 ..................................................................................... 29
机械 ..................................................................................... 29
合规 ..................................................................................... 29
型号 ..................................................................................... 29
配件型号 .............................................................................29
欧盟合规性 .............................................................................. 30
FCC PART 15 及 ICES-003 合规性 .........................................30
FCC PART 15.19 (A) (3) 合规性 ..............................................30
质量保证.................................................................................. 30
Page 37

第 1 章:介绍
产品概述
感谢您购买了 ClearOne 公司的 CHAT 150 多方会议扬声器。CHAT 150 是一种适合个人和小型团体使用的多方会议
扬声器。CHAT 150 可以连接到电话、PC、视频会议系统,并提供丰富的全双工音频通讯。
您可以将 CHAT 150 与多种设备和应用程序一起使用,包括:
• 企业电话, 如 Avaya,Cisco 等
• 视频会议系统,如 Tandberg,Sony,Polycom 等
• 网络电话应用程序,例如 Skype 和 Vonage
• VoIP 软件电话,例如 Avaya, Cisco,CounterPath 等
• Web 网络会议,如 IBM/Lotus Workplace,微软 Live 等
• 即时语音消息应用程序
• 音频播放器,如 iTunes,QuickTime 等
服务和支持
如果您需要更多关于如何设置或操作您的 CHAT 150 多方会议扬声器,请与我们联系。我们欢迎并鼓励您提出宝贵意
见,以便我们不断改进我们的产品,更进一步满足您的需求。
技术支持
电话: 1 800 283 5936(美国)
传真: 1 801 977 0087
电邮: tech.support@ClearOne.com
网站: www.ClearOne.com
售后服务
电话: 1 800 945 7730(美国)或 1 801 975 7200
传真: 1 800 933 5107(美国)或 1 801 977 0087
电邮: sales@ClearOne.com
产品退货
所有产品退货时需要退货授权(RMA)号码。您在退货之前,请联系 ClearOne 公司的技术支持部。请确保您返回本产
品所有附带的物品。
第 1 章:介绍 1
Page 38

重要安全信息
在使用本产品前,请阅读安全说明。此个人会议扬声器在电源出现故障时,并无拨打紧急电话的功能。您必须另行安排
使用紧急电话服务。
• 请阅读和理解全部说明,并遵守产品上标注的所有警告提示。
• 在清洁本产品之前,要从插座上拔下来。请勿使用液体清洁剂或喷雾清洁剂。清洁只能使用湿布。
• 使用本产品时,请勿在靠近有水的地方,例如浴缸,厨房水槽,或游泳池。
• 将本产品放置在一个平整、水平、干爽的表面进行操作。
• 切勿将产品靠近热源散热器或暖气,让产品充分散热。
• 本产品只能在产品标签上指定的电源下运作。如果您不能确定您所在位置的电力系统,请咨询经销商或当地的电力
公司。
• 不要使墙上的插座负荷超载和延长电源线;这可能会导致火灾或触电。
• 切勿将液体洒到本产品上或产品内。
• 请勿拆解本产品。打开或取下盖子,都可能会使您触碰危险电压或有其他风险。不正确的重新组装可能会使您在后
续使用过程中导致触电。拆开产品则保修无效。
• 如出现以下情况,请将本产品插头从插座上拔下,并与合格的技术服务人员联系:
a. 当电源线或插头损坏或磨损时。
b. 如果有液体洒入本产品。
c. 如果产品没有按照操作说明进行操作。
d. 如果产品掉落或损坏。
e. 如果产品的性能表现出明显地变化。
• 在雷雨天气避免使用电话。可能有遭受来自闪电的电击危险。
• 不要在煤气泄漏源的附近使用本产品。
• 本产品会干扰电气设备,如录音电话、电视机、收音机、电脑和微波炉。请勿将本产品放置在靠近这些设备的
地方。
• 本产品只适合在海拔 2000 米以下使用。
• 本产品不适合在热带气候条件下使用。
2 技术支持:800 283 5936
警告:为防止
火灾或触电的
危险,请勿将
本产品淋雨或
受潮。
请妥善保存本说明
在三角形内的
闪电和箭头是
警告标志,提
醒您在本产品
内有危险电压。
警告
触电危险
请不要打开
AVIS: RISQUE DE CHOC
ELECTRIQUE - NE PAS OUVRIR
注意:为减少电击的
危险,请不要取下盖
子(或背面),里面
没有用户可适用的部
件。有问题请咨询合
格的维修人员。
参见产品下面或背面的标志
在三角形内的
惊叹号是一个
警告信号,
提醒您本产品
有重要的说明
手册。
Page 39

开箱
下图显示各种型号的 CHAT 150 产品及其包装中的配套配件。请联系您的经销商更换零配件。
CHATAttach 150 USB 拆包
> 注意:ClearOne 公司对运输过程中产生的产品损坏并不负责。如有损坏,请直接与承运人联系索赔。
请仔细检查您的货物是否有明显的损坏迹象。如果货物出现损坏,请保留原来的盒子和包装材料,由
承运人检验。请立即联系您的承运人。
为确保安全性和合规性,请您只使用 CHAT 150 配套的电源。合格的电源有:Glob Tek 型号:GT- 41052-1509,
和 Phihong 型号:PSA05R-090。如果您的电源丢失或损坏,请联系 ClearOne 公司的技术支持予以更换。
第 1 章:介绍 3
Page 40

更换零配件
下图显示了供 CHAT 150 使用的所有部件及配件。请联系您的经销商更换零配件。
CHAT 150 附件
CISCO
附件套装
860-156-220L
接线盒为 Cisco
7940, 7960, 7970
电话电筒
CHAT 150
环接电缆 (12’)
AVAYA
附件套装
860-156-222L
接线盒为 AVAYA
2410, 2420, 4610. 4621
电话电筒
CHAT 150
环接电缆 (10’)
VC
附件套装
860-156-230
接线盒为 Video
Conferencing System
CHAT 150
环接电缆 (25’)
CHAT 150
环接电缆 (25’)
830-156-011L
CHAT 150 环接电缆
(RJ-9/RJ-9)
CHAT 150
万能电源适配器
CHAT 150 环接电缆
(RJ-9/RJ-9)
CHAT 150
万能电源适配器
CHAT 150 环接电缆
音频电缆
CHAT 150
万能电源适配器
CHATAttach 扩展电缆拆包
CHATAttach电缆
部件号: 830-156-010L
电源适配器
部件号: 551-156-200
快速入门指南
部件号: 800-156-225
CHAT 150 配置
CHAT 150 可以有多种配置,如下图所示。CHAT 150 多方会议扬声器的所有配置都是相同的;CHAT 150 设备的包装中
包含不同的链接组件,以便能够让它适应各种连接方式。所有的 CHAT 150 设备上都有一个迷你 USB 接口,所以每一
种配置都可以连接到一台 PC 上。
配置 使用方法简介
Avaya 和 Cisco 电话专用的
CHAT 150
CHAT 150 USB
CHAT 150 VC 连接到任意视频会议系统,都具有全双工扩音器功能。
4 技术支持:800 283 5936
连接到 Avaya 或 Cisco 电话的耳机插孔,具有全双工扩音器功能。
连接到 PC 或笔记本电脑的 USB 接口可以用来使用软件电话,网络电话应用程序,
网络会议,语音通讯等等。
Page 41

第 2 章:入门
MUTE ST
CHAT 150 控制
静音状态指示灯
音量状态指示灯
VOLUME STATUS
ATUS INDICATOR
INDICATOR
VOLUME DOWN
降音
升音
VOLUME UP
静音
MUTE
静音状态指示灯
MUTE STATUS INDICATOR
MUTE STATUS INDICATOR
静音状态指示灯
LED 指示灯
当 CHAT 150 的麦克风处于激活状态(非静音)时,麦克风 LED 指示灯会亮起三个蓝灯。当 CHAT 150 麦克风静音功
能打开时,指标灯会亮起红灯。七个音量 LED 指示灯亮起蓝灯时表明当前的音量设置,音量越高则亮的灯越多。
音量和静音按钮
使用升/降音按钮来调整 CHAT 150 的音量级别。使用静音按钮可以使 CHAT 150 的麦克风静音,再次按静音按钮可取
消静音。
如果您是将 CHAT 150 连接到一台 PC,你可以使用 Windows 的音量控制或者也可以在 CHAT 软件应用程序中调整。
> 注意:如果您是将 CHAT 150 连接到一台 PC,那么您通过 CHAT 150 按钮对音量进行的任何调整,
都会反映在 Windows 和 CHAT 软件的扬声器音量控制中。
耳机按钮
按下在电话接线盒上的耳机按钮,可将音频从您的电话发送到连接在 CHAT 150 接线盒上的耳机中。它会阻止声音从
接线盒传播到 CHAT 150 中——声音会被严格地传播到耳机中。电话接线盒 LED 指示灯亮起,表示耳机音频已被激
活,CHAT150 LED 指示灯将保持长亮。音频不再从接线盒(USB 音频仍然有效)发送到 CHAT 150。再次按下耳机按
钮,可禁用耳机音频并且重新将音频从接线盒发送到 CHAT 150。切换后,LED 指示灯会熄灭。
VC 接线盒
一旦您使用附带的 RCA 连接电缆,正确地将 CHAT 150 的 VC 接线盒连接到视频会议设备和电视上,则所有设置的改
变,如静音、麦克风和扬声器电平调整等,就可以通过 CHAT 150 软件来控制。接线盒本身没有按钮,也没有更改设置
的功能。LED 会指示该设备已通电。
第 2 章:入门 5
Page 42

安装 CHAT 软件到 WINDOWS
> 注意:所有版本的 Windows XP,Windows Vista 和 Windows7 操作系统的安装过程都是相同的。
CHAT 150 可以开箱即用。如果仅用于 PC,不必下载或安装任何软件。
如果 CHAT 150 用来连接其他设备,或者如果 CHAT 150 的固件需要更新,则可通过以下过程下载和安装 CHAT 软件。
1. 通过访问下面的网站来下载 CHAT 软件:
http://www.clearone.com/resources#uc_voice
2. 从“BY PRODUCT”窗口中选择您的设备并单击 SEARCH 按钮,屏幕上将只显示适用于您的设备的软件供您下
载。选择 CHAT 50/150 的最新软件版本,系统将会显示一个确认窗口,请您确认是否将软件下载到您的电脑上。
3. 解压下载的文件夹,然后运行 Setup.exe 开始安装过程。
4. 按照屏幕上的提示完成软件的安装。
当 CHAT 软件安装完成之后,通过双击您的 Windows 桌面上的 ClearOne CHAT 图标 运行 CHAT 软件,
或通过单击 :
(开始 > 所有程序 > ClearOne Communications > CHAT > ClearOne CHAT).
在第一次使用 CHAT 150 前,需要进行音频设置,其配置过程请参照本手册第四章的高级设置部分。
这将确保每个使用 CHAT 150 的设备和应用程序提供最佳的音质。
连接 CHAT 150 到 PC
1. 使用附带的 USB 电缆,将 CHAT 150 连接到您的 PC 或笔记本电脑上。CHAT 150 上的蓝色 LED 指示灯点亮,表明
CHAT 150 已通电并准备工作。
6 技术支持:800 283 5936
Page 43

连接 CHAT 150 到外部设备
连接到一部电话
ClearOne 公司提供了 CHAT 150 的配置方法,可以将您的 CHAT 150 连接到 Cisco 和 Avaya 的企业电话上(参见本手
册介绍中的 CHAT 150 配置内容 )。CHAT 150 电话接线盒是 CHAT 150 和特定电话之间的接口。
1. 使用附带的 25’ RJ-45 电缆,连接电话接线盒与 CHAT 150。
2. 使用附带的 2’ RJ-9 电话电缆,连接电话接线盒的电话插口与您的电话的耳机插口。
不要将电缆插入电话的线路插孔,听筒插孔,或插入不同于电话接线盒底部所列出的电话中,那样可
能会导致电话和∕或 CHAT 150 受损。
电话接线盒
电话
第 2 章:入门 7
Page 44

3. 如果您有一个经常与您电话一起使用的耳机,请将它插在 CHAT 150 电话接线盒的耳机插孔上。
电话接线盒
耳机
4. 找到适应您所在国家的正确电源插头部件,并将其滑入附带的电源适配器中。该电源插头部件可能包含一个塑料保
护罩,请将其摘除,然后再滑入电源适配器。
电源插头部件
电源适配器
8 技术支持:800 283 5936
Page 45

5. 使用附带的电源,将 CHAT 150 电话接线盒连接到电源插座上。
电话接线盒
电源适配器
6. CHAT 150 上的蓝色 LED 指示灯点亮,表明 CHAT150 已通电并准备工作。
7. 接下来,将 CHAT 150 连接到您的 PC 上。这样,您就可以使用 CHAT 软件设置已连接企业电话的 CHAT 150 设备
了。请参考本章结尾关于连接 CHAT 到 PC 部分内容。
> 注意:按下在电话接线盒上的耳机按钮,可将音频从您的电话发送到连接在 CHAT 150 接线盒上的耳
机中。它会阻止声音从接线盒传播到 CHAT 150 中——它仅会传播到耳机中。电话接线盒 LED 指示
灯点亮,表示耳机音频已被激活。CHAT 150 LED 指示灯仍然会亮,尽管音频信号没有从接线盒发送
到CHAT 150(USB 音频仍然有效)。再次按下耳机按钮,可禁用耳机音频并且重新将音频从接线盒
发送到 CHAT 150。这个改变将使 LED 指示灯熄灭。
连接到视频会议接线盒 (VC BoB)
ClearOne 公司提供了 CHAT 150 的配置方法,使其可以将您的 CHAT 150 连接到视频会议系统。CHAT 150 的 VC 接线
盒是 CHAT 150 和视频会议设备之间的接口。一旦您正确地将 CHAT 150 的 VC 接线盒连接到视频会议设备和电视上
(使用附带的 RCA 连接电缆),则所有的设置变动情况,如静音、调整麦克风和扬声器电平等,就可以通过 CHAT
150 软件来控制。接线盒本身没有按钮,也没有更改设置的功能。LED 仅指示该设备已通电。
1. 使用附带的 RJ-45 电缆,连接 VC 接线盒与 CHAT 150 设备。
)
)
(
(
)
)
(
(
vc 接线盒
第 2 章:入门 9
Page 46

2. 使用附带的 6 英尺 RCA 连接线,将 CHAT 150 的 VC 接线盒连接到您的视频会议设备和∕或电视∕显示器,如下图
)
)
)
)
所示。该电缆的一端有两个 RCA 接头,另一端有五个接头,五个接头分成两组,一组两个接头,另一组三个接头。
有两个接头连接到 VC 接线盒。蓝色接头连接到音频输入端口(通过 图标来识别),而黑色接头连接到音频输出
端口(通过 图标来识别)。
在电缆的另一端,有红色(右)和白色(左或单声道)接头的那一组,插入您的电视上对应的音频端口。这种连接方式
让您既可以使用 CHAT 150 上的扬声器来听到来自远端的音频,或者您也可以使用 TV 上的扬声器达到同样的效果。如
使用此选项,可参考高级设置:第 4 章音频设置:使用 CHAT 应用程序中的详细信息。
拥有三个接头的那一组应连接您的视频会议设备。红色(右)和白色(左或单声道)接头接到对应的音频输出端口。
但是,如果您的视频会议设备不具有左、右音频输出端口,仅有一个通道(单声道),则您需要连接白色接头来给
CHAT 150 发送单声道音频信号。黑色接头插入音频输入端口。
vc 接线盒
)
(
)
)
)
(
(
)
)
(
(
)
(
(
(
)
(
(
)
)
(
(
)
)
视频会议设备
3. 找到适应您所在国家的正确的电源插头部件,并将其滑入附带的电源适配器中。该电源插头部件可能包含一个塑料
保护罩,请将其移除,然后再滑入电源适配器。
电源适配器
电源插头部件
10 技术支持:800 283 5936
Page 47

4. 使用附带的电源,将 CHAT 150 电话接线盒连接到电源插座上。
5. CHAT 150 上的蓝色 LED 指示灯点亮,并且 VC 接线盒上的 LED 电源指示灯也点亮,表明 CHAT 150 已通电并准
备工作。
6. 如此,您便可以使用 CHAT 软件来配置 CHAT 150,方便您使用视频会议系统。请参考本章前述连接到 PC 内容。
第 2 章:入门 11
Page 48

CHATAttach:连接两台 CHAT 设备
CHATAttach 中的 CHATAttach 工具包可将两台 CHAT 设备连接在一起,用于设置大型会议。
使用 CHATAttach 工具包,必须满足以下条件:
1. 两台 CHAT 设备必须是同一型号,两台都是 CHAT 150,都是 CHAT 160,或者都是 CHAT 170,设备。目前,
不同 CHAT型号还不能和 CHATAttach 设备搭配使用。
2. 两台 CHAT 设备必须都安装相同的固件版本。固件必须兼容 CHATAttach。为了确保这一点,从网站下载固件的最
新版本,并使用最新固件配置每一个将要连接到 CHATAttach 配件上的设备。所有旧的 CHAT 150 设备需要更新固
件,以便与 CHATAttach 配件一起工作。
3. 为获得最佳性能,CHAT 设备之间的距离至少必须为 5’。
使用下列步骤来连接 CHATAttach 配件。
1. 使用带转接头的 CHATAttach 电缆连接两台 CHAT 设备。
2. 两台 CHAT 150 设备同时放置时,相距至少 5’。
3. 插上 CHATAttach 电源。
为了防止在会议前/中/后,电源线不慎拔出,建议采取方法固定电缆端接头。一种方法是使用公-母连
接器连接,防止断开的情况发生,如上图所示。
如想设立一个能够全面使用 CHATAttach 配件的会议室,建议在放置 CHAT 设备的附近钻一些孔,并
通过这些孔布线,将它们固定在会议桌下方,如上图所示。
4. 请按照 CHAT 150 用户手册中的说明,使用一台 PC 来设置 CHAT 设备。
12 技术支持:800 283 5936
Page 49

CHATAttach 工作模式
下表概述了 CHATAttach 工作模式。
模式 # 模式代码 描述 条件
1
2
两台 CHAT 设备上的
LED 红灯常亮
两台 CHAT 设备上的
LED 蓝灯常亮
CHAT 设备在静音模式下。 正常
CHAT 设备在非静音模式下。 正常
3
两台 CHAT 设备上只
亮一个蓝色音量灯
没有连接到 PC。CHAT 设备处于待机模式,当 PC 重
新连接到设备时,将唤醒该设备。CHAT 设备的所有
以前的设置将被恢复。
CHATAttach 故障排除
下表描述了在使用 CHATAttach 配件时可能出现的问题和可能的原因,帮助您及时发现问题并予以解决。
错误 # 错误代码 原因 解决方法
1
2
3
4
> 注意:CHATAttach 连接后,会阻止其他外部设备的连接,因为 USB 端口会被 CHATAttach 连接线占用。
两台设备的 LED 红灯
同时闪烁
两台设备上的 LED
蓝灯同时闪烁
一台 CHAT 设备上
LED 红灯闪烁
CHAT 设备不能同步
在 CHAT 设备上的固件支持
CHATAttach,但固件版本是不一样的。
在同一时间连接了多台 PC。 只将一台 PC 连接到 CHAT 设备
1. CHATAttach 电源未插好
2. 只有一台 CHAT 设备支持
CHATAttach
3. 只有一台 CHAT 设备连接到
CHATAttach
这两台设备上的固件不支持
CHATAttach 配件。
下载并安装最新的固件到两台
CHAT 设备上
1. 请将 CHATAttach 电源插入有
效电源插座中
2. 下载并安装最新的固件到两台
CHAT 设备
3. 两个 CHAT 设备连接到
CHATAttach 配件
下载并安装最新的固件到两台
CHAT 设备
正常
第 2 章:入门 13
Page 50

第 3 章:配置 CHAT 150
配置您的 CHAT 150
本节介绍如何配置能将您的 CHAT 150 连接到特定设备。CHAT 软件包含了一个预配置的设备设置的数据库,它可以让
您瞬间为所支持的设备选择和应用最佳设置。
> 注意:ClearOne 公司会不时地为数据库增加新的设备。更新您的 CHAT 软件,包括所有目前支持的
设备,请参阅本章后面的更新固件和数据库小节中的内容。
如果您连接到 CHAT 150 的特定设备没有在数据库中列出,您可以通过本章后面介绍的说明创建一个自定义的设备。
设备安装
为您的设备配置 CHAT 150,请执行以下步骤:
1. 使用附带的 USB 电缆,将 CHAT 150 连接到您的 PC 或笔记本电脑上。CHAT 150 上的蓝色 LED 指示灯点亮,表
明 CHAT150 已通电并准备工作。
2. 通过双击桌面上的 ClearOne CHAT 图标,或从电脑的开始菜单中启动应用程序来启动 CHAT 软件。
显示 CHAT 软件的主画面。
14 技术支持:800 283 5936
Page 51

3. 单机左栏中的按钮 Device Setup。Device Setup 界面显示出常见类型的设备,方便您配置 CHAT 150。
4. 从 Select 1st 栏中,选择您要连接到 CHAT 150 的设备类型。
5. 在 Select 2nd 栏中,选择您的设备的制造商。如果您选择 PC and Laptop,请选择 All。如果您要连接到 VC
接线盒,并且您的制造商不在列表中,请选择 Other。
6. 从 Select 3rd 栏中选择设备的型号。如果您选择的是 PC and Laptop,请选择 All。如果您选择的是 VC
Breakout Box,并且指定的型号不在列表中,请选择 Other。
7. 三栏选择完成后,在界面下方的 Add to My Device 和 Apply to CHAT 按钮将会激活。
8. 当您核对这三列中的选项后,单击 Apply to CHAT 按钮,将这些设置应用到 CHAT 150 上。将会弹出一个消息
框,显示该设置已成功应用到您的 CHAT 150。
9. 单击 Add to My Devices 按钮,在 My Devices 屏幕上会创建一个包含这些设置的条目,让您可以立刻选择,并可
在将来应用此配置。将会出现一条显示该设备已成功添加的消息框。
10. 如果您想添加 CHAT 150 到其他设备,请重复步骤 1-8。
为了确保最佳的音质,您需要为将要使用的每个应用程序和设备自定义 CHAT 150 的音频设置。
请参考接下来的优化声音质量小节中介绍的调音过程。
第 3 章:配置 CHAT 150 15
Page 52

我的设备
My Devices 可显示出您为使用 CHAT 150 配置的所有设备。这个屏幕让您轻松地在您所列设备的设置之间切换,包括
任何已保存的自定义配置,前提是您已经为您的设备创建了自定义音频设置(参见本章后面的高级设置:数据库部分,
介绍了关于保存自定义设置的详细信息)。
选择您希望与您的 CHAT 150 一起使用的设备,然后单击 Apply to CHAT 按钮,将音频设置应用到您的 CHAT 150。
如果想从 My Devices 列表中删除一个设备,在列表中选中该设备,然后单击 Remove from MyDevices 按钮。
请注意,这仅仅是从 My Devices 列表中删除设备。而不会从设备数据库中删除它(更多的信息请参见本章后面的
高级设置:数据库部分)
优化声音质量
为了获得最佳的音质,您必须为将用到的每台设备和应用程序调整 CHAT 150 的音频设置,下面的内容描述了其调整
过程。
> 注意:在 CHAT 软件中的音量设置与 Windows 音量设置是同步的。使用 CHAT 软件或 CHAT 150 中
的按钮来改变音量,同样也会改变 Windows 中的音量设置。反之,更改 Windows 的音量设置也会改
变 CHAT 软件的设置。
使用预定义的设备设置
在 CHAT 应用程序中可以预先定义设备设置,给那些 CHAT 150 最常用的设备提供良好的音质。如果您使用上一节中的
过程为其中的设备配置 CHAT 150 的设置,请在执行任何额外的调音之前测试的音质。如果您对音质满意,则没有必要
进一步调整。
设置 CHAT 150 音频
选择您希望与您的C HAT 150 一起使用的设备,然后单击 Apply to CHAT 按钮,使自定义的音频设置生效。
16 技术支持:800 283 5936
Page 53

第 4 章:使用 CHAT 应用程序
使用 CHAT 应用程序
1. 如果尚未打开程序,请启动 CHAT 应用程序。
2. 点击 My Devices 按钮,然后选择您想要调整的设备(如果您的设备∕应用程序不在列表中,请选择 Other 或者 All
选项),然后单击 Apply to CHAT 按钮。
3. 对于外部硬件设备,使用第 2 章:入门中介绍的相应连接图,将这个外部设备连接到 CHAT 150。
4. 在外部设备上调节扬声器和并将音量设置为 50%(音量的一半)。
5. 单击 Advanced 按钮,可显示出您在步骤 2 中为选中的设备预先定义的音频设置。使用屏幕上的 USB Audio 选
项调整应用程序;使用 Line Audio 选项为连接到 CHAT 150 接线盒的外部硬件设备调音。
> 注意:在 Advanced 设置中,在 USB Audio 中调节 Microphone Level 可以改变 CHAT 150 的 USB
应用的麦克风音量,而您调节 Line Audio 下的 Output Level,将会改变输送至连接到 CHAT 150 的线
路音频插孔上的设备的麦克风音量。同样,调节 USB Audio 下的 Speaker Level 可以改变 CHAT 150
音箱的音量,而调整 Line Audio 下的 Input Level 可以改变所连接设备接收到的扬声器音量。
6. 使用该设备或应用程序拨电话 / 呼叫。给音频调优时,座机的音质应为最佳。
7. 请电话另一端的人以正常的音量从 1 数到 10。在对方在计数的同时,单击并移动 CHAT 应用程序中的 Input 滑动
条,直到可以清楚地听到对方的声音。在有必要的时候重复这样做,以找到设备的最佳扬声器音量。
8. 当对方仍然是连接状态,以正常的音量从 1 数到 10。询问对方,他们是否都能听清楚。点击和移动 Output 滑动
条,直到对方能听清楚为止。在有必要的时候重复计数,以找到设备的最佳麦克风音量。
9. 单击 Save to Database 来捕获最佳设置。将出现 Add Settings to Database 对话框。在型号字段中输入相应的
名称,然后单击 Save to Database 按钮。
10. 为设备或应用程序设置的最佳音频已经可以使用了。对于任何新增的设备和应用程序可重复步骤 1 到 9。
如要在不同的设备和应用程序的音频设置之间进行切换,单击 My Devices 按钮,选择所需的设备或应用程序,然后单
击 Apply to CHAT 按钮。音频设置会立即应用于所选择的设备或应用程序。
使用第三方应用程序
如果您正在通过其他应用程序(非 CHAT)如 Cisco 通讯或 Skype 来使用 CHAT 150,ClearOne 公司建议您使用该应用
程序的优化配置向导来调整音频设置。如果应用程序不具有优化向导或音频设置功能,可使用 CHAT 应用程序调整音频
设置来获得最佳的音质,如前一节中的介绍内容。CHAT 应用程序的音频设置信息也可以在接下来的几页说明中找到。
第 4 章:使用 CHAT 应用程序 17
Page 54

更新固件和数据库
在 Update Firmware 屏幕上显示的是当前的固件版本,设备名称,并且检查 ClearOne 公司网站上是否有固件和设备
数据库的更新。使用 Check for updates 按钮,可以让您自动更新到最新的固件文件和设备数据库,或者您可以使用
Select File 按钮来手动加载现有的固件文件。
> 注意 CHAT 150 所连接到的电脑,必须能够连接到互联网才能使用 Check for updates 选项。
检查固件更新
更新固件和设备数据库,请执行下列步骤:
1. 启动 CHAT 150 软件,见本手册前面相关内容。
2. 单击位于窗口的左侧的 Update Firmware 按钮。
3. 单击 Check for updates 按钮,检查该网站的可用更新。
4. 在进度条上会显示以下一系列信息:
• “Locating website...”
• “Website found”
• “Click Update to load new firmware into device”(仅当有新固件文件可用时出现。)
• “Click Update to load new database information”(仅当有新设备数据库文件可用时出现。)
18 技术支持:800 283 5936
Page 55

> 注意:如果没有新的固件或设备数据库更新可用时,在进度条上将出现以下信息:
“Your device contains the most recent firmware”
“Your database contains the most recent updates”
这表明您的固件和数据库是最新的。不需要更新。
5. 单击 Update 按钮安装可用的更新。出现更新对话框。
通过单击相应的按钮执行下列任一或所有操作:
单击 Update Firmware 仅更新固件。
单击 Update Database 仅更新数据库。
单击 Cancel 取消更新程序并返回到 Update Firmware 屏幕。
第 4 章:使用 CHAT 应用程序 19
Page 56

当你点击任一更新按钮,都将会弹出一个 Update 对话框。
6. 单击 Yes 将继续固件或设备数据库的更新,或 No 取消更新。
7. 出现第二个 Update 对话框。单击 Yes 继续,或 No 取消。
8. 一系列的信息会显示在进度条的下方,表明更新正在进行中。
警告:当更新正在进行时,不要拔掉 CHAT 150 电源。
9. 当更新完成后会出现下面的进度条下面的消息:
• “Update Successful! The firmware for CHAT has been changed to <new revision level>”,
其中<new revision level>显示的时新固件版本号。
• “Update Successful! The database has been updated to <new revision level>” ,其中
<new revision level>是新固件版本号。
10. 您的 CHAT 150 现在拥有最新版本的固件和/或设备数据库。
20 技术支持:800 283 5936
Page 57

手动更新
> 注意: 这个程序是为高级用户、技术支持,以及存在 IT 安全规定而禁止自动更新的企业环境所准
备。加载了不正确的固件文件可能会导致无法预测的结果。在大多数情况下,您应该按 Check for
updates 按钮,使其自动更新程序。
如要手动更改固件版本或将数据库程序包加载到您的 CHAT 150 上,请使用以下过程:
1. 在 Update Firmware 屏幕上按 Select File 按钮。显示 Open 对话框。
2. 从 List files of type 下拉菜单中,选择 Firmware 或 Database package 下载。
3. 在系统上所有可用的适合 CHAT 的文件列表显示在左侧滚动列表框中。选择要上传的文件,然后按下 OK 按钮。
选择 Cancel 按钮取消更新,并返回到前一个画面。如果更新文件是直接从网站下载的,使用该窗口中心偏右的文
件夹列表,导航至保存下载文件的文件夹。
4. 找到并选中该文件后,点击 Update 进行更新。
5. 弹出警告对话框后,单击 Yes 手动加载所选的固件文件,或选择 No 取消加载。
6. 一系列的信息会显示在进度条的下方,表明更新正在进行中。
警告:当更新正在进行时,不要拔掉 CHAT 150 电源。
当更新完成后,在进度条的下方会出现一条说明更新成功的信息,并且在适用的情况下,信息里还会包含适当的版本级
别信息。
> 注意:如果固件编程中断,如断电或电缆意外断开,CHAT 150 可能会变得不稳定。在这种情况下,
请参考本手册第 5 章的固件更新中断恢复部分。
第 4 章:使用 CHAT 应用程序 21
Page 58

帮助
Help 按钮提供了以下选项:
• 单击 Help,启动联机帮助文件。
• 单击 Abo ut,可获得您的 CHAT 150 软件和固件的版本号等信息。
• 单击 ClearOne Homepage,将使用默认的 Web 浏览器访问 ClearOne 公司网站首页。
• 单击 Registration,使用默认的 Web 浏览器在 ClearOne 公司注册您的 CHAT 150。
高级设置
Advanced 显示您的 CHAT 150 的当前音频设置。
在 Advanced 屏幕中,可以为您的 CHAT 150 调整音频设置,将您的设置保存为自定义设备,查看和编辑 CHAT 150
设备数据库,并且查看 CHAT 150 的日志文件。本节将介绍如何使用这些功能。
22 技术支持:800 283 5936
Page 59

高级设置:音频设置
Audio Settings 显示当前音频设置,用户可以对当前连接在 PC 上的 CHAT 150 设备音频进行更改。您也可以自定义音
频设置(更多内容,请参见本章后面内容高级设置:数据库)。
音频设置如下所示:
• USB Audio:当 CHAT 150 通过 USB 连接到计算机上时,可以通过该功能控制设备的音频设置。Mute 按钮,可
以使 CHAT 150 上的麦克风或扬声器静音。使用滑块来调节麦克风和扬声器音量等级。CHAT 软件中的麦克风和扬
声器音量等级调节,自动反映在 Windows 麦克风和扬声器音量的变化上。
• Line Audio:在 CHAT 150 通过 I/O 插口连接到诸如手提电话及电话会议设备上时,该功能控制 CHAT 150 的音频
设置。仅当 USB 连接模式及变灰显示时,该功能不可用。输入滑块用来调节输入到扬声器的音频音量等级,而输
出滑块则是调节电话接收方的输出音频音量等级。
• Speaker:该设置仅在 VC 连接盒连接时可用。以下选项可用:
• Normal:USB 音频和来自 VC 连接盒的线路音频通过 CHAT 150 扬声器混合。
• Video Mode:选择该选项时,来源于视频会议电话远端的音频通过电视扬声器播放,而非 CHAT 150 设备播
放器播放。保证 CHAT 150 的 RCA 连接 电缆(包括 CHAT 150 的 VC 配置)正确连接(详细说明请参见本说
明书CHAT 150连接到视频会议设备章节)。该模式下,USB 音频将通过 CHAT 150 扬声器播放。
• External Speakers:选择该选项,CHAT 150上的所有音频(包括 USB 和线路音频)均静音,音频发送到
CHAT 150 VC 连接盒的外放接口上,用户可以连接外接扬声器和/或扩音器。该模式下,CHAT 150 只能作为
麦克风设备使用。
• USB/Analog Mix:点击该方框,就会将通过 USB 连接的 CHAT 150 音频和来自于 I/O 接口的音频混合。例如,如
果选择该选项,用户通过个人电脑上的 Skype(连接 CHAT 150)与同事对话,并且通过 VC 连接盒发起视频电话
会议,那么这三方可以连接起来,共同对话。但是,当 Speaker 选项(见前文)设置为 Video Mode 或 External
Speakers 时,USB/模拟混合设置无效。
• Line Echo Cancellation:单击该方框,启动线路回音消除。CHAT 150 连接到电话上时,线路回音消除可消除产
生的回音。在电话上交谈时,音频通常由送话口送到听筒,方能听见声音。然而,这样也使得声音返回到说话人的
电话上。
警告:在未连接电话时,启动线路回音消除功能可能会导致音频问题。因此,请仅在连接电话时,
使用该选项。
在该界面上执行的任何设置改动都将立即作用到 CHAT 150 上。此外,用户也可选择单击 Save to Database(保存到数
据库),记录当前设置,保存为自定义设备(参见下一章)。
第 4 章:使用 CHAT 应用程序 23
Page 60

高级设置:数据库
Database 显示 CHAT 150 配置的设备,方便用户编辑。CHAT 150 设备数据库包括 ClearOne 预制设备的所有音频设置
(通过每个设备旁的 图标表示),以及用户建立并以备后用的所有自定义音频设置。
该 图标表示,该设备在 My Devices 列表中,并且可以编辑。
要查看设备的设置,可以选择该设备,再单击 View 按钮,或者双击设备名称。弹出 View Database Record 对话框。
24 技术支持:800 283 5936
Page 61

单击 Ok,关闭 View Database Record 对话框。
要创建自定义音频设置,操作如下:
1. 单击上述主高级界面上的 New 按钮。弹出 Add Settings to Database 对话框,该数据库视图中显示用户先前选
择的设备设置。
2. 调整音频设置,或单击 Upload from CHAT,上传并显示 CHAT 150 的当前设置。
3. 单击 Select 1st 下拉菜单框,选择期望的设备类型。或者,也可以输入一个自定义名称(如需)。
4. 单击 Select 2nd 下拉菜单框,选择期望的生产厂商(或输入用户自定义名称)。
5. 在 Select 3rd 栏中输入新设备型号的名称。输入第一个字符后,立即弹出 Ok 按钮。
6. 如果您不希望添加该设备到 My Devices 列表中,取消选择 Include in My Devices 复选框。默认添加新设备到现
有列表中。
7. 完成所有选择后,单击 Ok,保存自定义音频设置。
8. 自定义设备已添加到 CHAT 150 设备数据库,可通过 Device Setup 作为可用设备启用。
> 备注:在设备数据库中,自定义设备旁没有 ClearOne 图标,以与预制设备相区分。
第 4 章:使用 CHAT 应用程序 25
Page 62

编辑自定义音频设置
1. 要编辑自定义设备,选择您希望编辑的自定义设备,然后单击 Edit 按钮(在自定义设备的 View 按钮处)。弹出
Edit Database Record 对话框。
2. 调整音频设置,或单击 Upload from CHAT,上传并显示 CHAT 150 的当前设置。
3. 完成编辑后,单击 Ok。
4. 单击 Yes 保存带有新音频设置的设备,或单击 No,返回 Edit Database Record 对话框。取消改动,
单击 Cancel。
5. 要从设备数据库中删除自定义记录,先选择要删除的设备,然后单击 Delete 按钮。
您可以只删除自定义设备——您不可以删除预制设备(旁边有 ClearOne 图标的设备)。
高级设置:日志
Log 显示 CHAT 150 所有的活动,包括活动的时间戳及描述。
单击 Save 按钮,将日志保存到文本文件中。弹出 Windows 标准保存对话框。给文件命名,指定文件保存路径(默认
路径为 CHAT 150 日志文件夹)。
单击 Clear,清除日志窗口下的所有表目。
26 技术支持:800 283 5936
Page 63

第 5 章:维护
保护您的 CHAT 150
• 遵守本手册中的所有警告和指示。
• 清洁前,拔去 CHAT 150 的所有电缆。
• 清洁前,从墙上插座拔去电源(仅电话和 VC)。
• 请勿使用液体清洁剂或喷雾清洁剂。将抹布湿润用来清洁 CHAT 150 及其电源外部。
故障排除
如果您的 CHAT 150 音频出现问题,可能是您没有优化(调整)您连接的硬件设备。如果您还没有优化该设备,参见
第 3 章优化声音质量。
如果仍然有问题,采用以下步骤,排除 CHAT 150 的故障:
1. 启动 CHAT 150 软件,校验连接在 CHAT 150 上的硬件设备的音频设置。如果仍然不能解决问题,那么进一步检查
您的硬件设备(参见硬件设备的使用手册,或者联系技术支持)。
2. 保证所有电缆都已正确、安全连接。校验硬件设备的电缆连接按照示意图正确连接(更多信息,参见第 2 章:
入门)。
3. 如果 CHAT 150 通过 USB 集线器连接,保证 USB 集线器连接在外接电源上。
4. 如果有另外一个 USB 设备,例如数码相机,也连接在与 CHAT 150 相同的计算机总线上,那么可能会出现
Windows 报错信息“USB Controller Bandwidth Exceeded”。此时,可将另外一个 USB 设备移动到其他 USB
总线上。CHAT 150 是一种高性能 USB 设备,需要充足的带宽,保障其正常运转。
如果该步骤仍旧不能解决问题,请参考 ClearOne 网站上的支持页面,或联系 ClearOne 技术支持。
电话: 1 800 283 5936(美国)
传真: 1 801 977 0087
电邮: tech.support@ClearOne.com
网址: www.ClearOne.com
第 5 章:维护 27
Page 64

固件更新中断恢复
如果固件软件中断(例如停电或偶然电缆断开),CHAT 150 可能会不稳定。CHAT 150 软件就会启用一般模式,显示
General Mode 界面。
要更新固件,请阅读和遵守界面上的指示,然后单击 Update Firmware 按钮(更多内容,参见 第 4 章:使用 CHAT
应用的更新固件&数据库)。在固件更新过程中,进程条上会显示“Initializing”和“Recovering”信息,然后再显示典
型更新信息,直到更新结束为止。
如果 CHAT 150 试图在一般(DFU)模式中启动,从而从程序设计错误中恢复,将会显示一系列指示窗口。请遵照屏幕
上指示解决问题。
28 技术支持:800 283 5936
Page 65

第 6 章:附录
规格
系统要求
Windows XP
Windows Vista
Windows 7
连接
USB:
兼容 2.0 版本
类型: Mini-B 母转接
转接接头:
转接:RJ-45(8 芯)
通过 VC 连接盒(BoB)的线性输入
频率响应:20 Hz - 20 kHz +/- 1 dB
最大输入电平:+6 dBu
输入阻抗:10 kΩ
通过 VC 连接盒(BoB)的线性输出
频率响应:20 Hz - 20 kHz +/- 1 dB
最大输出电平:+6 dBu
输出阻抗:50 Ω
控制
音量升高
音量降低
麦克风静音
音频
扬声器
带宽: 190 Hz - 20 kHz
85 dB SPL @ 1 英尺(0.30 米)
麦克风
带宽:50Hz – 7.75 kHz
环境
工作温度:
41 - 104° 华氏度(5 - 40° 摄氏度)
处理
全双工
分布式回音消除(D.E.C)
噪音消除(NC)
自动电平控制(ALC)
线路回音消除(LEC)—— 可选
第一麦克优先
电源
USB:
最大 5 VDC @ 500 mA
外接:
输入:100 - 240 VAC
输出:9 VDC @ 560 mA
机械
外形尺寸(W x D x H):
7.4” x 7.4” x 1.8”
(18.8 cm x 18.8 cm x 4.6 cm)
重量:
1.17 磅(0.53 kg)
®
合规
RoHS
REACH
FCC 法规 A 级第 15 部分(FCC Class A Part 15)
ICES-003
CE 列明标准(CE Listed)
UL 列明标准(UL Listed)
型号
910-156-200 CHAT 150 USB
• 单台 CHAT 150 及连接线
910-156-200-00 CHATAttach 150
• 双台(2)CHAT 150 设备,及连接线和电源
910-156-222 CHAT 150 Avaya
• CHAT 150 及连接 Avaya 企业电话的电缆
910-156-220 CHAT 150 Cisco
• CHAT 150 及连接 Cisco 企业电话的电缆
910-156-230 CHAT 150 VC
• CHAT 150 及连接视频会议系统的电缆
配件型号
860-156-230L CHAT 150 VC 配件套装
• 包括视频会议连接盒、电源适配器、国际电源插头、
RCA 连接电缆和 25’ 环接电缆
860-156-222L CHAT 150 Avaya 配件套装
• 包括 2410、2420、4610 及 4621 电话听筒连接盒、电源适配
器、国际电源插头、RJ-9/RJ-9 电话线和 25’ 环接电缆
860-156-220L CHAT 150 Cisco 配件套装
• 包括 7940、7960 及 7960 电话听筒连接盒、电源适配器、
国际电源插头、RJ-9/RJ-9 电话线和 25’ 环接电缆
910-156-225 Expansion Kit 扩展套装
• 包括电缆、电源适配器和更新 CHATAttach 的双(2)CHAT
150 设备的快速启动指南
第 6 章:附录 29
Page 66

欧盟符合性
更多关于欧盟符合性的最新详细信息,请参见 ClearOne 网址:
http://www.clearone.com/resources#uc_voice
FCC PART 15 及 ICES-003 符合性
本设备经测试,符合美国 FCC 技术法规第 15 部分(FCC Part 15)及加拿大工业部(IC)的干扰成因设备标准 #3
(ICES-003)关于 B 级数字设备的规定。这些限制标准为确保此设备在居住地区使用时,防止产生有害干扰。本设备
产生、使用并能够发射无线电频率。如未按使用说明书进行安装和使用,可能会对无线电通讯造成有害干扰。然而,
无法保证采用何种安装模式可以完全避免干扰。如果该设备对无线电或电视接收造成有害干扰,导致必须开启或关闭
该设备,用户可以尝试以下几种方法避免干扰:
• 调整接收天线。
• 将此设备远离其他信号接收设备。
• 将该设备与其他信号接收设备分置在不同电源上。
• 与供应商取得联系,或向资深广播电视技术人员咨询 。
FCC PART 15.19 (A) (3) 法规符合性
本设备符合 FCC 法规第 15 部分。操作时须遵循以下两个条件:(1)本设备不会造成有害的电信干扰,并且(2)此
设备必须接受任何接收到的电信干扰,包括可能导致意外操作的干扰。
质量保证
ClearOne 公司(生产厂商)承诺,本设备在材料和工艺上无任何瑕疵。完整质保信息,例如长度、范围和限制等,请
访问 ClearOne 网站,网址 www.ClearOne.com。
ClearOne, Inc.
Edgewater Corporate Park South Tower
5225 Wiley Post Way
Suite 500
Salt Lake City, Utah 84116 U.S.A.
30 技术支持:800 283 5936
 Loading...