

Page 1
1
User’s Manual & Quick Start Guide
Page 2

2
Register Your Product
Make sure you register your product at:
www.ClearClick.tech
Browse All Our Products!
If you’re looking for fun, unique, and easy-to-use technology,
we’ve got it! Please visit our website to browse all of our
products:
www.ClearClick.tech
Safety Precautions – Important, Please Read:
1. Do not disassemble the unit.
2. Do not permit children to use or play with this device.
3. Please note that the device and/or plugged in USB drives
may become very warm during use.
4. Do not operate the unit around water or rain. Do not operate
the unit around any kind of machines or appliances (other
than computers).
5. Turn off and unplug the unit when not in use.
6. Use only the included accessories with the device.
7. Do not connect high powered, amplified audio outputs to the
“in” ports of the device.
8. Follow all copyright laws in your country. You are
responsible for your own use of this device.
Full 1-Year Warranty
Your purchase comes with a full 1-year warranty. This
means that if anything goes wrong with the unit (other than
accidental damage) within the first year of ownership, we will
replace the unit for free, 100% at our cost. Contact us at
[email protected] with any issues.
Page 3
3
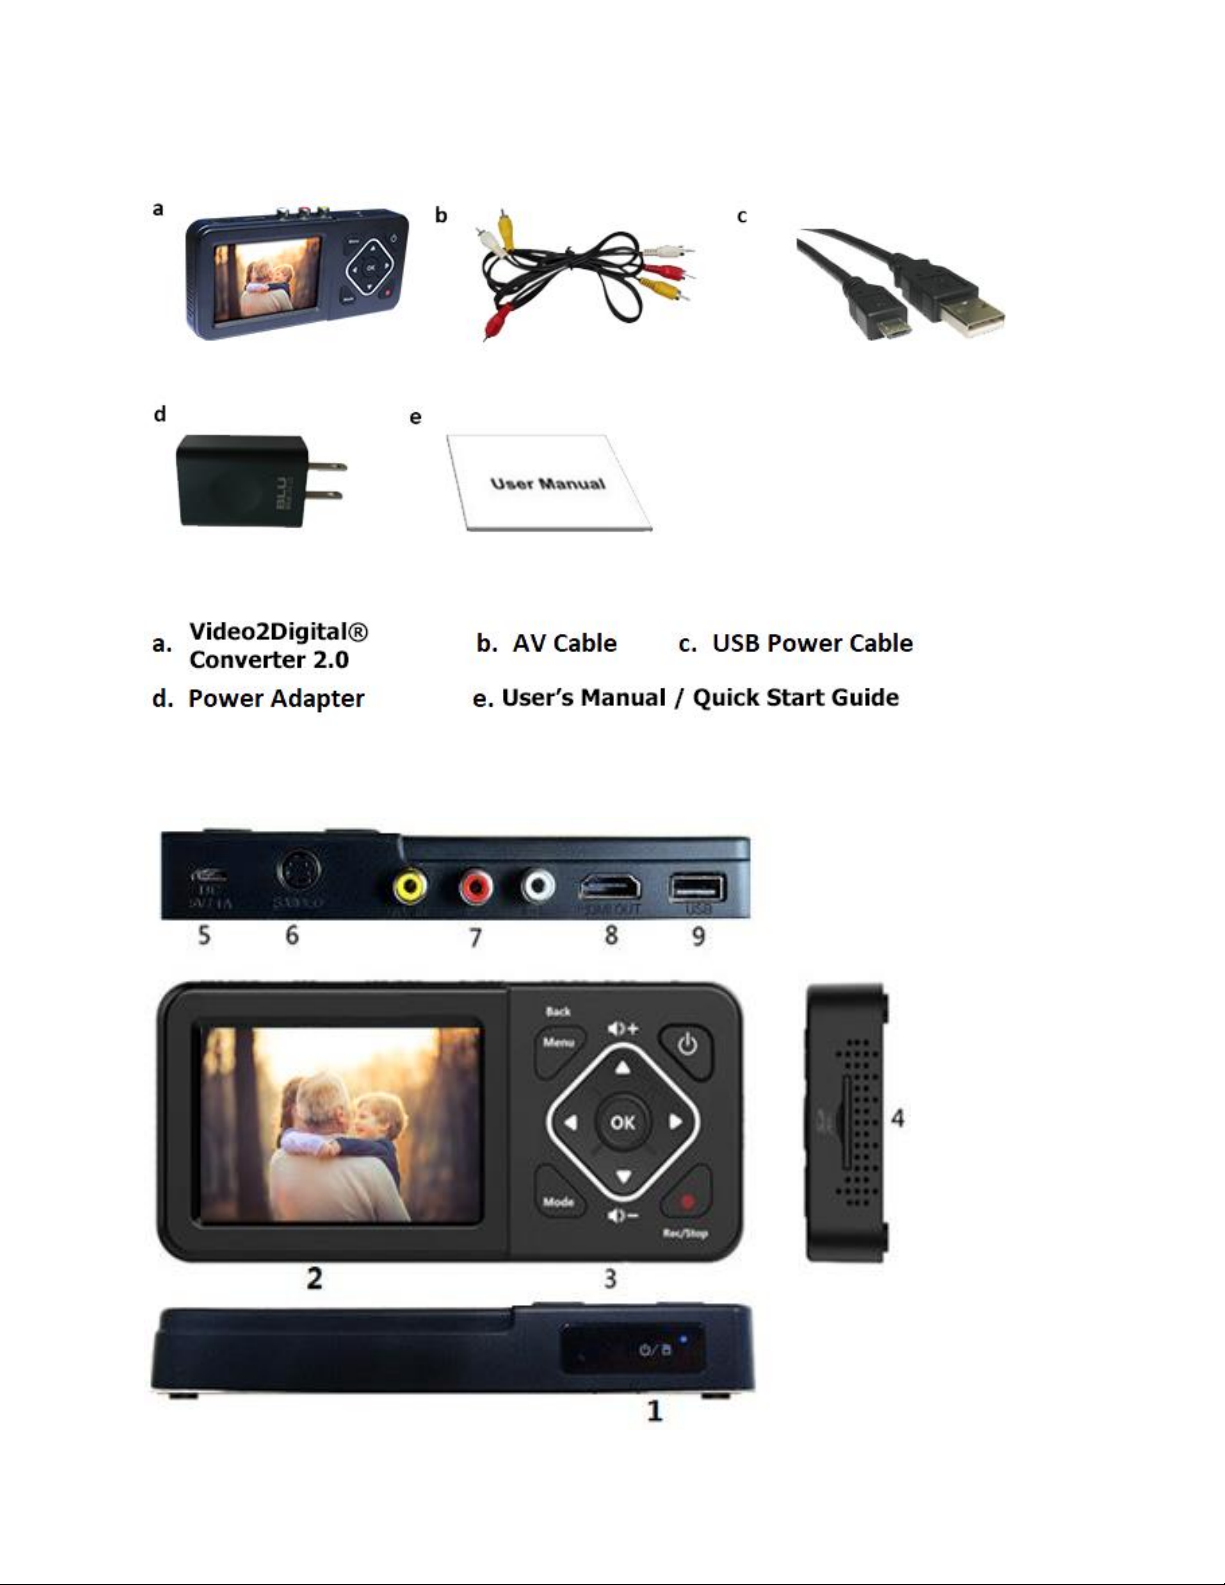
What’s In The Box?
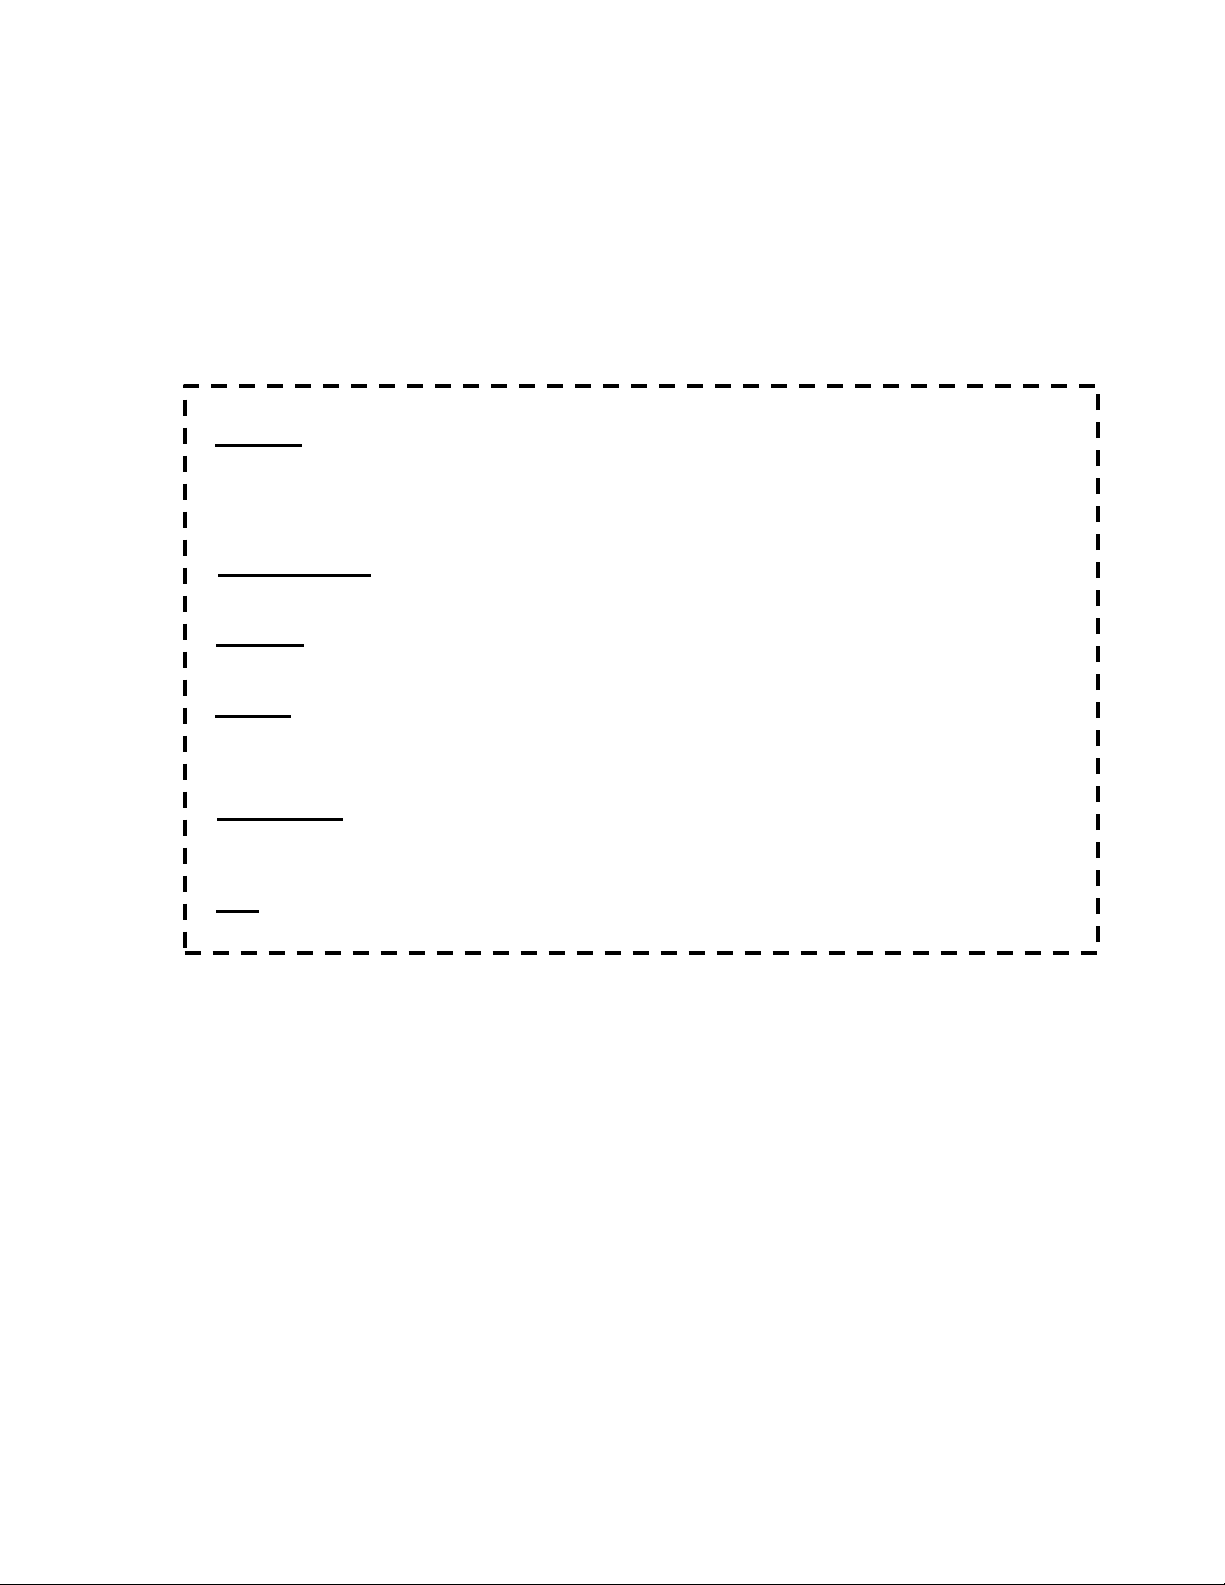
Device Diagram & Explanation (continued on next page)
Page 4
4
1. LED indicators: A blue light means the device is on. A blue
blinking light means it is running low on memory.
2. LCD Screen: LCD screen for preview/playback.
3. Panel Buttons:
Power: A single press will turn on/off the display screen. Hold
down for several seconds to turn off normally. To force device
shutoff, hold down longer than 10 seconds.
Menu/Back: Press this button to enter or exit menus.
Vol+/-: Press these buttons to control the built-in speaker volume.
Mode: Press this button to switch among Record/Photo/Playback
mode. Hold down longer to delete a recording in playback mode.
Rec/Stop: A single press will start/stop recording in recording
mode. Hold down longer to capture a snapshot.
OK: Select an option. Or in Record mode, press “OK” to
pause/resume while recording.
4. SD card slot: Insert an SD card for recording or playback.
5. Micro USB port: power input for USB power adapter.
6. S-Video: s-video input (optional).
7. AV IN: input jack for RCA input (from VCR, camcorder, etc.)
8. HDMI OUT: HDMI output port (optional).
9. USB: to plug in a USB flash drive
Page 5
5
Quick Start Guide
1. Plug in and turn on the device.
Using the included USB cable and power adapter,
plug in the Video2Digital® Converter 2.0 to a wall
outlet.
Then, power the device by pressing and holding
the power button for several seconds.
The device will automatically be in “Capture”
mode when you turn it on. You will see a blue
screen.
2. Plug in a USB flash drive or SD card.
Plug in a USB flash drive or SD card (not
included) into the converter. When you record
videos, the converter will save the digital videos
onto this drive.
Page 6

6
3. Hook up your video source.
Using the included video transfer cable (with red,
white, and yellow connectors), hook up your video
source (a VCR, camcorder, DVD player, gaming
device, or similar) to your Video2Digital®
Converter 2.0.
Connect the cable to the “OUT” ports of your
video source, and into the yellow, white, and red
“IN” ports on the top of the Video2Digital®
Converter 2.0.
Note, the converter’s preview screen may remain
black or blue until the device detects a live signal
from your video source. Continue to the next step.
4. Start converting your video!
Press “Play” on your video source (VCR,
camcorder, etc.) and start playing from it.
Page 7
7
Your video should appear on the Video2Digital®
Converter’s screen. (Note: If your video looks jerky
during recording or playback, do not worry. When you
transfer the video to your computer, the video will
appear normally.)
Simply press the record button (“Rec/Stop”)
to start recording your video in digital format!
To stop recording, simply press the “Rec/Stop”
button again.
Tip! The Video2Digital Converter 2.0 can
automatically stop recording after a preset
amount of time (i.e. 60 minutes, 90 minutes, etc.)
To learn how to use this feature, see page 9
before starting your recording.
5. Transfer your videos to your PC or Mac.
After stopping your recording, your digital file will
be saved onto the inserted USB drive or SD card.
When you’re ready, you can transfer the digital
video file to your computer.
Page 8

8
Simply unplug your USB flash drive or SD card from
the converter and plug it into your computer.
(NOTE: Don’t unplug your USB flash drive or SD
card until you’ve stopped recording by pressing the
“Rec”/”Stop” button first, as described in the
previous step.)
Your USB drive or SD card will show up as a new
drive on your computer. Browse this drive and go to
the “video” folder. Your recorded videos will be in
this folder.
Page 9
9
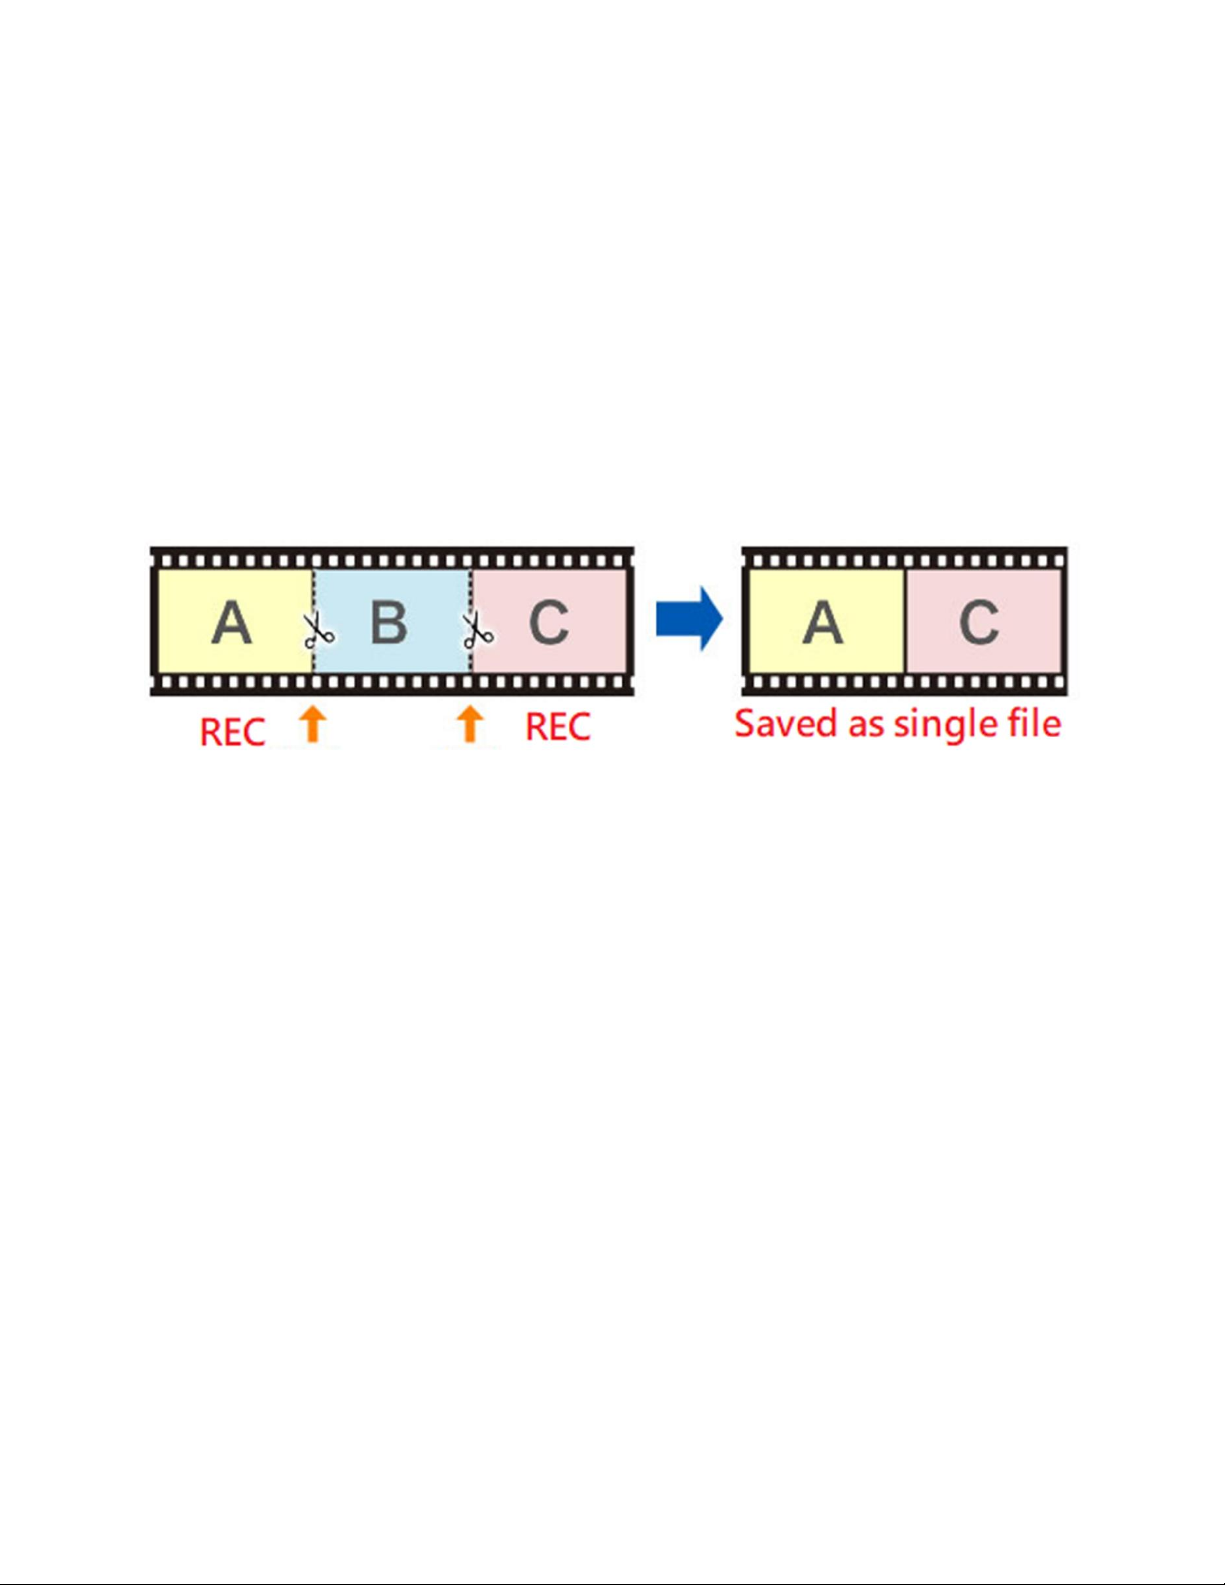
How To Pause/Resume Recording
After you’ve started recording, you may
pause/resume recording by pressing the “OK”
button. The converter won’t record anything while
recording is paused. Press the “OK” button again to
resume recording.
How To Turn Off Time/Date Stamp
By default, the converter will overlay the time & date
on your converter videos. Many users like to turn this
feature off.
To do this, press the “Menu” button. Scroll down to
the “Time watermark” menu option. Then press
“OK.” The checkbox next to the option should
disappear. Then close the menu by pressing the
“Menu” button again.
Page 10
10
How To Use The “Auto Stop” Feature
If you’d like, you can set the Video2Digital Converter
2.0 to automatically stop recording after a preset
amount of time.
(This is a helpful feature if you are converting a VHS
tape or camcorder tape to digital format, and you’d
like to leave your transfer unattended.)
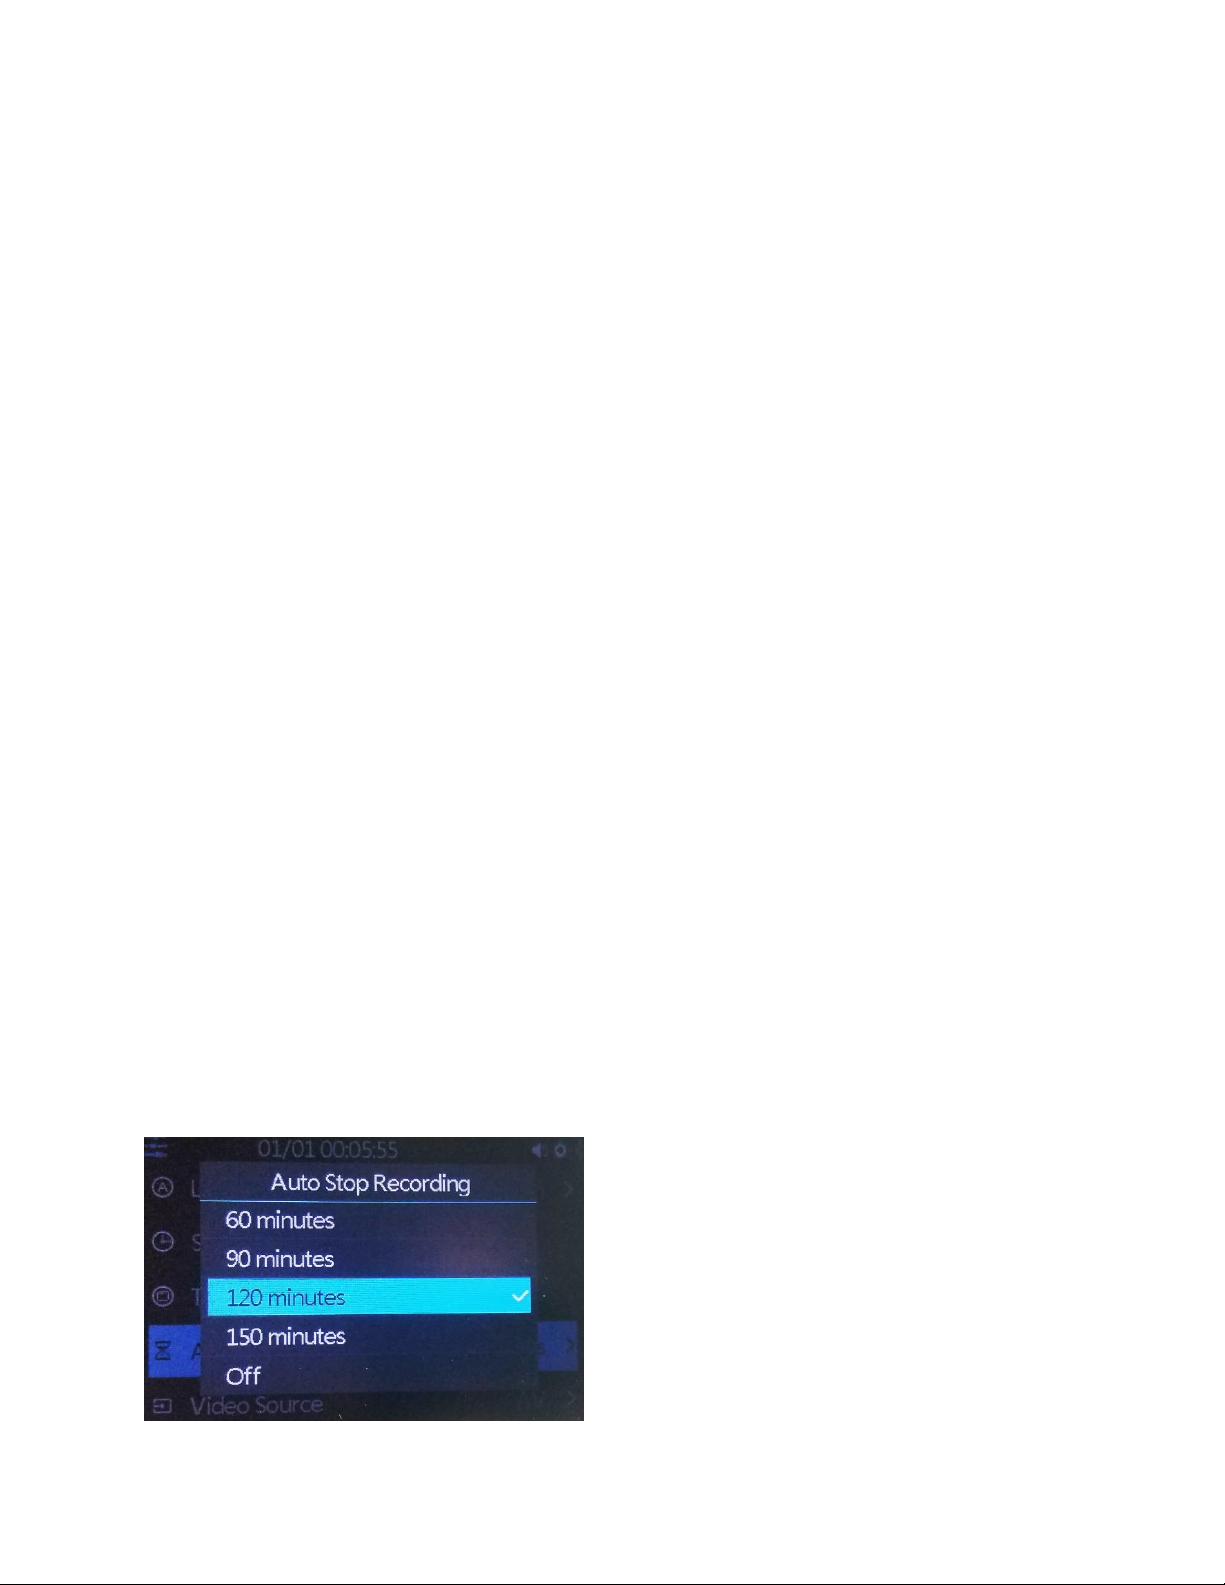
To use this feature, press the “Menu” button and
scroll to the “Auto Stop Recording” option, and press
“OK.”
Choose the option you would like, and press “OK.”
Then press “Menu” to close the menu.
Now, once you start recording, the converter will
automatically stop recording and save the digital
video file after the amount of time you’ve specified.
Page 11
11
How To Schedule Recordings
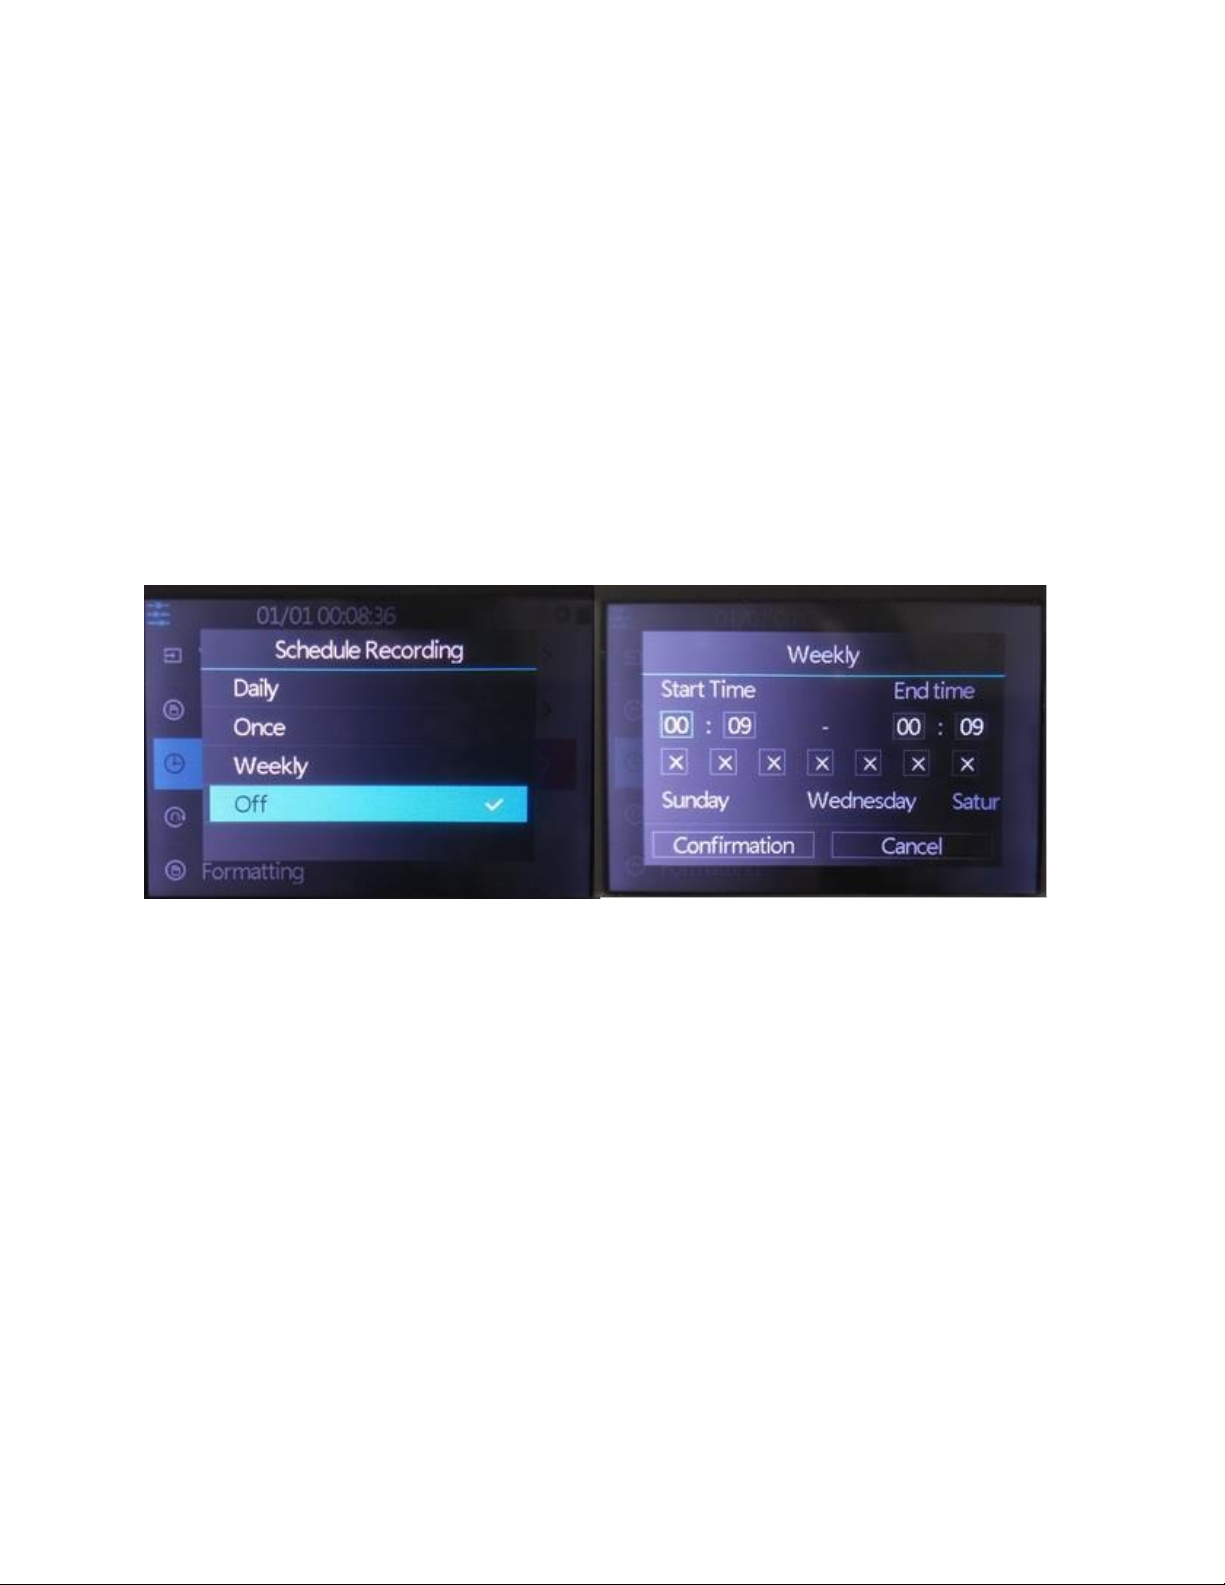
You can schedule a recording by pressing the
“Menu” button the device and selecting the
“Schedule Recording” option.
NOTE: Make sure your device is set to the right time
and date before scheduling.
On the above menu, the device allows you to set up
a daily recording, a one time recording, or a weekly
recording.
Start Time/End Time: set the desired time of
start/stop recording.
Day of Week Checkmarks: set the desired week
days of schedule.
Page 12

12
Confirmation: Choose to save the schedule
settings.
Cancel: Choose to exit without saving the schedule
settings.
How To Play Back Videos on the
Device or a TV
To play back videos on your device, go to Playback
mode. From Recording mode, press the “Mode”
button twice (or until a “Play” icon appears in the top
left corner of the LCD).
Your recordings will appear. Press “OK” to play or
pause a recording. Hold down “OK” to exit a
playback. Navigate to a different recording by
pressing the “Right” and “Left” arrows.
To delete a recording, hold down the “Mode” button.
To play back videos on your TV, simply connect an
HDMI cable (not included) to the HDMI OUT port on
your converter. Plug the other end into an HDMI IN
port on your TV. Make sure your TV is set to the
correct input.
Page 13

13
How To Format USB Drive or SD Card
To format a USB drive or SD card and prepare it for
recording, follow the steps below.
NOTE: Formatting a USB drive or SD card will erase
all data on it.
In “Recording” mode, press the “Menu” button. Scroll
down to select the “Formatting” option. Press “OK.”
The device will ask you to confirm formatting.
Choose either “USB” or “SD” to confirm (depending
on the type of memory device you have inserted).
The memory card/USB drive will be erased and
prepared for recording.
Page 14

14
FAQ’s & Troubleshooting
1. My video doesn’t show up on the LCD.
A) First, make sure your video source is functioning
correctly by plugging it into a TV. If your VCR or
camcorder hasn’t been used in several years, it may
need a tune-up or repair.
B) Make sure your AV cable is plugged into your
“OUT” ports on your video source (VCR, camcorder,
etc.), not the “IN” ports.
C) Make sure the AV source input is connected
securely.
D) Make sure the “Video Source” setting in the
device menu is set correctly.
2. My SD card or USB drive isn’t recognized by
the device.
Please try another SD card or USB drive. We
recommend using a fresh SD card or USB drive that
has not been used in other devices before.
NOTE: Many external USB hard drives require too
Page 15

15
much power to be used with this converter. We
recommend using a compact USB thumb drive, not
a large-capacity external USB hard drive.
3. My converter will not turn on.
When turning on the device, make sure you are
pressing and holding the power button for 2-3 full
seconds. A single press of the power button will not
turn it on.
Make sure your converter is plugged in using the
included power adapter. (The device does not
contain an internal battery.)
If your converter still does not turn on, please
contact us at [email protected].
4. How do I record from an HDMI video source?
You can’t – this device is not meant to record from
HDMI or HD video sources. (This device can only
output to HDMI.) Instead, please check out our “HD
Capture Box” and “HD Capture Box Ultimate”
products for this purpose at www.ClearClick.tech.
Page 16

16
5. The converter has frozen and won’t respond.
Remove your USB drive or SD card. Unplug the
converter and plug it in again, and use a different
USB drive or SD card.
6. No sound comes from the speaker.
Please make sure the volume is unmuted and
turned up. (Press the “Up” arrow button until you can
hear sound).
7. My recordings don’t show up on my PC or Mac
when I plug in the device by USB.
This device is not meant to be plugged into a
computer. To transfer your recordings, simply unplug
your USB thumb drive or SD card from the converter
and insert it into your computer.
8. The device isn’t working with an external USB
hard drive.
Since USB hard drives will consume more power
than USB flash drives, the Video2Digital Converter
may not provide enough power for them. Please use
a compact USB thumb drive instead.
Page 17

17
9. What video format does the converter save in,
and how large are the recorded files?
The converter saves in MP4 video format. The
resolution is 720x480. The recorded file size will be
around 2 GB per hour of video.
10. What is the maximum size USB flash drive or
SD card that can be used with the converter?
You may use up to a 128 GB USB drive or SD card
with the converter. If you are purchasing a larger
memory card, make sure you purchase an “SD” card
that is marked “Class 10” or better.
11. How do I remove an SD memory card from
the device?
Simply press (inward) on the memory card. It will
make a click when it has unlocked. Then pull the
card from the device.
12. I have a question that isn’t listed here, or
need further support.
No problem! Please email us at
[email protected] with your order number,
and we will get back to you as soon as possible.
Page 18
18
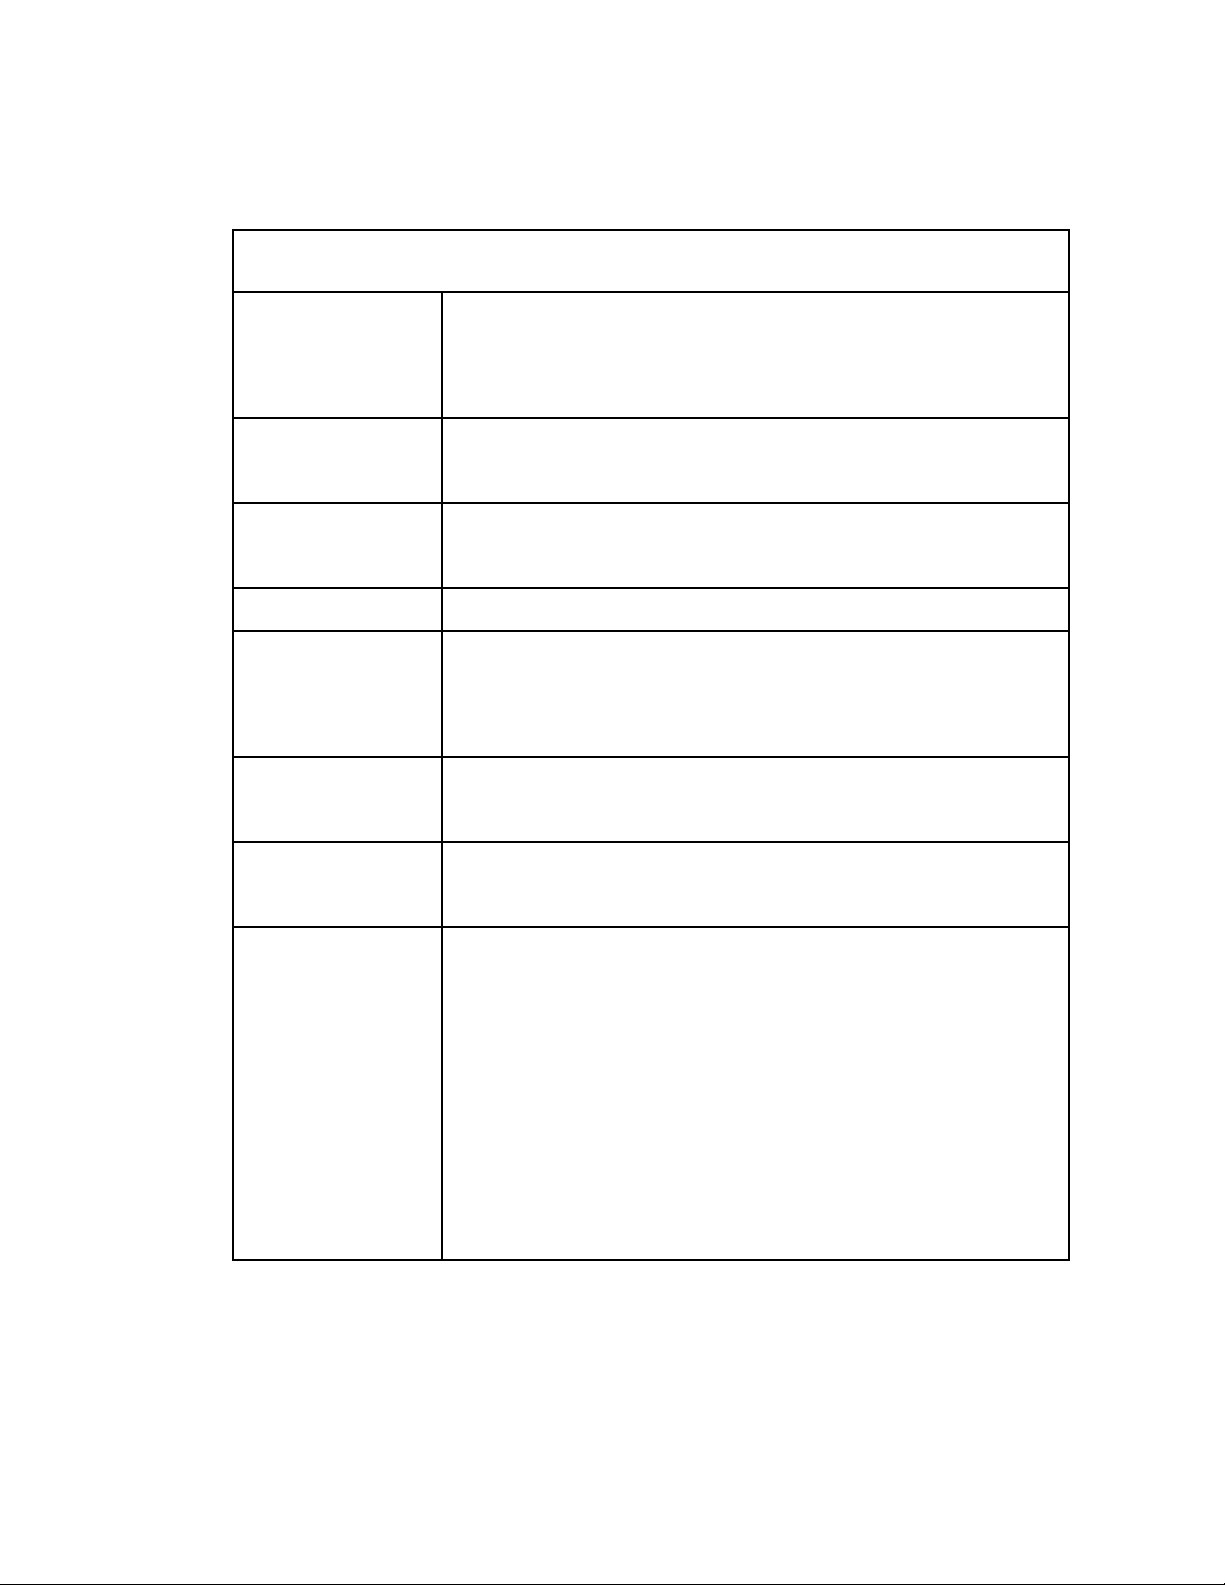
Technical Specifications
CVBS/S-
Video
Input
NTSC 720x480i60 / PAL 720x576i50
HDMI
Output
1280x720p60
Output
Signals
HDMI, Speaker
Recording
720x480p60 / 720x576p50
Supported
File
Systems
FAT32, FAT, NTFS, exFAT
Recording
Format
MP4 (H.264)
Recording
Capacity
Maximum 4GB per file
Maximum
Storage
Capacity
128GB (USB flash drive)
128GB (SD card)
4TB (USB hard drive)*
*Only hard drives that provide their
own power adapter are supported.
Page 19

19
Page 20

20
www.ClearClick.tech
 Loading...