

Page 1
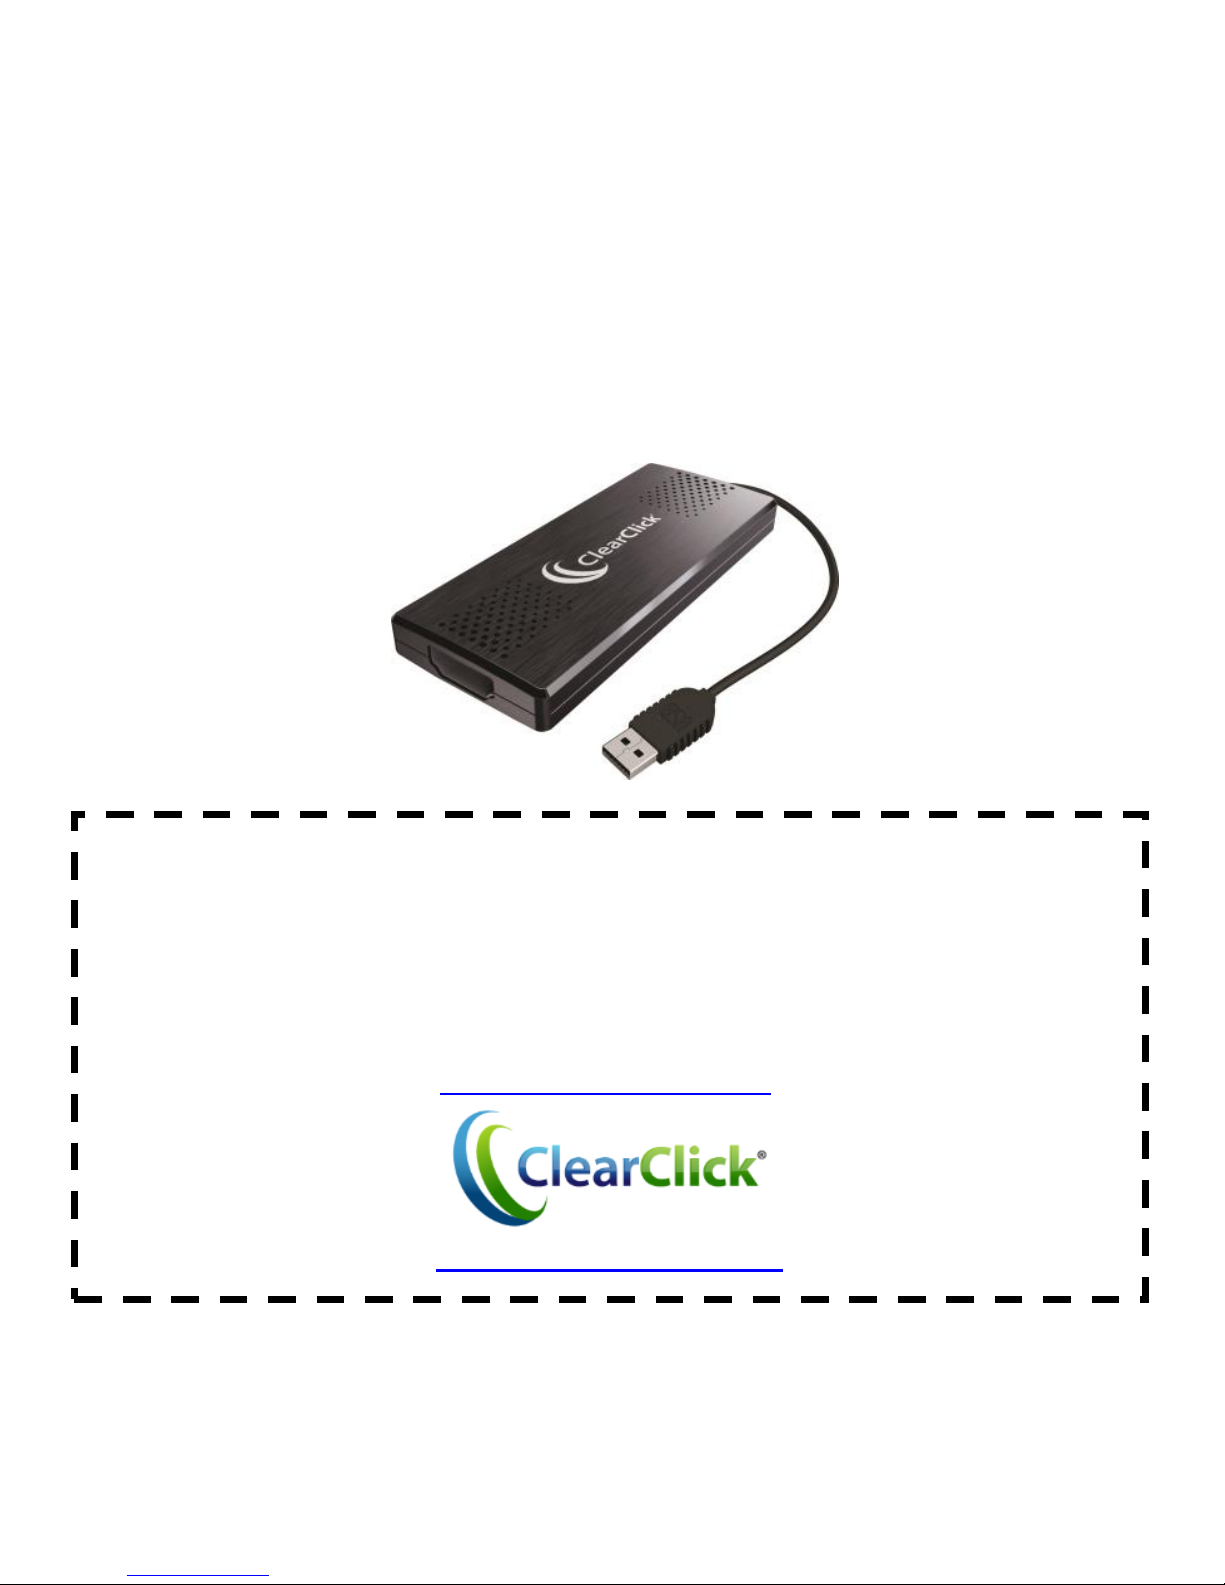
ClearClick® 720p/1080p
HD Video Capture Stick
™
Full 1-Year Warranty &
Free USA-Based Tech Support
This product comes with ClearClick®’s full 1-year warranty & free
USA-based tech support. As a small business, we’re here to serve you!
If you have any issues with our product, please contact us at
www.ClearClick.tech
Page 2

1
Register Your Device & Browse Our Products
Thank you for your purchase! Make sure you register your product &
check out our other unique & easy-to-use technology at:
www.ClearClick.tech
Full 1-Year Warranty & Free USA Tech Support
We’re ClearClick®, a small business based in California. We try to provide
the best experience possible with our products.
We provide free USA-based tech support for our products. All of our
products also come with a full 1-year warranty. If you need any assistance
with this product, please email us at [email protected].
Safety & Legal Warnings
1. Do not disassemble the unit.
2. Do not operate the unit around water or rain.
3. Do not operate the unit around any kind of machines (other than
your video source).
4. Unplug and safely store the device when not in use.
5. It is your responsibility to respect all copyright laws in your
country.
Page 3

2
Table of Contents
What’s In The Box ................................................................ 3
Windows Quick Start Guide ................................................ 4
Macintosh Quick Start Guide .............................................. 14
Live Streaming with XSplit Software on PC ....................... 20
Live Streaming with OBS Software on PC or Mac .............. 27
Tech Support & Contact Us ............................................. 32
Page 4
3
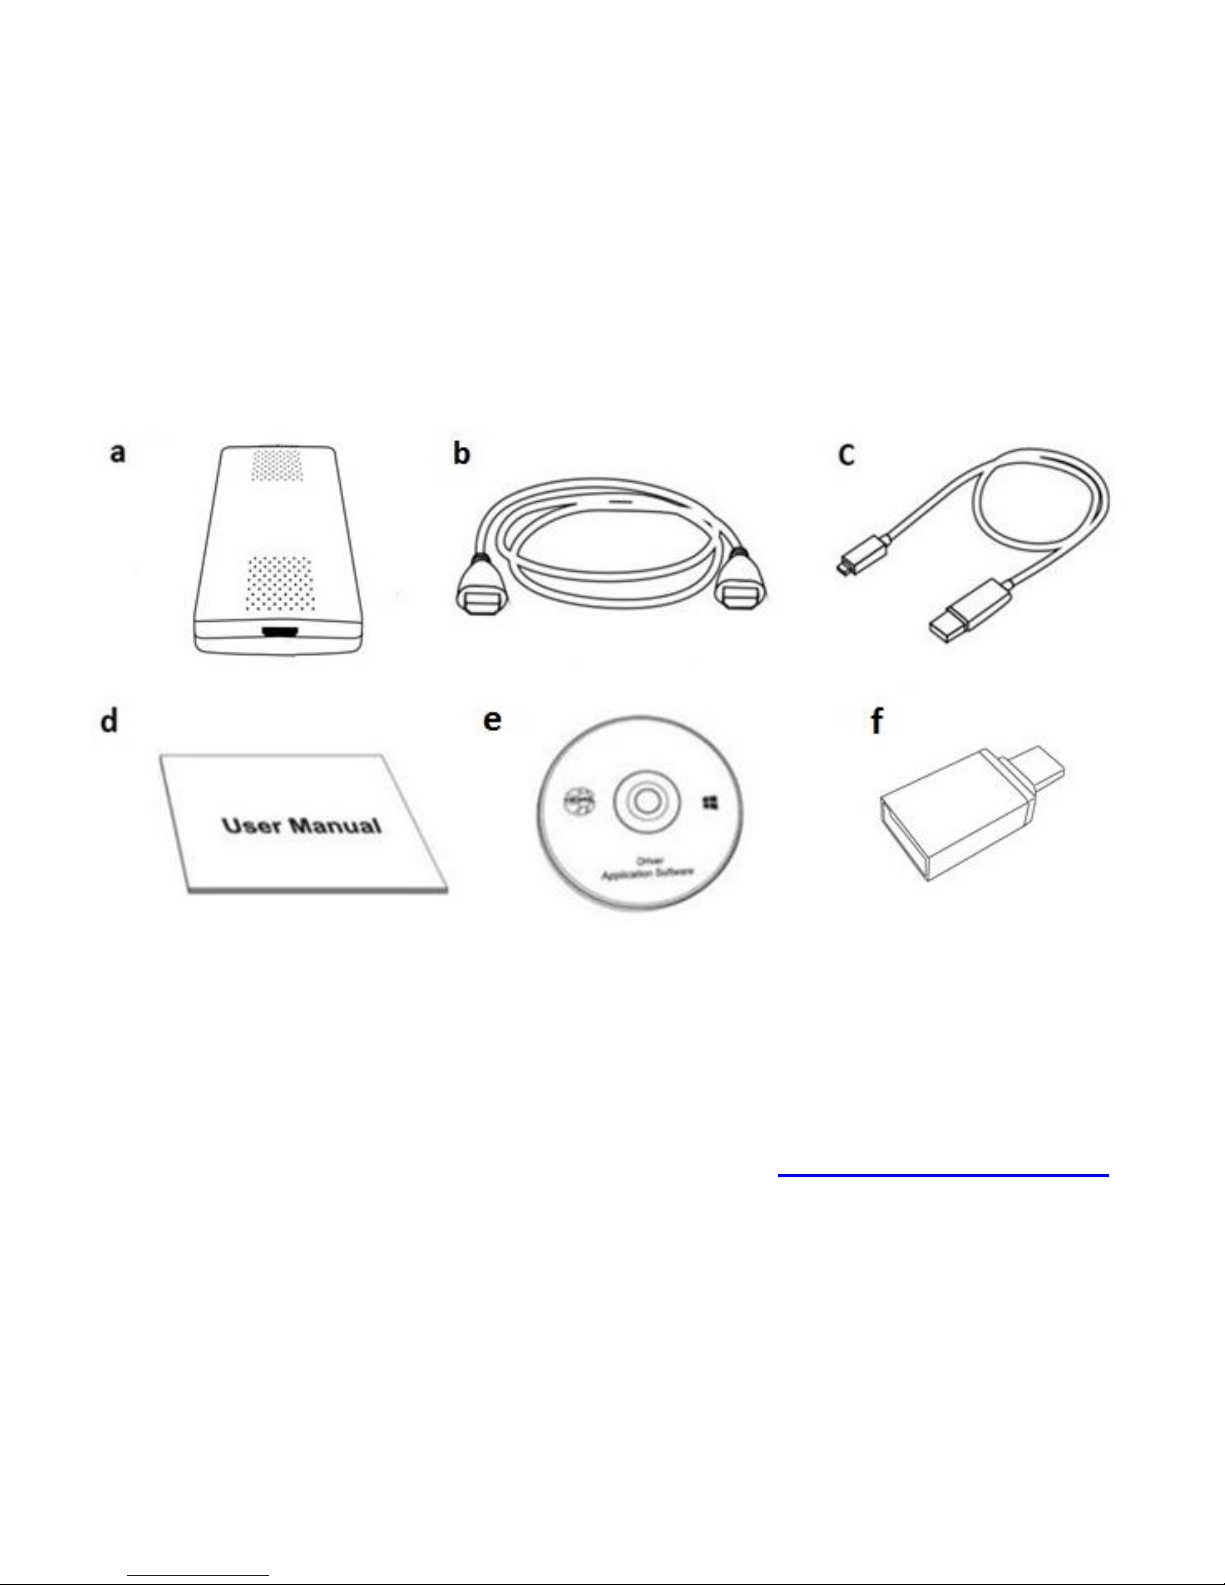
What’s In The Box?
a. HD Video Capture Stick™ b. HDMI Cable c. Micro USB Cable
d. User’s Manual e. Software/Driver CD f. USB To Type C Adapter
(for Mac)
Page 5
4
Quick Start Guide – Windows (Mac Users: See Page 14)
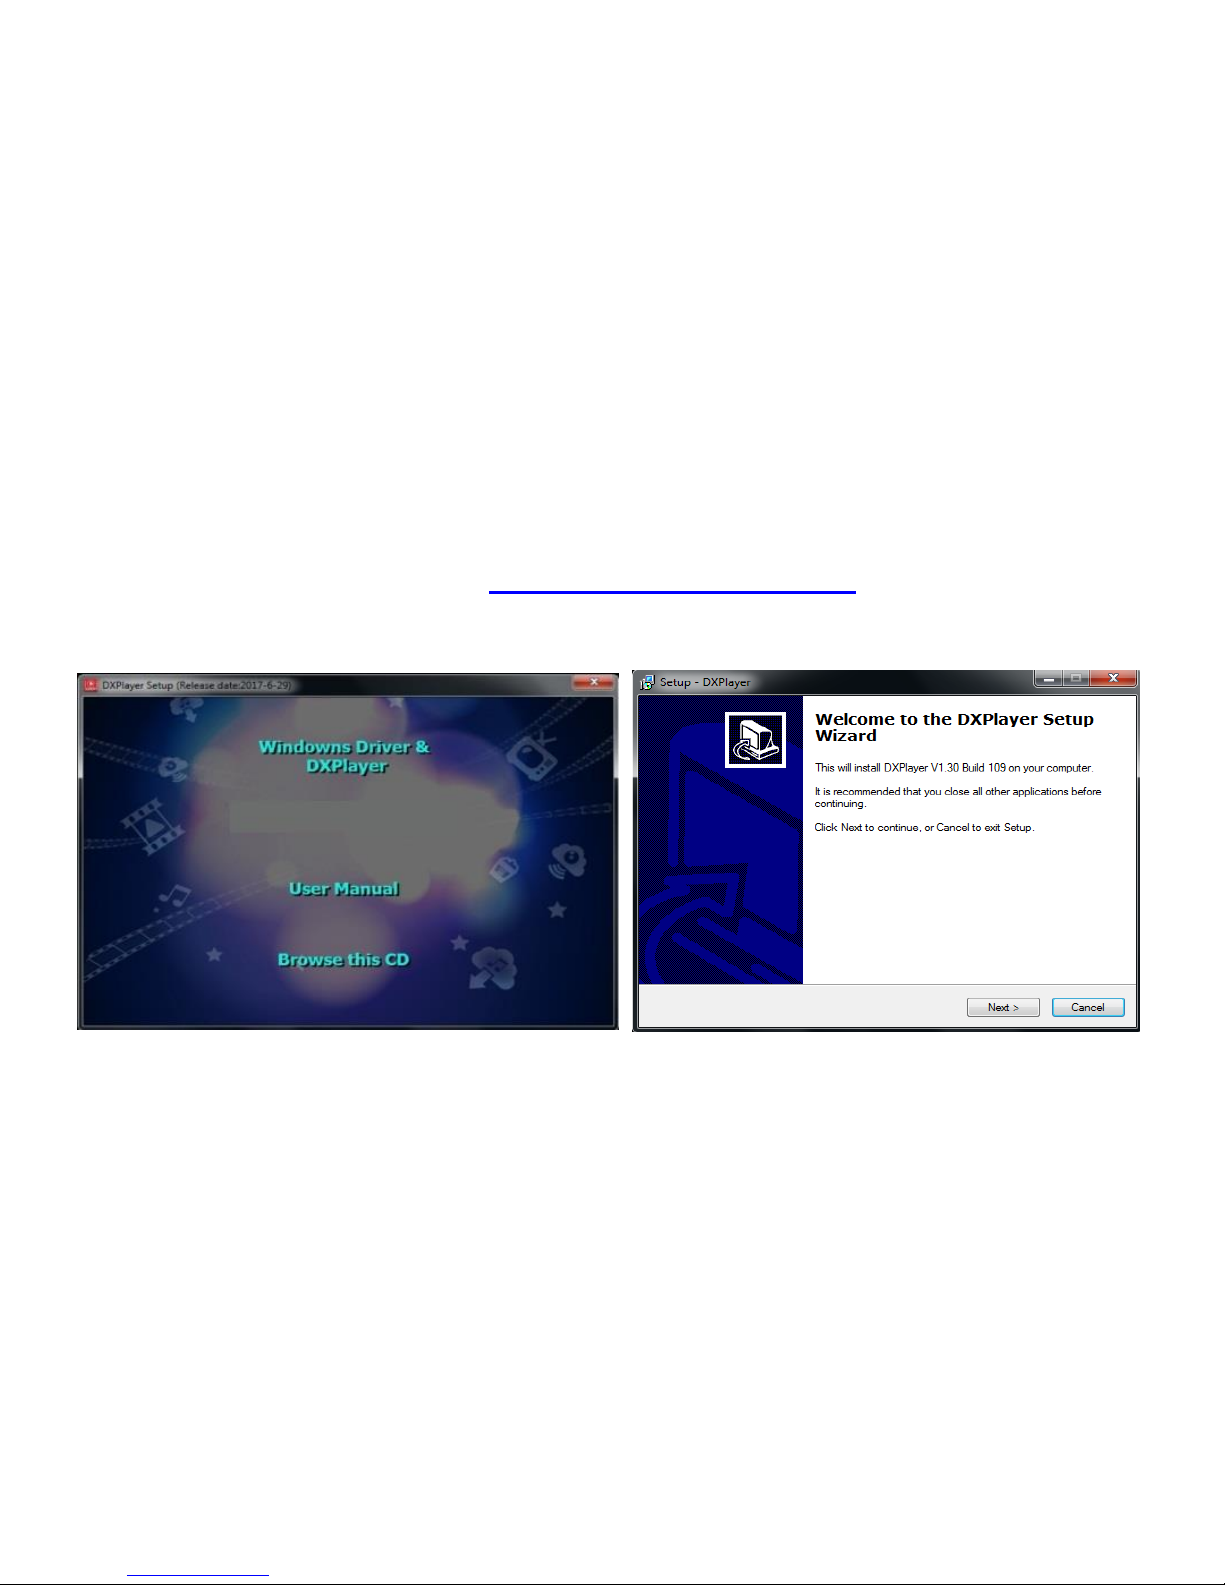
1. Install Software & Drivers
Insert the CD into your computer and run the Windows setup file.
Install the DXPlayer software. If your computer doesn’t have a CD
drive, please contact us at [email protected] for a download link
for the software & drivers.
Continue through the installation. The DXPlayer setup program will
automatically install the drivers for the HD Video Capture Stick™.
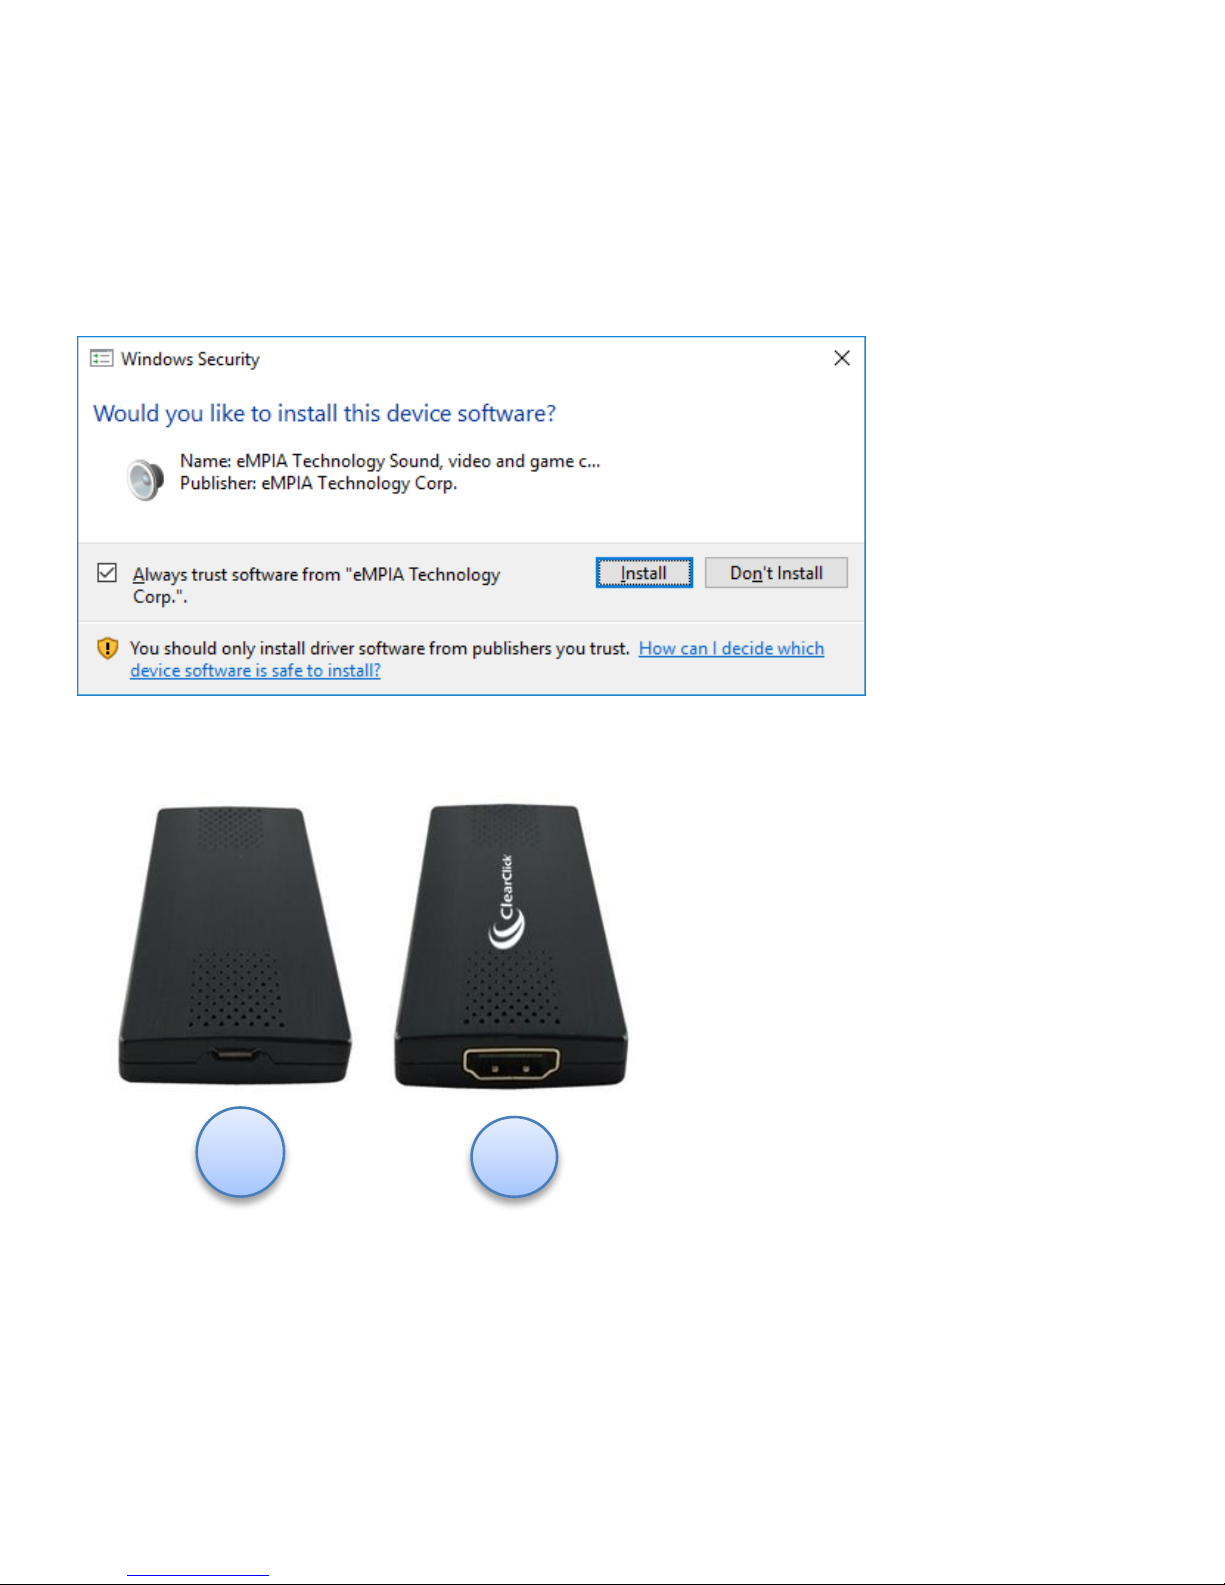
If you receive the “Windows Security” message as shown on the next
page, click the “Install” button.
Page 6
5
2. Plug In Your HD Video Capture Stick™
Locate the included micro USB cable and plug the small end of it into
1
Page 7
6
the HD Video Capture Stick™ (see [1] in diagram on previous page).
Plug the other end of the cable into your computer.
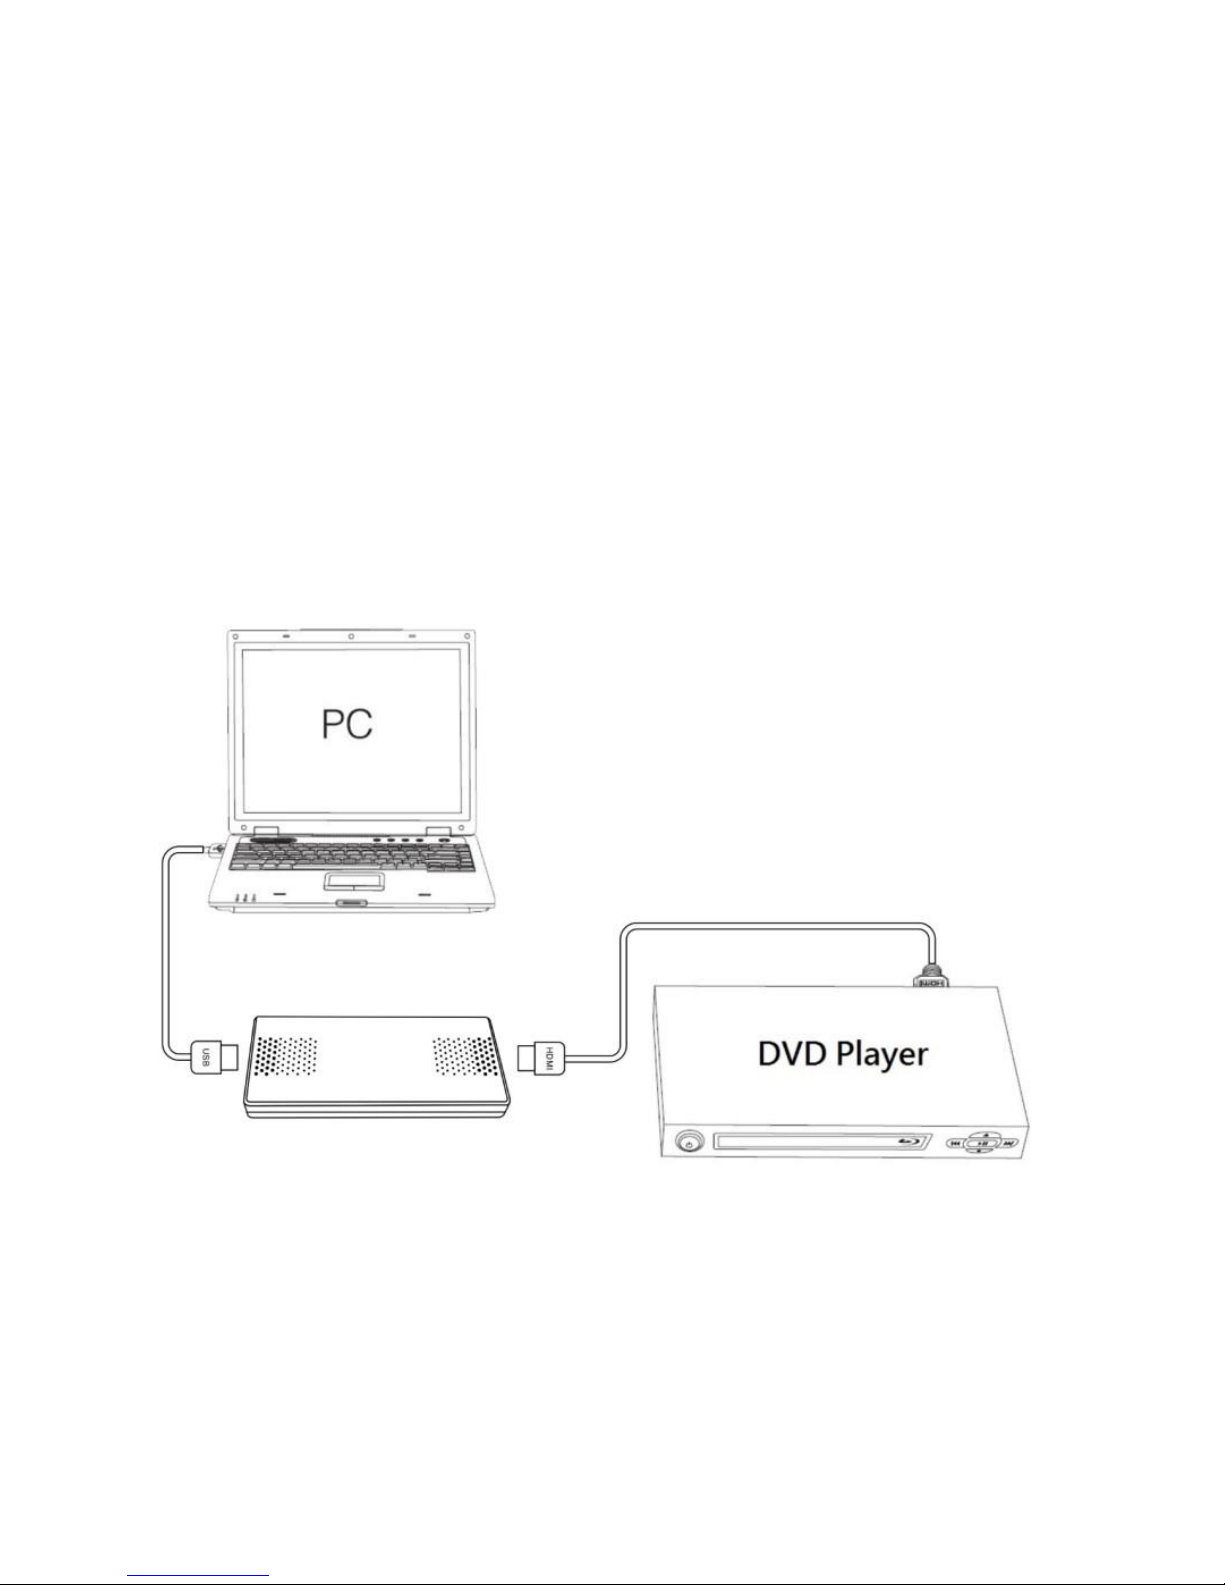
Next, connect your HDMI video source to the HDMI port on the HD
Video Capture Stick™ (see [2] in diagram on previous page).
An example of what your setup could look like:
Page 8
7
3. Open & Register DXPlayer Software
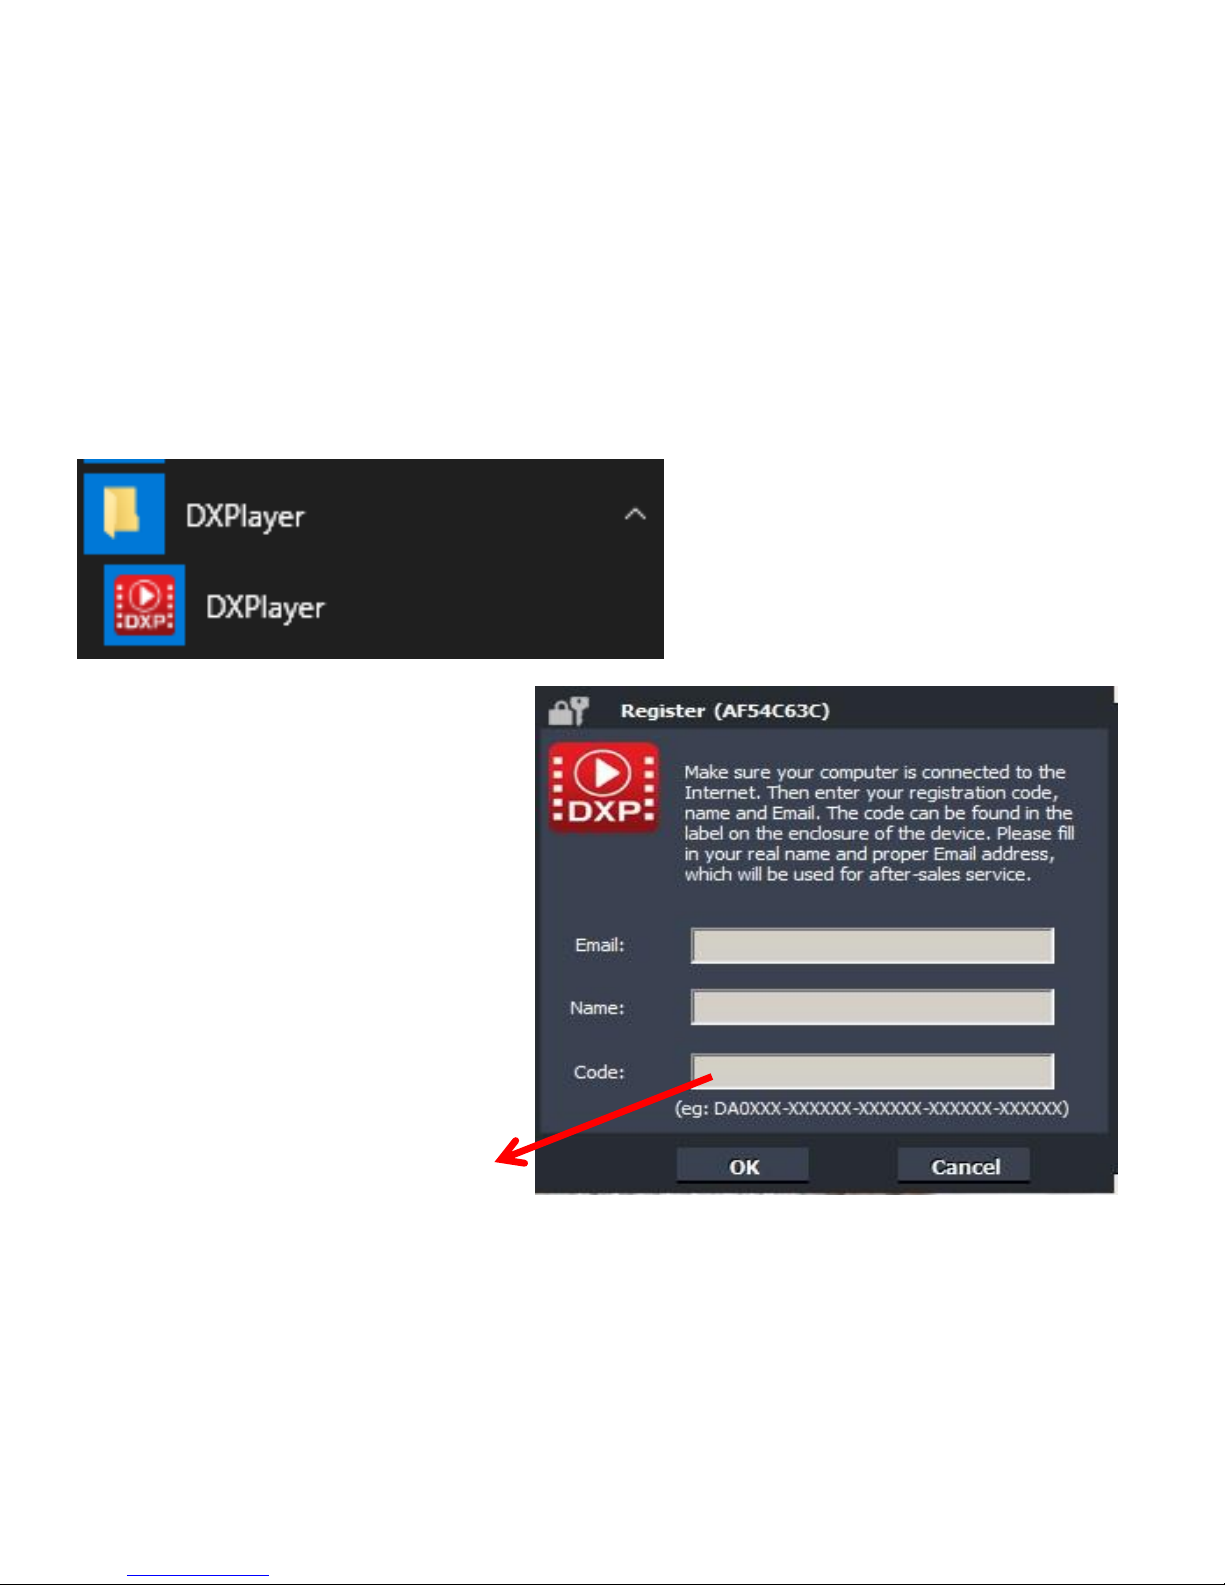
Run the DXPlayer software on your computer:
When you first run the
software, DXPlayer will
prompt you to register the
software using your name,
email, and registration code.
(We recommend doing this
immediately, because
without registering the
software, the recording time
is limited to 10 minutes.)
Your registration code is
located on the back of the
CD envelope.
Page 9
8
4. Start Recording Video!
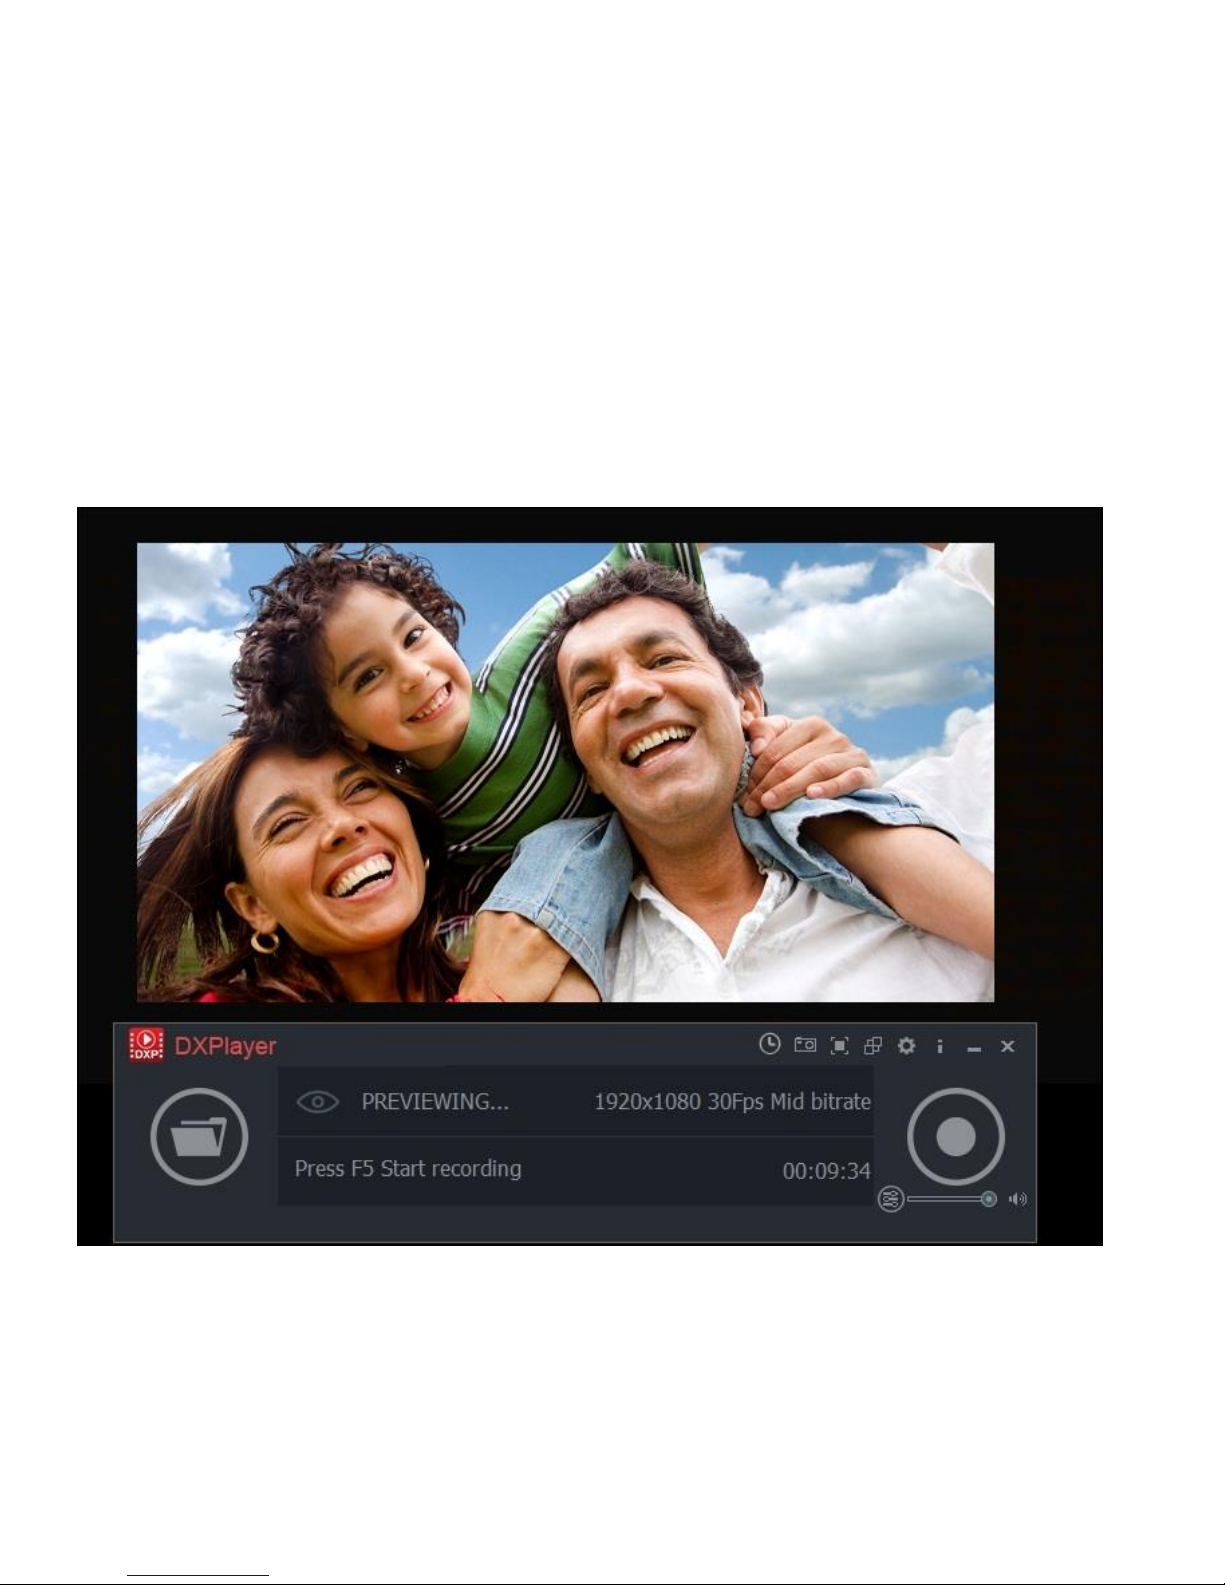
If a live signal is coming from your HDMI video source, you will see a
live video preview in the DXPlayer software.
Page 10
9
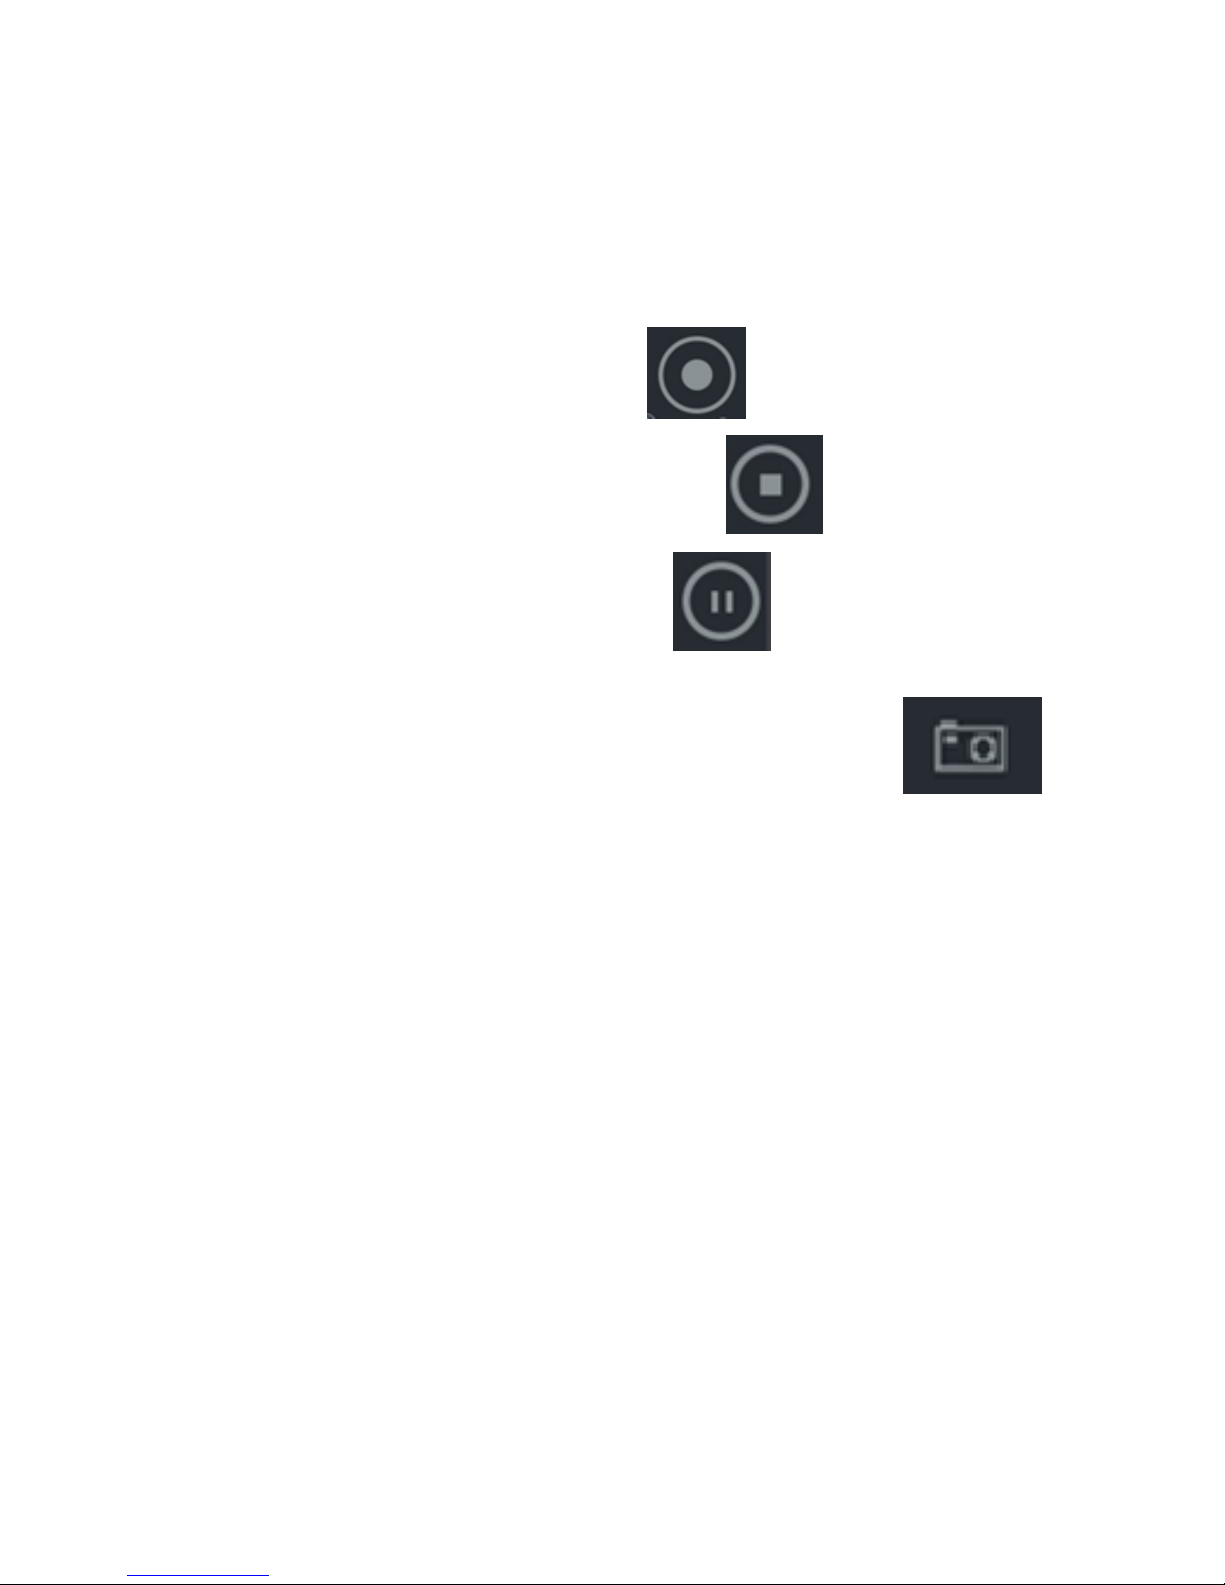
To start recording, click the record
button.
To stop recording, click the stop button.
To pause recording, click the pause
button.
To capture a frame (take a still photo) of your video,
press the screenshot button.
Page 11
10
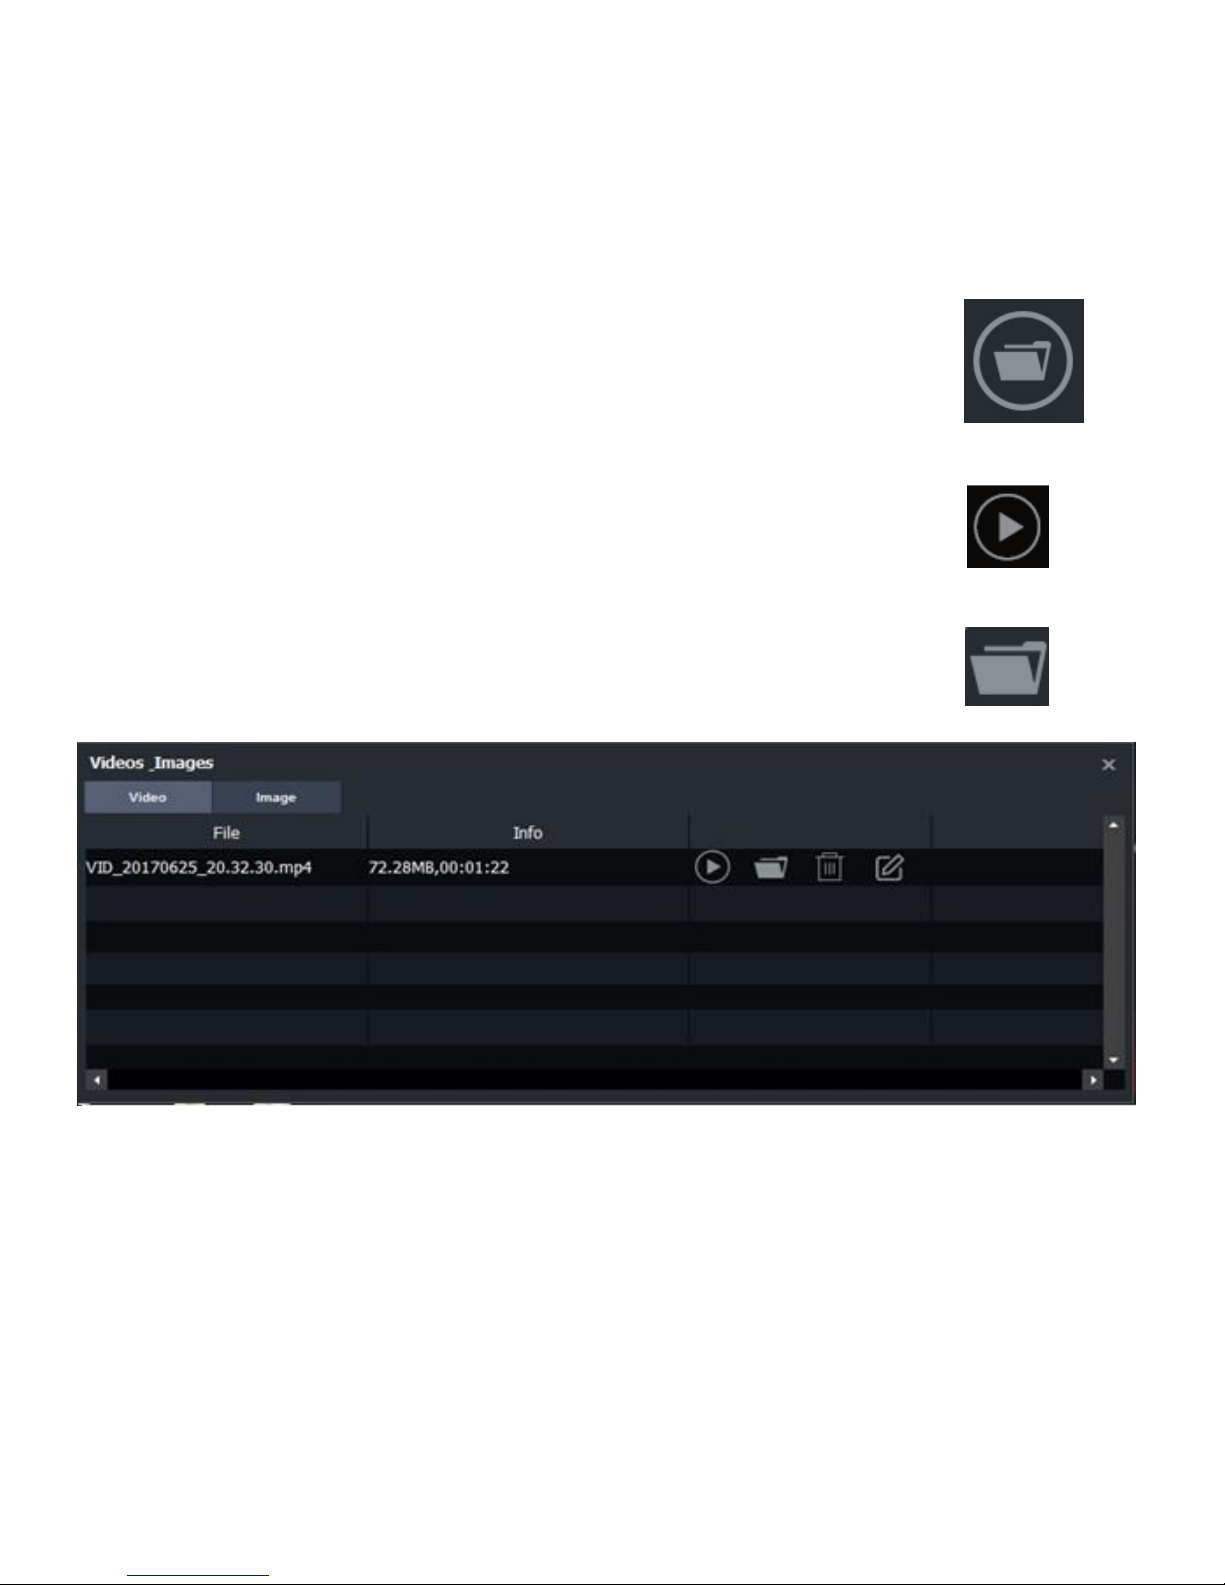
To play back recorded clips, first press the folder icon at
the bottom of the screen.
Then press the play button next to the file you’d like to view.
Or to open the folder that contains the clip, press the
folder button next to the clip’s name.
Page 12
11
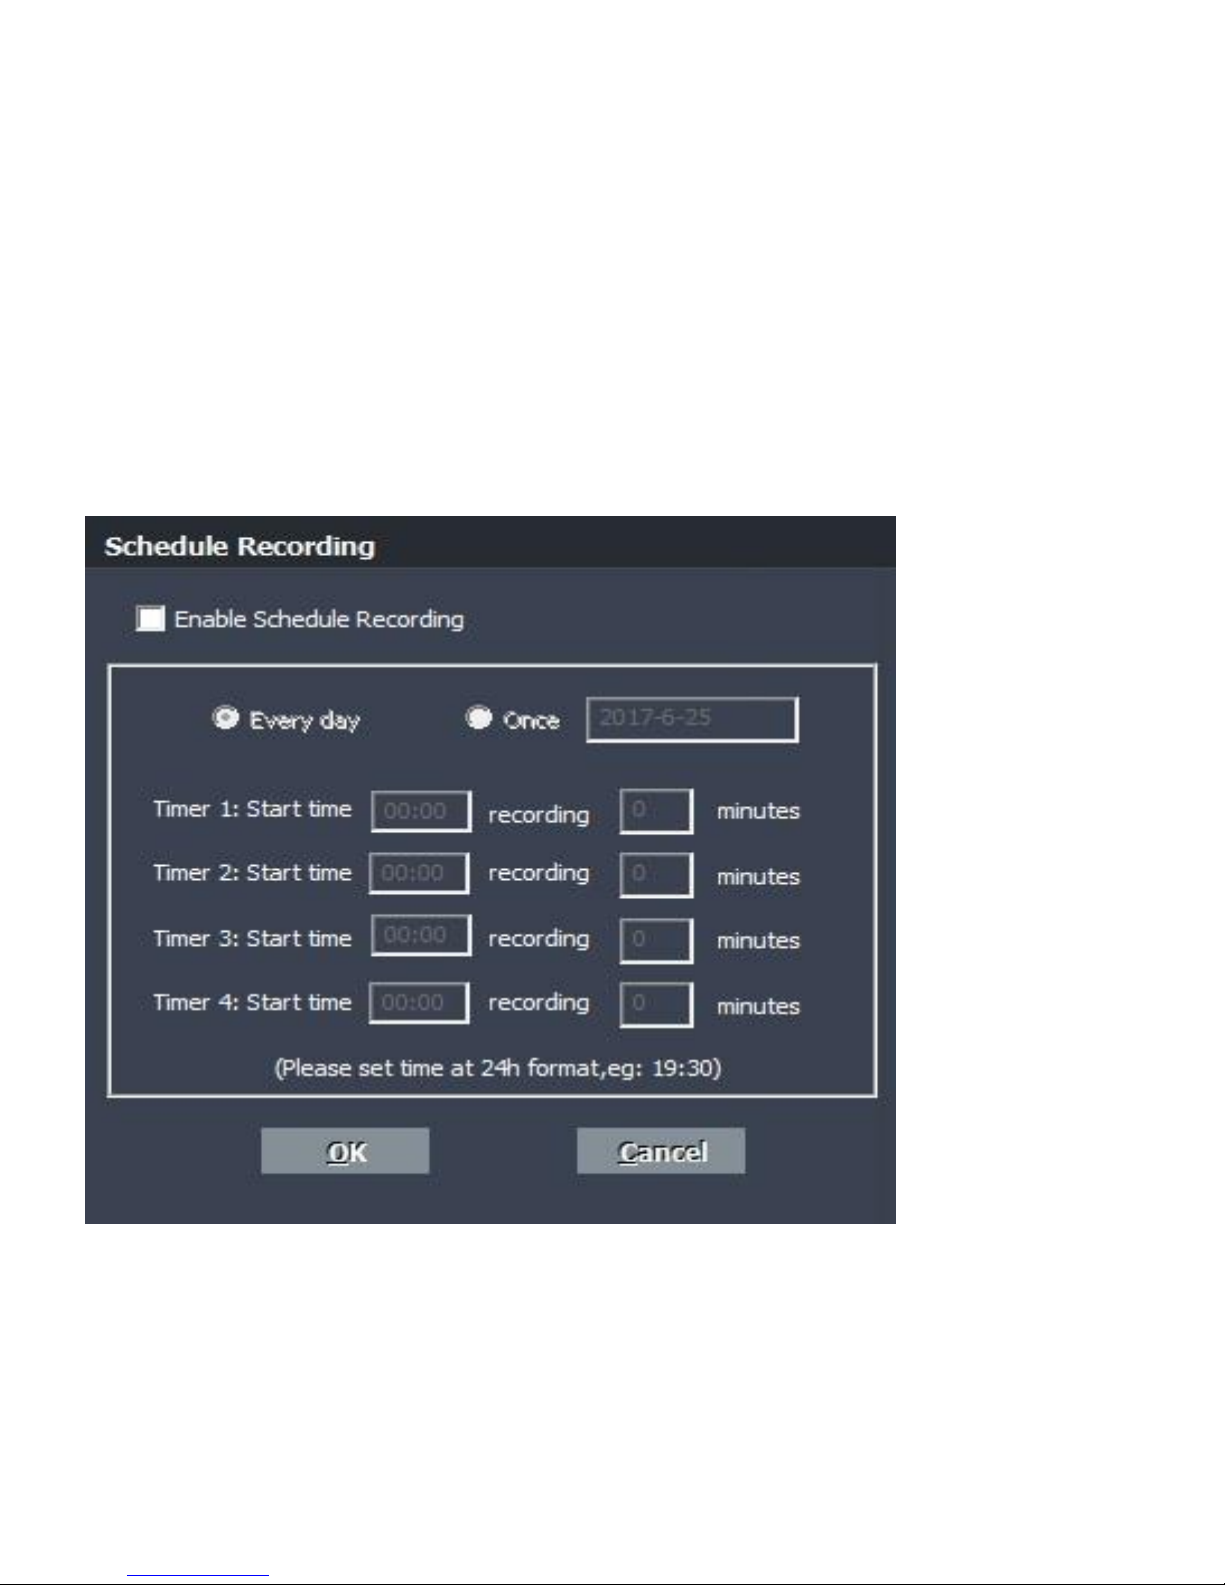
To schedule recording for a certain time, use the “Schedule
Recording” feature. (Accessible through the settings section.) You can
have the software start recording at a certain time for a set amount of
time. You may have the software do this once or repeat every day.
Page 13
12
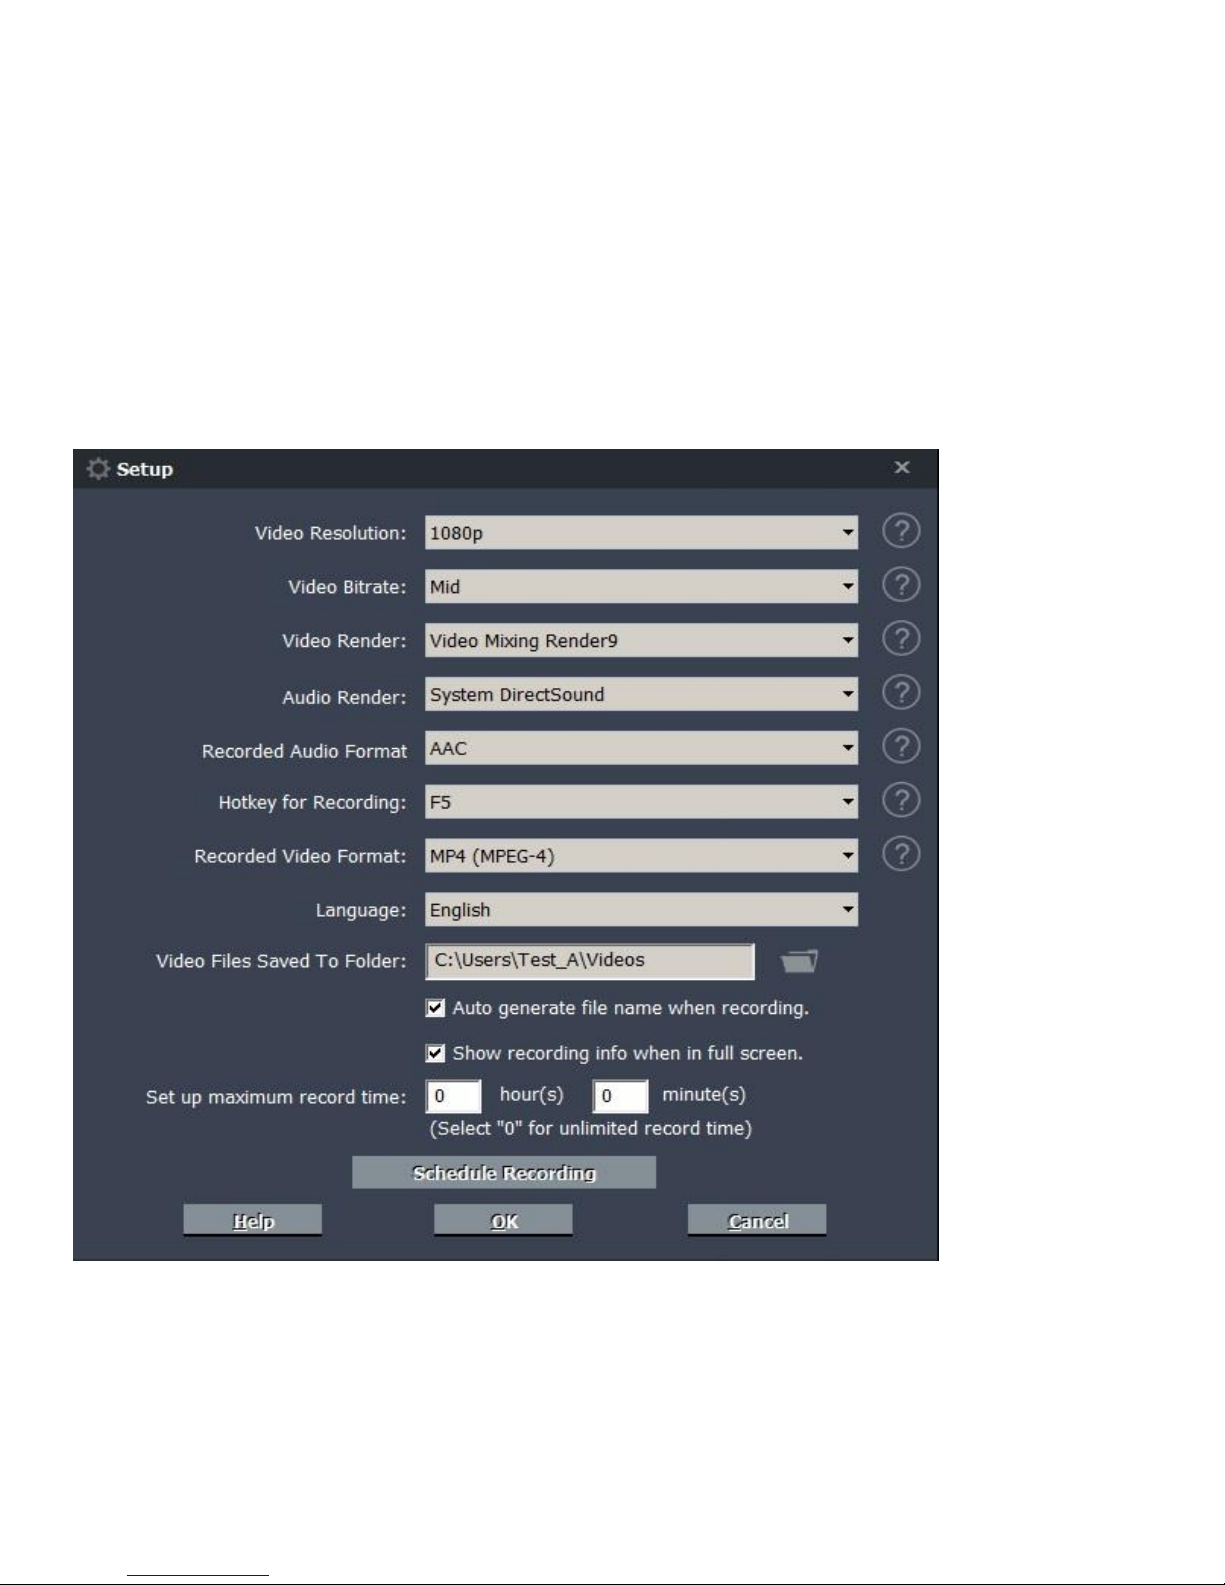
In the “Setup” window, you can adjust various settings for the
DXPlayer software. For an explanation of all the settings, please see
the next page.
Page 14

13
Video Resolution: Sets the recording resolution. 1080p, 720p and 480p are
available.
Video Bitrate: Sets the quality of recording. High, Mid, Low are available.
Video Render: Sets the video rendering technology. Video Mix Render9 and
Internal YUV Render are available.
Audio Render: Sets the audio rendering technology. System DirectSound and
Internal Audio Render are available.
Recorded Audio Format: Sets the audio format. MP4 (MPEG-4) / MP4
(MPEG-TS) are available.
Hotkey for Recording: Sets the hotkey for starting and stopping recording of
video.
Recorded Video Format: Sets the video format.
Language: Sets the language to be displayed on the screen. English,
Japanese, Simplified Chinese and Traditional Chinese are available.
Video Files Saved to Folder: Sets the directory that recorded videos will be
saved in. You can change the directory by clicking on the folder button.
Automatically generate the file name when recording starts: If this option
is selected, the filenames of recorded videos will be set automatically.
Set up maximum recording time: Sets the maximum recording time.
DXPlayer will stop recording when the maximum recording time is reached.
Schedule Recording: Allow you to schedule recording in advance.
OK: Click to save the settings.
Cancel: Click to exit the "Setup" window without saving the settings.
Page 15
14
Quick Start Guide – Macintosh
1. Install Software & Drivers
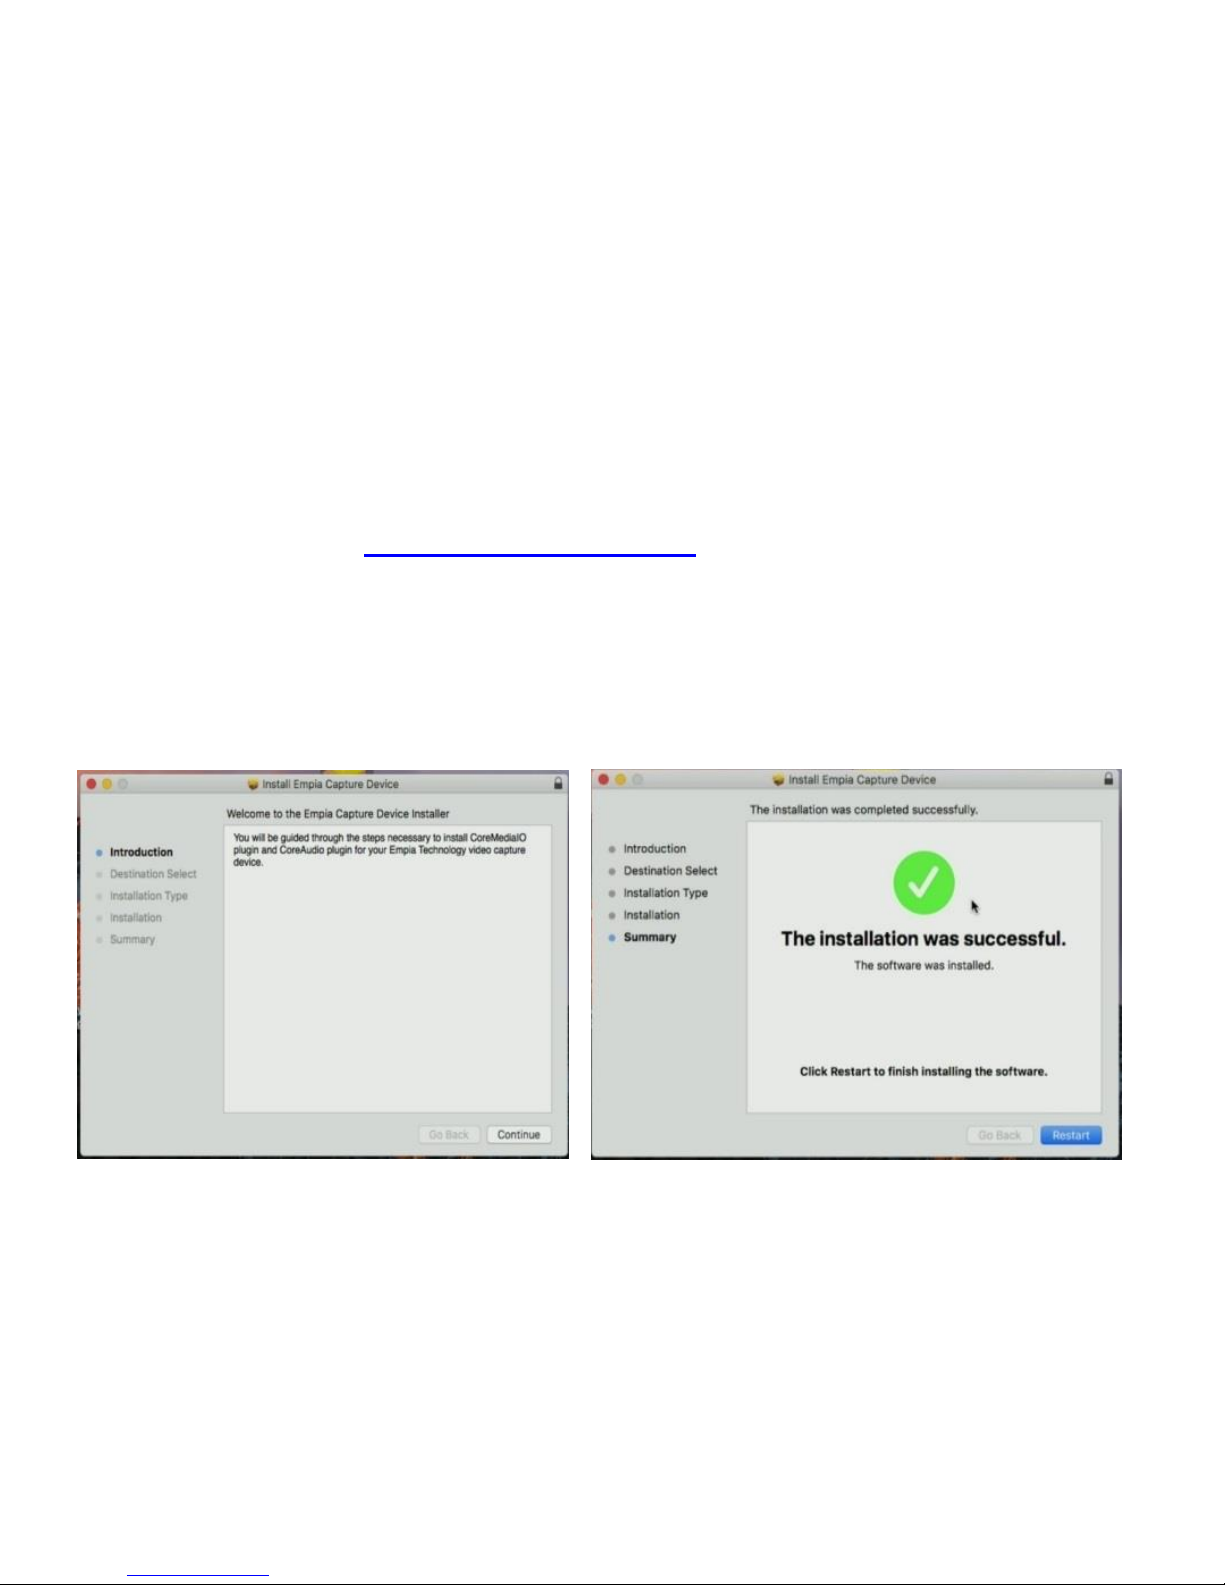
Insert the installation CD into your Mac. (If your Mac doesn’t have a CD drive,
please contact us at [email protected] for a download link.)
Browse the CD contents and double-click the “MAC-Driver.pkg” file. The
installation window will open. Continue through the installation to install the
driver. Then restart your Mac.
Page 16
15
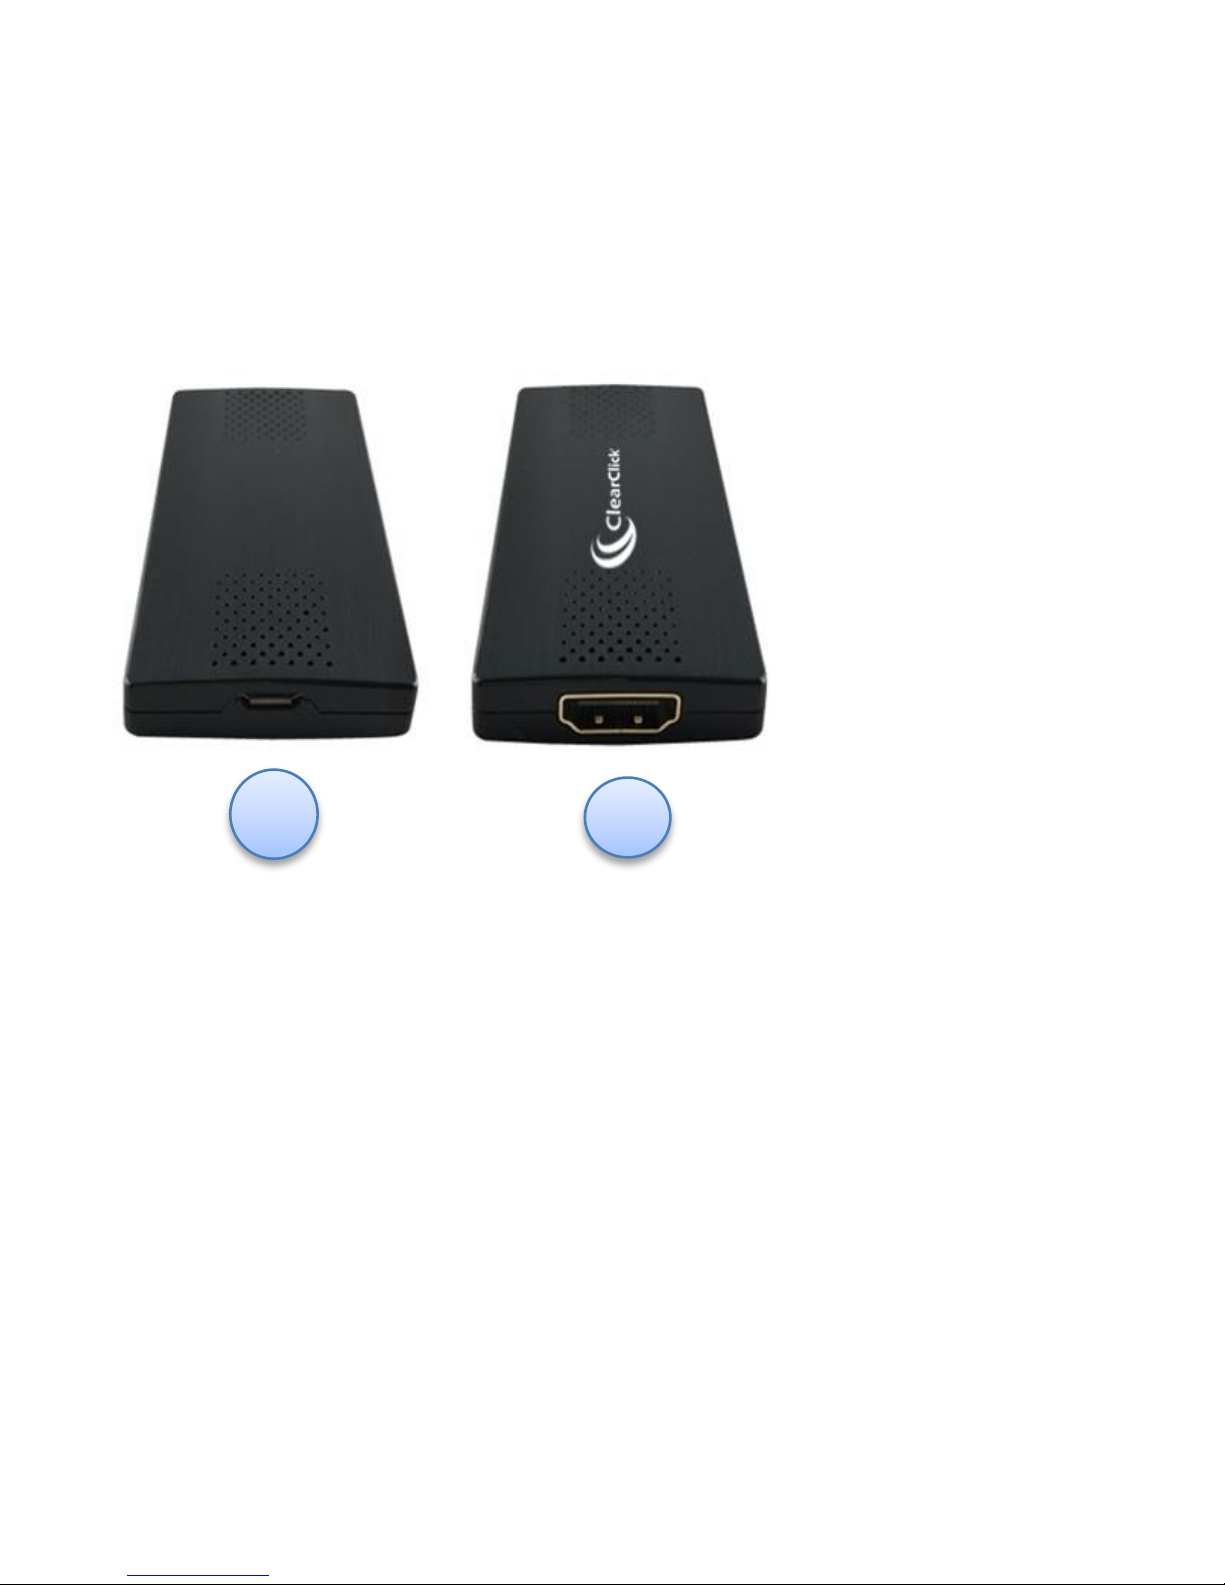
2. Plug In Your HD Video Capture Stick™
Locate the included micro USB cable and plug the small end of it into
the HD Video Capture Stick™ (see [1] in diagram above). Plug the
other end of the cable into your computer.
Next, connect your HDMI video source to the HDMI port on the HD
Video Capture Stick™ (see [2] in diagram above).
1
Page 17
16
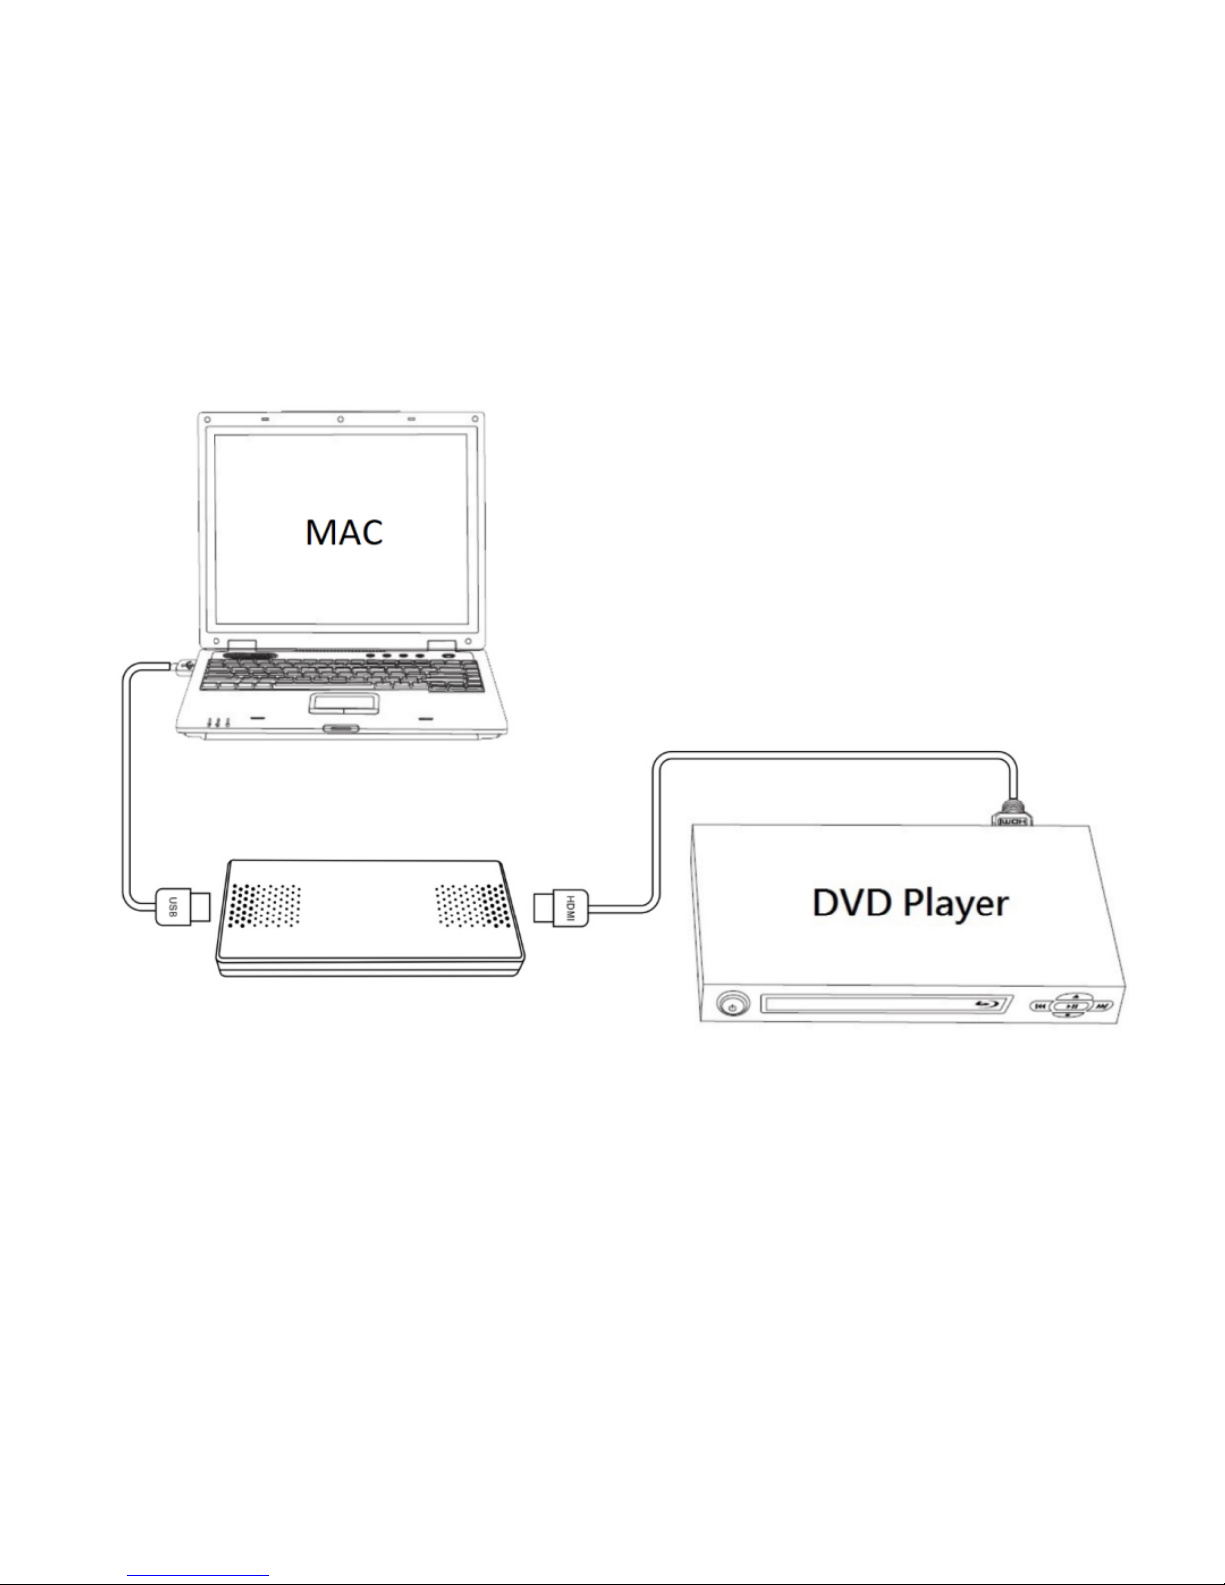
An example of what your setup could look like:
Page 18
17
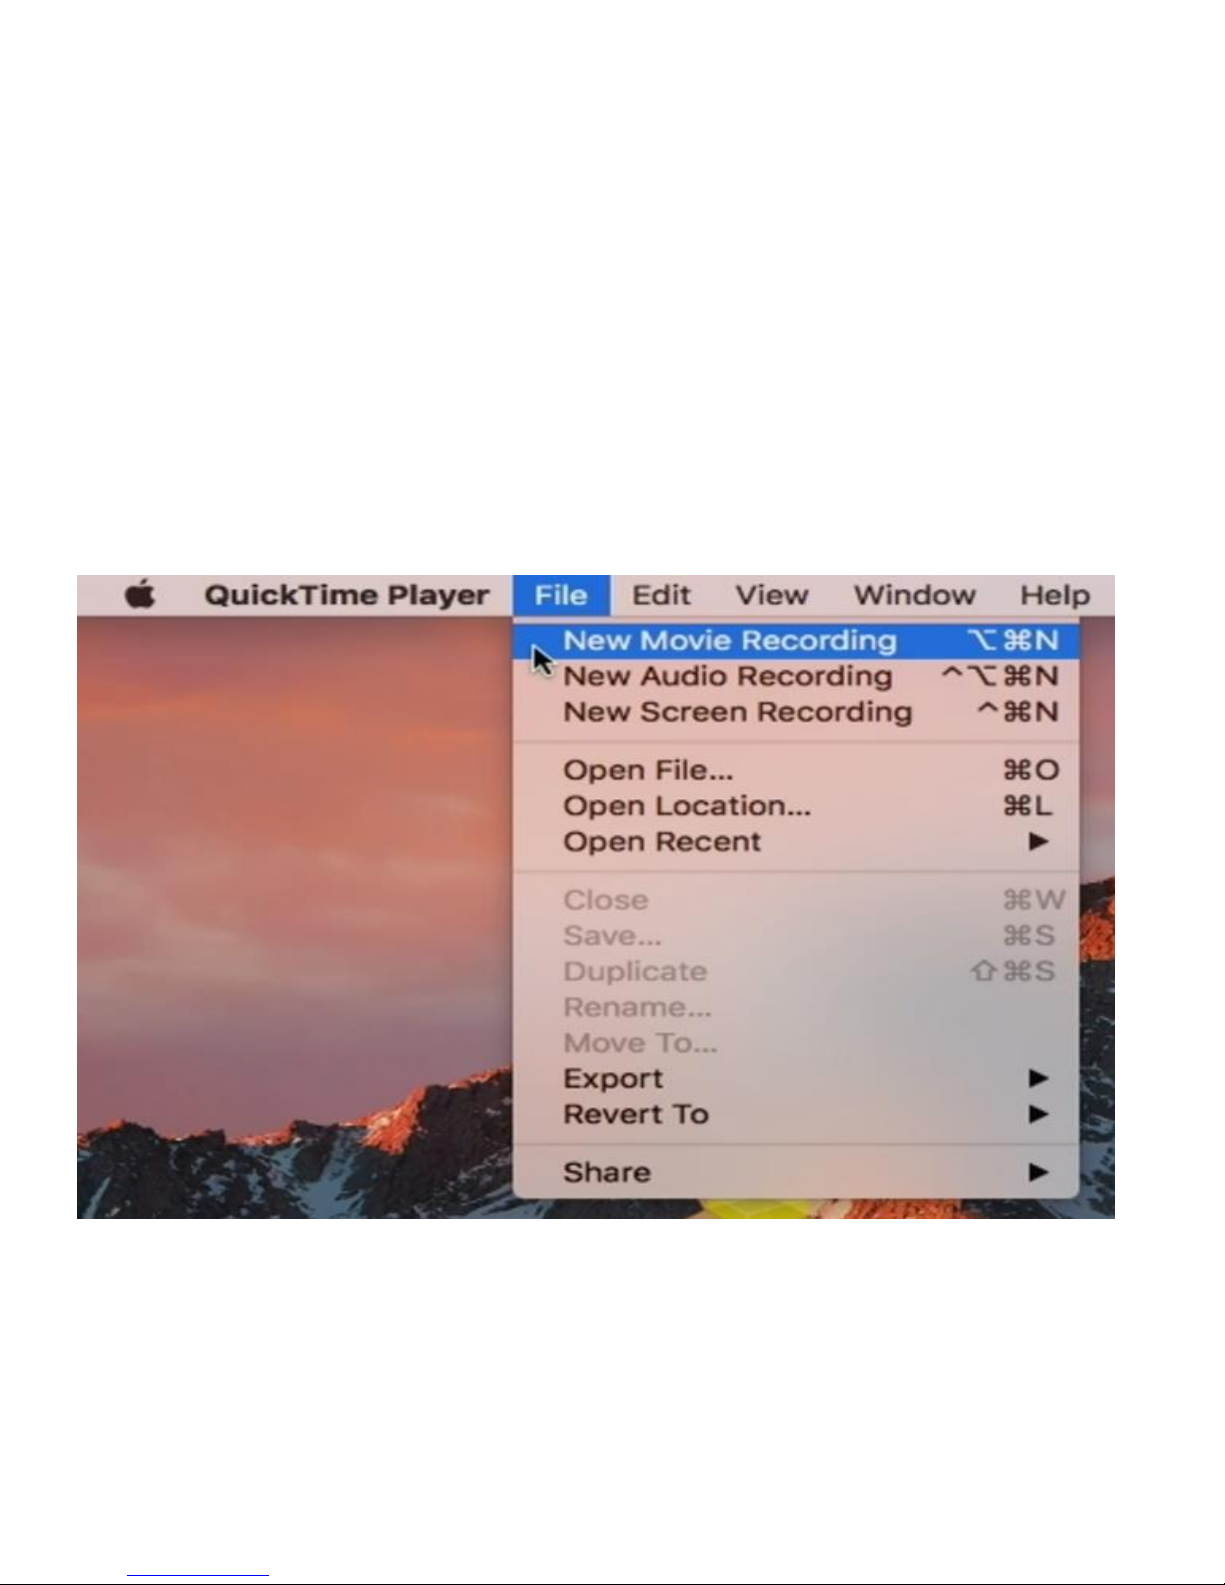
3. Open QuickTime Player
Open the QuickTime Player software on your Mac.
Click File New Movie Recording.
Page 19
18
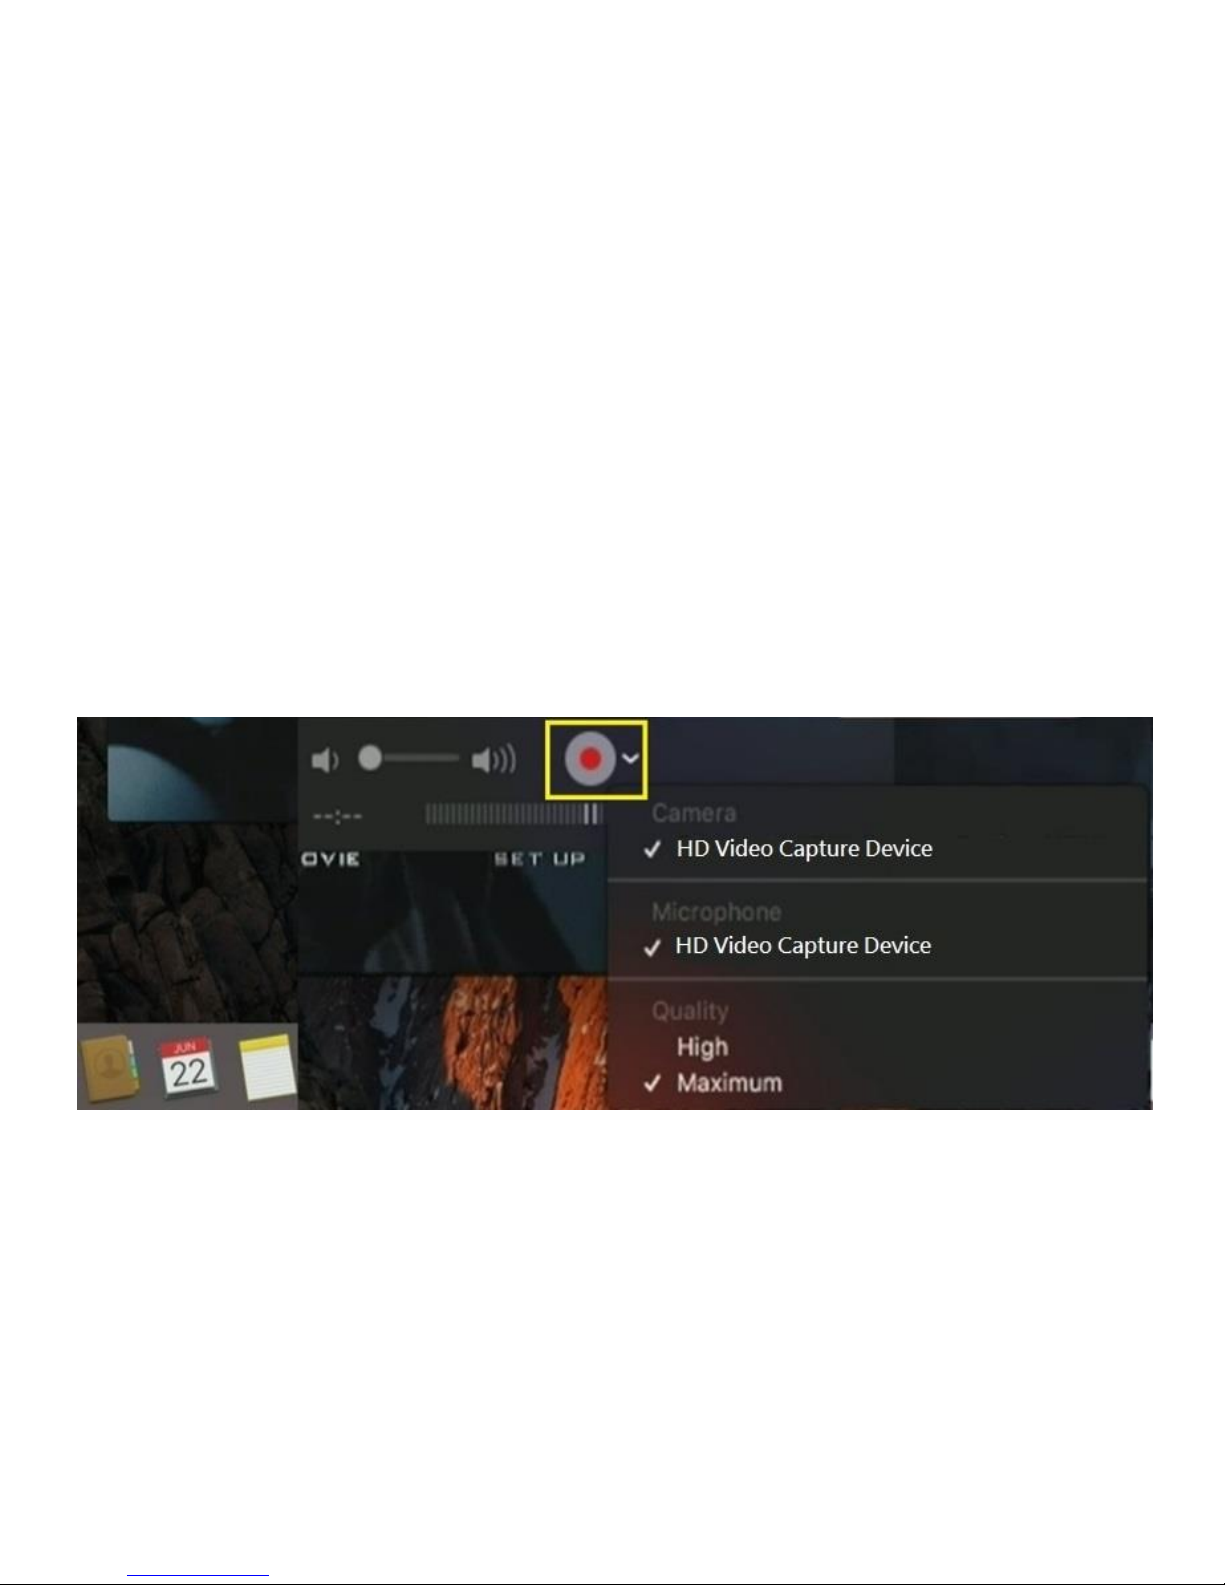
Click the arrow next to the “Record” button.
Make sure both the “Camera” and “Microphone” are set to: “HD Video
Capture Device.”
For quality, make sure “High” is selected. (Note: selecting “Maximum”
will result in very large video files, due to uncompressed video)
Make sure the volume is turned up part way.
Page 20

19
4. Start Recording Video!
If a live signal is coming from your HDMI video source, you will see a
live video preview in the DXPlayer software.
Simply press the “Record” button to start recording
video.
When you are done recording, press the “Stop” button.
Your video file will be saved in MOV format in your Videos or
Documents folder.
Page 21
20
Live Streaming with XSplit Software on PC
You can use the HD Video Capture Stick™ to stream your HDMI video
source (such as a video camera or gaming device) over the internet.
To do this, you will need the XSplit Broadcaster or OBS streaming
software. (Not included) Here’s how to get started.
1. Download the XSplit Broadcaster software from www.XSplit.com
and install it.
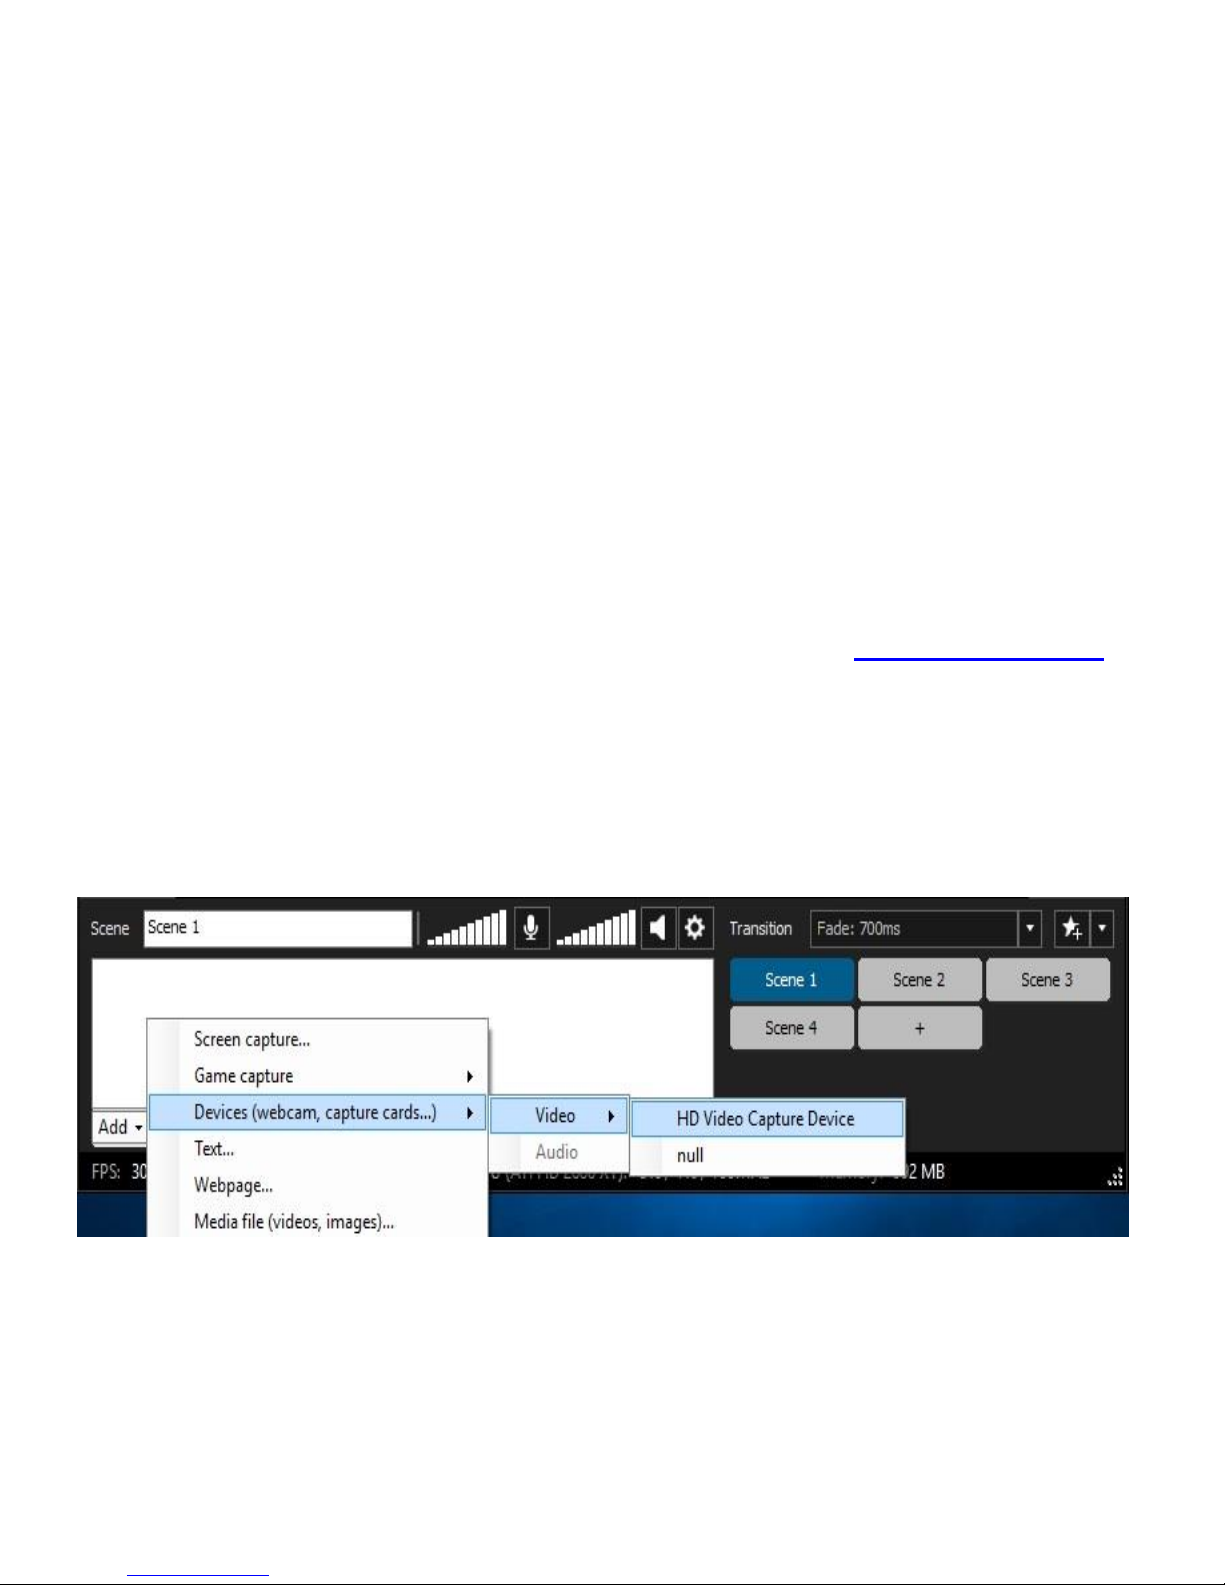
2. Open the XSplit Broadcaster software and click Add Devices
(Webcam, Capture Card) Video HD Video Capture Device.
Page 22
21
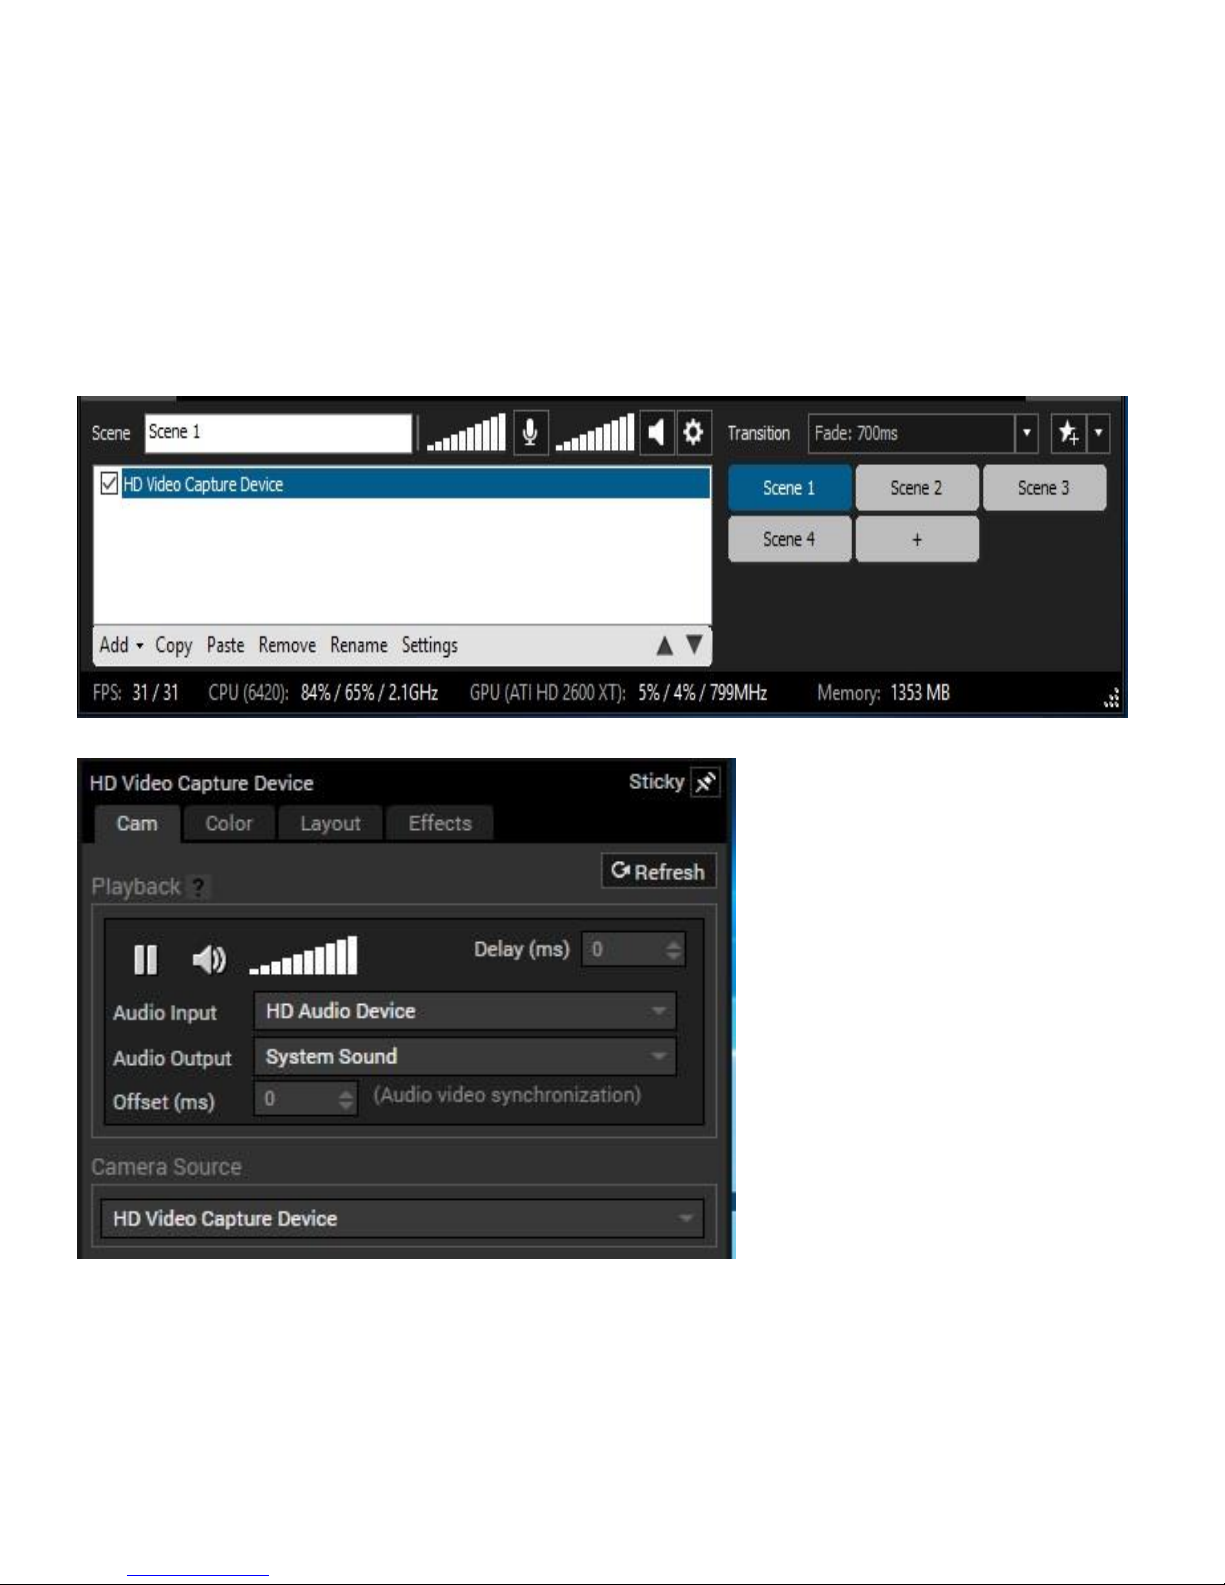
3. Click Settings. Under Audio Input, select “HD Audio Device.”
Page 23
22
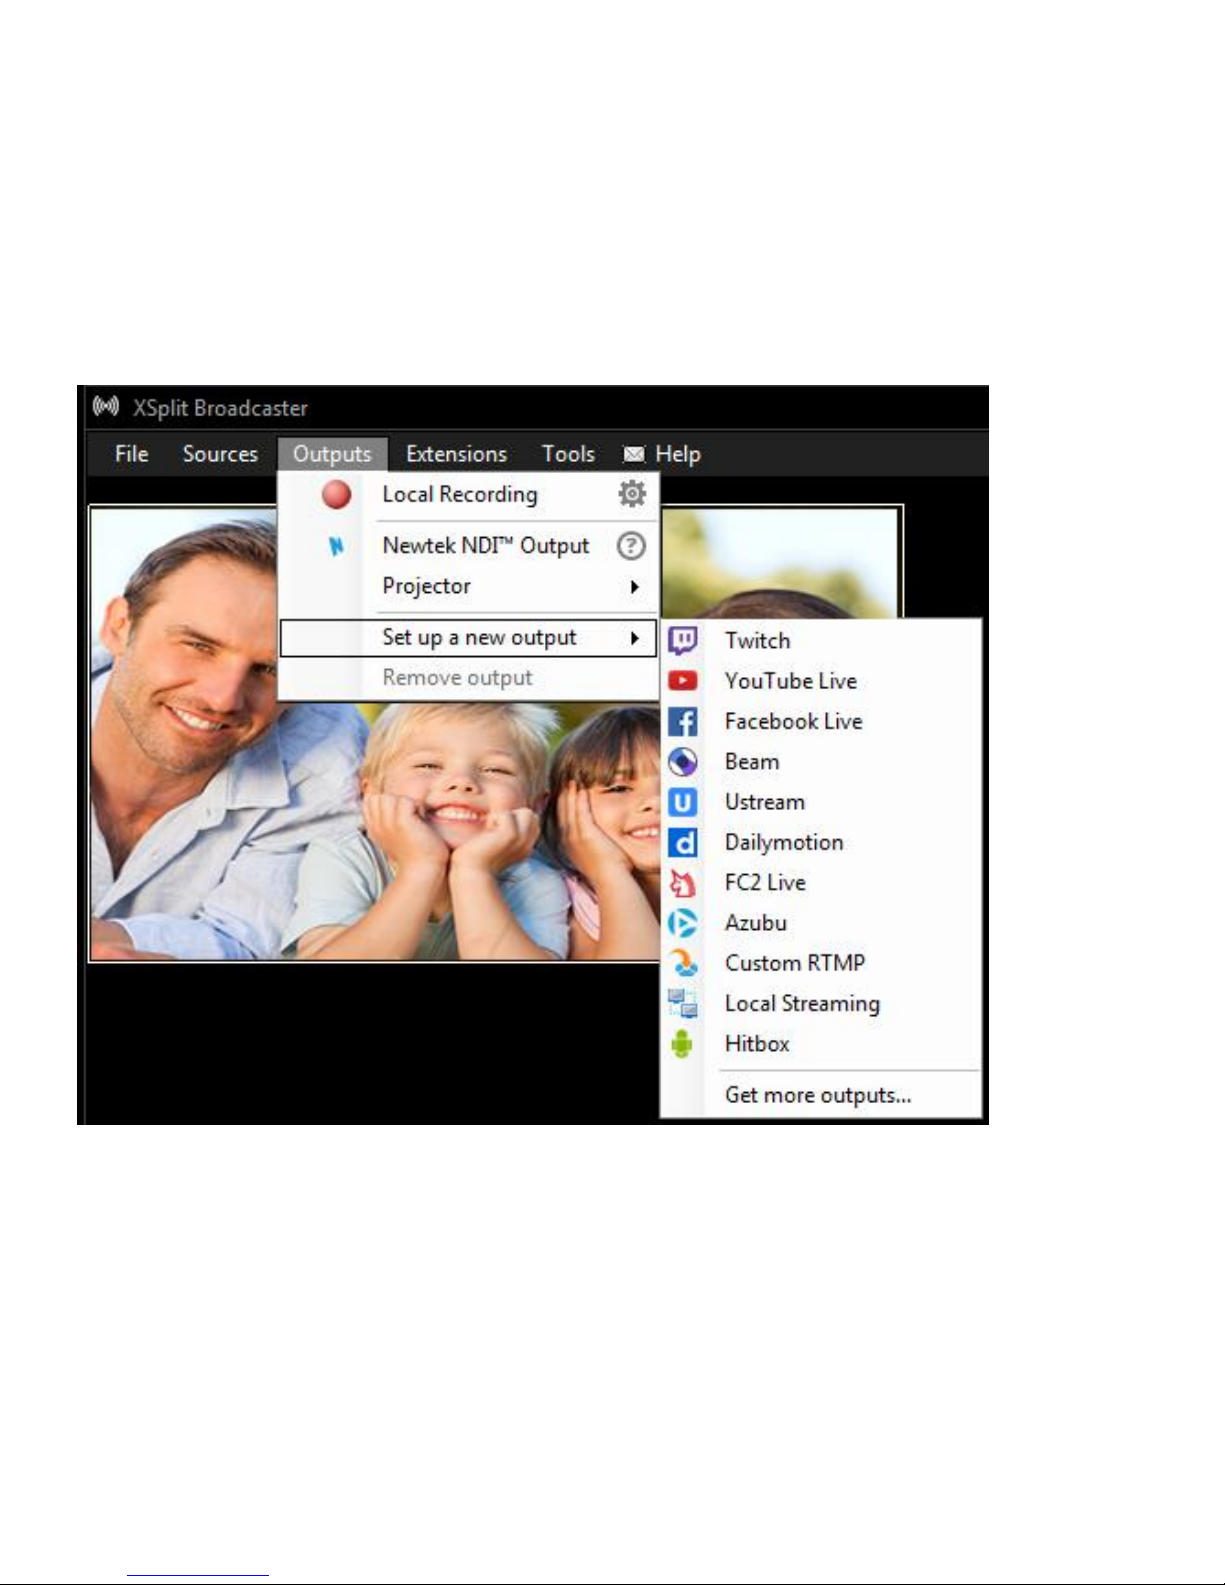
4. Click Outputs Set up a new output (Choose a website)
Page 24
23
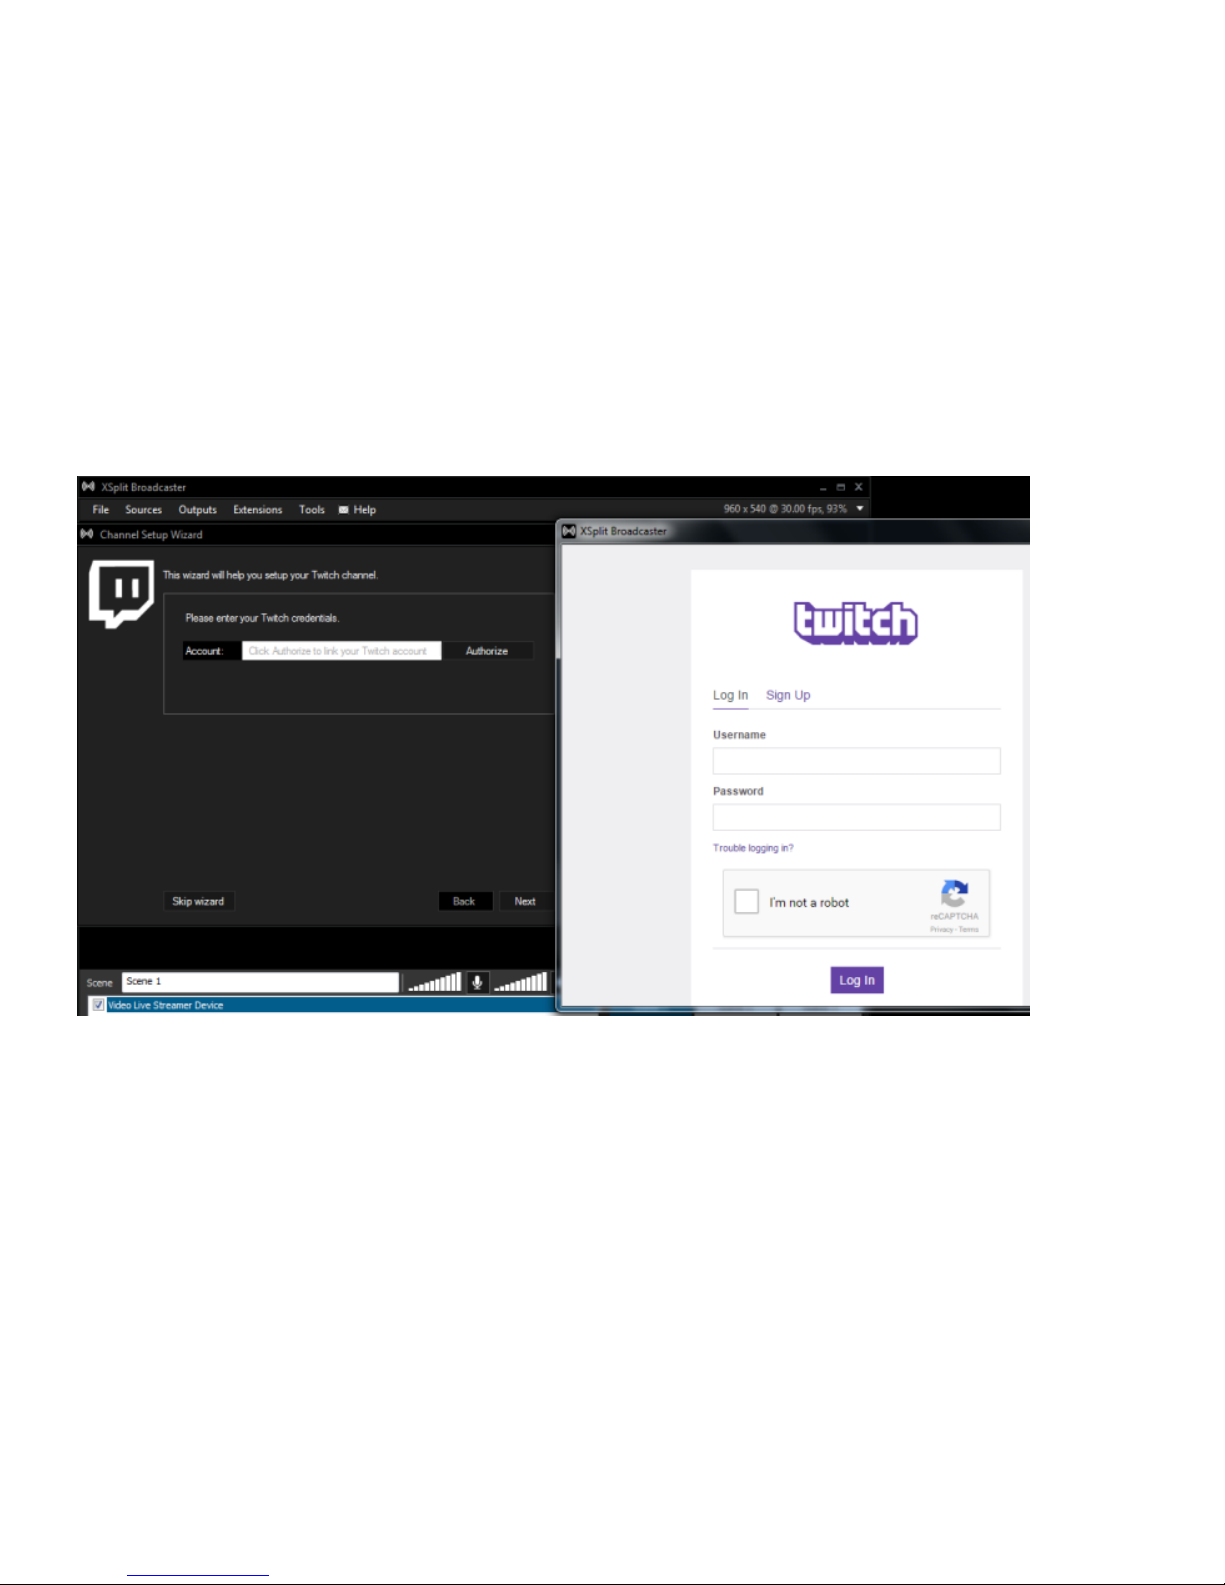
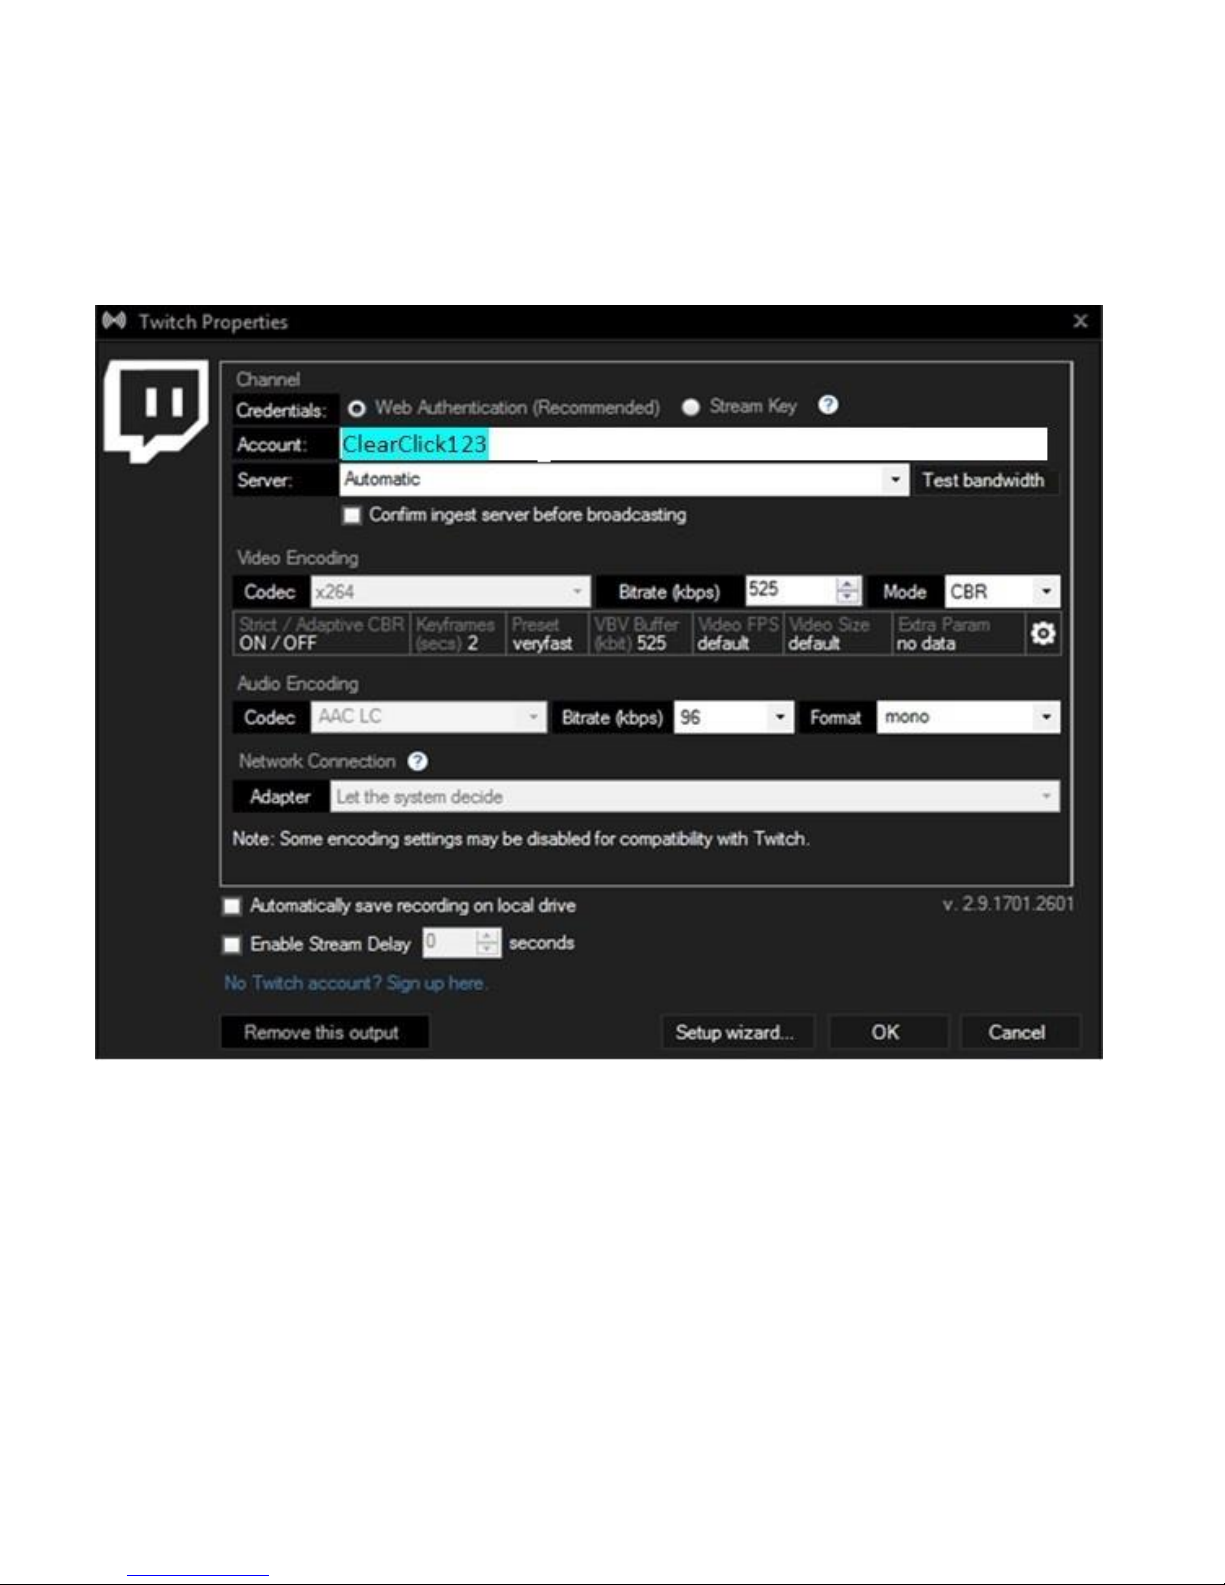
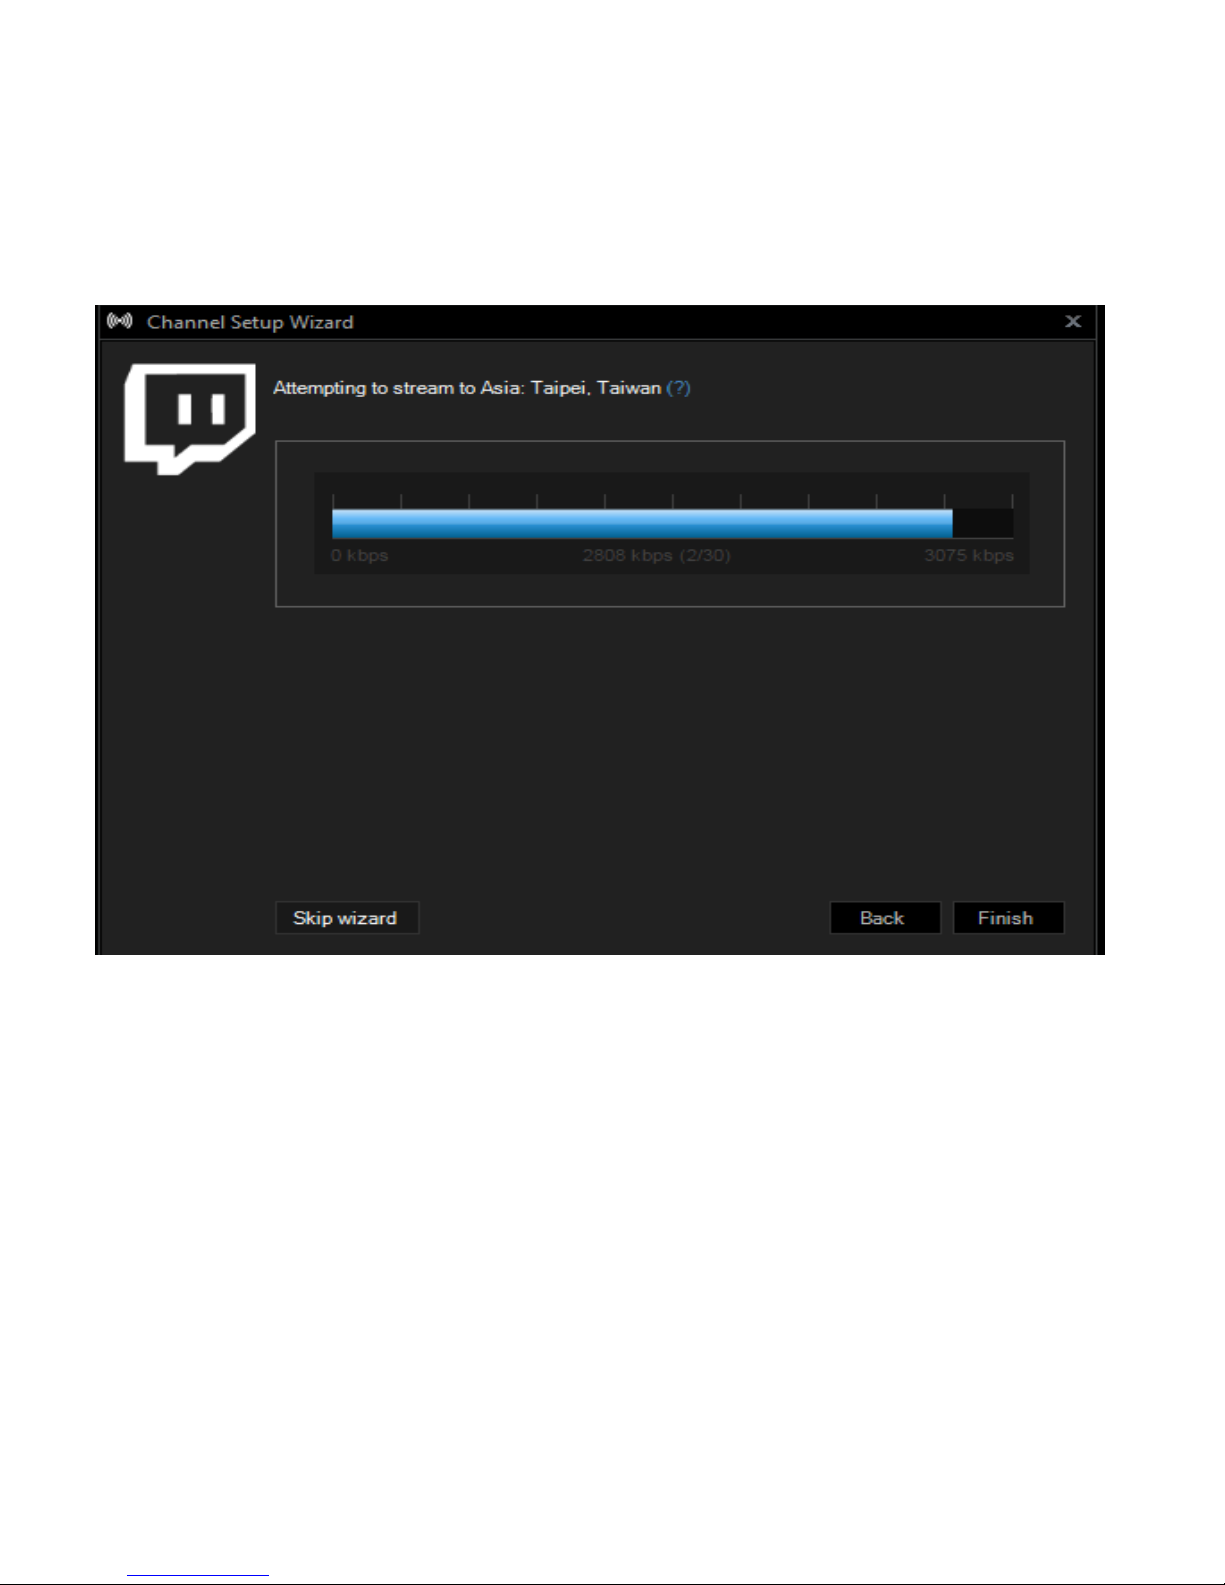
5. Enter your username and password for the selected website or
social network (you will need an account set up with the website
already).
Page 25
24
Page 26
25
Page 27
26
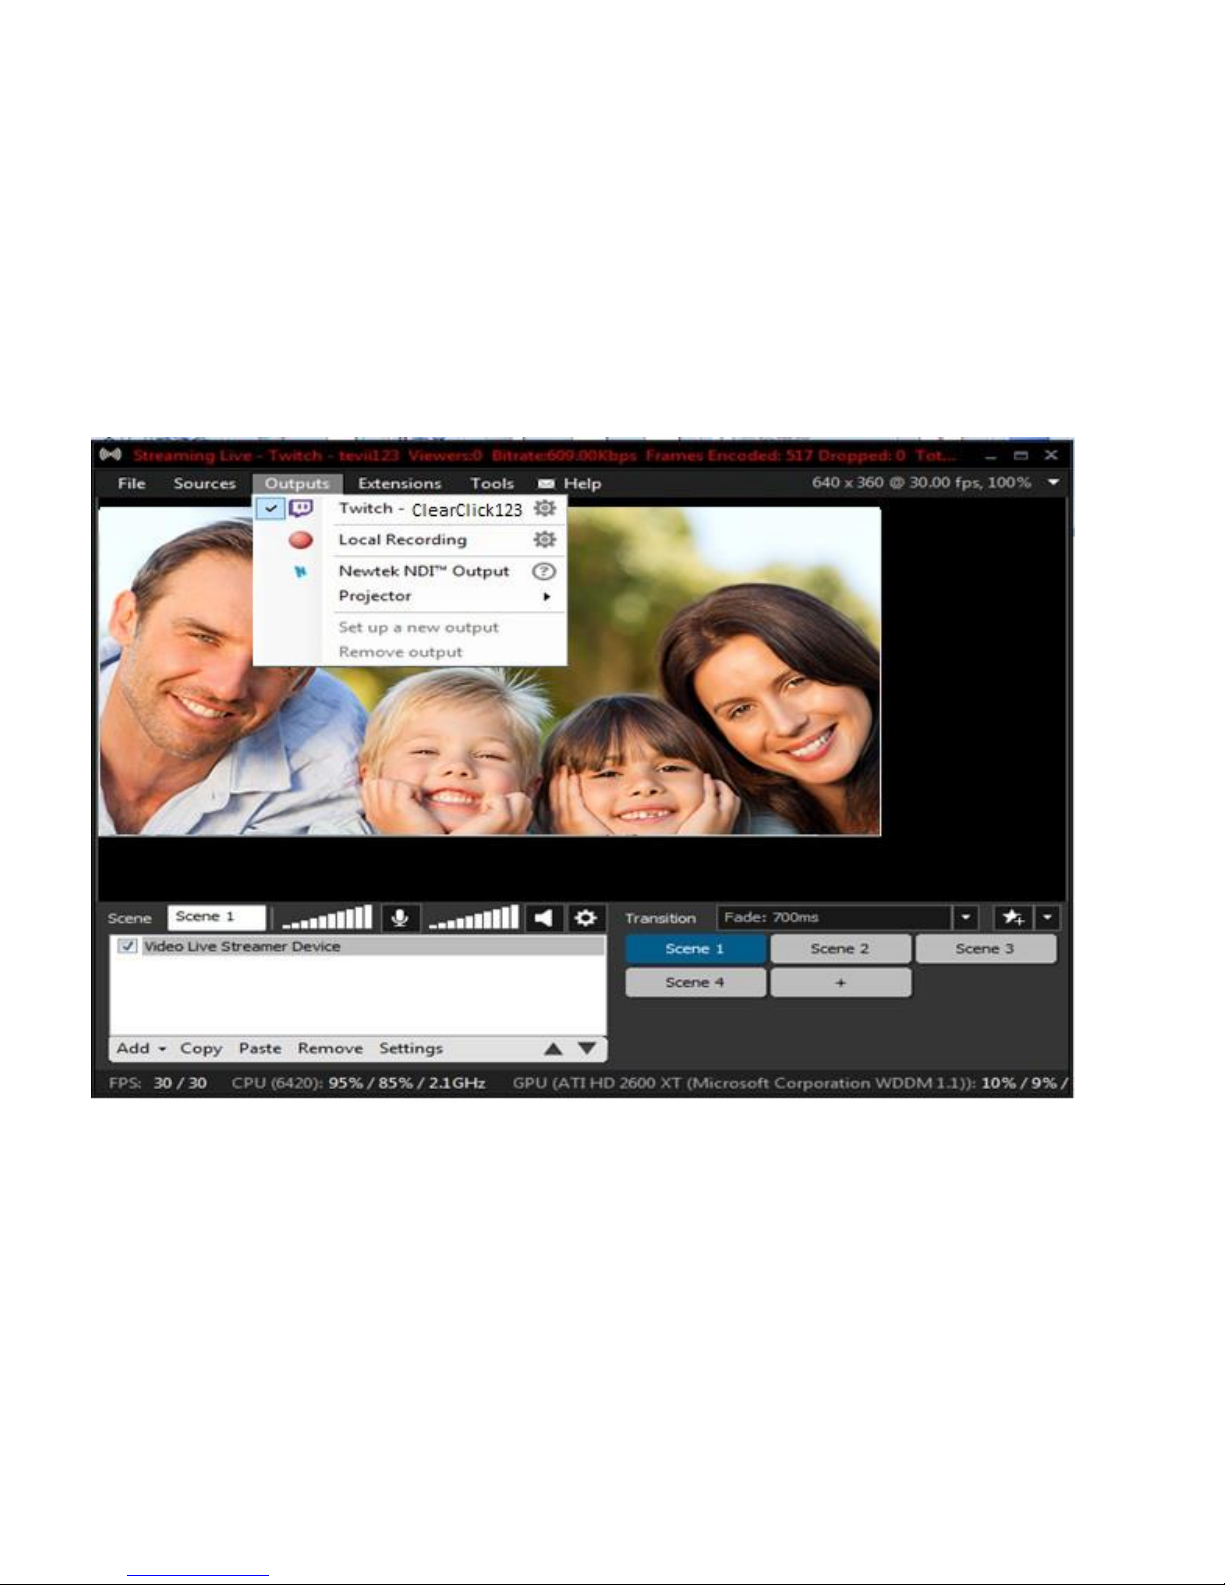
6. After the setup is completed, click Outputs Twitch (or other site)
ClearClick123 (your account name) to start streaming.
Page 28
27
Live Streaming with OBS Software on PC or Mac
1. Download the latest version of OBS software from
www.obsproject.com and install it. The software is compatible with
Windows, Macintosh, and Linux.
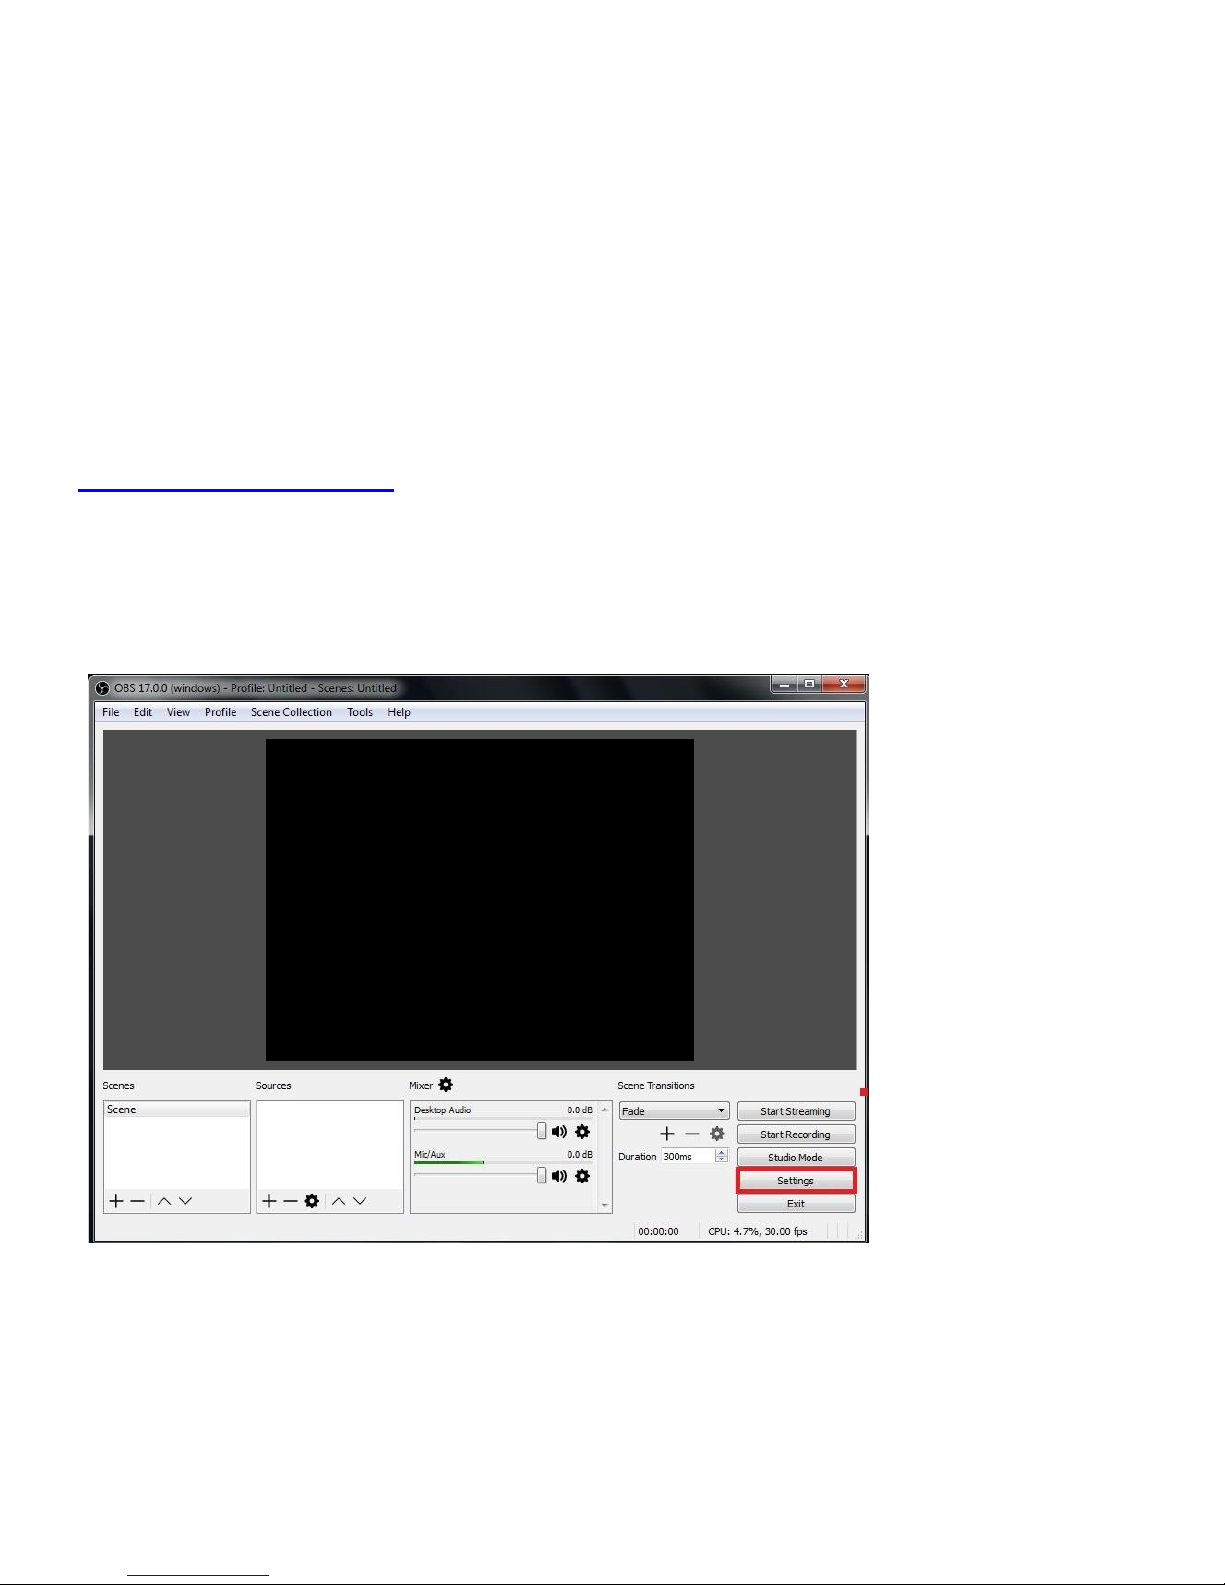
2. Open the OBS software and click the “Settings” button.
Page 29
28
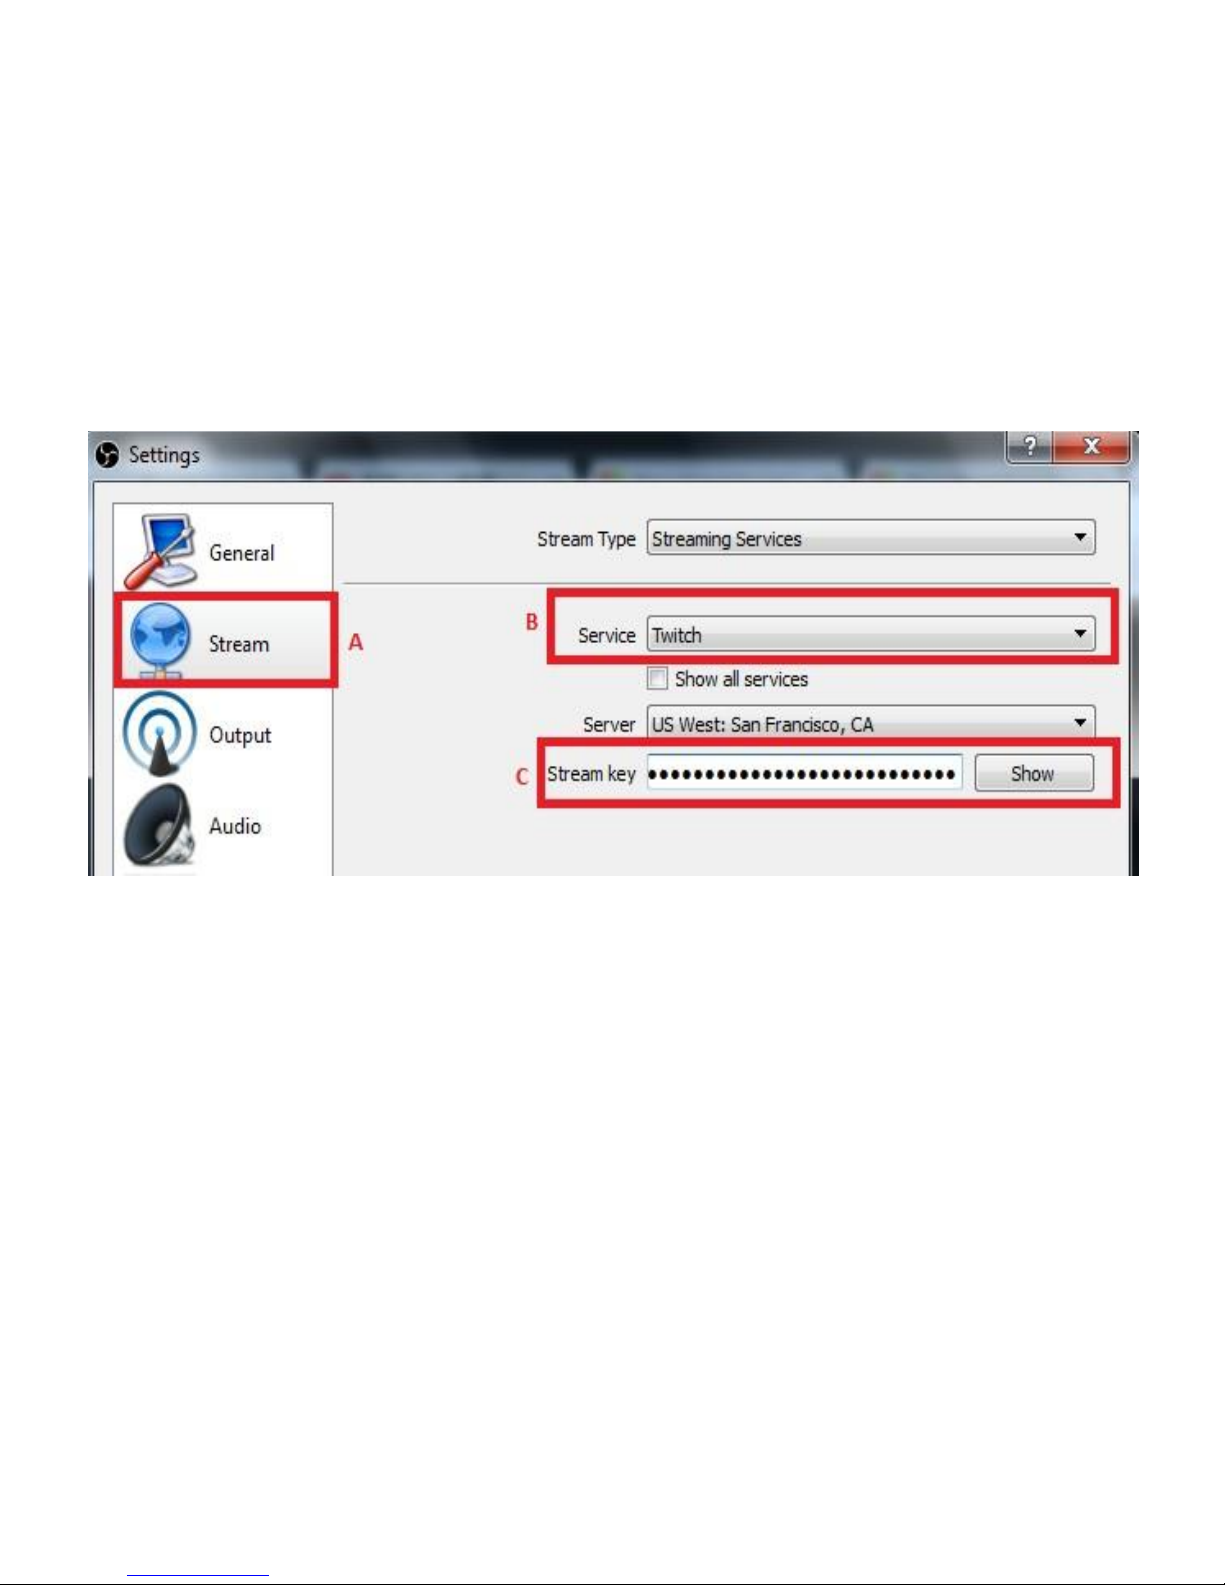
3. Click “Stream“ → Set your desired “Service” (streaming website) →
Enter your Stream Key → Click "OK.”
(To find your streaming key, go to your streaming service’s website
and look in the settings. For example, on Twitch, click Dashboard,
Settings, Show Key.)
Page 30
29
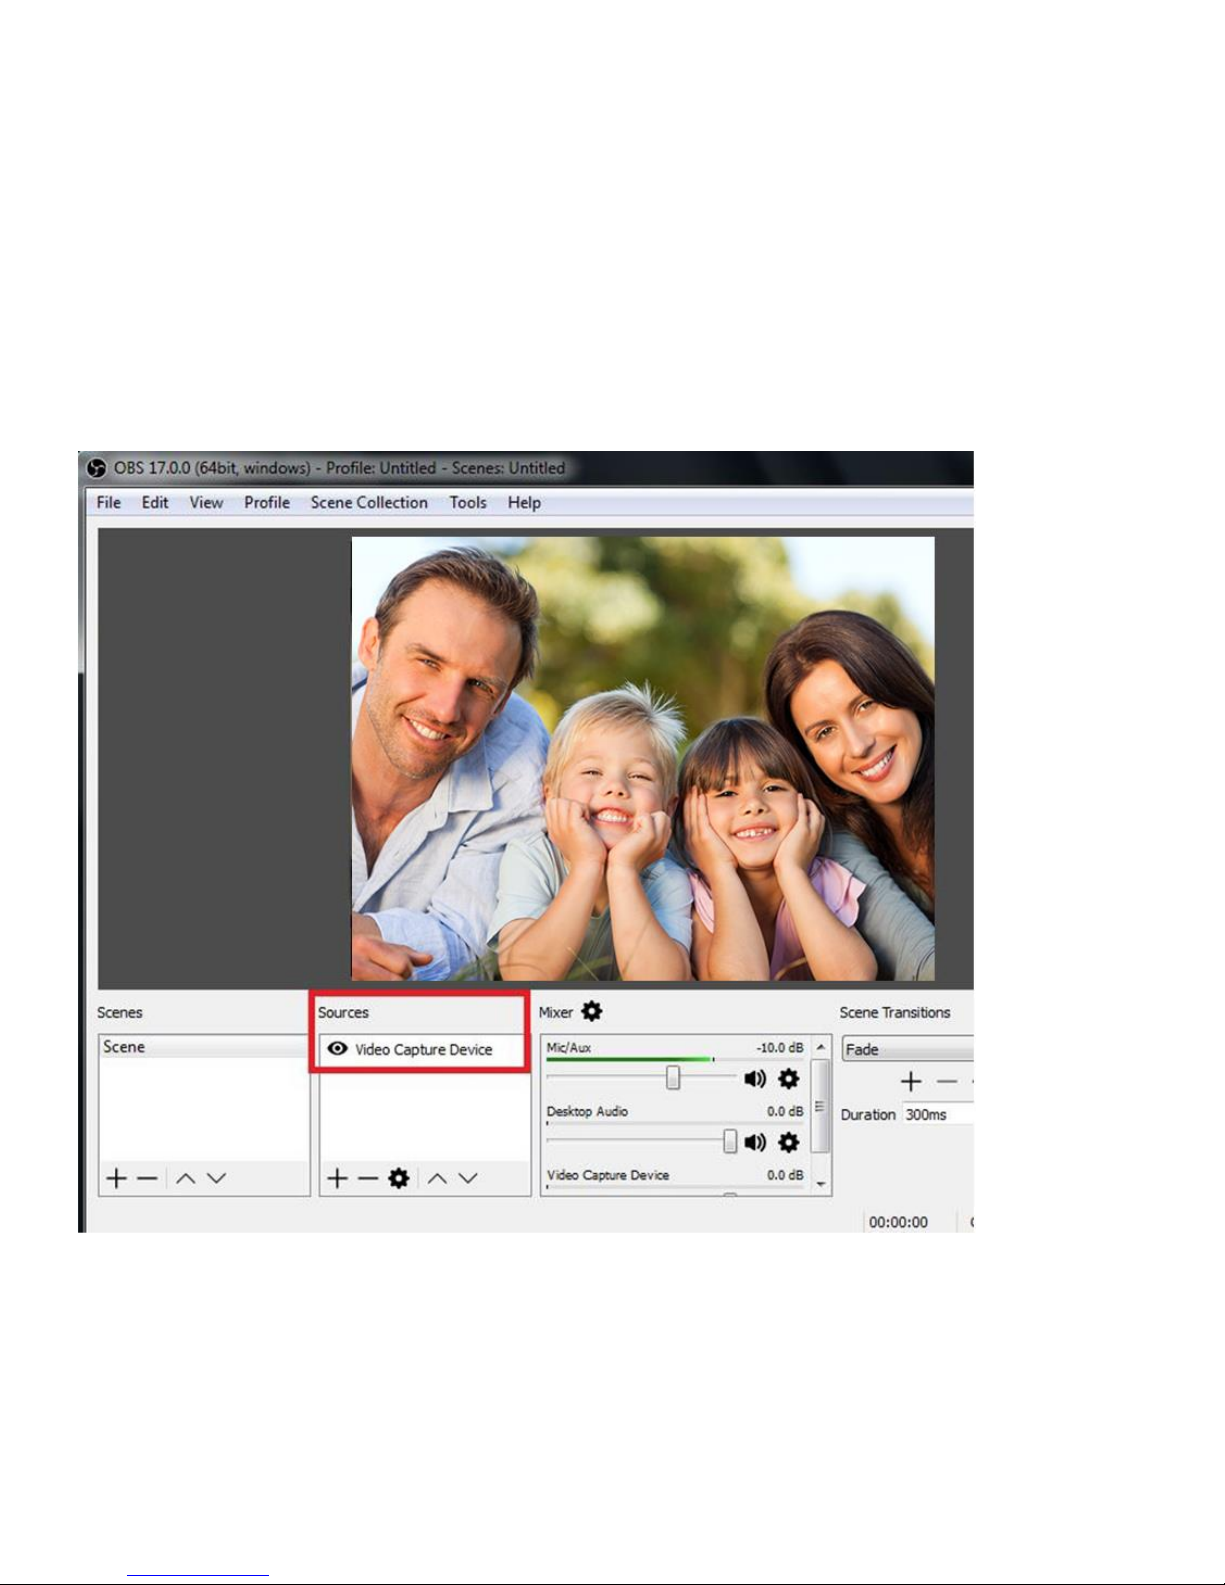
4. Click Sources → Add → Select Video Capture Device → Device →
Select “HD Video Capture Device.”
Page 31
30
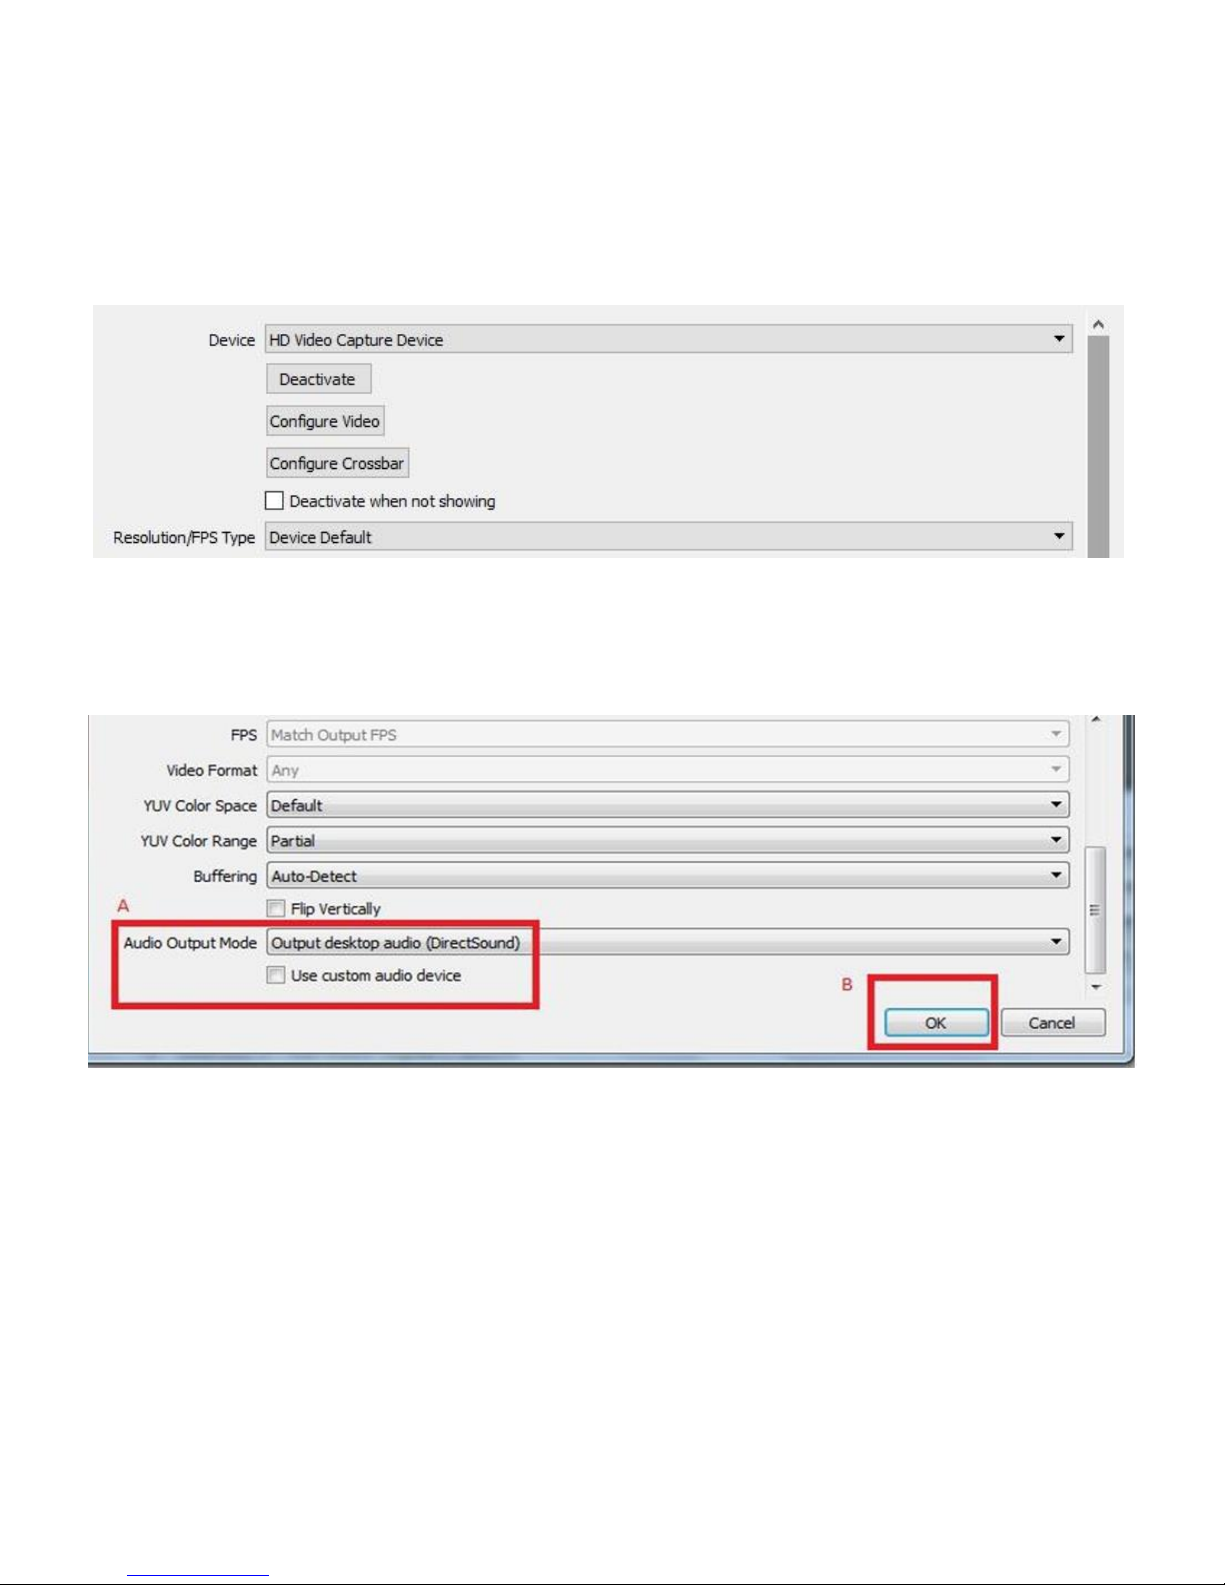
5. In the settings, under “Audio Output Mode,” select “Output desktop
audio (DirectSound)” and click OK.
Page 32
31
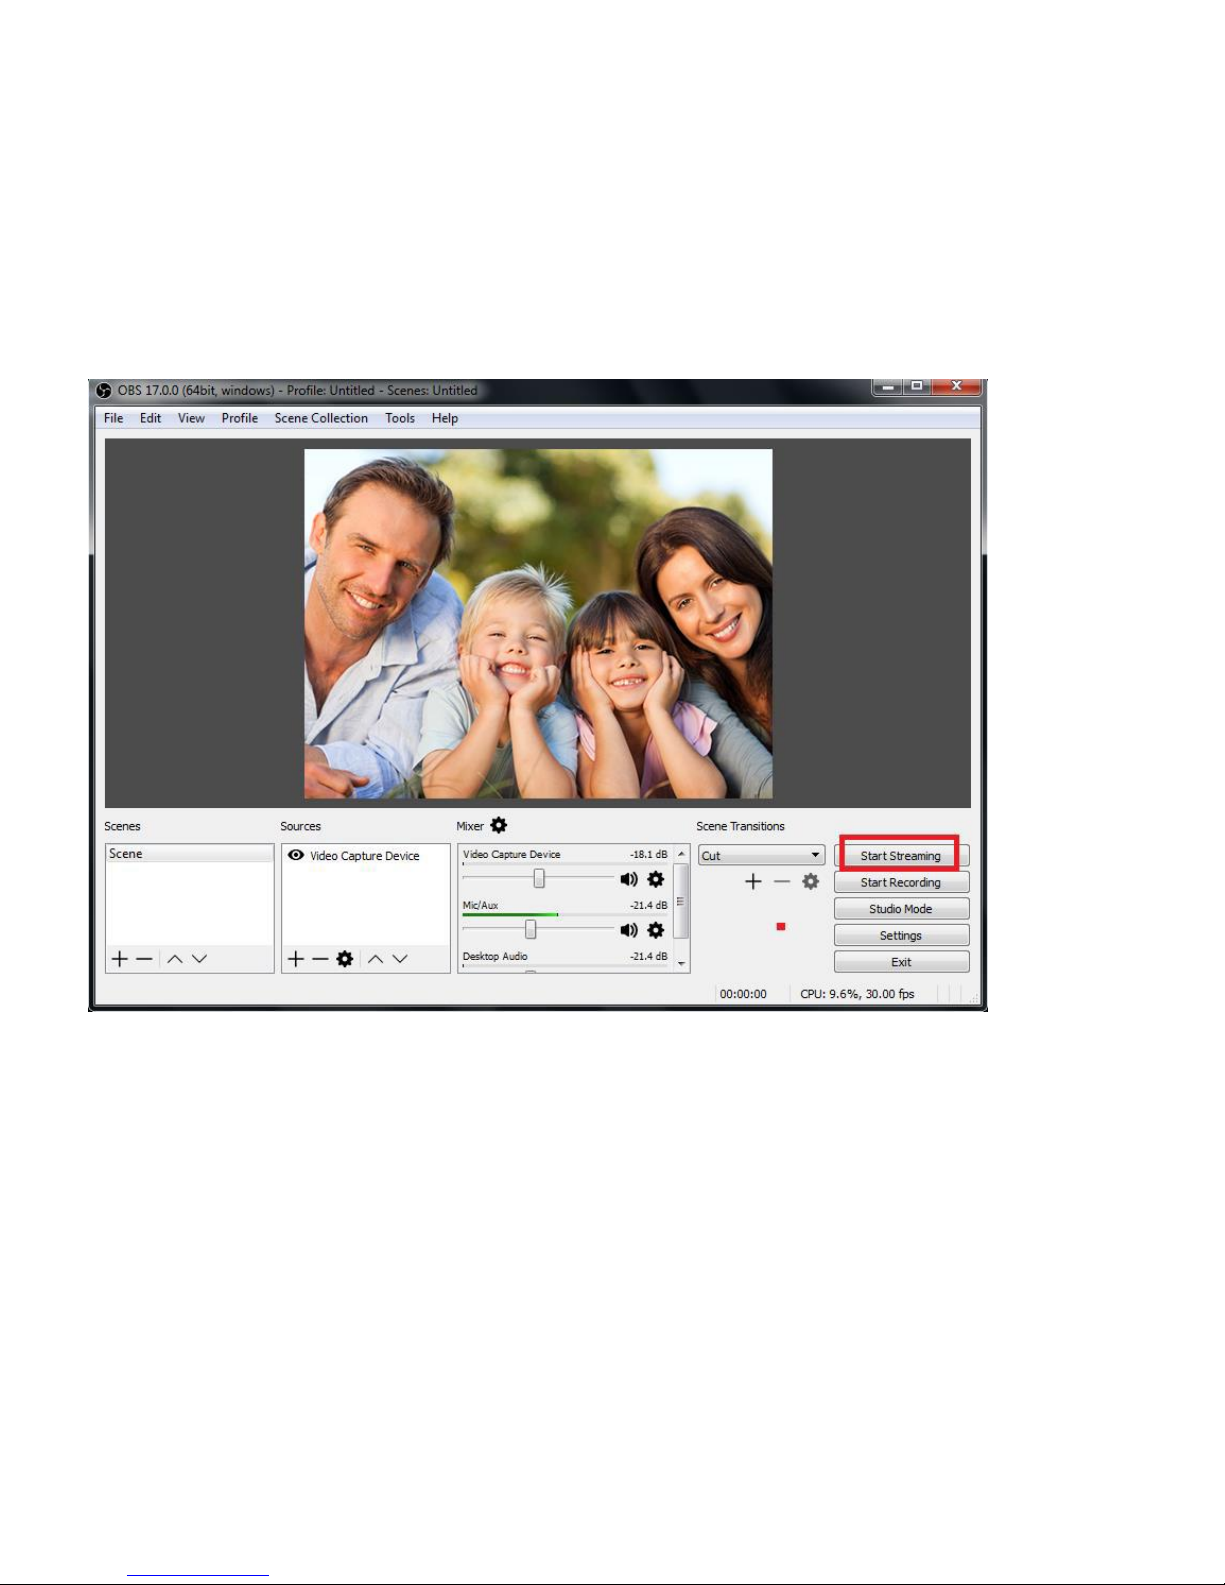
6. Click the “ Start Streaming ” button.
Page 33

32
Need help?
Open a support ticket and we’ll get back to you
within 24-48 hours! (Monday-Friday) Just visit:
http://Support.ClearClickSoftware.com
or email us at:
www.ClearClick.tech
 Loading...