

Page 1

smart matrix SILENT
User manual
Bedienungsanleitung
© clearaudio electronic GmbH, 2019-06 Made in Germany
Page 2
User manual / Bedienungsanleitung
User manual ......................................................2 - 13
Bedienungsanleitung ........................................14 - 25
Dear Clearaudio customer,
Thank you for choosing the
made in Germany by Clearaudio.
A clean vinyl record has so much more to oer: more information, more detail and, let’s face it,
better sound. That’s why audio experts advocate cleaning not only your latest ea market nds
but also your brand-new LPs fresh from the press – to remove those unwanted surface chemical
residues.
To avoid misuse and achieve the best possible cleaning results with your
SILENT
Components and processing
The Clearaudio
for intensive and continuous use. The chassis, the cleaning, vacuum and antistatic arms, and the
SMS Seal record clamp are all machined from solid aluminium. The design and construction of the
record cleaning machine reduce noise to a minimum.
We wish you much musical enjoyment with your new Clearaudio
cleaning machine.
Clearaudio electronic GmbH
record cleaning machine, please read this user manual carefully.
smart matrix SILENT
smart matrix SILENT
is built using the highest quality components and is designed
record cleaning machine, a high quality product
smart matrix
smart matrix SILENT
record
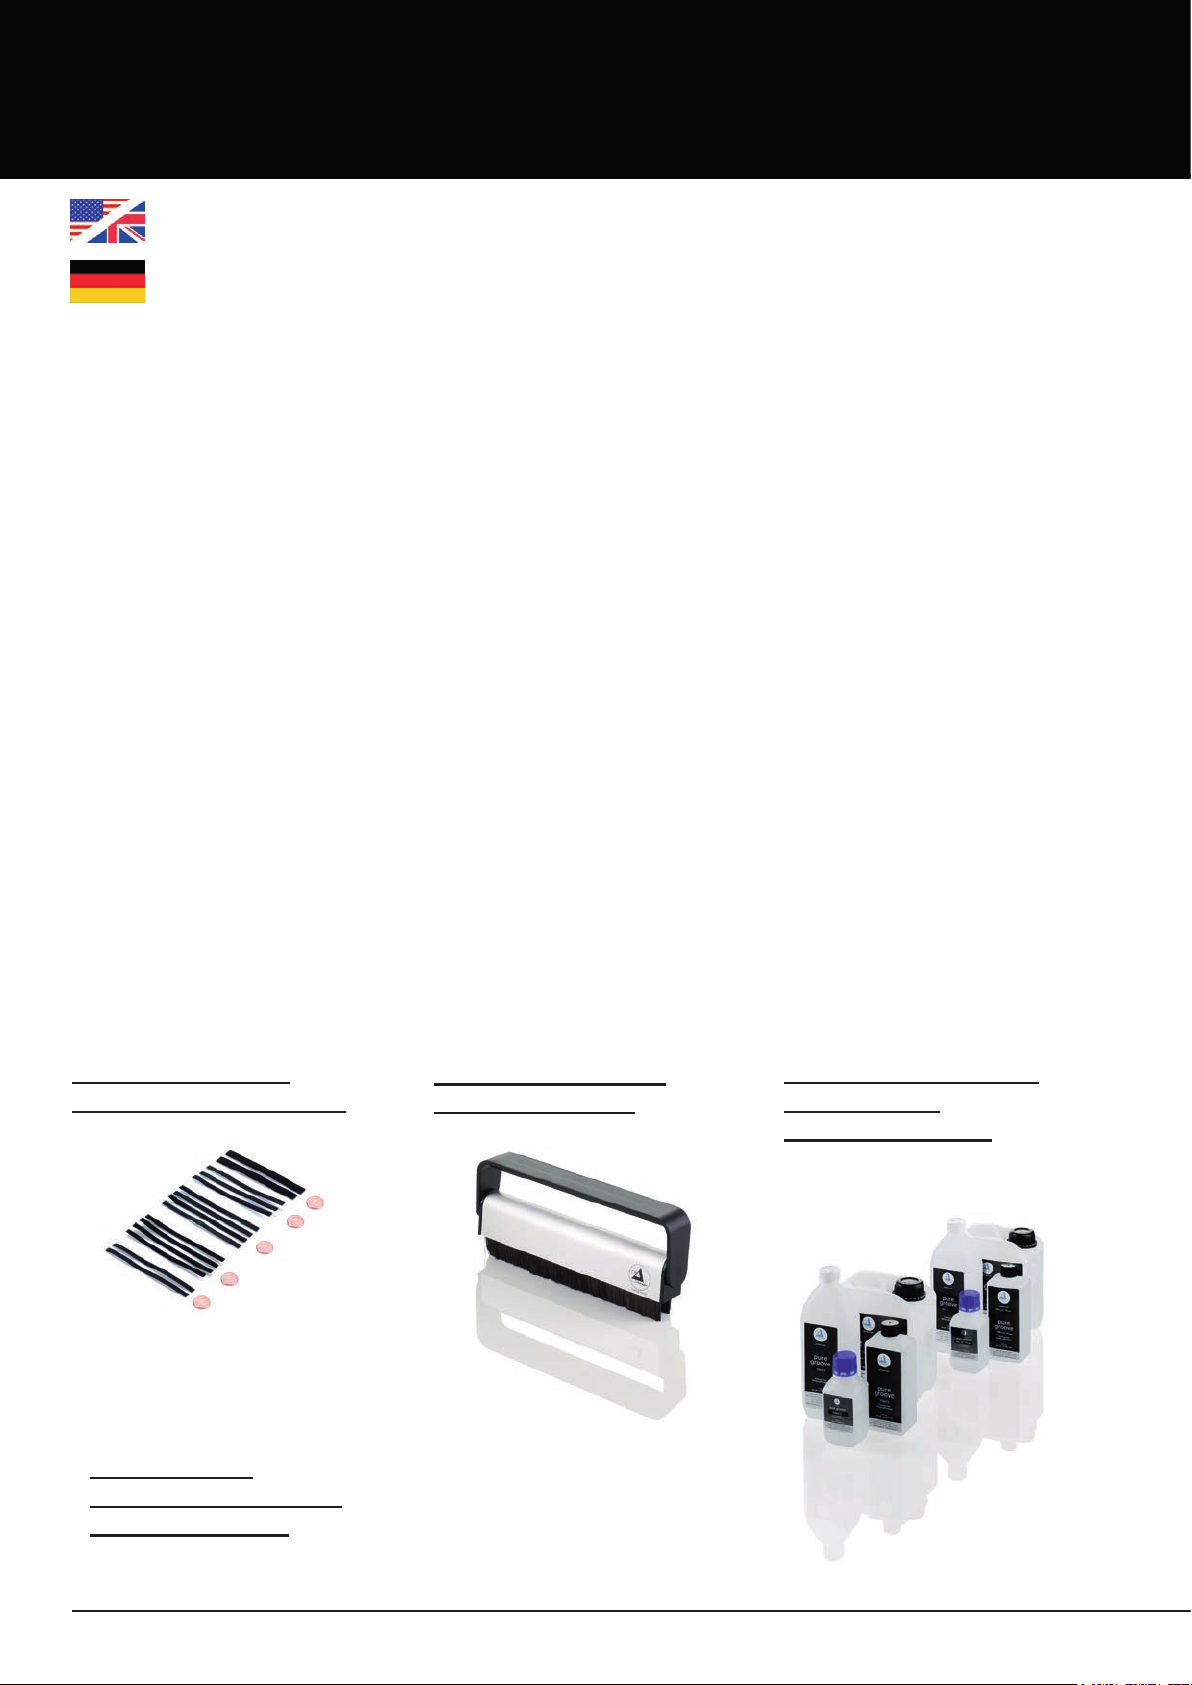
Available accessoires:
Microbre stripes
(Art. No. AC062/SMS):
Dustcover for
Carbon bre brush
(Art.No. AC004):
Record cleaning uid
Pure Groove
(Art. No. AC048):
Available in dierent sizes
smart matrix SILENT
(Art. No. AC162)
You can purchase spare parts or accessories either from your Clearaudio dealer or directly from
the Clearaudio analog shop: www.analogshop.de
2 © clearaudio electronic GmbH, 2019-06
Page 3

User manual / Bedienungsanleitung
Contents
1. Package contents .................................................................4
2. Features overview of the
3. Set-up and operation ............................................................6
4. Operating elements ..............................................................7
5. Cleaning process ..................................................................8 - 9
6. Maintenance .........................................................................9 - 11
7. Special instructions ..............................................................12
8. Technical data ......................................................................13
smart matrix SILENT
...................5
Warranty information ...............................................................27 - 28
Made in Germany 3
Page 4

User manual / Bedienungsanleitung
1. Package contents
The Clearaudio
We highly recommend that you k eep the original packing material in case any f utur e tr ansportation
or shipping is necessary.
After opening the shipping box, please take the various accessories out and place them near to the
area where you want to use the machine. Using both hands, lift out the machine and place it onto
a stable and waterproof surface.
Ensure that the packaging has no external damage, such as shipping damage.
IMPORTANT: Never lift the
Please check the contents included with the machine as listed below:
smart matrix SILENT
smart matrix SILENT
1. Fully assembled record cleaning machine
2. Record clamp (mounted on the platter)
record cleaning machine is packed in customised packing.
by its platter.
3. Filling funnel
4. IEC connector
(according to country specications)
5. Spare microbre stripes (2 pcs.)
6. 500ml Pure Groove cleaning uid
7. Cap for cleaning uid reservoir
(mounted on the lling opening)
8. Tube plug
(mounted on the drain tube)
9. Single adapter
10. Warranty card / Quality control card
In the event of an incomplete delivery, please contact the relevant Clearaudio dealer immediately.
4 © clearaudio electronic GmbH, 2019-06
Page 5

User manual / Bedienungsanleitung
2. Features overview of the
• Cleans 12, 10 and 7-inch records
Thanks to an individually adjustable and multifunctional cleaning/suction arm, it is possible to
clean all record sizes without changing the arm.
• Bi-directional rotation
For enhanced cleaning performance you can change the direction of the rotation.
• Record clamp
Ensures that the record is held rmly during the cleaning process and protects the record label
from uid damage.
• Integrated uid application
Via a pump, by pressing a button.
• Easy controls
Simple and quick handling, using buttons on the top of the cleaning machine.
smart matrix SILENT
Made in Germany 5
Page 6
User manual / Bedienungsanleitung
3. Set-up and operation
3.1
Place the
The surface should be waterproof.
Please make sure that the machine is positioned safely and securely.
TIP: We recommend keeping a towel near the machine to mop up any uid spillage.
3.2
Connect the mains cable to your
The
IMPORTANT:
Please read before you connect your
The
The correct voltage is indicated on the rear of your
Please make sure that you use the right voltage for your machine.
smart matrix SILENT
smart matrix SILENT
smart matrix SILENT
machine on a clean, dry and stable surface.
smart matrix SILENT
must always be used with a grounded mains wall socket.
smart matrix SILENT
is available in both 230V and 110V versions.
and then to your wall socket.
to any power outlet:
smart matrix SILENT
.
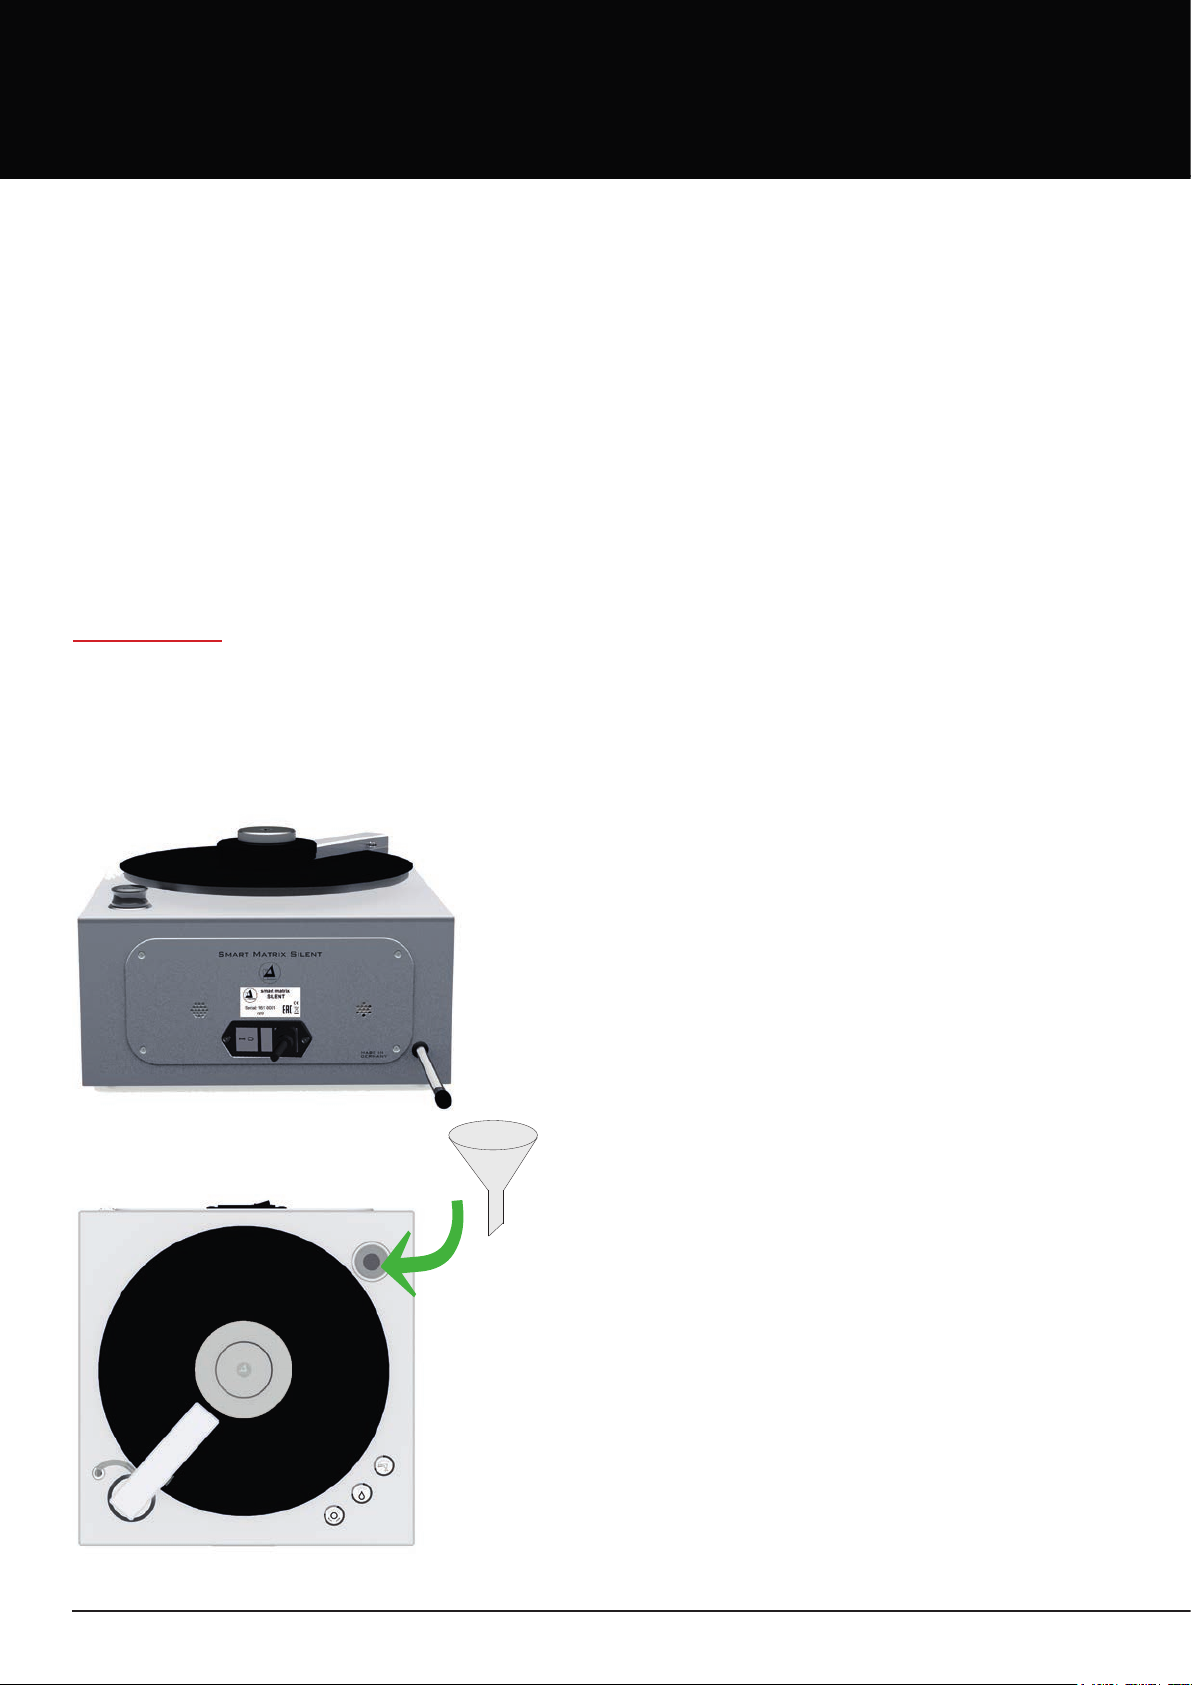
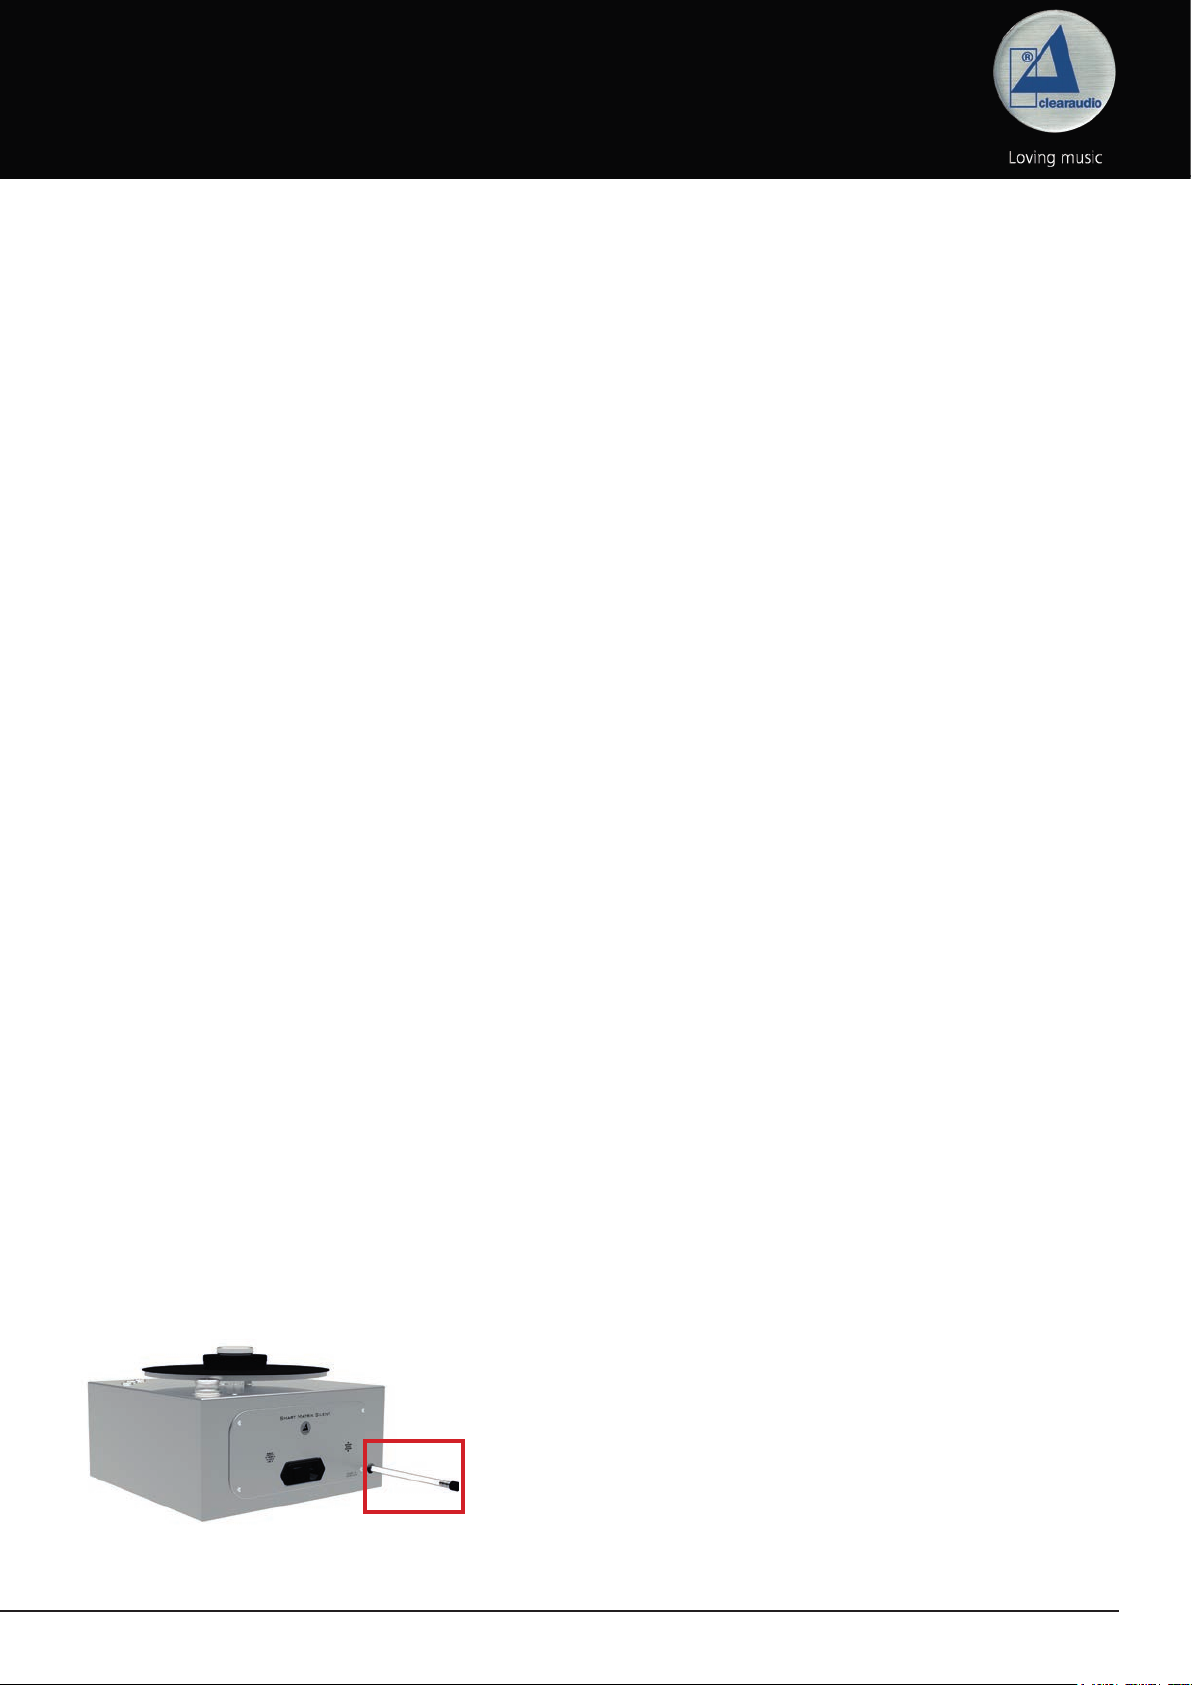
Pic. 1: IEC socket on the rear side
Use your
indicated on the rear of the machine!
To switch o the device completely (to avoid
unnecessary standby consumption if it will not be
used for a long period of time) we recommend setting
the switch on the IEC socket to the position “0”.
3.3 Filling the cleaning uid reservoir
Remove the cap from the cleaning uid reservoir and place the
lling funnel supplied into the hole (Pic. 2). Fill the uid reservoir
with the Pure Groove cleaning uid provided (max. 0.4l).
Then replace the cap.
For eective cleaning we recommend using only Clearaudio
Pure Groove cleaning uid (available at www.analogshop.de).
smart matrix SILENT
only with the voltage
Pic. 2: Filling the cleaning uid reservoir
6 © clearaudio electronic GmbH, 2019-06
Page 7
User manual / Bedienungsanleitung
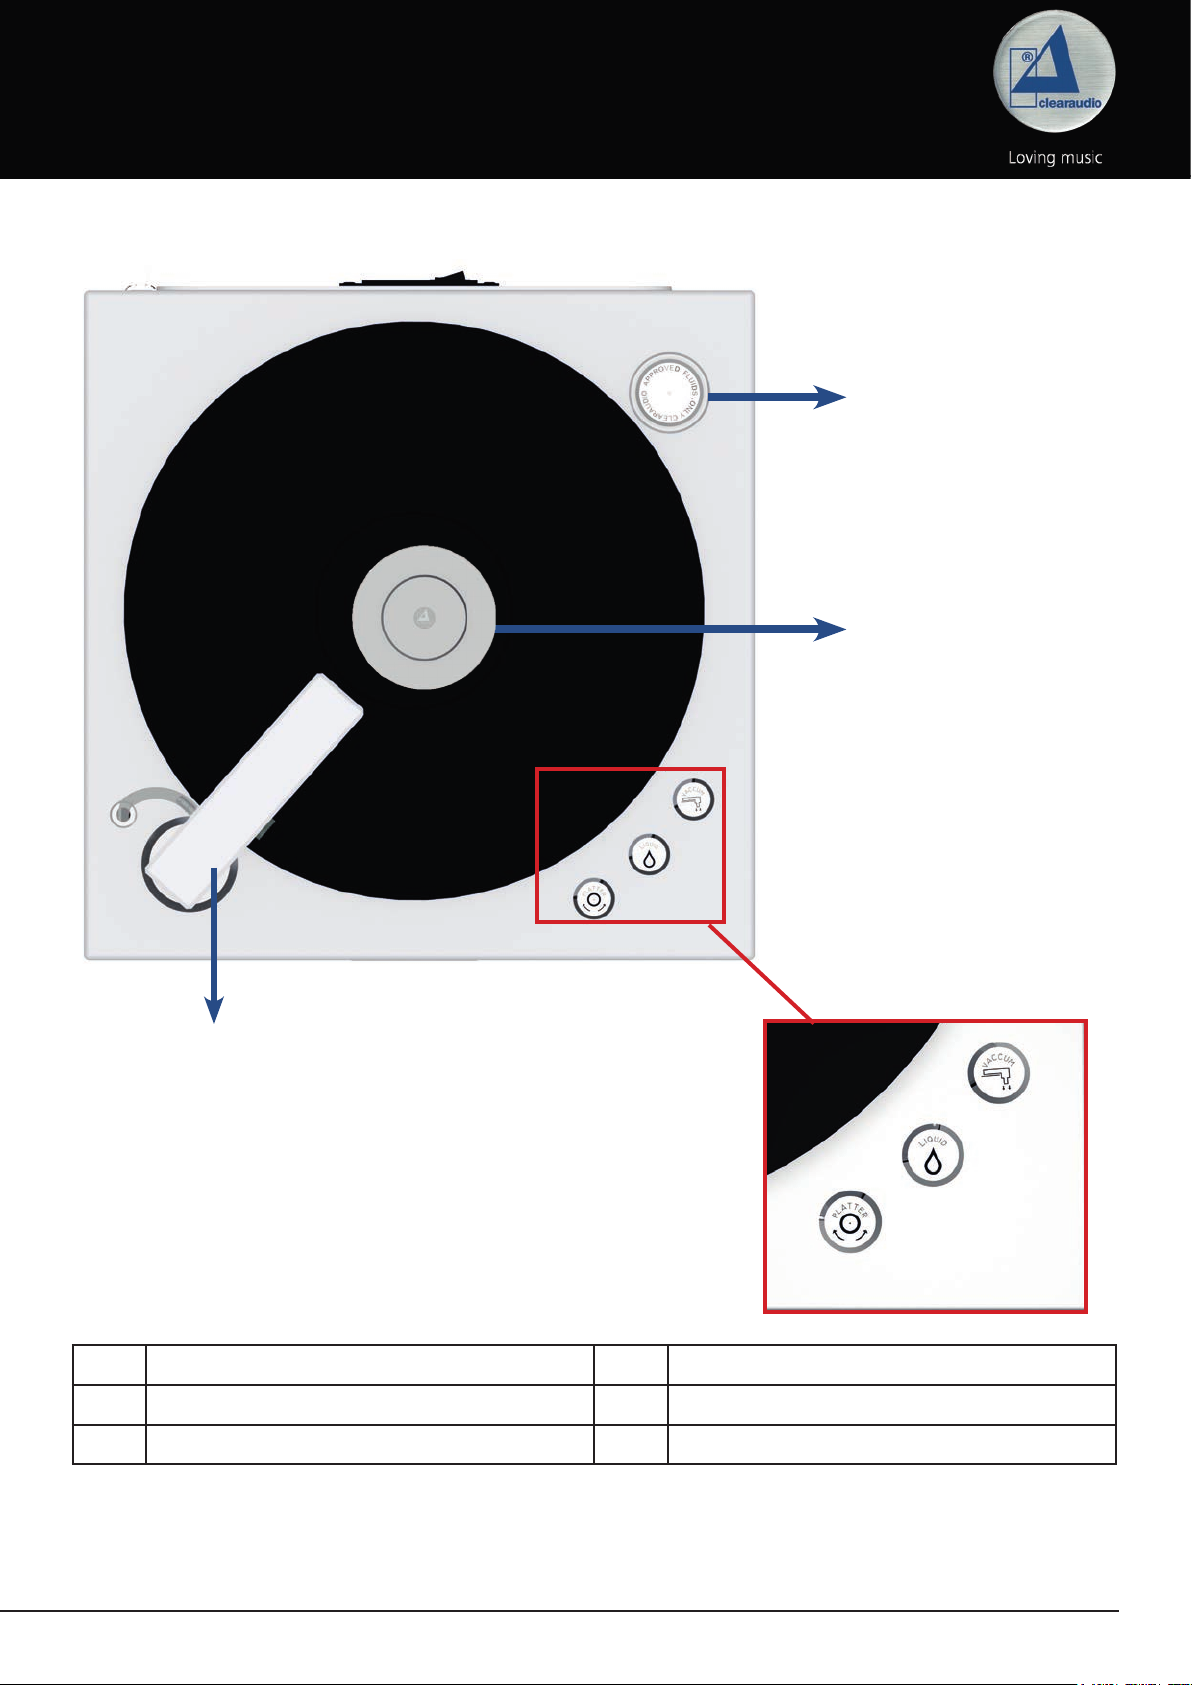
4. Operating elements
6
5
1
Pic. 3: View from above
4
3
2
Cleaning & vacuum arm
1
Rotation direction selector
2
Cleaning uid application
3
Please familiarise yourself with each of the operating elements shown above, which are described
in detail on the following pages.
Vacuum drying on / o
4
Record clamp
5
Cleaning uid reservoir lling cap
6
Made in Germany 7
Page 8
User manual / Bedienungsanleitung
5. Cleaning process
For simple and eective record cleaning please follow these steps:
(Make sure that there is good ventilation in the room while using the
1. Make sure, that the cleaning-/ vacuum arm is in rest position (not above the platter).
Connect the
switch the main switch on the rear panel on.
smart matrix SILENT
2. Remove the record clamp and place the record on the
platter , then hand-tighten the record clamp onto the spindle
so the record won‘t move during the suction process.
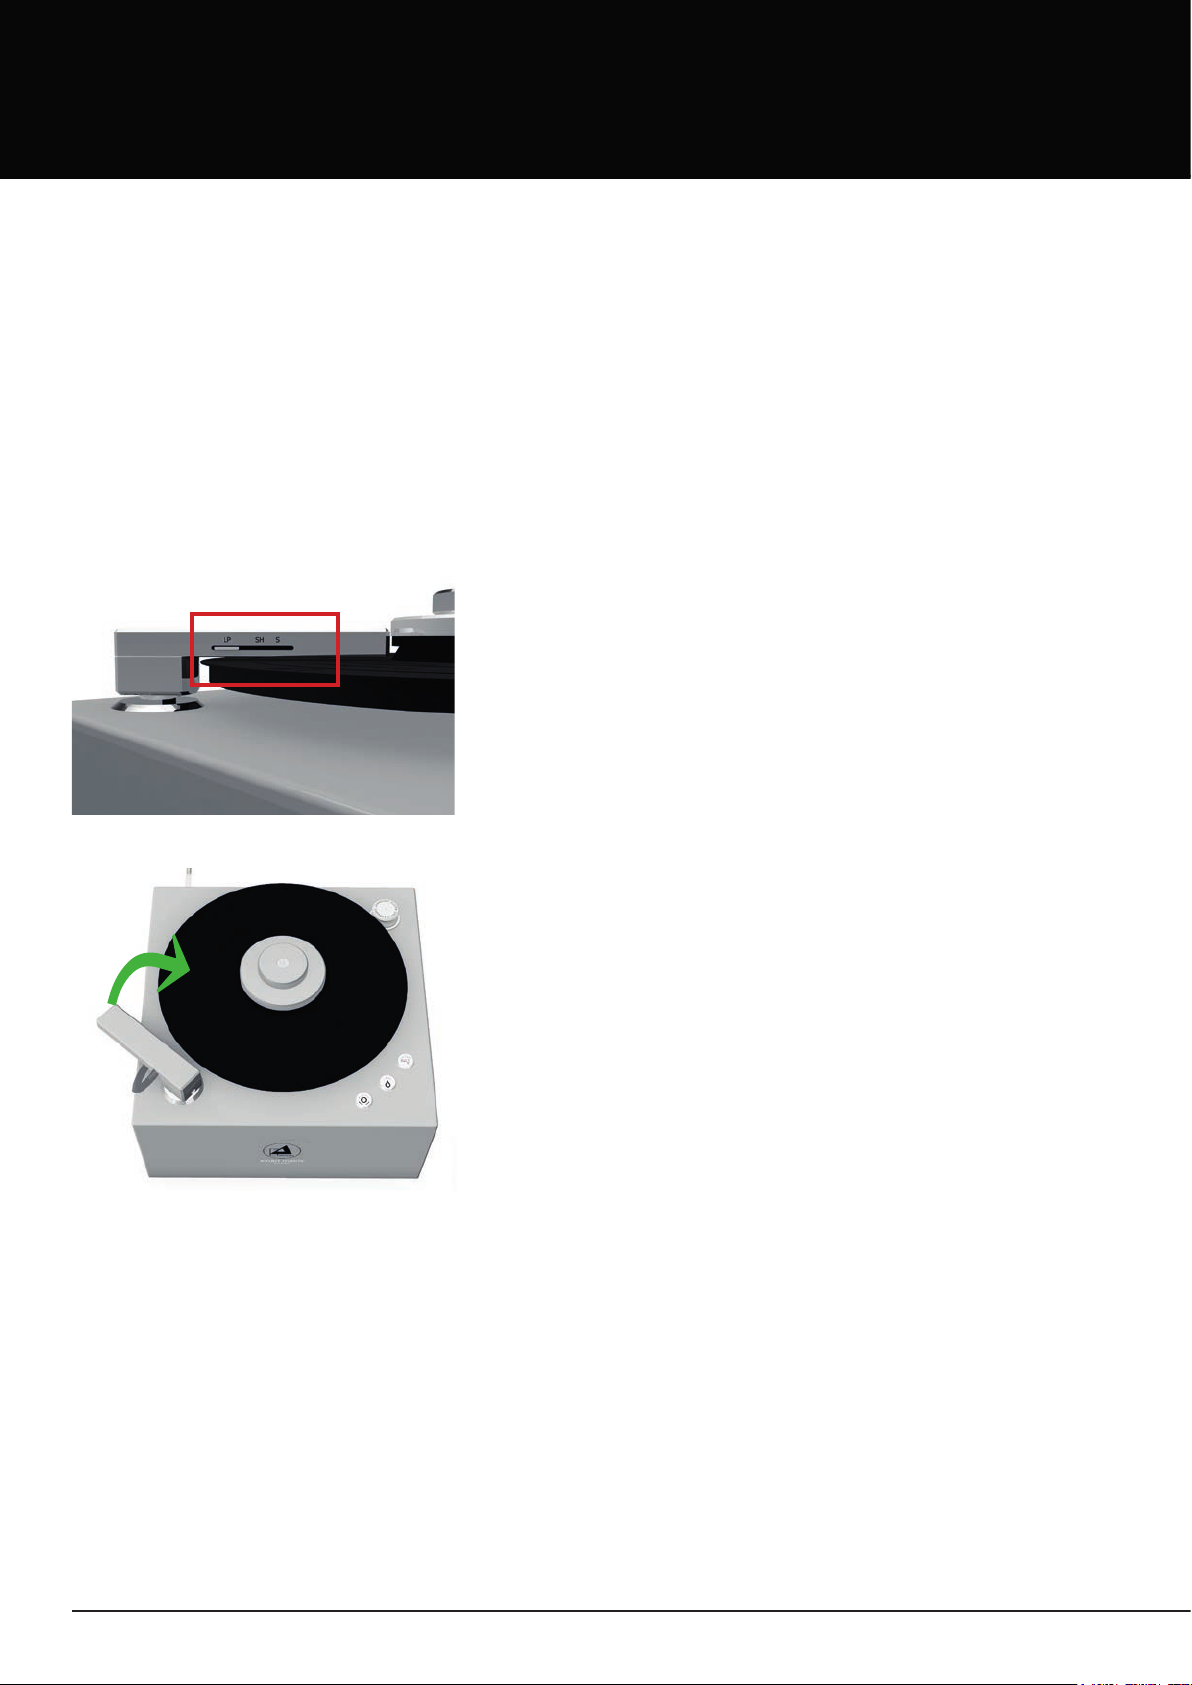
Now adjust the cleaning/vacuum arm to the correct size
of your record (Pic. 4).
machine to the mains supply as described in point 3.2 and
smart matrix SILENT
machine.)
Pic. 4: Adjustment of the cleaning/vacuum arm
3. Start the machine by swinging the cleaning/vacuum arm
back above the platter and then pressing it down.
Due to its automatic on/o system, the platter will start to
turn and will automatically apply a small dose of cleaning
uid onto the platter (Pic. 5).
Pic. 5: On/o system
4. By pressing and hold the ‘Liquid’ button (Pic. 3, No. 3) you can dose the cleaning uid on the
record. Once the record is equally and completely covered with a small amount of cleaning uid,
we recommend changing the platter direction after 2-3 rotations by pressing the ‘Platter’ switch
(Pic. 3, No. 2).
Please note:
The uid should just cover the whole record playing surface evenly. Too much uid will
spill onto the surface of the
If too much uid is applied, immediately mop up the excess with a towel or similar
material to prevent any damage to the record label or to the machine.
8 © clearaudio electronic GmbH, 2019-06
smart matrix SILENT
or onto the record label.
Page 9
User manual / Bedienungsanleitung
TIP: For very dirty records, we recommend allowing the platter to turn more than twice
in each direction and then repeating with a second or even third cleaning and vacuum
process.
5. Press the ‘Vacuum’ button (Pic. 3, No. 4) to start the vacuuming process and wait until the record
surface is completely dry. Press the ‘Vacuum’ button again to stop the vacuuming process.
Please note:
For best cleaning results we recommend selecting anti-clockwise rotation of the platter
for vacuuming.
6. Now you can switch the rotation o, by lifting the cleaning/suction arm and then swinging it back
to the side. Remove the record clamp.
Flip over the record and repeat the cleaning process by following points 1-5 for the other side.
To discharge any static that is generated during the drying process, we recommend using an
antistatic brush (Art. No. AC014, available at www.analogshop.de) before playing the record on
your turntable.
6. Maintenance
Cleaning and draining the waste uid tank
Please empty the waste uid tank after 30 – 40 cleaning procedures.
The waste uid tank has a capacity of approx. 0.5 litres. We recommend regular emptying of the
tank, to avoid any damage.
Please note that with intensive use, waste uid can evaporate nearly completely leaving a residue
within the waste tank which may clump over time and possibly clog the discharge opening.
For prevention we recommend occasional cleaning.
Before you start cleaning, you should rst empty the waste uid tank.
Please make sure that you have switched o the vacuum motor while emptying the
waste uid tank otherwise damage to the machine could occur.
To empty the tank, rst remove the stopper from the uid
release tube (on the rear panel of the
Place the tube in an appropriate vessel (one deep enough to
capture the uid as it is ows out). Be sure to securely replace
the stopper in the uid release tube.
smart matrix SILENT
).
Warning:
Pic. 6: Emptying the waste uid tank
Made in Germany 9
Do not use recycled cleaning uid. This could damage
the machine or your records.
Page 10
User manual / Bedienungsanleitung
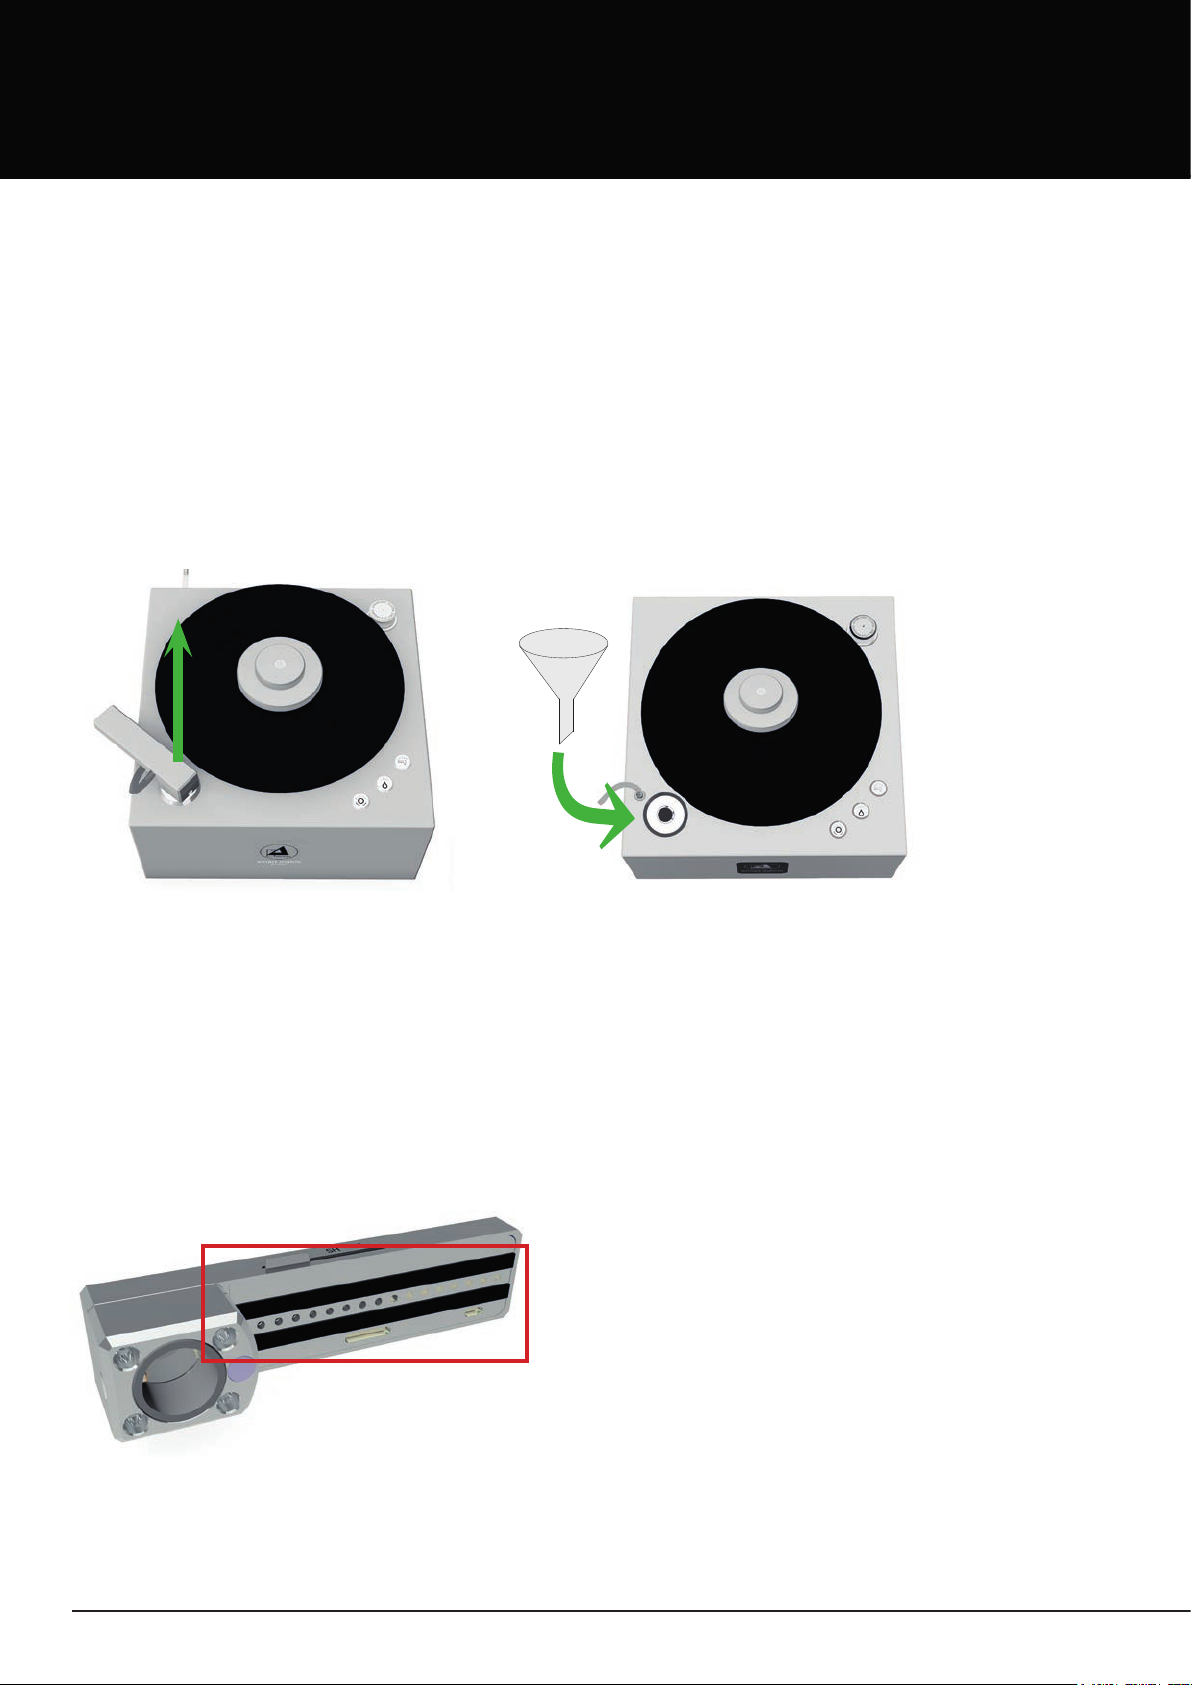
For cleaning: Remove the cleaning arm by removing the tube and pivoting it back as far as it will
go and pulling it upwards. Using the lling funnel supplied to ll 250ml of warm water through the
stainless steel tube. Leave the warm water in the waste tank for approximately 20 minutes, then
drain it by removing the sealing plug from the dr ain hose and putting the end of the drain hose into a
bowl (or similar). Repeat this process until the water drains clean and does not contain any residue.
Please use fresh water for every ushing process.
Please note:
When returning the machine to operation after maintenance, the drain tube must
always be closed using the stopper, so that the vacuum pump can generate the required
vacuum for suction. This is essential to ensure the full functionality and longevity of
your cleaning machine.
Pic. 7: Removing the cleaning- / suction arm Pic. 8: Insert the lling funnel
Cleaning and changing the microbre stripes
We recommend clean the microbre strips after approx. 30-40 cleaning programs, depending on the
condition of the records cleaned. First, remove the cleaning arm as previously described and remov e
the tube which is connected to it.
Now you can rinse the microbre strips under running water. Before using the unit again, press
the microbre strips back on again. Microbre strip lifespan is dependent on use. We recommend
changing the microbre strips after approx. 100 cleaning procedures, though this will depend on the
condition of the records cleaned.
If the microbre strips look worn out, it is recommended
that you change them.
To change the microbre strips, peel them o the
vacuum arm and carefully clean the tube with an
alcohol-based cleaning uid. Remove the protective
backing from the spare microbre strips to expose
the glue and stick them alongside the suction slot of
the vacuum arm. Please take care not to obstruct the
suction slot with the microbre strips.
The
Pic. 9: Removing the microbre stripes
smart matrix SILENT
hours after changing the microbre strips. The adhesive
should not be used for 24
takes 24 hours to fully dry. If used too soon the strips
may not hold properly to the vacuum arm and could
damage your records.
10 © clearaudio electronic GmbH, 2019-06
Page 11

User manual / Bedienungsanleitung
Reservoir for Pure Groove cleaning uid
The cleaning uid reservoir has a capacity of approx. 0.4 litres. We recommend that you ll the tank
only with Clearaudio Pure Groove cleaning uid (available at www.analogshop.de) to receive the
best cleaning results.
Attention:
Never use foaming cleaning uid. Use only cleaning uids
approved for record cleaning machines. Never use any
Pic. 10: Warning
aggressive or acid-based uids with your
SILENT
machine.
Clearaudio recommends Pure Groove record cleaning
uid (Art. No. AC048).
smart matrix
To empty the uid reservoir tank (to ship the unit or
to switch the to another liquid) remove the cleaning-/
suction arm as described on page 10.
Put the tube of the cleaning- / suction arm into an
appropriate vessel. Hold the button “Liquid” to pump the
liquid completely out of the tank.
Pic. 11: Entleeren des Vorratsbehälters
Visual check
For your own safety, a frequent visual check of the mains cable is suggested.
If any damage should occur, repair or exchange should be done immediately using an approved
electrician or institution.
Any servicing of Clearaudio products should only be done through certied Clearaudio dealers.
Made in Germany 11
Page 12

User manual / Bedienungsanleitung
7. Special instructions
7.1 Transportation
• If you transport or ship the Clearaudio
packaging must be used. Please pack the machine as it was packed originally by Clearaudio to
ensure secure transport.
Ensure also that both tanks (uid reservoir and waste uid tank) are empty before
packing the unit.
7.2 Service
• The
• If damage should occur for any reason and repair to the machine is necessary, it should be sent
smart matrix SILENT
persons, or by Clearaudio, otherwise the warranty will be void.
to the selected dealer, distributor or directly to Clearaudio.
should only be repaired by Clearaudio approved institutions or
Clearaudio electronic GmbH
Spardorfer Str. 150
smart matrix SILENT
91054 Erlangen
Germany
for any reason, the original
Phone: +49 9131 40300100
Fax: +49 9131 40300119
www.clearaudio.de
www.analogshop.de
info@clearaudio.de
Please note: If uids that produce foam, or uids which are acid-based, have been used, or if the
precautions noted in this instruction manual have not been followed, the warranty will be void.
Legal disclaimer:
Clearaudio refuse to cover any claims or damage to records or any other damage that have been
caused by misuse or mishandling of the
smart matrix SILENT
.
12 © clearaudio electronic GmbH, 2019-06
Page 13

User manual / Bedienungsanleitung
8. Technical data
Main features: • Bi-directional rotation of the platter
• Integrated uid application
• Very rigid chassis
• Included record clamp and single adapter
• Multifunctional cleaning arm for LPs, EPs and singles
• Easy controls
Power consumption: Max. consumption: 300 watts
O mode: 0 watts
(by switching o at the rear of the machine)
Weight: Approx. 10.6kg
Dimensions W/D/H
in inches:
Approx. 13.58 x 13.58 x 9.25 (with record clamp)
Approx. 13.58 x 13.58 x 9.65 (with dustcover)
Dimensions W/D/H in mm: Approx. 345 x 345 x 235 (with record clamp)
Approx. 345 x 345 x 245 (with dustcover)
Warranty: 3 years*
* Provided that the warranty card is correctly completed and returned to Clearaudio, or your product is registered
online at https://clearaudio.de/en/service/registration.php, within 14 days of purchase.
NOTE:
This machine is designed to be used in heated or climate controlled surroundings.
Never touch the power cable with wet hands or other wet body parts!
CE-Markierung
The Clearaudio
certication and other international standards and approvals.
smart matrix SILENT
machine is approved according to the regulations of the CE
Clearaudio electronic is not responsible for typographical errors in descriptions.
Technical specications subject to change or improvement without prior notice.
Product availability is as long as stock lasts.
Copies and reprints of this documents, including extracts, require written consent from
Clearaudio electronic GmbH; Germany
Made in Germany 13
Page 14

User manual / Bedienungsanleitung
Sehr geehrte clearaudio - Kundin, sehr geehrter clearaudio - Kunde,
Sie haben sich für eine clearaudio
– ein High-End Produkt der clearaudio electronic GmbH – wir beglückwünschen Sie dazu.
Das Reinigen von verschmutzten Schallplatten führt zu einer deutlichen Klangverbesserung; dies gilt
übrigens auch für neue Schallplatten, da bei der Pressung häug Verunreinigungen und Rückstände
des Trennmittels zwischen Matrize und Vinyl in den Rillen haften bleiben.
Bitte lesen Sie diese Bedienungsanleitung sorgfältig durch, um Fehlbedienungen zu
vermeiden und ein optimales Reinigungsergebnis zu erzielen.
Verwendete Bauteile und Verarbeitung
Bei der clearaudio
nahezu unverwüstlich sind. Alle gewählten Komponenten sind für eine intensive und dauerhafte
Nutzung ausgelegt. Die Konstruktion der Plattenwaschmaschine reduziert die Geräuschentwicklung
auf ein angenehmes Minimum.
Wir wünschen Ihnen viel Freude mit Ihrer neuen clearaudio
Plattenwaschmaschine.
clearaudio electronic GmbH
smart matrix SILENT
smart matrix SILENT
verwenden wir ausschließlich hochwertigste Bauteile, die
Schallplattenwaschmaschine entschieden
smart matrix SILENT
Erhältliches Zubehör:
Reinigungsstreifen
(Art. Nr. AC062/SMS):
Abdeckhaube für
smart matrix SILENT
(Art. Nr. AC162)
Karbonbürste
(Art.Nr. AC004):
Schallplattenreinigungs-
üssigkeit
(Art. Nr. AC048):
In verschiedenen Größen und
Ausführungen erhältlich.
Pure Groove
Sie können das Zubehör bei Ihrem Fachhändler oder direkt bei clearaudio unter
www.analogshop.de nachbestellen.
14 © clearaudio electronic GmbH, 2019-06
Page 15

User manual / Bedienungsanleitung
Inhaltsverzeichnis
1. Lieferumfang ............................................................................... 16
2. Eigenschaften der
3. Aufstellung und Inbetriebnahme ................................................ 18
4. Bedienelemente ........................................................................... 19
5. Reinigung von Schallplatten ....................................................... 20 - 21
6. Instandhaltung ............................................................................ 21 - 24
7. Besondere Hinweise .................................................................... 25
8. Technische Daten ........................................................................ 26
Weitere Garantie Informationen ..................................................... 27 - 28
smart matrix SILENT
im Überblick ................ 17
Made in Germany 15
Page 16

User manual / Bedienungsanleitung
1. Lieferumfang
Die clearaudio
besonders sicheren und speziell auf das Produkt abgestimmten Verpackung. Wir empfehlen Ihnen
diese Originalverpackung für einen eventuellen Transport aufzuheben.
Nehmen Sie nach dem Önen des Kartons das beigepackte Zubehör heraus und legen es gribereit
zur Seite. Heben Sie anschließend die Maschine nach oben aus dem Karton und stellen diese auf
eine stabile und wasserunempndliche Unterlage.
Überzeugen Sie sich davon, dass keine äußeren Beschädigungen vorliegen, insbesondere keine
Transportschäden.
Wichtig: Heben Sie Ihre
Plattenteller an!
Bitte kontrollieren Sie den Lieferumfang Ihrer neu erworbenen
Schallplattenwaschmaschine auf deren Vollständigkeit:
smart matrix SILENT
smart matrix SILENT
1. Komplett montierte
Schallplattenwaschmaschine
2. Plattenklemme
(auf Plattenteller angebracht)
Plattenwaschmaschine verlässt unsere Fertigung in einer
Plattenwaschmaschine niemals am
smart matrix SILENT
3. Einfülltrichter
4. Kaltgerätestecker
(Abweichungen je nach Länderspezikation)
5. Ersatz – Mikrofaserbezüge (2 Stück)
6. Pure Groove Reinigungsüssigkeit 500 ml
7. Verschlussstopfen für Vorratsbehälter
(auf Einfüllönung angebracht)
8. Schlauchstopfen
(am Ablassschlauch angebracht)
9. Singleadapter
10. Garantiekarte / Qualitätskarte
Im Falle einer unvollständigen Lieferung wenden Sie sich bitte umgehend an ihren
clearaudio Fachhändler, bei dem Sie das Produkt erworben haben.
16 © clearaudio electronic GmbH, 2019-06
Page 17

User manual / Bedienungsanleitung
2. Eigenschaften der
• Reinigung von 12, 10, 7 Zoll Platten
Dank eines individuell einstellbaren, multifunktionalen Reinigung-/Absaugsarmes können alle
Schallplattengrößen ohne Austauschen des Armes gewaschen werden.
• Links- / Rechtslauf
Wechsel der Drehrichtung per Knopfdruck.
• Plattenklemme
Sorgt für sicheren Halt der Schallplatte und dient als Labelschutz.
• Automatisierte Flüssigkeitsauftragung
Per Knopfdruck kann die gewünschte Menge der Reinigungsüssigkeit dosiert werden.
• Leichte Bedienung
Schnelle und leichte Bedienung per Knopfdruck auf der Deckplatte der Plattenwaschmaschine.
smart matrix SILENT
im Überblick
Made in Germany 17
Page 18

User manual / Bedienungsanleitung
3. Aufstellung und Inbetriebnahme
3.1
Stellen Sie die
Vergewissern Sie sich, dass die Maschine fest und sicher steht. Beim Reinigen Ihrer Schallplatten
kann Flüssigkeit auf die Unterlage gelangen, daher sollte die gewählte Unterlage unempndlich
gegenüber Feuchtigkeit und Nässe sein.
TIPP: Halten Sie ein saugfähiges Tuch zum Abtupfen bereit.
3.2
Verbinden Sie nun die Maschine mit dem Stromnetz durch das mitgelieferte Netzkabel, die
Anschlussbuchse bendet sich an der Geräterückseite.
Betreiben Sie die
WICHTIG:
Beachten Sie den folgenden Abschnitt in jedem Fall, bevor Sie die
an das Stromnetz anschließen:
smart matrix SILENT
smart matrix SILENT
auf eine saubere, trockene und stabile Unterlage.
ausschließlich an geerdeten Schuko-Steckdosen.
smart matrix SILENT
Abb. 1: Steckeranschluss auf der Rückseite
3.3 Vorratsbehälter befüllen
Entfernen Sie den Verschlusstopfen und setzen Sie den
mitgelieferten Trichter in die Einfüllönung (Abb. 2) und befüllen
Sie den Vorratsbehälter mit der mitgelieferten
Reinigungsüssigkeit (max. 0,4 l). Anschließen können Sie den
Stopfen wieder einsetzen.
Für eine gründliche und schonende Reinigung, empfehlen
wir ausschließlich die Verwendung unserer
Reinigungsüssigkeit (auch erhältlich über www.analogshop.de).
Abb. 2: Befüllen des Vorratsbehälter
Die
smart matrix SILENT
110V Spannungsversorgung erhältlich. Prüfen Sie daher vor
dem Verbinden der
unbedingt für welche Netzspannung Ihre
SILENT
der Rückseite der Plattenwaschmaschine ausgeweisen.
Wird das Gerät über längere Zeit nicht benutzt,
so sollten Sie den Hauptschalter auf der
Maschinenrückseite abschalten, um unnötigen
Standby - Verbrauch zu vermeiden.
ausgelegt ist. Die jeweilige Netzspannung ist auf
smart matrix SILENT
ist sowohl für 230V als auch für
mit dem Stromnetz
smart matrix
Pure Groove
Pure Groove
18 © clearaudio electronic GmbH, 2019-06
Page 19

User manual / Bedienungsanleitung
4. Bedienelemente
6
5
1
Abb. 3: Ansicht von oben
4
3
2
Reinigungs- / Absaugeinheit
1
Platter / Änderung Drehrichtung
2
Liquid / Manuelle Flüssigkeitsauftragung
3
Bitte machen Sie sich mit allen hier abgebildeten Bedienelementen vertraut.
Auf den folgenden Seiten der Bedienungsanleitung werden die einzelnen Bedienelemente näher
erläutert.
Vacuum / Absaugung
4
Plattenklemme
5
Vorratsbehälter / Einfüllönung mit
6
Verschlussstopfen
Made in Germany 19
Page 20

User manual / Bedienungsanleitung
5. Reinigung von Schallplatten
Zum Waschen Ihrer Platten gehen Sie bitte nun wie folgt vor:
(Achten Sie hierbei auf ausreichende Belüftung des Raumes!)
1. Achten Sie darauf, dass der Absaugarm in Ruheposition (nicht über der Platte) steht. Schließen
Sie die Maschine an das Stromnetz wie unter Punkt 3.2 beschrieben an und betätigen Sie den
Hauptschalter an der Rückseite der Maschine.
2. Nehmen Sie die Plattenklemme von dem Plattenteller
ab und legen Sie die zu reinigende LP auf den Plattenteller.
Die Plattenklemme schrauben Sie nun durch Drehung
des Rändels im Uhrzeigersinn fest auf die Tellerachse auf,
dass die Platte beim Reinigungs- und Absaugvorgang
nicht auf dem Plattenteller durchrutschen kann.
Stellen sie nun die benötigte Plattengröße über den
Schieberegeler auf dem Absaugarm ein (Abb. 4 ).
Abb. 4: Einstellung des Absaugarms
3. Schwenken Sie nun den Absaugarm über die Platte.
Durch herunterdrücken des Absaugarmes auf die LP startet
die Anschaltautomatik der Maschine.
Der Plattenteller beginnt sich zu drehen.
Um eine Beschädigung der Platte vorzubeugen wird
automatisch eine kleine Menge Reinigungsüssigkeit
aufgetragen (Abb. 5).
Abb. 5: Anschaltautomatik
4. Durch betätigen und halten des Tasters „Liquid“ kann die Reinigungsüssigkeit auf der Oberseite
der Schallplatte nachdosiert werden. Wenn Sie durch den Flüssigkeitsauftrag eine gleichmäßige,
lückenlose Benetzung der Schallplatte erreicht haben, empfehlen wir für eine normale Reinigung
ca. 2-3 Umdrehungen in jeweils beide Richtungen. Um die Rotationsrichtung zu ändern betätigen
Sie den untersten Knopf „Platter“ (Abb. 3, #2).
Bitte beachten:
Bei zu reichlichen Flüssigkeitsauftrag könnte das Papierlabel Ihrer Schallplatte
beschädigt werden oder Flüssigkeit auf das Gehäuse abtropfen.
Überschüssige Flüssigkeit bitte umgehend mit einem saugfähigen Tuch abtrocknen.
20 © clearaudio electronic GmbH, 2019-06
Page 21

User manual / Bedienungsanleitung
Tipp zur Reinigung von stark verschmutzten Schallplatten:
Hierzu empfehlen wir eine Zwischenabsaugung um grobe Verunreinigungen zu
entfernen und anschließend erneut Reinigungsüssigkeit auf die Schallplatte
aufzutragen. Lassen Sie den Plattenteller mehrere Umdrehungen rotieren und
wechseln Sie zwischendurch die Drehrichtung des Plattentellers.
5. Nun können Sie mit dem Schalter „VACUUM“ die Absaugpumpe aktivieren. Der am Absaugschlitz
entstehende Unterdruck bringt die Reinigungsstreifen in engen Kontakt mit der Plattenoberäche
und bewirkt eine rillentiefe Reinigung.
Nach Absaugung der kompletten Flüssigkeit ist die Oberäche der Platte restlos trocken.
Durch erneutes betätigen des Schalter „Vacuum“ schalten Sie die Absaugpumpe aus.
Bitte beachten:
Um die beste Reinigung zu ermöglich, empfehlen wir die Absaugung gegen den
Uhrzeigersinn.
6. Nun können Sie die Drehung des Plattentellers abstellen, indem Sie den Absaugarm wieder
anheben und in die Ruheposition schwenken.
Nach dem Lösen der Plattenklemme wenden Sie die Schallplatte und reinigen die zweite Seite
durch Wiederholen der Schritte 1-5.
Um die elektrostatische Auadung, die während des Reinigungsvorganges entstehen, abzuleiten,
empfehlen wir die Verwendung einer Antistatikbürste (Art. Nr. AC014, erhätlich über www.analogshop.
de) bevor Sie die Schallplatte auf Ihrem Laufwerk abspielen.
6. Instandhaltung
Flüssigkeitsauangbehälter reinigen und entleeren
Wenn Sie ca. 30 - 40 Schallplatten gewaschen haben, muss die gebrauchte Reinigungsüssigkeit
aus dem Auangbehälter entleert werden. Der Auangbehälter hat ein Fassungsvermögen von circa
0,5 Liter. Wir empfehlen eine regelmäßige Entleerung des Auangbehälters um Schäden an der
Maschine zu vermeiden.
Bitte beachten Sie, dass bei intensiver Nutzung die Flüssigkeit fast vollständig verdampfen kann und
sich dadurch zum Beispiel Rückstände im Auangbehälter absetzen können, die im Lauf der Zeit
verklumpen und unter Umständen die Ablassönung verstopfen. Zur Vorbeugung empehlt sich
deshalb eine gelegentliche Reinigung. Bevor Sie mit der Reinigung beginnen, sollten Sie zuerst den
Auangbehälter leeren.
Vergewissern Sie sich immer, dass bei abgehoben Wascherm der Schalter „VACUUM“ nicht
aktiviert ist. Hierbei könnte Flüssigkeit aufwirbeln und ins Geräteinnere gelangen.
Made in Germany 21
Page 22

User manual / Bedienungsanleitung
Um den Auangbehälter zu leeren, entfernen Sie zuerst den
Verschlussstopfen am Ende des Ablaufschlauches und der
Rückseite der
Lassen Sie das oene Ende des Ablaufschlauches in ein tiefer
gestelltes Auanggefäß hängen.
Abb. 6: Entleeren des Auangbehälters
ACHTUNG: Verwenden Sie die abgelassene Reinigungsüssigkeit kein zweites Mal. Dies
könnte zu Schäden an Ihrer Maschine führen.
Zur Reinigung nehmen Sie den Absaugarm ab, indem Sie den Schlauch am Absaugarm abziehen
und diesen bis zum Anschlag zurückschwenken und nach oben abziehen (Abb. 7). Mithilfe des
mitgelieferten Trichters können Sie nun 250 ml warmes Wasser durch das Edelstahlrohr einfüllen
(Abb. 8). Nach ca. 20 min. Einwirkzeit können Sie die Spülüssigkeit über den Ablaufschlauch
abießen lassen, indem Sie, wie bereits oben beschrieben, das oene Ende in ein tiefer gestelltes
Auanggefäß hängen. Dieser Vorgang sollte wiederholt werden bis keine Verschmutzung in der
Spülüssigkeit mehr erkennbar ist. Verwenden Sie für jeden Spülgang frisches Wasser.
smart matrix SILENT
(Abb. 6).
Nach Beendigung der Reinigung, können Sie den Reinigungsarm wieder einsetzen.
Achten Sie dabei darauf, diesen gerade und ohne Druck wieder einzusetzen, da dieser
sonst verkanten und die Maschine beschädigen könnte.
Abb. 7: Abziehen des Absaugarms
Abb. 8: Einsetzen des Trichters
Bitte beachten:
Wenn Sie die Maschine wieder in Betrieb nehmen, muss der Ablaufschlauch immer mit
dem Verschlussstopfen verschlossen sein, damit die Vakuum-Pumpe den erforderlichen
Unterdruck für die Absaugung erzeugen kann.
Nur so kann eine dauerhafte und vollständige Funktion gewährleistet werden.
22 © clearaudio electronic GmbH, 2019-06
Page 23

User manual / Bedienungsanleitung
Reinigen und wechseln der Mikrofaser-Bezüge
Nach 20-30 Waschgängen, abhängig von Nutzung und Verschmutzungsgrad empfehlen wir eine
Reinigung der Mikrofaser-Bezüge. Hierfür muss der Arm wie in Abb. 7 abgenommen werden.
Den Absaugarm können Sie nun unter laufendes Wasser halten und die Mikrofaser-Bezüge reinigen.
Vor erneuter Verwendung, empfehlen wir die Streifen nochmals anzudrücken.
Wir empfehlen einen Wechsel der Mikrofaserstreifen, je nach Nutzung und Verschmutzungsgrad der
Platten, nach circa 100 Waschgängen.
Sollten die Streifen bereits zu stark abgenutzt sein
empfiehlt es sich diese auszutauschen.
Nach abziehen des Armes können Sie die alten
Mikrofaser-Bezüge abziehen und durch neue
ersetzen. Bevor Sie jedoch die neuen MikrofaserBezüge aufkleben, ist dringend darauf zu achten,
dass die Mikrofaser-Träger gründlich von Fett,
Staub und alten Kleberesten gereinigt wurden.
Beim Aufkleben der neuen Mikrofaserstreifen ist
Abb. 9: Abziehen der Mikrofaser-Bezüge
Träger aufgebracht werden.
darauf zu achten, dass diese mit Druck auf dem
Nach Auswechseln der Mikrofaser-Bezüge empfehlen wir die Maschine für ca. 24 Stunden nicht zu
benutzen. Dies garantiert, dass die Bezüge vollständig anhaften und sich nicht zu früh ablösen und
somit den Absaugarm oder Ihre Platten beschädigen.
Vorratsbehälter für Pure Groove Fluid:
Der Vorratsbehälter hat ein Fassungsvermögen von ca. 0,4 Liter. Befüllen Sie den Vorratsbehälter
ausschließlich mit Pure Groove Reinigungsüssigkeit (erhältlich über www.analogshop.de) da nur
hiermit ein optimales Reinigungsergebnis erreicht wird.
ACHTUNG:
Verwenden Sie niemals aufschäumende, ätzende
Flüssigkeiten oder Wasser.
Dies könnte zu schwerwiegenden Schäden an Ihrer
Maschine und zum Erlöschen des Garantieanspruches
führen.
Abb. 10: Warnhinweis
Made in Germany 23
Page 24

User manual / Bedienungsanleitung
Abb. 11: Entleeren des Vorratsbehälters
Sichtkontrolle
Um den Vorratsbehälter zu entleeren, um zum Beispiel
die Maschine zu versenden oder um auf eine andere
Flüssigkeit zu wechseln, ziehen Sie den Absaugarm wie
auf Seite 22 beschrieben ab.
Führen Sie den Schlauch des Absaugarmes in ein Gefäß
und halten Sie die Taste „Liquid“ gedrückt um die
Flüssigkeit restlos aus dem Tank zu pumpen.
Die regelmäßige Sichtkontrolle einer eventuell defekten Isolierung der Anschlussleitung ist darüber
hinaus zu Ihrer eigenen Sicherheit empfehlenswert. Eine beschädigte Zuleitung sofort vom Fachmann
auswechseln lassen!
24 © clearaudio electronic GmbH, 2019-06
Page 25

User manual / Bedienungsanleitung
7. Besondere Hinweise
7.1 Transport
• Beim Transport der clearaudio
Achten Sie darauf, das Gerät genau so zu verpacken, wie es ausgeliefert wurde. Nur in
originalverpacktem Zustand ist ein sicherer Transport gewährleistet. Beim Verpacken umgekehrt
verfahren, wie bei dem Aufbau und der Inbetriebnahme beschrieben.
Achten Sie ebenfalls darauf, dass beide Tanks (Vorratsbehälter und
Flüssigkeitsauangbehälter) vor Verpacken der Maschine entleert werden!
7.2 Service
• Die
• Sollte trotz des hohen Fertigungsstandards eine Reparatur erforderlich werden, muss die
smart matrix SILENT
ansonsten erlischt der Garantieanspruch. Der Service für alle clearaudio Produkte sollte
ausschließlich beim Fachhändler erfolgen.
clearaudio
clearaudio eingeschickt werden.
smart matrix SILENT
darf während der Garantiezeit nur vom Hersteller repariert werden,
smart matrix SILENT
Plattenwaschmaschine über Ihren Fachhandel oder direkt an
stets die Originalverpackung verwenden.
clearaudio electronic GmbH
Spardorfer Str 150
91054 Erlangen
Germany
Tel.: +49 9131 40300100
Fax: +49 9131 40300119
www.clearaudio.de
www.analogshop.de
info@clearaudio.de
Bitte beachten: Der Garantieanspruch erlischt, wenn schäumende oder ätzende Flüssigkeiten
verwendet werden.
Haftungsausschluss:
Die Firma clearaudio übernimmt keinerlei Haftung für Schäden an Tonträgern, die aus
unsachgemäßer Handhabung resultieren!
Made in Germany 25
Page 26

User manual / Bedienungsanleitung
8. Technische Daten
Hauptmerkmale: • Rechts - und Linkslaufsteuerung des Drehteller
• Automatisierter Flüssigkeitsauftrag
• Stabiles Gehäuse
• Inklusive Plattenklemme und Single Adapter
• Multifunktionaler Reinigungsarm für LPs, EPs und
Singles
• Leichte Bedienung
Leistungsaufnahme: Max. Leistungsaufnahme: 300 Watt
Ausgeschaltet: 0.0 Watt
(Kippschalter auf der Geräterückseite auf "0" stellen)
Gewicht: ca. 10,6 kg
Maße (B/T/H in mm): ca. 345 x 345 x 235 (mit Plattenklemme)
ca. 345 x 345 x 245 (mit Abdeckhaube)
Garantie: 3 Jahre*
* Nur bei korrekt ausgefüllter und eingesandter Garantiekarte an clearaudio oder online registrierter Garantie innerhalb
von 14 Tagen.
HINWEIS:
Das Gerät ist für den Betrieb in beheizten Räumen konzipiert.
Das Netzkabel des Gerätes niemals mit feuchten oder nassen Händen anfassen.
CE-Markierung
Die clearaudio
smart matrix SILENT
entspricht den Bestimmungen über elektromagnetische
Störfreiheit (EMC) und denen über Niederspannungsgeräte.
Änderungen bleiben vorbehalten. Lieferbar solange Vorrat reicht. Für Druckfehler keine Haftung.
Irrtümer vorbehalten- Kopien und Abdrucke – auch nur auszugsweise – bedürfen der schriftlichen Genehmigung durch
die clearaudio electronic GmbH.
26 © clearaudio electronic GmbH, 2019-06
Page 27

User manual / Bedienungsanleitung
Um die volle clearaudio Garantie (für
smart matrix SILENT
3 Jahre) in Anspruch nehmen zu können, senden
Sie uns bitte die beigelegte Garantiekarte innerhalb von zwei Wochen korrekt und vollständig ausgefüllt zu
oder registrieren Sie die Garantie online unter https://clearaudio.de/de/service/registration.php, da sonst
nur die gesetzliche Gewährleistung von 2 Jahren berücksichtigt werden kann. Nur wenn das Produkt in der
Originalverpackung zurückgeschickt wurde kann clearaudio die Garantiezeit von 3 Jahren gewährleisten.
The full, extended warranty period for the
smart matrix SILENT
is 3 years. To receive this full Clearaudio
warranty, you must either complete and return the relevant section of the warranty registration card to
Clearaudio, or register your product online at https://clearaudio.de/en/service/registration.php, within 14
days of purchase. The full 3 year warranty can only be honoured if the product is returned in its original
packing.
ENGLISH
WARRANTY
For warranty information, contact your local Clearaudio distributor.
RETAIN YOUR PURCHASE RECEIPT
Your purchase r eceipt is your permanent record of a valuable purchase. It should be kept in a safe place to be referred
to as necessary for insurance purposes or when corresponding with Clearaudio.
IMPORTANT
When seeking warranty service, it is the responsibility of the consumer to establish proof and date of purchase.
Your purchase receipt or invoice is adequate for such proof.
FOR U.K. ONLY
This undertaking is in addition to a consumer‘s statutory rights and does not aect those rights in any way.
FRANÇAIS
GARANTIE
Pour des informations sur la garantie, contacter le distributeur local Clearaudio.
CONSERVER L‘ATTESTATION D‘ACHAT
L‘attestation d‘achat est la preuve permanente d‘un achat de valeur. La conserver en lieu sur pour s‘y reporter aux ns
d‘obtention d‘une couverture d‘assurance ou dansle cadre de correspondances avec Clearaudio.
IMPORTANT
Pour l‘obtention d‘un service couvert par la garantie, il incombe au client d‘établir la preuve de l‘achat et d‘en corroborer
la date. Le reçu ou la facture constituent des preuves susantes.
DEUTSCH
GARANTIE
Bei Garantiefragen wenden Sie sich bitte zunächst an Ihren Clearaudio Händler. Heben Sie Ihren Kaufbeleg gut auf.
WICHTIG!
Die Angaben auf Ihrer Quittung erlauben uns die Identizierung Ihres Gerätes und belegen mit dem Kaufdatum die
Dauer Ihrer Garantie-Ansprüche. Für Serviceleistungen benötigen wir stets die Gerätenummer. Diese nden Sie auf dem
Typenschild auf der Rückseite des Gerätes oder auch in der beigefügten Garantie-Registrierkarte.
NEDERLANDS
GARANTIE
oor inlichtingen omtrent garantie dient u zich tot uw plaatselijke Clearaudio.
V
UW KWITANTIE, KASSABON E.D. BEWAREN
Uw kwitantie, kassabon e.d. vormen uw bewijs van aankoop van een waardevol artikel en dienen op een veilige plaats
bewaard te worden voor evt, verwijzing bijv, in verbend met verzekering of bij correspondentie met Clearaudio.
BELANGRIJK
Bij een evt, beroep op de garantie is het de verantwoordelijkheid van de consument een gedateerd bewijs van aankoop
te tonen. Uw kassabon of factuurzijn voldoende bewijs.
Made in Germany 27
Page 28

User manual / Bedienungsanleitung
ITALIANO
GARANZIA
L’apparecchio è coperto da una garanzia di buon funzionamento della durata di un anno, o del periodo previsto dalla
legge, a partire dalla data di acquisto comprovata da un documento attestante il nominativo del Rivenditor e e la data di
vendita. La garanzia sarà prestata con la sostituzione o la riparazione gratuita delle parti difettose. Non sono coperti da
garanzia difetti derivanti da uso improprio, errata installazione, manutenzione eettuata da personale non autorizzato
o, comunque, da circostanze che non possano riferirsi a difetti di funzionamento dell’apparecchio. Sono inoltre esclusi
dalla garanzia gli interventi inerenti l’installazione e l’allacciamento agli impianti di alimentazione.
Gli apparecchi verranno riparati presso i nostri Centri di Assistenza Autorizzati. Le spese ed i rischi di trasporto sono a
carico del cliente. La casa costruttrice declina ogni responsabilità per danni diretti o indiretti provocati dalla inosservanza
delle prescrizio-ni di installazione, uso e manutenzione dettagliate nel presente manuale o per guasti dovuti ad uso
continuato a ni professionali.
ESPAÑOL
GARANTIA
Para obtener información acerca de la garantia póngase en contacto con su distribuidor Clearaudio.
GUARDE SU RECIBO DE COMPRA
Su recibo de compra es su prueba permanente de haber adquirido un aparato de valor, Este recibo deberá guardarlo
en un lugar seguro y utilizarlo como referencia cuando tenga que hacer uso del seguro o se ponga en contacto con
Clearaudio.
IMPORTANTE
Cuando solicite el servicio otorgado por la garantia el usuario tiene la responsabilidad de demonstrar cuándo efectuó la
compra. En este caso, su recibo de compra será la prueba apropiada.
28 © clearaudio electronic GmbH, 2019-06
Page 29

User manual / Bedienungsanleitung
Made in Germany 29
Page 30

User manual / Bedienungsanleitung
30 © clearaudio electronic GmbH, 2019-06
Page 31

User manual / Bedienungsanleitung
Made in Germany 31
Page 32

clearaudio electronic GmbH
Spardorfer Straße 150
91054 Erlangen
Germany
Phone/Tel.: +49 9131 40300 100
Fax: +49 9131 40300 119
www.clearaudio.de
www.analogshop.de
info@clearaudio.de
Handmade in Germany
(Technische Änderungen vorbehalten Technical specication are subject to change without prior notication)
2019
© clearaudio electronic GmbH, 2019-06 Made in Germany
 Loading...