

Clearaudio Bluemotion Start Smart, Emotion Red Start Smart, Emotion Black Start Smart User Manual
Page 1
EEm
moottiioonn
SSttaarrtt SSmmaarrt
t
Hi-Fi Components clearaudio electronic GmbH
Spardorfer Str. 150 ● D-91054 Erlangen ● Tel. +49(0) 1805/059595 ● FAX +49(0) 09131/51683
www.clearaudio.de
● www.analogshop.de ● info@clearaudio.de ● copyright clearaudio 2008
User manual
Bedienungsanleitung
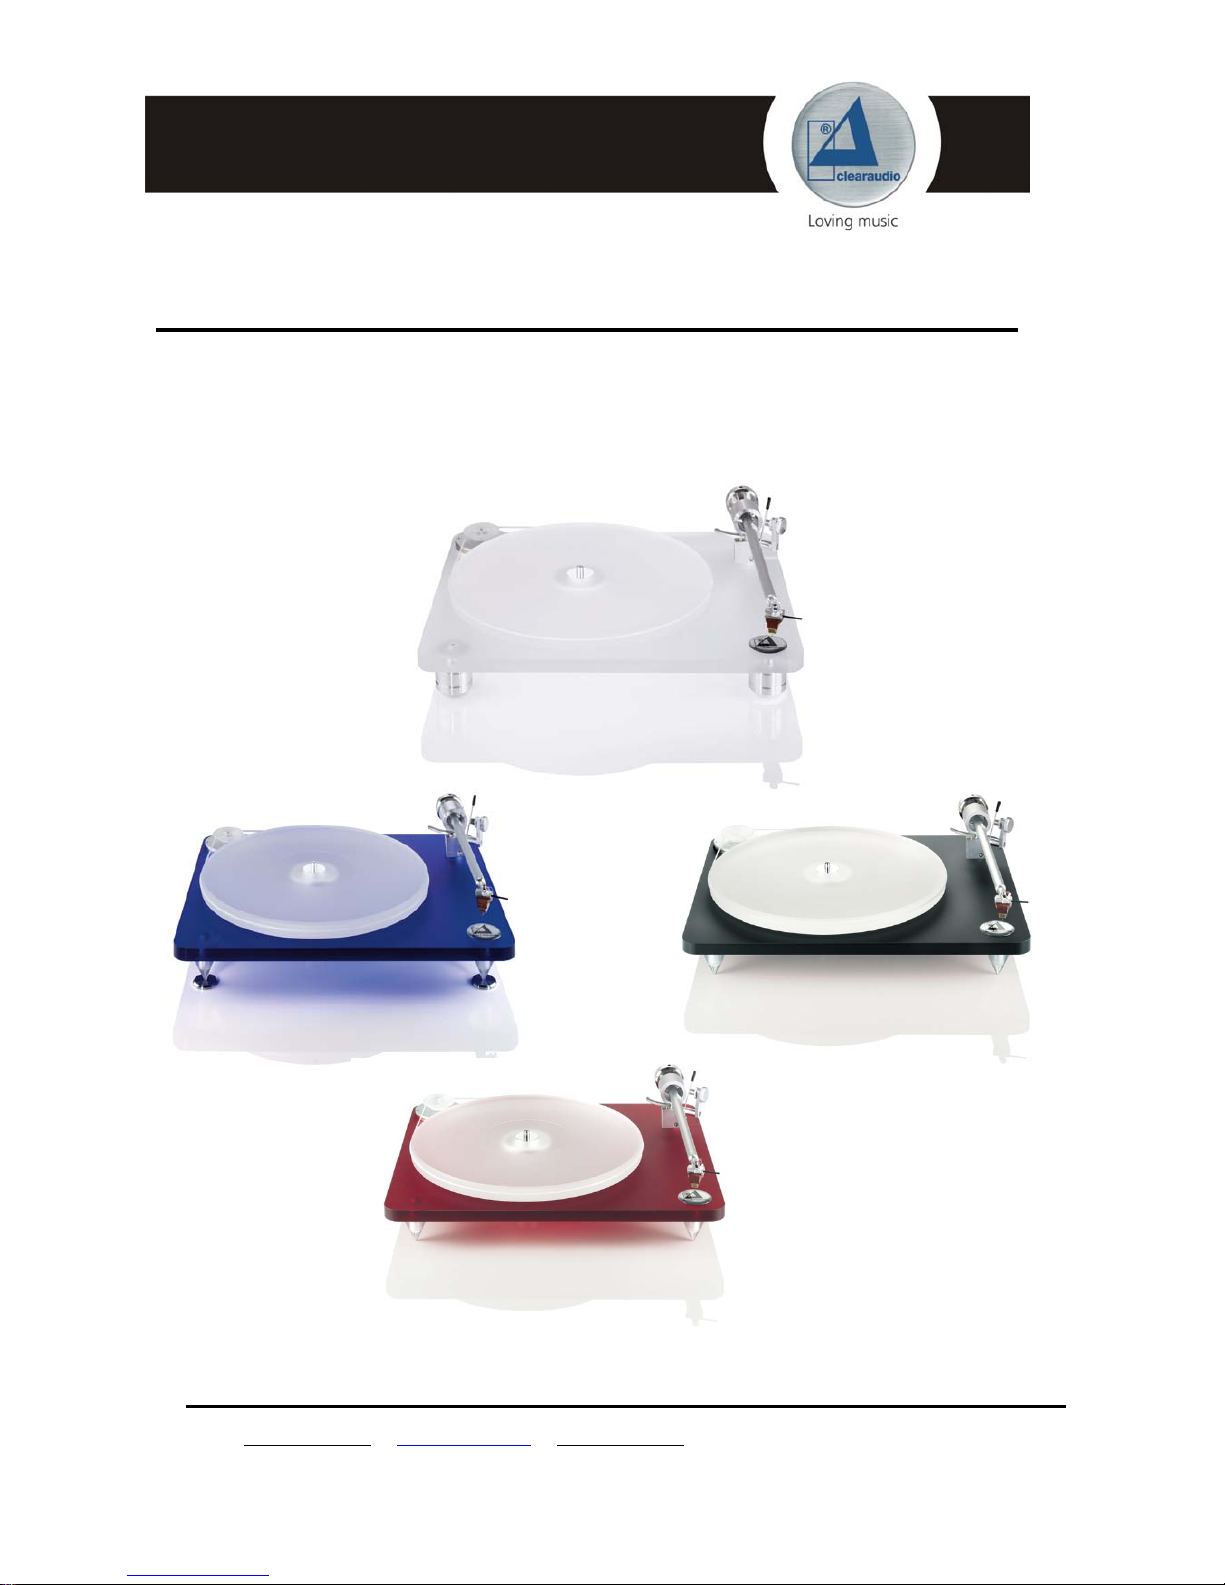
Emotion Start Smart
Bluemotion
Start Smart
Emotion Black
Start Smart
Emotion Red
Start Smart
Made in Germany
V
ersion 1.5_27.10.08_E+D
Page 2
Emotion
User manual / Bedienungsanleitung
Page / Seite 1 clearaudio electronic GmbH 2008
Dear clearaudio customer,
Congratulation’s to your choice of the
Emotion-Start Smart
turntable, a world class
turntable, made by clearaudio electronic GmbH.
Resonance minimized shape in combination with a stand alone motor unit,
guarantees total isolation of resonances from the turntable chassis, providing the
best music reproduction and authentic High End imaging. A high precision,
maintenance free sinter bronze bearing is completing the analogue pleasure.
Please read this instructions carefully, to avoid any damages or loss of warranty.
These instructions will help you with an easy set-up and guarantee the highest
pleasure for a long time.
We wish you a lot of musical enjoyments with your new clearaudio
Emotion-Start
Smart
turntable.
clearaudio electronic GmbH
CE-MARKING
The clearaudio
Emotion Start Smart
meets the regulations concerning
electromagnetic disturbance (EMC) and low-voltage appliances.
COPYRIGHT
Recording und reproduction of any sound-material may require the consent of the
creator.
Please acknowledge the information given in the
- Copyright Act 1956,
- Dramatic and Musical Performers Act 1958,
- Performers Protection Acts 1963 and 1072,
any more recent legal regulations.
WARNINGS
Don’t expose your turntable to rain or humidity.
Don’t handle the mains leads with wet hands.
Don’t place or insert anything into the equipment or through ventilation holes.
No naked flame sources, such as lighted candles, should be placed on the equipment.
Page 3

Emotion
User manual / Bedienungsanleitung
Page / Seite 2 clearaudio electronic GmbH 2008
Contents
User manual 3 – 12
Bedienungsanleitung 13 - 26
1. Packing overview 3
2. Packing contents 4
3. Installation and set up 6
4. Service 9
5. Special directions 11
6. Technical data 12
Warranty information 26
Page 4

Emotion
User manual / Bedienungsanleitung
Page / Seite 3 clearaudio electronic GmbH 2008
1. Packing overview
Layers:
Top layer
Middle layer
Bottom layer
Accessories,
motor,
tonearm, user
manual,
warranty card
(pic. 1)
Turntable
chassis incl.
mounted lower
and upper
bearing part
(p
ic. 2)
Turntable
Platter
(pic. 3)
Picture 1: Packing overview
1
2
3
Page 5

Emotion
User manual / Bedienungsanleitung
Page / Seite 4 clearaudio electronic GmbH 2008
2. Packing contents
clearaudio has developed a special and secure turntable packing for your
Emotion Start Smart
turntable, to avoid any transportation-damages.
Please store this original packing, in case you need to ship the turntable.
Below you can find the content of delivery of the clearaudio
Emotion Start Smart
turntable:
1. Turntable body with mounted lower
bearing part
2. Turntable-Platter
3. Bearing (upper part) with adjusted
bearing shaft
4. Motor drive unit with feeder
5.
Satisfy
Tonearm (direct-wired) 5a. Counterweight to adjust the
tracking force
6. Acrylic motor pulley 7. 3 x Aluminium feet
8. 3 x Stainless steel threaded bolts
(metric)
9. Emotion Acrylic dust cover
10. Smart Wire 1 m
1
2
3
5 / 5a
4
6
7
8
10
9
Page 6

Emotion
User manual / Bedienungsanleitung
Page / Seite 5 clearaudio electronic GmbH 2008
11. clearaudio Smart phono 12. Cartridge
clearaudio MM Classic Wood
13. 1 Pair of white gloves 14. grounding - wire for the
Emotion
-
Start Smart
Turntable (connect to in
the bottom bearing part)
15. clearaudio logo, self - adhesive 16. Level gauge for the turntable
alignment and for tonearm height
adjustment
17. 2 pcs. drive belts 18. 3 pcs. Allen – key
(sizes: 1.5 / 2.5 / 3)
19. Aluminium precision screw driver 20. Bearing oil for occasional use
21. Record clamp “Clever Clamp” 22. No illustration: User Manual
23. No illustration: warranty card,
clearaudio Quality Card
24. No illustration: cartridge alignment
gauge for
Satisfy
-tonearm
18
11
12
13
14
15
16 17
19 20 21
Page 7
Emotion
User manual / Bedienungsanleitung
Page / Seite 6 clearaudio electronic GmbH 2008
1 mm
3. Installation and set up
The
Emotion Start Smart
-turntable comes in several pre mounted parts, as
described under chapter 2 (Scope of supply). The set up and installation is done
quickly and very easy. Please use the white gloves during this procedure, to avoid
scratches.
You should consider a safe and clean working area for the installation, in spite, as
near as possible to the final position of the
Emotion Start Smart
turntable.
1.) First take out the motor and tonearm of the packing. Now you should take out
the first packing layer. After that you can take out the
Emotion Start Smart
turntable
body from the next packing layer. Place the turntable body on a on a clean underlay
so that the bearing hole is facing upside.
2.) In the accessory bag (placed in the top packing layer) you will find 3 aluminium
feet and 3 stainless steel threaded bolts. Screw the 3 bolts about 10 millimetre
inwards into the aluminium feet. Screw the 3 feet into the pre drilled holes of the
turntable body, while tightening them gently. Then take the turntable body and
place it on the area where the final position of your
Emotion Start
Smart
turntable will be.
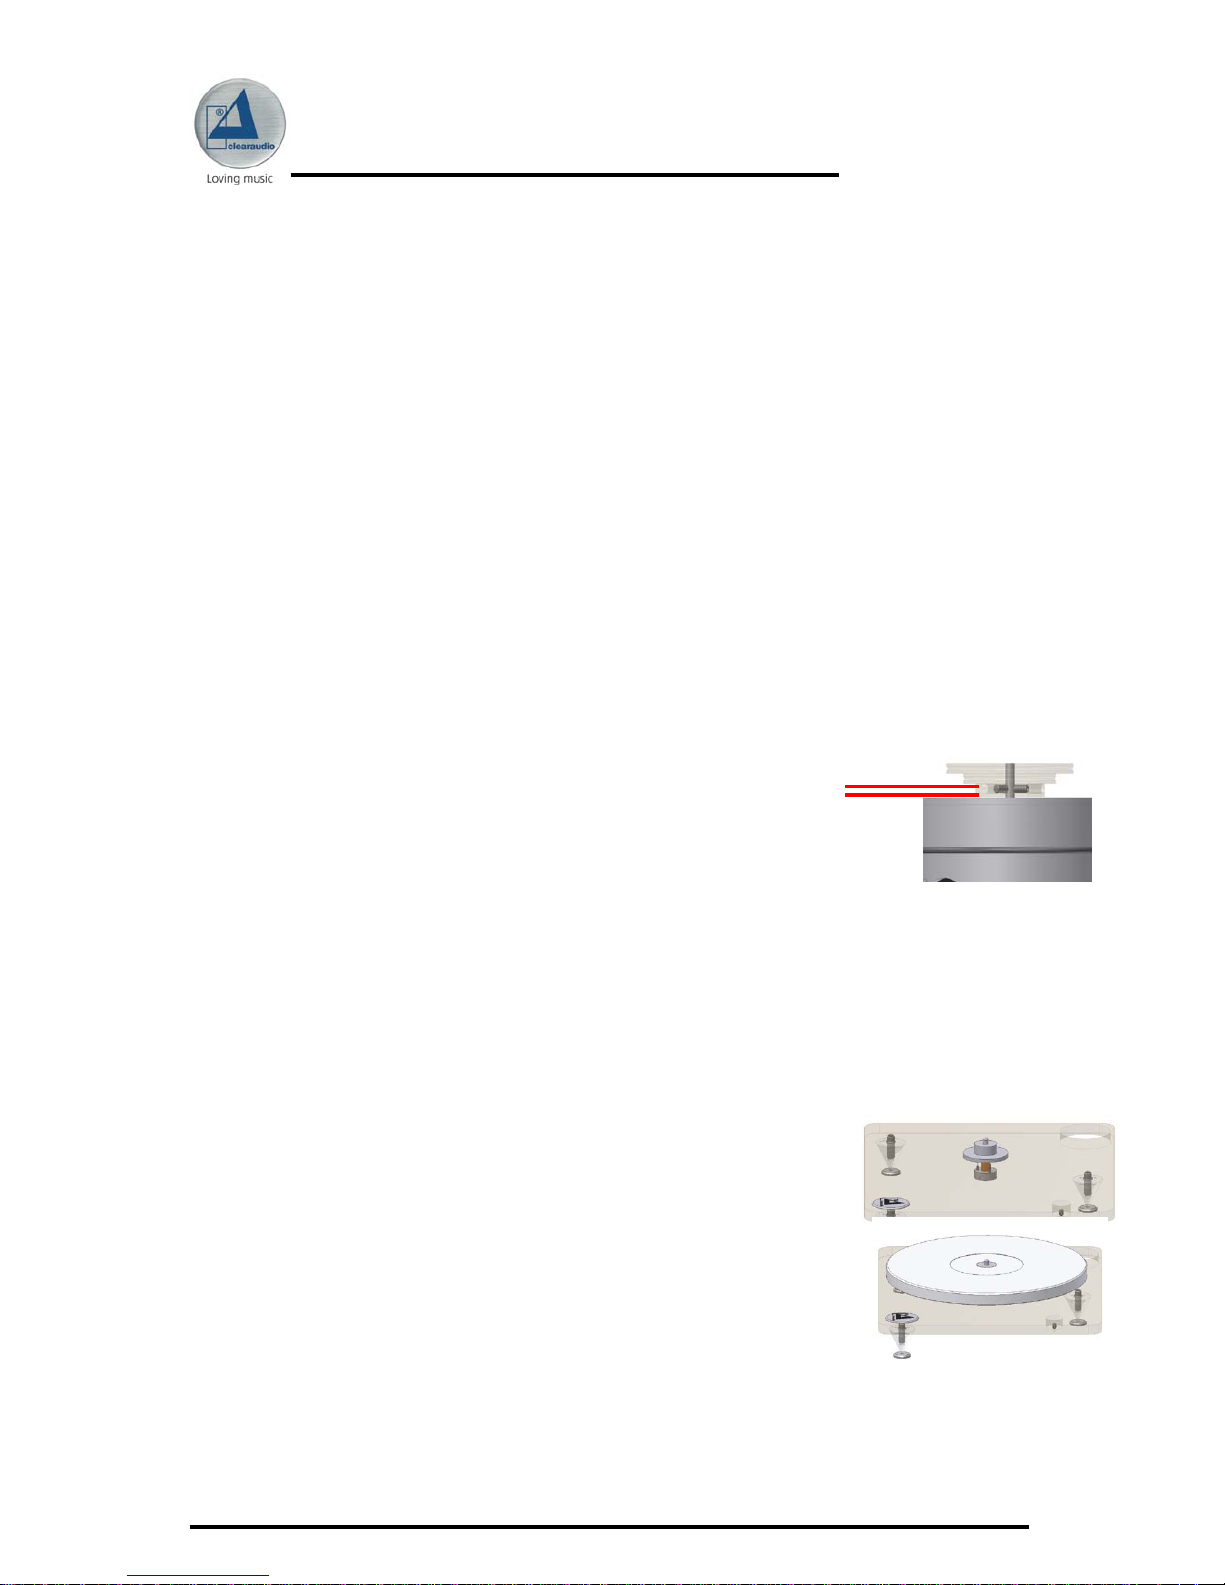
3.) Now take the motor-pulley out of the accessory bag
and shift the motor pulley as far as on the motors shaft until you have
a distance of approximately 1 mm between the upper edge of the
motor and the lower edge of the pulley. Now screw the three screws in
the pulley one
after the other with the precision screw driver.
4.) Lift the turntable chassis and slide it over the motor unit through the motorposition hole in the turntable body so that the rubber-o- ring around the housing of
the motor is fixing the final position. Please pay attention, that the switch of the
motor is outside on the left side of the record player body.
Tip: You have also the possibility to take off the rubber-o-ring
of the motor’s housing to centre the motor in the motorposition hole without any contact to the turntable chassis !
This way you can use your
Emotion Start Smart
turntable
perfectly decoupled from the motor.
5.) Now you can connect the power cord to your power outlet.
On the bottom packing layer you will find the turntable platter.
Please take the platter with both hands and place it on the bearing
upper part. Through a lightly up and down movement the platter
will slip onto the bearing upper part.
Make sure with a gently pressure that the platter is applying on
the complete surface of the bearing.
Picture 2: Mounting the pulle
y
Picture 3+4: Placing the platter on
the bearing upper part
Page 8
Emotion
User manual / Bedienungsanleitung
Page / Seite 7 clearaudio electronic GmbH 2008
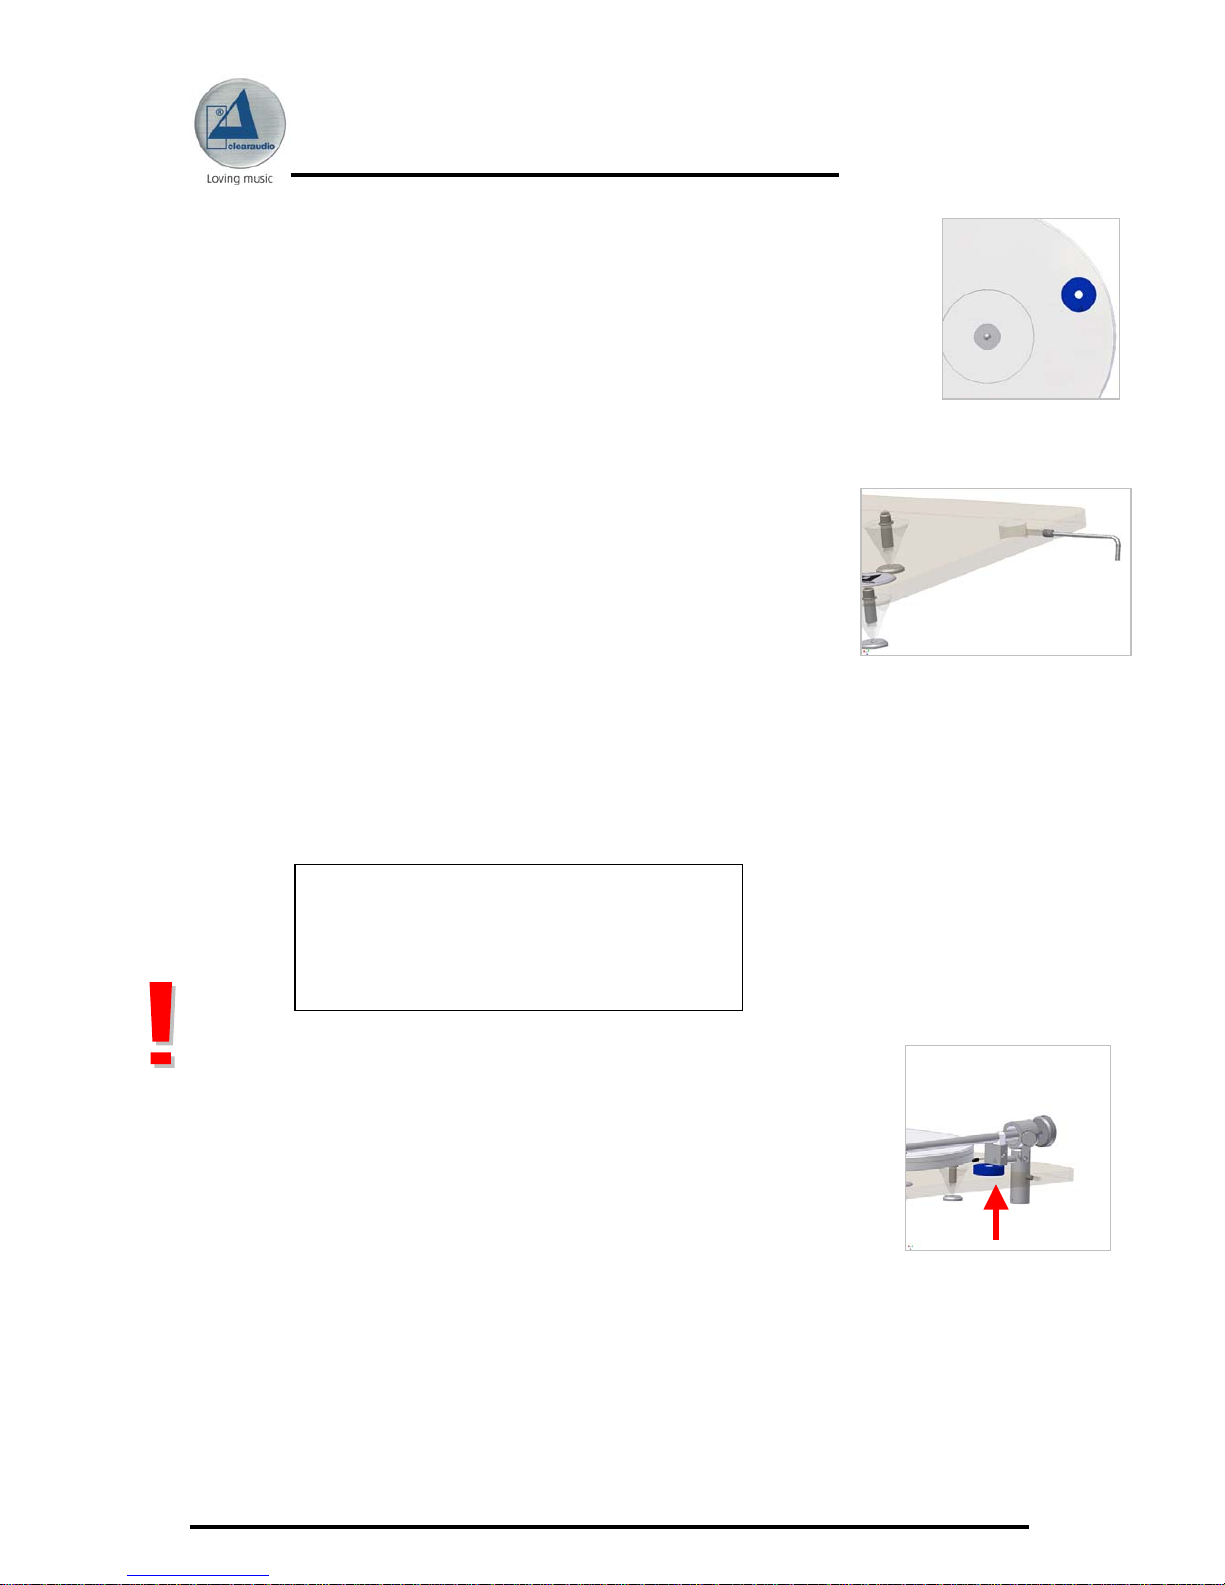
6.) Place the clearaudio level gauge on the platter and bring the
turntable in level by turning the corresponding spikes in the right
direction.
The following adjustment is very important:
should the air bubble in the level gauge not be in the black circle (see at
the blow up), please ensure then that your underground so will be
according aligned. Only if the turntable will be aligned you will receive
the optimum on sound.
7.) Take the threaded bolt (metric winding size 6) out of your
accessory bag and screw it with the adequate allen key into the
winding near the tonearm cut of the turntable chassis, so that
the front of the bolt is not facing out the inner side of the
tonearm cut.
8.) Now it’s the right time to mount your cartridge on your
Satisfy
-tonearm.
Please use the manufacturer’s instruction manual while this
installation procedure and follow the appropriate instructions.
The headshell wires (cartridge connection leads) are colour coded according to the
international
standard :
Please pay attention on every step to avoid any damages to the cartridge !
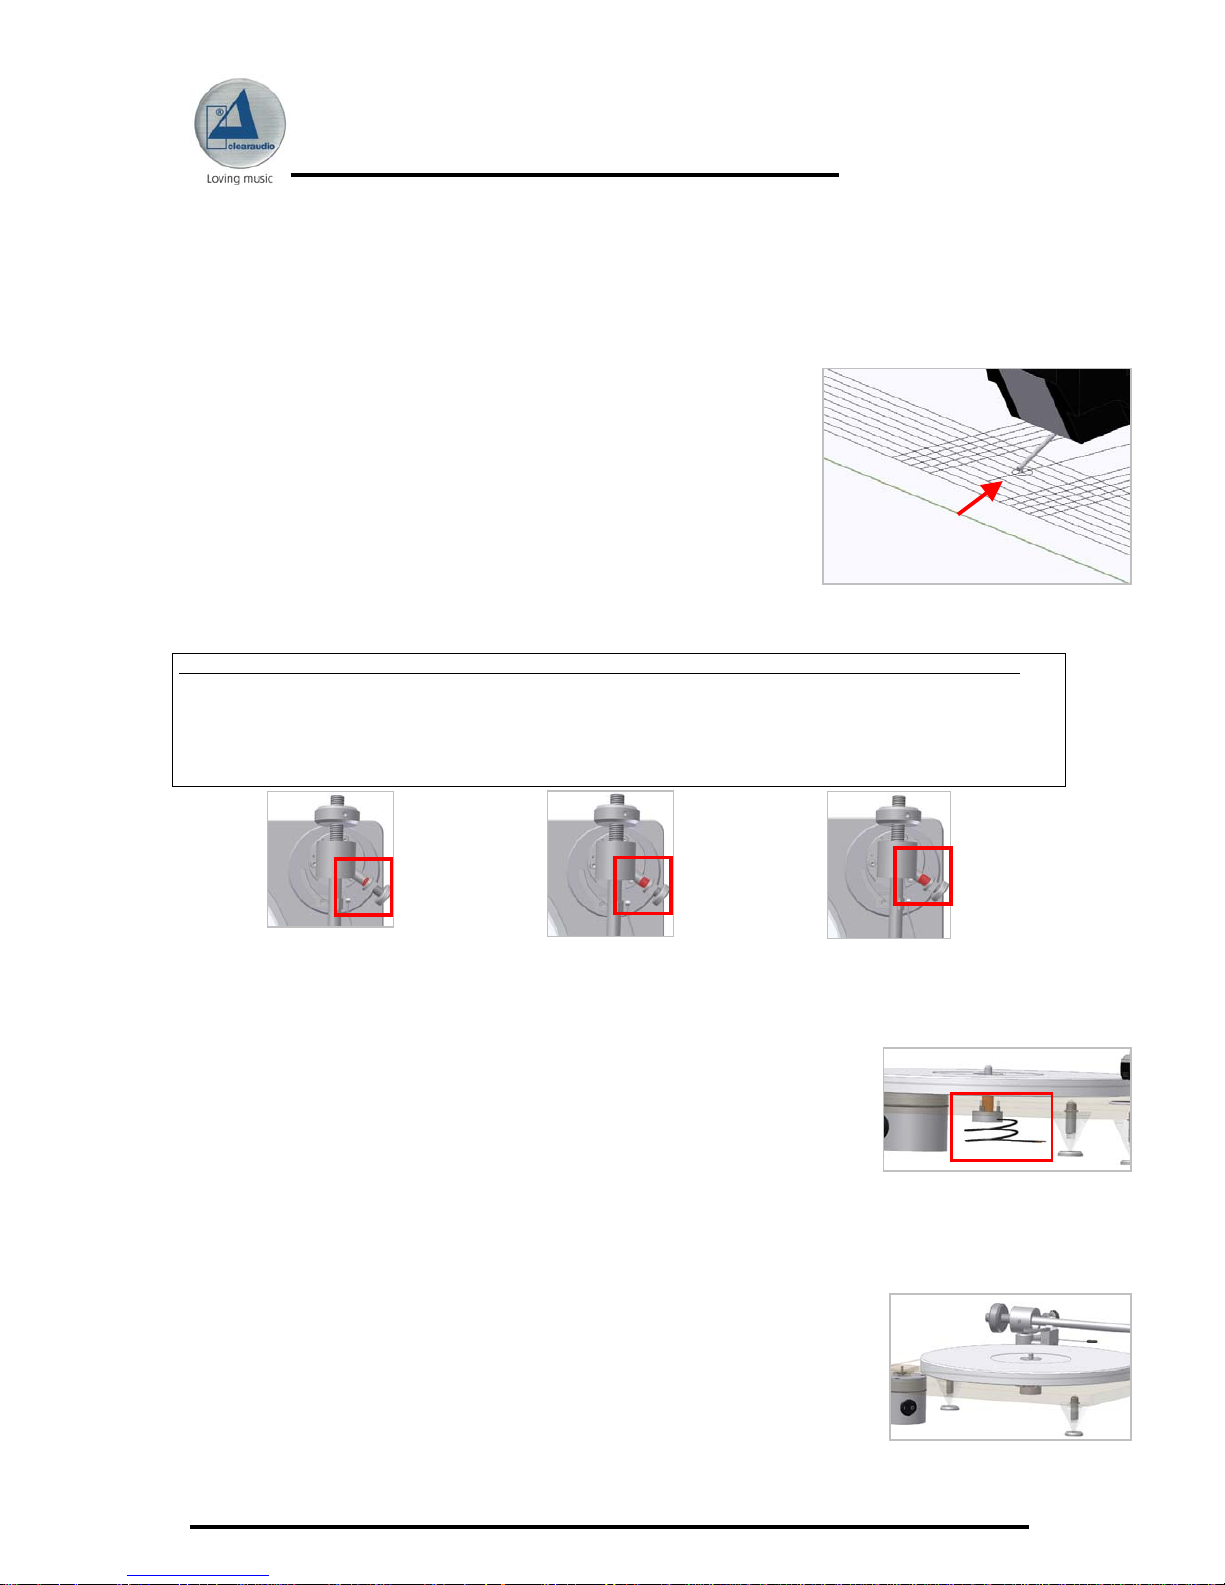
9.) Now take the
Satisfy
-tonearm with the mounted cartridge (and
the stylus protector on it!) and slide first the signal cable and then the
tonearm shaft into the pre-drilled hole on the right side of the
Emotion Start Smart
turntable body. Let the tonearm slide as far into
the hole as the cuing lever unit sits on the clearaudio level gauge
(accessorie box) as shown in the beneath picture. If you like to use a
mat on the turntable platter, please consider to add the thickness of
the mat while adjusting the tonearm height.
Please ensure that the tonearm tube is in parallel to the right edge of the turntable
body. Fix this position while
gently locking the allen screw in the turntable-body’s edge.
Now adjust the tracking force of the cartridge. Please follow the instructions
according the manual of the cartridge you use.
If you are using a clearaudio Moving Magnet cartridge (e.g. clearaudio
Aurum
classics Wood
) you can adjust the force (about 20 mN), by turning the tonearm`s
Colour code of the Satisfy tonearm wire:
Signal left channel (L+) → white
Signal ground left channel (L -) → blue
Signal right channel (R+) → red
Signal ground right channel (R -) → green
Picture 5: Alignment of the
Picture 6: To screw the threaded bolt
Picture 7: Tonearm hei
g
ht adjustment
Page 9
Emotion
User manual / Bedienungsanleitung
Page / Seite 8 clearaudio electronic GmbH 2008
counter weight on the threaded bolt until you can see approximately eight threads
(backside view of the tonearm). This works only if the lead plate, which is part of
delivery of the clearaudio cartridge, is not mounted under the cartridge. If you have
problems with the adjustment of the tracking force you can also use tools like the
clearaudio
Weight Watcher
gauge (Art. No. AC094). For more informations on that,
please contact your specialist dealer or directly clearaudio.
For contact address see page 11.
For the next settings place any LP. Now you can remove the stylus protector.
If you now lift down the cartridge to the middle of the turntable platter, you must
see (from the side) that the upper edge of the tonearm tube is parallel to the surface
of the record.
10.) You can use the tonearm tube as orientation. If it is necessary you can adjust
the height of the tonearm. For that you have to move the tonearm in chassis’s hole
in the right direction and to fix these position through locking the allen screw in the
edge of the turntable chassis.
If you now lift down the cartridge again and take a look at the front side of the
cartridge you have to make sure that the upper edge of the cartridge is parallel to
the record surface. This adjustment had been set up perfectly by clearaudio. Only if
it is necessary, you can adjust the cartridge position, while carefully screw the small
allen screw on the bottom side of the tonearm tube near the headshell (Caution:
please don’t unscrew the allen screw completely). Now you can twist the headshell
with the mounted cartridge around his roll-axis. To achieve the most precise
adjustment you can use a set square.
If you have found the right position you can carefully lock the small allen screw
without changing the position defined before.
Don’t twist the headshell when the cartridge is lifted down and
the diamante tip is on the record. It is necessary to lift the tip
from the record, before you can prove the position again.
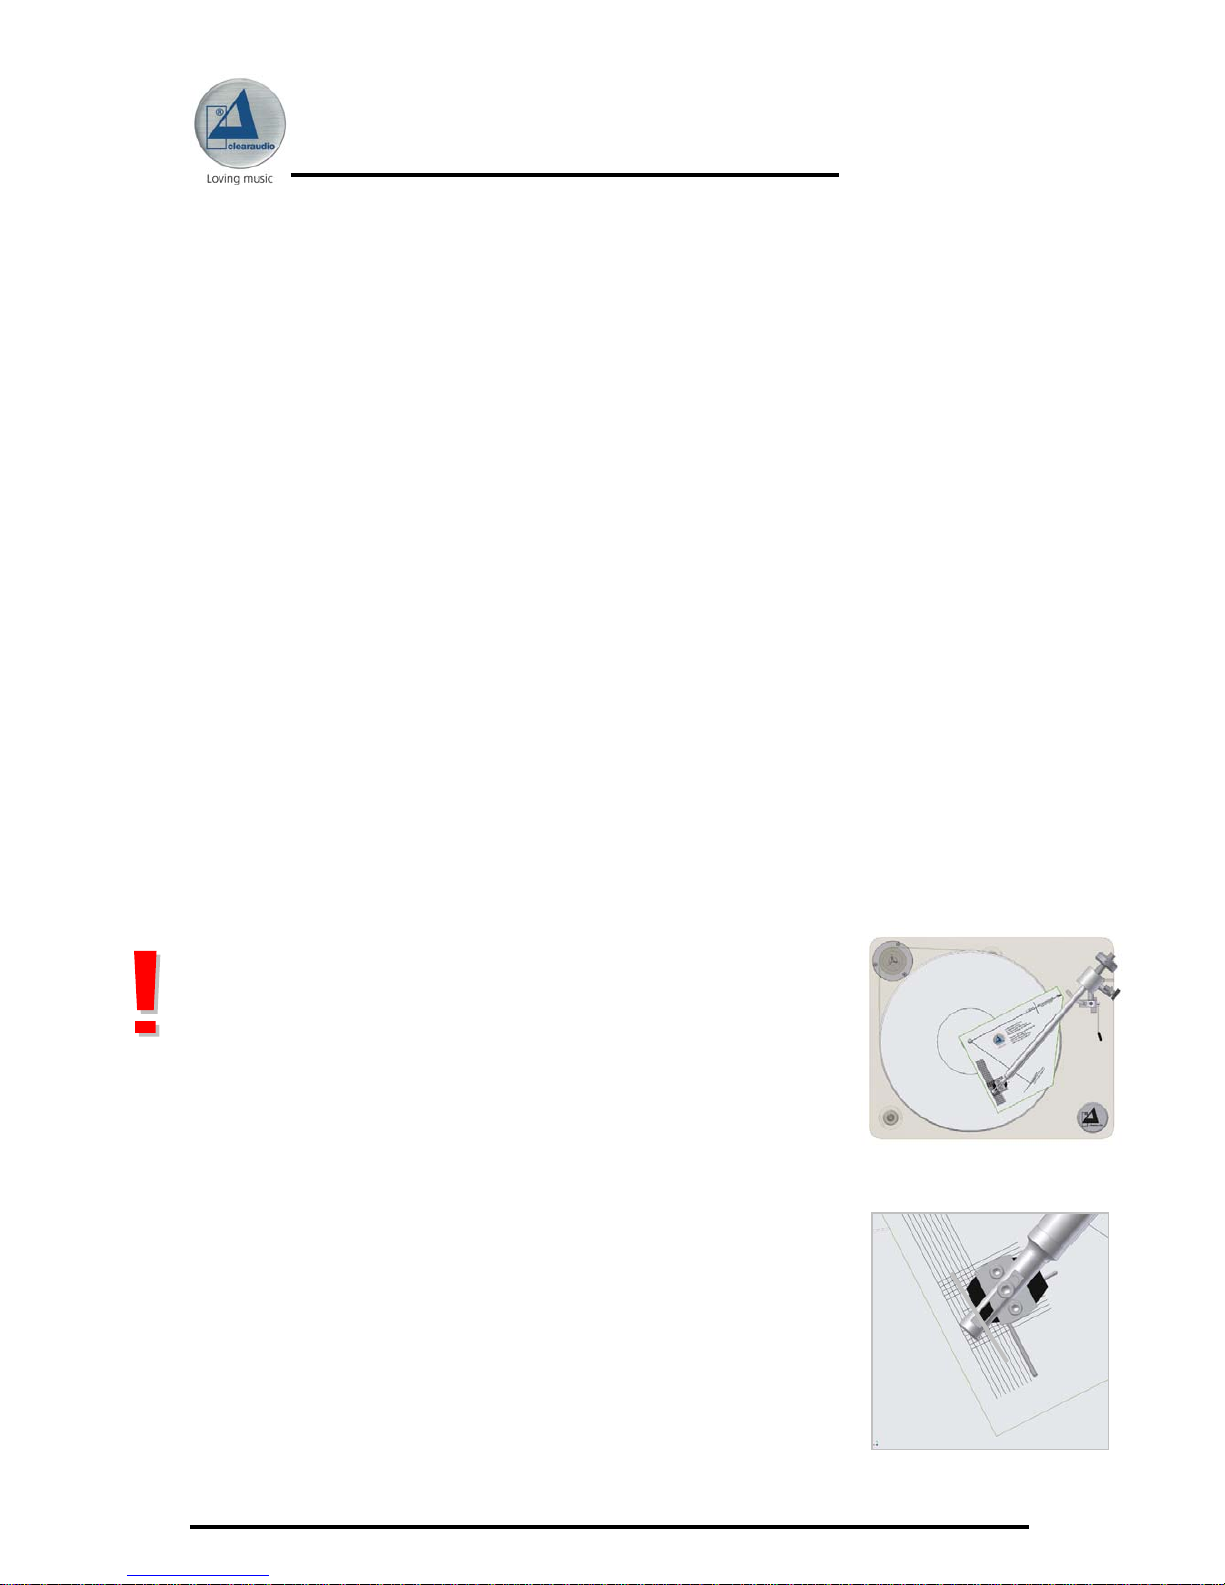
11.) For the final set-up of the tonearm, you need the cartridge
alignment gauge which is included as well. Slide the gauge over
the spindle of the turntable platter and turn the platter into the
position as shown on the beneath picture.
12.) Lift down the cartridge and place the diamond tip of the
cartridge on the reference point on the alignment gauge and make
sure that the edges of the tonearm tube are absolutely parallel to
the marking lines printed on the cartridge alignment gauge. For
that adjustment it is necessary to take a look directly from the top
on the tonearm and the alignment gauge.
13.) If you have to change the position of the diamond tip you can
unscrew the allen screw on the top of the tonearm`s
headshell and move the cartridge into the corresponding
position. Please make also sure that the leading edge of the
Picture 8: Alignment of the tonearm
Picture 9: The tonearm tube must be
absolute parallel
Page 10
Emotion
User manual / Bedienungsanleitung
Page / Seite 9 clearaudio electronic GmbH 2008
cartridge is parallel to the marker
lines of the cartridge alignment gauge. Fix the right position through
looking the headshell screw on the top.
During final tonearm and cartridge installation, always take a look from the top onto
the alignment gauge, to avoid any parallax errors.
14.) The installation is done correctly, when at the same time
the armtube is parallel to the marking lines on the gauge, the
diamond tip is on the reference point and the leading edge of
the cartridge is parallel to the lines on the gauge. Finally lock
all screws that had been involved during the adjustments.
Now you are ready for the anti-skating adjustment.
This also depends on the tracking force of the cartridge and
the diamond shape.
alignment of the anti-skating tracking force position of the antiskating-screw
minimal antiskating 10 – 15mN see illustration 1
medium antiskating 15 – 20mN see illustration 2
maximum antiskating 20mN and more see illustration 3
The general set-up is now finished.
15.) Connect your
Satisfy
-tonearm now with the phono input of
your phono-preamplifier. (More information on adequate phonopreamplifiers and interconnects you can find on our Website:
www.clearaudio.de)
16.) Place one drive belt (the second is for spare) around the platter
and around the pulley. The smaller diameter of the pulley is used for 33 1/3 rpm
and the larger diameter for 45 rpm. The position „I” on the motor-switch indicates
that the turntable is switched on. Please let the turntable be
switched on for the first 15 to 30 minutes, for breaking in.
Now you are finally ready to play your vinyl records.
We wish you a lot of pleasure with your new
Emotion Start Smart
turntable.
Your clearaudio-team
Picture 10: Correct installation
Picture 11: Anti-skating adjustment
Picture 12: Connecting the tonearm
with the phono input
Picture 13: Drive belt mounting
Illustration 1 :
Minimal antiscating
Illustration 2 :
Medium antiscating
Illustration 3 :
Maximum antiscating
Page 11

Emotion
User manual / Bedienungsanleitung
Page / Seite 10 clearaudio electronic GmbH 2008
4. Service
In case of any necessary service for all clearaudio products should be done by
authorized personal only.
In case of any repair, the clearaudio
Emotion- Start Smart
turntable needs to be
send to your nearest authorized dealer or directly to the clearaudio factory.
clearaudio electronic GmbH
Spardorfer Str 150
91054 Erlangen
Germany
Tel/Phone: +49-(0)1805/059595
www.clearaudio.de
www.analogshop.de
info@clearaudio.de
Send / ship the
Emotion-Start Smart
turntable always and only in
the original packing!
Only in the original packing clearaudio can provide the warranty.
If you repackage the turntable, please make all steps inverted like at installation and
set up (chapter 3).
Page 12

Emotion
User manual / Bedienungsanleitung
Page / Seite 11 clearaudio electronic GmbH 2008
5. Special directions
To achieve the full clearaudio warranty, it is necessary that you fill out and send
the corresponding part of the warranty registration card back to clearaudio, within
two weeks after purchase. Only if the product is returned in it’s original packing
clearaudio can provide the warranty.
Transportation advice: If any transportation of the
Emotion Start Smart
-turntable
should be necessary, please always remove the turntable platter. Otherwise serious
damage can occur!
The bearing hole needs to be covered as well, to avoid any dust coming into the
bearing. Always take of the pulley of the motor unit as well, to prevent the motor
shaft from any damages.
If the
Emotion- Start Smart
turntable is a longer time not in use, please disconnect
the motor from the mains supply.
Every two years you can lubricate (only if you will recognize speed variations) the
bearing of the turntable platter with the delivered oil. In this case it is enough to put
4 or 5 drops of the oil into bearing.
Please take special caution to any damages of the power cord. Any damages should
only be repaired only by authorized personal. A damaged power cord must be
exchanged immediately!
Caution !
Please use only non alcoholic fluids and only fluids specially used
for acrylic, to clean the
Emotion Start Smart
turntable. Otherwise could
occur damage to the material or the surface!!!
Page 13

Emotion
User manual / Bedienungsanleitung
Page / Seite 12 clearaudio electronic GmbH 2008
6. Technical data
Construction principle: Resonance optimised chassis’s shape, belt driven
Speed possibilities:
33 1/3 rpm / 45 rpm (78 rpm with optional motor
pulley)
Drive unit: Decoupled synchronous motor in a massive metal-housing
Bearing: Hardened steel, polished sinter bronze insert
Platter: GS-PMMA, acrylic, precision CNC machined surface
Speed variation:
±0,2 %
Dimensions: Approx. 400 mm x 330 mm x 150 mm
Warranty: 3 years* (please see page 26)
* Only if the warranty card is filled out correctly and sent back to clearaudio. Please see page 26!
Clearaudio electronic is not responsible for typographical errors in descriptions. Technical
specifications subject to change or improvement without prior notice. Availability as long as stock
lasts. Copies and imprints- also only in extracts – require written conformation through clearaudio
electronic GmbH; Germany
clearaudio electronic GmbH 2008
V
ersion: October 2008
Page 14

Emotion
User manual / Bedienungsanleitung
Page / Seite 13 clearaudio electronic GmbH 2008
Sehr verehrte clearaudio - Kundin, sehr verehrter clearaudio – Kunde,
Sie haben sich für ein clearaudio
Emotion Start Smart
Laufwerk entschieden, ein
hochwertiges Produkt der clearaudio electronic GmbH.
Resonanz reduzierende Formgebung in Verbindung mit einer ausgelagerten
Motoreinheit garantiert absolute Laufruhe, originalgetreue Wiedergabe und somit ein
echtes Musikerlebnis. Ein hochpräzises, wartungsfreies Sinterbronzelager sorgt für
reibungslosen Analoggenuss.
Wir bedanken uns bei Ihnen für Ihr Vertrauen.
Um die volle Qualität des
Emotion- Start Smart
Laufwerkes nutzen zu können, lesen
Sie bitte diese Bedienungsanleitung aufmerksam durch.
Alle Hinweise dienen dazu, Ihnen viele Jahre ungetrübten Musikgenuss zu bereiten
und Fehlbedienungen zu verhindern.
Wir wünschen Ihnen viel Freude mit Ihrem neuen clearaudio
Emotion Start Smart
Laufwerk.
clearaudio electronic GmbH
Lesen Sie diesen Abschnitt in jedem Fall, bevor Sie ein Gerät an das Stromnetz anschließen!
CE-MARKIERUNG
Der clearaudio
Emotion Start Smart
entspricht den Bestimmungen über
elektromagnetische Störfreiheit (EMC) und denen über Niederspannungsgeräte.
GERÄTENETZEINSTELLUNG
Ihr clearaudio-Produkt wurde so konstruiert, dass es der Haushaltsleistung und den
Sicherheitsbestimmungen in Ihrer Region genügt. Dieses Produkt kann nur mit 230 V
Wechselstrom betrieben werden.
URHEBERRECHT
Aufnahme und Wiedergabe jeglichen Tonmaterials kann die Zustimmung des Urhebers
erfordern. Beachten Sie dazu folgende Informationsschriften.
- Copyright Act 1956 (Urheberrechtsgesetz 1956)
- Dramatic and Musical Performers Act 1958 (Gesetz über dramatische und musikalische
Aufführungsrechte, 1958)
- Performers Protection Acts 1963 and 1972 (Künstlerschutzgesetze von 1963 und 1972)
- Sämtliche nachfolgende, gesetzliche Verfügungen und Bestimmungen.
WARNUNGEN
Das Gerät nicht Regen oder Feuchtigkeit aussetzen.
Das Netzkabel nicht mit feuchten oder nassen Händen anfassen.
A
uf dem Gerät dürfen keine Geräte mit offener Flamme aufgestellt werden (Brennende Kerze
o.ä.)
Page 15

Emotion
User manual / Bedienungsanleitung
Page / Seite 14 clearaudio electronic GmbH 2008
Inhaltsverzeichnis
1. Verpackungsübersicht 15
2. Lieferumfang 16
3. Aufbau und Inbetriebnahme 18
4. Service 23
5. Besondere Hinweis 24
6. Technische Daten 25
Garantie Informationen 26
Page 16

Emotion
User manual / Bedienungsanleitung
Page / Seite 15 clearaudio electronic GmbH 2008
1. Verpackungsübersicht
Zubehör-
Kleinteile,
Motor, Tonarm,
Bedienungs-
anleitung,
Garantiekarte
Bild 1
Emotion-
Laufwerkskörper
mit Lagerober-
und unterteil
Bild 2
Plattenteller
Bild 3
Bild 1: Verpackungsübersicht
1
2
3
Page 17

Emotion
User manual / Bedienungsanleitung
Page / Seite 16 clearaudio electronic GmbH 2008
2. Lieferumfang
Das clearaudio
Emotion Start Smart
-Laufwerk verlässt unsere Fertigung in einer
besonders sicheren und eigens für dieses Laufwerk konzipierten Verpackung.
Bewahren Sie diese Verpackung auf, um jederzeit einen sicheren Transport Ihres
Gerätes zu gewährleisten.
Bitte kontrollieren Sie anhand der unten aufgeführten Liste den Lieferumfang Ihres
neu erworbenen clearaudio
Emotion Start Smart-
Laufwerks. Dieser besteht aus:
1. Plattenspielerkörper mit
eingesetztem Lagerunterteil
2. Plattenteller aus GS-Acryl
3. Lageroberteil mit eingepasster
Lagerwelle
4. Motorantriebseinheit mit
Netzzuleitung
5. Optional:
Satisfy
Tonarm (entweder
mit Cinch-Buchsen oder
direktverkabelt)
5a. Gegengewicht zum Einstellen der
Tonabnehmerauflagekraft
6. Antriebsrad aus Acryl 7. 3 x Aluminiumfüsse
8. 3 x V2A-Gewindestangen M10 x 20 9. Emotion Acryl-Abdeckhaube
10. Smart Wire 1m Kabel
1
2
3
5 / 5a
4
6
7
8
10
9
Page 18

Emotion
User manual / Bedienungsanleitung
Page / Seite 17 clearaudio electronic GmbH 2008
Fortsetzung Lieferumfang:
11. clearaudio Smart Phono 12. MM Tonabnehmer
clearaudio Aurum Classic Wood
13. 1 paar weiße Handschuhe 14. Erdungskabel für das EmotionLaufwerk
15. clearaudio-Logo, selbstklebend 16. Libelle zum Ausrichten Ihres
Laufwerks und zur
Tonarmhöhenjustage
17. 2 x Antriebsriemen 18. 3 x Inbusschlüssel Größe 1,5 / 2,5 /
3
19. Feinschraubendreher aus Aluminium 20. Lageröl zur gelegentlichen
Schmierung des Plattentellerlagers
21.
Clever Clamp
Plattenklemme 22. o. Abb.: Bedienungsanleitung
23. o. Abb.: Garantiekarte, clearaudio
Quality Certificate
24. o. Abb.: Einstellschablone zur
Tonarm/Tonabnehmerjustage
11
12
18
15
16 17
13
20
14
19
21
Page 19

Emotion
User manual / Bedienungsanleitung
Page / Seite 18 clearaudio electronic GmbH 2008
3. Aufbau und Inbetriebnahme
Das
Emotion Start Smart
- Laufwerk besteht aus mehreren Teilen, wie unter Punkt 2
(Lieferumfang) beschrieben. Der Aufbau des Laufwerks ist mit wenigen Handgriffen
zu bewerkstelligen. Benutzen Sie bitte zum Aufbau unbedingt die mitgelieferten
weißen Handschuhe, um Kratzer zu vermeiden.
Für den Zusammenbau des
Emotion Start Smart
benötigen Sie eine saubere und
staubfreie Arbeitsfläche, im Idealfall in der Nähe des zukünftigen Aufstellortes Ihres
Emotion Start Smart
.
1.) Nehmen Sie zuerst den Motor und den Tonarm aus der Verpackung und legen Sie
beides zur Seite. Nun können Sie die gesamte obere Verpackungsschicht aus dem
Karton entnehmen. Nehmen Sie den Emotion-Körper samt eingepasstem Lageroberund Unterteil aus der Verpackung heraus und legen Sie diese Einheit mit der flachen
Seite auf einer sauberen Unterlage ab.
2.) In Ihrem Zubehörbeutel in der obersten Verpackungsetage finden Sie 3
Aluminiumfüsse und 3 Gewindestangen. Schrauben Sie zuerst die Gewindestangen
etwa 10mm in die Aluminiumfüsse. Jetzt können die Aluminiumfüsse in die dafür
vorgesehenen Gewindebohrungen am Laufwerkskörper handfest eingeschraubt
werden. Stellen Sie anschließend den Plattenspielerkörper auf das Rack, auf
dem Sie Ihren
Emotion Start Smart
in Betrieb nehmen möchten.
3.) Schieben Sie das Antriebsrad soweit auf die Achse des
Motors, bis zwischen Motoroberkante und
Antriebsradunterkante ein Spalt von ca. 1 mm besteht. Ziehen
Sie die drei Schrauben in dem Antriebsrad mit dem Feinschraubendreher
nacheinander gleichmäßig an.
4.) Heben Sie den Laufwerkskörper von der Motorenseite
aus an und schieben Sie die Motoreinheit von unten in die dafür vorgesehene
Aussparung des Körpers. Achten Sie dabei darauf, dass der Schalter des Motors zur
linken Seite des Plattenspielerkörpers weist.
Lassen Sie den Körper wieder nach unten ab. Dadurch zentriert sich die Motoreinheit
durch den O-Ring auf dem äußeren Durchmesser des Motorengehäuses.
TIPP: Sie haben die Möglichkeit, den O-Ring vom Motorengehäuse
abzunehmen und den Motor in der Aussparung des Emotion-Körpers ohne
Kontakt zum Laufwerkskörper auszumitteln. Dadurch können Sie Ihr
Emotion
-
Laufwerk perfekt vom Motor entkoppelt antreiben.
5.) Verbinden Sie nun das Netzkabel des Motors mit dem Stromnetz.
6.) Jetzt können Sie die verbleibende Verpackungsebene ebenfalls aus dem Karton
entnehmen und beiseite legen. Auf der untersten Verpackungsebene ist der
Plattenteller verpackt.
Bild 2: Befestigen des Antriebsrads
1 mm
Page 20

Emotion
User manual / Bedienungsanleitung
Page / Seite 19 clearaudio electronic GmbH 2008
7.) Nehmen Sie den Plattenteller in beide Hände, so dass die Plattentellerseite mit
der etwa 60mm breiten und 5mm tiefen Ausdrehung nach unten weist und setzen
Sie ihn auf das Lageroberteil auf. Durch leichtes Hin -und Herwippen gleitet der
Plattenteller auf das Lageroberteil. Mit sanftem (!) Druck von oben können Sie
sicherstellen, dass der Plattenteller auf der gesamten Auflagefläche des
Lageroberteiles liegt.
8.) Die folgende Einstellung ist besonders wichtig:
Sollte sich die Luftblase der Wasserwaage nicht im Mittelpunkt des
schwarzen Kreises befinden (siehe Bild 5), sorgen Sie bitte dafür, dass die
Unterlage, auf der Ihr Plattenspieler steht entsprechend ausgerichtet wird.
Nur wenn der Plattenteller genau in Waage ist,
erreichen Sie das Optimum an Klang.
Nehmen Sie aus dem Zubehörbeutel den Gewindestift (M6 x 8)
heraus und schrauben Sie ihn mit dem passenden Inbusschlüssel
in die Gewindebohrung des Laufwerkkörpers, nahe der
Tonarmaufnahmebohrung. Drehen Sie den Gewindestift nur
soweit ein, dass er nicht in der Tonarmaufnahmebohrung
austritt, damit anschließend der Tonarmfuß ungehindert
eingesetzt werden kann.
9.) Nun können Sie den Tonabnehmer auf den
Satisfy
-Tonarm montieren. Folgen
Sie dabei den Anweisungen des Tonabnehmerherstellers. Die Signalkabel des
Satisfy
-
Tonarms sind normgerecht farbmarkiert:
Gehen Sie bei den folgenden
Arbeitsschritten und Einstellungen
unbedingt behutsam vor, um eine
Beschädigung Ihres
Tonabnehmersystemes zu vermeiden!
Farbcodierung der Signalkabel des Satisfy-Tonarms:
Signal linker Kanal (L+) → weiß
Signalmasse linker Kanal (L -) → blau
Signal rechter Kanal (R+) → rot
Signalmasse rechter Kanal (R -) → grün
Bild 5: Ausrichten des Plattenspielers
Bild 6: Einschrauben des Gewindestifts
Bild 3+4: Aufsetzen des Plattentellers
Page 21

Emotion
User manual / Bedienungsanleitung
Page / Seite 20 clearaudio electronic GmbH 2008
10.) Nehmen Sie den
Satisfy
-Tonarm mit montiertem Tonabnehmersystem (und
aufgesetztem Nadelschutz!) und führen Sie zuerst das Signalkabel und anschließend
den Fuß des Tonarmes in die dafür vorgesehene Bohrung des
Emotion
- Körpers. Schieben Sie den Tonarm so weit in die
Bohrung, bis die Lifteinheit des Tonarms auf die mitgelieferte
Wasserwaage (in nebenstehender Abbildung mit einem roten Pfeil
gekennzeichnet) aufliegt. Das Tonarmrohr sollte, von der
Ruheposition gehalten, parallel zur rechten Kante des
Emotion Start
Smart
-Körpers verlaufen. Fixieren Sie den Tonarm in seiner
Position, indem Sie die seitlich angebrachte Madenschraube
handfest anziehen.
Sofern Sie eine Plattentellerauflage, wie
z.B. Filz, Leder etc. verwenden möchten,
müssen Sie die Tonarmhöhe um den Betrag der Materialdicke
der verwendeten Auflage anpassen.
11.) Stellen Sie jetzt die vom Hersteller empfohlene Auflagekraft des Tonabnehmers
ein. Wenn Sie einen clearaudio Moving-Magnet-Tonabnehmer der WOOD-Serie
verwenden, können Sie die Auflagekraft auf ca. 20mN einstellen, indem Sie das
Gegengewicht des Tonarmes vorsichtig auf den Gewindegängen verdrehen, bis – von
der Rückseite des Tonarmes betrachtet - etwa 8 Gewindegänge zu erkennen sind
(Dieser Richtwert funktioniert nur, wenn das dem Tonabnehmersystem beigelegte
Bleiplättchen nicht unter dem Tonabnehmer montiert wurde).
Andernfalls sind im Fachhandel Hilfsmittel wie z.B. die
Weight Watcher
Waage(Art.
Nr. AC094) von clearaudio zur Bestimmung des Auflagegewichts erhältlich. Wenden
Sie sich hierzu bitte an Ihren Fachhändler oder direkt an clearaudio.
Kontaktmöglichkeiten finden Sie auf Seite 23.
12.) Zu den nachfolgenden Einstellungen legen Sie eine Schallplatte Ihrer Wahl auf
den Plattenteller auf. Entfernen Sie den Nadelschutz des Tonabnehmers. Wenn Sie
den Tonabnehmer etwa auf Plattenmitte absenken, sollte seitlich betrachtet, die
Oberkante des Tonabnehmerkörpers parallel zur Schallplattenoberfläche verlaufen.
Als Orientierung kann hier auch das Tonarmrohr dienen. Die genaueste Einstellung
erreichen Sie, wenn Sie die Parallelität mithilfe eines Geodreiecks überprüfen. Falls
nötig, passen Sie die Tonarmhöhe durch Verschieben des Tonarmes in der
Tonarmbohrung in die entsprechende Richtung an und fixieren Sie diese
Tonarmposition durch Anziehen der seitlichen Madenschraube.
13.) Senken Sie nun den Tonabnehmer wieder auf die
Plattenoberfläche ab und betrachten Sie den Tonabnehmer von
vorne. Prüfen Sie, ob die obere Tonabnehmerkante parallel zur
Plattenoberfläche verläuft. Passen Sie gegebenenfalls
die Tonabnehmerposition an, indem Sie die kleine Inbusschraube
auf der Tonarmrohrunterseite in der Nähe des Headshells
vorsichtig lösen (Achtung: nicht ganz heraus drehen!), damit sich
das Headshell mit montiertem Tonabnehmer um die Längsachse
Bild 8: Absenken des Tonabnehmers
auf der Schablone
Bild 7: Einstellung der Tonarmhöhe mittels Wasserwaage
Page 22

Emotion
User manual / Bedienungsanleitung
Page / Seite 21 clearaudio electronic GmbH 2008
verdrehen lässt. Nachdem Sie die richtige Position gefunden haben, ziehen sie die
kleine Inbusschraube wieder vorsichtig fest, ohne dabei die zuvor gewählte Position
zu verändern.
Drehen Sie das Headshell nicht, während sich der Abtastdiamant auf der Schallplatte
befindet! Es ist notwendig, die Nadel von der Schallplatte abzuheben und
anschließend die Parallelität erneut zu prüfen.
14.) Nun können Sie den Tonarm in dieser Position fixieren, indem Sie die
Madenschraube auf der rechten Seite des
Emotion Start Smart
-Körpers mit dem
mitgelieferten Inbusschlüssel handfest anziehen.
15.) Zur endgültigen Tonarm- und Tonabnehmerjustage benötigen
Sie die ebenfalls mitgelieferte Einstellschablone. Stecken Sie diese
auf den Dorn des Plattentellers. Drehen Sie anschließend den
Plattenteller soweit, dass in etwa die Position wie in
nebenstehender Abbildung erreicht wird.
Wenn die Flanken des Tonarmrohres von oben betrachtet absolut
parallel mit den Markierungslinien der Einstellschablone
abschließen, können Sie mithilfe des Tonarmliftes den Diamanten
des Tonabnehmers auf den Referenzpunkt der
Einstellschablone absenken.
16.) Oft ist es nötig, die Position des Diamanten anzupassen; Sie erreichen dies
durch Lösen der Inbusschraube auf dem Headshell des Tonarmes und
anschließendes Verschieben des Tonabnehmers mit dem Headshell in die
entsprechende Richtung. Achten Sie dabei darauf, dass die Vorderkante des
Tonabnehmers parallel zu den auf der Einstellschablone angebrachten
Markierungslinien verläuft. Fixieren Sie anschließend diese Position durch handfestes
Anziehen der Headshellschraube.
Blicken Sie bei diesen Einstellungen immer im Lot, also direkt von oben auf den
Tonarm und Tonabnehmer, um Parallaxenfehler zu vermeiden.
17.) Sie haben die Justage korrekt durchgeführt, wenn die
beiden Markierungslinien der Einstellschablone mit den
Tonarmrohrflanken parallel in Linie zueinander verlaufen,
der Tonabnehmerdiamant exakt auf dem eingekreisten
Referenzpunkt liegt und die Vorderkante des Tonabnehmers
parallel zu den Linien auf der Einstellschablone verläuft.
Fixieren Sie anschließend alle von den Einstellungen
betroffenen Schrauben etwas kräftiger.
Bild 9: Positionierung des
Abtastdiamanten
Bild 10: Korrekte Position des
Abtastdiamanten
Page 23

Emotion
User manual / Bedienungsanleitung
Page / Seite 22 clearaudio electronic GmbH 2008
18.) Jetzt können Sie die Antiskatingeinstellung vornehmen. Diese wird in
Abhängigkeit von der Tonabnehmerauflagekraft getroffen:
Die Tonabnehmer-Tonarmjustage ist nun abgeschlossen.
19.) Verbinden Sie Ihren
Satisfy
-Tonarm mit dem Phonoeingang
Ihrer Vorstufe oder dem Phonovorverstärker (geeignete Kabel und
Phonovorverstärker finden Sie auf unserer Website:
www.clearaudio.de).Anschließend verbinden Sie das Massekabel
des Tonarmes mit der entsprechenden Erdungsbuchse Ihres
Phonovorverstärkers oder Vorverstärkers. Es empfiehlt sich
ebenfalls, Ihr
Emotion Start Smart
Laufwerk an dem Lagerunterteil
mit dem mitgelieferten Erdungskabel (siehe nebenstehende Abbildung) zu erden.
20.) Bringen Sie nun den Plattenteller des
Emotion Start Smart
-Laufwerkes in
Waage, undzwar mithilfe der mitgelieferten Libelle (Wasserwaage). Legen Sie diese
auf den Plattenteller und zentrieren Sie die Wasserblase der Libelle in den schwarz
aufgedruckten Ring der Libelle. Die genauesten Werte erreichen Sie, wenn Sie an
drei verschiedenen Punkten des Plattentellers mit der Libelle prüfen. Feine
Höheneinstellungen können durch Drehen der Acrylspikes erreicht werden. Sind
größere Positionskorrekturen notwendig, versuchen Sie die Unterstellfläche des
Laufwerks auszunivellieren. Zudem sind bei clearaudio Passscheiben
unterschiedlicher Stärke zum Unterschrauben zwischen Acrylspikes und
Plattenspielerkörper erhältlich.
Legen Sie nun den Antriebsriemen um das Antriebspulley des Motors und um den
Plattenteller. Der kleinere Durchmesser des Motorantriebsrades
entspricht 33 1/3 Umdrehungen pro Minute, der größere obere
Rillendurchmesser des Antriebsrades entspricht einer Drehzahl von
45 Upm. Durch Betätigen des seitlich am Motorgehäuse
angebrachten Schalters in die Position „I“ setzen Sie das Laufwerk in
Betrieb. Es empfiehlt sich, das Laufwerk in diesem Zustand 15-30
Minuten einlaufen zu lassen.
clearaudio wünscht Ihnen viel Spaß beim Musik hören mit Ihrem neuen
Emotion
Start Smart
-Plattenspieler!
Einstellung des Antiskating: Auflagekraft Position der Antiskatingschraube
Minimales Antiskating → 10-15mN → siehe Abbildung 1
Mittleres Antiskating → 15-20mN → siehe Abbildung 2
Maximales Antiskating → 20mN und größer → siehe Abbildung 3
Bild 12: Erdung des Laufwerks
Bild 13: Befestigung des Antriebsriemens
Abbildung 1 :
Minimales Antiskating
Abbildung 2 :
Medium Antiskating
Abbildung 3 : Maximales
Antiskating
Bild 11: Einstellung Antiskating
Page 24

Emotion
User manual / Bedienungsanleitung
Page / Seite 23 clearaudio electronic GmbH 2008
4. Service
Konnten Sie einen Fehler, trotz Beachtung aller hier erwähnten Hinweise nicht
beheben oder bestimmen, fragen Sie bitte zunächst Ihren Fachhändler um Rat.
Erst wenn dort der Fehler bestätigt und nicht behoben werden kann, senden Sie das
Gerät bitte frachtkostenfrei an unten aufgeführte Anschrift:
clearaudio electronic GmbH
Spardorfer Str 150
91054 Erlangen
Germany
Tel/Phon: +49-(0)1805/059595
Fax: +49-(0)9131/51683
www.clearaudio.de
www.analogshop.de
info@clearaudio.de
Dabei ist unbedingt auf korrekte bzw. sichere Verpackung zu achten
(Originalverpackung). Beim Verpacken umgekehrt verfahren wie bei Aufbau und
Inbetriebnahme (siehe Punkt 3).
Page 25

Emotion
User manual / Bedienungsanleitung
Page / Seite 24 clearaudio electronic GmbH 2008
5. Besondere Hinweise
Um die volle clearaudio - Garantie in Anspruch nehmen zu können, senden
Sie uns bitte den entsprechenden Teil der beigelegten Garantiekarte
innerhalb von zwei Wochen korrekt ausgefüllt zu, da ansonsten nur die
gesetzliche Garantiezeit berücksichtigt werden kann.
Bei einem Transport des clearaudio
Emotion Start Smart
Laufwerks stets den
Plattenteller und das Lageroberteil abnehmen, da sonst erhebliche
Beschädigungsgefahr besteht! Gehen Sie beim Verpacken in umgekehrter
Reihenfolge wie unter Punkt 2 (Aufbau) beschrieben vor.
Bitte beachten Sie, dass nur bei Plattenspielern, die uns im Originalkarton zugehen
Garantieleistungen erbracht werden.
Kleben Sie die Lageröffnung des Plattentellerlagers in dem
Emotion Start Smart
Körper bitte mit einem Streifen Klebeband ab, um Verunreinigungen durch Staub
oder Ähnliches vorzubeugen. Entfernen Sie auch unbedingt das Antriebsrad von der
Achse des Motors, da sich diese sonst durch Krafteinwirkung beim Transport
verbiegen könnte.
Sollten Sie Ihr
Emotion Start Smart
-Laufwerk über einen längeren Zeitraum nicht
betreiben, empfehlen wir, den Motor vom Stromnetz zu trennen.
Das Plattentellerlager sollte je nach Beanspruchung etwa alle zwei (2) Jahre mit dem
mitgelieferten Lageröl geschmiert werden. Es genügt, wenn Sie hierzu etwa 4 bis 5
Tropfen in die Lagerbuchse des
Emotion
-Körpers geben.
Zu Ihrer eigenen Sicherheit sollten Sie eine regelmäßige Sichtkontrolle der
netzspannungsführenden Zuleitung der Motorantriebseinheit vornehmen. Sollte
deren Isolierung beschädigt sein, lassen Sie sie bitte unverzüglich von einem
Fachmann auswechseln!
Achtung !
Bitte verwenden Sie zur Reinigung der Acrylglaselemente
nur
speziellen
Acrylglasreiniger und
keinesfalls
Spiritus oder andere auf Alkohol basierende
Flüssigkeiten (Gefahr von Oberflächenbeschädigung !) Verwenden Sie zum Reinigen
keine trockenen Tücher, da dies elektrostatische Aufladung erzeugt.
Geeignete Reinigungs- und Pflegemittel von clearaudio sind über den Fachhandel
erhältlich.
Page 26

Emotion
User manual / Bedienungsanleitung
Page / Seite 25 clearaudio electronic GmbH 2008
6. Technische Daten:
Konstruktionsprinzip: Resonanzoptimiertes Laufwerksdesign, Riemenantrieb
Drehzahlbereich: 33 1/3 U/min / 45 U/min (78 U/min optional)
Antrieb: Entkoppelter Synchronmotor in massivem Metall-
Druckgussgehäuse
Lager: Geläppter und gehärteter Stahl, polierte Laufbuchse aus
Sinterlagerbronze
Plattenteller: GS-PMMA / Acryl, Oberfläche, CNC-präzisionsgedreht,
Gleichlauf (bewertet)
±0,2 %
Abweichung vom
Sollwert
±0,2 %
Abmessungen: ca. 400 mm x 330 mm x 150 mm
Garantie: 3 Jahre*( siehe Seite 26)
* nur bei korrekt ausgefüllter und eingesandter Garantiekarte (siehe Seite 26)
Änderungen bleiben vorbehalten. Lieferbar solange Vorrat reicht. Für Druckfehler keine Haftung.
Irrtümer vorbehalten- Kopien und Abdrucke – auch nur auszugsweise – bedürfen der schriftlichen
Genehmigung durch die clearaudio electronic GmbH.
clearaudio electronic GmbH 2008
To achieve the full clearaudio warranty, it is necessary that you fill out and send the corresponding
part of the warranty registration certificate /card back to clearaudio, within two weeks after purchase.
Stand: Oktober 2008
Page 27

Emotion
User manual / Bedienungsanleitung
Page / Seite 26 clearaudio electronic GmbH 2008
Only if the product is returned in it’s original packing clearaudio can provide the warranty of 3 years.
Otherwise clearaudio provides the legal warranty of 2 years.
Um die volle clearaudio Garantie (für
Emotion Start Smart
3 Jahre) in Anspruch nehmen zu können,
senden Sie uns bitte die beigelegte Garantiekarte innerhalb von zwei Wochen korrekt und vollständig
ausgefüllt zu, da sonst nur die gesetzliche Garantiezeit von 2 Jahren berücksichtigt werden kann.
ENGLISH
WARRANTY
For warranty information, contact your local clearaudio distributor.
RETAIN YOUR PURCHASE RECEIPT
Your purchase receipt is your permanent record of a valuable purchase.
It should be kept in a safe place to be referred to as necessary for insurance purposes or when corresponding with clearaudio.
IMPORTANT
When seeking warranty service, it is the responsibility of the consumer to establish proof and date of purchase. Your purchase receipt or invoice
is adequate for such proof.
FOR U.K. ONLY
This undertaking is in addition to a consumer's statutory rights and does not affect those rights in any way.
FRANÇAIS
GARANTIE
Pour des informations sur la garantie, contacter le distributeur local clearaudio.
CONSERVER L'ATTESTATION D'ACHAT
L'attestation d'achat est la preuve permanente d'un achat de valeur. La conserver en lieu sur pour s'y reporter aux fins d'obtention d'une
couverture d'assurance ou dans le cadre de correspondances avec clearaudio.
IMPORTANT
Pour l'obtention d'un service couvert par la garantie, il incombe au client d'établir la preuve de l'achat et d'en corroborer la date. Le reçu ou la
facture constituent des preuves suffisantes.
DEUTSCH
GARANTIE
Bei Garantiefragen wenden Sie sich bitte zunächst an Ihren clearaudio-Händler.
Heben Sie Ihren Kaufbeleg gut auf.
WICHTIG!
Die Angaben auf Ihrer Quittung erlauben uns die Identifizierung Ihres Gerätes und belegen mit dem Kaufdatum die Dauer Ihrer GarantieAnsprüche.
Für Serviceleistungen benötigen wir stets die Gerätenummer.
Diese finden Sie auf dem Typenschild auf der Rückseite des Gerätes oder auch in der beigefügten Garantie-Registrierkarte.
NEDERLANDS
GARANTIE
Voor inlichtingen omtrent garantie dient u zich tot uw plaatselijke clearaudio.
UW KWITANTIE, KASSABON E.D. BEWAREN
Uw kwitantie, kassabon e.d. vormen uw bewijs van aankoop van een waardevol artikel en dienen op een veilige plaats bewaard te worden voor
evt, verwijzing bijv, in verbend met verzekering of bij correspondentie met clearaudio.
BELANGRIJK
Bij een evt, beroep op de garantie is het de verantwoordelijkheid van de consument een gedateerd bewijs van aankoop te tonen. Uw
kassabon of factuurzijn voldoende bewijs.
ITALIANO
GARANZIA
L’apparecchio è coperto da una garanzia di buon funzionamento della durata di un anno, o del periodo previsto dalla legge, a partire dalla data di
acquisto comprovata da un documento attestante il nominativo del Rivenditore e la data di vendita. La garanzia sarà prestata con la sostituzione
o la riparazione gratuita delle parti difettose.
Non sono coperti da garanzia difetti derivanti da uso improprio, errata installazione, manutenzione effettuata da personale non autorizzato o,
comunque, da circostanze che non possano riferirsi a difetti di funzionamento dell’apparecchio. Sono inoltre esclusi dalla garanzia gli interventi
inerenti l’installazione e l’allacciamento agli impianti di alimentazione.
Gli apparecchi verranno riparati presso i nostri Centri di Assistenza Autorizzati. Le spese ed i rischi di trasporto sono a carico del cliente. La casa
costruttrice declina ogni responsabilità per danni diretti o indiretti provocati dalla inosservanza delle prescrizioni di installazione, uso e
manutenzione dettagliate nel presente manuale o per guasti dovuti ad uso continuato a fini professionali.
ESPAÑOL
GARANTIA
Para obtener información acerca de la garantia póngase en contacto con su distribuidor clearaudio.
GUARDE SU RECIBO DE COMPRA
Su recibo de compra es su prueba permanente de haber adquirido un aparato de valor, Este recibo deberá guardarlo en un lugar seguro y
utilizarlo como referencia cuando tenga que hacer uso del seguro o se ponga en contacto con clearaudio.
IMPORTANTE
Cuando solicite el servicio otorgado por la garantia el usuario tiene la responsabilidad de demonstrar cuándo efectuó la compra. En este caso, su
recibo de compra será la prueba apropiada.
 Loading...