

Page 1
User manual
Bedienungsanleitung
© clearaudio electronic GmbH, 2018/10 Made in Germany
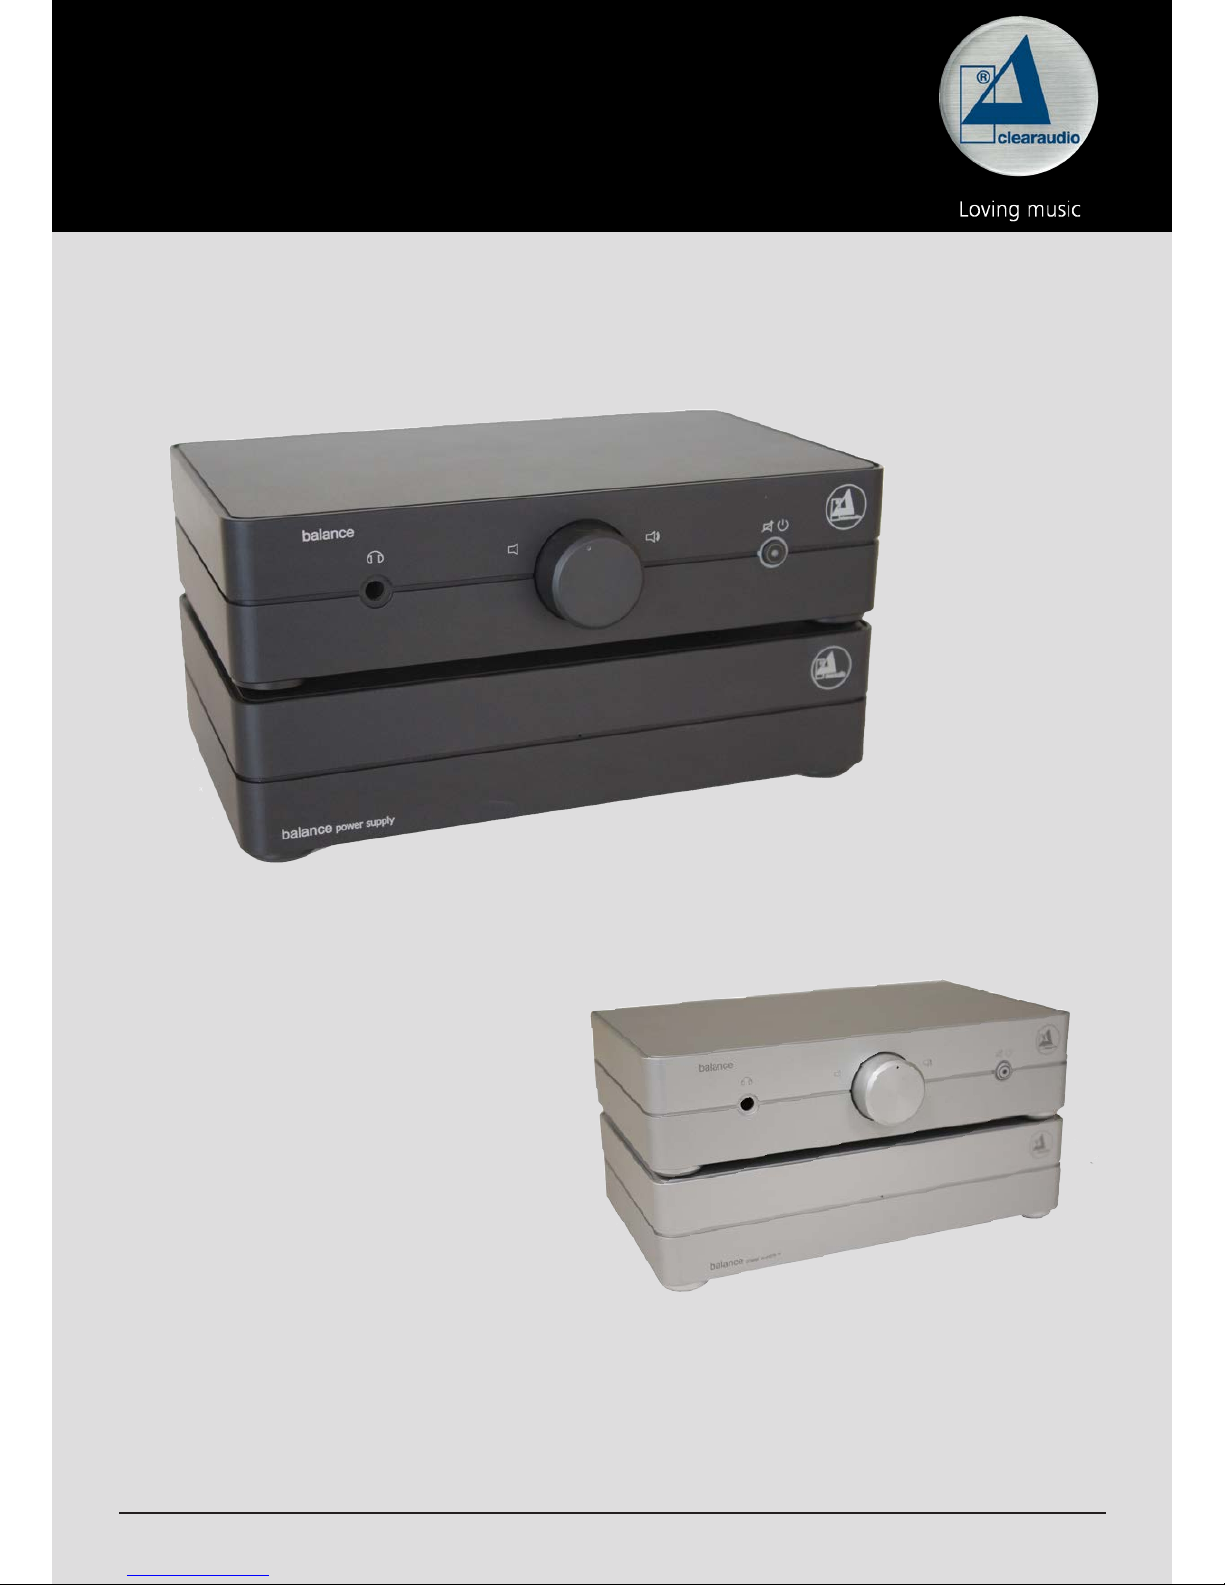
balance V2
Page 2
User manual / Bedienungsanleitung
2 © clearaudio electronic GmbH, 2018/10
User manual ............................................. 2 - 5
Bedienungsanleitung ............................... 6 - 9
Dear Clearaudio customer,
Thank you for choosing the
balance V2
phono stage, a high quality audio component made in
Germany by Clearaudio.
The
balance V2
builds upon, and advances, the technologies of the earlier
balance
+ phono stage,
while sacricing none of its ‘balance’.
Its design remains elegantly unfussy and its operation eortlessly intuitive. And yet, at the same
time, the
balance V2
oers an array of options to adjust and ne-tune its performance to your
particular system and preferences.
The
balance V2
has a power switch on the rear panel of the power supply which should ideally be
left on, only being switched o when connecting other components in your hi- system or when not
using it for an extended period of time. This assures a constant operating temperature and the best
possible sonic results.
We wish you much musical enjoyment with your new
balance V2
phono stage.
Clearaudio electronic GmbH
Warning
Do not expose the equipment to rain or moisture.
Do not handle the mains lead with wet hands.
No naked ame sources, such as lighted candles, should be placed on the equipment.
CE-Mark
Page 3
User manual / Bedienungsanleitung
Made in Germany 3
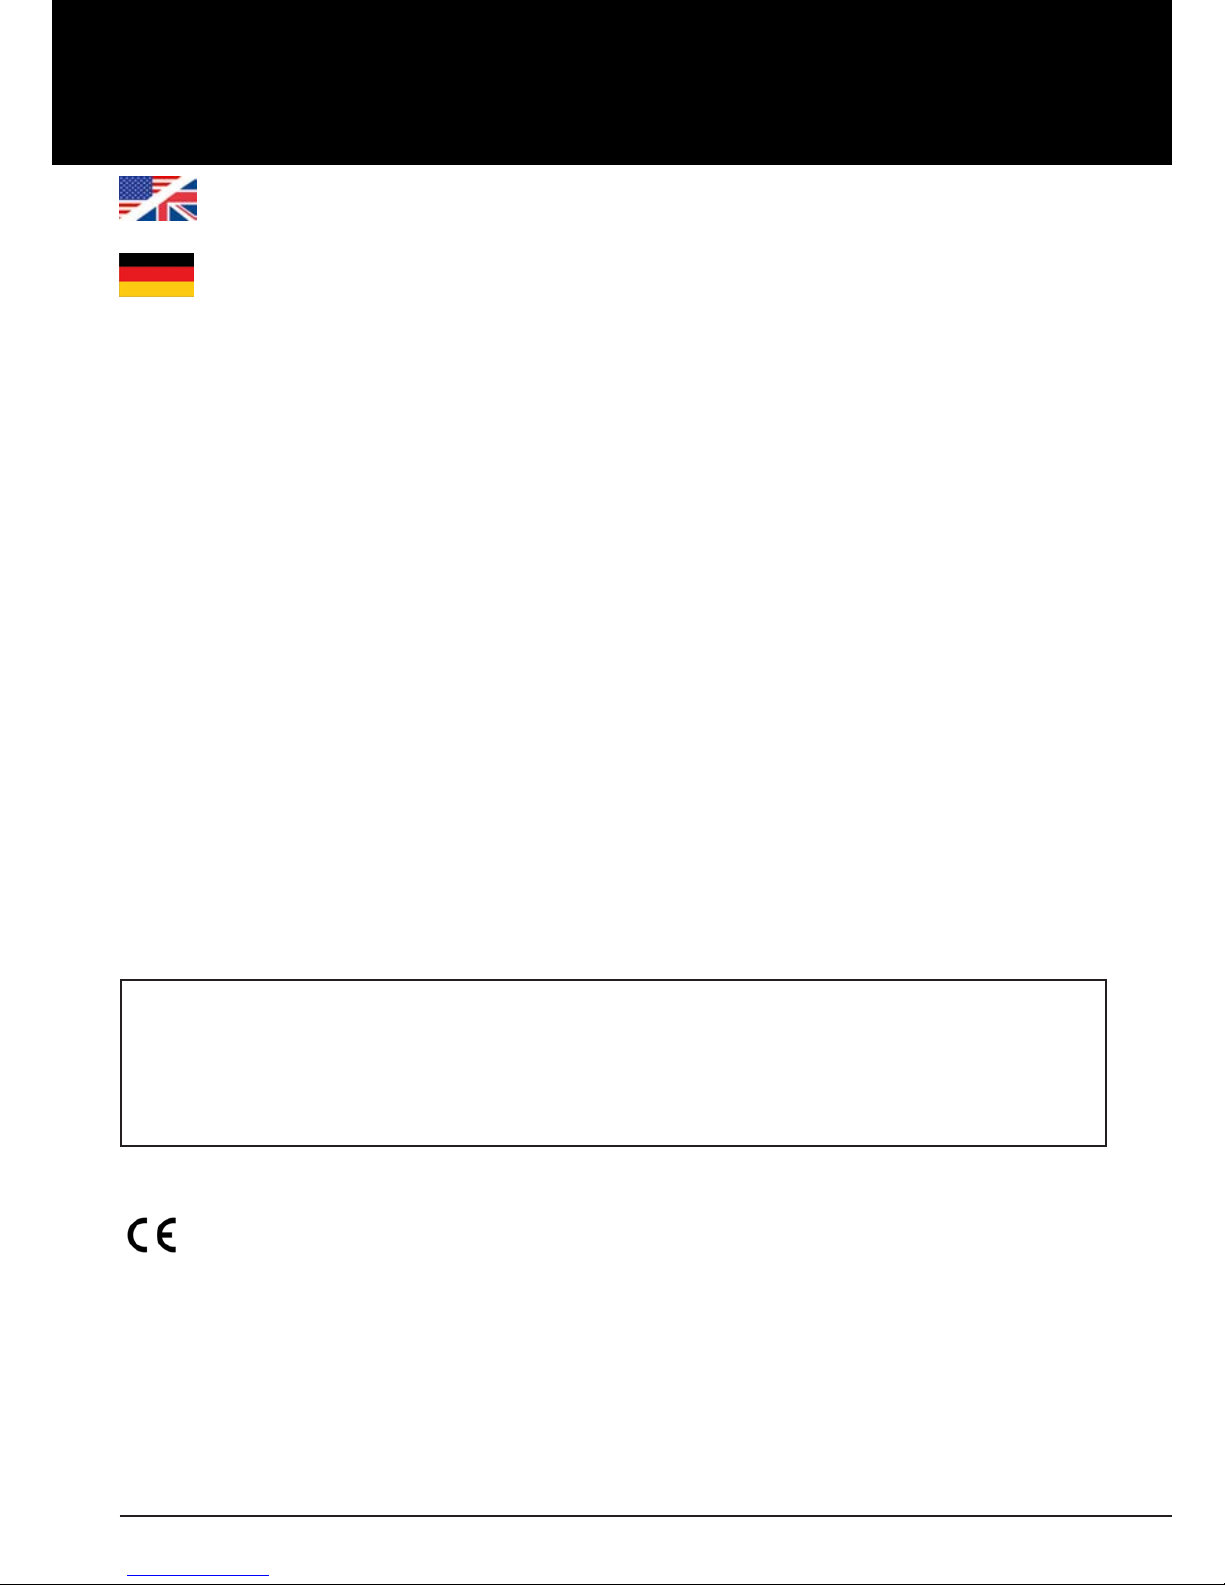
1. Set-up adjustments
To ensure the best possible channel separation, the left and right channels are entirely separate in
the
balance V2
. All switches are therefore duplicated for the left and right channels.
Please make sure that both corresponding switches are always in the same position.
Details of the adjustment and control options on the underside (Pic.1).
1 Gain (Selection of MM/MC cartridge mode)
• MM operation: Both ‘gain’ buttons in „o“ position (load impedance = 47 kOhm)
• MC operation: Both ‘gain’ buttons in „on“ position (load impedance = 500 Ohm)
2 Input selector (selction between balanced / unbalanced mode)
• Balanced / symmetrical operation: Both buttons in „o“ position
(use balanced XLR interconnects for input)
• Unbalanced / unsymmetrical operation: Both buttons in „on“ position
(use unbalanced RCA / cinch interconnects for input)
3 Subsonic lter
• Subsonic lter on: Both „subsonic o/on“ buttons in „on“ position
• Subsonic lter o: Both „subsonic o/on“ buttons in „o“ position
Pic. 1: Underside view of the
balance V2
phono stage
1 2 2
3 34
Page 4
User manual / Bedienungsanleitung
4 © clearaudio electronic GmbH, 2018/10
4 Variable function
The „mode“ button in the „variable“ positon (not pressed) unlocks the gain setting, which means
that the volume can be adjusted using the front volume knob.
In the „x“ option („mode“ button pressed), the volume knob is deactivated and the
balance V2
plays at maximum volume.
In this case you can control the volume using other components in your hi- system.
Please note:
To protect your loudspeakers from any damage, please make sure that your power
amplier(s) are always switched o when you are connecting the interconnects to or
from the
balance V2
phono stage.
Before adjusting any settings, be sure to switch o the power of the
balance V2
using
the switch on the rear panel of the power supply.
1
2
Pic. 2: Rear view of the
balance V2
phono stage
2. Getting started
1. Switch o all of your hi- system components and connect your
balance V2
phono stage.
2. Follow the set-up adjustment steps described above according to your components.
3. Connect the
balance V2
with the 15-pin Sub-D connector to the power supply unit (Pic. 2).
4. Connect the power supply to the mains supply and switch the unit on (Pic. 2).
33
4 4
5 5
6 6
7
Page 5

User manual / Bedienungsanleitung
Made in Germany 5
Details of connections on rear of the
balance V2
(Pic.2).
1 15-pole Sub-D connector
Connection to phono stage
2 Main socket
On/o switch with main socket
3 Balanced input XLR
Selection must be set manually using the „input selector“ on the underside.
4 Unbalanced input RCA
Selection must be set manually using the „input selector“ on the underside.
5 Balanced output XLR
Both outputs are activated and ready to use at the same time.
6 Unbalanced output RCA
Both outputs are activated and ready to use at the same time.
7 Grounding
Please note:
To prevent overheating of electronic parts, never cover or put anything on top of the
balance V2
phono stage or the power supply.
Clearaudio recycles your used equipment free of charge. Do not dispose of the unit via domestic
waste.
Phono stages are devices designed to provide a very high level of amplication.
This is necessary because the electrical signal generated by a phono cartridge is extremely low
(usually less than one-thousandth of a volt). The job of the phono stage is therefore to accurately
equalise the phono signal and boost it to line level (measured in volts).
However, phono stages are by nature extremely sensitive, which leads to the potential problem that
high-frequency interference may also be amplied to a point at which it becomes noticeable.
Unfortunately it is not possible to completely protect the sensitive phono stage circuitry from this
interference without degrading its high delity performance. Therefore care must be taken to
position the phono stage away from sources of high frequency interf erence such as mobile phones,
modems and power line communication systems (PLC) in which data is sent over the mains power
network.
If the
balance V2
is not in use for an extended period, switch it o at the rear panel.
Page 6

User manual / Bedienungsanleitung
6 © clearaudio electronic GmbH, 2018/10
3. Operating controls
1 Headphone output
When you connect headphones, the outputs on the rear of the phono stage will be deactivated
automatically. Similarly the ‘mode’ switch on the underside will have no function in this instance.
2 Volume control
When „mode“ on the underside is set to „variable“ this knob can be used to adjust the volume.
3 On/O/Mute function:
• After switching the unit on at the mains supply on the rear side, you then need to activate the
phono stage by pressing this button.
>> The LED of the button (3) will go o and the LED of the volume knob (2) will be
illuminated.
• To activate the „mute function“ press the button (3) again.
>> Both LEDs will start to blink.
• To deactivate „mute function“ press the button (3) again.
>> The LED of the button (3) will go o again and the LED of the volume knob (2) will be
illuminate again.
• To activate the standby mode, press the button (3) and hold it for 2-3 seconds.
>> The LED of the button (3) will now be illuminated and the LED of the volume knob (2) will
go o.
1 2 3
Pic. 3: Front view of the
balance V2
phono stage
Page 7

User manual / Bedienungsanleitung
Made in Germany 7
To switch o the device completely (to avoid unnecessary standby consumption if it
will not be used for a long period of time) we recommend using the main switch on
the rear.
4. Technical data
Mode: MM/MC (Subsonic lter switchable)
Amplication at 1 kHz: +46dB (MM mode) /
+66dB (MC mode)
Input impedance: 47kOhm / 270pF (MM mode) /
500Ohm / 270pF (MC mode)
MM/MC input: switchable (on bottom panel)
RIAA: 75μs / 318μs / 3180μs, 2 passive lter
RIAA accuracy: ± 0.1dB
THD: < 0.001% (IEC A)
Signal to noise ratio: -78dB (MM mode) /
-79dB (MC mode)
Channel separation: > 92dB (at 1kHz)
Max. output voltage: > 12V (at 1kHz)
Subsonic lter: 20Hz (–6dB / Oct.;
switchable on bottom panel, on each channel)
Operation voltage: ± 18V DC (+21V DC external power supply;
1.4m cable length)
Output connections: Unbalanced (RCA)
Balanced (XLR)
Headphone output (Jack 6.3mm)
Power consumption: Max. consumption: 6.6 watts
Standby mode: <0.3 watts
O mode: 0.0 watts (turned of at rear panel)
Weight: Approx. 2.3kg (preamp),
1.4kg (power supply)
Dimension (W/D/H): 240 x 145 (158 with RCA) x 62mm (preamp)
240 x 145 x 62mm (power supply)
9.44 x 5.71 x (6.22 with RCA) x 2.44 inches (preamp)
9.44 x 5.71 x 2.44 inches (power supply)
Manufacturer’s warranty*: 3 years*
* Provided that the warranty card is correctly completed and returned to Clearaudio within 14 days of purchase.
Clearaudio electronic is not responsible for typographical errors in descriptions.
Technical specications subject to change or improvement without prior notice.
Product availability is as long as stock lasts.
Copies and reprints of this documents, including extracts, require written consent from
Clearaudio electronic GmbH; Germany
Page 8

User manual / Bedienungsanleitung
8 © clearaudio electronic GmbH, 2018/10
Sehr geehrte clearaudio Kundin, sehr geehrter clearaudio Kunde,
Sie haben sich für den
balance V2
Phonovorverstärker entschieden – ein hochwertiges, deutsches
Qualitätsprodukt der Firma clearaudio – wir beglückwünschen Sie dazu und danken Ihnen für das
in uns gesetzte Vertrauen.
Mit wachsender Hörreife steigen auch die Ansprüche von Analog-Musikliebhabern.
Genau dieser eloquenten Zielgruppe ist der innovative Vorverstärker
balance V2
gewidmet.
Der Nachfolger der
balance +
bietet einige interessante Einstellungs- und Steuerungsmöglichkeiten
zur individuellen Sound-Optimierung, bleibt dabei aber im Design puristisch und in der
Bedienbarkeit intuitiv überschaubar.
Die
balance V2
verfügt über einen Netzschalter an der Rückseite des Netzteils, sollte aber nur zum
Wechseln der Komponenten Ihrer Anlage vom Netz genommen werden, damit das Gerät eine
konstante Betriebstemperatur beibehält und somit bestmögliche klangliche Ergebnisse erzielt
werden oder wenn das Gerät über einen längeren Zeitraum nicht genutzt wird.
Wir wünschen Ihnen viel Freude mit Ihrem neuen clearaudio
balance V2
Phonovorverstärker.
Ihre clearaudio electronic GmbH
Warnung
Das Gerät nicht Regen oder Feuchtigkeit aussetzen.
Das Netzkabel nicht mit feuchten oder nassen Händen anfassen.
Es dürfen keine Gegenstände mit oener Flamme, wie etwa brennende Kerzen, auf dem Gerät
aufgestellt werden.
CE-MARKIERUNG
Page 9

User manual / Bedienungsanleitung
Made in Germany 9
1. Inbetriebnahme
Der
balance V2
Phonovorverstärker erreicht die besten Messwerte bei der Kanaltrennung.
Dies wird durch den strikt kanalgetrennten Aufbau der einzelnen Verstärkerstufen erreicht.
Aus diesem Grund sind alle Schalter nach rechtem und linkem Kanal getrennt. Bitte stellen Sie
sicher, dass sich für alle Funktionen beide Schalter immer in der gleichen Schalterposition benden.
Bedienerläuterung der Einstellungs- und Steuerungsmöglichkeiten auf der Unterseite
(Abb. 1).
1 Gain (Auswahl des Tonabnehmer-Betriebs MM/MC):
• MM Betrieb: Beide Schalter „gain“ nicht gedrückt (Impedanz = 47 kOhm)
• MC Betrieb: Beide Schalter „gain“ gedrückt (Impedanz = 500 Ohm)
2 Input selector (Wechsel zwischen symmetrischen und unsymmetrischen Betrieb)
• balanced / symmetrischer Betrieb (XLR): Beide Schalter sind nicht gedrückt
(benutzen Sie symmetrische XLR Steckerverbindungen für den Eingang!)
• Unbalanced / unsymmetrischer Betrieb (RCA): Beide Schalter sind gedrückt
(benutzen Sie unsymmetrische Cinch-Stecker für den Eingang!)
3 Subsonic-Filter
Der Subsonic-Filter unterdrückt Geräusche, die durch Laufwerks- und/oder Tonarmresonanzen
entstehen können.
• Subsonic lter ist an: Beide Schalter „subsonic o/on“ sind gedrückt
• Subsonic lter ist aus: Beide Schalter „subsonic o/on“ sind nicht gedrückt
11 2 2
3 34
Abb. 1: Ansicht Bodenplatte der Phonovorstufe
Page 10

User manual / Bedienungsanleitung
10 © clearaudio electronic GmbH, 2018/10
4 Variable function
Der Schalter „mode“ in Position „variable“ auf der Unterseite schaltet die Verstärkungseinstellung
frei, wodurch die Lautstärke über den Drehknopf an der Front reguliert werden kann.
In Schalterstellung „x“ ist die Lautstärkeregelung über den Drehknopf nicht möglich und die
balance V2
spielt auf maximaler Lautstärke. In diesem Fall können Sie die Lautstärke über andere
Komponenten Ihrer Kette regeln.
Bitte beachten:
Um eine eventuelle Beschädigung ihrer Lautsprecher zu vermeiden, schalten Sie Ihre
Endstufe(n) bei Verkabelungsarbeiten aller Art immer aus.
Schalten Sie vor jeder Änderung der Einstellungen Ihre
balance V2
am Netzteil aus.
Abb. 2: Rückansicht der Phonovorstufe
2. Aufbau
1. Bitte schalten Sie nun alle Komponenten Ihrer Anlage aus und verbinden Sie die
balance V2
.
2. Nehmen Sie nun alle zuvor beschriebenen Einstellungen entsprechend Ihren Komponenten
an der
balance V2
vor.
3. Verbinden Sie die
balance V2
mit dem 15-poligen D-Sub Stecker mit dem dazugehörigen
Netzteil (Abb. 2).
4. Schließen Sie nun das Netzteil an das Stromnetz an und schalten Sie das Gerät ein (Abb. 2).
1
2
33
4 4
5 5
6 6
7
Page 11

User manual / Bedienungsanleitung
Made in Germany 11
Erläuterung der Anschlüsse auf der Rückseite (Abb. 2)
1 15-pol D-Sub Stecker
Verbindung mit Verstärkereinheit
2 Netzanschluss
Ein- und Ausschalter mit Kaltgeräte Netzbuchse
3 Symmetrischer Eingang XLR
Auswahl muss manuell über „input selector“ auf der Unterseite festgelegt werden.
4 Unsymmetrischer Eingang RCA
Auswahl muss manuell über „input selector“ auf der Unterseite festgelegt werden.
5 Symmetrischer Ausgang XLR
Beide Ausgänge sind gleichzeitig aktiv und gleichzeitig verwendbar.
6 Unsymmetrischer Ausgang RCA
Beide Ausgänge sind gleichzeitig aktiv und gleichzeitig verwendbar.
7 Erdungsanschluss
Bitte beachten:
Die Oberseite des Gerätes während des Betriebes nicht abdecken, damit eine ausreichende
Luftzufuhr zur Kühlung gewährleistet ist! Das Gerät nicht über den Hausmüll entsorgen.
Phonovorverstärker sind Geräte mit einer hohen Signalverstärkung, da die Spannung die der
Tonabnehmer des Plattenspielers liefert sehr niedrig ist (im Bereich von einigen mV).
Aus diesem Grund werden auch hochfrequente Störsignale wahrnehmbar verstärkt.
Eine vollständige Abblockung dieser Störsignale im Gerät würde die Audioeigenschaften
verschlechtern. Das hat zur Folge, dass hochfrequente Störungen, zum Beispiel aus dem 230 V Netz
bzw. 115 V Netz, die Klangqualität beeinträchtigen könnte.
Das Gerät sollte daher nicht in der Nähe von Hochfrequenzerzeugenden Geräten wie z.B.
Mobiltelefonen oder Modems bzw. an Stromnetzen die für Datenverkehr genutzt werden (PLC),
betrieben werden.
Bitte beachten:
Wird das Gerät über längere Zeit nicht benutzt, so sollten Sie es am Kippschalter an der
Rückseite abschalten.
Page 12

User manual / Bedienungsanleitung
12 © clearaudio electronic GmbH, 2018/10
3. Bedienelemente
1
Kopfhörer Ausgang
Durch Anschließen von Kopfhörern werden die Ausgänge auf Rückseite, sowie die Funktion des
Schalters „mode“ auf der Unterseite deaktiviert.
2 Lautstärkeregler
Wurde die Funktion des Knopfes „mode“ auf „variable“ gestellt, kann durch diesen Drehschalter
die Lautstärke geregelt werden.
3 On/O/Mute function:
• Nach dem Einschalten des Hauptschalters auf der Rückseite, muss die Phonovorstufe über
diesen Knopf durch Drücken gestartet werden.
>> Die LED des Knopfes (3) erlischt und die LED des Lautstärkereglers (2) leuchtet nun
durchgegehend.
• Zum Aktivieren der „mute function“ drücken Sie den Knopf erneut.
>> Die LED des Knopfes (3) und die LED des Lautstärkereglers (3) blinken.
• Drücken Sie den Knopf erneut um die „mute function“ zu deaktivieren.
>> Die LED des Knopfes (3) erlischt wieder und die LED des Lautstärkereglers (2) leuchtet
wieder durchgehend.
• Um das Gerät in den Standby-Mode zu versetzen, drücken Sie den Knopf und halten Sie diesen
für ca. 2-3 Sekunden gedrückt.
>> Die LED des Knopfes (3) leuchtet nun durchgehend und die LED des Lautstärkereglers (2)
erlischt.
1 2 3
Abb. 3: Vorderansicht der
balance V2
Page 13

User manual / Bedienungsanleitung
Made in Germany 13
Um das Gerät vollständig abzuschalten, wenn es über einen längeren Zeitraum nicht
verwendet wird und um unnötigen Standby-Verbrauch zu vermeiden, empfehlen wir
den Hauptschalter auf der Rückseite abzuschalten.
4. Technische Daten
Mode: MM/MC (Subsonic-Filter zuschaltbar)
Verstärkung bei 1 kHz: +46 dB (MM-Betrieb) /
+66 dB (MC-Betrieb)
Eingangsimpedanz: 47 kOhm / 270 pF (MM-Betrieb) /
500 Ohm / 270 pF (MC-Betrieb)
MM/MC-Eingang: schaltbar (auf Unterseite)
RIAA: 75 μs / 318 μs / 3180 μs, 2 passive Filter
RIAA Genauigkeit: ± 0,1 dB
Klirrfaktor: < 0,001 % (IEC A)
Signal/Rauschabstand: -78 dB (MM-Betrieb) /
-79 dB (MC-Betrieb)
Übersprechdämpfung: > 92 dB (bei 1 kHz)
Max. Ausgangsspannung: > 12 V (bei 1 kHz)
Subsonic-Filter: 20 Hz (–6 dB / Oct.;
schalbtbar auf Unterseite, für jeden Kanal)
Spannungsversorgung: ± 18 V DC (+ 21 V DC externes Netzteil;
1,4 m Kabellänge)
Ausgänge. asymmetrisch (MPC Cinch)
symmetrisch (XLR)
Kopfhörerausgang (Klinke: 6,3 mm)
Leistungsaufnahme: Max. Leistungsaufnahme: 6,6 Watt
Standby Modus: <0,3 Watt
Ausgeschaltet: 0 Watt (Kippschalter auf der
Geräterückseite auf „0“ stellen)
Gewicht: ca. 2,3 kg (Vorstufe),
1,4 kg (Netzteil)
Maße (B/T/H in mm): 240 x 145 (158 mit MPC Cinch) x 62 (Vorstufe)
240 x 145 x 62 (Netzteil)
Herstellergarantie*: 3 Jahre*
* Nur bei korrekt ausgefüllter und eingesandter Garantiekarte an clearaudio innerhalb von 14 Tagen.
Änderungen bleiben vorbehalten. Lieferbar solange Vorrat reicht. Für Druckfehler keine Haftung.
Irrtümer vorbehalten- Kopien und Abdrucke – auch nur auszugsweise – bedürfen der schriftlichen Genehmigung durch
die clearaudio electronic GmbH.
Page 14

User manual / Bedienungsanleitung
14 © clearaudio electronic GmbH, 2018/10
To achieve the full Clearaudio warranty, it is necessary that you ll out and send the corresponding
part of the warranty registration certicate /card back to Clearaudio within two weeks of purchase.
Only if the product is returned in its original packing Clearaudio can provide the warranty of three
years. Otherwise Clearaudio provide the normal legal warranty of two years.
Um die volle clearaudio Garantie in Anspruch nehmen zu können, senden Sie uns bitte die
beigelegte Garantiekarte innerhalb von zwei Wochen korrekt und vollständig ausgefüllt zu.
Nur wenn die Rückware in Originalverpackung zurück gesandt wird erweitert sich die Garantiezeit
auf 3 Jahre. Sonst kann nur die gesetzliche Gewährleistung von 2 Jahren berücksichtigt werden.
ENGLISH
WARRANTY
For warranty information, contact your local Clearaudio distributor.
RETAIN YOUR PURCHASE RECEIPT
Your purchase r eceipt is y our permanent r ecor d of a valuable purchase. It should be kept in a safe place to be referred
to as necessary for insurance purposes or when corresponding with Clearaudio.
IMPORTANT
When seeking warranty service, it is the responsibility of the consumer to establish proof and date of purchase. Your
purchase receipt or invoice is adequate for such proof.
FOR U.K. ONLY
This undertaking is in addition to a consumer‘s statutory rights and does not aect those rights in any way.
FRANÇAIS
GARANTIE
Pour des informations sur la garantie, contacter le distributeur local Clearaudio.
CONSERVER L‘ATTESTATION D‘ACHAT
L‘attestation d‘achat est la preuve permanente d‘un achat de valeur. La conserver en lieu sur pour s‘y reporter aux ns
d‘obtention d‘une couverture d‘assurance ou dansle cadre de correspondances avec Clearaudio.
IMPORTANT
Pour l‘obtention d‘un service couvert par la garantie, il incombe au client d‘établir la preuve de l‘achat et d‘en corroborer
la date. Le reçu ou la facture constituent des preuves susantes.
DEUTSCH
GARANTIE
Bei Garantiefragen wenden Sie sich bitte zunächst an Ihren Clearaudio Händler. Heben Sie Ihren Kaufbeleg gut auf.
WICHTIG!
Die Angaben auf Ihrer Quittung erlauben uns die Identizierung Ihres Gerätes und belegen mit dem Kaufdatum die
Dauer Ihrer Garantie-Ansprüche. Für Serviceleistungen benötigen wir stets die Gerätenummer. Diese nden Sie auf dem
Typenschild auf der Rückseite des Gerätes oder auch in der beigefügten Garantie-Registrierkarte.
NEDERLANDS
GARANTIE
Voor inlichtingen omtrent garantie dient u zich tot uw plaatselijke Clearaudio.
UW KWITANTIE, KASSABON E.D. BEWAREN
Uw kwitantie, kassabon e.d. vormen uw bewijs van aankoop van een waardevol artikel en dienen op een veilige plaats
bewaard te worden voor evt, verwijzing bijv, in verbend met verzekering of bij correspondentie met Clearaudio.
BELANGRIJK
Bij een evt, beroep op de garantie is het de verantwoordelijkheid van de consument een gedateerd bewijs van aankoop
te tonen. Uw kassabon of factuurzijn voldoende bewijs.
Page 15

User manual / Bedienungsanleitung
Made in Germany 15
ITALIANO
GARANZIA
L’apparecchio è coperto da una garanzia di buon funzionamento della durata di un anno, o del periodo
previsto dalla legge, a partire dalla data di acquisto comprovata da un documento attestante il nominativo del
Rivenditore e la data di vendita. La garanzia sarà prestata con la sostituzione o la riparazione gratuita delle
parti difettose.Non sono coperti da garanzia difetti derivanti da uso improprio, errata installazione, manutenzione eettuata da personale non autorizzato o, comunque, da circostanze che non possano riferirsi a difetti
di funzionamento dell’apparecchio. Sono inoltre esclusi dalla garanzia gli interventi inerenti l’installazione e
l’allacciamento agli impianti di alimentazione.
Gli apparecchi verranno riparati presso i nostri Centri di Assistenza Autorizzati. Le spese ed i rischi di trasporto
sono a carico del cliente. La casa costruttrice declina ogni responsabilità per danni diretti o indiretti provocati
dalla inosservanza delle prescrizio-ni di installazione, uso e manutenzione dettagliate nel presente manuale o
per guasti dovuti ad uso continuato a ni professionali.
ESPAÑOL
GARANTIA
Para obtener información acerca de la garantia póngase en contacto con su distribuidor Clearaudio.
GUARDE SU RECIBO DE COMPRA
Su recibo de compra es su prueba permanente de haber adquirido un aparato de valor, Este recibo deberá
guardarlo en un lugar seguro y utilizarlo como referencia cuando tenga que hacer uso del seguro o se ponga
en contacto con Clearaudio.
IMPORTANTE
Cuando solicite el servicio otorgado por la garantia el usuario tiene la responsabilidad de demonstrar cuándo
efectuó la compra. En este caso, su recibo de compra será la prueba apropiada.
Page 16

clearaudio electronic GmbH
Spardorfer Straße 150
91054 Erlangen
Germany
Phone/Tel.: +49 9131 40300 100
Fax: +49 9131 40300 119
www.clearaudio.de
www.analogshop.de
info@clearaudio.de
Handmade in Germany
(Änderungen und Irrtümer vorbehalten. Für Druckfehler keine Haftung.
Lieferbar solange Vorrat reicht. -
Technical specications are subject to change or improvement without prior notice.
Clearaudio accepts no liability for any misprints.
Product availability as long as stock lasts.)
2018
© clearaudio electronic GmbH, 2018/10 Made in Germany
 Loading...