

Page 1
Hi-Fi Components clearaudio electronic
®
GmbH
Spardorfer Str. 150 D-91054 Erla n ge n Tel. +49 9131 40300100 FAX +49 9131 51683
www.clearaudio.de
www.analogshop.de info@clearaudio.de copyright clearaudio 2013
ACCU „+“ Power Supply
Made in Germany
User manual
Bedienungsanleitung
Version 1.2_11.11.13_D+E
Page 2

ACCU+ Power Supply
User manual / Bedienungsanleitung
2 Clearaudio electronic GmbH 2013
Dear Clearaudio-customer,
Congratulations for choosing the
“ACCU+ Power Supply”
, a high quality product made in
Germany by Clearaudio.
An innovative charging technology in combination with selected and fo rmatted NiMH-high
performance accumulators guarantee, that no noise or distortion from the mains supply can
pollute the delicate phono signal.
The Clearaudio
Basic+, Symphono+
and
Balance+
phonostages can all be upgraded with the
new Clearaudio “
ACCU+ Power Supply”
.
To achieve the full performance of the “
ACCU+ Power Supply”
, please read the instruction and
user manual carefully.
The following pages will ensure the best performance and will help to avoid misusage.
We wish you a lot of pleasure and success with your new Clearaudio “
ACCU+ Power Supply
”.
Clearaudio electronic GmbH
Page 3

ACCU+ Power Supply
User manual / Bedienungsanleitung
3 Clearaudio electronic GmbH 2013
User manual 4 - 7
Bedienungsanleitung 8 - 13
Contents
1. Product view 4
2. Set-up 5
3. Safety instructions 6
4. Service 7
5. Technical data 7
Warranty information 14
Page 4
ACCU+ Power Supply
User manual / Bedienungsanleitung
4 Clearaudio electronic GmbH 2013
1. Product view
Through the innovative NiMH high performance accumulators the “
ACCU+ Power Supply”
achieves the highest music enjoyment.
State-of-the art charging technolog y and selected NiMH accumulators, combined in one unit,
supply your Clearaudio + series phono preamplifier with an absolutely pure DC voltage.
The “
ACCU+ Power Supply”
decouples your phonostage from all distortions caused by the
mains supply.
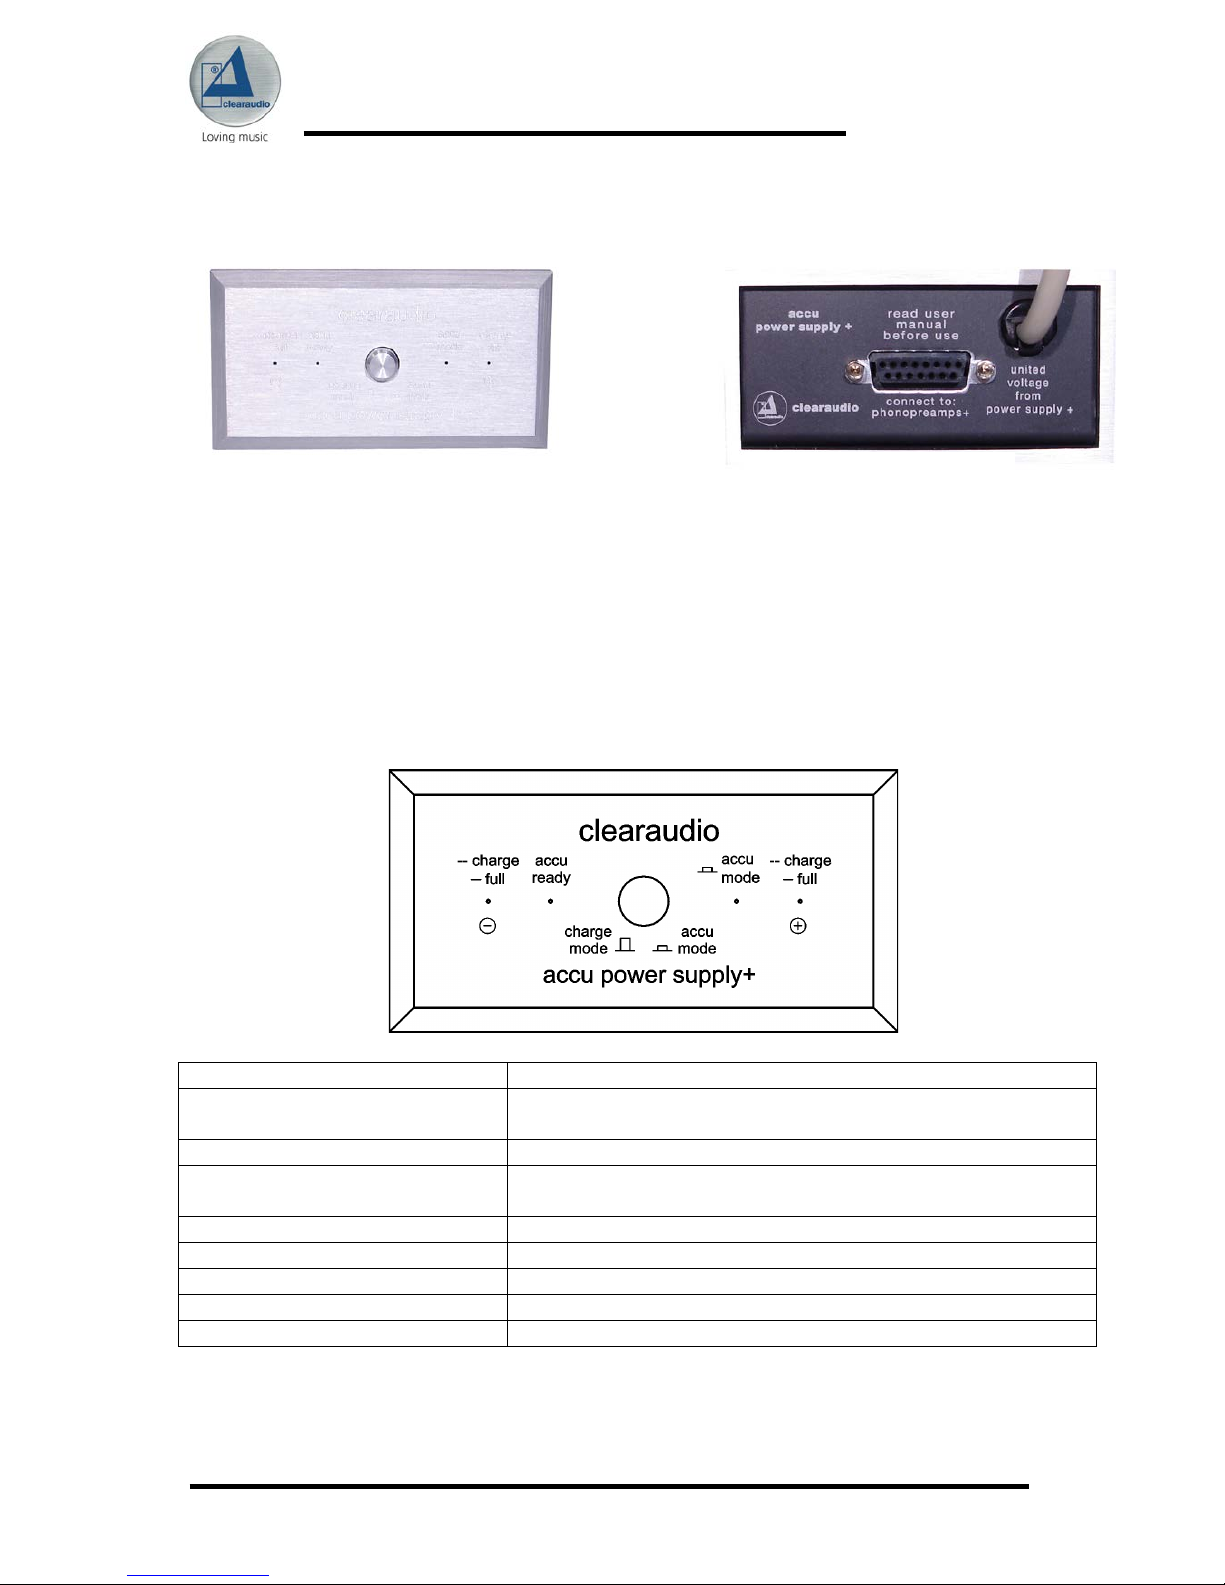
Front view and operational controls:
LED “charge”
Is flashing when charge mode is activated
LED “full”
Are lightning constantly after charging the accumulators
In the “accu mode” the LEDs are not lighting
LED “accu ready”
Is lighting constantly if charging is finished
In the “accu mode” the LEDs are not lighting
LED “accu mode”
The LED lights up, when the “accu mode” has been choosen
Button “charge mode”
Button not pressed = normal operation / charging mode
Button “accu mode”
Button pressed = battery operation
Back view
Front view
Page 5
ACCU+ Power Supply
User manual / Bedienungsanleitung
5 Clearaudio electronic GmbH 2013
2. Set-up
Before you can use the “
ACCU+ Power Supply”
, you have to insert the provided rechargable
accumulators into the
“ACCU +”
- device.
To avoid a self-discharging the accumulators are not pre-installed befo r e f i r st set-up.
1. Remove the screw on the bottom side of the case with the provided hex-wrench.
Now pull the slide-in module carefully out of the case.
Please take special care of th e co n nection cable during this step.
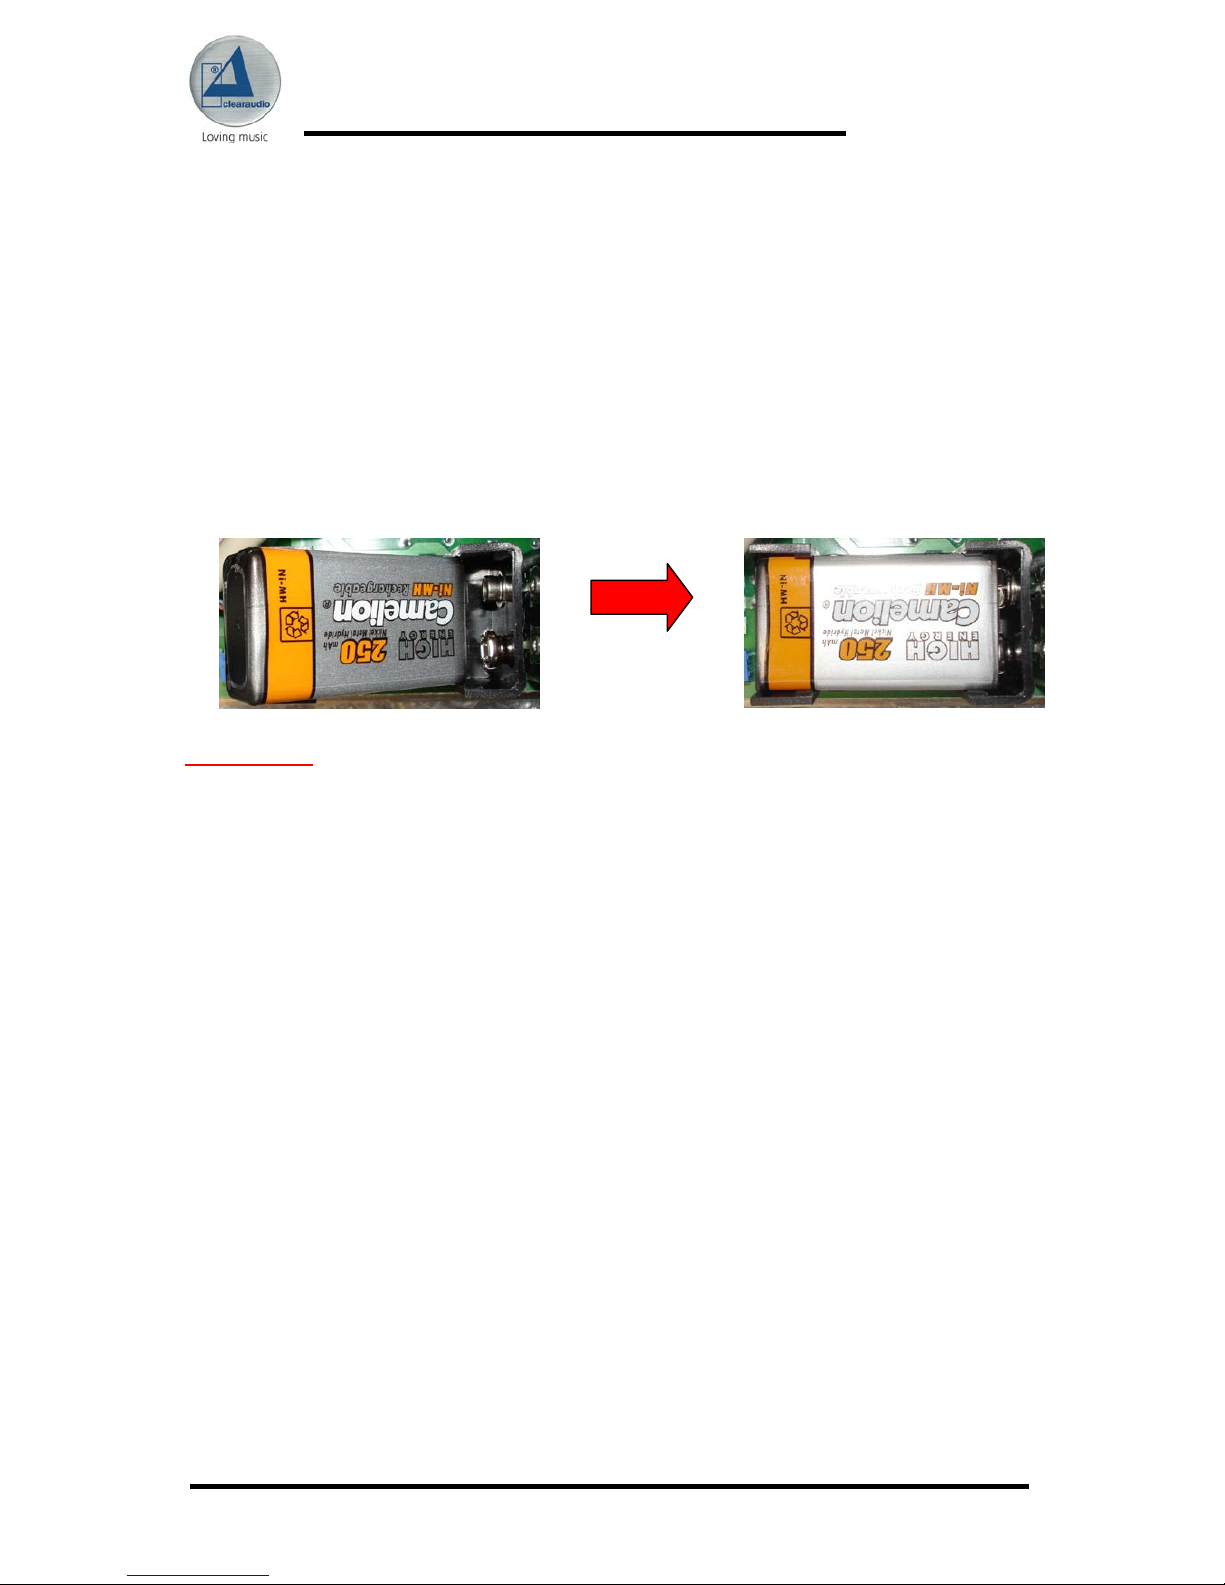
Now insert the provided accumulators in the intended mounting plates as shown below.
Please pay attention to the correct fit of the contacts, before you engage with light pressure
into the mount. Now push the slide in module carefully back into the housing and lock it with
the screw on the button side.
Please note:
When the “
ACCU+ Power Supply”
leaves our factory, the supplied, rechargeable
accumulators (NiMH-type) are fully charged.
Please keep in mind, that the capacity of the accumulators decreases, when the unit
is not in use for a few weeks.
To avoid self-discharging of the accumulators they are not inserted in the
“ACCU+ Power Supply”.
If your
“ACCU+ Power Supply”
is not in use for longer than one (1) week, please
remove the rechargeable accumulators to avoid a total discharge.
2. Make sure that the central switch is in position “charge mode”.
3. Please connect the “
ACCU+ Power Supply”
to your Clearaudio
”+ Series”
phonostage with
the shielded 15-pole cable.
4. Now connect the power supply unit of your phonostage with the mains supply.
5. Now the accumulators are charging.
6. Before first use, please wait until both “charge full” LED-lights are glowing constantly.
Then the accumulators are fully loaded and the “ accu ready“ LED lights up.
7.If you want to switch your phonostage into the “accu mode” please press th e
button „accu mode“.
Page 6

ACCU+ Power Supply
User manual / Bedienungsanleitung
6 Clearaudio electronic GmbH 2013
Now your phonostage is supplied with pure DC-voltage out of the accumulators and no
distortion out of the mains will effect your music reproduction.
The innovative circuit design of the “
ACCU+ Power Supply”
realizes automatically that the
accumulators need to be charged. This is to protect the NiMH-accumulators against total
discharge.
To avoid a total discharge the “Accu+ power supply” needs to be connected
constantly with the power supply !
The LEDs „accu ready“ will not lighting any more in the „accu mode“ when the voltage has
reached the minimum value. Now the accumulators will be recharged.
After listening to music please set the central switch in the “charge” position.
Even in the ”charge mode” the
„ACCU+ Power Supply“
decouples all distortions from the
mains supply, so that you can enjoy listening to the music.
3. Safety instructions
• After finishing listening to music always switch the central button to the position
„charge“.
This ensures that you have always full charged accumulators, if you want to listen to
music.
• Use the equipment only if you see no outside damages!
• Store and use the device only at room temperature (approx. 20° Celsius)
• To avoid total discharge the “
Accu+ power supp ly”
has to be connected constantly on
the mains supply
• Don’t recycle the equipment over the domestic refuse!
Clearaudio takes the equipment back free of charge.
Page 7

ACCU+ Power Supply
User manual / Bedienungsanleitung
7 Clearaudio electronic GmbH 2013
4. Service
In case of any necessary, service for all Clearaudio products should be done by authorized
personal only.
In case of any repair, the clearaudio equipment needs to be send to your nearest authorized
dealer or directly to Clearaudio:
Clearaudio electronic GmbH
Spardorfer Str. 150
91054 Erlangen
Germany
Tel/Phone: +49 9131 40300100
www.clearaudio.de
www.analogshop.de
info@clearaudio.de
Send / ship the equipment always and only in the original packing !
Only in the original packing clearaudio can provide the warranty of 2 years
(extended warranty period 3 years, if the registration form is sended back to Clearaudio.
More information on page 14).
5. Technical data
Power supply: see phonostage power supply unit
Output voltage: 2 x 18 volt battery backed
Accumulators charge: The innovative circuit design of the “ACCU+ Power Supply”
realizes automatically that the accumulators need to be
charged. This is to protect the NiMH-accumulators against
total discharge.
Dimensions (H x W x D): approx. 56 x 102 x 185 mm
approx. 2.2 x 4.0 x 7.3 inch
Weight: approx. 1.2 kg (approx. 1.7 kg with package)
Clearaudio electronic is not responsible for typographical errors in descriptions. Technical specifications
subject to change or improvement without prior notice. Availability as long as stock lasts. Copies and
imprints- also only in extracts – require written conformation through Clearaudio electroni c GmbH ;
Germany
Clearaudio electronic GmbH 2013
Version: November 2013
Page 8

ACCU+ Power Supply
User manual / Bedienungsanleitung
8 Clearaudio electronic GmbH 2013
Sehr verehrte clearaudio Kundin, sehr verehrter clearaudio – Kunde,
Vielen Dank, dass Sie sich für die
“ACCU+ Power Supply”
, ein Qualitätsprodukt aus dem Hause
clearaudio, entschieden haben.
Modernste Ladetechnolo gie und selektierte, formati e r te NiMH-Akkumulatoren, kombiniert in
einem Gerät, versorgen Ihren clearaudio-Phonovorverstärker der Serie "+" mit reinster
Gleichspannung. Da der ACCU+ keinerlei Störspannungen durchlässt, steht dem ungetrübten
Hörgenuss nun nichts mehr im Wege.
In der Plusversion sind die Mod el le
Balance+, Symphono+
und
Basic+
von clearaudio
erhältlich.
Der
“ACCU+ Power Supply”
ermöglicht durch seine innovative Akkutechnologie einen
ungeahnten Musikgenuss.
Um den vollen Leistungsumfang Ihrer
“ACCU+ Power Supply”
nutzen zu können, lesen Sie bitte
diese Bedienungsanleitung aufmerksam durch.
Alle Hinweise dienen dazu, Ihnen viele Jahre ungetrübten Musikgenuss zu bereiten und
Fehlbedienungen zu verhindern.
Wir wünschen Ihnen viel Freude mit Ihrer clearaudio
“ACCU+ Power Supply”
!
clearaudio electronic GmbH
Lesen Sie folgenden Abschnitt in jedem Fall aufmerksam durch, bevor Sie das Gerät
an das Stromnetz anschließen.
Page 9

ACCU+ Power Supply
User manual / Bedienungsanleitung
9 Clearaudio electronic GmbH 2013
Inhaltsverzeichnis
1. Produktübersicht 10
2. Inbetriebnahme 11
3. Sicherheitshinweise 12
4. Service 13
5. Technische Daten 13
Garantieinformationen 14
Page 10

ACCU+ Power Supply
User manual / Bedienungsanleitung
10 Clearaudio electronic GmbH 2013
1. Produktübersicht
Modernste Ladetechnologie und selektierte sowi e f o rmatierte NiMH-Akkumulatoren kombinier t
in einem Gerät versorgen Ihren clearaudio Phonovorverstärker der „
+Serie
“ mit reinster
Gleichspannung.
Da das „
ACCU+ Power Supply“
jegliche Störspannungen entkoppelt, steht dem ungetrübten
Hörgenuss nun nichts mehr im Wege. Die Akkumulatoren werden, solange das Gerät am
Netz angeschlossen ist erhaltungsge lad en, aber nie mals übe rlad en.
Frontansicht und Bedienelemente:
LED “-charge”
blinkt während die Akkus geladen werden im „charge mode“
LED “-full”
- leuchten konstant, wenn der Ladeschluss erreicht ist
- leuchten nicht, wenn die Akkus geladen sind und sich das
Gerät im „accu mode“ befinden
LED “accu ready”
- leuchtet konstant wenn die Akkus vollständig aufgeladen
sind und sich das Gerät im „charge mode“ befindet
- erlischt, wenn sich das Gerät im „accu mode“ befindet und
die Akkus wieder aufgeladen werden.
LED “accu mode”
- leuchtet auf, wenn der mittlere Schalter auf „accu mode“
geschaltet ist
- erlischt, wenn die Akkus wieder aufgeladen werden
Schalter „accu mode“
Taste gedrückt = Akkubetrieb („accu mode“)
Schalter „charge mode“
Taste nicht gedrückt = Normalbetrieb („charge mode“)
Frontansicht
Rückansicht
Page 11

ACCU+ Power Supply
User manual / Bedienungsanleitung
11 Clearaudio electronic GmbH 2013
2. Inbetriebnahme
Bevor Sie Ihr neues „
ACCU+ Power Supply“
in Betrieb nehmen können, müssen Sie zuerst die
mitgelieferten Akkumulatoren einsetzen.
Um eine mögliche Selbstentladung durch lange Lagerzeiten zu vermeiden, liefert clearaudio
die Akkus separat in der Verpackung aus.
Zum Einsetzen der Akkus gehen Sie bitte wie folgt vor:
1. Entfernen Sie die Schraube auf der Gehäuse-Unterseite mit d em mitgelieferten
Inbusschlüssel. Ziehen Sie nun den Einschub an der Frontplatte vorsichtig aus dem Gehäuse,
achten Sie bitte darauf, das Anschlusskabel dabei nicht zu beschädigen.
Nun setzen Sie die mitgelieferten Akkumulatoren in die dafür vorgesehenen Halterungen ein.
Achten Sie hierbei auf die Übereinstimmung der Druckknopfkontakte, bevor Sie die Akkus durch
leichten Druck in die Fassung einrasten lassen.
Nun verschließen Sie Ihre ACCU+ w i eder in der umgekehrten Reihenfolge.
Bitte beachten:
Die Akkus in Ihrem
„ACCU+ Power Supply“
wurden im Hause clearaudio bereits
vorgeladen, die Kapazität nimmt allerdings bei längerer Lagerung (ca. 5-6 Wochen)
wieder ab.
Falls Sie Ihre „
ACCU+ Power Supply“
länger als eine (1!) Woche außer Betrieb
nehmen, entfernen Sie bitte die Akkumulatoren, um deren Tiefentladung zu
vermeiden.
2. Stellen Sie sicher, dass sich der zentrale Schalter in der Position „CHARGE“ befindet.
3. Verbinden Sie das „
ACCU+ Power Supply“
über das abgeschirmte 15-polige Kabel mit Ihrer
clearaudio Phonostufe der „
+Serie“
.
4. Verbinden Sie erst jetzt das Netzteil Ihrer Phonostufe mit dem Stromnetz.
5. Die Akkus werden nun geladen.
6. Warten Sie vor erstmaligen Gebrauch, bis die beiden äußeren LEDs vom Blinken in
konstantes Leuchten übergehen. Nun sind die Akkus vollständig geladen und es leuchtet
zusätzlich „accu ready“ auf.
Page 12

ACCU+ Power Supply
User manual / Bedienungsanleitung
12 Clearaudio electronic GmbH 2013
7. Möchten Sie nun Ihre Phonovorstufe im reinen Akkubetrieb betreiben, so drücken Si e die
zentrale Taste („accu mode“).
Ihre Phonostufe wird nun über die Akkuspannung versorgt, wodurch keinerlei Netzstörungen
die Musikwiedergabe beeinflussen können.
Durch eine präzise Messschaltung erkennt das Gerät automatisch den Zeitpunkt zum
Wiederaufladen der Akkus und schützt dadurch die NiMH-Akkus frühzeitig vor Tiefentladung!
So werden die Akkus werden immer rechtzeitig geladen und die maximale Nutzungsdauer
erreicht.
Der Schutz vor einer Tiefentladung der Akkus funktioniert jedoch nur, wenn die
„Accu+ power supply“ konstant am Stromnetz angeschlossen ist.
Im „Akku-Modus erlischt „accu ready“, sobald die Spannung den Mindestwert unterschreitet und
die Akkus wieder geladen werden. Beim Laden im „accu mode“ erlischen alle LEDs.
Wenn Sie das Musik hören beenden, schalten Sie bitte den zentralen Schalter in die
Position „charge“.
Auch im „charge mode“ werden von der „
ACCU+“
Netzstörungen entkoppelt und Sie können
Ihre Musik frei von diesen Störeinflüssen genießen.
3. Sicherheitshinweise
• Wenn Sie das Musik hören beenden, schalten Sie bitte den zentralen Schalter in die
Position „charge“.
Dadurch wird gewährleistet, dass immer der volle Ladezustand bis zum Beginn der
nächsten Hörsession im Akkubetrieb zur Verfügung steht.
• Verwenden Sie das Gerät nur, wenn es keinerlei äußere Beschädigungen aufweist.
• Lagern und verwenden Sie das Gerät immer bei Raumtemperatur (ca. 20 ° Celsius)
• Zur Vermeidung von Tiefentladung ist es unbedingt erforderlich, dass die
„Accu+ -
Einheit“ konstant mit dem Stromnetz verbunden ist!
• Entsorgen Sie das Gerät niemals über den Hausmüll!
clearaudio nimmt das Gerät unentgeltlich zurück.
Page 13

ACCU+ Power Supply
User manual / Bedienungsanleitung
13 Clearaudio electronic GmbH 2013
4. Service
Konnten Sie einen Fehler trotz Beachtung aller hier erwähnten Hinweise nicht beheben oder
bestimmen, fragen Sie bitte zunächst Ihren Fachhändler um Rat.
Erst wenn dort der Fehler bestätigt und nicht behoben werden kann, senden Sie das Gerät bitte
frachtkostenfrei an unten aufgeführte Anschrift:
clearaudio electronic GmbH
Spardorfer Str. 150
91054 Erlangen
Germany
Tel/Phone: +49 09131 40300100
Fax: +49 9131 51683
www.clearaudio.de
www.analogshop.de
info@clearaudio.de
Dabei ist unbedingt auf korrekte bzw. sichere Verpackung zu achten (Originalverpackung).
Bitte beachten Sie die Garantiehinweise auf Seite 14.
5.Technische Daten
Spannungsversorgung: aus dem vorhandenen Phonostufen-Netzteil der „+“-Serie
Ausgangsspannung: 2 x 18 Volt akkugepuffert
Akkuladung: Über das Phonostufen- Netzteil und die int e grierte
Ladeelektronik, schalten die Akkus auf Erhaltungsladung,
wenn sie die Ladeschlussspannung erreicht haben.
Dies schließt eine Überladung der Akkus aus.
Abmessungen (H x B x T) ca. 56 x 102 x 185 mm
Gewicht: 1,2 kg (1,7 kg mit Verpackung)
Änderungen bleiben vorbehalten. Lieferbar solange Vorrat reicht. Für Druckfehler keine Haftung.
Irrtümer vorbehalten- Kopien und Abdrucke – auch nur auszugsweise – bedürfen der schriftlichen
Genehmigung durch die clearaudio electronic GmbH.
clearaudio electronic GmbH 2013
Stand: November 2013
Page 14

ACCU+ Power Supply
User manual / Bedienungsanleitung
14 Clearaudio electronic GmbH 2013
To achieve the full Clearaudio warranty (for
ACCU + Power Supply
3 years), it is necessary that you fill out and
send the corresponding part of the warranty registration certificate /card back to clearaudio, within two weeks after
purchase. Only if the product is returned in it’s original packing Clearaudio can provide the warranty. Otherwise
Clearaudio provides the legal warranty of 2 years.
Um die volle clearaudio Garantie (für
ACCU + Power Supply
3 Jahre), in Anspruch nehmen zu können, senden
Sie uns bitte die beigelegte Garantiekarte innerhalb von zwei Wochen korrekt und vollständig ausgefüllt zu, da sonst
nur die gesetzliche Garantiezeit von 2 Jahren berücksichtigt werden kann. Bitte verwenden Sie zum Zurücksenden
der Ware stets die Originalverpackung!
ENGLISH
WARRANTY
For warranty information, contact your local Clearaudio distributor.
RETAIN YOUR PURCHASE RECEIPT
Your purchase receipt is your permanent record of a valuable purchase.
It should be kept in a safe place to be referred to as necessary for insurance purposes or when corresponding with Clearaudio.
IMPORTANT
When seeking warranty service, it is the responsibility of the consumer to establish proof and date of purchase. Your purchase receipt or invoice is
adequate for such proof.
FOR U.K. ONLY
This undertaking is in addition to a consumer's statutory rights and does not affect those rights in any way.
FRANÇAIS
GARANTIE
Pour des informations sur la garantie, contacter le distributeur local clearaudio.
CONSERVER L'ATTESTATION D'ACHAT
L'attestation d'achat est la preuve permanente d'un achat de valeur. La conserver en lieu sur pour s'y reporter aux fins d'obtention d'une couverture
d'assurance ou dans le cadre de correspondances avec clearaudio.
IMPORTANT
Pour l'obtention d'un service couvert par la garantie, il incombe au client d'établir la preuve de l'achat et d'en corroborer la date. Le reçu ou la facture
constituent des preuves suffisantes.
DEUTSCH
GARANTIE
Bei Garantiefragen wenden Sie sich bitte zunächst an Ihren clearaudio-Händler.
Heben Sie Ihren Kaufbeleg gut auf.
WICHTIG!
Die Angaben auf Ihrer Quittung erlauben uns die Identifizierung Ihres Gerätes und belegen mit dem Kaufdatum die Dauer Ihrer Garantie-Ansprüche.
Für Serviceleistungen benötigen wir stets die Gerätenummer.
Diese finden Sie auf dem Typenschild auf der Rückseite des Gerätes oder au ch in der beigefügten Garantie-Registrierkarte.
NEDERLANDS
GARANTIE
Voor inlichtingen omtrent garantie dient u zich tot uw plaatselijke clearaudio.
UW KWITANTIE, KASSABON E.D. BEWAREN
Uw kwitantie, kassabon e.d. vormen uw bewijs van aankoop van een waardevol artikel en d ienen op een veilige plaats bewaard te worden voor evt,
verwijzing bijv, in verbend met verzekering of bij correspondentie met clearaudio.
BELANGRIJK
Bij een evt, beroep op de garantie is het de verantwoordelijkheid van de consument een gedateerd bewijs van aankoop te tonen. Uw
kassabon of factuurzijn voldoende bewijs.
ITALIANO
GARANZIA
L’apparecchio è coperto da una garanzia di buon funzionamento della durata di un anno, o del periodo previsto dalla legge, a partire dalla data di
acquisto comprovata da un documento attestante il nominativo del Rivenditore e la data di vendita. La garanzia sarà prestata con la sostituzione o la
riparazione gratuita delle parti difettose.
Non sono coperti da garanzia difetti derivanti da uso improprio, errata installazione, manutenzione effettuata da personale non autorizzato o,
comunque, da circostanze che non possano riferirsi a difetti di funzionamento dell’apparecchio. Sono inoltre esclusi dalla garanzia gli intervent i inerenti
l’installazione e l’allacciamento agli impianti di alimentazione.
Gli apparecchi verranno riparati presso i nostri Centri di Assistenza Autorizzati. Le spese ed i rischi di trasporto sono a carico del cliente. La casa
costruttrice declina ogni responsabilità per danni diretti o indiretti provocati dalla inosservanza delle prescrizioni di installazione, uso e manutenzione
dettagliate nel presente manuale o per guasti dovuti ad uso continuato a fini professionali.
ESPAÑOL
GARANTIA
Para obtener información acerca de la garantia póngase en contacto con su distribuidor clearaudio.
GUARDE SU RECIBO DE CO MPRA
Su recibo de compra es su prueba permanente de haber adquirido un aparato de valor, Este recibo deberá gua rdarlo en un lugar seguro y utilizarlo
como referencia cuando tenga que hacer uso del seguro o se ponga en contacto con clearaudio.
IMPORTANTE
Cuando solicite el servicio otorgado por la garantia el usuario tiene la responsabilidad de demonstrar cuándo efectuó la compra. En este caso, su
recibo de compra será la prueba apropiada.
 Loading...