

Page 1
CLEAR Stick Atlas
USER GUIDE
Model PXU1960
1
Page 2
Table of Contents
Getting Started
• What’s in the Box?
• Features & Indicators
• Care Instructions
• Connecting to CLEAR 4G Internet
Using Your CLEAR Stick Atlas
• Connecting and Disconnecting
Managing Your CLEAR Stick Atlas
• Summary Page
• Device Update Page
• Advanced Settings Page
• My Account
• Help Page
• Language Settings
Frequently Asked Questions
Technical Specifications
Troubleshooting
• Important Message from CLEAR
• Restarting Your Computer With The CLEAR Stick Inserted
• The CLEAR Stick LEDs Remain On When The Computer Is Off
• Can’t Connect To The Internet
• The CLEAR Stick Appears “Frozen” or “Stuck”
• How to Recognize and Resolve the Known Microsoft RNDIS Issue
Affecting Some Windows® 7 and Vista Users
• What To Do If You Have Trouble Downloading the Microsoft
Hotfixes
• Improving Your Indoor 4G Signal
Page 3
Page 5
Page 6
Page 12
Page 13
Page 14
Still Need Help?
• FAQs and Live Chat Support
• Telephone Support
• Questions About Your Automated Billing
• Important Information
• Warranty Information
• Legal Disclosures
2
Page 19
Page 3
Getting Started
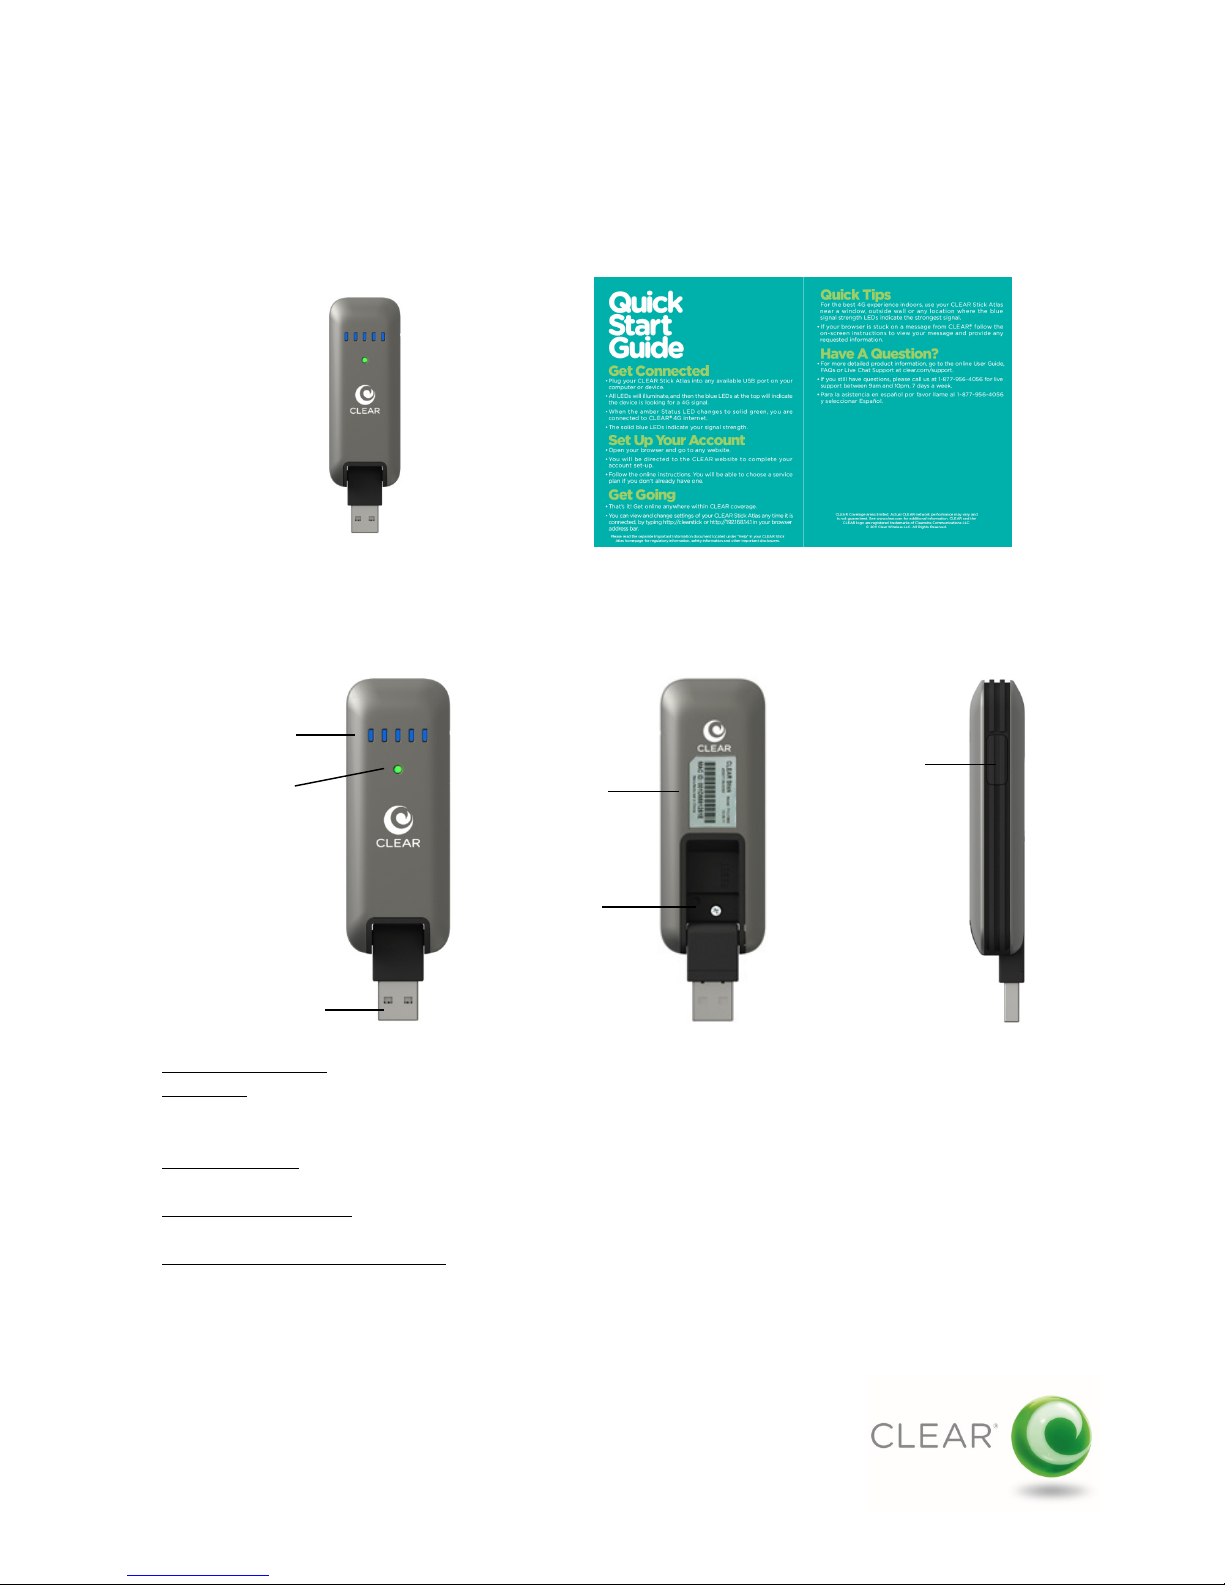
What’s In The Box?
CLEAR Stick Atlas Quick Start Guide
Features & Indicators
Signal Strength
LEDs
Status LED
USB Connector
• Signal Strength LEDs – Provide a quick reference indication of the CLEAR 4G signal quality for the current location
• Status LED – Indicates the status of the CLEAR 4G connection. Solid green indicates connected to 4G, solid amber
indicates not connected, flashing amber indicates firmware update in progress and flashing green indicates
connecting to 4G
• Production Label – Contains the manufacture date, regulatory marks, device MAC Address and other information
such as serial number
• Hardware Reset Button – This button can be used in the rare cases where the device is unresponsive. See
instructions for use under “Troubleshooting”
• Auxiliary Antenna Connector Cover – The cover can be removed to reveal two TS-9 antenna connects. See
“Troubleshooting” for more information about how to improve your 4G signal when in marginal coverage areas
Production
Label
Hardware
Reset
Button
Auxiliary
Antenna
Connector
Cover
3
Page 4
Getting Started (continued)
1
2
3
4
Use With Care
Always use your CLEAR Stick Atlas with care. Please consider the following when using the device:
• Take care do not drop the CLEAR Stick Atlas
• Keep the CLEAR Stick away from other devices that produce electromagnetic waves
• Keep the CLEAR Stick out of direct sunlight
• Do not throw or dismantle the CLEAR Stick
• Prevent pets and children from playing with the CLEAR Stick
• Do not immerse the CLEAR Stick in water or other liquid
• Make sure your hands are dry before handling the CLEAR Stick
• Do not cover or apply adhesives to the CLEAR Stick. They may cause the CLEAR Stick to overheat and may
alter the antenna’s performance
• Don’t operate the CLEAR Stick while driving
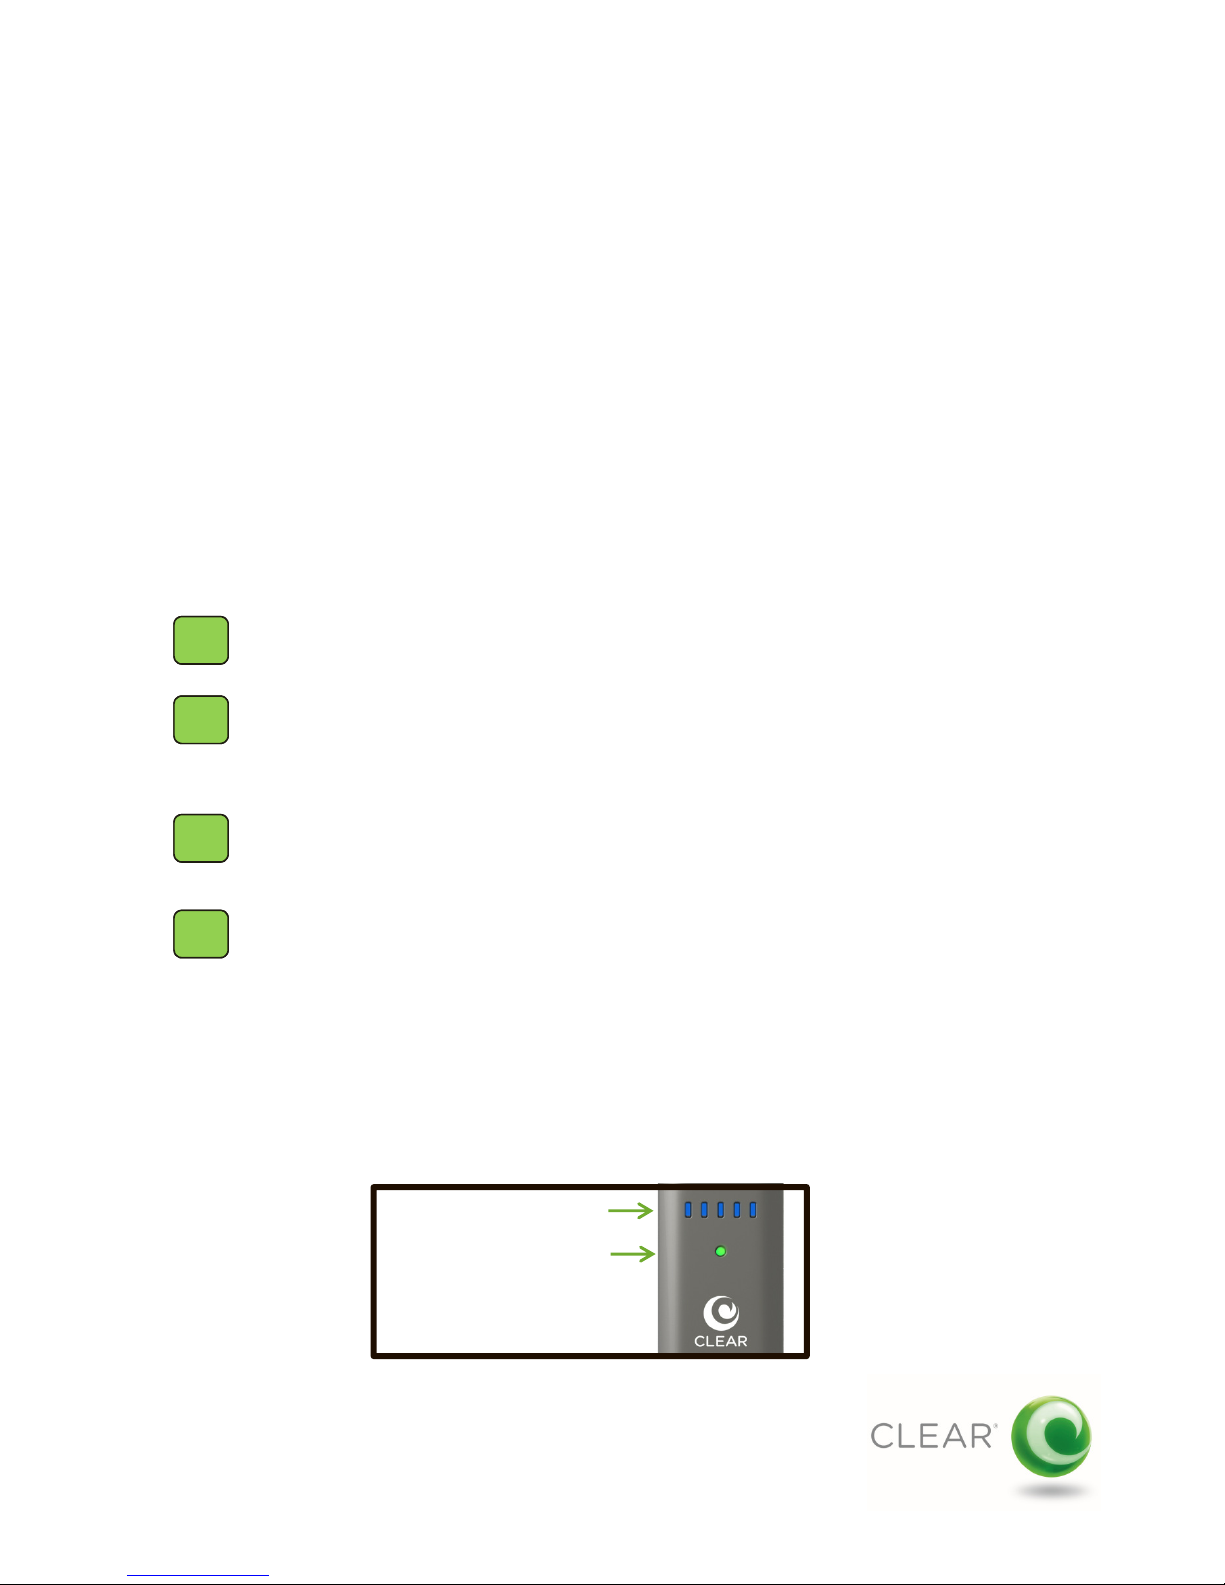
Connecting To CLEAR 4G Internet
Plug the CLEAR Stick into the USB port on your computer or other device. The device will
1
2
power up and detect the computer’s operating system.
The Blue Signal Strength LEDs will all light up and the center LED will flash briefly. The
Status LED will be solid Amber. After a few seconds, the Signal Strength LEDs will move in a
left to right “chase” pattern as the CLEAR Stick searches for a 4G signal. Once the signal is
acquired, the LEDs show solid Blue and reflect the appropriate signal strength.
The status LED will change from solid Amber (disconnected) to flashing Green for a few
3
seconds during network entry, then to solid Green (connected) when the device is
connected to CLEAR 4G.
Each time you use the CLEAR Stick, your computer’s operating system will apply the
4
4
appropriate, native RNDIS or CDC driver and then connect to CLEAR 4G. The first time you
use the device:
• For Windows® XP, the Stick automatically installs an RNDIS driver since this does not
exist natively for this operating system.
• For Windows® 7 & Vista computers with Autoplay enabled, your computer’s Autoplay
dialog will display “CLEAR Stick Setup”. Click this link to install a small application that
will suppress Autoplay from popping up during subsequent uses of the CLEAR Stick
Atlas. Note: the Autoplay suppression application is applied the next time your
computer is restarted. It will only suppress Autoplay when using the CLEAR Stick.
Signal Strength LEDs
Status LED
Page 5
Using Your CLEAR Stick Atlas
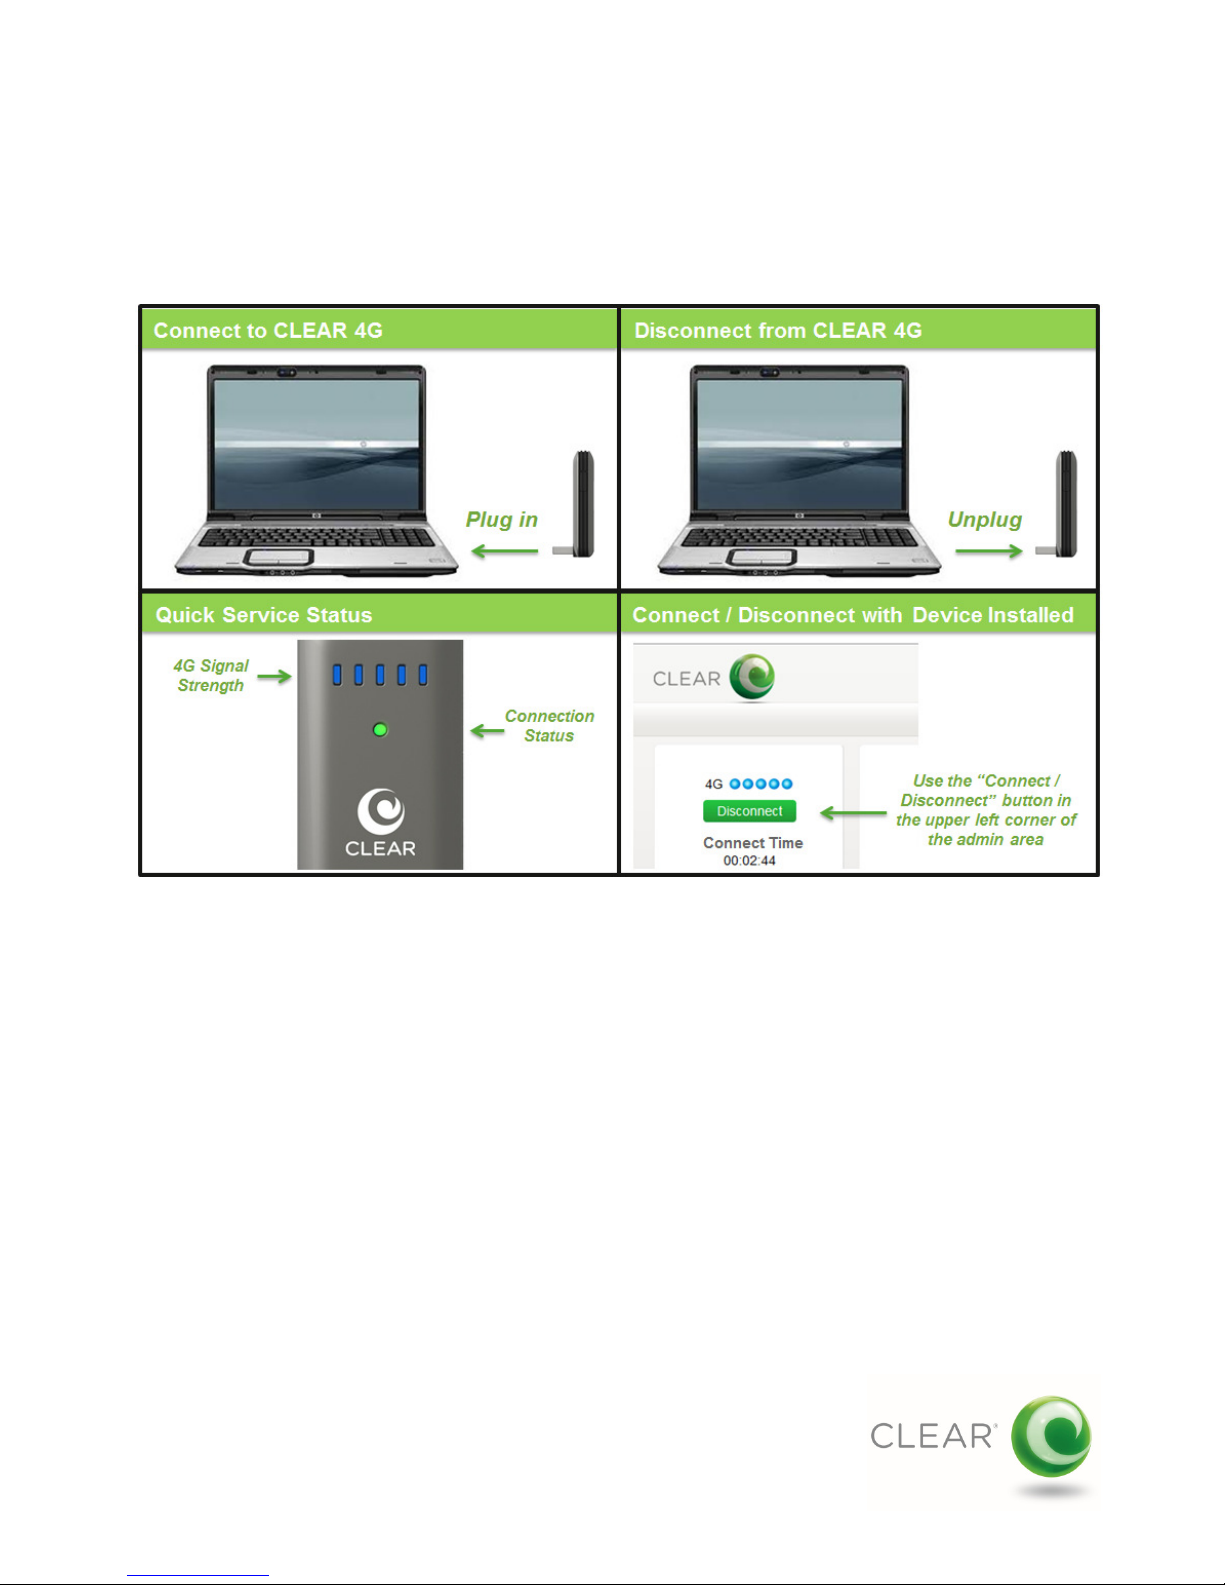
Connecting & Disconnecting from CLEAR 4G Internet
• To connect to CLEAR 4G Internet, plug the CLEAR Stick Atlas into the standard USB port of your computer
or other device
• To disconnect, remove the CLEAR Stick Atlas from the USB port
• You can connect and disconnect while leaving the CLEAR Stick Atlas plugged into your computer’s USB port
by going to the administrative area and selecting the “Connect/Disconnect” button located in the upper
left corner
• When using the CLEAR Stick Atlas you can quickly check the signal strength and connection status using the
LEDs located on the device
• Signal strength LEDs: 5 Blue LEDs = Excellent 4G signal
1 Blue LED = Poor 4G Signal
• Connection LED: Green = Connected to CLEAR 4G,
Amber = Disconnected
5
Page 6
Managing Your CLEAR Stick Atlas
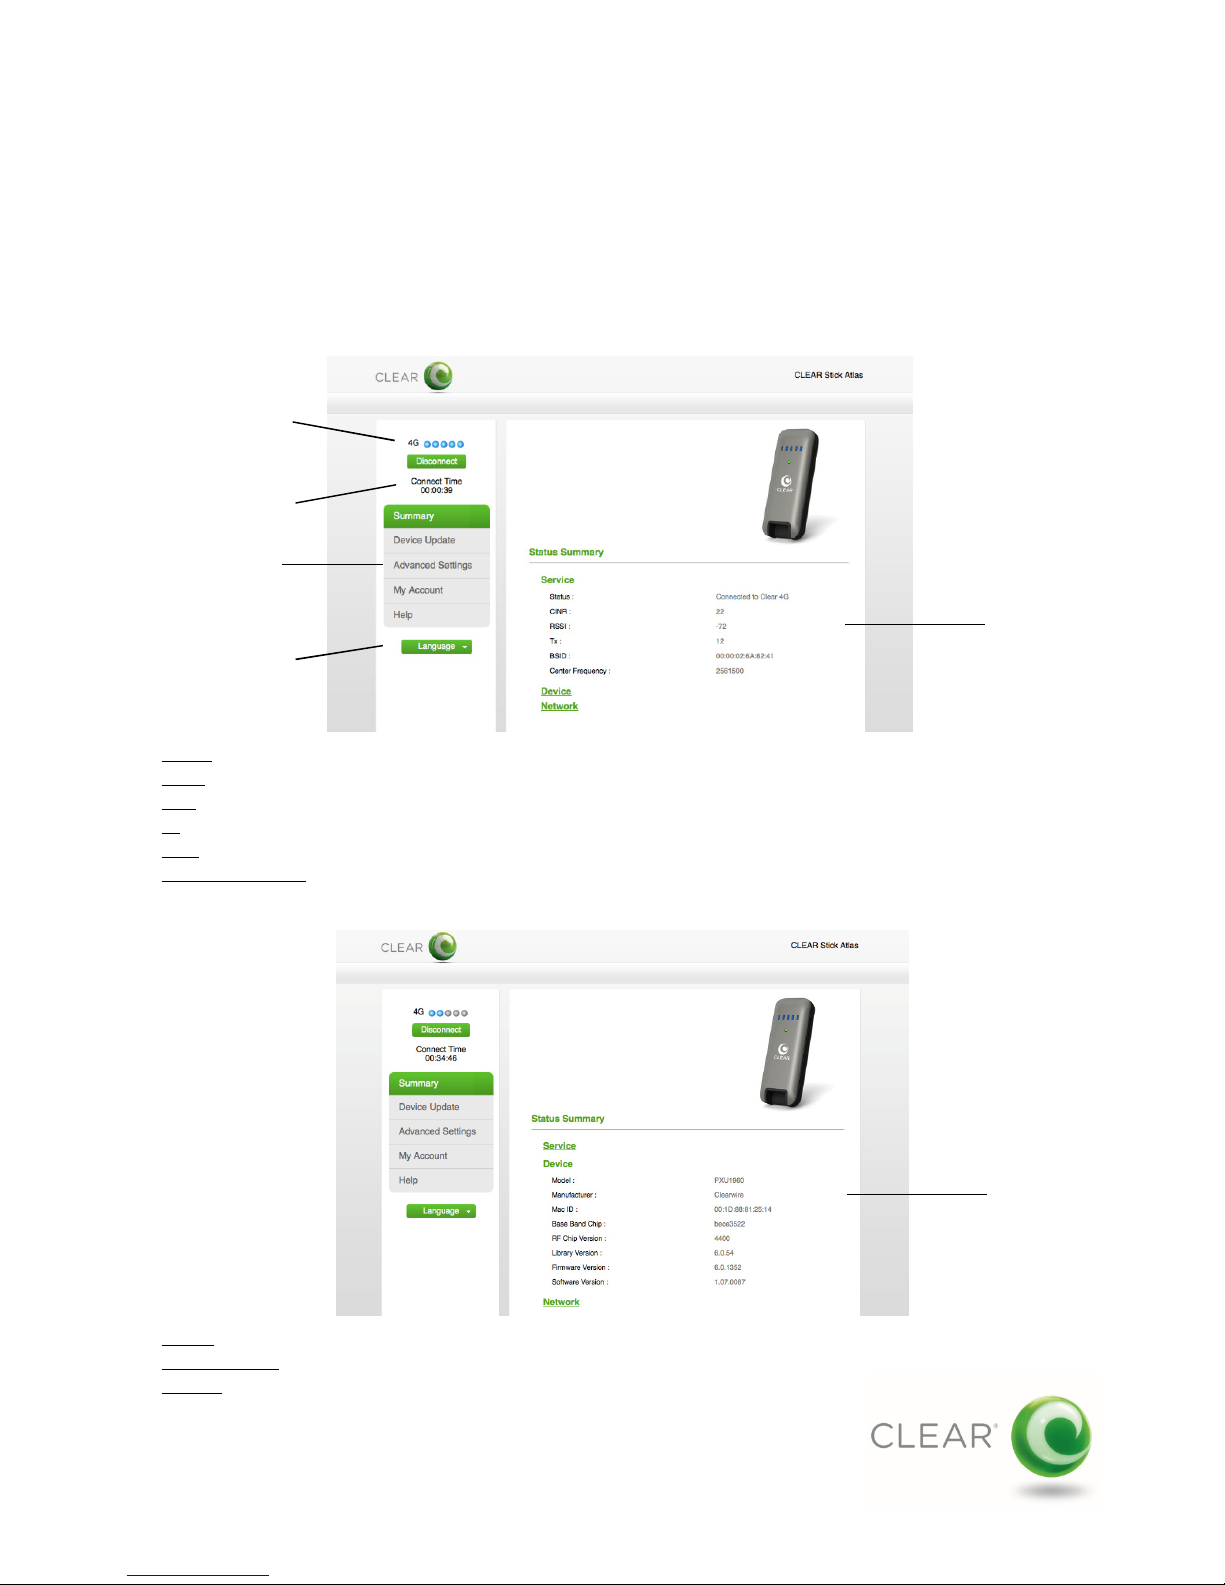
Summary Page
To access the administrative area of the CLEAR Stick Atlas, open your browser and enter “clearstick” or
“192.168.14.1” in the address bar. This will take you to the devices internal webserver and administration
area’s Summary Page. The Summary Page provides a status of the 4G Service, the Device information and the
4G network.
Summary Page
Signal Strength
LEDs
Connection
Time
Navigation
Menu
Select English
or Spanish
Language
• Status – Displays the status of the connection such as “Connected to CLEAR 4G” or “Not Connected”
• CINR – Displays the CLEAR 4G Carrier Interference Noise Ratio (CINR) value
• RSSI – Displays the CLEAR 4G Received Signal Strength Indication (RSSI) value
• Tx – Displays the Transmit Power the device is utilizing to achieve the connection, measured in dB
• BSID – Displays the connected Base Station Identification (BSID) value
• Center Frequency – Displays the center value of the frequency for the current RF channel, measured in Hz
Service
Details
Status
• Model – Displays the CLEAR Stick model number
• Manufacturer – Displays the manufacturer
• MAC ID – Displays the CLEAR Stick unique MAC Address number
6
Device Update Page
Device
Status
Details
Page 7

Managing Your CLEAR Stick Atlas (continued)
Summary Page (continued)
• Baseband Chip – Displays the part number for the 4G chipset used in the CLEAR Stick Atlas
• RF Chip Version – Displays the Radio Frequency (RF) chip firmware version number
• Library Version – Displays the 4G chipset library version number
• Firmware Version – Displays the 4G chipset firmware version number
• Software Version – Displays the CLEAR Stick device software version number
Summary Page
Network
Status
Details
• IP Address – Displays the Internet Protocol (IP) Address of the device
• Realm – Displays the network name for the CLEAR 4G service
• Gateway – Displays the Internet Gateway address
• DNS – Displays the Domain Name Server (DNS) addresses
• DHCP – Displays the Dynamic Host Configuration Protocol server address
• Data Received – Displays the approximate amount of data received by the device for the session
• Data Sent – Displays the approximate amount of data sent by the device for the session
7
Page 8

Managing Your CLEAR Stick Atlas (continued)
Device Update Page
The Device Update Page enables you to check for available software updates or apply a software update file
that has been downloaded from the clear.com/support website. In most cases, new software updates will be
applied automatically during normal use of the device so you will rarely need to use these features
Device Update Page
Current Software
Version
Check for
Software Updates
Apply Software
Updates
Downloaded from
clear.com/Support
8
Page 9

Managing Your CLEAR Stick Atlas (continued)
Advanced Settings Page
The Advanced Settings page allows you to alternate between IP Pass-through mode and Network Address
Translation (NAT) mode. To apply NAT mode, select the NAT mode radio button and enter a local IP Address
when requested. In almost all cases, IP Pass-through mode will work and this feature will rarely be used.
Advanced Settings
Page
Alternate
between IP
Pass-through
& NAT mode
• IP Pass-through Mode – The IP Address assigned to the device is also applied to the host computer
• NAT Mode – The IP Address applied to the device is different than the IP Address applied to the host computer
Advanced Settings
Page
• Device IP Address – The Internet Protocol (IP) Address assigned to the device is user configurable
• Host IP Address – The IP Address applied to the host computer is user configurable
• Block Ping to WAN – Prevents Internet Control Message Protocol (ICMP) traffic from the host computer to the
Wide Area Network (WAN)
• HTTP Remote Access – Enable/disable remove access to the host computer
9
Page 10

Managing Your CLEAR Stick Atlas (continued)
My Account
Selecting “My Account” on the Administration Area navigation menu opens a new browser window and directs
you to the “My Account” sign in page at CLEAR.com. Enter your “My Account” user name and password to
manage your CLEAR service account.
My Account Sign In Page on Clear.comNavigation Menu
10
Page 11

Managing Your CLEAR Stick Atlas (continued)
Help Page
The Help Page provides useful information that aids in using and troubleshooting your CLEAR Stick.
Help Page
• About CLEAR Stick – This link displays device information including the hardware and software versions and MAC
Address
• Diagnostics – Select this link to view the device logs. You can save a copy of the current device log to your
computer desktop by selecting the “Export” button in the Diagnostics area. When troubleshooting your CLEAR
Stick it may be necessary to email the saved log file to the CLEAR Customer Support team
• Return to Factory Settings – Select this link to change all device settings to the original state
• Online Support – This link opens a new browser window and directs you to the CLEAR Customer Support website
• License – This link displays information about 3rdparty and public software licenses utilized in developing the
CLEAR Stick
• Regulatory Information – This link opens a new browser window and directs you to information about the Federal
Communications Commission approval for the CLEAR Stick Atlas
• Important Information – This link displays important safety information about your CLEAR Stick
Language Settings
Selecting the “Language” button below the administration area navigation menu enables you to change the
language displayed on the administration area pages.
Selecting the
Language button
displays a drop
down menu
11
Choose English or
Spanish Language from
the drop down menu.
Page 12

Frequently Asked Questions
Q. Does using the CLEAR Stick Atlas require connection manager software to run on my
computer?
A. No connection manager software is required. In fact, no software is required at all. However,
CLEAR does provide the option to install a very small application on Microsoft Windows® 7 and
Vista computers to suppress the Autoplay feature from running each time you insert the Stick.
Q. Does the CLEAR Stick Atlas install device drivers on my computer?
A. No, the CLEAR Stick uses drivers that are already located in your Windows® and Mac®
operating system and most versions of Linux, Android and Chrome.
Q. Which operating systems are supported by the CLEAR Stick Atlas?
A. The CLEAR Stick support Microsoft Windows® 7, Vista, Windows® XP (SP3), Apple Macintosh
OS 10.5 Leopard, 10.6 Snow Leopard and 10.7 Lion. Versions of Linux, Android and Chrome that
support Remote Network Driver Interface Specification (RNDIS) or Communication Device Class
(CDC) also work with the CLEAR Stick.
Q. How do I manage my CLEAR Stick Atlas?
A. Plug the CLEAR Stick into your computer’s USB port and enter “clearstick” or “192.168.14.1”
in your browser’s address bar. This will take you to the internal administrative area where you
can review the status of the device and connection, check for software updates, modify settings
and get help.
Q. How do I connect and disconnect from the Internet when using my CLEAR Stick Atlas?
A. Simply plug in the CLEAR Stick when you want to connect to CLEAR 4G Internet and unplug
the Stick to disconnect. If you want to leave the Stick in your computer and disconnect from the
Internet you can go to the CLEAR Stick Atlas management area and select “Disconnect” in the
upper left corner. When you are ready to re-connect, select “Connect”.
Q. What is the cover located on the right side of the CLEAR Stick used for?
A. Removing the cover exposes two TS9 auxiliary antenna connectors. These connectors
support standard, 3rd party antennas that may improve your 4G signal reception when located
in marginal signal areas. See the “Troubleshooting” section of this document for more
information.
Q. I’ve heard there is a known Microsoft issue that can affect some CLEAR Stick Atlas
users. How do I know if I’m affected?
A. There is a known Microsoft RNDIS issue that can affect a small percentage of Windows® 7
and Vista users. Fortunately, Microsoft offers hotfixes to resolve the problem. See the
“Troubleshooting” section of this document for more information.
12
Page 13

Technical Specifications
1.2” 0.6”
3.25”
IN-BOX MATERIALS
• CLEAR Stick Atlas
• Quick Start Guide
SUPPORTED OPERATING SYSTEMS
• Microsoft Windows® 7 (32/64 bit)
• Microsoft Windows® Vista (32/64 bit)
• Microsoft Windows® XP (SP3)
• Mac® OS 10.5 Leopard
• Mac® OS 10.6 Snow Leopard
• Mac® OS 10.7 Lion
4.06”
• Linux*
• Android*
• Chrome*
PHYSICAL DIMENSIONS
• Closed: 3.25”(h) x 1.2”(w) x 0.65”(d)
• Opened: 4.06”(h) x 1.2”(w) x 0.65”(d)
WEIGHT
• 1.1 oz.
CLEAR Stick Atlas (front, back, side view)
CONNECTORS
• Standard USB Type-A Male Connector
• TS-9 Auxiliary Antenna Connectors (2)
SKU/PART NUMBER
• UBE-USB1960
UPC CODE
• 0 94922 04207 1
*
Computer or device must include a standard USB port and support for Remote Network Driver Interface
Specification (RNDIS) or Communication Device Class (CDC) devices.
13
Page 14

Troubleshooting
Important Message From CLEAR
If your browser is stuck on a message from CLEAR, follow the onscreen instructions to view the message and
provide any requested information.
Restarting Your Computer With The CLEAR Stick Inserted
CLEAR recommends that you remove the CLEAR Stick Atlas from the computer’s USB port when restarting
your computer. Once your computer has restarted, re-insert your CLEAR Stick into the computer’s USB port.
The CLEAR Stick LEDs Remain On When The Computer Is Off
Some computers continue to supply power to the USB port when the computer is in Sleep or Hibernate
Mode. In such cases, the CLEAR Stick will remain on. If this occurs make sure your computer is connected to
AC Power, or remove the CLEAR Stick from the USB port, in order to avoid draining your computer’s battery.
Can’t Connect To The Internet
If your CLEAR Stick appears to be connected to CLEAR 4G (one or more solid Blue signal strength LEDs and a
Green Status LED), but you cannot connect to the Internet AND you are using a Windows® 7 or Vista
computer, see the section below titled:
How to Recognize and Resolve the Known Microsoft RNDIS Issue Affecting Some Windows® 7 and Vista Users
If you are not using Windows 7 or Vista or the known Microsoft symptoms are not present on your Windows 7
or Vista computer, take the following steps:
1. Remove the CLEAR Stick from your computer’s USB port
2. Wait 5 seconds
3. Reinsert the CLEAR Stick into your computer’s USB port, wait for the device to connect to CLEAR 4G
4. Attempt to browse the Internet
If you still cannot connect to the Internet, go to the Administration Area of the CLEAR Stick and select “Help”
then select “Return to Factory Settings”. Reply “Yes” when prompted. The device will restart and connect to
CLEAR 4G.
If you still cannot connect to the Internet or you cannot get to the Administrative Area of the device, contact
CLEAR Customer Support at clear.com/support or by calling 877-956-4056.
The CLEAR Stick Appears “Frozen” or “Stuck”
If you are in a known CLEAR 4G coverage area and your CLEAR Stick appears to be stuck (no LEDs illuminated
or the Status LED is shows Amber with one or none of the Blue Signal Strength LEDs illuminated, take the
following steps:
1. Remove the CLEAR Stick from your computer’s USB port
2. Wait 5 seconds
3. Reinsert the CLEAR Stick into your computer’s USB port, wait for the device to connect to CLEAR 4G
4. Attempt to browse the Internet
If your CLEAR Stick remains unresponsive, go to the Administration Area of the CLEAR Stick and select “Help”
then “Return to Factory Settings”. Reply “Yes” when prompted. The device will restart and connect to CLEAR
4G.
14
Page 15

Troubleshooting (continued)
If your CLEAR Stick is still unresponsive and you cannot get to the Administrative Area of the device, take the
following steps:
1. Remove the CLEAR Stick from your computer’s USB port
2. Wait 5 seconds
3. Reinsert the CLEAR Stick into your computer’s USB port WHILE PRESSING AN D HOLDING THE RESET
BUTTON LOCATED ON THE BACK OF THE DEVICE
4. When the Status LED illuminates Amber release the RESET button
5. Wait for the CLEAR Stick to boot up and connect to CLEAR 4G, then attempt to browse the Internet
If this does not resolve the problem, contact CLEAR Customer Support at clear.com/support or by calling
877-956-4056.
How to Recognize and Resolve the Known Microsoft RNDIS Issue
Affecting Some Windows® 7 and Vista Users
A small percentage of Windows® 7 and Vista users will experience a problem where the CLEAR Stick Atlas
appears to be properly installed and working, but the user cannot access the Internet or pass IP traffic.
Known Microsoft Issue
Microsoft has documented two issues with their products where a USB RNDIS device, such as the CLEAR Stick
Atlas, will stop communicating with the host computer when running Windows® 7, Vista and some server
operating systems. Microsoft has published two “Hotfixes” that resolve these problems.
How to Recognize the Known Microsoft Issues
Before you attempt to resolve an issue, it is very important to be certain that you are experiencing the actual,
documented problem. Fortunately, it’s very easy to know for sure. Carefully read the following questions. If
you answer “YES” to ALL of these questions then you do have the known Microsoft problem and CLEAR
recommends that you install the “Hotfixes” available on the Microsoft Customer Support website using the
links provided below. Note: do not install these hotfixes unless you answer “YES” to ALL questions. If you
have questions or concerns regarding the hotfixes, please contact Microsoft Corporation.
Confirmation of the known Microsoft RNDIS issues
1. Is your CLEAR Stick Atlas installed in your computer’s USB port?
2. Is the single, Status LED on and solid Green?
3. Are one or more Signal Strength LEDs on and solid Blue?
4. Are unable to access Internet websites such as CLEAR.com and others?
5. Are you running Microsoft Windows® 7 or Vista on your computer?
6. Follow the instructions titled “Confirmation Step #1” below, do you see a “Yellow Bang” next to the
RNDIS device listed in Device Manager?
7. Follow the instructions titled “Confirmation Step #2” below, do you see the following message in the
“Device Status”: The device is not working properly because Windows cannot load the drivers required for
the device (Code 31)
If you answered “YES” to all seven of the preceding questions you are experiencing the known Microsoft
RNDIS issue. Please proceed by installing the two Microsoft Hotfixes located at the following links (Note:
some users experience difficulty downloading the hotfixes. If you have trouble, please see the instructions
below titled “What to do if you have trouble downloading the Microsoft Hotfixes.”)
Microsoft “Hotfixes”:
http://support.microsoft.com/kb/2477042
http://support.microsoft.com/kb/2471472
15
Page 16

Troubleshooting (continued)
Known Microsoft RNDIS Issues (continued)
Confirmation Step #1
a) In your Windows 7 or Vista operating system, go to “Device Manager”
b) Locate the “Network adapters”
c) Expand the list of adapters by clicking the small triangle to the left of the term “Network adapters”
d) You will see an adapter listed as “RNDIS” or “NDIS” (there may be a number after it, but not always)
e) Computers experiencing the known Microsoft issue will show a small, yellow triangle commonly called a
“Yellow Bang” on RNDIS or NDIS adapter as depicted within the solid red circle in the Exhibit #1 below
Confirmation Step #2
a) In “Device Manager”, place your mouse on the line titled “Network adapters”
b) Right click and select “Properties”
c) Computers experiencing the known Microsoft issue will show the following message under the “Device
Status” area: The device is not working properly because Windows cannot load the drivers required for
the device (Code 31) as depicted within the dashed red circle in the Exhibit #1below
Exhibit #1
16
Page 17

Troubleshooting (continued)
What To Do If You Have Trouble Downloading the Microsoft Hotfixes
When you register with Microsoft to receive the hotfix on the Microsoft Support Website you will receive an
email with a link to download the hotfix as shown in Screen Shot #1 below. Note that there is no mention of a
user name and password being required in order to receive the hotfix.
Most of the time, selecting the link results isn the appropriate hotfix file being downloaded as shown in Screen
Shot #4 below. However, in some cases you may receive an authentication requests as shown in Screen Shot
#2. If this happens, do the following:
a) Select the “Cancel” button on the Authentication Dialog Box multiple times. In most cases this will result
in receiving the hotfix file along with an error message as shown in Screen Shot #3. Disregard the error
message and install the hotfix.
b) Alternatively, you can click the link in the request email (shown in Screen Shot #1) multiple times and,
eventually, you will receive the hotfix file without as shown in Screen Shot #4. Install the hotfix file.
Screen Shot #1 Screen Shot #2
Screen Shot #3 Screen Shot #4
17
Page 18

Troubleshooting (continued)
Improving Your Indoor 4G Signal
For the best indoor signal locate your CLEAR Stick near a window or outside wall. It’s always a good idea to try
several locations within your home or office to determine where the best signal is located. Use the Blue
Signal Strength LEDs to help you determine the best location. The more LEDs illuminated, the better the 4G
signal.
Auxiliary Antenna
For CLEAR Stick Atlas owners who find themselves within marginal service coverage areas, it may be possible
to improve your 4G signal and internet speed using an auxiliary antenna. To do so, attach the antenna via the
two TS-9 connectors located on the side of the device.
Remove
Cover
TS-9
Connectors
4G
CLEAR Stick
Atlas
Note that using an auxiliary antenna will not improve your internet experience in all cases. Only use an
auxiliary antenna if your 4G signal conditions show a Carrier Interference Noise Ratio (CINR) of 8 dBi or lower.
Using an auxiliary antenna when CINR is above 8 dBi may result in a WORSE internet experience. To locate
the 4G signal conditions on your CLEAR Stick Atlas, go to the admin area and note the CINR value on the
Summary Page (see the user guide located at clear.com/support for detailed instructions). Should you elect
to use an auxiliary antenna, be sure to test the antenna in several different locations throughout your home
or office in order to identify the location that yields the best results (i.e. highest CINR value).
CLEAR Stick Atlas with
RfWel® 2x TS-9 MIMO Antenna
While CLEAR does not sell auxiliary antennae, we have tested the CLEAR Atlas with the RfWel® TS-9 MIMO
Antenna (SKU 6000450) and found it to perform well. MIMO antennae with two TS-9 connectors can be
purchased at a variety of retail locations and at numerous internet websites. Search the internet for “MIMO
Antenna with 2 TS-9 connectors“ to locate a suitable supplier.
18
Page 19

Still Need Help?
FAQs and Live Chat Support
If you have questions about your CLEAR Stick Atlas, please access the FAQs and live chat support at
www.clear.com/support.
Telephone Support
If you still have questions, please call us at 877-956-4056. We provide automated telephone support 24/7 and live
telephone support between 9am and 10pm, local time, seven days a week.
Questions About Your Automated Billing
When you set up your CLEAR online account, you most likely provided CLEAR with a credit card number so CLEAR can
automatically bill for service. It’s easy to view your bill or change the bank card information. While connected to the
internet, click here to login to your CLEAR My Account or enter https://www.clear.com/my_account/signin.php in
your browser’s address bar the next time you are connected to the Internet.
Important Information
Please read the “Important Information” section in the Administration Area of your CLEAR Stick for regulatory
information, safety information, and other important disclosures.
Warranty Information
See Section 6(d) of the CLEAR Terms of Service (at www.clear.com/legal/terms) for warranty details.
Legal Disclosures
CLEAR coverage areas are limited. Actual CLEAR network performance may vary and is not guaranteed. See
clear.com for rate plan, return policy, and additional information and restrictions. CLEAR and the CLEAR logo are
trademarks or registered trademarks of Clearwire Communications LLC. Other company, product, and brand names
and trademarks are the property of their respective owners. © 2012 Clear Wireless LLC. All rights reserved.
19
 Loading...