

Page 1
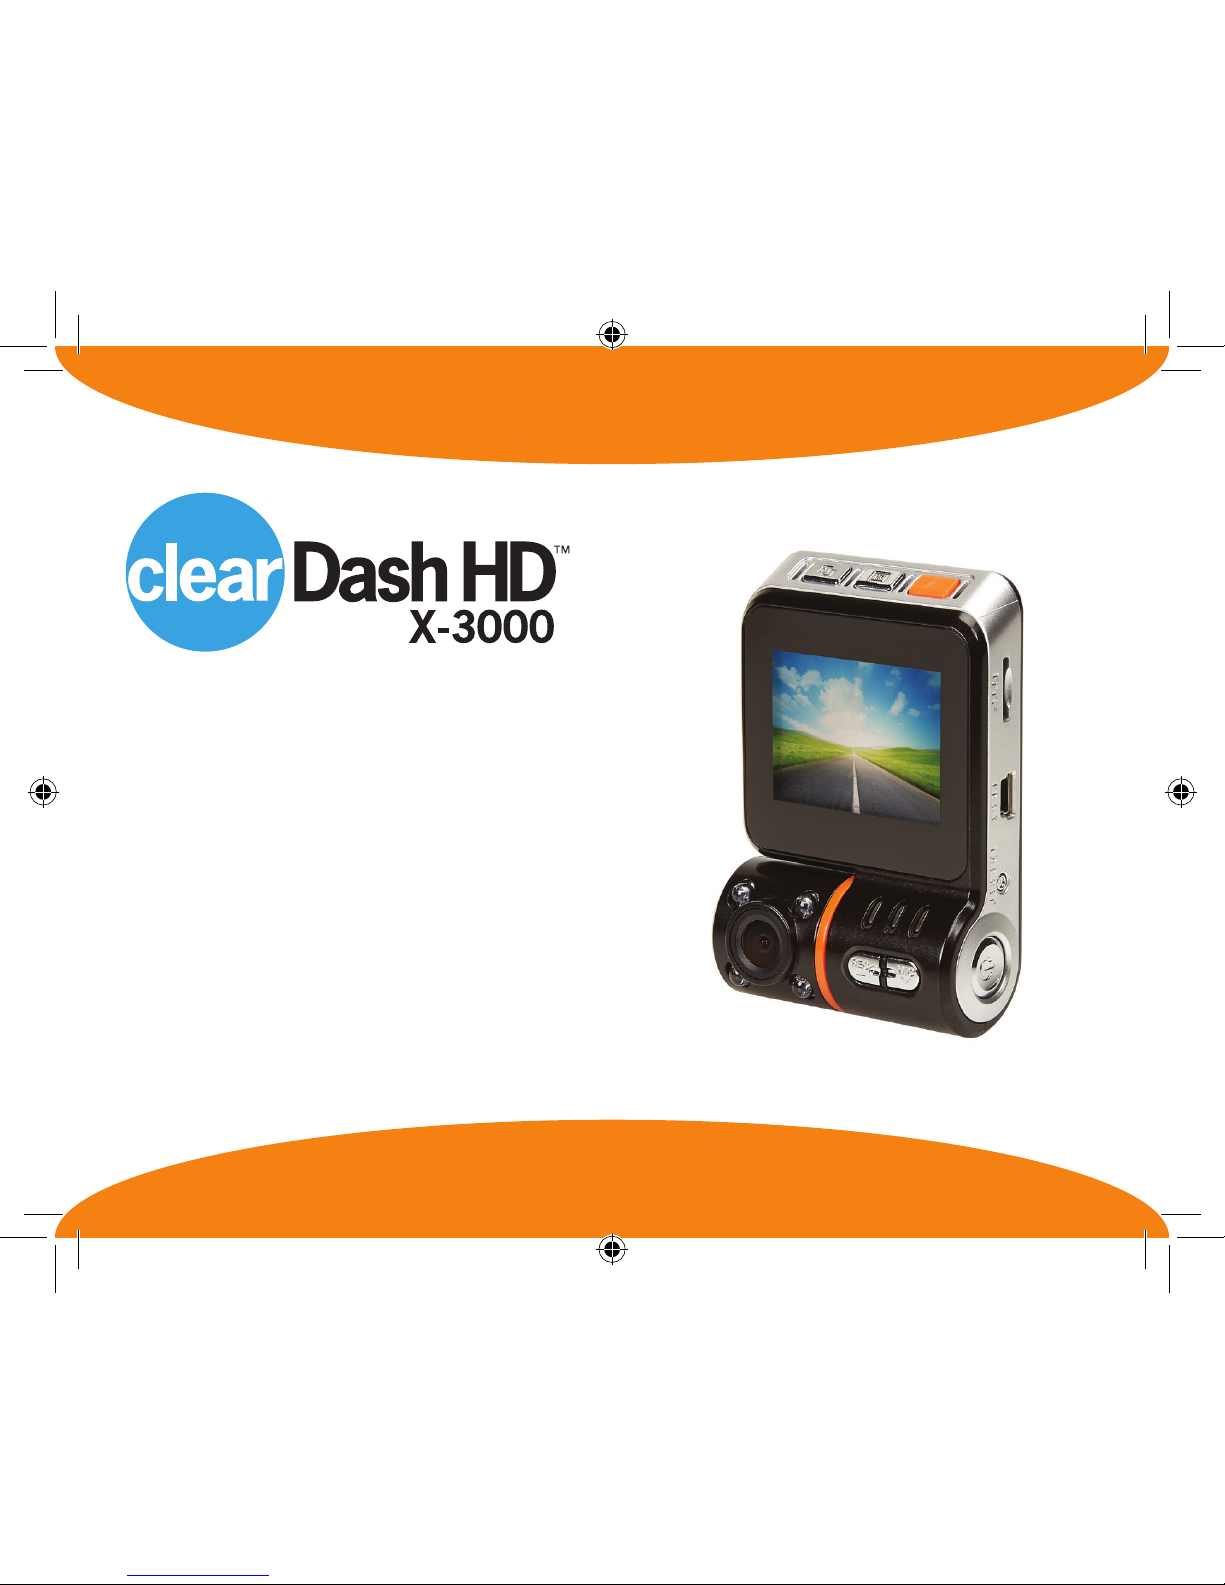
Owner’s
Manual
High-Denition
Automotive
Video Recorder
Warranty Information Inside
CDHD-X3000_IB_TP_ENG_V1_170302.indd 1 3/3/17 4:38 PM
Page 2

CDHD-X3000_IB_TP_ENG_V1_170302.indd 2 3/3/17 4:38 PM
Page 3

1
Congratulations…
On your purchase of the Safe Driving Dash Recorder. Dashboard mounted cameras are
becoming increasingly popular as a tool for recording car journeys, both for fun and purposes
of documentation should an unanticipated event happen while you are driving. Questions of guilt,
innocence or liability can easily be determined when a recorded version of an event is available.
Documented proof of events can reduce fraudulent insurance claims.
Statistics indicate a signicant reduction in accidents when cars are equipped with video recorders.
CDHD-X3000_IB_TP_ENG_V1_170302.indd 1 3/3/17 4:38 PM
Page 4

2
Notice: Windshield Mounting Legal Restrictions
Before mounting Clear Dash HD on windshield, consult state and local ordinances. Some
states may outlaw suction mounts while driving or regulate where suction mounts are located
in your vehicle. Many states have restrictions against “non-transparent material” on a car
windshield that may obstruct the driver’s view.
Warning: This product and its components contain chemicals known to the state of
California to cause cancer, birth defects, or reproductive harm. This Notice is being provided
in accordance with California’s Proposition 65. If you have any questions or would like
additional information, please refer to www.oehha.ca.gov/ prop65/background/p65plain.html.
Ensure proper disposal of the rechargeable battery.
The battery contained in this device is lithium ion. To locate a battery recycling center
near you, call 1-800-8-BATTERY or 1-877-2-RECYCLE for proper disposal.
IMPORTANT SAFETY INFORMATION
• Do not expose Safe Driving Dash Recorder to rain or moisture.
• Safe Driving Dash Recorder is intended for use in a motor vehicle. Do not install the product
where it will block the driver’s view of the road (including mirrors) or the deployment of airbags.
• Keep your attention on the road! Do not try to operate or focus on device while driving. If you
have to concentrate on or adjust the device, pull over to the side of the road for a moment.
• Make sure the camera lens is kept clean and there is nothing blocking the lens.
• Do not leave Safe Driving Dash Recorder in direct sunlight for a long period of time or where
the temperature could go above 140°F (60°C).
CDHD-X3000_IB_TP_ENG_V1_170302.indd 2 3/3/17 4:38 PM
Page 5
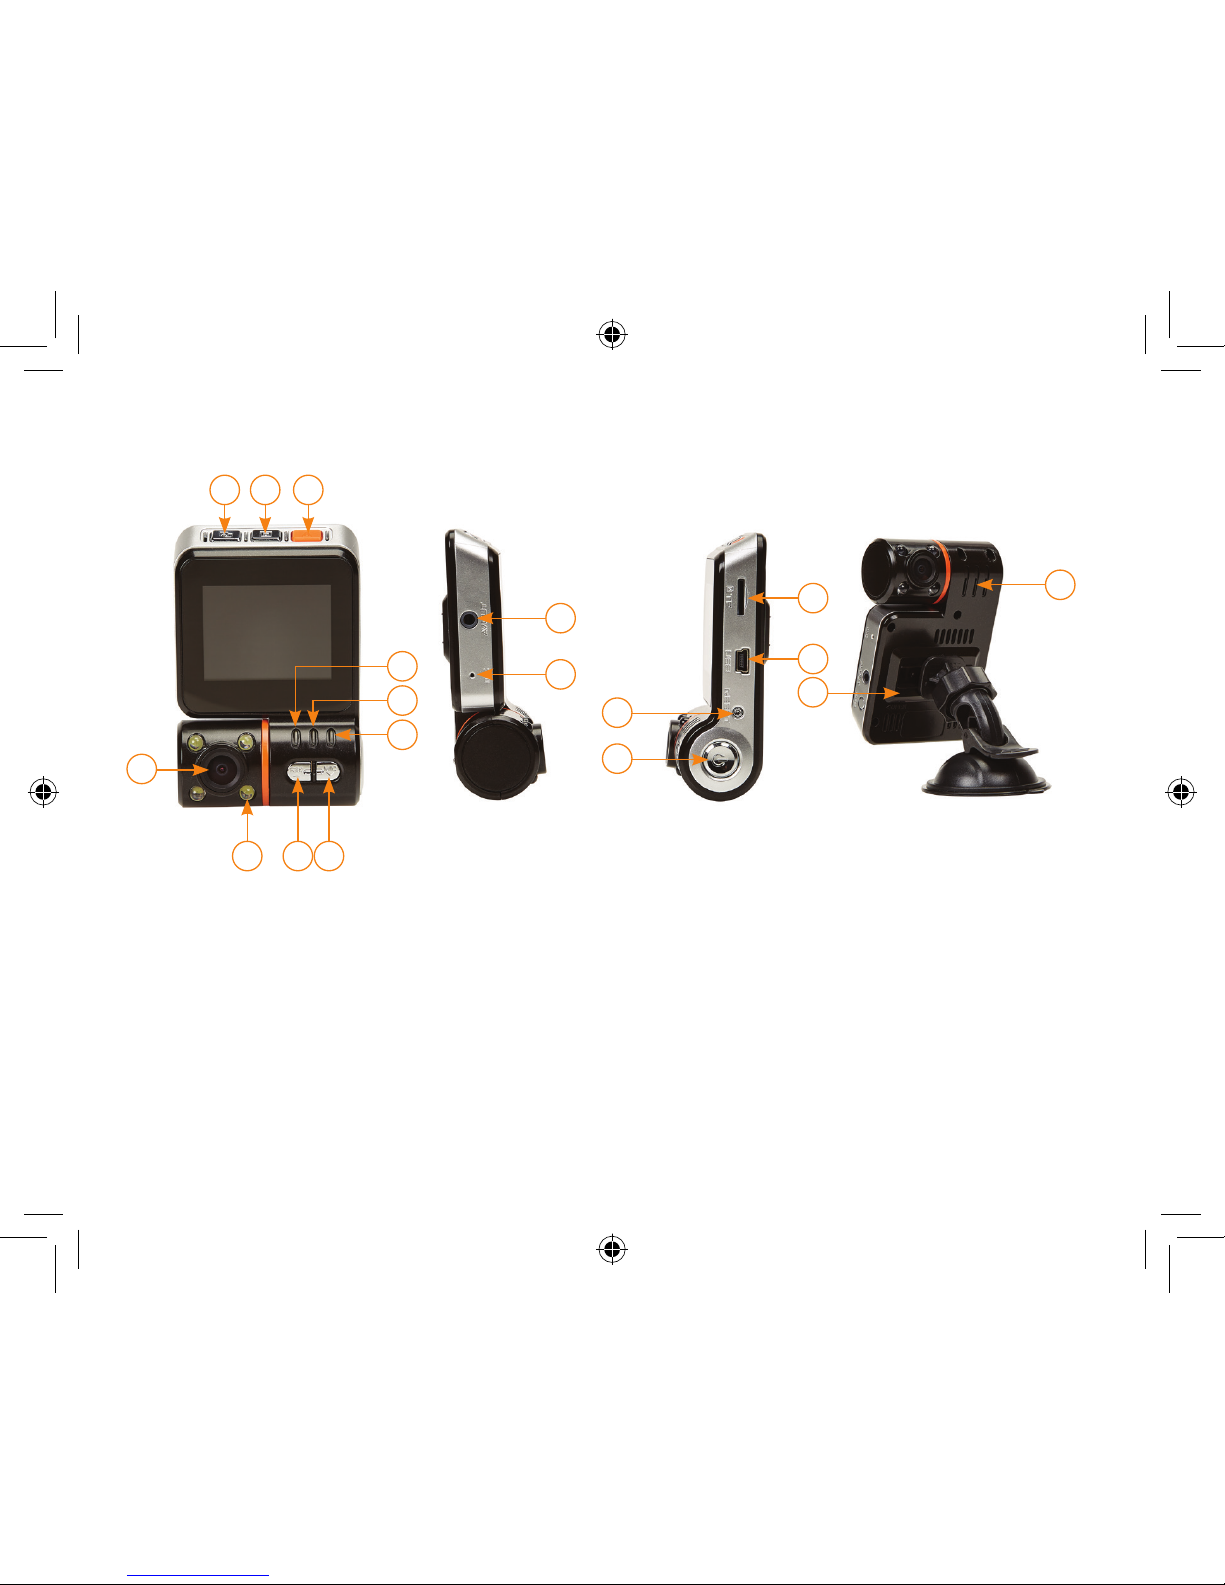
Mounting Bracket:
Slide Bracket on to back
of Dash Cam
3
14
17
2 31
18
4 5
6
8
7
10
9
13
12
11
16
15
Clear Dash HD Features & Functions
1. Menu
2. Photo / Play Back
3. Enter / File lock
4. Video Record/Stop/ Up
5. Sound Record/ Down
6. REC Indicator Light
7. Charging Indicator Light
8. MIC Indicator Light
9. AV OUT
10. MIC
11. Micro Memory Card Slot
12. USB Interface
13. Reset Button
14. On/Off Button - day/night
15. Speaker
16. Dash Mount Slot
17. LED Highlight
18. Rotating Camera Lens
CDHD-X3000_IB_TP_ENG_V1_170302.indd 3 3/3/17 4:38 PM
Page 6
3
2
1
4
4
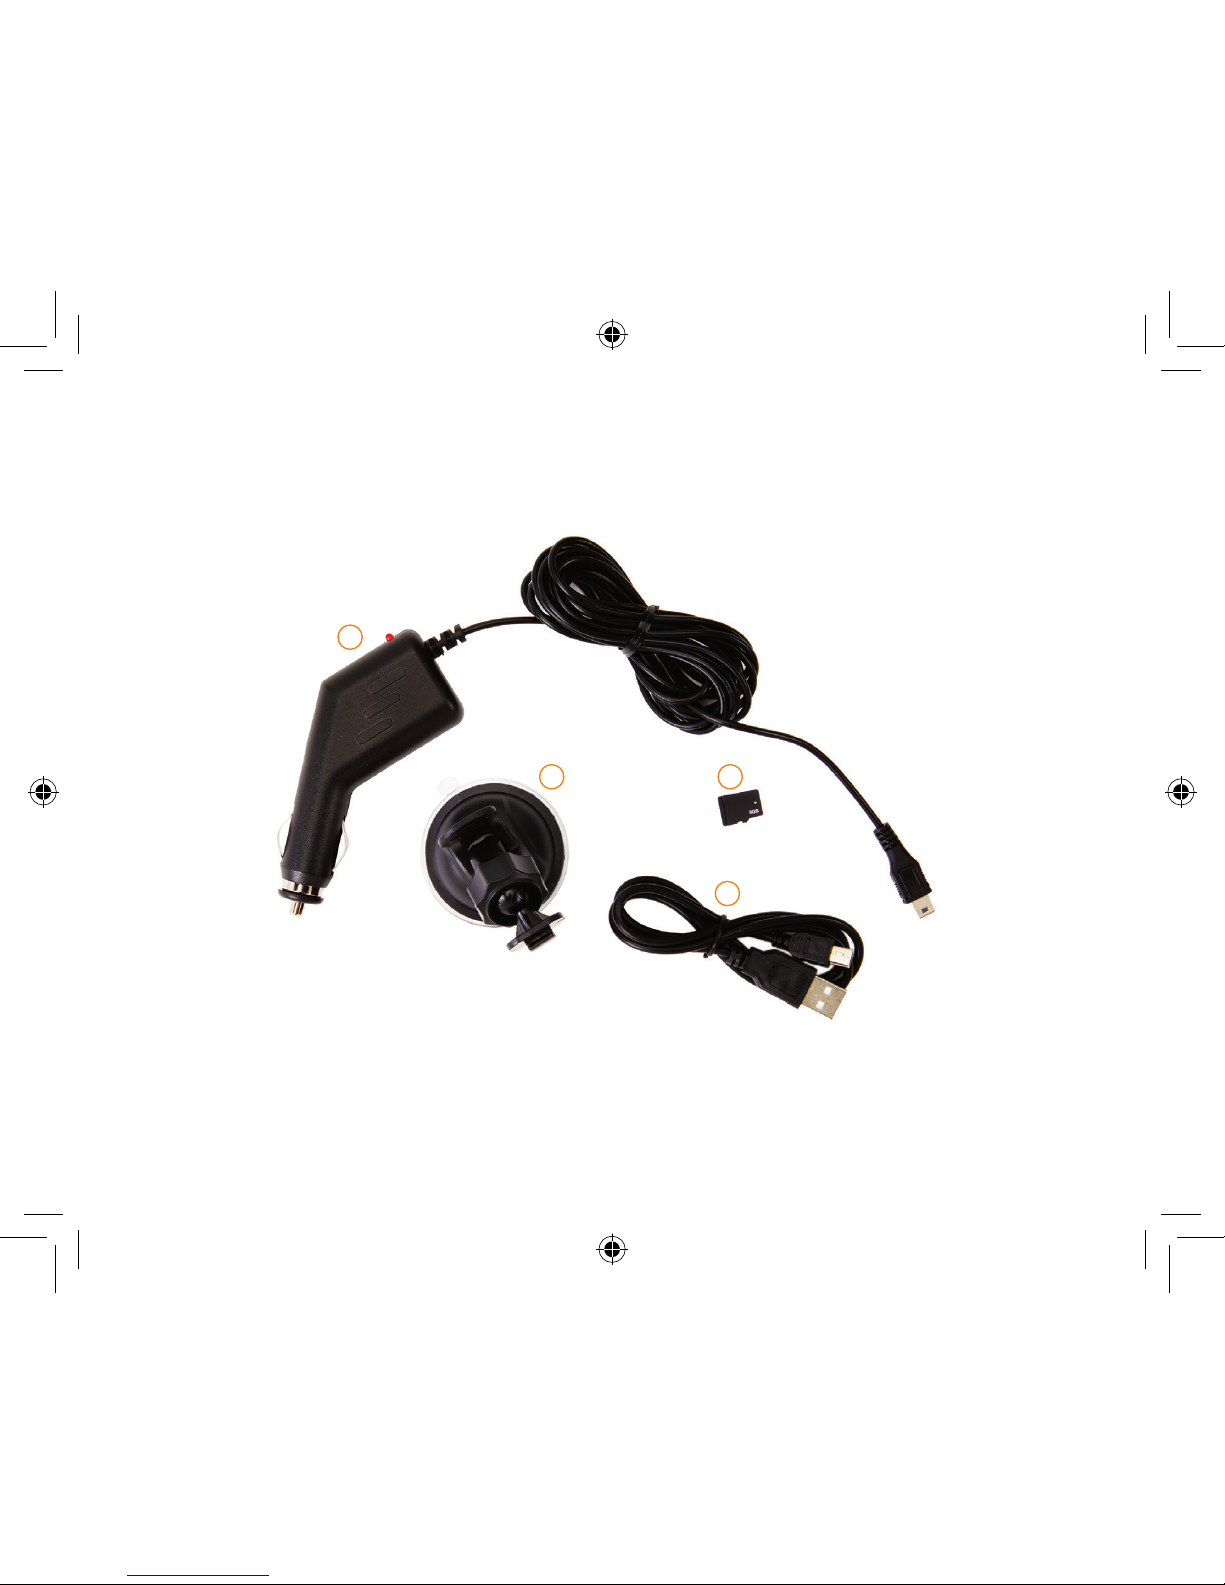
INCLUDES:
1. Power Port Car Charger with Mini USB Cable
2. Micro Memory Card -8Gb
3. USB to Mini USB Charging Cable
4. Suction Dash Mounting Bracket
Clear Dash HD
Accessories
CDHD-X3000_IB_TP_ENG_V1_170302.indd 4 3/3/17 4:38 PM
Page 7
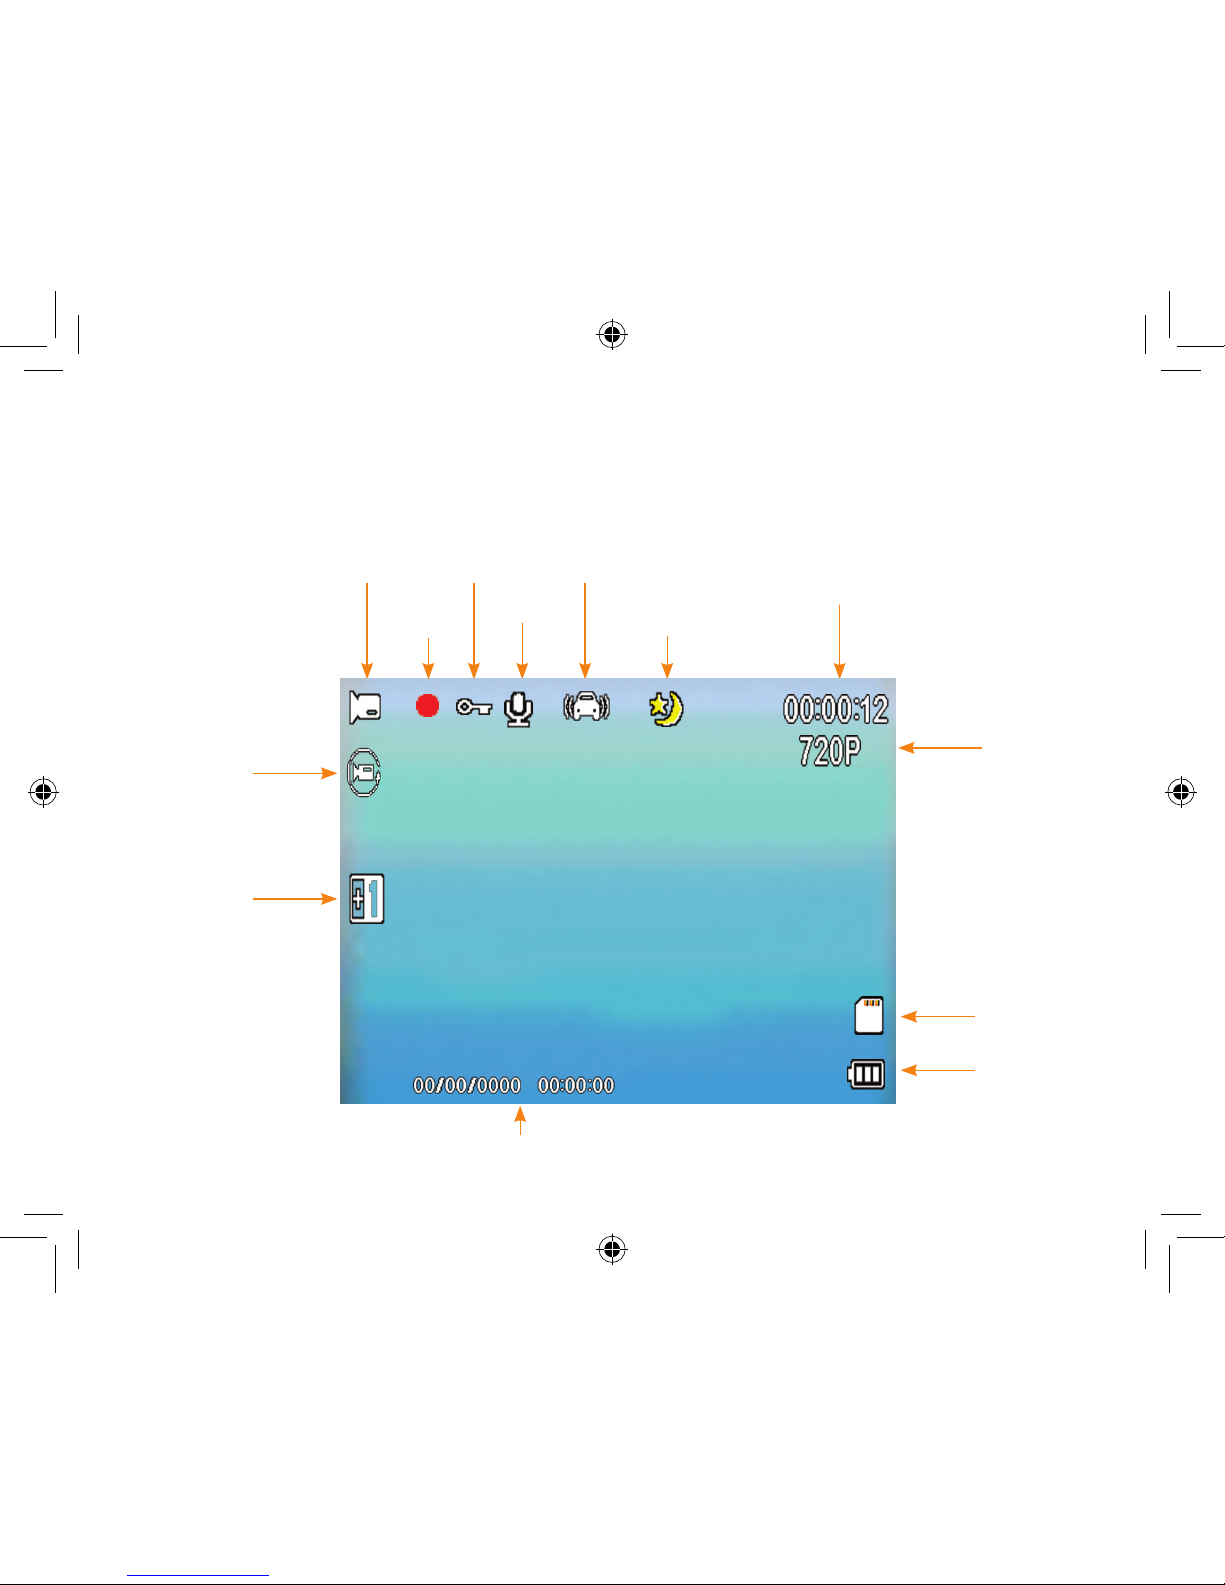
5
Clear Dash HD
Screen Features
Mode
Battery Charge
Date & Time
MM/DD/YYYY
Day/Night
Setting
Memory Card
Video
Resolution
Recording
Time
File Lock
Mic
G Sensor “on”
Cyclic Record
Exposure
Recording
Active
CDHD-X3000_IB_TP_ENG_V1_170302.indd 5 3/3/17 4:38 PM
Page 8

6
Clear Dash HD
Operating Instructions
Getting Started
1. Insert memory card into memory card
slot.
2. Mount unit on dash or window of vehicle
with camera lens facing the area to be
recorded.
Mounting to Dash with Suction Cup
a. Attach Safe Driving Dash Recorder
to the suction mount by sliding the
square mounting post into the mount
slot on the cam.
b. Locate a suitable position to mount
the dash cam. Do not obstruct
visibility for driving.
A smooth surface is needed for
suction cup to secure properly.
c. Make sure surface is clean as well as
suction cup.
d. Press suction cup to surface. Lock
lever in place.
e. Test mount to make secure. If loose,
repeat process.
3. Connect unit to power supply. Using
the power port cable, plug the USB
end into the X-3000 and the other end
into the Car Power port. The USB cable
can also be used to plug into the
X-3000 and a USB power adapter or
USB connection.
The red Charging light (7) will illuminate
and charge the unit’s battery while it
operates on the car’s electrical power.
The light will remain on while charging.
4. Unit should power up. If “Welcome”
screen does not appear, press and hold
ON/OFF (15) button for a few seconds
to turn on.
CDHD-X3000_IB_TP_ENG_V1_170302.indd 6 3/3/17 4:38 PM
Page 9

7
*While using the car power port
charging cable, the X-3000 will power
up and start recording.
Screen appears with 3 options.
Mass Storage
PC Camera
Rec mode
5. Scroll Down using Down key (5) key to
select Rec mode. Press Enter Key (3).
6. Press Video Rec Key (4) to start/stop
recording. Check video screen and
adjust unit position for best picture
recording. Video timer in upper left
corner will start to count. Blue record
light (6) will blink when recording.
Charging
Plug the power port cable into the USB port
on the X-3000. The charging light (7) will
illuminate. Charging light indicator will turn
off after fully charged.
Battery Use
Charge the internal battery as per
instructions above. The charge of the
battery can be seen by the battery strength
meter located on the screen in the lower
right corner.
Date & Time
Press Menu button once to enter Menu
Mode. Press again to advance to Video
Settings. Select Date/Time by pressing
enter. Adjust Date/Time by highlighting
elds and using up/down key to correct
date. Press Enter.
Modes of Operation:
Recording Video/DVR
Make sure unit is powered on. Press
Rec Key (4) to Start or Stop of
recording. Recording time can be
viewed in top right corner of the screen.
Files will be saved in time intervals set
in the Menu settings. Default is 1 minute
les. When power to the unit is turned
off, recording will be saved
automatically. Once memory card in full,
les will be rewritten from oldest one by
one. Except the locked le.
CDHD-X3000_IB_TP_ENG_V1_170302.indd 7 3/3/17 4:38 PM
Page 10

8
Photo/Camera
Make sure unit is powered on. Press the
Photo/Playback Key (2) to switch to the
Photo/Camera mode. Press Key (2)
again to take photo.
Playback/ Preview Delete les
Make sure unit is powered on. Hold and
press the Photo/Play Key (2) to enter
into playback mode. Press down (5)
or up Key (4) to scroll though saved
les. Press enter button (3) to play
le. Press Down button (5) to fast
forward at 2x, press again for 4x, press
again for 8x.Up button (4) can be
pressed to rewind -2x, press
again -4x, press again -8x.
Audio Record
Make sure unit is powered on. Press
the Audio Sound Key (5) to activate
microphone. Yellow Light (8) will
illuminate.
Switching between modes
Recording mode to Photo mode- Press
Photo Key (2).
Photo mode to Recording mode- Press
Video Key (4)
Playback mode to Photo mode- Press
and hold Photo Key (2).
Audio Record - press Audio Sound Key
(5). Toggle to turn off and on.
Panel Protect
This is the power saving screen.
Settings can be adjusted in the Main
Menu. Off setting will keep main screen
active continuously. Pressing any button
will activte the main screen. Default is 30
sec in order to limit distraction on driver.
Saving Files to PC
There are two methods to save les to PC.
From Micro Memory Card:
1) Remove Micro SD card and place in
card reader.
2) Find device and open folder for les.
3) Copy/save les to PC.
CDHD-X3000_IB_TP_ENG_V1_170302.indd 8 3/3/17 4:38 PM
Page 11

9
From Unit
1) Plug USB cable from X-3000 into the
USB slot of PC.
2) Find device under My computer.
3) Open folder listed and copy/save les
to PC.
Common Video les: O______
G-sensor locked les: EVEO______
Manual operated locked les: SOSO______
Deleting Files
Highlight les on PC when USB cable is
connected or when memory card is in
card reader. Press Delete.
Reset
Press reset button on the side of the unit
to restart the unit.
AV Out
Connect an AV cable to the AV out
port of the X--3000 after turning on
the product. The camera picture
appears automatically and then the
product can be operated normally. Pull
out the AV cable to exit.
Daylight/Night Recording
Toggle On/Off (14) to turn on Moon for
night and Blank for Sunlight.
Setting Loop Recording
Press Menu Key (1) ,and then press
Down Key (5),select “Cyclic Record.”
Setting Motion Detection
Press Menu Key (1), and then press
Down Key (5), select “Detection.”
CDHD-X3000_IB_TP_ENG_V1_170302.indd 9 3/3/17 4:38 PM
Page 12

10
Gravity Sensing
This car camera has G Shock built-in Gravity Sensing. If the vehicle has a severe
crash, the current video le will lock automatically. Lock Icon will appear on the middle
top of the screen. The lock le will not be overwritten in loop recording.
Parking guard
The car camera will turn on and record automatically when it detects shock after
setting parking guard function.
Fill Light
When the light is insufcient, turn on the LED highlight function in menu for additional
of light or press the On/Off button to turn on/off. Day/Night Icon will appear on
screen.
Capture Mode
Select time for capture mode/picture mode.
Anti-Shaking
Photographs will not be affected by shaking.
Lock File
Press the Enter/File Lock button (3) once to manually activate the video le protection
when in standby mode or when recording. The Lock Icon will appear on the screen.
The video le recording will be protected for overwriting of the cyclic recording. The
Lock icon will protect the le for the length of its recording time.( Ex. 1 min le length
Terms Denition
CDHD-X3000_IB_TP_ENG_V1_170302.indd 10 3/3/17 4:38 PM
Page 13

11
le will be protected for 1 min. Default setting can be changed in Main Menu Cyclic
Record.
Lock le is manual activation of the G-sensor which will automatically lock the le when
a shock/bump is sensed. Press manually to prevent overwrite of le.
Common Video les: O______
G-sensor locked les: EVEO______
Manual operated locked les: SOSO______
Resolution
Select resolution for video.
Cyclic record
Same as loop record. Time of each recording le.
Motion Detection
With motion detection selected on, unit will automatically record when there is motion
in front of the unit. Recording will stop when movement stops.
*An example of a shock could be a bump by another car in a parking lot.
CDHD-X3000_IB_TP_ENG_V1_170302.indd 11 3/3/17 4:38 PM
Page 14

12
Unit will not turn on
Unit must be charged. Connect to Power source. Charge for a few hours before use.
Unit is not recording
Check if memory card is installed or full. Another situation might be that the
memory card does not match the unit. Install the memory card supplied
with the unit or a similar type.
Battery is not charging
Check power connection and status of charging light. Charge for a few hours.
Battery issue may exist if there is no light and operation
Battery is dead after a few hours
Motion detection may be set to ON and draining battery by detecting excessive
motion. Change setting of motion detection to OFF. Default Motion is OFF.
No Memory Card
Card may not be installed correctly. Reinstall. Card may be mismatched to the unit.
Troubleshooting
CDHD-X3000_IB_TP_ENG_V1_170302.indd 12 3/3/17 4:38 PM
Page 15

13
Images are blurred
Clean camera lens.
Display shuts off
The display turns off at a preset time. Default panel protect setting turns unit off at a
preset time. Go to Menu to change setting.
CDHD-X3000_IB_TP_ENG_V1_170302.indd 13 3/3/17 4:38 PM
Page 16

14
Main Menu - Video Menu Default settings
Resolution
FHD 1920×1080 / HD
1280×720/VGA 640×480
HD 1280×720
Cyclic Record Off/1 Minute/2 Minutes/3 Minutes 1 Minute
Exposure -3/-2/-1/0/1/2/3 0
Audio Off/On OFF
Detection Off/On Off
Date Stamp Off/On On
Gravity Sensing Off/High/Medium/Low Medium
Parking Guard Off/On Off
DEFAULT SETTINGS
CDHD-X3000_IB_TP_ENG_V1_170302.indd 14 3/3/17 4:38 PM
Page 17

15
Menu - Video Settings Menu Default settings
Date/Time MM/DD/YYYY 02/17/2017
Power Save 1min, 3 mins, 5 mins, Off 1 Min
Beep Sound Off/On On
Language Chinese, English,Deutsch,Japanese English
TV Mode PAL/NTSC NTSC
Frequency 50Hz/60Hz 60Hz
Panel Protect Off/30S/1 Minute/2 Minutes 30 sec
Fill Light Off/On/Auto Off
Format Cancel/OK Cancel
Default Setting Cancel/OK Cancel
Version XD505_V0920170214
CDHD-X3000_IB_TP_ENG_V1_170302.indd 15 3/3/17 4:38 PM
Page 18

16
Capture Mode
Picture Mode
Menu Default settings
Capture Mode Off/self-timer 2s/self-timer 10s/Bust Off
Resolution
1.3M 1280*960/2MHD
1920*1080/3M 2048*1536
1.3M 1280*960
Sequence Off
Quality Fine/Normal/Economy Fine
Sharpness Strong/Normal/Soft Strong
White Balance
Auto/Daylight/Cloudy/Tungsten/
Fluorescent
Auto
Color
Normal/Black and White/Sepia/
Negative/Solarization
Normal
ISO Auto/100/200/400 Auto
Exposure -3/-2/-1/0/1/2/3 0
Anti-Shaking Off/On Off
Quick Review OFF/2 Seconds/5 Seconds Off
CDHD-X3000_IB_TP_ENG_V1_170302.indd 16 3/3/17 4:38 PM
Page 19

17
Capture Mode
Picture Mode
Menu Default settings
Date Stamp Off/Date/Time Date/Time
Date/Time
Auto Power Off
O/10S/20S/30S
Off
Beep Sound Off/On Off
Language Chinese, English,Deutsch,Japanese English
TV Mode PAL/NTSC NTSC
Frequency 50Hz / 60Hz 60Hz
LCD Brightness Off/1 Minute/2 Minutes/3 Minutes Off
Fill light Off/On/Auto Off
Format Cancel/OK Cancel
Default Setting Cancel/OK Cancel
Version XD505_V0920170214
CDHD-X3000_IB_TP_ENG_V1_170302.indd 17 3/3/17 4:38 PM
Page 20

18
Visual angle 120 degree
Lens degrees rotation 270 degree
Sensor 1.0 Mega pixels
Video resolution 1080P/1080PHD /720P/WVGA
Video format AVI
Video frame number 720P/30fps/ WVGA/30fps
Picture format JPEG
Picture resolution Actual pixel 1280**800 (optional)
Highlight support
Web camera support
Motion detection support
Removable disk support
Sound record synchronous video and sound record/only video without sound (optional)
TF card ≥ class4
Working humidity 300-500mA
Recording area 40m
Storage temperature -20-60 centigrade
Operation temperature -10-60 centigrade
Operation humidity 15-65%
Player software Windows Media Player/KM player
USB interface USB 2.0
Display screen 2.0 TFT
Capacity of battery 150mAh
Charging current 200MA
Charging time 1H
SPECIFICATION
CDHD-X3000_IB_TP_ENG_V1_170302.indd 18 3/3/17 4:38 PM
Page 21

19
CDHD-X3000_IB_TP_ENG_V1_170302.indd 19 3/3/17 4:38 PM
Page 22

20
MANUFACTURER’S
SIXTY DAY LIMITED WARRANTY
The manufacturer warrants that all parts and components are free of defects in materials
and workmanship for 60 days from the date the product is received. This warranty is valid
only in accordance with the conditions set forth below:
1. Normal wear and tear are not covered by this warranty. This warranty applies
to consumer use only, and is void when the product is used in a commercial or
institutional setting.
2. The warranty extends only to the original consumer purchaser and is not transferable.
In addition, proof of purchase must be demonstrated. This warranty is void if the
product has been subject to accident, misuse, abuse, improper maintenance or repair,
or unauthorized modication.
3. This limited warranty is the only written or express warranty given by the manufacturer.
Any implied warranty of merchantability or tness for a particular purpose on this
product is limited in duration to the duration of this warranty. Some states do not allow
limitations on how long an implied warranty lasts, so the above limitation may not apply
to you.
CDHD-X3000_IB_TP_ENG_V1_170302.indd 20 3/3/17 4:38 PM
Page 23

4. Repair or replacement of the product (or, if repair or replacement is not feasible, a
refund of the purchase price) is the exclusive remedy of the consumer under this
warranty. The manufacturer shall not be liable for any incidental or consequential
damages for breach of this warranty or any implied warranty on this product. Some
states do not allow the exclusion or limitation of incidental or consequential damages,
so the above limitation or exclusion may not apply to you.
5. This warranty gives you specic legal rights, and you may also have other rights which
vary from state to state.
Procedure for Warranty Repairs or Replacement:
If warranty service is necessary, the original purchaser must pack
the product securely and send it postage paid with a description
of the defect, proof of purchase, and a check or money order
for $9.99 to the following address:
Tristar Products Inc., 500 Returns Road, Wallingford, CT 06495.
CDHD-X3000_IB_TP_ENG_V1_170302.indd 21 3/3/17 4:38 PM
Page 24

22
CDHD-X3000_IB_TP_ENG_V1_170302.indd 22 3/3/17 4:38 PM
Page 25

23
CDHD-X3000_IB_TP_ENG_V1_170302.indd 23 3/3/17 4:38 PM
Page 26

Distributed By:
Tristar Products, Inc.
Faireld, NJ 07004
© 2017 Tristar Products, Inc.
CDHD-X3000_IB_TP_ENG_V1_170302
Owner’s Manual
High-Denition
Automotive
Video Recorder
CDHD-X3000_IB_TP_ENG_V1_170302.indd 24 3/3/17 4:38 PM
 Loading...