

Page 1
CLEAR SPOT 4G+
USER GUIDE
Page 2

SET IT UP 3
WHAT’S IN THE BOX? 3
IMPORTANT BUTTONS / LCD SCREEN INDICATORS / FEATURES 3
USE WITH CARE 3
INSERT AND CHARGE THE BATTERY 4
TURN IT ON 5
CONNECT YOUR WI-FI-ENABLED DEVICE TO THE CLEAR SPOT WI-FI NETWORK 5
CONNECT TO THE INTERNET 6
SHARE YOUR CLEAR SPOT 7
MANAGE YOUR CLEAR SPOT 8
CLEAR SPOT HOME PAGE OVERVIEW 8
CLEAR SPOT HOME PAGE / SIGNAL INFORMATION 9
CLEAR SPOT HOME PAGE / CONNECTED 10
CLEAR SPOT HOME PAGE / ALERTS 11
CLEAR SPOT HOME PAGE / WI-FI USERS 12
CLEAR SPOT HOME PAGE / BATTERY 13
CLEAR SPOT HOME PAGE / INTERNET CONNECTION INFORMATION 14
CLEAR SPOT HOME PAGE / MICRO SD CARD 15
CLEAR SPOT HOME PAGE / MICRO SD CARD (CONTINUED) 16
CLEAR SPOT HOME PAGE / SOUNDS 17
CLEAR SPOT HOME PAGE / ADMIN LOGIN 18
CLEAR SPOT HOME PAGE / ADMIN SETUP 19
CLEAR SPOT HOME PAGE / ADMIN SETUP (CONTINUED) 20
CLEAR SPOT HOME PAGE / ADVANCED SETTINGS / DEVICE / BASIC 21
CLEAR SPOT HOME PAGE / ADVANCED SETTINGS / DEVICE / DISPLAY 22
CLEAR SPOT HOME PAGE / ADVANCED SETTINGS / DEVICE / MICRO SD CARD 23
CLEAR SPOT HOME PAGE / ADVANCED SETTINGS / DEVICE / SOUNDS 24
CLEAR SPOT HOME PAGE / ADVANCED SETTINGS / DEVICE / ABOUT 25
CLEAR SPOT HOME PAGE / ADVANCED SETTINGS / DEVICE / ABOUT (CONTINUED) 26
CLEAR SPOT HOME PAGE / ADVANCED SETTINGS / DEVICE / LOG 27
CLEAR SPOT HOME PAGE / ADVANCED SETTINGS / WAN / SETUP 28
CLEAR SPOT HOME PAGE / ADVANCED SETTINGS / WAN / SETUP (CONTINUED) 29
CLEAR SPOT HOME PAGE / ADVANCED SETTINGS / WAN / 3G 30
CLEAR SPOT HOME PAGE / ADVANCED SETTINGS / WAN / 4G 31
CLEAR SPOT HOME PAGE / ADVANCED SETTINGS / WI-FI / NETWORK 32
CLEAR SPOT HOME PAGE / ADVANCED SETTINGS / WI-FI / NETWORK (CONTINUED) 33
CLEAR SPOT HOME PAGE / ADVANCED SETTINGS / WI-FI /SECURITY 34
CLEAR SPOT HOME PAGE / ADVANCED SETTINGS / WI-FI /SECURITY (CONTINUED) 35
CLEAR SPOT HOME PAGE / ADVANCED SETTINGS / WI-FI / MAC FILTER 36
CLEAR SPOT HOME PAGE / ADVANCED SETTINGS/ ROUTER / BASIC 37
CLEAR SPOT HOME PAGE / ADVANCED SETTINGS/ ROUTER / LAN 38
1
Page 3

CLEAR SPOT HOME PAGE / ADVANCED SETTINGS/ ROUTER / LAN 39
CLEAR SPOT HOME PAGE / ADVANCED SETTINGS / ROUTER / PORT FORWARD 40
CLEAR SPOT HOME PAGE / ADVANCED SETTINGS / ROUTER / PORT TRIGGER 41
CLEAR SPOT HOME PAGE / ADVANCED SETTINGS / ROUTER / DMZ 42
CLEAR SPOT HOME PAGE / SUPPORT 43
CLEAR SPOT HOME PAGE / FEEDBACK 44
CLEAR SPOT HOME PAGE / HELP 45
ADDITIONAL USE CASE INFORMATION 46
USING THE CLEAR SPOT VIA USB 46
QUICK TIPS 47
EXTEND THE CLEAR SPOT BATTERY LIFE 47
MAXIMIZE SECURITY OF THE CLEAR SPOT 47
ENSURE YOUR DEVICES RECOGNIZE YOUR CLEAR SPOT 47
FACILITATING YOUR ABILITY TO BROWSE THE INTERNET 48
RESETTING YOUR ADMINISTRATOR PASSWORD 48
IMPORTANT MESSAGE FROM CLEAR 48
OTHER INFORMATION 49
ACCESSORIES 49
TECHNICAL SPECIFICATIONS 49
STILL NEED HELP? 50
FAQS AND LIVE CHAT SUPPORT 50
TELEPHONE SUPPORT 50
QUESTIONS ABOUT YOUR BILL? 50
IMPORTANT INFORMATION DOCUMENT 50
WARRANTY INFORMATION 50
LEGAL DISCLOSURES 50
2
Page 4

Set It Up
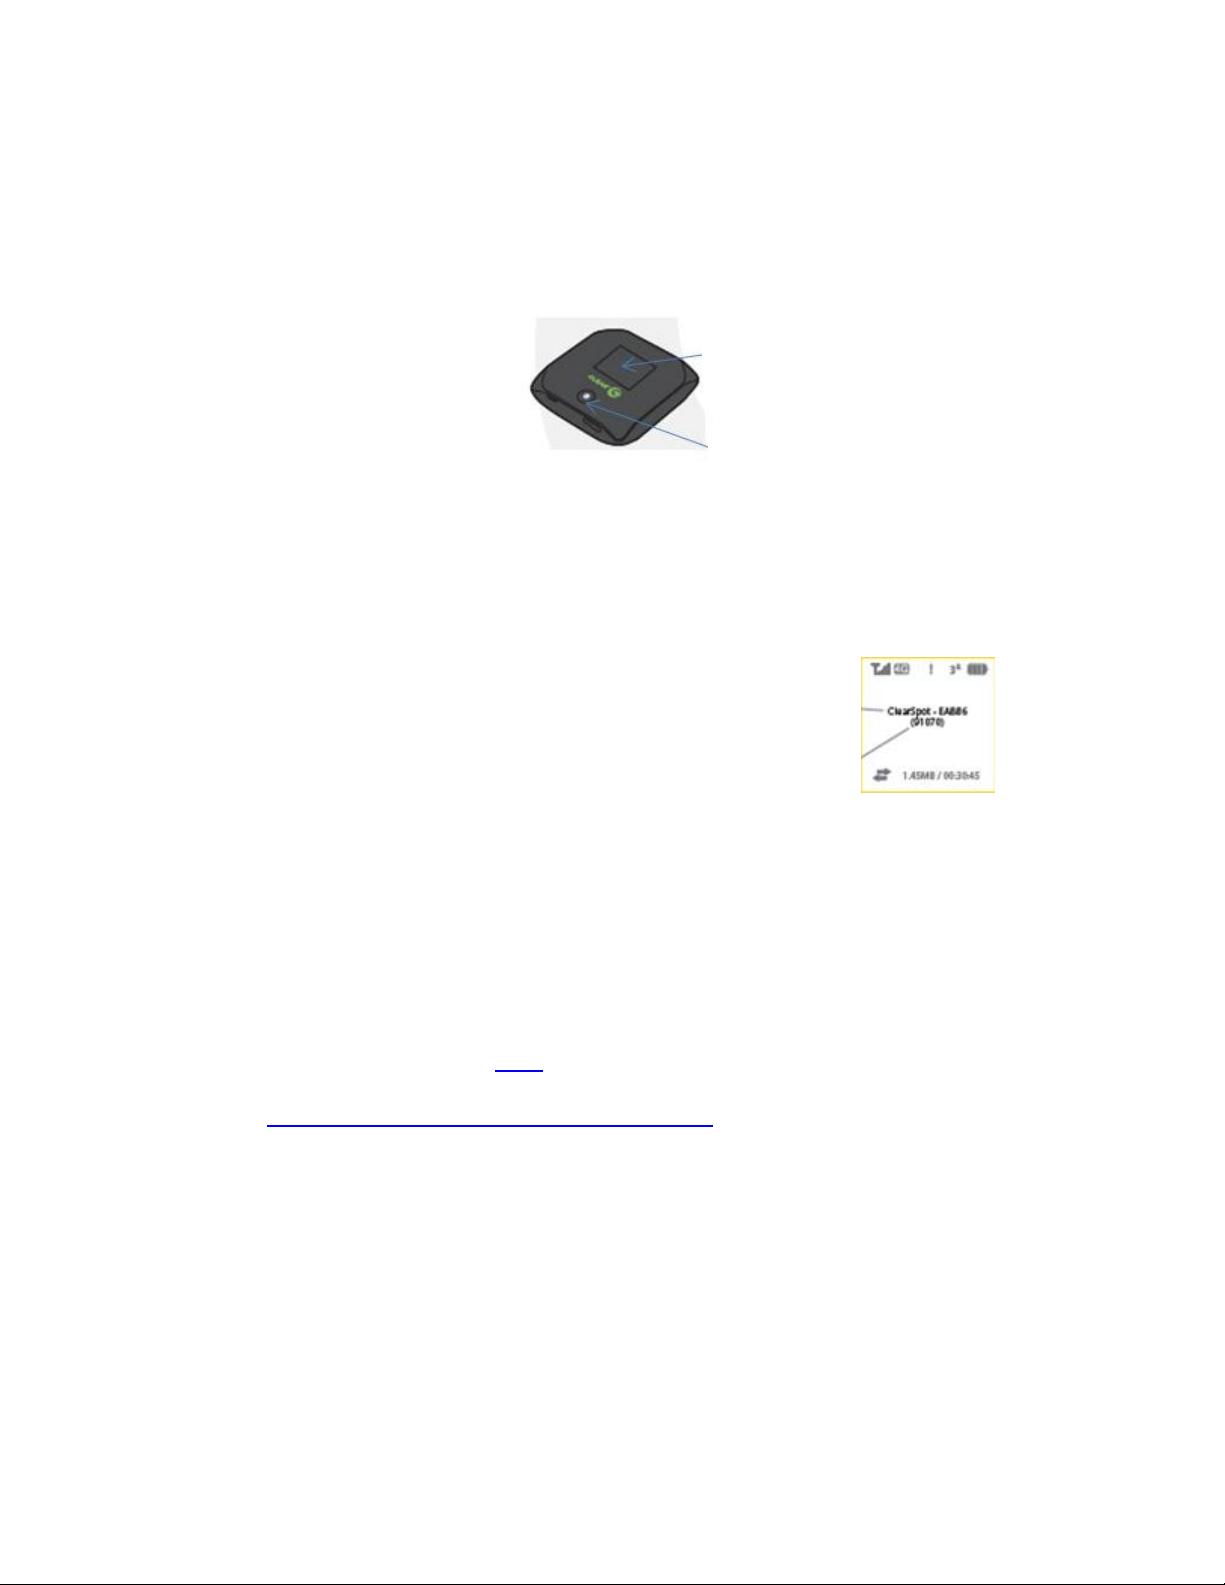
Mute Switch
Micro SD Card Slot
Micro-USB Port
A. Signal Strength
D. Number of Connected Users
What’s in the Box?
CLEAR Spot 4G+ Personal Hotspot Battery Wall Charger Micro-USB Cable Quick Start Guide
Important Buttons / LCD Screen Indicators / Features
LCD Screen
Power Button
B. 4G/3G Status
C. Alerts
E. Battery Status
The Power Button turns the CLEAR Spot 4G+ (CLEAR Spot) on and off.
Use the Micro-USB Port with the Wall Charger or to connect the CLEAR Spot to your computer.
The Mute Switch is used to turn on and off sounds (such as alerts) from the CLEAR Spot. The
mute switch is located on the side of the CLEAR Spot.
Your CLEAR Spot supports Micro SD Cards – up to 16GB (sold separately) for file sharing and
transfer or storage. The Micro SD Card Slot is located on the side of the CLEAR Spot. Your
computer recognizes the Micro SD Card as a removable storage device. Store the files on a
Micro SD Card and insert the Micro SD Card into the Micro SD Card Slot.
The LCD Screen displays important information about the CLEAR Spot.
F. Name / Message Area
G. Amount of Data Transferred
Use with Care
Position the CLEAR Spot on a clean, flat, secure surface, and do not drop the CLEAR Spot.
Keep the CLEAR Spot away from other devices that produce electromagnetic waves.
Keep the CLEAR Spot out of direct sunlight.
Do not throw or dismantle the CLEAR Spot.
Keep the CLEAR Spot and battery cool.
Keep pets and children from playing with the CLEAR Spot.
Do not immerse the CLEAR Spot or the battery in water or other liquid.
Make sure your hands are dry before handling the CLEAR Spot or any of the included items
Don’t apply adhesives to the CLEAR Spot. They may cause the CLEAR Spot to overheat and
may alter the antenna’s performance.
Don’t operate the CLEAR Spot while driving.
3
Page 5

Set It Up (continued)
To use the Wall Charger, plug the small end of the
To charge the CLEAR Spot battery through your
Remove the battery cover, slide in the battery so the pins
Insert and Charge the Battery
The battery comes partially charged, so you can use your CLEAR Spot right away.
align, and replace the battery cover.
The CLEAR Spot battery is easy to charge.
Micro-USB Cable (USB Cable) into the CLEAR
Spot, plug the large end into the Wall Charger, and
plug the Wall Charger into an electrical outlet.
computer, plug the small end of the USB Cable
into the CLEAR Spot, and plug the large end into
an available USB Port on your computer.
You can use the CLEAR Spot while charging the battery.
When the battery is fully charged, you’ll see four bars on the LCD screen.
It takes approximately three hours to fully charge a battery that has no charge.
The LCD screen displays icons, depending on the battery charge level. The chart below illustrates
the icons, as well as the descriptions of the different battery conditions.
Icon Description
The battery charge level is critical and the battery should be charged immediately. When this
happens, the CLEAR Spot automatically will turn off.
No battery is in the CLEAR Spot. The CLEAR Spot is connected to the Wall Charger.
The CLEAR Spot is connected via the USB Cable. The battery is either charging or not
inserted.
The battery is low.
Four bars indicate the battery is fully charged.
When charging, the LCD screen shows and, if the CLEAR Spot is off, displays a message
“Charging… xx% complete.”
4
Page 6
Set It Up (continued)
The CLEAR Spot wi-fi network name and network
key (password) are displayed on the LCD screen. If
Network
Password
LCD
Power
Turn It On
We recommend you use a laptop to set up your CLEAR Spot.
With the battery in your CLEAR Spot, press and hold the Power Button for two to three seconds, to
turn it on.
The CLEAR Spot automatically will activate and the LCD screen briefly will display “Activation
Complete.”
Connect your wi-fi-enabled device to the CLEAR Spot wi-fi network
the LCD screen is blank, briefly press the Power
Button to wake up the screen.
On your laptop or wi-fi-enabled device (device), view the list of available wireless networks. Select
the Clear Spot wi-fi network and when prompted, enter the password. Your device will display a
message indicating it has connected to your CLEAR Spot wi-fi network.
When indoors, place the CLEAR Spot near a window or outside wall to receive the best signal. The
CLEAR Spot wi-fi network range is 100 – 150 feet, so you don’t have to be next to the CLEAR Spot to
connect your device.
If you’re connected to the internet, click here to login to your CLEAR online account, and to use the
CLEAR network diagnostics tool to help optimize the CLEAR 4G signal. If you’re not connected to
the internet, enter https://www.clear.com/my_account/signin.php in your web browser when you are
connected to the internet.
5
Page 7

Set It Up (continued)
Connect to the Internet
The first time you connect to the internet, you’ll see a page where you will be asked to review the
CLEAR Terms of Service.
Once you accept them, your browser will display a welcome page. Click “The Internet” option.
If you activated your CLEAR Spot in 4G, you’ll be directed to a webpage to review your rate plan
information and set up your CLEAR online account.
If you activated your CLEAR Spot in 3G, you’ll go straight to the internet and won’t see these options
until you connect in 4G. You can, however, enter the following URL to view your rate plan
information and set up your CLEAR online account, in 3G.
Enter: https://www.clear.com/my_account/signin.php.
Or, you can wait until the first time you’re in 4G, when you’ll be prompted to view your rate plan and
set up your CLEAR online account.
Congrats! You’re ready for INTERNET AWESOMENESS!
6
Page 8
Set It Up (continued)
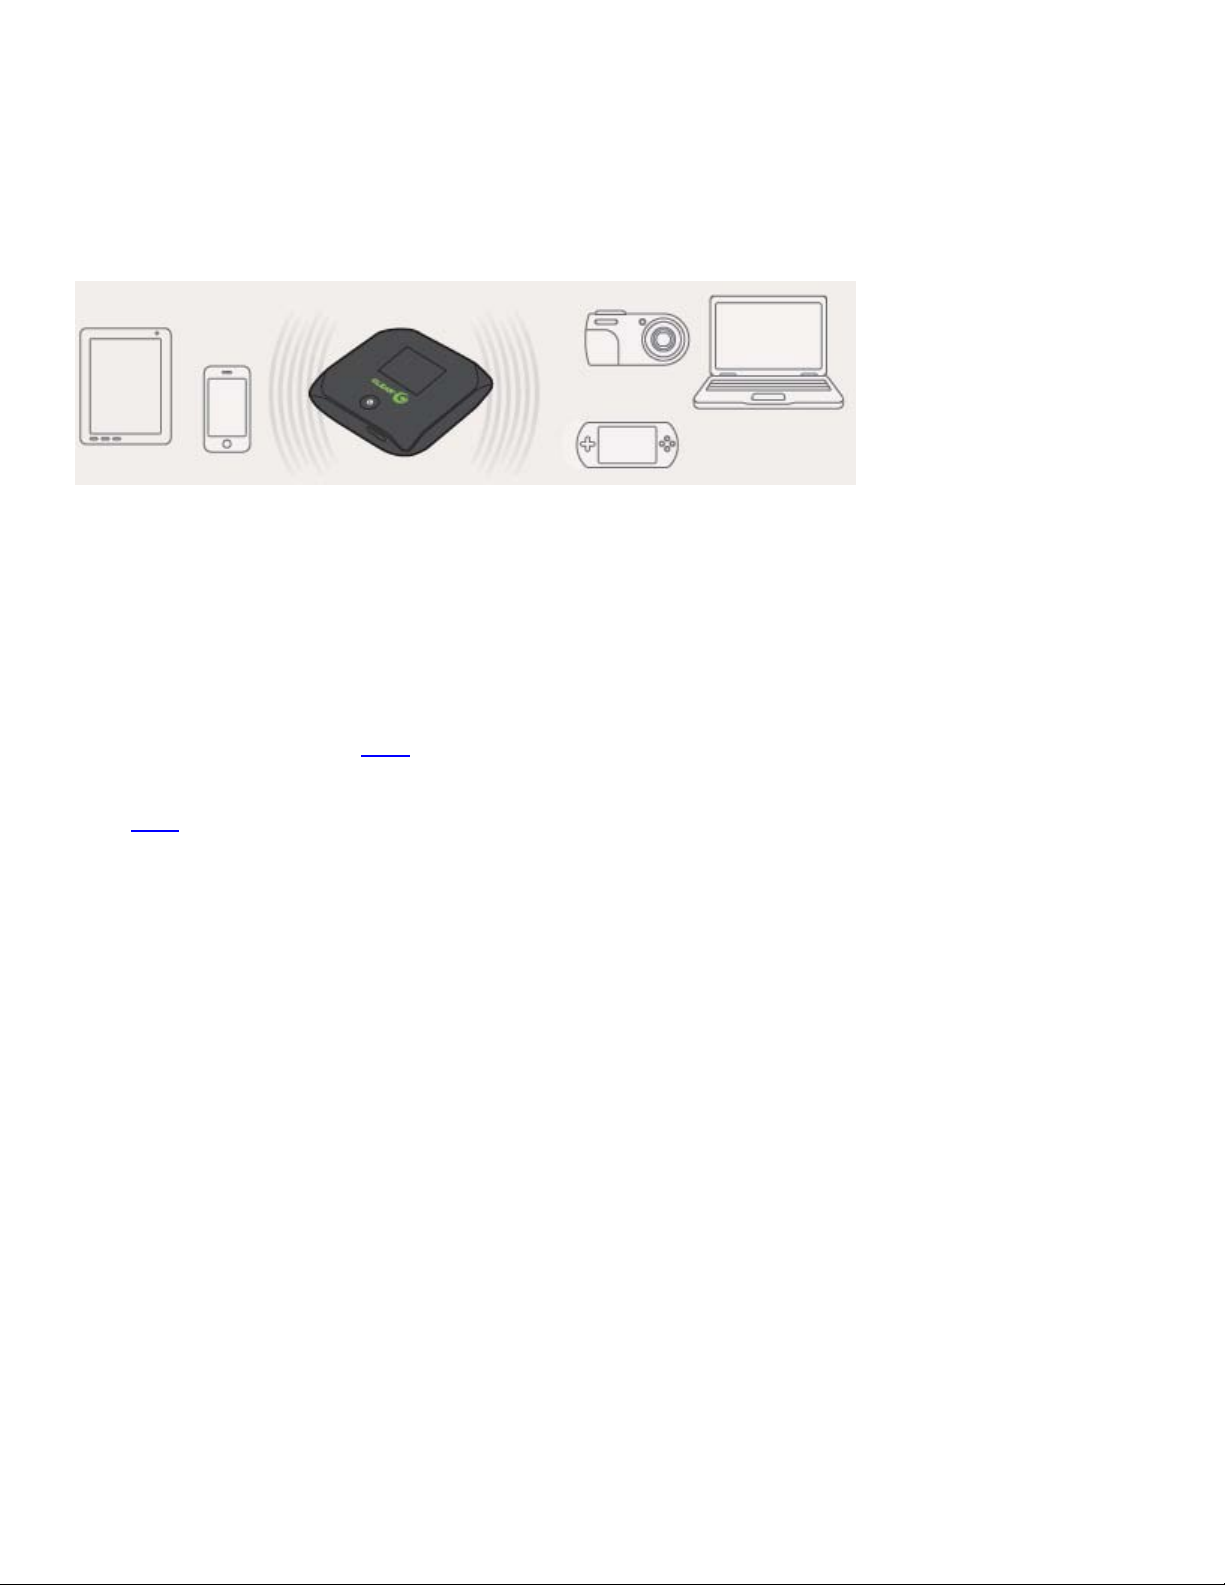
Share your CLEAR Spot
It’s easy to share your CLEAR Spot with up to five devices at the same time.
Give your colleagues and friends your CLEAR Spot network name and password.
Make sure the devices with which you desire to share are within range of your CLEAR Spot – usually
within 100 - 150 feet.
If you are sharing the CLEAR Spot wi-fi network with other devices and you turn off the CLEAR Spot,
the other devices won’t be able to access the internet using the CLEAR Spot wi-fi network.
If you changed the CLEAR Spot wi-fi network name and password, you easily can reset them.
Instructions are in the Quick Tips / Resetting your Administrator Password section of the CLEAR 4G+
Online User Guide. Click here to learn more.
You also can use the CLEAR Spot Home Page to change the wi-fi network name and password.
Click here to learn more.
7
Page 9
Manage your CLEAR Spot
If you’re using your
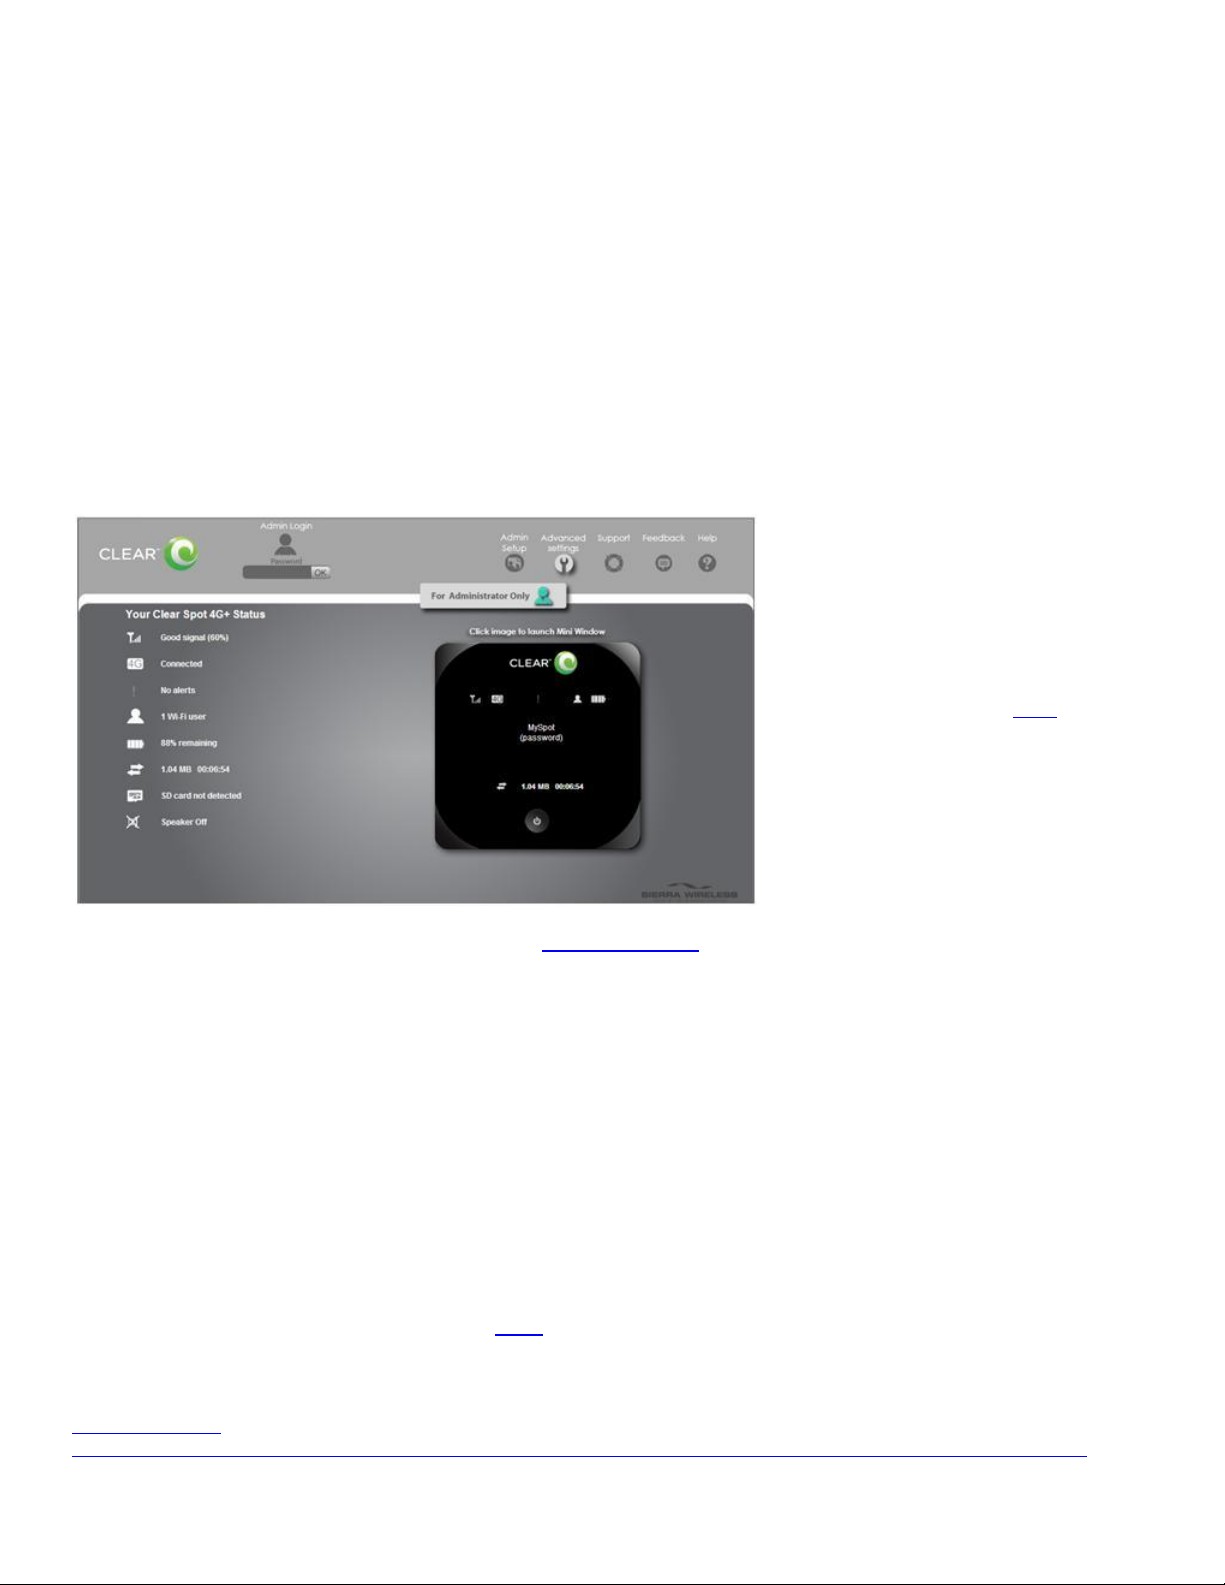
CLEAR Spot Home Page Overview
It’s easy to manage your CLEAR Spot.
With the CLEAR Spot Home Page, you can:
Change the CLEAR Spot network name and password.
Change settings, such as network signal range, security settings, and number of connected
devices.
View data usage.
View signal strength and battery charge level.
View connection time and the amount of data transmitted.
View and upgrade the CLEAR Spot firmware.
And more!
CLEAR Spot and are
connected to the
internet, click here to
open the CLEAR Spot
Home Page.
When you’re using your CLEAR Spot, enter http://clearspot in your web browser to open the CLEAR
Spot Home Page.
To login to the CLEAR Spot Home Page, you need to enter a Password, which is factory pre-set to
“admin.” When you’re logging in, you can choose “remember me” (or Automatic Login), so that each
time you open the CLEAR Spot Home Page, it remembers your login credential and the page will
open without prompting you to enter your password. You don’t need to login to access and view the
CLEAR Spot Home Page. However, in order to change settings, you must login.
Links to most of the screens (tabs / windows) appear on the CLEAR Spot Home Page. Just hover
your mouse over the links (on the left side of the screen) to see a preview of the information available
on the screen, or click on the links (on the top right of the screen).
We recommend bookmarking the CLEAR Spot Home Page for easy access.
If you’re connected to the internet, click here to view an online demo of the CLEAR Spot Home Page.
If you printed this document or are not connected to the internet, enter the following URL in your web
browser when you are connected to the internet. Enter:
https://empower-
dev.clearwire.com/images/images/stories/flash/Clear%20Spot%204G+%20Personal%20Hotspot%20Simulator.swf
8
Page 10
Manage your CLEAR Spot (continued)
If you’re using your
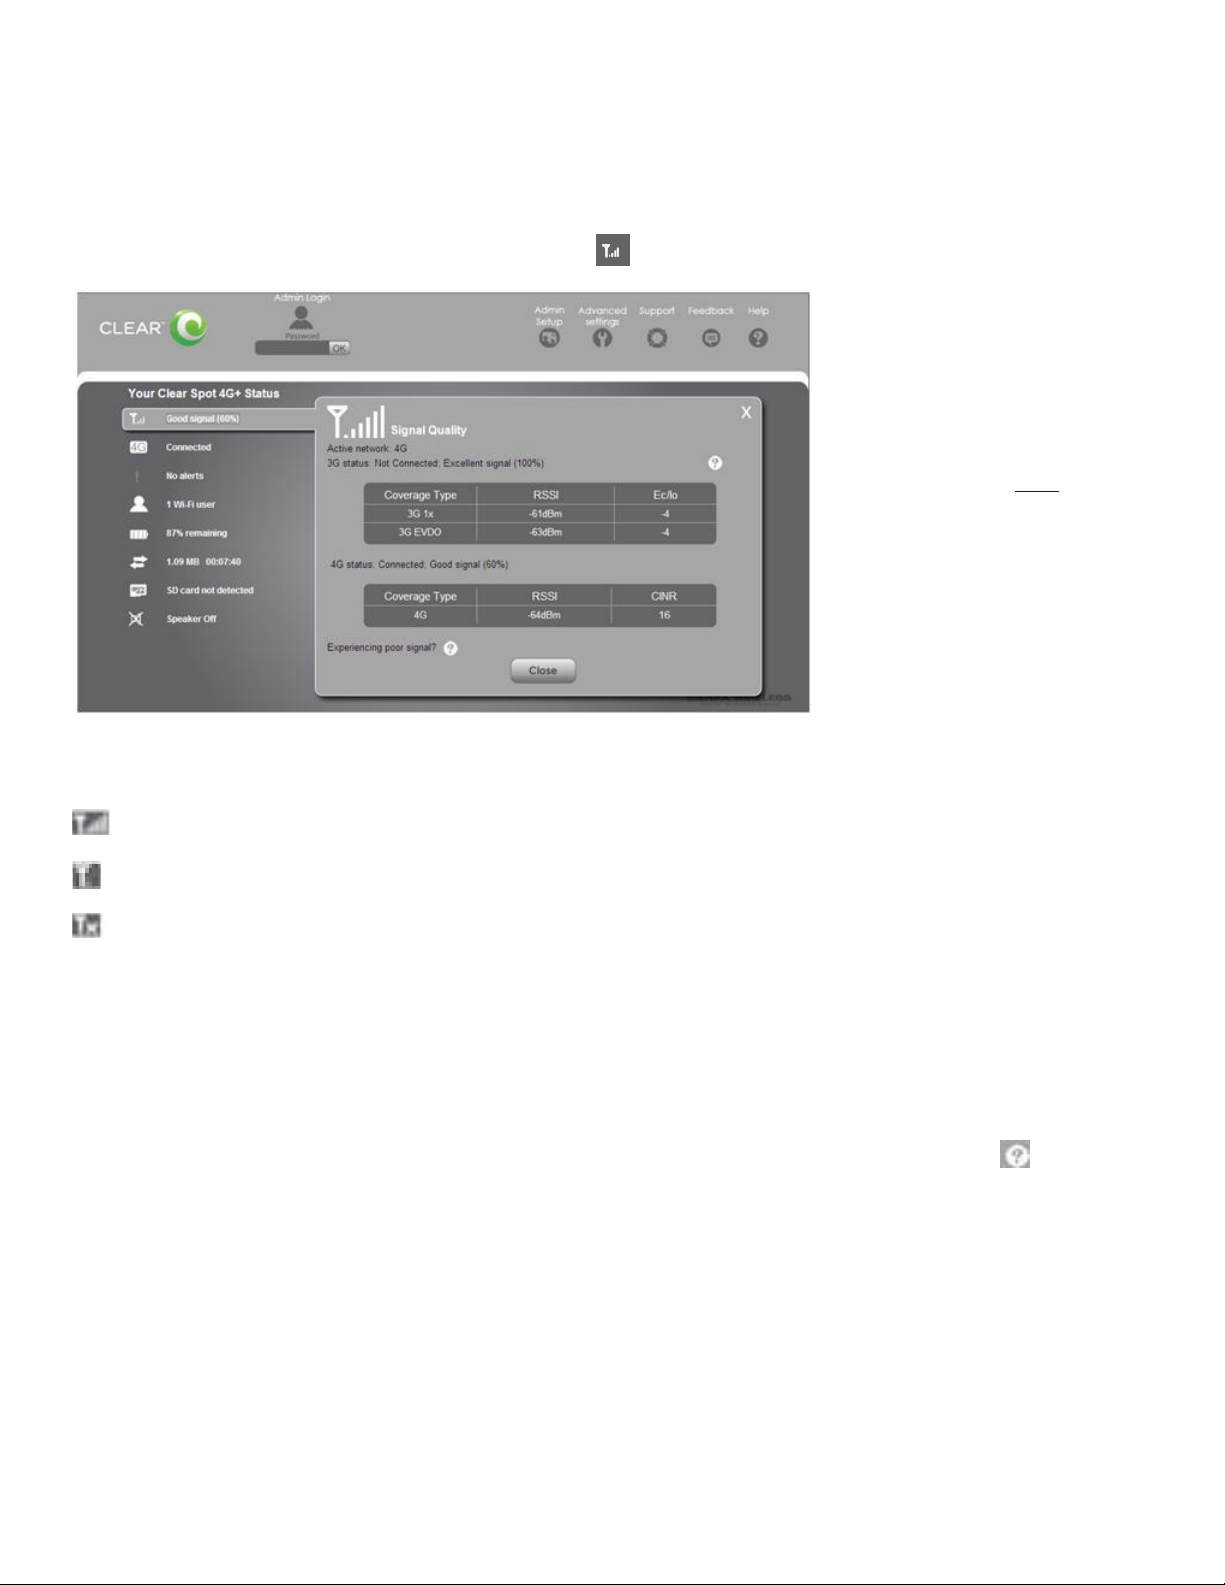
CLEAR Spot Home Page / Signal Information
This window displays helpful information about the CLEAR Spot signal strength.
To open the Signal Information window, click the graphic icon on the CLEAR Spot Home Page.
CLEAR Spot and are
connected to the
internet, click here to
open the CLEAR Spot
Home Page.
At the top of the window, a graphic icon uses bars to indicate the signal strength: the more bars, the
stronger the signal.
Means the CLEAR Spot is receiving an excellent signal.
Means the CLEAR Spot is receiving a weak signal.
Means the CLEAR Spot is not receiving a signal.
This window displays the active network type (4G or 3G) with a text description as well as the signal
status, represented as a percentage, for example “Excellent signal (100%)” or “Good signal (60%).”
Other information (such as RSSI, Ec/lo, and CINR – which are described later in the CLEAR Spot
Online User Guide) is displayed in the window, but the most important information are the type of
network to which the CLEAR Spot is connected and the signal strength.
On the bottom of the window, the text reads, “Experiencing Poor Signal?” Double click to open a
new window that provides tips on improving signal strength. When indoors, place the CLEAR Spot
near a window or outside wall to receive your best signal.
When you’re finished viewing this window, click “Close” and you’ll see the CLEAR Spot Home Page.
Note: The Signal Information link appears on every window of the CLEAR Spot Home Page.
9
Page 11
Manage your CLEAR Spot (continued)
If you’re using your
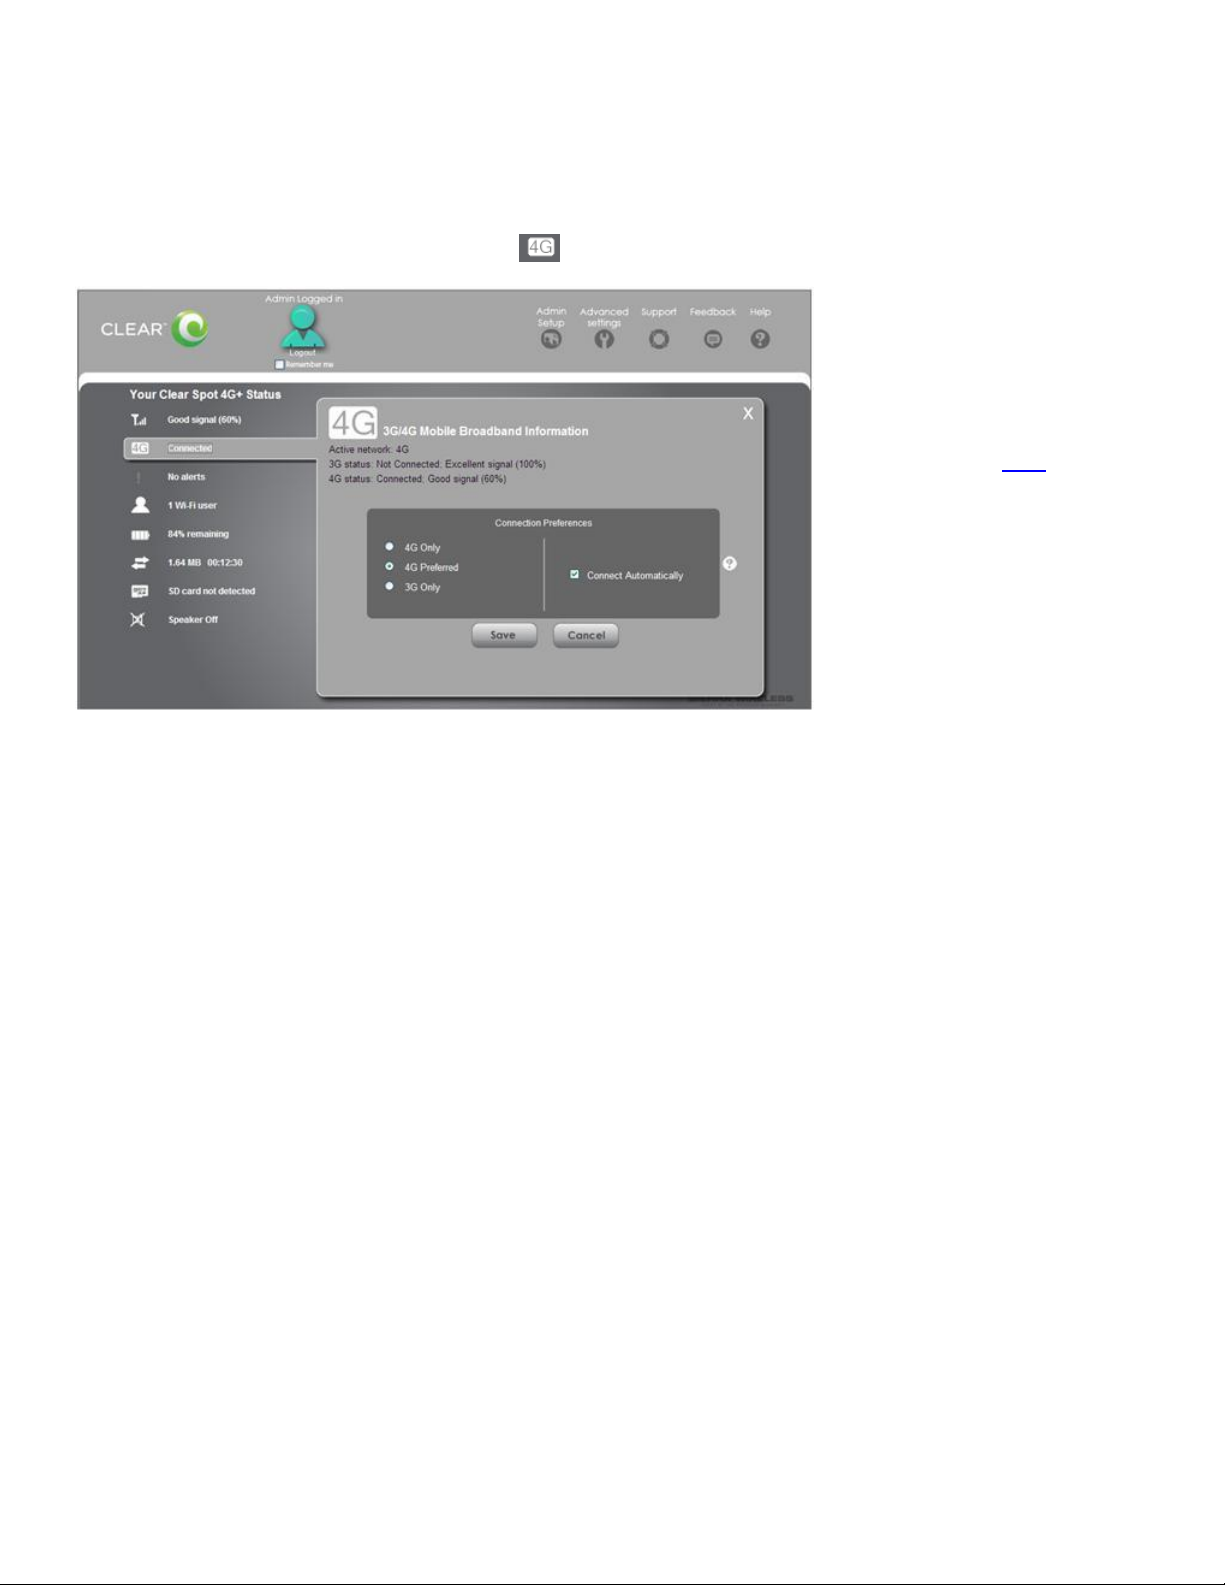
CLEAR Spot Home Page / Connected
Use this window to view and change the CLEAR Spot’s connection preferences.
To open the Connected window, click the graphic icon on the CLEAR Spot Home Page.
CLEAR Spot and are
connected to the
internet, click here to
open the CLEAR Spot
Home Page.
Note: To change your connection preferences, you must be logged in to the CLEAR Spot Home
Page.
You can choose:
4G Only: Not recommended – connection can be established only to 4G.
4G Preferred: This is the recommended setting – the CLEAR Spot automatically will search first
for the CLEAR 4G signal. If a CLEAR 4G signal is not available, the CLEAR Spot will search for
an available 3G signal
3G Only: Not recommended – connection can be established only to 3G.
Connect Automatically: Select to connect automatically to the network when the CLEAR Spot is
turned on, or upon loss of network connection.
When you’re ready to set your connection preferences, click “Save” and you’ll see the CLEAR Spot
Home Page.
If you don’t desire to make any changes, click “Cancel” and you’ll see the CLEAR Spot Home Page.
The window also displays the active network type, signal status, and signal strength (similar to the
information that is displayed in the Signal Strength window); however, the primary purpose is for you
to view and change your CLEAR Spot connection preferences.
Note: The Connected link appears on every window of the CLEAR Spot Home Page.
10
Page 12
Manage your CLEAR Spot (continued)
If you’re using your
connected to the internet,
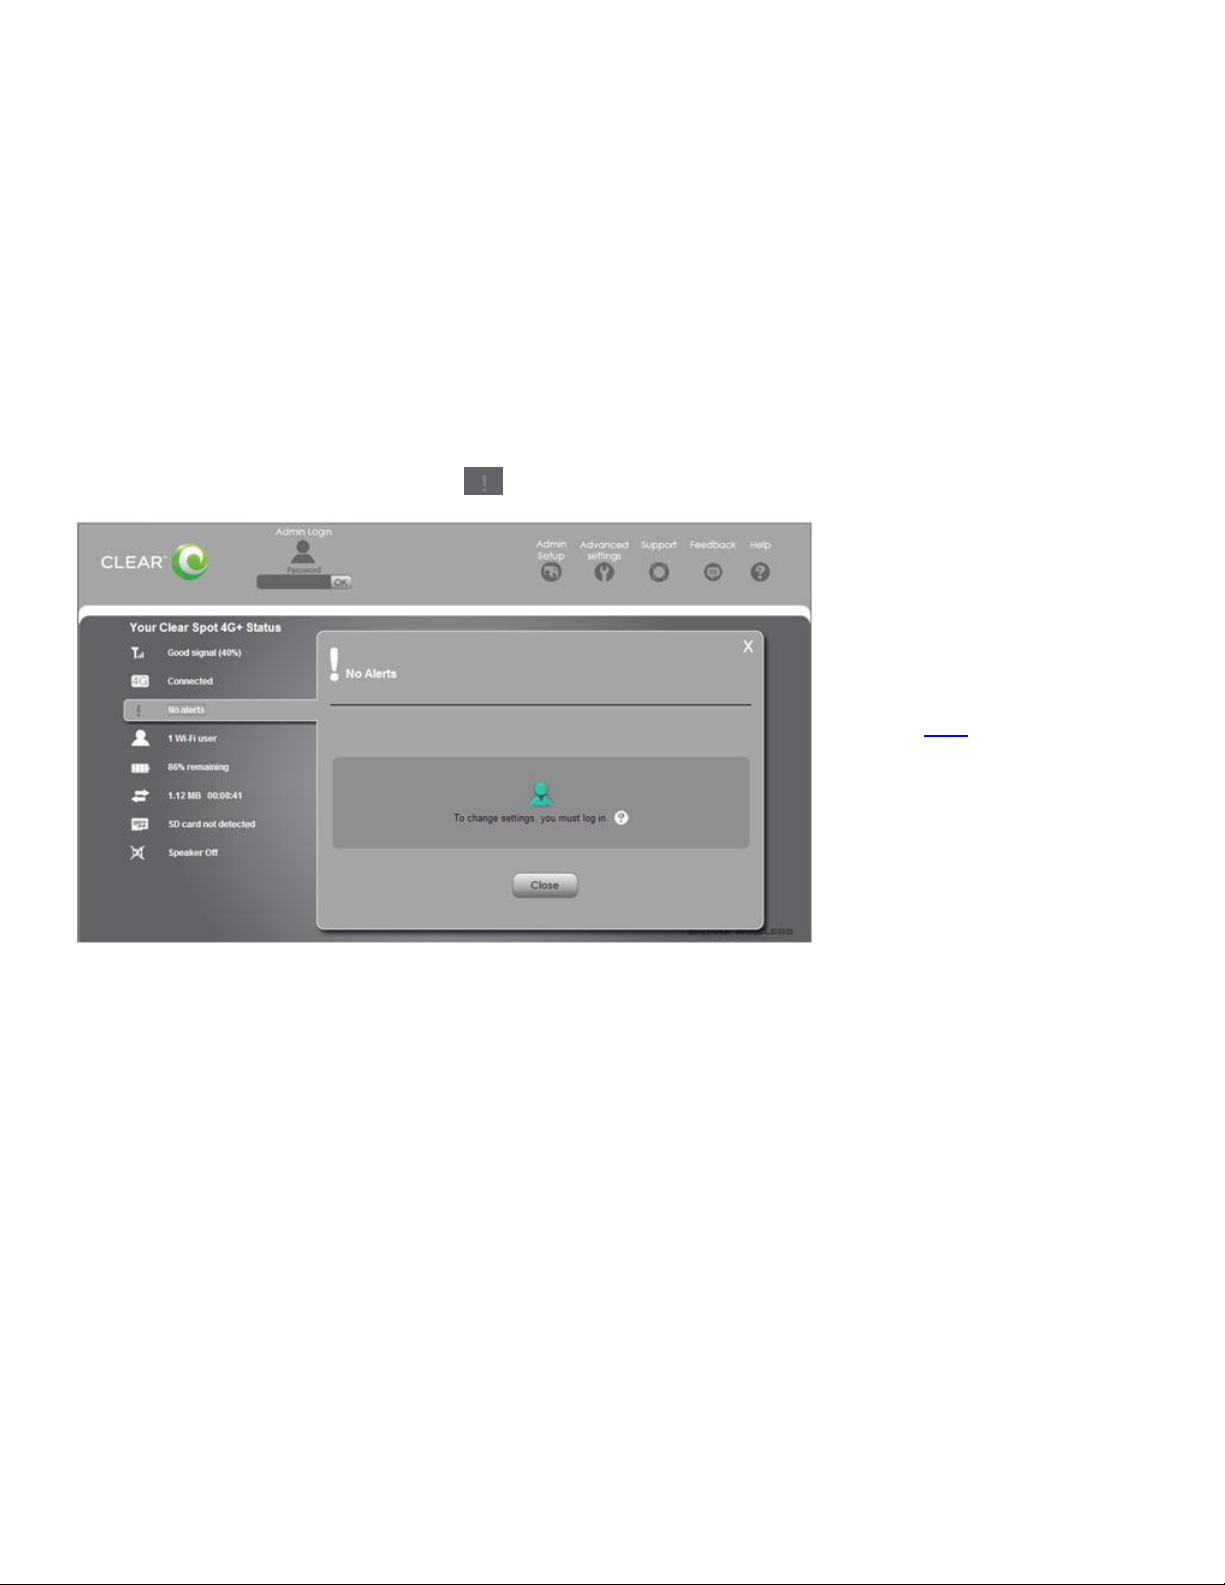
CLEAR Spot Home Page / Alerts
The alerts icon (on the CLEAR Spot LCD screen) indicates whether there are system events (or
alerts) that require your attention. New alerts are received when the CLEAR Spot is turned on.
System event alerts include several types of events, for example: critical battery charge level, critical
temperate, software update available, network update available, Micro SD Card error, routing
hardware settings reset, and device start-up failure.
If more than one alert is available, the higher priority alerts open first. When you close an alert, the
next one opens. You also can use the < and > buttons (at the top of the alert window) to view other
alerts.
To open the Alerts window, click the graphic icon on the CLEAR Spot Home Page.
CLEAR Spot and are
click here to open the
CLEAR Spot Home Page.
Note: To view and read alerts, you must be logged in to the CLEAR Spot Home Page.
The instructions and options shown in the alert window vary depending on the alert event. Please
read and follow the alert instructions carefully.
When you’re finished viewing this window, click “Close” and you’ll see the CLEAR Spot Home Page.
Note: The Alerts link appears on every window of the CLEAR Spot Home Page.
11
Page 13
Manage your CLEAR Spot (continued)
If you’re using your
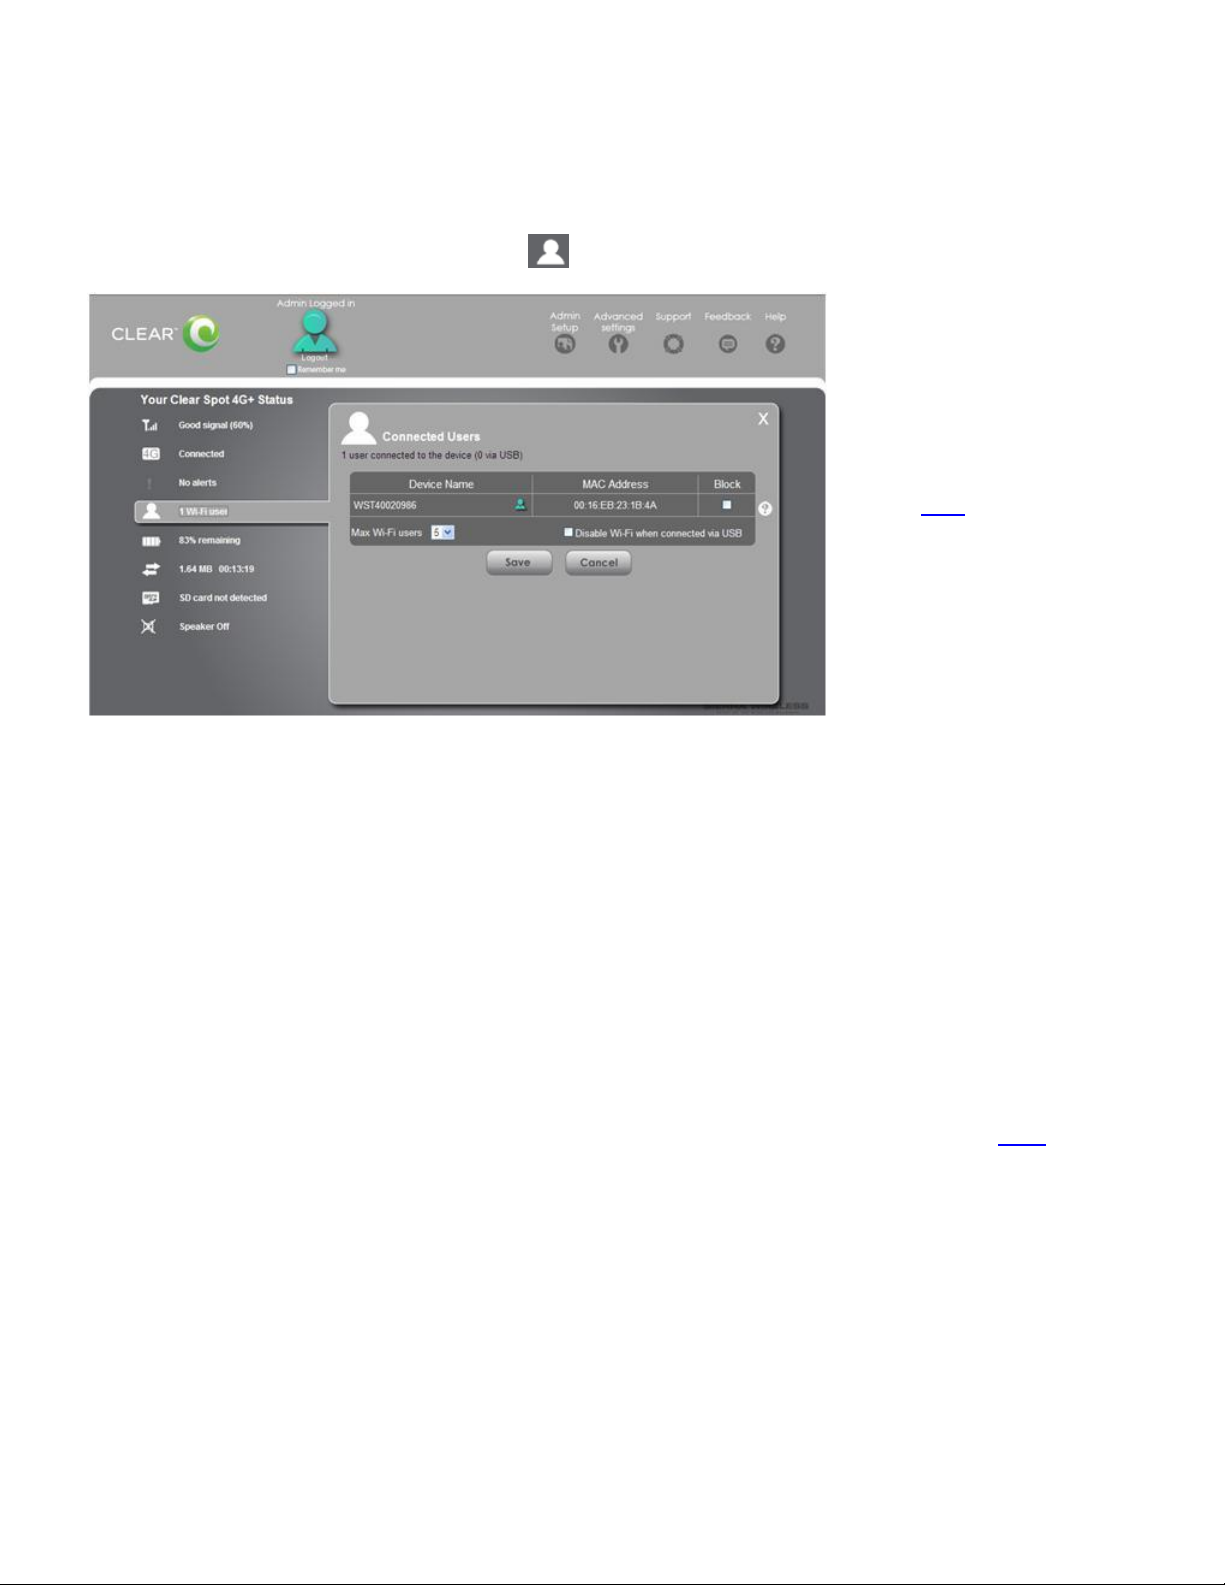
CLEAR Spot Home Page / Wi-Fi Users
This window lets you view the number of devices connected to your CLEAR Spot wi-fi network.
To open the Wi-Fi Users window, click the graphic icon on the CLEAR Spot Home Page.
CLEAR Spot and are
connected to the internet,
click here to open the
CLEAR Spot Home Page.
View the MAC Address: Each device has a unique MAC Address (assigned by the
manufacturer). On Windows® PCs, the MAC Address is called the “physical address.” On Mac®
computers, the MAC Address is called the “Ethernet ID.”
Block the Device: Check the box if you desire to block a device from accessing your CLEAR
Spot wi-fi network in the future. You may desire to use the blocking feature if:
o You don’t recognize a listed device.
o You need to transfer a lot of data and you desire to ensure you have a fast connection.
Additionally, you can change the number of devices that can connect to your CLEAR Spot wi-fi
network at the same time. Select 1-5 from the drop-down box. Fewer devices connected to the
CLEAR Spot can improve performance.
If you desire to connect the CLEAR Spot directly to your computer, via the USB Cable, use this
screen to change the “Disable wi-fi when connected via USB” setting. If the setting is enabled, only
the computer connected via the USB Cable will be able to use the CLEAR Spot. Click here to learn
more about connecting your CLEAR Spot to your computer, via the USB Cable.
Note: To change the number or to block devices, you must be logged in to the CLEAR Spot Home
Page.
When you’re ready to save your settings, click “Save” and you’ll see the CLEAR Spot Home Page.
If you don’t desire to make any changes, click “Cancel” and you’ll see the CLEAR Spot Home Page.
Note: The Wi-Fi Users link appears on every window of the CLEAR Spot Home Page.
12
Page 14

Manage your CLEAR Spot (continued)
If you’re using your
CLEAR Spot Home Page / Battery
To open the Battery window, click the graphic icon on the CLEAR Spot Home Page.
CLEAR Spot and are
connected to the internet,
click here to open the
CLEAR Spot Home Page.
This window displays the battery charge level, represented as the %of battery charge remaining.
In this window, you can change the CLEAR Spot wi-fi signal range settings to improve battery life.
Note: To change battery settings, you must be logged in to the CLEAR Spot Home Page.
If you’re using the CLEAR Spot battery or the CLEAR Spot is connected to a computer via USB
Cable, you can:
Change the Wi-Fi Performance Setting for “better battery life” or “longer wi-fi range”.
o “Better battery life” means the CLEAR Spot wi-fi signal range is shorter, using less battery
charge.
o “Longer wi-fi range” means the CLEAR Spot wi-fi signal range is longer, using more battery
charge.
Set the standby timer to automatically turn off the CLEAR Spot, if there is no activity on the
CLEAR Spot in the selected time – select the number of minutes from the drop-down box.
o If you don’t desire to set a standby time setting, select “Disabled”.
If the CLEAR Spot is AC-Powered (or connected to the Wall Charger), you can:
Change the wi-fi performance settings to longer or shorter wi-fi range depending, on the proximity
to the CLEAR Spot of the devices you desire to connect to the CLEAR Spot wi-fi network.
Since the CLEAR Spot is connected to the Wall Charger, there won’t be any battery drain,
regardless of which setting is selected.
Set the standby timer to automatically turn off the CLEAR Spot, if there is no activity on the
CLEAR Spot in the selected time – select the number of minutes from the drop-down box.
o If you don’t desire to set a standby time setting, select “Disabled”.
When you’re ready to set your battery settings, click “Save” and you’ll see the CLEAR Spot Home
Page.
If you don’t desire to make any changes, click “Cancel” and you’ll see the CLEAR Spot Home Page.
Note: The Battery link appears on every window of the CLEAR Spot Home Page.
13
Page 15
If you’re using your CLEAR
Manage your CLEAR Spot (continued)
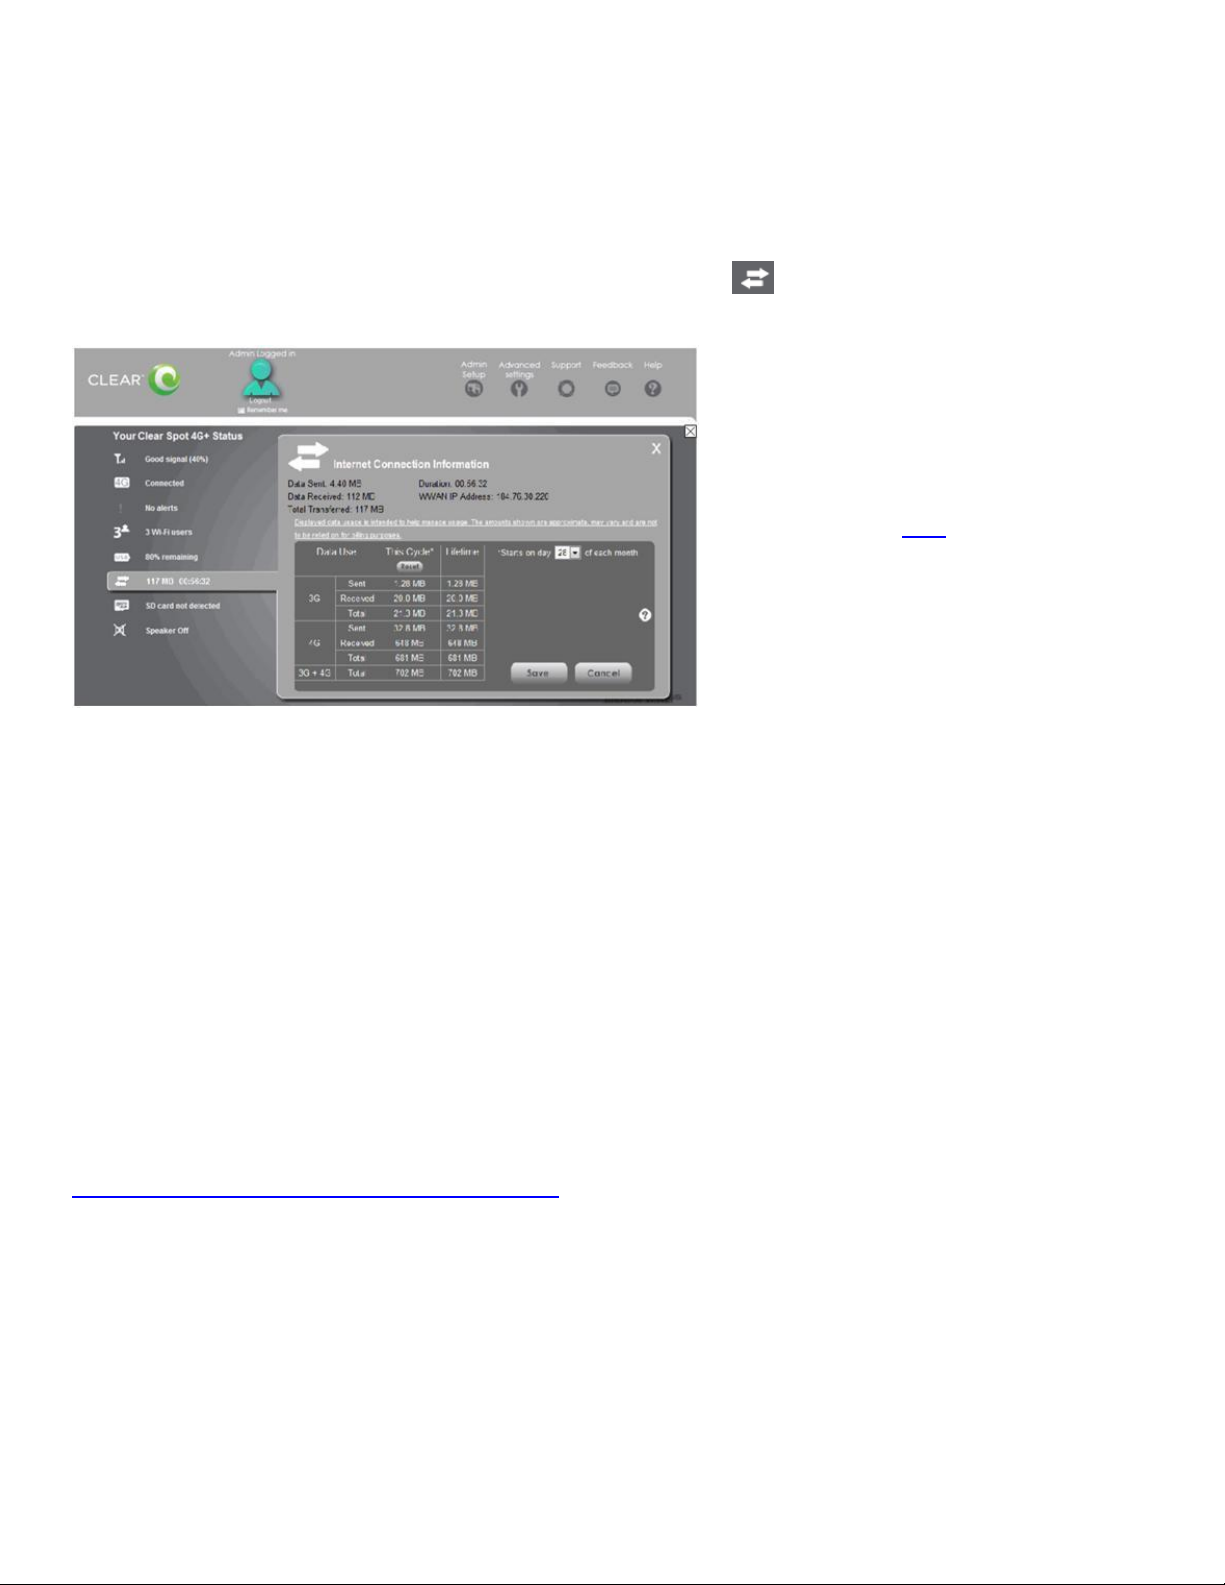
CLEAR Spot Home Page / Internet Connection Information
This window displays Internet Connection information.
To open the Internet Connection Information window, click the graphic icon on the CLEAR Spot
Home Page.
Spot and are connected to
the internet, click here to
open the CLEAR Spot
Home Page.
You can view:
Data Sent: View data sent in 3G and 4G for the current period (this cycle) and lifetime of the
CLEAR Spot.
Data Received: View data received in 3G and 4G for the current period (this cycle) and lifetime of
the CLEAR Spot.
Total Transmitted: View the total data sent / transmitted in 3G and 4G and the combined total
data transmitted for the current period (this cycle) and the lifetime of the CLEAR Spot.
Duration: This shows the connection time (for the current connection session).
CLEAR Spot IP Address: This shows the IP Address of the CLEAR Spot.
You also can change the day of the month you desire this cycle (the current billing period) to begin.
Choose the day from the drop-down box.
Note: Data usage amounts are approximate and should not be used for billing purposes. For daily
updated data usage amounts, login to your CLEAR online account at
https://www.clear.com/my_account/signin.php.
Note: To change the billing cycle start date, you must be logged in to the CLEAR Spot Home Page.
If you’ve changed the day you desire the billing cycle to start, click “Save” and you’ll see the CLEAR
Spot Home Page.
If you don’t desire to make any changes, click “Cancel” and you’ll see the CLEAR Spot Home Page.
Note: The Internet Connection Information link appears on every window of the CLEAR Spot Home
Page.
14
Page 16
Manage your CLEAR Spot (continued)
If you’re using your CLEAR
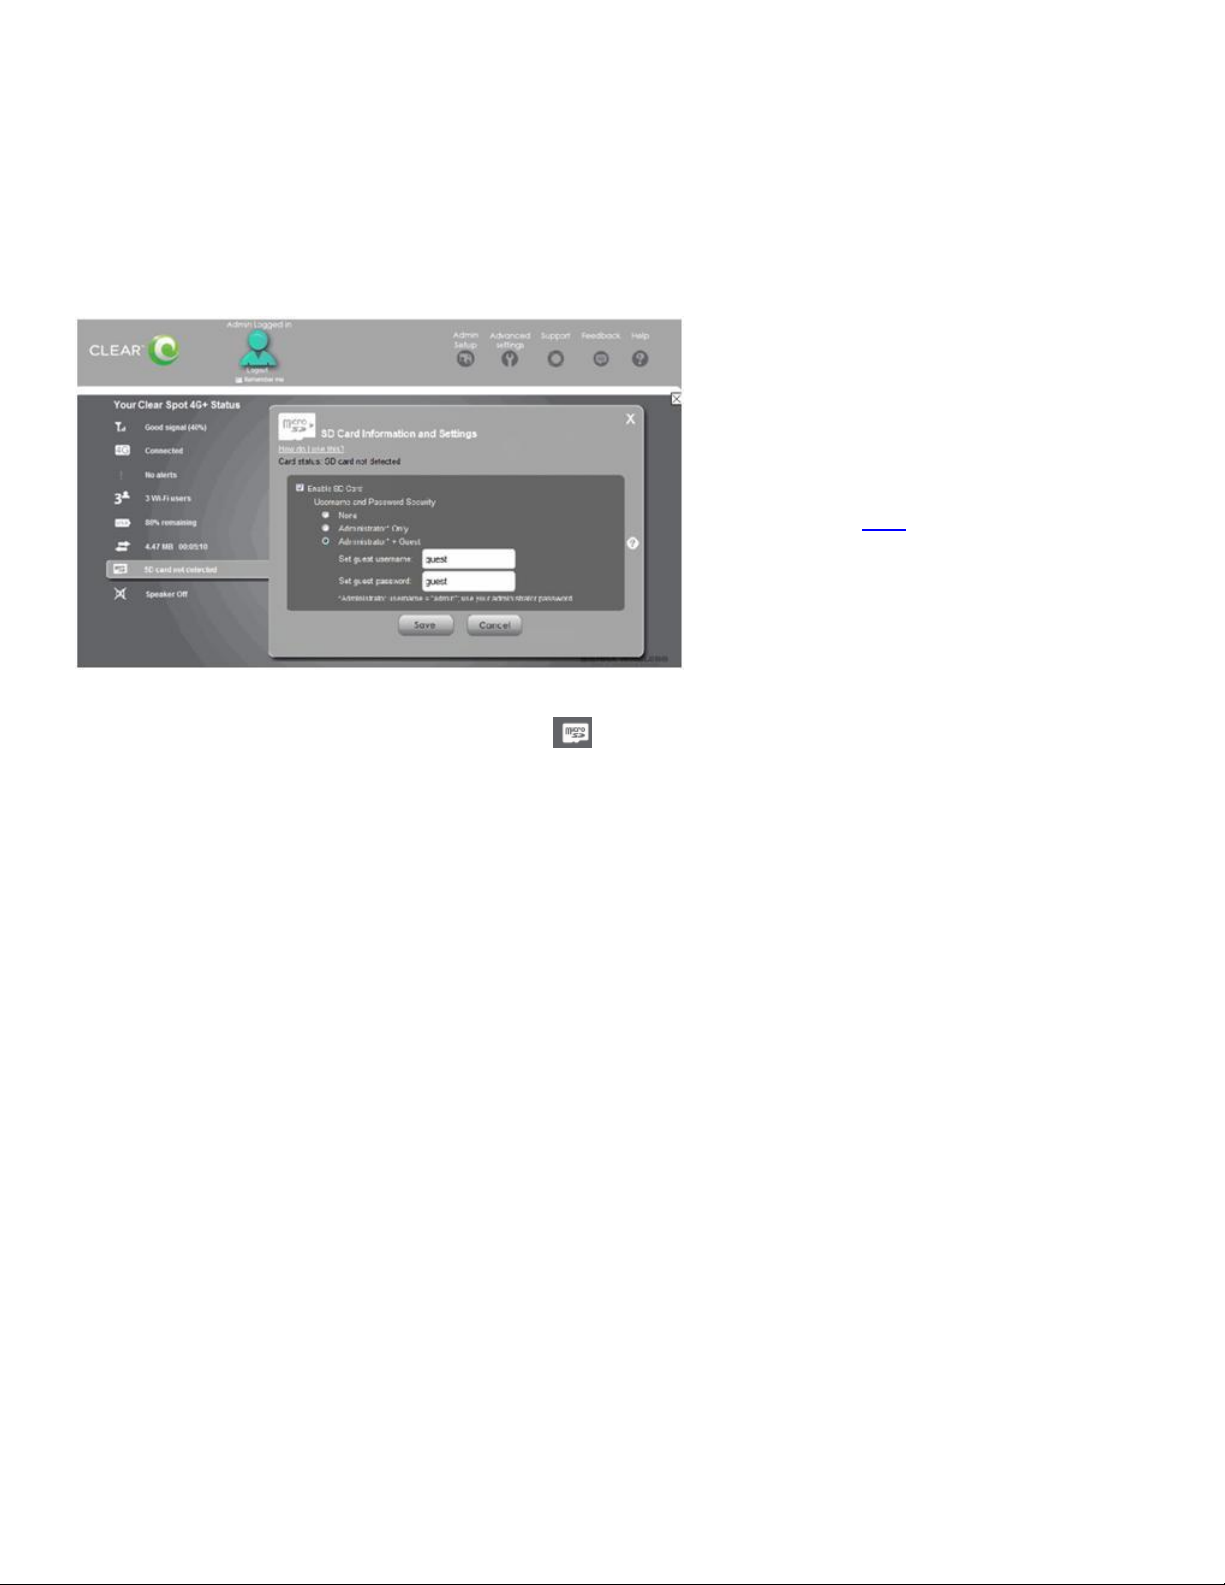
CLEAR Spot Home Page / Micro SD Card
Your CLEAR Spot supports Micro SD Cards – up to 16GB (sold separately) for file (such as
documents or music) sharing and transfer or storage. Your computer recognizes the Micro SD Card
as a removable storage device. Store the files on a Micro SD Card and insert the Micro SD Card into
the Micro SD Card Slot, which is located on the side of the CLEAR Spot.
Spot and are connected to the
internet, click here to open the
CLEAR Spot Home Page.
To open the Micro SD Card window, click the graphic icon on the CLEAR Spot Home Page.
Before you can share any data stored on the Micro SD Card, you need to enable the card, setup
access to and name the slot / folder, and inform others how they can access the Micro SD Card.
Note: To enable the Micro SD Card and to make changes in this window, you must be logged in to
the CLEAR Spot Home Page.
Click the box next to “Enable SD Card.”
Set up the Username and Password Security Setting required to access the Micro SD Card.
If you choose “Administrator Only”, the username is “admin” and the password is your CLEAR
Spot Administrator password.
If you choose “Administrator + Guest”, you need to set the guest username and guest password
by entering them in the text boxes on the screen. The Administrator username is “admin”, and
the password is your CLEAR Spot Administrator password.
When you’re ready to enable your Micro SD Card and save your Username and Password Security
Settings, click “Save”.
If you don’t desire to make any changes, click “Cancel” and you’ll see the CLEAR Spot Home Page.
Note: The Micro SD Card link appears on every window of the CLEAR Spot Home Page.
15
Page 17

Manage your CLEAR Spot (continued)
CLEAR Spot Home Page / Micro SD Card (continued)
Follow the instructions below to access the Micro SD Card (inserted in your CLEAR Spot) from your
computer.
Windows:
In Windows Explorer or Internet Explorer®, type \\ClearSpot\shared.
-Or-
Start > Run > \\ClearSpot\shared.
Mac:
1. In Finder, select Go > Connect to Server.
2. Type smb://ClearSpot/shared.
3. In Finder, double click the shared drive.
Linux:
Open the file browser and type smb://ClearSpot/shared in the address bar.
-Or-
Open the run menu (Alt+F2) and type smb://ClearSpot/shared.
If you’ve enabled security, you must give the guest username and password to the users with whom
you desire to share the data stored on the CLEAR Spot.
16
Page 18

Manage your CLEAR Spot (continued)
If you’re using your
CLEAR Spot Home Page / Sounds
To open the Sounds window, click the graphic icon on the CLEAR Spot Home Page.
CLEAR Spot and are
connected to the internet,
click here to open the
CLEAR Spot Home Page.
The window displays:
Status of the CLEAR Spot speaker: means the speaker is on and means the speaker is
off.
Check the boxes to enable or disable sounds for the following events:
o Internet connected: When the CLEAR Spot connects to the internet.
o Internet disconnected: When the CLEAR Spot disconnects from the internet.
o Low battery: This can be useful as a reminder to charge the CLEAR Spot battery.
o System alerts: When you hear the CLEAR Spot beep, you then can use the LCD screen
or the Alerts window to get information about the alert.
o wi-fi user has joined: Useful, for example to detect an unwelcome wi-fi user, if you’re the
only one using the CLEAR Spot, or you’ve not enabled security settings.
o wi-fi user has left: Indicates when a user of the CLEAR Spot wi-fi network has left.
o Last user has left: Indicates the last user of the CLEAR Spot wi-fi network has
disconnected.
Note: To change the Sounds settings, you must be logged in to the CLEAR Spot Home Page.
If you desire to mute (or disable) all sounds, you can use the Mute switch on the side of the CLEAR
Spot. This overrides all enabled settings on the Sounds Window of the CLEAR Spot Home Page.
If you’ve enabled sounds through the CLEAR Spot Home Page, but there are no sounds when an
event occurs, check the position of the Mute switch.
When you’re ready to set your Sounds Settings, click “Save”.
If you don’t desire to make any changes, click “Cancel” and you’ll see the CLEAR Spot Home Page.
Note: The Sounds link appears on every window of the CLEAR Spot Home Page.
17
Page 19

Manage your CLEAR Spot (continued)
If you’re using your
CLEAR Spot Home Page / Admin Login
In order to set up or make any changes to your CLEAR Spot, you need to login in to the CLEAR Spot
Home Page.
On the top of the page, you’ll see “Admin Login”. Enter your “Administrator” password (which is set to
“Admin) in the text box and click “OK”.
CLEAR Spot and are
connected to the internet,
click here to open the
CLEAR Spot Home Page.
Note: The Admin Login icon appears on every window of the CLEAR Spot Home Page.
18
Page 20

Manage your CLEAR Spot (continued)
If you’re using your
CLEAR Spot Home Page / Admin Setup
Upon a successful Administrator login, you’ll see the Admin Setup window.
CLEAR Spot and are
connected to the internet,
click here to open the
CLEAR Spot Home Page.
In the Admin Setup window, you can:
Change the Administrator password (which can be 1-20 characters long).
Change the CLEAR Spot wi-fi network name (SSID).
Set up the wi-fi security used by your CLEAR Spot (check your computer’s or wi-fi enabled
device’s user manual to see what types of security are supported). You can select from:
o None: No security password is required to access the CLEAR Spot wi-fi network – not
recommended since anyone may access your CLEAR Spot wi-fi network, use your internet
connection, and contribute toward your data usage amounts (for which you would be
responsible).
o WEP- 64 Bit: Low security – works with older and newer wi-fi enabled devices.
Recommended only if any of your devices don’t support WPA or WPA2.
o WPA-Personal: A strong security standard, supported by most wi-fi-enabled devices.
o WPA2-Personal: A stronger, newer security standard – limited to newer wi-fi devices.
19
Page 21

Manage your CLEAR Spot (continued)
CLEAR Spot Home Page / Admin Setup (continued)
o If you don’t see the wi-fi security type you want to use, click “More Options” and you’ll see
an expanded list of options, including:
None: No security password is required to access the CLEAR Spot wi-fi network
– not recommended since anyone may access your CLEAR Spot wi-fi network,
use your internet connection, and contribute toward your data usage amounts
(for which you would be responsible).
WEP 64 Bit-Shared: Low security. Works with older and newer wi-fi devices.
Recommended only if any of your devices don’t support WPA or WPA2. Shared
WEP uses the same key for encryption and authentication; some consider
shared WEP to be less secure than open WEP.
WEP 128 Bit-Shared: Low security. Works with older and newer wi-fi devices.
Recommended only if any of your devices don’t support WPA or WPA2. Shared
WEP uses the same key for encryption and authentication; some consider
shared WEP to be less secure than open WEP.
WEP 64 Bit-Open: Low security. Works with older and newer wi-fi devices.
Recommended only if any of your devices don’t support WPA or WPA2. Open
WEP uses the key for encryption, but not for authentication.
WEP 128 Bit-Open: Low security. Works with older and newer wi-fi devices.
Recommended only if any of your devices don’t support WPA or WPA2. Open
WEP uses the key for encryption, but not for authentication.
WPA Personal-TKIP: A strong security standard, supported by most wi-fi
devices.
WPA Personal-TKIP/AES: A strong security standard, supported by most wi-fi
devices.
WPA2 Personal-AES: A stronger, newer security standard. Limited to newer wi-
fi devices.
WPA2 Personal-TKIP/AES: A stronger, newer security standard, but limited to
newer wi-fi devices.
WPA/WPA-2 Personal (recommended setting): wi-fi devices that use either
WPA or WPA2 can connect to the CLEAR Spot. Supported by most wi-fi
devices.
Change the CLEAR Spot wi-fi network password.
Change the setting so the wi-fi network password is displayed on the CLEAR Spot LCD screen.
Note: To make any changes, you must be logged in to the CLEAR Spot Home Page.
When you’re ready to change the password and security settings, click “Submit”.
If you don’t desire to make any changes, click “Cancel” and you’ll see the CLEAR Spot Home Page.
20
Page 22

Manage your CLEAR Spot (continued)
If you’re using your CLEAR
Spot and are connected to the
to open the
CLEAR Spot Home Page / Advanced Settings / Device / Basic
In this window, you can view and adjust basic settings.
internet, click here
CLEAR Spot Home Page.
Admin Password: View and /or change the Admin Password to login to the CLEAR Spot Home
Page.
Remember Me Client List: View a list of computers / devices set to automatically log in when
connecting to the CLEAR Spot wi-fi network.
Help for Advanced Settings: Contextual help is available for many of the windows within the
CLEAR Spot Home Page. Use this to enable or disable contextual help pages.
Import Router Settings: Restore (load) the saved configuration settings.
Export Router Settings: Export the configuration settings to a text file.
Upgrade the Firmware from File: Updating the firmware helps to keep the CLEAR Spot
performing optimally and may add features and functionality. When new firmware versions are
available, they automatically are pushed to the CLEAR Spot. However, if you desire to manually
update the firmware, this is where you can.
Standby Timer on Battery or USB and On AC Power: Set the standby timer to automatically
turn the CLEAR Spot off, if there is no activity on the CLEAR Spot in the selected time – select the
number of minutes from the drop-down box. This setting is for when the CLEAR Spot is using the
battery or connected via USB Cable, to help conserve the battery charge. Additionally, enable or
disable the Standby Timer when the CLEAR Spot is connected to AC Power. If disabled, the
CLEAR Spot will stay on until it is manually turned off.
TRU Install: TRU-Install is a feature that installs the necessary drivers the first time you connect
the CLEAR Spot to your Windows or Mac computer through the USB Cable. Use this screen to
enable or disable this.
Check for Updates automatically and Check for Updates Now: Check to see if updates are
available for the CLEAR Spot. If no updates are available, this is indicated on the window.
When you’re ready to change the basic settings, click “Save”.
If you don’t desire to make any settings changes, click “Cancel” and you’ll see the CLEAR Spot Home
Page.
Note: The Advanced Settings Tab appears on every window of the CLEAR Spot Home Page.
21
Page 23

Manage your CLEAR Spot (continued)
If you’re using your CLEAR Spot
CLEAR Spot Home Page / Advanced Settings / Device / Display
In this window, you can view and adjust settings for the Power Button, LCD screen, and backlight
settings. Changing the settings helps conserve the battery charge.
and are connected to the
internet, click here to open the
CLEAR Spot Home Page.
Power Button LED: Turn the Power Button light on or off.
LCD Backlight: Turn the LCD Screen backlight on or off.
Turn Off Backlight: Choose a time interval (from the drop-down list) for how soon the LCD
screen goes dormant (or to sleep). When the LCD Screen is dormant (or asleep), briefly press the
Power Button to wake up the LCD Screen.
Backlight Settings:
On Battery USB Power: Choose the backlight setting (Low, Medium, or High) to use when the
CLEAR Spot is using battery power or connected via USB Cable.
On AC Power: Choose the backlight setting (Low, Medium, or High) to use when the CLEAR
Spot is connected to the Wall Charger.
Note: To make any changes, you must be logged in to the CLEAR Spot Home Page.
When you’re ready to set your display settings, click “Save”.
If you don’t desire to make any changes, click “Cancel” and you’ll see the CLEAR Spot Home Page.
Note: The Advanced Settings Tab appears on every window of the CLEAR Spot Home Page.
22
Page 24

Manage your CLEAR Spot (continued)
If you’re using your CLEAR
CLEAR Spot Home Page / Advanced Settings / Device / Micro SD Card
Your CLEAR Spot supports Micro SD Cards – up to 16GB (sold separately) for file (such as
documents or music) sharing and transfer or storage. The Micro SD Card slot is located on the side
of the CLEAR Spot. Your computer recognizes the Micro SD Card as a removable storage device.
Store the files on a Micro SD Card and insert the Micro SD Card into the Micro SD Card slot.
Spot and are connected to the
internet, click here to open the
CLEAR Spot Home Page.
In this window, you can view and adjust settings for the Micro SD Card:
Status: View the status of the Micro SD Card.
SD-Card Slot: Enable or disable the SD Card slot.
Micro SDShared Folder Name: You can view and change the name (can be a combination of up
to 32 letters, numbers, and spaces) of the folder as which that the Micro SD Card shows up (in the
file browser program); the default folder name is “shared.”
Username and Password Security: You need to set up the Username and Password Security
Setting required to access the Micro SD Card.
o None: not recommended.
o Admin Only: Guests sharing your CLEAR Spot will not be able to access information
stored on the Micro SD Card in the CLEAR Spot. The Username is “admin” and the
password is your CLEAR Spot Administrator Password.
o Admin + Guest: Allows users of the CLEAR Spot to access information on the Micro SD
Card, if they know the Guest Username and Password. You need to set the Guest
Username and Guest Password by entering them in the text boxes on the screen.
Guest Username: This is needed to access the Micro SD Card slot. The default Guest
Username is “guest”.
Guest Password: This is needed to access the Micro SD Card slot. The default Guest
Password is “guest”.
Note: If your Micro SD Card has not been formatted, or is in a format your computer does not
recognize, you may be prompted to format the Micro SD Card. The formatting procedure erases all
the data on the Micro SD Card, after which the files CANNOT be retrieved. To prevent the loss of
important data, please check the contents before you format the Micro SD Card.
Note: To enable the Micro SD Card Slot / change settings, you must be logged in to the CLEAR Spot
Home Page.
When you’re ready to enable the Micros SD Card slot and save the settings, click “Save”.
If you don’t desire to make any changes, click “Cancel” and you’ll see the CLEAR Spot Home Page.
Note: The Advanced Settings Tab appears on every window of the CLEAR Spot Home Page.
23
Page 25

Manage your CLEAR Spot (continued)
If you’re using your CLEAR Spot
and are connected to the internet,
CLEAR Spot Home Page / Advanced Settings / Device / Sounds
In this window, you can enable or disable sounds for different types of events.
click here to open the CLEAR
Spot Home Page.
Low Battery: Enable or disable the sound when the battery is low, as well as select the
percentage of battery charge remaining to be alerted.
System Alerts: Enable or disable the sound when system alerts are received.
Internet Connected: Enable or disable the sound when the CLEAR Spot connects to the internet.
Internet Disconnected: Enable or disable the sound when the CLEAR Spot disconnects from the
internet.
Wi-Fi User Has Joined: Enable or disable the sound when a device connects to the CLEAR
Spot.
Wi-Fi User Has Left: Enable or disable the sound when a device disconnects from the CLEAR
Spot.
Last User Has Left: Enable or disable the sound when the last device disconnects from the
CLEAR Spot.
Note: To change any Sounds settings, you must be logged in to the CLEAR Spot Home Page.
When you’re ready to change the Sounds settings, click “Save”.
If you don’t desire to make any changes, click “Cancel” and you’ll see the CLEAR Spot Home Page.
Note: The Advanced Settings Tab appears on every window of the CLEAR Spot Home Page.
24
Page 26

Manage your CLEAR Spot (continued)
If you’re using your CLEAR
CLEAR Spot Home Page / Advanced Settings / Device / About
This window displays information about your CLEAR Spot such as software, firmware, and hardware
versions, MAC ID, and more.
Spot and are connected to the
internet, click here to open the
CLEAR Spot Home Page.
Model Number: Displays the CLEAR Spot model number.
Manufacturer: Displays “Sierra Wireless,” the company that manufactured the CLEAR Spot.
Software Version: Displays the software version for the routing hardware of the CLEAR Spot.
Reconditioned Status: If the CLEAR Spot has been reconditioned (refurbished), it will be
indicated.
Reconditioned Date: If the CLEAR Spot has been reconditioned (refurbished), the recondition
date will be displayed.
Activation Status: Displays the activation status of the CLEAR Spot.
Activation Date: Displays the activation date, if available, of the CLEAR Spot.
Network Operator: Displays “Clearwire,” the wireless carrier with whom the CLEAR Spot is
activated.
Wi-Fi Firmware Version: Displays the version number of the software that runs the wi-fi chipset.
Router PRI Version: Displays the PRI (Product Release Instructions) version for the CLEAR Spot
routing hardware.
3G Information:
o Total Bytes: Displays the total number of bytes transferred by the CLEAR Spot, in 3G.
o ESN (DEC/HEX): The ESN (Electronic Serial Number) is the unique first-generation serial
number assigned to the CLEAR Spot.
o MDN: The Mobile Directory Number – a 10-digit phone number.
o PRL Version: The PRL (Preferred Roaming List) is an account configuration item, which
controls the radio channels and network carrier used when the CLEAR Spot is connected
to 3G.
o Firmware Version: Shows the current firmware version of the 3G component of the
CLEAR Spot. Updating the firmware helps to keep the CLEAR Spot performing optimally
and may add features and functionality.
25
Page 27

Manage your CLEAR Spot (continued)
CLEAR Spot Home Page / Advanced Settings / Device / About (continued)
4G Information:
o Total Bytes: Displays the total number of bytes transferred by the CLEAR Spot, in 4G.
o MAC Address: A MAC Address (ID) is a unique serial number burned into devices that
identifies them on a network.
o Firmware Version: Shows the current firmware version of the 4G component of the
CLEAR Spot. Updating the firmware helps to keep the CLEAR Spot performing optimally
and may add features and functionality.
o Plan Version: Identifies your service plan type.
The window also has buttons to:
Save to file: Allows you to save the information to a text file.
Reset Device to Factory Defaults: If you have forgotten your Administrative Password, you can
reset the CLEAR Spot to the factory default settings. When you do this, this also resets the
CLEAR Spot wi-fi network name and password, as well as other settings, to the factory default
settings.
Note: The Advanced Settings Tab appears on every window of the CLEAR Spot Home Page.
26
Page 28

Manage your CLEAR Spot (continued)
If you’re using your CLEAR
Spot and are connected to the
to open the
CLEAR Spot Home Page / Advanced Settings / Device / Log
Logs are a great way to find out what your CLEAR Spot is doing and where it might be having
problems.
This window allows you to change the CLEAR Spot’s logging rules.
internet, click here
CLEAR Spot Home Page.
Verbose System Event Logging: Enable logging of system events.
Connect/Disconnect: Enable logging of devices that connect / disconnect from the CLEAR Spot.
Time Acquisition Method: Time information is stored in the connection history log and system
events log.
o 3G: Time information is obtained from the 3G network.
o NTP: The CLEAR Spot’s clock is synchronized to a Network Time Protocol server on the
internet.
Export and Clear Logs: Clear the logs or export them to text files.
When you’re ready to set your CLEAR Spot logging rules, click “Save”.
If you don’t desire to make any changes, click “Cancel” and you’ll see the CLEAR Spot Home Page.
Note: The Advanced Settings Tab appears on every window of the CLEAR Spot Home Page.
27
Page 29

Manage your CLEAR Spot (continued)
If you’re using your CLEAR
Spot and are connected to the
to open the
CLEAR Spot Home Page / Advanced Settings / WAN / Setup
This window provides access to the WAN (Wide Area Network) setup information and settings.
internet, click here
CLEAR Spot Home Page.
You can view or adjust these settings, or perform the following actions:
WAN Status:
Active Network: The network type (4G, 3G, or none) to which the CLEAR Spot is currently
connected.
Network Operator: Displays “Clearwire,” the carrier with whom the CLEAR Spot is activated.
Session Duration: The length of time (for the current session) the CLEAR Spot has been
connected to the network.
Session Total Data: The amount of data transferred by the CLEAR Spot for the current session.
Connection Preferences:
WAN Mode: Select the WAN Mode preference.
o 4G Only: Not recommended – connection can be established only to 4G.
o 4G Preferred: This is the recommended setting – the CLEAR Spot automatically will
search first for the CLEAR 4G signal. If a CLEAR 4G signal is not available, the CLEAR
Spot will search for an available 3G signal.
o 3G Only: Not recommended – connection can be established only to 3G.
Connect Automatically: To automatically connect to the network when the CLEAR Spot is turned
on, or upon loss of network connection, select Connect Automatically.
Failover wait time: Use this setting to determine the length of time between when he CLEAR
Spot loses the connection with the preferred network, and when the CLEAR Spot attempts to
connect to the other network (not available if WAN mode is “3G only” or “4G only”).
Switchback wait time: Use this setting to determine the length of time the CLEAR Spot should
wait -- when the less-preferred network is connected and the preferred network becomes available
-- before switching to the preferred network (not available if WAN mode is “3G only” or “4G only”).
28
Page 30

Manage your CLEAR Spot (continued)
CLEAR Spot Home Page / Advanced Settings / WAN / Setup (continued)
Network Updates:
Update 3G PRL: Check whether an updated PRL (Preferred Roaming List) is available. The
PRL is set by Clearwire, and controls the radio channels and network carrier used by the CLEAR
Spot.
Update 3G Profile: If you updated the 3G PRL, you also need to update the 3G Profile.
Note: To change any WAN Status settings, you must be logged in to the CLEAR Spot Home Page.
When you’re ready to set your WAN Status settings, click “Save”.
If you don’t desire to make any changes, click “Cancel” and you’ll see the CLEAR Spot Home Page.
Note: The Advanced Settings Tab appears on every window of the CLEAR Spot Home Page.
29
Page 31

Manage your CLEAR Spot (continued)
If you’re using your CLEAR
CLEAR Spot Home Page / Advanced Settings / WAN / 3G
This window displays information about CLEAR Spot’s 3G connection status.
Spot and are connected to
the internet, click here to
open the CLEAR Spot
Home Page.
Connection Status: Indicates whether or not the CLEAR Spot is connected to 3G.
Service Type: Displays the type of 3G coverage available.
o Coverage Type: Displays the 3G coverage type.
o RSSI: Reflects the signal strength of the network.
o Ec/lo: Is a dimension ratio of the average power of a channel (typically the pilot channel)
to the total signal power.
MDN: Mobile Directory Number, a 10-digit phone number, assigned to the CLEAR Spot.
SID: The System ID identifies your home network area.
MSID: Mobile Station ID is used as an identifier on the network.
NAI: Network Access Identifier, is used for accessing the 3G network.
PRL Version: The PRL (Preferred Roaming List) is set by Clearwire and controls the radio
channels and network carriers used by the CLEAR Spot.
Load 3G PRL: Update the 3G PRL.
Upload: Upload the 3G PRL data.
Note: To change any settings, you must be logged in to the CLEAR Spot Home Page.
Note: The Advanced Settings link appears on every window of the CLEAR Spot Home Page.
30
Page 32

Manage your CLEAR Spot (continued)
If you’re using your CLEAR
Spot and are connected to the
to open the
CLEAR Spot Home Page / Advanced Settings / WAN / 4G
This window displays information about the CLEAR Spot’s 4G WAN connection status.
internet, click here
CLEAR Spot Home Page.
Connection Status: Indicates whether or not the CLEAR Spot is connected to 4G.
Service Type: Displays the type of 4G coverage available as well as other information.
o RSSI: Reflects the signal strength of the network.
o CINR: CINR stands for Carrier to Interference-plus-Noise Ratio, and is a measurement of
the signal effectiveness.
Tx Power: Transmitter power – a higher number is better.
Center Frequency: Frequency of the 4G channel used for data connection / transfer.
NSP-ID: 4G Network Service Provider ID.
NAP-ID: 4G Network Access Provider ID.
BSID: Base Station ID.
Preamble: Preamble ID of the current base station to which the CLEAR Spot is connected.
Realm: Login address used for 4G service.
Certificate Information: Displays CLEAR Spot security information.
Note: To change any settings, you must be logged in to the CLEAR Spot Home Page.
Note: The Advanced Settings link appears on every window of the CLEAR Spot Home Page.
31
Page 33

Manage your CLEAR Spot (continued)
If you’re using your CLEAR
Spot and are connected to the
to open the
CLEAR Spot Home Page / Advanced Settings / Wi-Fi / Network
Use this window to view or adjust these settings, or perform the following actions:
internet, click here
CLEAR Spot Home Page.
Disable Wi-Fi upon USB-PC: Only the computer that is connected to the CLEAR Spot via a
Micro USB Cable can use the CLEAR Spot – click here to learn more about using your CLEAR
Spot via a Micro USB Cable.
SSID: The CLEAR Spot wi-fi network name.
Hostname: The host name is, in essence, the name you’re giving the CLEAR Spot. In most
cases, it is easiest to link the CLEAR Spot wi-fi network name (SSID) and the Hostname. Check
the box to do this.
SSID Broadcast: When enabled (or turned on), the CLEAR Spot wi-fi network name is broadcast
and appears in the list of available wireless networks. For increased security, disable this. Others
can still connect to your CLEAR Spot wi-fi network, but they will need to manually enter the
network name in the SSID text box.
Max Number of Users: Set the number of devices (users) that can connect to your CLEAR Spot
wi-fi network at the same time. Select 1-5 from the drop-down box. Fewer devices connected to
the CLEAR Spot can improve performance.
Battery or USB Powered: Change the settings for when the CLEAR Spot is using the CLEAR
Spot battery or connected to a computer via a USB Cable.
o “Better battery life” means the CLEAR Spot wi-fi signal range is shorter, using less battery.
o “Longer wi-fi range” means the CLEAR Spot wi-fi signal range is longer, using more
battery.
AC Powered: Change the settings for when the CLEAR Spot is connected to a Wall Charger.
o Change the wi-fi performance settings to longer wi-fi range or shorter wi-fi range depending
on the proximity to the CLEAR Spot of the devices connecting to the CLEAR Spot wi-fi
network.
o Since the CLEAR Spot is connected to the Wall Charger, there won’t be any battery drain,
regardless of which setting is selected.
Wi-Fi Channel: The active channel used by the CLEAR Spot. If your CLEAR Spot is
experiencing performance issues (possibly caused by other nearby wi-fi networks using the same
channel), try a different wi-fi channel.
32
Page 34

Manage your CLEAR Spot (continued)
CLEAR Spot Home Page / Advanced Settings / Wi-Fi / Network (continued)
Basic Rate: Type of wireless devices connected to your network. If you’re certain that all of the
wi-fi devices used with your device support 802.11g, then select 802.11g only (this ensures faster
Wi-Fi speeds); otherwise, select 802.11b/g compatibility.
RTS Threshold: Specifies the smallest packet size, in bytes, for which RTS/CTS (Request to
Send/Clear to Send) handshaking is used. The recommended value is 2347. Change this value
only if you’re experiencing inconsistent data flow. Make only minor changes to this value.
Fragmentation Threshold: Specifies the largest allowable size, in bytes, for a packet. If a
packet is larger than the threshold amount, the packet is fragmented into multiple packets before it
is transmitted. To prevent poor network performance, it is recommended to keep this value as
large as possible (up to 2345).
Note: to change any settings, you must be logged in to the CLEAR Spot Home Page.
When you’re ready to set your wi-fi network settings, click “Save”.
If you don’t desire to make any changes, click “Cancel” and you’ll see the CLEAR Spot Home Page.
Note: The Advanced Settings Tab appears on every window of the CLEAR Spot Home Page.
List of connected devices: Opens a window that shows devices that are connected to the Clear
Spot. You’ll see the MAC Address, the device name, and the IP Address of the connected device.
.
33
Page 35

Manage your CLEAR Spot (continued)
If you’re using your CLEAR
Spot and are connected to the
to open the
CLEAR Spot Home Page / Advanced Settings / Wi-Fi /Security
Use this window to view and change the wi-fi security settings.
internet, click here
CLEAR Spot Home Page.
Wi-Fi Security Type:
o None: No security password is required to access the CLEAR Spot wi-fi network – not
recommended since anyone may access your CLEAR Spot wi-fi network, use your internet
connection, and contribute toward your data usage amounts (for which you would be
responsible).
o WEP 64 Bit-Shared: Low security. Works with older and newer wi-fi devices.
Recommended only if any of your devices don’t support WPA or WPA2. Shared WEP uses
the same key for encryption and authentication; some consider shared WEP to be less
secure than open WEP.
o WEP 64 Bit-Open: Low security. Works with older and newer wi-fi devices. Recommended
only if any of your devices don’t support WPA or WPA2. Open WEP uses the key for
encryption, but not for authentication.
o WEP 128 Bit-Shared: Low security. Works with older and newer wi-fi devices.
Recommended only if any of your devices don’t support WPA or WPA2. Shared WEP uses
the same key for encryption and authentication; some consider shared WEP to be less
secure than open WEP.
o WEP 128 Bit-Open: Low security. Works with older and newer wi-fi devices.
Recommended only if any of your devices don’t support WPA or WPA2. Open WEP uses
the key for encryption, but not for authentication.
o WPA Personal-TKIP: A strong security standard, supported by most wi-fi devices.
o WPA Personal-TKIP/AES: A strong security standard, supported by most wi-fi devices.
o WPA2 Personal-AES: A stronger, newer security standard. Limited to newer wi-fi devices.
o WPA2 Personal-TKIP/AES: A stronger, newer security standard, but limited to newer wi-fi
devices.
34
Page 36

o WPA/WPA-2 Personal (recommended setting): wi-fi devices that use either WPA or
WPA2 can connect to the CLEAR Spot. Supported by most wi-fi devices.
Manage your CLEAR Spot (continued)
CLEAR Spot Home Page / Advanced Settings / Wi-Fi /Security (continued)
Wi-Fi password: If wi-fi security is enabled, a wi-fi password is required to connect to the CLEAR
Spot wi-fi network. The wi-fi password is displayed here. You can change the wi-fi password on
the Advanced Settings / Wi-Fi / Security window.
Password Reminder: When “On”, the wi-fi password is displayed on the CLEAR Spot LCD
screen. If you don’t desire the wi-fi password displayed on the CLEAR Spot LCD screen, select
“Off”.
Note: To change any settings, you must be logged in to the CLEAR Spot Home Page.
When you’re ready to set your wi-fi security settings, click “Save”.
If you don’t desire to make any changes, click “Cancel” and you’ll see the CLEAR Spot Home Page.
Note: The Advanced Settings Tab appears on every window of the CLEAR Spot Home Page.
35
Page 37

Manage your CLEAR Spot (continued)
If you’re using your
CLEAR Spot Home Page / Advanced Settings / Wi-Fi / MAC Filter
Warning: This window includes settings that could negatively impact the performance of the CLEAR
Spot, if set incorrectly. These settings should be modified only by advanced users or if directed by
CLEAR Customer Care.
The MAC (Media Access Control) filter is used to grant devices access to your CLEAR Spot wi-fi
network. MAC filtering increases the security of your CLEAR Spot wi-fi network and can prevent
unauthorized devices from connecting to it. Access is based on the MAC address of each device.
Choose from:
No filtering: All devices are allowed to access the CLEAR Spot wi-fi network. In most cases, this
setting is used, since you can prevent devices from accessing your CLEAR Spot wi-fi network by
setting wi-fi security and not sharing the wi-fi password with people you don’t desire to use your
CLEAR Spot wi-fi network.
Allow all in list: Only devices that are in the list are allowed to access the CLEAR Spot wi-fi
network.
Block all in list: All devices are allowed to access the CLEAR Spot wi-fi network, unless they’re
in the list.
If you have enabled the wi-fi password setting, devices will still need to provide the wi-fi password to
access the CLEAR Spot wi-fi network.
When you’re ready to set your MAC filtering settings, click “Save”.
If you don’t desire to make any changes, click “Cancel” and you’ll see the CLEAR Spot Home Page.
Note: The Advanced Settings Tab appears on every window of the CLEAR Spot Home Page.
List of connected devices: Opens a window that shows devices that are connected to the Clear
Spot. Click “Add” if you desire to add a device, and enter the MAC Address and Name, for
example “Dad’s computer.”
.
CLEAR Spot and are
connected to the internet,
click here to open the
CLEAR Spot Home Page.
36
Page 38

Manage your CLEAR Spot (continued)
If you’re using your
CLEAR Spot Home Page / Advanced Settings/ Router / Basic
Warning: This window includes settings that could negatively impact the performance of the CLEAR
Spot, if set incorrectly. These settings should be modified only by advanced users or if directed by
CLEAR Customer Care.
Use this window to enable / disable the routing hardware component of the CLEAR Spot.
CLEAR Spot and are
connected to the internet,
click here to open the
CLEAR Spot Home Page.
Port Forwarding: Normally, incoming traffic (from the internet) is blocked. Port forwarding
means you forward incoming traffic to specific ports/devices (through their local IP address) on
your CLEAR Spot wi-fi network. One example is to configure port forwarding so you can access
your Remote Desktop from the internet (by specifying the WAN (public) IP Address the computer
is using. Another example is to allow internet users to access a Web, FTP, or email server or
gaming application hosted by your computer.
Port Triggering: Some applications require multiple ports open for communication, many of
which may be initiated by a computer on the WAN. Examples include video conferencing, VoIP
(internet telephony) and internet gaming. With port triggering, the device monitors outgoing data
on specific port numbers (trigger ports). The device keeps track of the IP Address of the devices
that send data on these trigger ports, so when incoming traffic (on the forward ports) arrives, the
device sends the incoming data to the same device.
DMZ: A DMZ is a “Demilitarized Zone” between a secure internal network and an unsecured
network such as the internet. Usually devices or computers that require less restrictive settings
are placed in a DMZ. Configuring this option requires the IP Address of the host.
UPnP: Universal Plug and Play provides simple and robust connectivity among consumer
electronics, intelligent appliances, and mobile devices from many different manufacturers.
SPI: Stateful Packet Inspection, also known as dynamic packet filtering, helps to prevent cyber-
attacks by validating that the traffic passing through a session conforms to the protocol used by
the type of session. Packets that don’t conform are rejected.
Router Settings Reset: Reset the router settings to the factory default settings.
Note: To make any changes, you must be logged in to the CLEAR Spot Home Page.
When you’re ready to set your basic router settings, click “Save”.
If you don’t desire to make any changes, click “Cancel” and you’ll see the CLEAR Spot Home Page.
Note: The Advanced Settings Tab appears on every window of the CLEAR Spot Home Page.
37
Page 39

Manage your CLEAR Spot (continued)
If you’re using your CLEAR
Spot and are connected to the
to open the
CLEAR Spot Home Page / Advanced Settings/ Router / LAN
Warning: This window includes settings that could negatively impact the performance of the CLEAR
Spot, if set incorrectly. These settings should be modified only by advanced users or if directed by
CLEAR Customer Care.
Use this window to view and change Network Address Settings of the CLEAR Spot.
internet, click here
CLEAR Spot Home Page.
Network Address Settings
Router IP Address: Allows you to view / modify the Internet Protocol (IP) Address used to locate
and access your Clear Spot network. You may desire to change the IP Address to integrate the
CLEAR Spot into an existing wireless network or to help secure the network.
Subnet Mask: Allows you to view / modify the Subnet Mask address, if necessary. The subnet
mask is used to subdivide the network.
Hostname: The host name is, in essence, the name you’re giving the CLEAR Spot. In most
cases, it is easiest to link the CLEAR Spot wi-fi network name (SSID) and the Hostname. Check
the box to do this.
SSID: The CLEAR Spot wi-fi network name.
DHCP Server: Dynamic Host Configuration Protocol (DHCP) is used to automatically assign IP
Addresses and configuration information to Wi-Fi clients, greatly simplifying network setup.
DHCP IP Address Range: You may configure the range of IP Addresses you want the CLEAR
Spot to allow to recognize the CLEAR Spot network name.
DHCP Lease Time: Set the time that a computer remains connected to the gateway using its
current assigned IP address. At the end of this time, the DHCP server renews the lease or
assigns the computer a new IP address.
Max DHCP Clients: The number of DHCP addresses that can be assigned and active at the
same time. It’s recommended you set this to a number greater than the number of wi-fi users.
DNS Mode: Specifies how the DNS servers are obtained. Select “Auto” or “Manual”.
Note: To make changes, you must be logged in to the CLEAR Spot Home Page.
When you’re ready to set your basic router settings, click “Save”.
If you don’t desire to make any changes, click “Cancel” and you’ll see the CLEAR Spot Home Page.
Note: The Advanced Settings Tab appears on every window of the CLEAR Spot Home Page.
38
Page 40

Manage your CLEAR Spot (continued)
If you’re using your CLEAR
Spot and are connected to the
to open the
CLEAR Spot Home Page / Advanced Settings/ Router / LAN
DHCP Static IP Assignment List: Dynamic Host Configuration Protocol (DHCP) is used to
automatically assign IP Addresses and configuration information to wi-fi clients, thereby greatly
simplifying network setup. If you desire, you may configure the IP Addresses that the CLEAR Spot
will allow to recognize the CLEAR Spot wi-fi network.
internet, click here
CLEAR Spot Home Page.
Note: To make changes, you must be logged in to the CLEAR Spot Home Page.
When you’re ready to save your DHCP Static IP Assignment List, click “Save”.
If you don’t desire to make any changes, click “Cancel” and you’ll see the CLEAR Spot Home Page.
39
Page 41

Manage your CLEAR Spot (continued)
If you’re using your CLEAR Spot
and are connected to the internet,
CLEAR Spot Home Page / Advanced Settings / Router / Port Forward
Warning: This window includes settings that could negatively impact the performance of the CLEAR
Spot, if set incorrectly. It should be used only by advanced users or if directed by CLEAR Customer
Care.
Use this window to enable / disable Port Forwarding.
click here to open the CLEAR
Spot Home Page.
Port Forwarding: Normally, incoming traffic (from the internet) is blocked. Port forwarding
means you forward incoming traffic to specific ports and devices (through their local IP address)
on your CLEAR Spot wi-fi network. For example, you can configure port forwarding so you can
access your Remote Desktop from the internet (by specifying the WAN (public) IP Address the
computer is using). Another example is to allow internet users to access a Web, FTP, or email
server or gaming or internet application hosted by your computer.
Note: The Advanced Settings Tab appears on every window of the CLEAR Spot Home Page.
40
Page 42

Manage your CLEAR Spot (continued)
If you’re using your CLEAR Spot
CLEAR Spot Home Page / Advanced Settings / Router / Port Trigger
Warning: This window includes settings that could negatively impact the performance of the CLEAR
Spot, if set incorrectly. It should be used only by advanced users or if directed by CLEAR Customer
Care.
Use this window to enable / disable Port Triggering.
and are connected to the
internet, click here to open the
CLEAR Spot Home Page.
Port Triggering: Some applications require multiple ports be open for communication, many of
which may be initiated by a computer on the WAN. Examples include video conferencing, VoIP
(internet telephony) and internet gaming. With port triggering, the device monitors outgoing data
on specific port numbers (trigger ports). The device keeps track of the IP Address of the devices
that send data on these trigger ports, so when incoming traffic (on the forward ports) arrives, the
device sends the incoming data to the same device.
Note: The Advanced Settings Tab appears on every window of the CLEAR Spot Home Page.
41
Page 43

Manage your CLEAR Spot (continued)
If you’re using your CLEAR
Spot and are connected to the
to open the
CLEAR Spot Home Page / Advanced Settings / Router / DMZ
Warning: This window includes settings that could negatively impact the performance of the CLEAR
Spot, if set incorrectly. It should be used only by advanced users or if directed by CLEAR Customer
Care.
Use this window to enable / disable DMZ Hosting.
internet, click here
CLEAR Spot Home Page.
DMZ: A DMZ is a “Demilitarized Zone” between a secure internal network and an unsecured network
such as the internet. Usually devices or computers that require less restrictive settings are placed in
a DMZ. Configuring this option requires the IP Address of the host.
Note: The Advanced Settings Tab appears on every window of the CLEAR Spot Home Page.
42
Page 44

Manage your CLEAR Spot (continued)
CLEAR Spot Home Page / Support
If you are connected to the internet, clicking “Support” (on the top right side of the CLEAR Spot
Home Page) will open a new web browser (or window) and you’ll see the CLEAR online support
page.
A variety of resources are available on this page:
Forum Discussions
Frequently Asked Questions
Live Chat Support
Downloads available for your CLEAR Spot
Login to your CLEAR online account
Note: The Support link appears on every window of the CLEAR Spot Home Page.
If you’ve printed this document and / or are not connected to the internet, you can access the
Support Page by entering http://www.clear.com/support in your web browser when you have
internet access.
Note: The Support Page screenshot below is mean to be illustrative. Design and content are
subject to change.
43
Page 45

Manage your CLEAR Spot (continued)
CLEAR Spot Home Page / Feedback
If you are connected to the internet, clicking “Feedback” (on the top right side of the CLEAR Spot
Home Page) will open a new web browser (or window), where you’ll be able to provide feedback
on your CLEAR Spot.
If you’ve printed this document and / or are not connected to the internet, you can access the
Support Page by entering http://www.sierrawireless.com/mobilehotspots/feedback/default.aspx in your
web browser when you have internet access.
Note: The Feedback link appears on every window of the CLEAR Spot Home Page.
Note: The screenshot below is mean to be illustrative. Design and content are subject to
change.
44
Page 46

Manage Your CLEAR Spot (continued)
CLEAR Spot Home Page / Help
The Help Window is context-sensitive and displays helpful tips that are relevant to the window you
are viewing.
You can choose:
Online Help: View and read the contextual help pages.
User Guide: View and download the CLEAR Spot User Guide.
Important Information: Opens a window that displays regulatory information, safety information,
and other important disclosures.
Note: The Help link appears on every window of the CLEAR Spot Home Page.
45
Page 47

Additional Use Case Information
Using the CLEAR Spot via USB
For additional convenience, you can use the USB Cable to connect the CLEAR Spot to a compatible
(Windows 7, Windows Vista®, Windows XP, or Mac (OS X 10.4 x or higher based) computer (also
known as tethering) when:
You need to charge the CLEAR Spot battery, but you don’t desire to use the Wall Charger, or it is
not available.
The computer you’re using doesn’t have wi-fi capability.
You desire to block others from using your CLEAR Spot wi-fi network.
To connect the CLEAR Spot to your computer:
Insert the large end of the USB Cable to an available USB port on your computer.
Insert the smaller end of the USB Cable into the USB Port on the side of the CLEAR Spot.
When using your computer connected to the CLEAR Spot, via the USB Cable, you also can use the
CLEAR Spot wi-fi network, to share with up to five other devices. You can, however, choose to
disable the CLEAR Spot wi-fi network when the CLEAR Spot is connected to a computer, via the
micro USB Cable. Disabling wi-fi when connected via USB Cable can be set in the CLEAR Spot
Home Page:
Home Page > Wi-Fi Users.
Home Page > Advanced Settings > Wi-Fi > Network.
While the CLEAR Spot is connected to your computer, via the USB Cable, the CLEAR Spot battery is
being charged.
In order to use your CLEAR Spot connected to your computer, via the USB Cable, you must first
download the required drivers. We recommend using the TRU-Install feature, which makes the
installation process easy. By factory default, TRU-Install is enabled. An installation CD is not
required.
If you desire to change the setting, you can:
Ensure you’re logged in to the CLEAR Spot Home Page.
Click Advanced Settings > Device > Basic.
Select a value (Enabled or Disabled) for TRU-Install.
46
Page 48

Quick Tips
Extend the CLEAR Spot Battery Life
Use the CLEAR Spot Home Page to decrease the wi-fi network range:
o Home Page > Battery.
o Home Page > Wi-Fi Users.
Use the CLEAR Spot Home Page to change the backlight settings and standby settings:
o Home Page > Battery.
o Home Page > Advanced Settings > Device > Basic.
o Home Page > Advanced Settings > Device > Display.
Use the Clear Spot Home Page to limit the number of Wi-Fi users:
o Home Page > Wi-Fi Users.
o Home Page > Advanced Settings > Wi-Fi / Network.
Maximize security of the CLEAR Spot
Use the CLEAR Spot Home Page to set security:
o Home Page > Admin Setup.
o Home Page > Advanced Settings / Wi-Fi / Security.
Use the CLEAR Spot Home Page to block devices from your CLEAR Spot:
o Home Page > Wi-Fi Users.
o Home Page > Advanced Settings / Wi-Fi / MAC Filter.
Use the CLEAR Spot Home Page to set guest access to the Micro SD Card:
o Home Page > Micro SD Card.
o Home Page > Advanced Settings > Device > Micro SD Card.
Use the highest level of Wi-Fi security your wi-fi-enabled devices support – check your wi-fi-
enabled device’s user manual for instructions.
Ensure your devices recognize your CLEAR Spot
It’s easy to share your CLEAR Spot with up to five devices at the same time. Make sure you are
using the correct CLEAR Spot wi-fi network name and password. They can be found on the CLEAR
Spot LCD screen. If the LCD screen is blank, briefly press the Power button, and the CLEAR Spot
wi-fi network name and password will be displayed.
Give your friends and colleagues your CLEAR Spot wi-fi network name and password.
Make sure the devices with which you are trying to share are within range of your CLEAR Spot –
usually 100-150 feet.
Make sure you have not “disabled” the SSID Broadcast setting. If you set “SSID Broadcast” to
disable, other users will not see your CLEAR Spot in the list of available wireless networks.
Make sure the devices they are trying to connect to your CLEAR Spot are not blocked.
If you are sharing the CLEAR Spot wi-fi network with other users and you turn the CLEAR Spot
off, the devices won’t be able to access the internet.
47
Page 49

Quick Tips (continued)
Facilitating your ability to browse the internet
First, verify that your CLEAR Spot is receiving a signal.
The CLEAR Spot displays the network type and signal strength.
Use the CLEAR Spot Home Page (Home Page > Connected) to make sure your “Connection
Preferences” are set correctly. You can choose:
o 4G Only: Not recommended – connection can be established only to 4G.
o 4G Preferred: This is the recommend setting – the CLEAR Spot automatically will search
first for the CLEAR 4G signal. If a CLEAR 4G signal is not available, the CLEAR Spot will
search for an available 3G signal.
o 3G Only: Not recommended – connection can be established only to 3G.
o Connect Automatically: To connect automatically to the network when the CLEAR Spot is
turned on, or upon loss of network connection, select Connect Automatically.
Resetting your Administrator Password
If you changed your Administrator Password, and have forgotten it, it’s easy to reset to the default
factory settings:
Remove the back panel (battery cover) of the CLEAR Spot.
Locate the small hole (approximately 1 mm in diameter) below and to the right of the battery
compartment.
Insert a sturdy thin object (for example, a paper clip) and hold for 5 seconds.
Follow the instructions on the LCD screen.
Note: When you reset the CLEAR Spot to the default settings, this also resets the wi-fi network
name (SSID) and password, as well as other settings.
Important Message from CLEAR
If your browser is stuck on a message from CLEAR, follow the on-screen instructions to view the
message and provide any requested information.
If your account is past due, click the option to make a payment. You also can make a payment
through our automated payment system by calling 888-888-3113 and selecting option 2.
48
Page 50

Other Information
Accessories
There are a variety of accessories available for the CLEAR Spot, including replacement batteries,
Micro-USB Cables, Wall Chargers, and a Car Charger.
Battery Wall Charger Micro-USB Cable Car Charger
Visit any CLEAR Retail Store nationwide to learn more and to purchase the accessories you need.
Technical Specifications
Dimensions: 3.15” x 3.15” x .59”
Weight: 4.5 oz
Compatibility: Works with any wi-fi-enabled device
Radio Standards:
o Wi-Fi: 802.11b and 802.11g
o WiMAX: 802.16e-2005
Wi-Fi Security:
o WEP (Open and Shared)
o WEP-64
o WEP-128
o WPA-Personal TKIP & AES (Pre-Shared Key or WPA-PSK)
o WPA2-Personal TKIP & AES CCMP (WPA2-PSK)
o WPA+WPA2-Personal (WPA+WPS2-PSK)
Advanced Networking:
o Port Forwarding
o Port Triggering
o DMZ Support
o MAC Filtering
Battery Information: 1830 mAH
Usage Time: Up to three hours of continuous use*
Wi-Fi Network Range: Up to 150 feet
*Actual usage time which user experiences between battery charges may vary and is not guaranteed.
49
Page 51

Still need help?
FAQs and Live Chat Support
If you have questions about your CLEAR Spot, please access the FAQs and live chat support at
www.clear.com/support.
Telephone Support
If you still have questions, please call us at 877-956-4056. We provide automated telephone
support 24/7 and live telephone support between 9am and 10pm, local time, seven days a week.
Questions about your bill?
When you set up your CLEAR online account, you provided CLEAR with a credit card number to
which CLEAR automatically may bill your charges. However, if you desire to view your bill or to
change the credit card to which your CLEAR charges are billed, it’s easy to do so. If you’re
connected to the internet, just click here to login to your CLEAR online account. If you’re not
connected to the internet, enter https://www.clear.com/my_account/signin.php in your web
browser when you are connected to the internet.
Important Information Document
Please read the separate “Important Information” document included with your CLEAR Spot for
regulatory information, safety information, and other important disclosures.
Warranty Information
See Section 6(d) of our Terms of Service (at http://www.clear.com/legal/terms) for warranty
details.
Legal Disclosures
CLEAR coverage areas limited. Actual CLEAR network performance may vary and is not
guaranteed. See Device, Support, and other pages at www.clear.com for additional information.
CLEAR, the CLEAR logo and CLEAR Spot are trademarks or registered trademarks of Clearwire
Communications LLC. Other company, product, and brand names and trademarks are the
property of their respective owners. ©2011 Clear Wireless LLC. All rights reserved.
50
 Loading...