

Page 1
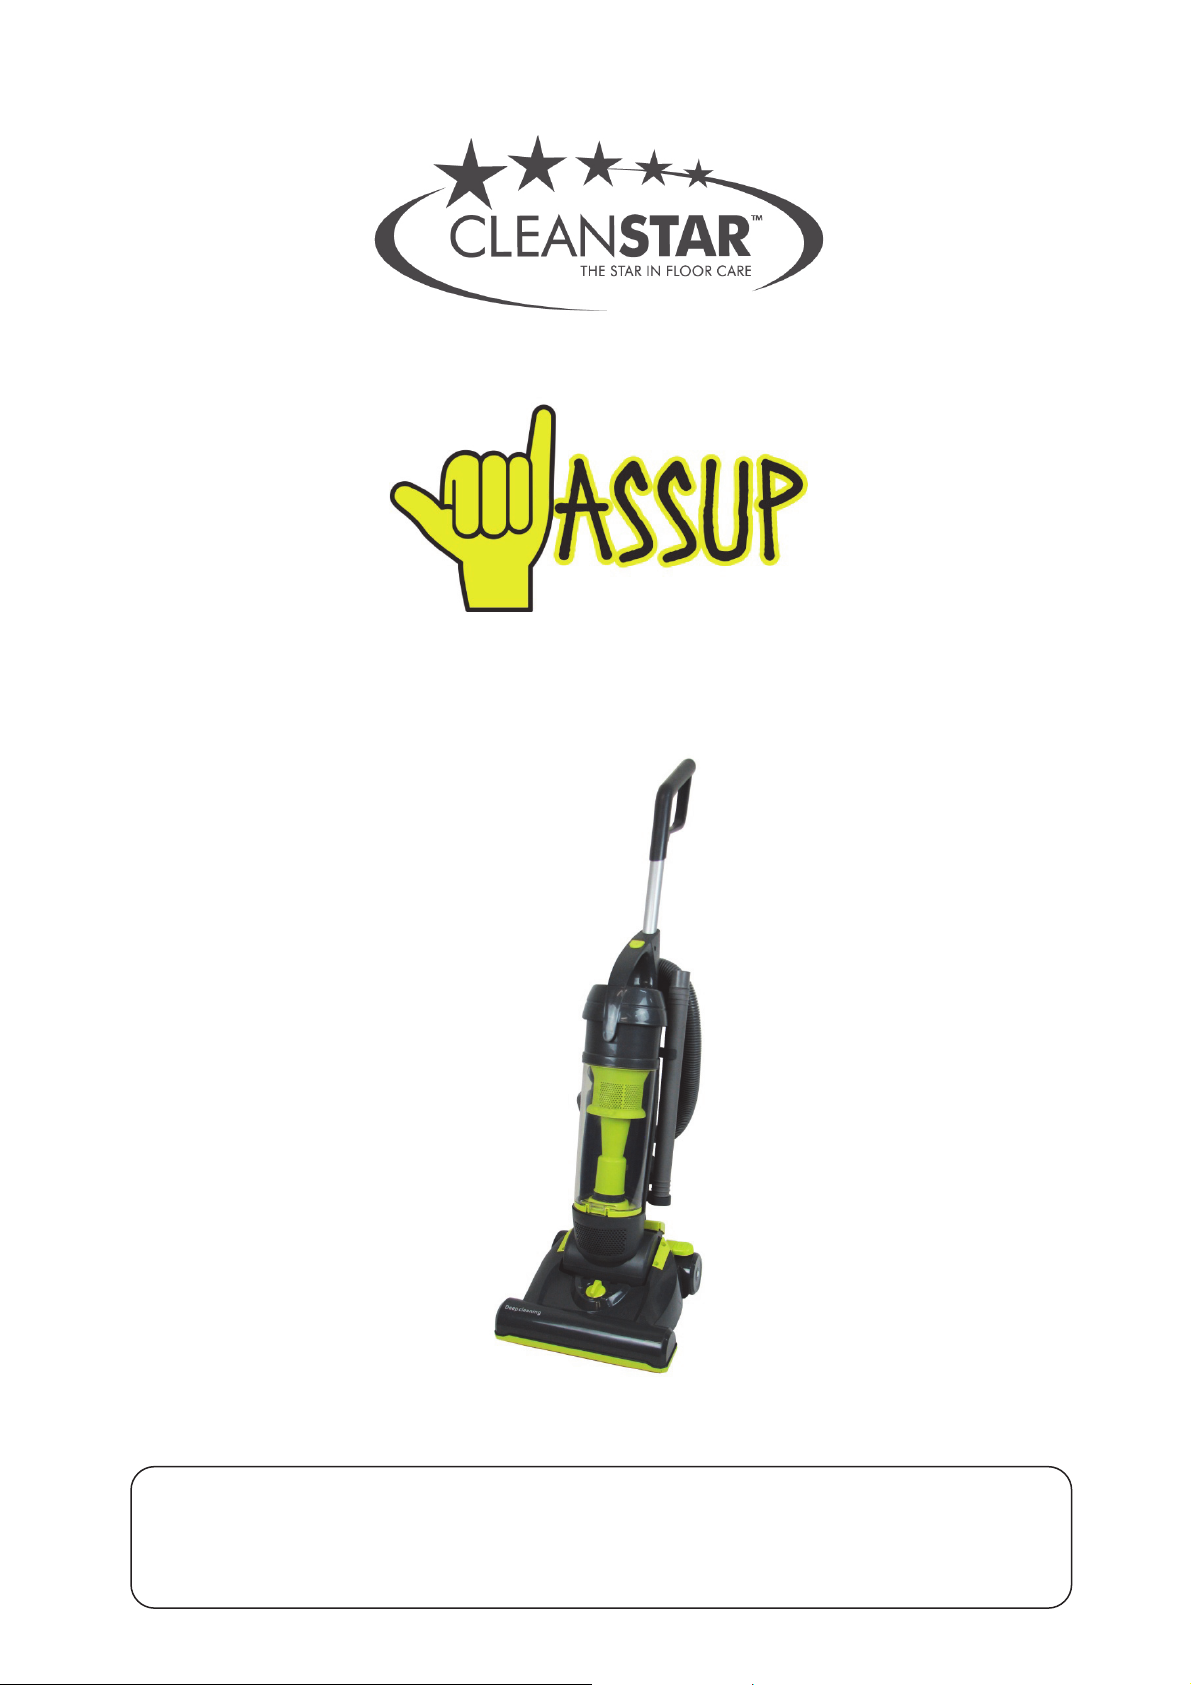
Instruction Manual
CYCLONIC UPRIGHT
VACUUM CLEANER
Model: V-WASSUP
Please read this Instruction Manual carefully before operation and follow
all guidelines before using this vacuum cleaner.
Please keep this Manual for future reference.
1
Page 2

TABLE OF CONTENTS
SAFETY INSTRUCTIONS ....................................................................................................................... 3
PARTS & FEATURES .............................................................................................................................. 4
UPRIGHT VACUUM FULLY ASSEMBLED ........................................................................................... 4
ASSEMBLY INSTRUCTIONS .................................................................................................................. 5
USING THE WAND............................................................................................................................... 6
ADDING ATTACHMENTS ..................................................................................................................... 6
TOOL STORAGE .................................................................................................................................. 6
OPERATING INSTRUCTIONS ................................................................................................................ 7
HOW TO START ................................................................................................................................... 7
HEIGHT ADJUSTMENT ....................................................................................................................... 7
VACUUMING TIPS ................................................................................................................................... 8
TO UNLOCK FROM UPRIGHT POSITION .......................................................................................... 8
SUGGESTED SWEEPING PATTERN .................................................................................................. 8
ATTACHMENTS ....................................................................................................................................... 9
DUSTING BRUSH ................................................................................................................................ 9
CREVICE TOOL ................................................................................................................................... 9
EXTENSION ROD ................................................................................................................................ 9
VACUUM CARE ..................................................................................................................................... 10
REMOVING CLOGS ........................................................................................................................... 10
TO CHECK FOR CLOGS ................................................................................................................... 10
CLEANING EXTERIOR AND ATTACHMENTS ................................................................................... 10
EMPTYING DUST BIN ........................................................................................................................... 11
CLEANING DUST BIN ........................................................................................................................... 12
CLEANING BRUSH BAR ROLLER ...................................................................................................... 13
REMOVING THE BRUSH BAR ROLLER ........................................................................................... 13
REINSTALLING THE BRUSH BAR ROLLER ..................................................................................... 14
BELT REPLACEMENT ....................................................................................................................... 14
TROUBLESHOOTING ........................................................................................................................... 15
WARNING! .......................................................................................................................................... 15
CONDITIONS OF WARRANTY ............................................................................................................. 16
2
Page 3

SAFETY INSTRUCTIONS
*** IMPORTANT: Read all instructions in this guide before assembling or using your vacuum cleaner.
Use your vacuum cleaner only as described in this guide. Use only with Cleanstar recommended
attachments.
Make sure the local power supply conforms to that the rating label or in the instructions.
Do not leave vacuum cleaner when plugged in. Unplug from the wall outlet when not in use and before
performing servicing.
To reduce the risk of electrical shock, do not use outdoors or on wet surfaces.
Do not allow to be used as a toy. Close attention is necessary when used near children.
Do not use with a damaged cord or plug. If vacuum cleaner is not working as it should, has been dropped,
damaged, left outdoors, or dropped in water, return it to your nearest Cleanstar authorised service agent.
Do not pull or carry by cord, use cord as a handle, close a door on cord, or pull cord around sharp edges
or comers. Do not run vacuum cleaner over cord. Keep cord away from heated surfaces.
Do not unplug by pulling on cord. To unplug, grasp the plug, not the cord.
Do not handle plug or vacuum cleaner with wet hands.
Do not put any objects into openings.
Do not use with any opening blocked; keep free of dust, lint, hair, and anything that may reduce air flow.
Keep hair, loose clothing, fingers, and all parts of body away from openings and moving parts.
Turn off all controls before unplugging.
Use extra care when cleaning on stairs. Do not put on chairs, tables, etc. Keep on floor.
Do not use vacuum cleaner to pick up water or flammable or combustible liquids (gasoline, cleaning fluid,
perfumes, etc.), or use in areas where they may be present. The fumes from these substances can
create a fire hazard or explosion.
Do not pick up anything that is burning or smoking, such as cigarettes, matches, or hot ashes.
Do not use vacuum cleaner without dust bin and/or filters in place.
If any blockage is found in brush, hose or tubes, the appliance can be re-operated only after the blockage
is cleaned away.
If the power cord, switch or motor are damaged, have them repaired or do not run over the power cord.
If the supply cord is damaged, it must be replaced by the manufacturer or its service agent or a similarly
qualified person in order to avoid a hazard.
Always empty the dust bin after vacuuming carpet cleaners or freshener, powders, and fine dust. These
products clog the filters, reduce airflow and can cause damage to the vacuum cleaner. Failure to do so
could cause permanent damage to the vacuum cleaner.
Do not use the vacuum cleaner to pick up sharp hard objects, small toys, pins, paper clips, etc. They may
damage the vacuum cleaner.
This vacuum is strictly for household use only.
This appliance is not intended for use by persons (including children) with reduced physical, sensory or
mental capabilities, or lack of experience and knowledge, unless they have been given supervision or
instruction concerning use of the appliance by a person responsible for their safety.
Children should be supervised to ensure that they do not play with the appliance.
3
Page 4
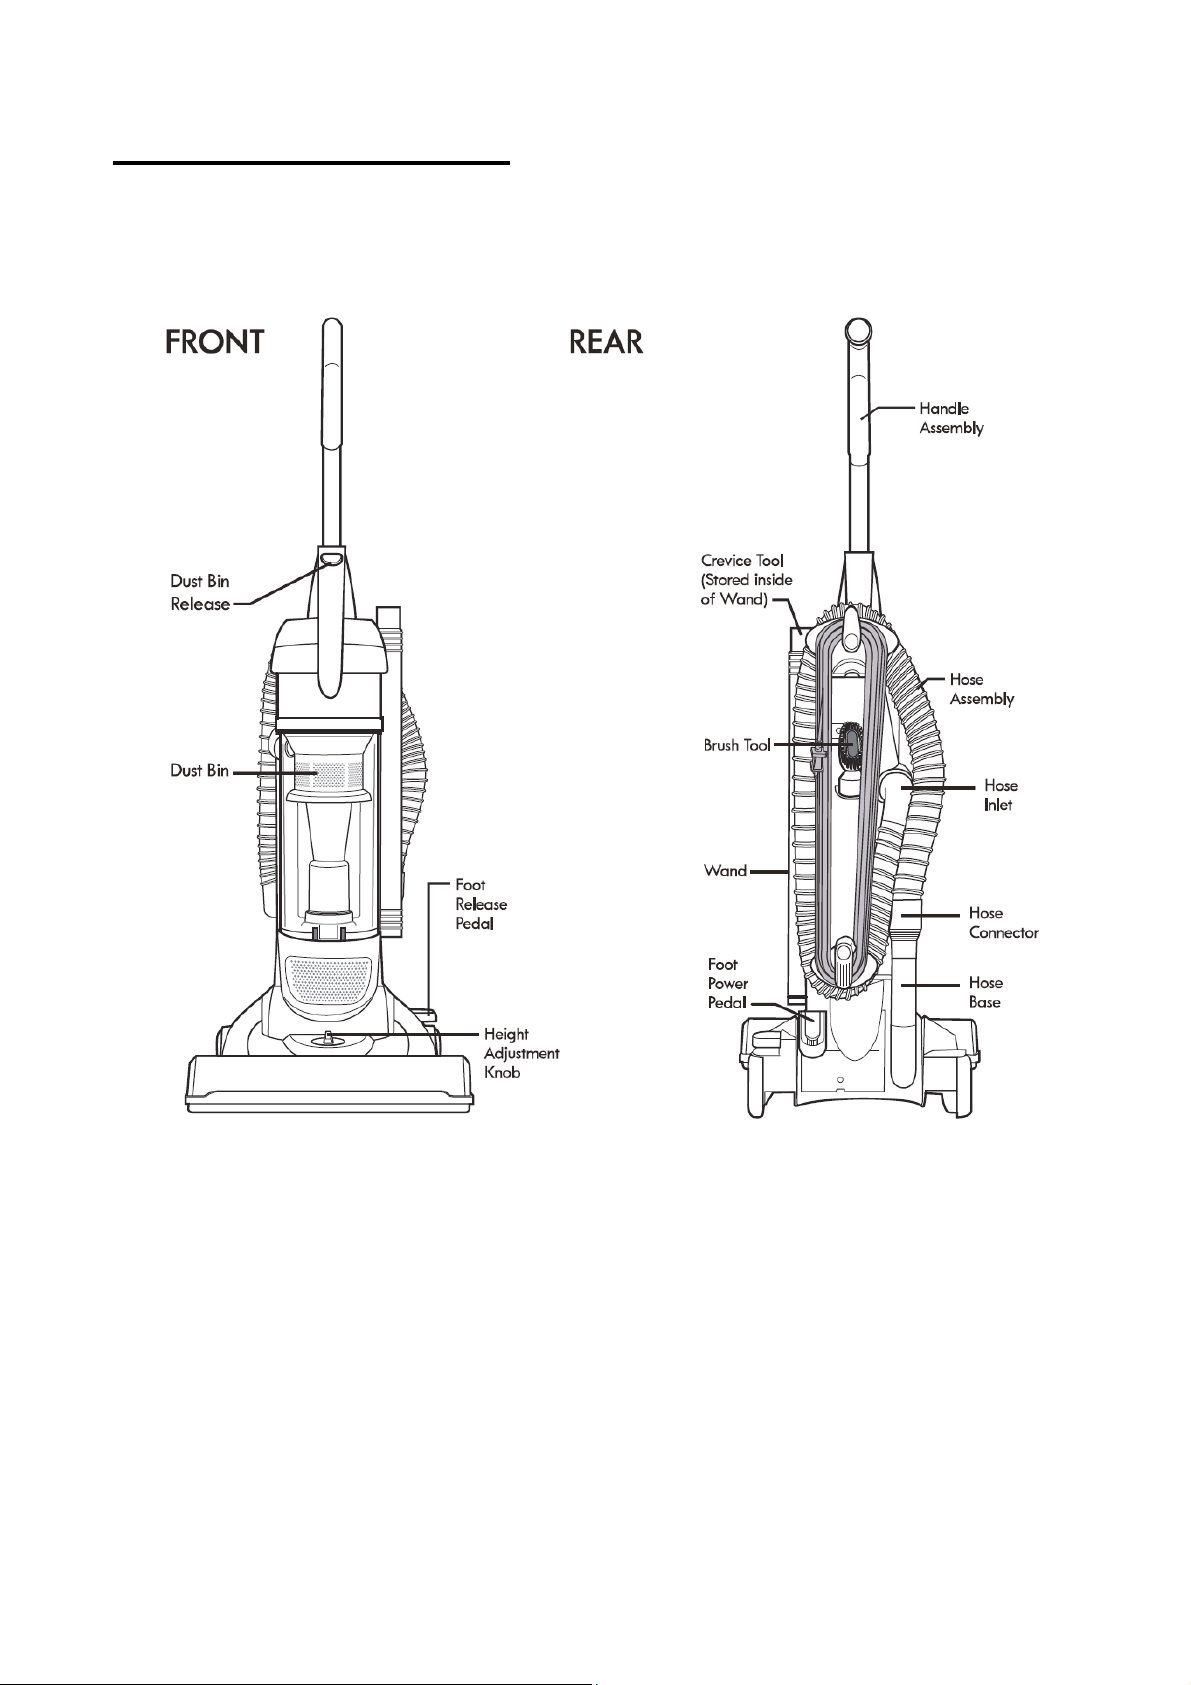
PARTS & FEATURES
It is important to know your vacuum cleaner's parts and features to ensure its proper and safe use. Review
these before using your vacuum cleaner.
UPRIGHT VACUUM FULLY ASSEMBLED
4
Page 5
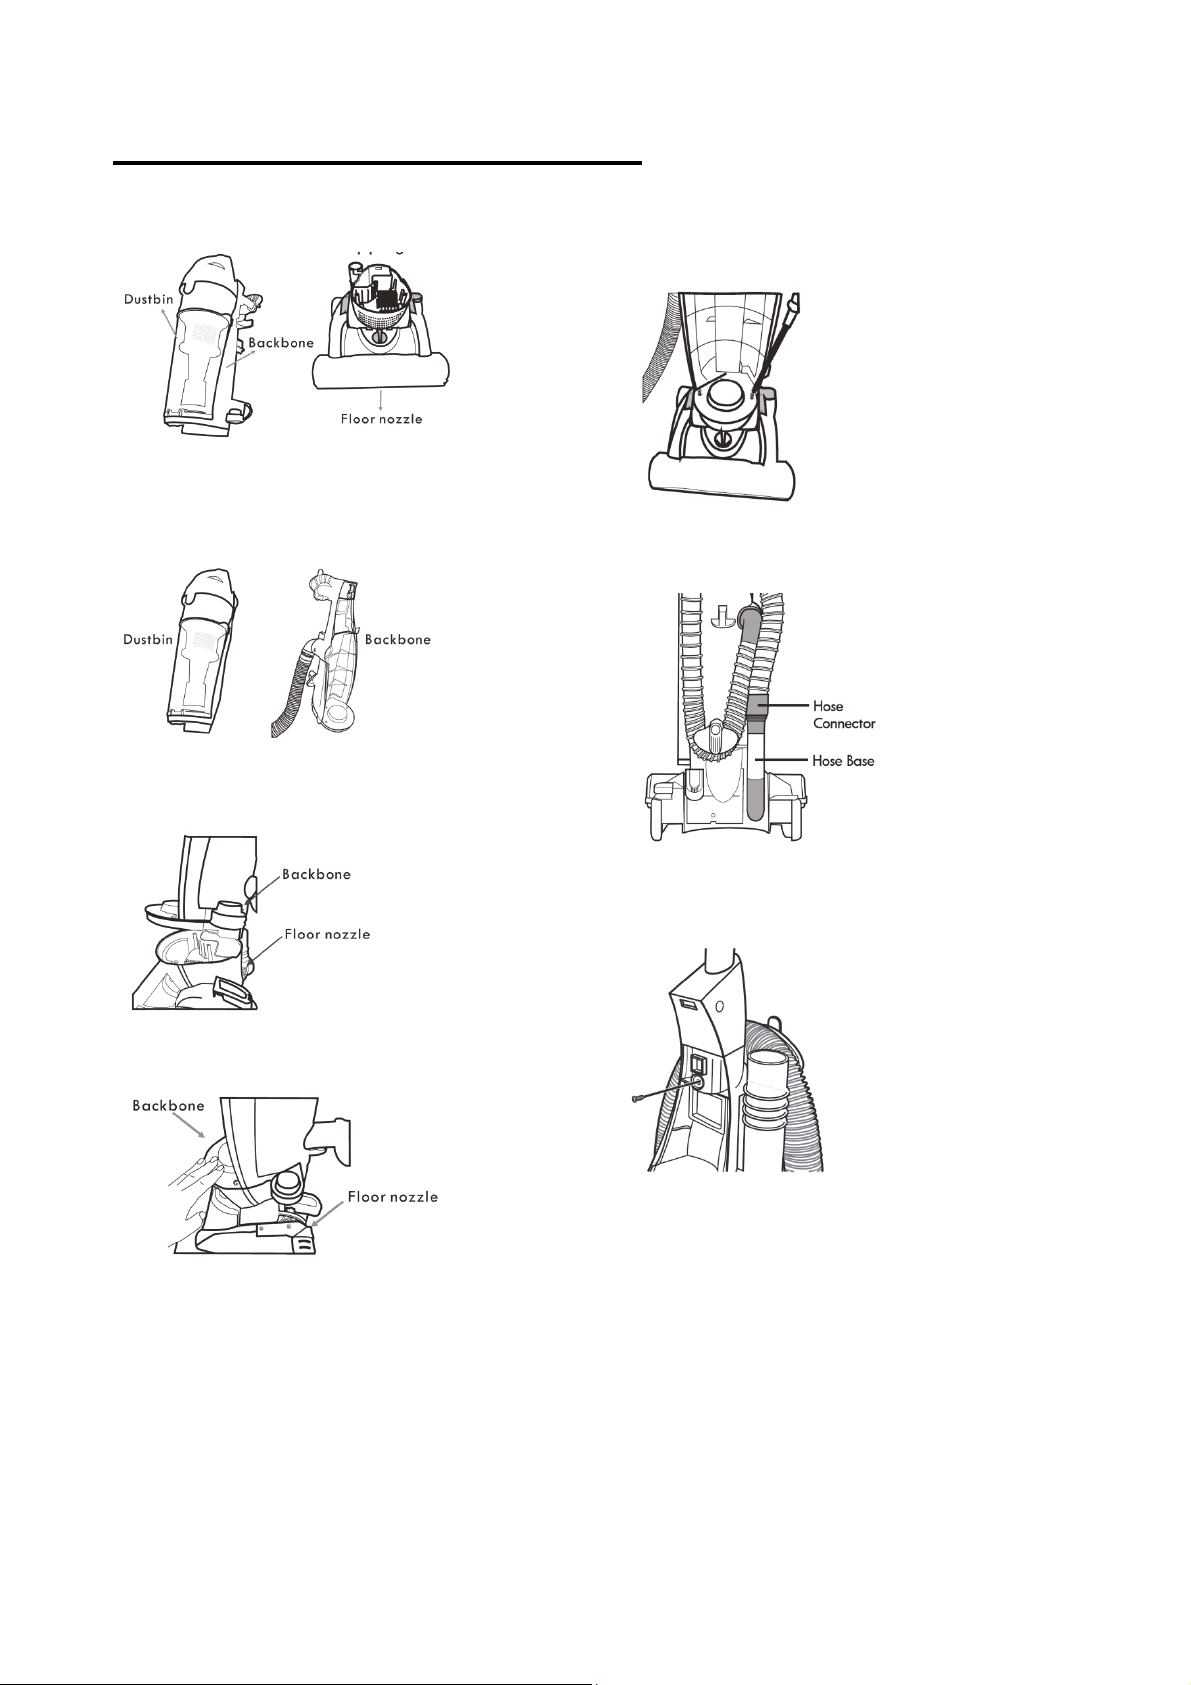
ASSEMBLY INSTRUCTIONS
1. Remove the dust bin assembly and floor nozzle
from the shipping box.
2. Remove the dust bin from the backbone by
pushing the dust bin release button and lifting off the
dust bin. Set dust bin aside.
5. Install the three screws as shown to securely
connect the upper and lower sections of the vacuum
together. Insert dust bin back into backbone.
6. Insert the hose connector all the way into the
hose base. Be sure both ends are secure.
3. Insert the rear of the backbone into the floor
nozzle as shown.
4. Press the front of the backbone down onto the
floor nozzle.
7. Insert the handle assembly into the base. Insert
and tighten the handle assembly screw.
5
Page 6
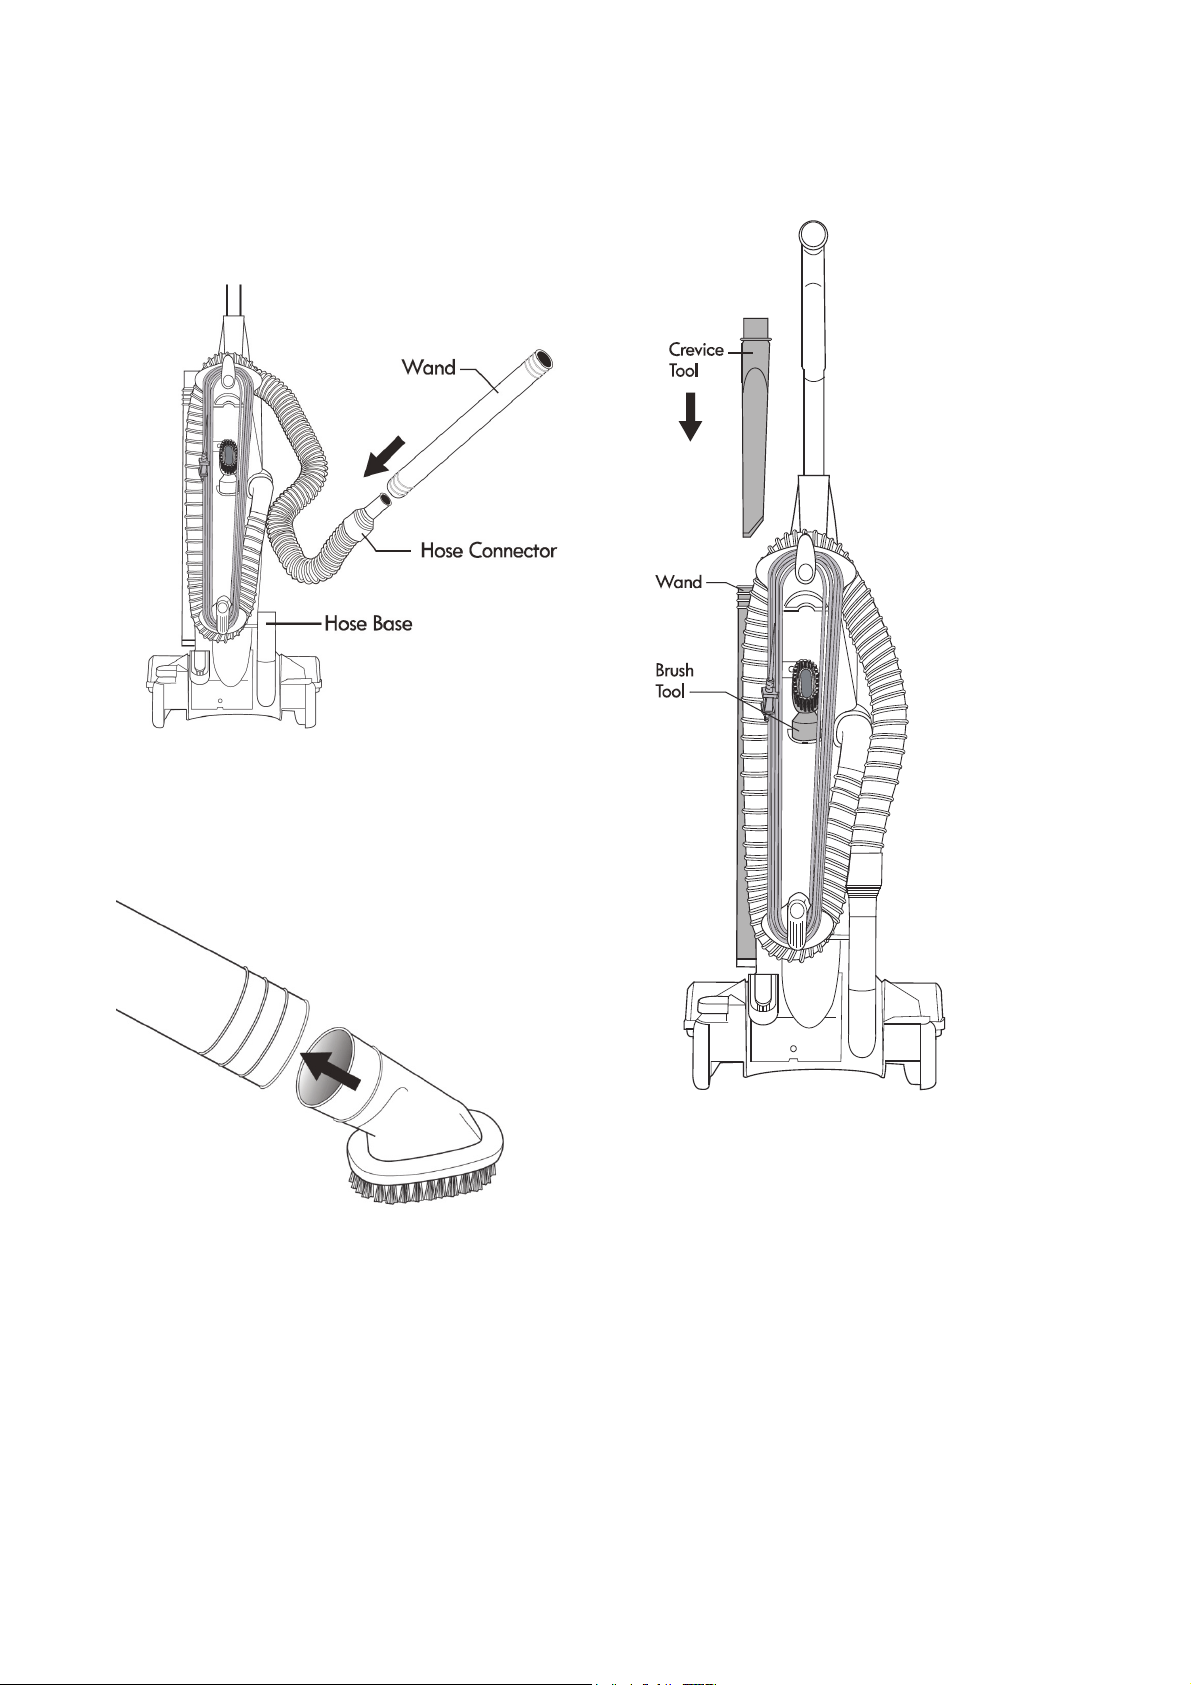
USING THE WAND
Remove the hose from the hose base as shown.
Insert the hose connector into the wand by pressing
and turning together tightly until the wand is
securely attached to the hose.
TOOL STORAGE
Store the tools on the vacuum when not in use.
NOTE: The Crevice Tool stores inside of the wand.
ADDING ATTACHMENTS
Add the Crevice Tool or the Brush Tool by inserting
them into the wand as shown below.
6
Page 7
OPERATING INSTRUCTIONS
HOW TO START
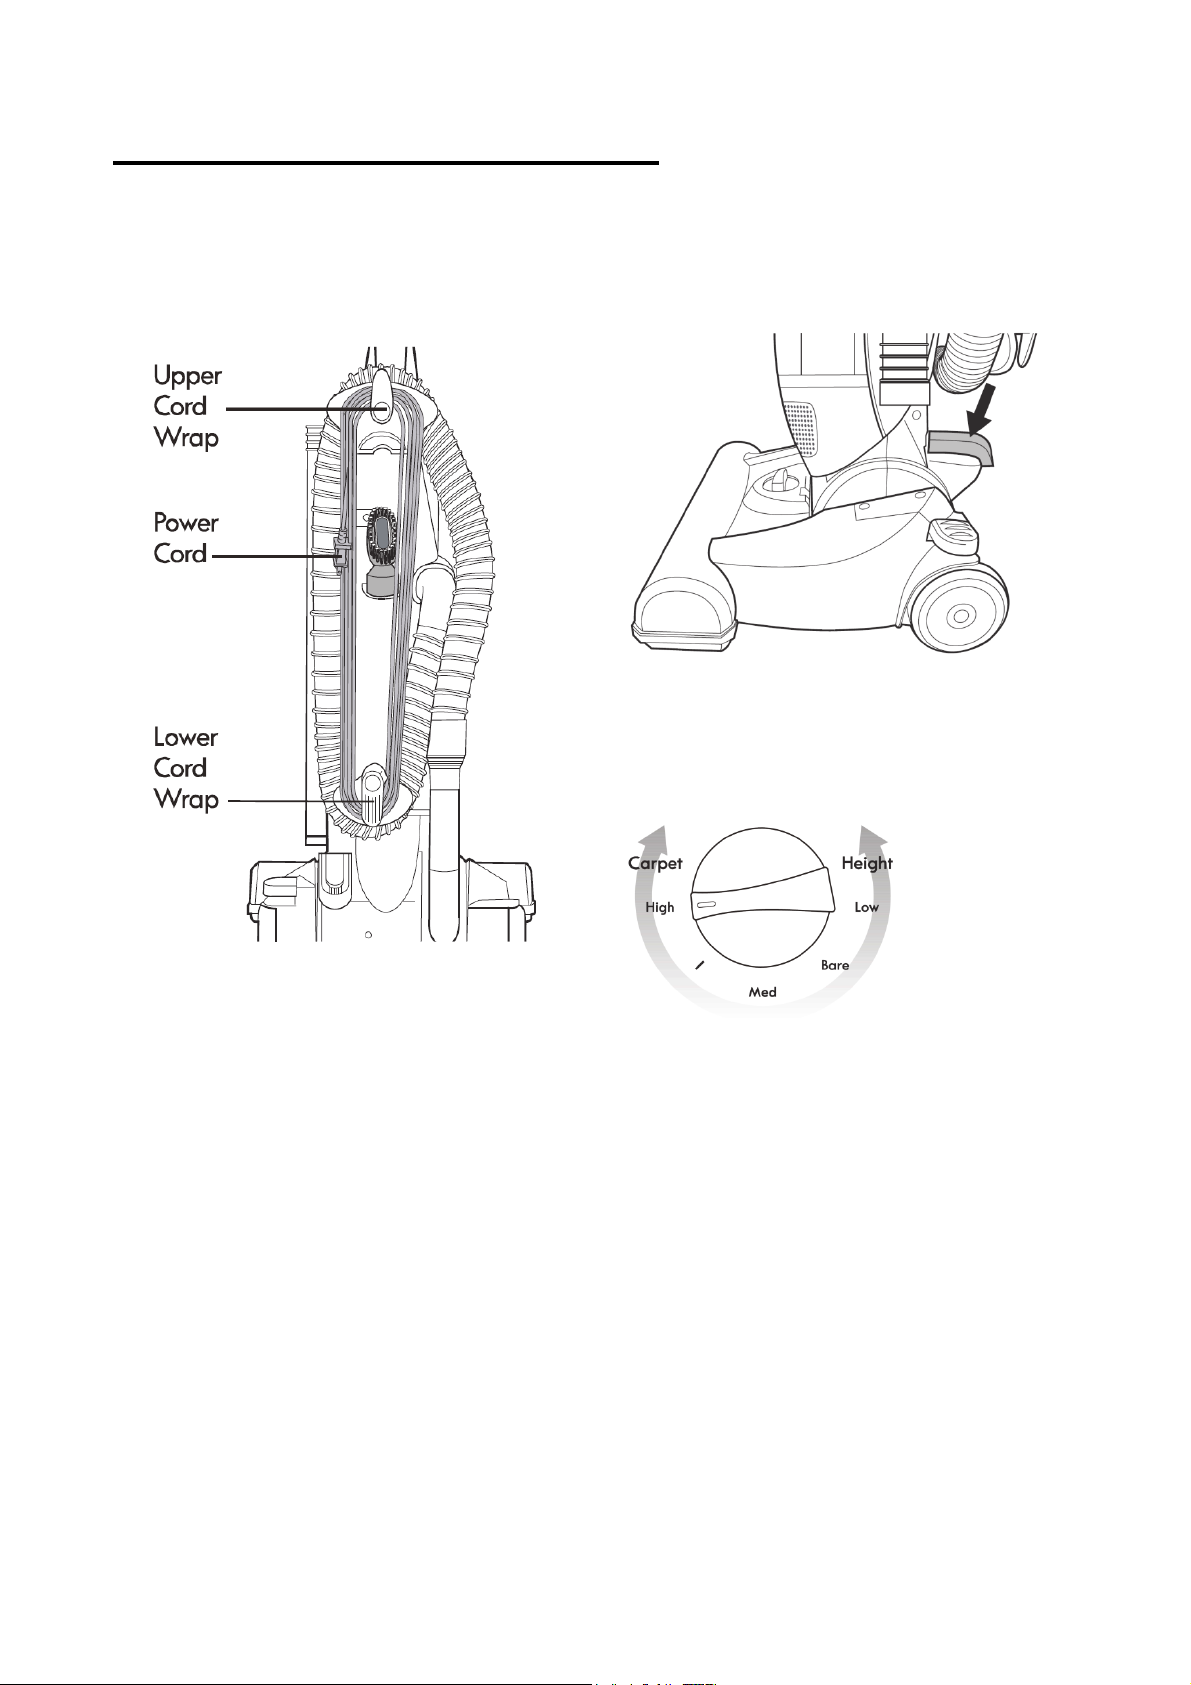
• The cord is stored on the cord wrap on the back
side of the vacuum. Unwrap the desired
amount of cord.
• Plug the power cord into an electricity outlet.
• Start or stop vacuum cleaner by pushing on the
HEIGHT ADJUSTMENT
Adjustable height control allows you to change the
height of the vacuum cleaner for different types of
carpet and pile heights.
power switch with your foot.
• To rewind the cord: Wrap the cord around
upper and lower cord wrap. Clip the plug onto
the cord.
7
Page 8
VACUUMING TIPS
TO UNLOCK FROM UPRIGHT POSITION
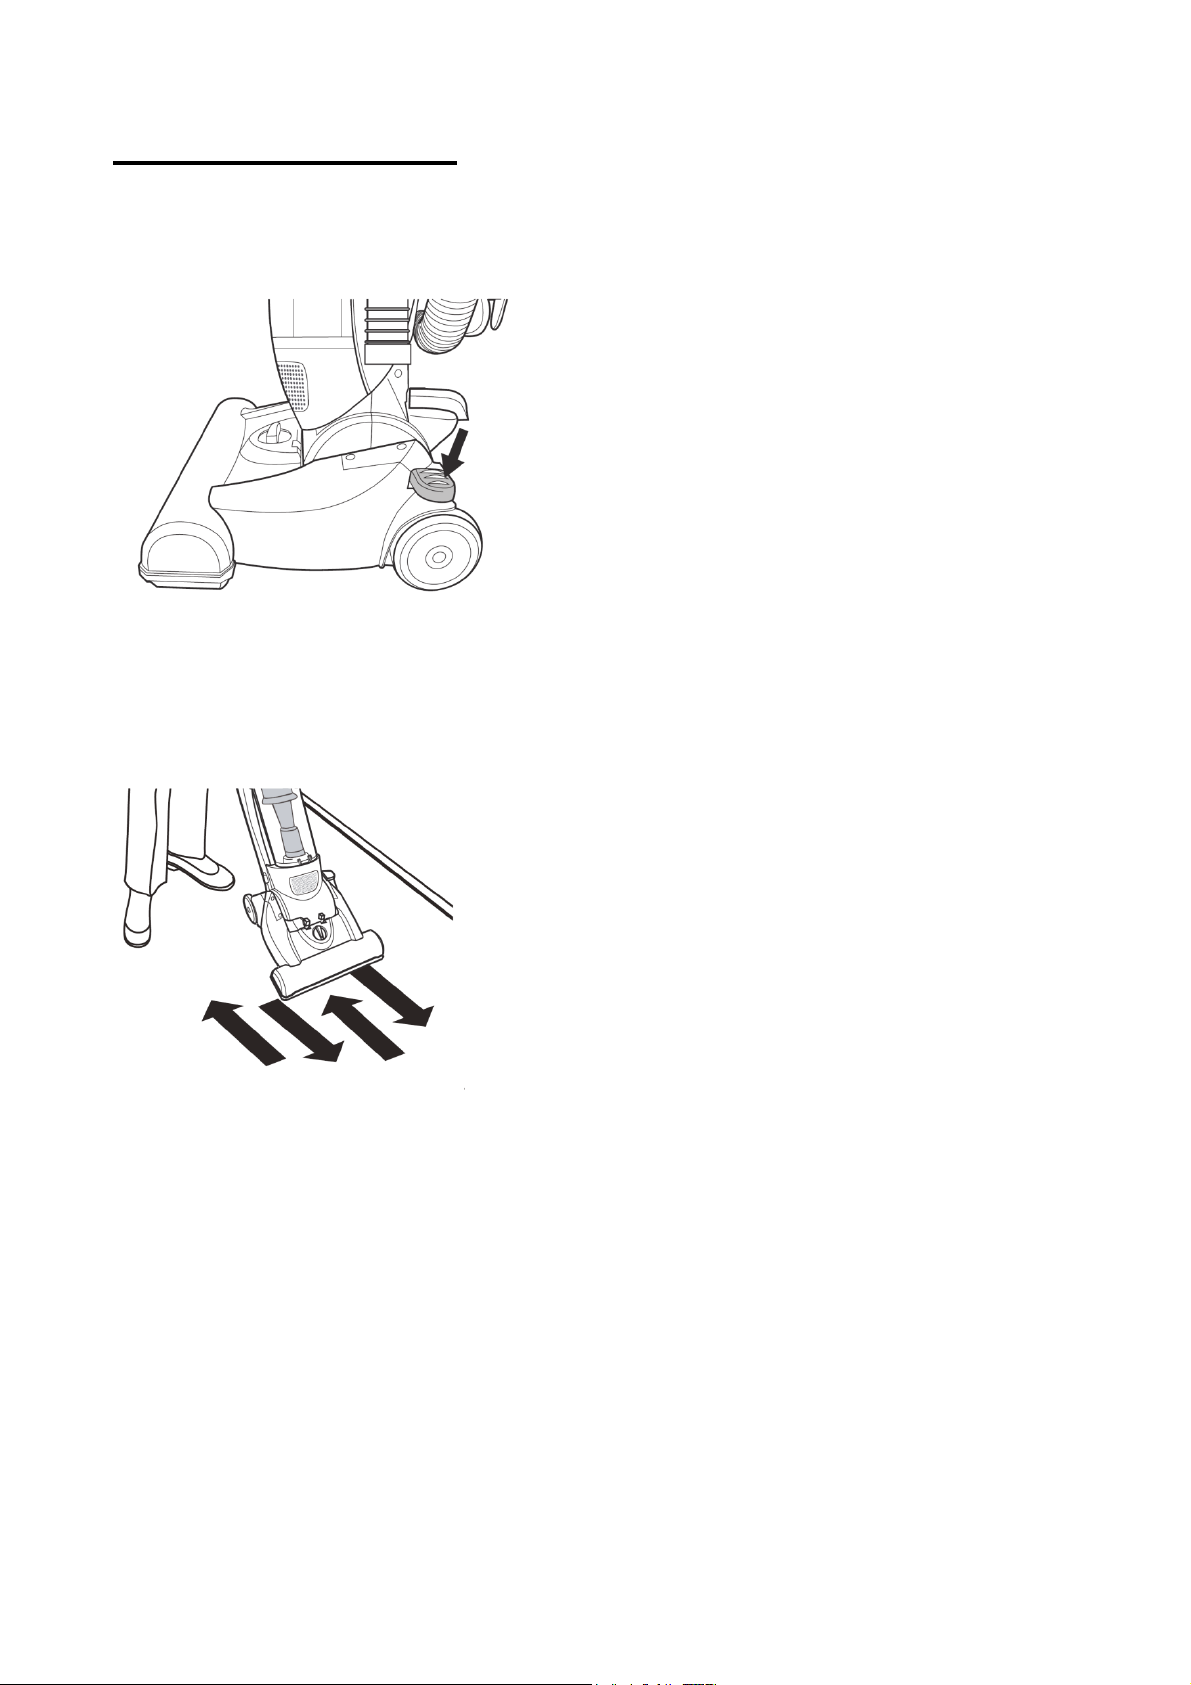
Press the position lever to unlock the vacuum from the upright position.
SUGGESTED SWEEPING PATTERN
For best cleaning action, the floor brush should be pushed straight away from you and pulled straight back. At
the end of each pull stroke, the direction of the nozzle should be changed to point into the next section to be
cleaned. This pattern should be continued across the carpet with slow, gliding motions.
NOTE: Fast, jerky strokes do not provide complete cleaning.
For best cleaning results, keep the airflow passage open. Check each assembly area occasionally for clogs.
Turn off machine and unplug from outlet before checking.
8
Page 9
ATTACHMENTS
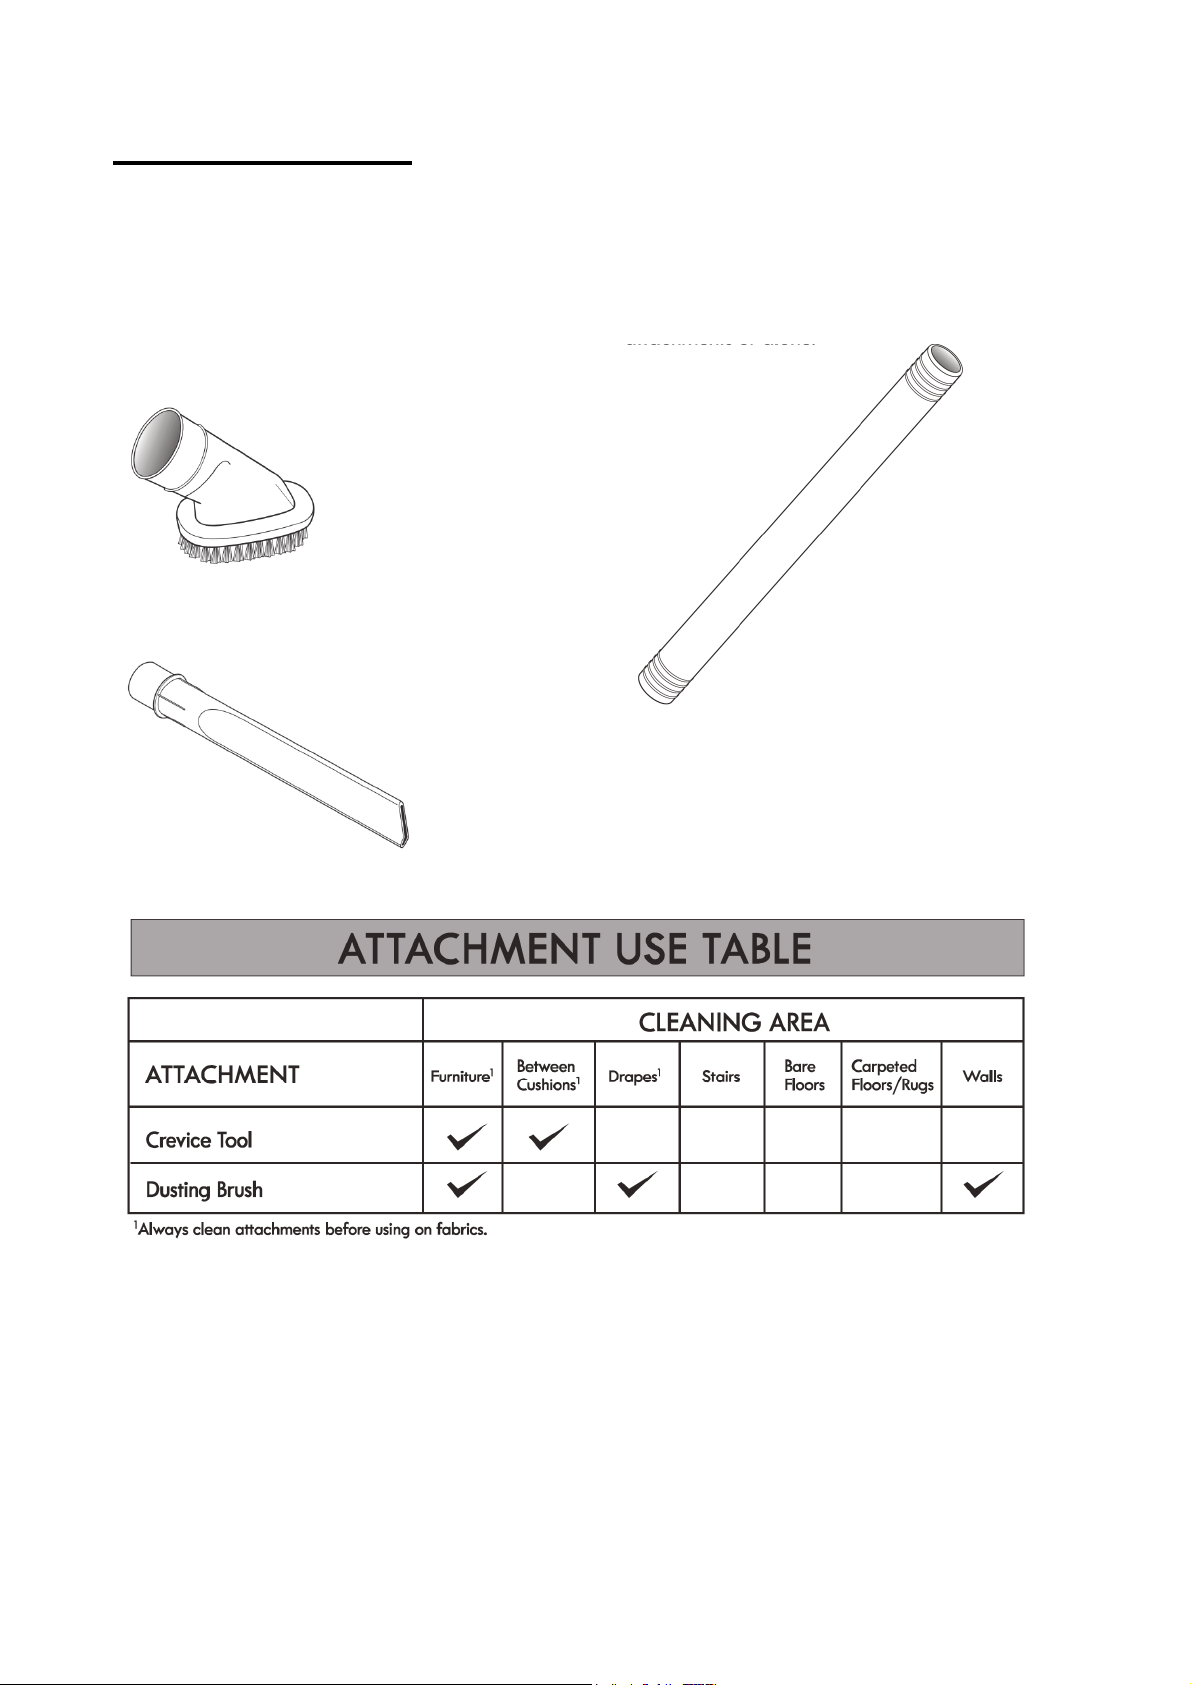
Slide attachments firmly on handle or extension rod
as needed. See ATTACHMENT USE TABLE below.
DUSTING BRUSH
The brush attachment is suitable for cleaning
narrow spaces such as between a wall and an
adjoining surface.
CREVICE TOOL
For vacuuming edges and gaps.
EXTENSION ROD
For extending reach. Use with attachments or alone.
9
Page 10
VACUUM CARE
REMOVING CLOGS
The vacuum cleaner creates suction that picks up dirt.
Rapidly moving air carries the dirt to the dust canister
through the airflow passages. The dust canister lets the
air pass through, while it traps the dirt. For best cleaning
results keep the airflow passage open.
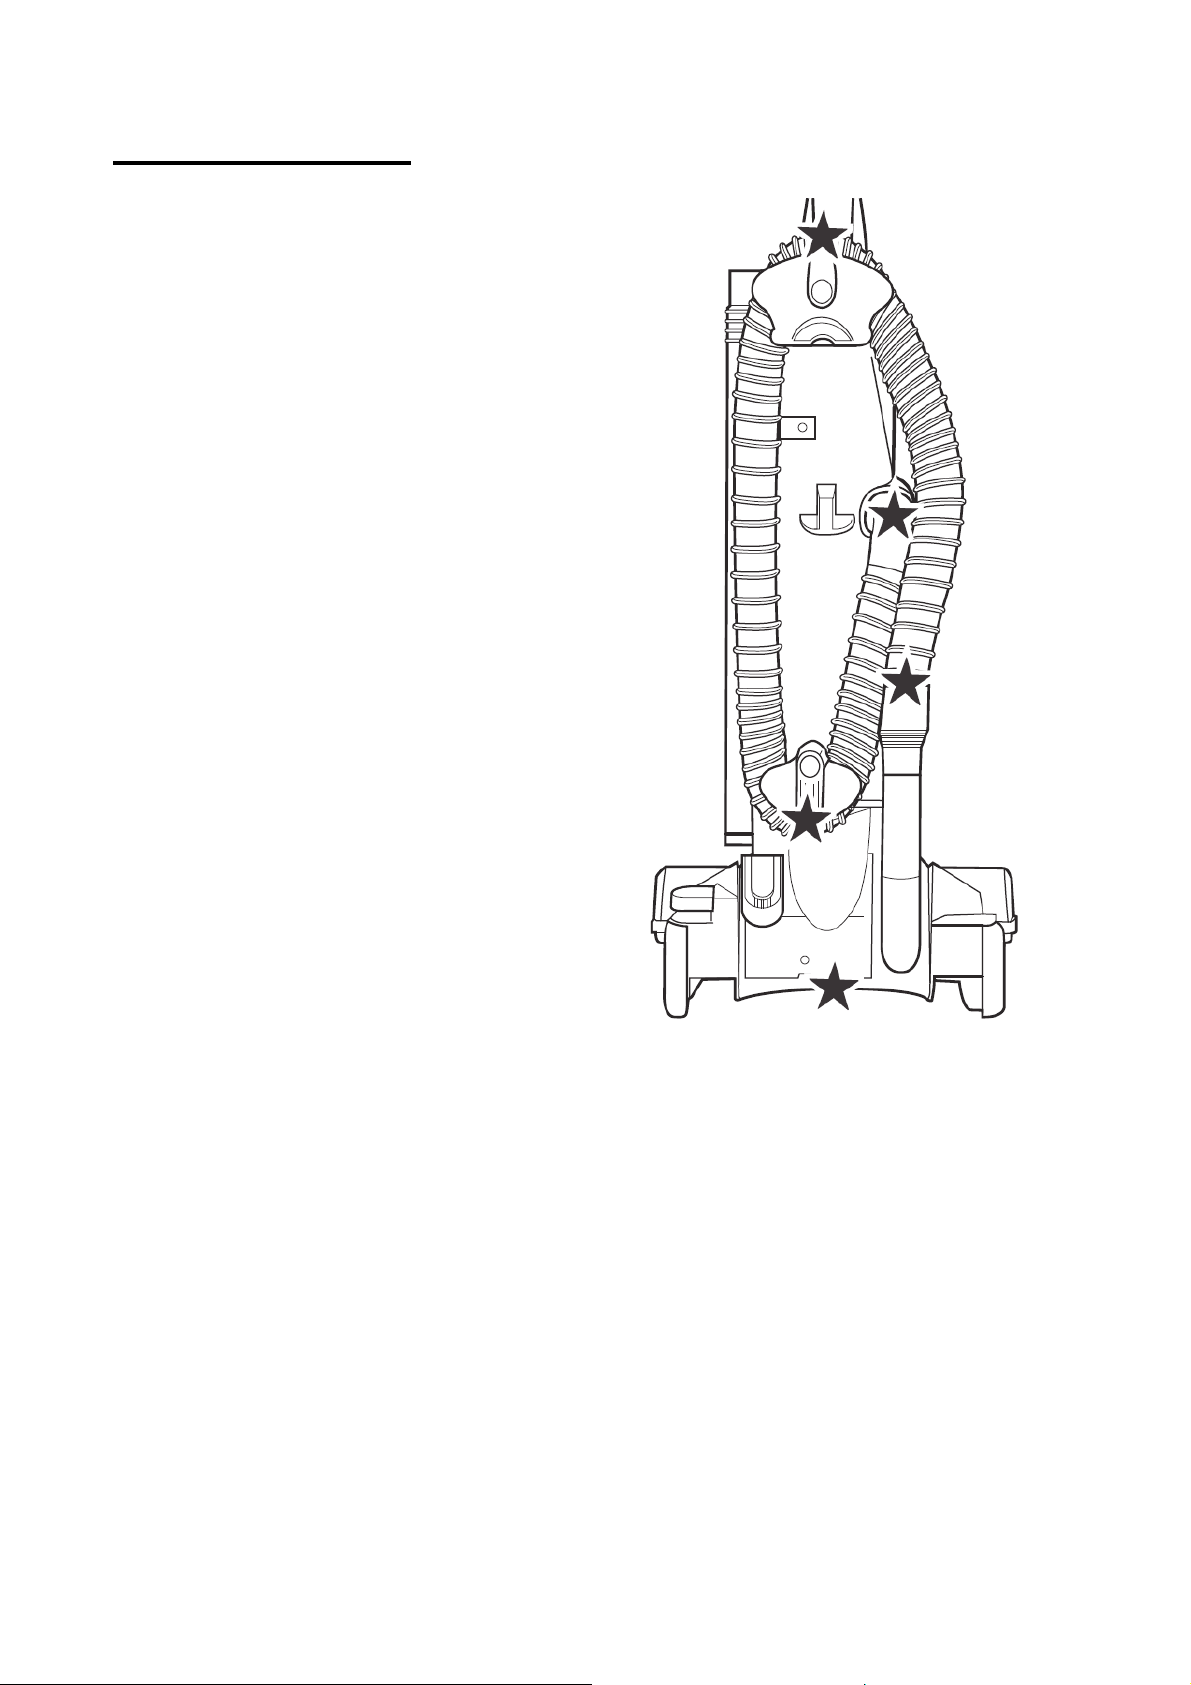
Check the starred () areas occasionally for clogs. Tum
off and unplug vacuum cleaner from outlet before
checking.
TO CHECK FOR CLOGS
• Check dust bin and empty if full.
• Check Roller Brush for any dirt or debris. Carefully
remove any string or debris located on the Roller
Brush.
• Check under Floor Brush suction opening.
If the vacuum cleaner still has poor suction, do the
following:
• Connect the hose to the canister and turn vacuum
cleaner on. Check the end of the hose for suction. If
there is good suction on the hose handle, there is no
clog in the hose. If the suction is bad, remove any
dirt or debris in the hose and handle.
• Connect hose handle to extension rod. Check the
end of the rod for suction. If there is good suction at
the end of the rod, there is no clog in the wand. If the
suction is bad, remove any dirt or debris in the rod.
CLEANING EXTERIOR AND ATTACHMENTS
• Turn off and unplug vacuum cleaner. DO NOT drip water on vacuum cleaner.
• To dean exterior, or to reduce static electricity and dust build-up, wipe outer surface of vacuum cleaner
and attachments. Use a clean, soft cloth that has been dipped in a solution of mild liquid detergent and
water, then wrung dry. Wipe dry after cleaning.
10
Page 11
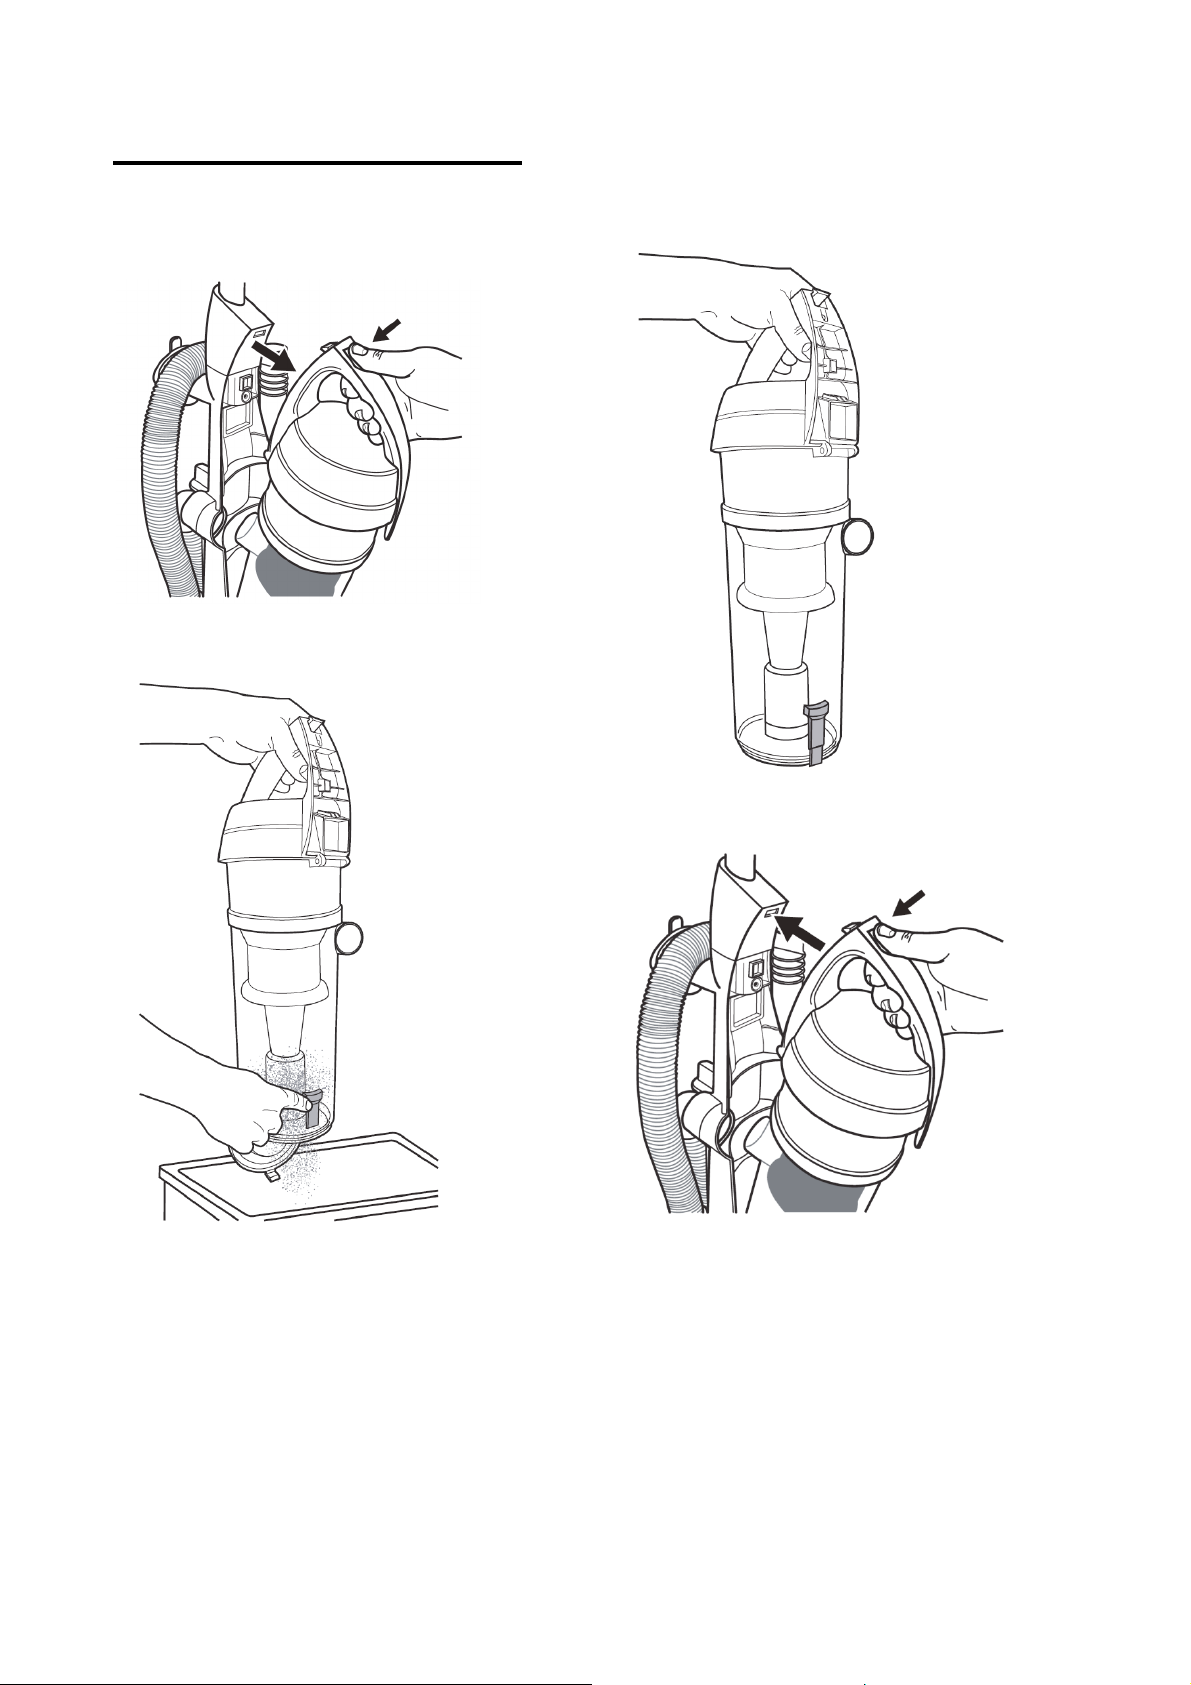
EMPTYING DUST BIN
1. Push the dust bin release button and lift off the
dust bin.
2. Hold the dust bin over a trash container and lift
the release button to open and empty.
3. Close the dust bin.
4. Reinstall dust bin as shown.
11
Page 12
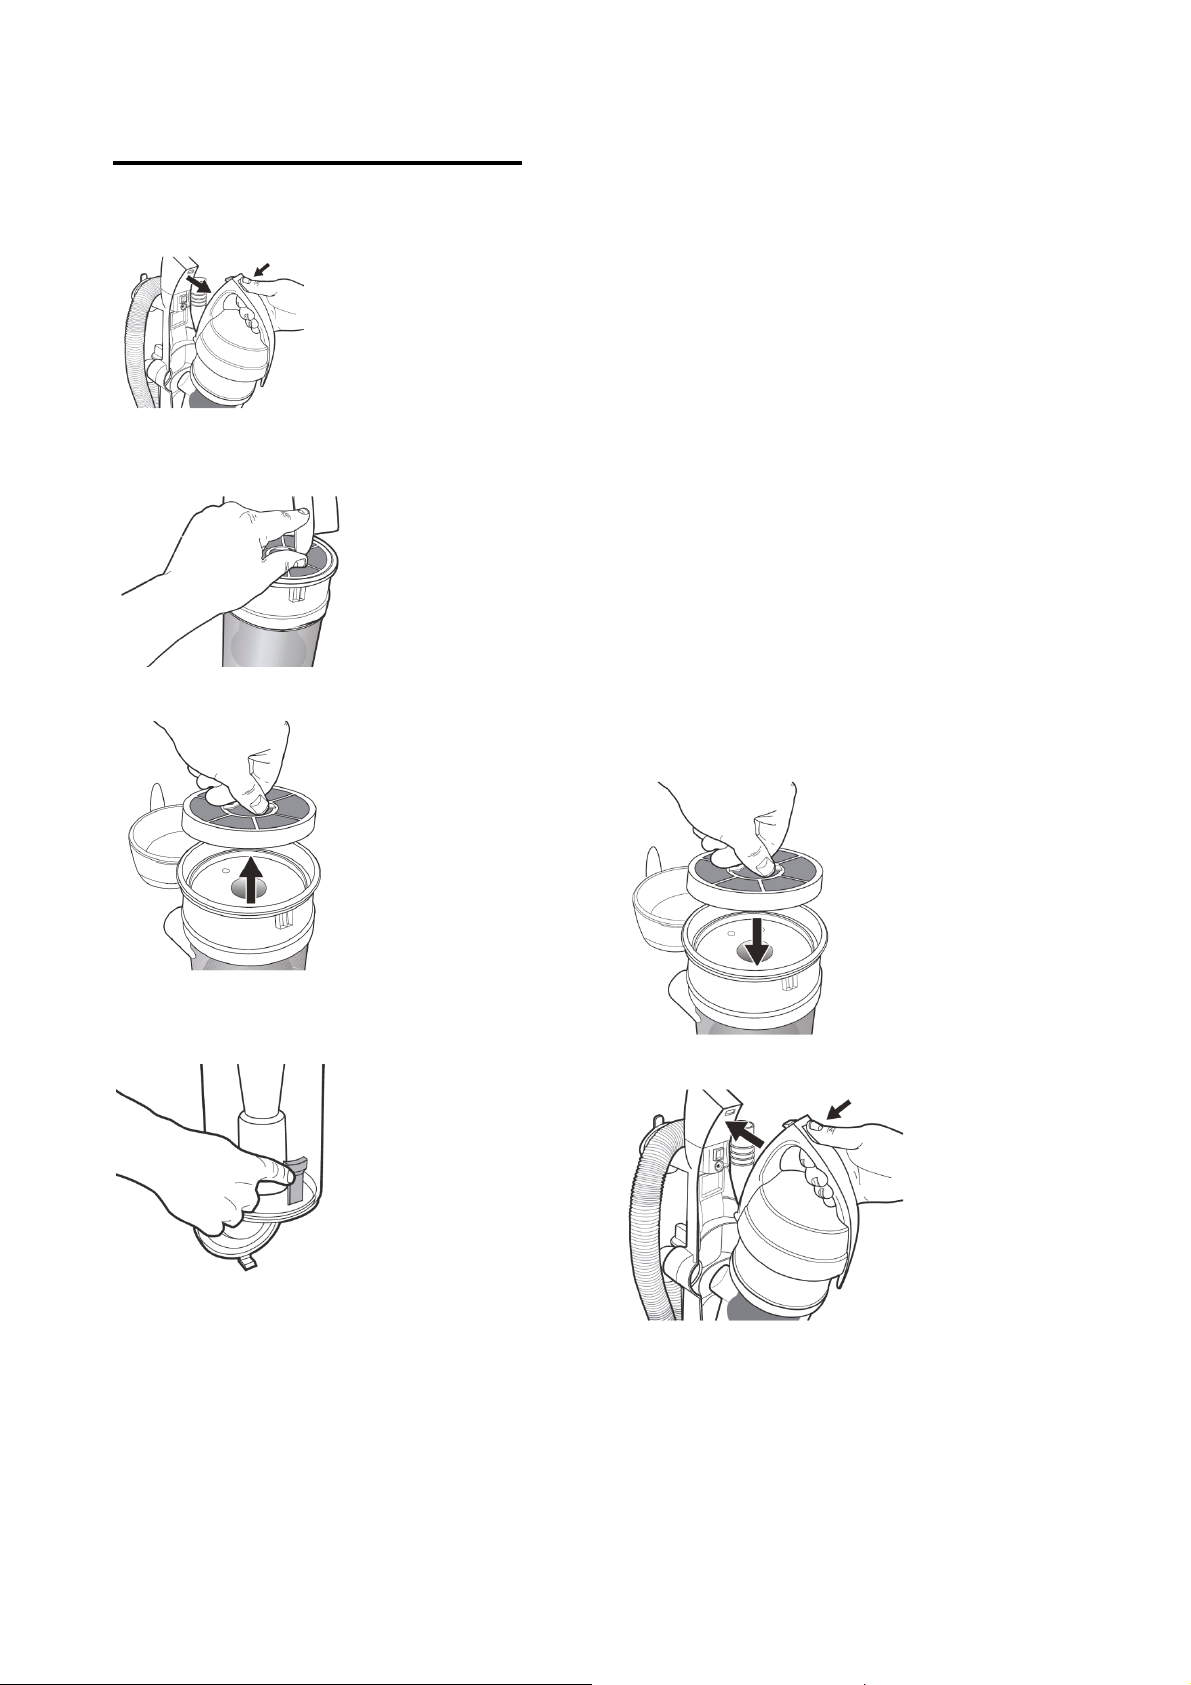
CLEANING DUST BIN
1. Remove the dust bin.
2. Open the dust bin filter lid, located on the top of
the dust bin.
3. Remove the dust bin foam filter from the dust bin.
5. Hand wash the bin foam filter. Allow filter to dry 24
hours before putting back into vacuum cleaner.
NOTE: When the cleaning of the filter no longer
restores vacuum cleaner suction to full power,
replace the filter.
DO NOT operate without filter installed.
DO NOT wash dust bin in the dishwasher.
DO NOT install filter damp.
CAUTION:
• Do not attempt to dry filter with a hair dryer or
by placing in clothes dryer. Hot air may cause
the filters to warp.
• It is not necessary to wash the dust bin or filter
after each vacuum use.
6. Install the foam bin filter.
4. Push the release button, open the dust bin and
clean all parts of the dust bin.
7. Close the dust bin and reattach as shown.
12
Page 13
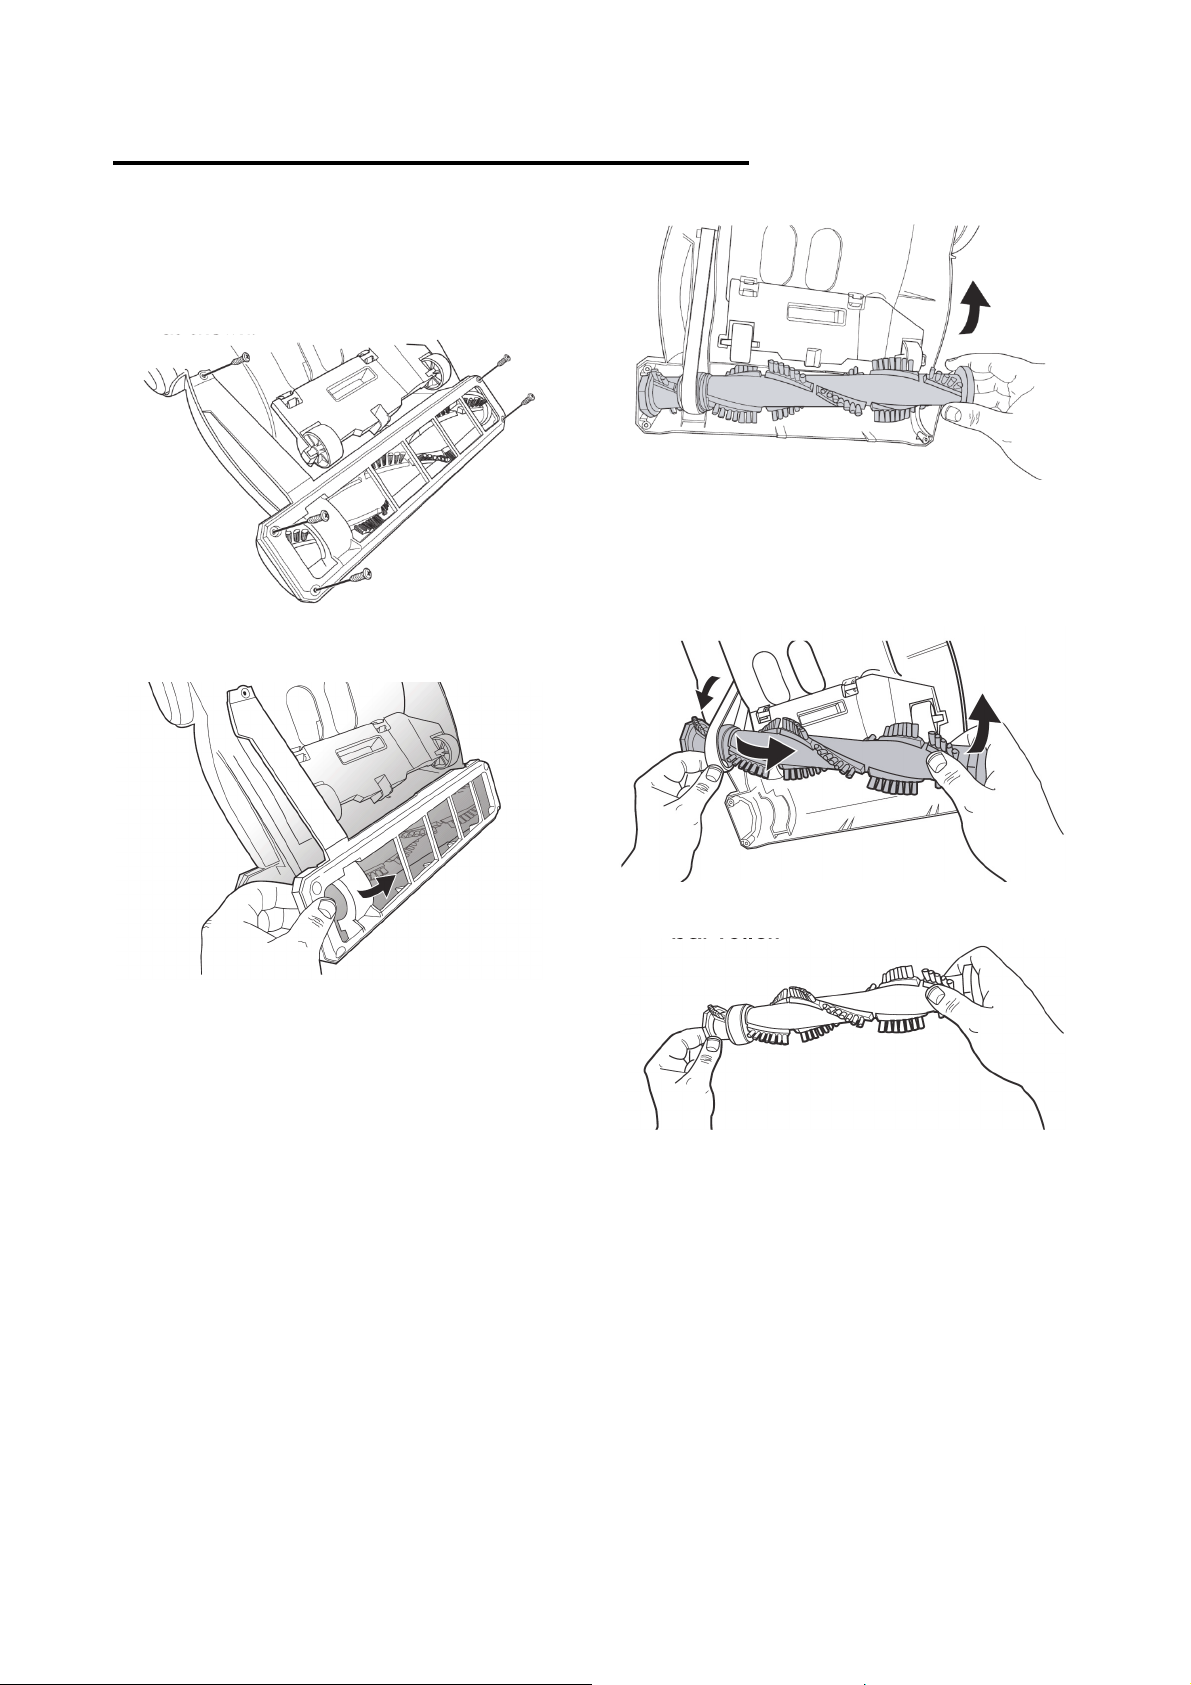
CLEANING BRUSH BAR ROLLER
REMOVING THE BRUSH BAR ROLLER
1. Remove the five screws that hold the brush roller
base plate in place as shown.
4. Remove the brush bar roller from the belt
assembly by pulling the belt towards you and sliding
the brush
2. Remove the brush bar roller base plate by lifting it
up.
bar out.
3. Remove the brush bar roller by lifting the right
side out of the roller guides as shown.
5. Remove all debris from the brush bar roller.
NOTE: When the cleaning of the brush bar no
longer restores vacuum cleaner suction to full power,
check for clogs or replace the filters.
13
Page 14
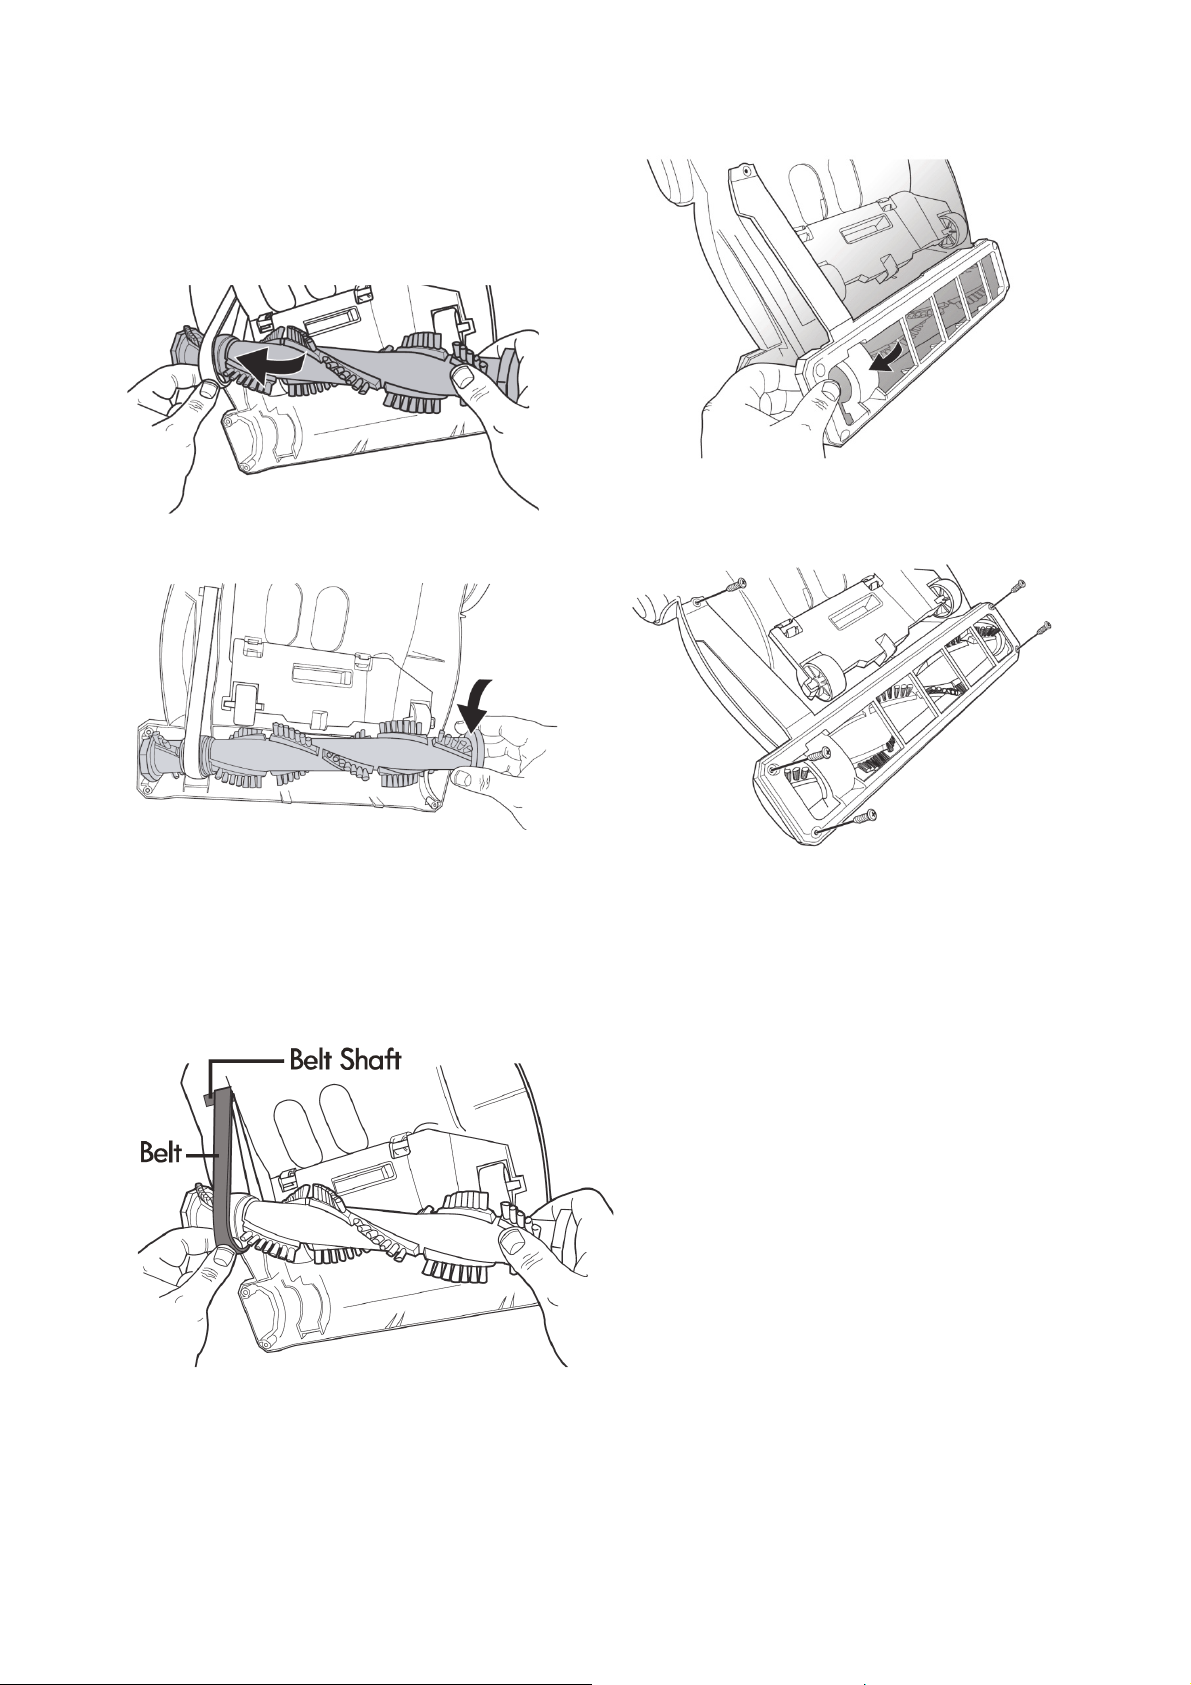
REINSTALLING THE BRUSH BAR ROLLER
DO NOT operate without brush bar brush installed.
Reinstall the brush bar roller by inserting the left
side of the roller through the belt and into the roller
guides.
Slide the right side of the brush bar roller into the
guides as shown below.
Replace the five screws that hold the brush roller
base plate in place as shown.
Replace the brush bar roller base plate as shown.
BELT REPLACEMENT
To replace a broken belt, remove the brush bar roller as explained previously. Insert one end of the new belt
around the belt shaft, and the other end around the brush bar as shown below. Reinstall brush bar as
explained in the previous section.
14
Page 15

TROUBLESHOOTING
Review this table to find do-it-yourself solutions for minor performance problems. Any other service needed
should be performed by a qualified service agent.
WARNING!
Always turn off and unplug vacuum cleaner before performing maintenance. Failure to do so could result in
electrical shock or personal injury.
PROBLEM POSSIBLE CAUSE POSSIBLE SOLUTION
Vacuum cleaner won't start 1. Unplugged at wall outlet
2. Tripped circuit breaker / blown
fuse at household service panel
Poor job of dirt pick-up 1. Full or clogged dust bin.
2. Clogged airflow passages
3. Dirty filters
4. Dust bin open
5. Broken drive belt.
1. Plug in firmly, push ON/OFF
switch
2. Reset circuit breaker or replace
fuse
1. Empty dust bin
2. Clear airflow passages
3. Change / clean filters
4. Close dust bin until release
button is latched
5. Replace belt
15
Page 16

Cleanstar Pty Ltd
ABN: 51 121 002 104 ACN: 121 002 104
59 Radford Road, Reservoir VICTORIA 3073
Phone: (03) 9460 5655 Fax: (03) 9460 5666
Email: [email protected]
Web: www.cleanstar.com.au
CONDITIONS OF WARRANTY
This document outlines the terms and conditions of warranty for your Cleanstar product. This is an important document that
should be kept with your proof of purchase documents in a safe place for future reference should you require service for your
product.
Thank you for purchasing your new Cleanstar product. We are confident this product will give you trouble-free use and excellent service,
provided the operator uses and maintains the product in accordance with the Instruction Manual. Please read the Instruction Manual
carefully before using the product for correct operation and maintenance procedures, and store it in a safe place for future reference.
1. This is a parts and labour warranty against faulty or defective parts, materials or workmanship in manufacturing, when the product
is used and operated in accordance with the Instruction Manual.
2. This product carries a 12 month (1 year) warranty period that commences from the original date of purchase by the first
user/purchaser, and is not transferable.
3. The warranty covers only personal, domestic or household use of the product to remove dry dirt and dust from household carpets,
flooring and fabrics.
4. This product is not suitable for commercial or industrial cleaning applications and therefore no warranty applies in this case.
5. This warranty only applies to products purchased and used in Australia.
6. At all times during the warranty period, Cleanstar shall, at its sole discretion, determine whether repair, replacement or refund will
apply if the product has a valid warranty claim applicable to it.
7. The repair or replacement of the product under this warranty does not extend the original period of warranty.
8. Please note that this warranty will be voided in the following cases (which are not exhaustive) and the warranty does not
the cost of replacing any parts of the product resulting from:
Accidental damage;
Normal wear and tear;
Neglect, misuse or physical abuse by the operator, including failure to properly maintain or service;
Any alterations, modifications or tampering with the product without the prior written consent of Cleanstar;
Incomplete or improper installation;
Incorrect, improper or inappropriate operation;
Insect or vermin infestation;
Power surges, electrical storm damage or incorrect power supply/voltage;
Excessive use or use for which this product has not been designed;
apply to
16
Page 17

Vacuuming up water, liquids, toner, powders, glass, hazardous, flammable or corrosive materials, plaster dust, concrete dust
and other similar building or construction materials;
Failure to comply with the operating instructions contained in the Manual supplied with the product;
If the product is rented;
If the product is used outside of Australia;
If the product was serviced or repaired by anyone other than Cleanstar, or one of Cleanstar’s Authorised Service Agents
(ASA). Cleanstar is unable to accept any responsibility under this warranty for any repair work not carried out by an ASA or
from the use of non-genuine parts.
9. This warranty does not cover service calls, travelling time or consumable parts such as belts, dust bags, filters, hose or hose parts,
rods and wands, floor tools and accessories, motor brushes and other like consumable items, unless defective in manufacture. In
order to prolong the life of accessories and consumables, regular care and maintenance is recommended.
10. Please retain your original proof of purchase which will be required before you can make a claim under this warranty. If proof of
purchase cannot be provided at the time of a warranty claim or service, any work carried out on the cleaner is chargeable.
11. Any transportation and delivery costs involved in the repair of defective parts shall be borne by the claimant. In all instances, unless
the product is transported by Cleanstar or a Cleanstar authorised representative, the product is transported at the owner’s cost and
risk while in transit to and from Cleanstar or its ASA.
Our goods come with guarantees that cannot be excluded under the Australian Consumer Law. You are entitled to a replacement or
refund for a major failure and for compensation for any other reasonably foreseeable loss or damage. You are also entitled to have the
goods repaired or replaced if the goods fail to be of acceptable quality and the failure does not amount to a major failure. The benefits
conferred by this warranty are in addition to other rights and remedies under law in respect of the product to which this warranty relates.
TO INQUIRE ABOUT MAKING A CLAIM UNDER THIS WARRANTY, PLEASE FOLLOW THESE STEPS:
a) carefully check the Instruction Manual and the terms of this warranty;
b) have the name and model number of the appliance available;
c) have the proof of purchase available (ie. invoice, receipt, etc) showing where the appliance was purchased from and date of
purchase;
d) call Cleanstar on (03) 9460 5655 to speak to one of our customer service staff.
17
 Loading...