

Page 1
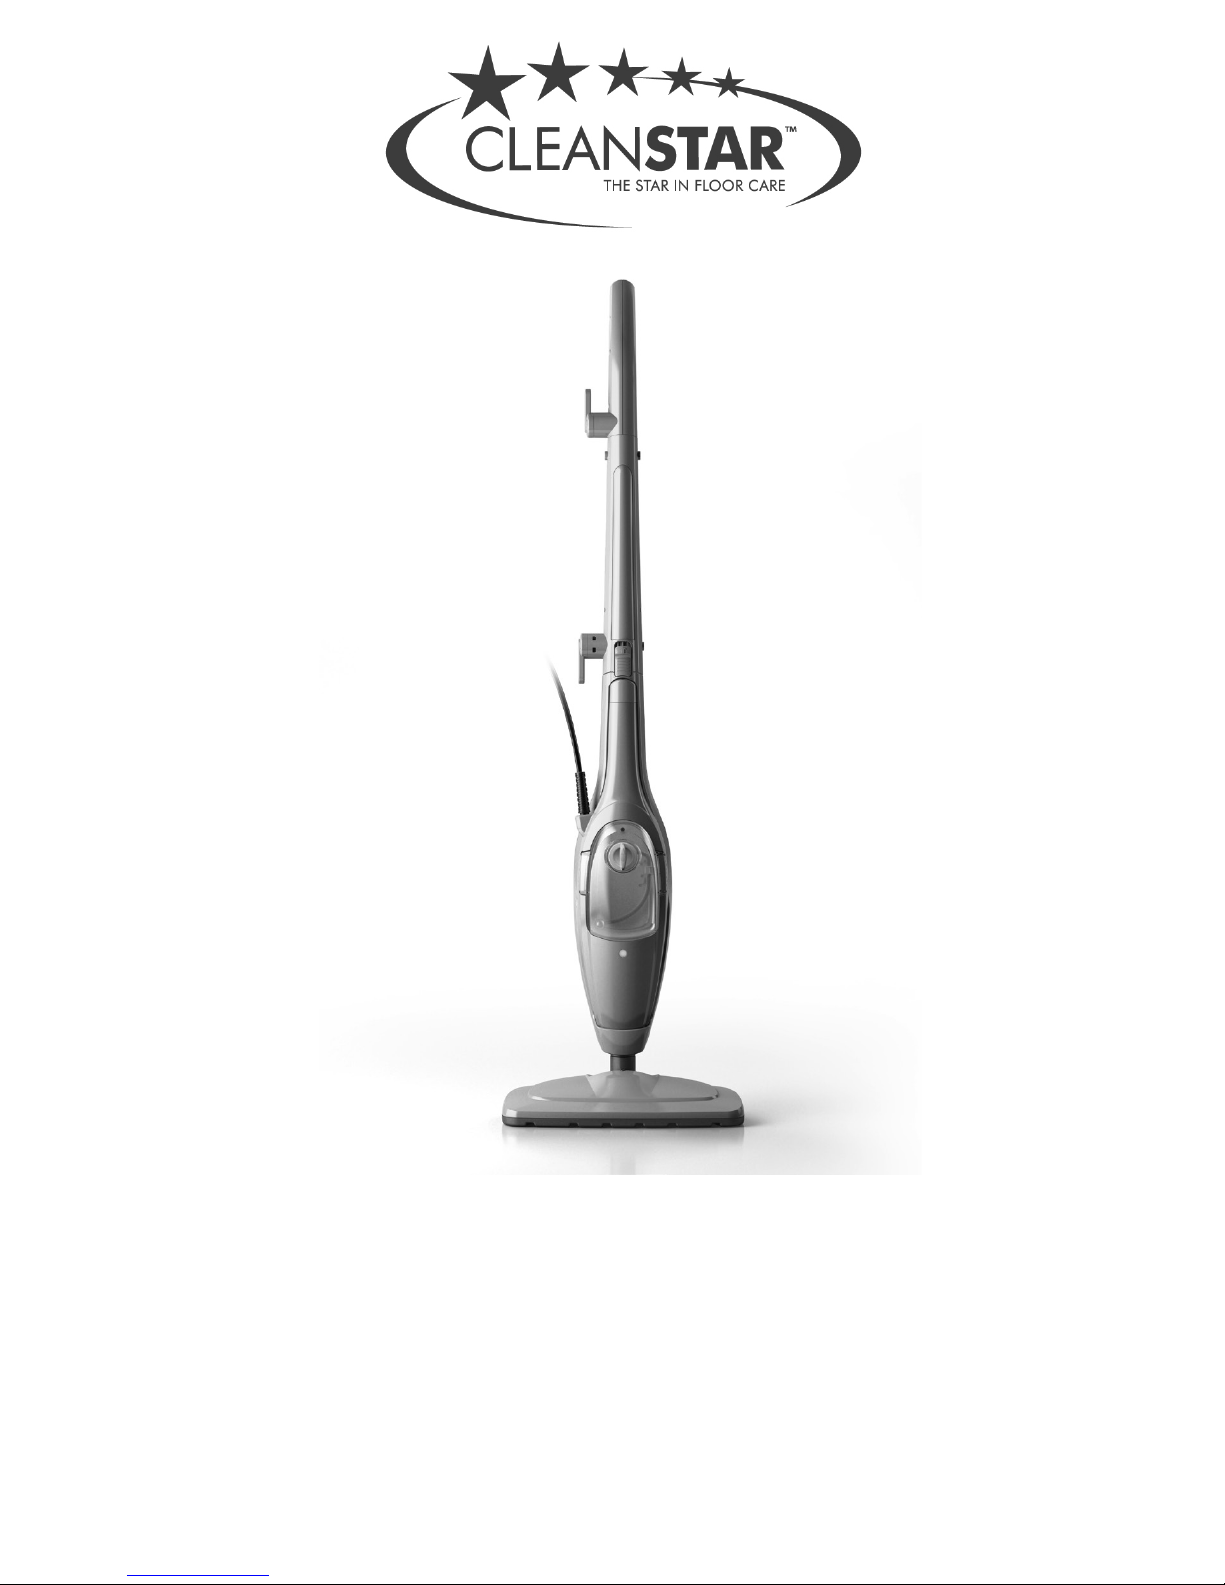
STEAMSTAR
2-in-1 Steam Cleaner
Model: SS-101
Instruction Manual
Page 2
GB
Contents
Key to the symbols in this manual _________________________________ 14
Safety guidelines ______________________________________________ 15
Warranty conditions __________________________________________________ 17
Equipment overview and parts purchased ____________________________ 18
Before using for the rst time ____________________________________ 19
Unpacking __________________________________________________________ 19
Assemble the stand for the oor steam cleaner. ______________________________ 19
Use ________________________________________________________ 19
Important points to note before use ______________________________________ 20
Filling the water tank __________________________________________________ 20
Use as a oor steam cleaner ____________________________________________ 20
Use of the hand steam cleaner ___________________________________________ 22
Cleaning and storage ___________________________________________ 23
Troubleshooting ______________________________________________ 24
Reordering __________________________________________________ 24
Technical data ________________________________________________ 24
GB
Contents
Key to the symbols in this manual _________________________________ 14
Safety guidelines ______________________________________________ 15
Warranty conditions __________________________________________________ 17
Equipment overview and parts purchased ____________________________ 18
Before using for the rst time ____________________________________ 19
Unpacking __________________________________________________________ 19
Assemble the stand for the oor steam cleaner. ______________________________ 19
Use ________________________________________________________ 19
Important points to note before use ______________________________________ 20
Filling the water tank __________________________________________________ 20
Use as a oor steam cleaner ____________________________________________ 20
Use of the hand steam cleaner ___________________________________________ 22
Cleaning and storage ___________________________________________ 23
Troubleshooting ______________________________________________ 24
Reordering __________________________________________________ 24
GB
Contents
Key to the symbols in this manual _________________________________ 14
Safety guidelines ______________________________________________ 15
Warranty conditions __________________________________________________ 17
Equipment overview and parts purchased ____________________________ 18
Before using for the rst time ____________________________________ 19
Unpacking __________________________________________________________ 19
Assemble the stand for the oor steam cleaner. ______________________________ 19
Use ________________________________________________________ 19
Important points to note before use ______________________________________ 20
Filling the water tank __________________________________________________ 20
Use as a oor steam cleaner ____________________________________________ 20
Use of the hand steam cleaner ___________________________________________ 22
Cleaning and storage ___________________________________________ 23
Troubleshooting ______________________________________________ 24
Reordering __________________________________________________ 24
Technical data ________________________________________________ 24
Disposal ____________________________________________________ 24
Customer services ____________________________________________ 25
14
Dear customer,
We are delighted that you have chosen the “cleanmaxx” Multi Steam Cleaner Mega Power. It
uses pure steam to ensure hygienic cleanliness – and with no chemicals at all! As a powerful
steam brush, it glides effortlessly over carpets and smooth oors. By taking out the integrated hand steam cleaner, you will be able to get all kinds of surfaces, such as cooker hoods,
tiles and racks, to sparkle afresh. Even stubborn grease marks can be removed.
We hope you enjoy using your new “cleanmaxx” Multi Steam Cleaner Mega Power.
Please read the instruction manual carefully before using the appliance for the rst
time and keep it in a safe place. If the appliance is passed on, this instruction manual
must also be handed over. The manufacturer and the importer do not accept any
liability if the instructions in this manual are not observed.
Key to the symbols in this manual
All safety guidelines are indicated with this symbol. Read these carefully and observe
the safety guidelines in order to prevent personal injury and damage to property.
Tips and recommendations are indicated with this symbol.
This appliance operates with hot steam!
GB
Contents
Key to the symbols in this manual _________________________________ 14
Safety guidelines ______________________________________________ 15
Warranty conditions __________________________________________________ 17
Equipment overview and parts purchased ____________________________ 18
Before using for the rst time ____________________________________ 19
Unpacking __________________________________________________________ 19
Assemble the stand for the oor steam cleaner. ______________________________ 19
Use ________________________________________________________ 19
Important points to note before use ______________________________________ 20
Filling the water tank __________________________________________________ 20
Use as a oor steam cleaner ____________________________________________ 20
Use of the hand steam cleaner ___________________________________________ 22
Cleaning and storage ___________________________________________ 23
Troubleshooting ______________________________________________ 24
Reordering __________________________________________________ 24
Technical data ________________________________________________ 24
Disposal ____________________________________________________ 24
Customer services ____________________________________________ 25
Conditions of Warranty _____________________________________
“STEAMSTAR” 2-in-1 Steam Cleaner.
“STEAMSTAR” 2-in-1 Steam Cleaner.
2
2
3-5
6
7
7
11
12
12
12
13
14
7
7
8
8
8-9
10-11
Page 3
15
Safety guidelines
Proper use
❐ This appliance is suitable for cleaning heat-resistant surfaces. It is also suitable for clean-
ing laminate oors if the following instructions are followed:
1. The laminate should be professionally tted and there should be no gaps or cracks
into which moisture could penetrate.
2. Test the steam cleaner in an inconspicuous area rst of all and then check the laminate for undulations or moisture which may have penetrated.
3. If there are no traces on the surface, the appliance can be used to clean the entire
laminate oor.
❐ The appliance is not suitable for unsealed wooden oors, soft plastics, leather or wooden
furniture.
❐ Ask a professional whether your oor coverings are suitable for cleaning with the steam
cleaner. Always test the cleaner on a small inconspicuous area rst.
❐ Only use the appliance in enclosed areas.
❐ This appliance is intended for private use and not for commercial use. Only use the appli-
ance as described in the instruction manual. Any other use is considered to be improper
use.
Risk of injury
❐ Keep children and animals away from the packaging material. There is a risk of suffocation!
❐ This appliance is not intended to be used by persons (including children) with sensory or
mental impairment or those who lack experience and/or knowledge, unless they are supervised by a person who is responsible for their safety or if they received instructions from
this person regarding how to use this appliance. Children must be supervised in order to
ensure that they do not play with the appliance.
❐ Never point the steam directly at people, animals or plants. This can result in serious scald-
ing.
❐ Beware - risk of scalding! Never touch the appliance's cleaning head/attachment while
in operation! Keep at least 30 cm away. Wear shoes when cleaning oors.
❐ While in use, only hold the appliance by the handle. There is a risk of scalding!
❐ Never leave the appliance unattended when it is connected to the mains.
❐ The attachment/cleaning head used can remain hot for a short time after use. Wait a few
minutes therefore until it has fully cooled down before removing it/the oor cleaning cloth.
❐ Always let the appliance fully cool down before adding or removing water, cleaning and/or
putting away the appliance.
❐ Stow the appliance away in a place inaccessible for children.
❐ Arrange the cable in such a way that it does not represent a trip hazard.
❐ Beware! Risk of burns! Improper use can result in injury, scalding and electric shocks.
❐ Do not use the appliance when it is damaged.
❐ Be especially careful when cleaning stairs.
3
Page 4
16
Risk of electric shock and burns
❐ Only connect the appliance to a correctly installed plug socket, equipped with protec-
tive contacts. The plug socket must also be easily accessible after connection. The mains
voltage must correspond to the technical specications of the appliance. Only use proper
extension cables whose technical specications correspond to those of the appliance.
❐ This appliance must be connected to earth. Only use the accompanying plug. Do not try to
bypass earth.
❐ Never immerse the appliance, cable or plug in water or in any other liquid. Ensure that the
appliance, cables and plug do not fall into water or become wet. Should the appliance fall
into water, shut off the power supply immediately.
❐ Never touch the appliance, the power cable or the plug with wet hands.
❐ The steam must never be pointed directly at power cables or parts which contain electrical
components (e. g. oven interiors, refrigerators, switches and lights, microwaves).
❐ Remove the plug after each use, before removing/replacing an attachment/a oor cleaning
cloth, lling/emptying the water tank, cleaning the appliance or when not using the appli-
ance. Never pull on the cable, always pull at the plug.
❐ Never use the appliance in rooms in which there is highly inammable dust, or toxic or
explosive vapours.
❐ Check the appliance for damage before every use. In the case of defects, the appliance
must not be used any further until repaired by a professional.
❐ Only use the appliance if it is completely assembled and functional.
❐ Switch off the appliance immediately in the case of damage/blockages.
❐ Never try to repair an electrical appliance or replace parts yourself. Find the nearest
customer service/professional or contact customer services in the case of damage (see the
"Customer services" section).
Avoiding material and physical damage and damage to the appliance
❐ Lay the cable in such a way that it will not be squeezed or kinked and does not make con-
tact with any hot surfaces.
❐ Never carry or pull the appliance by the cable.
❐ Always work with sufcient lighting.
❐ Do not use any additional accessories. Only use those accessories supplied by the manufac-
turer.
❐ Never undo the water tank catch during use. Always ensure that the water tank is rmly
closed before using the appliance.
❐ Never use the appliance without water.
❐ Use normal or distilled water for lling the water tank. Other liquids can damage the
appliance.
❐ Do not pour any cleaning agent into the appliance. This can irreparably damage the appli-
ance, and it may no longer be safe to use.
4
Page 5

17
❐ Only use fragrance additives with water and never undiluted in the water tank. Only use
fragrance additives in well ventilated rooms.
❐ Never cover the steam outlet, do not place it on soft surfaces (which will block it) and do
not insert any objects into it.
❐ Maintain sufcient distance to heat sources, e. g. hot plates or ovens, in order to avoid
damage to the appliance.
❐ Never use the cleaning head without a oor cleaning cloth.
❐ Always check the oor cleaning cloth for wear before each use. It must not be used if it
is visibly worn or damaged. This could result in damage to your oor covering.
❐ Do not drop the appliance and do not subject it to heavy shocks.
❐ Always test the cleaning performance rst in a small inconspicuous area.
❐ Never direct the steam for too long onto one area.
❐ Never use the appliance on cold glass surfaces. The hot steam could cause the glass to
shatter.
❐ The heat and the steam can remove the wax from wax-treated surfaces.
❐ Do not use any corrosive or abrasive cleaning agents (e. g. vinegar) or cleaning pads.
❐ When cleaning the appliance, do not allow any liquid to enter it. This may cause major
damage to the appliance.
❐ Only return the appliance to its storage place once it has fully cooled down and there is no
water left in the water tank.
❐ Do not wind the power cable too tightly around the hooks provided for holding it. This
could result in it being damaged.
❐ Keep the appliance in a dry, clean and cool place which is inaccessible to children.
❐ Do not expose the appliance to extreme temperatures, extreme temperature uctuations,
direct sunlight or moisture.
Warranty conditions
All defects caused by improper use, damage or repair attempts are excluded from the war-
ranty. This also applies to normal wear and tear.
5
Page 6
18
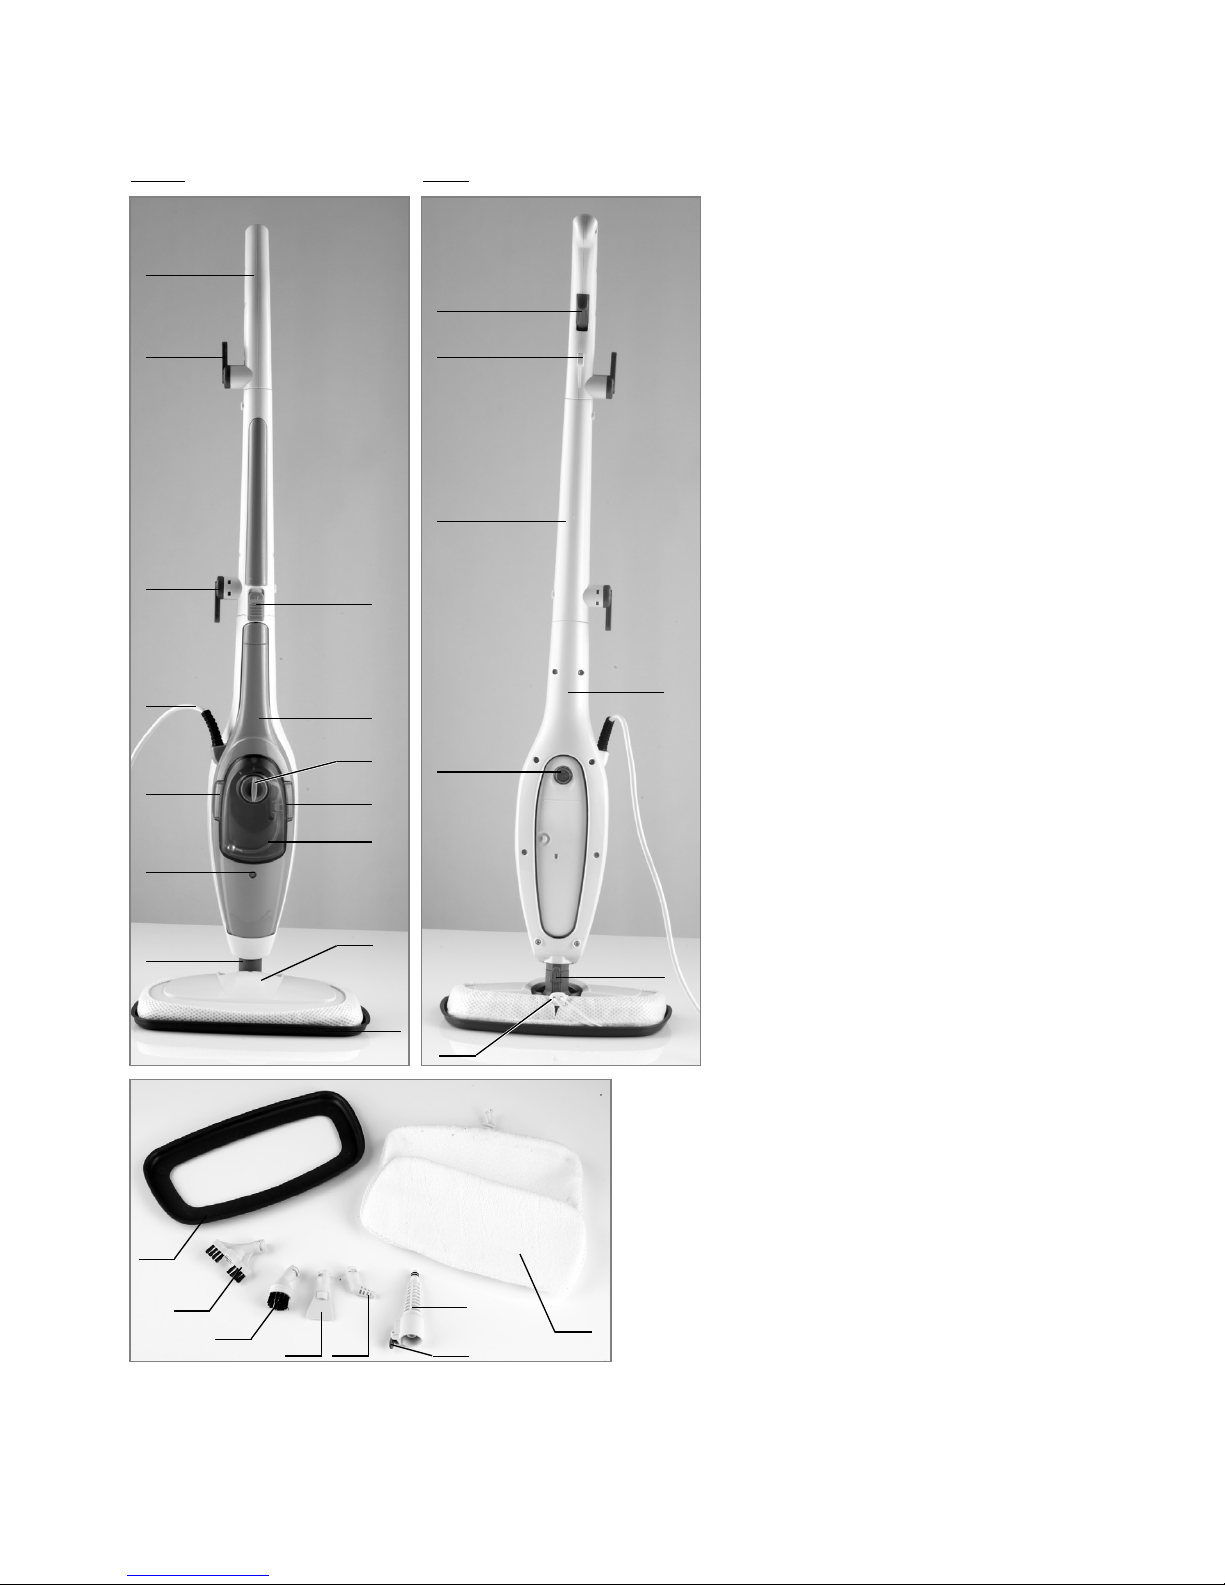
Equipment overview and parts purchased
1 Unlatching button for the base
unit
2 Base unit
3 Water tank catch
4 Unlatching buttons of the
water tank
5 Water tank
6 Cleaning head
7 Carpet glider
8 Pivot of the cleaning head
9 Indicator lamp
10 Power cable
11 Lower hook for holding the
cable
12 Upper hook for holding the
cable
13 Handle
14 Middle piece
15 Unlatching lever of the clean-
ing head
16 Catch of the oor cleaning
cloth
17 1 0 On/off switch
18 Handle bar
19 Cable holder
20 Steam activator on the stand
of the oor cleaner;
on the base unit, the steam activator is located on the back
of the handle
21 Long brush attachment
22 Circular brush attachment
23 Spatula attachment
24 Nozzle attachment
25 Adapter
26 Unlatching button of the
adapter
27 Floor cleaning cloth
1
13
12
11
2
3
4
5
10
4
9
8
6
7
20
19
18
14
17
16
15
25
7
21
22
23 24
27
Front Rear
26
Fragrance additives can be ordered at our webshop www.service-shopping.com.
6
Page 7
19
Before using for the rst time
Before using the appliance you must:
• unpack the purchased parts,
• assemble the stand for the oor steam cleaner.
unpacking
CAutIoN!
❐ Keep children away from the packaging material. It represents a hazard, including risk of
suffocation.
• Unpack all the parts and check the purchased parts for completeness (see "Purchased
parts") and for transport damage. If there is damage to any of the parts, do not use
them(!); contact customer services instead.
Assemble the stand for the oor steam cleaner.
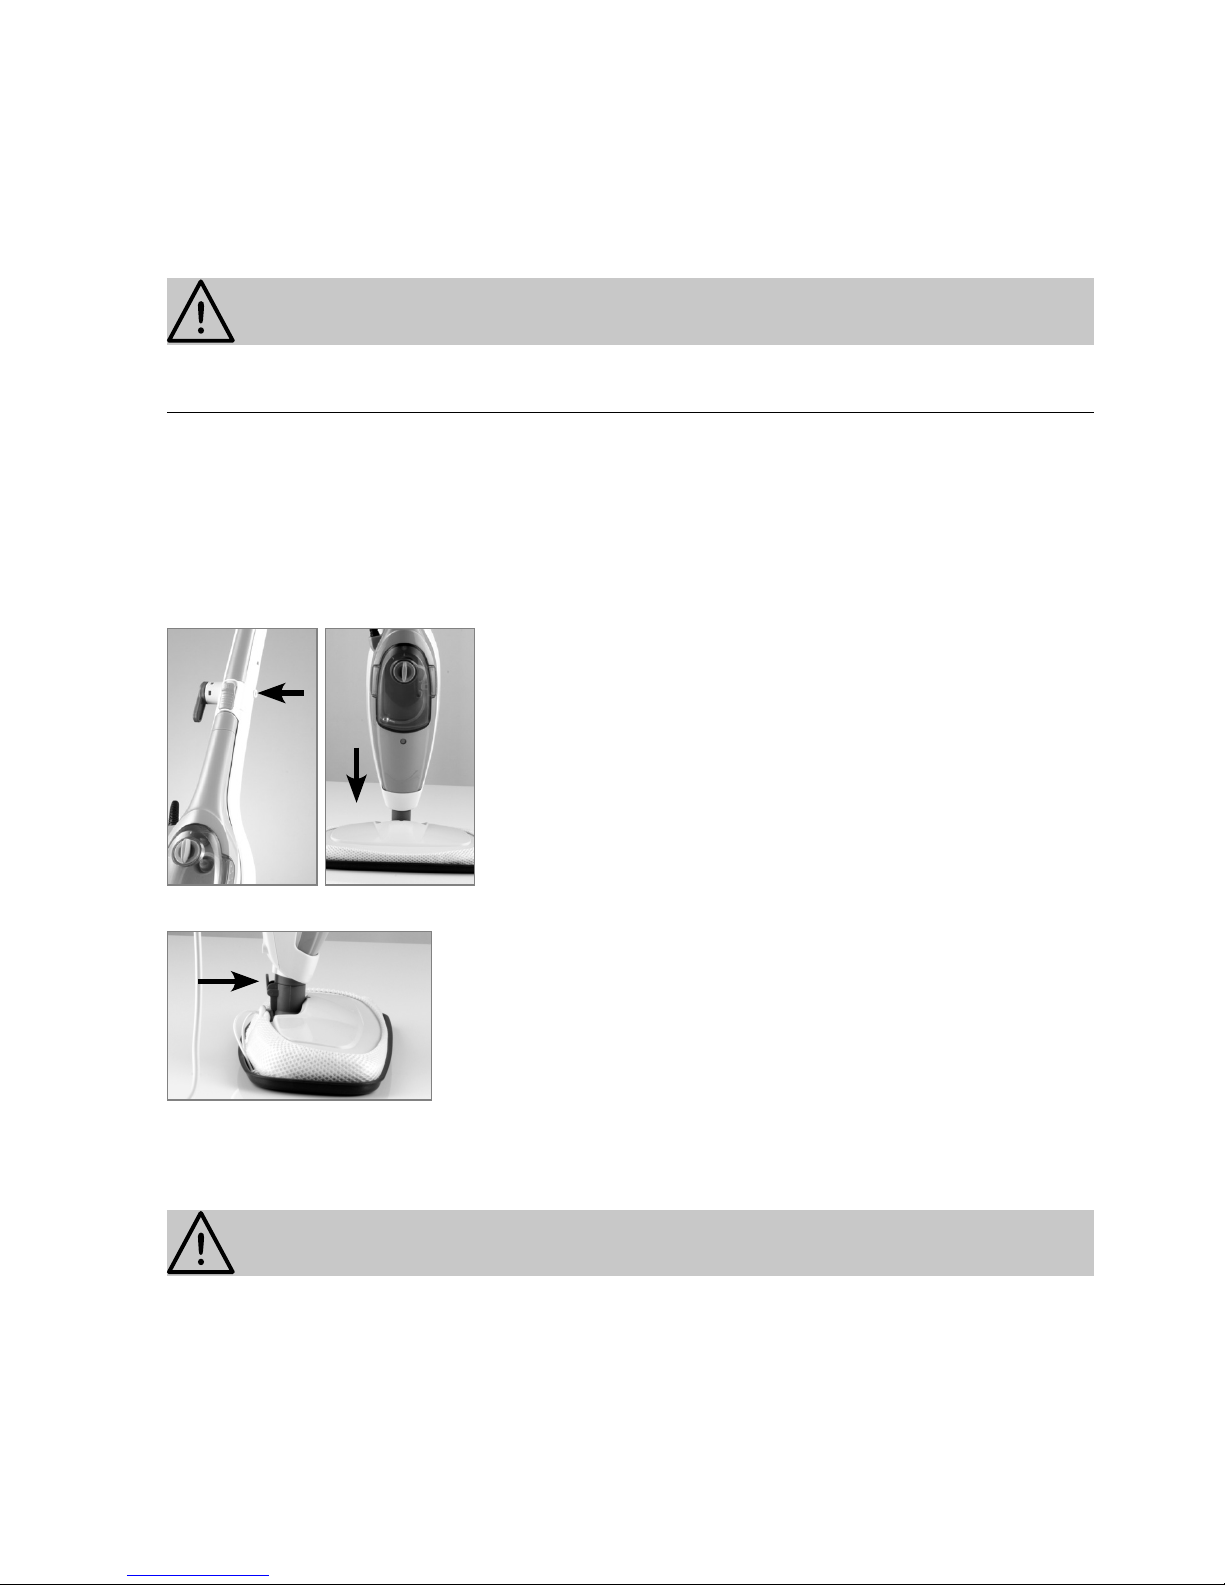
The stand for the oor steam cleaner is supplied in three parts: the handle (18), the middle
piece (14) (with base unit), and the cleaning head (6).
1. Insert the handle onto the middle piece and screw both
parts together. To do this, insert the screw supplied into
the side hole of the handle (and middle piece) and turn
it.
2. Insert the steam outlet nozzle at the bottom end of the
middle piece into the adapter of the cleaning head. You
must hear it click into place.
3. To put the appliance away, wind the power cable (10)
loosely around the top and bottom hooks provided for
holding the cable.
• If you want to remove the cleaning head, press the unlatching
lever (15) where the cleaning head joins the middle piece and
remove it.
use
CAutIoN!
❐ Always check the oor cleaning cloth for wear before each use. It must not be used if it
is visibly worn or damaged. This could result in damage to your oor covering.
❐ The steam cleaner should only be used with oor cleaning cloths specically manufac-
tured for it.
❐ When cleaning, ensure that the oor cleaning cloth is rmly attached to the cleaning
head in order to avoid damage to the appliance or oor covering.
7
Page 8
20
❐ Never direct the steam at people, animals or equipment which contains electrical com-
ponents (e.g. oven interiors, refrigerators, switches and lights, microwaves etc.).
❐ Beware - risk of scalding! Never touch the appliance's cleaning head/attachment while
in use.
❐ The oor cleaning cloth can remain very hot for a short time after use. If you want to re-
move it, wait until it has cooled down and the appliance is no longer emitting any steam.
❐ Put the appliance back in its place only when it has completely cooled down.
Important points to note before use
• Water residue in the lter and in the tank can be attributed to the appliance having been
tested.
• When using the appliance for the rst time, or if the appliance has not been used for a
long time, it may take some time after switching on for steam to be generated, as the
appliance's pipes are not yet lled with water. Steam can only be emitted when the appliance has reached its operating temperature and the appropriate parts of the appliance
have lled with water. To do this, press the steam activator several times.
Filling the water tank
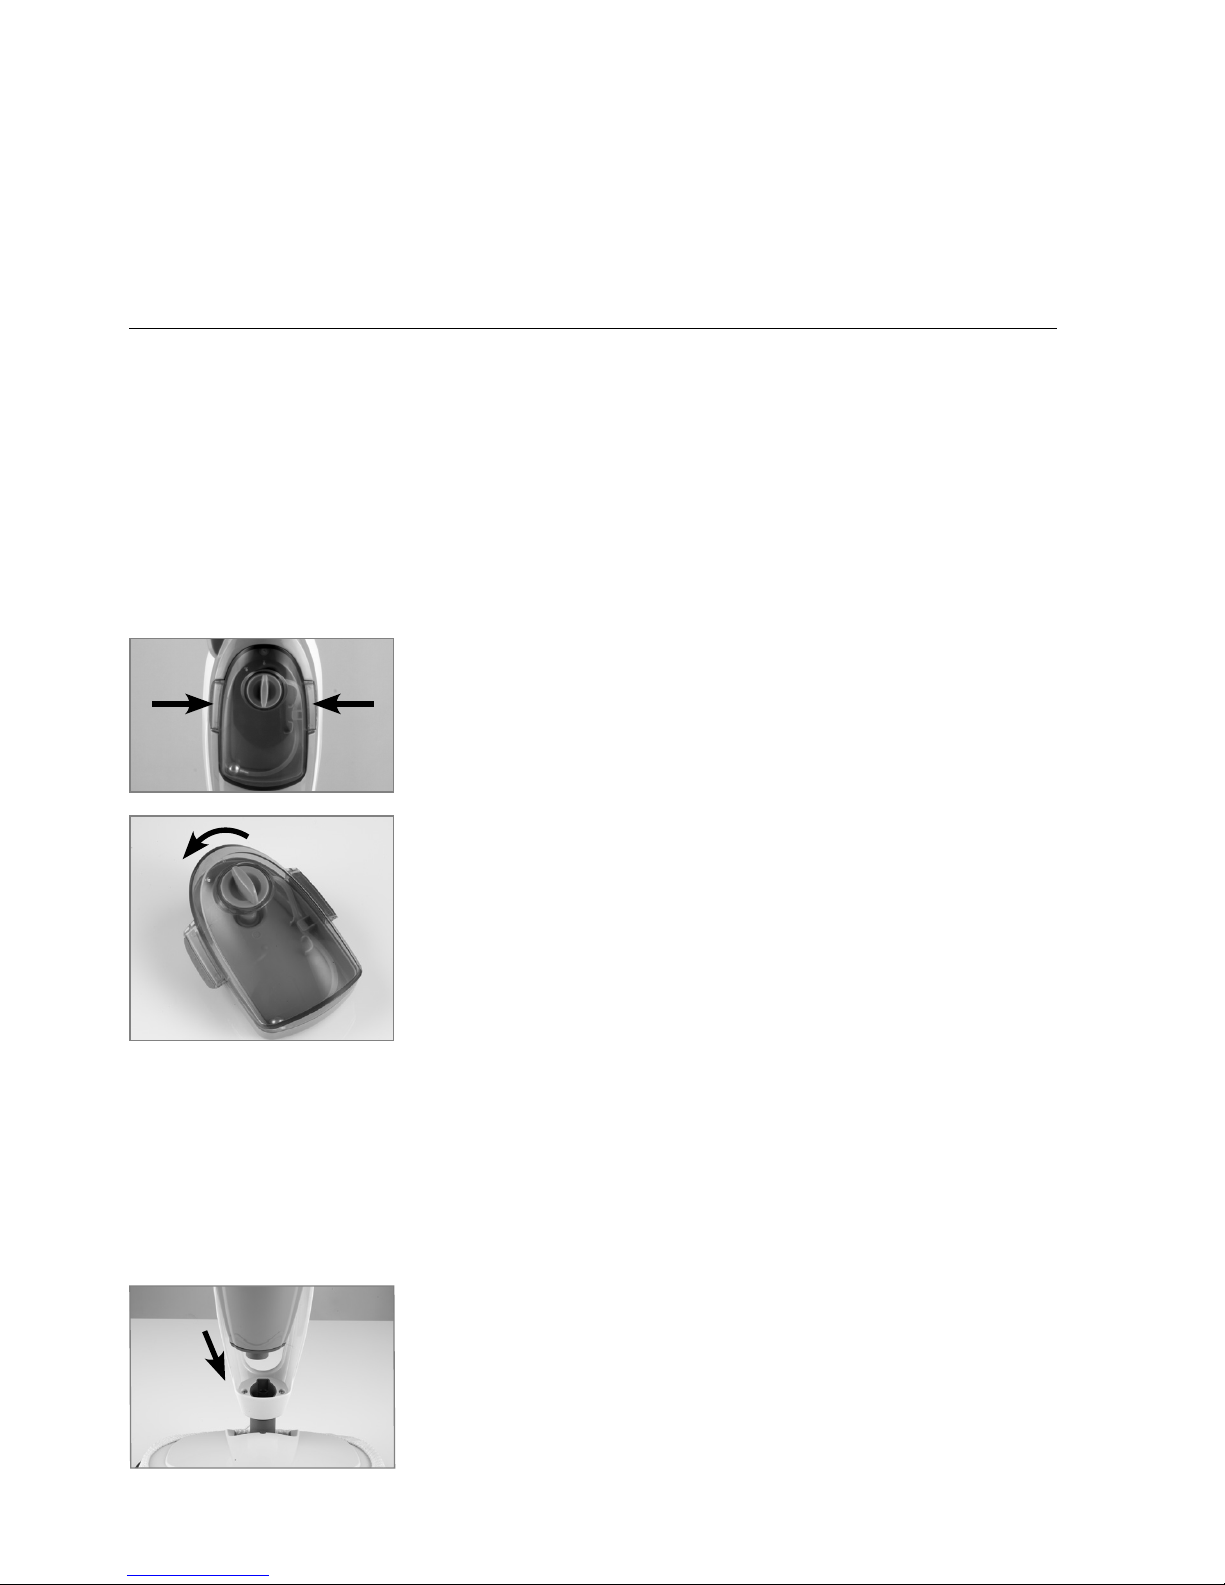
1. Press both the unlatching buttons on the water tank (4) at
the same time and remove the water tank from the base
unit.
2. Turn the water tank catch (3) anticlockwise slightly and
remove it from the tank.
3. Fill the tank with water. If you want to use a fragrance additive, follow the instructions that come with it.
4. Then lock the water tank by replacing the water tank catch
and turning it clockwise.
5. Place the water tank back into the base unit. Press it down
until it is rmly in place.
Use as a oor steam cleaner
It is recommended that the oor is swept with a brush or vacuum cleaned before using the
appliance.
1. If the base unit (2) is already in the stand for oor cleaning, miss out the following steps
1 to 3.
If the adapter (25) (with an attachment) is tted to the base unit, press on the adapter's
unlatching lever (26) and remove it from the base unit.
2. Insert the base unit's steam outlet nozzle into the adapter in
the bottom part of the stand for oor cleaning.
3. Press the handle of the base unit into the stand until you
hear the locking mechanism click into place.
8
Page 9
21
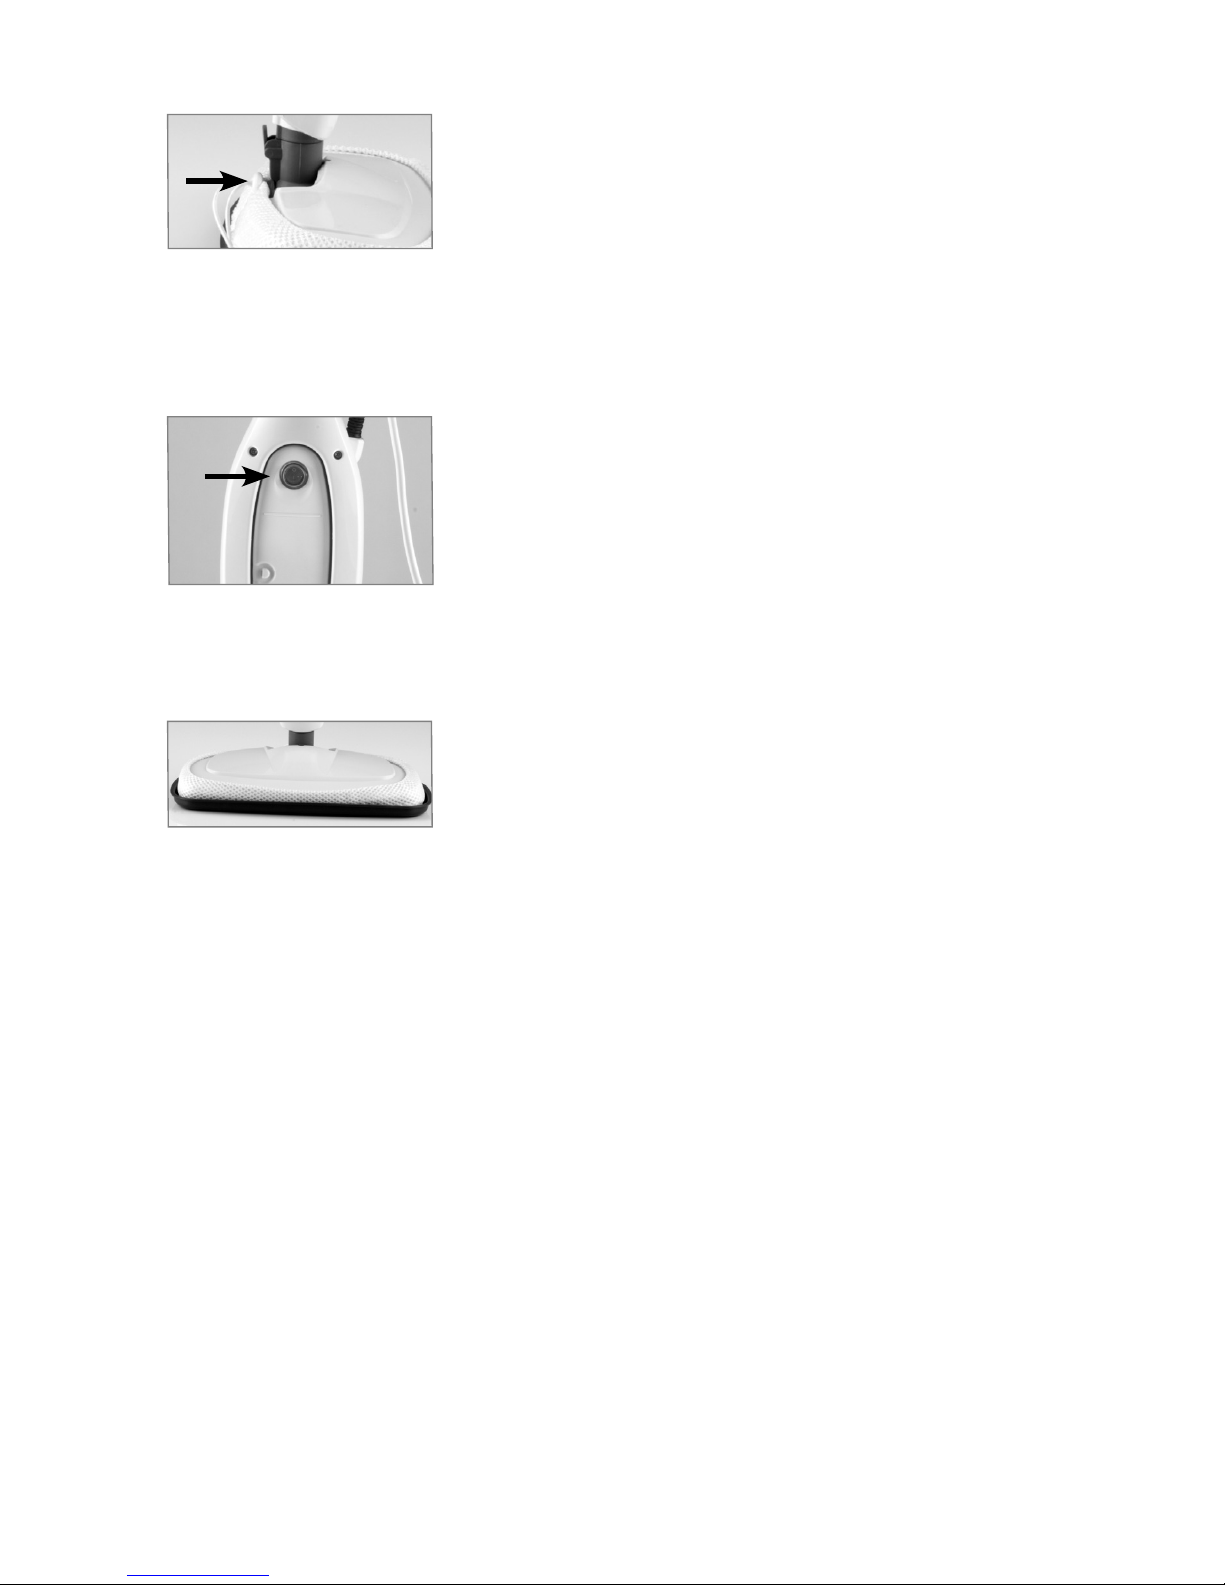
4. Pull the oor cleaning cloth (27) over the cleaning head and
tighten the rubber spring.
When you want to remove the oor cleaning cloth, press the
catch (26) on the rubber spring to release the cloth.
5. In order to quickly unreel the power cable, twist the top hook for holding the cable (12)
downwards.
6. Press the power cable into the cable holder (19), so that you can manipulate the oor
cleaner better and not trip over the cable.
7. Insert the plug into a properly installed and easily accessible plug socket.
8. Move the on/off switch (17) to position 1. The indicator lamp
(9) on the front of the appliance lights up and the appliance
heats up.
9. Release the standing position by placing your foot on the
cleaning head and tilting the stand.
10. When the appliance has reached its operating temperature, steam is emitted when the
steam activator (20) is pressed. You can now start cleaning the oor.
11. Slowly move the cleaning head backwards and forwards over the surface to be cleaned
(do not press down hard!) and press the steam activator as required.
12. For cleaning carpets, insert the cleaning head (with the oor
cleaning cloth) into the carpet glider (7).
13. When you want to replace or rinse out the oor cleaning cloth, switch the appliance off
with the on/off switch (position 0) and remove the plug from the plug socket. Never pull
on the cable, always pull at the plug. Wait a few minutes so that the appliance and oor
cleaning cloth can cool down. Be aware that when turning off the appliance a wet
area can form beneath the cleaning head. Afterwards you can replace the oor
cleaning cloth.
14. Once the water tank is empty and steam is no longer being generated, switch the appliance off, pull the plug out of the plug socket and wait until the appliance has cooled
down. Then remove the water tank and rell it with water (see "Filling the water tank").
15. If the cleaning process has nished and the appliance has completely cooled down, remove the water tank, empty it and let it dry.
16. Turn the top hook for holding the cable upwards and roll up the cable.
17. Remove the oor cleaning cloth from the cleaning head and rinse it out (see the section
"Cleaning and storage").
18. Store the appliance upright in a cool, dry place. To stop the appliance, return it to a vertical (standing) position. Engage the pivot on the cleaning head and the appliance is locked
in place.
19. Before using the appliance again, the water tank should always be checked for any residual water and, if necessary, completely emptied.
9
Page 10
22
use of the hand steam cleaner
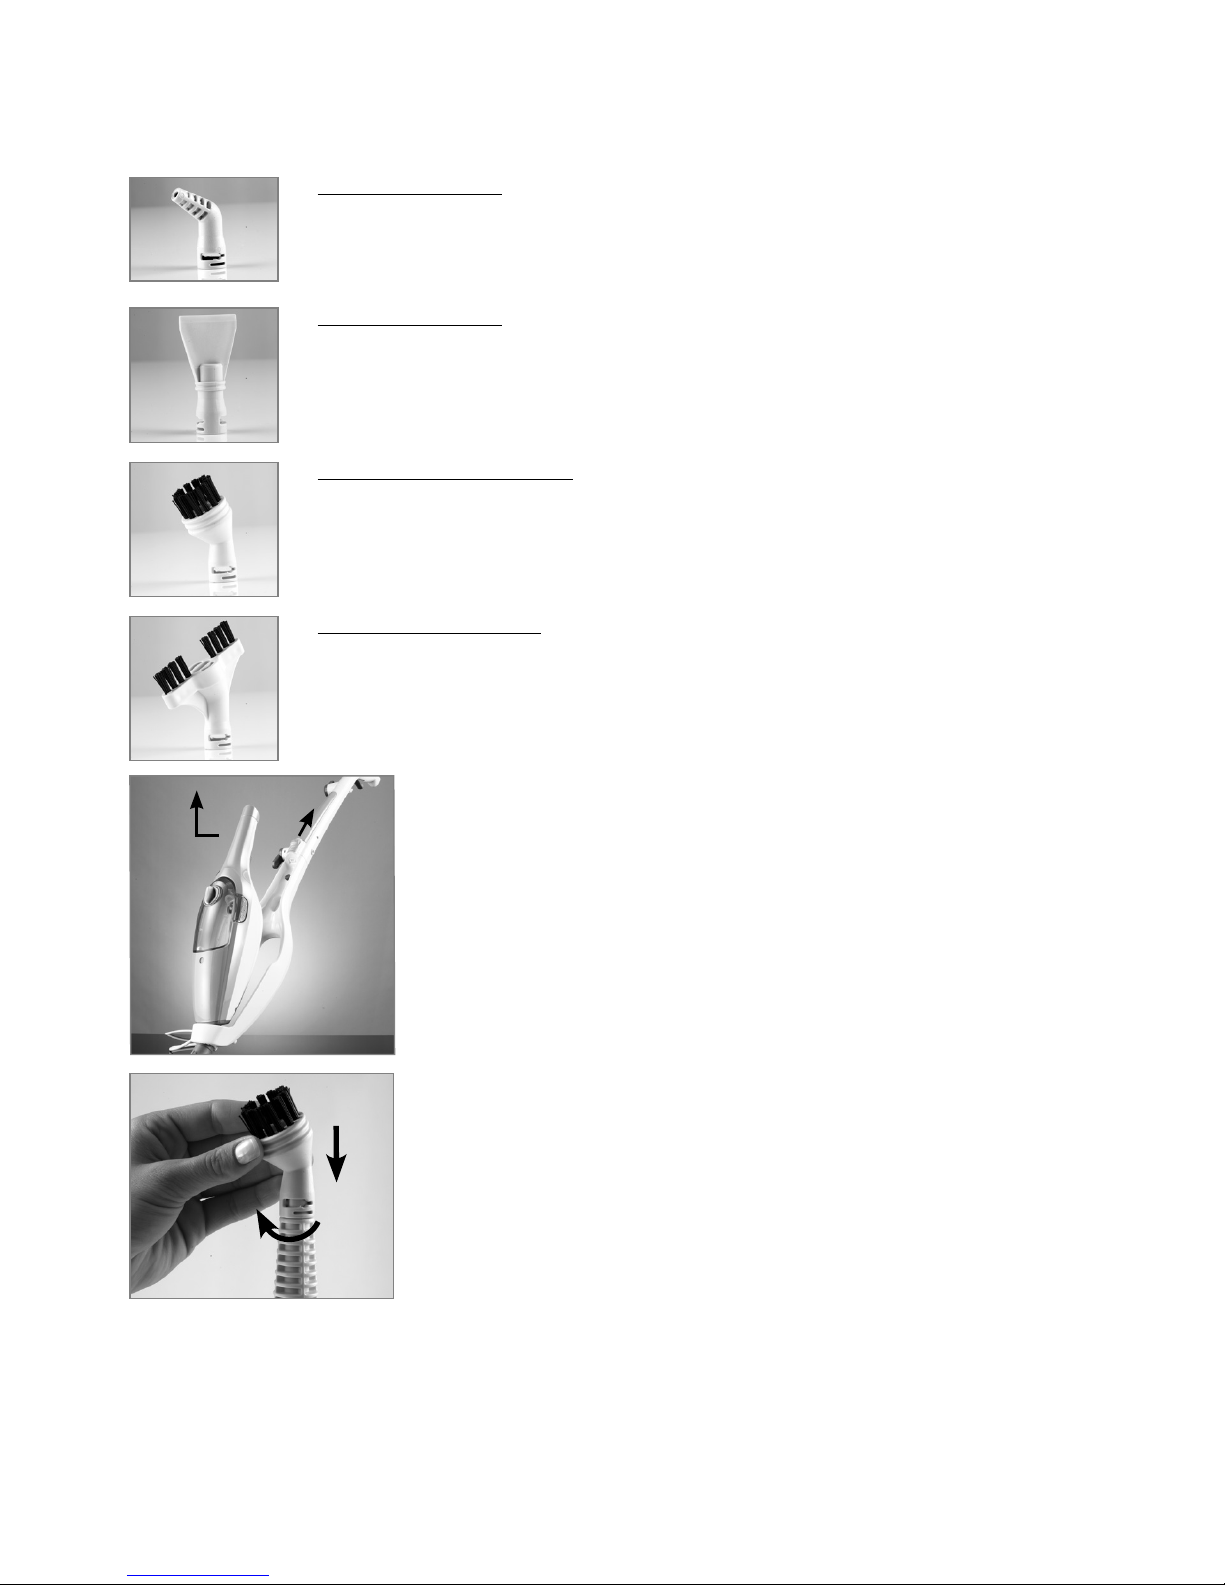
The following attachments belong with the hand steam cleaner:
Nozzle attachment
Use the nozzle attachment to clean places that are not readily accessible or
crevices, for instance.
Spatula attachment
Use the spatula attachment to remove stubborn stains, such as limescale
and deposits.
Circular brush attachment
Use the circular brush attachment to remove stains, for instance on tiles,
wheel rims, mirrors and non-cold glass surfaces.
Long brush attachment
Use the long brush attachment to remove dirt, in grooves and crevices, for
instance.
1. If the base unit is located in the stand on the oor cleaner,
push the unlatching button (1) upwards in order to release
the locking mechanism. Remove the base unit (2) from the
stand.
2. Insert the adapter (25) onto the appliance's steam outlet
nozzle. You must hear it click into place.
3. Select an attachment (see above) and insert it onto the
adapter until it stops. When attached, the exed end piece of
the appliance (with the exception of the spatula attachment)
must point to the left when the base unit is held with the
water tank facing you.
4. Turn the attachment 90 degrees.
• To remove an attachment from the adapter, turn it back 90
degrees and then pull it off.
• If you want to remove the adapter from the base unit, press on the adapter's unlatching
lever (26) and remove it from the base unit.
10
Page 11
23
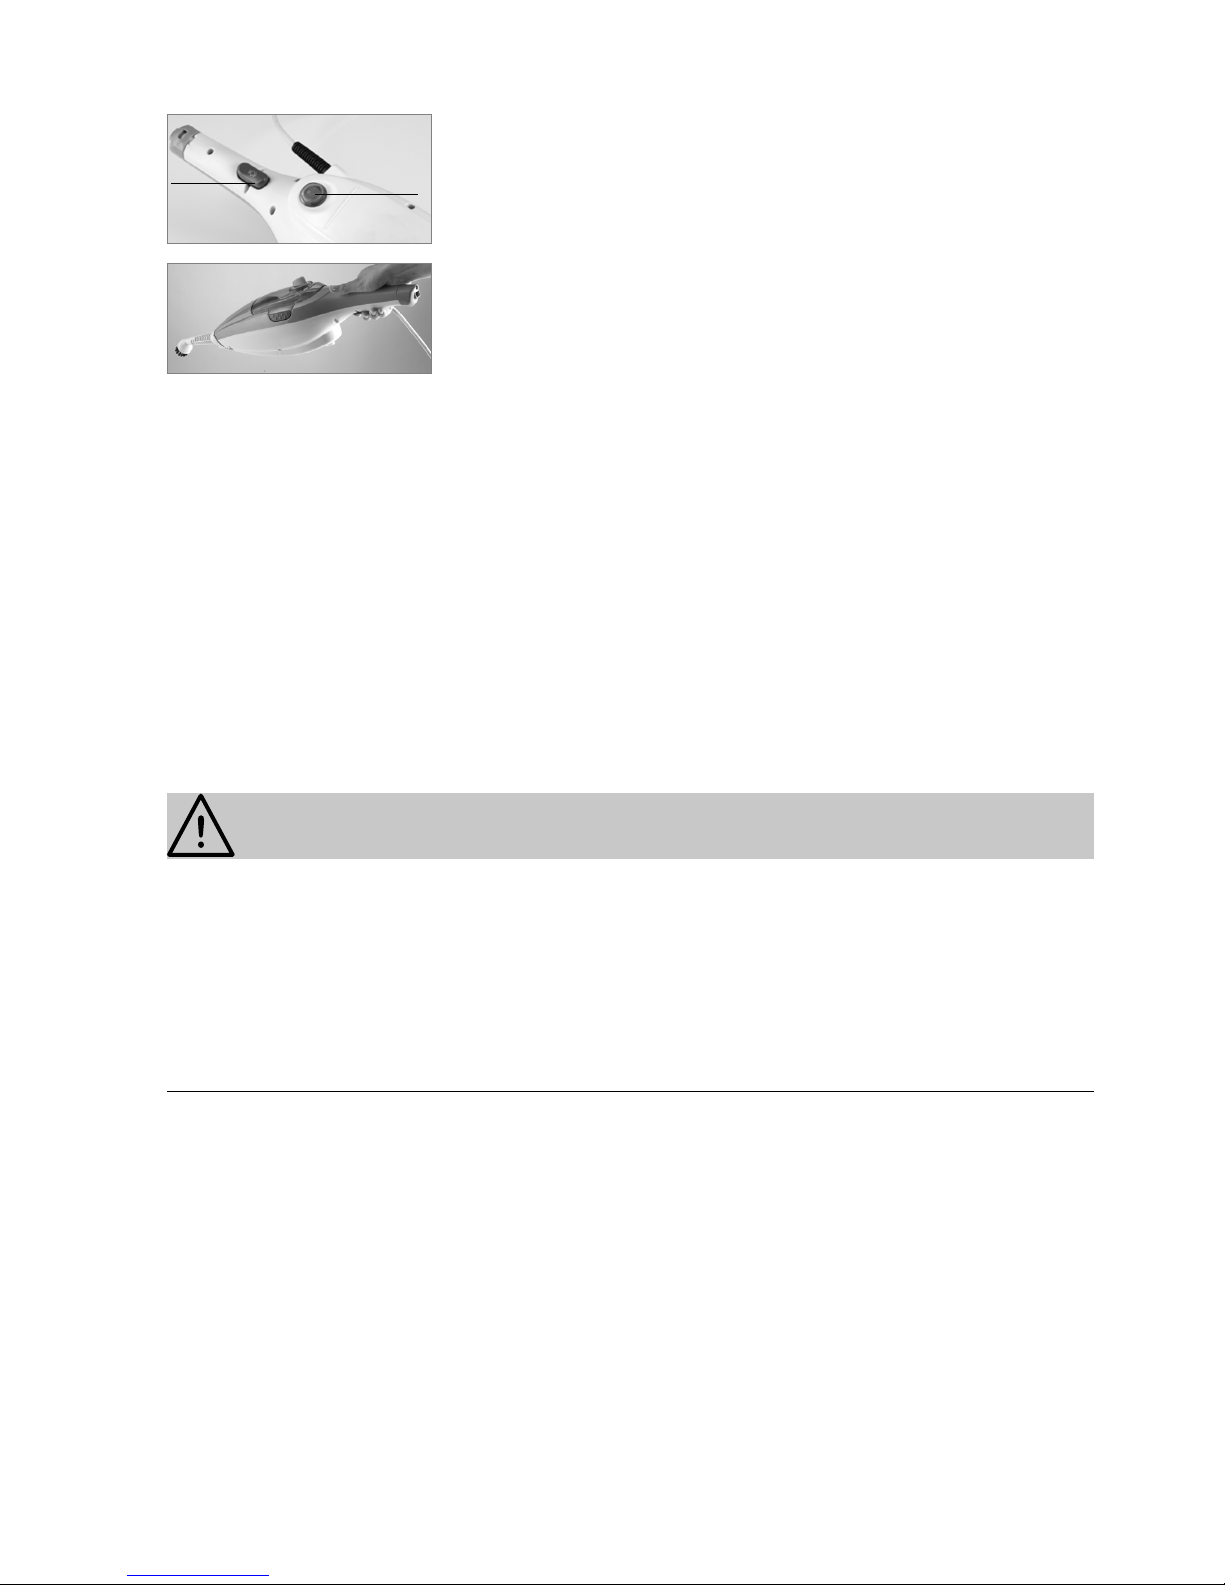
5. Move the on/off switch (17) on the back of the appliance to
position 1. The indicator lamp (9) on the front of the appliance lights up and the appliance heats up.
6. When the appliance has reached its operating temperature,
steam is emitted by pressing the handle of the steam activator (28). You can now start cleaning.
7. Slowly move the attachment backwards and forwards over the surface to be cleaned and
press the steam activator as required. Hold the attachment for approximately 10 seconds
over areas which need to be cleaned especially thoroughly.
8. When the water tank is empty and steam is no longer being produced, switch the appliance off, pull the plug out of the plug socket and wait until the appliance has cooled
down. Then remove the water tank and rell it with water (see "Filling the water tank").
9. If the cleaning process has nished and the appliance has completely cooled down,
remove the water tank, empty it and let it dry.
10. Before using the appliance again, the water tank should always be checked for any
residual water and, if necessary, completely emptied.
Cleaning and storage
CAUTION!
❐ Pull the plug out of the plug socket before cleaning.
❐ Never immerse the appliance in water and do not rinse it under running water.
❐ Do not use solvents or abrasive cleaning agents.
❐ The safety of the appliance can only be guaranteed when it is regularly checked for dam-
age and wear and tear.
❐ Do not use any corrosive or abrasive cleaning agents for cleaning. These could damage
the surface.
• When necessary, wipe the appliance with a damp cloth and possibly some mild cleaning
agent.
• Remove any dirt from the attachments (hairs, uff etc.)
• The oor cleaning cloth can be washed in a washing machine. It is NOT, however, suit-
able for tumble drying.
• Do not put the appliance back in its place until it has completely cooled down and has
been emptied of water.
• Keep the appliance in a dry, clean and cool place which is inaccessible to children.
28
17
11
Page 12
Troubleshooting
If the appliance does not function properly, please check rst of all whether you can solve
the problem yourself. Otherwise, contact customer services. Do not attempt to repair a
defective appliance yourself.
Problem Possible cause/solution
No steam is emitted.
The indicator lamp does not
light up.
• Is the on/off switch at position 1?
• Is the plug properly inserted in the plug socket?
• Is the plug socket faulty? Try another plug socket.
• Check the fuse in your mains supply.
No steam is emitted.
The indicator lamp lights up.
• Has the appliance reached the operating temperature?
The appliance must heat up for approximately 30
seconds before steam can be emitted.
• Is the water tank empty?
Fill up the water tank (see the section "Filling the
water tank").
Reordering
Floor cleaning cloths and fragrances for the “cleanmaxx” Multi Steam Cleaner Mega Power
can be reordered at www.service-shopping.com or from customer services.
Technical data
Model: SM102K
Appliance: “cleanmaxx” Multi Steam Cleaner Mega Power
Power supply: 230 V ~ 50/60 Hz
Rated power: 1400 - 1600 W W
SS-101
Cleanstar “STEAMSTAR” 2-in-1 Steam Cleaner
220-240v ~ 50/60Hz
1400-1600 Watt
Troubleshooting
If the appliance does not function properly, please check rst of all whether you can solve
the problem yourself. Otherwise, contact customer services. Do not attempt to repair a
defective appliance yourself.
Problem Possible cause/solution
No steam is emitted.
The indicator lamp does not
light up.
• Is the on/off switch at position 1?
• Is the plug properly inserted in the plug socket?
• Is the plug socket faulty? Try another plug socket.
• Check the fuse in your mains supply.
No steam is emitted.
The indicator lamp lights up.
• Has the appliance reached the operating tempera-
ture?
The appliance must heat up for approximately 30
seconds before steam can be emitted.
• Is the water tank empty?
Fill up the water tank (see the section "Filling the
water tank").
Reordering
Floor cleaning cloths and fragrances for the “cleanmaxx” Multi Steam Cleaner Mega Power
can be reordered at www.service-shopping.com or from customer services.
Technical data
Model: SM102K
Appliance: “cleanmaxx” Multi Steam Cleaner Mega Power
Power supply: 230 V ~ 50/60 Hz
Rated power: 1400 - 1600 W W
Protection class: I
Steam temperature: approx. 100°C
Capacity of the water tank: approx. 400 ml
Disposal
The packaging material is recyclable. Dispose of the packaging material in an
environmentally-friendly way by taking it to a materials collection point.
Dispose of the appliance in an environmentally-friendly way when you throw it
away. The appliance should not be placed with household refuse. Dispose of it at a
recycling facility for electrical and electronic waste appliances.
More detailed information can be obtained from your local council.
12
Page 13

Customer services
Should you have any questions regarding the appliance, please contact customer services:
Cleanstar Pty Ltd
59 Radford Road, Reservoir, Victoria 3073 Australia
Ph: (03) 9460 5655
Fax: (03) 9460 5666
Email: [email protected]
Web: www.cleanstar.com.au
13
Page 14
14
Cleanstar Pty Ltd
ABN: 51 121 002 104 ACN: 121 002 104
59 Radford Road, Reservoir VICTORIA 3073
Phone: (03) 9460 5655 Fax: (03) 9460 5666
Email:
Web: www.cleanstar.com.au
CONDITIONS OF WARRANTY
This document outlines the terms and conditions of warranty for your Cleanstar product. This is an important document that should
be kept with your proof of purchase documents in a safe place for future reference should you require service for your product.
Thank you for purchasing your new Cleanstar pr oduct. We are confident this pr oduct will give you trouble-fr ee use and excellent service,
provided the operator uses and maintains the pr oduct in accordance with the Instruction Manual. Please read the Instruction Manual c arefully
before using the product f or correct operation and maintenance procedures, and store it in a s afe plac e for f utur e r ef er enc e.
1. This is a parts and labour warranty against faulty or defective parts, materials or workmanship in manufacturing, when the product is used
and operated in acc or d anc e with t he Instruction Manual.
2. This product c arries a 12 month (1 year) warranty period that c ommences from the original date of purchas e by the first user/purchaser,
and is not transf erable.
3. The warranty covers only pers onal, domestic or household us e of the product.
4. This product is not suit able for commercial or industrial cleaning applications and t heref ore n o warranty applies in this case.
5. This warr anty only applies to products purchased and used in Australia.
6. At all times during the warranty period, Cleanstar shall, at its sole discretion, determine whether r epair, replacement or refund will apply if
the product has a valid warranty claim applic able to it.
7. The repair or replacement of the product under this warranty does not extend the original period of warranty.
8. Please note that this warranty will be voided in the following cases (which are not exhaustive) and the warranty does not
apply to the cost
of replacing any parts of the product resulting from:
• Accidental damage;
• Nor mal wear and tear;
• Neg lect, misus e or physic al abus e by the operator, including f ailure to properly maint ain or servic e;
• Any alterations, modifications or tampering with the product without the prior written consent of Cleans tar;
• Incomplete or improper installation;
• Inc orrect , improper or inappropriate operation;
• Insect or vermin infestation;
• Power surges, electrical storm damage or incorrect power supply/voltage;
• Excessive use or use for which this product has not been designed;
• Failure to comply with the operating instructions contained in the Manual supplied with the pr oduct;
• If the product is rented;
• If th e product is us ed outside of Australia;
• If the product was serviced or repaired by anyone other than Cleanstar, or one of Cleanstar’s Authoris ed Servic e Agents (AS A).
Cleanstar is unable to acc ept any responsibility under this warranty for any repair work not carried out by an ASA or from the use of
non-genuine parts.
9. This warr anty does not cover servic e calls, tr avelling time or consumable parts such as belts, dust bags, filters, hose or hose parts, rods
and wands, floor tools, mop pads, brushes and access ories, motor brushes and other like consumable items, unless defective in
manufacture. I n order to prolong the lif e of accessories and consumables, regular c are and maintenanc e is recommended.
10. Please retain your original proof of purchase which will be required before you can make a claim under this warranty. If proof of purchase
can not be provided at the time of a warranty claim or service, any work carried out on the cleaner is chargeable.
11. Any transportation and delivery costs involved in the repair of defective parts shall be borne by the claimant. In all instances, unless the
product is transported by Cleanstar or a Cleans tar authorised representative, the product is transported at the owner’s cost and risk while
in transit to and from Cleanstar or its ASA.
Our goods come with guarantees that cannot be excluded under the Australian Consumer Law. You are entitled to a replacement or refund for a
major failure and for compensation for any other reasonably foreseeable loss or damage. You are also entitled to have the goods r epaired or
replaced if the goods fail to be of acceptable quality and t he failure does not amount to a major failure. The benefits conferred by this warranty
are in addition to other rights and remedies under law in respect of the product to which this warranty relates.
TO INQUIRE ABOUT MAKING A CLAIM UNDER THIS WARRANTY, PLEASE FOLLOW THESE STEPS:
a) c aref ully check the Instruction Manual and the terms of this warranty;
b) have the name and model number of the appliance available;
c) have the proof of purchase available (ie. invoice, receipt, etc) showing where the applianc e was purchased from and date of
purchas e;
d) call Cleanstar on (03) 9460 5655 to speak to one of our customer s ervice staff.
 Loading...