

Page 1
Z 08183_V1_06_2016
Z 08183
DE
Gebrauchsanleitung
ab Seite 3
EN
Instruction manual
starting on page 14
FR
Mode d’emploi
à partir de la page 24
NL
Handleiding
vanaf pagina 35
Page 2

Page 3
3 DE
Bestimmungsgemäßer Gebrauch
• Dieses Gerät ist zum Aufsaugen von normalem Hausstaub vorgesehen.
Saugen Sie auf keinen Fall folgende Dinge auf:
– Flüssigkeiten oder nasse Stoffe (z. B. nasses Teppich-Shampoo)
– glühende Asche, Zigarettenkippen, Streichhölzer etc.
– brennbare oder entzündliche Stoffe
– sehr feinen Staub (z. B. Betonstaub), Asche oder Toner
– spitze, harte Gegenstände, z. B. größere Glassplitter
• Das Gerät ist für den Privatgebrauch, nicht für eine gewerbliche Nutzung bestimmt.
• Nutzen Sie das Gerät nur wie in der Anleitung beschrieben. Jede weitere Verwen-
dung gilt als bestimmungswidrig.
• Von der Gewährleistung ausgeschlossen sind alle Mängel, die durch unsachgemä-
ße Behandlung, Beschädigung oder Reparaturversuche entstehen. Dies gilt auch
für den normalen Verschleiß.
Symbolerklärung
Sicherheitshinweise:
Lesen Sie diese aufmerksam durch und halten Sie
sich an sie, um Personen- und Sachschäden zu
vermeiden.
Ergänzende Informationen
Schutzklasse II
Inhalt
Bestimmungsgemäßer Gebrauch ___________ 3
Sicherheitshinweise _____________________ 4
Lieferumfang und Geräteübersicht __________ 6
Zusammenbau __________________________ 7
Benutzung _____________________________ 9
Gerät und Zubehör reinigen ______________ 10
Fehlerbehebung _______________________ 12
Technische Daten ______________________ 13
Entsorgung ___________________________ 13
Sehr geehrte Kundin, sehr geehrter Kunde,
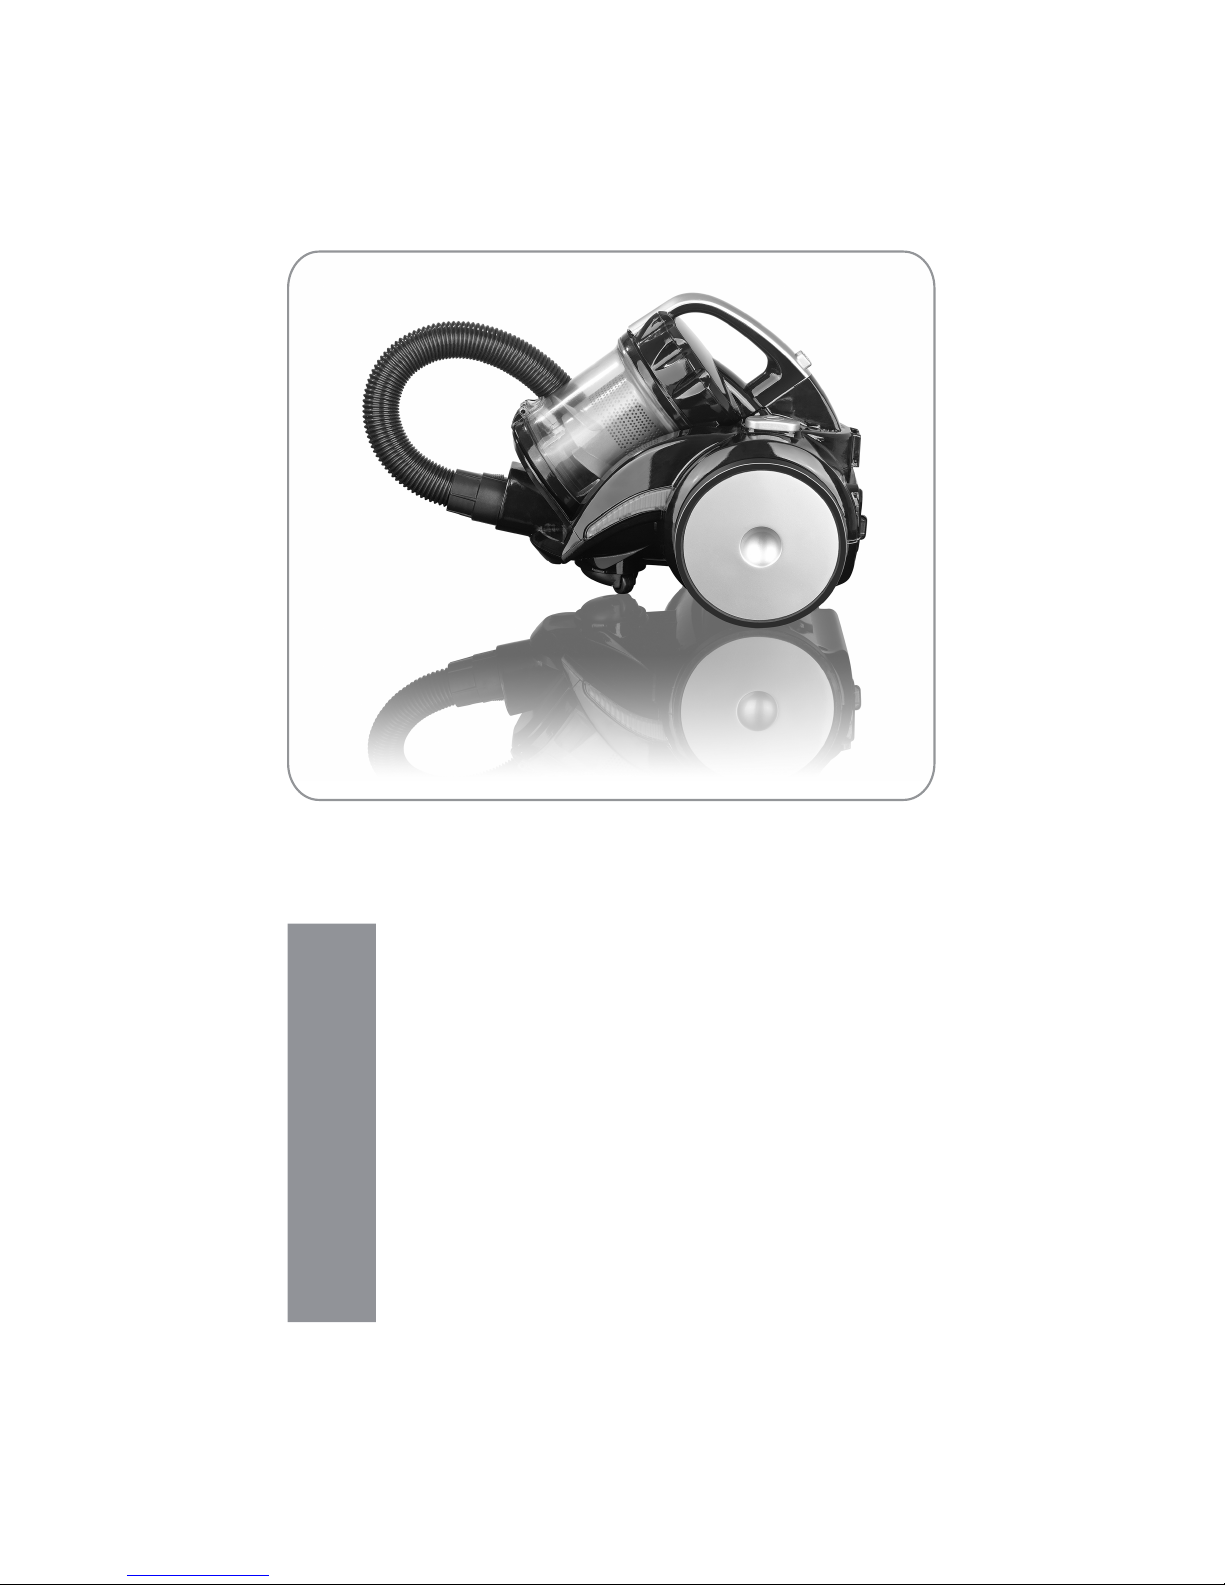
wir freuen uns, dass Sie sich für diesen Zyklonstaubsauger entschieden haben.
Lesen Sie vor dem ersten Gebrauch des Gerätes die Anleitung sorgfältig durch und
bewahren Sie sie zum späteren Nachlesen auf. Bei Weitergabe des Gerätes ist auch
diese Anleitung mitzugeben.
Hersteller und Importeur übernehmen keine Haftung, wenn die Angaben in dieser
Anleitung nicht beachtet werden.
Sollten Sie Fragen zum Gerät sowie zu Ersatz- / Zubehörteilen haben, kontaktieren
Sie den Kundenservice über unsere Webseite:
www.service-shopping.de
Page 4

DE 4
Sicherheitshinweise
■ Dieses Gerät kann von Kindern ab 8 Jahren sowie von Perso-
nen mit reduzierten physischen, sensorischen oder mentalen
Fähigkeiten oder Mangel an Erfahrung und/oder Wissen benutzt werden, wenn sie beaufsichtigt oder bezüglich des sicheren Gebrauchs des Gerätes unterwiesen wurden und die daraus resultierenden Gefahren verstanden haben.
■ Kinder dürfen nicht mit dem Gerät spielen.
■ Reinigung und Benutzer-Wartung dürfen nicht durch Kinder
durchgeführt werden, es sei denn, sie sind älter als 8 Jahre und
werden beaufsichtigt.
■ Kinder jünger als 8 Jahre und Tiere sind vom Gerät und dem
Netzkabel fernzuhalten.
■ Kinder müssen beaufsichtigt werden, um sicherzustellen, dass
sie nicht mit dem Gerät spielen und / oder sich mit dem Gerät
verletzen.
■ Benutzen und lagern Sie das Gerät nur außerhalb der Reichwei-
te von Kindern und Tieren. Unsachgemäße Bedienung kann zu
Verletzungen und Stromschlägen führen. Auch das Netzkabel
darf für Kinder und Tiere nicht erreichbar sein.
■ Das Gerät ist bei nicht vorhandener Aufsicht und vor dem Zu-
sammenbau, dem Auseinandernehmen oder Reinigen stets
vom Netz zu trennen.
■ Tauchen Sie das Gerät, das Netzkabel und den Stecker niemals
in Wasser oder andere Flüssigkeiten ein und stellen Sie sicher,
dass diese nicht in Wasser fallen oder nass werden können.
■ Wenn das Gerät, das Netzkabel oder der Stecker des Gerätes
beschädigt ist, muss es durch den Hersteller oder Kundenservice oder eine ähnlich qualifi zierte Person (z. B. Fachwerkstatt)
ersetzt werden, um Gefährdungen zu vermeiden.
Verletzungsgefahren
■ Erstickungsgefahr! Halten Sie das Verpackungsmaterial von Kindern und Tieren fern.
■ Halten Sie Tiere, Haare, Schmuck, weite Kleidung, Finger und alle übrigen Körper-
teile von den Düsen des Gerätes fern. Sie könnten sich festsaugen. Sollte sich der
Staubsauger doch einmal festsaugen, schalten Sie das Gerät sofort aus.
■ Seien Sie bei der Reinigung von Stufen besonders vorsichtig, damit Sie nicht stürzen.
■ Achten Sie darauf, dass das angeschlossene Netzkabel keine Stolpergefahr darstellt.
Page 5

5 DE
Stromschlag- und Brandgefahr
■ Benutzen Sie das Gerät nicht, wenn leicht entzündliche Gase in der Luft vorhanden
sind.
■ Verwenden und lagern Sie das Gerät nur in geschlossenen Räumen. Betreiben Sie
es nicht im Freien, in Räumen mit hoher Luftfeuchtigkeit oder auf heißen Oberfl ä-
chen.
■ Fassen Sie den Netzstecker, das Netzkabel oder Gerät nie mit nassen bzw. feuch-
ten Händen an.
■ Saugen Sie niemals Flüssigkeiten auf. Füllen Sie keine Flüssigkeiten in den Staub-
behälter. Halten Sie die Motoreinheit von Feuchtigkeit oder Nässe fern!
■ Tragen oder ziehen Sie das Gerät nicht am Kabel, behandeln Sie das Kabel immer
mit Achtsamkeit. Vermeiden Sie es, das Kabel in Türen einzuklemmen, über scharfe
Kanten oder Ecken zu ziehen. Halten Sie das Kabel von heißen Flächen fern.
■ Schließen Sie das Gerät nur an eine Steckdose an, deren Netzspannung mit den
Angaben auf dem Typenschild übereinstimmen. Die Steckdose muss auch nach
dem Anschließen weiterhin gut zugänglich bleiben. Verwenden Sie nur ordnungsgemäße Verlängerungskabel, deren technische Daten mit denen des Gerätes übereinstimmen.
■ Überprüfen Sie das Gerät im Interesse Ihrer eigenen Sicherheit vor jeder Inbetrieb-
nahme auf Beschädigungen. Benutzen Sie es nur, wenn das Gerät keine Schäden
aufweist!
■ Schalten Sie das Gerät aus und ziehen Sie den Netzstecker aus der Steckdose:
– bei Gewitter,
– bei Schäden / Störungen (z. B. ungewöhnliche Geräusche, Geruch- oder Rauch-
entwicklung)
– wenn Flüssigkeiten aufgesogen wurden,
– wenn das Gerät heruntergefallen ist.
Lassen Sie es von einem Fachmann prüfen, bevor Sie es wieder benutzen.
■ Das Gerät muss ausgeschaltet sein, wenn Sie den Netzstecker ziehen oder ihn in
die Steckdose stecken.
■ Wenn Sie den Netzstecker aus der Steckdose ziehen wollen, ziehen Sie immer am
Stecker und nie am Netzkabel!
Material-, Sach- und Geräteschäden
■ Lassen Sie den Staubbehälter nicht zu voll werden. Leeren Sie ihn möglichst nach
jedem Gebrauch. Auch die Filter müssen regelmäßig gereinigt werden, um eine
Überlastung des Motors zu vermeiden.
■ Der Staubbehälter und die Filter müssen nach dem Auswaschen vollständig getrock-
net sein, bevor er wieder eingesetzt werden dürfen.
■ Benutzen Sie das Gerät nur, wenn es vollständig und korrekt zusammengebaut ist!
Der Staubbehälter und die Filter müssen eingesetzt und unbeschädigt sein! Würde
der Schmutz in das Geräteinnere gelangen, könnte es zum Motorschaden kommen.
Stecken Sie nichts in die Öffnungen / Düse des Gerätes und achten Sie darauf, dass
diese nicht verstopft sind. Decken Sie niemals die Lüftungsöffnungen ab.
■ Verwenden Sie nur Original-Zubehörteile des Herstellers.
Page 6
DE 6
■ Setzen Sie das Gerät keinen extremen Temperaturen, starken Temperaturschwan-
kungen, offenem Feuer oder direkter Sonneneinstrahlung aus.
■ Lassen Sie das Gerät nicht fallen und setzen Sie es keinen starken Stößen aus.
■ Stellen Sie niemals schwere Gegenstände auf das Gerät.
■ Versuchen Sie nicht, die Rollen mit Schmiermittel oder Öl zu schmieren. Danach
würde Staub oder Schmutz verstärkt an den Rollen haften bleiben.
■ Bewahren Sie das Gerät bei Nichtgebrauch an einem kühlen, trockenen, für Kinder
und Tiere unzugänglichen Ort auf.
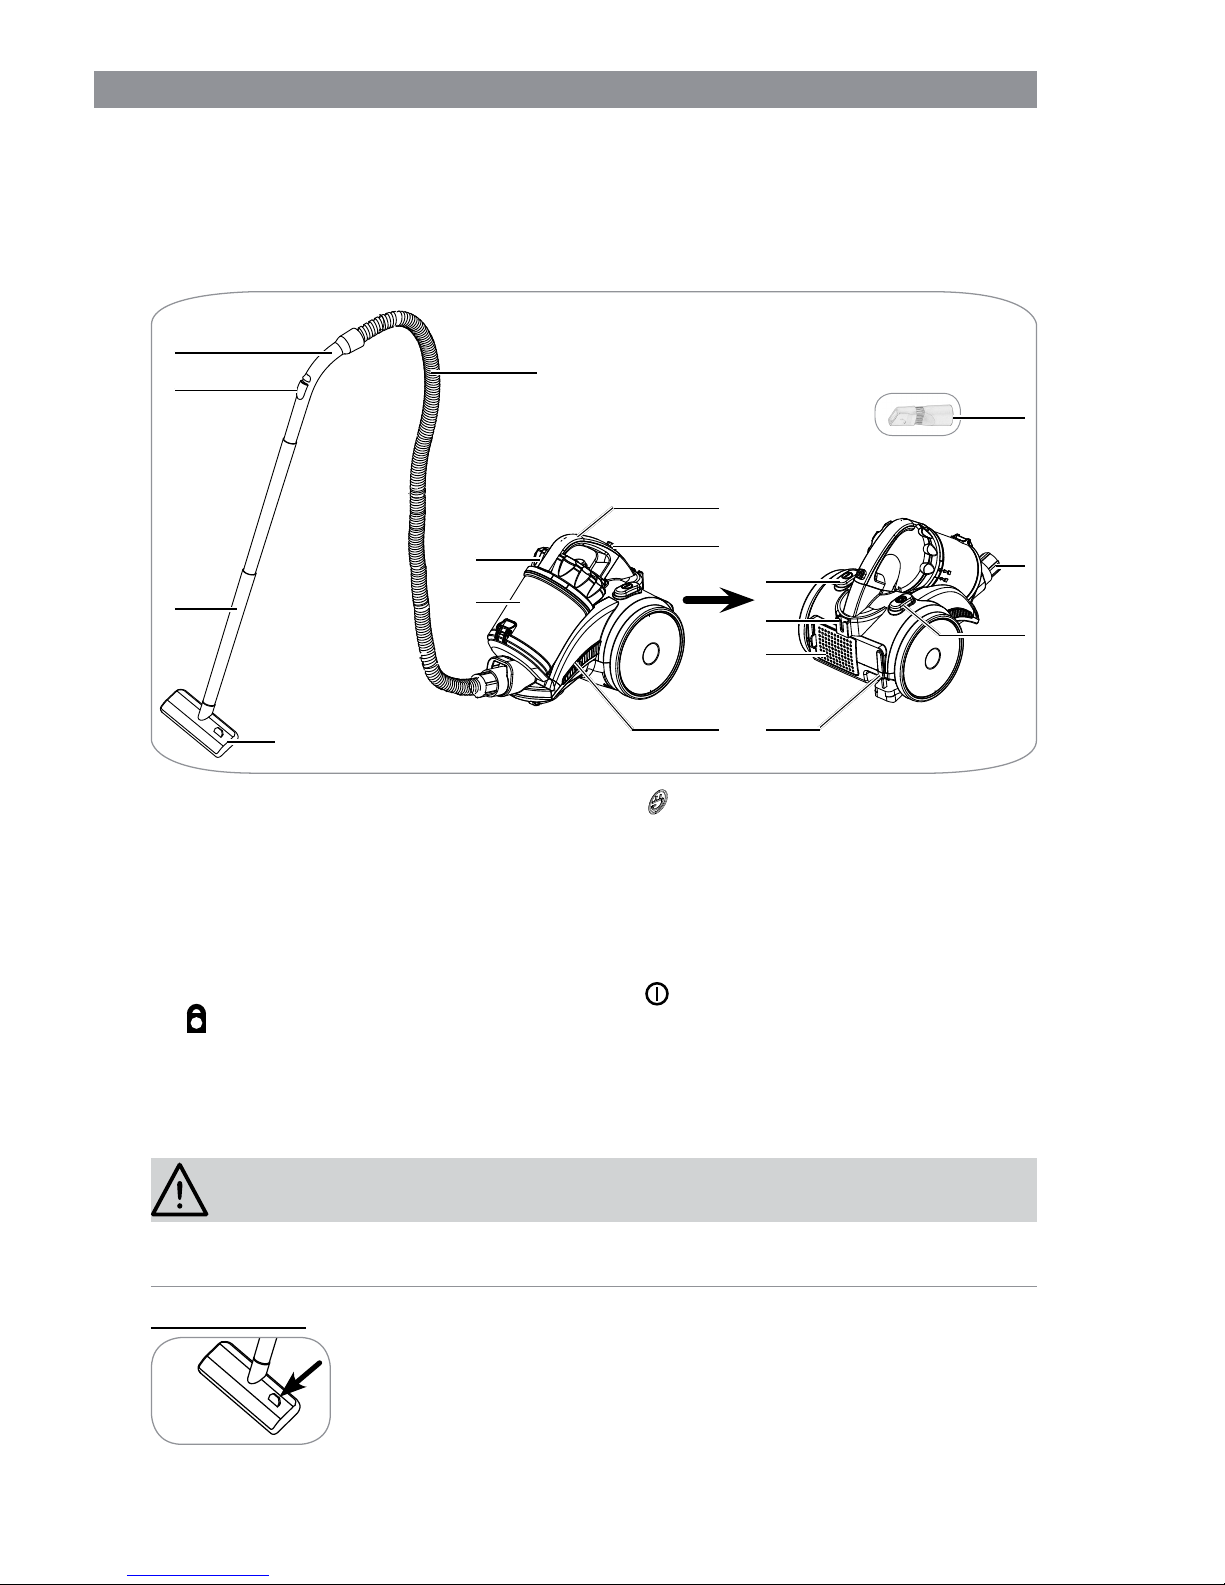
Lieferumfang und Geräteübersicht
1
5
7
10
15
11
14
2
9
16
12
8
6
1
3
4
13
17
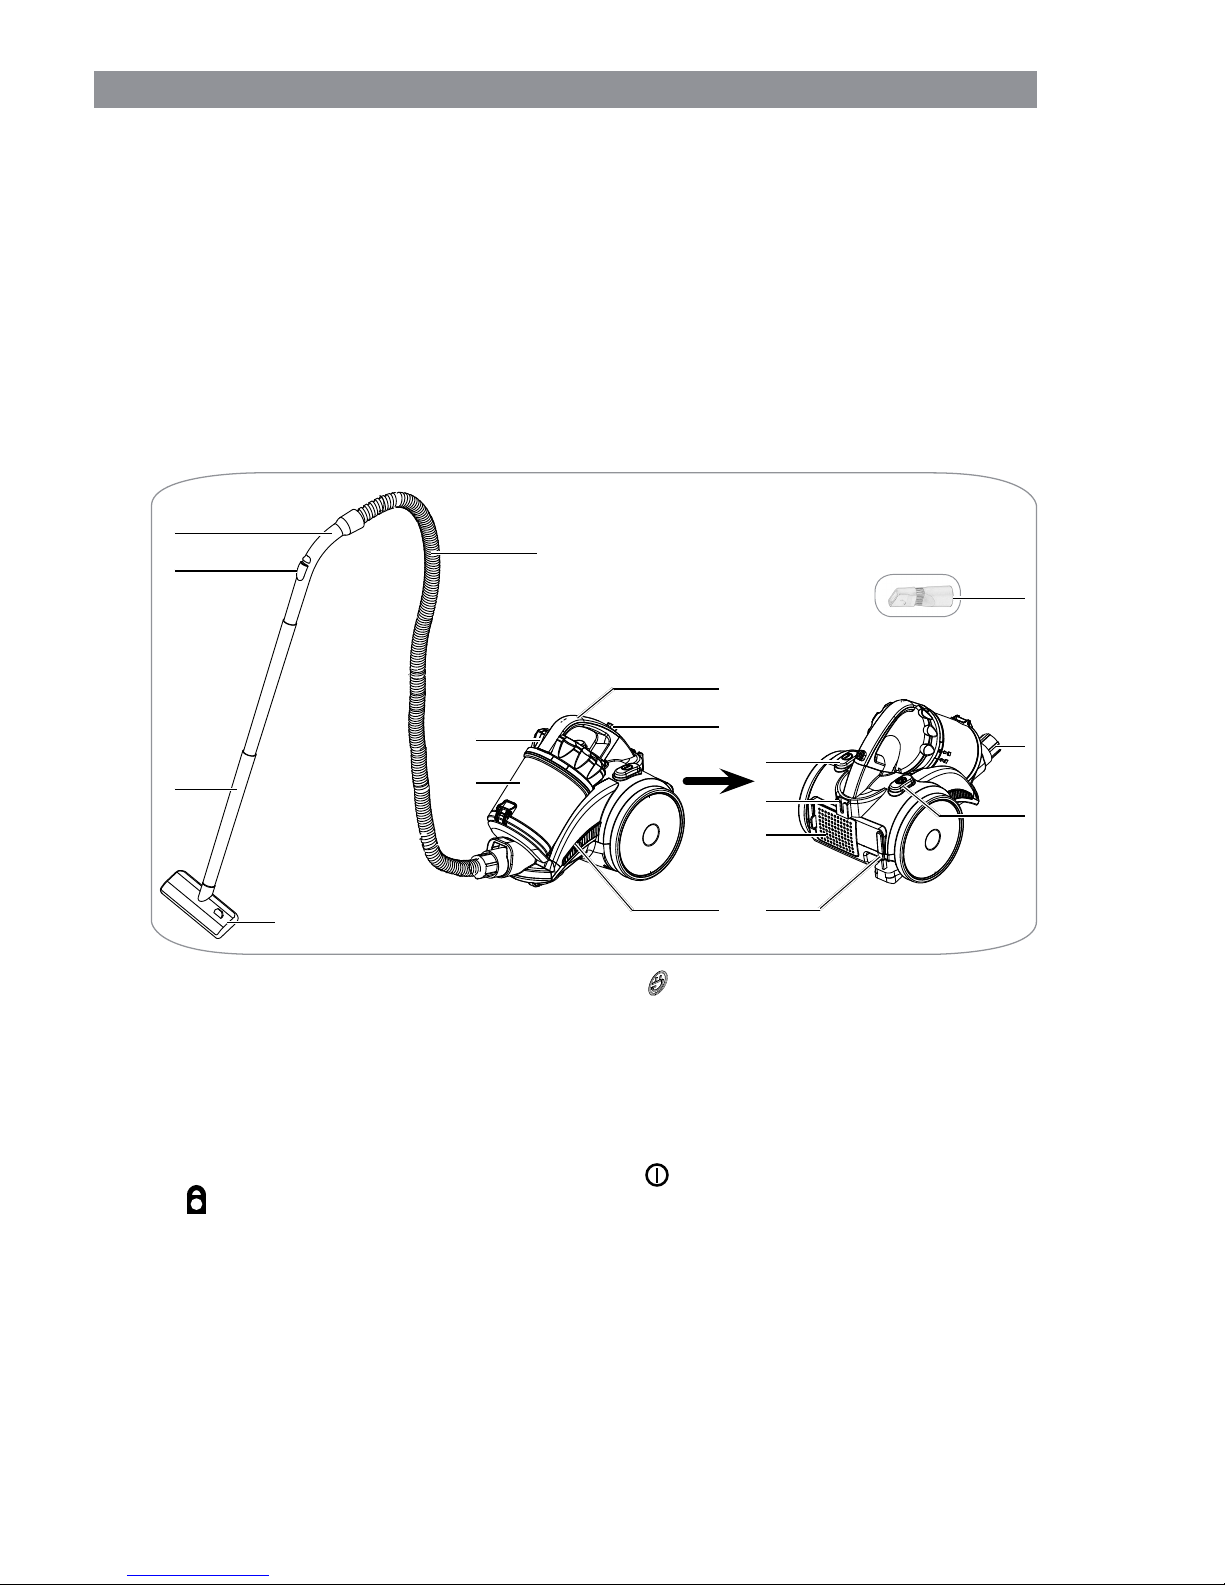
1 Bodendüse
2 Teleskoprohr
3 Nebenluftventil
4 Handgriff
5 Saugschlauch
6 Staubbehälter
7 Staubbehälterdeckel
8 Staubbehältergriff
9
Entriegelungstaste des Staubbe-
hälters
10 Ansaugöffnung
11 Taste zur Kabelaufwicklung
12 Netzstecker
13 Motoreinheit
14 Abluftklappe (dahinter sitzt der Abluft-
fi lter)
15 Halterung zum Einhaken der Boden-
düse
16
Ein / Aus- Schalter
17 Kombidüse (Fugen-/Bürstendüse)
• Diese Gebrauchsanleitung
Page 7
7 DE
Saugdüsen
ACHTUNG!
■ Bevor Sie die Düsen austauschen, schalten Sie immer zuerst den Staubsauger aus.
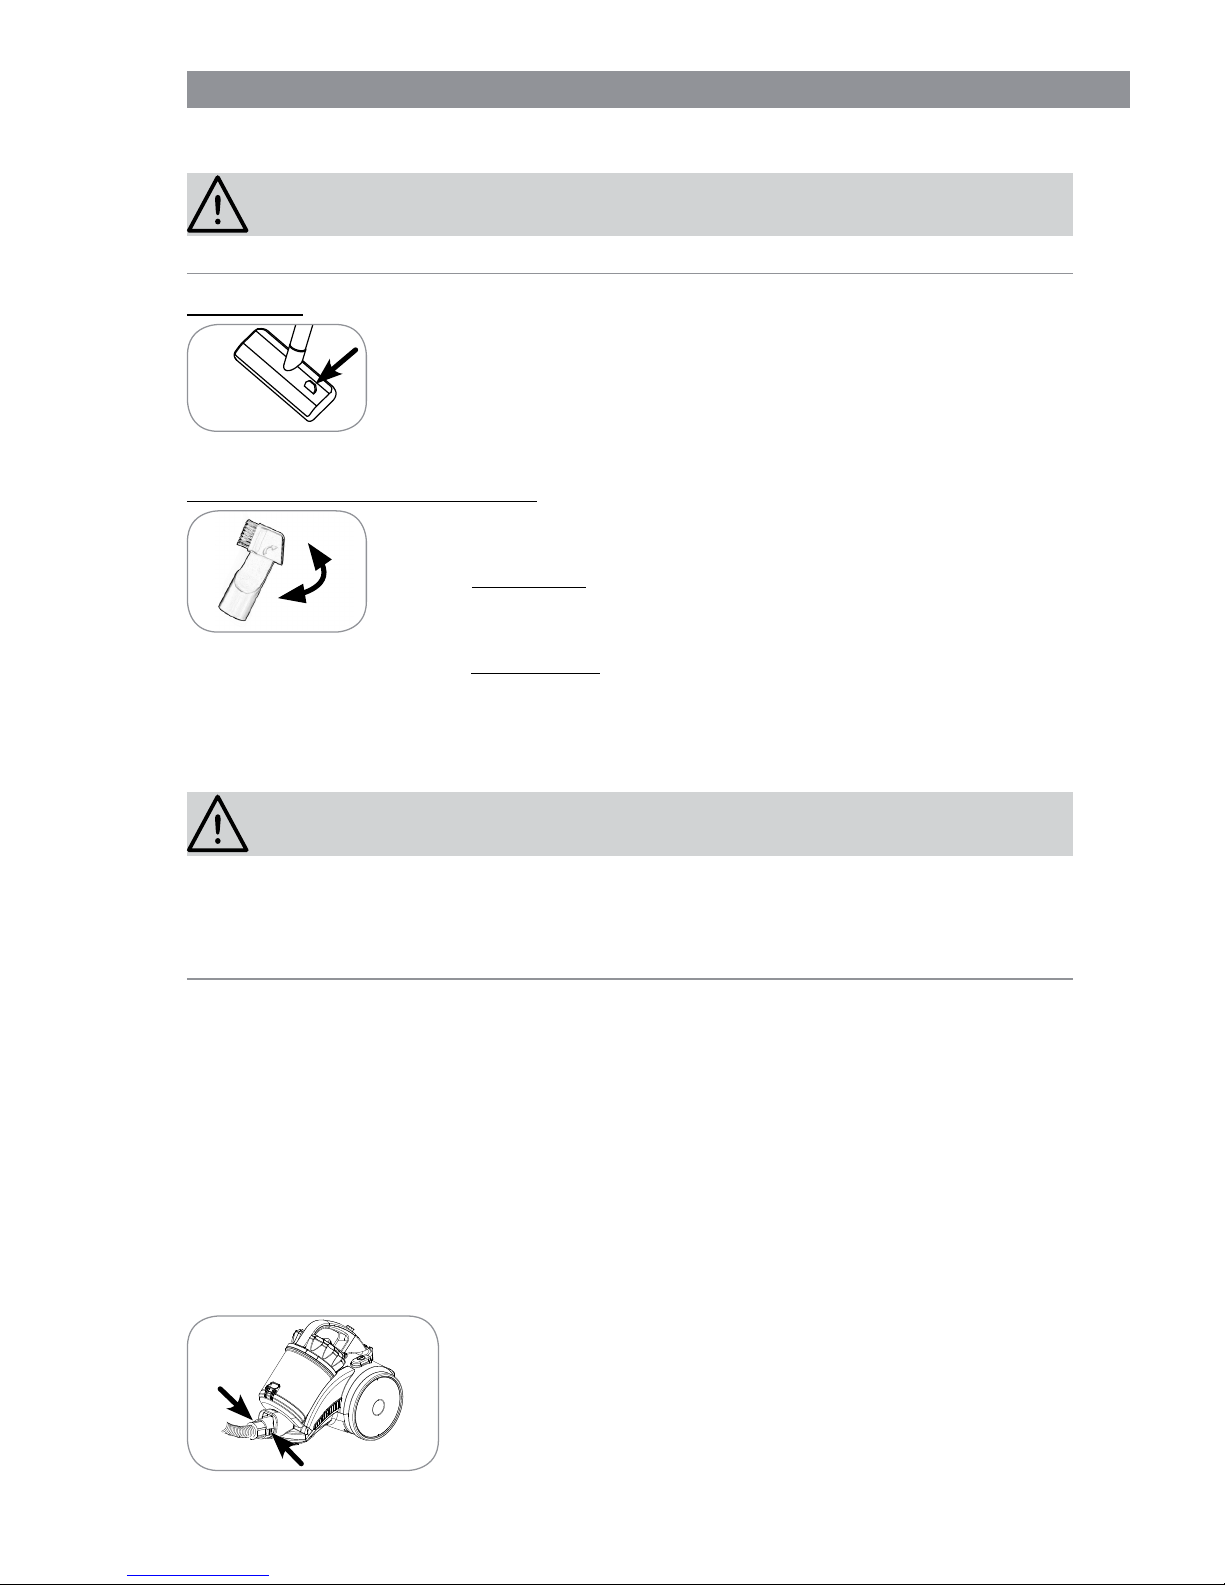
Bodendüse
Die Bodendüse ist sowohl für Teppiche als auch für glatte Böden
geeignet.
Mit dem Fußschalter können Sie zwischen Teppich und glattem
Boden umschalten. Für glatte Böden wird auf der Unterseite eine
Bürste ausgefahren.
Kombidüse (Fugen- / Bürstendüse)
Klappen Sie den Bürstenaufsatz in Pfeilrichtung um und aus der
Fugendüse wird eine Bürstendüse:
• Die Fugendüse ist für Polsterungen, die Innenreinigung von
PKWs und alle Ecken und Winkel, die Sie mit den anderen Düsen nicht erreichen können, geeignet.
• Die Bürstendüse ist für alle unebenen Gegenstände, Möbel,
Lampen, Profi l- und Fußleisten, Fensterbänke etc. geeignet.
Zusammenbau
ACHTUNG!
■ Erstickungsgefahr! Halten Sie das Verpackungsmaterial von Kindern und Tieren
fern.
■ Stellen Sie sicher, dass das Gerät nicht an das Stromnetz angeschlossen ist, bevor
Sie das Zubehör anbringen oder abnehmen.
1. Packen Sie alle Teile aus und überprüfen Sie den Lieferumfang auf Vollständigkeit
(siehe Kapitel „Lieferumfang und Geräteübersicht“) und Transportschäden. Falls die
Bestandteile Schäden aufweisen sollten, verwenden Sie diese nicht (!), sondern kontaktieren Sie den Kundenservice.
2. Entfernen Sie vor der Benutzung des Gerätes sämtliches Verpackungsmaterial sowie eventuell vorhandene Etiketten und Transportsicherungen, die sich am Gerät
befi nden und zum Transportschutz bzw. zur Werbung dienen.
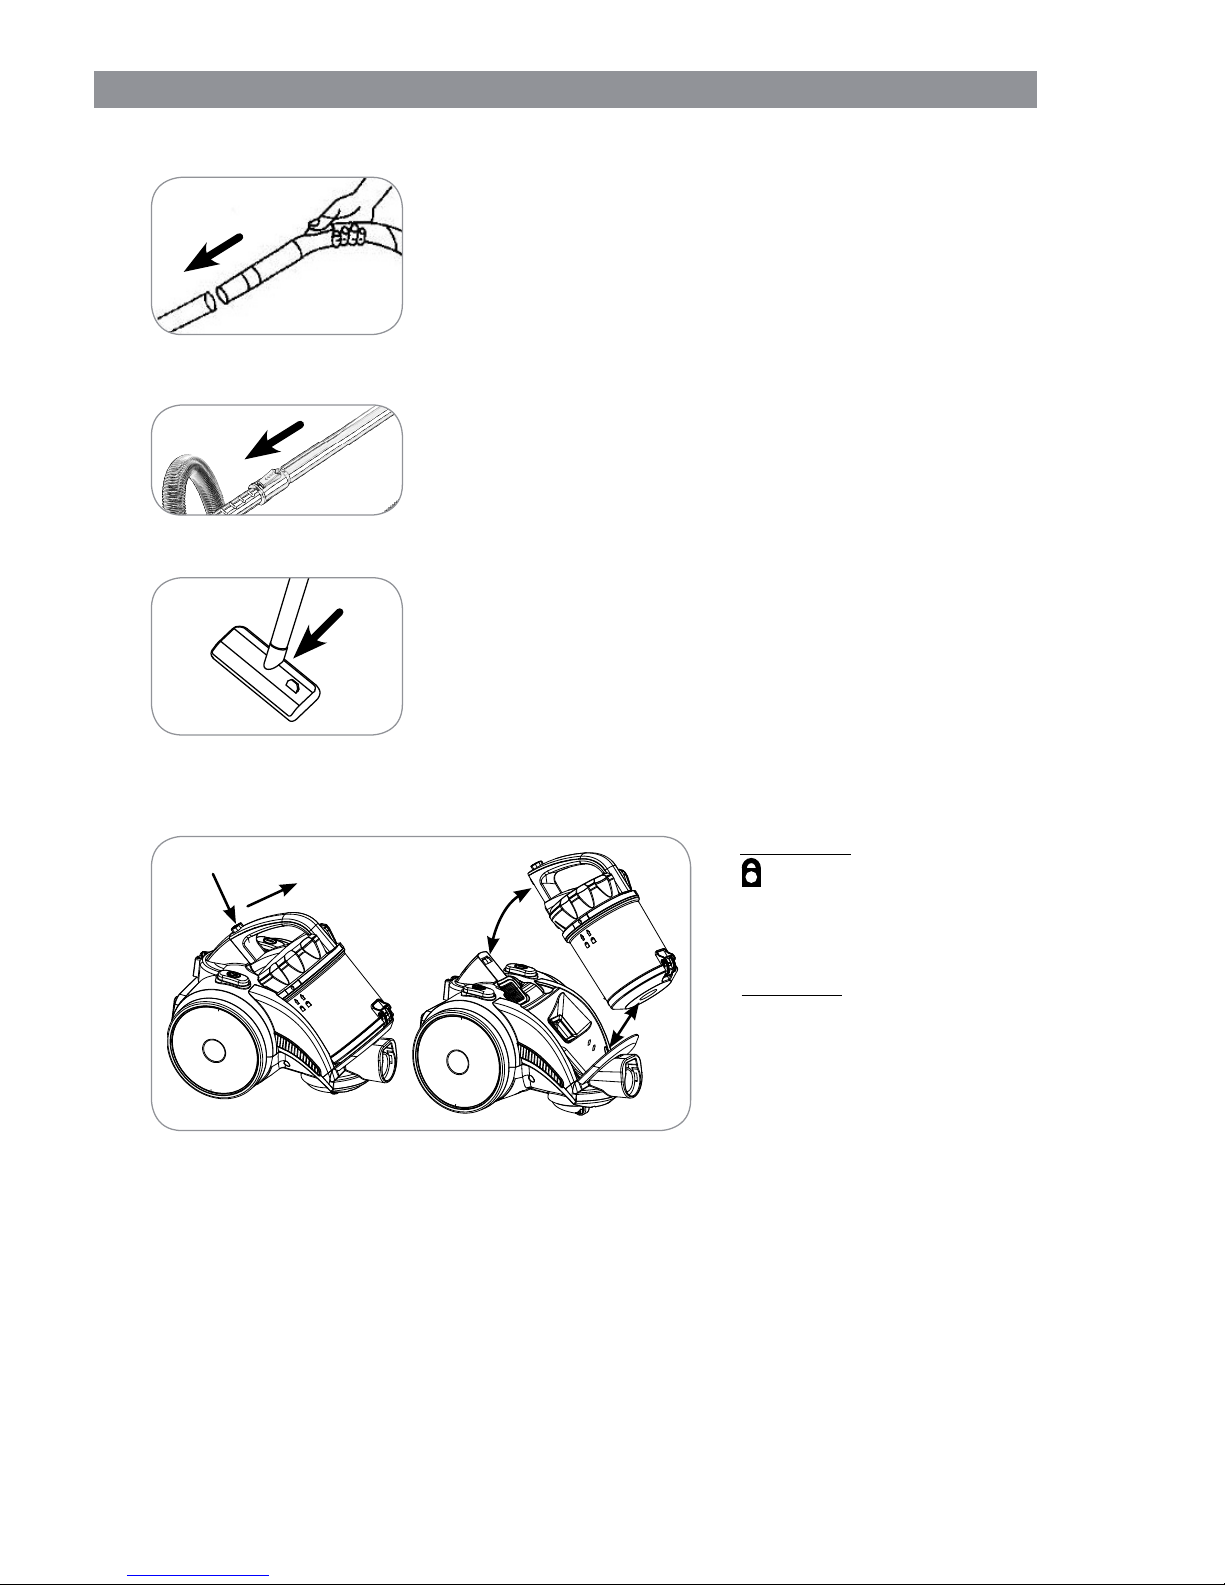
3. Bringen Sie den Saugschlauch, das Teleskoprohr und eine Saugdüse an der Motoreinheit an (s. u.).
Saugschlauch einsetzen / abnehmen
• Stecken Sie das Anschlussstück des Saugschlauches in
die Ansaugöffnung. Es muss einrasten.
• Zum Abnehmen des Saugschlauches drücken Sie die
Entriegelungstasten am Anschlussstück und ziehen Sie
es ab.
Page 8
DE 8
Teleskoprohr einsetzen / abnehmen
• Stecken Sie das offene Ende des Handgriffs in die passende Öffnung des Teleskoprohres. Drehen Sie den
Handgriff dabei leicht hin und her. Überprüfen Sie die Verbindung anschließend auf festen Sitz.
• Um das Teleskoprohr abzunehmen, ziehen Sie es vom
Handgriff ab.
Länge des Teleskoprohres einstellen
• Betätigen Sie den Schieber am Teleskoprohr und stellen
Sie die gewünschte Länge ein.
• Lassen Sie den Schieber los und bewegen Sie das Rohr
noch ein Stückchen weiter, bis es einrastet.
Saugdüsen anbringen / abnehmen
• Stecken Sie das freie Ende des Teleskoprohres bis zum
Anschlag in eine der mitgelieferten Saugdüsen. Drehen
Sie die Düse dabei leicht hin und her.
• Für mehr Flexibilität können die Saugdüsen auch direkt
auf den Handgriff des Saugschlauches gesteckt werden,
ohne das Teleskop rohr.
• Um eine Saugdüse abzunehmen, ziehen Sie diese ab.
Staubbehälter abnehmen / einsetzen
• Abnehmen: Drücken Sie die
Entriegelungstaste am
Staubbehältergriff und nehmen Sie den Staubbehälter
von der Motoreinheit ab.
• Einsetzen: Stecken Sie den
verschlossenen Staubbehälter in die Motoreinheit. Drücken Sie den Staubbehältergriff gegen das Gehäuse, bis
er hörbar einrastet.
Page 9
9 DE
Benutzung
ACHTUNG!
■ Halten Sie die Düsen während des Gebrauchs niemals in die Nähe von Körperteilen
oder Tieren und fassen Sie nicht hinein. Sie könnten sich festsaugen / verletzen.
Sollte sich der Staubsauger doch einmal festsaugen, schalten Sie das Gerät sofort
aus (
Ein / Aus- Schalter drücken).
■ Schalten Sie den Staubsauger erst dann ein, wenn Sie sichergestellt haben, dass
alle Teile komplett montiert und alle Filter korrekt eingesetzt sind.
■ Damit das Netzkabel während des Betriebs nicht heiß wird, ziehen Sie mindestens
zwei Drittel seiner Gesamtlänge aus dem Gerät heraus, bevor Sie den Staubsauger
einschalten. Ziehen Sie das Netzkabel nicht mit Gewalt bis zum Anschlag heraus
(nicht weiter als bis zur roten Markierung auf dem Kabel), um Beschädigungen zu
vermeiden!
■ Schalten Sie das Gerät immer erst aus und ziehen Sie den Netzstecker aus der
Steckdose, bevor Sie eine Düse austauschen bzw. sonstiges Zubehör anbringen
oder abnehmen!
■ Saugen Sie auf keinen Fall folgende Dinge auf:
– Flüssigkeiten oder nasse Stoffe (z. B. nasses Teppich-Shampoo)
– glühende Asche, Zigarettenkippen, Streichhölzer etc.
– brennbare oder entzündliche Stoffe
– sehr feinen Staub (z. B. Betonstaub), Asche oder Toner
– spitze, harte Gegenstände, wie z. B. größere Glassplitter
1. Falls noch nicht geschehen, bringen Sie die gewünschte Saugdüse am Teleskoprohr
bzw. am Saugschlauch an (siehe Kapitel „Zusammenbau“, Abschnitt „Saugdüsen
anbringen / abnehmen“).
2. Ziehen Sie das Netzkabel aus dem Gehäuse heraus, idealerweise bis zur gelben
Markierung, jedoch nicht weiter als bis zur roten Markierung auf dem Kabel!
3. Stecken Sie den Netzstecker in eine ordnungsgemäß installierte, gut zugängliche
Steckdose.
4. Drücken Sie den
Ein / Aus-Schalter, um den Staubsauger einzuschalten.
5. Führen Sie die Düse über die zu reinigende Fläche. Beim Saugen kann der Staubsauger wie ein Schlitten gezogen werden.
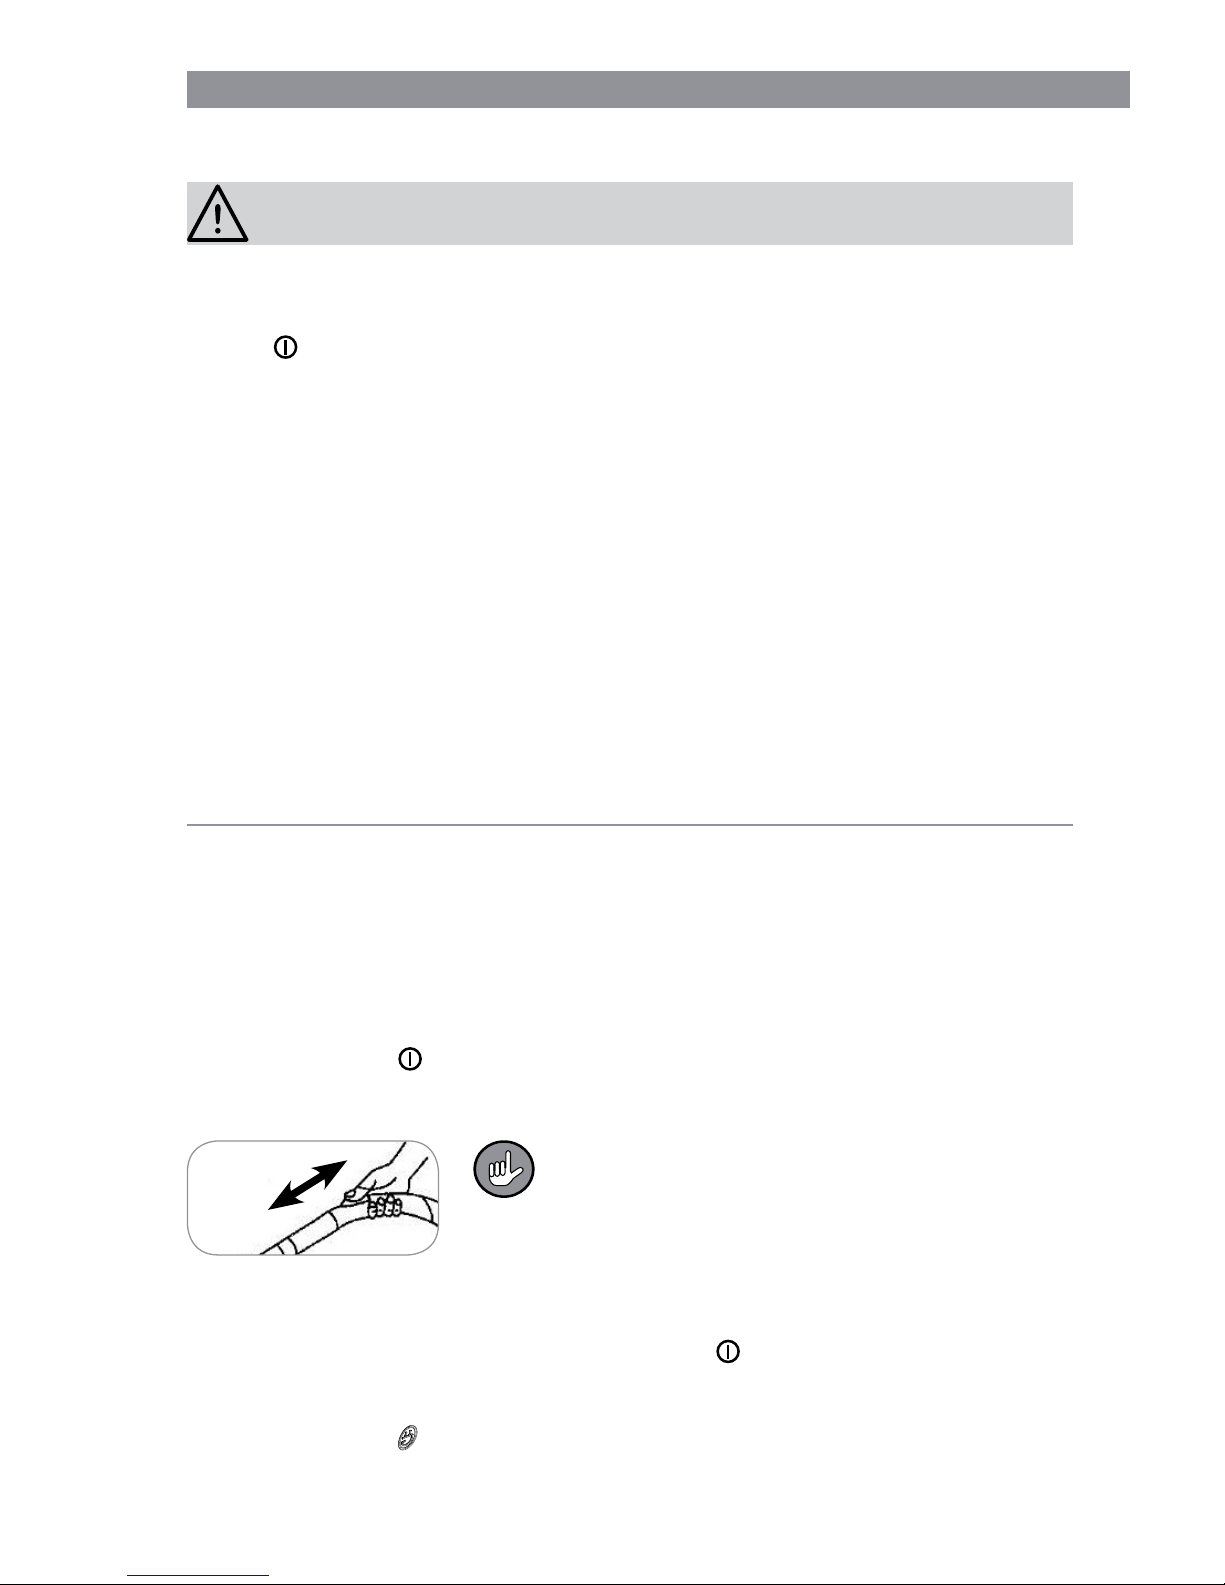
Am Handgriff befi ndet sich ein Nebenluftventil. Öff-
nen Sie es (durch Schieben der Abdeckung), um die
Saugkraft zu verringern, wenn Sie Polster, Teppiche
oder leichte, bewegliche Gegenstände absaugen.
Normalerweise soll das Nebenluftventil geschlossen
sein, damit die Saugkraft nicht unnötig vermindert
wird.
6. Drücken Sie nach dem Staubsaugen wieder den
Ein / Aus-Schalter, um das Gerät
auszuschalten.
7. Ziehen Sie den Netzstecker aus der Steckdose, halten Sie das Netzkabel fest und
drücken Sie die
Taste zur Kabelaufwicklung mit dem Fuß hinunter. Durch das
Festhalten des Netzkabels vermeiden Sie, dass das Kabel mit „Peitscheneffekt“ z. B.
gegen Ihre Beine schlägt.
Page 10
DE 10
8. Lassen Sie den Staubbehälter nicht zu voll werden. Leeren Sie ihn möglichst nach
jedem Gebrauch und reinigen Sie den Zykloneinsatz und die Filter regelmäßig, um
eine Überhitzung des Motors zu vermeiden (siehe Kapitel „Gerät und Zubehör reinigen“). Für eine optimale Leistung des Gerätes leeren Sie den Staubbehälter nach
jedem Gebrauch.
Gerät und Zubehör reinigen
ACHTUNG!
■ Leeren Sie den Staubbehälter möglichst nach jedem Gebrauch und reinigen Sie
den Zykloneinsatz und die Filter regelmäßig, um eine Überhitzung des Motors zu
vermeiden.
■ Ziehen Sie vor Reinigungstätigkeiten am Gerät immer den Netzstecker aus der
Steckdose.
■ Halten Sie die Motoreinheit, das Netzkabel und den Netzstecker von Wasser oder
anderen Flüssigkeiten fern, um Stromschläge zu vermeiden. Achten Sie beim Reinigen darauf, dass keine Flüssigkeit in die Motoreinheit gelangt. Lediglich die Filter
dürfen mit Wasser gereinigt werden. Sie müssen aber beim Einsetzen in das
Gerät vollständig trocken sein.
■ Die Filter sind weder waschmaschinen- noch spülmaschinen- oder trocknergeeig-
net! Trocknen Sie die Filter ausschließlich an der Luft, keinesfalls mit einem Haartrockner.
■ Verwenden Sie zum Reinigen keine scharfen oder scheuernden Reinigungsmittel
oder Reinigungspads. Diese können die Oberfl ächen beschädigen.
Mit der Zeit können sich die Filter verfärben. Dies ist normal und beeinträchtigt
nicht die Funktionalität.
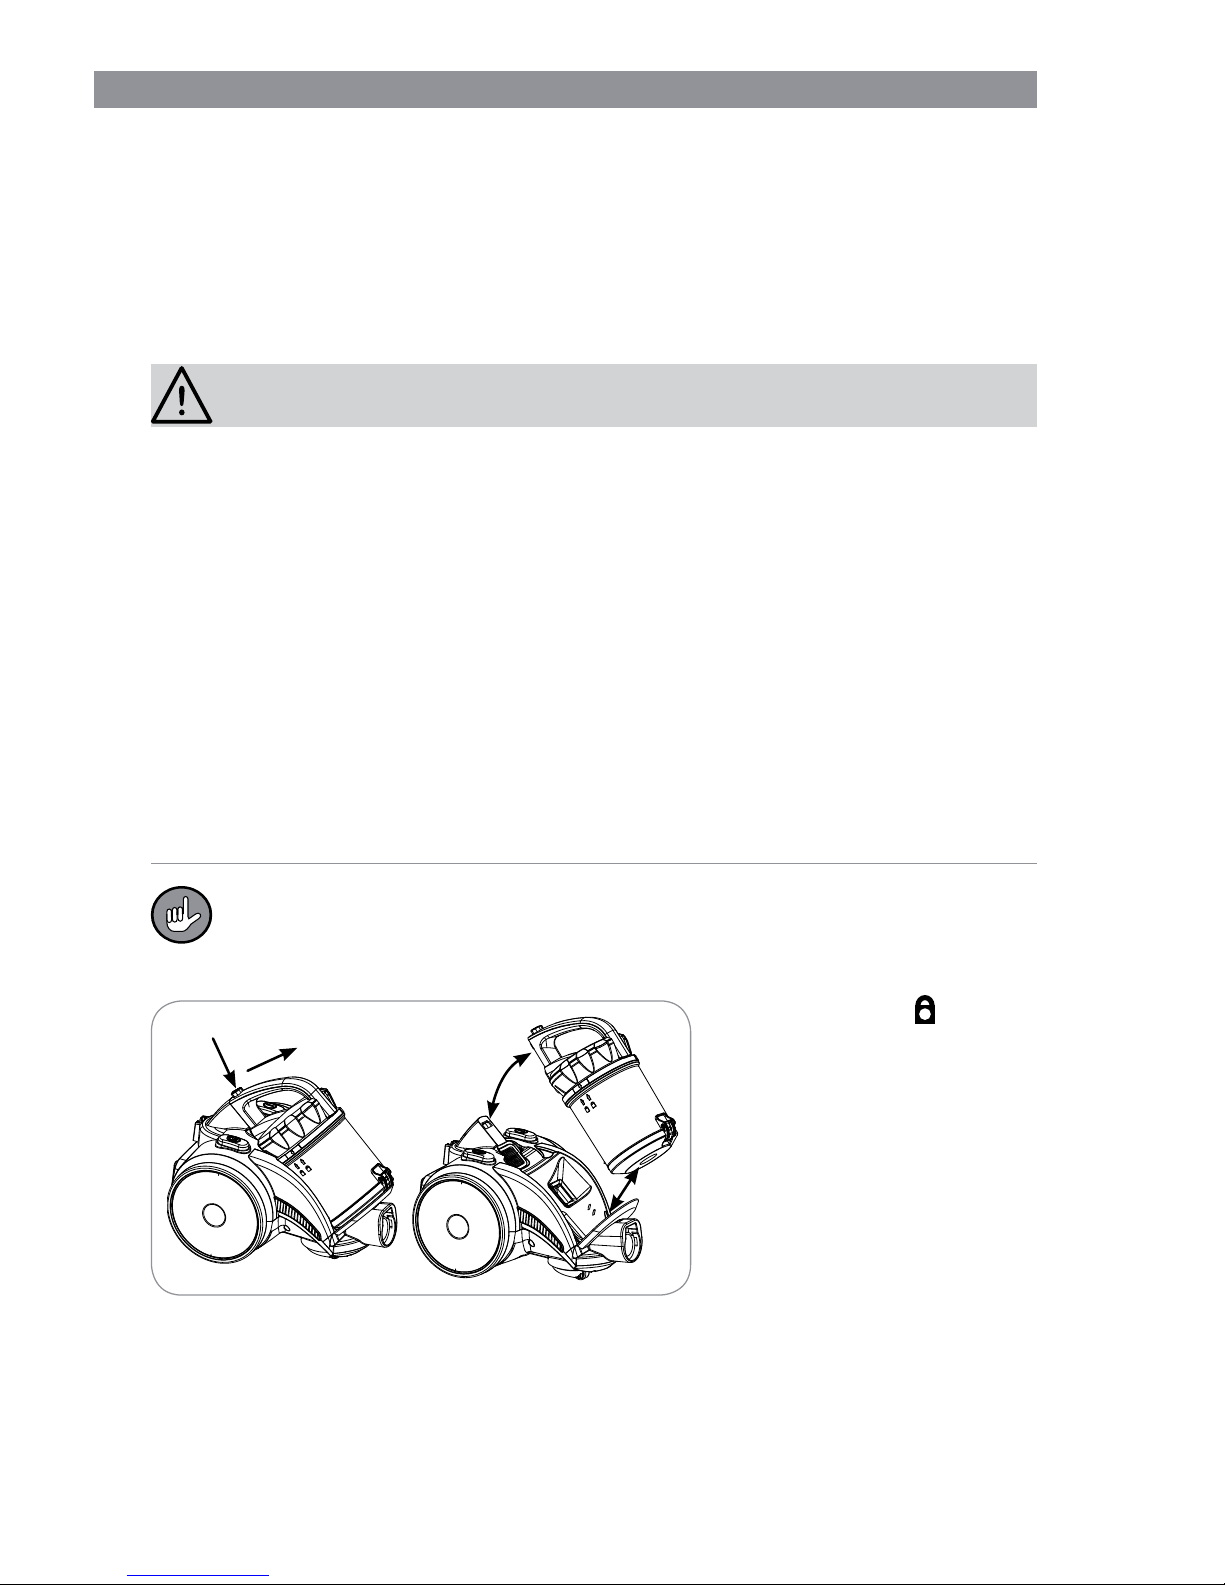
Staubbehälter leeren
1. Drücken Sie die Entriegelungstaste am Staubbehältergriff und nehmen Sie den
Staubbehälter von der Motoreinheit ab.
2. Halten Sie den Staubbehälter über einen geöffneten
Mülleimer. Der Abstand zum
Mülleimer sollte möglichst
klein sein, damit der Staub
aus dem Staubbehälter nur
in den Mülleimer fällt und
sich nicht in der Umgebung
verteilt.
Page 11
11 DE
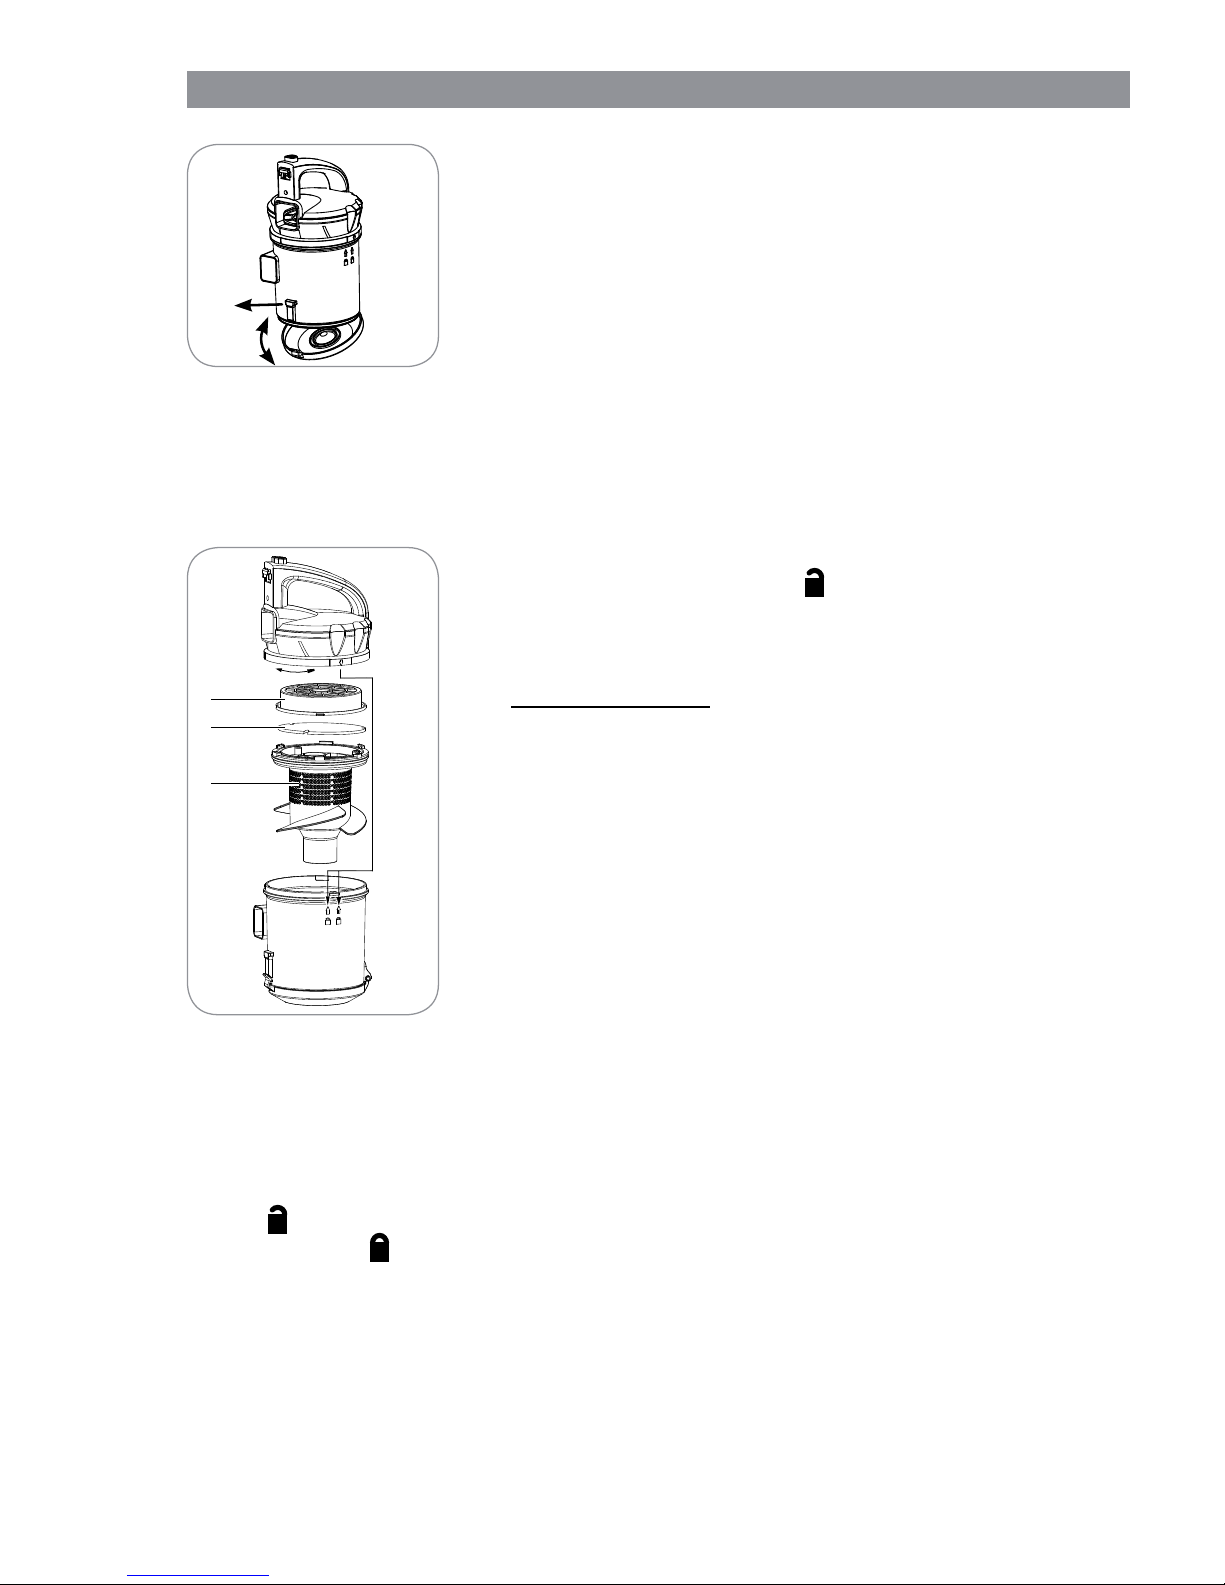
3. Ziehen Sie den Verschluss vom Staubbehälter weg.
Der Boden des Staubbehälters öffnet sich und der
Schmutz fällt heraus.
4. Klappen Sie den Staubbehälterboden wieder zu. Der
Verschluss muss hörbar einrasten.
5. Stecken Sie den verschlossenen Staubbehälter in die
Motoreinheit. Drücken Sie den Staubbehältergriff gegen das Gehäuse, bis er hörbar einrastet.
Staubbehälter, Zykloneinsatz und Motorfi lter reinigen
Der Zykloneinsatz befi ndet sich im Staubbehälter. Die Motorfi lter (HEPA- und Schaum-
stofffi lter) sitzen auf dem Zykloneinsatz (20).
1. Nehmen Sie den Staubbehälter aus dem Gerät und leeren Sie ihn (siehe Abschnitt
„Staubbehälter leeren“).
2. Drehen Sie den Deckel des Staubbehälters, bis der
Pfeil am Deckelrand auf das
Symbol auf dem Staub-
behälter zeigt. Dann nehmen Sie den Deckel ab.
3. Drehen Sie den HEPA-Filter (18) ein Stück gegen den
Uhrzeigersinn und nehmen Sie ihn ab.
Bitte beachten Sie: Der HEPA-Filter ist mit der Filterhalterung fest verbunden und kann nicht herausgenommen werden!
4. Entnehmen Sie den Schaumstofffi lter (19).
5. Nehmen Sie den Zykloneinsatz vorsichtig aus dem
Staubbehälter heraus. Greifen Sie hierzu in den Staubbehälter und drücken Sie den Zykloneinsatz hoch.
6. Klopfen Sie alle Teile über einem Mülleimer aus und
bürsten Sie losen Schmutz ab.
7. Bei Bedarf spülen Sie die Filter mit klarem, lauwarmem
Wasser gründlich aus. ACHTUNG: Kein Reinigungs-
mittel verwenden!
Schütteln Sie überschüssiges Wasser anschließend ab und lassen Sie die Filter
vollständig an der Luft trocknen.
8. Reinigen Sie den Zykloneinsatz und Staubbehälter mit einem feuchten Tuch.
9. Wenn alle Teile trocken sind, setzen Sie sie wieder zusammen. ACHTUNG: Setzen
Sie auf keinen Fall noch feuchte Geräteteile in den Staubbehälter ein!
10. Setzen Sie den Deckel so auf den Staubbehälter, dass
der Pfeil am Deckelrand auf
das
Symbol auf dem Staubbehälter zeigt. Dann
drehen Sie den Deckel bis zum
Anschlag zum
Symbol
.
11. Legen Sie den Staubbehälter in das Gerät ein. Achten Sie darauf, dass er hörbar
einrastet.
18
19
20
Page 12
DE 12
Abluftfi lter reinigen
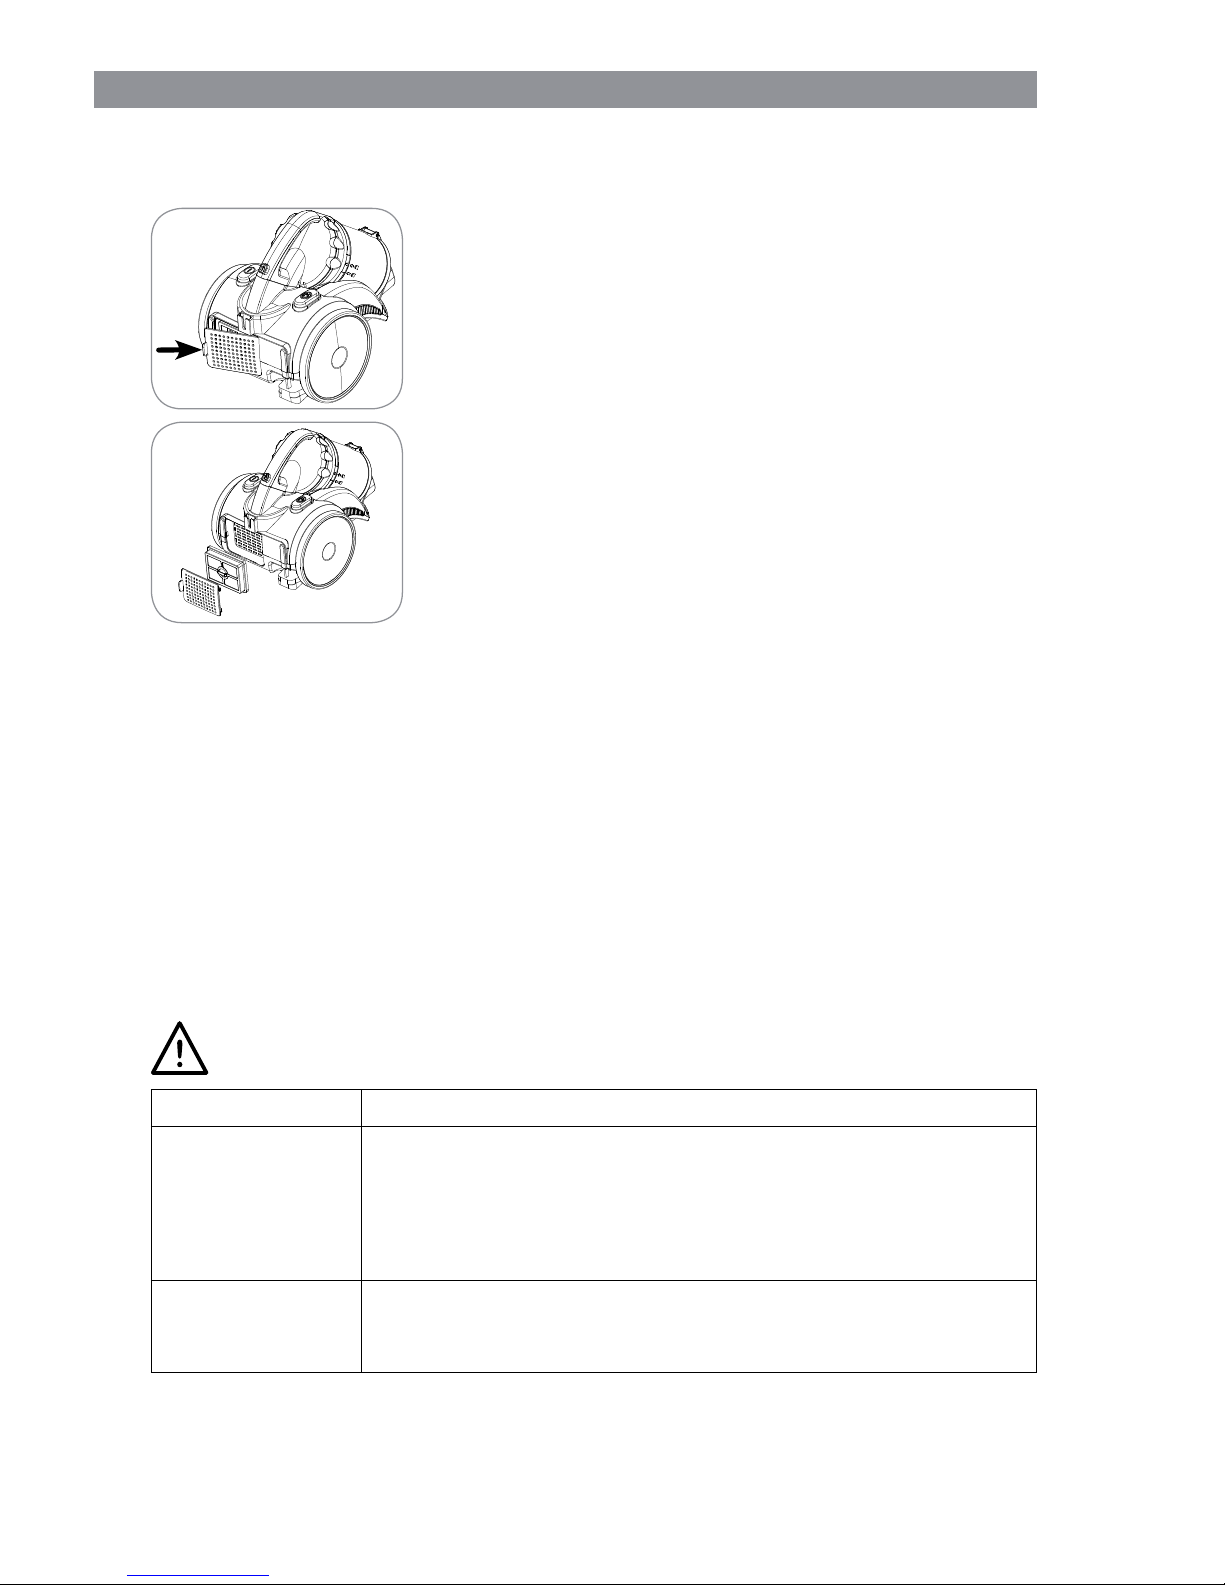
Der Abluftfi lter befi ndet sich auf der Rückseite des Staubsaugers.
1. Drücken Sie den Verschluss zur Abluftklappe und nehmen Sie sie ab.
2. Entnehmen Sie den Filter, klopfen Sie ihn über einem
Müllbehälter aus und bürsten Sie losen Schmutz ab. Sie
können den Filter auch mit klarem, lauwarmem Wasser abspülen. ACHTUNG: Kein Reinigungsmittel ver-
wenden!
Schütteln Sie überschüssiges Wasser anschließend ab
lassen Sie den Filter vollständig an der Luft trocknen.
3. Bürsten bzw. wischen Sie das Filterfach bei Bedarf aus.
4. Setzen Sie den Filter in das Filterfach ein.
5. Setzen Sie die Abluftklappe in das Gerät ein und klappen Sie sie zu.
Gehäuse und Düsen reinigen
• Reinigen Sie das Gehäuse bei Bedarf mit einem leicht angefeuchteten, weichen
Tuch.
• Entfernen Sie regelmäßig Haare und Fussel aus den Düsen.
Fehlerbehebung
Sollte das Gerät nicht ordnungsgemäß funktionieren, überprüfen Sie zunächst, ob Sie
ein Problem selbst beheben können.
Versuchen Sie nicht, ein defektes elektrisches Gerät eigenständig zu reparieren!
Problem Mögliche Ursache / Lösung / Tipps
Das Gerät saugt
nicht.
• Steckt der Netzstecker nicht korrekt in der Steckdose? Korrigieren Sie den Sitz des Netzsteckers.
• Ist die Steckdose defekt? Probieren Sie eine andere Steckdose.
• Überprüfen Sie die Sicherung Ihres Netzanschlusses.
Der Staubbehälter
lässt sich nicht
einsetzen.
• Ist der Deckel am Staubbehälter richtig angebracht? Der
Staubbehälter muss richtig geschlossen sein, damit er sich
einsetzen lässt.
Page 13
13 DE
Problem Mögliche Ursache / Lösung / Tipps
Die Leistung ist
schwach.
• Ist das Nebenluftventil im Handgriff geöffnet? Schließen Sie
es.
• Ist der Staubbehälter zu voll? Leeren Sie den Behälter.
• Sind die Filter stark verschmutzt? Reinigen Sie den Zyklon-
einsatz und die Filter.
• Ist die Düse, das Teleskoprohr oder der Saugschlauch ver-
stopft? Schalten Sie das Gerät aus, ziehen Sie den Netzstecker aus der Steckdose und entfernen Sie die Verstopfung.
Beim Saugen
entweicht Staub
aus dem Gerät.
• Ist der Staubbehälter nicht korrekt geschlossen und / oder
nicht (korrekt) in das Gerät eingesetzt? Korrigieren Sie dies.
• Sind die Filter stark verschmutzt? Reinigen Sie den Zyklon-
einsatz und die Filter.
Das Netzkabel
lässt sich nicht
ganz aufwickeln.
• Das Netzkabel wurde im Gerät nicht richtig aufgewickelt. Zie-
hen Sie es ein Stück heraus und betätigen Sie danach erneut
die
Taste zur Kabelaufwicklung.
Während des
Saugens lässt sich
ein unangenehmer
Geruch feststellen.
• Wird das Gerät zum ersten Mal benutzt? Eine Geruchsent-
wicklung tritt bei der ersten Benutzung neuer Geräte häufi g
auf. Der Geruch sollte verschwinden, nachdem Sie das Gerät
mehrmals benutzt haben.
Technische Daten
Artikelnummer: Z 08183
Modellnummer: PC-C008
Spannungsversorgung: 230 V~, 50 Hz
Motorleistung: 750 W
Schutzklasse: II
Kapazität Staubbehälter: 2 l Staub
Kabellänge: 5 m
Entsorgung
Das Verpackungsmaterial ist wiederverwertbar. Entsorgen Sie die Verpackung
umweltgerecht und führen Sie sie der Wertstoffsammlung zu.
Entsorgen Sie das Gerät umweltgerecht. Es gehört nicht in den Hausmüll. Entsorgen Sie es an einem Recyclinghof für elektrische und elektronische Altgeräte. Nähere Informationen erhalten Sie bei Ihrer örtlichen Gemeindeverwaltung.
Kundenservice / Importeur:
DS Produkte GmbH
Am Heisterbusch 1
19258 Gallin
Deutschland
Tel.: +49 38851 314650
(0 – 30 Ct. / Min. in das dt.
Festnetz. Kosten variieren je
nach Anbieter.)
Alle Rechte vorbehalten.
Page 14
EN 14
Proper use
• This device is designed for vacuuming up normal house dust.
Do not in any case vacuum up the following things:
– liquids or wet substances (e.g. wet carpet shampoo)
– smouldering ashes, cigarette butts, matches etc.
– fl ammable or ignitable materials
– very fi ne dust (e.g. cement dust), ash or toner
– pointy, hard objects such as larger glass shards
• The device is intended for domestic, not commercial use.
• Only use the device as described in this instruction manual. Any other use is deemed
improper.
• Defects arising due to improper handling, damage or attempts at repair are excluded
from the warranty. This also applies to normal wear and tear.
Explanation of Symbols
Safety instructions:
Please read these careful-
ly and comply with them in
order to prevent personal
injury and damage to
property.
Supplementary information
Protection class II
Dear Customer,
We are delighted that you have chosen this cyclone vacuum cleaner.
Before using the device for the fi rst time, please read the instructions through
carefully and keep them for future reference. If the device is given to someone else,
these instructions should also be handed over with it.
The manufacturer and importer do not accept any liability if the information in these
instructions is not complied with.
If you have any questions about the device and about spare parts/accessories,
contact the customer service department via our website:
www.service-shopping.de
Contents
Proper use ____________________________ 14
Safety notes __________________________ 15
Items Supplied and Device Overview _______ 17
Assembly _____________________________ 18
Use _________________________________ 19
Cleaning the Device and Accessories ______ 20
Tro ublesh ooting ________________________ 2 2
Technical Data ________________________ 23
Disposal______________________________ 23
Page 15
15 EN
Safety notes
■ This device may be used by children ages 8 and over as well as
persons with impaired physical, sensory or mental capacities or
those lacking experience and/or knowledge if they are supervised or have been instructed in how to safely use the device
and have understood the risks associated with operating the device.
■ Children must not play with the device.
■ Children must not perform cleaning and user maintenance of
the device unless they are 8 years of age or older and are supervised.
■ Keep children under 8 years of age and animals away from the
device and the mains cable.
■ Children must be under supervision to ensure that they do not
play with the device and/or injure themselves with the device.
■ Only use and store the device out of the reach of children and
animals. Improper use may result in injury and electrical shock.
The mains cable must also not be accessible for children and
animals.
■ If the device is not supervised, before assembling, disassem-
bling or cleaning the device, it must always be disconnected
from the power supply.
■ Never immerse the device, the mains cable and the plug in water
or other liquids and make sure that there is no risk of them falling
in water or getting wet.
■ If the device, the mains cable or the device plug is damaged, it
must be replaced by the manufacturer or customer service or
by a similarly qualifi ed person (e.g. qualifi ed workshop) to avoid
any risks.
Risks of injury
■ Risk of suffocation! Keep the packaging material away from children and animals.
■ Keep animals, hair, jewellery, loose-fi tting clothing, fi ngers and all other body parts
away from the nozzles of the device. They could be caught in the vacuum cleaner. If
the vacuum cleaner attaches itself to the fl oor, turn it off immediately.
■ Be very careful that you don’t fall when vacuuming stairs.
■ Ensure that the connected mains cable does not pose a tripping hazard.
Page 16

EN 16
Danger of Electric Shock and Fire
■ Do not use the device if highly fl ammable gases are present in the air.
■ Use and store the device only in closed rooms. Do not operate it outdoors, in rooms
with high humidity or on hot surfaces.
■ Never touch the mains plug, the mains cable or the device with wet or damp hands.
■ Never pick up liquids with the device. Do not pour liquids into the dust container.
Keep the motor unit away from moisture or wet conditions!
■ Never carry or pull the device by the cable; always treat the cable with care. Avoid
pinching the cable in doors or pulling it over sharp edges or corners. Keep the cable
away from hot surfaces.
■ Connect the device only to a plug socket whose mains voltage corresponds to the
data on the rating plate. The plug socket must still be accessible after the connection has been made. Only use suitable extension cables whose technical data is the
same as that of the device.
■ In the interest of your own safety, you should check the device for damage each time
before you use it. Only use it if it is not damaged in any way!
■ Switch the device off and pull the mains plug out of the plug socket:
– in the event of a thunderstorm,
– in the event of damage / faults (e.g. unusual noises, odour or smoke development)
– if liquids have been sucked up,
– if the device has been dropped.
Have it checked by an expert before you use it again.
■ The device must be switched off when inserting or removing the mains plug from the
plug socket.
■ When you want to remove the mains plug from the socket, always pull the plug and
never the mains cable!
Damage to Materials, Property and the Device
■ Do not allow the dust container to get too full. Empty it after each use if possible. The
fi lters must also be regularly cleaned in order to prevent overloading of the motor.
■ The dust container and the fi lters must be completely dried after washing before they
may be reinserted.
■ The device should only be used when it is fully and correctly assembled. The dust
container and the fi lters must be inserted and must not be damaged. If the dirt were
to get inside the device, this could damage the motor. Do not insert anything into the
openings / nozzle of the device and make sure that they do not become clogged.
Never cover the ventilation openings.
■ Use only original manufacturer’s accessories.
■ Do not expose the device to extreme temperatures, wide temperature variations,
open fi re or direct sunlight.
■ Do not drop the device or allow it to be knocked violently.
■ Never place heavy objects on the device.
■ Do not try to lubricate the rollers with lubricant or oil. This would cause dust and dirt
to increasingly adhere to the rollers.
■ Store the device in a cool, dry place that is not accessible to children and animals
when it is not being used.
Page 17
17 EN
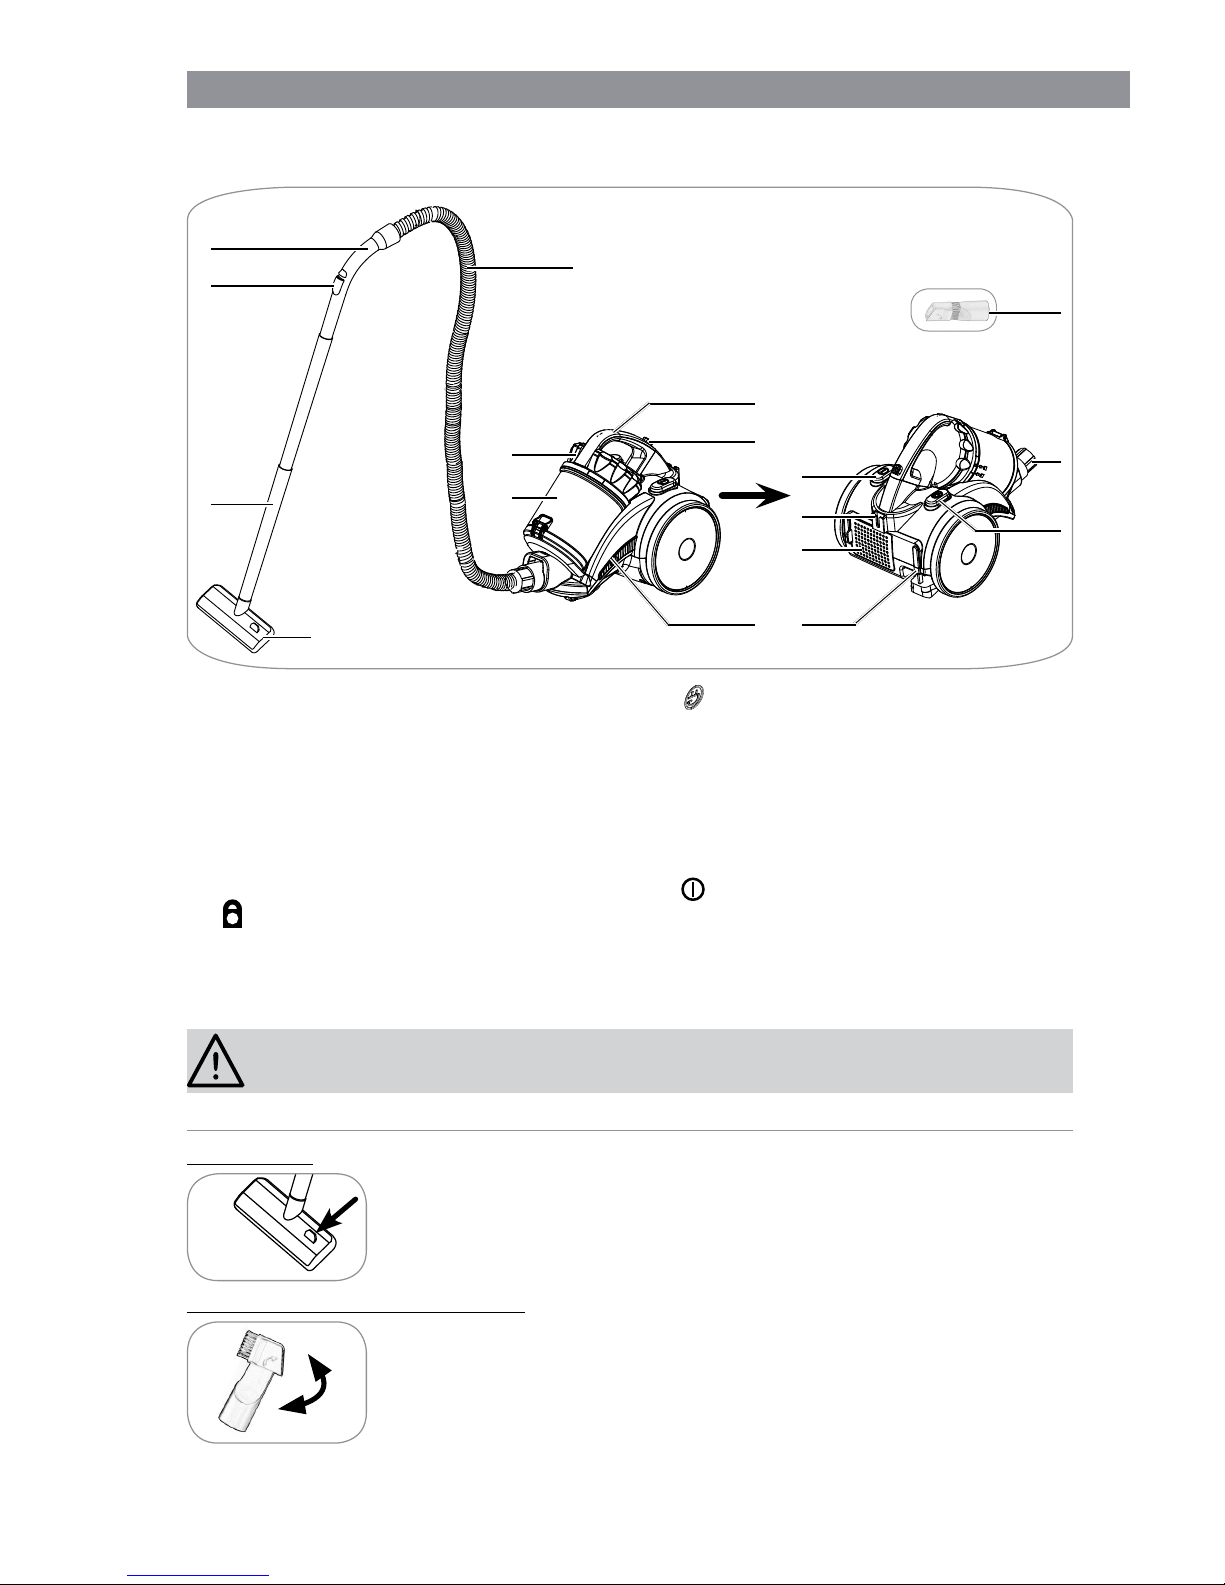
Items Supplied and Device Overview
1
5
7
10
15
11
14
2
9
16
12
8
6
1
3
4
13
17
1 Floor nozzle
2 Telescopic tube
3 Auxiliary airfl ow vent on
4 Handle
5 Suction hose
6 Dust container
7 Dust container lid
8 Dust container handle
9 Release button of the dust container
10 Suction intake opening
11
Button for retracting the cable
12 Mains plug
13 Motor unit
14 Exhaust air grille (not shown, the
exhaust air fi lter sits behind this)
15 Bracket for attachment of the fl oor
nozzle
16
On / Off switch
17 Combi nozzle (crevice/brush nozzle)
• These operating instructions
Suction nozzles
ATTENTION!
■ Always turn off the vacuum cleaner fi rst before changing the nozzles.
Floor nozzle
The fl oor nozzle is suitable both for carpets and smooth fl oors.
With the foot switch, you can switch between smooth fl oor and
carpet. A brush is deployed on the bottom for smooth fl oors.
Combi nozzle (Tile/brush nozzle)
Turn the brush adapter in the direction of the arrow to convert the
tile nozzle into a brush nozzle:
• The tile nozzle is suitable for cushions, cleaning the inside of
passenger vehicles as well as all nooks and crannies that can’t
be reached with other nozzles.
• The brush nozzle is suitable for all uneven objects, furniture, lamps, profi ling strips
and skirting boards, window sills etc.
Page 18
EN 18
Assembly
ATTENTION!
■ Risk of suffocation! Keep the packaging material away from children and animals.
■ Make sure that the device is not connected to the mains electricity supply before you
attach or remove the accessories.
1. Unpack all parts and make sure that the product contents are complete (see chapter
“Items Supplied and Device Overview”) and check for any damage from transport.
If you identify damage to the components, do not use them (!), instead contact our
customer service centre.
2. Before using the device, remove all packaging materials and any labels and transport restraints that may be on the device and are used for protection during transportation or for advertising.
3. Attach the suction hose, the telescopic tube and a suction nozzle to the motor unit
(see below).
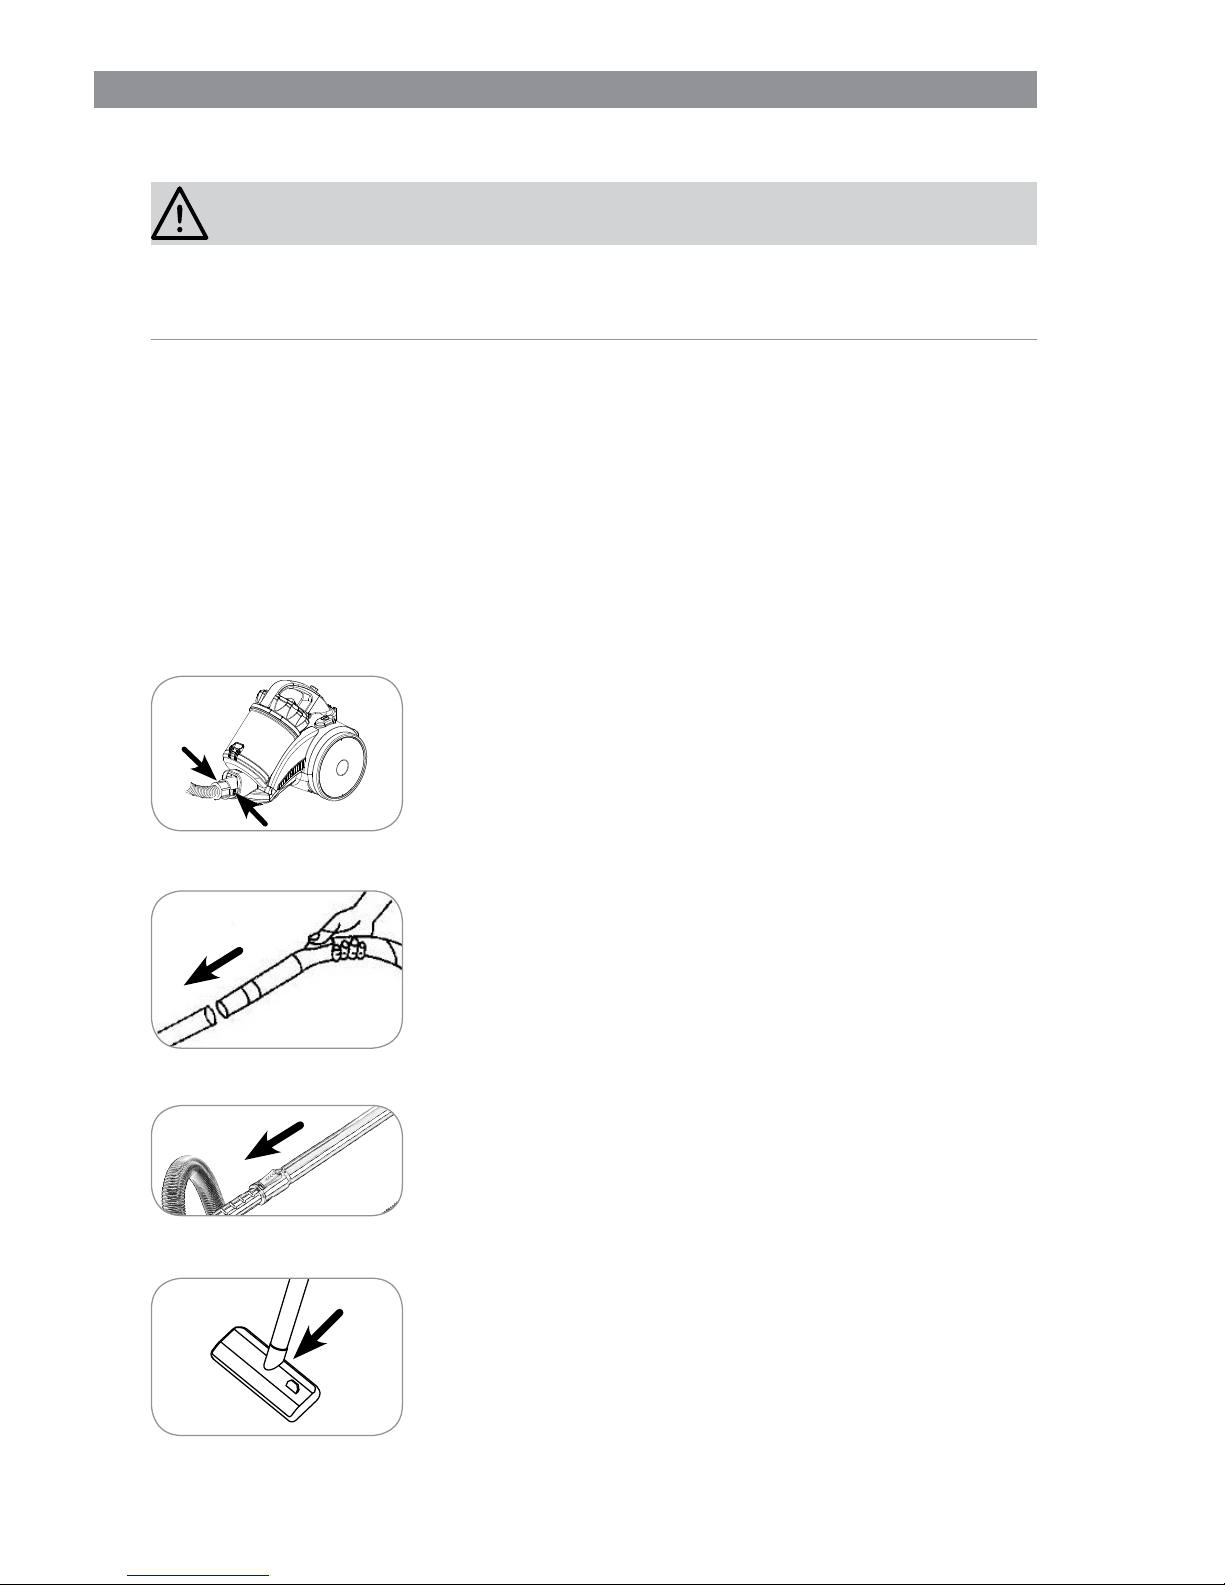
Inserting / Removing the Suction Hose
• Plug the connection piece of the suction hose into the suction intake opening. It must engage properly.
• To remove the suction hose, press the release buttons on
the connection piece and pull it off.
Inserting/removing the telescopic tube
• Insert the open end of the handle into the corresponding
opening of the telescopic tube. At the same time twist the
handle gently backwards and forwards. Afterwards, check
the connection for secure seating.
• To remove the telescopic tube, pull it out of the handle.
Adjusting the length of the telescopic tube
• Push the slider on the telescopic tube and set the desired
length.
• Release the slider and move the tube forward until it locks
into place.
Attaching / Removing Suction Nozzles
• Plug the free end of the telescopic tube as far as it will go
into one of the suction nozzles supplied. Twist the nozzle
back and forth slightly as you do this.
• For greater fl exibility, the suction nozzles can also be
plugged directly onto the handle of the suction hose, without the telescopic tube.
• To detach a suction nozzle, pull it off.
Page 19
19 EN
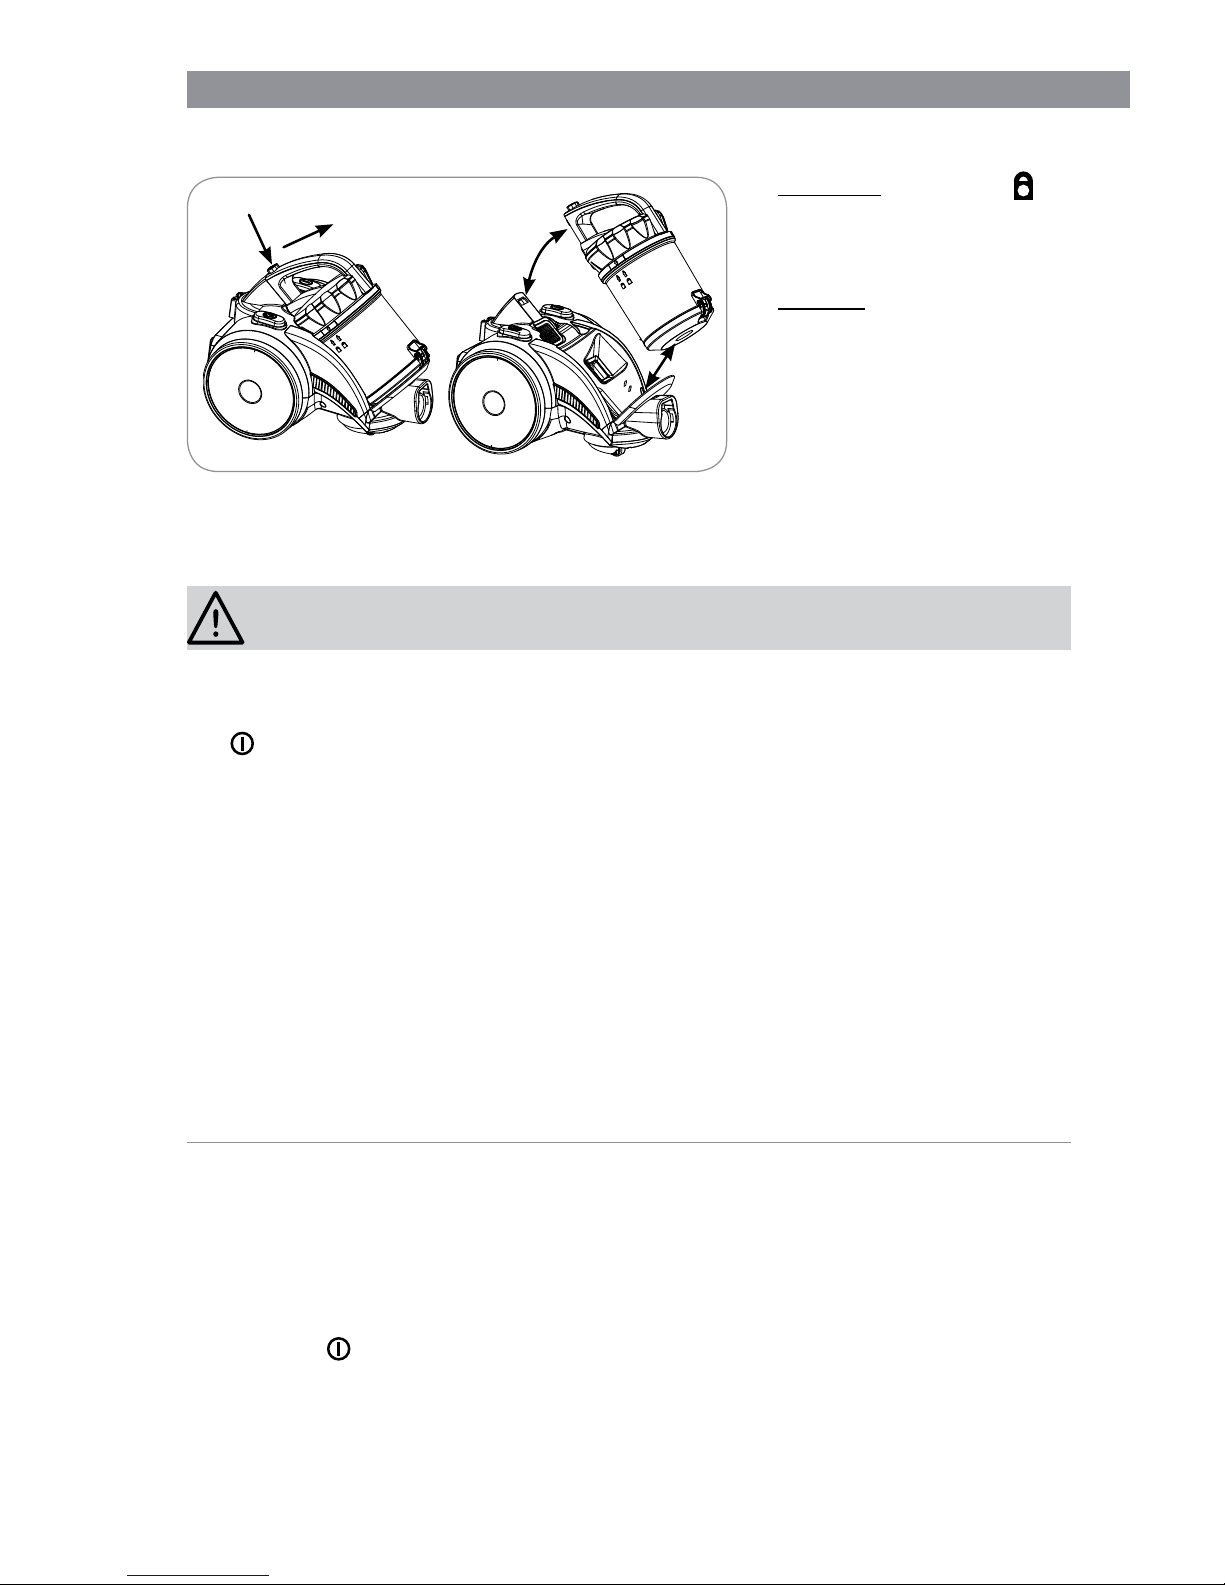
Removing / Inserting the Dust Container
• Removing: Press the re-
lease button on the dust container handle and remove the
dust container.
• Inserting: Place the closed
dust container onto the motor
unit. Press the dust container
handle against the housing
until it engages audibly.
Use
ATTENTION!
■ During use, always keep the nozzles away from body parts or animals and don’t
reach into the nozzles. You/they could be caught in the vacuum cleaner or injured.
If something does get caught in the vacuum cleaner, immediately turn off the device
(
push the On/Off switch).
■ Only turn on the vacuum cleaner once you are sure that all parts have been com-
pletely assembled and that all fi lters are correctly inserted.
■ To ensure that the mains cable does not heat up during operation, pull at least two
thirds of its entire length out of the device housing before switching on the vacuum
cleaner. In order to avoid damage do not tug out the mains cable as far as it will go
(no further than the red mark on the cable)!
■ Always turn off the device and pull the mains plug out of the socket before you
change a nozzle or attach or remove any other accessories!
■ Do not under any circumstances vacuum up the following:
– liquids or wet materials (such as wet carpet shampoo)
– smouldering ashes, cigarette butts, matches etc.
– fl ammable or ignitable materials
– very fi ne dust (e.g. cement dust), ash or toner
– hard, pointy objects such as larger glass shards
1. If you have not already done so, attach the desired suction nozzle to the telescopic
tube or suction hose (see chapter “Assembly”, section “Mounting/removing suction
nozzles”).
2. Pull the mains cable out of the housing, ideally as far as the yellow mark but in any
case no further than the red mark on the cable!
3. Insert the mains plug in a properly installed socket that is easily accessible.
4. Press the
On/Off switch to turn the vacuum cleaner on.
5. Move the nozzle over the surface you want to clean. You can pull the vacuum cleaner like a sled when vacuum cleaning.
Page 20
EN 20
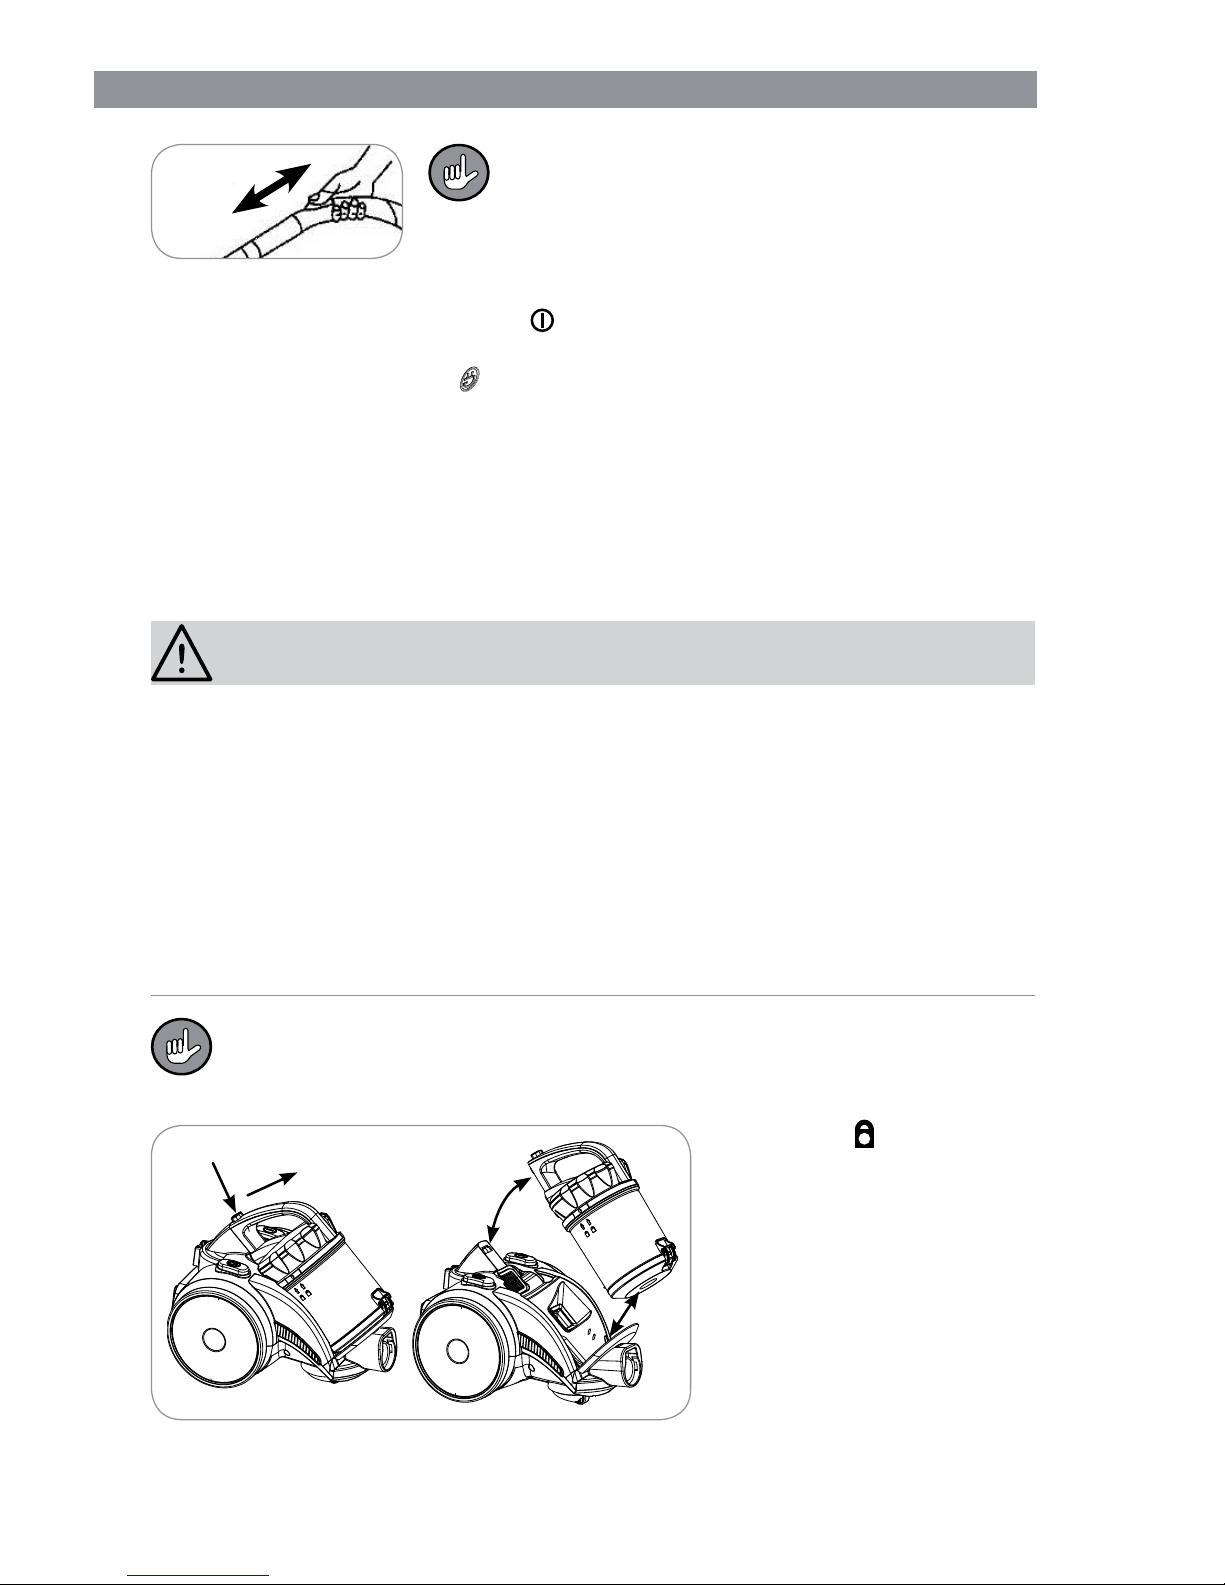
There is an auxiliary airfl ow vent on the handle.
Open this (by sliding the cover) in order to reduce the
suction power when vacuuming upholstery, carpets
or lightweight, easily movable objects. The auxiliary
airfl ow vent should normally be kept closed so that
the suction power is not unnecessarily reduced.
6. After vacuum cleaning, press the
On/Off switch again to turn off the device.
7. Remove the mains plug from the mains socket, hold on to the mains cable and press
the cable retraction button
with your foot. By holding the mains cable, you prevent
it from lashing against body parts such as your legs.
8. Do not allow the dust container to get too full. Empty it after each use if possible and
clean the cyclone insert and the fi lters regularly in order to prevent the motor from
overheating (see chapter “Cleaning the Device and Accessories”). For optimum performance, empty the dust container after each use.
Cleaning the Device and Accessories
ATTENTION!
■ Empty it after each use if possible and clean the cyclone insert and fi lters regularly
in order to prevent the motor from overheating.
■ Prior to cleaning the device, always pull the mains plug out of the socket.
■ Keep the device, the mains cable and the mains plug away from water or other liq-
uids in order to avoid the risk of electrical shock. When cleaning the vacuum cleaner
make sure that no liquid gets into the device. Only the fi lters may be cleaned with
water. However, when fi tted back into the device they must be completely dry.
■ The fi lters are not suitable for the washing machine, dishwasher or dryer! Only air
dry the fi lters and do not under any circumstances use a hair dryer.
■ Do not use any corrosive or abrasive cleaners or cleaning pads for cleaning. They
could damage the surface.
Over time the fi lters may become discoloured. This is normal and does not
affect the functionality.
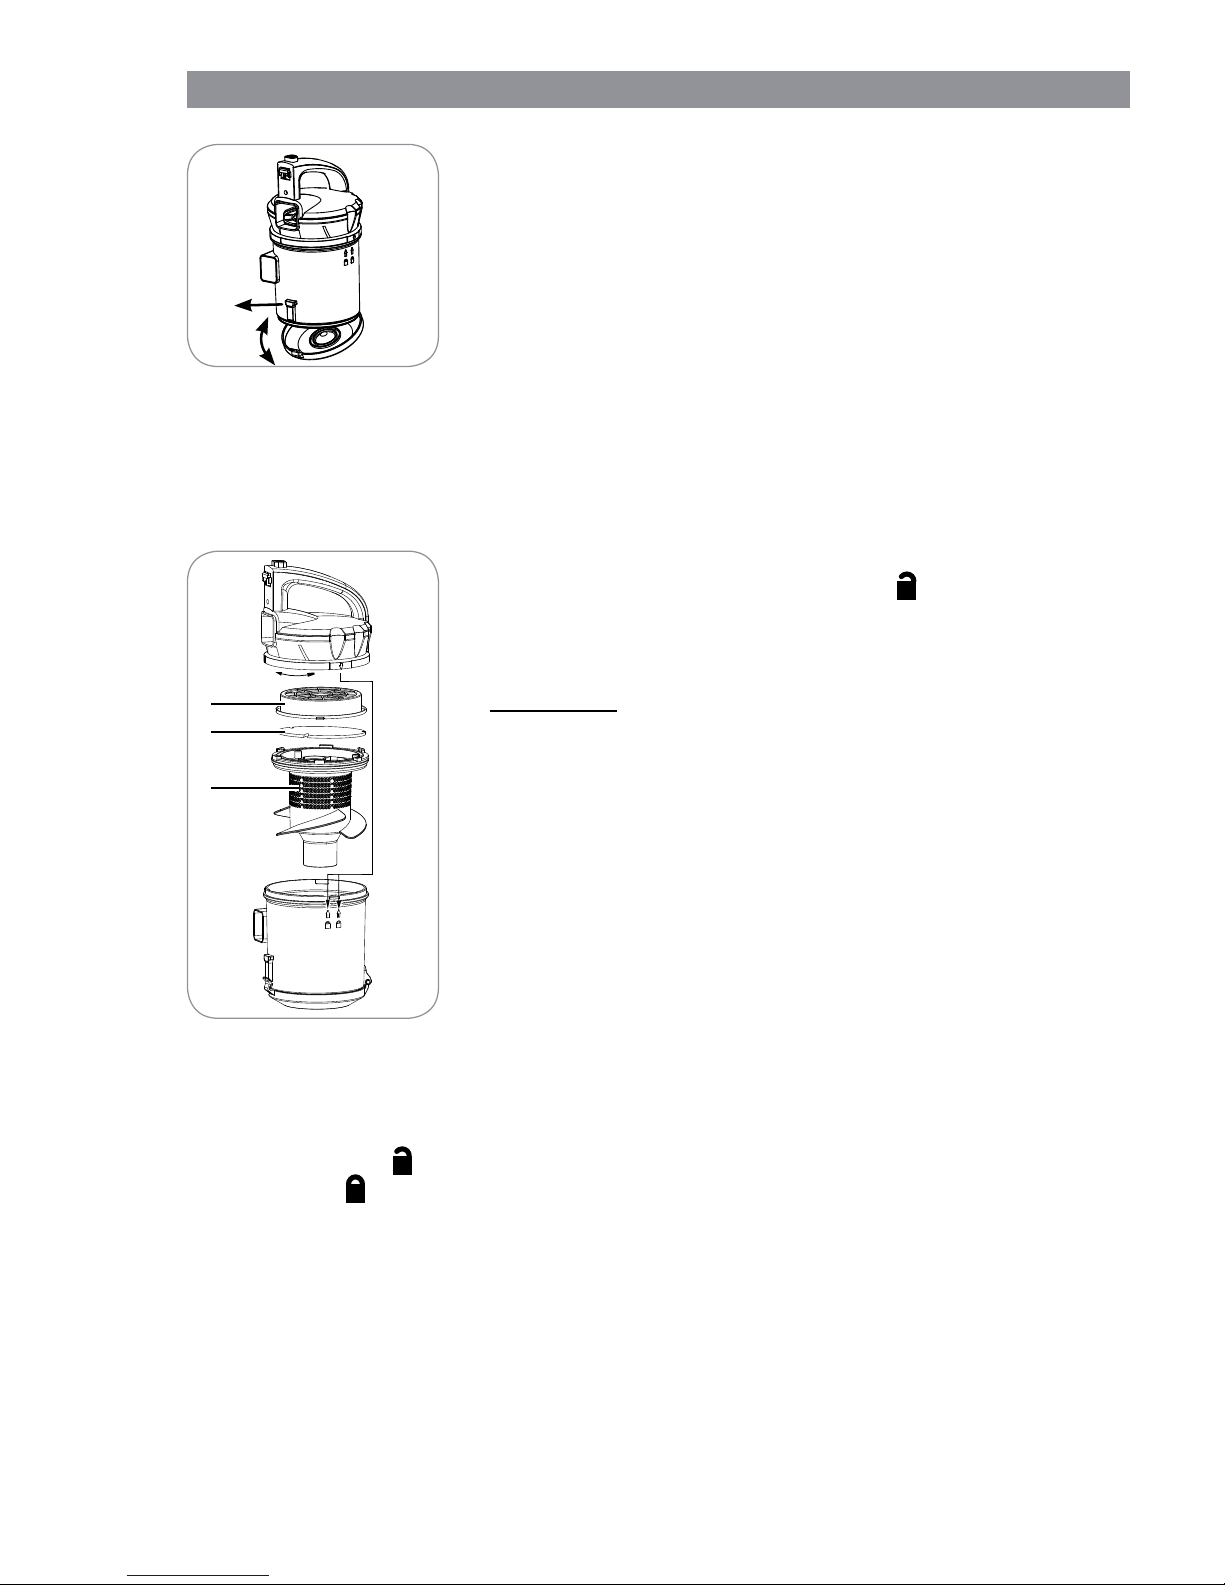
Emptying the Dust Container
1. Press the release button
on the dust container handle
and remove the dust container.
2. Hold the dust container over
an open dustbin. The distance between the dust container and the dustbin should
be as short as possible to
ensure that the dust from the
dust container falls into the
dustbin only and does not
spill into the environment.
Page 21
21 EN
3. Pull the catch away from the dust container. The bottom of
the dust container will open and the dirt will fall out.
4. Close the bottom of the dust container again. The fastener must be heard to engage in place.
5. Plug the closed dust container into the motor unit. Press
the dust container handle against the housing until it engages audibly.
Cleaning the Dust Container Cyclone Insert and Motor Filters
The cyclone insert is located in the dust container. The motor fi lters (HEPA and foam
fi lter) are seated on the cyclone insert (20).
1. Remove the dust container from the device and empty it (see the “Emptying the Dust
Container” section).
2. Turn the lid of the dust container until the arrow marked
on the edge of the lid is pointed to the
symbol on the
dust container. Then, remove the lid.
3. Turn the HEPA fi lter (18) a little in an anticlockwise direc-
tion and remove it.
Please note: The HEPA fi lter is attached to the fi lter hold-
er and cannot be taken out of the holder!
4. Remove the foam fi lter (19).
5. Carefully remove the cyclone insert from the dust container. For this put your hand into the
dust container and push
the
cyclone insert up.
6. Tap out all the parts over a dustbin and brush off the loose
dirt.
7. If necessary, thoroughly rinse the fi lters using clear, luke-
warm water. CAUTION: Do not use any cleaning agent!
Then shake off any excess water and let the fi lters dry
completely in the air.
8. Clean the cyclone insert and dust container with a damp cloth.
9. When all parts are dry, reassemble them. CAUTION: Under no circumstances
should you place damp device parts into the dust container!
10. Place the lid onto the dust container so that
the arrow marked on the edge of the lid
is pointed to the
symbol on the dust container. Then
turn the lid as far as it will go
towards the
symbol
.
11. Insert the dust container into the device. Make sure that it audibly locks in place.
18
19
20
Page 22
EN 22
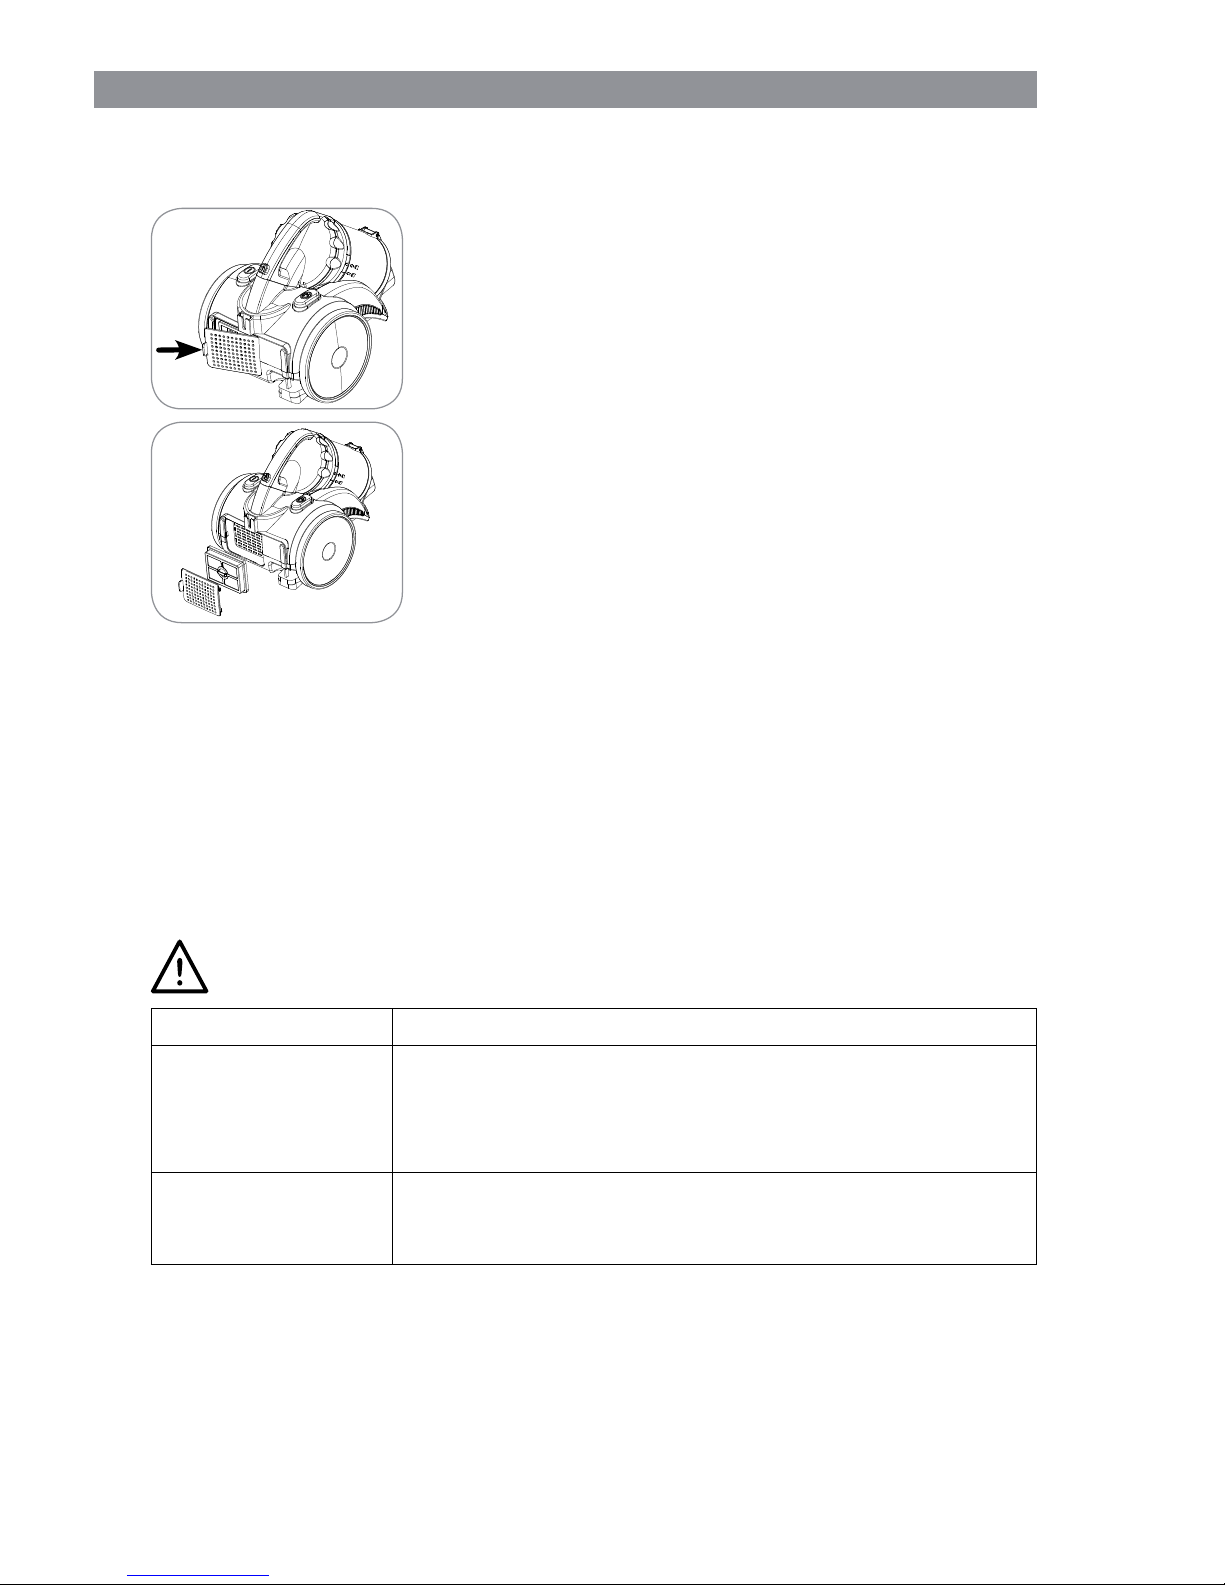
Cleaning the Exhaust Air Filter
The exhaust air fi lter is located on the back of the vacuum cleaner.
1. Press the catch towards the exhaust air grille and remove
it.
2. Take out the fi lter, tap it out over a dustbin and brush off
the loose dirt. You can also rinse the fi lter with clear, luke-
warm water. CAUTION: Do not use any cleaning agent!
Then shake off any excess water and let the fi lter dry
completely in the air.
3. If necessary, brush or wipe the fi lter compartment clean.
4. Insert the fi lter into the fi lter compartment.
5. Insert the exhaust air grille into the device and then fl ip
it shut.
Cleaning the housing and nozzles
• If needed, clean the housing with a damp, soft cloth.
• Regularly remove hair and lint from the nozzles.
Troubleshooting
If the device should stop working properly, fi rst check whether you are able to correct
the problem yourself.
Do not attempt to repair a defective electrical device yourself!
Problem Possible cause/solution
The vacuum cleaner has no suction
power.
• Is the mains plug not correctly connected with a socket?
Correct the position of the mains plug.
• Is the socket defective? Try another socket.
• Check the fuse for your mains connection.
The dust container
cannot be inserted.
• Is the lid correctly attached to the dust container? The
dust container must be closed correctly to allow it to be
inserted.
Page 23
23 EN
Problem Possible cause/solution
The suction performance is poor.
• Is the auxiliary air vent on the handle open? Close it.
• Is the dust container too full? Empty the container.
• Are the fi lters heavily laden with dirt? Clean the cyclone
insert and the fi lters.
• Is the nozzle, telescopic tube or suction hose clogged?
Turn the device off, pull the mains plug out of the socket
and remove the obstruction.
The device emits
dust when vacuuming.
• Has the dust container not been closed properly and/or is
it not (properly) inserted in the device? Correct this.
• Are the fi lters heavily laden with dirt? Clean the cyclone
insert and the fi lters.
The mains cable
will not completely
retract.
• The mains cable has not been correctly retracted into the
device. Pull it out a little and press the cable retraction
button
again.
An unpleasant odour
develops when vacuuming.
• Are you using the device for the fi rst time? An odour often
develops when using new devices for the fi rst time. The
odour should disappear once you have used the device
a few times.
Technical Data
Article number: Z 08183
Model number: PC-C008
Voltage supply: 230 V~, 50 Hz
Power: 750 W
Protection class: II
Dust container capacity: 2 l dust
Cable length : 5 m
Disposal
The packaging material is recyclable. Please dispose of it in an environmentally
friendly manner and take it to a recycling centre.
Dispose of the article in an environmentally friendly manner. It should not be
disposed of in the normal household waste. Please dispose of it at a recycling
centre for used electrical and electronic devices. You can obtain more information from your local authorities.
Customer Service / Importer:
DS Produkte GmbH
Am Heisterbusch 1
19258 Gallin
Germany
Tel.: +49 38851 314650
(Calls to German landlines are
subject to charges. The cost varies
depending on the service provider.)
All rights reserved.
Page 24
FR 24
Utilisation adéquate
• Cet appareil est destiné à aspirer de la poussière ménagère normale.
N’aspirez en aucun cas les choses suivantes :
– des liquides et les substances humides (p. ex. le shampooing à moquette
humide)
– de la cendre incandescente, des mégots de cigarettes, des allumettes etc.
– des matières infl ammables
– de la poussière très fi ne (p. ex. de la poussière de béton), des cendres ou du
toner
– des objets pointus et durs, comme, p. ex., de gros débris de verre
• L’appareil est destiné à un usage en privé, pas pour une utilisation commerciale.
• Utilisez l’appareil uniquement comme la description du mode d’emploi. Toute autre
utilisation est considérée comme contraire aux dispositions.
• Sont exclus de la garantie tous les défauts causés par une manipulation non appropriée, par un dommage ou par des tentatives de réparation par un tiers. Ceci est
aussi valable pour l’usure normale.
Explication des
symboles utilisés
Consignes de sécurité :
Lisez attentivement ces
consignes de sécurité et
observez-les minutieusement afi n d’éviter tout
risque de blessure ou de
dégâts matériels.
Informations complémentaires
Classe de protection II
Chère cliente, cher client,
Nous vous félicitons d’avoir fait l’acquisition de cet aspirateur cyclone. Veuillez lire
attentivement le présent mode d’emploi avant la première utilisation de l’appareil et
le conserver précieusement pour toute consultation ultérieure. Si vous donnez ou
prêtez cet appareil à une tierce personne, n’oubliez pas d’y joindre ce mode d’emploi.
Le fabricant et l’importateur déclinent toute responsabilité en cas de non-observation
des instructions qu’il contient.
Pour toute question concernant l’appareil et ses pièces de rechange et accessoires,
vous pouvez contacter le service après-vente à partir de notre site Internet :
www.service-shopping.de
Sommaire
Utilisation adéquate _____________________ 24
Consignes de sécurité __________________ 25
Composition et vue générale de l’appareil ___ 27
Assemblage __________________________ 28
Usage _______________________________ 30
Nettoyage de l’appareil et des accessoires __ 31
Dépannage ___________________________ 33
Données techniques ____________________ 34
Élimination ____________________________ 34
Page 25

25 FR
Consignes de sécurité
■ Cet appareil peut être utilisé par des enfants à partir de 8 ans
ainsi que par des personnes ayant des capacités physiques,
sensorielles ou mentales réduites ou ayant un manque d’expérience et/ou de connaissance si elles sont surveillées ou si elles
sont reçues des instructions sur la manière d’utiliser l’appareil
en toute sécurité et si elles ont compris les dangers qui peuvent
en résulter.
■ Il est interdit aux enfants de jouer avec l’appareil.
■ Le nettoyage et l’entretien fait par l’utilisateur ne doivent pas être
réalisés par des enfants, sauf s’ils ont plus de 8 ans et qu’ils sont
surveillés.
■ Les enfants de moins de 8 ans et les animaux doivent être tenus
éloignés de l’appareil et du câble d’alimentation.
■ Les enfants doivent être surveillés pour s’assurer qu’ils ne jouent
pas et/ou qu’ils ne se blessent pas avec l’appareil.
■ Utilisez et rangez l’appareil uniquement hors de portée des en-
fants et des animaux. Une utilisation non appropriée peut causer
des blessures et des électrocutions. Même le câble d’alimentation ne doit pas être accessible aux enfants et aux animaux.
■ En l’absence de surveillance et avant l’assemblage, avant le dé-
montage ou le nettoyage, il faut toujours débrancher la prise
électrique de l’appareil.
■ Ne plongez jamais l’appareil, le câble d’alimentation et la fi che
dans de l’eau ou d’autres liquides et assurez-vous qu’ils ne
peuvent pas tomber dans de l’eau ou devenir humides.
■ Lorsque l’appareil, le câble d’alimentation ou la fi che de l’appa-
reil sont endommagés, il faut les faire remplacer par le fabricant
ou le service après-vente ou une personne qualifi ée (p. ex. un
atelier professionnel) pour éviter tout risque.
Risques de blessure
■ Risque d’asphyxie ! Gardez le matériel d’emballage loin des enfants et des animaux.
■ Gardez les animaux, les cheveux, les bijoux, les habits amples, les doigts et les
autres parties du corps éloignés des suceurs de l’appareil. Vous pourriez les aspirer et rester coincé. Cependant, si l’aspirateur devait se bloquer, coupez l’appareil
immédiatement.
Page 26

FR 26
■ Lors du nettoyage de marches d’escalier soyez particulièrement prudent pour ne
pas tomber.
■ Veillez à ce que le câble d’alimentation branché ne soit pas une cause de trébuche-
ment.
Risque d’électrocution et risque d’incendie
■ N’utilisez pas l’appareil en présence de gaz facilement infl ammables dans l’atmos-
phère.
■ Utilisez et entreposez l’appareil uniquement dans des pièces fermées. Ne l’utilisez
pas en plein air ni dans des locaux à taux d’humidité élevé ou encore sur des surfaces chaudes.
■ Ne touchez jamais la fi che électrique, le câble d’alimentation ou l’appareil avec les
mains humides.
■ N’aspirez jamais de liquides. Ne versez aucun liquide dans le bac à poussière. N’ex-
posez pas l’unité moteur à l’humidité et ne la mouillez pas non plus.
■ Ne portez pas l’appareil et ne le tirez pas par son câble d’alimentation électrique.
Manipulez toujours le câble avec précaution. Évitez de pincer le câble dans les
portes ou de le tirer sur des coins ou des arêtes vives. Tenez le câble éloigné de
toute surface chaude !
■ Branchez l’appareil uniquement sur une prise dont la tension secteur correspond
aux indications de sa plaque signalétique. La prise doit rester facilement accessible,
même après le branchement. Utilisez uniquement des rallonges conformes dont les
caractéristiques techniques correspondent à celles de l’appareil.
■ Pour votre propre sécurité, contrôlez l’appareil avant chaque utilisation et assu-
rez-vous qu’il ne présente aucun endommagement. N’utilisez l’appareil que s’il ne
présente aucun dommage apparent.
■ Arrêtez l’appareil et retirez la fi che de la prise de courant :
– en cas d’orage ;
– en cas de dommages / dysfonctionnements (par ex. de bruits inhabituels, de déga-
gement d’odeurs suspectes ou de fumées) ;
– en cas d’aspiration de liquides ;
– en cas de chute de l’appareil.
Faites-le réviser par un spécialiste avant de le réutiliser.
■ Avant de retirer la fi che de la prise de courant, ou de la brancher, veillez à ce que
l’interrupteur de l’appareil se trouve en position d’arrêt.
■ Pour extraire la fi che de la prise de courant, tirez toujours sur la fi che, jamais sur le
câble d’alimentation.
Endommagement de l’appareil et dégâts matériels
■ Ne remplissez pas trop le bac à poussière. Videz-le dans la mesure du possible
après chaque utilisation. Les fi ltres doivent également être nettoyés à intervalles
réguliers afi n d’éviter une surcharge du moteur.
■ Après leur lavage, le bac à poussière et les fi ltres doivent être entièrement secs
avant de pouvoir être remis en place.
■ N’utilisez l’appareil que s’il est intégralement et correctement assemblé ! Le bac à
poussière et les fi ltres doivent être montés et en parfait état ! Si de la salissure venait
à pénétrer à l’intérieur de l’appareil, cela pourrait endommager le moteur. N’introdui-
Page 27
27 FR
sez aucun objet dans les orifi ces / le suceur de l’appareil et assurez-vous que ces
derniers ne sont pas obstrués. Ne couvrez jamais les orifi ces d’aération.
■ Utilisez uniquement les accessoires d’origine du fabricant.
■ N’exposez pas l’appareil à des températures extrêmes, à de fortes variations de tempé-
rature, maintenez-le à l’écart de toute fl amme et évitez le rayonnement direct du soleil.
■ Ne faites pas tomber l’appareil et ne lui faites pas subir de chocs violents.
■ Ne posez jamais d’objets lourds sur l’appareil.
■ N’essayez pas de graisser les roulettes avec de l’huile ou tout autre lubrifi ant. Cela
favoriserait l’adhésion de poussière et de saletés sur les roulettes.
■ Lorsqu’il n’est plus utilisé, rangez l’appareil dans un local frais et sec inaccessible
aux enfants et aux animaux.
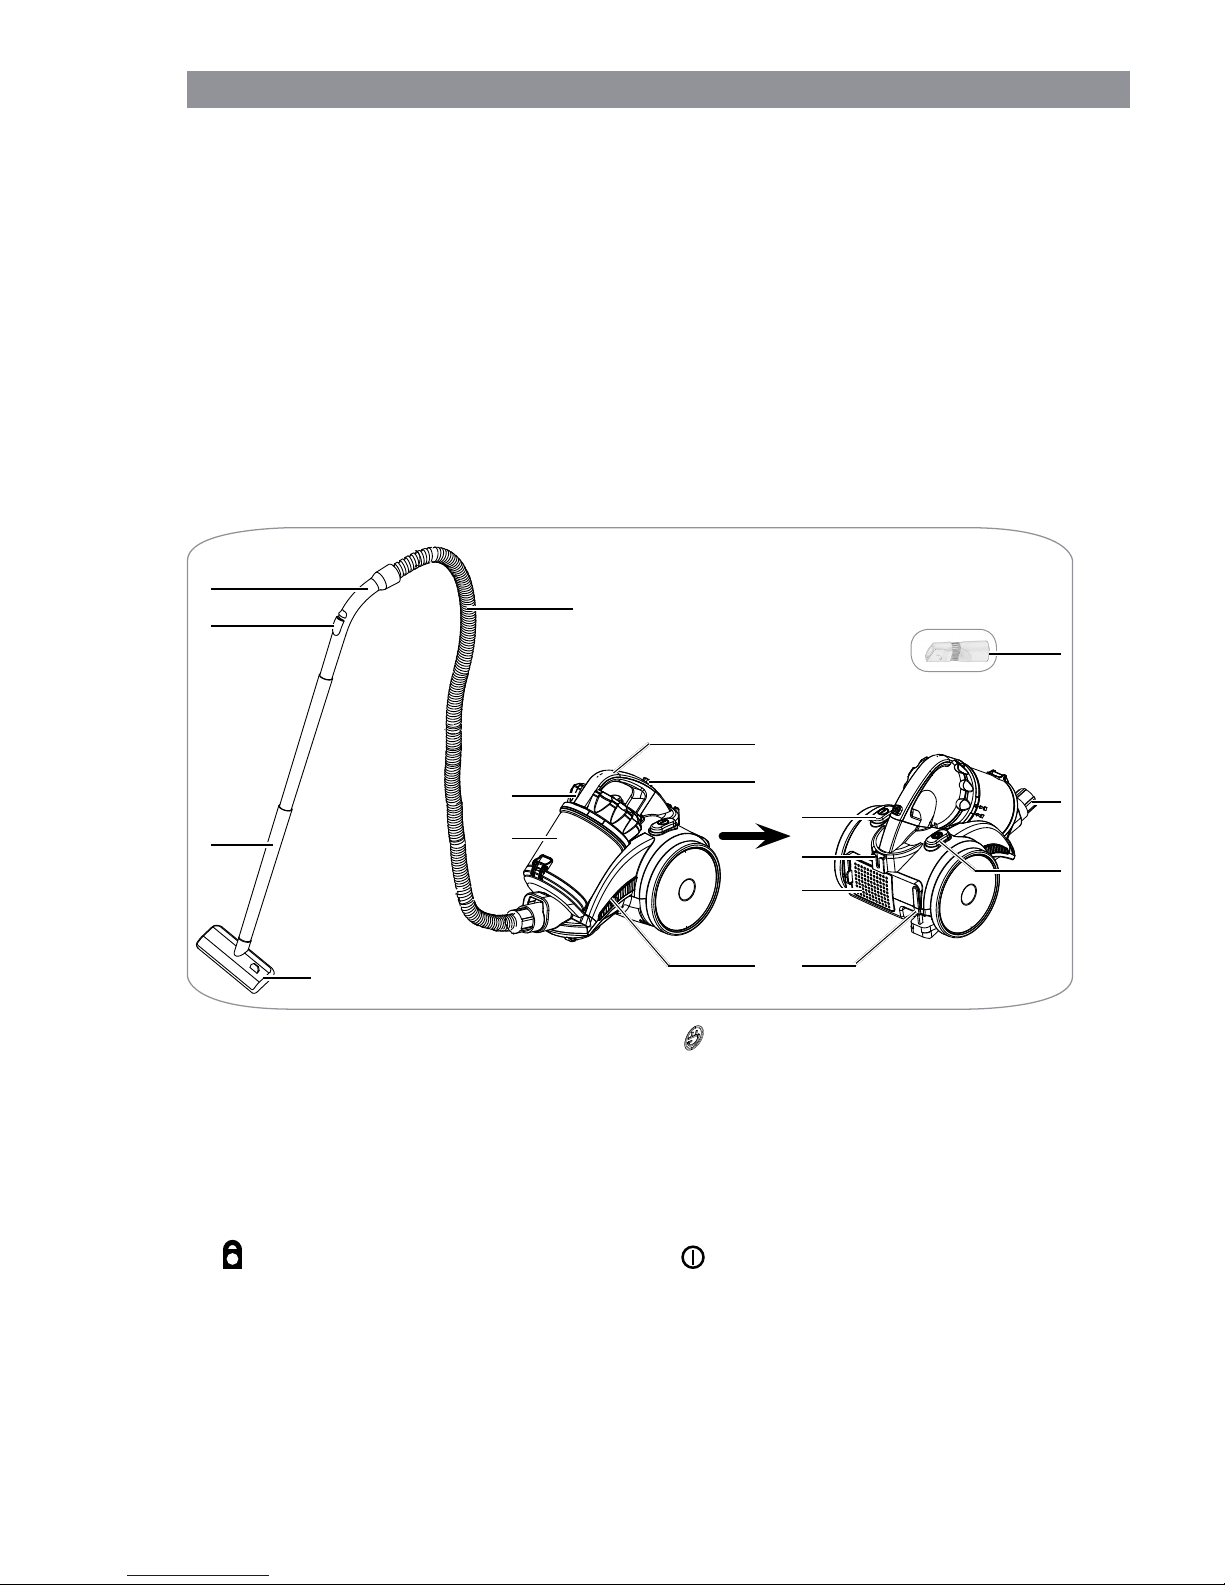
Composition et vue générale de l’appareil
1
5
7
10
15
11
14
2
9
16
12
8
6
1
3
4
13
17
1 Suceur pour sols
2 Tube télescopique
3 Régulateur d’air
4 Poignée
5 Flexible d'aspiration
6 Bac à poussière
7 Couvercle du bac à poussière
8 Poignée du bac à poussière
9
Touche de déverrouillage du bac à
poussière
10 Prise d’aspiration
11
Touche pour l’enroulement du
câble
12 Fiche
13 Unité moteur
14 Grille de souffl age (non illustrée, le
fi ltre de sortie d’air est placé derrière)
15 Support d’accrochage du suceur pour
sols
16
Interrupteur marche/arrêt
17 Suceur combiné (suceur pour fentes à
brosse intégrée)
• Le présent mode d'emploi
Page 28
FR 28
Suceurs
ATTENTION !
■ Avant de remplacer les suceurs, arrêtez toujours l’aspirateur en premier lieu.
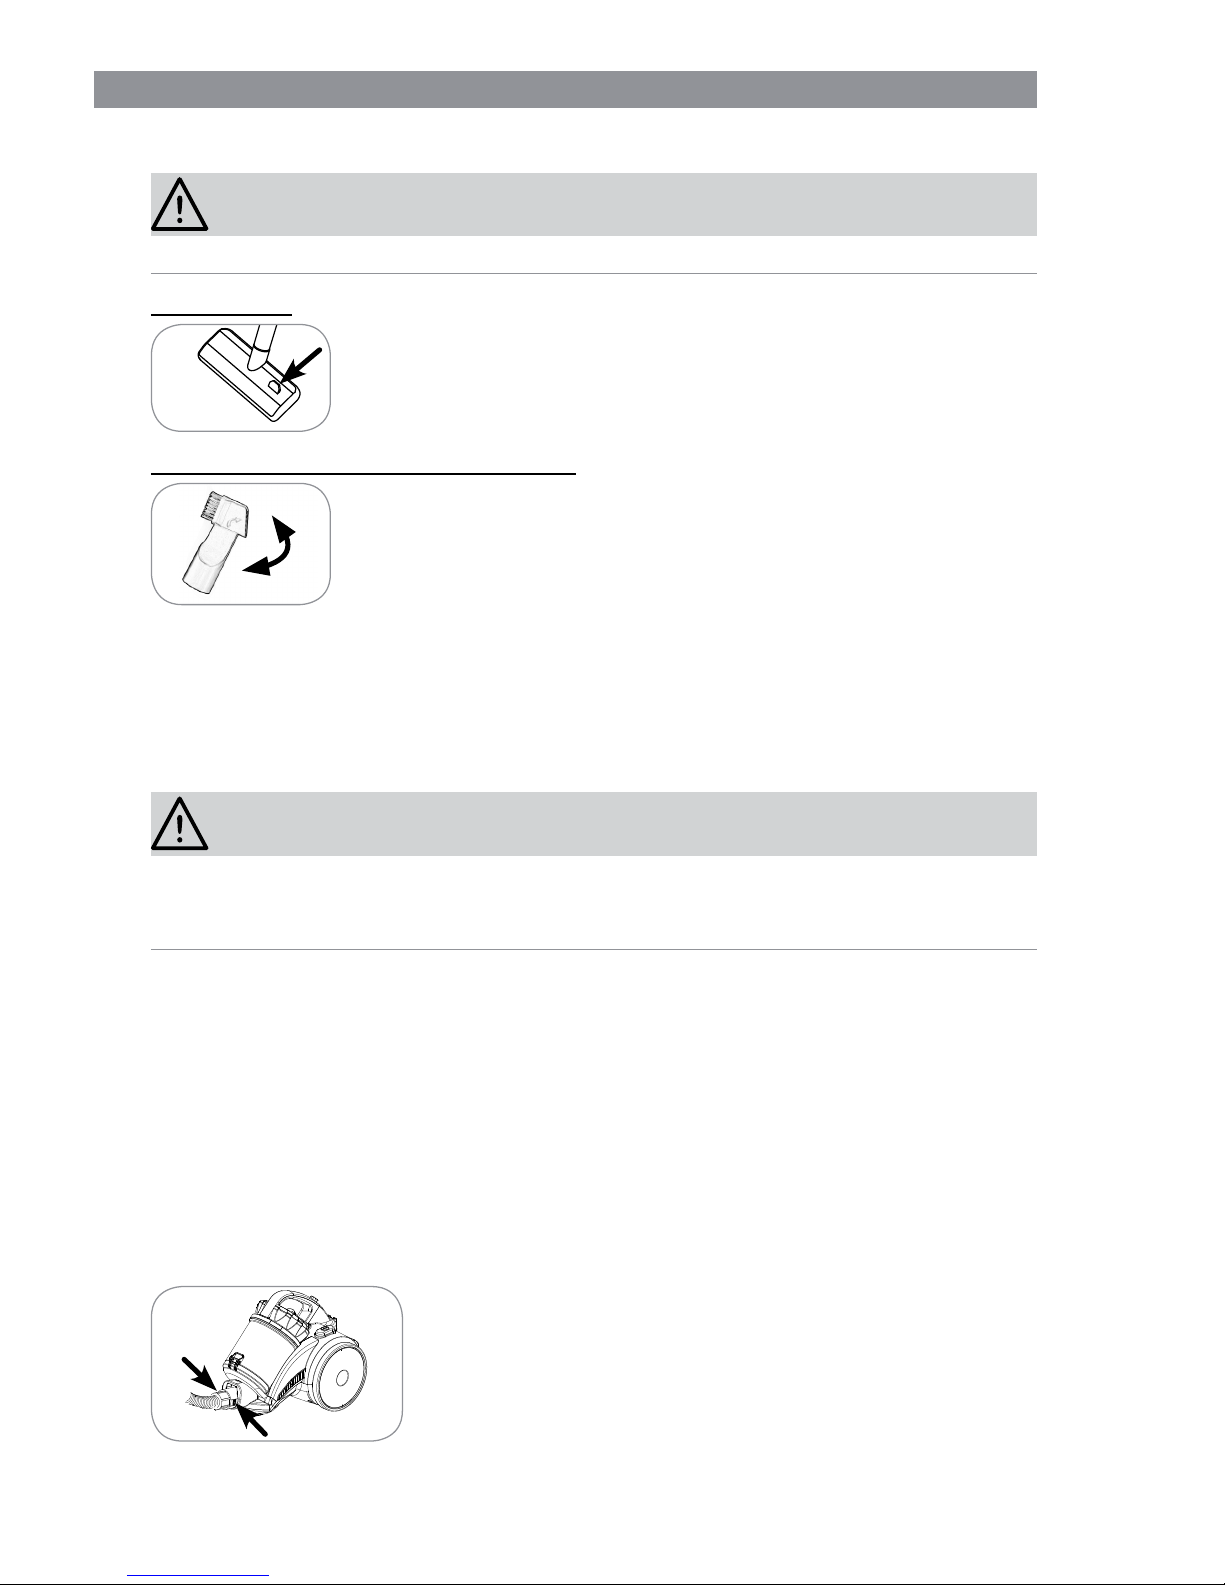
Suceur de sol
Le suceur de sol convient aussi bien aux moquettes qu’aux sols
lisses.
Avec le levier à pédale vous pouvez commuter entre moquette et
sol lisse. Pour les sols lisses, une brosse sort par dessous.
Suceur combiné (Suceur à joint/à brosse)
Rabattez l’extrémité dans le sens de la fl èche et le suceur à joint
devient un suceur à brosse :
• Le suceur de joint convient aux coussins, au nettoyage de l’intérieur de voitures et dans tous les coins que vous ne pouvez pas
atteindre avec les autres suceurs.
• Le suceur à brosse convient à tous les objets irréguliers, les
meubles, les lampes, les baguettes profi lées et les seuils, les
rebords de fenêtres etc.
Assemblage
ATTENTION !
■ Risque d’asphyxie ! Gardez le matériel d’emballage loin des enfants et des animaux.
■ Assurez-vous que l’appareil ne soit pas branché à une prise électrique avant de
placer ou d’enlever un accessoire.
1. Déballez toutes les pièces et vérifi ez l’intégralité de la livraison (voir chapitre « Com-
position et vue générale de l’appareil ») ainsi que les éventuels dommages de transport. Si les composants comportaient des dommages, ne les utilisez pas (!) mais
contactez notre service après-vente.
2. Avant l’utilisation de l’appareil, retirez tous les emballages et les éventuelles étiquettes et sécurisations de transport qui se trouvent sur l’appareil et qui ont servi de
protection pendant le transport ou de support publicitaire.
3. Appliquez le fl exible d’aspiration, le tube télescopique ou un suceur sur l’unité mo-
teur (cf. ci-dessous).
Montage / démontage du fl exible d’aspiration
• Insérez le raccord du fl exible d’aspiration dans l’ouverture
d’aspiration. Celui-ci doit s’enclencher.
• Pour enlever le fl exible d’aspiration, enfoncez les touches
de déverrouillage situées sur le raccord, et extrayez le
fl exible.
Page 29
29 FR
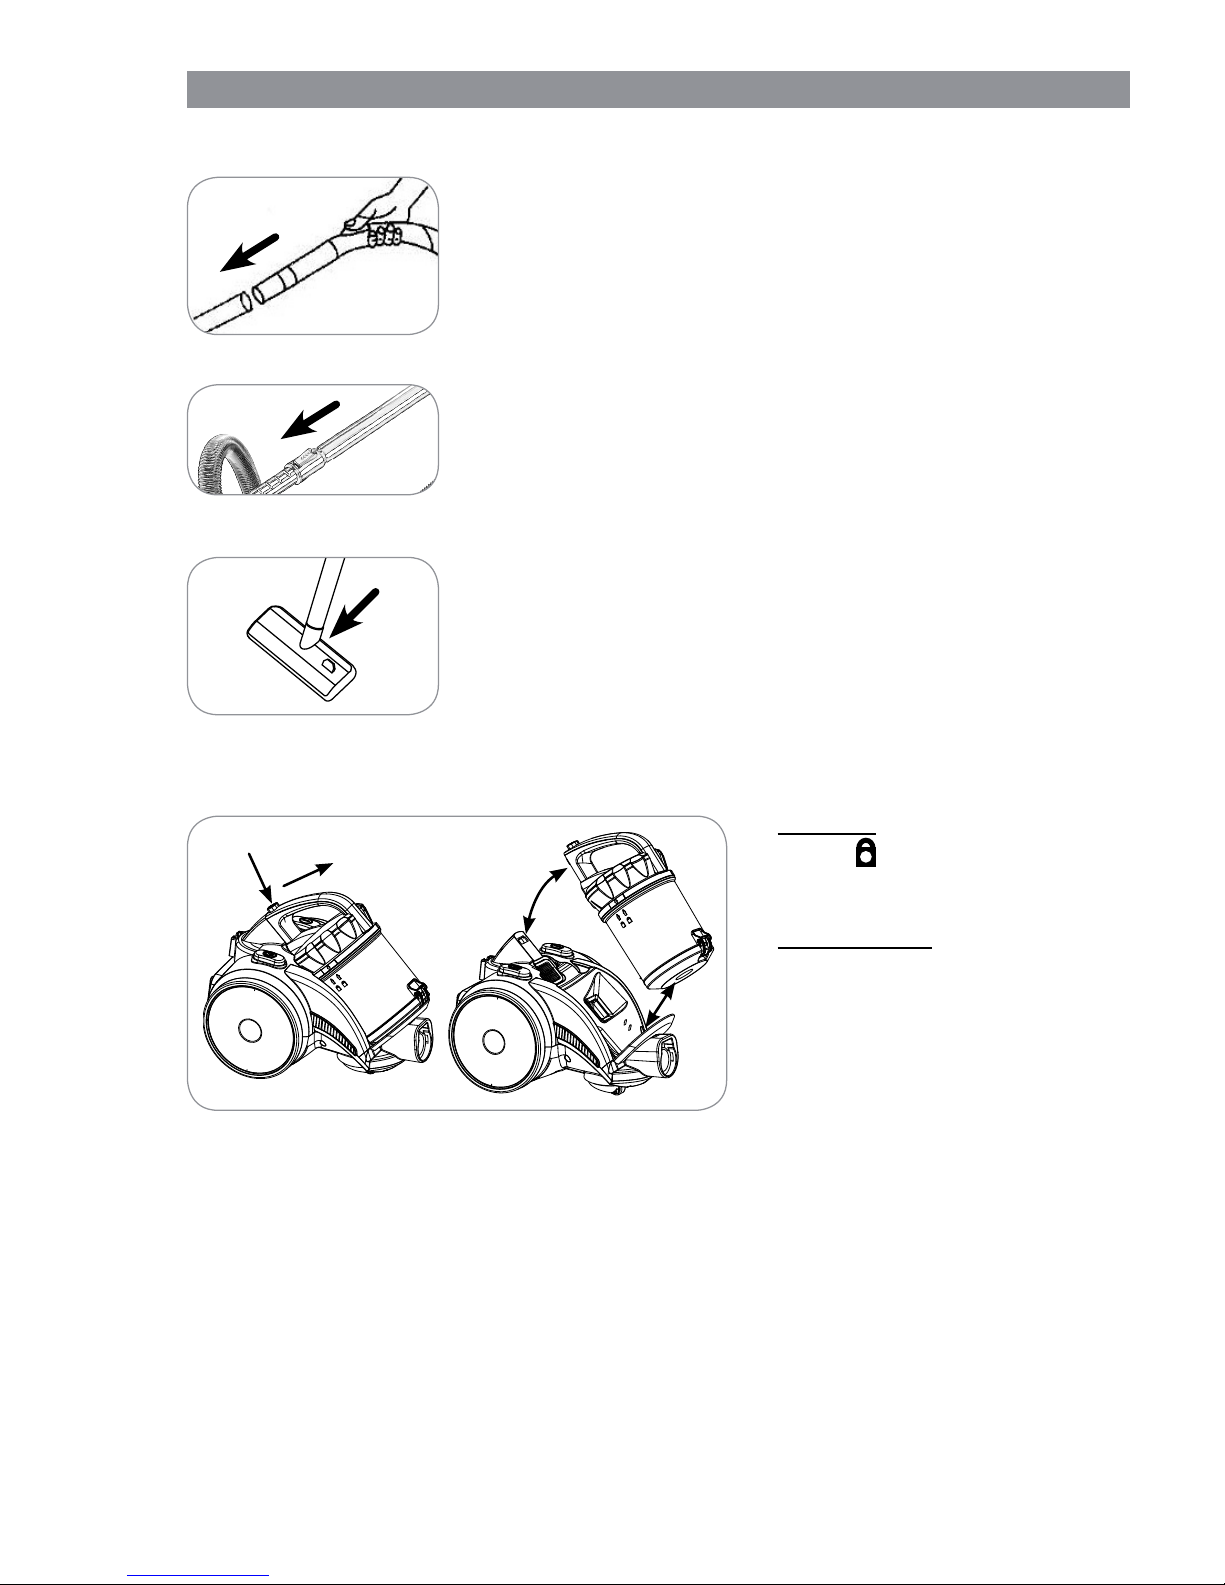
Mettre en place/retirer le tube télescopique
• Introduisez l’extrémité ouverte de la poignée dans l’ouver-
ture du tube télescopique. Pour ce faire, tournez légèrement la poignée d’un côté et de l’autre. Vérifi ez que l’as-
semblage soit bien en place.
• Pour retirer le tube télescopique, retirez-le de la poignée.
Régler la longueur du tube télescopique
• Poussez le coulisseau sur le tube télescopique et réglez la
longueur souhaitée.
• Relâchez le coulisseau et poussez encore un peu le tube
jusqu’à ce qu’il s’enclenche.
Mise en place / retrait des suceurs
• Insérez l’un des suceurs fournis en butée à l’extrémité
libre du tube télescopique. À cet effet, effectuez des légers
mouvements de va-et-vient avec le suceur.
• Pour plus de fl exibilité, les suceurs peuvent également
être directement placés sur la poignée du fl exible d’aspi-
ration sans l’intermédiaire du tube télescopique.
• Pour enlever un suceur, retirez-le simplement.
Mise en place / retrait du bac à poussière
• Retrait : déverrouillez la
touche
se trouvant sur la
poignée du bac à poussière
et retirez le bac.
• Mise en place : placez le bac
à poussière fermé sur l’unité
moteur. Enfoncez la poignée
du bac à poussière en direction du bâti jusqu’à ce qu’elle
produise un déclic audible indiquant qu’elle est en place.
Page 30
FR 30
Usage
ATTENTION !
■ Pendant l’utilisation, ne tenez jamais les suceurs à proximité de parties du corps ou
d’animaux et ne mettez pas les doigts à l’intérieur. Vous pourriez les aspirer/vous
blesser. Si vous deviez bloquer l’aspirateur, arrêtez immédiatement l’appareil (Appuyer sur
l’interrupteur Marche/Arrêt).
■ Ne mettez l’aspirateur en marche que si vous êtes certain que toutes les pièces sont
entièrement montées et que tous les fi ltres sont correctement en place.
■ Pour que le câble d’alimentation ne chauffe pas pendant le fonctionnement, tirez au
moins deux tiers de sa longueur totale hors de l’appareil avant de mettre l’aspirateur
en marche. Ne tirez pas sur le câble d’alimentation avec violence jusqu’à la butée
(pas plus loin que la marque rouge sur le câble) afi n d’éviter tout dommage !
■ Arrêtez d’abord l’appareil et débranchez ensuite la fi che électrique avant de retirer
ou placer un suceur ou tout autre accessoire !
■ N’aspirez en aucun cas les choses suivantes :
– des liquides et les substances humides (p. ex. le shampooing à moquette humide)
– de la cendre incandescente, des mégots de cigarettes, des allumettes etc.
– des matières infl ammables
– de la poussière très fi ne (p. ex. de la poussière de béton), des cendres ou du toner
– des objets pointus et durs, comme, p. ex., de gros débris de verre
1. Si ce n’est pas encore fait, placez le suceur d’aspiration souhaitée sur le tube télescopique respectivement le tuyau d’aspiration (voir chapitre « Assemblage », paragraphe « Mise en place / retrait des suceurs »).
2. Sortez le câble d’alimentation de l’appareil, de préférence jusqu’à la marque jaune,
mais pas plus loin que la marque rouge sur le câble !
3. Branchez la fi che dans une prise électrique correctement installée et bien accessible.
4. Appuyez sur l’interrupteur Marche/Arrêt pour mettre l’aspirateur en marche.
5. Passer le suceur sur la surface à nettoyer. En aspirant, l’aspirateur peut être tiré
comme un traîneau.
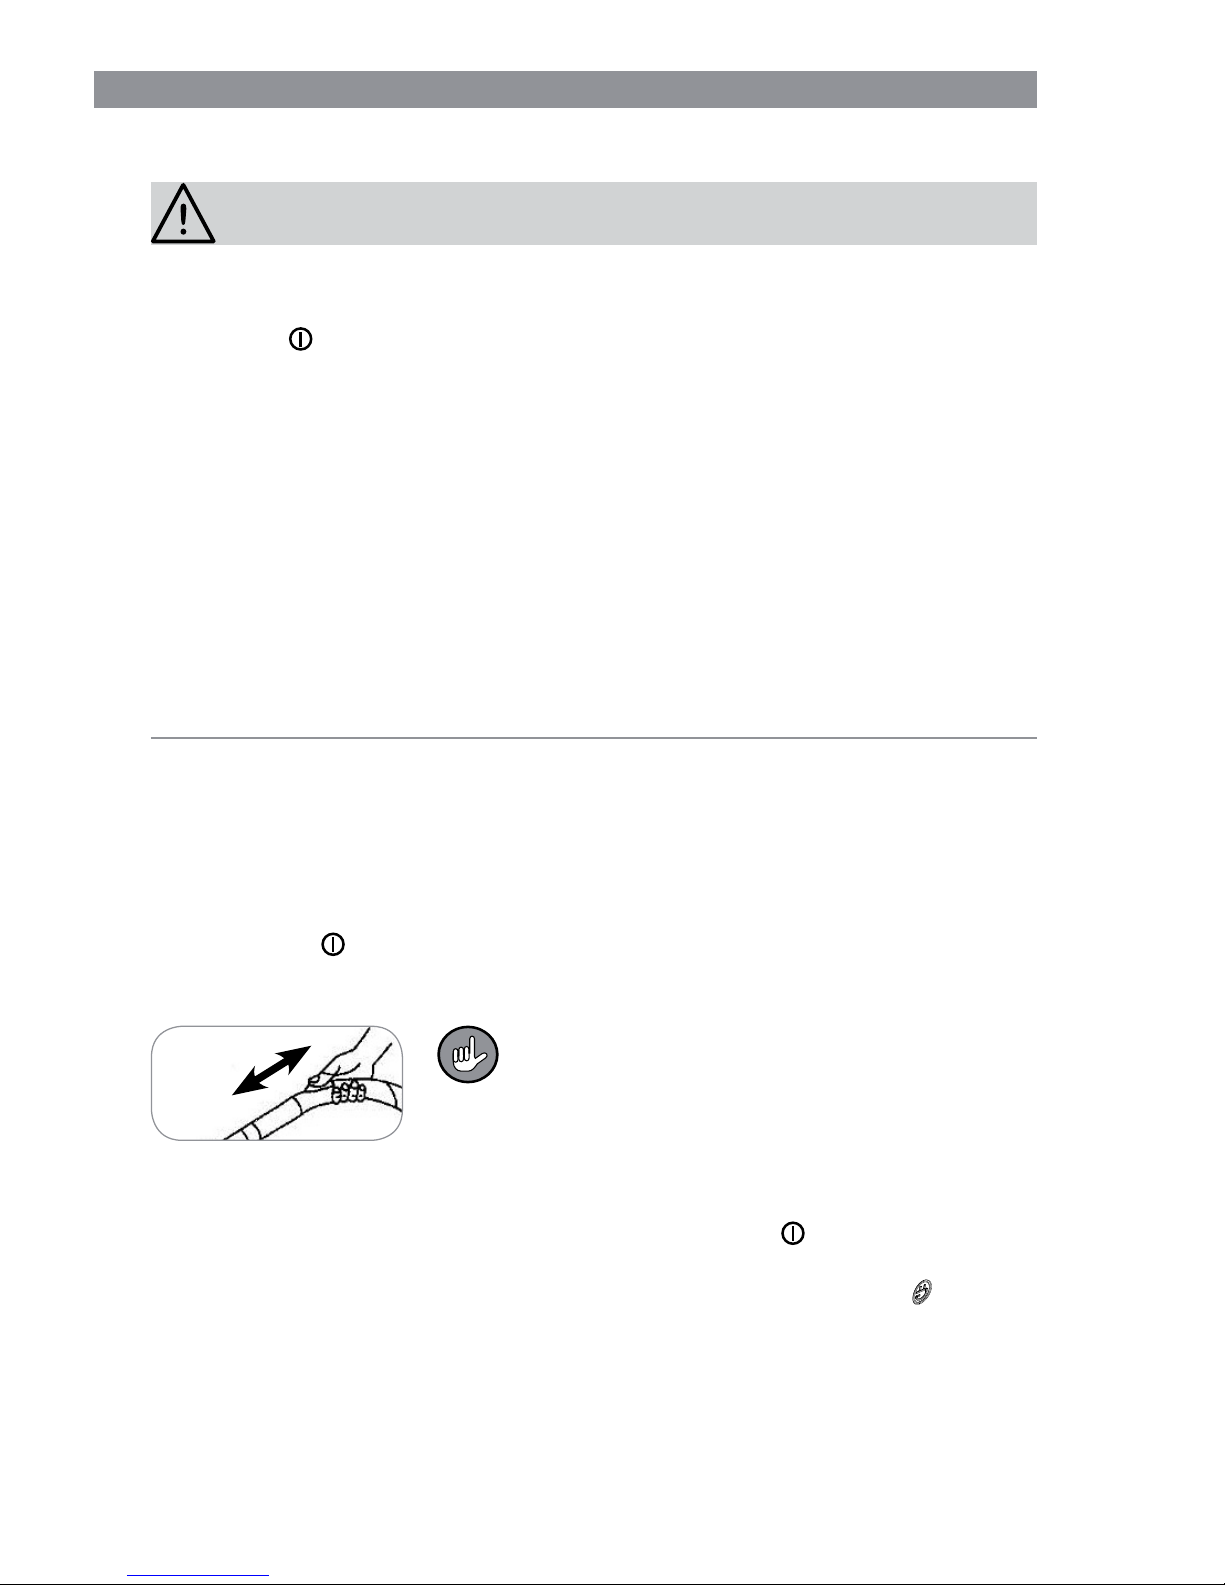
Un régulateur d’air se trouve sur la poignée. Ouvrez-le (en poussant la tirette) pour diminuer la force
d’aspiration lorsque vous aspirez des coussins, des
moquettes ou des objets légers ou mobile.
Normalement, le régulateur d’air doit rester fermé
pour que la force d’aspiration ne soit pas inutilement
diminuée.
6. Après avoir passé l’aspirateur, appuyez de nouveau sur
l’interrupteur Marche/
Arrêt pour éteindre l’appareil.
7. Tirez la fi che de la prise électrique, maintenez le câble et appuyez sur
la touche
de l’enrouleur de câble avec le pied. En maintenant le câble d’alimentation, vous
évitez « l’effet de fouettement » du câble p. ex. contre vos jambes.
8. Ne remplissez pas trop le bac à poussière. Videz-le dans la mesure du possible
après chaque utilisation et nettoyez régulièrement le cyclone et les fi ltres pour éviter
toute surchauffe du moteur (voir chapitre « Nettoyage de l’appareil et des accessoires »). Pour que l’appareil donne toute sa puissance, videz après chaque usage
le réservoir de poussière.
Page 31
31 FR
Nettoyage de l’appareil et des accessoires
ATTENTION !
■ Videz-le dans la mesure du possible après chaque utilisation et nettoyez régulière-
ment le cyclone et les fi ltres pour éviter toute surchauffe du moteur.
■ Débranchez toujours la prise électrique avant de nettoyer l’appareil.
■ Gardez le corps de l’appareil, le câble d’alimentation et la fi che électrique éloignés
de l’eau et d’autres liquides pour éviter toute électrocution. Lors du nettoyage, veillez
à ce qu’aucun liquide ne pénètre dans le corps de l’appareil. Seuls les fi ltres peuvent
être nettoyés à l’eau. Mais lorsque vous utilisez l’appareil, ils doivent être tota-
lement secs.
■ Le fi ltres ne peuvent être ni lavés en machine, ni en lave-vaisselle ni séchés en sé-
choir ! Séchez les fi ltres exclusivement à l’air libre, en aucun cas avec un sèche-che-
veux.
■ Pour le nettoyage, n’utilisez aucun détergent ni serviette de nettoyage agressif ou
abrasif. Ceux-ci pourraient endommager la surface.
Avec le temps, les fi ltres peuvent changer de couleur. Ceci est normal et n’in-
fl uence en rien la fonctionnalité de l’appareil.
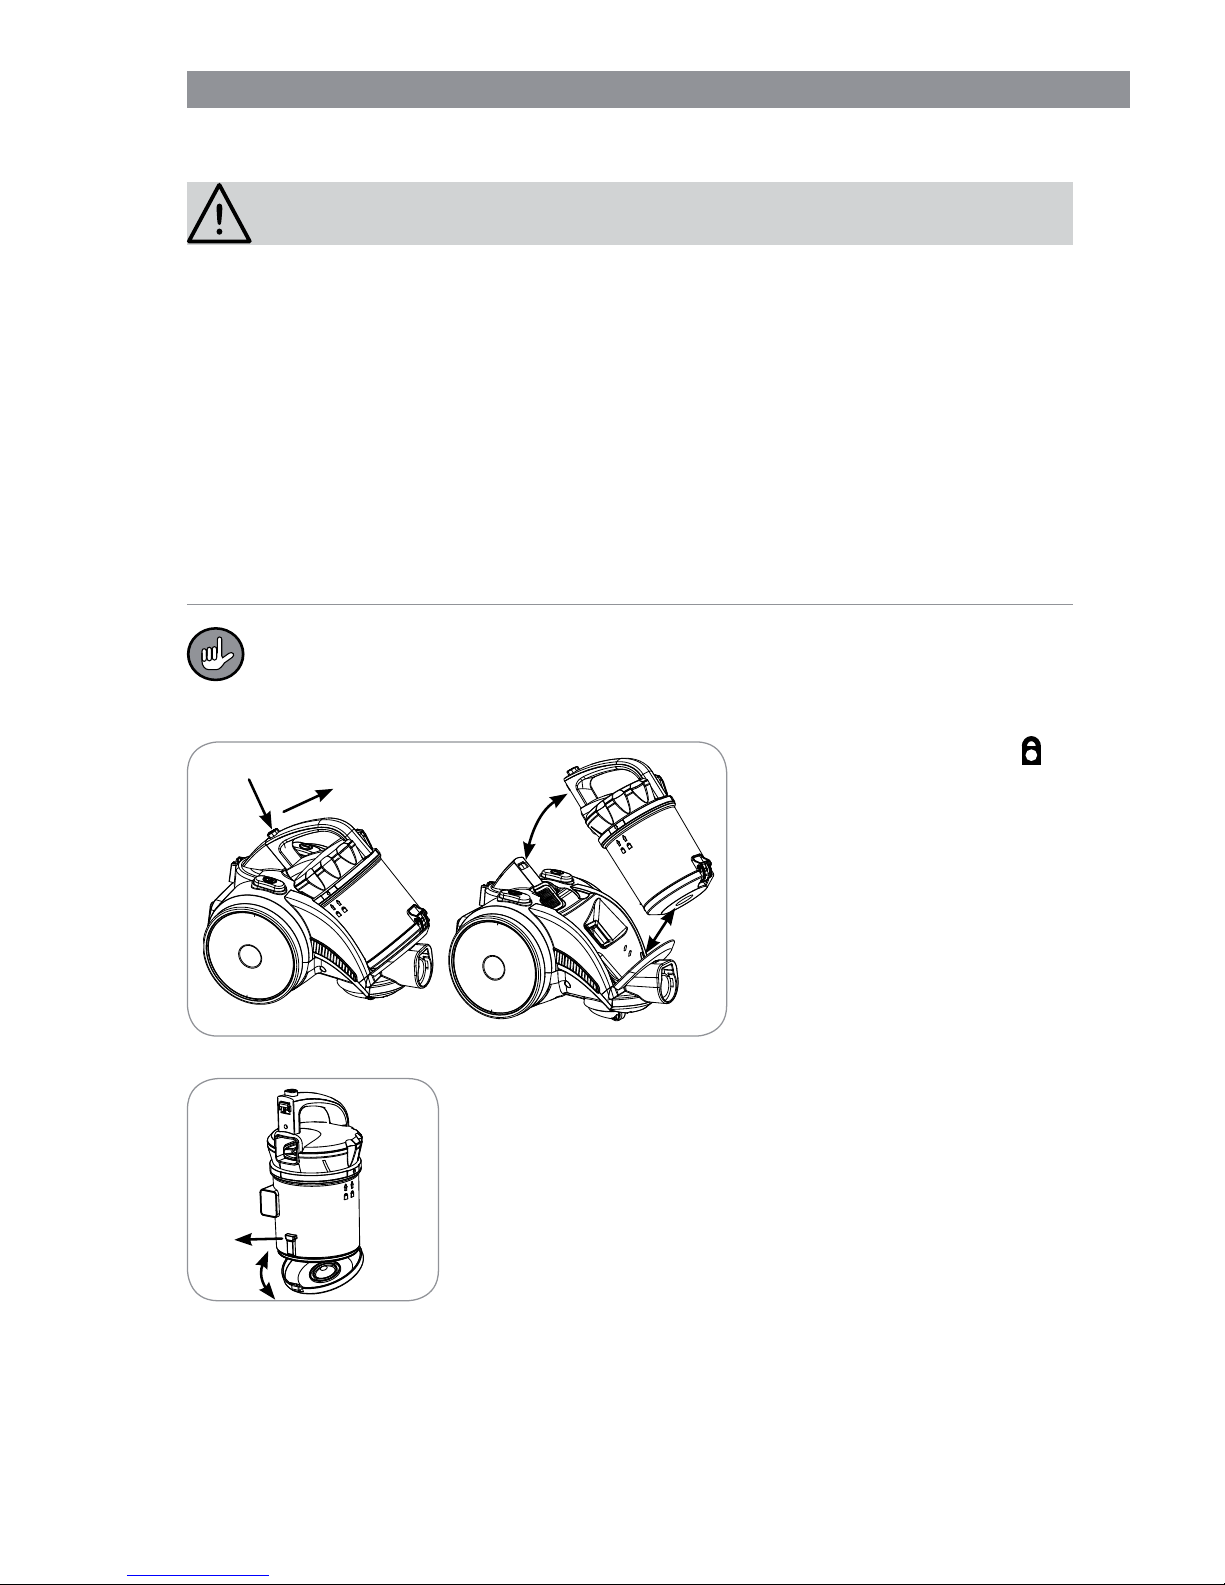
Vidage du bac à poussière
1. Déverrouillez la touche se
trouvant sur la poignée du
bac à poussière et retirez le
bac.
2. Tenez le bac à poussière
au-dessus d’une poubelle
ouverte. La distance avec la
poubelle doit être aussi réduite que possible afi n que
la poussière du bac tombe
dans la poubelle et ne se répartisse pas autour.
3. Tirez la fermeture du bac à poussière. Le fond du bac à
poussière s’ouvre et les saletés tombent.
4. Rabattez le fond du bac à poussière. La fermeture doit
s’enclencher en produisant un déclic audible.
5. Insérez le bac à poussière fermé dans l’unité moteur. Enfoncez la poignée du bac à poussière en direction du bâti
jusqu’à ce qu’elle produise un déclic audible indiquant
qu’elle est en place.
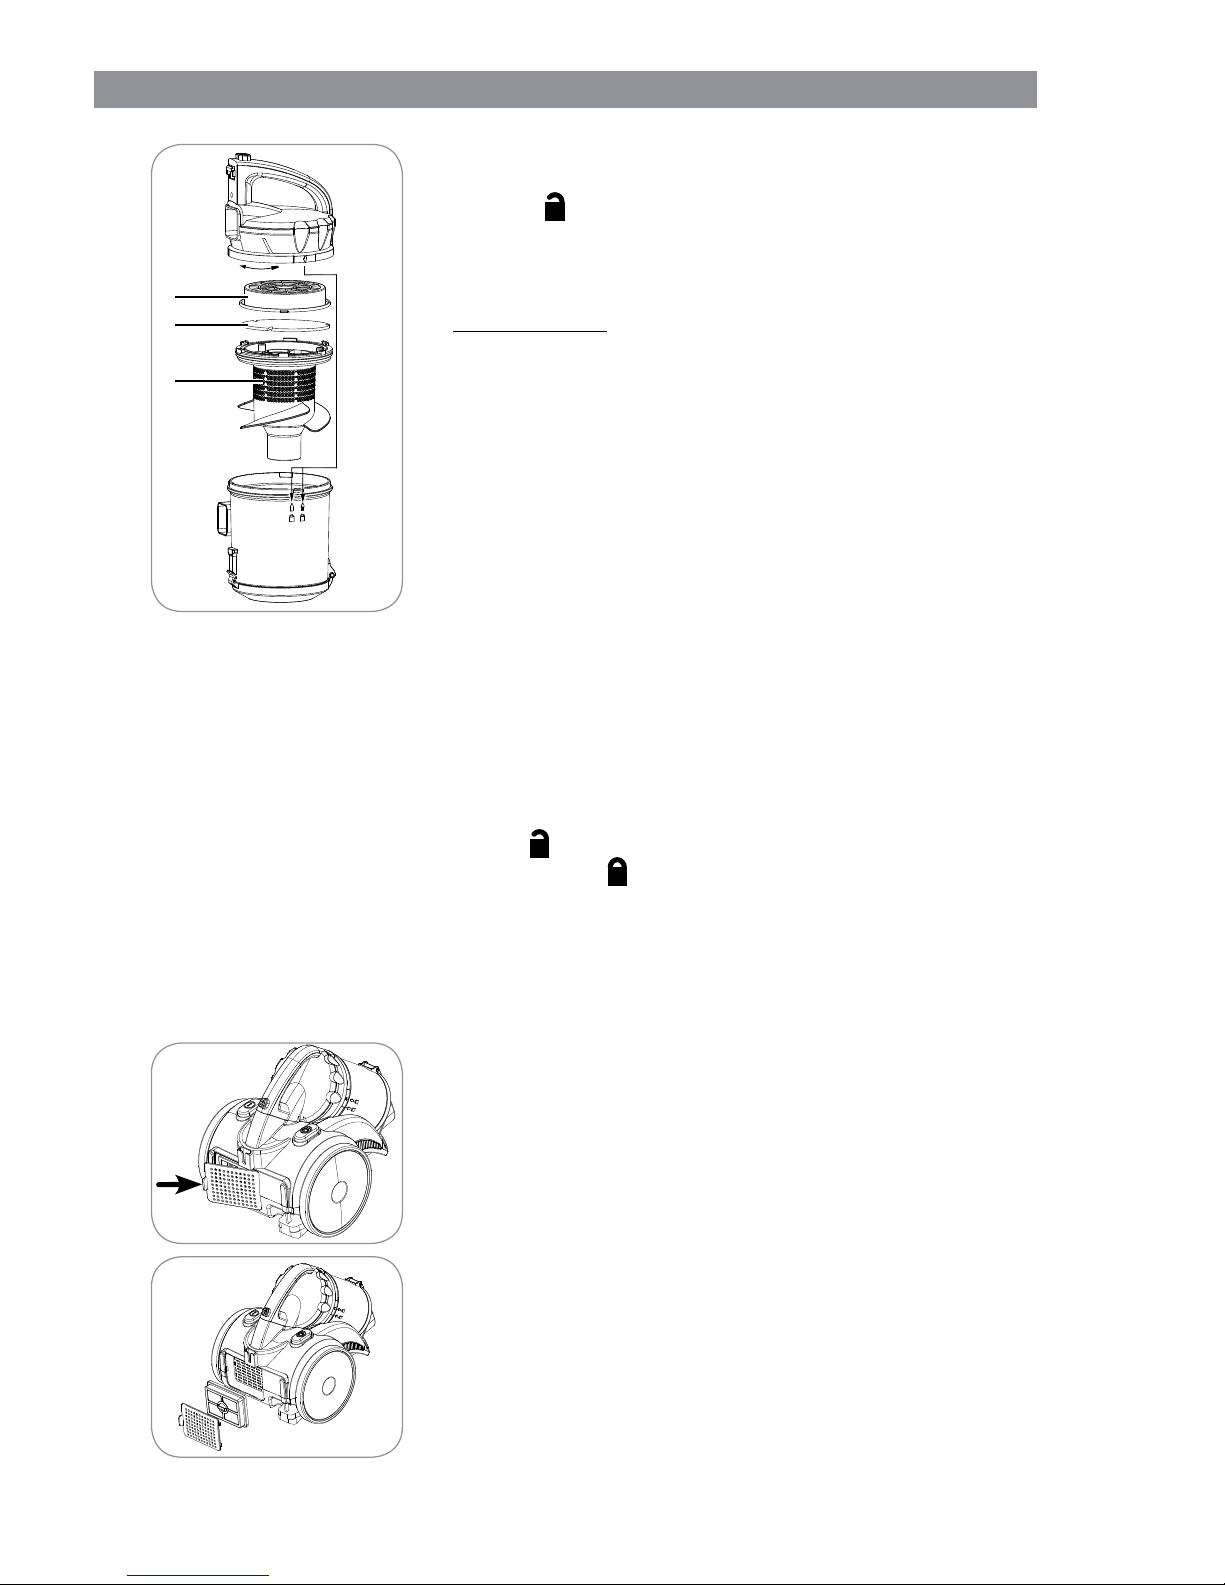
Nettoyage du bac à poussière, de l’embout cyclonique et des fi ltres moteur
L’embout cyclonique se trouve dans le bac à poussière. Les fi ltres moteur (fi ltre HEPA
et fi ltre en mousse) sont logés sur l’embout cyclonique (20).
1. Retirez le bac à poussière de l’appareil et videz-le (voir section « Vidage du bac à
poussière »).
Page 32
FR 32
2. Tournez le couvercle du bac à poussière jusqu’à ce que la
fl èche marquée sur le bord du couvercle pointe vers le
symbole
situé sur le bac à poussière. Ensuite, retirez le
couvercle.
3. Tournez le fi ltre HEPA (18) légèrement dans le sens in-
verse des aiguilles d’une montre et retirez-le .
Veuillez noter : le fi ltre HEPA est solidaire du support de
fi ltre et ne peut donc pas en être extrait.
4. Retirez le fi ltre en mousse (19).
5. Retirez délicatement l’embout cyclonique du bac à poussière. A cet effet, insérez la main dans le bac à poussière
et poussez l’embout cyclonique vers le haut.
6. Tapotez toutes les pièces au-dessus d’une poubelle, puis
brossez-les pour éliminer la saleté.
7. Si nécessaire, rincez abondamment les fi ltres à l’eau
tiède et propre. ATTENTION : n’utilisez pas de produits
nettoyants !
Ensuite, secouez l’excédent d’eau et laissez sécher entièrement tous les fi ltres
à l’air libre.
8. Nettoyez l’embout cyclonique et le bac à poussière avec un chiffon humide.
9. Après le séchage, remettez toutes les pièces en place. ATTENTION : ne remontez
en aucun cas des parties de l’appareil encore humides dans le bac à poussière !
10. Placez le couvercle sur le bac à poussière de sorte que
la fl èche sur le bord du
couvercle pointe vers le symbole
situé sur le bac à poussière. Tournez
ensuite le
couvercle jusqu’en butée vers le
symbole
.
11. Placez le bac à poussière dans l’appareil. Veillez à ce qu’il s’enclenche bien audiblement.
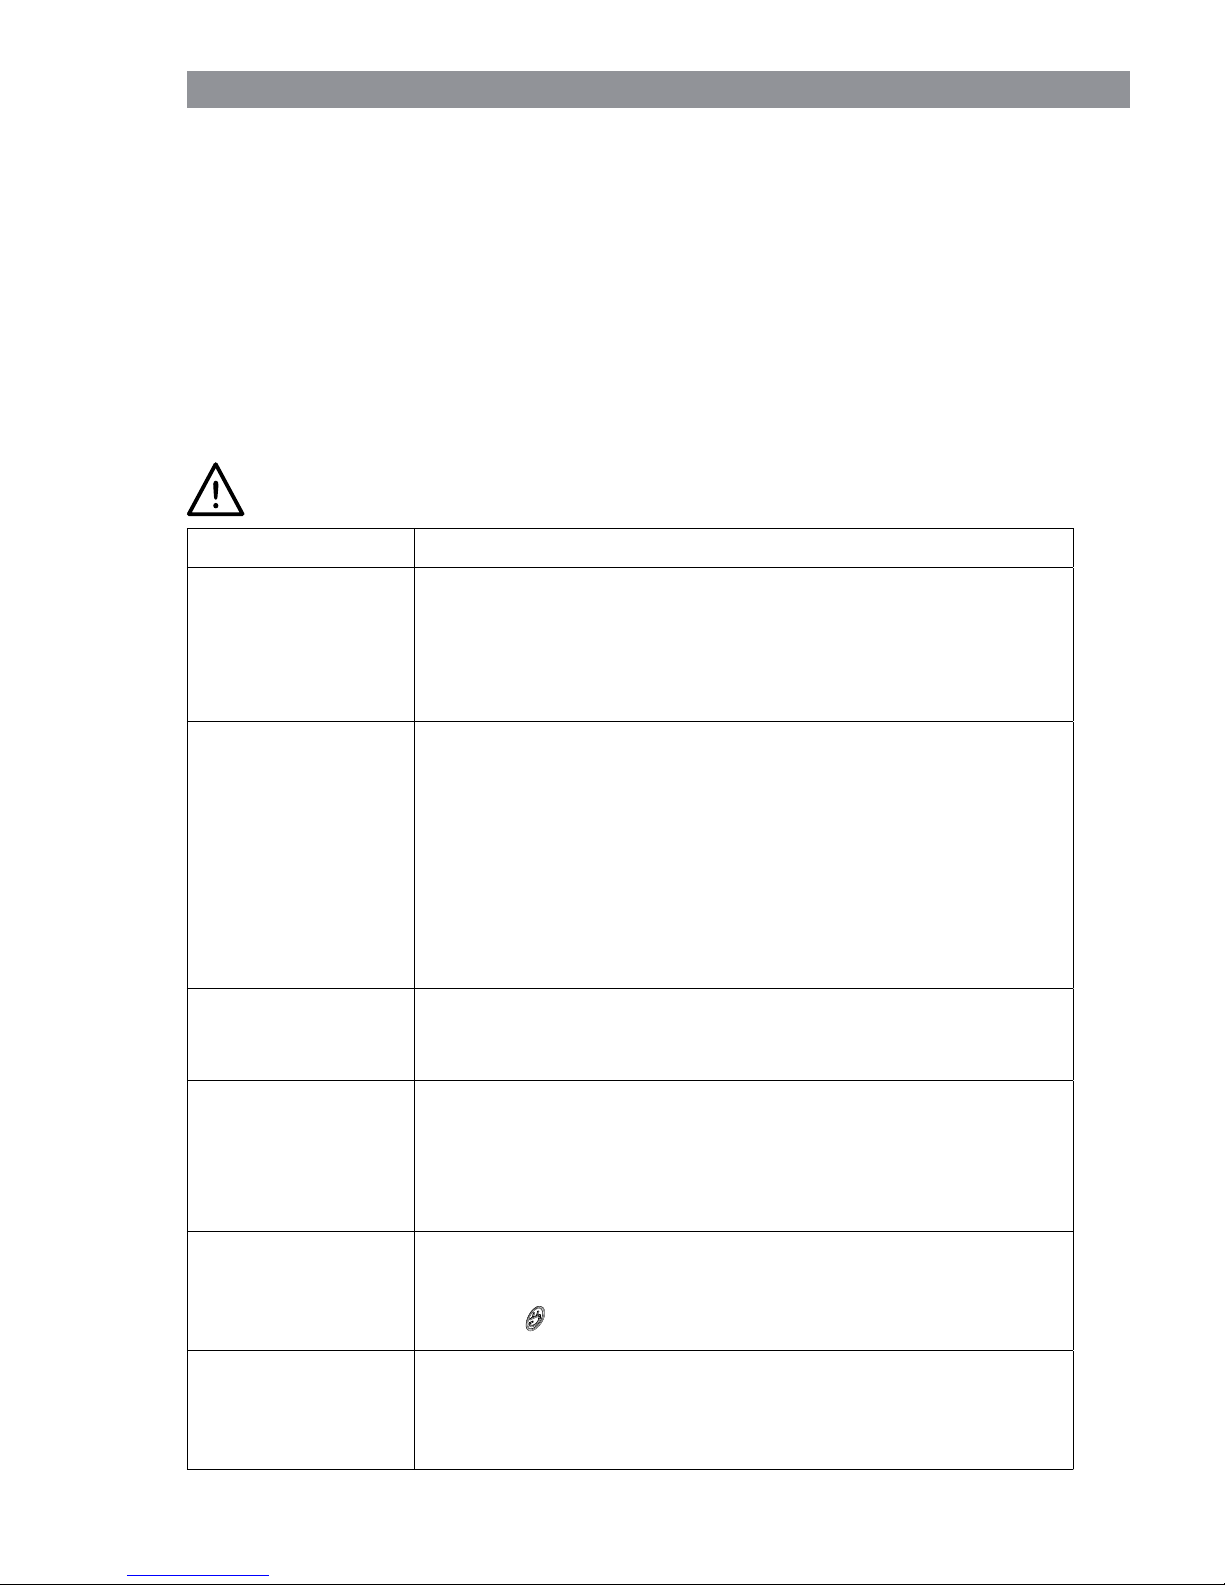
Nettoyage du fi ltre de sortie d’air
Le fi ltre de sortie d’air se trouve au dos de l’aspirateur.
1. Poussez la fermeture vers la grille de sortie d’air et retirez-la.
2. Retirez le fi ltre et tapotez-le au-dessus d’une poubelle,
puis brossez-les pour éliminer la saleté. Vous pouvez
également rincer le fi ltre à l’eau tiède propre.
ATTENTION : n’utilisez pas de produits nettoyants !
Ensuite, secouez l’excédent d’eau et laissez sécher en-
tièrement le fi ltre à l’air libre.
3. Si nécessaire, brossez ou essuyez le compartiment à
fi ltre.
18
19
20
Page 33
33 FR
4. Placez le fi ltre dans son compartiment.
5. Placez la grille de sortie d’air dans l’appareil et ensuite rabattez-la.
Nettoyer le boîtier et les suceurs
• Si nécessaire, nettoyez le boîtier avec un chiffon doux légèrement humecté.
• Enlevez régulièrement les cheveux et les peluches se trouvant dans les suceurs.
Dépannage
Si l’appareil ne fonctionne pas correctement, examinez tout d’abord le problème pour
constater si vous pouvez y remédier vous-même.
N’essayez pas de réparer vous-même un appareil électrique défectueux !
Problème Cause possible / solution
L'appareil n'aspire
pas.
• La fi che n'est pas bien branchée dans la prise électrique ?
Corrigez l'emplacement de la prise électrique.
• Est-ce que la prise électrique est défectueuse ? Branchez
dans une autre prise.
• Vérifi ez le fusible de votre branchement au secteur.
La puissance d'aspiration est faible.
• Est-ce que le régulateur d'air sur la poignée est ouvert ?
Fermez-le.
• Est-ce que le réservoir à poussière est plein ? Videz le
réservoir.
• Est-ce que les fi ltres sont fortement encrassés ? Nettoyez
le cyclone et les fi ltres.
• Est-ce que le suceur, le tube télescopique ou le fl exible
d’aspiration est bouché ? Éteignez l'appareil, débranchez
la prise électrique et retirer le bouchon.
Le bac à poussière
ne rentre pas dans
le logement.
• Le couvercle du bac à poussière est-il correctement positionné ? Le bac à poussière doit être correctement fermé
pour qu'il puisse être utilisé.
En aspirant, de la
poussière sort de
l'appareil.
• Est-ce que le réservoir à poussière n'est pas correctement
fermé et/ou pas (correctement) placé dans l'appareil ?
Faites la correction nécessaire.
• Est-ce que les fi ltres sont fortement encrassés ? Nettoyez
le cyclone et les fi ltres.
Le câble d'alimentation ne peut pas
être enroulé complètement.
• Le câble d'alimentation n'a pas été correctement enroulé
dans l'appareil. Sortez-le un peu et appuyez de nouveau
sur la
touche pour enrouler le câble.
Pendant l'aspiration, une odeur
désagréable se
dégage.
• Est-ce que l'appareil est utilisé pour la première fois ? Lors
de la première utilisation d'appareils neufs, il se dégage
souvent une odeur. L'odeur devra disparaître lorsque l'appareil aura été utilisé plusieurs fois.
Page 34
FR 34
Données techniques
Référence article : Z 08183
N° de modèle : PC-C008
Tension d’alimentation : 230 V~, 50 Hz
Puissance : 750 W
Classe de protection : II
Capacité du bac à poussière : 2 l poussière
Encablure: 5 m
Élimination
Les matériaux d’emballage sont recyclables. Débarrassez-vous de l’emballage
dans le respect de l’environnement en le déposant à un point de collecte prévu
à cet effet.
Éliminez cet article conformément aux prescriptions pour la protection de l’environnement. Ne le jetez pas avec les ordures ménagères. Remettez-le à une
station de collecte et de recyclage d’appareils électriques et électroniques usagés. Pour de plus amples renseignements à ce sujet, adressez-vous aux services municipaux compétents.
Service après-vente /
importateur :
DS Produkte GmbH
Am Heisterbusch 1
19258 Gallin
Allemagne
Tél. : +49 38851 314650
(Prix d’un appel vers le réseau
fi xe allemand. Coût variable
selon le prestataire.)
Tous droits réservés.
Page 35
35 NL
Reglementair gebruik
• Dit apparaat is bedoeld voor het opzuigen van normaal huisstof.
Zuig zeker niet de volgende zaken op:
– vloeistoffen of vochtige stoffen (bijv. vochtige tapijtshampoo)
– gloeiende as, sigarettenpeuken, lucifers etc.
– brandbare of ontvlambare stoffen
– zeer fi jn stof (bijv. betonstof), as of toner
– puntige, harde voorwerpen, zoals groter glassplinters
• Het apparaat werd ontworpen voor het privégebruik, niet voor commerciële doel-
einden.
• Gebruik het apparaat alleen volgens de beschrijvingen in de handleiding. Elk ander
gebruik geldt als oneigenlijk gebruik.
• De garantie dekt geen gebreken die ontstaan door verkeerd gebruik, beschadiging
of reparatiepogingen. Dit geldt ook voor de normale slijtage.
Uitleg van de symbolen
Veiligheidsaanwijzingen:
Lees deze aandachtig door
en houdt u zich hieraan om
lichamelijk letsel en materiële schade te voorkomen.
Aanvullende informatie
Beschermingsklasse II
Geachte klant,
Wij zijn blij dat u hebt besloten tot de aankoop van deze cycloonstofzuiger. Gelieve
vóór het eerste gebruik van het apparaat de handleiding zorgvuldig door lezen en
deze te bewaren om later nog eens na te kunnen nalezen. Wanneer u het apparaat
aan iemand anders geeft, moet tevens deze handleiding worden overhandigd.
Fabrikant en importeur aanvaarden geen aansprakelijkheid wanneer de informatie in
deze handleiding niet in acht wordt genomen.
Neem bij vragen over het apparaat alsook over reserveonderdelen/toebehoren
contact op met de klantenservice via onze website:
www.service-shopping.de
Inhoud
Reglementair gebruik ___________________ 35
Veiligheidsinstructies____________________ 36
Leveringsomvang en apparaatoverzicht _____ 38
Montage _____________________________ 39
Gebruik ______________________________ 40
Apparaat en toebehoren reinigen __________ 41
Technische gegevens ___________________ 43
Oplossing van fouten ___________________ 44
Verwijdering __________________________ 44
Page 36

NL 36
Veiligheidsinstructies
■ Dit apparaat mag door kinderen vanaf de leeftijd van 8 jaar en
door personen met beperkte fysieke, sensorische of mentale
vaardigheden of een gebrek aan ervaring en/of kennis worden
gebruikt als ze onder toezicht staan of over het veilig gebruik van
het apparaat werden geïnformeerd en de daaruit voortvloeiende
gevaren hebben begrepen.
■ Kinderen mogen niet met het apparaat spelen.
■ De reiniging en het onderhoud door de gebruiker mogen niet
worden uitgevoerd door kinderen tenzij ze ouder zijn dan 8 jaar
en er een persoon is die toezicht uitoefent.
■ Kinderen jonger dan 8 jaar en dieren moeten uit de buurt worden
gehouden van het apparaat en het
netsnoer
.
■ Kinderen moeten onder toezicht staan, zodat wordt gegarandeerd
dat ze niet met het apparaat spelen en/of zich bezeren door het
apparaat.
■ Gebruik en bewaar het apparaat alleen buiten het bereik van
kinderen en dieren. Verkeerd gebruik kan leiden tot letsels en
elektrische schokken. Ook het netsnoer mag voor kinderen en
dieren niet toegankelijk zijn.
■ Het apparaat moet steeds van het elektriciteitsnet worden losge-
koppeld als er geen toezicht is en voor de montage, demontage
of reiniging.
■ Dompel het apparaat, het netsnoer en de stekker nooit onder in
water of andere vloeistoffen en zorg ervoor dat deze niet in het
water kunnen vallen of nat kunnen worden.
■
Als het apparaat,
het
netsnoer of de stekker van het apparaat
beschadigd is, moet het door de producent of klantendienst of
een gelijkaardig gekwalifi ceerde persoon (bijv. gespecialiseerde
werkplaats) worden vervangen, zodat risico’s worden vermeden.
Verwondingsgevaren
■ Verstikkingsgevaar! Houd het verpakkingsmateriaal uit de buurt van kinderen en
dieren.
■ Houd dieren, haar, sieraden, ruim zittende kleding, vingers en alle overige lichaams-
delen weg van de mondstukken van het apparaat. Ze kunnen worden vastgezogen.
Zuigt de stofzuiger zich toch eens vast, schakel het apparaat dan meteen uit.
■ Wees bijzonder voorzichtig bij de reiniging van treden, zodat u niet valt.
■ Zorg ervoor dat het aangesloten netsnoer geen struikelblok vormt.
Page 37

37 NL
Gevaar van elektrische schokken en brand
■ Gebruik het apparaat niet wanneer er licht ontvlambare gassen in de lucht aanwezig
zijn.
■ Gebruik en berg het apparaat alleen op in gesloten ruimten. Gebruik het niet in de
openlucht, in ruimten met een hoge luchtvochtigheid of op hete oppervlakken.
■ Raak nooit de netstekker, het netsnoer of apparaat aan met natte resp. vochtige
handen.
■ Zuig nooit vloeistoffen op. Vul het stofreservoir niet met vloeistoffen. Houd het mo-
torblok uit de buurt van vocht en natheid!
■ Draag of trek het apparaat niet aan het snoer, behandel het snoer altijd zeer zorg-
vuldig. Voorkom dat het snoer bekneld raakt tussen deuren en trek het niet over
scherpe randen of hoeken heen. Houd het snoer uit de buurt van hete oppervlakken.
■ Sluit het apparaat uitsluitend aan op een contactdoos, waarvan de netspanning
overeenstemt met de gegevens op het typeplaatje van het apparaat. De contactdoos moet ook na het aansluiten goed toegankelijk blijven. Gebruik alleen correct
werkende verlengsnoeren, waarvan de technische gegevens overeenstemmen met
die van het apparaat.
■ Controleer het apparaat in het belang van uw eigen veiligheid vóór elke ingebruikna-
me op beschadigingen. Gebruik het apparaat alleen als het geen schade vertoont!
■ Schakel het apparaat uit en trek de netstekker uit de contactdoos:
– bij onweer,
– bij schade / storingen (bijv. ongewone geluiden, geur- of rookontwikkeling)
– wanneer er vloeistoffen werden opgezogen,
– wanneer het apparaat is gevallen.
Laat het door een vakman controleren, voordat u het weer gebruikt.
■ Het apparaat moet zijn uitgeschakeld, wanneer u de netstekker uit de contactdoos
trekt of erin steekt.
■ Trek, als u de netstekker uit de contactdoos wilt trekken, altijd aan de stekker en nooit
aan het netsnoer!
Materiële schade en schade aan het apparaat
■ Laat het stofreservoir niet te vol worden. Leeg hem indien mogelijk na elk gebruik.
Ook de fi lters moeten regelmatig worden gereinigd, om overbelasting van de motor
te voorkomen.
■ Het stofreservoir en de fi lters moeten na het uitwassen volledig droog zijn, voordat
deze weer mogen worden teruggeplaatst.
■ Gebruik het apparaat uitsluitend wanneer het volledig en op de juiste wijze is ge-
monteerd! Het stofreservoir en de fi lters moeten zijn geplaatst en onbeschadigd zijn!
Wanneer er vuil in het binnenste van het apparaat terecht zou komen, kan er schade
aan de motor ontstaan. Steek niets in de openingen/mond van het apparaat en let
erop, dat deze niet zijn verstopt. Dek nooit de ventilatieopeningen af.
■ Gebruik uitsluitend originele toebehoren van de fabrikant.
■ Stel het apparaat niet bloot aan extreme temperaturen, sterke temperatuurschom-
melingen, open vuur of direct zonlicht.
■ Laat het apparaat niet vallen en stel het niet bloot aan sterke schokken.
■ Plaats nooit zware voorwerpen op het apparaat.
■ Probeer niet om de rollen te smeren met smeermiddel of olie. Daarna zou er meer
stof of vuil aan de rollen blijven plakken.
Page 38
NL 38
■ Berg het apparaat wanneer u het niet gebruikt op een koele, droge en voor kinderen
en dieren ontoegankelijke plaats op.
Leveringsomvang en apparaatoverzicht
1
5
7
10
15
11
14
2
9
16
12
8
6
1
3
4
13
17
1 Vloerzuigmond
2 Telescopische buis
3 Nevenluchtventiel
4 Handgreep
5 Zuigslang
6 Stofreservoir
7 Stofreservoirdeksel
8 Greep van het stofreservoir
9
Ontgrendelingsknop van het stofre-
servoir
10 Aanzuigopening
11 Knop voor de snoeropwikkeling
12 Netstekker
13 Motorblok
14 Afvoerrooster (niet afgebeeld, daar-
achter zit het fi lter voor afvoerlucht)
15 Houder voor het inhaken van de
vloerzuigmond
16
Aan- /uitschakelaar
17 Combi-mondstuk (voegen-/borstel-
mondstuk)
• Deze bedieningshandleiding
Zuigmondstukken
OPGELET!
■ Alvorens de mondstukken te vervangen, dient u steeds eerst de stofzuiger uit te
schakelen.
Vloermondstuk
Het vloermondstuk is geschikt voor zowel tapijten als gladde vloeren.
Met de voetschakelaar kunt u kiezen tussen gladde vloer en tapijt.
Voor gladde vloeren worden op de onderkant een borstel uitgeklapt.
Page 39
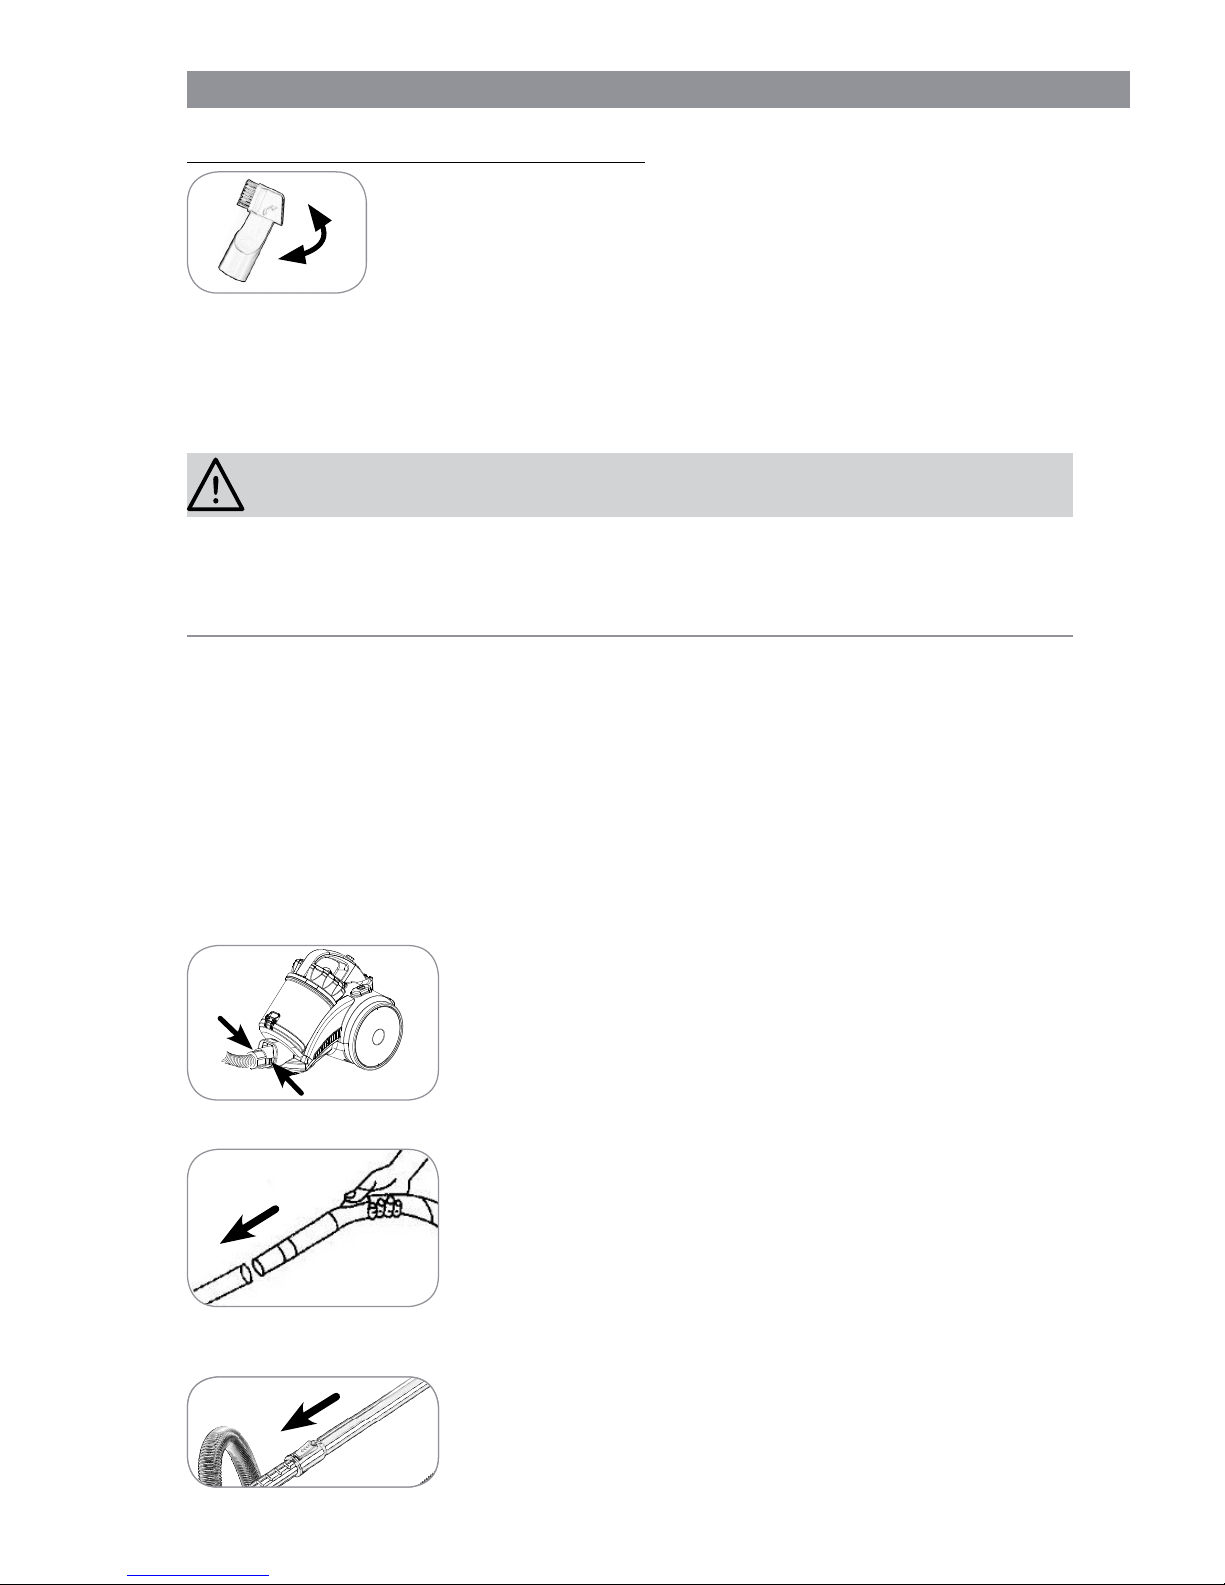
39 NL
Combi-mondstuk (voegen-/borstelmondstuk)
Klap het uiteinde in de richting van de pijl om en het voegenmondstuk wordt een borstelmondstuk:
• Het voegenmondstuk is geschikt voor gestoffeerde meubels, de
binnenreiniging van auto’s en alle uithoeken en hoeken die u met
de andere mondstukken niet kunt bereiken.
• Het borstelmondstuk is geschikt voor alle oneffen voorwerpen,
meubelen, lampen, profi el- en voetlijsten, vensterbanken etc.
Montage
OPGELET!
■ Verstikkingsgevaar! Houd het verpakkingsmateriaal uit de buurt van kinderen en
dieren.
■ Zorg ervoor dat het apparaat niet op het elektriciteitsnet is aangesloten alvorens het
accessoire te vervangen.
1. Pak alle onderdelen uit en controleer het leveringspakket op volledigheid (zie “Leveringsomvang en apparaatoverzicht”) en transportschade. Als er onderdelen schade
vertonen gebruikt deze dan niet (!), maar contacteer de klantenservice.
2. Verwijder vóór het gebruik van het apparaat al het verpakkingsmateriaal en eventueel aanwezige etiketten en transportbeveiligingen, die zich op het apparaat bevinden en die bedoeld zijn ter bescherming tijdens het transport resp. voor reclame.
3. Breng de zuigslang, de telescopische buis en een zuigmond aan op het motorblok
(zie onderstaand).
Zuigslang monteren / verwijderen
• Steek het aansluitstuk van de zuigslang in de aanzuigopening. Het moet vastklikken.
• Voor het afnemen van de zuigslang drukt u op de ontgrendelingsknoppen op het aansluitstuk en trekt u deze eraf.
Telescopische buis plaatsen/verwijderen
• Steek het open uiteinde van de handgreep in de passende
opening van de telescopische buis. Draai de handgreep
daarbij lichtjes heen en weer. Kijk na of de verbinding stevig vastzit.
• Om de telescopische buis te verwijderen, trekt u ze van
de handgreep.
Lengte van de telescopische buis instellen
• Druk de schuiver aan de telescopische buis en stel de gewenste lengte in.
• Laat de schuiver los en beweeg de buis nog een stukje
verder tot deze vastklikt.
Page 40
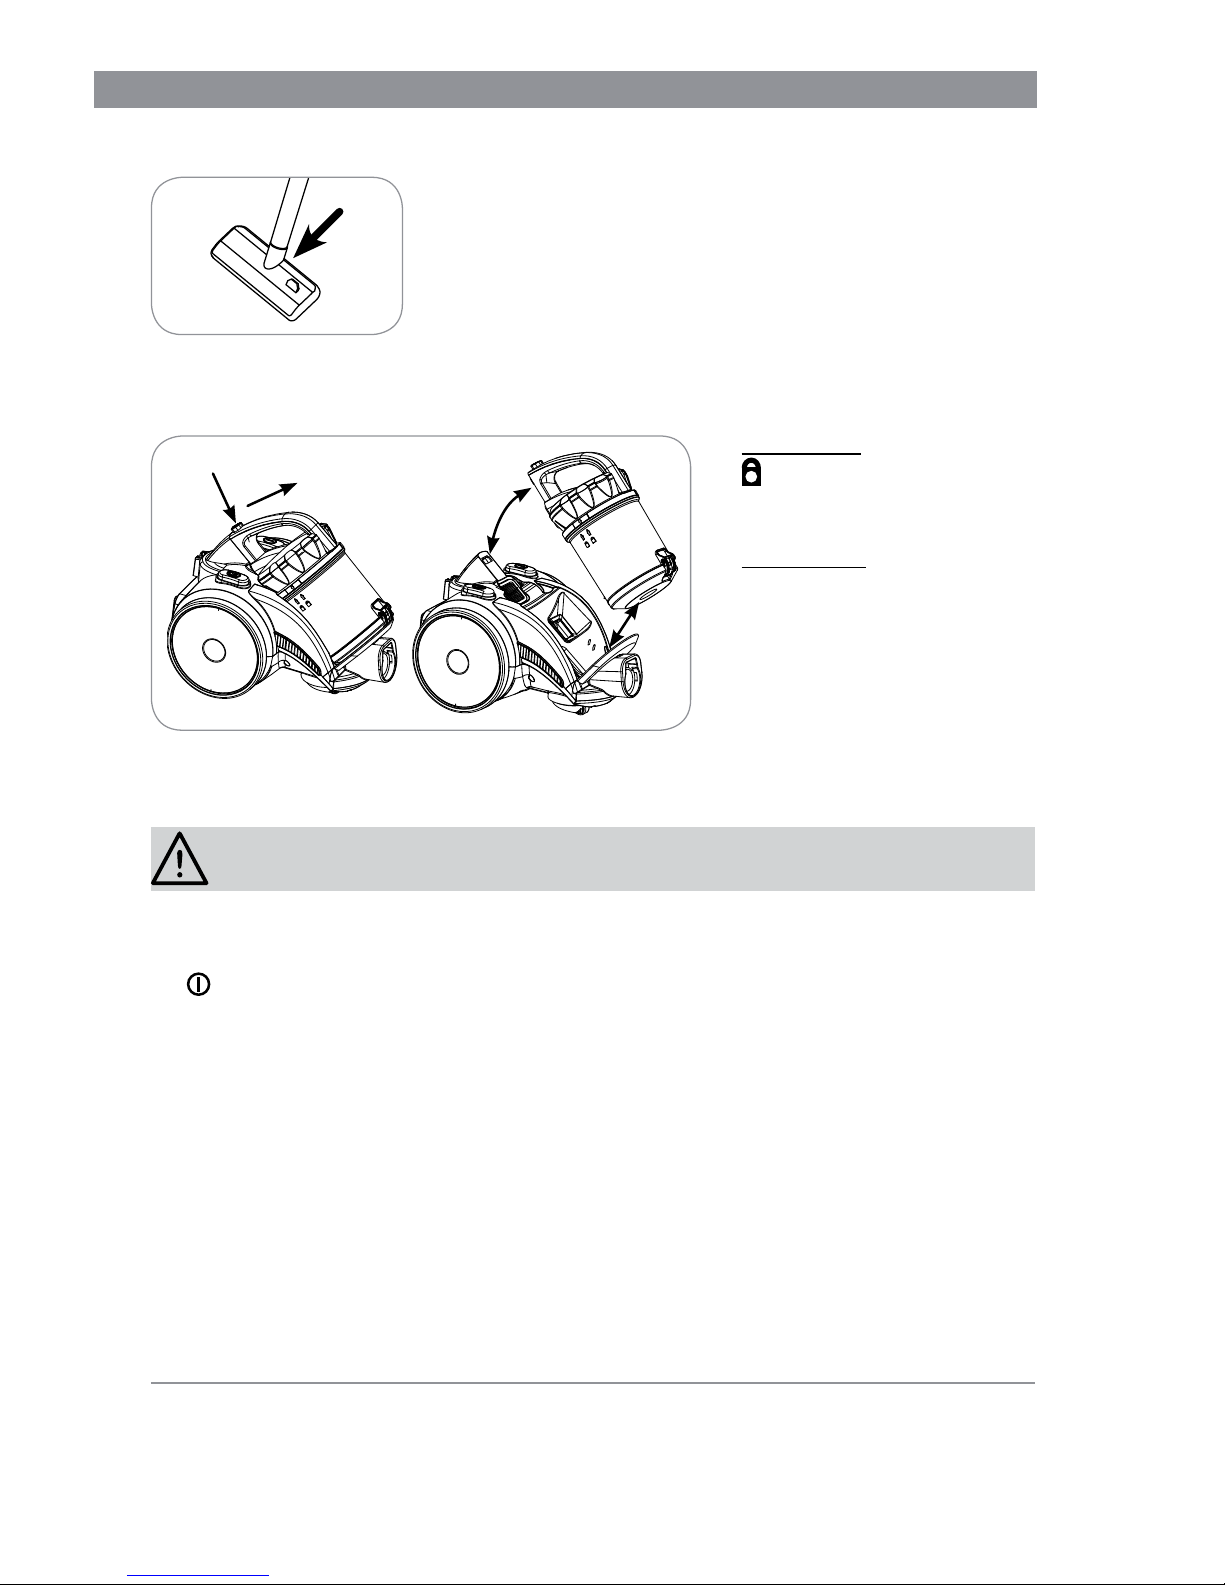
NL 40
Zuigmonden aanbrengen / verwijderen
• Steek het vrije uiteinde van de telescopische buis tot de
aanslag in een van de meegeleverde zuigmonden. Draai
het mondstuk daarbij licht heen en weer.
• Voor meer fl exibiliteit kunnen de zuigmonden ook direct
op de handgreep van de zuigslang worden gestoken, zonder telescopische buis.
• Om een zuigmond te verwijderen, trekt u deze eraf.
Stofreservoir verwijderen / monteren
• Verwijderen: druk op de
ontgrendelingsknop op de
greep van het stofreservoir
en trek het stofreservoir eraf.
• Aanbrengen: plaats het ge-
sloten stofreservoir op het
motorblok. Druk de greep
van het stofreservoir tegen
de behuizing tot hij hoorbaar
vastklikt.
Gebruik
OPGELET!
■ Houd de mondstukken tijdens het gebruik nooit in de buurt van lichaamsdelen of
dieren en ga er niet met de handen in. U kunt worden vastgezogen of zich bezeren. Zuigt de stofzuiger zich toch eens vast, schakel het apparaat dan meteen uit (
aan/uit-schakelaar indrukken).
■ Schakel de stofzuiger pas dan in, als u er zeker van bent dat alle onderdelen volledig
zijn gemonteerd en alle fi lters correct zijn geplaatst.
■ Trek het netsnoer voor ten minste tweederde van zijn totale lengte uit het apparaat
alvorens de stofzuiger in te schakelen en om te vermijden dat het snoer tijdens gebruik heet wordt. Trek er het netsnoer niet met geweld tot aan de aanslag uit (niet
verder dan tot de rode markering op het snoer), zodat schade wordt vermeden!
■ Schakel het apparaat steeds eerst uit en trek de stekker uit het stopcontact, alvorens
het mondstuk te vervangen of andere accessoires aan te brengen of te verwijderen!
■ Zuig zeker niet de volgende zaken op:
– vloeistoffen of vochtige stoffen (bijv. vochtige tapijtshampoo)
– gloeiende as, sigarettenpeuken, lucifers etc.
– brandbare of ontvlambare stoffen
– zeer fi jn stof (bijv. betonstof), as of toner
– puntige, harde voorwerpen, zoals groter glassplinters
Page 41
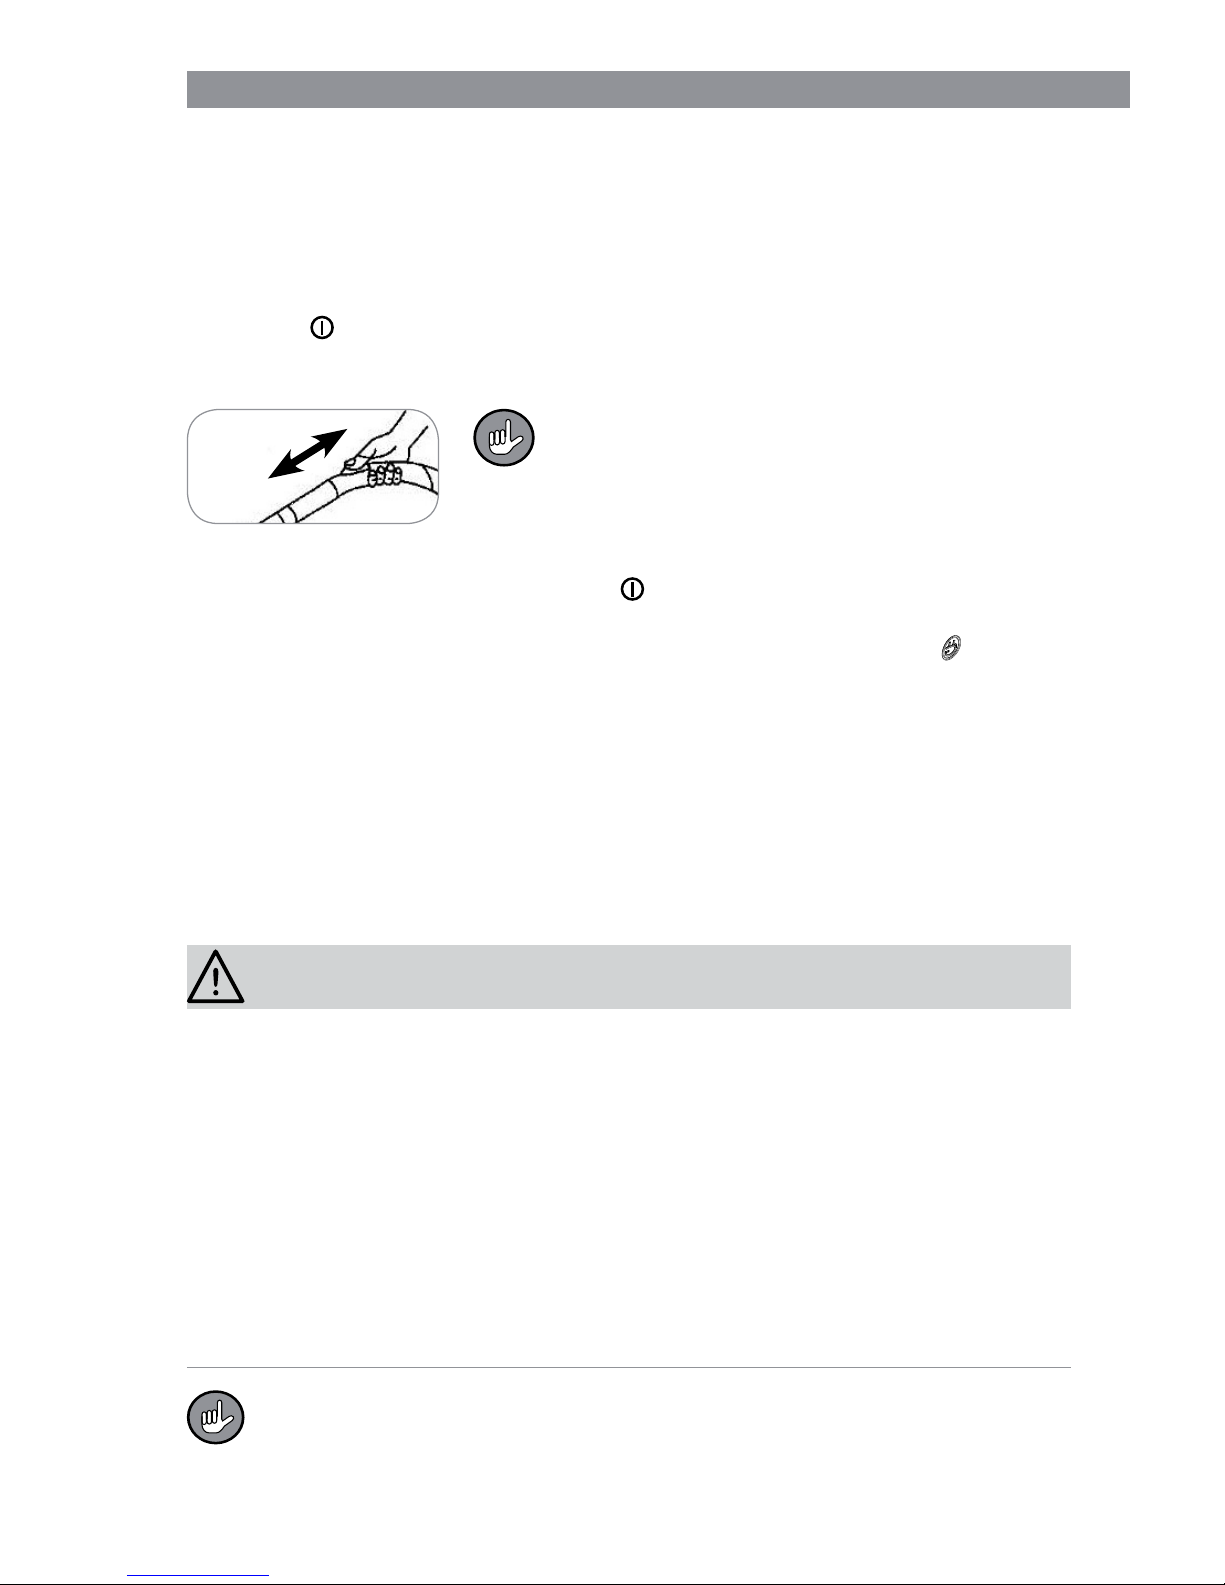
41 NL
1. Breng het gewenste mondstuk aan de telescopische buis of aan de zuigslang aan,
als dit nog niet is gebeurd (zie hoofdstuk “Montage”, afdeling “Zuigmonden aanbrengen / verwijderen”).
2. Trek het netsnoer uit de behuizing, in het beste geval tot aan de gele markering ech-
ter niet verder dan tot de rode markering op het snoer!
3. Steek de stekker in een reglementair geïnstalleerd, goed bereikbaar stopcontact.
4. Druk de
aan/uit-schakelaar om de stofzuiger in te schakelen.
5. Beweeg het mondstuk over het oppervlak dat u wenst te reinigen. Bij het stofzuigen
kan de stofzuiger worden voortgetrokken als een slede.
Aan de handgreep bevindt zich een nevenluchtventiel. Open het (als u de afdekking verschuift) om het
zuigvermogen te verminderen als u meubelen, tapijten of lichte, beweeglijke voorwerpen stofzuigt.
Normaliter moet het nevenluchtventiel gesloten zijn
zodat het zuigvermogen niet onnodig afneemt.
6. Druk na het stofzuigen opnieuw op de
aan/uit schakelaar om het apparaat uit te
schakelen.
7. Trek de stekker uit het stopcontact, houd het netsnoer vast en druk de
knop voor
het oprollen van het snoer met de voet omlaag. Als u het netsnoer vasthoudt, vermijdt u dat het snoer met een “zweepeffect” bijv. tegen de benen slaat.
8. Laat het stofreservoir niet te vol worden. Leeg hem indien mogelijk na elk gebruik
en reinig regelmatig het cyclooninzetstuk vanbinnen en de fi lters zodat een over-
verhitting van de motor wordt vermeden (zie hoofdstuk “Apparaat en toebehoren
reinigen”). Voor een optimale werking van het apparaat dient u na elk gebruik het
stofreservoir leeg te maken.
Apparaat en toebehoren reinigen
OPGELET!
■ Leeg hem indien mogelijk na elk gebruik en reinig regelmatig het cyclooninzetstuk
vanbinnen en de fi lters zodat een oververhitting van de motor wordt vermeden.
■ Trek voor de reiniging van de motoreenheid steeds de stekker uit het stopcontact.
■ Gebruik het apparaat, het netsnoer en de stekker niet in de buurt van water of an-
dere vloeistoffen om elektrische schokken te vermijden. Zorg er bij de reiniging voor
dat er geen vloeistof in de motoreenheid belandt. Alleen de fi lters mogen met water
worden gereinigd. Ze moeten echter volledig droog zijn als ze in het apparaat
worden geplaatst.
■ De fi lters zijn niet geschikt voor de wasmachine, noch de vaatwasmachine of droog-
trommel! Laat de fi lters uitsluitend in open lucht drogen, gebruik zeker geen haar-
droger.
■ Gebruik voor de reiniging geen bijtende of schurende reinigingsmiddelen of reini-
gingspads. Daardoor kan de bovenlaag worden beschadigd.
Na verloop van tijd kunnen de fi lters verkleuren. Dit is normaal en heeft geen
invloed op de werking.
Page 42
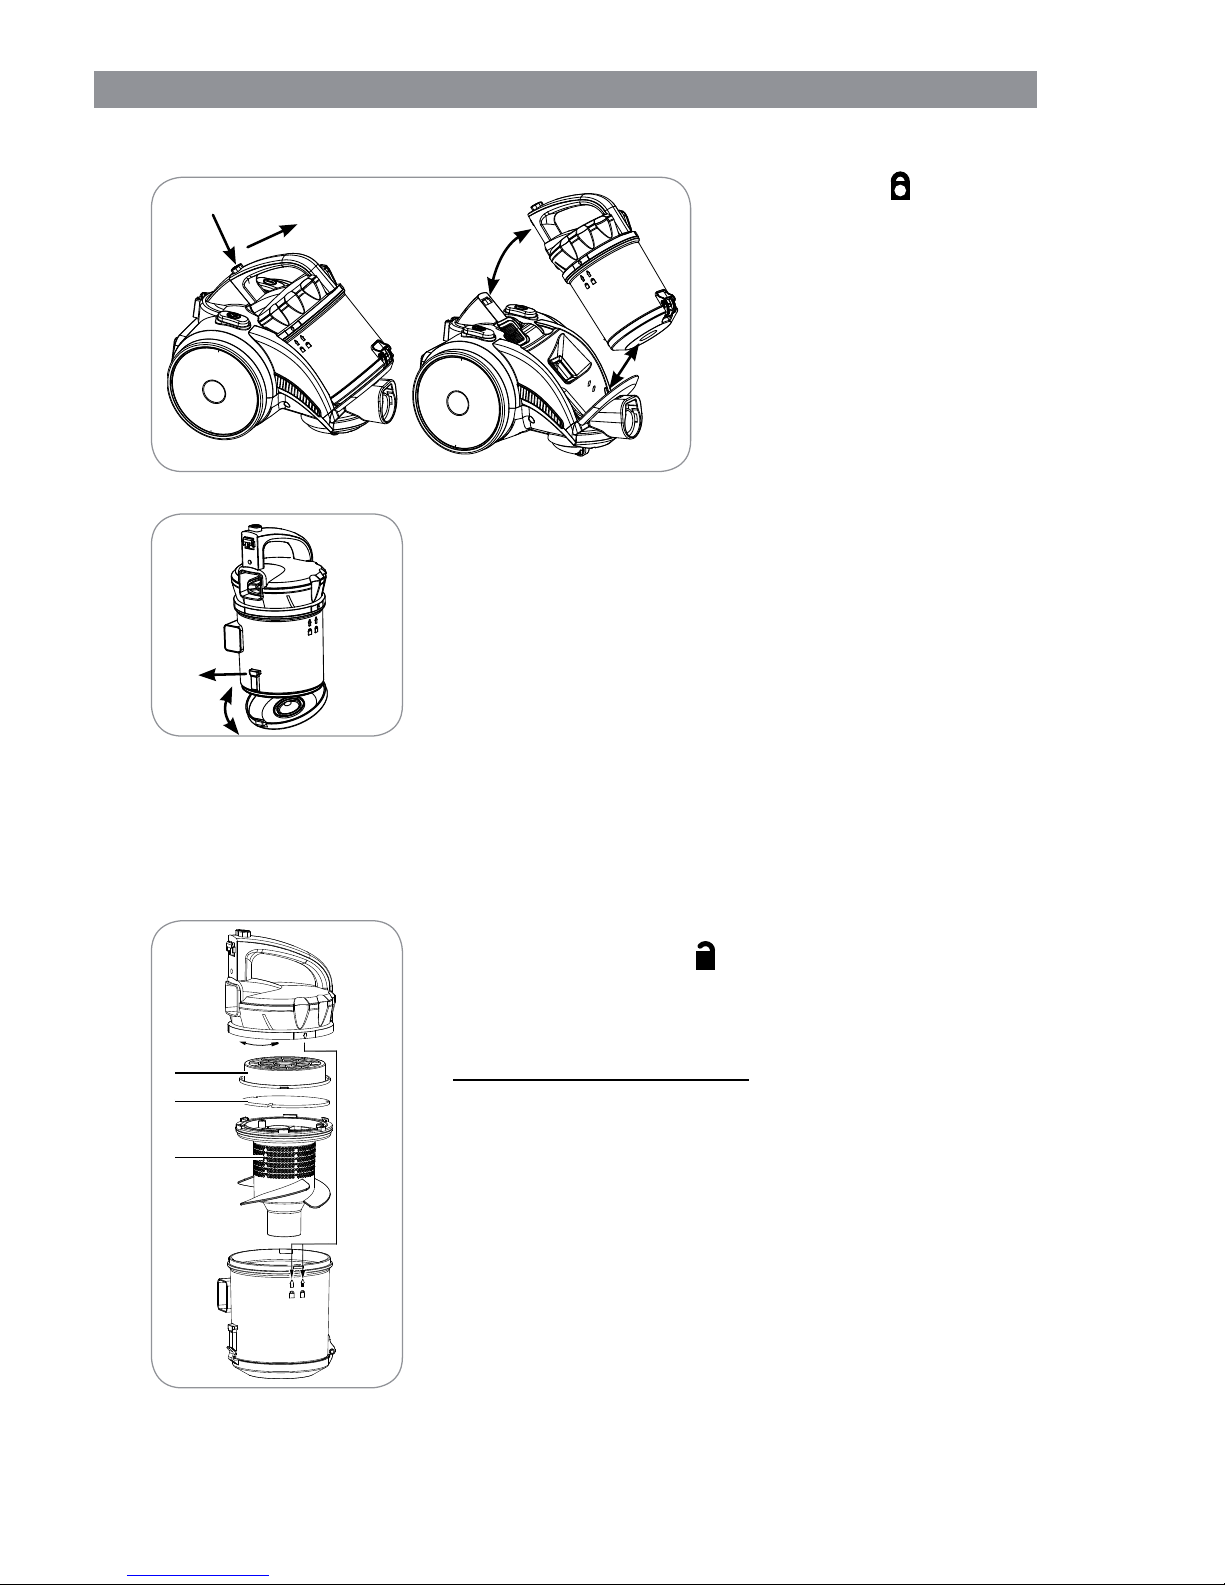
NL 42
Stofreservoir legen
1. Druk op de ontgrende-
lingsknop op de greep van
het stofreservoir en trek het
stofreservoir eraf.
2. Houd het stofreservoir boven
een geopende vuilnisbak.
De afstand tot de vuilnisbak
moet zo klein mogelijk zijn,
zodat het stof uit het stofreservoir alleen in de vuilnisbak valt en zich niet verspreidt in de omgeving.
3. Trek de sluiting weg van het stofreservoir. De bodem van
het stofreservoir gaat open en het vuil valt eruit.
4. Klap de bodem van het stofreservoir weer dicht. De sluiting moet hoorbaar vastklikken.
5. Steek het gesloten stofreservoir in het motorblok. Druk
de greep van het stofreservoir tegen de behuizing tot hij
hoorbaar vastklikt.
Stofreservoir, cyclooninzetstuk en motorfi lters reinigen
Het cyclooninzetstuk bevindt zich in het stofreservoir. De motorfi lters (HEPA-fi lter en
schuimstoffi lter) bevinden zich op het cyclooninzetstuk (20).
1. Neem het stofreservoir uit het apparaat en leeg hem (zie sectie ‘Stofreservoir legen’).
2. Draai de deksel van het stofreservoir tot de pijl op de dekselrand wijst naar het
symbool op het stofreservoir.
Dan verwijdert u de deksel.
3. Draai de HEPA-fi lter (18) een beetje tegen de wijzers van
de klok in en verwijdert u de fi lter.
Neem het volgende in acht: de HEPA-fi lter is vast ver-
bonden met de fi lterhouder en kan er niet uit worden ge-
nomen!
4. Trek de schuimstoffi lter (19) af.
5. Neem het cyclooninzetstuk voorzichtig uit het stofreservoir. Daartoe steek de hand in het stofreservoir en druk
op het stofreservoir.
6. Klop alle onderdelen uit boven een vuilnisbak en borstel
los vuil af.
7. Bij behoefte spoelt u de fi lters grondig uit met schoon,
lauwwarm water. LET OP: geen reinigingsmiddel ge-
bruiken!
Schud overtollig water vervolgens af en laat de fi lters volledig aan de lucht dro-
gen.
18
19
20
Page 43
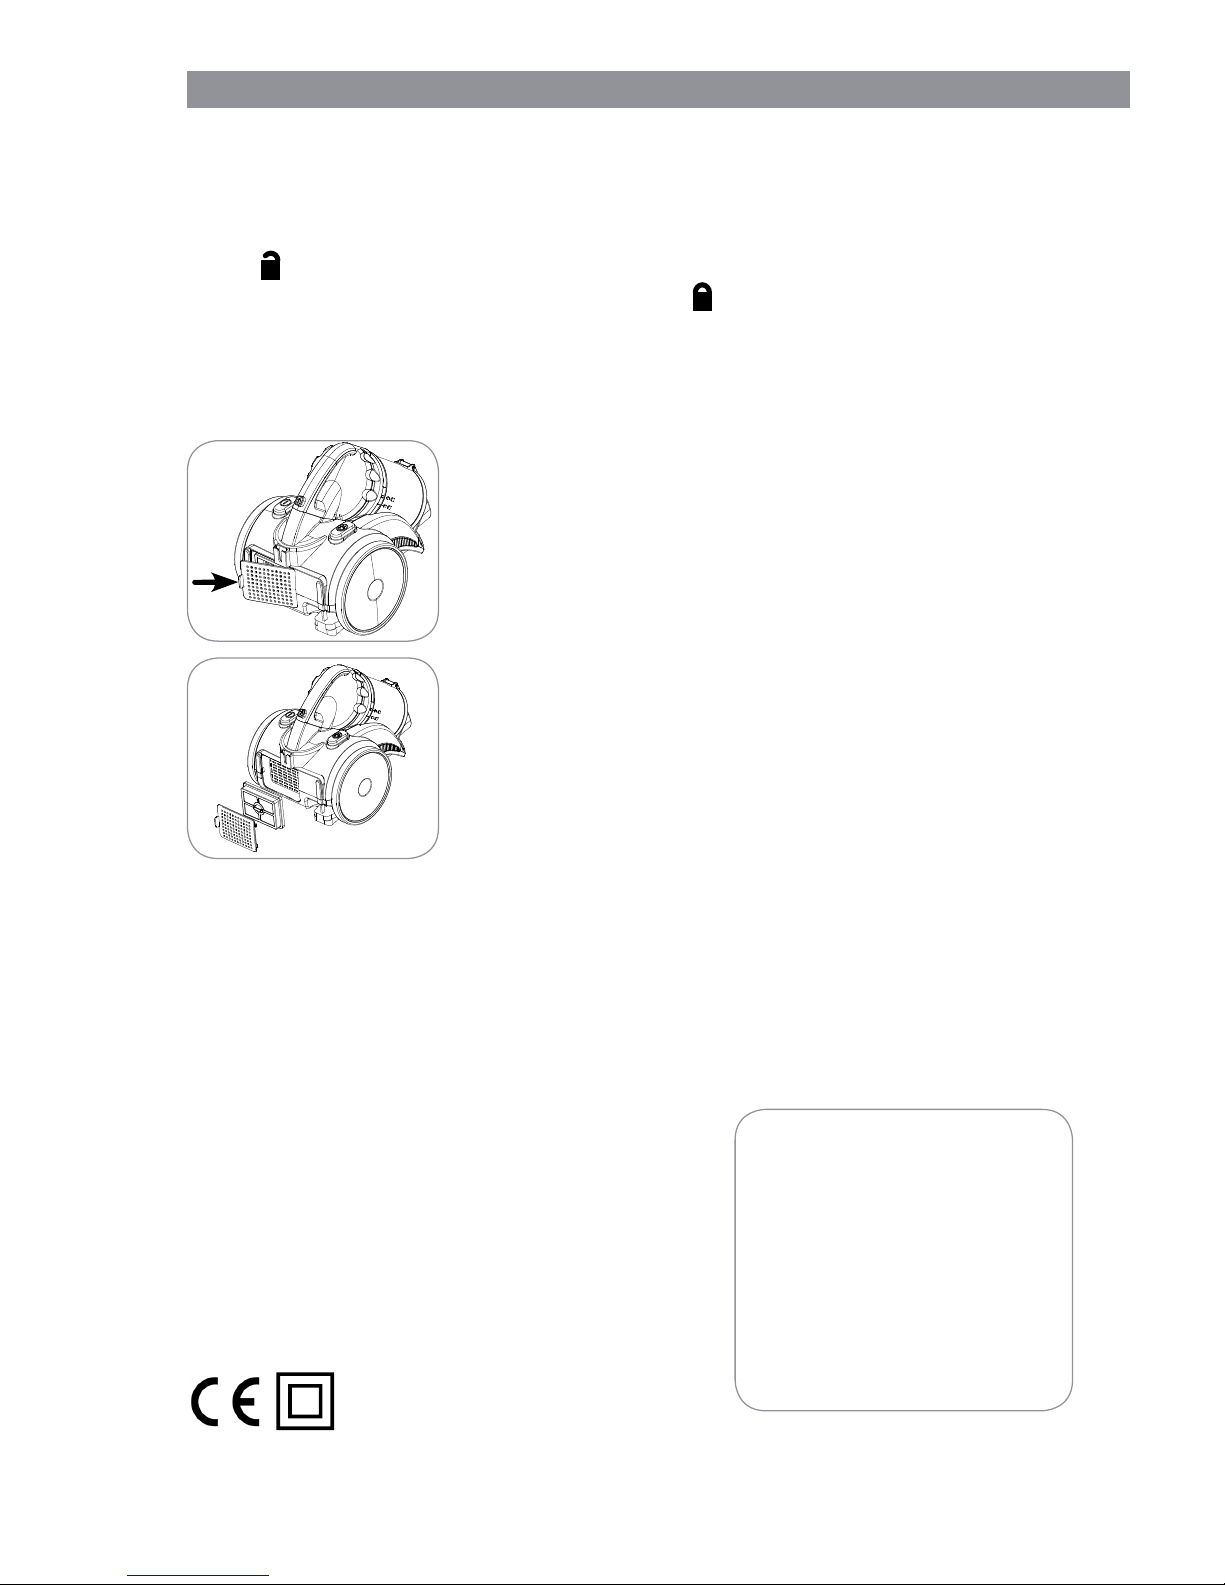
43 NL
8. Reinig het cyclooninzetstuk en stofreservoir met een vochtige doek.
9. Wanneer alle onderdelen volledig zijn gedroogd, zet ze weer in elkaar. LET OP:
plaats beslist geen nog vochtige apparaatonderdelen in het stofreservoir!
10. Plaats de deksel zo op het stofreservoir dat
zich de pijl op de dekselrand wijst naar
het
symbool van het stofreservoir.
11. Dan
draait u de deksel tot de aanslag naar het
symbool
.
12. Plaats het stofreservoir in het apparaat. Let erop dat hij hoorbaar vastklikt.
Filter voor afvoerlucht reinigen
De fi lter voor afvoerlucht bevindt zich aan de achterkant van de stofzuiger.
1. Druk de sluiting naar het afvoerrooster en verwijder het.
2. Verwijder de fi lter, klop hem boven een afvalbak uit en
borstel los vuil af. U kunt de fi lter ook afspoelen met
schoon, lauwwarm water. LET OP: geen reinigingsmid-
del gebruiken!
Schud overtollig water vervolgens af en laat de fi lter vol-
ledig aan de lucht drogen.
3. Borstel resp. veeg het fi ltercompartiment bij behoefte uit.
4. Plaats de fi lter in het fi ltercompartiment.
5. Plaats het afvoerrooster in het apparaat en klap het ver-
volgens dicht.
Behuizing en mondstukken reinigen
• Reinig de behuizing indien nodig met een ietwat vochtige, zachte doek.
• Verwijder regelmatig haar en pluisjes van de mondstukken.
Technische gegevens
Artikelnummer: Z 08183
Modellnummer: PC-C008
Spanningsvoorziening: 230 V~, 50 Hz
Vermogen: 750 W
Beschermingsklasse: II
Capaciteit stofreservoir: 2 l stof
Snoerlengte: 5 m
Klantenservice / importeur:
DS Produkte GmbH
Am Heisterbusch 1
19258 GALLIN
Duitsland
Tel.: +49 38851 314650
(Niet gratis voor Duitse vaste
lijnen. Kosten variëren per
aanbieder.)
Page 44
NL 44
Oplossing van fouten
Wanneer het apparaat niet naar behoren functioneert, gelieve dan eerst na te gaan of u
een probleem zelf kunt verhelpen.
Probeer niet om een defect elektrisch apparaat zelf te repareren!
Probleem Mogelijke oorzaak/oplossing
Het apparaat zuigt
niet.
• Steekt de stekker niet goed in het stopcontact? Corrigeer de
positie van de stekker.
• Is het stopcontact defect? Probeer een ander stopcontact.
• Kijk de zekering van uw elektrische aansluiting na.
Het stofreservoir
kan niet worden
geplaatst.
• Is de deksel op het stofreservoir juist aangebracht? Het
stofreservoir moet juist zijn gesloten zodat hij zich laat
plaatsen.
Het zuigvermogen
is zwak.
• Is het extra luchtventiel aan de handgreep geopend? Sluit
het.
• Is het stofreservoir te vol? Maak het stofreservoir leeg.
• Zijn de fi lters erg vuil? Reinig het cyclooninzetstuk en de
fi lters.
• Is het mondstuk, de telescopische buis of de zuigslang
verstopt? Schakel het apparaat uit, trek de stekker uit het
stopcontact en verwijder de verstopping.
Bij het stofzuigen
ontsnapt er stof uit
het apparaat.
• Is het stofreservoir niet correct gesloten en/of niet (correct)
in het apparaat geplaatst? Corrigeer dit.
• Zijn de fi lters erg vuil? Reinig het cyclooninzetstuk en de
fi lters.
Het netsnoer kan
niet helemaal worden opgerold.
• Het netsnoer werd in het apparaat niet goed opgerold. Trek
het er een stukje uit en druk daarna opnieuw op de
knop
om het snoer op te rollen.
Tijdens het stofzuigen wordt een
onaangename
geur vastgesteld.
• Wordt het apparaat voor de eerste keer gebruikt? Een
reukontwikkeling treedt vaak op bij het eerste gebruik van
nieuwe apparaten. De reuk zou moeten verdwijnen als u het
apparaat meerdere keren hebt gebruikt.
Verwijdering
Het verpakkingsmateriaal kan worden gerecycled. Voer de verpakking op milieuvriendelijke wijze af en breng deze naar een recyclepunt.
Verwijder het artikel op milieuvriendelijke wijze. Het hoort niet bij het huisvuil.
Breng het naar een recyclingbedrijf voor oude elektrische en elektronische apparaten. Meer informatie is verkrijgbaar bij uw plaatselijke gemeenteadministratie.
Alle rechten voorbehouden.
Page 45

45 NL
Page 46

Page 47

Page 48

 Loading...