

Page 1
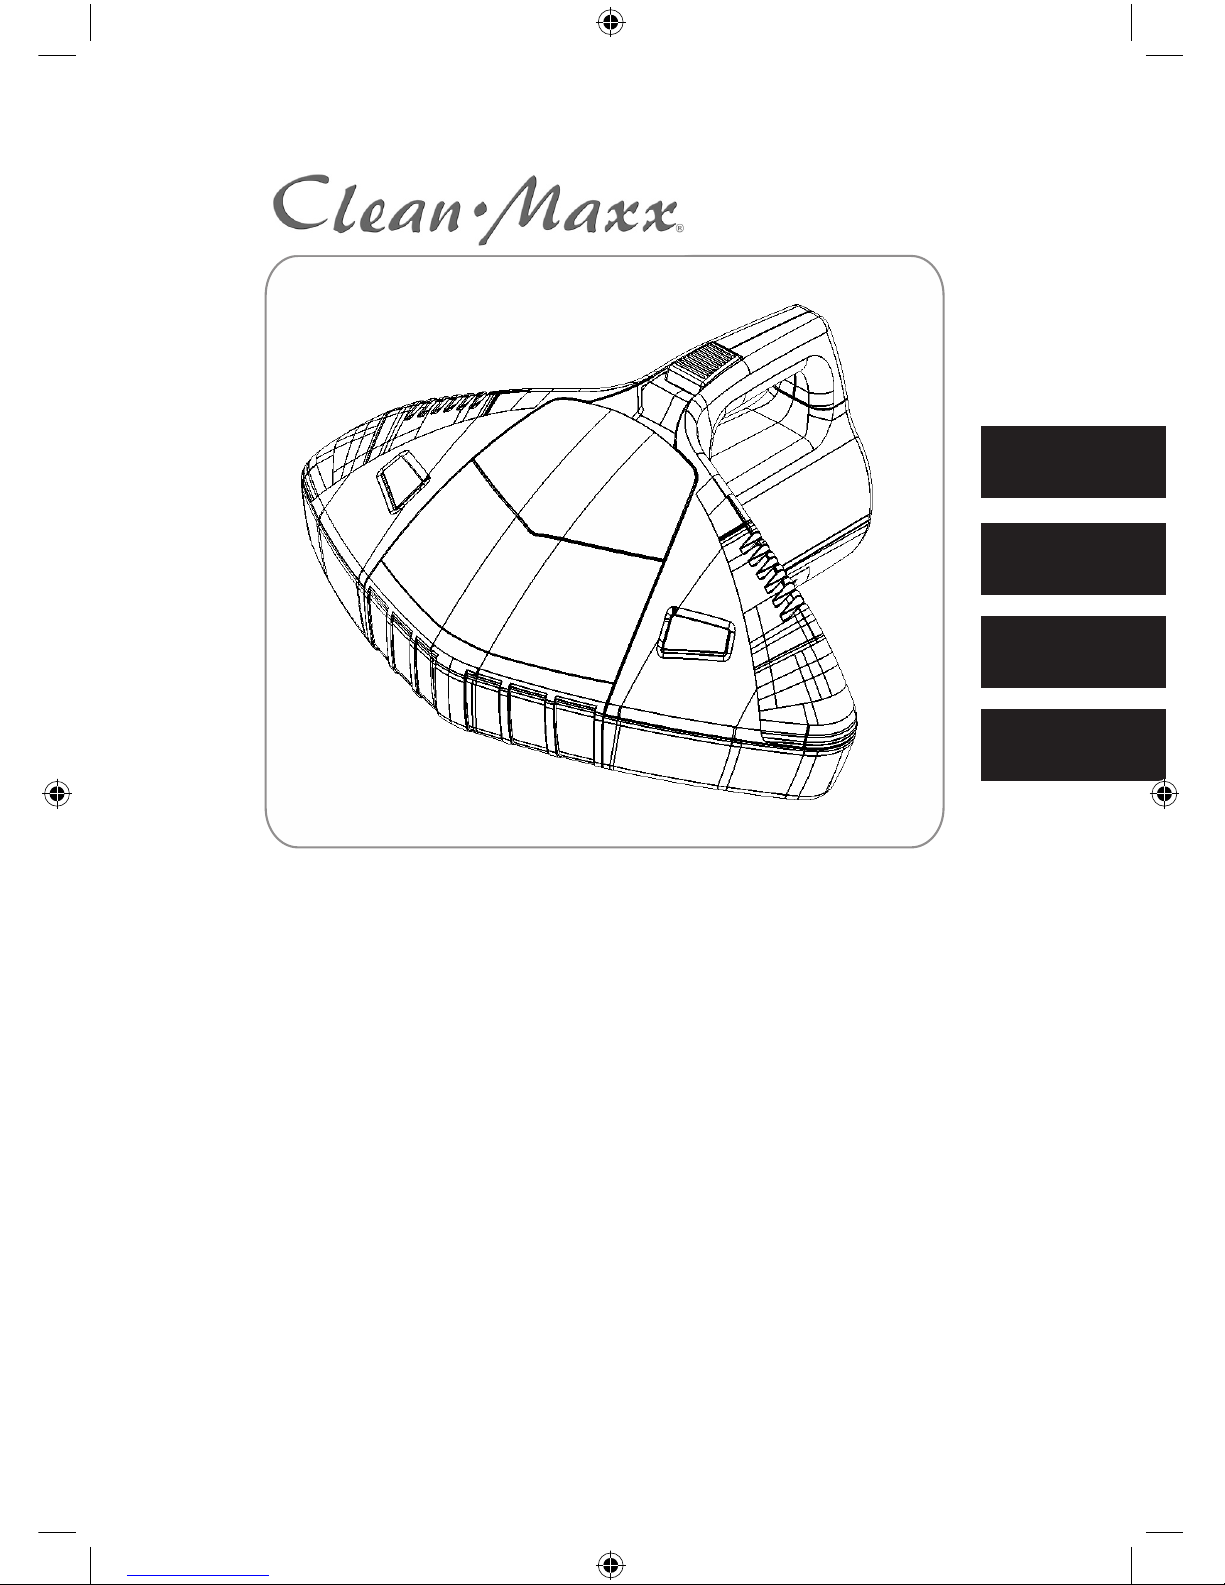
Clean Maxx Milbensauger
Gebrauchsanleitung (Seite 2)
Clean Maxx Dust Mite Vacuum Cleaner
Operating Instructions (Page 11)
Aspirateur à acariens Clean Maxx
Mode d’emploi (Page 20)
Clean Maxx stofzuiger voor stofmijt
Gebruiksaanwijzing (Pagina 30)
Z 02274_DE-GB-FR-NL_V2
DE
GB
FR
NL
02274_DE-GB-FR-NL_V2.indd 1 09.03.10 10:00
Page 2

2
Inhalt
Sicherheitshinweise _________________________________________________3
Bestimmungsgemäßer Gebrauch ______________________________________________3
Verletzungsgefahren ________________________________________________________3
Aufstellen und Anschließen ___________________________________________________4
Brand- und Explosionsgefahr __________________________________________________4
Gebrauch _______________________________________________________________4
Reinigung _______________________________________________________________5
Gewährleistungsbestimmungen ______________________________________5
Lieferumfang und Geräteübersicht __________________________________6
Vor dem ersten Gebrauch ___________________________________________ 7
Inbetriebnahme _____________________________________________________ 7
Reinigen/Auswechseln des Staubbehälters und -lters_______________7
Auswechseln des Mikrolters ________________________________________ 8
Reinigen der UV-C-Sterilisationslampe ______________________________8
Auswechseln der UV-C-Sterilisationslampe _________________________ 9
Reinigung und Pege ________________________________________________9
Fehlerbehebung _____________________________________________________9
Technische Daten __________________________________________________10
Entsorgen __________________________________________________________10
Kundenservice _____________________________________________________10
DE
02274_DE-GB-FR-NL_V2.indd 2 09.03.10 10:00
Page 3
3
Sehr geehrte Kundin, sehr geehrter Kunde,
wir freuen uns, dass Sie sich für den „Clean Maxx Milbensauger“ entschieden haben. Mit diesem
praktischen Gerät können Sie Bakterien abtöten und Hausmilben und Keime entscheidend
reduzieren. So können Sie die Gefahr verschiedener Atemwegserkrankungen deutlich reduzieren.
Wir wünschen Ihnen viel Spaß mit Ihrem neuen „Clean Maxx Milbensauger“.
Bitte lesen Sie vor dem ersten Gebrauch des Gerätes die Anleitung sorgfältig durch
und bewahren Sie sie gut auf. Bei Weitergabe des Gerätes ist diese Anleitung mit
auszuhändigen. Hersteller und Importeur übernehmen keine Haftung, wenn die
Angaben in dieser Anleitung nicht beachtet werden!
Bedeutung der Symbole in dieser Anleitung
Alle Sicherheitshinweise sind mit diesem Symbol gekennzeichnet. Lesen Sie diese
aufmerksam durch und halten Sie sich an die Sicherheitshinweise, um Personen- und
Sachschäden zu vermeiden.
Tipps und Empfehlungen sind mit diesem Symbol gekennzeichnet.
Sicherheitshinweise
Bestimmungsgemäßer Gebrauch
❐ Das Gerät ist zum Abtöten von Bakterien und zur Entfernung von Staub, Keimen
und Hausmilben konzipiert.
❐ Das Gerät ist für den Privatgebrauch, nicht für eine gewerbliche Nutzung konzi-
piert.
❐ Nutzen Sie das Gerät nur wie in der Anleitung beschrieben. Jede weitere Verwen-
dung gilt als bestimmungswidrig.
❐ Das Gerät ist nicht geeignet zur Nutzung in Scheunen, Ställen und ähnlichen Orten.
❐ Das Gerät ist nicht geeignet zur Nutzung an Orten, an denen entzündliche Dämpfe
oder explosiver Staub auftreten können.
Verletzungsgefahren
❐ Halten Sie Kinder vom Verpackungsmaterial fern. Es besteht u.a. Erstickungsgefahr!
❐ Dieses Gerät ist nicht dafür bestimmt, durch Personen (einschließlich Kinder) mit
eingeschränkten physischen, sensorischen oder geistigen Fähigkeiten oder mangels
Erfahrung und/oder mangels Wissen benutzt zu werden, es sei denn, sie werden
durch eine für ihre Sicherheit zuständige Person beaufsichtigt oder erhielten von ihr
Anweisungen, wie das Gerät zu benutzen ist. Kinder müssen beaufsichtigt werden,
um sicherzustellen, dass sie nicht mit dem Gerät spielen.
02274_DE-GB-FR-NL_V2.indd 3 09.03.10 10:00
Page 4

4
❐ Benutzen und lagern Sie das Gerät nur außerhalb der Reichweite von Kindern.
Auch das Netzkabel darf für Kinder nicht erreichbar sein. Sie könnten das Gerät
daran herunterziehen.
❐ Lassen Sie nach Gebrauch des Gerätes die UV-C-Lampe ausreichend abkühlen,
bevor Sie sie berühren!
❐ ACHTUNG! Vermeiden Sie es, sich direkten oder stark reek-
tierten germiziden ultravioletten Strahlen auszusetzen. Germizide
ultraviolette Strehlen sind schädlich für Augen und Haut!
❐ Legen Sie nie die Hand unter das Gerät, solange dieses noch in Betrieb ist.
Aufstellen und Anschließen
❐ Verwenden Sie das Produkt nur in geschlossenen Räumen.
❐ Halten Sie ausreichend Abstand zu Wärmequellen wie z. B. Herdplatten oder Öfen,
um Geräteschäden zu vermeiden.
❐ Schließen Sie das Gerät nur an eine vorschriftsmäßig installierte Steckdose an. Die
Steckdose muss auch nach dem Anschließen gut zugänglich sein. Die Netzspannung
muss mit den technischen Daten des Gerätes übereinstimmen. Verwenden Sie
nur ordnungsgemäße Verlängerungskabel, deren technische Daten mit denen des
Gerätes übereinstimmen.
❐ Achten Sie darauf, dass das angeschlossene Netzkabel keine Stolpergefahr darstellt.
Lassen Sie das Kabel nicht über den Rand von Tischen oder Küchentheken hängen.
Es könnte jemand hängen bleiben und das Gerät herunterziehen.
❐ Verlegen Sie das Kabel so, dass es nicht gequetscht oder geknickt wird und nicht
mit heißen Flächen in Berührung kommt.
❐ Versuchen Sie nicht Tiere, Personen oder Panzen mit diesem Gerät abzusaugen!
❐ Stellen oder setzen Sie sich nicht auf das Gerät. Es könnte umkippen.
❐ Bitte nie die Sicherheitsschalter der UV-C-Lampe blockieren.
❐ Während des Betriebs nicht den Vibrationsknopf berühren.
Brand- und Explosionsgefahr
❐ Saugen Sie keine brennenden oder glühenden Gegenstände auf, wie z.B. Zigaretten,
heiße Asche, Zündhölzer, auf. Diese könnten den Filter in Brand setzen.
❐ Saugen Sie ebenfalls keine brennbaren oder leicht entzündlichen Flüssigkeiten, wie
etwa Benzin auf.
Gebrauch
❐ Überprüfen Sie das Gerät vor jeder Inbetriebnahme auf Beschädigungen. Wenn
das Gerät, das Kabel oder der Stecker sichtbare Schäden aufweisen, darf das Gerät
nicht benutzt werden. Verwenden Sie das Gerät nicht, wenn es eine Fehlfunktion
hatte oder heruntergefallen ist.
❐ Sollte das Gerät defekt sein, versuchen Sie nicht, das Gerät eigenständig zu
reparieren. Kontaktieren Sie in Schadensfällen den Kundenservice (siehe Abschnitt
„Kundenservice“).
❐ Ziehen Sie den Netzstecker aus der Steckdose,
– wenn Sie das Gerät über einen längeren Zeitraum nicht verwenden,
– wenn während des Betriebes ein Fehler auftritt,
02274_DE-GB-FR-NL_V2.indd 4 09.03.10 10:00
Page 5
5
– vor einem Gewitter,
– bevor Sie Zubehörteile auswechseln,
– bevor Sie es reinigen.
❐ Wenn Sie den Netzstecker aus der Steckdose ziehen möchten, ziehen Sie immer
am Stecker und nie am Kabel.Reinigen Sie nur trockene Oberächen. Das Gerät
ist nicht zum Aufsaugen von Flüssigkeiten geeignet! Warten Sie z.B. bei shampoo-
nierten Teppichböden erst, bis diese vollständig getrocknet sind!
❐ Das Gerät darf nur mit eingesetzten Filtern verwendet werden. Beschädigte Filter
müssen umgehend ausgetauscht werden. Wenden Sie sich in diesem Fall an unseren
Kundendienst.
❐ Achten Sie darauf, dass der Filter trocken ist, bevor er wieder in das Gerät gesetzt
wird.
❐ Stecken Sie keine Gegenstände in die Geräte-Öffnungen. Verwenden Sie das Gerät-
nicht, wenn die Öffnungen blockiert sind.
❐ Entfernen Sie vor dem Saugen größere, scharfe und spitze Gegenstände von der zu
saugenden Fläche. Diese könnten den Filter beschädigen.
❐ Saugen Sie keinen Steinstaub, Zement, Bohrstaub, etc. auf. Dies könnte den Filter
verstopfen und beschädigen.
❐ Versuchen Sie nicht, die Rollen mit Schmiermittel oder Öl zu schmieren. Danach
würde Staub oder Schmutz verstärkt an den Rollen haften bleiben.
❐ Tauchen Sie das Gerät niemals in Wasser oder andere Flüssigkeiten ein! Stellen
Sie sicher, dass das Gerät, Kabel oder Stecker nicht ins Wasser fallen oder nass
werden können. Sollte das Gerät ins Wasser fallen, unterbrechen Sie sofort die
Stromzufuhr.
❐ Berühren Sie das Gerät, das Kabel oder den Stecker niemals mit feuchten Händen.
❐ Verwenden Sie kein zusätzliches Zubehör.
❐ Nicht die Belüftungsschlitze verdecken!
❐ Lassen Sie das Gerät nicht ohne Aufsicht eingeschaltet.
❐ Lassen Sie das Gerät nicht fallen und setzen Sie es keinen starken Stößen aus.
Reinigung
❐ Ziehen Sie vor dem Reinigen immer den Netzstecker und lassen Sie das Gerät
abkühlen.
❐ Tauchen Sie das Gerät, das Netzkabel und den Stecker niemals in Wasser.
❐ Verwenden Sie keine ätzenden oder scheuernden Reinigungsmittel. Benutzen Sie
keine Metallgegenstände.
❐ Reinigen bzw. wechseln Sie die Filter in den empfohlenen Zeitabständen.
Gewährleistungsbestimmungen
Von der Gewährleistung ausgeschlossen sind alle Mängel, die durch unsachgemäße Behandlung,
Beschädigung, Verkalkung oder Reparaturversuche entstehen. Dies gilt auch für den normalen
Verschleiß der einzelnen Bauteile.
02274_DE-GB-FR-NL_V2.indd 5 09.03.10 10:00
Page 6
6
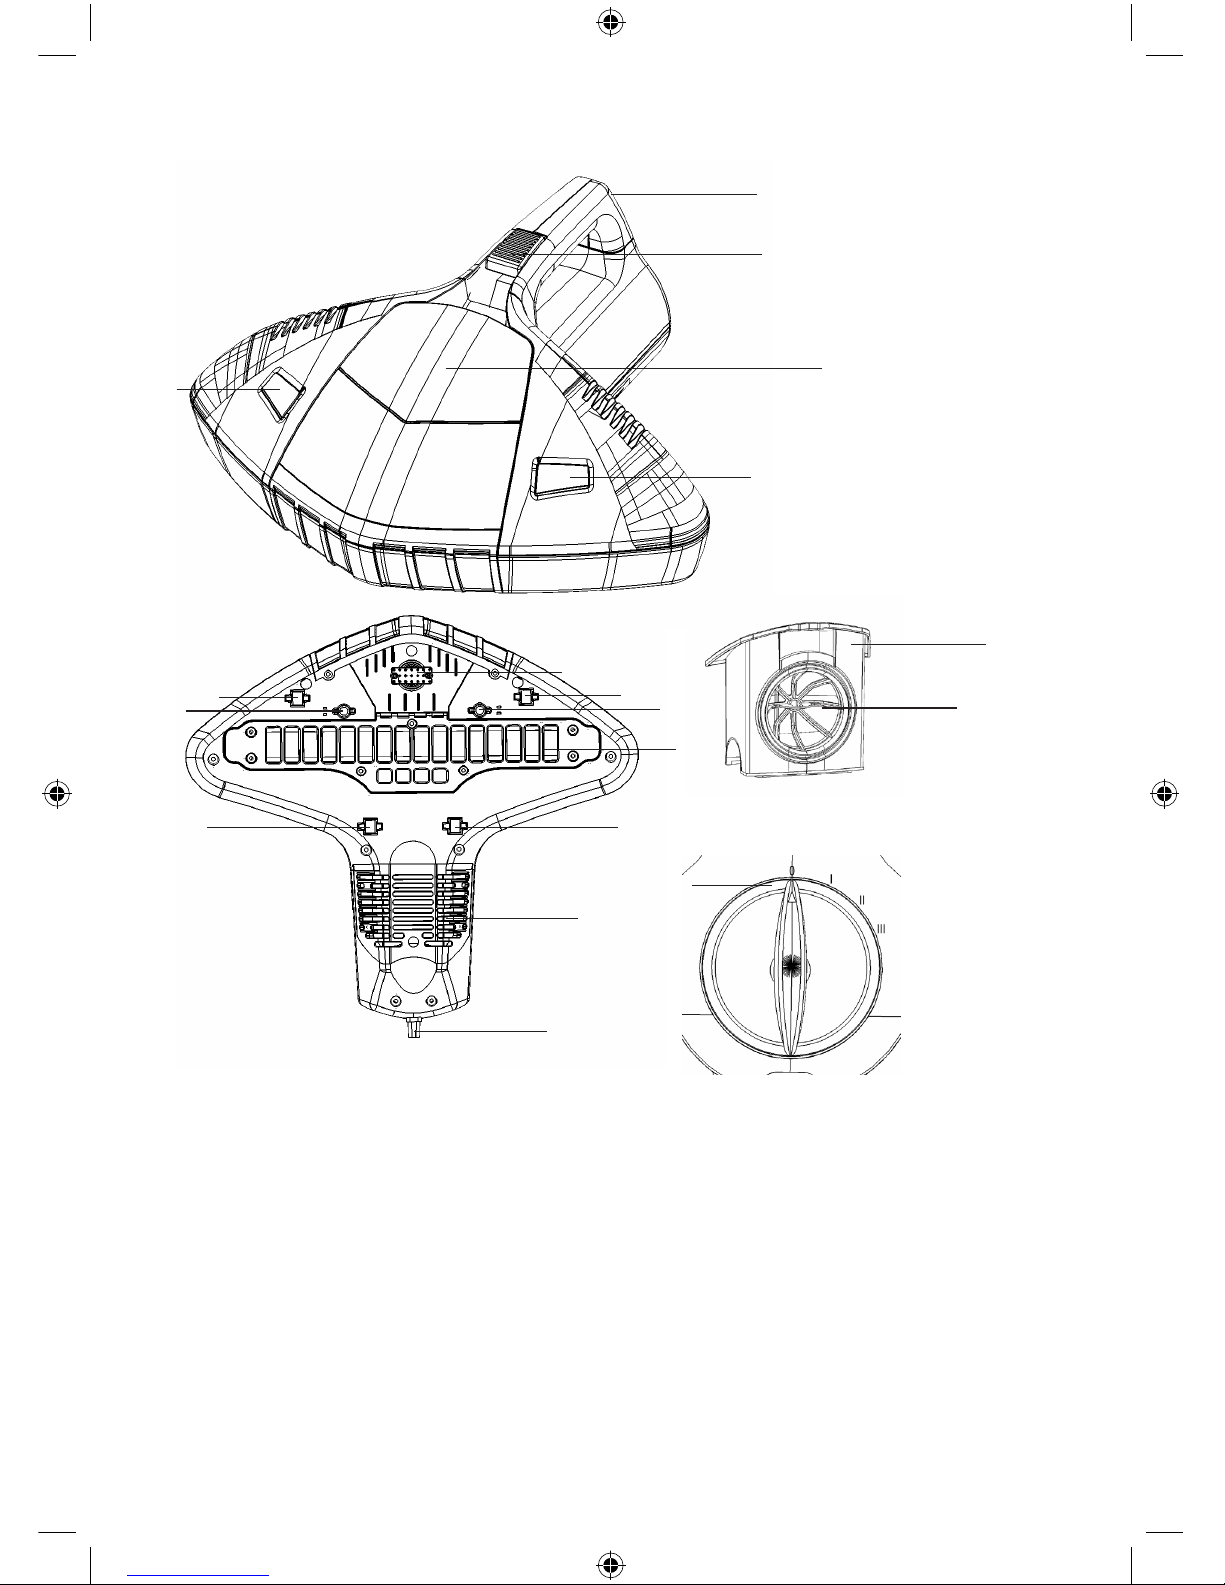
Lieferumfang und Geräteübersicht
1. Griff
2. Luftschieber
3. Bedienungsschalter
0: Aus-Position
I: nur Saugerfunktion
II: Sauger- und UV-C-Lampenfunktion
III: Sauger-, UV-C-Lampen- und
Vibrationsfunktion
4. Staubbehälter mit Staublter (12)
5. Anzeigefenster für UV-C-Lampe
6. Vibrationsknopf
7. Rollen
8. Sicherheitsschalter
9. UV-C-Sterilisationslampe
10. Mikrolter
11. Steckerkabel
12. Staublter
• diese Gebrauchsanleitung
5
5
8
1
2
7
77
7
9
8
10
11
6
4
12
3
4
02274_DE-GB-FR-NL_V2.indd 6 09.03.10 10:00
Page 7
7
Vor dem ersten Gebrauch
❐ Halten Sie Kinder vom Verpackungsmaterial fern. Es besteht u.a.
Erstickungsgefahr!
❐ Packen Sie das Gerät und das Zubehör aus. Prüfen Sie den Inhalt anhand des Liefe-
rumfangs (siehe Abschnitt „Lieferumfang und Geräteübersicht“) auf Vollständigkeit
und mögliche Transportschäden.
❐ Sollten Sie einen Transportschaden feststellen, wenden Sie sich umgehend an den-
Kundenservice (siehe Abschnitt „Kundenservice“).
Inbetriebnahme
1. Stecken Sie den Netzstecker in eine vorschriftsmäßig installierte und geerdete 230 V-Steckdose.
2. Setzen Sie das Gerät ach auf die Matratze, das Bettlaken oder die Bettdecke auf und drehen
Sie den Bedienungsknopf auf die gewünschte Position (I, II oder III).
I: Nur Saugerfunktion (Sie können oberächlichen Schmutz absaugen)
II: Sauger- und UV-C-Lampenfunktion (Die UV-C-Lampe tötet Bakterien ab, der
Sauger saugt diese auf)
III: Sauger-, UV-C-Lampen- und Vibrationsfunktion (Durch Vibration werden Milben,
Milbenkot und Bakterien aufgerüttelt und können besser abgesaugt werden)
3. Bewegen Sie das Gerät gleichmäßig.
❐ Bei Kopfkissen und kleineren Flächen bewegen Sie das Gerät vor
und zurück, um ein optimales Ergebnis zu erzielen.
4. Stellen Sie den Bedienungsknopf zum Abstellen wieder auf Position 0.
Reinigen Sie die Matratzen von beiden Seiten.
Neue Matratzen sollten einmal im Monat gereinigt werden.
Ältere Matratzen sollten anfänglich eine Woche lang täglich, dann ebenfalls einmal
im Monat gereinigt werden.
Reinigen/Auswechseln des Staubbehälters und -lters
❐ Ziehen Sie vor jeder Reinigung/jedem Wechsel den Netzstecker
aus der Steckdose und lassen Sie das Gerät abkühlen.
1. Greifen Sie in die Aussparung über dem Staubbehälter und ziehen Sie den Staubbehälter nach
oben heraus.
2. Ziehen Sie den Staublter in der Öffnung aus dem Staubbehälter heraus.
3. Leeren Sie den Staubbehälter.
4. Befreien Sie den Staublter vom Schmutz und reinigen Sie ihn bei Bedarf unter ießendem
Wasser.
5. Trocknen Sie den Staubbehälter sowie den Staublter mit einem weichen Tuch.
02274_DE-GB-FR-NL_V2.indd 7 09.03.10 10:00
Page 8
8
6. Setzen Sie den Staublter wieder in den Staubbehälter.
7. Stecken Sie den Staubbehälter wieder zurück in das Gerät.
❐ Achten Sie darauf, dass sowohl der Staubbehälter als auch der
Staublter trocken sind, bevor Sie sie wieder ins Gerät stecken!
Wechseln Sie den Staublter alle 12-18 Monate, wenn Sie das Gerät mit den von
uns empfohlenen Reinigungsintervallen benutzen. Wenden Sie sich hierfür an
unseren Kundenservice (siehe Abschnitt „Kundenservice“).
Auswechseln des Mikrolters
❐ Ziehen Sie vor jedem Wechsel den Netzstecker aus der Steckdose
und lassen Sie das Gerät abkühlen.
1. Drehen Sie die Schraube in der Mikrolter-Abdeckung heraus und entnehmen Sie die
Abdeckung (Hinweis: Abdeckung und Mikrolter sind miteinander verbunden!).
2. Setzen Sie die neue Mikrolter-Abdeckung mit Filter ins Gerät und schrauben Sie die
Schraube wieder fest.
❐ Entsorgen Sie den alten Mikrolter beim Recyclinghof.
Wechseln Sie den Mikrolter alle 12-18 Monate, wenn Sie das Gerät mit den von
uns empfohlenen Reinigungsintervallen benutzen. Wenden Sie sich hierfür an
unseren Kundenservice (siehe Abschnitt „Kundenservice“).
Reinigen der UV-C-Sterilisationslampe
❐ Ziehen Sie vor jeder Reinigung den Netzstecker aus der Steckdose
und lassen Sie das Gerät abkühlen.
1. Drehen Sie die 7 Schrauben der UV-C-Lampenabdeckung heraus und nehmen Sie die
Abdeckung ab.
2. Polieren Sie die Glasabdeckung der UV-C-Sterilisationslampe mit einem Staubtuch.
3. Schrauben Sie die Abdeckung wieder fest.
Wechseln Sie die UV-C-Sterilisationslampe alle 1 bis 2 Jahre, wenn Sie das Gerät
mit den von uns empfohlenen Reinigungsintervallen benutzen. Wenden Sie sich
hierfür an unseren Kundenservice (siehe Abschnitt „Kundenservice“).
02274_DE-GB-FR-NL_V2.indd 8 09.03.10 10:00
Page 9
9
Auswechseln der UV-C-Sterilisationslampe
❐ Ziehen Sie vor jedem Wechsel den Netzstecker aus der Steckdose
und lassen Sie das Gerät abkühlen.
1. Drehen Sie die 7 Schrauben der UV-C-Lampenabdeckung heraus und nehmen Sie die
Abdeckung ab.
2. Greifen Sie die UV-C-Sterilisationslampe mit einer Zange und drehen Sie diese um 90°, bis
die Stifte der Lampe aus dem Schlitz herausgucken. Ziehen Sie die Lampe heraus.
3. Schieben Sie eine neue UV-C-Lampe in das dafür vorgesehene Schutzröhrchen und setzen Sie
sie wieder zurück an ihren Platz.
4. Greifen Sie die UV-C-Sterilisationslampe mit einer Zange und drehen Sie diese um 90°, bis
die Stifte der Lampe im Schlitz nicht mehr zu sehen sind.
5. Schrauben Sie die Abdeckung wieder mit den 7 Schrauben fest.
Wechseln Sie die UV-C-Sterilisationslampe alle 1 bis 2 Jahre, wenn Sie das Gerät mit
den von uns empfohlenen Reinigungsintervallen benutzen.
Reinigung und Pege
❐ Achtung! Tauchen Sie das Gerät, das Netzkabel und den Stecker
niemals in Wasser oder andere Flüssigkeiten.
❐ Verwenden Sie zum Reinigen keine aggressiven oder scheuernden
Reinigungsmittel.
❐ Ziehen Sie vor jeder Reinigung den Netzstecker aus der Steck-
dose und lassen Sie das Gerät abkühlen.
Fehlerbehebung
Sollte das Gerät defekt sein, versuchen Sie nicht, das Gerät eigenständig zu reparieren.
Kontaktieren Sie in Schadensfällen den Kundenservice (siehe Abschnitt „Kundenservice“).
Überprüfen Sie bitte, ob Sie ein Problem selbst beheben können.
Problem mögliche Ursache /Lösung
Die UV-C-Lampe funktioniert
nicht.
Das Gerät steht nicht eben auf einer Fläche. Hierdurch sind
die Sicherheitskontaktschalter nicht im Gerät versunken und
der Kontakt zur UV-C-Lampe ist unterbrochen.
Das Gerät blockiert.
Versichern Sie sich, dass die Rollen auf der Unterseite des
Geräts nicht blockiert sind.
Keine Funktion
• Überprüfen Sie, ob der Netzstecker richtig eingesteckt,
das Gerät eingeschaltet und die Sicherung aktiv ist.
• Prüfen Sie, ob alle Teile korrekt eingebaut sind.
02274_DE-GB-FR-NL_V2.indd 9 09.03.10 10:00
Page 10
10
Technische Daten
Modell: P00183
Leistung: max. 400 W
Spannungsversorgung: 230 V ~ 50 Hz
Schutzklasse: II
Entsorgen
Das Verpackungsmaterial ist wiederverwertbar. Entsorgen Sie die Ver packung
umweltgerecht und führen Sie sie der Wertstoffsammlung zu.
Entsorgen Sie das Gerät umweltgerecht, wenn Sie sich von ihm trennen möchten. Das
Gerät gehört nicht in den Hausmüll. Entsorgen Sie es an einem Recyclinghof für
elektrische und elektronische Altgeräte.
Nähere Informationen erhalten Sie bei Ihrer örtlichen Gemeindever waltung.
Kundenservice
Sollten Sie Fragen zu dem Gerät haben, wenden Sie sich bitte an unseren Kundenservice:
DS Produkte GmbH, 19258 GALLIN, DEUTSCHLAND
Tel. 0180-5003530 *)
E-mail: [email protected]
*) 14 Ct./Min. aus dem dt. Festnetz der Telekom AG, Mobilfunkpreise können abweichen (max. 42 Ct./Min.).
Im Rahmen unserer ständigen Weiterentwicklung behalten wir uns das Recht vor, Produkt,
Verpackung oder Beipackunterlagen jederzeit zu ändern.
Importeur:
DS Produkte GmbH, Am Heisterbusch1, 19258 GALLIN, DEUTSCHLAND
Alle Rechte vorbehalten.
02274_DE-GB-FR-NL_V2.indd 10 09.03.10 10:00
Page 11

11
Contents
Safety instructions _________________________________________________12
Proper use _____________________________________________________________12
Risks of Injury ___________________________________________________________12
Set-up and connection _____________________________________________________13
Fire hazard and risk of explosion______________________________________________13
Use ___________________________________________________________________13
Cleaning _______________________________________________________________14
Warranty conditions _______________________________________________14
Product contents and device overview ______________________________15
Prior to rst use ____________________________________________________16
Start-up ____________________________________________________________16
Cleaning/changing the dust bin and lter ___________________________16
Changing the microlter ____________________________________________17
Cleaning the UV-C sterilisation light ________________________________17
Changing the UV-C sterilisation light _______________________________18
Cleaning and care ___________________________________________________18
Troubleshooting ____________________________________________________18
Technical data ______________________________________________________19
Disposal ____________________________________________________________19
Customer service ___________________________________________________19
GB
02274_DE-GB-FR-NL_V2.indd 11 09.03.10 10:00
Page 12
12
Dear customer,
We are delighted that you have decided on the “Clean Maxx Dust Mite Vacuum Cleaner”. With
this convenient device, you can kill bacteria while considerably reducing house mites and germs.
You can signicantly decrease the risk of numerous respiratory diseases.
You wish you plenty of enjoyment with your new “Clean Maxx Dust Mite Vacuum Cleaner”.
Prior to using the device for the rst time, please carefully read through the operating
instructions and store them in a safe place. The instructions are to accompany the
device if it is passed on to others. The manufacturer and importer assume no liability
in the event the data in these instructions has not been observed!
Meaning of symbols in instructions
All safety notices are marked with this symbol. Please carefully read through and obey
the safety notices in order to avoid injury to persons and damage to property.
Tips and recommendations are marked with this symbol.
Safety instructions
Proper use
❐ The device is designed for killing bacteria and removing dust, germs, and house
mites.
❐ The device is designed for private, not for commercial use.
❐ Only use the device as described in these instructions. Any other use is deemed
improper.
❐ The device is not suitable for use in barns, stables and similar locations.
❐ The device is not to be used in locations where ammable vapour or explosive dust
is likely to exist.
Risks of Injury
❐ Keep children away from the packaging. There is, among other things, a danger of
suffocation!
❐ This device is not designed to be used by persons (including children) with impaired
physical, sensory or mental abilities or those lacking experience and/or knowledge
unless they are supervised by a person responsible for their safety or received
instructions on how to use the device from them. Children must be under supervi-
sion to ensure that they do not play with the device.
❐ Only use and store the device out of the reach of children. The mains cord may
also not be accessible for children. They could pull the device down with it.
02274_DE-GB-FR-NL_V2.indd 12 09.03.10 10:00
Page 13
13
❐ After use, give the UV-C light enough time to cool off before you touch it!
❐ ATTENTION! Avoid exposing yourself to direct or intense re-
ected germicide ultraviolet rays. Germacide ultraviolet rays are
hazardous to your eyes and skin!
❐ Never place your hand under the device while it is in use.
Set-up and connection
❐ Only use the device in enclosed areas.
❐ Maintain adequate distance to heat sources such as stovetops or ovens in order to
prevent damages to the device.
❐ Only connect the device to a properly installed socket. The socket must also be
easily accessible after the device has been connected. The mains voltage must
correspond to the technical data of the device. Only use proper extension cords,
whose technical data correspond to those of the device.
❐ Ensure that the connected mains cord does not pose a tripping hazard. Do not al-
low the cord to hang over the edge of a table or kitchen worktop. Someone could
catch him/herself and pull down the device.
❐ Lay the cable such that it is not crushed or creased and such that it does not come
into contact with hot surfaces.
❐ Do not attempt to vacuum off animals, persons or plants with this device!
❐ Do not sit or stand on the device. Otherwise, it could tip over.
❐ Never block the UV-C light’s safety switch.
❐ Do not touch the vibrating head when in use.
Fire hazard and risk of explosion
❐ Do not vacuum up any burning or smouldering objects such as cigarettes, hot
ashes, matches. They could set re to the lter.
❐ Also do not vacuum up any ammable or highly ammable liquids such as petrol.
Use
❐ Check the device for damages prior to each usage session. If the device, the cord
or the plug exhibit visible damages, the device may not be used. Do not use the
device if it malfunctions or has fallen down.
❐ If the device is defective, do not attempt to
repair it yourself. In the event of damage, contact the customer service (see section
“Customer service”).
❐ Pull the mains plug from the socket
- if you do not plan to use the device for a prolonged period of time,
- if a defect occurs while in use,
- before a storm,
- before you change accessories,
- before you clean it.
❐ If you wish to pull the mains plug out of the socket, always pull on the plug and nev-
er on the cord. Only clean dry surfaces. The device is not suitable for vacuuming up
liquids! For shampooed carpets, for example, wait until they have dried completely!
02274_DE-GB-FR-NL_V2.indd 13 09.03.10 10:00
Page 14
14
❐ The device may only be used when the lters are in place. Damaged lters must be
immediately replaced. In such a case, please contact our customer service team.
❐ Make sure that the lter is dry before you put it back in the device.
❐ Do not insert any objects in the device openings. Never operate the device if the
openings are blocked.
❐ Before using the vacuum cleaner, remove any larger, sharp, and pointy objects from
the surface you intend to clean. They could damage the lter.
❐ Do not vacuum up rock dust, cement, drill dust etc. It could block or damage the
lter.
❐ Do not attempt to grease the wheels with a lubricant or oil. Otherwise dust or dirt
will stick to the wheels.
❐ Never submerge the device in water or other liquids! Ensure that the device, cord
or plug do not fall in water or are at risk of getting wet. If the device falls in water,
immediately disconnect the power supply.
❐ Never touch the device, the cord or the plug with wet hands.
❐ Do not use any additional accessories.
❐ Do not cover the vents!
❐ Do not leave the device on when unattended.
❐ Do not allow the device to fall and do not subject it to strong percussions.
Cleaning
❐ Before cleaning, always disconnect the mains plug and let the device cool off.
❐ Never submerge the device, the mains cord, and the plug in water.
❐ Do not use any aggressive or abrasive cleaning agents. Do not use any metallic
objects.
❐ Clean and/or change the lters at the recommended intervals.
Warranty conditions
All defects caused by improper treatment, damage, limescale build-up or repair attempts
are excluded from the guarantee. This also applies to normal wear and tear of the individual
components.
02274_DE-GB-FR-NL_V2.indd 14 09.03.10 10:00
Page 15
15
Product contents and device overview
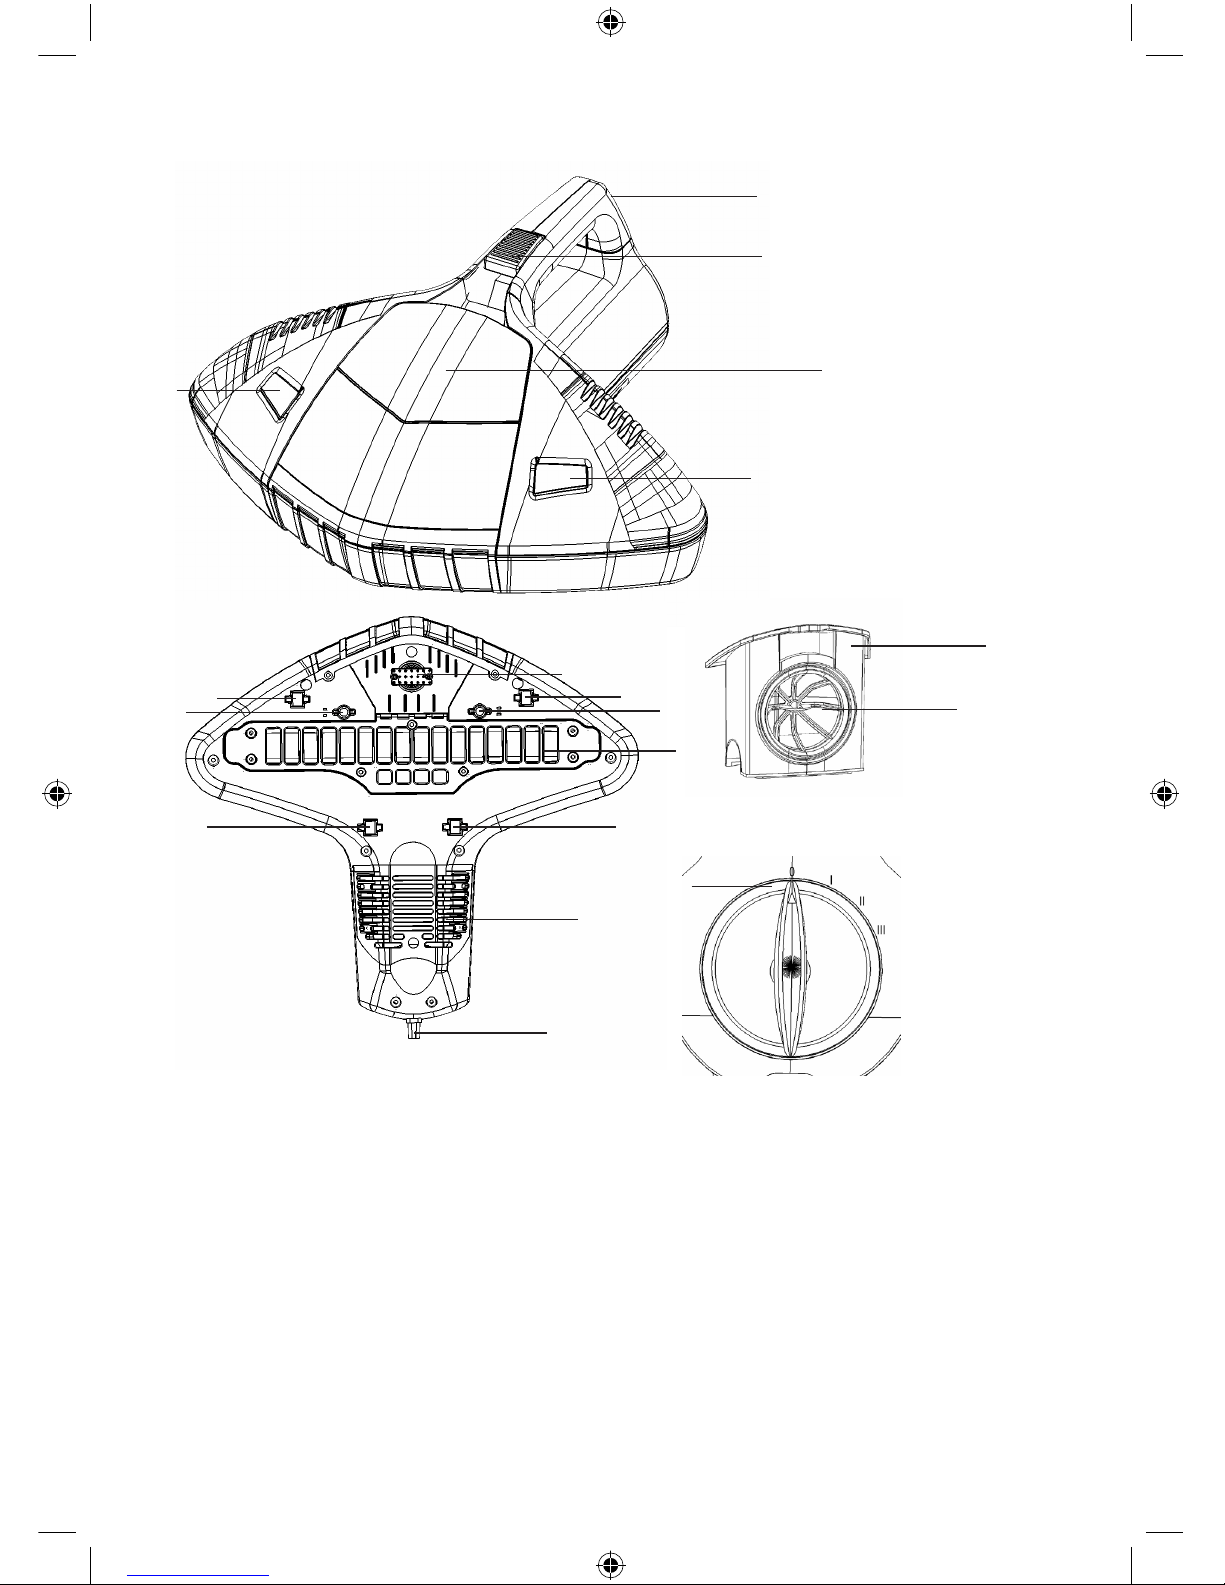
1. Handle
2. Air slide
3. Control switch
0: Off position
I: only the vacuum function
II: vacuum and UV-C light function
III: Vacuum cleaner, UV-C lights, and
vibration function
4. Dust bin with dust lter (12)
5. Display window for UV-C light
6. Vibration button
7. Wheels
8. Safety switch
9. UV-C sterilisation light
10. Microlter
11. Plug-in cable
12. Dust lter
• these operating instructions
5
5
8
1
2
7
77
7
9
8
10
11
6
4
12
3
4
02274_DE-GB-FR-NL_V2.indd 15 09.03.10 10:00
Page 16
16
Prior to rst use
❐ Keep children away from the packaging. There is, among other
things, a danger of suffocation!
❐ Unpack the device and the accessories. Using the list of product contents (see
“Product contents and device overview” section), check the contents for completeness and possible transport damage.
❐ Should you identify any transport damages, please promptly contact our customer
service department (see section “Customer service”).
Start-up
1. Insert the mains plug in an installed, 230 V earthed socket and which has been installed in
compliance with regulations.
2. Set the device on a mattress, bed sheet or blanket in a at position and turn the control knob
to the desired position (I, II or III).
I: Vacuum cleaner function only (you can vacuum up surface dirt)
II: Vacuum cleaner and UV-C light function (the UV-C light kills bacteria that the
vacuum cleaner vacuums up)
III: Vacuum cleaner, UV-C lights, and vibration function (the vibration stirs up dust
mites and bacteria making it easier to vacuum them up)
3. Move the device evenly over the surface.
❐ To clean pillows and smaller areas, move the device back and forth
for best results.
4. To turn off the vacuum cleaner, turn the control knob back to position 0.
Clean both sides of mattresses.
You should clean new mattresses once a month.
When you start cleaning with the device, you should clean older mattresses once a
week and then also once a month.
Cleaning/changing the dust bin and lter
❐ Before cleaning/changing, pull the plug out of the socket and let
the device cool off.
1. Reach into the recess over the dust bin and pull the dust bin up and out of the vacuum
cleaner.
2. Pull the dust lter in the opening out of the dust bin.
3. Empty the dust bin.
4. Remove dirt from the dust lter and if necessary, clean it under running water.
02274_DE-GB-FR-NL_V2.indd 16 09.03.10 10:00
Page 17
17
5. Dry off the dust bin and dust lter with a soft cloth.
6. Place the dust lter back in the dust bin.
7. Put the dust bin back in the device.
❐ Make sure that both the dust bin and dust lter are dry before you
put them back into the device!
Change the dust lter every 12–18 months if you use the device at the cleaning
intervals we recommend. For this, please contact our customer service
department(see the section “Customer service”).
Changing the microlter
❐ Before changing, pull the plug out of the socket and let the device
cool off.
1. Unscrew the screw on the microlter cover and remove the cover (Note: Cover and
microlter are connected with one another).
2. Set the new microlter cover with the lter in the device and screw tighten the screw.
❐ Dispose of the old microlter at a recycling depot.
Change the dust lter every 12–18 months if you use the device at the cleaning
intervals we recommend. For this, please contact our customer service department
(see the section “Customer service”).
Cleaning the UV-C sterilisation light
❐ Before cleaning, pull the plug out of the socket and let the device
cool off.
1. Unscrew the 7 screws for the UV-C light cover and take off the cover.
2. Polish the glass cover of the UV-C sterilisation light with a dust rag.
3. Screw tighten the cover.
Change the UV-C sterilisation light every 1 to 2 years if you use the device at the
cleaning intervals we recommend. For this, please contact our customer service
department (see the section “Customer service”).
02274_DE-GB-FR-NL_V2.indd 17 09.03.10 10:00
Page 18
18
Changing the UV-C sterilisation light
❐ Before changing, pull the plug out of the socket and let the device
cool off.
1. Unscrew the 7 UV-C light cover screws and take off the cover.
2. Take hold of the UV-C sterilisation light with pliers and turn it by 90° until the light pins are
visible in the slot. Pull the light out.
3. Insert a new UV-C light in the designated protective sleeve and return it to its previous
position.
4. Take hold of the UV-C sterilisation light with pliers and turn it by 90° until the light pins are
no longer visible in the slot.
5. Screw the cover back into place with the 7 screws.
Change the UV-C sterilisation light every 1 to 2 years if you use the device at the
cleaning intervals we recommend.
Cleaning and care
❐ Attention! Never immerse the device, the mains cord, or the plug
in water or other liquids.
❐ When cleaning, do not use any scouring abrasive or scouring clean-
ers.
❐ Prior to each cleaning, pull the plug out of the socket and let the
device cool off.
Troubleshooting
If the device is defective, do not attempt to repair it yourself. In the event of damage, contact the
customer service (see section “Customer service”).
Please check whether you are able to rectify the problem yourself.
Problem Potential cause/solution
The UV-C light does not work.
The device is not in a level position on the surface. The safety
contact switches are not properly positioned in the device
and the contact to the UV-C light has been interrupted.
The device is jammed.
Make sure that the wheels on the bottom of the device are
not jammed.
Device isn’t working.
• Check whether the mains plug has been properly
inserted, the device is turned on and the guard has been
activated.
• Check whether all parts are properly installed.
02274_DE-GB-FR-NL_V2.indd 18 09.03.10 10:00
Page 19
19
Technical data
Model: P00183
Power: max. 400 W
Voltage supply: 230 V ~ 50 Hz
Safety class: II
Disposal
The packaging material can be recycled. Dispose of the packaging in an
environmentally-friendly manner and make it available for the recyclable material
collection-service.
Dispose of the device in an environmentally-friendly manner when you decide to part
with it. The device does not belong in the household waste. Dispose of it at a
recycling depot for electric and electronic appliances.
For more information, please contact the administration in your community.
Customer service
Please contact our customer service department with any questions relating to the device:
DS Produkte GmbH, 19258 GALLIN, GERMANY
Tel. 0180-5003530 (chargeable telephone call)
Email: [email protected]
As part of our continual device development, we reserve the right to alter devices, packaging or
enclosed documentation at any time.
Importer:
DS Produkte GmbH, Am Heisterbusch 1, 19258 GALLIN, GERMANY
All rights reserved.
02274_DE-GB-FR-NL_V2.indd 19 09.03.10 10:00
Page 20

20
Sommaire
Consignes de sécurité_______________________________________________21
Utilisation adéquate ______________________________________________________21
Risques de blessure _______________________________________________________21
Mise en place et branchement _______________________________________________22
Risque d’incendie et d’explosion ______________________________________________22
Utilisation ______________________________________________________________22
Nettoyage ______________________________________________________________23
Dispositions de la garantie __________________________________________24
Étendue de la livraison et vue générale de l’appareil ________________25
Avant la première utilisation _______________________________________26
Mise en service _____________________________________________________26
Nettoyer/Remplacer le récipient et le ltre à poussière ____________26
Remplacement du microltre _______________________________________27
Nettoyage de la lampe de stérilisation UV-C _______________________27
Remplacement de la lampe de stérilisation à UV-C _________________28
Nettoyage et entretien _____________________________________________28
Suppression des défauts ____________________________________________28
Données techniques ________________________________________________29
Mise au rebut _______________________________________________________29
Service après-vente ________________________________________________29
FR
02274_DE-GB-FR-NL_V2.indd 20 09.03.10 10:00
Page 21
21
Chère cliente, cher client,
Nous nous réjouissons que vous ayez décidé d’acheter l’« Aspirateur à acariens Clean Maxx ».
Avec cet appareil pratique, vous pouvez détruire les bactéries et les acariens et réduire
considérablement les germes. Vous pouvez réduire considérablement le risque de différentes
maladies respiratoires.
Nous souhaitons que votre nouvel « Aspirateur à acariens Trimm Maxx » vous donne entière
satisfaction.
Avant d’utiliser pour la première fois l’appareil, veuillez lire attentivement ce mode
d’emploi et le conserver précieusement. Si vous cédez l’appareil à un tiers, veuillez
également lui remettre ce mode d’emploi. Le fabricant et l’importateur déclinent toute
responsabilité si les indications de ce mode d’emploi ne sont pas respectées !
Signication des symboles contenus dans ce mode d’emploi
Toutes les consignes de sécurité sont marquées de ce symbole. Veuillez lire
attentivement et entièrement ces consignes et tenez-vous en aux consignes de
sécurité pour éviter les dommages corporels et matériels.
Tous les conseils et recommandations sont caractérisés par ce symbole.
Consignes de sécurité
Utilisation adéquate
❐ L’appareil est conçu pour détruire des bactéries et pour supprimer la poussière, les
germes et les acariens.
❐ L’appareil est conçu pour un usage privé, pas pour une utilisation commerciale.
❐ Utilisez l’appareil uniquement comme la description du mode d’emploi. Toute autre
utilisation est considérée comme contraire aux dispositions.
❐ L’appareil n’est pas destiné à être utilisé dans des granges, des étables ou des lieux
similaires.
❐ L’appareil n’est pas destiné à être utilisé dans les lieux, où des fumées inammables
ou la poussière explosive peuvent se trouver.
Risques de blessure
❐ Gardez les enfants éloignés du matériel d’emballage. Il y a, entre autres, risque
d’asphyxie !
❐ Cet appareil n’est pas destiné à être utilisé par des personnes (y compris des
enfants) ayant des capacités physiques, sensorielles ou mentales restreintes ou
ayant un manque d’expérience et/ou un manque de connaissance, sauf si elles sont
02274_DE-GB-FR-NL_V2.indd 21 09.03.10 10:00
Page 22
22
surveillées par une personne responsable de leur sécurité ou si elles ont reçu de
celle-ci une instruction sur la manière d’utiliser l’appareil. Les enfants doivent être
surveillés pour s’assurer qu’ils ne jouent pas avec l’appareil.
❐ Utilisez et rangez l’appareil uniquement hors de portée des enfants. Même le câble
d’alimentation ne doit pas être accessible aux enfants. Ceux-ci pourraient sinon
tirer l’appareil et le faire tomber.
❐ Après utilisation de l’appareil, laisser refroidir sufsamment la lampe UV-C avant de
la toucher !
❐ ATTENTION ! Évitez de vous exposer aux rayons ultraviolets
germicides, qu’ils soient directs ou fortement rééchis. Les rayons
ultraviolets germicides sont dangereux pour les yeux et la peau !
❐ Ne mettez jamais la main sous l’appareil tant qu’il est encore en marche.
Mise en place et branchement
❐ Utilisez l’appareil uniquement dans une pièce fermée.
❐ Gardez sufsamment de distance par rapport aux sources de chaleur, comme
par exemple les plaques de cuisson ou les fours an d’éviter des dommages sur
l’appareil.
❐ Branchez l’appareil uniquement à une prise électrique installée selon les règles en
vigueur. Après le branchement, la prise doit aussi être bien accessible. La tension
du secteur doit correspondre aux données techniques de l’appareil. Utilisez unique-
ment des câbles de rallonge corrects dont les données techniques correspondent à
celles de l’appareil.
❐ Veillez à ce que le câble d’alimentation branché ne soit pas une cause de trébuche-
ment. Ne laissez pas pendre le câble par-dessus le bord de tables ou de plans de
travail de cuisine. Quelqu’un pourrait s’y accrocher et faire tomber l’appareil.
❐ Veuillez disposer le câble de sorte que celui-ci ne soit pas plié, écrasé ou ne soit
pas en contact avec des surfaces brûlantes.
❐ N’essayez pas de passer l’aspirateur sur des animaux, des personnes ou des plantes
avec cet appareil !
❐ Ne montez ni ne vous asseyez sur l’appareil. Il pourrait basculer.
❐ Veuillez ne jamais bloquer le contacteur de sécurité de la lampe UV-C.
❐ Pendant le fonctionnement, ne pas toucher le bouton de vibration.
Risque d’incendie et d’explosion
❐ N’aspirez aucun objet en feu ou incandescents, comme par exemple des cigarettes,
des cendres brûlantes, des allumettes. Ceux-ci pourraient enammer le ltre.
❐ N’aspirez pas non plus de liquides enammables ou facilement enammables
comme, par exemple, de l’essence.
Utilisation
❐ Vériez avant chaque utilisation que l’appareil n’est pas endommagé. Lorsque l’ap-
pareil, le câble ou la prise électrique présentent des dommages visibles, l’appareil
ne doit pas être utilisé. N’utilisez pas l’appareil en cas de dysfonctionnement ou
lorsque l’appareil est tombé.
02274_DE-GB-FR-NL_V2.indd 22 09.03.10 10:00
Page 23
23
❐ Si l’appareil devait être défectueux, n’essayez pas de le
réparer vous-même. En cas de dommages, veuillez contacter le service après-vente
(Cf. passage « Service après-vente »).
❐ Débranchez la prise électrique
– lorsque vous n’utilisez pas l’appareil pendant une longue période,
– lorsqu’une erreur survient pendant le fonctionnement,
– avant un orage,
– avant remplacer des accessoires,
– avant nettoyer l’appareil.
❐ Lorsque vous souhaitez retirer la prise électrique, saisissez-la toujours au niveau de
la prise et jamais par le câble. Nettoyez uniquement des surfaces sèches. L’appareil
n’est pas conçu pour aspirer des liquides ! Attendez, par exemple, pour les mo-
quettes shampooinées, que celles-ci soient entièrement sèches !
❐ L’appareil ne doit pas être utilisé si les ltres sont encrassés. Les ltres endomma-
gés doivent être remplacés immédiatement. Dans ce cas, veuillez vous adresser à
notre service après-vente.
❐ Veillez à ce que le ltre soit sec avant de le remettre dans l’appareil.
❐ Ne mettez aucun objet dans les ouvertures de l’appareil. N’utilisez pas l’appareil
lorsque les ouvertures sont bloquées.
❐ Avant de passer l’aspirateur, enlever les objets plus gros, coupants et pointus de la
surface à aspirer. Ceux-ci pourraient endommager le ltre.
❐ N’aspirez aucune poussière de pierre, aucun ciment, aucune poussière de perçage
etc. Celles-ci pourraient boucher et endommager le ltre.
❐ N’essayez pas de lubrier les roulettes avec du lubriant ou de l’huile. La poussière
ou la saleté y resterait sinon collée.
❐ Ne plongez jamais l’appareil dans de l’eau ou d’autres liquides ! Assurez-vous que
l’appareil, le câble ou la prise ne peuvent pas tomber dans l’eau ou devenir mouillés.
Si l’appareil devait tomber dans l’eau, coupez immédiatement l’alimentation élec-
trique.
❐ Ne touchez jamais l’appareil, le câble ou la prise électrique lorsque vous avez les
mains mouillées.
❐ N’utilisez aucun accessoire supplémentaire.
❐ Ne couvrez pas les fentes d’aération !
❐ Ne laissez jamais l’appareil sans surveillance lorsqu’il est en marche.
❐ Ne laissez pas tomber l’appareil et ne l’exposez pas à de forts chocs.
Nettoyage
❐ Avant le nettoyage, débranchez toujours la prise électrique et laissez refroidir
l’appareil.
❐ Ne plongez jamais l’appareil, le câble d’alimentation et la prise électrique dans de
l’eau.
❐ N’utilisez aucun détergent agressif ou abrasif. N’utilisez aucun objet métallique.
❐ Nettoyez respectivement remplacez les ltres dans les intervalles recommandés.
02274_DE-GB-FR-NL_V2.indd 23 09.03.10 10:00
Page 24

24
Dispositions de la garantie
Sont exclus de la garantie tous les défauts causés par une manipulation non appropriée, par un
dommage, par l’entartrage ou par des tentatives de réparation. Cela vaut également pour l’usure
normale des différents éléments.
02274_DE-GB-FR-NL_V2.indd 24 09.03.10 10:00
Page 25
25
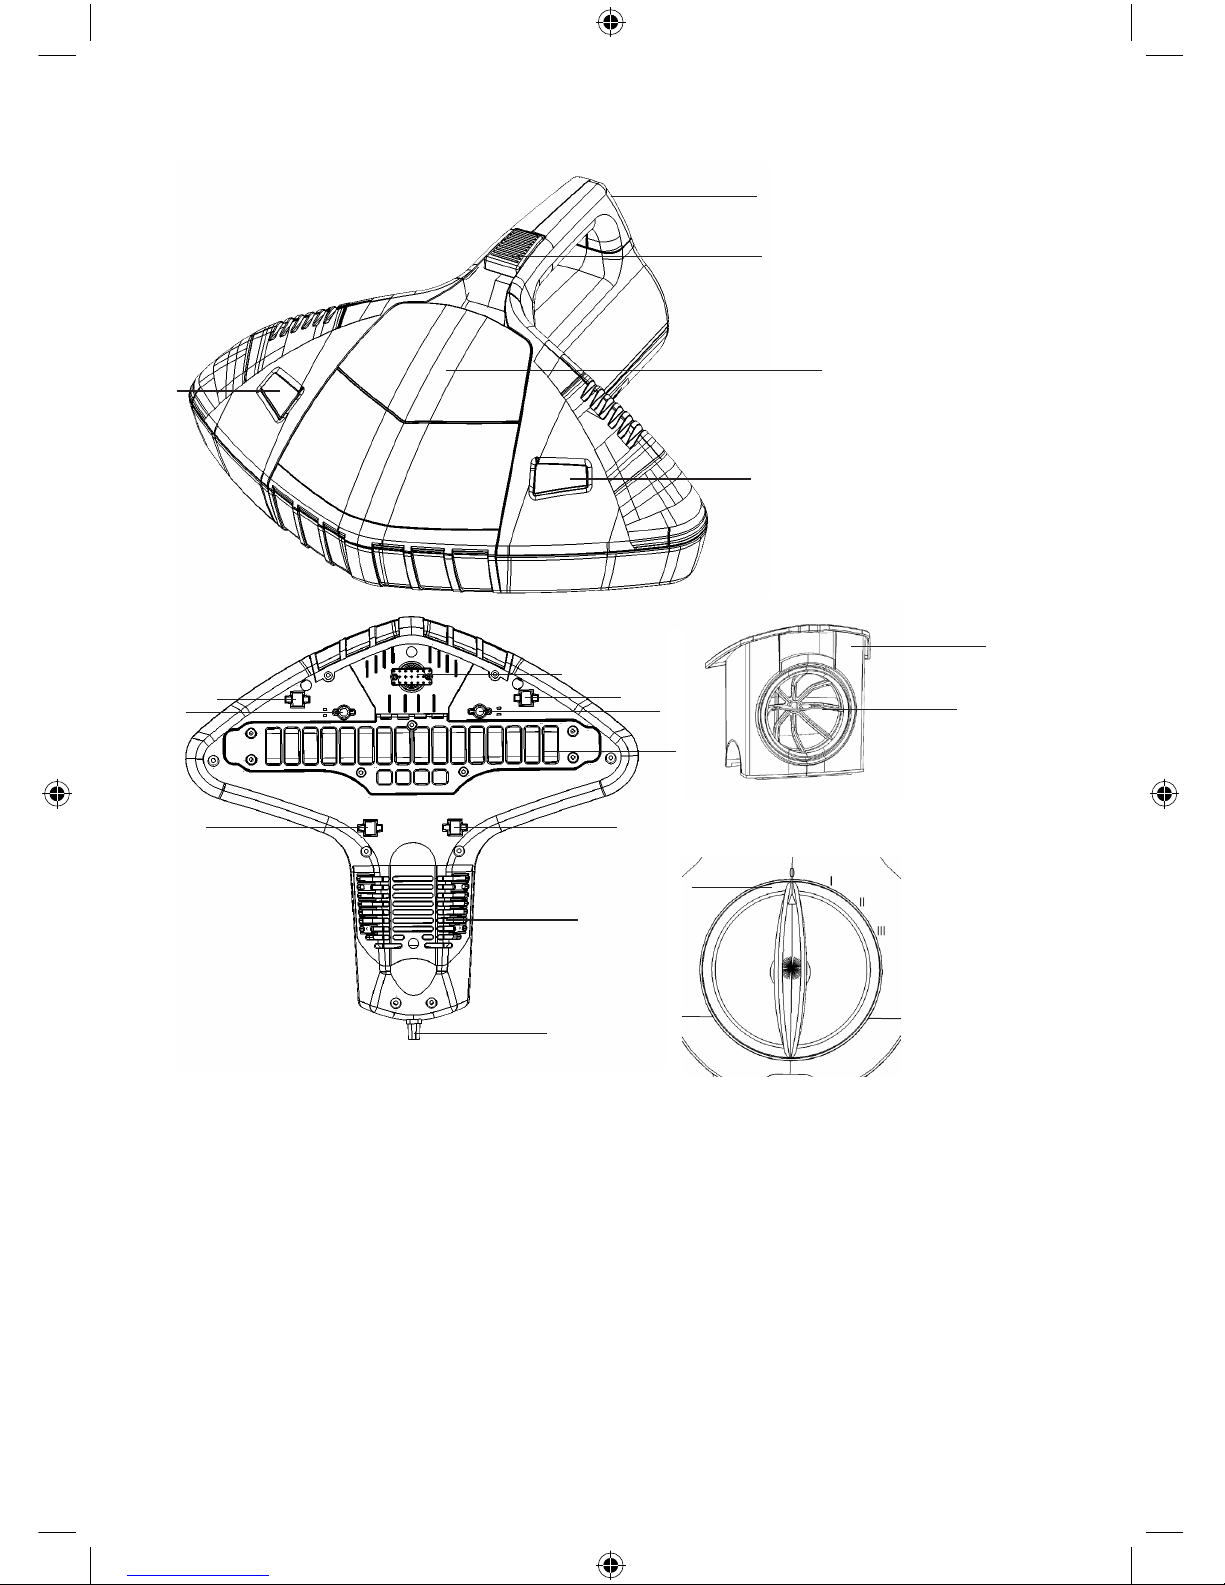
Étendue de la livraison et vue générale de l’appareil
1. Poignée
2. Curseur de puissance d'air
3. Contacteur de commande
0 : Position arrêt
I : Uniquement aspiration
II : Aspiration et lampe UV-C
III : Aspiration, lampe UV-C et
fonction de vibration
4. Récipient à poussière et ltre à poussière
(12)
5. Voyant pour la lampe UV-C
6. Bouton de vibration
7. Roulettes
8. Contacteur de sécurité
9. Lampe de stérilisation UV-C
10. Microltre
11. Câble d'alimentation
12. Filtre à poussière
• ce mode d’emploi
5
5
8
1
2
7
77
7
9
8
10
11
6
4
12
3
4
02274_DE-GB-FR-NL_V2.indd 25 09.03.10 10:00
Page 26
26
Avant la première utilisation
❐ Gardez les enfants éloignés du matériel d’emballage. Il y a, entre
autres, risque d’asphyxie !
❐ Déballez l’appareil et les accessoires. Vériez le contenu en vous servant de la vue
générale (Cf. passage « Étendue de la livraison et vue générale de l’appareil ») pour
voir s’il est complet et s’il y a d’éventuels dommages de transport.
❐ Si vous constatiez un dommage de transport, veuillez vous adresser immédiatement
au service après-vente (Cf. passage « Service après-vente »).
Mise en service
1. Branchez la prise électrique dans une prise de 230 V avec mise à la terre correctement
installée.
2. Placez l’appareil à plat sur le matelas, les draps ou la couverture de lit et tournez le bouton de
commande sur la position souhaitée (I, II ou III).
I : Uniquement fonction d’aspiration (vous pouvez aspirer la saleté de surface)
II : Fonction d’aspiration et de lampe UV-C (la lampe UV-C détruit les bactéries,
l’aspirateur les aspire)
III : Fonction d’aspiration, de lampe UV-C et de vibration (avec les vibrations, les
acariens, les déjections des acariens et les bactéries sont secouées et peuvent être
mieux aspirés)
3. Déplacez l’appareil régulièrement.
❐ Pour les oreillers et les plus petites surfaces, déplacez l’appareil
d’avant en arrière pour obtenir un résultat optimal.
4. Pour arrêter, mettez le bouton de commande sur la position 0.
Nettoyez les matelas des deux côtés.
Les matelas neufs devront être nettoyés une fois par mois.
Les matelas plus anciens devront, au début, être nettoyés tous les jours pendant
une semaine, ensuite également une fois par mois.
Nettoyer/Remplacer le récipient et le ltre à poussière
❐ Débranchez toujours la prise électrique et laissez refroidir l’appa-
reil avant chaque nettoyage/échange.
1. Prenez le récipient à poussière dans son logement et sortez-le en tirant vers le haut.
2. Sortez le ltre à poussière de son logement hors du récipient à poussière.
3. Videz le récipient à poussière.
4. Libérez le ltre à poussière de sa saleté et nettoyez-le, si nécessaire, sous l’eau courante.
02274_DE-GB-FR-NL_V2.indd 26 09.03.10 10:00
Page 27
27
5. Séchez le récipient à poussière ainsi que le ltre à poussière avec un chiffon doux.
6. Remettez le ltre à poussière dans le récipient à poussière.
7. Remettez le récipient à poussière dans l’appareil.
❐ Veillez à ce qu’aussi bien le récipient à poussière que le ltre à
poussière soient secs avant de les remettre dans l’appareil !
Remplacez le ltre à poussière tous les 12 à 18 mois si vous utilisez l’appareil en
respectant les intervalles de nettoyage que nous recommandons. Pour ce faire,
veuillez contacter le service après-vente (Cf. passage « Service après-vente »).
Remplacement du microltre
❐ Débranchez toujours la prise électrique et laissez refroidir l’appa-
reil avant chaque échange.
1. Dévissez la vis du couvercle du microltre et retirez le couvercle (Remarque : le couvercle et
le microltre sont reliés ensemble).
2. Placez le nouveau couvercle à microltre avec le ltre dans l’appareil et revissez la vis.
❐ Éliminez le microltre auprès d’un centre de recyclage.
Remplacez le microltre tous les 12 à 18 mois si vous utilisez l’appareil en respectant les intervalles de nettoyage que nous recommandons. Pour ce faire, veuillez
contacter le service après-vente (Cf. passage « Service après-vente »).
Nettoyage de la lampe de stérilisation UV-C
❐ Débranchez toujours la prise électrique et laissez refroidir l’appa-
reil avant chaque nettoyage.
1. Dévissez les 7 vis de la protection de la lampe UV-C et retirez la protection.
2. Polissez la protection en verre de la lampe de stérilisation UV-C avec un chiffon à poussière.
3. Replacez le nouveau microltre avec le ltre dans l’appareil et revissez la protection.
Remplacez la lampe de stérilisation UV-C tous les 1 à 2 ans si vous utilisez l’appareil
en respectant les intervalles de nettoyage que nous recommandons. Pour ce faire,
veuillez contacter le service après-vente (Cf. passage « Service après-vente »).
02274_DE-GB-FR-NL_V2.indd 27 09.03.10 10:00
Page 28
28
Remplacement de la lampe de stérilisation à UV-C
❐ Débranchez toujours la prise électrique et laissez refroidir l’appa-
reil avant chaque échange.
1. Dévissez les 7 vis de la protection de la lampe UV-C et retirez la protection.
2. Saisissez la lampe de stérilisation à UV-C avec une pince et tournez-la de 90° jusqu’à ce que
les tétons de la lampe sortent de la fente. Retirez la lampe.
3. Introduisez une nouvelle lampe UV-C dans le petit tube de protection prévu à cet effet et
remettez-la à sa place.
4. Saisissez la lampe de stérilisation à UV-C avec une pince et tournez-la de 90° jusqu’à ce que
les tétons de la lampe ne soient plus visibles dans la fente.
5. Revissez la protection avec les 7 vis.
Remplacez la lampe de stérilisation à UV-C tous les 1 à 2 ans si vous utilisez
l’appareil en respectant les intervalles de nettoyage que nous recommandons.
Nettoyage et entretien
❐ Attention ! Ne plongez jamais l’appareil, le câble et la prise élec-
trique dans de l’eau ou d’autres liquides.
❐ Pour le nettoyage, n’utilisez aucun détergent agressif ou abrasif.
❐ Débranchez l’appareil et laissez refroidir celui-ci complètement
avant chaque nettoyage.
Suppression des défauts
Si l’appareil devait être défectueux, n’essayez pas de le réparer vous-même. En cas de dommages,
veuillez contacter le service après-vente (Cf. passage « Service après-vente »).
Veuillez vérier si vous pouvez résoudre vous-même un problème.
Problème Cause possible/solution
La lampe UV-C ne fonctionne
pas.
L'appareil n'est pas sur une surface plate. De ce fait, les
contacteurs de sécurité ne sont pas rentrés dans l'appareil et
le contact de la lampe UV-C est interrompu.
L'appareil est bloqué.
Assurez-vous que les roulettes sous l'appareil ne sont pas
bloquées.
L’appareil ne fonctionne pas.
• Vériez si la prise électrique est correctement branchée,
que l’appareil est en marche et que le fusible est activé.
• Vériez sit toutes les pièces sont correctement montées.
02274_DE-GB-FR-NL_V2.indd 28 09.03.10 10:00
Page 29
29
Données techniques
Modèle : P00183
Puissance : max. 400 W
Alimentation électrique : 230 V ~ 50 Hz
Catégorie de protection : II
Mise au rebut
Le matériel d’emballage peut être réutilisé. Il faut mettre l’emballage au rebut en
respectant l’environnement et l’amener au service de collection de matières
recyclables.
Si vous souhaitez vous séparer de cet appareil, il faut le mettre au rebut en respectant
l’environnement. Ne jetez pas cet appareil aux ordures ménagères. Éliminez-le dans
un centre de recyclage pour les appareils électriques et électroniques usés.
De plus amples informations sont à disposition auprès de votre municipalité.
Service après-vente
Pour toutes questions supplémentaires concernant l’appareil, veuillez vous adresser à notre
service après-vente :
DS Produkte GmbH, 19258 GALLIN, ALLEMAGNE
Tél. : 0180-5003530 (télécommunication payante)
e-mail : [email protected]
Dans le cadre de l’évolution constante de nos produits, nous nous réservons le droit de modier
à tout moment le produit, l’emballage ou les notices.
Importateur :
DS Produkte GmbH, Am Heisterbusch 1, 19258 GALLIN, ALLEMAGNE
Tous droits réservés.
02274_DE-GB-FR-NL_V2.indd 29 09.03.10 10:00
Page 30

30
Inhoud
Veiligheidsinstructies _______________________________________________31
Reglementair gebruik _____________________________________________________31
Verwondingsgevaren ______________________________________________________31
Opstelling en aansluiting ____________________________________________________32
Gevaar voor brand en explosie _______________________________________________32
Gebruik________________________________________________________________32
Reiniging _______________________________________________________________33
Garantiebepalingen _________________________________________________33
Leveringspakket en overzicht van het apparaat _____________________34
Voor ingebruikname ________________________________________________35
Ingebruikneming ___________________________________________________35
Reiniging/vervanging van de stofbak en -lter ______________________35
Vervanging van de microlter ______________________________________36
Reiniging van de UV-C-sterilisatielamp _____________________________36
Vervanging van de UV-C-sterilisatielamp ___________________________37
Reiniging en onderhoud ____________________________________________37
Oplossing van fouten _______________________________________________37
Technische gegevens _______________________________________________38
Afvalverwijdering __________________________________________________38
Klantenservice _____________________________________________________38
NL
02274_DE-GB-FR-NL_V2.indd 30 09.03.10 10:00
Page 31
31
Geachte klant,
We zijn blij dat u hebt gekozen voor de “Clean Maxx stofzuiger voor stofmijten”. Met dit
praktische apparaat kunt u bacteriën doden en huisstofmijten en kiemen zeker reduceren. U kunt
het risico op verschillende luchtweginfecties duidelijk reduceren.
We wensen u veel plezier met de nieuwe “Clean Maxx stofzuiger voor stofmijten”.
Voordat u het apparaat voor het eerst in gebruik neemt, dient u de handleiding
zorgvuldig te lezen en goed te bewaren. Geeft u het apparaat aan iemand anders,
overhandig dan ook de handleiding. Producent en importeur zijn niet aansprakelijk,
wanneer de gegevens in deze handleiding niet worden opgevolgd!
Betekenis van de symbolen in deze handleiding
Alle veiligheidsinstructies zijn met dit symbool aangeduid. Neem deze aandachtig door
en houd u aan de veiligheidsinstructies om lichamelijke letsels en materiële schade te
vermijden.
Tips en aanbevelingen zijn aangeduid met dit symbool.
Veiligheidsinstructies
Reglementair gebruik
❐ Het apparaat is bedoeld voor het doden van bacteriën en de verwijdering van stof,
kiemen en huisstofmijten.
❐ Het apparaat werd ontworpen voor het privé-gebruik, niet voor commerciële
doeleinden.
❐ Gebruik het apparaat alleen volgens de beschrijvingen in de handleiding. Elk ander
gebruik geldt als onreglementair.
❐ Het apparaat is niet bedoeld voor het gebruik in schuren, stallen of dergelijke
plaatsen.
❐ Het apparaat is niet bedoeld voor het gebruik aan plaatsen, waar ontvlambare dam-
pen of explosieve stof kunnen optreden.
Verwondingsgevaren
❐ Houd kinderen uit de buurt van het verpakkingsmateriaal. Er bestaat o.a. gevaar
voor verstikking!
❐ Dit apparaat is niet bedoeld voor het gebruik door personen (inclusief kinderen)
met beperkte fysieke, sensorische of mentale vaardigheden of met een gebrek aan
ervaring en/of kennis, tenzij ze worden bijgestaan door een persoon die instaat
voor hun veiligheid of als ze van die personen instructies kregen voor het gebruik
02274_DE-GB-FR-NL_V2.indd 31 09.03.10 10:00
Page 32
32
van het apparaat. Kinderen moeten onder toezicht staan, zodat wordt gegaran-
deerd dat ze niet met het apparaat spelen.
❐ Gebruik en bewaar het apparaat alleen buiten het bereik van kinderen. Ook het
snoer mag voor kinderen niet toegankelijk zijn. Ze kunnen het apparaat aan het
snoer naar beneden trekken.
❐ Laat na gebruik van het apparaat de UV-C-lamp voldoende afkoelen, alvorens ze
aan te raken!
❐ OPGELET! Vermijd de blootstelling aan directe of sterk reecte-
rende kiemdodende ultraviolette stralen. Kiemdodende ultravio-
lette stralen zijn schadelijk voor de ogen en de huid!
❐ Leg nooit de hand onder het apparaat, zolang dit nog in gebruik is.
Opstelling en aansluiting
❐ Gebruik het product alleen in gesloten ruimten.
❐ Houd voldoende afstand tot warmtebronnen zoals fornuisplaten of ovens, om
schade aan het apparaat te vermijden.
❐ Sluit het apparaat alleen aan op een reglementair geïnstalleerd geaard stopcontact.
Het stopcontact moet ook na de aansluiting goed toegankelijk zijn. De spanning
moet overeenstemmen met de technische gegevens van het apparaat. Gebruik al-
leen reglementaire verlengsnoeren, waarvan de technische gegevens overeenstem-
men met die van het apparaat.
❐ Zorg ervoor dat aangesloten snoeren geen struikelblok vormen. Laat het snoer
niet over de rand van tafels of keukentabletten bungelen. Er kan iemand aan blijven
hangen en het apparaat naar beneden trekken.
❐ Plaats het snoer zodanig, dat het niet geklemd of geplooid wordt en niet in aanra-
king komt met hete oppervlakken.
❐ Probeer niet om dieren, personen of planten met dit apparaat te stofzuigen!
❐ Ga niet staan of zitten op het apparaat. Het kan omkantelen.
❐ Blokkeer nooit de veiligheidsschakelaar van de UV-C-lamp.
❐ Tijdens het gebruik mag u de vibreerknop niet aanraken.
Gevaar voor brand en explosie
❐ Stofzuig geen brandende of gloeiende voorwerpen, zoals sigaretten, hete as, luci-
fers. Daardoor kan de lter vuur vatten.
❐ Stofzuig eveneens geen brandbare of licht ontvlambare vloeistoffen, zoals benzine.
Gebruik
❐ Kijk het apparaat voor elk gebruik na op beschadigingen. Als het apparaat, het
snoer of de stekker zichtbare schade vertonen, mag het apparaat niet worden
gebruikt. Gebruik het apparaat niet als het een storingsfunctie vertoonde of als het
is gevallen.
❐ Is het apparaat defect, probeer dan niet het apparaat eigenhandig te
repareren. Contacteer in geval van schade de klantendienst (zie paragraaf “Klanten-
service”).
02274_DE-GB-FR-NL_V2.indd 32 09.03.10 10:00
Page 33
33
❐ Trek de stekker uit het stopcontact
– als u het apparaat gedurende een langere tijdspanne niet gebruikt,
– als er tijdens het gebruik een fout optreedt,
– voor een onweer,
– voor de vervanging van onderdelen,
– voor de reiniging.
❐ Als u de stekker uit het stopcontact wilt trekken, trek dan steeds aan de stekker en
nooit aan het snoer. Reinig alleen droge oppervlakken. Het apparaat is niet geschikt
voor het opzuigen van vloeistoffen! Wacht bijv. bij geshamponeerde tapijtbekledin-
gen tot deze volledig droog zijn geworden!
❐ Het apparaat mag alleen worden gebruikt met de geplaatste lters. Beschadigde
lters moeten direct worden vervangen. Richt u in dit geval tot onze klantendienst.
❐ Zorg ervoor dat de lter droog is, alvorens hem opnieuw in het apparaat te plaat-
sen.
❐ Steek geen voorwerpen in de openingen van het apparaat. Gebruik het apparaat
niet, als de openingen zijn geblokkeerd.
❐ Verwijder voor het stofzuigen grotere, scherpe en puntige voorwerpen van het op-
pervlak dat u wenst te stofzuigen. Daardoor kan de lter worden beschadigd.
❐ Zuig geen jn stof, cement, boorstof etc. op. Deze kunnen de lter verstoppen en
beschadigen.
❐ Probeer niet de wielen met smeermiddel of olie te smeren. Dan zou het stof of het
vuil nog meer aan de wielen blijven kleven.
❐ Dompel het apparaat nooit onder in water of andere vloeistoffen! Zorg ervoor
dat het apparaat, het snoer of de stekker niet in het water kunnen vallen of nat
kunnen worden. Als het apparaat in het water valt, onderbreek dan onmiddellijk de
stroomtoevoer.
❐ Raak het apparaat, het snoer of de stekker nooit met vochtige handen aan.
❐ Gebruik geen bijkomende toebehoren.
❐ Dek de verluchtingsspleten niet af!
❐ Laat het apparaat niet ingeschakeld achter zonder toezicht.
❐ Zorg ervoor dat het apparaat niet valt en dat het geen hevige schokken ondergaat.
Reiniging
❐ Trek voor de reiniging steeds de stekker uit en laat het apparaat afkoelen.
❐ Dompel het apparaat, het snoer en de stekker nooit in water onder.
❐ Gebruik geen bijtende of schurende reinigingsmiddelen. Gebruik geen metalen
voorwerpen.
❐ Reinig resp. vervang de lters op de aanbevolen tussentijden.
Garantiebepalingen
De garantie dekt geen gebreken die ontstaan door verkeerd gebruik, beschadiging en
reparatiepogingen van derden. Dit geldt ook voor de normale slijtage van de afzonderlijke
onderdelen.
02274_DE-GB-FR-NL_V2.indd 33 09.03.10 10:00
Page 34
34
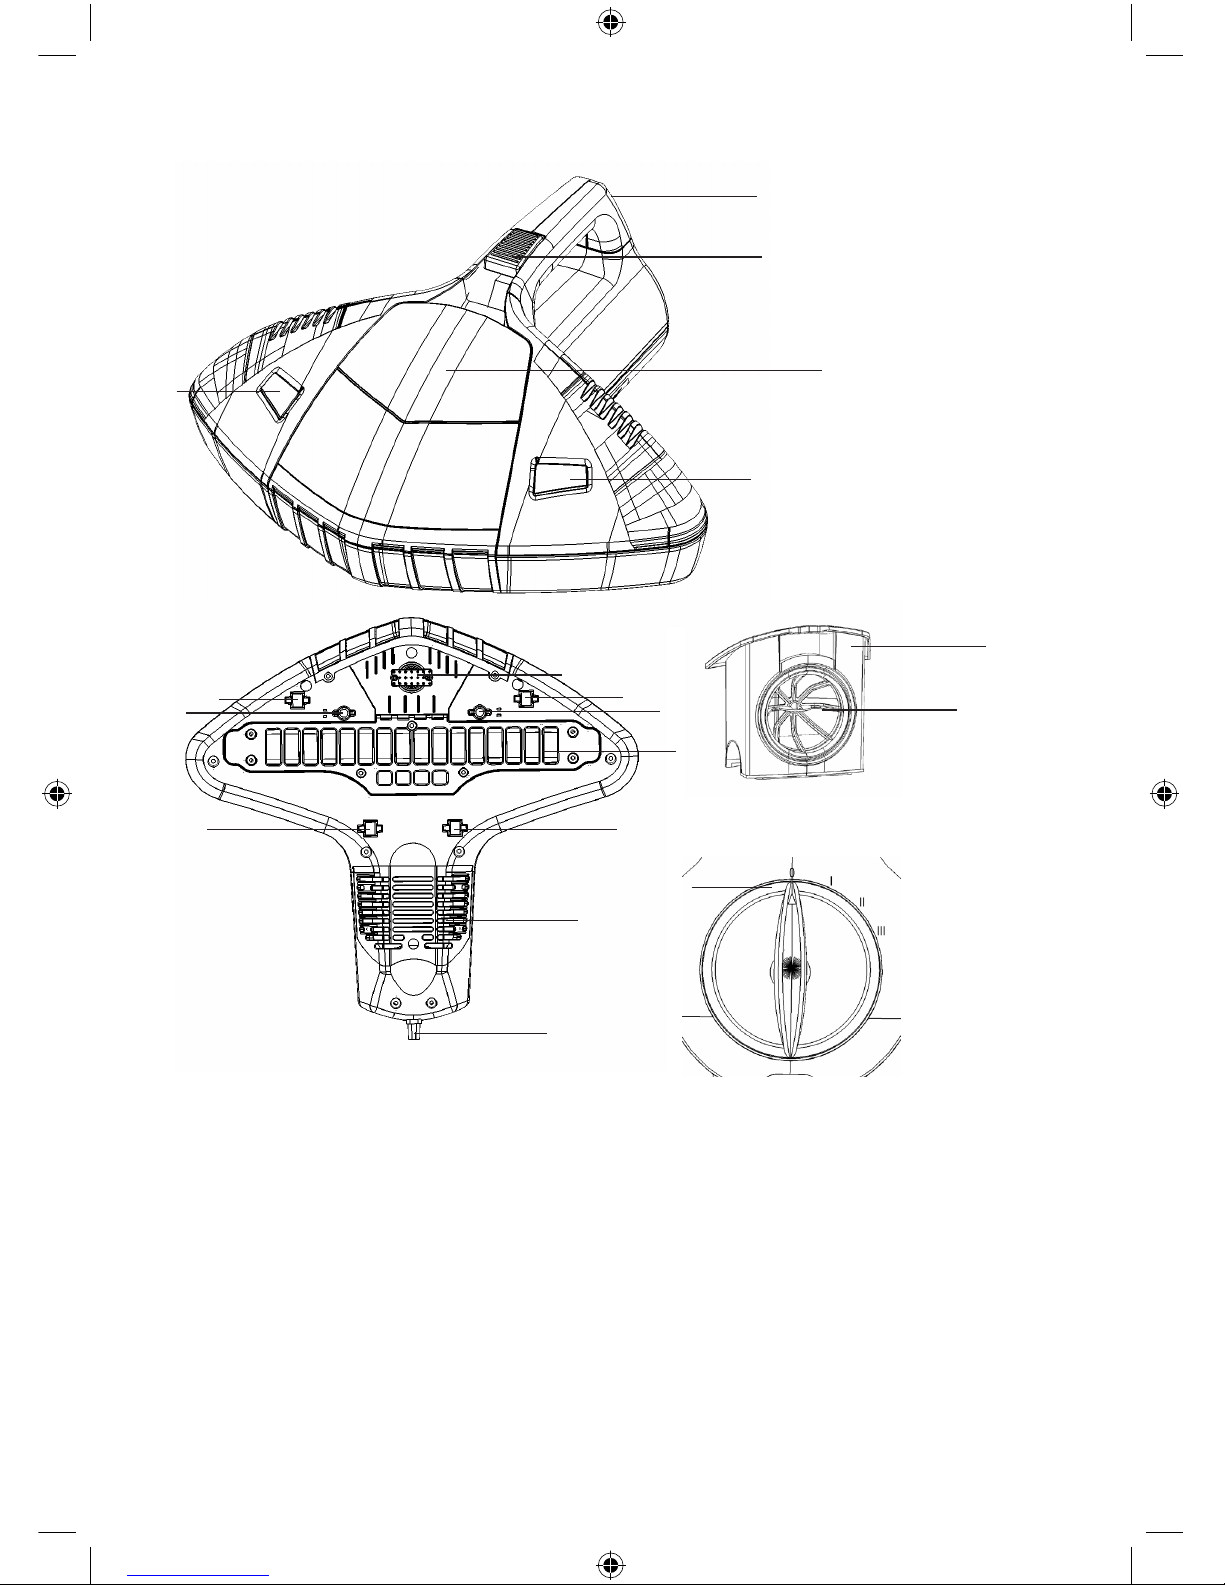
Leveringspakket en overzicht van het apparaat
1. Greep
2. Luchtschuif
3. Bedieningsschakelaar
0: Uit-positie
I: Alleen zuigfunctie
II: Zuig en UV-C-lampfunctie
III: Zuig-, UV-C-lamp- en
vibreerfunctie
4. Stofbak met stoflter (12)
5. Controlevenster voor UV-C-lamp
6. Vibreerknop
7. Wielen
8. Veiligheidsschakelaar
9. UV-C-sterilisatielamp
10. Microlter
11. Stekkersnoer
12. Stoflter
• deze gebruiksaanwijzing
5
5
8
1
2
7
77
7
9
8
10
11
6
4
12
3
4
02274_DE-GB-FR-NL_V2.indd 34 09.03.10 10:00
Page 35
35
Voor ingebruikname
❐ Houd kinderen uit de buurt van het verpakkingsmateriaal. Er
bestaat o.a. gevaar voor verstikking!
❐ Pak het apparaat en de onderdelen uit. Controleer de inhoud aan de hand van het
leveringspakket (zie paragraaf “Leveringspakket en overzicht van het apparaat”) op
volledigheid en mogelijke transportschade.
❐ Stelt u transportschade vast, dan dient u zich direct te richten tot de klantendienst
(zie paragraaf “Klantenservice”).
Ingebruikneming
1. Steek de stekker in een reglementair geïnstalleerd en geaard stopcontact van 230 V.
2. Zet het apparaat plat op de matras, het beddenlaken of de donsdeken en draai de bedieningsknop in de gewenste positie (I, II of III).
I: Alleen zuigfunctie (u kunt het oppervlakkige vuil wegzuigen)
II: Zuig- en UV-C-lampfunctie (de UV-C-lamp doodt bacteriën, de zuiger zuigt deze
op)
III: Zuig-, UV-C-lamp- en vibreerfunctie (Door vibratie worden stofmijten,
uitwerpselen van stofmijten en bacteriën losgeschud en zo kunnen ze beter
worden gestofzuigd)
3. Beweeg het apparaat gelijkmatig.
❐ Bij hoofdkussens en kleinere oppervlakken beweegt u het appa-
raat voor- en achterwaarts om een optimaal resultaat te verkrijgen.
4. Plaats de bedieningsknop opnieuw op te positie 0 om het apparaat uit te schakelen.
Reinig de matrassen aan beide kanten.
Nieuwe matrassen moeten een keer per maand worden gereinigd.
Oudere matrassen moeten in het begin gedurende een week dagelijks, dan
eveneens een keer per maand worden gereinigd.
Reiniging/vervanging van de stofbak en -lter
❐ Trek voor elke reiniging/vervanging de stekker uit het stopcon-
tact en laat het apparaat afkoelen.
1. Grijp in de opening boven de stofbak en trek de stofbak er naar boven toe uit.
2. Trek de stoflter in de opening uit de stofbak.
3. Maak de stofbak leeg.
4. Verwijder het vuil van de stoflter en reinig hem indien nodig onder stromend water.
5. Droog de stofbak en ook de stoflter af met een zachte doek.
6. Plaats de stoflter opnieuw in de stofbak.
02274_DE-GB-FR-NL_V2.indd 35 09.03.10 10:00
Page 36
36
7. Steek de stofbak opnieuw terug in het apparaat.
❐ Zorg ervoor dat niet alleen de stofbak, maar ook de stoflter
droog zijn ,alvorens ze opnieuw in het apparaat te steken!
Vervang de stoflter om de 12–18 maanden, als u het apparaat met de door ons
aanbevolen reinigingsintervallen gebruikt. Richt u hiervoor tot onze klantendienst
(zie hoofdstuk “Klantenservice”).
Vervanging van de microlter
❐ Trek voor elke vervanging de stekker uit het stopcontact en laat
het apparaat afkoelen.
1. Draai de schroef in de afdekking van de microlter los en verwijder de afdekking (tip:
afdekking en microlter zijn met elkaar verbonden).
2. Plaats de nieuwe microlterafdekking met lter in het apparaat en draai de schroef opnieuw
vast.
❐ Geef de oude microlter af in een recyclagepark.
Vervang de microlter om de 12–18 maanden, als u het apparaat met de door ons
aanbevolen reinigingsintervallen gebruikt. Richt u hiervoor tot onze klantendienst
(zie hoofdstuk “Klantenservice”).
Reiniging van de UV-C-sterilisatielamp
❐ Trek voor elke reinigingde stekker uit het stopcontact en laat het
apparaat afkoelen.
1. Draai de 7 schroeven van de UV-C-lampafdekking los en verwijder de afdekking.
2. Veeg het glazen deksel van de UV-C-sterilisatielamp glad met een stofdoek.
3. Schroef de afdekking opnieuw vast.
Vervang de UV-C-sterilisatielamp om de 1 tot 2 jaar, als u het apparaat met de
door ons aanbevolen reinigingsintervallen gebruikt. Richt u hiervoor tot onze
klantendienst (zie hoofdstuk “Klantenservice”).
02274_DE-GB-FR-NL_V2.indd 36 09.03.10 10:00
Page 37
37
Vervanging van de UV-C-sterilisatielamp
❐ Trek voor elke vervanging de stekker uit het stopcontact en laat
het apparaat afkoelen.
1. Draai de 7 schroeven van de UV-C-lampafdekking los en verwijder de afdekking.
2. Grijp de UV-C-sterilisatielamp met een tang vast en draai deze in een hoek van 90° tot de
pinnen van de lamp uit de spleet te voorschijn komen. Trek de lamp eruit.
3. Schuif een nieuwe UV-C-lamp in het daarvoor voorziene beschermbuisje en plaats ze terug
op haar plaats.
4. Grijp de UV-C-sterilisatielamp met een tang vast en draai deze in een hoek van 90° tot de
pinnen van de lamp in de spleet niet meer te zien zijn.
5. Schroef de afdekking opnieuw vast met de 7 schroeven.
Vervang de UV-C-sterilisatielamp om de 1 tot 2 jaar, als u het apparaat met de
door ons aanbevolen reinigingsintervallen gebruikt.
Reiniging en onderhoud
❐ Opgelet! Dompel het apparaat, het snoer en de stekker nooit
onder in water of andere vloeistoffen.
❐ Gebruik voor de reiniging geen agressieve, schurende of giftige
reinigingsmiddelen.
❐ Trek voor elke reiniging de stekker uit het stopcontact en laat het
apparaat afkoelen.
Oplossing van fouten
Is het apparaat defect, probeer dan niet het apparaat eigenhandig te repareren. Contacteer in
geval van schade de klantendienst (zie paragraaf “Klantenservice”).
Controleer of u een probleem zelf kunt oplossen.
Probleem Mogelijke oorzaak/oplossing
De UV-C-lamp functioneert
niet.
Het apparaat staat niet effen op een oppervlak. Hierdoor zijn
de veiligheidscontactschakelaars niet in het apparaat weggezonken en is het contact met de UV-C-lamp onderbroken.
Het apparaat blokkeert.
Zorg ervoor dat de wielen op de onderkant van het apparaat
niet geblokkeerd zijn.
Geen functie
• Kijk na of de stekker juist in het stopcontact zit, het
apparaat ingeschakeld is en de zekering actief is.
• Kijk na of alle onderdelen correct zijn gemonteerd.
02274_DE-GB-FR-NL_V2.indd 37 09.03.10 10:00
Page 38
38
Technische gegevens
Model: P00183
Vermogen: max. 400 W
Stroomvoorziening: 230 V ~ 50 Hz
Veiligheidsklasse: II
Afvalverwijdering
Het verpakkingsmateriaal is recycleerbaar. Verwijder de verpakking op een
milieuvriendelijke manier en zorg voor gescheiden afvalverwerking.
Verwijder het apparaat op een milieuvriendelijke manier, wanneer u het apparaat wilt
weggooien. Het apparaat hoort niet thuis bij het huisvuil. Breng het naar de
gemeentewerf of naar een inzamelstation voor oude elektrische en elektronische
apparaten.
Meer informatie vindt u bij uw plaatselijk gemeentebestuur.
Klantenservice
Als u vragen heeft in verband met het apparaat, kunt u zich richten tot onze klantenservice:
DS Produkte GmbH, 19258 GALLIN, DUITSLAND
Tel.: +49 (0) 180-5003530 (met verplichte betaling van de kosten)
E-mail: [email protected]
In het kader van onze voortdurende verdere ontwikkeling behouden we ons het recht voor, het
product, de verpakking of de bijgeleverde documenten op elk moment te wijzigen.
Importeur:
DS Produkte GmbH, Am Heisterbusch 1, 19258 GALLIN, DUITSLAND
Alle rechten voorbehouden.
02274_DE-GB-FR-NL_V2.indd 38 09.03.10 10:00
Page 39

39
02274_DE-GB-FR-NL_V2.indd 39 09.03.10 10:00
Page 40

02274_DE-GB-FR-NL_V2.indd 40 09.03.10 10:00
 Loading...