

Page 1

Z515 Might Plus 2
User Manual
Page 2

Content
Key points .................................................................................................. 1
Packing List: .................................................................................................. 2
Product Specification ..................................................................................... 2
Charging your device ................................................................................. 4
Battery Saving ............................................................................................... 4
Connecting to a PC: ....................................................................................... 5
Connecting a USB device: ............................................................................. 5
Inserting the MicroSD card :.......................................................................... 6
Connecting to the Network: ........................................................................... 6
Power On ....................................................................................................... 7
Sleep Mode .................................................................................................... 7
Power off and Reboot .................................................................................... 7
Page 3

Operation of Touch Panel ............................................
Home Screen ............................................................................................... 10
Change of Wallpaper ................................................................................... 11
Add shortcut on Home screen ...................................................................... 11
Add Widget in Home Screen ....................................................................... 11
Relocate the shortcut on Home screen ......................................................... 11
Cancel shortcut on Home screen .................................................................. 11
Notification screen ....................................................................................... 13
Applications ................................................................................................. 13
Browsing webpage ...................................................................................... 14
Email ........................................................................................................... 15
Sending outgoing message ........................................................................... 16
Check email message ................................................................................... 16
Audio player ................................................................................................ 17
Video player ................................................................................................ 17
...............................
7
Page 4

File Manager ................................................................................................ 19
FM Radio ..................................................................................................... 21
Phone ........................................................................................................... 22
Messaging .................................................................................................... 23
Contacts ....................................................................................................... 23
Commonly used settings SIM Card Management ........................................ 24
More… ........................................................................................................ 25
Sound¬ification ......................................................................................... 26
Display ........................................................................................................ 27
Wallpaper .................................................................................................... 27
Font size ......................................................................
Screen time out ............................................................................................ 27
Storage ......................................................................................................... 28
Apps ............................................................................................................ 28
Location
................................................................
................................
................................
....
27
28
Page 5

Language&Input .......................................................................................... 28
Backup and reset .......................................................................................... 29
Accounts ...................................................................................................... 29
Date& time .................................................................................................. 29
Scheduled power on and off ........................................................................ 29
Accessibility ................................................................................................ 30
About phone ................................................................
Troubles Shooting ........................................................................................ 32
................................31
Page 6
Key points
This manual includes security measures and correct operating methods. For personal safety, please
make sure to read this manual before using. Thank you!
The machine adopts capacitive touch screen, you can just touch it by finger or click with capacitive
pen for operation. (Never use the sharp objects to click the screen, or the touch screen may be
damaged).
Do not put the device at any high temperature, high humidity or dusty place.
Do not drop or crash the device to prevent the violent impacting between the display and the
capacitive touch screen. Or the customers have to take the consequence by themselves.
Please choose the suitable volume and never make the too loud volume .If you feel uncomfortable
please turn down the volume or stop to use the device soon.
Please charge if you meet those situations as below:
A、Low battery on the battery icon. B、The system turns off automatically.
C、The keys do not work. D、―
Note:Don’t use the different type charger or it may make the device burned. We assume no
liability for the damage. Please contact with our agent if you need the original adaptor.
In the charging process,the device may be warning up a little (not too hot), this is normal, and it
won’t effect functions.
Do not disconnect the device while formatting, downloading or uploading, or it may make the error.
Do not dismantle this device by yourself, and do not polish it with alcohol, dilution, or benzene.
Do not use this device where electronics is forbidden, such as on the airplane.
Do not use this device while walking and driving, avoiding traffic accident.
USB is for transferring data.
For any support needed for this device please contact the company or the authorized distributor.
Any unauthorized dismantling of the device will make the warranty null and void.
‖ is battery charging.
1
Page 7

Packing List:
Please check box for the following items
1. Device
2. User Manual
3. Earphone
4. Power Adaptor
5. USB Cable
Product Specification
CPU Cortex: MT6580A
OS: Android 5.1
Size: 146.15*73.9*9.00mm
RAM: 512MB RAM GB DDRIII
ROM: 4GB ROM
External Maximum 32GB
3G : WCDMA:B2/B4/B5
2G: GSM:850,1900
Camera :
FM: 87.5MHZ-108.0MHZ
Music format: MP3
Video format: MPEG4
Picture format: JPEG
Battery : 2000mAh
Front 2.0M pxRear 8.0M px
2
Page 8
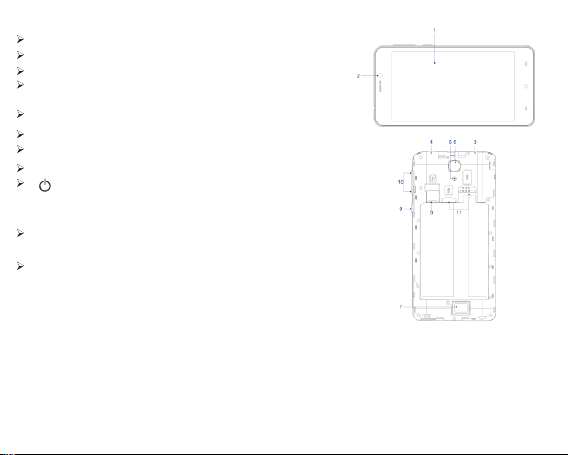
Device description
1 Touch screen:You can click and drag in the touch screen.
2 Front Camera:You can take photos and videos etc..
3 Earphone jack: 3.5mm standard earphone jack.
4Micro USB, Micro-5 pin connector & Connect the power able
to charge to the device.
5 Rear Camera:You can take photos and videos etc..
6 Glittering:Will flash when taking pictures
7 Speaker
8 Micro SD/TF card:Micro SD/TF card sl ot.
9 POWERKeep pressing button over 2 seconds
for power on/ off, press button once to turn on
screen from sleep mode .
10 Volume +:Turn up the volume
Volume -:Turn down the volume
11 SIM Card:Insert/Pull out SIM Card
TIPS 1. When the battery is low, it will power off automatically.
screen will stay at the progress bar for a long time.
2. Shutdown illegally, when you restart, device would scan and repair the disk. The
3
Page 9
Setting up for the first time
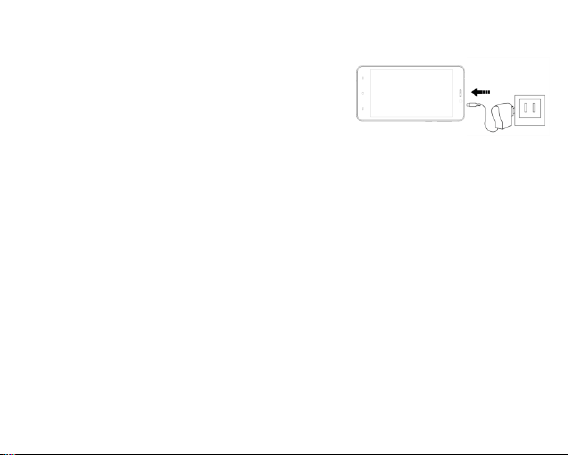
Charging your device
For first-time use, you need to charge the device for ten hours.
After that you can recharge the device as needed.
Connect the DC-in jack to your device and plug the AC
adapter into any AC outlet.
TIPS:
1. This device adopts built-in polymer battery. Only the specified
charger should be used.
2. It is normal for the device’s surface to become warm during
charging or long
before release.
3. If you do not use this set for a long time, please charge/release it once
One month to avoid deep discharge. The damage caused by battery over-consuming
is not included in the warranty.
Battery Saving
To save battery running life, please see below key points. With below suggestions, battery can run
longer time after fully charged
each time.
1. When device is not in use, press power button once to go to sleep mode.
2. Shut down the applications when not in use.
3. Turn off WLAN when not in use
4. Shut off application sync selection
5. Set a shorter time for display backlight
6. Reduce brightness of display
periods of use. All devices are factory tested
4
Page 10
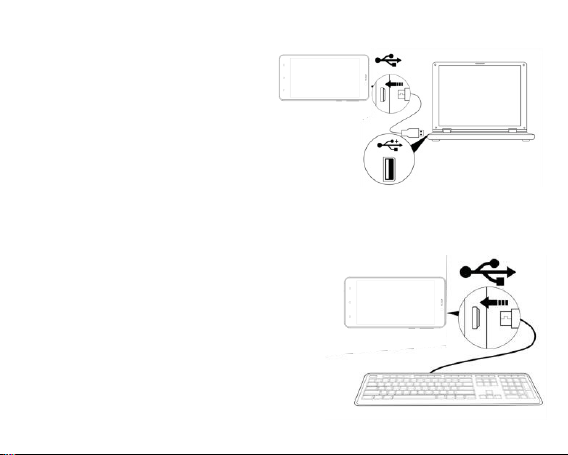
Connecting to a PC:
You can connect with PC by USB cable attached with the device.
You can transfer your personal data to the PC.
Connect the PC and the device, it will change to
the USB mode, in this state, realize the files
transfer function between the PC and the device
Connecting a USB device:
USB devices are supported, such as a keyboard,
mouse through the USB port.
View media files on USB storage with installed
photo, music or video
Caution: Before removing this USB storage, make
sure your device is not accessing data from the USB
storage
.
applications.
5
Page 11
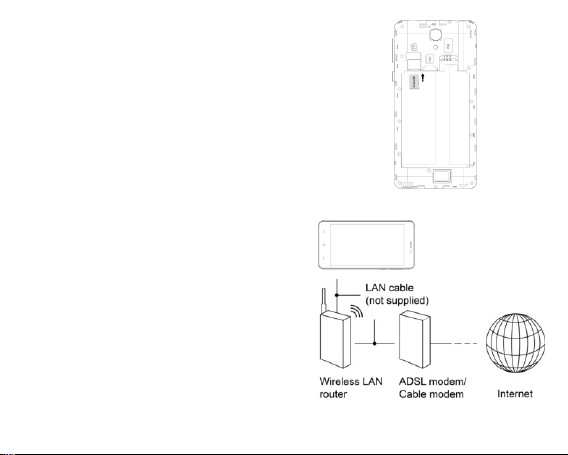
Inserting the Micro SD card :
You may install a Micro SD card to expand your device’s
storage space.
1. This device supports Micro SD card up to 32GB capacity.
2. Insert the Micro SD card as shown.
Note: Ensure that the Micro SD card is inserted all the
Caution: Before removing this card, make sure your device
way into the card slot.
is not accessing data on the card.
Connecting to the Network:
WLAN wireless setup:
Enter the setting interface, and turn on the WLAN
item. The device will automatically search any
accessible nearby wireless networks.
6
Page 12

Power On
Keep pressing power button over 2 seconds, device will start up opening screen; Android system is
activating and enter the main screen.
Sleep Mode
After devise is on, press power button once and it goes to sleep mode. The screen is now on standby
and under low battery consumption. To wake up device, press one more time power button.
Power off and Reboot
When you are not using the device, keep pressing power button over 2 seconds, the screen will
display two options: ―Power off‖ and ―Reboot‖ .Select Power off ,the phone will shun down while
selecting Reboot, it will restart.
Click -- Use finger or capacity panel pen to touch once, so as to select or activate function, or select
menu or turn on applications.
7
Page 13

Tap and hold -- Tap over 2 seconds, it will turn on option list
Slide -- Slide up, down, left or right for fast scrolling browsing page and display screen
Drag – drag an icon and relocate the position
8
Page 14
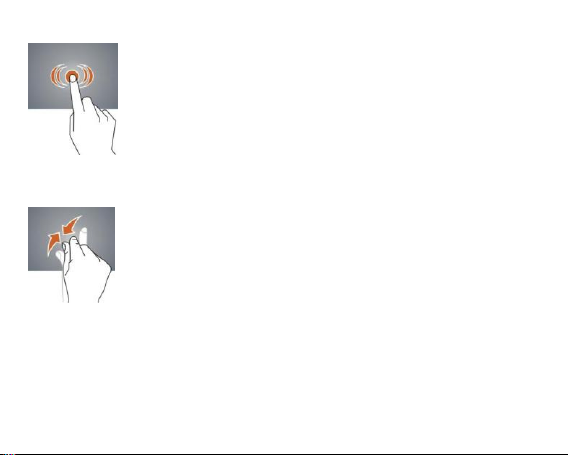
Double Click – Double click to enlarge or shrink the display size of picture
Shut --Use two fingers at same time on touch panel, to enlarge or to shrink the display scale.
9
Page 15

Home Screen
1 Google search 2 Google voice search 3 Back key
4 Home key 5 Menu key 6 Status bar
7 Settinges App 8 Enter apps interface
10
Page 16

Home screen with a set of 3 screens, slide left/ right to view individual screen
Change of Wallpaper
1. Click Menu key on home screen , it will pop-up wallpaper selection
2. Select preloaded wallpapers or picture as wallpaper
3. Click ―Set wallpaper‖ to confirm
Add shortcut on Home screen
1. Enter in application menu, tap and hold the icon of the application
2. Drag the icon to home screen where you want to placed and release
Add Widget in Home Screen
1. Click Menu key on Home screen
2. Select ―WIDGETS‖ to enter widget screen
3. Tag designated widget and locate it in home screen
RemarkSome widgets is linked to internet service, be careful it will occur data cost
some widgets might only be used in certain countries or under assigned service providers
Relocate the shortcut on Home screen
1. Tag the application icon and move
2. Move icon to the designated position
Cancel shortcut on Home screen
1. Long press one icon of application on home screen until you see ―X Remove‖ icon
display on top of home screen
2. Drag icon into the ―X Remove‖icon
11
Page 17

3. When icon changes to red, let go
12
Page 18

Notification screen
On top of the main screen, check device status and set up below options
Icon Icon Description
WLAN signal WLAN connection, icon is full under strong signal
Battery Show the status of battery or if device is being charged
USB Connection To show if USB port is connected
Soft keyboard Turn on soft keyboard, for word typing Screen
shot After taking screen shot, show picture saved
Applications
Internet Browsing
Browse internet and bookmark the website
Remark Web browser and bookmark might be different in different countries or different service
providers
13
Page 19

Browsing webpage
1. Enter application page, select ‖Browser‖ Icon
2. To brows certain webpage, select URL and input website address, and select ―confirm‖
3. See below browsing options:
3.1 Input address: On top of interface, you can tap to input address
3.2 Go to Previous page:Tap this icon:
3.3 Go to Next page: Tap this icon:
3.4 Open new tabs: Tap this icon:
3.5 View Bookmarks/History/Saved pages: Tap this icon:
14
Page 20

Browser settings
When browsing webpage, click Menu key to enter browser settings
Enter application page, click ‖Browser‖
Select bookmark
1.
2. Select webpage
Email
Send and Receive email
Setting of email account
1. Enter application page and click ‖Email‖
2. Enter email address and password
3. Select next step ( for personal email account) or manual setting (for commercial email account)
4. Follow and input the requested setting
current visited history
‖
After email account setting, message will be received in device. For more than one email account,
switch email account for operation, to receive and send out message.
15
Page 21

Sending outgoing message
1.Enter application page and select ‖Email‖
2.Type in Recipients ;Manual input email address,use ‖ ;‖ or ‖ ,‖ to separate more than one
recipients
3.Type in Subject
4.Type in message in content
5.Select for attachments
6.Select and send out message
Remark If user is offline,message cannot be sent out
Check email message
In email account, user can check downloaded message, go online to check new messages.
16
Page 22

Audio player
Click ―Music‖ in application page.
Music will be categorized by artists, album, and play list. It will display all music inside
―Songs‖. Click the song and it will play automatically.
Video player
Click ―Videos‖ in application page.
Video player will search for all supported video files in the device, click the designated video
file to play.
17
Page 23

Camera
The built-in front camera can take picture and video file.
Take pi cture
1. Click ―Camera‖ in application page, device is default at picture taking
2. To take picture,click ― ‖
3.When take the photos, it can be zoom
Option by two finger
freely Video shooting
1-3X
18
Page 24

1. Select recording in video file,click―
2. It will start recording automatically
3. Click ― ‖ again to stop
File Manager
File manager will copy, cut, delete, rename the documents or the folder in the TF card, it also will
share the files, install apk etc.In the main menu or desktop, click the document manager icon
to enter into documents manager.
A B
A. Copy, cut, delete, and rename the files and folder: choose the file or folder, long press the file or
folder to enter into the interface as Picture 9.4; you can operate the file or folder.
B. Paste the file or folder you copy or cut: in the catalogue you want to paste, choose
19
Page 25
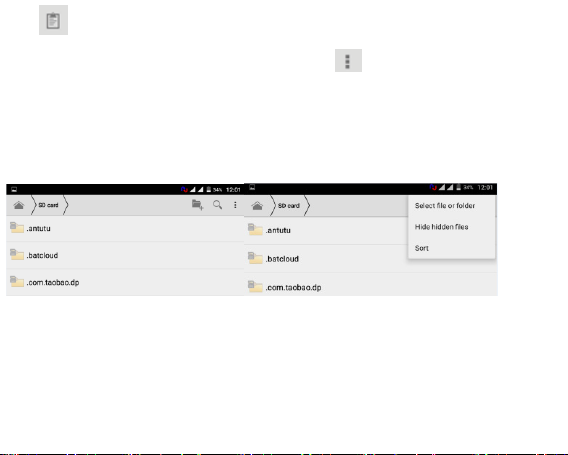
icon
in right top, as Picture
C. Share file: choose any file, long click this file, choose icon in right top, it will
show
C D
20
Page 26

FM Radio
Click in the main interface or desktop to enter into FM radio interface:
1. Tap this icon to start or stop FM:
2. Tap this icon to search channels:
3. Tap this icon to start FM recording:
4.
.Click search to scan FM frequency
[Note]: Use FM radio, you need to insert earphone, if no antenna, you can’t search radio frequency
21
Page 27

Phone
Click Phone application procedure
1
2
3
1.Signal icon
2.Status bar
4
3.The whole screen
4.Numbers to input
5.Dial keypad
6.Dial icon
5
6
22
Page 28

Messaging
1.Enter into main menu, choose application procedure.
2.Click ―Edit new message‖: tap this icon:
3.Input the number or tap this icon to add contacts:
4.Type text message and tap this icon to add
picture,viceo,sound and so on:
5.Tap the send icon to send out the message:
Contacts
1.Click Contacts in the main interface, enter into
the contact list.
2.
Search contact: click button, enter into search function
3.
Add contact: click button, enter into add
contact interface.
23
Page 29

Commonly used settings
SIM Card Management
Click setting application in main menu; choose SIM cards
WLAN: Click ON or OFF to open or close WLAN. W hen open
WLAN, the system will scan the WLAN signal around
automatically. Meanwhile, users could add network manually
as well.
BT:1. Click setting application in main menu interface 2.Click
BT and open it.
2. Click search device in right above, then MID will
automatically search the BT device nearby
3. Click search to get BT device, it will popup match
request window, click match.
4. After matching successfully, find the device name you
want to operate, click icon, and enter into interface
24
Page 30

Data Usage: 1.View SIM Card data usage
2. View data usage
More...
1.Airplane mode
Airplane mode can quickly turn off WLAN and GSM card
function, when you open airplane mode, WLAN and GSM can’t
read any signal, machine will resume to previous state when
you close airplane mode.
VPN Tethering and portable hotspot
25
Page 31

Sound¬ification
Open setting, click Sound¬ification then you have
different choices. Click General to enter.
1.Vibrate: click vibrate, the device will remind you
have incoming calls by vibrating.
2.Ring Volume: Drag the icon to the left or right to adjust the
volume
3.Phone ringtone
Click Phone ringtone to choose incoming voice/video call
ringtone
26
Page 32

Display
Wallpaper
1. Click setting application.
2. Click display, click wallpaper
3. You can choose different wallpaper as your preference
there are some options: Wallpaper---Gallery/ Live
Wallpaper/ Wallpapers
Font size
1. Click setting application
2. Click display, click Font size, there are four different
options :Small/Normal/Large/Extra large
Screen Time Out
1. Click setting application.
2. Click display,
3. Click ―Screen Time Out‖.
4. Popup screen standby time settings, choose the
standby time you want to set
27
Page 33

Storage
Open setting application, choose storage,
and choose default storage. View SD card and Phone space.
BatteryClick setting function, choose
battery, you can view battery usage situation.
Apps
1. Choose Setting procedure in the
application procedure list.
2. Choose application, after entering, you can
manage and delete installed applications
Language& input
Click settings, choose language&input, choose
language to switch language type.
28
Page 34

Backup and Reset
Click backup my data, when WLAN is connected and
login Google account, system will copy your data into
Google server. If you wish to reset factory setting,
please click restore factory reset.
Accounts
1.Click Setting application.
2. Click Accounts
3. Choose email type you want to login.
4. If login successfully, sync function will auto open.
Date& time
when the internet is connected, turn on- Automatic
Date & Time the device can obtain the real date and
time from the internet.
Scheduled power on and off
1. Enter into setting application.
2. Click scheduled power on and off selection.
3. Operation as right Picture
29
Page 35

Accessibility
1. Large text
Click it to make system font become large.
2. Press power key to end call
Click call, press power key to end call, but won’t sleep.
3. Touch and hold delay
And so on
30
Page 36

About phone
1. Click about phone to view status information,
model, Android version, and version information.
2. Click status to view battery state, battery level,
SIM status, IMEI information, IP address and so on
.
31
Page 37

Troubles Shooting
1.The first startup of phone is slow
After the MID system upgraded, the first startup need to install the pre-installed application
software, the lead time is around 2-3 minutes, the startup afterwards will be much quicker.
2.Phone can’t connect WLAN
Make sure the wireless router of internet service can work in normal.
Ensure the MID and wireless router in certain distance, and no wall or other barrier between them.
Ensure the user name and password both correct.
3.ID feels hot
When many application procedures are used in meanwhile, or the brightness of screen open to
the lightest or under charging, MID may feel fever. It is normal.
4.Email can’t be set or Registration of application procedure.
Ensure your internet is well connected.
Make sure your email setting way is correct.
Keep your system time and local time consistent.
5. The system is abnormal and can’t work.
When you install some third party application procedure, it may cause abnormal work, you can
press Reset key (next to power port) to reset the system.
6. The webpage can’t be opened
1. Please keep the distance between from route to MID in effective range.
2. Please restart WLAN and try again.
7. Phone works terribly slow sometimes
It is normal phenomenon. Please turn off some application you don’t need in advanced task
management, or uninstall some third party application to release more system resources.
32
Page 38

Warning:
Any Changes or modifications not expressly approved by the party responsible for compliance could
void the user's authority to operate the equipment.
This device complies with part 15 of the FCC Rules. Operation is subject to the following two conditions:
(1) This device may not cause harmful interference, and (2) this device must accept any interference
received, including interference that may cause undesired operation. Note: This equipment has been
tested and found to comply with the limits for a Class B digital device, pursuant to part 15 of the FCC
Rules. These limits are designed to provide reasonable protection against harmful interference in a
residential installation. This equipment generates uses and can radiate radio frequency energy and, if
not installed and used in accordance with the instructions, may cause harmful interference to radio
communications. However, there is no guarantee that interference will not occur in a particular
installation. If this equipment does cause harmful interference to radio or television reception, which can
be determined by turning the equipment off and on, the user is encouraged to try to correct the
interference by one or more of the following measures:
—Reorient or relocate the receiving antenna.
—Increase the separation between the equipment and receiver.
—Connect the equipment into an outlet on a circuit different from that to which the receiver is connected.
—Consult the dealer or an experienced radio/TV technician for help.
SAR tests are conducted using standard operating positions accepted by the FCC with the phone
transmitting at its highest certified power level in all tested frequency bands, although the SAR is
determined at the highest certified power level, the actual SAR level of the phone while operating can be
well below the maximum value, in general, the closer you are to a wireless base station antenna, the
lower the power output.
Before a new mobile phone is a available for sale to the public, it must be tested and certified to the
FCC that it does not exceed the exposure limit established by the FCC, Tests for each phone are
performed in positions and locations (e.g. at the ear and worn on the body)as required by the FCC.
For body worn operation, this mobile phone has been tested and meets the FCC RF exposure
guidelines when used with an accessory designated for this product or when used with an accessory
that contains no metal and that positions the handset a minimum of 10 mm from the body.
33
Page 39

Non-compliance with the above restrictions may result in violation of RF exposure guidelines.
34
 Loading...