

Page 1

User Manual
ABOUT AN DROI D...........................................................................................................................................................................3
AP PLI CAT I O NS................................................................................................................................................................................3
YOUR PH O N E....................................................................................................................................................................................3
GET T I N G STARTED........................................................................................................................................................................4
TOUCH SCREEN & KEY S...............................................................................................................................................................4
TOUCH TI PS.....................................................................................................................................................................................................4
ZOOMI NG TI PS.................................................................................................................................................................................................5
ROTATE THE SCREEN.......................................................................................................................................................................................5
KEY TI PS............................................................................................................................... ...........................................................................5
HOM E SCREEN .................................................................................................................................................................................5
QUI CK START: HOME SCREEN........................................................................................................................................................................5
WORKI NG WI TH MENUS.................................................................................................................................................................................6
HORTCUT
S
W
I DGET
ARRANGI NG YOUR HOME SCREEN..................................................................................................................................................................7
CHANGI NG THE BACKGROUND OF YOUR HOME SCREEN...............................................................................................................................7
AP PLI CAT I ON M EN U.....................................................................................................................................................................8
APPLI CATI ON MENU.........................................................................................................................................................................................8
.......................................................................................................................................................................................................6
............................................................................................................................................................................................................7
PH ON E STATUS BAR AN D N O T I FI CAT I O N S.......................................................................................................................8
CHECKING NOTI FI CATI ONS AND ONGOI NG ACTI VATES................................................................................................................................8
TOOLKI TS.........................................................................................................................................................................................................9
DI AL PAD ...........................................................................................................................................................................................9
MAKE A CALL....................................................................................................................................................................................................9
OPTIONS AVAI LABLE DURI NG A CALL.............................................................................................................................................................9
TEXT EN TRY....................................................................................................................................................................................10
ON- SCREEN KEYBOARD.................................................................................................................................................................................10
ENTER TEXT...................................................................................................................................................................................................10
NTER VARIOUS CHARACTERS
E
DI T TEXT
E
SELECT TEXT.................................................................................................................................................................................................10
CUT / COPY/ PASTE TEXT..............................................................................................................................................................................11
COM M UN I CATI ON ........................................................................................................................................................................11
MESSAGI NG...................................................................................................................................................................................................11
PEOPLE...........................................................................................................................................................................................................12
PHONE............................................................................................................................................................................................................13
EMAI L.............................................................................................................................................................................................................13
......................................................................................................................................................................................................10
.....................................................................................................................................................................10
MU LTI MED I A..................................................................................................................................................................................14
Page 2

CAMERA..........................................................................................................................................................................................................14
MUSI C............................................................................................................................................................................................................15
FM RADI O......................................................................................................................................................................................................17
GALLERY.........................................................................................................................................................................................................18
SOUND RECORDER........................................................................................................................................................................................18
TOOLS...............................................................................................................................................................................................19
CALENDAR......................................................................................................................................................................................................19
CLOCK............................................................................................................................................................................................................19
CALCULATOR..................................................................................................................................................................................................19
BROW SER........................................................................................................................................................................................20
CON N ECT TO N ETW ORKS AND D EVI CES...........................................................................................................................20
DETERMI NE THE NETWORK YOU ARE USI NG..............................................................................................................................................20
EDI T OR CREATE NEW ACCESS POINTS......................................................................................................................................................20
WI -FI NETWORKS.........................................................................................................................................................................................20
BLUETOOTH....................................................................................................................................................................................................21
CONNECT TO A COMPUTER VI A USB............................................................................................................................................................21
WORKI NG WI TH SECURE CERTIFICATES.....................................................................................................................................................21
I NSTALL SECURE CERTIFI CATE FROM SD CARD........................................................................................................................................21
SET T I N GS........................................................................................................................................................................................22
ACCESSI N G PASSW ORD ............................................................................................................................................................22
PIN CODE......................................................................................................................................................................................................23
PIN2 CODE...................................................................................................................................................................................................23
PUK CODE.....................................................................................................................................................................................................23
PUK2 CODE..................................................................................................................................................................................................23
PR ECAU TI ON S...............................................................................................................................................................................23
FREQU EN TLY ASKED Q U ESTI ON S AN D TROUBLESH O O TI N G...................................................................................25
SAFETY I NFORM ATI ON AN D N OTI CES...............................................................................................................................26
USI NG THE MOBI LE PHONE AND CHARGER.................................................................................................................................................26
USI NG THE MOBI LE PHONE..........................................................................................................................................................................27
USI NG THE BATTERY.....................................................................................................................................................................................27
USI NG THE CHARGER....................................................................................................................................................................................28
REQUIREMENTS FOR MOBI LE PHONE...........................................................................................................................................................28
REQUIREMENTS FOR THE BATTERY..............................................................................................................................................................28
REQUIREMENTS FOR THE CHARGER AND AC ADAPTER..............................................................................................................................28
CLEANI NG AND MAI NTENANCE.....................................................................................................................................................................28
Page 3
Abo ut An droid
An An dr oid p h one can p erf or m m any of t he sam e funct ions as a com put er. But you can also adj ust it t o bett er
suit y ou r needs, to r eceive the inform at ion you w ant , and have fun at t h e sam e t im e. You can add and delet e
applicat ions, or en h ance t hem to im prove fun ct ionalit y. At Andr oid Mar k et you can dow nload a range of
applicat ions and gam es fr om a const an tly g r ow in g collect ion. You can also in tegrat e applications on y our
Andr oid ph on e w it h your p er sonal dat a and on line accoun ts. For exam ple, you can back up y our t rack of you r
appoint m ent s, and engage in as m uch social n et work ing as you like.
App lica t io ns
An applicat ion is a phone pr ogr am t hat help s you perfor m a task . For exam ple, t here ar e applicat ion s t o m ake
calls, t ak e phot os an d dow nload m ore ap p licat ions.
N ot e: Th e color s an d sp ecificat ion s show n/ m ent i oned in t he user m anu al m ay differ f r om t he act u al produ ct . I mages sh ow n are
fo r r epresen t at ion purpose only.
The cont ent o f t he m anual is co r r ect w hen it is r eleased , b u t we r eserv e t h e right t o m od ify t h e t echnical specification w it h o ut
addition a l not if icat i on.
Som e cont ent in t he m anu al m ay be dif f eren t from t he m obil e pho n e, as t h e accessory so f t war e, SI M car d or ser v i ce v aries by
pr ov ider s.
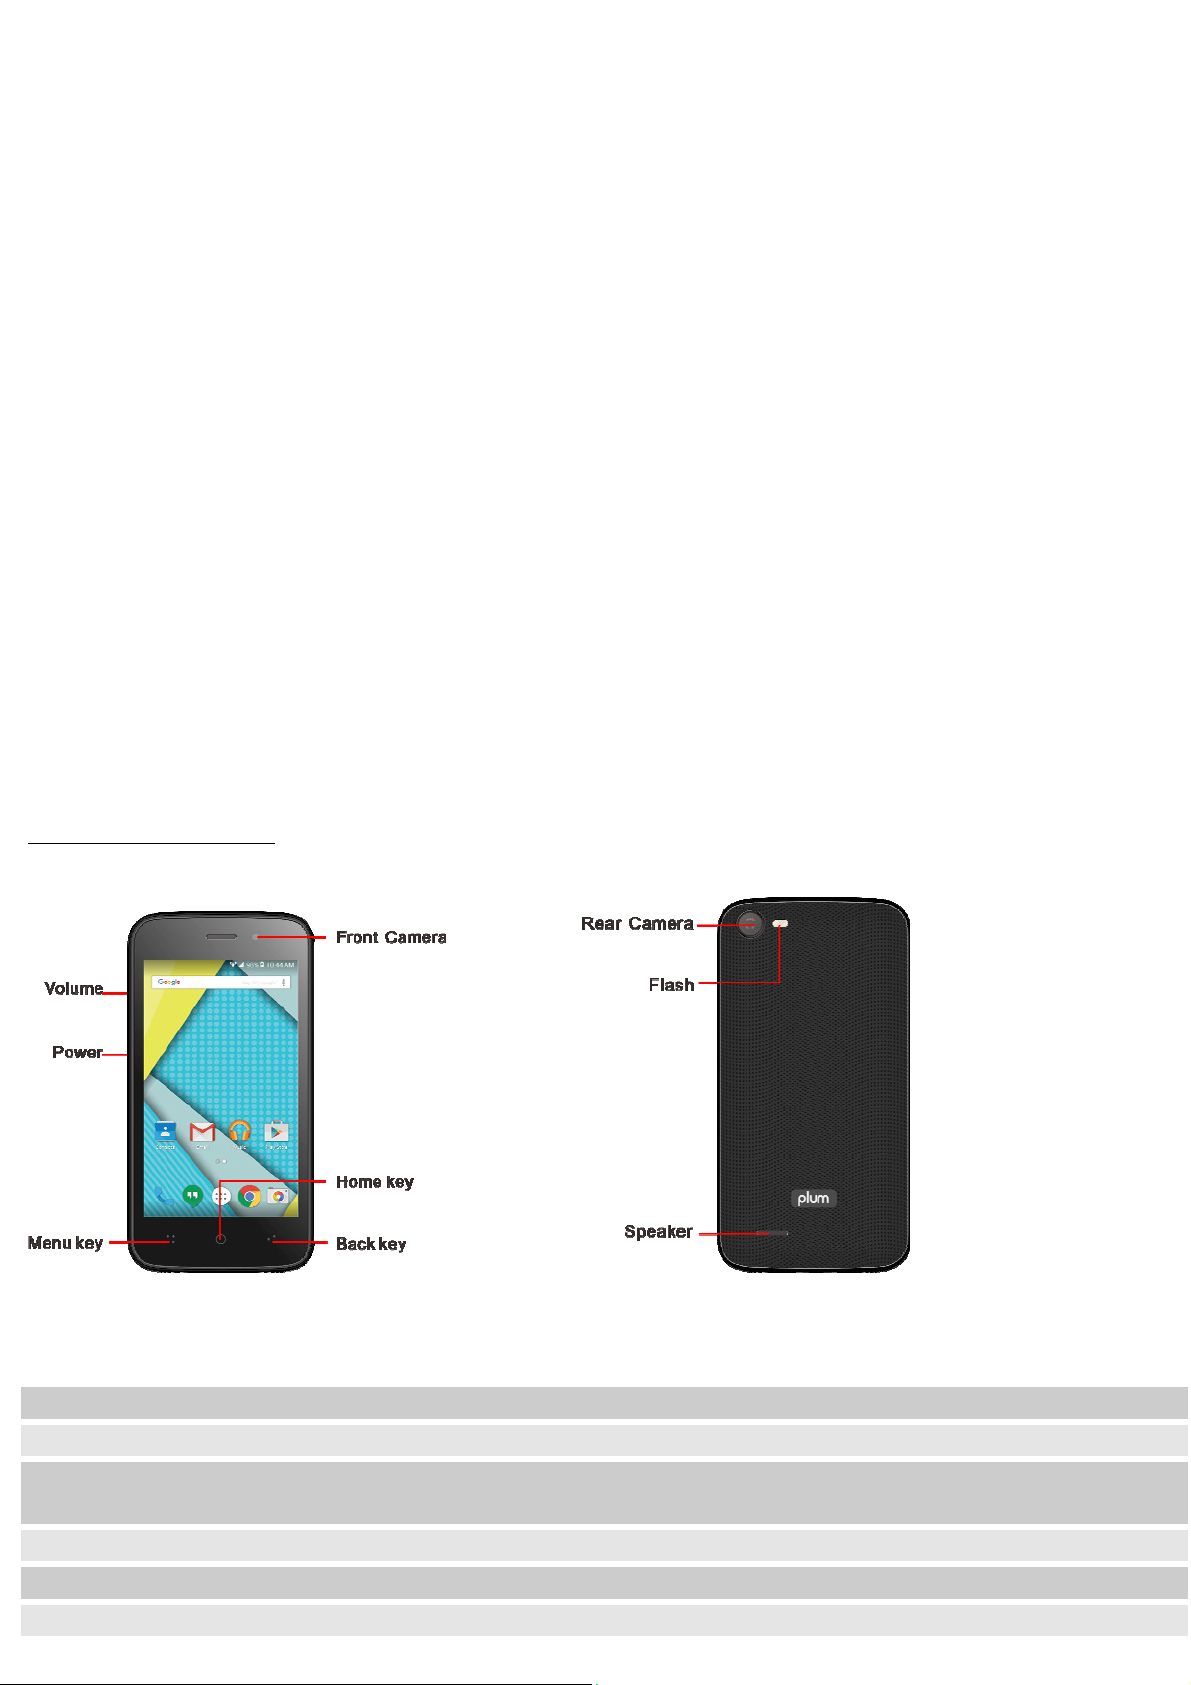
Your ph on e
the im por t ant key s & conn ect ors
Phone overv iew
1
Char g e/ USB Port To con nect ch ar ger or USB dat a cable for d at a exchange.
2
Earphone Jack To con nect an ear ph one so y ou can list en to m usic/ r adio.
Fron t Cam era
3
Lens
4
Receiv er To hear t he voice of t he ot h er side w hen calling.
5
Men u Key Open a list of opt ion s available in t he cur ren t screen or applicat ion.
6
Hom e Key Go t o Hom e screen;
Allow y ou t o t ak e pict ur es while f acin g the screen .
3
Page 4

Press an d h old t o open a w indow showing y our m ost r ecent ly used applicat ions.
7
Back Key
8
Volu m e Key s
9
Shut t er key
Back Cam er a
1 0
Lens
1 1
Flashlight To take phot os in low -light condit ions.
1 2
Speak er To list en t o m usic, and ot her sounds offer ed by y ou r phone.
1 3
Power/ Lock Key
Go b ack t o t he previous scr een;
Close t he on- screen k eypad , a dialog b ox , an op t ions m enu, or t he Not ificat ion panel.
To adj ust t he r in g er volum e, ad j ust t he voice volum e d ur in g a call, and adj ust m edia
volum e.
Lon g p r ess t o ent er cam er a applicat ion; I n cam er a applicat ion, short press t o t ak e
pict u re.
For t aking phot os.
Swit ch t he ph on e on and off;
Press an d h old t o open ph on e opt ions m enu .
Ge t t ing st arted
let's ge t y ou u p an d run n ing
Assem ble & char ge
SI M ca rd i n
Mak e sure t hat t he clipped cor ner of t he SI M car d is f acing t he corr ect direct ion an d the m etallic con tact s are
facin g the cor r ect d ir ect ion . Slide t he SI M car d int o t h e car d slot unt il it st ops.
SD ca rd i n
Slid e t he SD car d int o t he SD car d slot with t he m et allic pins f acing d ow nwards. Push t he car d unt il it lock s
in to place.
Ba t t e ry in
Wit h t he m et allic cont act s of t he b at t er y facing t he m et allic cont act s in t he b at t er y slot , press the bat t ery
dow n unt il it locks int o place.
Cha rg e u p
Ensu re the bat t ery is in ser ted in t he han d set . To char ge t he bat tery , plug in t he charger con nect or at y ou r
phone ( USB int er f ace) and t hen plug t he ot her end int o an AC pow er socket .
The bat tery sym bol indicat es the ch ar ging stat us. While charging, the ch ar ge indicat or s will scr oll. When all
t he scroll bar s ar e st ead y, t he bat ter y is fully ch arged. Disconnect t he charg er fr om t he phone. Disconn ect t he
charger f rom t he AC power socket .
N o te : I f t he b at ter y is powerless, t he bat t er y icon w ill reappear aft er a f ew m inut es of ch ar ging.
Touch scr e e n & k e y s
a f ew essen t ials
Tou ch t ips
Here ar e som e t ips on how t o navigat e aroun d your ph one.
Touch
To choose an icon or opt ion , touch it .
Touch & h old
Open special fu n ct ions or addit ional opt ion s. Tr y it : From Ap plica t i o n m e nu , t ouch M usic icon to ent er
4
Page 5

Music libr ar y , t hen touch and h old an art ist , a son g, or an album , som e opt ions will be av ailable t o y ou. For
ex am ple: play , add t o playlist , delet e, et c.
Dr ag
To scroll t hrough a list or m ov e slow ly , drag acr oss t he t ouch scr een. Tr y it : on t he Hom e screen, t ouch
Peop le icon t o ent er con tact s list , y ou can d rag con tact s list up or dow n to scroll list .
Slid e
To slide by m oving y ou r finger up or d ow n on t he t ou ch screen qu ickly. Scroll t hr ou gh a list or m ov e qu ickly,
slid e acr oss t he t ouch scr een ( drag quick ly and r elease) .
Dou ble - tou ch
Tou ch quick ly tw ice t o zoom in / out . For ex am ple, double- t ouch a pict ure in Galler y t o zoom in/ out .
Zoom ing t ips
Wh en looking at
m ap s, w ebpages or ph ot os, place t wo finger s on t he t ouch scr een at on ce and pinch t hem
toget her to zoom out or spr ead t hem apart to zoom in.
N o te : Use t he zoom f un ct ion w hen you view phot os, m aps or when you b r ow sing t he w eb.
Rot at e t he scr een
On som e scr eens, t he orien tat ion of t he scr een rot at es wit h t he ph on e as y ou t ur n it from upr ight t o it s slide
an d back again. You can t ur n this f eatu re on and off .
Key t ip s
Pow er / Lock k e y
• Wh en pow er in g off st at us, pr ess and hold t o t urn on t he phone;
• Wh en pow ering on st at us, pr ess and hold t o ent er p h one opt ions ( Power off, Reboot , Airplane m ode,
an d so on) ;
• To sav e your bat t ery, p r ev ent accident al t ou ches or w hen y ou w ant t o w ip e sm u dges off you r t ouch
scr een, pu t t he t ouch screen t o sleep by p r essing Power/ Lock k ey ;
• To w ak e up t he t ouch screen, j u st p r ess Power/ Lock k ey again, and t hen d rag t he lock icon t o t he r ight
on the screen to unlock according t o the clue on t he scr een.
Me nu k e y
• Open s a m enu with it em s r elat ed t o t he cur rent scr een/ application.
Ho m e k e y
• Press Hom e k ey to close any m enu or app and r et urn t o t he Hom e scr een. I f you ar e v iewing t he left
or right Extended Hom e scr een, open t he cen t ral Hom e screen.
• Press an d h old Hom e key t o view t he applicat ions you have used r ecent ly .
Ba ck ke y
• Press Back k ey t o ret urn t o t h e pr ev ious scr een y ou wer e w or king on.
Volu m e k e ys
• Press Volu m e k eys t o ch ange t he v olum e. When p laying m usic or video f iles, pr ess Volu m e k ey s t o
adj ust m ed ia v olum e.
Sh ut t e r k ey
• Lon g p r ess t o ent er cam er a applicat ion. I n cam er a applicat ion, short press t o t ak e p ictu r e.
Ho m e scr e en
quick access t o t he t hin gs you n eed m ost
Quick star t : Hom e screen
5
Page 6
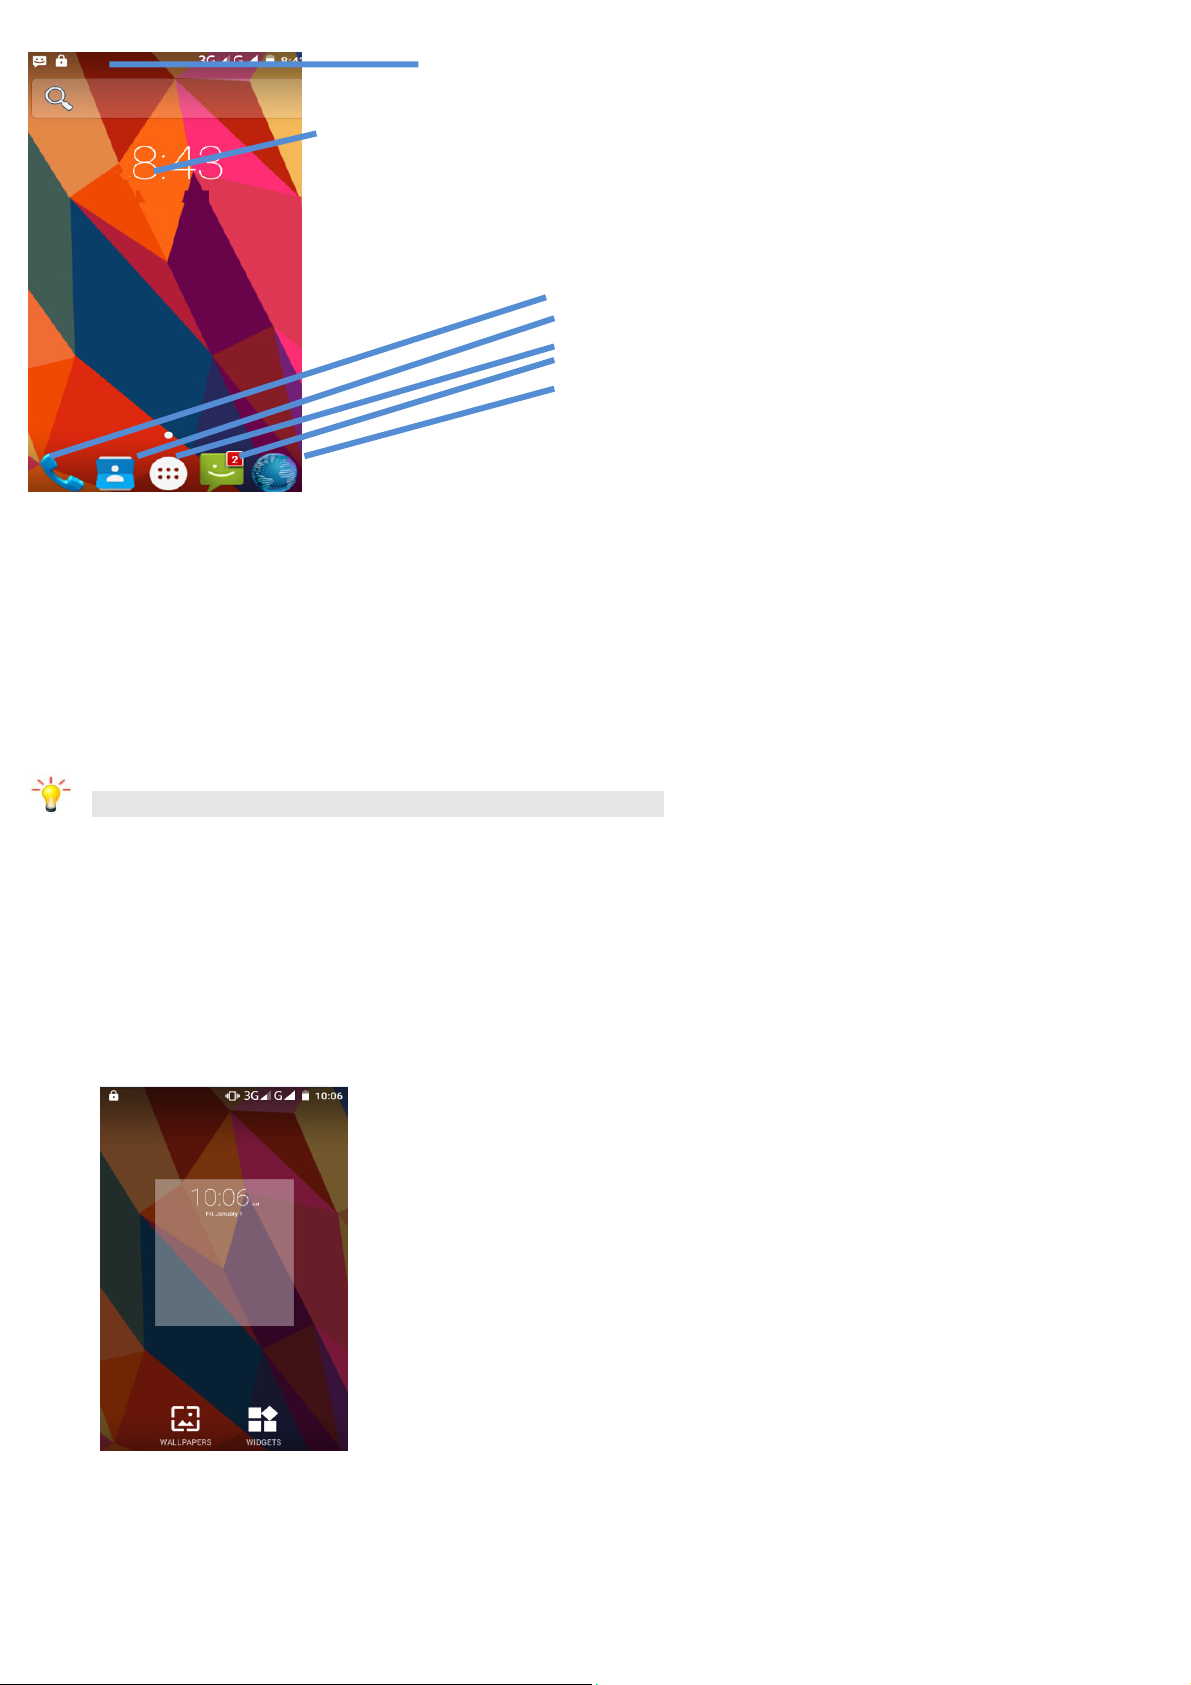
Ph o n e st a t us ba r a n d
not ifi ca tions
W id g e t s
Ph o n e
Pe o p l e
La un che r: M ai n m e nu
Me ssa g in g
Br o w ser
The Hom e screen g iv es y ou all your lat est inform at ion in one place. I t 's w hat you
see w hen you t ur n on t he phone. I t is t he equivalen t of t he d esk top on a com put er . I t ’s y ou r gat eway t o t he
m ain feat u res in y our phone. You can cu st om ize y ou r Hom e scr een w it h sh or t cu t s, w id g et s, f olders, an d
wallpapers.
You need slide t he Hom e screen left or right t o v iew m or e con t ent in ot her panels on t he Hom e screen. You
can add shor t cu t s, w id g et s, folder s, et c. t o Hom e scr een.
N o te : Your Hom e screen m ight look a lit tle different .
Wor k in g w it h Menus
The ph on e pr ov ides y ou with Opt ion s m en us an d con text m enu s.
Opt ions m e nu s
• Opt ions m enu s cont ain tools t hat apply t o t he act iv it ies of the cu r rent scr een or application, not t o an y
specific it em on t he scr een. You can open opt ions m enu b y pressin g M en u k ey .
• Not all scr eens h av e opt ions m enu s. I f y ou pr ess M e n u k e y on
•
• a scr een t hat has n o opt ions m en u , not hin g h appens.
Short cut
To a d d a sh o rt cu t t o H om e scre en
1. From Hom e screen, t ou ch La un ch e r icon .
2. From APPS t ab, y ou w ill see applicat ion m enu.
6
Page 7

3. Touch and hold an applicat ion icon u ntil it v ibr at es, t hen back t o t he Hom e screen , an d dr ag it t o t he
desir ed locat ion.
To r e m ov e a sh or t cu t on H om e scr e e n
I f y ou want t o rem ove t he shor t cut , y ou can t ouch and hold t he short cut icon on Hom e screen unt il it vibrat es,
an d then dr ag it t o Re m ove t ab.
Widget
A w idget is sm all application on t he Hom e screen th at ty pically d isplay s in for m at ion such as Analog clock ,
Music and y ou can u se d ir ect ly on y our Hom e scr een. For ex am ple, t he Music widget allow s y ou to st art
play in g audio files direct ly on Hom e screen . You can also ad d a w idget such as Analog clock t hat shows tim e.
You can also download ad d it ion al widget s from t he libr ary of Android widget s.
To a d d a w id g et t o Ho m e scr e e n
1. From Hom e screen, t ou ch La un ch e r icon .
2. Touch W I D GETS t ab, y ou w ill see widget opt ions m en u .
3. Touch and hold a w id g et icon t o pick up the w idget , t hen b ack t o t he Hom e screen, and dr ag it t o t he
desir ed locat ion.
To r e m ov e a w id ge t on H om e scre e n
I f you w ant t o r em ove t h e w idget , you can touch and hold t he w idg et icon on Hom e scr een, and t hen drag it
to Re m ov e t ab.
Arr anging y ou r Hom e scr een
To m ov e a n it em on H om e scre en
Tou ch and hold an it em on Hom e scr een un t il it vibrat es, t h en dr ag it where you w an t.
To or ga n ize y ou r a p ps w it h f olde rs
To m ak e a new f older on your Hom e screen , st ack one app on t op of anot her.
To na m e f olde r on H om e scr e e n
1. Touch t he apps st ack on Hom e screen t o open
2. Touch t he U nna m e d Fo l d er t o sh ow t he nam e f older field.
3. Edit t he fold er n am e.
To m ov e a pplica t ion sh o rt cu ts on H om e scr e e n t o a fold er
Tou ch and hold t he it em on Hom e screen un til it v ibr at es, an d then stack th e app on top of ot her s.
To m ov e a pplica t ion sh o rt cu ts in a fold er t o H om e scre en
Tou ch and hold t he it em in a folder , an d t hen dr ag t he it em ou t of t he folder.
Changing t he backgr oun d of y ou r Hom e scr een
Adapt t he Hom e screen t o y our ow n st yle u sing wallpapers fr om Galler y , Live w allpap ers, Video wallpaper s,
or Wallpaper s.
Tou ch and hold t he Hom e screen t o select w allpap er f r om Galler y, Liv e w allpaper s, Video wallpaper s, or
Wallpapers. Then set it as w allpaper .
Tip: You can u se cam era t o take a ph ot o, and t hen set it as w allpaper .
7
Page 8
App lica t io n m e nu
enj oy applicat ions from t he Applicat ion m enu
Applicat ion m en u
The Applicat ion m enu , which you open from your Hom e scr een, con tains t he applicat ion s t hat com e inst alled
wit h your ph one.
The Applicat ion m enu ext ends beyond t he screen width , so you n eed t o slid e left and r ight t o v iew all con tent .
To ope n t he Applica t ion m en u
1. On Hom e screen , touch La un che r icon .
2. Touch APPS t ab.
To br ow se t h e App lica t ion m en u
Open the Applicat ion m enu, then slide t he screen lef t or r igh t.
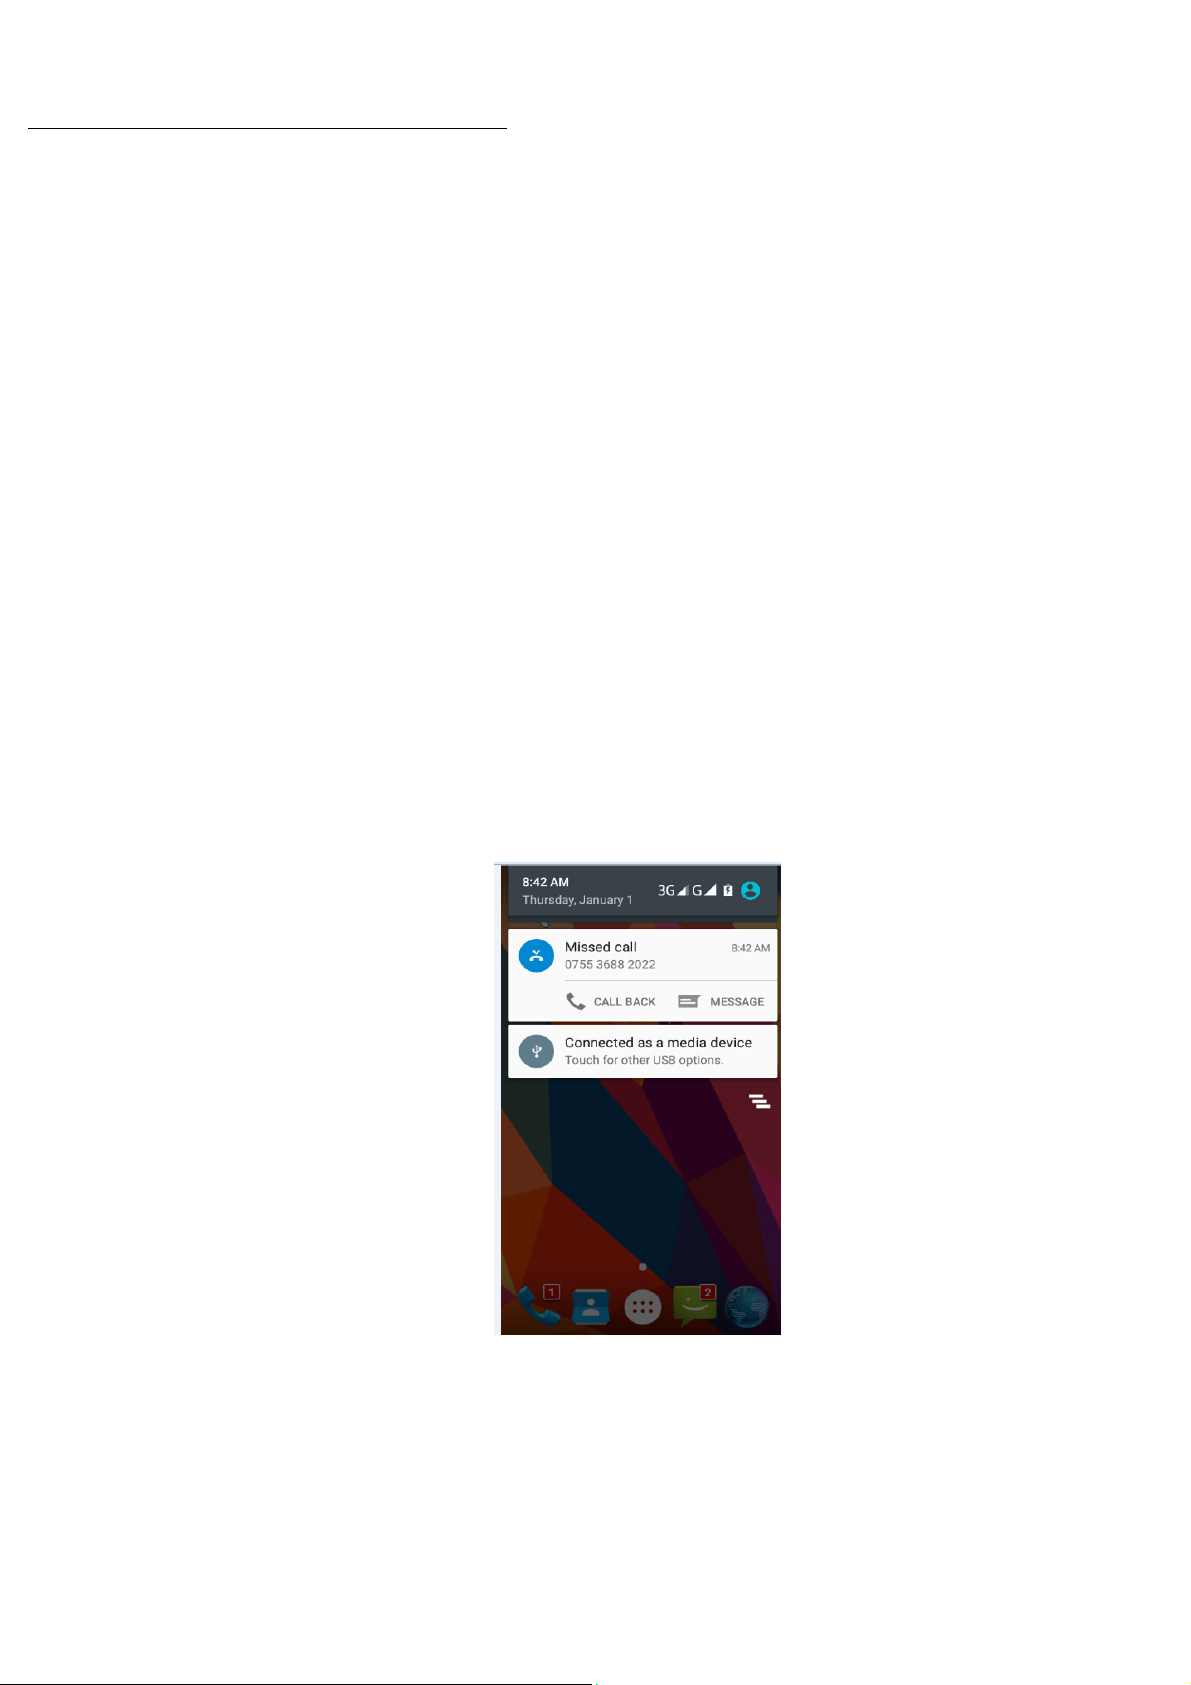
Phon e st a t u s b a r a n d not ifica t ions
The stat us bar at t h e t op of t he scr een con t ain s icon s t hat t ell you abou t m essages and phone st atu s and
shows wh at ’s goin g on in y ou r phone. At t he t op y ou g et not if icat ion s w h en t here is som eth ing n ew or
on g oing. For exam ple, new m essag e, m issed call, signal st r engt h, bat tery st at us and ot her in for m at ion
appear her e.
Check in g not ificat ions and ongoing act iv at es
You can dr ag dow n the st at us b ar t o open
th e Not ificat ion panel an d g et m or e
in for m at ion . For ex am ple, v iew m issed calls f rom Not ificat ion p anel. You can also open r unning applicat ion s,
such as the m usic p layer.
To ope n t he N ot i f ica tion pa ne l
Dr ag t he st at us b ar d ow nw ar ds.
To clo se t h e N ot if ica t ion p an el
Dr ag t he bot t om of t he Not ificat ion panel upw ar ds.
To ope n a ru nn in g a pplica t io n fr om t he N o tif ica t ion p an el
From t he Not ificat ion panel, t ou ch t he icon f or th e r unning applicat ion t o open it .
8
Page 9
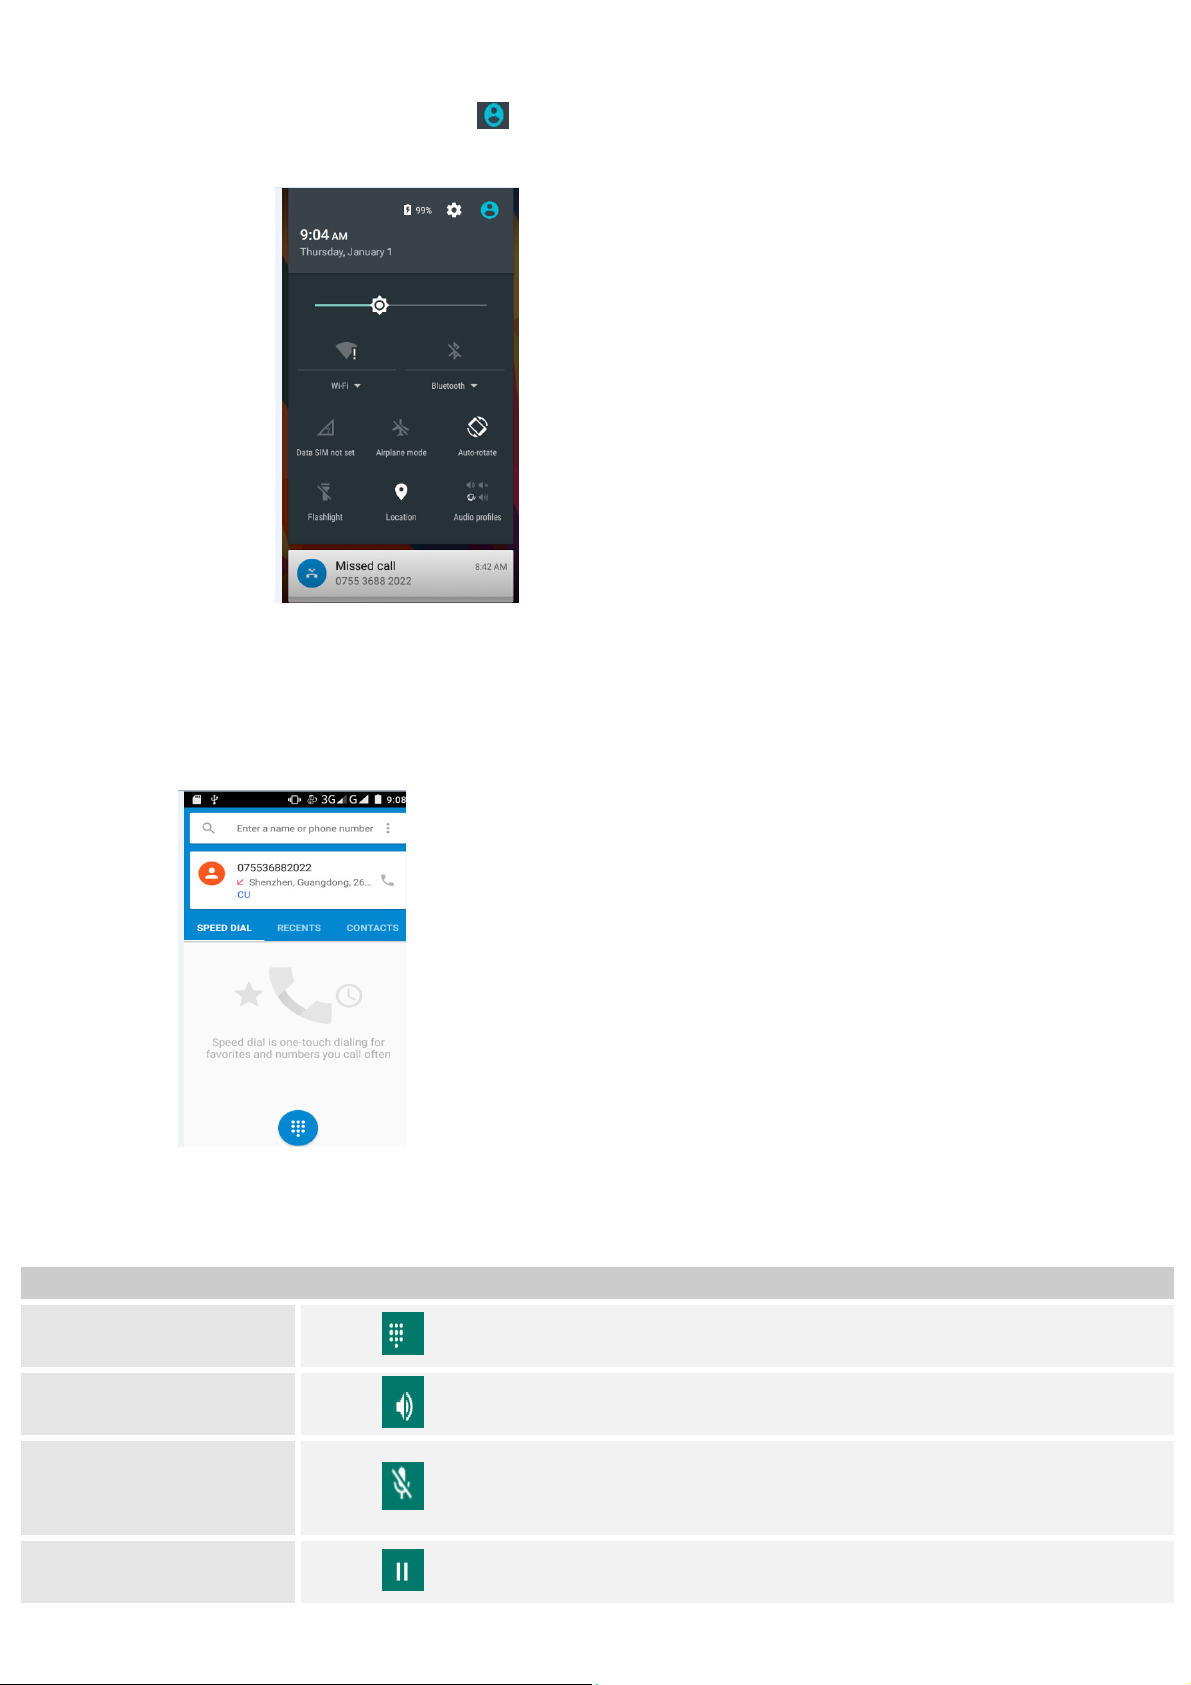
Toolk it s
I n t he t oolkit s y ou can q u ick ly st ar t t he com m on applicat ions such as Bluet oot h, Wi- Fi an d so on.
• Open the t oolkit s panel b y t ouchin g
Dia l p a d
Mak e a call
Tou ch Ph on e icon on t he Hom e scr een.
I n dialing screen , input num ber and t ou ch dial icon t o dial t he inpu t t ed n u m b er.
Opt ions av ailable dur in g a call
Du r in g a call, t her e ar e som e call opt ion s av ailab le t o y ou. These call opt ions can b e seen only du rin g a call.
Wh en a call is in pr ogr ess, you can p u t it on h old, init iat e a phone conference, m u t e your m icr op h one et c.
To
Ke y p a d: Go t o t h e k ey
pa d.
Tou ch
Sp ea ke r: To t urn on / off
th e speaker .
Tou ch
Mu t e : Mut e you r voice
so t hat t h e ot her p ar ty
Tou ch
cannot hear y ou .
Ho l d : To p lace a call on
hold.
Tou ch
9
Page 10

Ad d ca ll: Op en d ial pad
T
T
g
T
to dial t h e second call.
Tou ch
End : To end a call.
Tou ch
Press Vo l u m e k e y s t o ad j ust t he call volum e.
Te x t e n t r y
On- scr een k ey b oar d
Tou ch t he key s of t he on- screen QWERTY k ey b oar d to ent er t ext convenien tly. You can open t his keyboard by
touching a t ex t field .
An dr oid ke yb o ar d inp ut m e th od
ou ch t his icon t o select
desir ed con tact from
phonebook.
ex t
field
Sen d m essa
ou ch to capit alize t he
nex t let ter y ou typ e.
e
Ent er tex t
• Tou ch t he k ey s on t he k ey b oar d t o t ype.
• Use t he D ele t e k ey
to er ase ch ar act er s t o t he lef t of t he cur sor.
• Wh en y ou fin ished t y p in g , Press Ba ck k e y t o close t he keyboard.
Ent er Variou s Char acters
• Tou ch t he Sy m bols k ey
• Tou ch
on t h e sy m bols k ey b oard t o view addit ional sym bols.
to swit ch t o t he num bers and sym bols k ey b oard .
Edit Tex t
You can edit the t ex t you ent er in t ex t fields and use m enu com m ands t o cu t, copy , and past e t ex t, w it hin or
across applicat ion s. Som e applicat ions d o not su p p or t edit in g som e or all of t he t ext t hey display. Ot her s m ay
of f er t heir own w ay to select t ext you w ant t o w or k w it h.
• Tou ch and hold t he t ex t f ield t hat cont ains the t ex t t o select t h e w or d.
• Cut or cop y t he t ex t.
Select Tex t
You can select t ext for cu tt in g or copying. Th e select ed t ex t is highlig h ted in blue.
• Tou ch and hold t he por t ion th at cont ains text . Som e op t ions open wit h icons.
• Mov e t he cur sor t o select t he t ex t .
10
Page 11

Select all
Copy
Cut
Cut / Copy/ Past e Text
1. Touch Cu t icon or Co p y icon in the m en u t h at op ens.
2. Touch and h old t he tex t field wher e y ou w ant t o past e the t ex t .
3. Touch PASTE in t he m en u that opens. The t ex t is inser ted at the cu rsor.
You can p ast e t h e t ex t t hat you copied fr om one applicat ion in t o a text field in any applicat ion.
Com m u n ica t io n
it ’s good t o t alk , t ex t or em ail. . .
Messagin g
Fin d it : Ap p li ca tio n m e nu > M e ssag in g
You can com pose, send and r eceive t ext m essages f rom your p h one, and also can com pose, sen d and r eceiv e
m ult im edia m essages, w hich cont ain m edia files such as pict ur es, v ideos and audios.
Wh en y ou v iew you r m essag es, they appear as conv ersat ion s, w hich m eans t hat all m essages t o and f rom a
par ticu lar person ar e gr ou p ed t og et her.
• Com p ose n ew m e ssa ge
1. From your Hom e screen , t ouch M essa gin g icon or find it : App l i ca tion m e n u > M e ssa gin g.
2. Touch
.
3. To add r ecipient (s) , touch , t hen fin d and m ark th e cont act nam e. To add m ore t han one cont act , m ar k
th e con tact nam e for the desired recipient s. You can also en ter t he recipient ’s p h one nu m ber m anually.
4. Af ter y ou f inish m ar kin g con tact (s) , t ouch OK.
5. Touch Ty pe m essa ge t o ent er you r m essage t ex t.
6. I f y ou w ant t o inser t a m edia file, t ouch
, and select an at tach m ent .
7. Touch , t o sen d the m essage.
Wh en edit ing m essage, p r ess M en u k e y, som e addit ional opt ions will be
11
Page 12

available t o y ou . For exam ple, add subj ect . You can t ou ch t he opt ion s t o do act ion s.
• D e le t e m essa ge t hr e a ds
1. From your Hom e screen , t ouch M essa gin g icon or find it : App l i ca tion m e n u > M e ssa gin g.
2. Touch and h old t he m essage t hread.
3. Select t he conver sat ion s you w ant t o d elet e.
4. Touch
, t hen touch D e l e t e in t he m enu that pop s up.
You can also pr ess M enu ke y and t ouch D ele t e a l l t hr ea ds t o d elet e all m essage t hr eads fr om t he window.
• Fo rw ar d a m e ssa ge
1. From your Hom e screen , t ouch M essa gin g icon or find it : App l i ca tion m e n u > M e ssa gin g.
2. Touch t he con v er sat ion cont aining t he m essage y ou w ant t o f or war d.
3. Touch and h old t he m essage y ou w ant t o for war d.
4. Touch For w a rd in the m enu t hat open s.
5. Ad d r ecipient (s) , t ou ch
, t hen find and m ark t he con tact nam e. To ad d m ore t han one cont act , m ar k t he
cont act nam e f or t he desir ed r ecipient s. You can also ent er th e r ecipien t’s phone num ber m anually.
6. Touch
, t o sen d the m essage.
• Lock a m e ssag e
You can lock a m essage.
1. From your Hom e screen , t ouch M essa gin g icon or find it : App l i ca tion m e n u > M e ssa gin g.
2. Touch t he con v er sat ion cont aining t he m essage y ou w ant t o lock .
3. Touch and h old t he m essage y ou w ant t o lock .
4. Touch Lock in t he m enu t hat opens. A lock icon appear s. Un lock a m essage by t ouching and h olding t he
m essag e and t hen t ouch Un lo ck .
• M essa ging se tt in g s
1. From your Hom e screen , t ouch M essa gin g icon or find it : App l i ca tion m e n u > M e ssa gin g.
2. Press M en u k ey , select Se t tin gs in t he m en u t hat opens.
3. You can change m essag es set t ings, su ch as delet e old m essages as lim it s are r eached, r equest a delivery
repor t f or each m essage you sen d .
People
Find i t : App l ica t ion m en u > P e o p l e
The People ap plicat io n of fer s y o u t o st ore an d m ana ge al l y o ur con t act s.
• Pe o ple scr e e n o v e r vi e w
Tou ch t o search
Fav o rit es t ab
Tou ch a co nt act
to v iew it s d et ails
Tou ch a con t act
thum bn ail t o access
the quick co nt act
m en u
Tou ch t o ad d n ew
con t a ct
Cont act s t ab
• Add a con t act
1. From y our Hom e screen, t ouch Pe ople icon or find it : App l i ca tion m e nu > Pe ople .
12
Page 13

2. Touch
.
3. Select st or age pat h t o wh ich you w ant t o add t his new cont act .
4. Ent er the inform at ion for t he cont act.
5. Af ter y ou f inish , t ouch D O NE.
• Se a rch a con ta ct
1. From your Hom e screen , t ouch Pe o ple icon or f ind it : Applica tion m e nu > Pe ople .
2. Touch
.
3. I nput th e fir st char act er of t he nam e you ar e search in g for in t he cur sor, and t hen all r ecor ds m eet in g t he
condit ions will be d isplayed. Sear ch r esult s will be diff er ent due t o different in pu t con t en t.
• Addit ion al op tion s
From con t act s list scr een, pr ess M e n u k e y, som e addit ional op t ions w ill be av ailab le t o y ou. For exam ple,
im por t / ex p or t, and share visible cont act s.
• De let e con ta ct : You can m ark m uch m ore than one cont act , and t hen delet e t hese m ark ed con tact s.
• Cont a ct s t o displa y: To select w hat sort of cont act s t o display in t he cont act s list .
• I m por t / e x por t : Copy con t act s t o w hich y ou w an t im port .
• Acco unt s: You can synchronize y our phone cont act s w it h a sy nchronizat ion accou nt.
• Se t t in gs: Change t he set tings involved display opt ions.
• Sh ar e v isible con t a ct s: You can share cont acts via Bluet oot h, Em ail, and so on .
To a ssign a con ta ct t o a g rou p
1. From your Hom e screen , t ouch Pe o ple icon or f ind it : Applica tion m e nu > Pe ople .
2. Touch Gro ups t ab.
3. Touch a group t o wh ich you w ant t o assig n cont act s.
4. Press M en u k ey , touch Ed i t in t he m enu t hat opens.
5. Touch Ty pe pe rson ’s n am e t o input t he cont act ’s nam e, t hen t he cor responding con tact ent ry w ill pop up,
select t he desir ed con tact en t r y.
6. Af ter y ou f inish edit in g , t ou ch DO N E.
• Fa vo r it es
You can set cont act s as favorit es so t h at you can get access t o t hem from t he People applicat ion.
To se t a con t a ct a s fa vor it e
1. From your Hom e screen , t ouch Pe o ple icon or f ind it : Applica tion m e nu > Pe ople .
2. From cont acts list , t ou ch a cont act w hich y ou wan t t o set as favorit e.
3. Touch
. I f you w ant t o cancel t he favor it e, t ouch .
Phone
Fin d it : Ap p li ca tio n m e nu > Ph one
• Ca ll log
Fin d it : Ap p li ca tio n m e nu > Ph one > Call lo g t a b
Tou ch different t abs su ch as All, Receiv ed, Dialed, and Missed calls on upside screen of Call log int er face, and
th en y ou can view d if f erent call logs.
Email
Fin d it : Ap p li ca tio n m e nu > Em a il
The Email application in y ou r phone off er s you t o com pose, sen d and r eceive em ails t hrough y our regular
em ail account .
You need creat e account first , an d then creat e em ail t o sen d. You can configure Em ail for m ost accoun t s in
j u st a few st eps.
13
Page 14

• Se t u p a n e m ail a ccoun t in y our ph o ne
1. From your Hom e screen , t ouch La un ch e r icon , th en find it : Applica t ion m en u > Em ai l .
2. Ent er you r em ail ad d r ess and passw or d, t h en t ouch N ex t .
3. I f t he set tin g s for t he em ail account cannot b e dow nload ed aut om at ically, com plet e t he set up m anually . I f
necessary , cont act y our em ail ser vice pr ov ider f or det ailed set t in g s.
4. When you ar e pr om pt ed, ent er a n am e f or y ou r em ail account , so t hat it is easily ident ifiable. The sam e
nam e sh ow s in t he em ails you send fr om t his accoun t .
5. Af ter y ou f in ish , t ouch N e xt .
• Cr e a te a n d se nd a n e m a il
1. From your Hom e screen , t ouch La un ch e r icon , th en find it : Applica t ion m en u > Em ai l .
2. Touch
.
3. Ent er recip ient s’ ad d r esses, and subj ect .
4. Com pose em ail. Press M e n u k ey , you can at tach a file, select the t ype of at t ach m ent , and select th e file
which you w ant t o at tach fr om t he list t hat ap p ears.
5. I f y ou wan t t o add Cc/ Bcc, press M e n u k ey , t hen t ouch Ad d Cc/ Bcc.
6. When you f in ish , t ouch
to sen d the em ail.
• Rece i v e e m a ils
1. From your Hom e screen , t ouch La un ch e r icon , th en find it : Applica t ion m en u > Em ai l .
2. Touch
to r efr esh , you can download n ew em ails.
• Rea d y ou r e m a il s
1. From your Hom e screen , t ouch La un ch e r icon , th en find it : Applica t ion m en u > Em ai l .
2. I n t he em ail in box , scr oll up or dow n, and t ouch t he em ail you w ant t o r ead.
• Rep ly t o a n e m a il
1. From your Hom e screen , t ouch La un ch e r icon , th en find it : Applica t ion m en u > Em ai l .
2. I n t he em ail in box , scr oll up or dow n, and t ou ch t he em ail t o which y ou want t o r eply.
3. Touch
4. Ent er y our reply, touch
to r eply or press M e n u k ey , t o select Re ply a ll.
to sen d the em ail.
• Fo rw ar d a n e m a i l
1. From your Hom e screen , t ouch La un ch e r icon , th en find it : Applica t ion m en u > Em ai l .
2. I n t he em ail in box , scr oll up or dow n, and t ou ch t he em ail y ou w ant t o f or w ar d.
3. Press M en u k ey , t o select For w a r d.
4. Ent er recip ient s’ ad d r esses.
5. Touch
to sen d the em ail.
• Vie w a ll fold er s
1. From your Hom e screen , t ouch La un ch e r icon , th en find it : Applica t ion m en u > Em ai l .
2. Touch
at t he bot tom of t he em ail inbox.
Mult im e d ia
list en it , wat ch it , capt ure it, enj oy it !
Cam er a
Fin d it : Ap p li ca tio n m e nu > Ca m e ra
Tak e a phot o or r ecor d a v ideo wit h t he cam er a in y ou r phone. You can hold t he cam era hor izon tally or
vert ically. Share a ph ot o or a vid eo w it h y our f r iends, or u p load your photos and vid eos t o a w eb ser vice.
• Ca m er a con t r ol ove rv ie w
5
14
Page 15

4
7
6
1
2
8
1 Preview your p ictu res or videos you capt ured
2 Tak e a phot o
3 Record a v ideo
4 Set t ings
5 Swit ch bet w een fr on t cam er a and back cam era
6 Shoot ing m ode
3
7 Sim e m ode
8 Phot o m ode and p anoram a m ode
• Ta ke a ph ot o
• Adj ust your p ictu r e size, color effect , and ot h er set t ings if you w ish .
• Fram e you r subj ect on scr een. You can zoom in or out by placing t wo finger s on t he t ouch scr een and
pin ching t hem t og et her t o zoom ou t or spread in g them apar t t o zoom in .
• Tou ch t he shut ter icon on t he screen.
The pict ur e you j ust t ook is display ed for a m om en t, and then is disp layed as a t hu m bn ail.
• Sh oot a v id eo
• Adj ust th e video qualit y, color eff ect , and ot her sett ings if y ou wish.
• Point t he lens t o t h e scen e y ou wan t t o shoot
• Tou ch t he cam cor der icon t o st ar t.
• Tou ch t he cam cor der icon again t o st op shoot ing.
Music
Fin d it : Ap p li ca tio n m e nu > M usic
The ph on e com es w it h a Music play er t hat plays songs, list en to audio book and podcast s y ou h ave st ored . I t
giv es y ou a h ost of set t in g opt ion s t o m ake your list en ing experience int er est ing.
15
Page 16

You can easily t ran sfer your f avorit e m usic fr om y our PC t o the SD car d and ex p er ience a w h ole wor ld of
in terest in g and m elod ious m usic.
Wh en y ou copy m usic to your SD card, the Mu sic play er searches t he car d f or m usic files an d bu ilds a cat alog
of you r m usic, b ased on infor m at ion about each file t hat is st ored in t he f ile it self.
• M usic libr ar y
Categories To uc h to select
Artists,Albums,SonsorPlaylists.
An Qi XuanAn Qi XuanAn Qi Xuan
Cai Yi Lin
Chen Guan Pu
Chen Qian Qian
The Music library off er s t he f ollowing m ult iple cat egories t hat y ou can select .
Cat e gor i e s
Ar t ist s: Songs classified by singer s
Alb um s: Son gs classified by album s
Son gs: Disp lay all songs
Play li st s: Disp lay p laylist s
I f you t ouch and h old an art ist , a song, or an album , som e opt ions will be av ailable t o you. For exam ple: play,
add t o play list , d elet e, et c.
Chen Guan Pu
Taiduo
Taiduo
Chen Guan Pu
16
Page 17

• M usic pla ye r
Now p layin g
Son g det ail s
Set t ing s contr ols
Chen Guan Pu
Music con t r o ls
Jiu Rang Ni Zou
Taiduo
You can r et urn to t he m u sic library scr een f rom m u sic play er scr een in the Music ap plicat ions by pressing
To t a l s o ng t i m e Prog r ess bar
Me nu k e y and t ou ch Libr ar y.
Mu sic an d se t tin gs con tr ols
Play / Pause
Tou ch /
Press M en u k ey , som e addit ional opt ions such as
Par ty shuffle, Ad d t o play list , and Librar y will be
available t o y ou .
Previous/ Next
Rewind/ For ward
Volu m e adj ust Press Volum e k ey s
Tou ch /
Tou ch and hold /
FM r adio
Fin d it : Ap p li ca tio n m e nu > FM r a d io
The ph on e com es w it h an in- built FM Radio. You can
Now playing
Tou ch
list en t o FM radio st at ion s, and add t hem t o channel
list . You hav e t o p lu g in an earphone, as t he ant en n a
Shuff le
Tou ch
of the FM radio. You can list en t o t he r adio eit her
th r ou gh an earphone, or thr ough t he speaker in t he
Repeat : Touch
to r epeat all
songs; t ou ch
Tou ch
again t o r epeat
cur r en t song .
phone.
2
1
1 Channel list
3
4
6
5
8
7
9
17
Page 18

2 r ecor d FM
3 Earphone or Speaker
4 Sav e or rem ove a ch ann el as a favorit e
5 To f ine- tu n e t he FM fr equency
6 To f ine- tu n e t he FM fr equency
7 To sear ch for t he previous effect iv e f r equ ency
8 To sear ch for t he nex t effect ive frequency
9 Play or Pause
Galler y
Fin d it : Ap p li ca tio n m e nu > Ga lle ry
The Galler y offer s y ou t o view ph ot os and play videos wh ich are dow nloaded as w ell as t hose t aken by t he
phone cam era.
From Galler y, you can also sh ar e y ou r phot os and vid eos w it h your friends, via Messag in g , Bluetoot h, or
Email.
1. Touch an album t o open it and v iew it s con tent s.
2. Touch a pict ure or a v ideo in an album t o view it .
To
Share via
various w ay s
Tou ch
Wh en v iewing a pict ur e, pr ess M en u k ey , som e
addit ional opt ions will be available t o you, such as
slid esh ow, edit , rot at e left , rot at e r igh t , crop, set
pict u re as, and d et ails.
Delet e
Tou ch
• Sh a r e a n Alb um
1. From your Hom e screen , t ouch La un ch e r icon , th en find it : Applica t ion m en u > Galle ry .
2. Press M en u k ey , touch Sele ct alb um in t he m en u that opens.
3. Select t he albu m s you w ant t o share.
4. Touch
.
5. I n t he m enu t hat open s, tou ch t he application t o use t o sh are t he select ed alb um s. You can shar e via Email,
Bluet oot h, and Messagin g.
Sound r ecorder
Fin d it : Ap p li ca ti o n m e nu > Sou nd r ecor der
Recor d sound and p lay sound f ile
1
.
2 4
1 To st ar t r ecor ding
2 Recording f iles list
3
18
Page 19

3 To p ause r ecor d ing
4 To st op r ecor ding
5 Rev iew and play r ecor ded file
Tools
st ay on t op of t hin gs
Calen d ar
Fin d it : Ap p li ca tio n m e nu > Ca le n da r
Your ph on e has a calendar for m anag in g y our t im e schedule. You can u se t he calen d ar t o keep tr ack of
im por t ant ev ent s. Aft er ent er in g the calen dar fu nct ion m en u , you can select year , m ont h and dat e.
• To set t he ca le nd ar v ie w
1. From your Hom e screen , t ouch La un ch e r icon , th en find it : Applica t ion m en u > Ca len da r.
2. Touch
3. Select d ay, week , or m on t h in t he m enu t hat opens.
• To a dd a ca len da r e v en t
1. From your Hom e screen , t ouch La un ch e r icon , th en find it : Applica t ion m en u > Ca len da r.
2. Touch M en u k ey , t h en t ouch N e w e ve nt in t he m enu t hat opens.
3. Ent er the nam e, locat ion, t im e, and d escript ion f or th e event .
4. Select a r em inder for t he ev ent .
5. Af ter y ou f inish , t ouch D O NE.
Clock
Fin d it : Ap p li ca tio n m e nu > Clo ck
The clock allow s y ou to v iew t im e and dat e. You can also add an alar m, set t he alar m and t ur n it on . Then, th e
alarm can r in g at a specif ic t im e y ou set .
• Add a n a la r m
1. From your Hom e screen , t ouch La un ch e r icon , th en find it : Applica t ion m en u > Clock .
2. Touch
3. Touch
4. You n eed set tim e, r in gt one, r epeat , and v ibr at e. Th en, tur n it on.
Then t he alar m can r in g at a specif ic t im e you set .
Calculat or
Fin d it : Ap p li ca tio n m e nu > Ca lcu lat or
Keep your calcu lat ions on you r finger t ip s wit h t he calcu lat or. Using t his application allow s you t o m ak e
calculat ion s. Th e calculat or p r ov ides t he basic ar it hm etic fun ctions; addit ion , subt ract ion, m u lt ip licat ion, an d
div ision . You can also use an advanced panel.
• H ow t o u se t h e ca lcu la t or
1. From your Hom e screen , t ouch La un ch e r icon or find it : App lica t ion m en u > Ca lcu l a t or.
2. Ent er t he first n um ber u sin g the num eric k ey s.
3. Ent er t he oper at ion for y ou r calculat ion by t ouch in g the Plus, M in us, M ult iplica t io n, or D ivision k ey.
4. Ent er the next num ber.
5. To v iew t he result , t ou ch t he “ = ” ( eq u als) key.
Press M en u k e y, y ou can open advanced panel t o d o calcu lat ion.
Tou ch
Tou ch and hold
, y ou can on ly er ase one num eric before t he cursor .
.
.
.
, y ou can er ase all n um er ic bef or e t he cur sor .
19
Page 20

Br ow se r
Use your w eb br ow ser t o v iew and n av igat e w eb pages, add pages as book m ar ks, and sav e pages for offline
reading. You can open sev eral w in d ow s at t he sam e t im e and sw it ch am ong t hem easily .
• Ope n t he w e b b r ow ser
From y our Hom e scr een, t ou ch Br o w se r icon or fin d it : App lica t ion m en u > Bro w se r.
• Se a rch an d a ddr ess b ar
Cancel t he dow n load
of t he cu r r ent w eb
page
Ent er a sear ch w ord
to sear ch f or a w eb
page , or ent er a w eb
page ad dress t o lo ad
a w eb page
• M an age book m a rk s
Book m ar ks let y ou access y our f avor it e and fr equent ly visit ed w eb pages quick ly . You can add b ook m ar k s
dir ect ly f r om y ou r phone br ow ser .
To boo k m a r k a w eb p age
1. When you ar e v iewing t he web page, p ress M en u k ey.
2. Touch Sa ve t o b ook m ar k s.
3. I f d esir ed, y ou can edit t he book m ar k .
4. When you’r e done, t ou ch OK.
Conn ect t o N et w or ks an d D ev i ce s
Your ph on e can connect t o a var iet y of net w or ks and d evices, inclu ding Wi- Fi, Blu et oot h, devices such as
headset s. You can also t r ansfer files t o/ fr om y ou r PC t hr ou g h t he data cable.
Det er m ine t he Net w or k You Are Using
1. Touch La un ch e r icon, an d f rom Applicat ion m enu, t ouch Se tt ing s.
2. Touch M o re ... > M obile ne t w or k s > Access p oint na m e s. Th e nam e of t he wir eless ser v ice p r ov ider
you are cur rent ly regist ered wit h is select ed in t he list.
Edit or Creat e New Access Poin t s
I f you and y ou r wir eless ser v ice p r ov ider det erm ine t hat you n eed t o chan ge t he set t in g s of y our cur r en t
access point nam e ( APN) or to cr eat e a new one, y ou m ust obt ain t he APN and det ailed set t in g s fr om your
provider.
1. Touch La un ch e r icon, and f rom Applicat ion m enu, t ouch Se tt ing s.
2. Touch M or e . .. > M obile n et w or k s > Acce ss po i n t n am es.
3. Touch an exist in g APN t o edit it , or p r ess M en u k e y an d t ouch N ew APN . Ent er the APN set tings t hat you
obt ain ed fr om y ou r wir eless ser vice provider.
4. When you f in ish ed, p r ess M en u k ey and t hen Sa ve .
5. I f y ou creat ed a new APN, t ouch it in t he APNs scr een t o st ar t usin g it .
Wi- Fi Net work s
Wi- Fi is a w ir eless n et work in g techn ology t hat can pr ov ide int ern et access at dist ance of u p t o 20 m eters. To
use Wi- Fi on y our phone, y ou access a wir eless access poin t, or “ h ot spot ”. Som e h ot spot s ar e open and y ou
can sim ply con n ect t o t hem . Ot her s ar e h idden or im plem ent ot her secu r it y f eatu r es, so y ou m ust configur e
your p hon e so it can con n ect t o t hem .
TI P: Turn off Wi- Fi wh en y ou are not using it , t o ext en d t he lif e of y our bat t er y .
• Con ne ct t o W i- Fi N e t w or k
View the dow n load
pr o gress o f t he
curren t w eb p ag e
20
Page 21

1. Touch La un ch e r icon, and f rom Applicat ion m enu, t ouch Se tt ing s.
2. Touch W i- Fi.
3. Check Wi- Fi t o t ur n it on. Th e phone scan s for available Wi- Fi n et work s and display s t he n am es of t hose it
fin ds. Secu r ed n et work s ar e indicat ed w it h a Lock icon.
4. Touch a net wor k t o con n ect t o it
I f t h e net work is secur ed, y ou ar e pr om pt ed t o ent er a password or ot her cr edent ials ( Ask your n et work
adm inist rat or f or det ails)
• Rece i v e N ot ificat ion s
By d efault , when Wi- Fi is on, y ou r eceive not if icat ion s in t he st at us bar w hen you r phone det ect s an open
Wi- Fi net work .
1. Tu r n on Wi- Fi, if it ’s not alr eady on.
2. I n t he Wi- Fi list screen , press M en u k ey t o open Advanced opt ions, check Net wor k notificat ion . You can
unch eck t h is opt ion t o st op receiv in g n ot if icat ion s.
Bluet oot h
Bluet oot h is a sh ort -range wir eless com m unicat ion s t echn ology t hat devices can use t o ex change inform at ion
ov er a dist ance of abou t 10 m et er s.
• Tu r n Blu e t oot h On / Of f
1. Touch La un ch e r icon, and f rom Applicat ion m enu, t ouch Se tt ing s.
2. Touch Bl u et oot h .
3. Check or un check Blu et oot h t o t ur n it on or off.
• Pa i r W it h Blue t oo th D e v ice s
You m ust pair y ou r phone wit h a dev ice before you can con nect t o it . Once you pair y our p h one w it h a dev ice,
th ey st ay paired un less you un p air t hem .
1. Touch La un ch e r icon, and f rom Applicat ion m enu, t ouch Se tt ing s.
2. Touch Blu et oot h.
3. I f Blu et oot h is not t u rned on, check Blu et oot h t o t ur n it on. You r phone scans for and disp lay s t he I Ds of
all available Blu et oot h dev ices in range.
4. I f t he dev ice y ou wan t t o pair w it h is n ot in t he list , t ou ch SEARCH FO R D EV I CES.
5. Touch t he I D of t he desir ed device in t he list to pair it.
Connect t o a com put er via USB
You can conn ect your p h one t o a com put er wit h a USB cable t o t ransf er m u sic, pict ur es, and ot her files
bet ween y ou r phone’s SD card and the com put er .
You can not sh ar e y ou r phone’s dat a con nect ion and SD car d via USB cable at t he sam e t im e. I f you are usin g
USB t et hering, you m u st t ur n that of f f ir st.
The con nect ion t o USB int erf aces has to be lim it ed t o USB 2. 0 ver sion or higher . The con nect ion t o so called
pow er USB is pr oh ibit ed.
Wor k in g w it h Secu re Cer t ificat es
I f your or ganizat ion’s VPN or Wi- Fi Net work r elies on secur e cer tificat es, you m ust ob tain th e cer tificat es and
st or e t hem in y ou r phone’s secur e cr edent ial st orage, b efore y ou can configure access t o t hose VPN or Wi- Fi
net wor ks on y our p h one.
I f your net work adm inist r at e inst r u ct s you t o dow nload t he cert if icat es from a w ebsit e, y ou ar e pr om pt ed t o
set a passw or d for th e creden t ial st or age wh en y ou dow nload t he cer tificat es.
I nst all Secur e Cer tificat e fr om SD Card
1. Copy t he cer tificat e fr om y our com pu ter t o the r oot of t he SD card.
2. Touch La un ch e r icon, and f rom Applicat ion m enu, t ouch Se tt ing s.
3. Touch Secu rit y .
4. Touch I nst all fr om SD ca rd.
21
Page 22

5. Touch t he file nam e of t he cer tificat e t o inst all. Only t he nam es of cer tificat es t hat y ou hav e not already
in stalled on you r phone are display ed.
6. I f p r om pt ed, ent er t h e cer t ificat e’s password.
7. From Wi- Fi list , search and select t he cer tificat e.
Se t t in gs
th e set t in g s for v ar ious feat ur es of t he phone
Get t o k n ow t he set tings in you r phone so t hat y ou can p er sonalize t hem t o your ow n requirem en t s. Go t o
Set t in g s t o con f igur e h ow y ou r phone look s, soun d s, com municat ion, p r iv acy , and oper at ion s in a variet y of
ways:
W i- Fi
Blu et oot h
SI M
m a na gem en t
Da t a u sa ge
Mo r e . ..
Displa y
Au dio p r of ile s
Turn Wi- Fi on or off , scan available Wi- Fi net w or ks, or add t he Wi- Fi n et work .
Turn Blu et oot h on or off, sear ch for available Bluet oot h devices, an d m ak e y our phone
visible or in visible t o ot her Bluet oot h devices.
Set pr eferences on h ow y ou u se SI Ms inser ted in y ou r phone.
Turn the m obile dat a t raffic on or off , an d k eep t rack of y our dat a usage det ails ov er a
specified per iod of t im e.
Turn Airplan e m ode on or off , an d con figur e set t in g s for VPN and m obile net work s,
enable your ph on e t o shar e it s m obile dat a con n ect ion as a por t able Wi- Fi hotspot , or
th r ou gh USB t ethering or Blu et oot h t et her ing, and share Wind ow s PC int er n et via USB
cable.
Let you set t he screen bright ness, select t o sw it ch or ient at ion w hen you r ot at e your
phone, an d con figu r e ot her scr een set tings.
Configur e how y ou r phone rings, v ibr at es, or aler ts you in ot her ways when y ou
receiv e com m un icat ion s, et c.
St or ag e Let you check out av ailab le space on y our
Ba t t e ry Check bat t er y st at us and b at t er y lev el.
Ap ps Man age an d r em ove inst alled applicat ion s.
Locat ion a ccess Enab le or disable GPS sat ellit es, and so on .
Se cu rit y Prot ect y ou r phone by set t in g up diff er ent locks and passwords.
Acco unt s
La ngu ag e &
inp u t
Ba ck up & r ese t Manage your person al dat a and r eset your phone.
Da t a & t im e Let you choose pr eferences such as f or m at an d t im e zon e.
Sche du le d po w e r
on & of f
Acce ssibilit y Enable y ou r inst alled accessibilit y ser vices and adj ust r elat ed set t ing s.
Ab out ph one View in for m at ion about your ph on e, such as st at us, and legal in f or m at ion.
Let you add, and m anage support ed accou nt s. Enable y our phone synch ron ize dat a
wit h the sy nchr onizat ion account s t hat you add.
Let y ou select t he lan guag e f or t he t ext on y our phone and for configur ing t he on screen
keyboar d.
Schedule au t om at ic power in g on/ off of t he ph on e.
Acce ssing Passw or d
The cell phone and SI M car d use sev eral accessing passw or ds. These p asswor d s help t o p r ev ent t h e cell
phone f rom b eing em bezzled.
22
Page 23

You can u se t he function opt ions in t he securit y set tings of set t ing s m en u to ch ang e accessing passw or d
( except for PUK and PUK2) .
PI N Code
PI N cod e ( Per sonal I den t ificat ion Num ber ) can pr event t he SI M car d fr om being em bezzled. The PIN code is
provided along w it h t he SI M card. I f t he PI N code ch eck in g is act ivat ed , it is necessar y t o inpu t t he PI N cod e
when t he cell phone powers on every t im e.
I f a wrong PI N code has been in p ut for 3 t im es st r aight , it is needed t o in p u t t he PUK cod e, then inpu t a new
PI N cod e and inpu t it again for confir m at ion.
PI N2 Code
Som e SI M card s m ay p rov ide PIN2 code, w hile PIN2 code needs t o be used in som e fun ct ions like Call Cost .
These f unct ions can be used only if t he SI M car d support s t hem .
I f a w rong PIN2 code has been input f or 3 t im es straig ht , it is n eeded t o in put t he PUK2 code, t hen input a n ew
PI N2 cod e and input it again for con fir m at ion.
PUK Code
PUK cod e ( Per sonal Unlock Key) is used t o change locked PIN cod e. PUK cod e is p r ov ided alon g w it h t he SI M
card. I f n ot provided, please con tact your local serv ice pr ov ider f or PUK code.
I f w rong PUK code has been in p ut for 10 tim es st raight , t h e SI M car d can not be used any m ore. Please
cont act your ser vice prov ider f or a new SI M card.
PUK code can n ot be chan ged. I f t he PUK cod e is lost , please cont act your ser vice provider.
PUK2 Code
PUK2 code is provided along w it h som e SI M card s for chan gin g locked PIN2 code.
I f w rong PUK2 code has been input for 10 t im es st raight , t he SI M card can n ot be used any m or e. Please
cont act your ser vice prov ider f or a new SI M card.
Th e PUK2 code can not be changed. I f it is lost , p lease cont act your serv ice pr ov ider.
Pr e ca u t ion s
Please car efully r ead an d obser v e t he
term s below :
Saf e pow er on
Do n ot use your m obile ph on e w her e it is
for bid d en t o use or y ou m ight cause a
dist u rbance or danger.
Saf e t ran spor tat ion f ir st
Please observ e all r elat ed local law s an d
regulat ion s.
Do n ot use your m obile ph on e w hile
driving.
Saf e t ran spor t at ion should be considered
fir st when dr iv in g .
Dist ur bance
All m obile p h one perfor m ances m ig h t be
dist u rbed .
23
Page 24

Turn off w hen in t he hospit al
Please follow relat ed lim it at ions.
Please sw it ch you r m obile phone of f w hen
near a m edical inst r um en t .
Turn off on an airplane
Please follow relat ed lim it at ions.
Do n ot use your m obile ph on e on an
air p lane.
Turn off when at a gasolin e st ation
Do n ot use your m obile ph on e at a f illing
st at ion or ar oun d fu els or chem icals.
Turn off aroun d ex p osu re Area
Please observ e r elated lim it ations and do
not use y our m obile ph on e near an area
where explosions can occur.
Proper u se
As described in t his m anual, your m obile
phone can b e u sed on ly in t he corr ect
locat ion .
I f possible, please do not t ouch t he
an t enna ar ea of your p h one.
Use qualif ied aft er sales ser v ice
Only a qualif ied t ech nician can in st all or
repair y our m obile ph one. Please cont act
th e aut horized ser v ice cen ter in case of
phone f ailure.
Accessor ies and b at ter ies
Only u se t he au thor ized accessories and
bat t eries and do not connect t o
in com pat ible m an uf act ur er s or pr odu ct s.
Wat er pr oof
Your m obile ph one is not wat er p roof.
Please keep it away f rom w at er.
Backu p
Rem em ber t o m ake a back up or k eep a
wr it t en r ecord of all im por t ant inf or m at ion
sav ed in y our m obile p h one.
Connect t o ot her dev ices
Please r ead t he u ser m anual of t he d ev ice
to get m or e det ailed secur it y instr uct ions
befor e conn ect ing t o ot her dev ices and do
not con n ect t o an incom pat ible product .
SOS em er gency calls
Mak e su re you r m ob ile phone is sw it ched
on and in a ser vice ar ea. I n idle m ode,
in pu t t he SOS n u m b er, t hen p r ess t he Dial
Key. Advise wh ere you are and do not han g
up wit hout p er m ission .
24
Page 25

Fr e quent ly Ask e d Qu e st ions a n d Tro ublesh oot in g
Fr eq ue n
t l y
Ask ed
Que st io
ns
Fail t o
tu r n on
Fail t o
connect
net wor k
Disp lay
in for m at i
on while
tu r ning
on
Poor
qualit y of
calling
St andby
durat ion
short en e
Cau se a n d Solu tio n
Press t h e power on k ey f or over 1
second.
Check if the bat tery is pr oper ly
connect ed. Please rem ov e and inst all it
again, r et ry t o t ur n it on;
Check if bat ter y is appropriat ely
charged.
Weak sig n al. Please t r y an d m ove t o a
locat ion with st r on g signal and t ry
connect in g to t he n et work again;
Please ensur e t hat y ou ar e not b eyond
th e n et work cov erage of ser vice
providers;
Please ensur e y ou h ave a valid SI M
card. Please con tact your net work
provider for f ur t h er in f or m at ion;
Check if the SI M car d is inst alled
corr ect ly
Handset lock passwor d. I f t h e handset
lock is act ivat ed, you have t o in p u t
han dset passw or d.
I n put PI N : I nput t in g PI N wh ile t u rning
on each t im e is act ivat ed, you h ave t o
in pu t t he PI N code.
I n pu t PU K code : When y ou ’v e in pu t
wr on g PI N code for 3 t im es will lock t he
SI M car d . You n eed t o inp u t t he PUK
code p r ov ided by y our net w or k
provider.
Please ch eck if the sound v olum e is
tu n ed im properly
I n an ar ea wit h poor receiv in g
condit ion, ex am ple: basem ent , t he
signal m igh t be weak. Try sear ching a
locat ion with st r on ger signal r ecept ion
an d call again.
Wh ile using t he m ob ile ph one in t he
peak p er iod of com m unicat ion, like
com m ute t im e, y ou m ay b e unable to
call because of line congest ion.
The standby d u rat ion is relat iv e t o the
system set ting of n et work . Wh ile t h e
m obile ph on e is in an ar ea wit h poor
25
Page 26

d signal st ren g t h and can not r eceive t h e
signal, th e h andset w ill cont inuously
sear ch for a base st at ion . This w ill
significant ly r edu ce bat ter y char ge. I t is
recom m ended t hat y ou t ur n off y ou r
m obile in ar ea w it h no signal recept ion
to sav e bat tery.
Need r eplacing t he b at t er y. Please
change a new b at ter y.
Dir t on t he m et al surf ace of an SI M
card. Use clean clot h t o w ip e t he m et al
SI M Car d
Err or
touch point on an SI M card.
The SI M card is not inst alled .
The SI M card is dam ag ed. Please
cont act your n et work ser vice provider.
Please ch eck if you p r ess t he d ial key
aft er dialing.
Please ch eck if calling is f or bidden
Fail t o
dial out
because of d efault ing .
Please ch eck if the SI M is v alid.
Please ch eck if the call b arr in g is set .
Please ch eck if the fixed dial f u nct ion is
set .
Caller s
can not
cont act
you
Please ch eck if the m obile phone is on
an d con nect ed wit h t he net work .
Please ch eck if the Call barr ing or call
div er t is act iv at ed.
Please ch eck if the SI M car d is v alid.
Poor cont act . Please check if t he plug is
connect ed w ell.
Fail t o
charge
Please conf ir m if t he en vir on m ent
tem per at ure is w it hin t he r ange of 0º C
~ 40º C wh ile ch ar ging.
The bat tery or charger is dam aged . You
need t o replace it .
Fail t o set
som e
funct ion s
Wrong operat ion.
The net work provider does not support
th e f unct ion, or you have not applied for
it .
N o te : I f t he inst r uct ion above can not help y ou solv e pr oblem s, p lease recor d,
Mob ile phone m od el and ser ial num ber,
Specific cont en t of w arr ant y,
Clear st at em ent of pr oblem s,
Then cont act your local dealer or the aut h orized ser vice cent er in y our ar ea.
Sa f e t y I nform a t ion and Not ice s
Using t he Mob ile Phone an d Char g er
Da ng er :
Only u se aut horized bat t ery and charger. Using ot her b r ands m ay cau se b at t er y leakage, overheating,
26
Page 27

ex plosion or ev en fir e.
Cau t i o n:
Keep t he ph one away fr om du st , wat er and d am p areas. Dust , w at er or ot her liqu ids m ay cau se overh eat ing,
elect rical leak age, and/ or phone failure.
The ph on e, bat tery, charger and AC adapt er ar e not wat er p r oof. Keep t hem away f r om r ain and liquid.
W a rn in g:
Do n ot bum p, sh ake or t am per w it h t he phone or charger. Th is m ay cau se bat tery leakage, ov er heat ing,
ex plosion or ev en fir e.
Do n ot place t he bat tery, phone or ch arger near a m icr owave or high- volt age d evice. This may cause bat ter y
leakage, ov er heat in g , ex plosion or even fir e; also pr event t he phone and AC adapt er from overheating ,
sm ok in g or short cir cuit ing.
Do n ot use t he p h one around v olat ile oil. Th is m ay cau se f ir e, b reak d ow n or dam age.
To avoid any dam age or b r eakdow n, do not disassem ble t he phone, bat t ery, charger or in t ernal com ponen ts
by y our self.
Locat ion :
The socket- ou tlet shall b e installed n ear t he equipm ent and shall be easily accessible.
Using t he Mob ile Phone
W a rn in g:
Please conf ir m if the en v ir on m ent t em per at ure is w it hin t he r ange of 0º C ~ 40º C w hile ch ar ging .
Do n ot u se t he phone wh ile you ar e d riving. Pull ov er and st op y our aut om obile t o dial or list en t o a phone call.
Usage of mobile p h ones in aircraf t s or h osp it als is prohibit ed. Swit ch t he ph on e off t o prevent in t erference
wit h elect r on ic m edical dev ices. Follow any rules or r egulat ions in such p laces.
Do n ot use t he p h one at a gas st at ion, n ear fuel or n ear chem icals.
Do n ot use t he ph one near elect ronic m edical d ev ices such as hearing aids, pacem aker s and aut o- cont rol
dev ices such as fir e det ect ors and aut om at ic door s.
I f you have t o u se y our m obile ph one near an elect ronic m edical device su ch as a pacem aker, p lease con tact
your m anufact urer or d ealer for inf or m at ion about prevent ing in t erference.
Cau t i o n:
Elect ron ic syst em s in aut om obiles such as ant i- lock brakes, speed cont rol, or fu el spr ay in g syst em s, are
usually not in f luenced by w ir eless dev ices. Man uf act ur er s of t hese syst em s will t ell you w het her t h ey ar e
provided wit h good screening funct ions. I f you suspect t hat an aut om obile failur e is cau sed b y a w ir eless
wav e, p lease cont act your au t om obile dealer.
Avoid using your p h one in crowded places.
Do n ot st or e y our m obile ph one near or w it h a cr edit car d, disk or ot her m ag n et ic m at er ials. This m ay eff ect
in for m at ion stor ed on y our phone.
Keep your ph on e away f r om p ins. Pins can be absor bed by t he phone’s r eceiver m agnet , wh ich m ay cause
har m .
I f you int end n ot to use y our m obile ph on e for a long per iod of t im e, p lease r em ove t he bat tery from t he
phone. Leaving t he bat t er y in side t he m obile phone for a long period of t im e m ay cause m oist u re to t he
bat t ery, an d it can dam age t he m obile p hone or t he bat t er y.
Using t he Bat t er y
Da ng er :
Do n ot dispose of t he bat tery in t o a fir e. Doing so m ay cause b at t er y ex plosion or even fir e.
I f you have difficult ies inst alling t he bat tery, do n ot force t he inst allat ion . This m ay cau se b at ter y leakage,
ov er heat ing, ex p losion or even fir e.
Keep m et al obj ect s away so t hey do not com e in cont act w it h t he bat tery or it s con nect ors as it m ay cause t he
bat t ery to shor t cir cuit , ov er h eat or ex plode.
Do n ot weld t he polar it ies of t he bat tery dir ect ly t og et her. This m ay cau se bat tery leakage, ov er h eat in g ,
ex plosion or ev en fir e.
27
Page 28

Batt ery liq uid is severely h ar mful for your eyes. I f bat ter y liquid gets in your ey es, do not r ub t hem . I nst ead,
wash y our ey es wit h w at er f ir st and t hen go direct ly to a doct or for help.
Do n ot use or st or e your phone in high tem perat ure ar eas. This m ay cause batt er y leak age, overheat in g ,
ex plosion or ev en fir e.
W a rn in g:
Replace t he bat ter y wh en t he norm al usage t im e begin s t o decrease or if you not ice the bat tery is over h eated
or has ch anged sh ape or color.
I f bat t er y liqu id leaks ont o your skin or clot hes, im m ediat ely w ash the affect ed part s w it h wat er.
I f t h e bat tery b egins to leak or em it s a st r ange odor, pr operly disp ose of t he bat tery according t o local
regulat ion s. Do not thr ow it int o a fir e.
Cau t i o n:
Do n ot leave t he pr odu ct or it s bat tery in sid e a vehicle. This m ay dam age t he pr odu ct , ov er h eat the bat t er y,
or pose a r isk t o the vehicle.
W a rn in gs on Ba tt e ry:
( a) Please use appoint ed bat tery in case of explosion r isk.
( b) Please dispose of lif eless bat t ery u nder g uidance.
Using t he Charger
Da ng er :
Only use t he ch arg er that cam e wit h t he ph on e. Using a d iff er ent ch ar ger m ay cau se t he phone t o b reakdow n
or ex plode.
I f t h e ch ar g er short cir cuit s, a fir e m ay occur.
Do n ot use a dam aged, w or n or broken ch ar g er. This m ay cau se a fire.
Clean du st away f rom t he power socket to avoid the possibility of a fir e.
Do n ot st or e t he char g er near any liquids. I f liquids sp ill ont o t he char g er it m ay cau se it t o overh eat or
break dow n.
I f liqu id d oes spill ont o t he ch ar ger, im m ediat ely unplug t he p ow er cable t o pr event ov er h eat ing , fir e or
an ot her t ype of br eakdow n .
Do n ot use t he charger in p laces w it h high h um idit y lik e a bat h room . This m ay cause a fire or ot h er
break dow n.
Do n ot t ouch t he charger, p ow er cable or socket w it h wet han ds. This m ay cau se an elect r ic shock .
Requirem en t s f or Mobile Phone
Avoid using your m obile p h one in ext rem ely h igh or low t em perat ures.
I t is recom m ended t hat you do not use your m obile ph one near a telephone, TV set , rad io or ot her radio
frequency sen sitiv e devices.
Requirem en t s f or the Bat tery
Wh en n ot in u se, st or e t he bat tery in a cool, w ell-v ent ilat ed place wit h sun shine.
I f you w ill n ot be usin g t he m obile ph on e for an ex t ended per iod of t im e, ch arg e t he bat t ery on a regular basis
to avoid bat t er y breakdown .
The ph on e bat tery w ears out f ast . I f charging t he bat tery d oes n ot im prove its per form ance, it is t im e t o
replace t he bat ter y. Proper ly dispose of the batt er y accor ding t o local regulat ions. Do not t h row it in t o a f ir e.
Cau t i o n: Risk of explosion if bat tery is replaced by an incor rect t ype. Dispose of used bat teries accor din g to
th e instr uct ions.
Requirem en t s f or the Char ger an d AC Adap t er
Please conf ir m if the en v ir on m ent t em per at ure is w it hin t he r ange of 0º C ~ 40º C w hile ch ar ging .
Clean in g and Maint en ance
The m obile ph on e, the bat t ery and t he char g er ar e n ot water p r oof. Do n ot use t hem in p laces w it h high
28
Page 29

hum idit y like a bat hr oom an d also avoid spillin g any liquids on them .
Use a sof t clot h t o clean t he m obile p h one, t he batt er y and t he char ger.
Do n ot use alcohol, dilut ed liquid or b enzene t o clean t he m obile ph one.
I f dust gets in th e sockets t he ph on e can be dam aged, short -cir cuit or even t he lose t he abilit y t o be
re- charged. Be sure t o clean t he socket regu larly.
War ning:
Any Changes or modifications not expressly approved by the party responsible for compliance could void the user's authority to
operate the equipment.
This device complies with part 15 of the FCC Rules. Operation is subject to the following two conditions: (1) This device may not
cause harmful interference, and (2) this device must accept any interference received, including interference that may cause undesired
operation. Note: This equipment has been tested and found to comply with the limits for a Class B digital device, pursuant to part 15
of the FCC Rules. These limits are designed to provide reasonable protection against harmful interference in a residential installation.
This equipment generates, uses and can radiate radio frequency energy and, if not installed and used in accordance with the
instructions, may cause harmful interference to radio communications. However, there is no guarantee that interference will not occur
in a particular installation. If this equipment does cause harmful interference to radio or television
reception, which can be determined by turning the equipment off and on, the user is
encouraged to try to correct the interference by one or more of the following measures:
—Reorient or relocate the receiving antenna.
—Increase the separation between the equipment and receiver.
—Connect the equipment into an outlet on a circuit different from that to which the receiver is connected.
—Consult the dealer or an experienced radio/TV technician for help.
SAR tests are conducted using standard operating positions accepted by the FCC with the phone transmitting at its highest certified
power level in all tested frequency bands, although the SAR is determined at the highest certified power level, the actual SAR level of
the phone while operating can be well below the maximum value, in general, the closer you are to a wireless base station antenna, the
lower the power output.
Before a new mobile phone is a available for sale to the public, it must be tested and certified to the FCC that it does not exceed the
exposure limit established by the FCC, Tests for each phone are performed in positions and locations (e.g. at the ear and worn on the
body)as required by the FCC.
For body worn operation, this mobile phone has been tested and meets the FCC RF exposure guidelines when used with an accessory
designated for this product or when used with an accessory that contains no metal and that positions the handset a minimum of 10 mm
from the body.
Non-compliance with the above restrictions may result in violation of RF exposure guidelines.
29
 Loading...