

Page 1

USER MANUAL
Tablet PC
FCC ID:Y7WPLUMZ708
Page 2

Key points˖
This manual includes security measures and correct operating methods. For personal safety, please
make sure to read this manual before using. Thank you!
The Machine uses a capacitive touch screen. You can operate the device by touching the screen
with your finger or with a capacitive pen. (Never use the sharp objects to click the screen, or the
touch screen may be damaged).
Do not expose the device to high temperature, high humidity, or dust.
Protect the device from drops or sudden impacts. Accidental damage may not be included as part
of your warranty.
Please note that the maximum volume of the device can damage your hearing.
Please charge your phone in the event of the following situations:
AǃLow battery on the battery icon. BǃThe system turns off automatically.
CǃThe keys do not work.
Dǃ“ ” is battery charging. ǏNoteǐ:Please use the included charger for your phone, as using
incompatible chargers may result in damages. We assume no liability for the damage. Plase contact
our customer service should you need a new adapter.
During charging, it is normal for the charger to feel warm to the touch. This does not affect the
functionality of the charger
Do not disconnect the device while formatting, downloading or uploading.
Do not attempt to dismantle the device, nor polish it using chemical abrasives or solvents.
Do not use this device where electronics are forbidden, such as on airplanes..
Take extra precautions if using the device while walking or driving. Please note that operating the
device while driving a vehicle is against the law in many places.
USB is for transferring data.
For technical support, please contact our customer service or the authorized distributor.
1
Page 3

Packing List:
Please check box for the following items
1. Tablet Device
2. User Manual
3. Earphone
4. Power Adaptor
5. USB Cable
Page 4
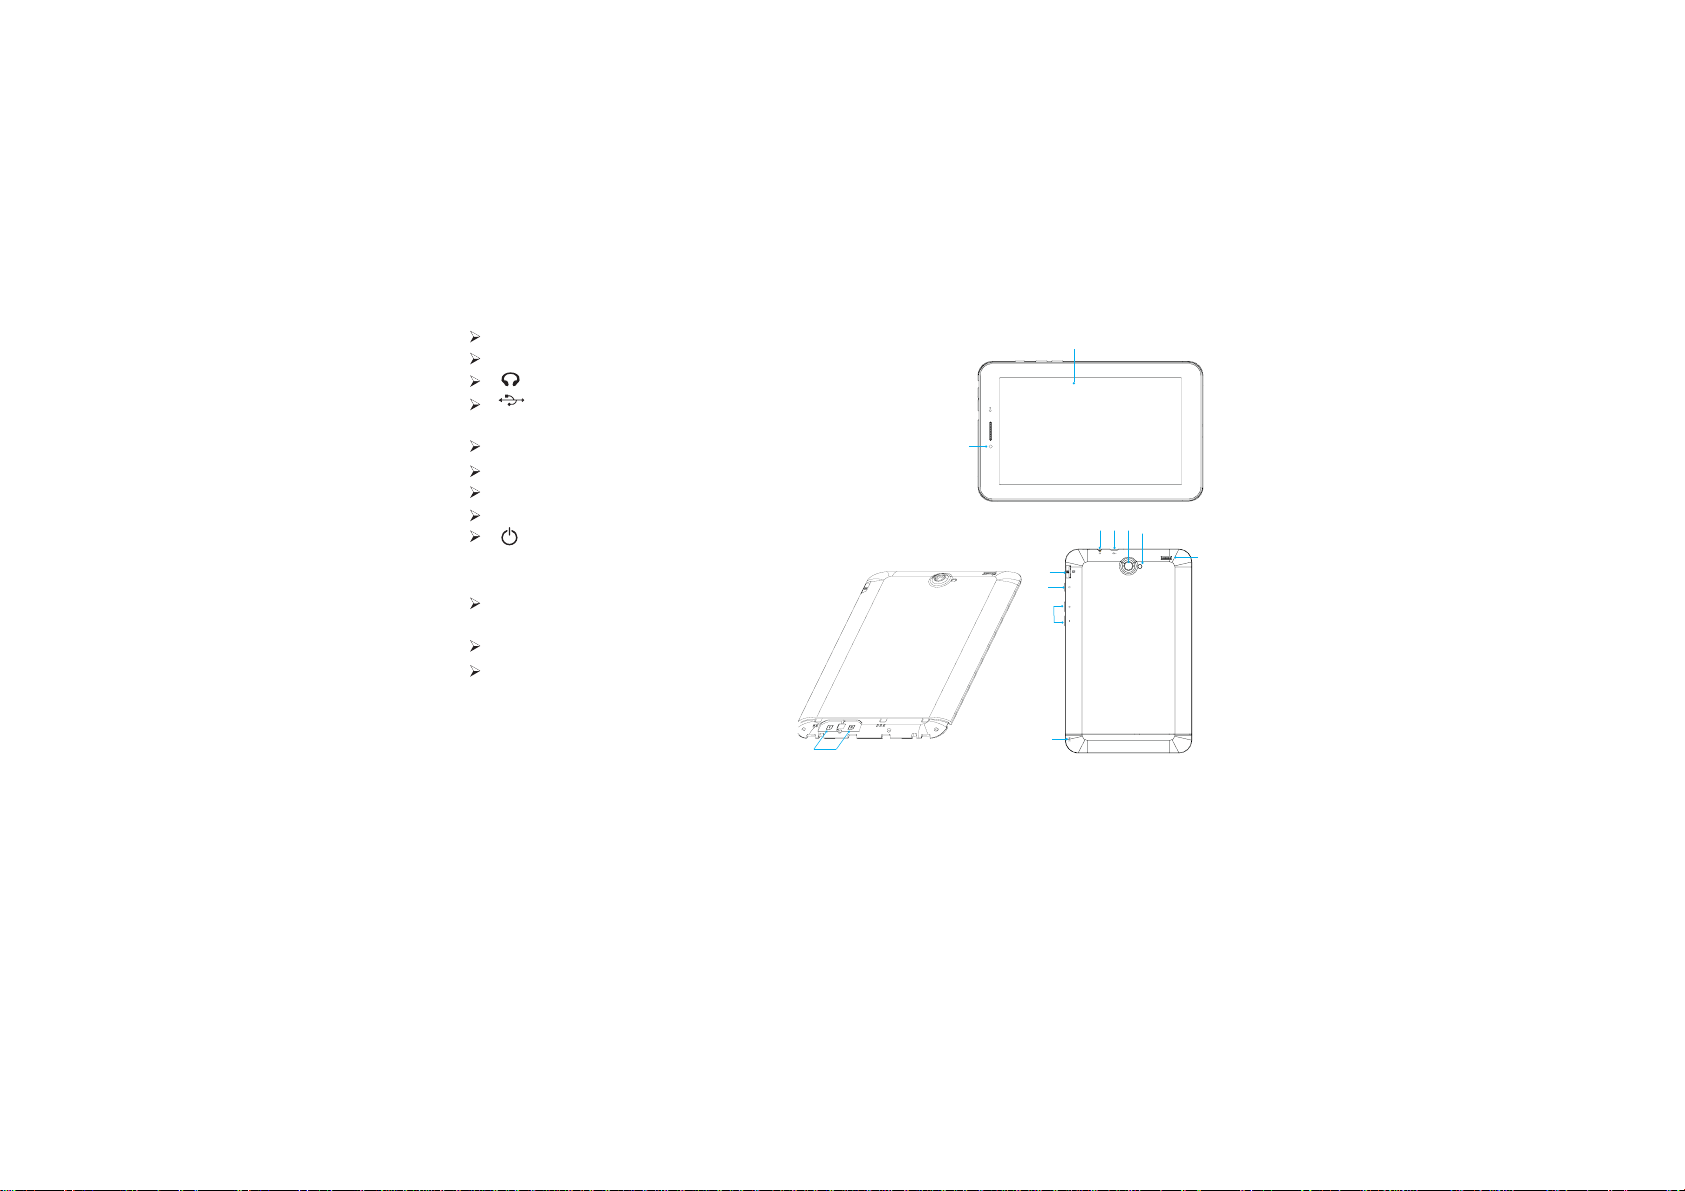
Device description
1 Touch screen:You can click and drag in the touch screen.
2 Front Camera:You can take photos and videos etc..
3 :Earphone jack: 3.5mm standard earphone jack.
4 :Micro USB 5 pin connector: For battery charging and data
transfer.
5 Rear Camera:You can take photos and videos etc..
6 Flash: Camera flash.
7 Speaker
8 Micro SD/TF card
9 POWER˖Keep pressing button over 2 seconds
for power on/ off, press button once to turn on
screen from sleep mode .
10 Volume +:Turn up the volume
Volume -:Turn down the volume
11 SIM Card:Insert/Pull out SIM Card
12 MIC:Voice Recording
2
10
1
5
3114
6
8
9
12
ǏTIPS ǐ˖1. When the battery is low, it will power off automatically.
2. In the event of an unexpected shutdown, the device will scan and repair the disk.
This will result in an extended loading delay.
3
7
Page 5
Setting up for the first time
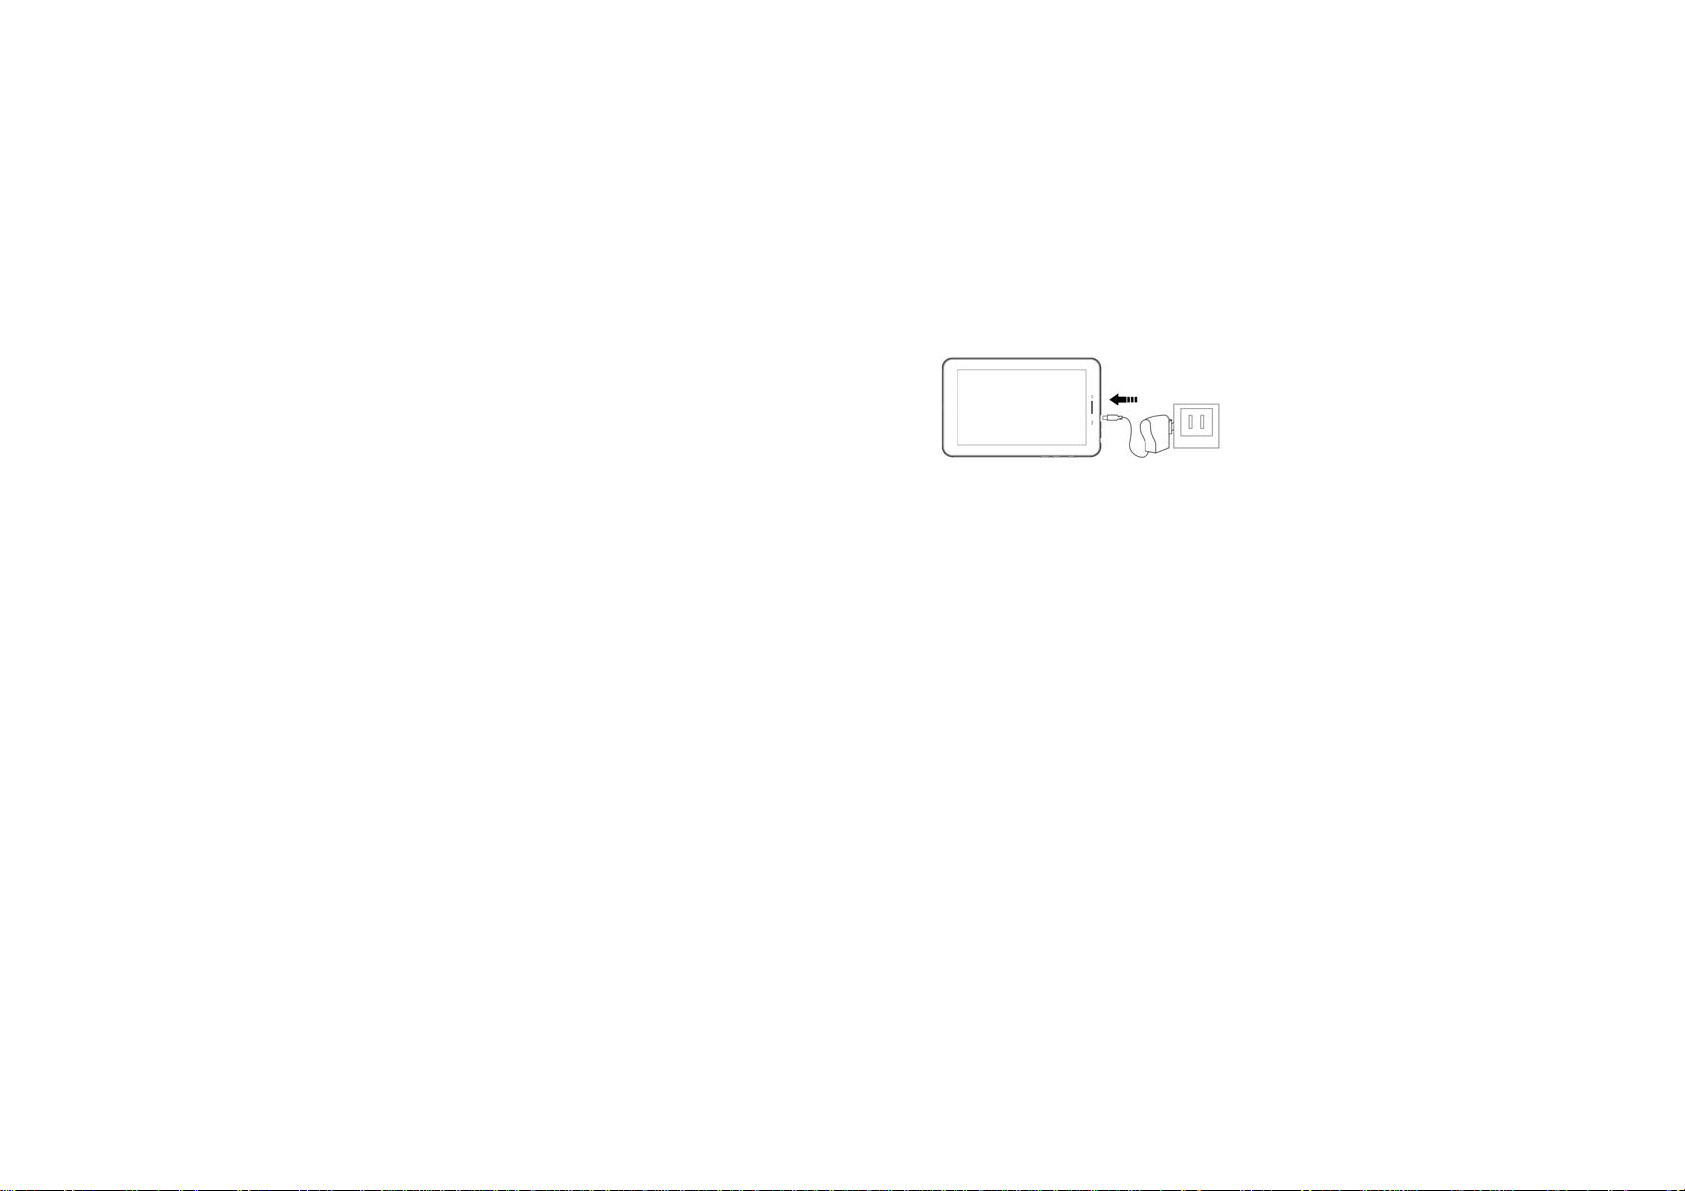
Charging your device˖
Prior to using your phone, allow the battery to charge for a full
ten hours. After that you can recharge the device as needed.
Connect the DC-in jack to your device and plug the AC
adapter into any AC outlet.
ǏTIPSǐ:
1. This device uses a built in polymer battery. Please only use
authorized chargers.
2. It is normal for the device’s surface to become warm during
charging or long
periods of use. All devices are factory tested before release.
3. To ensure long battery life, you should completely charge and then
discharge the device battery once a month.
Battery Saving
To increase the device's operation time per charge, please follow the
key points below˖
1. When device is not in use, press power button once to go to sleep mode.
2. Shut down the applications when not in use.
3. Turn off WLAN when not in use
4. Shut off application sync selection
5. Set a shorter time for display backlight
6. Reduce brightness of display
4
Page 6
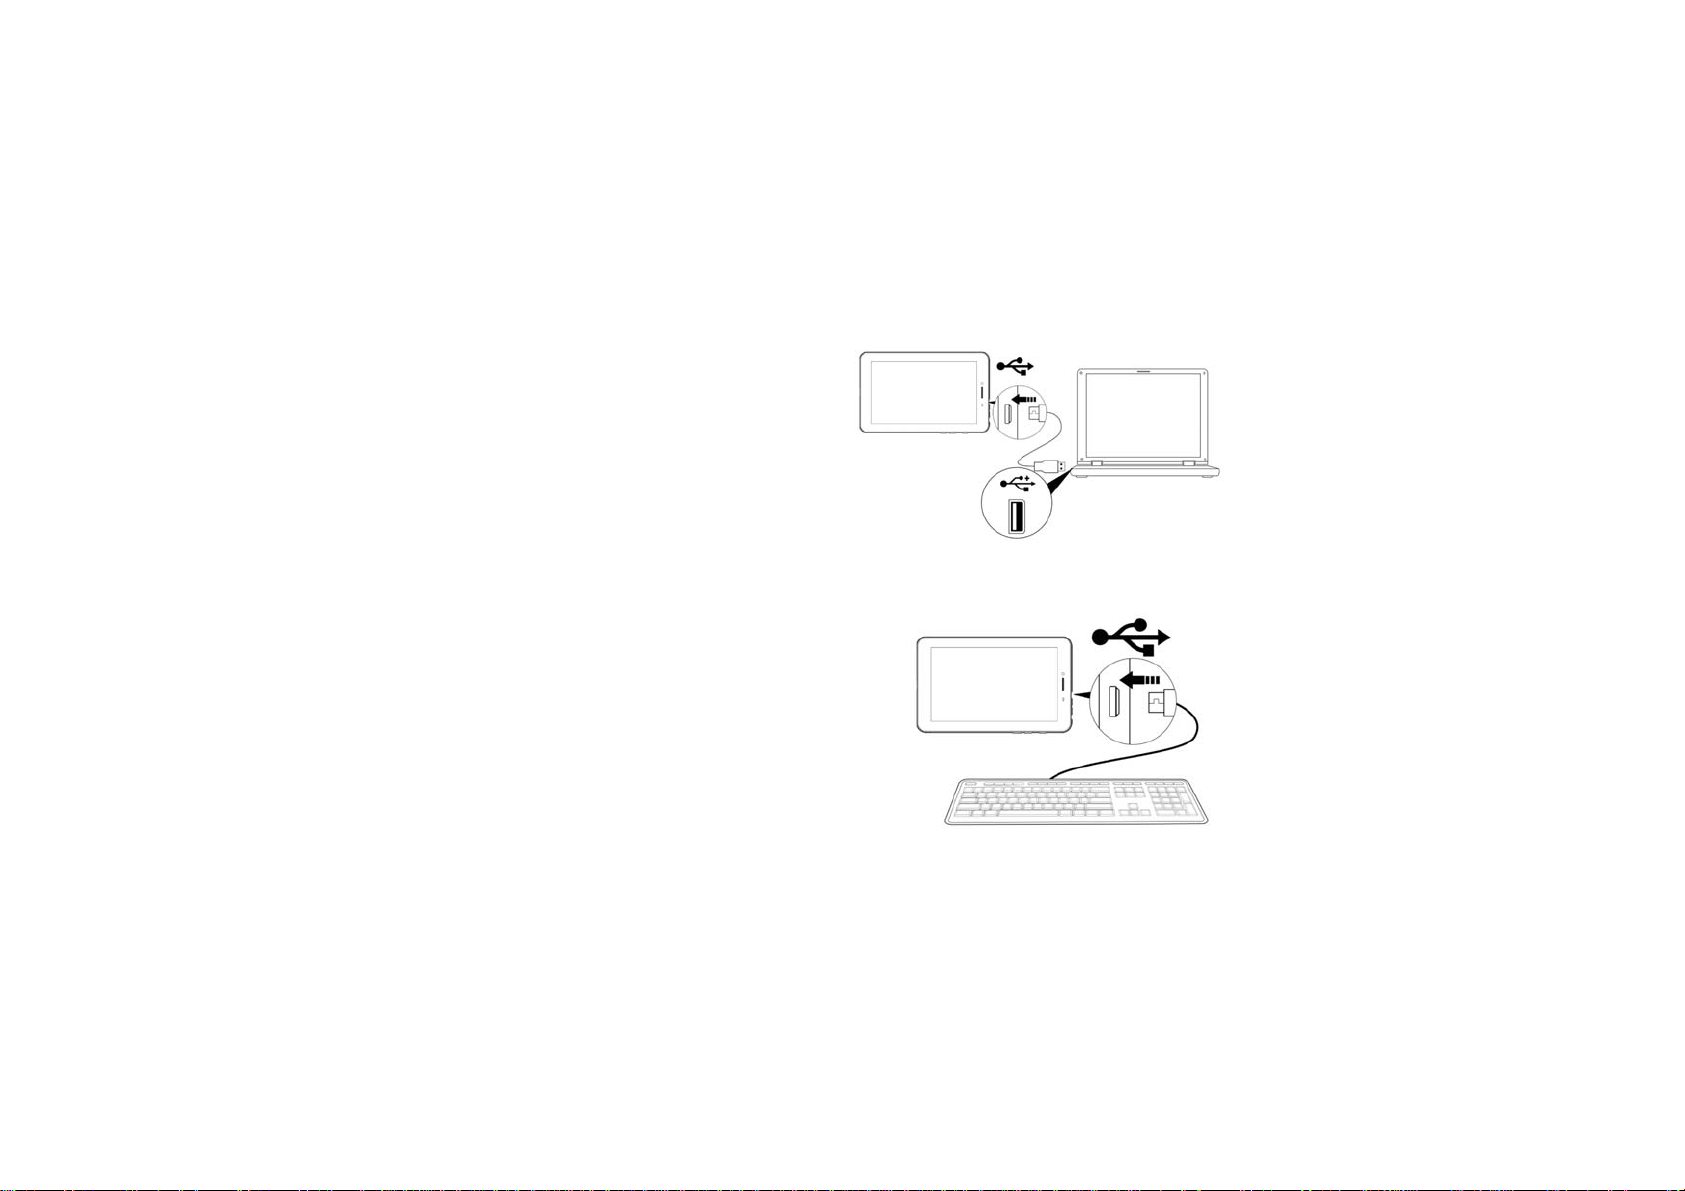
Connecting to a PC:
<RXFDQFRQQHFWZLWKD3&XVLQJWKH86%FDEOH
that comes with your device.
You can transfer your personal data to the PC.
&RQQHFWWKH3&DQGWKHGHYLFHLWZLOOFKDQJHWR
the USB mode,in this state, realize the files transfer
function between the PC and the device.
Connecting a USB device:
86%GHYLFHVDUHVXSSRUWHGVXFKDVDNH\ERDUGPRXVH
through the USB port.
9LHZPHGLDILOHVRQ86%VWRUDJHZLWKLQVWDOOHGSKRWR
music or video applications.
ǏCautionǐ: Before removing this USB storage,make sure
your device is not accessing data from the USB storage
5
Page 7
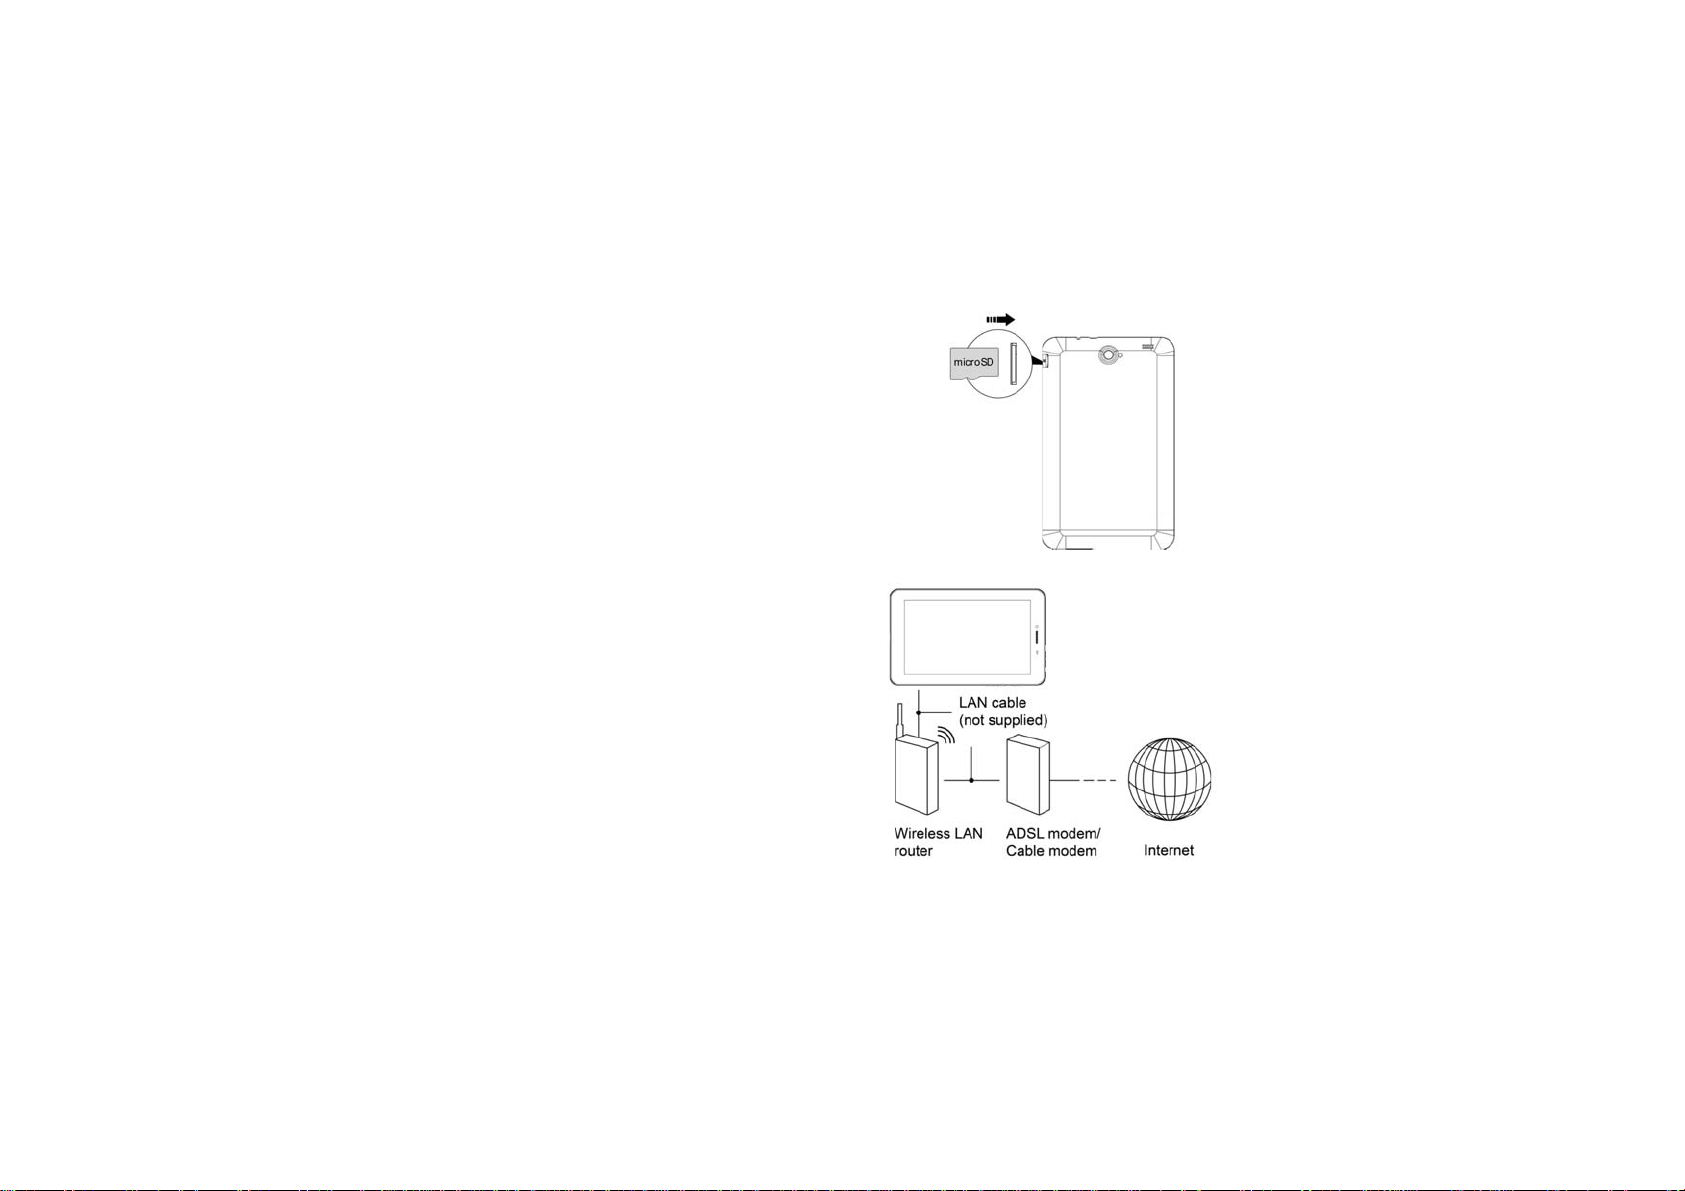
Inserting the MicroSD card :
You may install a Micro SD card to expand your device’s
storage space.
1. This device supports Micro SD card up to 32GB capacity.
2. Insert the Micro SD card as shown.
ǏNoteǐ: Ensure that the Micro SD card is inserted all the
way into the card slot.
ǏCautionǐ: Before removing this card, make sure your device
is not accessing data on the card.
Connecting to the Network:
Wi-Fi wireless setup:
Enter the setting interface, and turn on the Wi-Fi item.
The device will automatically search any accessible
nearby wireless networks.
6
Page 8

Power On
Keep pressing power button over 2 seconds, device will start up opening screen, Android system is
activating and enter the main screen.
Sleep Mode
After device is on, press power button once and it goes to sleep mode. The screen is now on standby
and under low battery consumption. To wake up device, press one more time power button.
Power off and Forced Shut down
When you are not using the device, keep pressing power button over 2 seconds,the screen will
display “shut down” , select “Yes” to power off unit completely. If device is hanging, use a small pin to
press Reset hole, it will forced shut down and the device will power on again.
Operation of Touch Panel
Click -- Use finger or capacity panel pen to touch once, so as to select or activate function, or select
menu or turn on applications.
7
Page 9
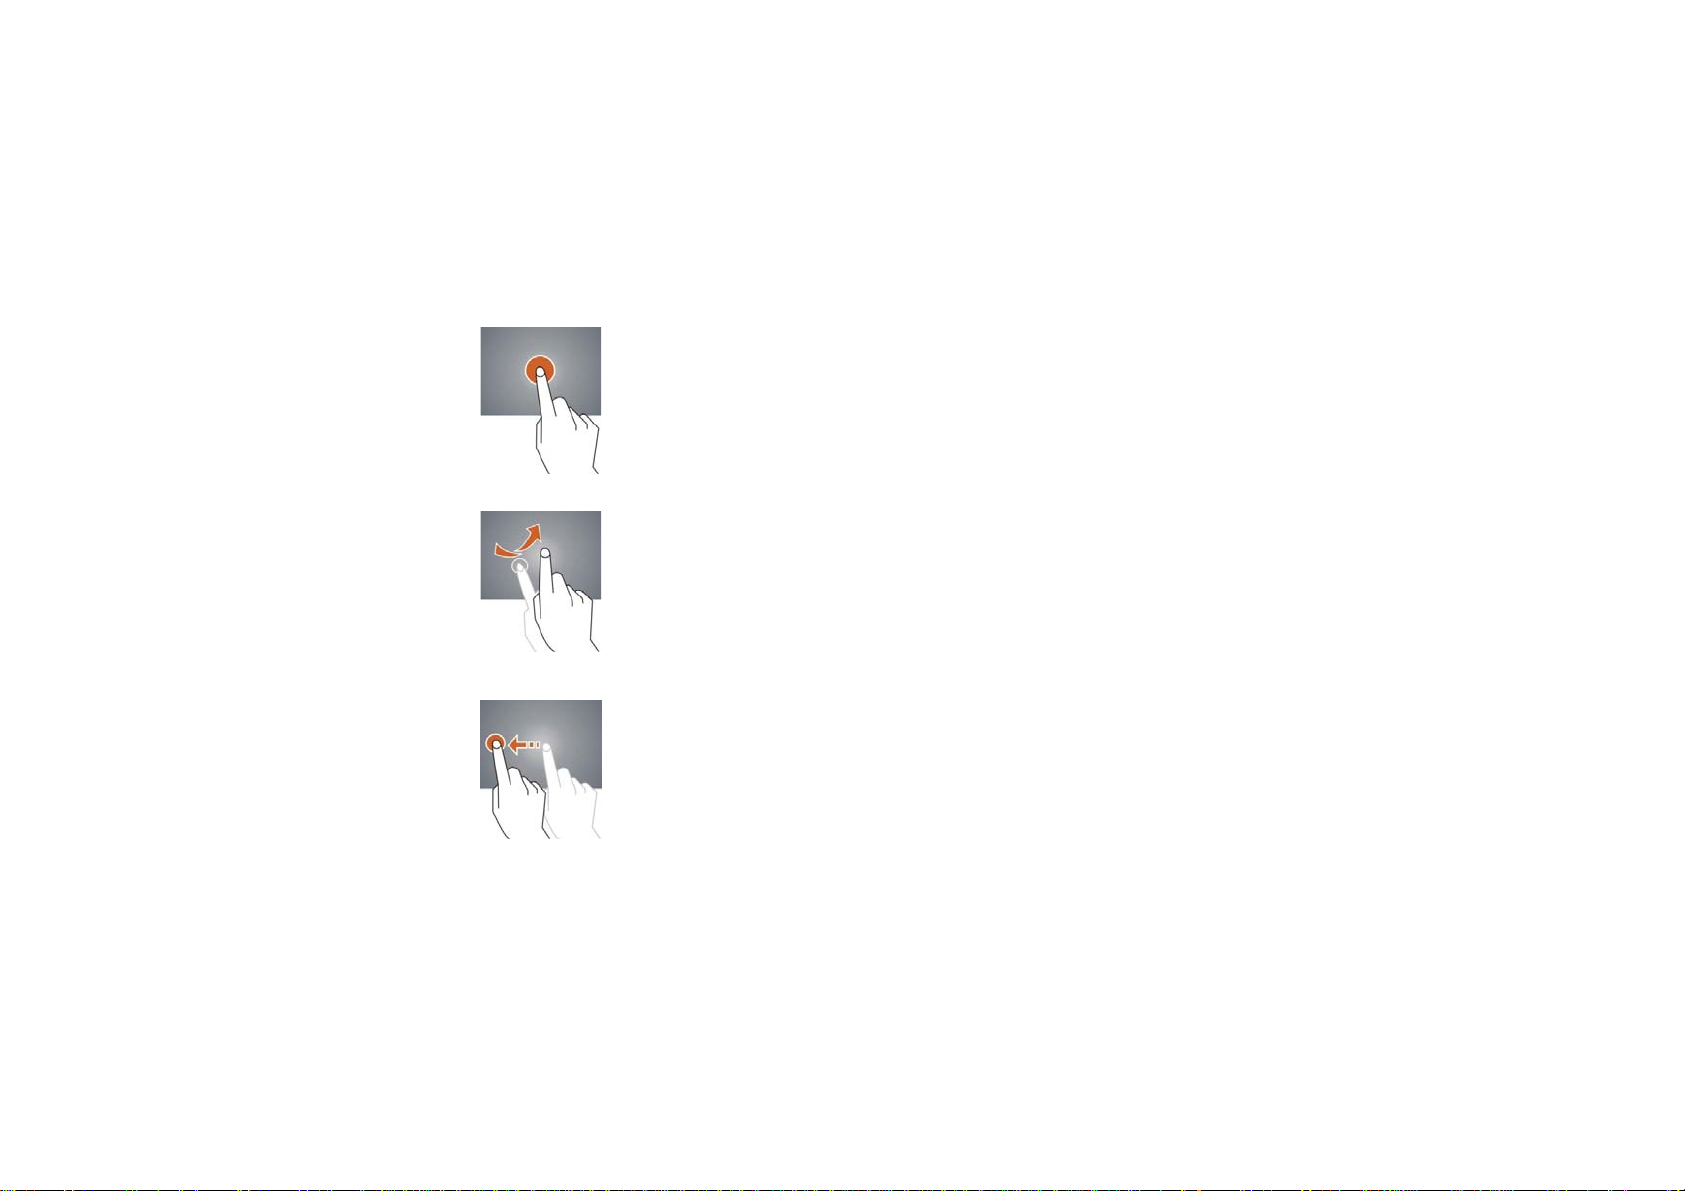
Tap and hold -- Tap over 2 seconds, it will turn on option list
Slide -- Slide up, down, left or right for fast scrolling browsing page and display screen
Drag – drag an icon and relocate the position
8
Page 10

Double Click – Double click to enlarge or shrink the display size of picture or under browsing
webpage.
Shut --Use two fingers at same time on touch panel, to enlarge or to shrink the display scale.
9
Page 11
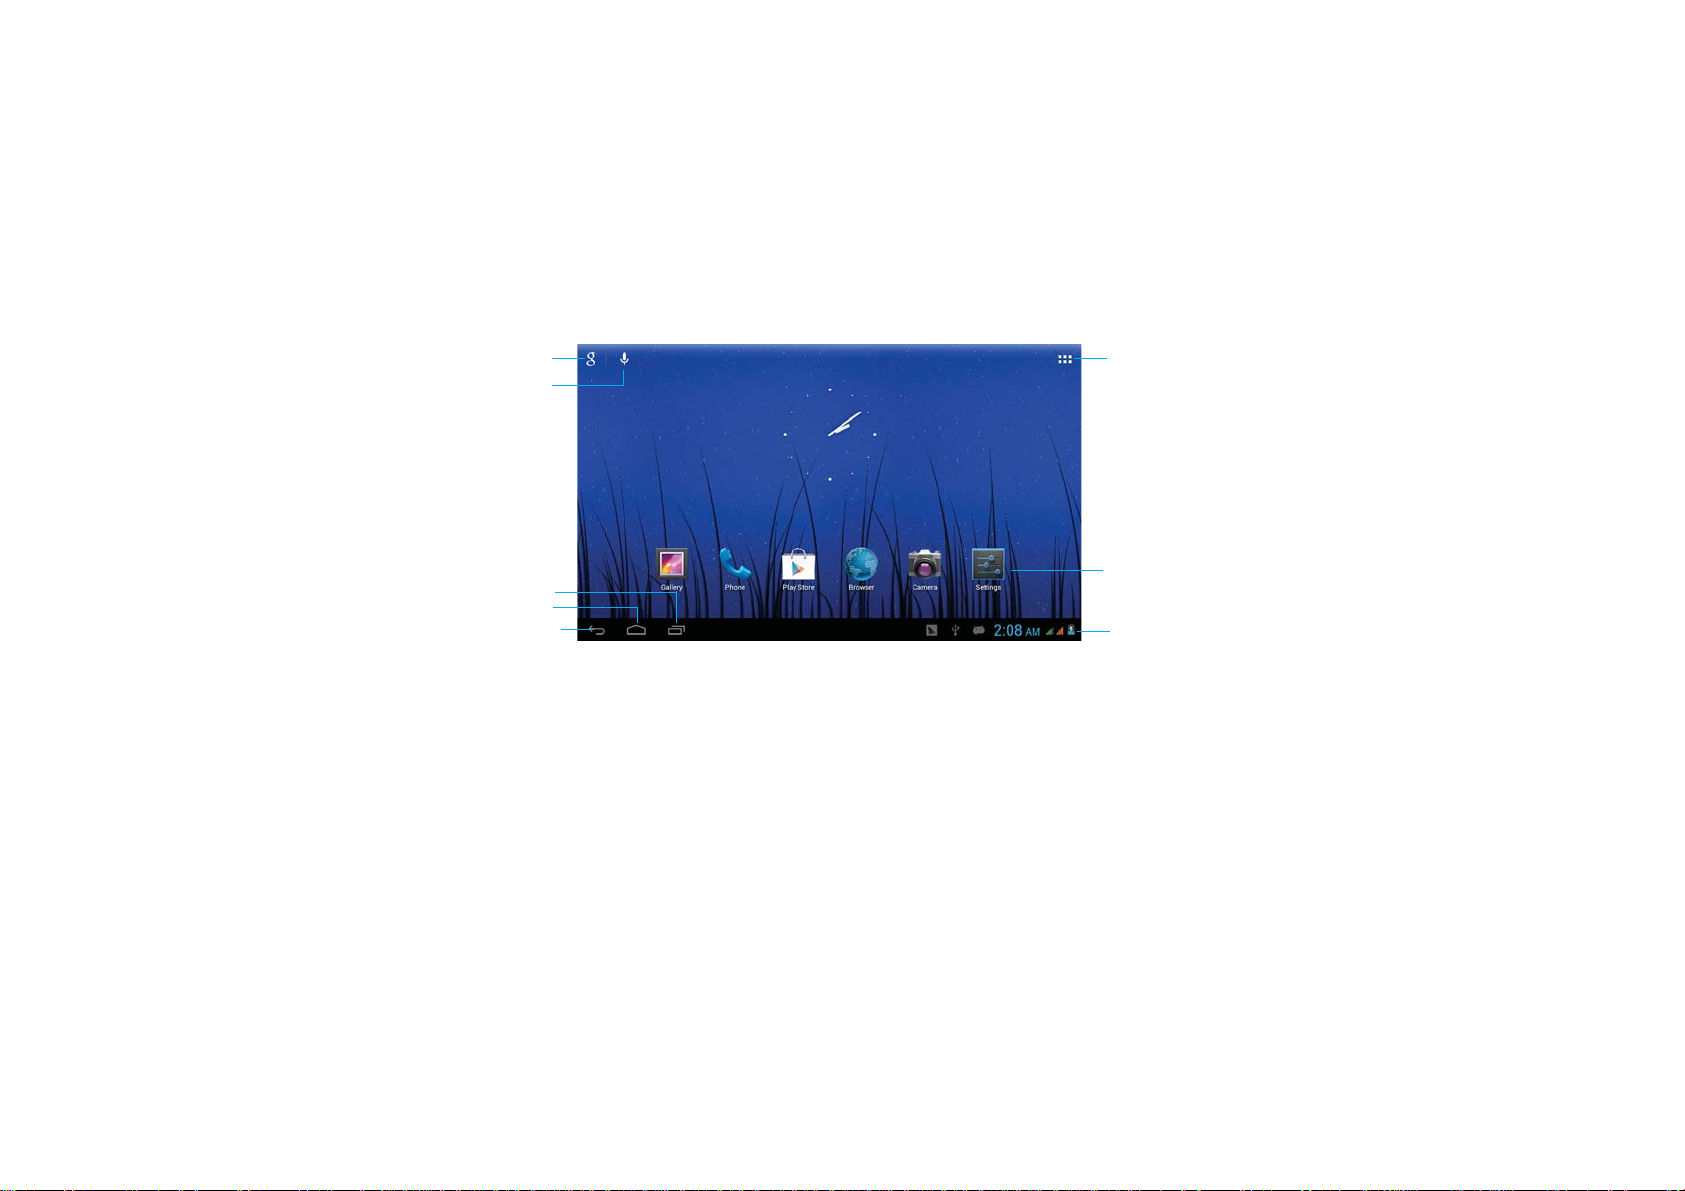
Home Screen
1
8
2
7
3
4
5
ķ Google Search
ĸ Click to turn on voice search, it will search according to voice input ( Make sure Wireless is on )
Ĺ List of last running applications
ĺ Back to Home screen
Ļ Back to previous screen
ļ Display of icons and device status, click to turn on notification screen
Ľ Shortcut to application
ľ Enter applications page
10
6
Page 12

Home screen with a set of 5 screens, slide left/ right to view individual screen
Change of Wallpaper
1. Long press an open area of the home screen. A Wall paper selection pop-up will appear.
2. Select preloaded wallpapers or picture as wallpaper.
3. Click "Set Wallpaper" to confirm.
Add shortcut on Home screen
1. Enter the application page, and long hold the app you wish to make a shortcut of.
2. Drag the app to the desired location on your home screen.
Add Widget in Home Screen
1. Enter application page and slide to Widget page
2. Long hold widget you want, then drag it to your home screen
Remark˖Some widgets are linked to internet services, and may incur data charges
Some widgets are restricted by region or service provider
Relocate the shortcut on Home screen
1. Tag the application icon and move
2. Long hold the application icon and drag it to the desired location
Cancel shortcut on Home screen
1. Long hold the application icon, recycle bin displays on upper screen
2. Drag the icon to the recycle bin icon located at the top of your screen
3. When icon changes to red, let go
11
Page 13

Notification screen
While in home screen or when running applications, press the notification bar on the bottom right
hand side of your screen, then click the settings icon next to your power indicator˖
Icon Icon Description
Wireless signal Wireless connection, icon is full under strong signal
Battery Status of battery or if device is being charged
USB Connection To show if USB port is connected
Soft keyboard Turn on soft keyboard, for word typing
Screen shot After taking screen shot, show picture saved
ǏAttentionǐ:The icons here do not match the device.
Applications
Internet Browsing
Browse internet and bookmark the website
Remark :Web browser and bookmark might be different in different countries or different service
providers
12
Page 14

Browsing webpage
1. Enter application page, select ”Browser” Icon
2. To brows certain webpage, select URL and input website address, and select “confirm”
3. See below browsing options˖
1
2
3
4
5
ķ Open new window
ĸ Shut down current webpage
Ĺ Go to Next or Previous webpage
ĺ Accessing webpage, icon becomes “X” when webpage shows
Ļ Detail message of webpage
ļ Enter webpage address or related words
Ľ Bookmark current page
ľ Search message
Ŀ Open bookmark and current visited webpage
ŀ Option list of browser
13
10
9
8
7
Page 15

Browser setting
When browsing webpageˈclick upper right corner“ ”ˈadjust setting in the option menu
Current visited webpage
1. Enter application page, click ”Browser”
2. Select bookmark current visited history
3. Select webpage
Email
Send and Receive email
Setting of email account
1. Enter application page and click ”Email”
2. Enter email address and password
3. Select next step ( for personal email account) or manual setting (for commercial email account)
4. Follow and input the requested setting
5. For setting more than one email account, select setting add email account, repeat steps
2-4.
After email account setting, message will be received in device. For more than one email account,
switch email account for operation,to receive and send out message.
14
Page 16

Sending outgoing message
1.Enter application page and select ”Email”
2.Type in Recipients ;Manual input email addressˈuse ” ;” or ” ,” to separate more than one
recipients
3.Type in Subject
4.Type in message in content
5.Select for attachments
6.Select and send out message
Remark ˖If user is offlineˈmessage cannot be sent out
Check email message
In email account, user can check downloaded message, go online to check new messages.
15
Page 17

Audio player
Click “Play Music”in application page.
Music will be categorized by artists, album, and play list. It will display all music inside“Songs”.
Click the song and it will play automatically.
Video player
Click “Video”in application page.
Video player will search for all supported video files in the device, click the designated video
file to play.
16
Page 18

Camera
The built-in front camera can take picture and video file.
Take picture
1. Click“Camera”in application page, device is default at picture taking, icon is“ ”
2. To take pictureˈclick “ ”
3.When take the photos, it can be zoom
option by two finger freely
1-3X
Video shooting
1. Select recording in video fileˈclick“ ”
2. Click “ ” to record video file.
3. Click “ ” again to stop recording.
Camera Setting
In camera modeˈclick“ ” for set upˈclick“ ” to select set up options.
17
Page 19

File Manager
File manager will copy, cut, delete, rename the documents or the folder in the TF card, it also will
share the files, install apk etc.In the main menu or desktop, click the document manager icon
to enter into documents manager.
A
A.Copy, cut, delete, rename the files and folder: choose the file or folder, long pressthe file or folder
to enter into the interface as Picture 9.4, you can operate the file or folder.
B.Paste the file or folder you copy or cut: in the catalogue you want to paste, choose icon
in right top, as Picture
C.Share file: choose any file, long click this file, choose icon in right top, it willl show
B
C
18
Page 20

FM Radio
Click in the main interface or desktop to enter into FM radio interface:
1
2
3
1.Open outer voice
2.Channel list
3.Menu
4
5
4.Save button
5.Current frequency
6.Next channel
7.Play/pause
8
6
8.Previous channel
7
Click search to scan FM frequency
[Note]: Use FM radio, you need to insert earphone, if no antenna, you can’t search radio frequency
19
Page 21

Phone
Click Phone application procedure
1
7
2
3
1.Call history
2.Phonebook
4
3.Display phone numbers
4.The area of dial phone
5.Function key
6.Dial phone numbers
5
7.Hide number keyboard
6
20
Page 22

Text Message
1.Enter into main menu, choose application procedure.
2.Click “Edit new message”
2
1
3
1.Directly input phone number
4
2.Attach picture/videos/audio/calenter
/contact/capture video etc.
3.Search information
5
4.Add receiver
5.Send message
Contact List
1.Click Contact list in the main interface,
enter into the contact list.
2.Search contact: click button, enter
into search function
3.Add contact: click button, enter into
add contact interface.
21
Page 23

Commonly used settings
SIM Card Management
Click setting application in main menu;choose SIM
management.
Wireless: Click ON or OFF to open or close Wireless. When
open Wireless,the system will scan the Wireless signal around
automatically. Meanwhile, users could add network manually
as well.
BT:1.Click setting application in main menu interface
2.Click BT and open it.
3.Click search device in right above, then device will
automatically search the BT device nearby
4.Click search to get BT device, it will popup match request
window, click match.
5.After matching successfully, find the device name you want
to operate, click icon, enter into interface
22
Page 24

Data Usage:1.View SIM Card data usage 2.View data usage
More...
1.Airplane mode
Airplane mode can quickly turn off Wireless and GSM card function, when you open airplane mode,
Wirelessand GSM can’t read any signal, machine will resume to previous state when you close
airplane mode.
23
Page 25

VPN Tethering and portable hotspot
Contextual mode
Open setting, click contextual mode then you
1.Vibrate:click vibrate, the device will remind you
have incoming calls by vibrating.
have different choices.Click General to enter.
24
Page 26

2.Volume:click volume, you can adjust rings, notice and alarm volume
3.Voice/Video call ringtones
click voice/video call ringtones to choose incoming voice/video call ringtone
25
Page 27

Display
Scene:1.Click setting application.
2.Click display, click scene.
3.System will have different scenes for option.
Wallpaper
1. Click setting application.
2. Click display, click wallpaper.
3. You can choose different wallpaper as your perference
dynamic wallpaper---gallary/wallpaper/video,live wallpaper.
Theme
1. Click setting application.
2. Click display, click theme, there are four different styles
of theme for option.
26
Page 28

Sleep
1. Click setting application.
2. Click display, 3. Click “sleep”.
4. Popup screen standby time setting,choose the
standby time you want to set.
Storage
Open setting application, choose storage, and choose
default storage.View SD card and device space.
Battery˖Click setting function, choose battery, you can
view battery usage situation.
27
Page 29

Application
1.Choose Setting procedure in the application procedure
list.
2.Choose application, after entering, you can manage
and delete installed applications.
Location Access
1.Wireless and mobile network location
2.GPS satellite
3.GPS Auxiliary
4.GPS EPO setting
5.A-GPS
6.A-GPS setting
Language and Input Method
Click setting, choose language and input method,
choose language to switch language type.
28
Page 30

Backup and Reset
Click backup my data, when Wireless is connected and
login Google account, system will copy your data into
Google server.If you wish to reset factory setting, please
click restore factory reset.
Add Account
1.Click Setting application.
2. Click Add account.
3. Choose email type you want to login.
4. If login successfully, sync function will auto open.
Date&time
when the internet is connected,turn on- Automatic
Date & Time the device can obtain the real date and
time from the internet.
29
Page 31

Scheduled power on and off
1.Enter into setting application.
2.Click scheduled power on and off selection.
3.Operation as right Picture.
Accessibility
1.Large text
Click it to make system font become large.
2.Press power key to end call
Click call, press power key to end call, but won’t sleep.
3.Touch and hold delay
4.Add webpage accessibility function
Developer options
30
Page 32

About Tablet
1.Click about tablet to view status information, model,
Android version, and version information.
2.Click status message to view battery state, electric
volume, SIM state, IMEI number, IP address.
Visit Application Procedures.
Click button, enter into main menuchoose the
application procedure you want to visit.
.
USB Connection
1.Connect the device and computer by USB cable,
the reminder column will show the remind information.
2.Open the reminder board.
3.In the reminder board, click the “USB Connected”,
then click “open USB storage configuration”.
4.Now the USB is connected successfully.
31
Page 33

Troubles Shooting
1.The first startup of Tablets is slow
After updates, the Device may require 2-3 minutes to start up. Subsequent startups will run as
normal.
2.Device cannot connect to a Wireless connection
Make sure your wireless broadcast device is functioning normally.
Ensure that your device is within range of the wireless source, with minimal barriers or walls
between them.
Ensure your wireless name and password are correct.
3.Device feels hot
When running multiple applications, or when running at maximum brightness, or when being
charged, it is normal for the device to feel warm to the touch.
4.Emails cannot be sent or registered with an email application
Ensure you have a stable internet connection.
Ensure your email connection settings are correct.
Keep your system time and local time consistent.
5. The system is abnormal and can’t work.
Third party applications may cause problems with the device. Should you encounter major issues,
you can reset the device with the Reset key, located between SIM1 and SIM2.
6. The webpage can’t be opened
1.Please keep the distance between from route to tablets in effective range.
2.Please restart wireless and try again.
7. Tablets works terribly slow sometimes
When the device's system resources are overburdened by too many running applications, the
device will slow down. Close or uninstall some applications to free up system resources.
32
Page 34

FCC RF EXPOSURE INFORMATION:
WARNING!! Read this information before using your phone
In August 1986 the Federal Communications Commission (FCC) of the United States with its
action in Report and Outer FCC 96-326 adopted an updated safety standard for human exposure
to radio frequency (RF) electromagnetic energy emitted by FCC regulated transmitters. Those
guidelines are consistent with the safety standard previously set by both U.S. and international
standards bodies. The design of this phone complies with the FCC guidelines and these
international standards. Use only the supplied or an approved antenna. Unauthorized antennas
modifications, or attachments could impair call quality, damage the phone, or result in violation
of FCC regulations. Do not use the phone with a damaged antenna. If a damaged antenna comes
into contact with the skin, a minor burn may result. Please contact your local dealer for
replacement antenna.
BODY-WORN OPERATION:
This device was tested for typical body-worn operations with the back of the phone kept 0cm
from the body. To comply with FCC RF exposure requirements, a minimum separation distance
of 0cm must be maintained between the user's body and the back of the phone, including the
antenna, whether extended or retracted. Third-party belt-clips, holsters and similar accessories
containing metallic components shall not be used.
For more information about RF exposure, please visit the FCC website at www.fcc.gov
Your wireless handheld portable telephone is a low power radio transmitter and receiver. When
it is ON, it receives and also sends out radio frequency (RF) signals. In August, 1996, the Federal
Communications Commissions (FCC) adopted RF exposure guidelines with safety levels for
hand-held wireless phones. Those guidelines are consistent with the safety standards previously
set by both U.S. and international standards bodies:
<ANSIC95.1> (1992) / <NCRP Report 86> (1986) / <ICIMIRP> (1996)
Those standards were based on comprehensive and periodic evaluations of the relevant
scientific literature. For example, over 120 scientists, engineers, and physicians from universities,
government health agencies, and industry reviewed the available body of research to develop
the ANSI Standard (C95.1). Nevertheless, we recommend that you use a hands-free kit with
your phone (such as an earpiece or headset) to avoid potential exposure to RF energy. The
design of your phone complies with the FCC guidelines (and those standards).
Use only the supplied or an approved replacement antenna. Unauthorized antennas,
modifications, or attachments could damage the phone and may violate FCC regulations.
NORMAL POSITION:
Hold the phone as you would any other telephone with the antenna pointed up and over your
shoulder.
TIPS ON EFFICIENT OPERATION:
For your phone to operate most efficiently:
• Do not touch the antenna unnecessarily when the phone is in use. Contact with the antenna
affects call quality and may cause the phone to operate at a higher power level than otherwise
needed.
RF Exposure Information:
This product is compliance to FCC RF Exposure requirements and refer to FCC website search for FCC
ID: Y7WPLUMZ708 to gain further information include SAR Values.
This device complies with part 15 of the FCC rules. Operation is subject to the following two
conditions:
(1) this device may not cause harmful interference, and
(2) this device must accept any interference received, including interference that may
cause undesired operation.
Page 35

NOTE: The manufacturer is not responsible for any radio or TV interference caused by
unauthorized modifications to this equipment. Such modifications could void the user’s
authority to operate the equipment.
NOTE: This equipment has been tested and found to comply with the limits for a Class B
digital device, pursuant to part 15 of the FCC Rules. These limits are designed to provide
reasonable protection against harmful interference in a residential installation. This equipment
generates uses and can radiate radio frequency energy and, if not installed and used in
accordance with the instructions, may cause harmful interference to radio communications.
However, there is no guarantee that interference will not occur in a particular installation. If
this equipment does cause harmful interference to radio or television reception, which can be
determined by turning the equipment off and on, the user is encouraged to try to correct the
interference by one or more of the following measures:
- Reorient or relocate the receiving antenna.
- Increase the separation between the equipment and receiver.
-Connect the equipment into an outlet on a circuit different from that to which the receiver is
connected.
-Consult the dealer or an experienced radio/TV technician for help
Do not use the device with the environment which below minimum -10℃ or over maximum
50℃, the device may not work.
Changes or modifications to this unit not expressly approved by the party responsible for
compliance could void the user’s authority to operate the equipment.
Ad Hoc function is supported but not able to operate on non-US frequencies.
 Loading...