

Page 1

STARTING UP
Before using your Z700 for the first time, completely charge the battery!
Charging the Battery
1. Connect the supplied power cable to the Z700 and to a wall outlet.
2. The Z700 device will turn on and start charging.
FCC ID: Y7WPLUMZ700
Installation Wizard
The first time you start up your Z700, the installation wizard will bring you
through a few screens to help you set up the principal settings: language, country,
time, etc.
1
Page 2
1. Power Button: press and hold to switch on.
- To switch off, when you press and hold on the Power button, “Power Off” >
“Ok” to fully shut down your 3G
-To put your device in standby, press the Power button once.
2.
Volume Bottons
3. Micro-USB port: to connect your 3-G to your computer, using the included USB
cable
(to transfer files) .
4. SIM card slot: Any standard SIM card can be inserted.
5. Micro-SD card slot: a Micro-SD card should be inserted in the device. It allows the
device to be identified as a
6. Loudspeakers
7. Headphone jack
DESCRIPTION OF THE TABLET
removable storage
when connected to a PC.
Page 3
CONNECTING TO A 3G NETWORK
N
k
Your Z700 is equipped with a SIM card slot. Any standard SIM card can be inserted. There is no
provider restriction. Note that the Z700will only have signal if you are in an area covered by your 3G
provider’s or EDGE network.
Inserting your SIM card
IMPORTANT: Before inserting a SIM card, you must turn off the device.
1. Switch off the device.
2. Insert the SIM card in the SIM card slot.
3. Turn on the device.
A Pin number may be requested. Enter the SIM card pin number.
Your device will attempt to connect to the 3G network of your provider.
OTE: If your device does not connect to your 3G provider’s networ
1. Contact your 3G provider to obtain the connection parameters.
2. On your device, tap the Menu icon, then settings.
3. Select Wireless & networks > Mobile networks.
In Network operators, select your operator.
In Access Point Names, select the correct access point name and enter the exact connection parameters.
Page 4
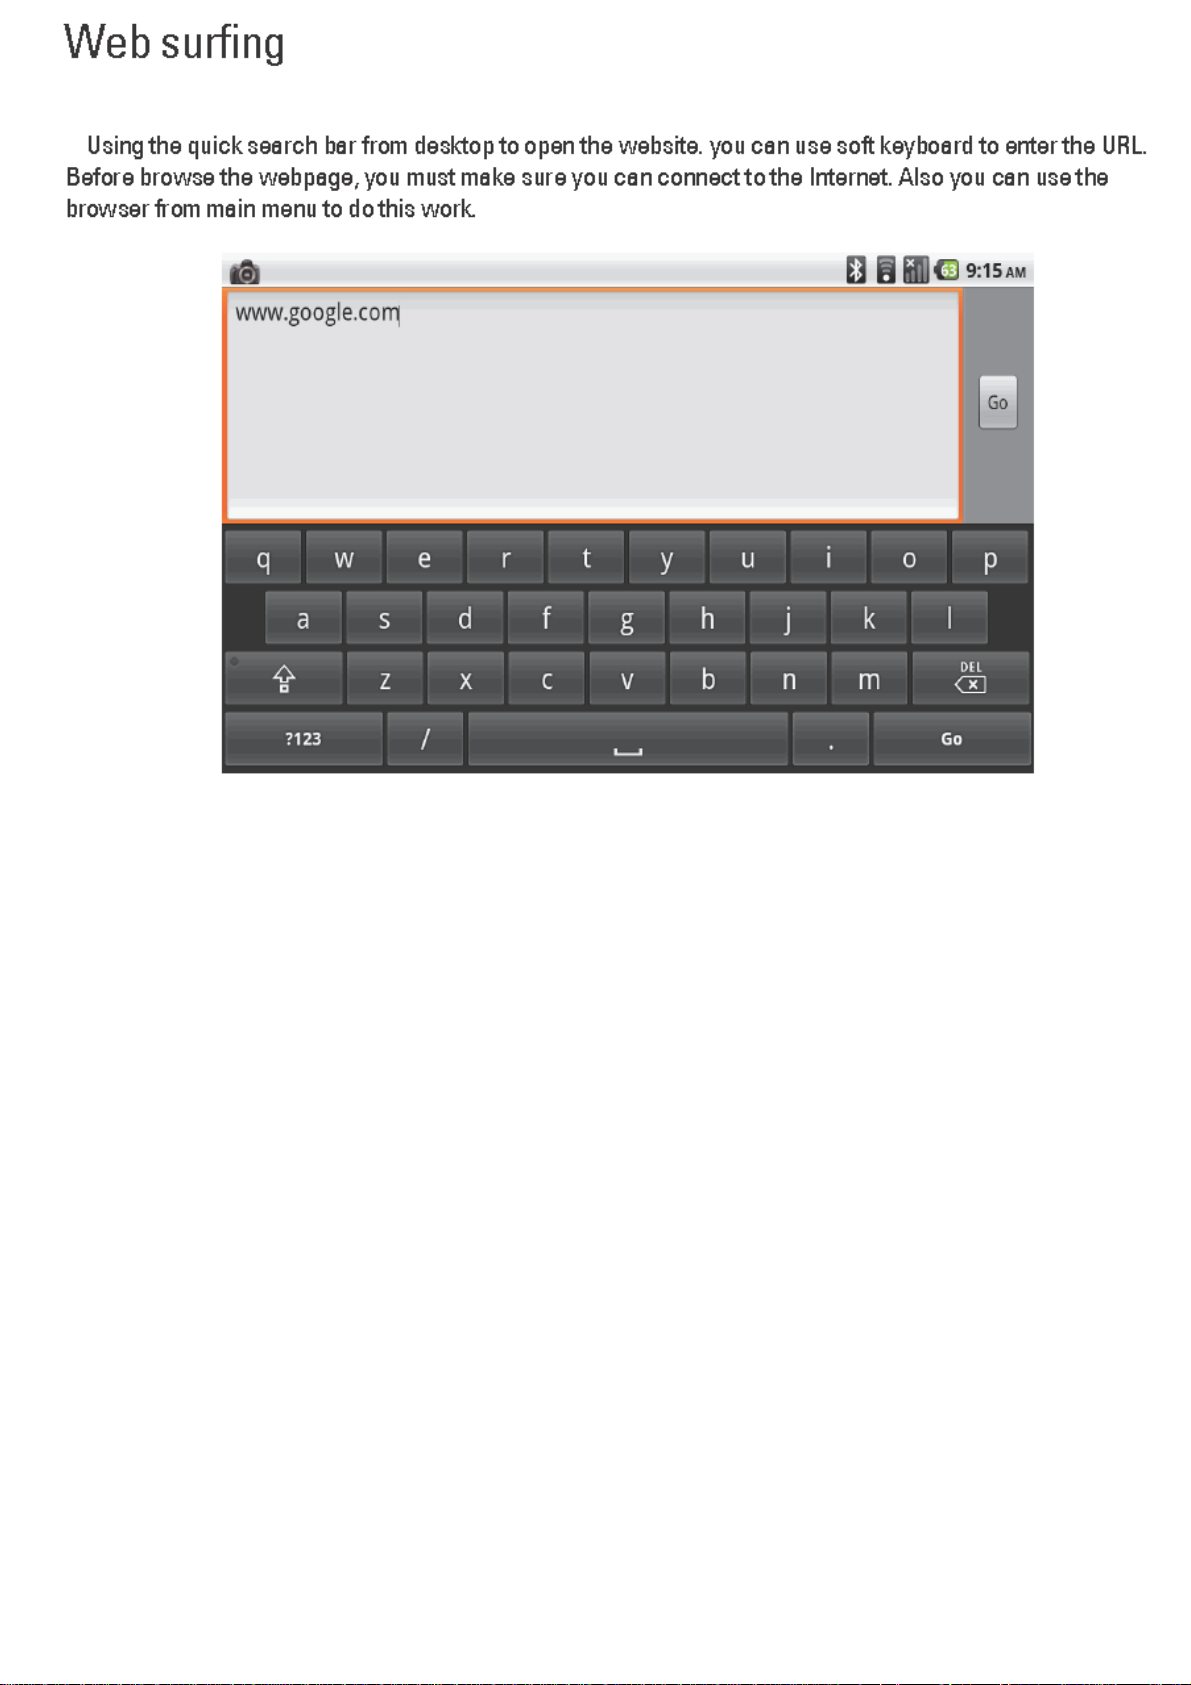
www
For this procedure to work, you need to be in a WiFi zone that will allow you to connect to it. Every time the
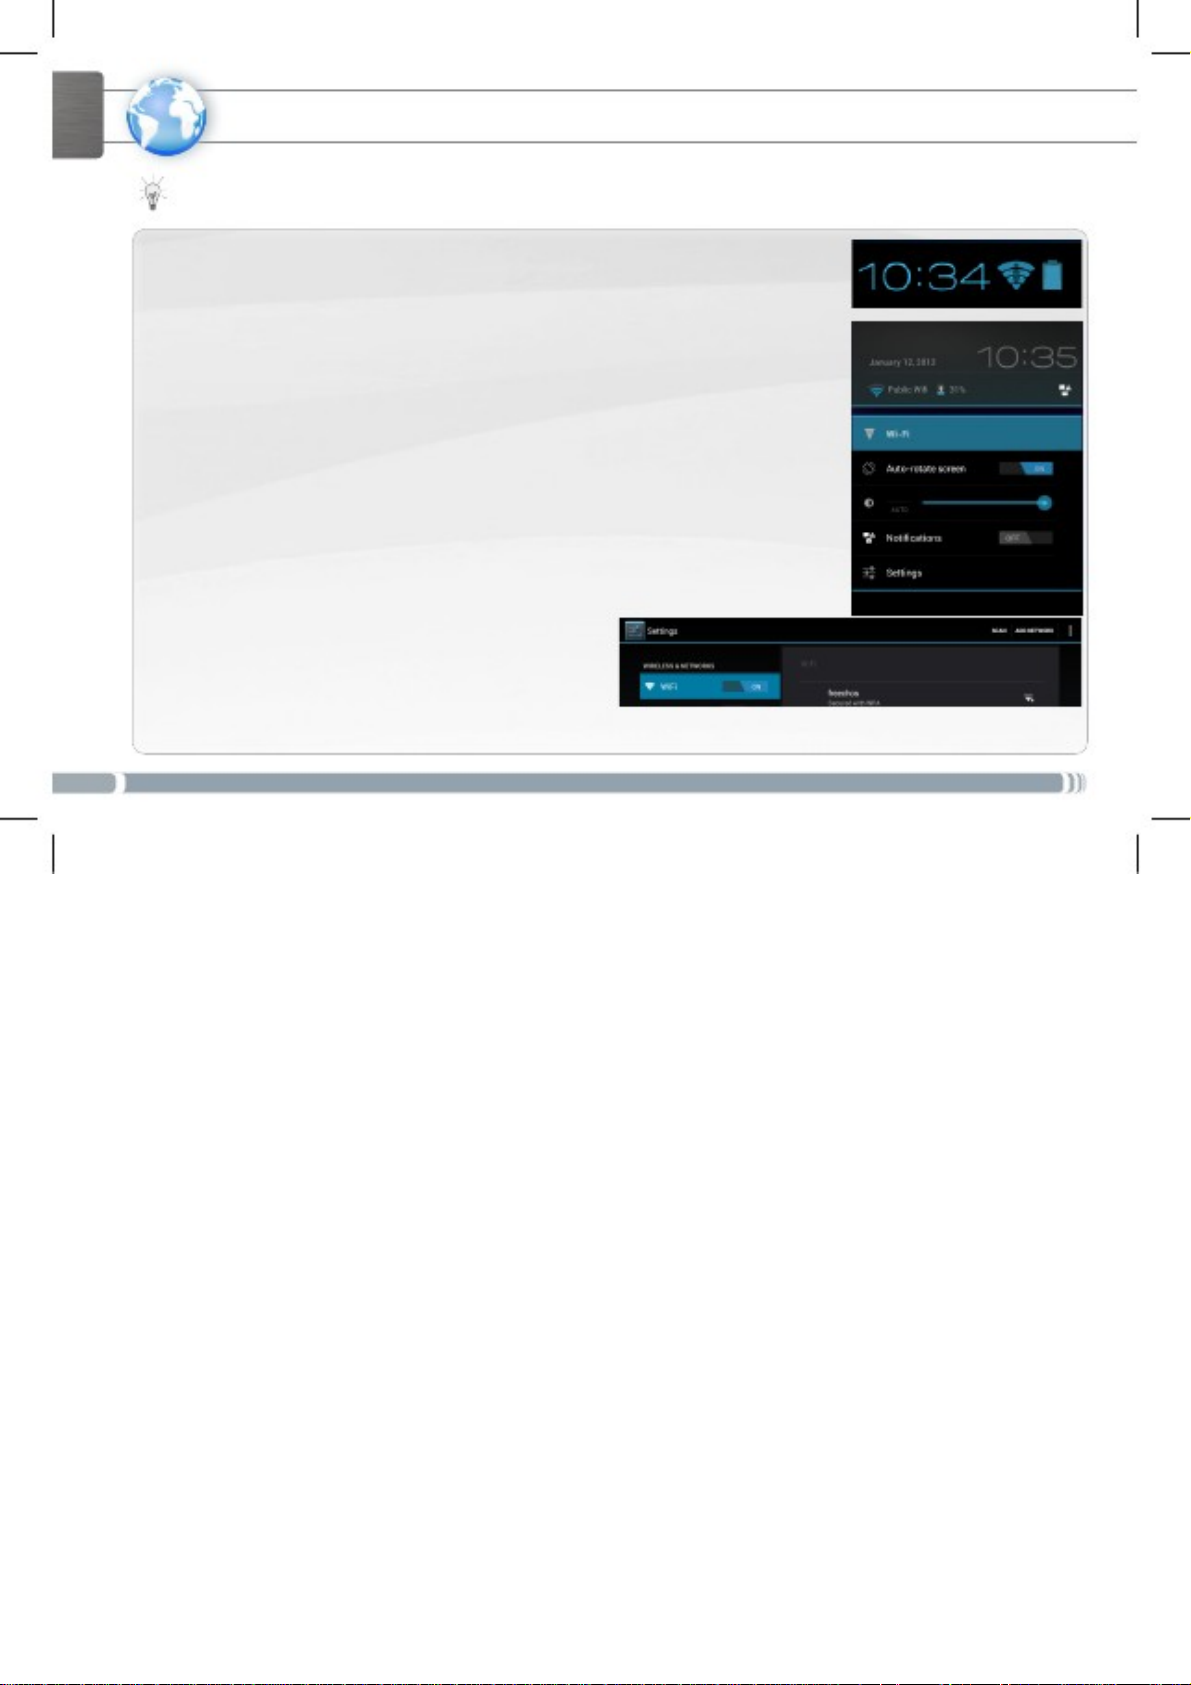
CONNECTING TO THE WIFI NETWORK
Z700 is in range of a network that you have already configured once, it will attempt to make a connection.
How to configure a WiFi network
From the status bar, at the bottom right hand of the screen, you can access the WiFi
settings quickly.
1. Touch the time in the status bar. The status dashboard is displayed.
2. Touch the time in the status dashboard. The setting dashboard is displayed below.
3. Touch WiFi to open the WiFi settings.
4. If the WiFi is off, slide the WiFi switch to the On position.
Once the WiFi is on, the Z700 will scan for available WiFi networks.
Secured networks are indicated with a Lock icon. If the device finds a network that
you connected to previously, it connects to it.
5. Touch the network you want to connect to.
6. Enter the required network information* and touch Connect.
We recommend that you select Show password in order to be able to see the
characters you are typing.
Your Z700 will attempt to establish a connection to that WiFi access point.
* For free access WiFi points, there is no need to enter
any special information. For secured networks, you will
need a key (a series of numbers and/or letters) of the type
WEP, WPA, or WPA2. To obtain the exact connection
parameters required, contact the Internet service provider.
Page 5
Page 6

Page 7

THE ANDROID INTERFACE
Touch for text search
These are default Android™
applications (Web Browser,
EMail, etc.). Tap on an icon
to open the corresponding
application. You can customize
the Home screen by adding/
removing shortcuts and
widgets, changing the wallpaper
etc. See next page.
The navigation bar displays
the Back, Home and Recent
Apps buttons.
Main Touch screen buttons
The Back button - to go back to your previous
screen.
The Home button - to return to the main screen.
Your Z700 device is equipped with a capacitive touch screen. Use your
Fingertip to navigate.
All apps button
Tap on this icon to reveal all
the Android™ applications
and widgets installed on your
Z700 (games, various
tools, etc.). You can copy
them onto the Home screen.
You can get more Android™
applications from AppsLib
.
The status bar displays
notifications and system
icons.
The Search button - to type terms to search
your tablet and the web.
The All apps button - to find all your apps and
widgets.
The Recent Apps button - to navigate among your apps.
- to remove a thumbnail from the list, swipe it left or right.
5
Page 8

Page 9

Page 10

N
The extended Home screen
avigate between different home
screen panels by swiping left and
right.
CUSTOMIZING YOUR TABLET
Customizing the Home screen panels
- To change your wallpaper, hold your finger on the screen at an empty
location, then choose from the list.
Arranging & working with apps
- To move a Home screen item, touch and hold your finger onto it until
the positioning gridlines appear, then slide it to the desired location,
and release your finger.
- To remove a Home screen item, touch and hold it, slide your finger
towards the top of the screen and drop it over the Remove icon.
Removing an item from the All apps screens will uninstall the item.
Creating application folders: you can combine several application icons in a
folder. Drop one app icon over another on a Home screen and the two icons
will be combined.
Changing the Settings
Tap on Settings and choose a menu among
these categories: Wireless & networks,
Device, Personal, System.
Adding more applications with APPSLIB : with the Z700
connected to the Internet, tap on the AppsLib icon.
This online library has thousands of applications to
download and use.
Zoom: In some apps (such as
Browser, and Galle ry),
you can zoom in and
out by placing two
fingers on the screen
at once and pinching
them together
(to zoom out) or
spreading them apart
(to zoom in).
Page 11

CUSTOMIZING YOUR TABLET
Add widgets
Widgets are like windows into your apps. They’re available
from All Apps tab for you to move onto your Home
screens.
To see your widgets:
1. Touch any apps on your menu screen.
2. Touch Widgets at the top of the screen.
3. From the main Widgets screen, you can:
- move between screens: Swipe left or right.
- drag a widget to a Home screen. Touch and hold the
widget’s icon, slid e your finger where you want to place it
and lift your finger.
You may be asked to make further choices before the widget
activates. If there isn’t room where you have dropped it, the
widget won’t be added to the Home screen.
Extend the life of your battery
- If you aren’t using WiFi, select the Settings app to turn it off.
- Turn down screen brightness and set a shorter Sleep timeout: Settings > Device > Display.
- If you don’t need it, turn off automatic syncing for all apps: Settings > Personal > Accounts &
sync. Note that this means you need to sync manually to collect messages, email, and other recent
information, and won’t receive notifications when updates occur.
Use the lock screen
To protect personal information, you
can adjust your tablet’s lock settings:
1. From the Home or All Apps screen,
touch the Settings icon .
2. Scroll down and touch Security.
3. Touch Screen lock.
4. Touch the type of lock you’d like
to use.
After you set a lock here, a lock
screen is displayed whenever your
screen wakes up, requesting the
pattern, PIN or other specified key.
Page 12

THE END
8
Page 13

FCC RF EXPOSURE INFORMATION:
WARNING!! Read this information before using your phone
In August 1986 the Federal Communications Commission (FCC) of the United States with its
action in Report and order FCC 96-326 adopted an updated safety standard for human
exposure to radio frequency (RF) electromagnetic energy emitted by FCC regulated transmitters.
Those guidelines are consistent with the safety standard previously set by both U.S. and
international standards bodies. The design of this phone complies with the FCC guidelines and
these international standards. Use only the supplied or an approved antenna. Unauthorized
antennas modifications, or attachments could impair call quality, damage the phone, or result in
violation of FCC regulations. Do not use the phone with a damaged antenna. If a damaged
antenna comes into contact with the skin, a minor burn may result. Please contact your local
dealer for replacement antenna.
BODY-WORN OPERATION:
This device was tested for typical body-worn operations with the back of the phone kept 1.5cm
from the body. To comply with FCC RF exposure requirements, a minimum separation distance
of 1.5cm must be maintained between the user's body and the back of the phone, including the
antenna, whether extended or retracted. Third-party belt-clips, holsters and similar accessories
containing metallic components shall not be used. Body-worn accessories
that cannot maintain 1.5cm separation distance between the user’s body and the back of the
phone, and have not been tested for typical body-worn operations may not comply with FCC RF
exposure limits and should be avoided.
For more information about RF exposure, please visit the FCC website at www.fcc.gov
Your wireless handheld portable telephone is a low power radio transmitter and receiver. When
it is ON, it receives and also sends out radio frequency (RF) signals. In August, 1996, the Federal
Communications Commissions (FCC) adopted RF exposure guidelines with safety levels for
hand-held wireless phones. Those guidelines are consistent with the safety standards previously
set by both U.S. and international standards bodies:
<ANSIC95.1> (1992) / <NCRP Report 86> (1986) / <ICIMIRP> (1996)
Those standards were based on comprehensive and periodic evaluations of the relevant
scientific literature. For example, over 120 scientists, engineers, and physicians from universities,
government health agencies, and industry reviewed the available body of research to develop
the ANSI Standard (C95.1). Nevertheless, we recommend that you use a hands-free kit with
your phone (such as an earpiece or headset) to avoid potential exposure to RF energy. The
design of your phone complies with the FCC guidelines (and those standards).
Use only the supplied or an approved replacement antenna. Unauthorized antennas,
modifications, or attachments could damage the phone and may violate FCC regulations.
NORMAL POSITION:
Hold the phone as you would any other telephone with the antenna pointed up and over your
shoulder.
TIPS ON EFFICIENT OPERATION:
For your phone to operate most efficiently:
• Extend your antenna fully.
• Do not touch the antenna unnecessarily when the phone is in use. Contact with the antenna
affects call quality and may cause the phone to operate at a higher power level than otherwise
needed.
Page 14

RF
FCC RF Exposure requirements: The highest SAR value reported under this standard
during product certification for use next to the body with the minimum separation
distance of 1.5cm is 0.935W/kg, next to the head is 0.757W/kg. This transmitter must not
be collocated or operating in conj unction with any other antenna or transmitter.
This device complies with part 15 of the FCC rules. Operation is subject to the following
two conditions:
(1) this device may not cause harmful interference, and
(2) this device must accept any interference received, including interference that may
cause undesired operation.
NOTE: This equipment has been tested and found to comply with the limits for a Class B
digital device, pursuant to part 15 of the FCC Rules. These limits are designed to provide
reasonable protection against harmful interference in a residential installation. This
equipment generates uses and can radiate radio frequency e nergy and, if not ins talled and
used in accordance with the instructions, may cause harmful interference to radio
communications. However, there is no guarantee that interference will not occur in a
particular installation. If this equipment does cause harmful interference to radio or
television reception, which can be determined by turning the equi pment off and on, the user
is encouraged to try to correct the interference by one or more of the following measures:
- Reorient or relocate the receiving antenna.
- Increase the separation between the equipment and receiver.
-Connect the equipment into an outlet on a c ircuit different from that to which t he receiver is
-Consult the dealer or an experienced radio/TV technician for help
Ad Hoc function is supported but not able to operate on non-US frequencies.---WIFI
Do not use the device with the environment which below minimum -10℃ or maximum over
50, the device may not work.
Changes or modifications to this unit not expressly approved by the party responsible for
compliance could void the user’s authority to operate the equipment.
Exposure Information:
connected.
 Loading...