

Claxan CL-KVM-MPC1700S2-EN, CL-KVM-MUX1708S2-EN, CL-KVM-MUX1708S2-GE, CL-KVM-MUX1708S2-SG, CL-KVM-MPC1700S2-GE User Manual
...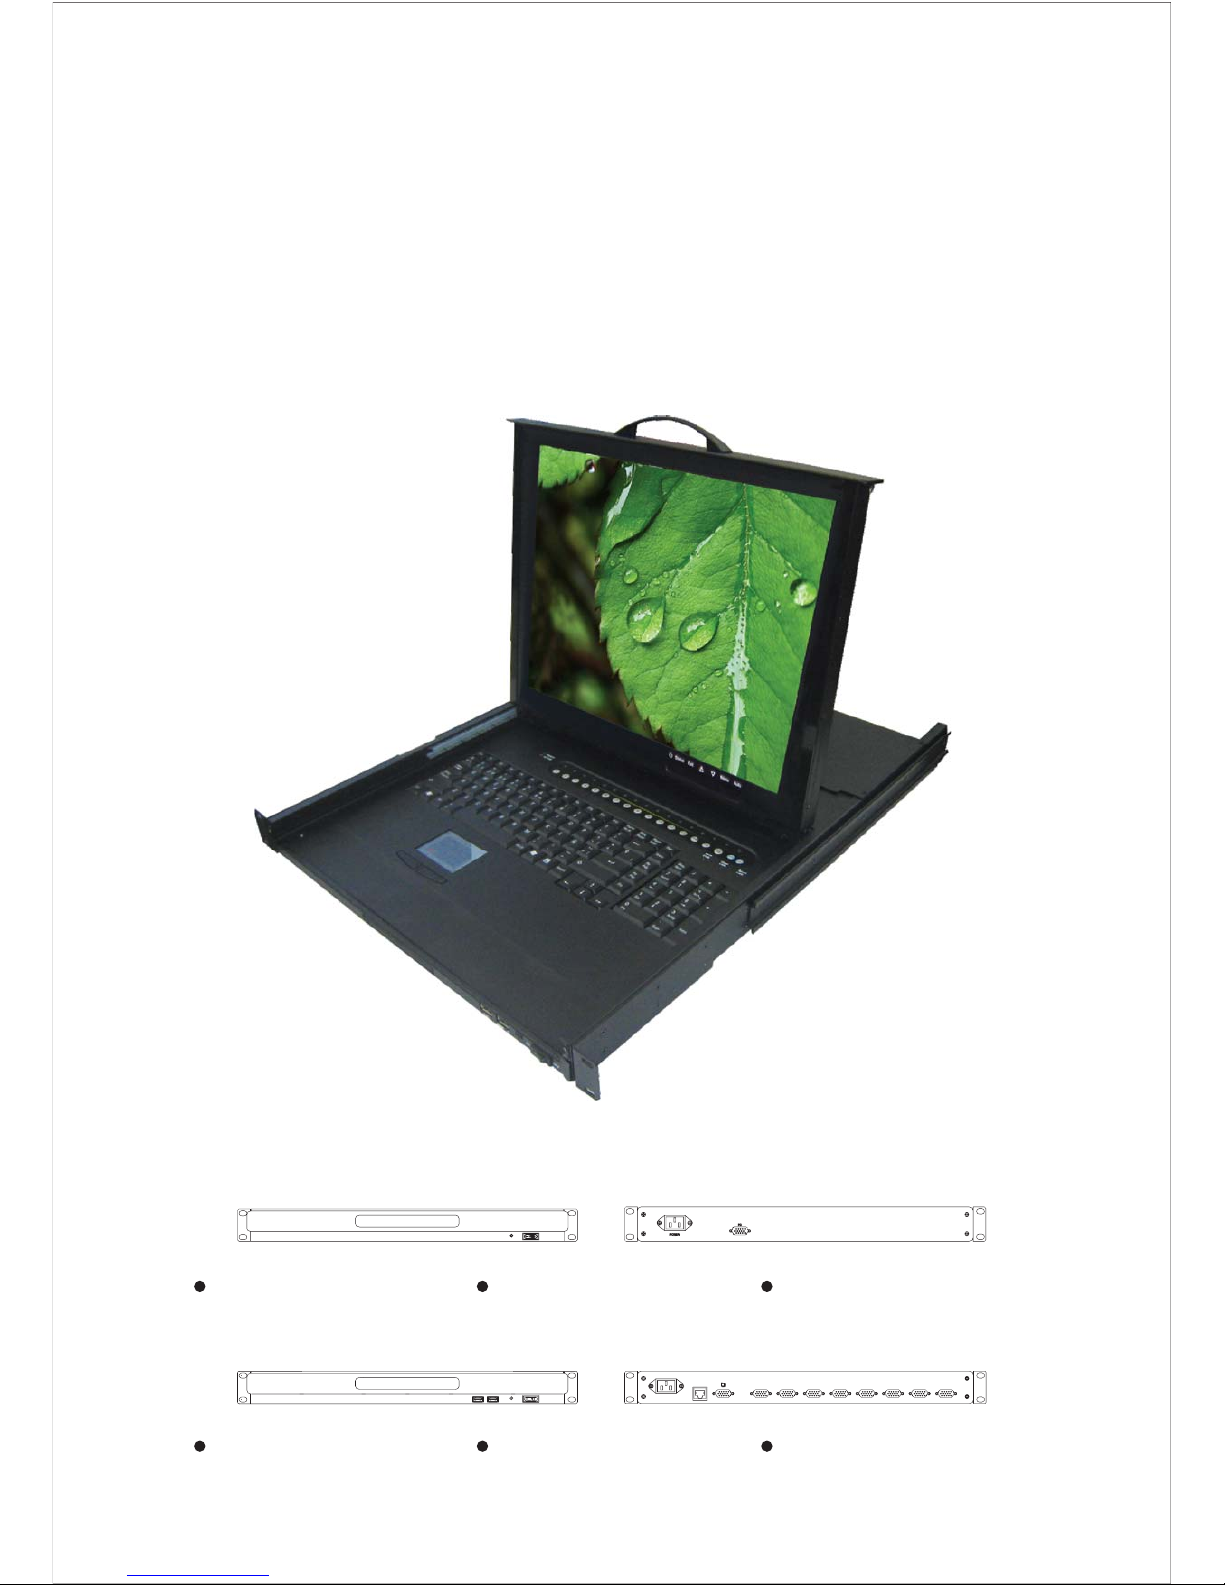
17’’ Dual Slide LCD Console Series
User's Manual
CL-KVM-MPC1700S2-GE CL-KVM-MPC1700S2-SG
PC8
PC7PC6PC5PC4PC3PC2PC1
PROGRAM
POWER
CL-KVM-MUX1708S2-EN CL-KVM-MUX1708S2-GE CL-KVM-MUX1708S2-SG
CL-KVM-MPC1700S2-EN

PACKING LIST
CONTENTS:
Please check to ensure that the unit is not damaged. Report any damages
immediately to your dealer/shipper.
Please read the manual thoroughly and follow the installation and operation
procedures carefully to prevent any damages to the console unit, and/or any devices
connected to it.
* 1u 17" Rack-mount Console : 1 pcs
* 6ft KVM Cable/Optional : 1 p c s
* Back rail for 17.72 (450mm )~ 31.50 (800mm) mounting range : 2 pcs
* Power cord : 1pcs
* Philips screws : 8 pcs
"”
I
1u Claxan KVM-Switch Rack
CL-KVM-MPC1700S2-EN CL-KVM-MPC1700S2-GE CL-KVM-MPC1700S2-SG

PACKING LIST
CONTENTS:
Please check to ensure that the unit is not damaged. Report any damages
immediately to your dealer/shipper.
Please read the manual thoroughly and follow the installation and operation
procedures carefully to prevent any damages to the console unit, and/or any devices
connected to it.
* 1u 17" Rack-mount Console : 1 pcs
* 6ft KVM Cable/Optional : 8 p c s
* Back rail for 17.72 (450mm )~ 31.50 (800mm) mounting range : 2 pcs
* Power cord : 1pcs
* Philips screws : 8 pcs
"”
II
1u Claxan KVM-Switch Rack
CL-KVM-MUX1708S2-EN CL-KVM-MUX1708S2-GE CL-KVM-MUX1708S2-SG

SAFETY INSTRUCTIONS
1. Please read the manual before installing and operating the console unit.
2. Please store the user manual in a safe and easily accessible place.
3. Please power down and unplug the console before performing any cleaning.
4. No liquid detergent can be applied directly. Use a moist cloth for this purpose.
5. The unit must be kept in a cool and dry place.
6. Do not keep the unit in an environment above 140 degree F.
7. Dropping the unit will cause irreversible damage and/or cause injuries.
8. Do not block any ventilation holes as the unit will overheat and malfunction.
9. Make sure that the power rating of the outlet matches the unit's.
10. Plug the unit to a UPS or surge protector to avoid damage thru electrical surges.
11. If in any situation the unit is not used for a long period of time, it is advisable to
power Down and unplug the unit for safety purposes.
12. Place the power in a safe spot to prevent tripping or stepped on.
13. Do not open the unit for any reasons, unless it is done by a qualified technician.
14. Do not pour liquid onto the unit as this can cause a fire or electric shock.
15. All cautions and warnings on the unit must be noted and followed.
16. Before the unit can be use again following any damages to it, a qualified technician
Must test and certify the usability and safety of the unit first.
III
1u Claxan KVM-Switch Rack

PACKING LIST …….…………………………………………………….................…………......................I
SAFETY INSTRUCTIONS………………………………………………………………………..................III
INDEXES……………………………………………………………………………………………...................
SECTION 1 General Information………………………………………………………………............... 1
1.1 Overview ……………………………………………………..…………………...................1
1.2 Product Specification (1PORT)…………………………………..…….......................2
1.3 Product Specification (8PORT)………………………………………..…….........................3
SECTION 2 Panel Controls and OSD Functions………………………………………………... ... ... ... ... .....4
2.1 Colour ……………………………………………………………………....................….....5
2.2 Picture …………………………………………………………………….….........................7
2.3 Function …… … …………… ……………… …………… … …………… … … ..….....................9
2.4 OSD Menu ……………………………………………………………………………....…...........10
2.5 Misc ………………………………………………………………………...…........................12
2.6 Exit ……………………………………………………………………...….....................…….13
2.7 Power Indicator (LED light)………………………………………………………………..…..13
SECTION 3 KVM Control and OSD fuction………………………………………………........................14
I FUNCTION ……………………………………………………………………........................... 1 4
II OPERATION …………………………………………………………………….…......................1 4
1.Front Panel Push Buttons………………………………………………….….......................14
2.Hot-key Commands………………………..................................................................14
3.Using numerical key to select PC………………………..................................................15
4.Press <F1> key to activate the AUTO SCAN function…………………...........................15
5.<F2> key SELECT PC function……………………………............................................16
6.<F3> key SEARCH PC function…………………………………………............................17
7.<F4> key EDIT PC NAME function……………………………………..............................18
8.<F5> key MORE SYSTEM function…………………………………….............................20
9.<F6> key EDIT UNIT/PC PSW……………………………………....................................21
10.Enable Password………………………..................................................................... 22
11.<F7> enter OSD position adjustable function……………………………........................23
12.<F8> to enter the screen display HELP………… …...................................................24
SECTION 4 INSTALLATIO N … … … … … ………………………………………………….….................... 25
4.1 Preparation for installing the Console into the Cabinet………………….
.......................25
4.2 Hardware Kit Content ……………………………………………………………................ 25
4.3 Installation for the C ons ole equipped into the Cabinet………………........................ 26
INDEXES
Ċ
1u Claxan KVM-Switch Rack

CHAPTER 1 GENERAL INFORMATION
This console is an ideal solution for all network administration environments with
multiple servers and platforms. The 17-inch TFT LCD color display and low-profile
industrial keyboard/touchpad provide the user-friendliest and most reliable
environment for all network administrators. All these functions are integrated into a
17-inch 1u space console. Its rugged construction design also provides space
saving and high reliability for all industrial network applications.
The drawer housing the monitor forms a tough and rugged enclosure that will
protect it from all hazards and also permits easy access to the monitor controls.
The high quality monitor provides flicker-free color images at the optimal
resolutions. It ensures crisp images with clear definitions. This monitor is an auto-
adjusting and ergonomically designed display.
We utilize the latest in active thin film transistor (TFT) technology for all our
monitors. This provides crisp images and wider viewing angles. Compared with the
conventional CRT, the LCD monitors are not affected by the magnetic fields
commonly found in most plant floor or communications centers. They are also
brighter, making them ideal for high ambient lighting conditions found in today's
factory environments. On-screen menus allow for display adjustments. The
monitor's P-N-P features support Windows 95/98, NT and XP, with the universal
power supply allows global acceptability.
The console's monitor are compatible to most analog RGB (Red, Green, Blue)
display standards, including PS/2, optional for Sun Micro System, Apple Macintosh
Centris, Quadra and Macintosh II Family signals. The monitor is capable of
displaying crisp, vibrant color graphics with VGA, SVGA, XGA ,SXGA, and most
Macintosh compatible color video cards.
1
1.1 Overview
1u Claxan KVM-Switch Rack
2
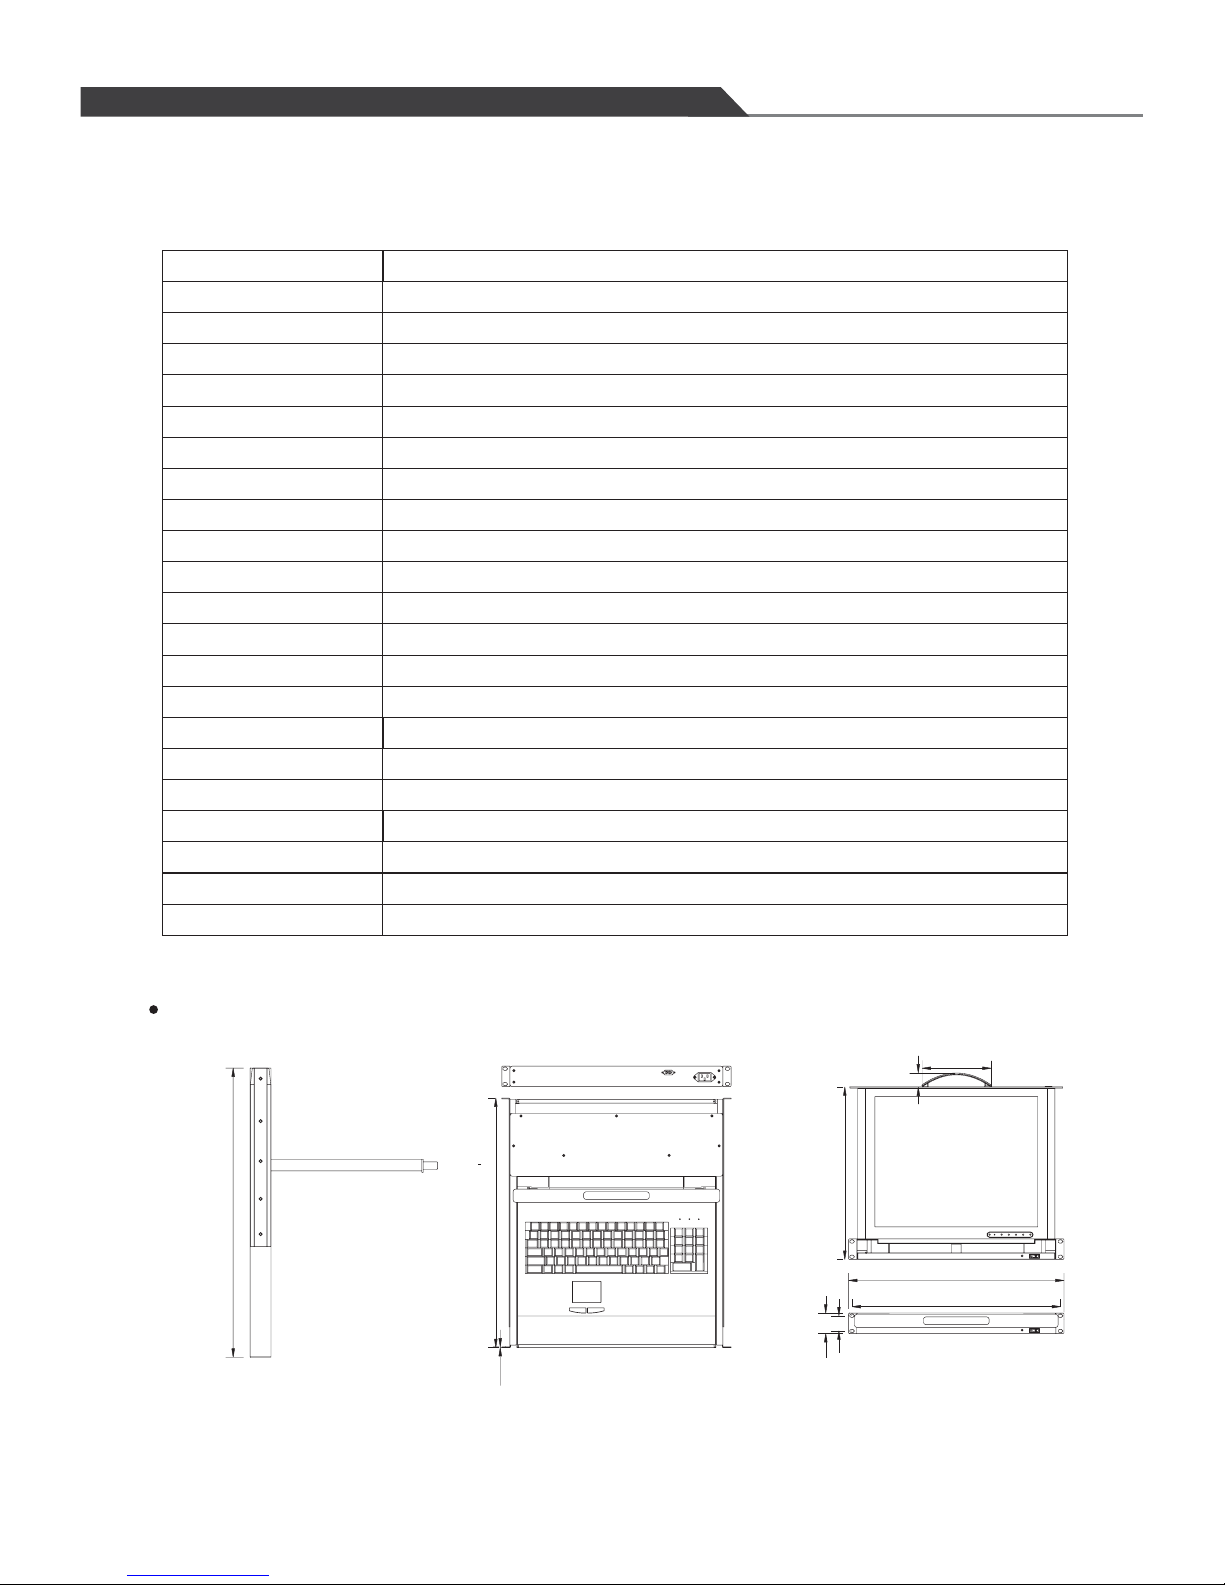
1.2 PRODUCT SPECIFICATIONS(1PORT)
Function/Model
Operating temperature
Storage temperature
PC selection method
Ports
PC side connector
Max.Resolution
1280 x 1 02 4@ 6 0 Hz
0~45℃
-20 ~60℃℃
1
HD-15M x 1
NO
NO
Housing
Dimensions(mm)
Metal
24.41 (620mm)(L)x17.58 446.4 m (W)x1.72 43.5 m)(H)""(m)"(m
N.W(Kg)/carton
G.W(Kg)/carton
14.2
19.5
Pixel Pitch (mm)
0.26 4 (p er o ne t ri ad) x 0.264
Pixel Position
R.G.B. Vertica l St ri pe
Display Mode
Normally White
Brightness (cd/m²)
300 (c en te r, Typ ) @ 7. 5m A
Contrast Ratio
1000:1 (typ.)
Support Color
16.7 M co lo rs ( RG B 6-bits + FRC da ta )
Energy Consumption (max.)
24W
Powe r Su pp ly ( Ex ternal)
110-240V
Power Supply (Internal)
12V 3. 8A
Standards
CE FCC. AC Ada pt or : UL , TU V, CE
Console side connector
CL-KVM-MPC1700S2-GE CL-KVM-MPC1700S2-SG
\
24.41"(620mm)~39.17”(995mm)
24.41"(620mm)
0.08"(2.0mm)
1.72"(43.5mm)
1.26"(32.0mm)
14.57"(370mm)
19.02"(483mm)
18.35"(466mm)
136
23
PC
POWER
Num
Lock
Caps
Lock
Scroll
Lock
CL-KVM-MPC1700S2-EN CL-KVM-MPC1700S2-GE
\
1u Claxan KVM-Switch Rack
CL-KVM-MPC1700S2-EN
\
CL-KVM-MPC1700S2-SG
\
3
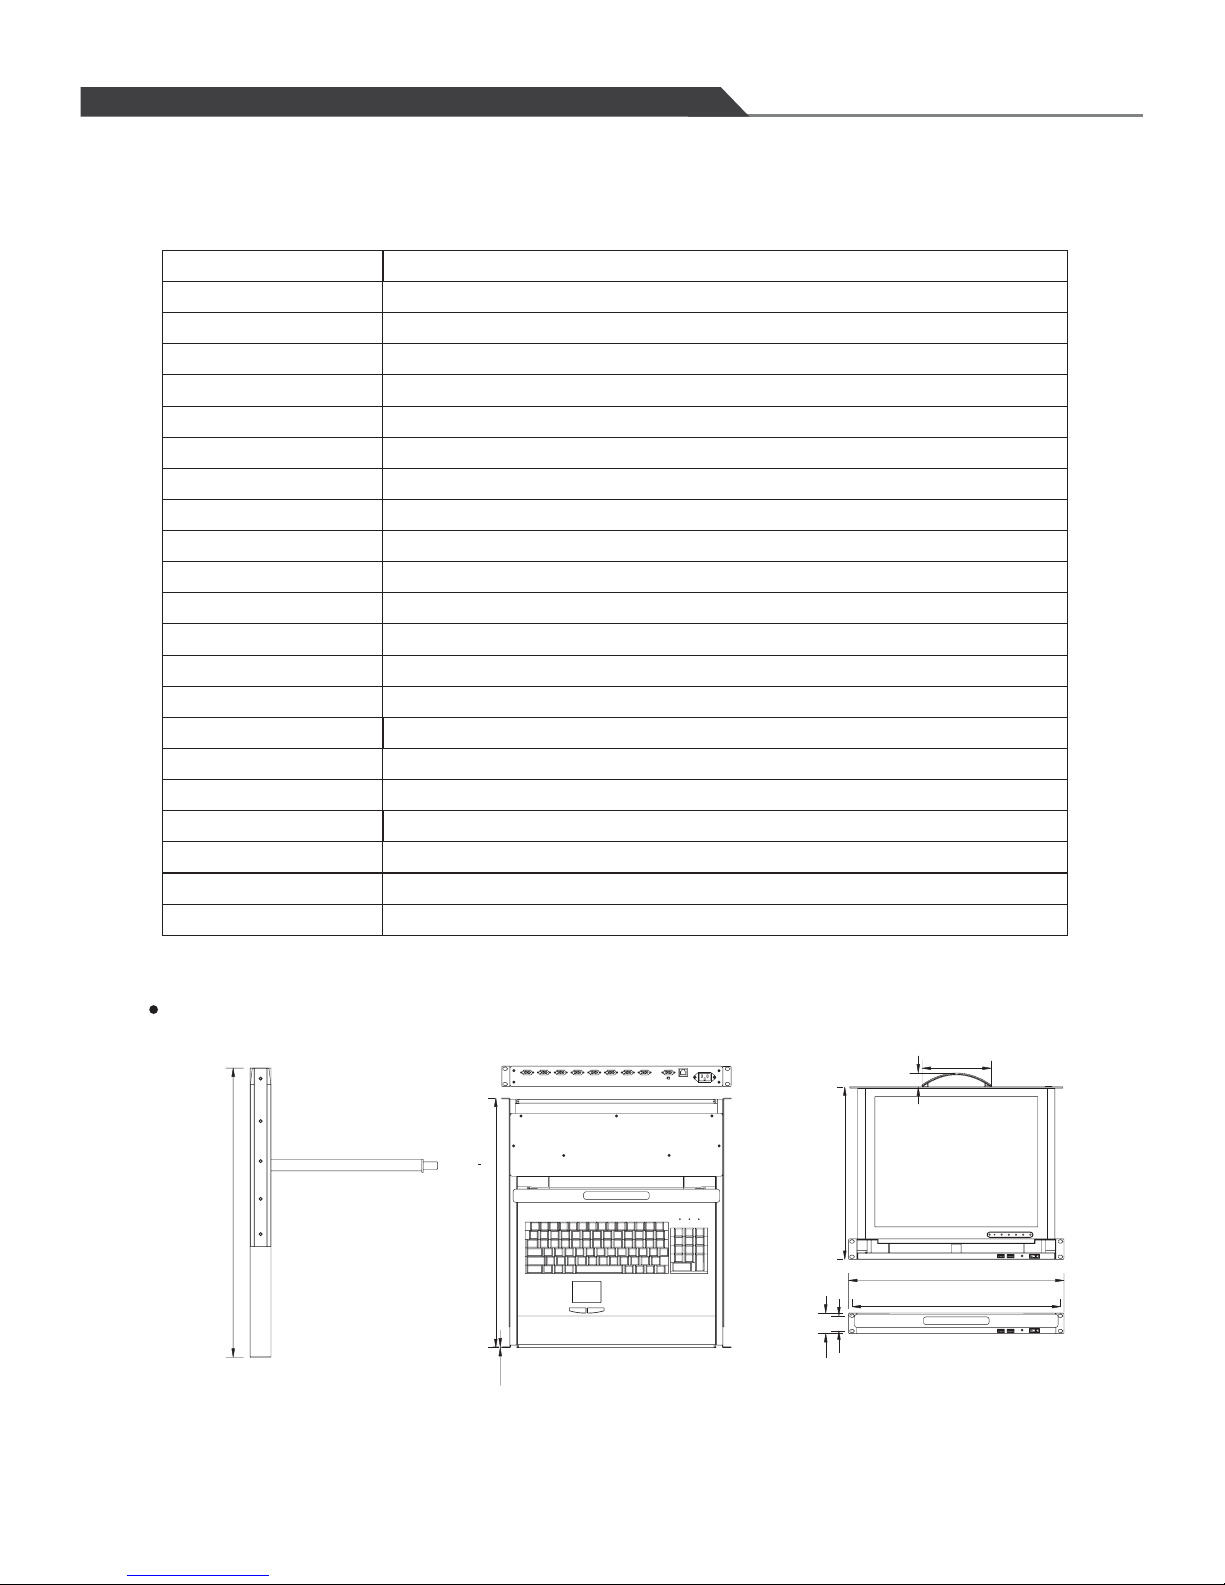
1.3 PRODUCT SPECIFICATIONS(8PORT)
Function/Model
Operating temperature
Storage temperature
PC selection method
Ports
PC side connector
Max.Resolution
1280 x 1 02 4@ 6 0 Hz
0~45℃
-20 ~60℃℃
8
HD-15M x 8
Hotkey /O SD /P ush button
8P8C 1; HD -1 5F 1,USB A ty pe 2(K/B & mouse only) x x x
Housing
Dimensions(mm)
Metal
24.41 (620mm)(L)x17.58 446.4 m (W)x1.72 43.5 m)(H)""(m)"(m
N.W(Kg)/carton
G.W(Kg)/carton
14.2
19.5
Pixel Pitch (mm)
0.26 4 (p er o ne t ri ad) x 0.264
Pixel Position
R.G.B. Vertica l St ri pe
Display Mode
Normally White
Brightness (cd/m²)
300 (c en te r, Typ ) @ 7. 5m A
Contrast Ratio
1000:1 (typ.)
Support Color
16.7 M co lo rs ( RG B 6-bits + FRC da ta )
Energy Consumption (max.)
24W
Powe r Su pp ly ( Ex ternal)
110-240V
Power Supply (Internal)
12V 3. 8A
Standards
CE FCC. AC Ada pt or : UL , TU V, CE
Console side connector
CL-KVM-MUX1708S2-EN
CL-KVM-MUX1708S2-GE CL-KVM-MUX1708S2-SG
\\
24.41"(620mm)~39.17”(995mm)
24.41"(620mm)
0.08"(2.0mm)
1.72"(43.5mm)
1.26"(32.0mm)
14.57"(370mm)
19.02"(483mm)
18.35"(466mm)
136
23
PC8
PC7PC6PC5PC4PC3PC2PC1
PROGRAM
POWER
Num
Lock
Caps
Lock
Scroll
Lock
CL-KVM-MUX1708S2-EN
CL-KVM-MUX1708S2-GE CL-KVM-MUX1708S2-SG
\\
1u Claxan KVM-Switch Rack
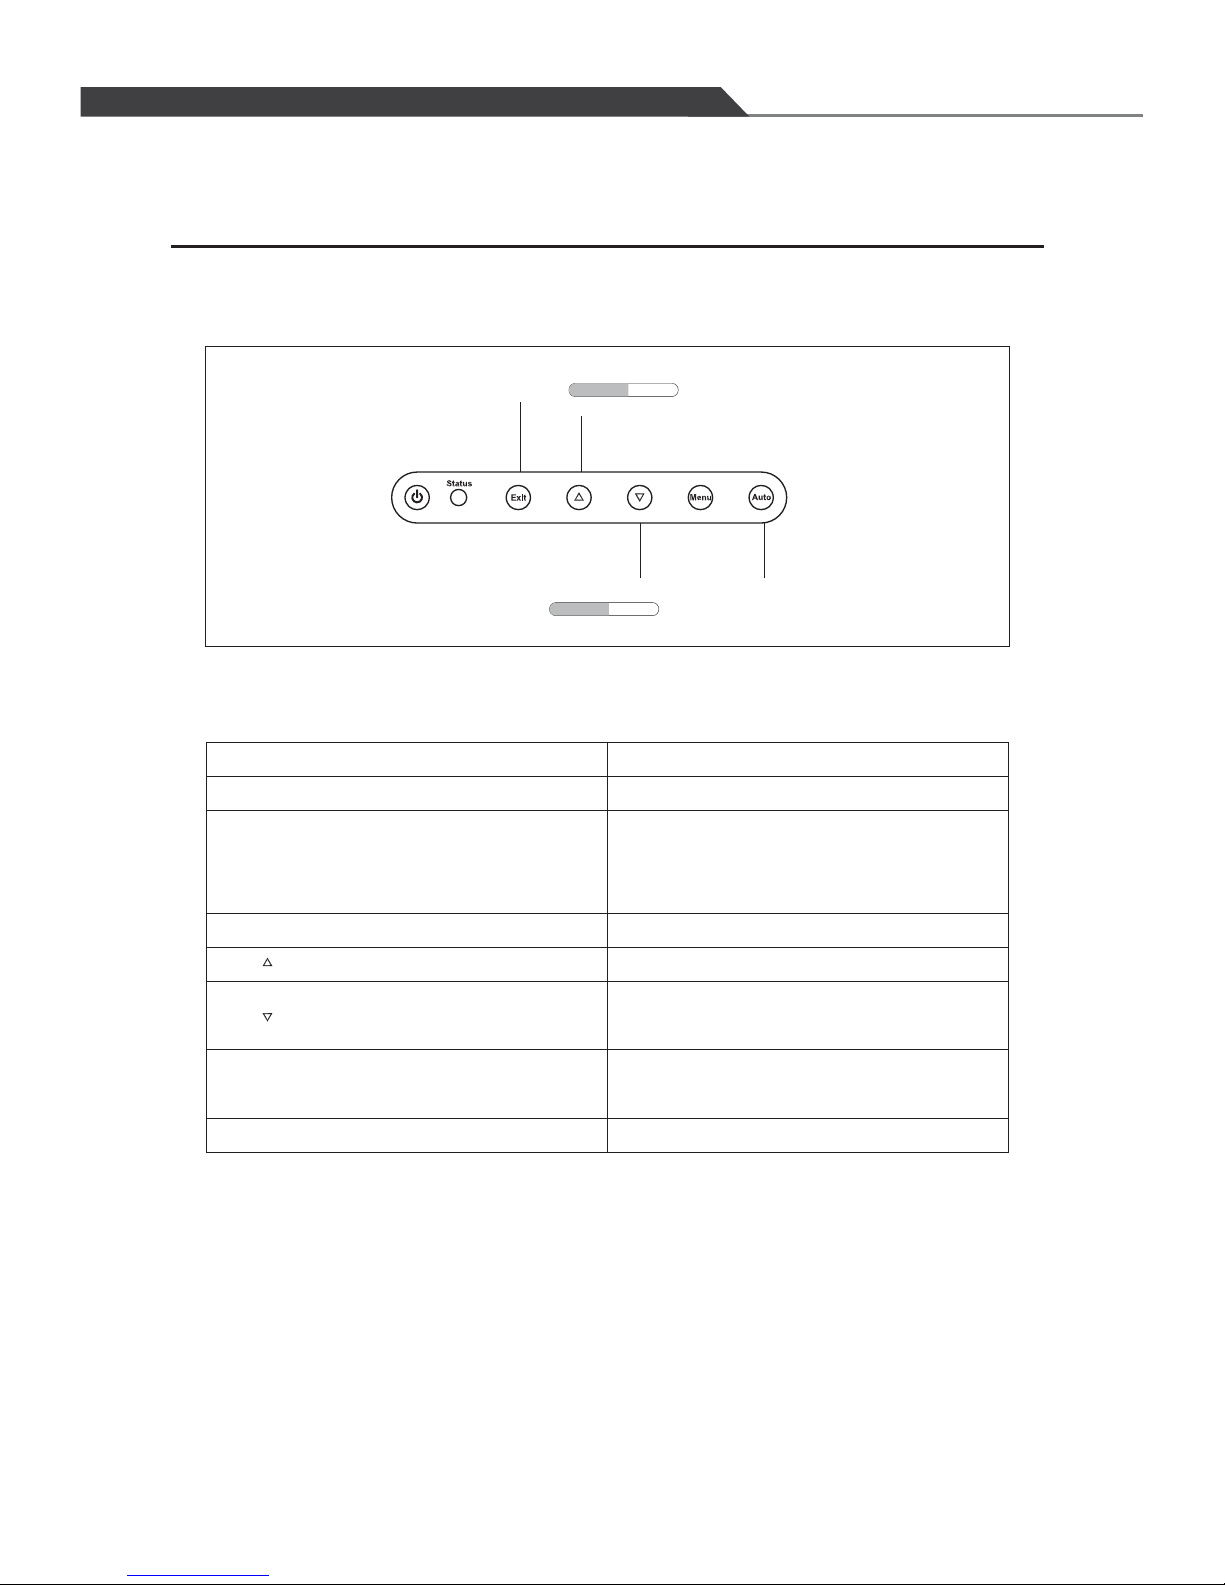
SECTION 2 CONTROL PANEL & OSD FUNCTIONS
4
To acces s the mai n menu an d also do uble as
the 'Enter' button
Controls
Description
Powe r On/Off Bu tton. L ED will b e lit whe n on.
LED in dicat or for st atus. G reen me ans pow er
on and s ignal r eciep t ; Red mea ns stan dy,
susp end or po wer off.
Return last menu
Status
Exit
Menu
Move c ursor u p to the fu nctio n to be adj usted
Move cursor down to the function to be
adjusted
Auto
Auto-adjustment
Power
Return last menu
Brightness
Contrast
Auto-adjustment
50-
+
50-
+
Hotkey
1u Claxan KVM-Switch Rack
5
Color
Picture
Function
OSD Men u
Misc
Exit
Contrast
Brightness
Gamma
Color Temp
Color Adjust
Exit
50- +
50- +
0 1 2 3
930 0 6500 580 0 Use r
2.1.2 Brightness
I. Press the 'Menu' button to activate the on-
screen menu
II. Use the 'UP' & 'Down' buttons to scroll up or
down
III. Scroll down to the selection 'Color'
IV. Press the 'Menu' button to confirm the
selection.
V. Use the 'UP' & 'Down ' but ton s to sc rol l up or d own
VI. Scroll down to the selection 'Brightness'
VII. Press the 'Menu' button to confirm the selection and the number of scale on the right will turn
red from black.
VIII. Use the 'UP' & 'Down' buttons to change the number for Brightness adjustment.
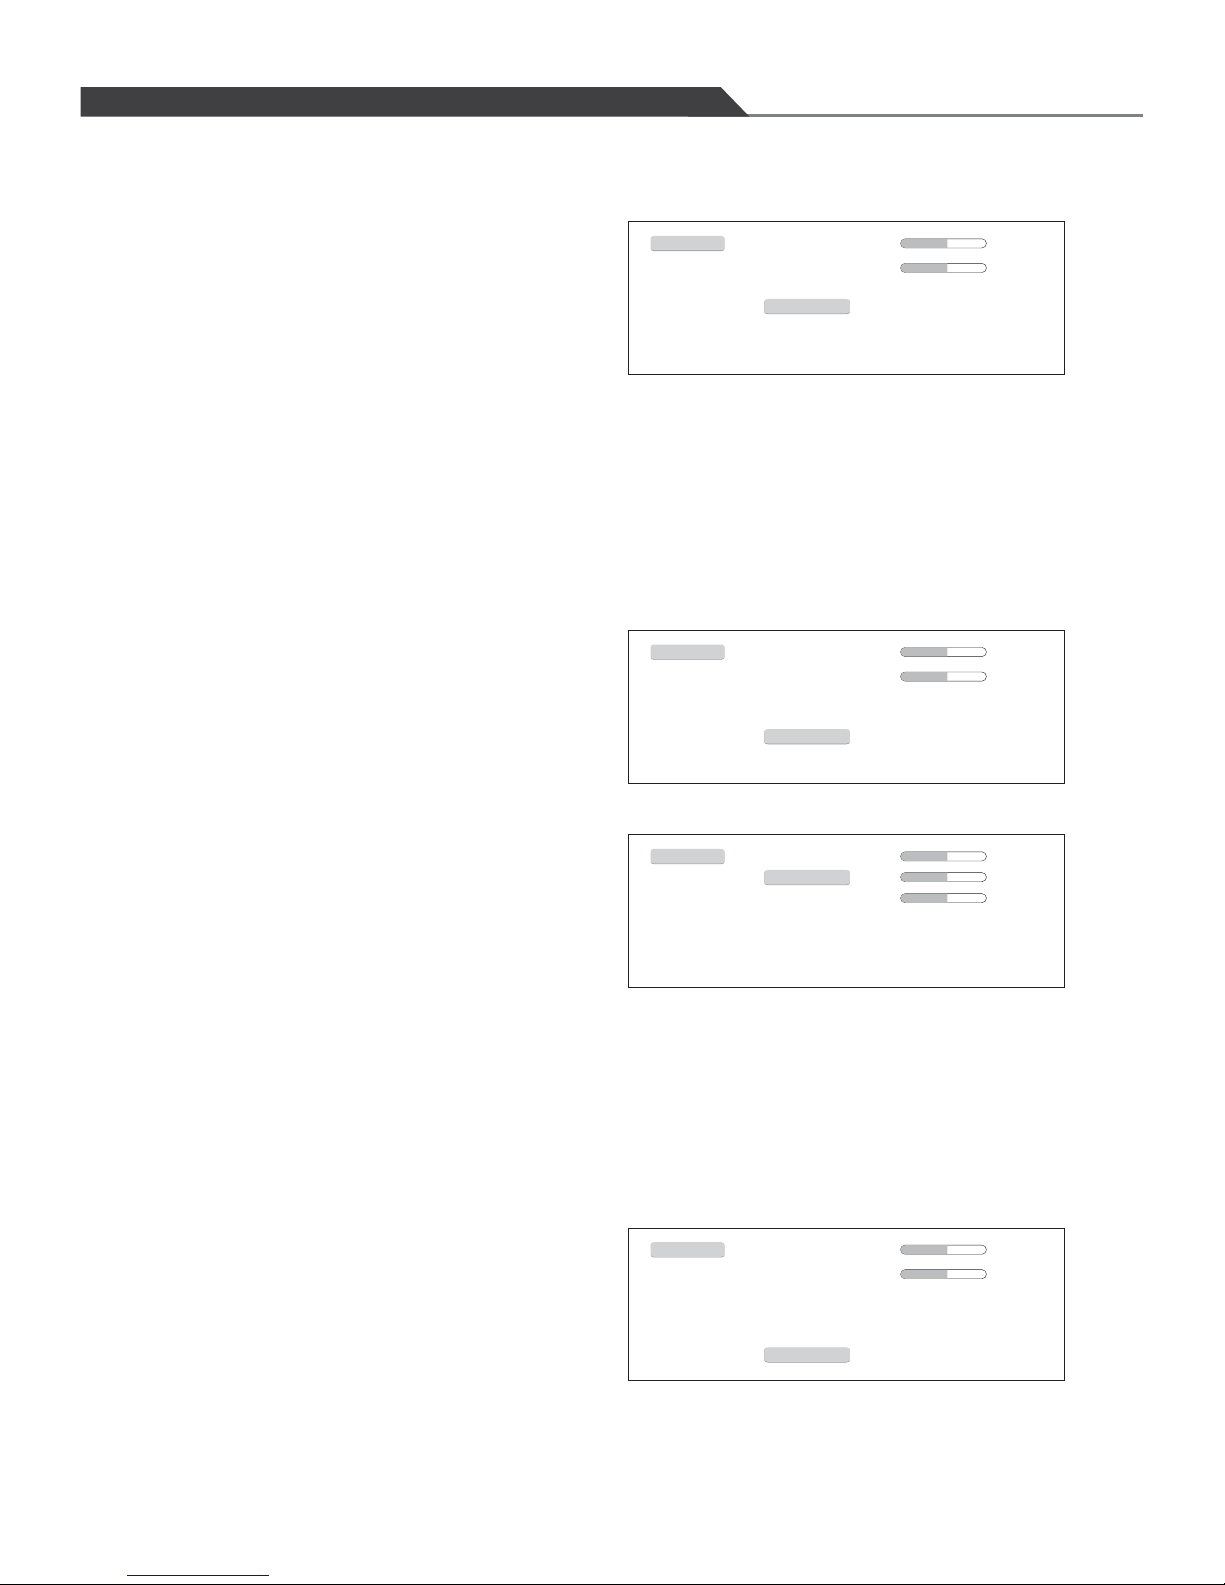
2.1.3 Gamma
I. Press the 'Menu' button to activate the on-
screen menu
II. Use the 'UP' & 'Down' buttons to scroll up or
down
III. Scroll down to the selection 'Color'
IV. Press the 'Menu ' but ton t o con fir m the
selection.
V. Use the 'UP' & 'Down ' but ton s to sc rol l up or d own
VI. Scroll down to the selection 'Gamma'
VII. Press the 'Menu' button to confirm the select ion a nd th e num ber s fro m 0 to 3 on t he ri ght a re
selectable.
VIII. Use the 'UP' & 'Down' buttons to scroll down to the wanted number( selection) an d pre ss
'Menu' button to confirm for Gamma adjustment.
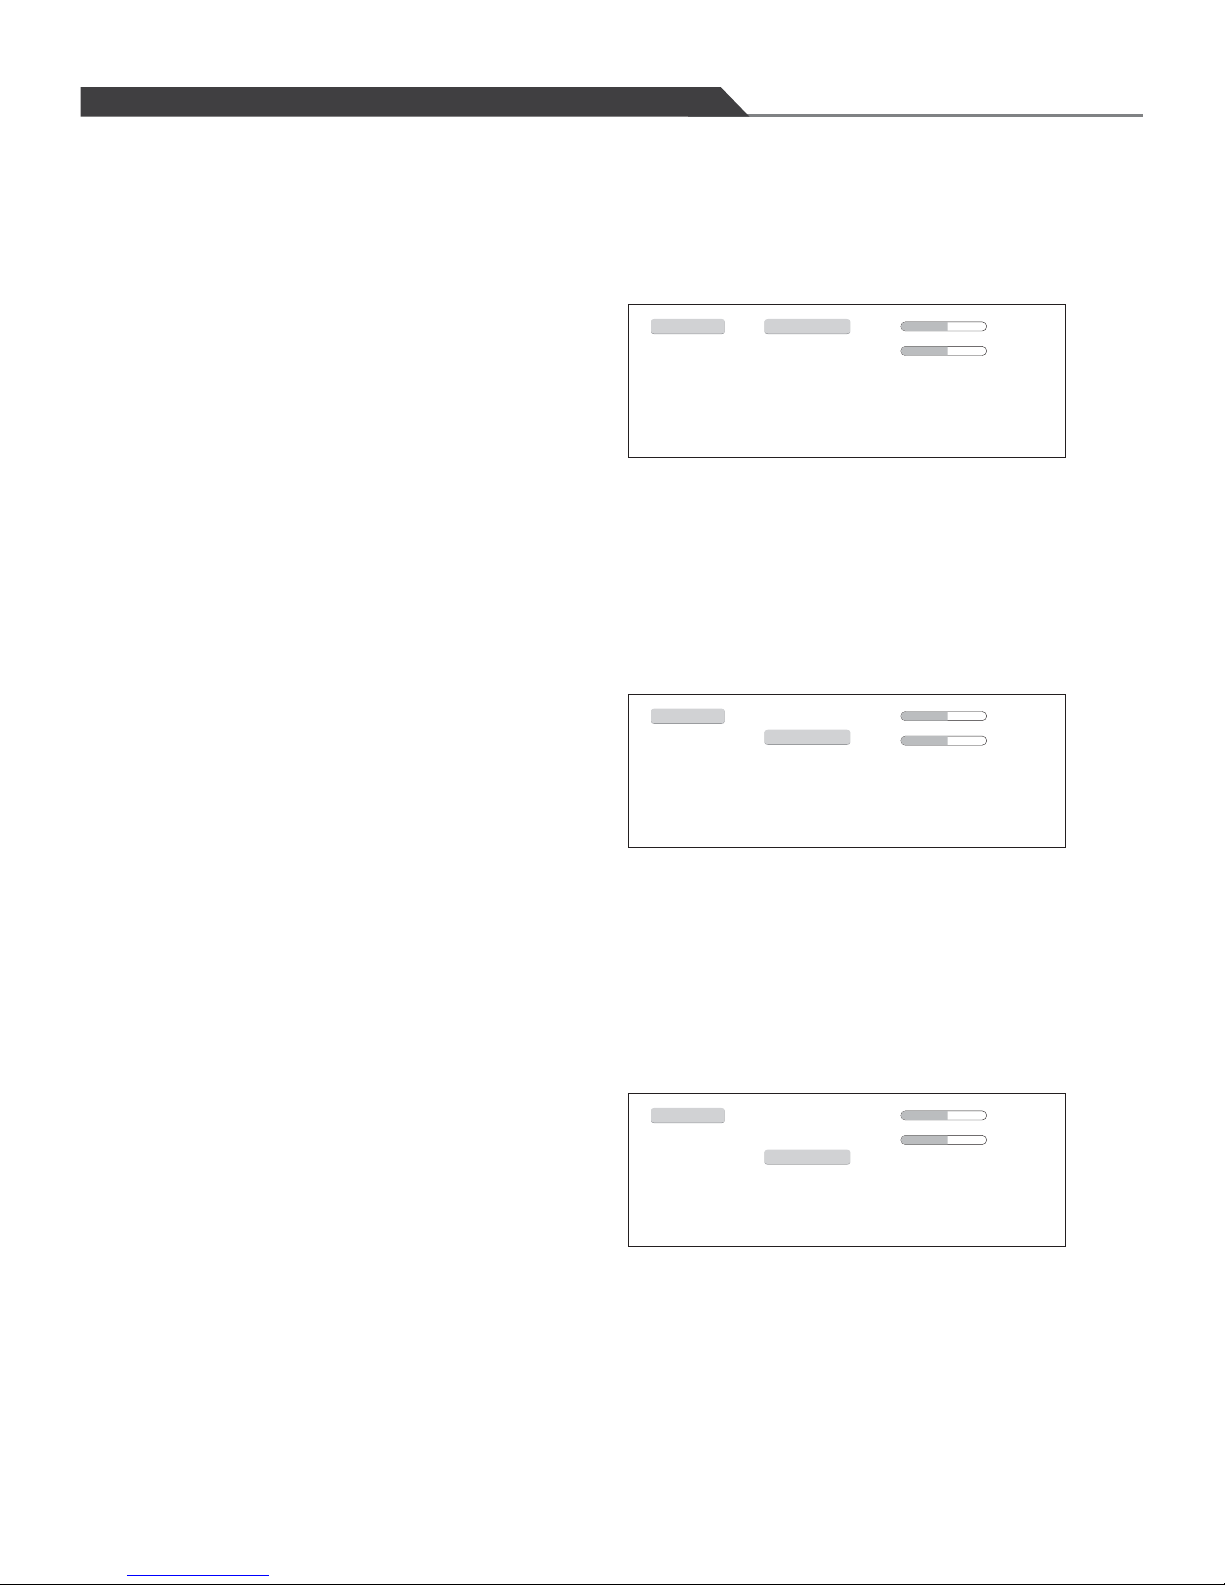
2.1 Color ( To adjust the factors such as contrast, brightness, gamma, colour
temp and color adjust)
2.1.1 Contrast
I. Press the 'Menu' button to activate the on-
screen menu
II. Use the 'UP' & 'Down' buttons to scroll up or
down
III. Scroll down to the selection 'Color'
IV. Press the 'M enu ' but ton t o con fir m the
selection.
V. Use the 'UP' & 'D own ' but ton s to sc rol l up or d own
VI. Scroll down to the selection 'Contrast'
VII. Press the 'Menu' button to confirm the selection and the number of scale on the right will turn
red from black.
VIII. Use the 'UP' & 'Down' buttons to change the number for contrast adjustment.
Color
Picture
Function
OSD Men u
Misc
Exit
Contrast
Brightness
Gamma
Color Temp
Color Adjust
Exit
50- +
50- +
0 1 2 3
930 0 6500 580 0 Use r
Color
Picture
Function
OSD Men u
Misc
Exit
Contrast
Brightness
Gamma
Color Temp
Color Adjust
Exit
50- +
50- +
0 1 2 3
930 0 6500 580 0 Use r
1u Claxan KVM-Switch Rack
2.1.4 Color Temperature
I. Press the 'Menu' button to activate the on-
screen menu
II. Use the 'UP' & 'Down' buttons to scroll up or
down
III. Scroll down to the selection 'Color'
IV. Press the 'M enu ' but ton t o con fir m the
selection.
V. Use the 'UP' & 'Down ' but ton s to sc rol l up or d own
VI. Scroll down to the selection 'Color Temp'
VII. Press the 'Menu' button to confirm the selection and There are 4 options on the right, (9300,
6500, 5800 and User) .
VIII. Use the 'UP' & 'Down' buttons to scroll down to th e wanted selection and press 'Menu' button
to confirm for Color Temperature adjustment.
2.1.5 Color adjustment
I. Press the 'Menu' button to activate the on-
screen menu
II. Use the 'UP' & 'Down' buttons to scroll up or
down
III. Scroll down to the selection 'Color'
IV. Press the 'M enu ' but ton t o con fir m the
selection.
V. Use the 'UP' & 'Down ' but ton s to sc rol l up or
down
VI. Scroll down to the selection 'Color Adjust'
VII. Press the 'Menu' button to confirm the
selection and the OSD will switch to another
display mode with 4 options on the right(
Red, Green, Blue colors with scale and
Exit.) .
VIII. Use the 'UP' & 'Down' buttons to scroll down to the wanted color and press the 'Menu' button
to confirm the selection and the number of scale on the right will tu rn re d fro m bla ck.
VIII. Use the 'UP' & 'Down' buttons to change the number for Color adjustment.
IX. To leave this selection (Color Adjust), use the 'UP' & 'Down' buttons to scroll up or down to
'Exit'
2.1.6 Exit from “ Color” selection
I. To leave this selection, use the 'UP' & 'Down'
buttons to scroll up or down to 'Exit'
II. Press the 'Menu' button to confirm the
selection and move back to the options on the
left.
6
Color
Picture
Function
OSD Men u
Misc
Exit
Red
Green
Blue
Exit
50- +
50- +
50- +
Color
Picture
Function
OSD Men u
Misc
Exit
Contrast
Brightness
Gamma
Color Temp
Color Adjust
Exit
50- +
50- +
0 1 2 3
930 0 6500 580 0 Use r
Colour
Picture
Function
OSD Men u
Misc
Exit
Contrast
Brightness
Gamma
Color Temp
Color Adjust
Exit
50- +
50- +
0 1 2 3
930 0 6500 580 0 Use r
Color
Picture
Function
OSD Men u
Misc
Exit
Contrast
Brightness
Gamma
Color Temp
Color Adjust
Exit
50- +
50- +
0 1 2 3
930 0 6500 580 0 Use r
1u Claxan KVM-Switch Rack
 Loading...