

Clavitech MP6110 User Manual

USER S MANUAL
,
MP6110
Digital Piano
1) Read these instructions.
2) Keep these instructions.
3) Heed all warnings.
4) Follow all instructions.
5) Do not use this apparatus near water.
6) Clean only with dry cloth.
7) Do not block any ventilation openings,install in accordance with the manufacturer s instructions.
8) Do not install near any heat sources such as radiators, heat registers,stoves,or other apparatus (including am
plifiers) that produce heat.
9) Do not defeat the safety purpose of the polarized or grounding-type plug.A polarized plug hase two blades
with one wider than the other.A grounding type plug has two blades and a third grounding prong.The wide blade
or the third prong are provided for your safety,if the provided plug does not fit into your outlet.consult an elec
trician for replacement of the obsolete outlet.
10) Protect the power cord from being walked on or pinched particularly at plugs.convenience receptacles,and
the point where they exit from the apparatus.
11) Only use attachments/accessories specified by the manufacturer.
12) Use only with the cart,stand,tripod,bracket,or table specified by the manufacturer,or sold with the
apparatus.When a cart is used,use caution when moving the cart/apparatus combination to avoid injury from
tip-over (Figure 1).
13) Unplug this apparatus during lightning storms or when unused for a long periods fo time.
14) Refer all servicing to qualified service personnel.Servicing is required when the apparatus has been dam
aged in any way,such as power-supply cord or plug is damaged,liquid has been spilled or objects have fallen
into the apparatus,the apparatus has been exposed to rain or moisture,does not operate normally,or has been
dropped.
WARNING:To reduce the risk of fire or electric shock,do not expose this apparatus to rain or moisture.
CAUTION:Apparatus shall not be exposed to dripping or splashing and no objects filled with liquids,such as
vases,shall be placed on the apparatus.
(Figure 1)
Thank you for purchasing this digital instrument.For perfect operation and security,please
read the manual carefully and keep it for future reference.
Precaution
Safety Precautions
Important Safety Instructions
DO NOT OPEN
RISK OF ELECTRIC SHOCK
CA UTI ON
The lightning flash with arrowhead symbol within an equilateral triangle is in
tended to alert the user to the presence of uninsulated “dangerous voltage”
within the product s enclosure that may be of sufficient magnitude to constitute a
risk of electric shock to persons.
The exclamation point within an equilateral triangle is intended to alert the user
to the presence of important operating and maintenance(servicing) instructions in
the literature accompanying the product.
’

Thanks for using our digital piano
Your instrument is a high-quality digital piano with 61 standard
size keyboard and utilizes the advanced PCM tone generation tech-
nology. Your instrument has 100 accompaniment styles that can be
used to provide fully orchestrated Auto Accompaniment. The multi-
functional LED(MULTI DISPLAY) make your operation more con-
veniently.
In order to obtain maximum performance and enjoyment, please
read this manual thoroughly while trying out the various features
described.
DIGITAL PIANO
1
Contents
DIGITAL PIANO
2
Panel controls ...............................................................................
Preparation .................................................................................
Using an AC Power Adaptor ..........................................................
Using Headphones ........................................................................
Using MIC .... ............................................................................
The Sustain Pedal .........................................................................
The Music Stand ..........................................................................
MIDI IN/MIDI OUT .....................................................................
Listen to the Demo .......................................................................
Selecting and Playing the Voices ...................................................
Select a Voice ..............................................................................
Keyboard Percussion ...................................................................
Split Mode ..................................................................................
Overall Control ...........................................................................
Sustain ....................................................................................
Touch ......................................................................................
Auto Accompaniment ..................................................................
Selecting a Style ..........................................................................
Auto Accompaniment Fingering ...................................................
Accompaniment Control ..............................................................
Accompaniment Volume ..............................................................
Tempo Control ............................................................................
Recording Functions ...................................................................
Record .......................................................................................
Play ...........................................................................................
Appendix ....................................................................................
Voice List ...................................................................................
Style List ....................................................................................
Percussion List ............................................................................
Specifications ..............................................................................
3
5
5
5
5
5
5
5
6
7
7
7
8
8
8
8
9
9
10
11
12
13
14
14
14
15
15
16
17
17

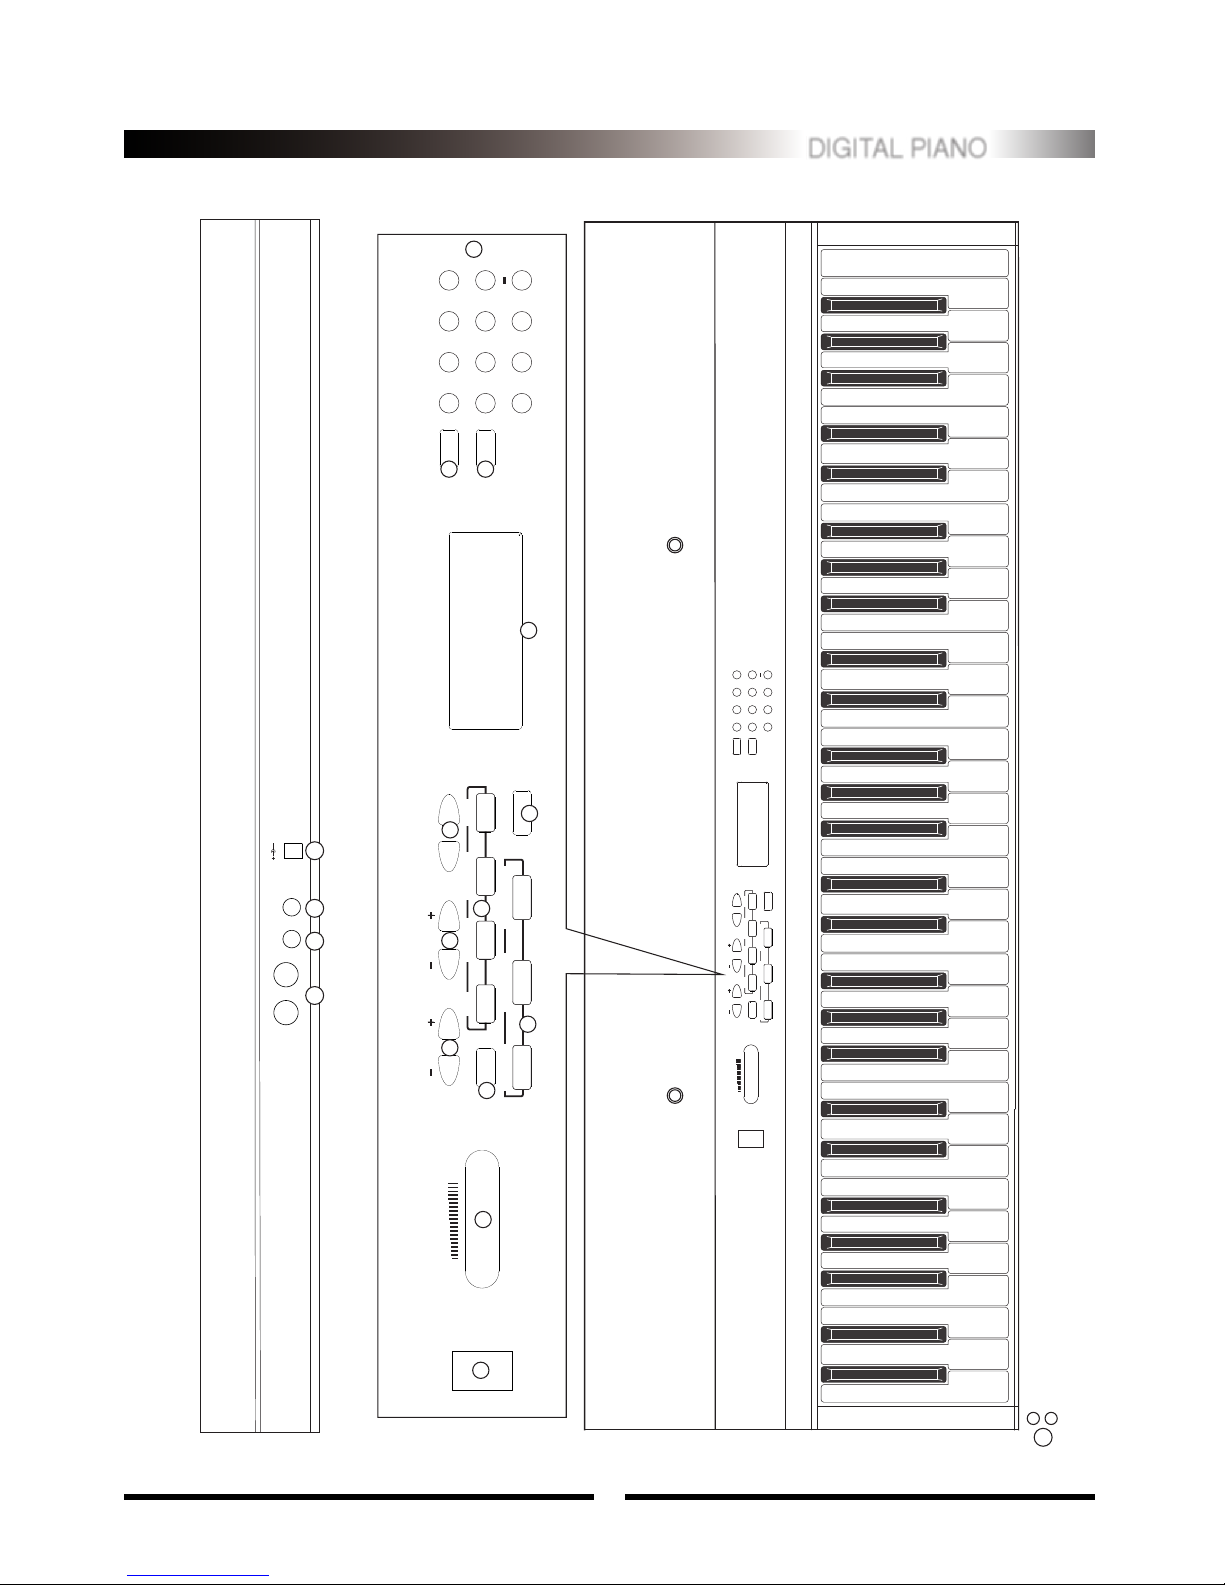
Panel Controls
Top Panel Controls
1.POWER Button
2.MASTER VOLUME Control
3.ACCOMPANIMENT CONTROL SECTION
SYNCHRO Button
START/STOP Button
INTRO/FILL Button
4.FINGERING Bu ttons
NORMAL Button
S.FINGER Button
FINGERED Button
SPLIT Button
5.ACCOMP. VOLUME +/-Buttons
6.TEMPO+/- Buttons
7.TOUCH Button
8.DEMO Button
9.RECORDING SECTION
RECORD Button
PLAY Button
10.MULTI LED DISPLAY
11.VOICE/STYLE Button
12.SUSTAIN Button
13.Number [0]-[9], [+],[-] Buttons
Rear Panel Controls
14.DC 12V IN Jack
15.MIC Jack
16.PEDAL Jack
17.MIDI IN/OUT Connector
18.PHONE Jacks
DIGITAL PIANO
3
DIGITAL PIANO
4
DC 12V
MICPEDAL MIDI IN
MIDI OUT
1
4
7
2
5
8
3
6
9
+
0
VOICE/STYLE
SUSTAINDEMO
TOUCH
ACC TEMPO RECORD PLAY
POWER
ON
OFF
MASTER VOLUME
MIN
MAX
OFF S.FINGER FINGERED SPLIT
SYNCHRO START/STOP INTRO/FILL IN
DEMO
1
4
7
2
5
8
3
6
9
+
0
VOICE/STYLE
SUSTAIN
TOUCH
ACC TEMPO RECORD PLAY
POWER
ON
OFF
MASTER VOLUME
MIN
MAX
OFF S.FINGER FINGERED SPLIT
SYNCHRO START/STOP INTRO/FILL IN
1
2
4
3
5 6
7
8
9
10
11
12
13
14
1516
17
18
 Loading...