

Page 1

Bedienungsanleitung/Garantie
Mode d’emploi • Istruzioni per l’uso
Instruction Manual • Návod k použití
Terrassenheizstrahler
Parasol chauffant • Riscaldamento da esterno
Patio heater • Tepelný zářič
THS 3550
Page 2

DEUTSCH ..................................................................................................... Seite 3
FRANÇAIS ..................................................................................................... page 17
ITALIANO ................................................................................................... pagina 30
ENGLISH ........................................................................................................ page 43
ČESKY.......................................................................................................... Strana 56
2
Page 3

Inhaltsverzeichnis
Sicherheitshinweise............................................................................................................................................................................................................................... 3
Technische Daten ................................................................................................................................................................................................................................. 5
Übersicht ................................................................................................................................................................................................................................................ 6
Stückliste ................................................................................................................................................................................................................................................ 7
Terrassenheizstrahler montieren .......................................................................................................................................................................................................... 7
Gasanschluss ...................................................................................................................................................................................................................................... 13
Terrassenheizstrahler betreiben ......................................................................................................................................................................................................... 14
Bedienung des Terrassenheizstrahlers .............................................................................................................................................................................................. 14
Störungsbehebung .............................................................................................................................................................................................................................. 14
Terrassenheizstrahler reinigen ............................................................................................................................................................................................................ 14
Terrassenheizstrahler aufbewahren ................................................................................................................................................................................................... 15
Hinweis zur Richtlinienkonformität ...................................................................................................................................................................................................... 15
Garantie ............................................................................................................................................................................................................................................... 15
Entsorgung .......................................................................................................................................................................................................................................... 16
Sicherheitshinweise
Sie haben ein sicheres Produkt erworben, doch auch der Kunde trägt Verantwortung für den ordnungsgemäßen Aufbau, den Betrieb und die Pege des
Terrassenheizstrahlers.
Verschiedene Sicherheitseinrichtungen schützen Sie vor Schäden oder Verletzungen. Was Sie zu Ihrer eigenen Sicherheit wissen müssen, haben wir Ihnen
in dieser Anleitung zusammengefasst. Erwerben Sie kompetentes Wissen. Lesen und beachten Sie die Bedienungsanleitung vor der Montage und der
Inbetriebnahme des Gerätes.
Lesen Sie vor allem die Sicherheitshinweise. Benutzen Sie den Artikel nur wie in dieser Anleitung beschrieben.
Ein Nichtbeachten der Anleitung kann zu Verpuffungen oder Bränden führen!
Bewahren Sie diese Anleitung zum späteren Nachlesen auf. Bei Weitergabe des Artikels ist auch diese Anleitung mitzugeben.
Symbole in dieser Bedienungsanleitung
Wichtige Hinweise für Ihre Sicherheit sind besonders gekennzeichnet. Beachten Sie diese Hinweise unbedingt, um Unfälle und Schäden am Gerät zu vermeiden:
WARNUNG:
Warnt vor Gefahren für Ihre Gesundheit und zeigt mögliche Verletzungsrisiken auf.
ACHTUNG:
Weist auf mögliche Gefährdungen für das Gerät oder andere Gegenstände hin.
HINWEIS:
Hebt Tipps und Informationen für Sie hervor.
Verwendungszweck
Der Terrassenheizstrahler darf nur im Freien verwendet werden.
WARNUNG: Anweisung für Kinder und Personen mit eingeschränkten Fähigkeiten
Dieses Gerät ist nicht für die Benutzung durch Kinder oder durch Personen mit eingeschränkten Fähigkeiten vorgesehen. Es darf nur von Personen
benutzt werden, die in der Lage sind, das Gerät sicher zu bedienen.
Allgemeine Gefahren
WARNUNG:
• Der Terrassenheizstrahler hat scharfe Kanten, an denen Sie sich schneiden können. Verwenden Sie bei der Montage, Wartung, Reinigung oder dem
Transport Schutzhandschuhe.
• Transportieren Sie den Terrassenheizstrahler niemals, wenn er noch brennt oder heiß ist.
• An dem Terrassenheizstrahler entstehen heiße Oberächen. Es besteht Verbrennungsgefahr! Weisen sie umstehende Personen zu einem Sicherheitsabstand von 1 Meter an.
• Anwesende Kinder sind besonders zu beaufsichtigen.
• Der Aufbau des Terrassenheizstrahlers erfordert technisches Grundwissen und handwerkliches Geschick. Lassen Sie sich ggf. von einer qualizierten
Person helfen.
• Lassen Sie die Wartung und Reparatur durch Gasfachleute durchführen.
• Nehmen Sie niemals eigenständig Änderungen am Gas- oder Regelsystem vor. Es besteht Explosions- und Brandgefahr!
• Der Betrieb auf Schiffen oder Fahrzeugen ist verboten.
• Das Benutzen dieses Gerätes in geschlossenen Räumen kann gefährlich sein und ist verboten!
• Dieser Heizer ist nur zum Einsatz im Freien und in gut ventilierten Räumen bestimmt.
3
Page 4

WARNUNG:
• Ein gut ventilierter Raum muss zu mindestens 25 % der gesamten Fläche des Raumes geöffnet sein.
• Die gesamte Fläche des gesamten Raumes entspricht der der Summe aller Oberächen der jeweiligen Wände.
• Vor dem Benutzen dieses Gerätes lesen Sie bitte die Bedienungsanleitung. Das Gerät muss gemäß der Anleitung und lokaler Bestimmungen aufgebaut werden.
• Brennbare Materialien nicht in der Nähe des Heizers aufbewahren.
• Schließen Sie nach dem Benutzen das Gasventil am Gaszylinder und/oder am Regulator.
Gerät auspacken
WARNUNG:
• Zur Sicherheit Ihrer Kinder lassen Sie keine Verpackungsteile (Plastikbeutel, Karton, Styropor, etc.) erreichbar liegen.
• Lassen Sie kleine Kinder nicht mit Folie spielen. Es besteht Erstickungsgefahr!
Gasanlage anschließen
WARNUNG: BRAND- UND EXPLOSIONSGEFAHR
• Der Terrassenheizstrahler darf nur mit einem Niederdruckregler betrieben werden. Der beiliegende Druckregler ist für den Betrieb mit Flüssiggas (LPG)
werkseitig korrekt eingestellt. Lesen und beachten Sie auch die separat dem Druckregler beiliegenden Montage- und Anwendungshinweise.
• Der Gasschlauch muss ggf. ausgetauscht werden, wenn entsprechend nationale Anforderungen bestehen.
• Achten Sie darauf, dass sich keine Zündquellen, offenes Feuer o. Ä. in der Nähe benden, wenn Sie die Gasasche austauschen.
• Lassen Sie sich beim Kauf oder Mieten der Gasasche im Fachhandel beraten.
• Das Gerät muss so angeschlossen werden, wie es in dieser Anleitung beschrieben ist.
• Achten sie darauf, dass der Gasschlauch nicht geknickt wird oder scheuert.
• Prüfen Sie nach der Montage der Gasanlage alle Verbindungsstellen mit einem handelsüblichen Lecksuchspray oder Seifenwasser auf Dichtheit. Eine
Dichtigkeitsprüfung mit offener Flamme ist strengstens untersagt!
Terrassenheizstrahler betreiben
WARNUNG: BRAND- UND EXPLOSIONSGEFAHR
• Rauchen Sie nicht beim Umgang mit der Gasanlage. Stellen Sie die Gasasche nicht in der Nähe von offenem Feuer ab.
• Gefahr: In geschlossenen Räumen kann sich Gas sammeln und zur Erstickung oder Explosion führen.
• Benutzen Sie den Terrassenheizstrahler nur im Freien.
• Beachten Sie: Der Terrassenheizstrahler ist windempndlich. Bei aufkommendem Wind müssen besondere Maßnahmen getroffen werden, um das
Umkippen des Gerätes zu vermeiden.
• Schützen Sie den Terrassenheizstrahler vor Regen, Feuchtigkeit, Spritzwasser, etc.
• Stellen Sie den Terrassenheizstrahler auf eine ebene, stabile und feuerfeste Fläche.
• Halten Sie die Lüftungsöffnungen am Schott und am Brenner immer frei.
• Schützen Sie die Gasasche vor starker Sonneneinstrahlung.
• Prüfen Sie den Schlauch und den Druckregler vor jedem Betrieb auf Risse und Beschädigungen.
• Nehmen Sie den Terrassenheizstrahler nicht in Betrieb, wenn Druckregler, Schlauch oder Gasasche defekt oder undicht sind.
• Entzünden Sie die Gasamme nicht mit einer offenen Flamme. Benutzen Sie zum Zünden den elektrischen Anzünder des Gerätes.
• Zünden Sie die Pilotamme nur in Ausnahmefällen manuell. Lassen Sie die Zündanlage umgehend von einem Fachmann reparieren oder tauschen.
• Zum Schutz gegen versehentlich ausströmendes Gas sollte das Flaschenventil auf der Gasasche nur dann geöffnet sein, wenn der Terrassenheizstrahler in Betrieb ist. Drehen Sie das Flaschenventil nach jedem Ausschalten des Terrassenheizstrahlers sofort wieder zu.
• Halten Sie während des Betriebes einen sicheren Abstand zu brennbaren und hitzeempndlichen Materialien ein. Der Abstand darf nicht geringer als
1 m sein.
• Achten Sie darauf, dass sich oberhalb des Terrassenheizstrahlers keine Gegenstände oder Gebäudeteile benden.
• Die Flächen des Terrassenheizstrahlers werden während des Betriebes sehr heiß. Warnen Sie umstehende Personen und halten Sie Kinder fern.
• Lassen Sie den Terrassenheizstrahler während des Betriebes nicht unbeaufsichtigt.
• Drehen Sie bei einer Störung sofort das Ventil der Gasasche zu.
• Vor jedem Stellplatzwechsel muss der Terrassenheizstrahler ausgeschaltet, das Ventil der Gasasche zugedreht und die Gasasche zum Schutz des
Druckreglers und der Schlauchleitung aus dem Unterteil des Grills herausgenommen werden.
Terrassenheizstrahler warten
WARNUNG: BRAND- UND EXPLOSIONSGEFAHR
• Reparaturen und Wartungen an der Gasanlage dürfen nur von hierfür autorisiertem Fachpersonal durchgeführt werden. Nehmen Sie keine Veränderungen am Terrassenheizstrahler und am Druckregler vor.
• Tauschen Sie den Druckregler nach 2 und den Schlauch nach spätestens 5 Jahren, auch wenn keine äußerlichen Schäden zu erkennen sind. Achten
Sie darauf, dass der Druckregler für das verwendete Gas zugelassen und auf den korrekten Ausgangsdruck (siehe Technische Daten) eingestellt ist.
Ein neuer Schlauch darf nicht länger als 1,5 m sein.
4
Page 5

WARNUNG: BRAND- UND EXPLOSIONSGEFAHR
• Das Gas bildet zusammen mit Öl ein explosives Gemisch. Versuchen Sie niemals, schwergängige Ventile und Regulierknöpfe mit Öl oder Kriechöl
leichtgängig zu machen.
Maßnahmen zur Brandbekämpfung
• Bringen Sie umstehende Personen in Sicherheit! Drehen Sie, wenn möglich, das Ventil der Gasasche zu. Kühlen Sie die Gasasche mit Wasser. Achten
Sie dabei auf Ihre Sicherheit! Eine spontane, explosionsartige Wiederentzündung ist möglich.
• Löschen Sie ausströmendes, brennendes Gas nur, wenn Sie den Gasaustritt nicht stoppen können. Alle Löschmittel können benutzt werden.
Erste-Hilfe-Maßnahmen
- Maßnahmen nach Einatmen von Gas
• Hohe Konzentrationen können Ersticken verursachen. Symptome können Verlust der Bewegungsfähigkeit und des Bewusstseins sein. Das Opfer
bemerkt das Ersticken nicht. In niedrigen Konzentrationen können Schwindelgefühl, Kopfschmerzen, Übelkeit und Koordinationsstörungen auftreten.
• Bringen Sie das Opfer an die frische Luft. Verständigen Sie einen Arzt oder den Rettungsdienst. Leiten Sie bei Atemstillstand die künstliche Beatmung
ein.
- Maßnahmen nach größeren Verbrennungen oder Verbrühungen
• Es besteht die akute Gefahr einer Unterkühlung und eines Schocks. Rufen Sie sofort den Rettungsdienst!
• Eventuellen Kleiderbrand sofort mit Wasser löschen oder die Flammen mit einer dicken Decke ersticken.
• Bei Verbrühungen: Kleidung sofort entfernen.
• Bei Verbrennungen: Kleidung am Körper lassen.
• Mit kaltem Wasser mindestens 15 Minuten kühlen, bis der Schmerz nachlässt.
• Den betroffenen Bereich mit einem sterilen Metalline-Brandtuch abdecken. Die mit Metalline beschichtete Seite auf die verletzte Haut auegen und
locker mit einer Mullbinde oder einem Dreieckstuch xieren.
• Keine Hausmittel wie Salben, Puder, Öle, Desinfektionsmittel etc. anwenden!
- Maßnahmen nach kleineren Verbrennungen oder Verbrühungen
• Bei Verbrühungen: Kleidung sofort entfernen.
• Bei Verbrennungen: Kleidung nur entfernen, wenn sie nicht haftet.
• Mit kaltem Wasser mindestens 15 Minuten kühlen, bis der Schmerz nachlässt.
• Kleine Verbrennungen oder Verbrühungen ohne Blasenbildung an der Luft heilen lassen, nicht mit einem Paster oder Verband abdecken.
Transporthinweise
WARNUNG: BRAND- UND EXPLOSIONSGEFAHR
• Transportieren Sie die Gasasche möglichst nicht in Fahrzeugen, deren Laderaum nicht von der Fahrerkabine getrennt ist. Der Fahrer muss die möglichen Gefahren der Ladung kennen und er muss wissen, was bei einem Unfall oder Notfall zu tun ist.
• Transportieren Sie die Gasasche stehend sowie gegen Umfallen und Verrutschen gesichert.
• Achten Sie darauf, dass das Ventil der Gasasche geschlossen und dicht ist.
Aufbewahrungshinweise
WARNUNG: BRAND- UND EXPLOSIONSGEFAHR
• Wird das Gerät nicht verwendet, muss die Gasasche vom Gerät getrennt werden.
• Bewahren Sie die Gasasche außerhalb der Reichweite von Kindern auf.
• Halten Sie die Gasasche von oxidierenden Gasen und anderen brandförderlichen Stoffen fern.
• Ausströmendes Flüssiggas ist schwerer als Luft und sinkt zu Boden. Bewahren Sie die Gasasche nicht im Haus, unter Erdgleiche (z. B. Keller,
Schacht, Tiefgarage etc.) oder an unbelüfteten Plätzen auf, an denen sich ausströmendes Gas sammeln könnte.
• Schützen Sie die Gasasche vor direkter Sonneneinstrahlung und anderen Wärmequellen.
• Lagern Sie die Gasasche bei weniger als 50°C an einem gut gelüfteten, schattigen Ort und gegen Witterungseinüsse geschützt.
• Lagern Sie die Gasasche stehend und gegen Umfallen gesichert.
• Leere Gasaschen enthalten immer eine Restmenge Flüssiggas. Beachten Sie die Aufbewahrungshinweise auch für leere Gasaschen.
Konstruktion und Ausstattung
• Transportabler Terrassenheizstrahler mit Gehäuse für Gasbehälter
• Gehäuse aus pulverbeschichteter Stahl
• Gasanschlüsse mit Verschraubung
• Wärmeabgabe durch Reektor
Technische Daten
5
Page 6

Spezikationen
• Ausschließlich für Nutzung im Freien
• Ausschließlich für LPG-Gasgemische
• Max.: 14000 Watt
• Min.: 5000 Watt
Hersteller Hongmaoxinda Electric.
Produkt: Terrassenheizstrahler
Modellbezeichnung: THS 3550 (HMXD-A)
Gaskategorie: I
Gasart: LPG Gasmischungen
Gasdruck: 50 mbar
Gesamte aufgenommene
Heizleistung aller Gaskategorien:
Gasdüse: 1,70 mm Hauptbrenner 0,18 mm Pilotbrenner
Zielländer: AT, DE, CZ, CH
Identikationsnummer: 0063BU7882
3B/P(50)
14 kW (870 g/h)
Übersicht
1 Reektor
2 Flammenfeld
3 Öffnung Pilotamme
4 Luftöffnungen
5 Gasregelknopf
6 Zünder
7 Brennereinheit
8 Standrohr
9 Raum für die Gasasche
10 Vierkantrohr
11 Schott
12 Sockel
6
Page 7

Stückliste
Pos. Beschreibung Stk. Pos. Beschreibung Stk.
Schraubenschlüssel 2
12 Sockel 1 7 Brennereinheit 1
Radsatz 1
+ Schraube M8 X 16 2
+ Mutter M8 2
+ Unterlegscheibe M8 4 1 Reektor bestehend aus Teilen 3
10 Vierkantrohr, 90° gebogen 3 + Schrauben M5 X 10 9
+ Schraube M8 X 16 3 + Hutmuttern M5 9
8 Standrohr 1 + Unterlegscheiben M5 6
+ Schraube M6 X 30 6 + Distanzbolzen M8 X 10 1
+ Mutter M6 6 + Fügelmuttern M8 3
11 Schott für die Gasasche 1 + Unterlegscheibe M8 6
Gasrohr 880mm m. Überwurfmutter u.
Gewinde
EDS-Schrauben zur Befestigung des Brenners am Standrohr M6 X 10
Terrassenheizstrahler montieren
1
4
Für den Aufbau benötigen Sie: • 2 Personen
• Schutzhandschuhe
• Ggf. eine Decke als Unterlage
• Schraubenschlüssel der SW 10, 14 und 17 (im Lieferumfang)
• Schraubendreher der Größe PZ2
• Zange
• Lecksuchmittel oder Seifenlauge
Entfernen Sie vorher die Schutzfolien die an den Flächen haften.
Bei der Montage orientieren Sie sich an der Stückliste und der bebilderten Aufbauanleitung:
7
Page 8

89101112
Page 9

Page 10

Page 11

Page 12

Page 13

Gasanschluss
Allgemeines
Der Terrassenheizstrahler kann mit Gasaschen zwischen 5 kg und 15 kg betrieben werden. Zugelassen sind LPG-Gasgemische bei 50 mbar.
Ihr Terrassenheizstrahler funktioniert am besten mit Propangas oder LPG-Gasgemischen. Butan kann verwendet werden, aufgrund der Nennleistung des
Geräts kann die Gasasche jedoch einfrieren. Dadurch sinkt der Gasdruck und Ihr Terrassenheizstrahler liefert nicht die volle Leistung.
Verwenden Sie einen Regler, der nach DIN EN 12864:2001 zertiziert ist.
HINWEIS:
Wenden Sie sich für Informationen zum richtigen Regler für Gasaschen an Ihren LPG-Händler.
Regler und Schlauch
Diese Teile sind im Lieferumfang des Terrassenheizstrahlers enthalten. Ersatzteile erhalten Sie bei Ihrem Händler oder einem zugelassenen LPG-Lieferanten. Verwenden Sie nur Schläuche und Regler mit dem oben angegebenen Druck, die für LPG zugelassen sind.
Die Haltbarkeit des Reglers beträgt normalerweise 2 Jahre. Ein Austausch des Reglers wird innerhalb von 2 Jahren nach Herstellungsdatum empfohlen.
WARNUNG:
• Wechseln Sie die Gasasche nur in gut gelüfteten Räumen.
• Der verwendete Schlauch muss den nationalen Vorgaben entsprechen.
• Die Verwendung von ungeeigneten Schläuchen oder falschen Reglern ist gefährlich.
• Vergewissern Sie sich vor dem Betrieb, dass Sie die richtigen Teile verwenden.
An der Gasasche
Der Anschluss erfolgt über einen exiblen Schlauch und den passenden Niederdruckregler. Der Niederdruckregler ist an der Gasasche zu montieren.
1. Entfernen Sie die Schutzkappe und den Gewindeschutz an der Gasasche.
2. Wählen Sie einen passenden Schraubenschlüssel und ziehen Sie die Überwurfmutter (Achtung Linksgewinde) des Niederdruckreglers an der Gasasche
handfest.
3. Wählen Sie einen passenden Schraubenschlüssel und ziehen Sie die Überwurfmutter (Achtung Linksgewinde) des Schlauches am Niederdruckregler
handfest.
Am Gerät
Spinnweben oder Insekten können das Rohr verstopfen. Stellen Sie vor dem Anschluss sicher, dass die Öffnungen frei sind.
• Wählen Sie einen passenden Schraubenschlüssel und ziehen Sie die Überwurfmutter (Achtung Linksgewinde) des Schlauches am Gasrohr handfest.
Die Schraubanschlüsse des Schlauches müssen mit dem Gerät und dem Niederdruckregler sicher verbunden sein.
Undichte Stellen nden
ACHTUNG: Prüfen Sie vor dem Gebrauch auf undichte Stellen.
• Suchen Sie undichte Stellen niemals mit offener Flamme.
• Verwenden Sie ein Lecksuch-Spray oder Seifenlauge.
Undichte Stellen lassen sich mit Seifenlauge sichtbar machen. Sie benötigen ca. 50 ml im Mischverhältnis 1:3.
1. Vergewissern Sie sich, dass alle Stellknöpfe auf 12 Uhr Position (OFF) stehen.
2. Haben Sie alle Bauteile wie zuvor beschrieben angeschlossen, drehen Sie das Gas auf.
3. Verteilen Sie das Seifenwasser auf den Schlauch und sämtliche Anschlüsse. Werden an einer Stelle Blasen geworfen, ist diese Stelle undicht und muss
vor Gebrauch repariert werden.
4. Wiederholen Sie die Prüfung nach der Reparatur.
5. Drehen Sie die Gasasche nach dem Test zu.
Sollten Sie eine undichte Stelle nden, die Sie nicht reparieren können, wenden Sie sich an einen Gasfachmann.
Terrassenheizstrahler betreiben
Aufstellort
• Der Terrassenheizstrahler ist nur für die Verwendung in Außenbereichen.
• Wird der Terrassenheizstrahler in einer Laube untergestellt, müssen mindestens 25% der umschließenden Fläche offen sein.
• Stellen Sie den Terrassenheizstrahler auf einen ebenen, stabilen Untergrund.
• Der Terrassenheizstrahler ist windempndlich und kann umkippen. Er muss mit Schrauben am Boden befestigt werden.
• Entfernen Sie brennbare Materialien im Umkreis von 3 m.
Beachten Sie die Abbildung K
• Achten Sie auf einen Freiraum von mindestens 1 m über und um das Gerät.
• Behindern Sie nicht die Wärmestrahlung. Decken Sie den Terrassenheizstrahler in keiner Weise ab.
13
Page 14

Wenn Sie Gasgeruch bemerken
1. Drehen Sie die Gaszufuhr an der Flasche zu.
2. Löschen Sie offene Flammen und benutzen Sie keine elektrischen Geräte in der Nähe.
3. Lüften Sie den Bereich.
4. Suchen Sie nach den undichten Stellen wie zuvor beschrieben wurde.
5. Sollten Sie immer noch Gasgeruch feststellen, wenden Sie sich an Ihren Händler oder Gasfachmann.
Bedienung des Terrassenheizstrahlers
Zünden
Bitte beachten Sie dazu die Abbildung L.
1. Drehen Sie die Gaszufuhr an der Gasasche ganz auf.
2. Drücken Sie den Knopf des Gasregelventils ein und drehen Sie ihn gegen den Uhrzeigersinn auf
3. Halten Sie den Gasregelknopf ca. 30 Sekunden lang gedrückt und drücken Sie währenddessen wiederholt den Zünder.
4. An der Öffnung 4 beobachten Sie, ob die Pilotamme brennt.
HINWEIS:
• Wurde die Gasasche neu angeschlossen, kann es bis zu einer Minute dauern bis das Gas am Zünder ist.
• Während des Zündvorgangs muss der Gasregelknopf ständig gedrückt bleiben, damit Gas ießt.
• Ist nach 30 Sekunden an der Öffnung 4 keine Pilotammen zu sehen, wiederholen Sie der Schritt 3.
• Wenn die Pilotamme brennt, lassen Sie den Gasregelknopf noch rund 5 weitere Minuten in der Position
5. Drehen Sie den Gasregelknopf dann in die gewünschte Heizstellung.
Abschalten
1. Drehen Sie den Gasregelknopf im den Uhrzeigersinn auf
2. Drücken Sie den Gasregelknopf ein und drehen Sie ihn auf OFF.
3. Drehen Sie die Gaszufuhr an der Gasasche zu.
.
.
.
Störungsbehebung
Tritt eine Störung auf, liegt es oft nur an einer Kleinigkeit. Bevor Sie sich an unseren Service wenden, beachten Sie bitte folgende Hinweise:
Störung Mögliche Ursache Hinweise/Abhilfe
Pilotamme zündet nicht Gashahn ist abgedreht Drehen Sie den Gashahn auf
Gasasche ist leer Erneuern Sie die Gasasche
Gasleitungen sind verstopft Kontrollieren Sie die Schläuche/Rohre
Luft im System Halten Sie den Knebel in Position
undichte Verbindungen Kontrollieren Sie die Verbindungen
der elektrische Zünder ist defekt Lassen Sie die Zündanlage umgehend durch einen Fach-
mann reparieren
Pilotamme erlischt Pilotbrenner ist verschmutzt Reinigen Sie durch die Pilotöffnung 4
Undichte/lockere Verbindungen oder Leckage Kontrollieren Sie die Schläuche/Rohre und die Verbindungen
Niedriger Druck Erneuern Sie die Gasasche
Thermoelement ist beschädigt Wenden Sie sich an einen Gasfachmann
Brenner zündet nicht Niedriger Druck Erneuern Sie die Gasasche
Gasleitungen sind verstopft Kontrollieren Sie die Schläuche/Rohre
Gashahn ist abgedreht Drehen Sie den Gashahn auf
Pilotbrenner ist verbogen oder Brenner ist nicht in richtiger
Position
Wenden Sie sich an einen Gasfachmann
länger gedrückt
Terrassenheizstrahler reinigen
WARNUNG: Heiße Oberächen
Warten Sie vor der Reinigung, bis der Terrassenheizstrahler vollständig abgekühlt ist.
WARNUNG: BRAND- UND EXPLOSIONSGEFAHR
• Entfernen Sie vor der Reinigung die Gasasche.
• Verwenden Sie keine brennbaren Reinigungsmittel.
14
Page 15

ACHTUNG:
• Benutzen Sie keine Drahtbürste oder andere scheuernde Gegenstände.
• Verwenden Sie keinen Hochdruck- oder Dampfreiniger. Diese Geräte greifen lackierte Flächen an und können empndliche Teile des Gassystems
beschädigen.
Außenächen
1. Verwenden Sie milde Reinigungsmittel sowie heißes Wasser.
2. Anschließend spülen Sie gründlich mit Wasser nach.
Weitere Reinigungsarbeiten….
Reinigungsarbeiten am Brenner oder Pilotbrenner, dem Gasregler oder dem Zünder, sind von einem Gasfachmann durchzuführen.
Wartung
Kontrollieren Sie jedes Mal, wenn Sie die Gasasche wechseln, die Schläuche und Anschlüsse. Mindestens aber einmal im Monat.
Tauschen Sie undichte Schläuche oder Anschlussstücke unverzüglich aus. Verwenden Sie nur Bauteile der gleichen Qualität und Spezikation.
Wenn Sie Teile gewechselt haben, führen Sie im Anschluss eine Lecksuche durch.
Für eine erweiterte Wartung (1 mal jährlich) und Reparaturen wenden Sie sich an einen Gasfachmann.
Terrassenheizstrahler aufbewahren
• Ist der Terrassenheizstrahler sauber und trocken können Sie ihn mit einer Decke schützen.
• Kondensat kann ein schädliches, feuchtes Klima unter der Hülle erzeugen. Bei einer längeren Standzeit führt dieses feuchte Klima zur Korrosion.
• Achten Sie bei der Wahl der Decke darauf, dass diese luftdurchlässig ist.
• Bewahren Sie den Terrassenheizstrahler in einem frostfreien und trockenen Raum auf.
• Schließen Sie immer das Ventil der Gasasche und bewahren Sie diese außerhalb der Reichweite von Kindern auf.
• Beachten Sie zur Aufbewahrung auch die Hinweise im Abschnitt „Sicherheitshinweise“.
Gasasche
Behandeln Sie die Gasasche immer mit Vorsicht!
• Wird das Gerät nicht verwendet, drehen Sie die Gasasche zu und schrauben Sie den Niederdruckregler ab.
• Verschließen Sie die Flasche und setzen Sie die Schutzkappe wieder auf.
• Gasaschen müssen draußen aufrecht stehend und für Kinder unzugänglich gelagert werden.
• Lagern Sie die Flasche nicht im Keller, da sich ausströmendes Gas am Boden sammeln kann.
• Die Gasasche darf niemals an Orten gelagert werden, an denen Temperaturen von über 50°C entstehen können.
• Lagern Sie die Gasasche nicht in der Nähe von offenem Feuer oder anderen Zündquellen.
Hinweis zur Richtlinienkonformität
Hiermit erklärt der Hersteller, dass sich das Gerät THS 3550 in Übereinstimmung mit den grundlegenden Anforderungen der europäischen Richtlinie
2009/142/EG für Gasverbrauchsgeräte bendet.
Garantie
Garantiebedingungen
1. Gegenüber Verbrauchern gewähren wir bei privater Nutzung des Geräts eine Garantie von 24 Monaten ab Kaufdatum.
Ist das Gerät zur gewerblichen Nutzung geeignet, gewähren wir beim Kauf durch Unternehmer für das Gerät eine Garantie von 12 Monaten.
Die Garantiezeit für Verbraucher reduziert sich auf 12 Monate, sofern sie ein zur gewerblichen Nutzung geeignetes Gerät – auch teilweise – gewerblich
nutzen.
2. Voraussetzung für unsere Garantieleistungen sind der Kauf des Geräts in Deutschland bei einem unserer Vertragshändler sowie die Übersendung einer
Kopie des Kaufbelegs und dieses Garantiescheins an uns.
Bendet sich das Gerät zum Zeitpunkt des Garantiefalls im Ausland, muss es auf Kosten des Käufers uns zur Erbringung der Garantieleistungen zur
Verfügung gestellt werden.
3. Mängel müssen innerhalb von 14 Tagen nach Erkennbarkeit uns gegenüber schriftlich angezeigt werden. Besteht der Garantieanspruch zu Recht, entscheiden wir, auf welche Art der Schaden/Mangel behoben werden soll, ob durch Reparatur oder durch Austausch eines gleichwertigen Geräts.
4. Garantieleistungen werden nicht für Mängel erbracht, die auf der Nichtbeachtung der Gebrauchsanweisung, unsachgemäßer Behandlung oder normaler
Abnutzung des Geräts beruhen. Garantieansprüche sind ferner ausgeschlossen für leicht zerbrechliche Teile, wie zum Beispiel Glas oder Kunststoff.
Schließlich sind Garantieansprüche ausgeschlossen, wenn nicht von uns autorisierte Stellen Arbeiten an dem Gerät vornehmen.
5. Durch Garantieleistungen wird die Garantiezeit nicht verlängert. Es besteht auch kein Anspruch auf neue Garantieleistungen. Diese Garantieerklärung
ist eine freiwillige Leistung von uns als Hersteller des Geräts. Die gesetzlichen Gewährleistungsrechte (Nacherfüllung, Rücktritt, Schadensersatz und
Minderung) werden durch diese Garantie nicht berührt.
Stand 06 2012
15
Page 16

Garantieabwicklung
24 Stunden am Tag, 7 Tage in der Woche
Sollte Ihr Gerät innerhalb der Garantiezeit einen Mangel aufweisen, steht Ihnen die schnellste und komfortabelste Möglichkeit der Reklamationsanmeldung
über unser SLI - Internet-Serviceportal zur Verfügung.
www.sli24.de
Bitte melden Sie direkt den Servicevorgang auf unserem Online Serviceportal www.sli24.de an. Sie erhalten wenige Sekunden nach Abschluss der Anmeldung ein kostenloses Versandticket per E-Mail übermittelt. Zusätzlich erhalten Sie weitere Informationen zur Abwicklung Ihrer Reklamation.
Mit Ihren persönlichen Zugangsdaten, die direkt nach Ihrer Anmeldung per E-Mail an Sie übermittelt werden, können Sie den Status Ihres Vorgangs auf
unserem Serviceportal www.sli24.de online verfolgen.
Sie brauchen das kostenlose Versandticket nur noch auf die Verpackung Ihres gut verpackten Gerätes zu kleben und das Paket bei der nächsten Annahmestelle der Deutschen Post / DHL abzugeben. Der Versand erfolgt für Sie kostenlos an unser Servicecenter bzw. Servicepartner.
So einfach kann Service sein!
1. Anmelden
2. Einpacken
3. Ab zur Post damit
Fertig, so einfach geht es!
Bitte vergessen Sie nicht, dem Gerät eine Kopie Ihres Kaufbeleges (Kassenbon, Rechnung, Lieferschein) als Garantienachweis beizulegen, da wir sonst
keine kostenlosen Garantieleistungen erbringen können.
Unser Serviceportal www.sli24.de bietet Ihnen weitere Leistungen an:
• Downloadbereich für Bedienungsanleitungen
• Downloadbereich für Firmwareupdates
• FAQ’s, die Ihnen Problemlösungen anbieten
• Kontaktformular
• Zugang zu unseren Zubehör- und Ersatzteile-Webshops
Auch nach der Garantie sind wir für Sie da! – Kostengünstige Reparaturen zum Festpreis!
Bitte nehmen Sie in keinem Fall eine unfreie Einsendung Ihres Gerätes vor. Unfreie Lieferungen werden von uns nicht angenommen. Es entstehen Ihnen
damit erhebliche Kosten.
Stand 06 2012
Clatronic International GmbH
Industriering Ost 40
D-47906 Kempen
Entsorgung
Verpackung
Die Produktverpackung besteht zu großem Teil aus wiederverwertbaren Rohstoffen.
Helfen Sie die Umwelt zu schonen! Entsorgen Sie die Werkstoffe entsprechend ihres Materials in bereitgestellten Sammelbehältern.
Terrassenheizstrahler
Entsorgen Sie den Terrassenheizstrahler am Ende seiner Nutzungszeit nicht im Hausmüll!
Erkundigen Sie sich bei Ihrer Kommune oder einem ansässigen Recycling-Unternehmen über die fachgerechte und schonende Entsorgung des Produkts.
16
Page 17

Table des matières
Notes de sécurité.................................................................................................................................................................................................................................17
Caractéristiques techniques ............................................................................................................................................................................................................... 19
Résumé ............................................................................................................................................................................................................................................... 20
Liste des pièces ................................................................................................................................................................................................................................... 21
Montage du parasol chauffant ............................................................................................................................................................................................................ 21
Branchement du gaz ........................................................................................................................................................................................................................... 27
Utilisation du parasol chauffant ........................................................................................................................................................................................................... 27
Fonctionnement du parasol chauffant ................................................................................................................................................................................................ 28
Dépannage .......................................................................................................................................................................................................................................... 28
Nettoyage du parasol chauffant .......................................................................................................................................................................................................... 28
Rangement du parasol chauffant ....................................................................................................................................................................................................... 29
Élimination ........................................................................................................................................................................................................................................... 29
Notes de sécurité
Vous avez acheté un produit sûr. Cependant, le client partage la responsabilité de la bonne installation, l’utilisation et l’entretien du parasol chauffant.
Les diverses pièces de l’équipement de sécurité vous protège des dommages et blessures. Dans ces consignes, nous avons réuni tout ce dont vous avez
besoin de savoir pour votre sécurité. Vous acquerrez les connaissances et le savoir-faire. Lisez et suivez les consignes d’utilisation avant de monter et d’utiliser
l’appareil.
Lisez particulièrement les consignes de sécurité. N’utilisez l’appareil uniquement comme décrit dans ces consignes.
Le non respect de ces consignes peut causer des explosions et des incendies !
Conservez ces consignes pour les lire ultérieurement. Lorsque vous transmettez ce produit à un tiers, veuillez joindre ces consignes.
Symboles utilisés dans ce mode d’emploi
Les consignes importantes pour votre sécurité portent une marque distinctive. Pour éviter tout accident et ne pas endommager l’appareil, n’oubliez pas de
suivre ces consignes :
AVERTISSEMENT :
Avertit contre les dangers pour la santé et indique les risques potentiels de blessure.
ATTENTION :
Indique de potentiels dangers pour l’appareil ou d’autres objets.
NOTE :
Souligne les conseils et informations donnés à l’utilisateur.
But prévu
Le parasol chauffant doit être utilisé uniquement à l’extérieur.
AVERTISSEMENT : Notes pour les enfants et personnes aux capacités réduites
Cet appareil n’est pas conçu pour être utilisé par des enfants ou des personnes aux capacités réduites. Il ne doit être utilisé que par des personnes qui
peuvent utiliser l’appareil en toute sécurité.
Risques généraux
AVERTISSEMENT :
• Le parasol chauffant a des bords coupants sur lesquels vous risquez de vous couper. Portez des gants de protection pendant le montage, l‘entretien, le
nettoyage ou le transport.
• Ne transportez jamais le parasol chauffant s‘il est encore brûlant ou chaud.
• Le parasol chauffant aura des surfaces chaudes. Risque de brûlure ! Demandez aux autres personnes de garder une distance de sécurité de 1 mètre.
• Les enfants qui sont présents doivent être surveillés de près.
• Le montage du parasol chauffant exige des connaissances techniques de base et des compétences manuelles. Adressez-vous à une personne
qualiée.
• Faites entretenir et réparer l‘appareil par un spécialiste en gaz.
• Ne modiez jamais le système de gaz ou de régulation vous-même. Risque d‘explosion et d‘incendie !
• Il est interdit de l‘utiliser sur un navire ou un véhicule.
• L‘utilisation de cet appareil dans des endroits connés est interdite et peut être dangereuse !
• Ce chauffage doit uniquement être utilisé à l‘extérieur et dans des pièces bien ventilées.
• Une pièce bien ventilée doit être ouverte sur au moins 25 % de sa supercie totale.
• La supercie totale de la pièce correspond à la somme de toutes les surfaces des murs respectifs.
• Avant utilisation, lisez le mode d‘emploi. L‘appareil doit être monté conformément aux instructions et à la réglementation locale.
• N‘entreposez pas de matières combustibles à proximité du chauffage.
• Fermez le robinet de la bouteille de gaz et/ou sur le détendeur après utilisation.
17
Page 18

Déballer l’appareil
AVERTISSEMENT :
• Pour la sécurité de vos enfants, garder hors de leur portée tous les emballages (sachets en plastique, pièces de cloisonnement, polystyrène etc.).
• Ne pas laisser de jeunes enfants jouer avec les emballages danger d’étouffement !
Brancher l’installation au gaz
AVERTISSEMENT : RISQUE D’INCENDIE ET D’EXPLOSION
• Le parasol chauffant ne doit être utilisé qu’avec un régulateur basse pression. Le régulateur de pression fourni a été correctement réglé à l’usine pour
le fonctionnement au gaz de pétrole liquéé (GPL). De plus, lisez et suivez les consignes d’utilisation et de montage séparées qui accompagnent le
régulateur de pression.
• Si besoin, le tuyau de gaz doit être remplacé en cas de dispositions nationales correspondantes.
• Assurez-vous qu’il n’y a aucune source de ammes nues (ou source identique) à proximité lorsque vous changez la bouteille de gaz.
• Si vous achetez ou louez la bouteille de gaz, laissez-vous vous conseiller.
• L’appareil doit être branché dans le sens décrit dans ces consignes.
• Assurez-vous que le tuyau de gaz n’est pas déformé ou usé.
• Après avoir monté l’installation au gaz, vériez le serrage de tous les branchements à l’aide d’un produit de détection de fuites standard ou de l’eau
savonneuse. Il est strictement interdit de tester l’étanchéité avec une amme nue !
Utilisation du parasol chauffant
AVERTISSEMENT : RISQUE D’INCENDIE ET D’EXPLOSIONS
• Ne fumez pas lorsque vous manipulez l’installation au gaz. Ne placez pas la bouteille de gaz à proximité d’une amme nue.
• Danger : Du gaz peut s’accumuler dans des pièces fermées et peut causer une asphyxie ou une explosion.
• Utilisez le parasol chauffant uniquement en extérieur.
• Remarque : Le parasol chauffant est sensible au vent. En cas de vents forts, prendre des mesures particulières an d’éviter que l’appareil ne bascule.
• Protégez le parasol chauffant de la pluie, de l’humidité, des éclaboussures d’eau, etc.
• Posez le parasol chauffant sur une surface plane, solide et résistante au feu.
• Veillez à ce que les orices de ventilation sur le compartiment de la bouteille et sur le brûleur restent dégagés.
• Protégez la bouteille de gaz des rayons directs du soleil.
• Avant d’utiliser l’appareil, vériez toujours si le tuyau et le régulateur de pression sont ssurés ou endommagés.
• N’utilisez pas le parasol chauffant si le détendeur, le tuyau ou la bouteille de gaz sont défectueux ou fuient.
• N’allumez pas la amme du gaz avec une amme nue. Pour allumer, utiliser l’allumage électrique installé dans l’appareil.
• N’allumez la veilleuse manuellement que dans des cas exceptionnels. Faites réparer ou remplacer le système d’allumage par un spécialiste immédiatement.
• An d’éviter une fuite de gaz, ouvrir le détendeur uniquement lorsque le parasol chauffant est en marche. Refermez immédiatement le détendeur à
chaque fois que le parasol chauffant est éteint.
• Lorsque vous utilisez l’appareil, n’oubliez pas de maintenir une distance de sécurité par rapport aux matériaux sensibles à la chaleur et combustibles.
La distance ne doit pas être inférieure à 1 m.
• Vériez qu’aucune partie de bâtiment ne se situe au-dessus du parasol chauffant.
• Les surfaces du parasol chauffant deviennent brûlantes pendant son fonctionnement. Mettez en garde les personnes qui se trouvent à proximité et
éloignez les enfants.
• Ne laissez sans surveillance pas le parasol chauffant en fonctionnement.
• En cas d’erreur, arrêtez le robinet de la bouteille de gaz.
• Avant de déplacer le parasol chauffant, éteignez l’appareil, fermez le détendeur de la bouteille et enlevez la bouteille de la base de la grille de protection du détendeur et du tuyau.
Entretien du parasol chauffant
AVERTISSEMENT : RISQUE D’INCENDIE ET D’EXPLOSION
• Les réparations et l’entretien de l’installation au gaz ne doivent être effectués que par des spécialistes agrées. Ne modiez jamais le parasol chauffant
et le détendeur de gaz.
• Remplacez le régulateur de pression après au moins 2 ans et le tuyau après 5 ans, même s’il n’y a pas de signes de dégâts visibles externes. Assurezvous que le régulateur de pression est homologué pour le gaz utilisé et qu’il est réglé sur la bonne pression de sortie (consulter les Caractéristiques
techniques). La longueur d’un nouveau tuyau ne doit pas dépasser 1,5 m.
• Avec le pétrole, le gaz forme un mélange explosif. N’essayez pas de dégager les robinets et boutons de contrôle bloqués avec de l’huile ou de l’huile
de dégrippage.
Gestes à adopter en cas d’incendies
• Déplacez les personnes à proximité vers un endroit sûr ! Si possible, fermez le robinet de la bouteille de gaz. Refroidissez la bouteille de gaz avec de l’eau.
Parallèlement, assurez votre sécurité ! Une inammation explosive et spontanée est possible.
• N’éteignez le gaz qui a fui ou brûlé que s’il vous est impossible d’arrêter le gaz de s’échapper. Tous les extincteurs peuvent être utilisés.
18
Page 19

Mesures de premiers soins
- Mesures après l’inhalation de gaz
• Les concentrations élevées peuvent causer un étouffement. Les symptômes peuvent inclure une perte de la mobilité et de la conscience. La victime
ne se rend pas compte qu’elle étouffe. Les faibles concentrations peuvent causer des problèmes de vertige, de mal de tête, de nausée et de coordination.
• Ramenez le patient à l’air libre Contactez un médecin ou les services d’urgence. Si le patient s’arrête de respirer, pratiquez la respiration articielle.
- Mesures à la suite de brûlures graves ou de brûlures liées à l’eau bouillante
• Il existe un risque d’hypothermie et de choc. Contactez les services d’urgence immédiatement !
• Éteignez immédiatement avec de l’eau tout vêtement en feu ou étouffer les ammes avec une couverture épaisse.
• En cas de brûlures liées à l’eau bouillante : Enlevez immédiatement les vêtements.
• En cas de brûlures : Gardez vos vêtements.
• Refroidissez avec de l’eau froide pendant au moins 15 minutes jusqu’à ce que la douleur s’atténue.
• Couvrez la zone affectée avec un pansement Métalline stérilisé (pour les brûlures). Appliquez la face revêtue de Métalline sur la peau blessée et xez
sans serrer avec un morceau de gaz ou un tissu triangulaire.
• N’utilisez pas les remèdes domestiques tels que les baumes, la poudre, les huiles, les désinfectants etc. !
- Mesures à la suite de brûlures légères ou de brûlures liées à l’eau bouillante
• En cas de brûlures liées à l’eau bouillante : Enlevez immédiatement les vêtements.
• En cas de brûlures : N’enlevez le vêtement que s’il ne colle pas.
• Refroidissez avec de l’eau froide pendant au moins 15 minutes jusqu’à ce que la douleur s’atténue.
• En cas de brûlures légères ou de brûlures liées à l’eau bouillante sans formation de cloques, laissez cicatriser à l’air libre. Ne couvrez pas avec un
sparadrap ou un pansement.
Consignes relatives au transport
AVERTISSEMENT : RISQUE D’INCENDIE ET D’EXPLOSION
• Dans la mesure du possible, ne transportez pas la bouteille de gaz dans des véhicules qui ne contiennent pas une séparation entre la zone de stockage
et le poste de conduite. Le conducteur doit connaître les dangers possibles liés au chargement et doit savoir quoi faire en cas d’accident ou d’urgence.
• Transportez la bouteille de gaz en position debout et xez-la an de l’empêcher de tomber ou de glisser.
• Assurez-vous que le robinet de la bouteille de gaz est fermé et bien étanche.
Notes sur le rangement
AVERTISSEMENT : RISQUE D’INCENDIE ET D’EXPLOSION
• Si vous n’utilisez pas l’appareil, la bouteille de gaz doit être débranchée de l’appareil.
• Gardez la bouteille de gaz hors de la portée des enfants.
• Éloignez la bouteille de gaz des gaz oxydants et d’autres matériaux susceptibles de causer un incendie.
• Le gaz liquéé qui s’échappe est plus lourd que l’air et tombe sur le sol. Ne rangez pas la bouteille de gaz à l’intérieur sous le niveau du sol (p. ex. le
sous-sol, un puits, un garage souterrain, etc.) ou dans des pièces non ventilées qui pourraient retenir le gaz qui s’échappe.
• Protégez la bouteille de gaz des rayons directs du soleil et d’autres sources de chaleur.
• Si la température est inférieure à 50°C, rangez la bouteille de gaz dans un endroit bien ventilé, à l’ombre et à l’abri des intempéries.
• Rangez la bouteille de gaz pour qu’elle soit debout et xée an qu’elle ne tombe pas.
• Les bouteilles de gaz vides contiennent toujours une quantité résiduelle de gaz liquéé. Suivez les consignes de rangement, même pour les bouteilles
de gaz vides.
Caractéristiques techniques
Conception et matériel
• Parasol chauffant mobile avec boîtier pour bouteille de gaz
• Boîtier fait en acier enduit de poudre
• Raccordement de gaz avec raccord vissé
• Émission de chaleur par un réecteur
Caractéristiques
• Réservé à un usage extérieur
• Conçu exclusivement pour un mélange gazeux GPL
• Max. : 14000 W
• Min. : 5000 W
19
Page 20

Fabricant Hongmaoxinda Electric.
Produit : Parasol chauffant
Description du modèle : THS 3550 (HMXD-A)
Catégorie de gaz : I
Type de gaz : Mélanges gazeux GPL
Pression du gaz : 50 mbar
Chaleur absorbée totale
de toutes les catégories de gaz :
Jet de gaz : 1,70 mm brûleur principal 0,18 mm veilleuse
Pays cibles : AT, DE, CZ, CH
Numéro d’identication : 0063BU7882
3B/P(50)
14 kW (870 g/h)
Résumé
1 Réecteur
2 Écran du brûleur
3 Ouverture de la veilleuse
4 Ouvertures de ventilation
5 Molette de réglage du gaz
6 Allumeur
7 Groupe du brûleur
8 Conduite verticale
9 Espace pour la bouteille de gaz
10 Tube carré
11 Compartiment de la bouteille
12 Base
20
Page 21

Liste des pièces
Article Description pc. Article Description pc.
Clé 2
12 Base 1 7 Groupe du brûleur 1
Ens. de roue 1
+ vis M8 X 16 2
+ écrou M8 2
+ rondelle M8 4 1 Réecteur constitué de pièces 3
10 Tube carré, angle de 90° 3 + vis M5 X 10 9
+ vis M8 X 16 3 + écrous borgnes M5 9
8 Conduite verticale 1 + rondelles M5 6
+ vis M6 X 30 6 + boulons d‘écartement M8 X 10 1
+ écrou M6 6 + écrous à oreilles M8 3
11 Compartiment pour la bouteille de gaz 1 + rondelles M8 6
Conduite de gaz de 880 mm avec écrou
borgne et let
Vis EDS pour xer le brûleur à la conduite
verticale M6 X 10
Montage du parasol chauffant
1
4
Pour monter le gril, vous aurez besoin d’/de : • 2 personnes
• Gants de protection
• Mettre une couverture vers le bas, au besoin
• Une clé à molette pour les parois latérales 10, 14 et 17 (inclus)
• Un tournevis (taille PZ2)
• Une pince
• Détecteur de fuite ou solution savonneuse
Retirez préalablement le lm protecteur qui est xé aux surfaces.
Pendant le montage, familiarisez-vous avec la liste des pièces et les consignes de montage illustrées :
21
Page 22

2223242526
Page 23

Page 24

Page 25

Page 26

Page 27
Branchement du gaz
Informations générales
Le parasol chauffant peut être utilisé avec des bouteilles pensant entre 5 et 15 kg. Les mélanges gazeux GPL avec 50 mbar sont permis.
Votre parasol chauffant fonctionne au mieux avec du gaz propane ou des mélanges gazeux GPL. Du butane peut être utilisé, mais la bouteille peut geler à
cause de la puissance nominale de l’appareil. La pression de gaz diminuera donc et votre parasol chauffant ne fournira pas sa pleine puissance.
Utilisez un régulateur certié conformément à la norme DIN EN 12864 :2001.
NOTE :
Pour obtenir des informations sur le bon régulateur pour les bouteilles de gaz, veuillez consulter votre fournisseur de GPL.
Régulateur et tuyau
Ces pièces sont fournies avec votre parasol chauffant. Vous pouvez vous procurer les pièces de rechange auprès de votre revendeur ou d’un fournisseur de
GPL agrée. Utilisez uniquement les tuyaux et régulateurs dont la pression indiquée ci-dessus est approuvée pour le GPL.
Normalement, un régulateur a une durée de vie de 2 ans. Il est conseillé de remplacer le régulateur dans un délai de 2 ans à partir de sa date de fabrication.
AVERTISSEMENT :
• Changez la bouteille de gaz uniquement dans une pièce bien ventilée.
• Le tuyau utilisé doit répondre aux dispositions légales en vigueur.
• L’utilisation de tuyaux inadaptés et de régulateurs incorrects est dangereuse.
• Avant le fonctionnement, veillez à utiliser les bonnes pièces.
Connecter la bouteille de gaz
Un branchement est établi via un tuyau exible et le bon régulateur de basse pression. Le régulateur de basse pression doit être xé sur la bouteille de gaz.
1. Retirez le bouchon de protection et le protecteur de letage de la bouteille de gaz.
2. Sélectionnez la bonne clé et serrez l’écrou d’accouplement (attention : letage à gauche) du régulateur de basse pression sur la bouteille de gaz à la
main.
3. Sélectionnez la bonne clé et serrez l’écrou d’accouplement (attention : letage à gauche) du tuyau sur le régulateur de basse pression à la main.
Connecter l’appareil
Les toiles d’araignée ou les insectes peuvent boucher la conduite. Avant le raccordement, vériez que les ouvertures sont dégagées.
• Choisissez une clé adaptée et serrez l’écrou borgne (let à gauche) du tuyau sur la conduite de gaz à la main.
Les connexions à vis du tuyau doivent être bien branchées à l’appareil et au régulateur de basse pression.
Repérer les zones dont l’étanchéité n’est pas assurée
ATTENTION : Avant utilisation, vériez qu’il n’y a pas de zones dont l’étanchéité n’est pas assurée.
• Ne cherchez jamais les sections dont l’étanchéité n’est pas assurée à l’aide d’une amme nue.
• Utilisez un produit de détection de fuites ou de l’eau savonneuse.
Les sections dont l’étanchéité n’est pas assurée deviennent visibles dans l’eau savonneuse. Vous aurez besoin d’environ 50 ml (rapport de dosage 1 :3).
1. Assurez-vous que tous les boutons de réglage sont sur la position 12 heures (OFF).
2. Une fois que vous avez connecté tous les composants comme décrit ci-dessus, allumez le gaz.
3. Répandez l’eau savonneuse sur le tuyau et toutes les connexions. En cas d’apparition de bulles à un endroit précis, la section présente une mauvaise
étanchéité et doit être réparée avant utilisation.
4. Répétez le test après la réparation.
5. Après le test, fermez la vanne sur la bouteille de gaz.
S’il vous est impossible de réparer une section dont l’étanchéité n’est pas assurée, conez la réparation à un technicien spécialisé en gaz.
Utilisation du parasol chauffant
Emplacement de l’installation
• Le parasol chauffant est conçu pour être utilisé uniquement à l’extérieur.
• Si le parasol chauffant est placé sous une tonnelle, alors au moins 25 % de la supercie connée doit être ouverte.
• Placez le parasol chauffant sur une surface plane et stable.
• Le parasol chauffant est sensible au vent et peut basculer. Il doit être xé au sol avec des boulons.
• Éloignez les matières combustibles d’au moins 3 m.
Voir la gure K
• Assurez-vous qu’il y a un espace d’au moins 1 m au-dessus et autour de l’appareil.
• N’obstruez pas le rayonnement de chaleur. Ne couvrez le parasol chauffant d’aucune manière que ce soit.
27
Page 28

En cas d’odeur de gaz
1. Fermez la soupape à gaz sur la bouteille.
2. Éteignez les ammes nues et n’utilisez pas d’appareils électriques à proximité.
3. Aérez la zone.
4. Repérez les zones dont l’étanchéité n’est pas assurée (comme décrit précédemment).
5. Si l’odeur de gaz persiste, contactez votre revendeur ou spécialiste en gaz.
Fonctionnement du parasol chauffant
Allumage
Voir la gure L.
1. Ouvrez entièrement l‘admission de la bouteille de gaz.
2. Appuyez sur le bouton du détendeur et ouvrez-le en le tournant dans le sens anti-horaire
3. Appuyez sur le détendeur pendant au moins 30 secondes et appuyez plusieurs fois sur l‘allumeur en même temps.
4. Surveillez l‘ouverture 4 pour voir si la veilleuse et brûle.
NOTE
• Si une nouvelle bouteille de gaz a été raccordée, le gaz peut mettre une minute à atteindre l‘allumeur.
• Le détendeur doit être maintenu enfoncé en continu pendant le processus d‘allumage pour que le gaz circule.
• Si la veilleuse n‘est pas visible à l‘ouverture 4 au bout de 30 secondes, recommencez l‘étape 3.
• Si la veilleuse brûle, laissez la molette de gaz en position
5. Ensuite, mettez la molette de régulation de gaz sur le réglage de chauffage voulu.
Arrêt de l‘appareil
1. Tournez la molette de gaz dans le sens horaire
2. Appuyez sur la molette de gaz et réglez-la sur OFF.
3. Fermez l’admission de la bouteille de gaz.
.
pendant environ 5 minutes supplémentaires.
.
Dépannage
Une défaillance est souvent due à de légers problèmes. Avant de contacter notre service à la clientèle, veuillez vérier le tableau ci-dessous :
Problèmes Origine possible Note / solution
La veilleuse ne s‘allume pas. Le robinet de gaz est fermé. Ouvrez le robinet de gaz.
La bouteille de gaz est vide. Changez la bouteille de gaz.
Les conduites de gaz sont bouchées. Inspectez les tuyaux/conduites.
Présence d‘air dans le circuit. Maintenez le bouton enfoncé en position
Fuite dans les raccords. Inspectez les raccords.
L‘allumeur électrique est défectueux. Faites réparer le système d‘allumage par un spécialiste
immédiatement.
La veilleuse s‘éteint. La veilleuse est sale. Nettoyez soigneusement l'ouverture 4 de la veilleuse.
Les raccords fuient/sont desserrés. Inspectez les tuyaux/conduites raccords.
Pression faible. Changez la bouteille de gaz.
L‘élément chauffant est endommagé. Contactez un spécialiste du gaz.
La brûleur ne s‘allume pas. Pression faible. Changez la bouteille de gaz.
Les conduites de gaz sont bouchées. Inspectez les tuyaux/conduites.
Le robinet de gaz est fermé. Ouvrez le robinet de gaz.
La veilleuse set courbée ou le brûleur est dans la mauvaise
position.
Contactez un spécialiste du gaz.
plus longtemps.
Nettoyage du parasol chauffant
AVERTISSEMENT : Surfaces brûlantes
Avant le nettoyage, attendre que le parasol chauffant ait complètement refroidi.
AVERTISSEMENT : RISQUE D‘INCENDIE ET D‘EXPLOSION
• Enlevez la bouteille de gaz avant le nettoyage.
• N‘utilisez pas de nettoyant inammable.
28
Page 29

ATTENTION :
• N'utilisez pas de brosses métalliques ou d'autres types d'ustensiles abrasifs pour le nettoyage.
• N'utilisez pas de nettoyeurs à vapeur ou sous haute pression. Ces appareils corrodent les surfaces peintes et peuvent endommager les pièces
sensibles du circuit de gaz.
Surfaces extérieures
1. Utilisez un nettoyant doux et de l’eau chaude.
2. Puis, rincez bien à l’eau.
Nettoyage supplémentaire…
Conez toute intervention sur le brûleur, la veilleuse, la régulation de gaz ou l’allumeur à un spécialiste du gaz.
Entretien
Inspectez les tuyaux et les raccords à chaque changement de bouteille de gaz, et dans tous les cas une fois par mois.
Changez immédiatement tout tuyau ou raccord qui fuit. Utilisez uniquement des composants de qualité et de caractéristiques identiques.
Après un changement de pièce, faites un essai de fuite.
Conez l’entretien annuel et les réparations à un spécialiste du gaz.
Rangement du parasol chauffant
• Si le parasol chauffant est propre et sec, vous pouvez le protéger avec une couverture.
• De la condensation pourrait causer une atmosphère humide nocive sous la couverture. En cas de longue période d’arrêt, cette atmosphère humide peut
entraîner de la corrosion.
• Choisissez une couverture perméable à l’air.
• Rangez le parasol chauffant dans une pièce sèche et à l’abri du gel.
• Fermez la soupape de la bouteille de gaz et rangez-la hors de la portée des enfants.
• Pour ce qui est du rangement, consultez également les informations dans la section intitulée “Notes de sécurité”.
Bouteille de gaz
Manipulez toujours la bouteille de gaz avec précaution !
• Si vous n’utilisez pas l’appareil, fermez la bouteille de gaz et enlevez le régulateur de basse pression.
• Fermez la bouteille et replacez le bouchon de protection.
• Les bouteilles de gaz doivent rester debout à l’extérieur et être rangées hors de la portée des enfants.
• Ne rangez pas la bouteille au sous-sol car le gaz qui fuit s’accumule sur le sol.
• Ne rangez jamais la bouteille de gaz dans un endroit où la température dépasse 50°C.
• Ne placez pas la bouteille de gaz à proximité d’une amme nue ou d’autres sources d’allumage.
Élimination
Emballage
L’emballage du produit est constitué principalement de matériaux réutilisables.
Contribuez à la protection de l’environnement ! Déposez les matériaux dans les conteneurs de recyclage prévus à cet effet.
Parasol chauffant
Ne jetez pas le parasol chauffant avec les déchets ménagers à la n de sa durée de vie !
Demandez à votre municipalité ou à une entreprise de recyclage locale quelle est la bonne manière de jeter votre produit.
Cet appareil a été testé en conformité avec toutes les directives (CE) EC en vigueur, p. ex. la directive européenne 2009/142/EC sur les appareils à gaz et a
été fabriqué conformément aux règlementations de sécurité en cours.
29
Page 30

Indice
Note di sicurezza ................................................................................................................................................................................................................................. 30
Speciche tecniche ............................................................................................................................................................................................................................. 32
Riassunto ............................................................................................................................................................................................................................................. 33
Elenco dei pezzi .................................................................................................................................................................................................................................. 34
Montaggio del riscaldamento da esterno ........................................................................................................................................................................................... 34
Collegamento gas ............................................................................................................................................................................................................................... 40
Utilizzo del riscaldamento da esterno ................................................................................................................................................................................................. 40
Funzionamento del riscaldamento da esterno ................................................................................................................................................................................... 41
Risoluzione problemi ........................................................................................................................................................................................................................... 41
Pulizia del riscaldamento da esterno .................................................................................................................................................................................................. 41
Conservazione del riscaldamento da esterno .................................................................................................................................................................................... 42
Smaltimento ......................................................................................................................................................................................................................................... 42
Note di sicurezza
Avete acquistato un prodotto sicuro. Tuttavia, il cliente condivide la responsabilità per la corretta congurazione del riscaldamento da esterno nonché per il
funzionamento e la manutenzione.
I vari pezzi dell’attrezzatura di sicurezza ti proteggono da danni e lesioni. In queste istruzioni, dobbiamo mettere insieme tutto quello che devi sapere per la
tua sicurezza. Acquisirai la conoscenza e il know-how. Leggi e segui le seguenti istruzioni di funzionamento prima di montare e mettere in funzione l’apparecchio.
In particolare, leggi le istruzioni di sicurezza. Usa l’apparecchio solo nel modo descritto in queste istruzioni.
La non conformità con le istruzioni può provocare esplosioni e incendi!
Conserva queste istruzioni per una futura consultazione. Quando passi a qualcuno quest’apparecchio, accludi queste istruzioni.
Simboli usati in queste istruzioni di funzionamento
Le istruzioni di funzionamento importanti per la tua sicurezza sono segnate in modo speciale. Per evitare incidenti e danni all’apparecchio, assicurati di seguire le seguenti istruzioni.
AVVISO:
Avvertimenti di pericoli alla salute e indica rischi potenziali di lesioni.
ATTENZIONE:
Indica pericoli potenziali per il dispositivo e altri oggetti.
NOTA:
Sottolinea consigli e informazioni.
Scopo
Il riscaldamento da esterno deve essere usato solo all’esterno.
AVVISO: Nota per bambini e persone con capacità limitate
Quest’apparecchio non è inteso per essere utilizzato da bamabini o da persone con capacità limitate. Deve essere usato solo da persone che sono in
grado di utilizzarlo in modo sicuro.
Pericoli generali
AVVISO:
• Il riscaldamento da esterno presenta bordi taglienti che rischiano di tagliare. Durante l’assemblaggio, la manutenzione, la pulizia o il trasporto, indossare guanti protettivi.
• Non trasportare mai il riscaldamento da esterno se ancora bollente o caldo.
• Il riscaldamento da esterno presenta superci caldissime. C’è pericolo di ustione! Istruire le persone vicine al ne di mantenere una distanza di 1 metro.
• I bambini presenti devono essere ben controllati.
• L’assemblaggio del riscaldamento da esterno necessita di conoscenze tecniche di base e abilità manuali. Contattare una persona qualicata.
• Far eseguire la manutenzione e la riparazione da tecnici del gas.
• Non apportare modiche al sistema del gas o di controllo da soli. C’è un rischio di incendio e esplosione!
• È proibiti l’utilizzo su navi o veicoli.
• L’uso del dispositivo in stanze chiuse può essere pericoloso ed è proibito!
• Questo riscaldamento è previsto solo per l’uso in esterno e in stanze ben ventilate.
• Una stanza ben ventilata deve essere aperta ad almeno il 25% dell’intera area della stanza.
• L’area totale dell’intera stana corrisponde alla somma di tutte le superci delle relative pareti.
• Prima di usare il dispositivo, leggere il manuale d’istruzione. Il dispositivo deve essere assemblato secondo le istruzioni e i regolamenti locali.
• Non conservare materiali combustibili vicino al riscaldamento.
• Chiudere la valvola del gas della bombola di gas e/o sul regolatore dopo l’uso.
30
Page 31

Disimballare il dispositivo
AVVISO:
• Per ragioni di sicurezza tenere qualsiasi parte dell’imballaggio (sacchetti di plastica, cartilagine, spugne ecc.) fuori dalla portata dei bambini.
• Non lasciare che i bambini giochino con le pellicole in quanto c’è pericolo di soffocamento!
Collegare il sistema a gas
AVVISO: RISCHIO DI INCENDI ED ESPLOSIONE
• Il riscaldamento da esterno può essere utilizzato con un regolatore a bassa pressione. Il regolatore di pressione incluso è stato impostato correttamente in fabbrica per il funzionamento con gas di petrolio liquido (GPL). Inoltre, leggi e segui le istruzioni d’uso e montaggio separate che accompagnano il
regolatore di pressione.
• Se necessario, il tubo del gas deve essere cambiato se ci sono requisiti nazionali corrispondenti.
• Assicurati che non ci siano fonti di amme vive (o simili) nelle vicinanze quando cambi la bombola di gas.
• Quando si compra o si noleggia la bombola di gas, lascia che il negozio ti consigli.
• L’apparecchio deve essere collegato nel modo descritto in queste istruzioni.
• Assicurati che il tubo del gas non sia chiuso o rovinato.
• Dopo aver montato il sistema a gas, controlla la tenuta di tutti i collegamenti con uno spray rilevatore di perdite standard o con acqua e sapone. E’
severamente vietato testare il sigillo con una amma viva!
Funzionamento del riscaldamento da esterno
AVVISO: RISCHIO DI INCENDI ED ESPLOSIONI
• Non fumare quando maneggi il sistema del gas. Non posizionare la bombola di gas nei pressi di una amma viva.
• Pericolo: può accumularsi gas in stanze chiuse e causare soffocamento o esplosione.
• Usare il riscaldamento da esterno solo all’esterno.
• Nota: Il riscaldamento da esterno è sensibile al vento. In caso di forte vento, applicare misure speciali per prevenire che il dispositivo cada.
• Proteggere il riscaldamento da esterno da pioggia, umidità, schizzi d’acqua, ecc.
• Posizionare il riscaldamento da esterno su una supercie piana, regolare e resistente al fuoco.
• Tenere sempre le aperture di ventilazione libere su un vano della bombola e sul bruciatore.
• Proteggi la bombola di gas dalla luce solare diretta.
• Prima di mettere in funzione l’apparecchio, controlla sempre il tubo e il regolatore di pressione per controllare il danno.
• Non utilizzare il riscaldamento da esterno se il regolatore di pressione, tubo o bombola del gas è difettosa o perde.
• Non accendere la amma a gas con una amma viva. Per accendere, usare l’accensione elettrica che è installata sull’apparecchio.
• Accendere solo la spia manuale manualmente in casi eccezionali. Far riparare il sistema di accensione o farlo sostituire da un tecnico immediatamente.
• Come misura di sicurezza contro perdite di gas inavvertite, aprire la valvola della bombola di gas solo quando il riscaldamento da esterno è in funzione.
Spegnere immediatamente la valvola della bombola ogni volta che il riscaldamento da esterno è spento.
• Mentre metti in funzione l’apparecchio, assicurati di mantenere una distanza di sicurezza dal combustibile e da materiali sensibili al calore. La distanza
deve essere meno di 1 m.
• Accertarsi che non vi siano oggetti o parti di edicio situate sopra il riscaldamento da esterno.
• Le superci del riscaldamento da esterno diventano molto calde durante il funzionamento. Avverti del pericolo le persone intorno e tieni ben lontani i
bambini.
• Non lasciare il riscaldamento da esterno incustodito durante il funzionamento.
• In caso di guasto, chiudi la valvola della bombola di gas.
• Prima di cambiare posizione spegnere il riscaldamento da esterno, la valvola della bombola di gas deve essere disattivata e la bombola di gas deve
esser rimossa dalla parte bassa del grill per la protezione del regolatore di pressione e la linea del tubo.
Manutenzione del riscaldamento da esterno
AVVISO: RISCHIO DI INCENDI ED ESPLOSIONE
• Le riparazione e la manutenzione dell’impianto a gas deve essere effettuata solo a esperti autorizzati. Non eseguire modiche sul riscaldamento da
esterno e sul regolatore di pressione.
• Sostituisci il regolatore di pressione dopo almeno 2 anni e il tubo dopo 5 anni, anche se non ci sono segni visibili di danni esterni. Assicurati che il regolatore di pressione sia approvato per il gas usato e impostato sulla corretta emissione di pressione (vedi dati tecnici). Il nuovo tubo non deve essere
lungo più di 1,5 m.
• Insieme all’olio, il gas forma un miscuglio esplosivo. Non cercare mai di liberare le valvole bloccate e controlla le manopole con l’olio o l’olio di penetrazione.
Azioni durante la lotta agli incendi
• Spesa le persone attorno in un posto sicuro! Se possibile, chiudi la valvola della bombola di gas. Raffredda la bombola di gas con l’acqua. Contemporaneamente, mettiti al sicuro! E’ possibile una riaccensione esplosiva e spontanea.
• Estinguere solo il gas che perde, brucia se non riusci a fermare la fuga di gas. Possono essere usati tutti gli estintori.
31
Page 32

Misure di primo soccorso
- Misure dopo aver inalato il gas
• Alte concentrazioni possono causare soffocamento. I sintomi possono includere la perdita di mobilità e di coscienza. La vittima non si rende conto del
soffocamento. Basse concentrazioni possono provocare capogiri, mal di testa, nausea e problemi di coordinazione.
• Portare il paziente all’aria aperta. Informare il dottore o i servizi di emergenza. Nel caso in cui il paziente smetta di respirare, si pratichi la respirazione
articiale.
- Misure in seguito a ustioni gravi o scottature
• C’è rischio di ipotermia e shock. Chiamare subito i servizi di emergenza!
• Spegnere qualsiasi indumento che brucia subito con acqua o soffocare le amme con un lenzuolo spesso.
• In caso di scottature: Rimuovi subito gli indumenti.
• In caso di ustioni: Tieni gli indumenti addosso.
• Raffredda con acqua per almeno 15 minuti no a che si allevia il dolore.
• Copri la parte interessata con un bendaggio Metalline sterile (per ustioni). Applica il lato rivestito di Metalline alla pelle lesa e ssala senza stringere
con una garza o un panno triangolare.
• Non usare rimedi casalinghi come pomate, polvere, oli, disinfettanti, ecc.!
- Misure in seguito di piccole ustioni o scottature
• In caso di scottature: Rimuovi subito gli indumenti.
• In caso di ustioni: Rimuovi gli indumenti solo se non sono attaccati.
• Raffredda con acqua per almeno 15 minuti no a che si allevia il dolore.
• In caso di piccole ustioni o scottature senza alcuna formazione di bolle, lasciare guarire con l’esposizione all’aria aperta. Non coprire con un cerotto o
una benda.
Istruzioni riguardo il trasporto
AVVISO: RISCHIO DI INCENDI ED ESPLOSIONE
• Laddove possibile, non trasportare la bombola di gas in veicoli in cui l’area di conservazione non sia separata dalla cabina del conducente. Il conducente deve essere consapevole dei possibili pericoli associati al carico e deve sapere cosa fare nel caso di un incidente o di un’emergenza.
• Trasportare la bombola di gas dritta e assicurarsi che non cada o scivoli.
• Assicurati che la valvola della bombola di gas sia chiusa e che abbia un buon sigillo.
Annotazioni sulla conservazione
AVVISO: RISCHIO DI INCENDI ED ESPLOSIONE
• Se l’apparecchio non è usato, la bombola di gas deve essere scollegata da esso.
• Conservare la bombola di gas fuori dalla portata dei bambini.
• Controlla che la bombola di gas sia lontana dai gas ossidanti e da altri materiali che favoriscono gli incendi.
• Il gas liquido che fugge è più pesante dell’aria e cade al suolo. Non conservare la bombola di gas al chiuso sotto il livello del terreno (ad es. cantina,
pozzo, garage sotterraneo ecc.) o in zone non ventilate dove la fuga di gas può raccogliersi.
• Proteggi la bombola di gas dalla luce del sole diretta e da altre fonti di calore.
• Se la temperatura è minore di 50°C, conserva la bombola di gas in un luogo ben ventilato, ombroso e protetto dalle alterazioni.
• Conserva la bombola di gas in modo che si mantenga in posizione e non possa cadere.
• Le bombole di gas vuote contengono una quantità residua di gas liquido. Segui le istruzioni di conservazione, anche per le bombole di gas vuote.
Speciche tecniche
Design e dispositivo
• Il riscaldamento da esterno trasportabile con alloggiamento per la bombola del gas
• Alloggiamento prodotto in acciaio rivestito in polvere
• Connessioni del gas con giunto a vite
• Emissione di calore tramite riettore
Speciche
• Solo per uso esterno
• Solo per miscele gassose GPL
• Max.: 14000 Watt
• Min.: 5000 Watt
32
Page 33
Produttore Hongmaoxinda Electric.
Prodotto: Riscaldamento da esterno
Descrizione del modello: THS 3550 (HMXD-A)
Categoria gas: I
Tipo di gas: Miscele gassose GPL
Pressione del gas: 50 mbar
Calore totale assorbito
tutte le categorie di gas:
Getto del gas: Bruciatore principale 1,70 mm bruciatore pilota 0,18 mm
Paesi target: AT, DE, CZ, CH
Numero identicativo: 0063BU7882
3B/P(50)
14 kW (870 g/h)
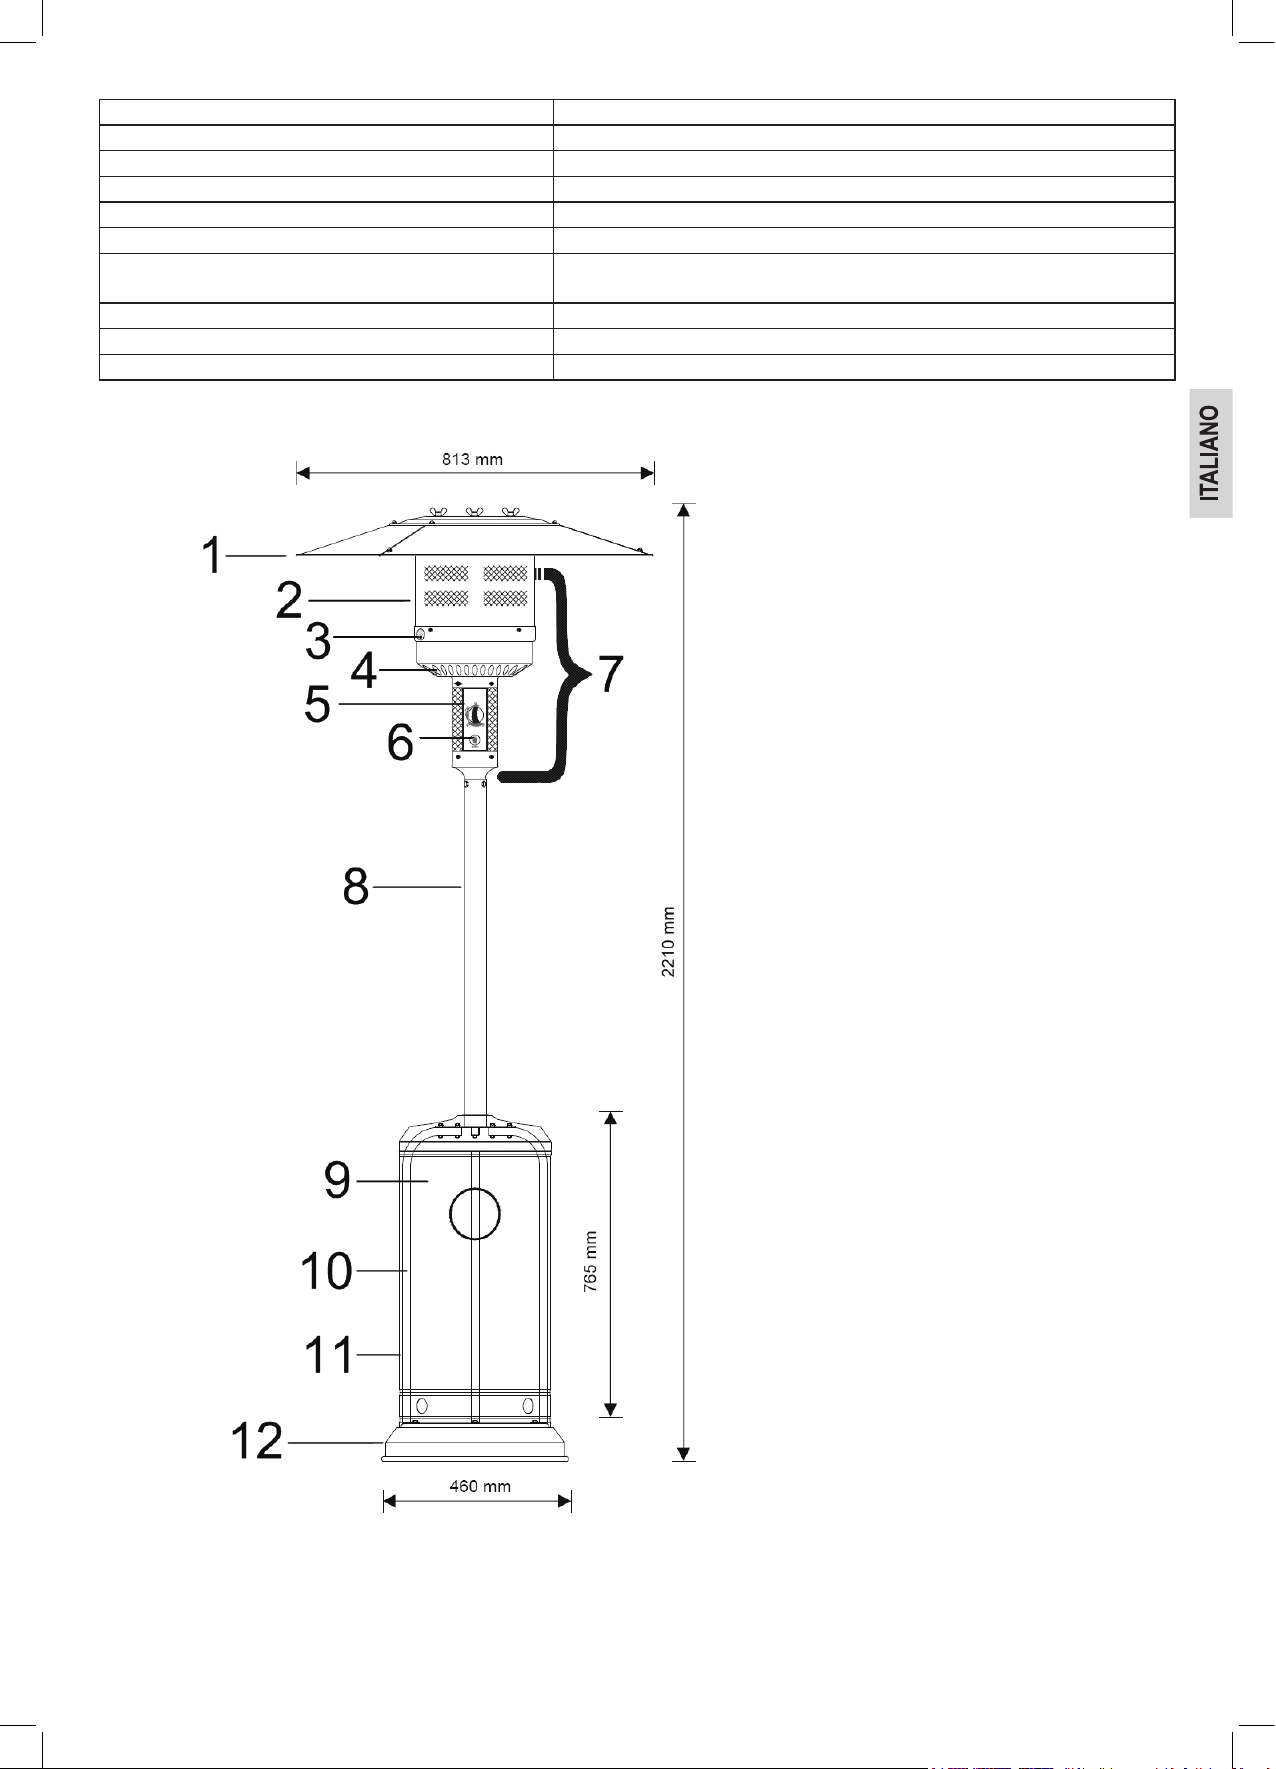
Riassunto
1 Riettore
2 Schermata bruciatore
3 Apertura spia pilota
4 Aperture di ventilazione
5 Manopola di controllo gas
6 Accensione
7 Unità del bruciatore
8 Tubazione
9 Spazio per la bombola del gas
10 Tubo quadrato
11 Vano della bombola
12 Colonna
33
Page 34
Elenco dei pezzi
Pezzo Descrizione pz. Pezzo Descrizione pz.
Chiave inglese 2
12 Colonna 1 7 Unità del bruciatore 1
Set di rotelle 1
+ vite M8 X 16 2
+ dado M8 2
+ rondella M8 4 1 Riettore composto da parti 3
10 Tubo quadrato, 90° piegato 3 + viti M5 X 10 9
+ vite M8 X 16 3 + dado del cappuccio M5 9
8 Tubazione 1 + rondelle M5 6
+ vite M6 X 30 6 + bulloni distanziatori M8 X 10 1
+ dado M6 6 + galletti M8 3
11 Vano per la bombola del gas 1 + rondelle M8 6
Tubo del gas 880 mm con dado del cap-
puccio e lettatura
Viti EDS per montare il bruciatore alla tubazione M6 X 10
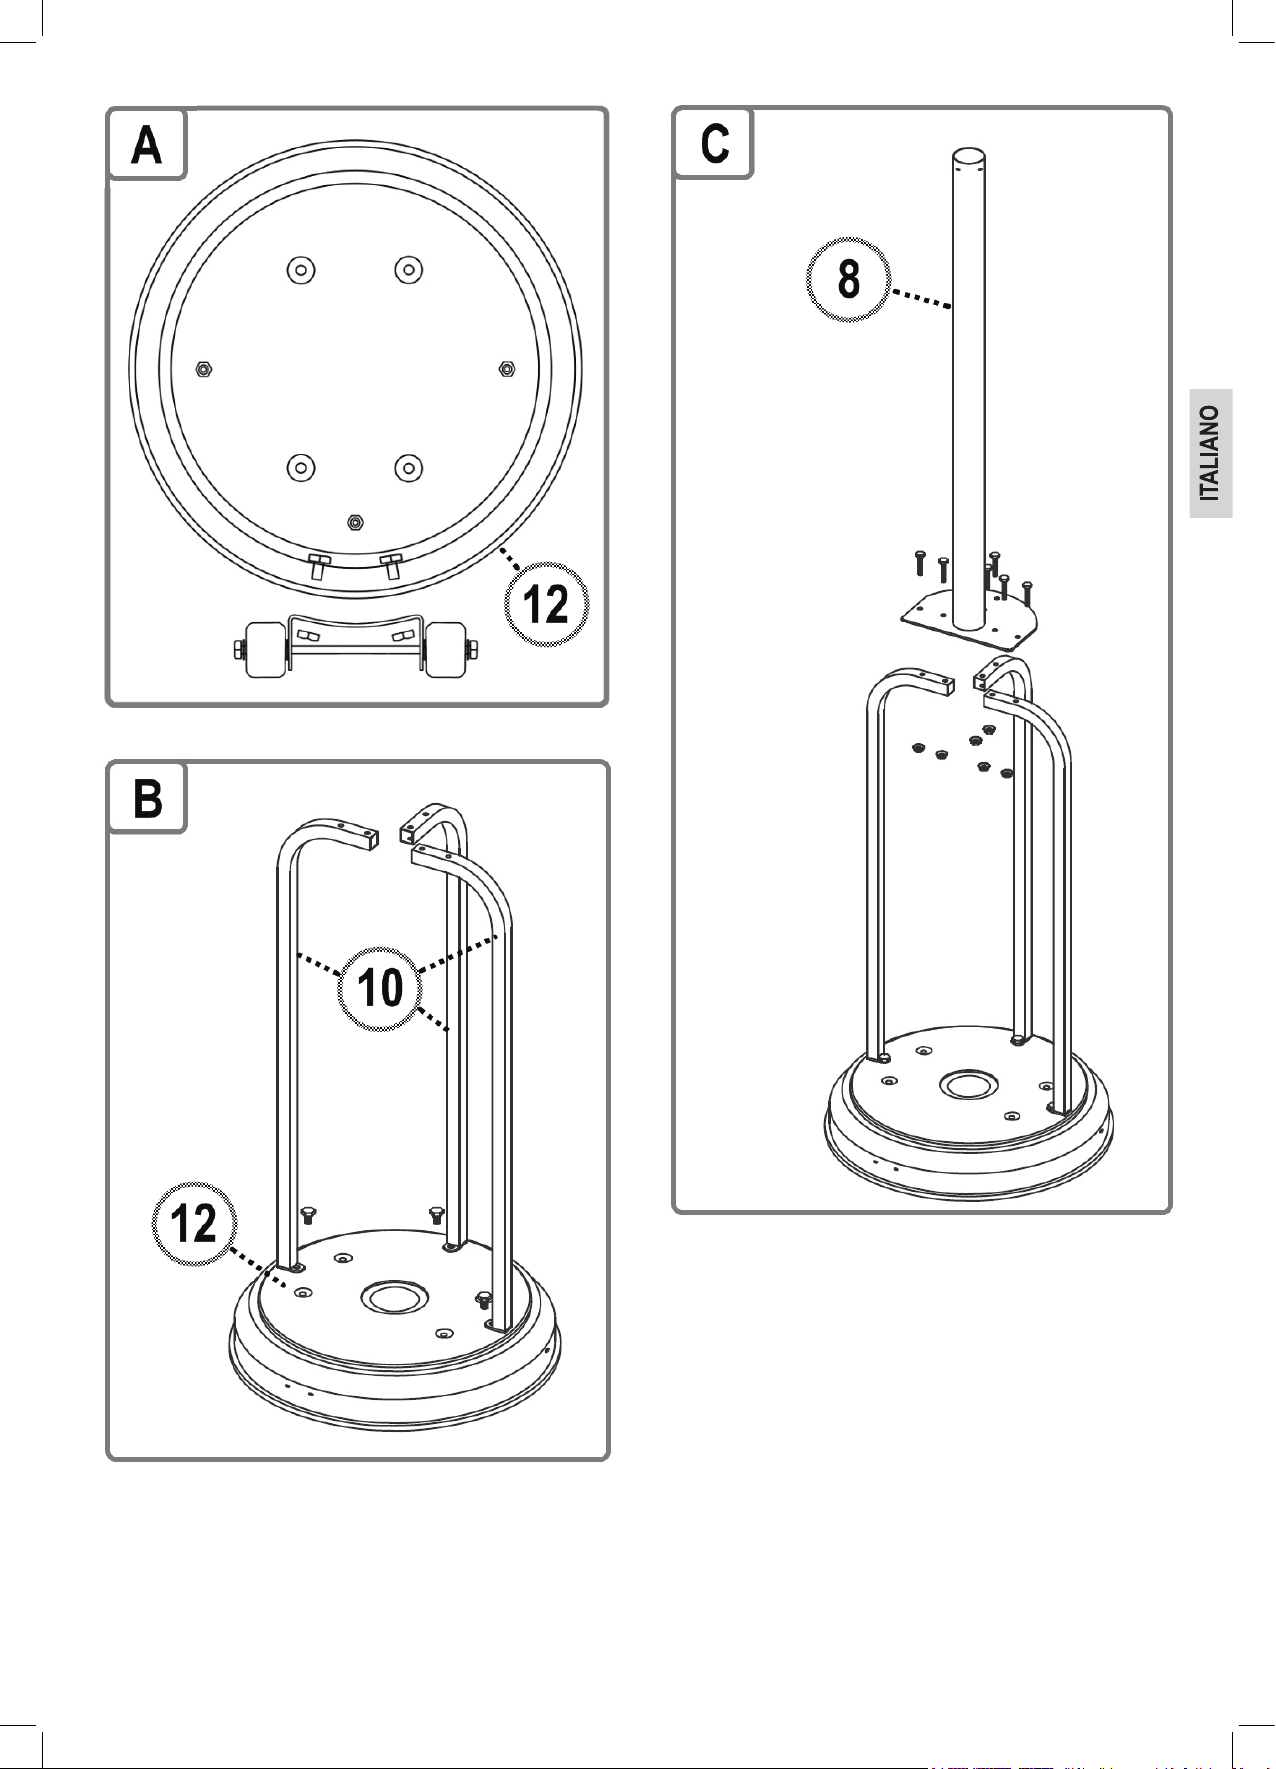
Montaggio del riscaldamento da esterno
1
4
Per montare il barbecue, dovrai avere: • 2 persone
• Guanti protettivi
• Se necessario, metti un lenzuolo sotto la base
• Chiave inglese per muri laterali 10, 14 e 17 (Incluso)
• Cacciavite (Grandezza PZ2)
• Plier
• Rilevatore di perdite o soluzione a base di sapore
Prima, rimuovere la pellicola protettiva che è attaccata alle superci.
Durante il montaggio, familiarizza con l’elenco dei componenti e le istruzioni di montaggio illustrate:
34
Page 35
3536373839
Page 36

Page 37

Page 38

Page 39

Page 40
Collegamento gas
Informazioni generali
Il riscaldamento da esterno può essere utilizzato con bombole per il gas tra 5 kg e 15 kg. Sono consentite miscele gassose GPL con 50 mbar.
Il riscaldamento da esterno funziona meglio con gas propano o miscele gassose GPL. Il butano può essere utilizzato; la bombola di gas può tuttavia congelarsi a potenza nominale del dispositivo. La pressione del gas diminuirà e il riscaldamento da esterno non fornirà alimentazione completa.
Usa un regolatore che è certicato secondo la DIN EN 12864:2001.
NOTA:
Per informazioni riguardo il regolatore corretto per le bombole di gas, consulta il tuo rivenditore GPL.
Regolatore e tubo
Queste parti sono incluse del riscaldamento da esterno. Puoi ottenere parti di ricambio o un fornitore GPL approvato. Usa solo i tubi e i regolatori summenzionati che sono approvati per il GPL.
Di solito, la durata di un regolatore è di 2 anni. Si consiglia di sostituire il regolatore entro 2 anni dalla data di produzione.
AVVISO:
• Sostituire solo la bombola del gas in ambienti ben ventilati.
• Il tubo che è usato deve corrispondere alle leggi statutarie.
• L’utilizzo di tubi non adatti e di regolatori scorretti è pericoloso.
• Prima del funzionamento, assicurati di usare le parti corrette.
Collegare la bombola di gas
Un collegamento viene stabilito attraverso un tubo essibile e il regolatore di pressione bassa corretto. il regolatore di pressione bassa corretto deve essere
adattato alla bombola di gas.
1. Rimuovi il tappo protettivo e il lo protettore sulla bombola di gas.
2. Seleziona un ramo adatto e avvita il dado di accoppiamento (attenzione: lo sinistro) del regolatore della bombola di gas.
3. Seleziona un ramo adatto e avvita il dado di accoppiamento (attenzione: lo sinistro) del regolatore della pressione bassa.
Collegare l’apparecchio
Ragnatele e insetti potrebbe intasare il tubo. Assicurarsi prima della connessione che le aperture siano libere.
• Selezionare una chiave idonea e stringere il dado del cappuccio (nota: lettatura a sinistra) del tubo alla tubatura del gas manualmente.
I collegamenti della vite del tubo devono essere collegati in sicurezza all’apparecchio e al regolatore di bassa pressione.
Trovare le zone sigillate in modo sbagliato
ATTENZIONE: Prima dell'uso, controlla per assicurarti che non ci siano zone con un sigillo sbagliato.
• Non guardare mai le selezioni con un sigillo sbagliato usando una amma viva.
• Usa uno spray di rilevamento della perdita o acqua e sapone.
Le sezioni con un sigillo sbagliato diventano presto visibili in acqua e sapone. Avrai bisogno approx. di 50 ml (rapporto mix 1:3)
1. Assicurati che tutte le manopole di regolazione siano in posizione ore 12 (OFF).
2. Una volta collegato tutti i componenti sopradescritti, accendi il gas.
3. Spalma l’acqua con il sapone sul tubo e su tutte le connessioni. Se compaiono delle bolle in un punto particolare, la sezione ha un sigillo sbagliato e deve
essere riparata prima dell’uso.
4. Ripeti il test dopo la riparazione.
5. Dopo il test, chiudi la valvola della bombola di gas.
Se trovi una sezione con un sigillo sbagliato che non riesci a riparare, riferisci il problema a un tecnico del gas.
Utilizzo del riscaldamento da esterno
Sito di installazione
• Il riscaldamento da esterno è destinato a solo uso in ambienti esterni.
• Se il riscaldamento da esterno è installato sotto un pergolato, allora almeno il 25% dell’area chiusa deve essere aperta.
• Posizionare il riscaldamento da esterno su una supercie regolare e stabile.
• Il riscaldamento da esterno è sensibile al vento e può cadere. Deve essere ssato al pavimento con bulloni.
• Togliere i materiali combustibili entro un raggio di 3 m.
Far riferimento alla Fig. K
• Accertarsi di mantenere uno spazio libero sufciente di almeno 1 m al di sopra e intorno al dispositivo.
• Non ostruire la radiazione del calore. Non coprire il riscaldamento da esterno in nessun modo.
40
Page 41
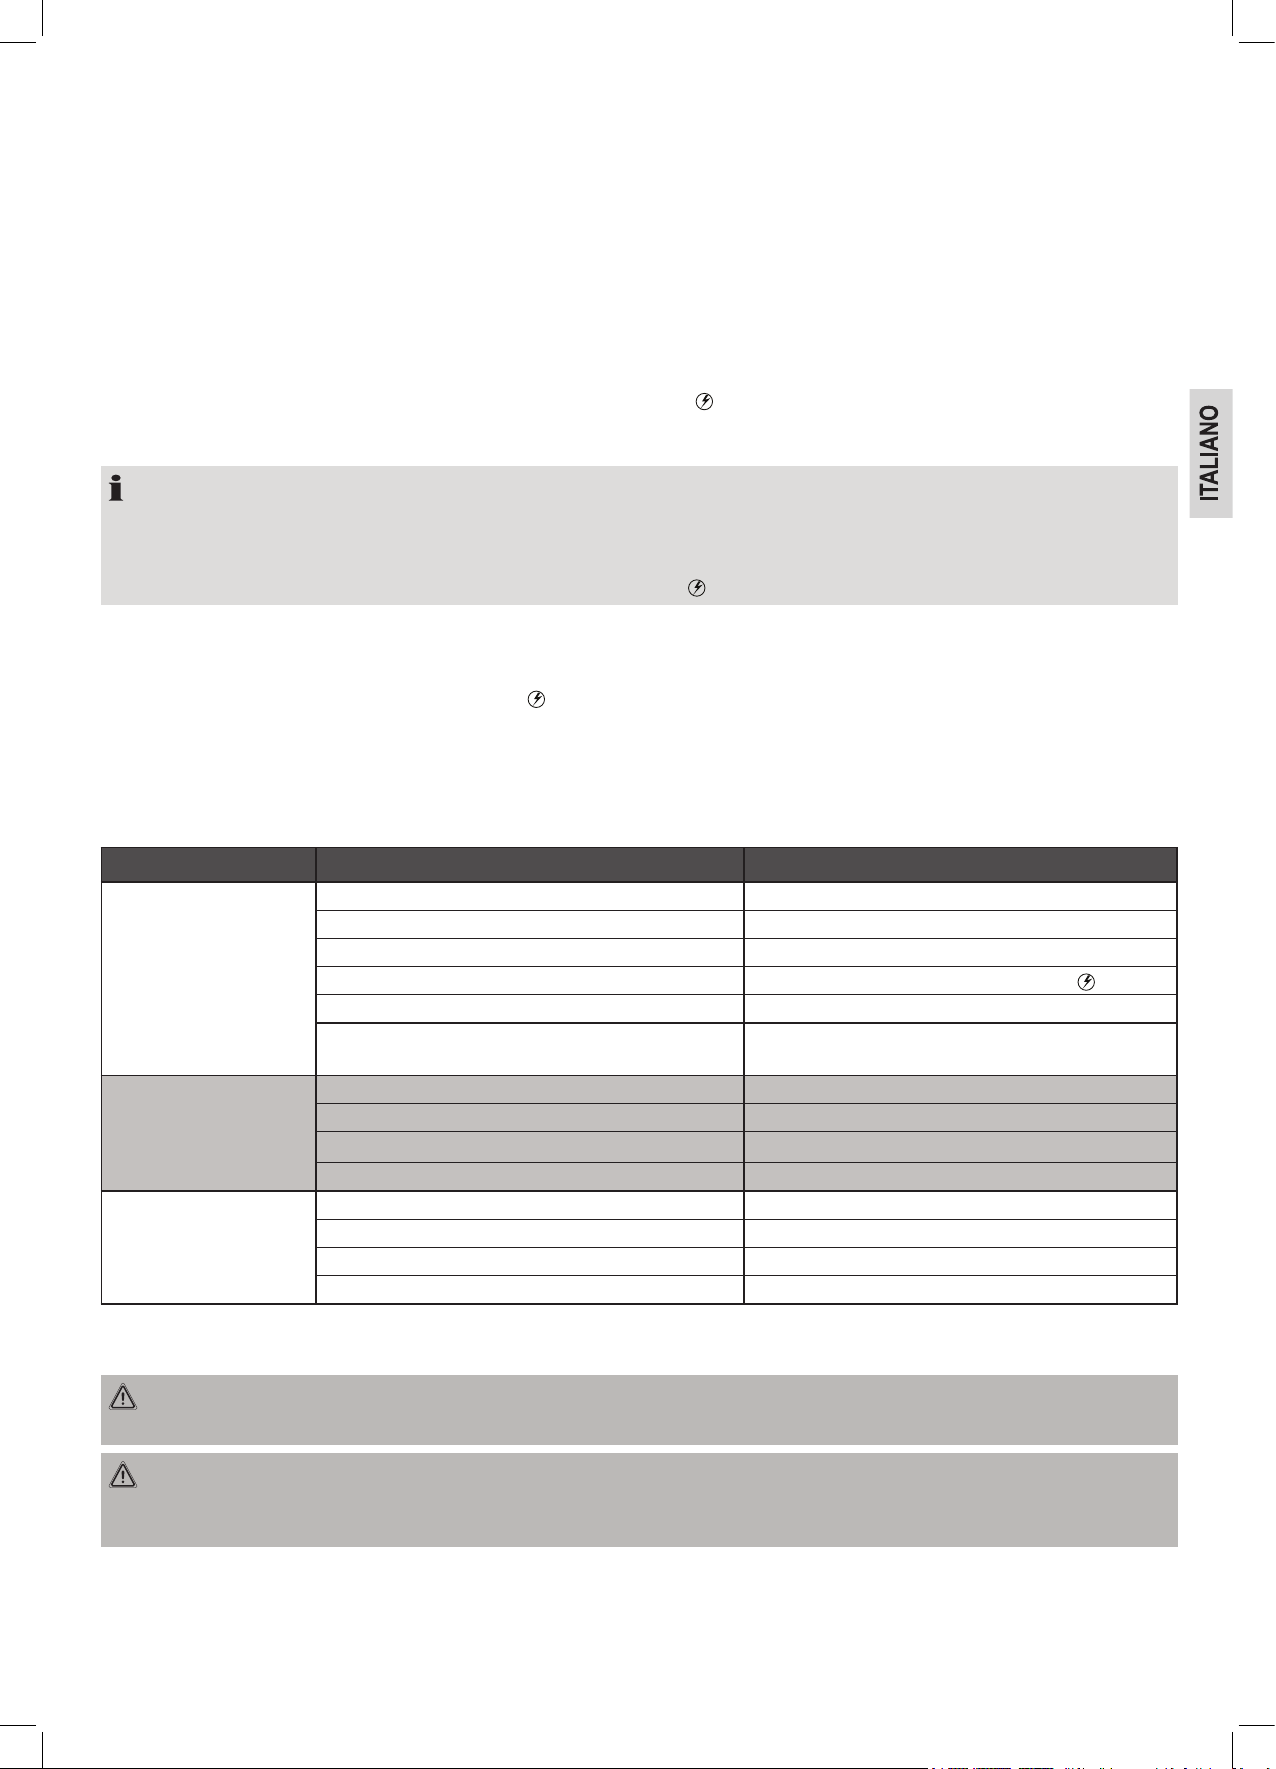
Se noti puzza di gas
1. Chiudi la valvola del gas sulla bombola.
2. Spegni le amme vive e non usare dispositivi elettrici in prossimità.
3. Ventilare l’area.
4. Cerca aree con un sigillo sbagliato (come descritto in precedenza).
5. Se senti ancora puzza di gas, rivolgiti al tuo rivenditore o professionista del gas.
Funzionamento del riscaldamento da esterno
Accensione
Far riferimento alla Fig. L.
1. Aprire completamente l‘alimentazione del gas sulla bombola del gas.
2. Premere il tasto della valvola di controllo gas e aprirlo girandolo in senso anti orario
3. Premere la valvola di controllo gas per circa 30 secondi e premere ripetutamente l‘accensione contemporaneamente.
4. Guardare l‘apertura 4 per vedere se la spia luminosa è accesa.
NOTA
• Se viene collegata una nuova bombola del gas, può impiegare un minuto nché il gas non raggiunge l‘accensione.
• La manopola di controllo gas deve essere pressata di continuo durante il processo di accensione in modo da far deuire il gas.
• Se la amma pilota è visibile all‘apertura 4 dopo 30 secondi, ripetere il passaggio 3.
• Se la amma pilota brucia, la sciare la manopola di controllo del gas in posizione
5. Poi girare la manopola di controllo gas all‘impostazione di calore desiderata.
Spegnimento
1. Aprire la manopola di controllo gas girando in senso orario
2. Premere la manopola di controllo gas e girarlo su OFF.
3. Chiudere l’alimentazione del gas sulla bombola del gas.
.
.
per altri 5 minuti.
Risoluzione problemi
I malfunzionamenti sono spesso causati da problemi lievi. Prima di contattare il seervizio assistenza, si prega di vericare la seguente tabella:
Problema Possibile causa Note / soluzione
La amma pilota non si
accende
La amma pilota si spegne Il bruciatore pilota è sporco Pulirlo tramite l'apertura pilota 4
Il bruciatore non si accende Bassa pressione Sostituire la bombola del gas
Il cappuccio del gas è disattivo Aprire il cappuccio del gas
La bombola del gas è vuota Sostituire la bombola del gas
Le linee del gas sono bloccate Controllare le tubature
Aria nel sistema Tenere la manopola premuto di più in posizione
Connessioni che perdono Controllare le connessioni
L‘accensione elettrica è difettosa Far riparare il sistema di accensione da un tecnico immedia-
tamente
Connessioni che perdono/allentate o perdita Controllare le tubature e le connessioni
Bassa pressione Sostituire la bombola del gas
L‘elemento termico è danneggiato Contattare un tecnico del gas
Le linee del gas sono bloccate Controllare le tubature
Il cappuccio del gas è disattivo Aprire il cappuccio del gas
Il bruciatore pilota o bruciatore non è in posizione corretta Contattare un tecnico del gas
Pulizia del riscaldamento da esterno
AVVISO: Superci bollenti
Pima di pulire attendere nché il riscaldamento da esterno non si è completamente raffreddato.
AVVISO: RISCHIO DI INCENDIO E ESPLOSIONE
• Togliere la bombola del gas prima di pulire.
• Non utilizzare prodotti di pulizia inammabili.
41
Page 42

ATTENZIONE:
• Non utilizzare spazzole d’acciaio o altri utensili abrasive per effettuare la pulizia.
• Non usare alcun detersivo ad alta pressione o a vapore. Questi dispositivi corrodono le superci verniciate e possono danneggiare le parti sensibili del
sistema di gas.
Superci esterne
1. Usare detersivi delicati e acqua calda.
2. Dopo aver fatto questo, sciacqua attentamente con acqua.
Ulteriore pulizia...
La pulizia del bruciatore e del bruciatore pilota, del controllo gas e dell’accensione deve essere eseguita da un tecnico.
Manutenzione
Controllare il tubo e le connessioni ogni volta che si sostituisce la bombola del gas, ma almeno una volta al mese.
Sostituire i tubi e le connessioni immediatamente. Usare solo componenti della stessa qualità e speciche tecniche.
Dopo aver sostituito le parti, eseguire un test per vedere se ci sono perdite.
Contattare un tecnico del gas per manutenzione (una volta l’anno) e riparazioni.
Conservazione del riscaldamento da esterno
• Se il riscaldamento da esterno è pulito e asciutto, proteggerlo con una coperta.
• Può formarsi condensa in un’atmosfera umida sotto al coperchio. In caso di inattività prolungata, questa atmosfera umida può determinare corrosione.
• Quando si sceglie la coperta, accertarsi che sia traspirante.
• Conserva il riscaldamento da esterno in una stanza asciutta, senza ghiaccio.
• Chiudi la valvola della bombola di gas e conservala fuori dalla portata dei bambini.
• Per quanto riguarda la conservazione, fai riferimento alle informazioni nella sezione intitolata “Note di sicurezza”.
Bombola di gas
Maneggia sempre la bombola di gas con cura!
• Se l’apparecchio non è in uso, chiudi la bombola e rimuovi il regolatore di bassa pressione.
• Chiudi la bombola di gas e sostituisci il tappo protettivo.
• Le bombole di gas devono stare dritte all’aperto e devono stare fuori dalla portata dei bambini.
• Non conservare la bombola in una cantina, poiché la perdita di gas può raccogliersi sul pavimento.
• Non conservare mai la bombola di gas in posti dove la temperatura può superare i 50°C.
• Non posizionare la bombola di gas nei pressi di una amma viva o di altre fonti di accensione.
Smaltimento
Imballaggio
L’imballaggio consiste per lo più di materiali riutilizzabili.
Aiuta a proteggere l’ambiente! Smaltisci i materiali nei principali contenitori per il riciclaggio forniti.
Riscaldamento da esterno
Non smaltire il riscaldamento da esterno con riuti domestici alla ne della sua durata!
Chiedi all’autorità locale o a un’azienda di riciclaggio locale il modo corretto di smaltire il tuo prodotto.
Quest’apparecchio è stato testato in conformità con tutte le rilevanti Direttive CE 2009/142/CE relative agli apparecchi a gas ed è stato costruito in conformità
con le leggi di sicurezza vigenti.
42
Page 43

Table of contents
Safety notes ......................................................................................................................................................................................................................................... 43
Technical specications ....................................................................................................................................................................................................................... 45
Summary ............................................................................................................................................................................................................................................. 46
List of pieces ........................................................................................................................................................................................................................................ 47
Assembling the patio heater ...............................................................................................................................................................................................................47
Gas connection ................................................................................................................................................................................................................................... 53
Using the patio heater ......................................................................................................................................................................................................................... 53
Operating the patio heater ..................................................................................................................................................................................................................54
Troubleshooting ................................................................................................................................................................................................................................... 54
Cleaning the patio heater .................................................................................................................................................................................................................... 54
Storing the patio heater ....................................................................................................................................................................................................................... 55
Disposal ............................................................................................................................................................................................................................................... 55
Safety notes
You have bought a safe product. However, the customer shares responsibility for the proper set up of the patio heater, as well as for its operation and maintenance.
Various pieces of safety equipment protect you from damage and injuries. In these instructions, we have put together everything that you need to know for
your safety. You will acquire knowledge and know-how. Read and follow the operating instructions before assembling and putting the appliance into use.
In particular, read the safety instructions. Only use the appliance as described in these instructions.
Non-compliance with the instructions may result in explosions and res!
Keep these instructions safe for reading later on. When passing this appliance on, please enclose these instructions.
Symbols used in these operating instructions
Important instructions for your safety are specially marked. In order to avoid accidents and damage to the appliance, make sure you follow these instructions:
WARNING:
Warns of dangers for your health and indicates potential risks of injury.
CAUTION:
Indicates potential dangers for the device or other objects.
NOTE:
Highlights tips and information for you.
Intended purpose
The patio heater should only be used outdoors.
WARNING: Note for children and persons with limited capacities
This appliance is not intended for use by children or persons with limited capacities. It should only be used by persons who are in a position to use the
appliance safely.
General hazards
WARNING:
• The patio heater has sharp edges which you could cut yourself on. When assembling, servicing, cleaning or transporting, wear protective gloves.
• Never transport the patio heater if it is still burning or is hot.
• The patio heater will have hot surfaces. There is a risk of burning! Instruct people nearby to keep a safe distance of 1 meter.
• Children that are present must be closely supervised.
• The assembly of the patio heater requires basic technical knowledge and manual skills. Seek help from a qualied person.
• Have the maintenance and repair performed by gas specialists.
• Never perform changes to the gas or control system by yourself. There is a risk of explosion and re!
• The operation on ships or vehicles is prohibited.
• The use of this appliance in closed rooms can be dangerous and is prohibited!
• This heater is only intended for use outdoors and in well-ventilated rooms.
• A well-ventilated room must be opened to at least 25 % of the entire area of the room.
• The total area of the entire room corresponds to the sum of all the surfaces of the respective walls.
• Prior to using this appliance, please read the instruction manual. The appliance must be assembled in accordance with the instructions and local regulations.
• Do not store combustible materials near the heater.
• Close the gas valve on the gas cylinder and/or on the regulator after use.
43
Page 44

Unpacking the device
WARNING:
• For the safety of your children, keep any packing parts (plastic bags, cartilage, Styrofoam etc.) out of their reach.
• Don’t let small children play with foils for danger of suffocation!
Connecting the gas system
WARNING: RISK OF FIRE AND EXPLOSION
• The patio heater may only be operated with a low pressure regulator. The enclosed pressure regulator has been correctly set in the factory for operation
with liquid petroleum gas (LPG). In addition, read and follow the separate assembly and usage instructions which accompany the pressure regulator.
• If necessary, the gas hose has to be exchanged if there are corresponding national requirements.
• Make sure that there are no sources of naked ames (or similar) in the vicinity when you change the gas cylinder.
• When buying or renting the gas cylinder, let the store advise you.
• The appliance must be connected in the way that is described in these instructions.
• Make sure that the gas hose is not buckled or worn.
• After assembling the gas system, check all of the connections for tightness with a standard leak detection spray or soapy water. It is strictly prohibited to
test the seal with a naked ame!
Operating the patio heater
WARNING: RISK OF FIRE AND EXPLOSIONS
• Do not smoke when handling the gas system. Do not place the gas cylinder in the vicinity of a naked ame.
• Danger: Gas may accumulate in enclosed rooms and may result in suffocation or explosion.
• Only use the patio heater outdoors.
• Please note: The patio heater is sensitive to wind. In case of high winds, special measures must be taken to prevent the appliance from tipping over.
• Protect the patio heater from rain, moisture, splashing water, etc.
• Set the patio heater onto an even, sturdy, and re-resistant surface.
• Always keep the ventilation openings clear on the cylinder compartment and on the burner.
• Protect the gas cylinder from direct sunlight.
• Before operating the appliance, always check the hose and the pressure regulator for cracks and damage.
• Do not operate the patio heater if the pressure regulator, hose, or gas cylinder is defective or is leaking.
• Do not ignite the gas ame with a naked ame. To ignite, use the electrical ignition that is installed in the appliance.
• Only ignite the pilot light manually in exceptional cases. Have the ignition system repaired or replaced by a specialist immediately.
• As a safeguard against inadvertently leaking gas, the cylinder valve on the gas cylinder should only be opened, when the patio heater is in operation.
Immediately turn off the cylinder valve again each time the patio heater is turned off.
• Whilst operating the appliance, make sure that you maintain a safe distance from combustible and heat sensitive materials. The distance should not be
less than 1 m.
• Ensure that no objects or parts of buildings are located above the patio heater.
• The surfaces of the patio heater get very hot during operation. Warn people who are standing around and keep well away from children.
• Do not leave the patio heater unattended during operation.
• In the case of a fault, shut the valve of the gas cylinder.
• Prior to changing the location, the patio heater must always be turned off, the valve of the gas cylinder must be turned off, and the gas cylinder must be
removed from the bottom part of the grill for the protec-tion of the pressure regulator and the hose line.
Maintaining the patio space heater
WARNING: RISK OF FIRE AND EXPLOSION
• Repairs and servicing of the gas system should only be carried out by authorised experts. Do not perform any changes on the patio heater and on the
pressure regulator.
• Replace the pressure regulator after at least 2 years and the hose after 5 years, even if there are no visible external signs of damage. Make sure that
the pressure regulator is approved for the gas that is used and is set to the correct output pressure (see Technical data). A new hose should not be
longer than 1.5 m.
• Together with oil, gas forms an explosive mixture. Never attempt to free stiff valves and control knobs with oil or penetrating oil.
Action when ghting res
• Move persons who are standing around to a safe place! If possible, close the valve of the gas cylinder. Cool the gas cylinder with water. At the same time,
ensure your own safety! Spontaneous and explosive re-ignition is possible.
• Only extinguish leaking, burning gas if you cannot stop gas from escaping. All extinguishers can be used.
44
Page 45

First aid measures
- Measures after inhaling gas
• High concentrations can cause suffocation. Symptoms can include loss of mobility and consciousness. The victim does not realise the suffocation are
suffocating. Low concentrations can result in dizziness, headaches, nausea and coordination problems.
• Bring the patient into the open air. Inform a doctor or the emergency services. In the event that the patient stops breathed, perform articial respiration.
- Measures following major burns or scalding
• There is a risk of hypothermia and shock. Call the emergency services straight away!
• Extinguish any burning clothing with water straight away or smother the ames with a thick blanket.
• In the case of scalding: Remove clothing straight away.
• In the case of burns: Keep clothing on the body.
• Cool with cold water for at least 15 minutes until the pain eases.
• Cover the affected area with a sterile Metalline bandage (for burns). Apply the side coated with Metalline to the wounded skin and loosely x with a
gauze bandage or a triangular cloth.
• Do not use household remedies such as ointments, powder, oils, disinfectants etc.!
- Measures following minor burns or scalding
• In the case of scalding: Remove clothing straight away.
• In the case of burns: Only remove clothing if it is not sticking.
• Cool with cold water for at least 15 minutes until the pain eases.
• In the case of small burns or scalding without any formation of a blister, allow to heal through exposure to the air. Do not cover with a plaster or bandage.
Instructions concerning transportation
WARNING: RISK OF FIRE AND EXPLOSION
• Where possible, do not transport the gas cylinder in vehicles where the storage area is not separated from the driver’s cab. The driver must be aware of
the possible dangers associated with the load and he must know what to do in the event of an accident or emergency.
• Transport the gas cylinder standing upright and secure the gas cylinder from falling over or sliding.
• Make sure that the valve of the gas cylinder is closed and has a good seal.
Storage notes
WARNING: RISK OF FIRE AND EXPLOSION
• If the appliance is not being used, the gas cylinder must be disconnected from the appliance.
• Keep the gas cylinder out of the reach of children.
• Keep the gas cylinder away from oxidising gases and other materials that help res.
• The liquid gas that escapes is heavier than air and it sinks to the ground. Do not store the gas cylinder indoors under ground level (e.g. basement, shaft,
underground garage etc.) or in non-ventilated areas where escaping gas could collect.
• Protect the gas cylinder from direct solar radiation and other sources of heat.
• If the temperature is less than 50°C, store the gas cylinder in a place that is well-ventilated, shady and protected against weathering.
• Store the gas cylinder so that it is standing and secured from falling over.
• Empty gas cylinders always contain a residual quantity of liquid gas. Follow the storage instructions, even for empty gas cylinders.
Technical specications
Design and equipment
• Transportable patio heater with housing for the gas cylinder
• Housing made of powder-coated steel
• Gas connections with screw joint
• Heat emission through reector
Specications
• Exclusively for the use outdoors
• Exclusively for LPG gaseous mixture
• Max.: 14000 Watt
• Min.: 5000 Watt
45
Page 46

Manufacturer Hongmaoxinda Electric.
Product: Patio heater
Model description: THS 3550 (HMXD-A)
Gas category: I
Gas type: LPG gaseous mixtures
Gas pressure: 50 mbar
Total absorbed heat
all categories of gas:
Gas jet: 1,70 mm main burner 0,18 mm pilot burner
Target countries: AT, DE, CZ, CH
Identication number: 0063BU7882
3B/P(50)
14 kW (870 g/h)
Summary
1 Reector
2 Burner screen
3 Pilot light opening
4 Ventilation openings
5 Gas control knob
6 Igniter
7 Burner unit
8 Standpipe
9 Space for the gas cylinder
10 Square tube
11 Cylinder compartment
12 Pedestal
46
Page 47

List of pieces
Item Description pc. Item Description pc.
Wrench 2
12 Pedestal 1 7 Burner unit 1
Wheel set 1 Gas pipe 880 mm with cap nut and thread 1
+ screw M8 X 16 2
+ nut M8 2
+ washer M8 4 1 Reector consisting of parts 3
10 Square tube, 90° bent 3 + screws M5 X 10 9
+ screw M8 X 16 3 + cap nuts M5 9
8 Standpipe 1 + washers M5 6
+ screw M6 X 30 6 + distance bolts M8 X 10 1
+ nut M6 6 + wing nuts M8 3
11 Compartment for the gas cylinder 1 + washers M8 6
EDS screws for attaching the burner to the
standpipe M6 X 10
Assembling the patio heater
To assemble the barbecue, you will need: • 2 persons
• Protective gloves
• If necessary, put a blanket downbase
• Screw wrench for side walls 10, 14 and 17 (included)
• Screwdriver (Size PZ2)
• Pliers
• Leak detector or soap solution
4
Beforehand, remove the protective lm that is attached to the surfaces.
When assembling, familiarise yourself with the list of parts and the illustrated assembly instructions:
47
Page 48
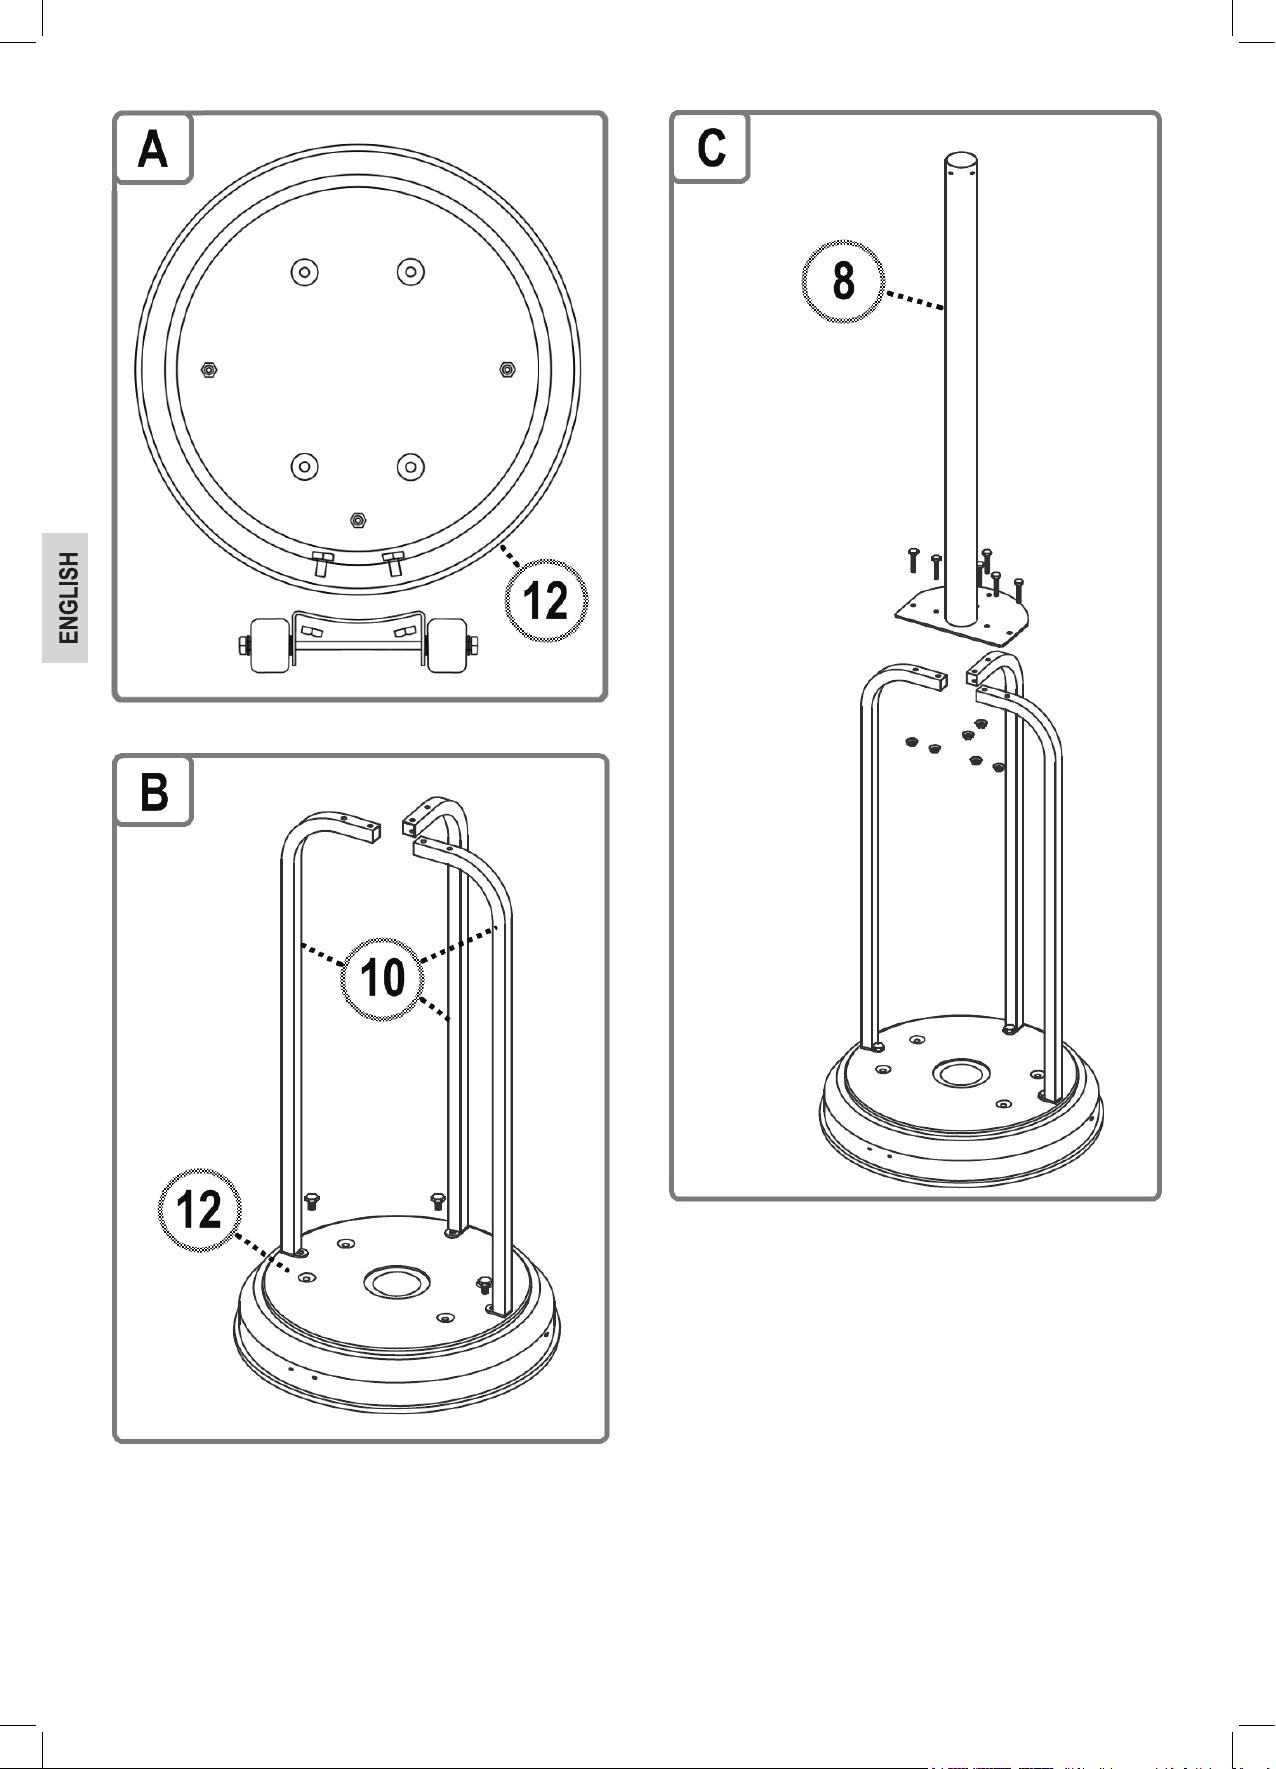
4849505152
Page 49

Page 50

Page 51

Page 52
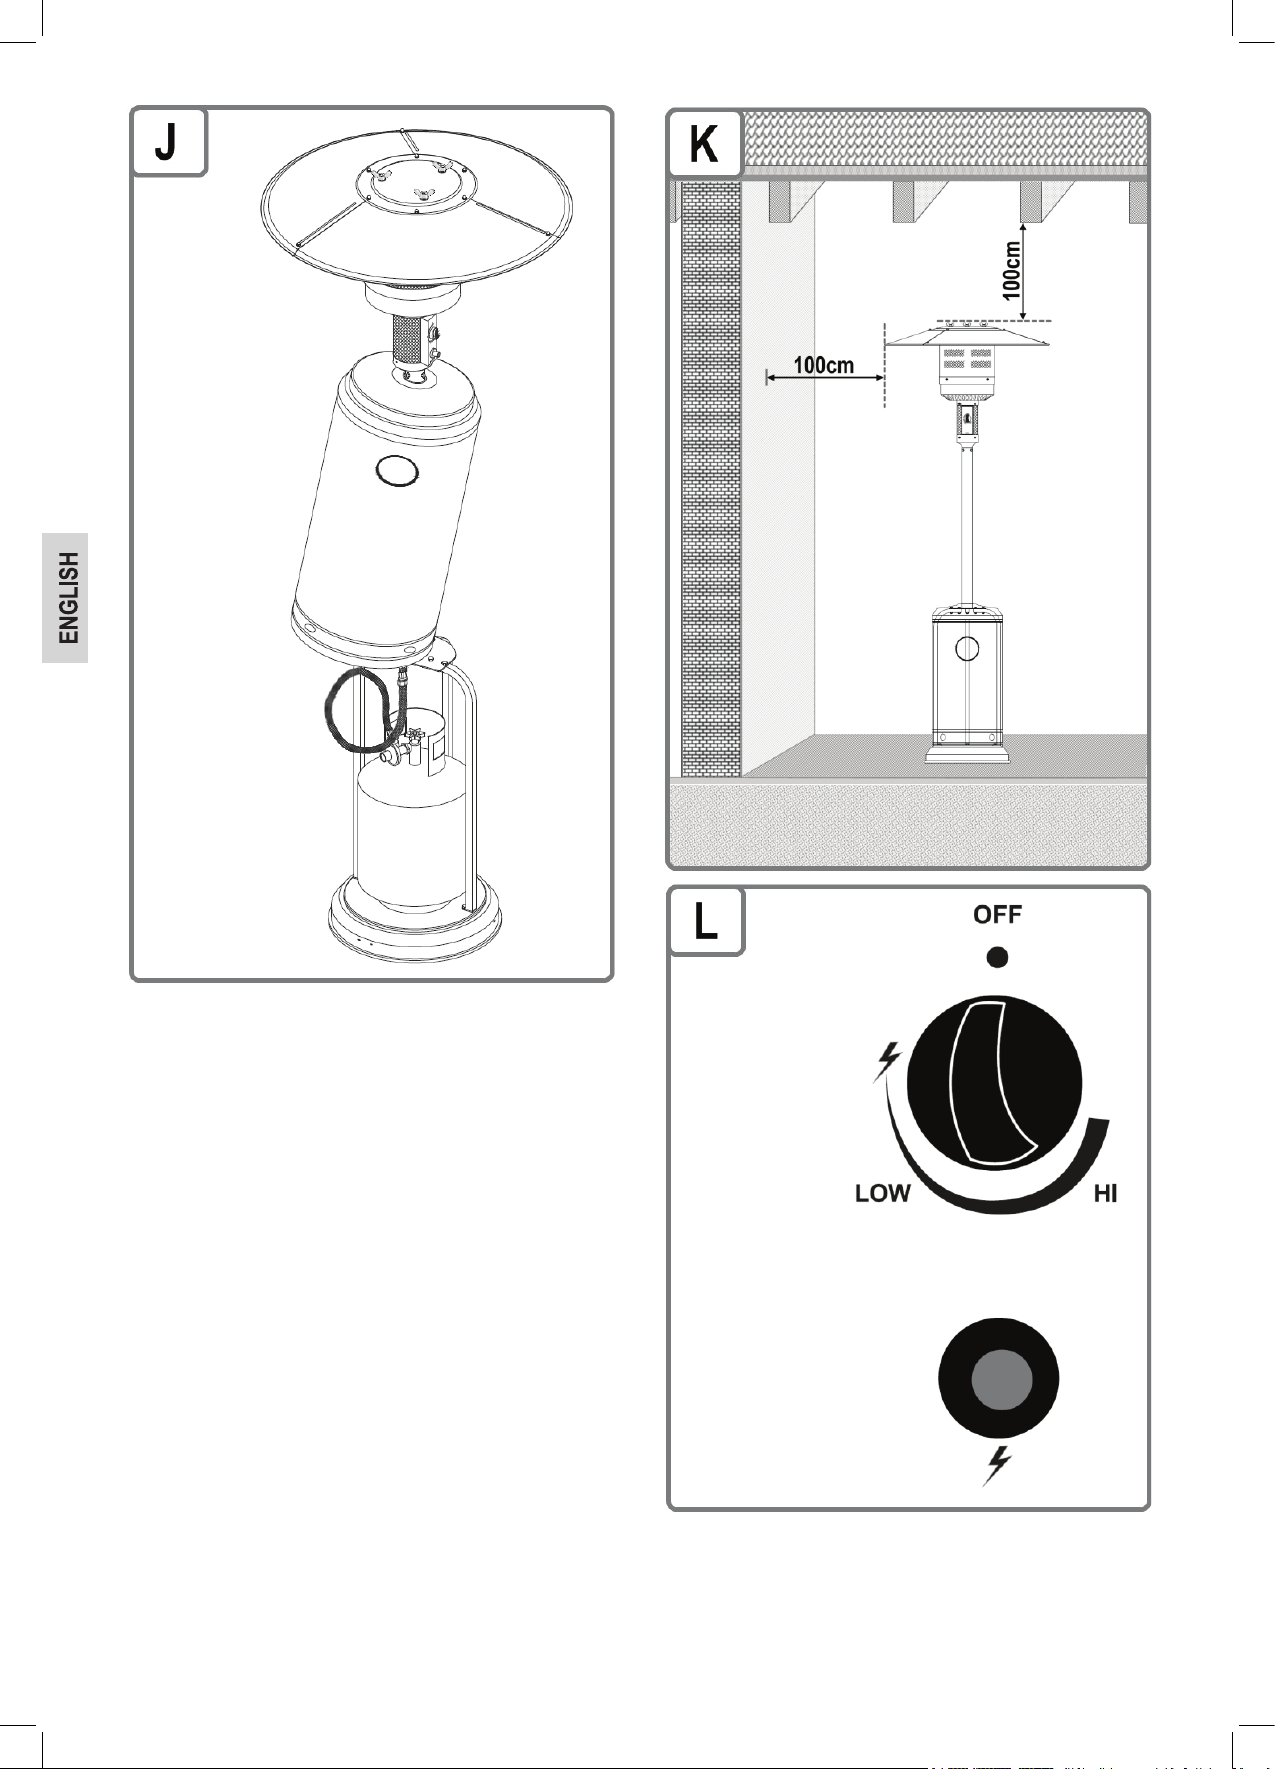
Page 53

Gas connection
General information
The patio heater can be operated with gas cylinders between 5 kg and 15 kg. LPG gaseous mixtures with 50 mbar are permitted.
Your patio heater works best with propane gas or LPG gaseous mixtures. Butane may be used; the gas cylinder may however freeze due to the nominal
power of the appliance. The gas pressure will thereby decrease and your patio heater will not supply the full power.
Use a regulator which is certied in accordance with DIN EN 12864:2001.
NOTE:
For information concerning the correct regulator for gas cylinders, please consult your LPG dealer.
Regulator and hose
These parts are included with your patio space heater. You can obtain spare parts from your dealer or an approved LPG supplier. Only use hoses and regulators at the pressure stated above which are approved for LPG.
Normally, the service life of a regulator is 2 years. It is recommended that the regulator is replaced within 2 years of the production date.
WARNING:
• Only replace the gas cylinder in well-ventilated rooms.
• The hose that is used must correspond to statutory regulations.
• The use of unsuitable hoses and incorrect regulators is dangerous.
• Before operation, make sure that you use the correct parts.
Connecting the gas cylinder
A connection is established via a exible hose and the correct low pressure regulator. The low pressure regulator should be tted onto the gas cylinder.
1. Remove the protective cap and the thread protector on the gas cylinder.
2. Select a suitable wrench and tighten the coupling nut (attention: left thread) of the low pressure regulator on the gas cylinder hand-tight.
3. Select a suitable wrench and tighten the coupling nut (attention: left thread) of the hose on the low pressure regulator hand-tight.
Connecting the appliance
Cobwebs or insects may clog the pipe. Ensure prior to connection that the openings are clear.
• Select a suitable wrench and tighten the cap nut (note: left-thread) of the hose to the gas pipe by hand.
The screw connections of the hose must be securely connected to the appliance and the low pressure regulator.
Finding areas with a bad seal
CAUTION: Before use, check to make sure there are no areas with a bad seal.
• Never look for sections with a bad seal using a naked ame.
• Use a leak detection spray or soapy water.
Sections with a bad seal soon become apparent in soapy water. You will need approx. 50 ml (mix ratio 1:3).
1. Make sure that all adjustment knobs are in the 12 o’clock position (OFF).
2. Once you have connected all components as described above, turn the gas on.
3. Spread the soapy water on the hose and all connections. If bubbles appear at a particular point, the section has a bad seal and it must be repaired before
use.
4. Repeat the test after the repair.
5. After the test, shut the valve on the gas cylinder.
If you nd a section with a bad seal that you cannot repair, refer the problem to a gas technician
Using the patio heater
Installation site
• The patio heater is only intended for use in outdoor spaces.
• If the patio heater is set up underneath an arbor, then at least 25 % of the enclosed area must be open.
• Set the patio heater onto an even, stable surface.
• The patio heater is sensitive to wind and can tip over. It must be fastened to the ground with bolts.
• Remove combustible materials within a radius of 3 m.
Refer to gure K
• Ensure sufcient clearance of at least 1 m above and around the appliance.
• Do not obstruct the heat radiation. Do not cover the patio heater in any way.
53
Page 54

If you notice the smell of gas
1. Close the gas valve on the cylinder.
2. Extinguish naked ames and do not use electrical devices in the vicinity.
3. Ventilate the area.
4. Look for areas with a bad seal (as previously described).
5. If you can still smell gas, refer to your dealer or gas specialist.
Operating the patio heater
Igniting
Please refer to gure L.
1. Fully open the gas supply on the gas cylinder.
2. Press the button of the gas control valve and twist it open in an anticlockwise direction
3. Press the gas control valve for about 30 seconds and repeatedly press the igniter at the same time.
4. Watch opening 4 to see if the pilot lamp is burning.
NOTE
• If a new gas cylinder has been connected, it can take up to one minute until the gas has reached the igniter.
• The gas control knob must be pressed down continuously during the ignition process so that the gas will ow.
• If no pilot ame can be seen on opening 4 after 30 seconds, repeat step 3.
• If the pilot ame is burning, leave the gas control knob in the
5. Then turn the gas control knob to the desired heating setting.
Shutting off
1. Open the gas control knob in a clockwise direction
2. Press the gas control knob and turn it to OFF.
3. Close the gas supply on the gas cylinder.
.
position for about 5 more minutes.
.
Troubleshooting
Malfunctions are often just caused due to minor problems. Before contacting our customer service, please check the table below:
Problem Possible cause Notes / solution
Pilot ame does not ignite Gas tap is turned off Open the gas tap
Gas cylinder is empty Replace the gas cylinder
Gas lines are blocked Check the hoses/ pipes
Air in the system Keep the knob pressed down longer in position
Leaking connections Check the connections
The electric igniter is defective Have the ignition system repaired by a specialist immediately
Pilot ame goes out Pilot burner is dirty Clean it through the pilot opening 4
Leaking/ loose connections or leakage Check the hoses/ pipes and the connec-tions
Low pressure Replace the gas cylinder
Heater element is damaged Contact a gas specialist
Burner does not ignite Low pressure Replace the gas cylinder
Gas lines are blocked Check the hoses/pipes
Gas tap is shut off Open the gas tap
Pilot burner is bent or burner is not in the correct position Contact a gas specialist
Cleaning the patio heater
WARNING: Hot surfaces
Prior to cleaning, wait until the patio heater has completely cooled.
WARNING: RISK OF FIRE AND EXPLOSION
• Remove the gas cylinder prior to cleaning.
• Do not use any ammable cleaning agents.
54
Page 55
CAUTION:
• Do not use a wire brush or other abrasive utensils for cleaning.
• Do not use any high-pressure or steam cleaners. These appliances corrode painted surfaces and can damage sensitive parts of the gas system.
Exterior surfaces
1. Use mild cleaning agents and hot water.
2. Following this, rinse thoroughly with water.
Further cleaning….
Cleaning work on the burner or the pilot burner, the gas control or the igniter must be performed by a gas specialist.
Servicing
Check the hoses and the connections each time you replace the gas cylinder, but at least once a month.
Replace leaking hoses or connecting parts immediately. Only use components of the same quality and specication.
If you have replaced parts, perform a leakage test afterwards.
Contact a gas specialist for extended maintenance (once a year) and repairs.
Storing the patio heater
• If the patio heater is clean and dry, you may protect it with a blanket.
• Condensation may result in a harmful, moist atmosphere underneath the cover. In the case of a lengthy downtime, this moist atmosphere may result in
corrosion.
• When selecting the blanket, ensure that it is air-permeable.
• Store the patio heater in a frost-free, dry room.
• Shut the valve of the gas cylinder and store it out of the reach of children.
• Concerning storage, also refer to the information in the section entitled “Safety notes”.
Gas cylinder
Always handle the gas cylinder with care!
• If the appliance is not in use, shut the gas cylinder and remove the low pressure regulator.
• Close the cylinder and replace the protective cap.
• Gas cylinders should stand upright outdoors and should be stored out of the reach of children.
• Do not store the cylinder in a basement, as leaking gas can collect on the oor.
• Never store the gas cylinder in places where temperatures can exceed 50°C.
• Do not place the gas cylinder in the vicinity of a naked ame or other sources of ignition.
Disposal
Packaging
The product packaging mostly consists of reusable materials.
Help protect the environment! Dispose of materials in the relevant recycling containers provided.
Patio heater
Do not dispose of the patio heater with the household waste at the end of its useful life!
Ask your local authority or a local recycling company about the proper way to dispose of your product.
This appliance has been tested in compliance with all of the relevant EC Directives (CE), e.g. the European Directive 2009/142/EC relating to gas appliances
and has been built in compliance with current safety regulations.
55
Page 56
Tabulka obsahu
Bezpečnostní poznámky ..................................................................................................................................................................................................................... 56
Technické specikace ......................................................................................................................................................................................................................... 58
Souhrn ................................................................................................................................................................................................................................................. 59
Seznam dílů ......................................................................................................................................................................................................................................... 60
Sestavení tepelného zářiče ...............................................................................................................................................................................................................60
Připojení plynu ..................................................................................................................................................................................................................................... 66
Použití tepelného zářiče ...................................................................................................................................................................................................................... 66
Obsluha tepelného zářiče .................................................................................................................................................................................................................. 67
Lokalizace a odstraňování poruch ...................................................................................................................................................................................................... 67
Čištění tepelného zářiče ...................................................................................................................................................................................................................... 67
Skladování tepelného zářiče ............................................................................................................................................................................................................... 68
Likvidace .............................................................................................................................................................................................................................................. 68
Bezpečnostní poznámky
Koupili jste si bezpečný výrobek. Zákazník je nicméně spoluodpovědný za správné nastavení tepelného zářiče stejně jako za jeho obsluhu a údržbu.
Různé části bezpečnostního vybavení vás ochrání před nebezpečím a zraněním. V těchto pokynech jsme uvedli souhrn všeho, co potřebujete znát o své
bezpečnosti. Díky tomu nabudete znalosti a know-how. Přečtěte si a dodržujte provozní pokyny dříve než začnete s montáží a uvedením přístroje do
provozu.
Konkrétně si přečtěte bezpečnostní pokyny. Používejte pouze přístroj způsobem popsaným v těchto pokynech.
Nedodržení pokynů může vést k výbuchu a požáru!
Tyto pokyny uložte bezpečně tak, abyste si je mohli přečíst i později. Při prodeji tohoto přístroje třetí straně, prosím přiložte i tyto pokyny.
Symboly použité v těchto provozních pokynech
Důležité pokyny pro vaši bezpečnost jsou zvýrazněny. Abyste předešli úrazu a poškození přístroje, ujistěte se, že dodržujete tyto pokyny:
VÝSTRAHA:
Varuje o nebezpečí vašemu zdraví a indikuje potenciální nebezpečí zranění.
POZOR:
Indikuje potenciální nebezpečí pro zařízení nebo jiné předměty.
UPOZORNĚNÍ:
Zvýrazňuje pro vás tipy a informace.
Účel určení
Tepelný zářič se smí používat pouze venku.
VÝSTRAHA: Poznámka pro děti a osoby se sníženou schopností
Tento přístroj není určen pro použití dětmi a hendikepovanými osobami. Měly by ho používat pouze osoby, které mohou přístroj používat bezpečným
způsobem.
Obecná rizika
VÝSTRAHA:
• Tepelný zářič má ostré hrany, o které byste se mohli pořezat. Noste ochranné rukavice při sestavování, servisu, čištění nebo převozu.
• Nikdy nepřepravujte tepelný zářič, pokud hoří nebo je horký.
• Tepelný zářič bude mít horké povrchy. Riziko popálení! Poučte lidi v okolí, aby udržovali bezpečný odstup 1 metr.
• Přítomné děti musí být pečlivě hlídány.
• Sestavení tepelného zářiče vyžaduje základní technické znalosti a manuální zručnost. Vyhledejte kvalikovanou pomoc.
• Opravu a údržbu přenechte kvalikovaným plynařům.
• Nikdy neprovádějte změny na regulačním nebo plynovém systému sami. Nebezpečí výbuchu a požáru!
• Používání na lodích nebo ve vozidlech je zakázáno.
• Použití tohoto spotřebiče v uzavřených místnostech může být nebezpečné a je zakázáno!
• Toto topení je určeno k venkovnímu použití a v dobře větraných místnostech.
• Dobře větraná místnost musí být otevřená minimálně z 25 % celé plochy.
• Celková plocha místnosti je součet všech povrchů příslušných stěn.
• Před použitím tohoto spotřebiče si nejprve přečtěte návod k obsluze. Spotřebič musí být sestaven podle návodu a místních nařízení.
• Neukládejte hořlavé materiály v blízkosti tohoto topení.
• Po použití uzavřete plynový ventil na tlakové láhvi a/nebo regulátor.
56
Page 57

Rozbalení zařízení
VÝSTRAHA:
• Pro zajištění bezpečnosti vašich dětí skladujte veškeré části obalu (plastové sáčky, polystyrénové díly atd.) mimo dosah dětí.
• Nedovolte, aby si malé děti hrály s fóliemi. Hrozí jim nebezpečí udušení!
Připojení přívodu plynu
VÝSTRAHA: NEBEZPEČÍ POPÁLENÍ A VÝBUCHU!
• Tento tepelný zářič smí být provozován pouze s nízkotlakým regulátorem. Přiložený regulátor tlaku byl správně nastaven ve výrobě pro činnost se
zkapalněným plynem (LPG). Navíc si přečtěte a dodržujte samostatný návod k obsluze, který je dodáván s regulátorem tlaku.
• Je-li to nezbytné, plynová hadice musí být vyměřena, pokud existují příslušné požadavky podle národní legislativy v místě použití.
• Ujistěte se, že v sousedství nejsou žádné zdroje otevřeného plamene (nebo podobně), když vyměňujete plynovou bombu.
• Při koupi nebo výměně plynové bomby si nechejte poradit u odborníka.
• Přístroj musí být připojen způsobem, který je popsán v těchto pokynech.
• Ujistěte se, že hadice přívodu plynu není zlomená nebo opotřebená.
• Po montáži plynového přívodu zkontrolujte všechny spoje, zda jsou dotažené pomocí standardního spreje detekujícího únik plynu nebo mýdlovou
pěnou. Je přísně zakázáno testovat těsnost otevřeným plamenem!
Obsluha tepelného zářiče
VÝSTRAHA: NEBEZPEČÍ POPÁLENÍ A VÝBUCHU!
• Když manipulujete s plynovým grilem, nekuřte. Plynový gril neumisťujte do blízkosti otevřeného ohně.
• Nebezpečí: Plyn se může akumulovat v uzavřených místech, což může mít za následek udušení nebo výbuch.
• Používejte tento tepelný zářič venku.
• Uvědomte si, prosím: Tepelný zářič je citlivý na vítr. V případě silného větru musíte provést speciální bezpečnostní opatření, aby se tepelný zářič nepřevrhl.
• Chraňte tepelný zářič před deštěm, vlhkostí, stříkající vodou, apod.
• Postavte tepelný zářič na rovný, pevný a ohnivzdorný povrch.
• Vždy udržujte ventilační otvory na místě pro tlakovou láhev a hořák čisté.
• Plynovou bombu chraňte před přímým slunečním svitem.
• Před zapnutím přístroje vždy zkontrolujte hadici a tlakový regulátor, zda nejsou prasknuté či poškozené.
• Nepoužívejte tepelný zářič, pokud je regulátor tlaku, hadice nebo tlaková láhev vadná nebo netěsní.
• Plamen grilu nezapalujte otevřeným ohněm. Použijte k zapalování elektrický zapalovač, který je instalován na přístroji.
• Zapalovací plamen zapalujte ručně pouze ve výjimečných případech. Systém zapalování si nechte ihned opravit nebo vyměnit odborníkem.
• Jako bezpečnostní opatření proti nechtěnému úniku plynu byste měli otevírat kohout na tlakové láhvi pouze, když je tepelný zářič v provozu. Ihned po
každém vypnutí tepelného zářiče uzavřete plynový ventil.
• Při provozování přístroje se ujistěte, že je gril v dostatečné vzdálenosti od hořlavých a teplotně citlivých materiálů. Vzdálenost by měla být alespoň 1 m.
• Zajistěte, aby nad tepelným zářičem nebyly žádné předměty nebo části budov.
• Povrch tepelného zářiče se během provozu velice zahřívá. Upozorněte osoby zdržující se kolem grilu a nedovolte dětem, aby se k němu přiblížily.
• Nenechávejte tepelný zářič bez dozoru během provozu.
• V případě poruchy, zavřete ventil plynové bomby.
• Vždy před přemístěním tepelného zářiče ho musíte vypnout, uzavřít tlakovou láhev, a tlakovou láhev demontovat ze spodní části kvůli ochrany regulátoru tlaku a hadicového vedení.
Údržba tepelného zářiče
VÝSTRAHA: NEBEZPEČÍ POPÁLENÍ A VÝBUCHU!
• Opravy a servis plynového systému smí být prováděny pouze autorizovaným servisem. Neprovádějte žádné úpravy tepelného zářiče a regulátoru
tlaku.
• Tlakový regulátor vyměňte každé dva roky a hadice po pěti letech, i když na nich nejsou žádné viditelné znaky poškození. Ujistěte se, že je tlakový
regulátor schválen pro plyn, který používáte a nastaven na správný výstupní tlak (viz. Technická data). Nová hadice by neměla být delší než 1,5 m.
• Plyn společně s olejem vytváří výbušnou směs. Nikdy nezkoušejte uvolnit zaseknuté ventily nebo ovládací knoíky olejem nebo penetrací olejem.
Akce při hašení požáru
• Odveďte osoby stojící kolem na bezpečné místo! Je.li to možné, zavřete ventil plynové bomby. Ochlaďte plynovou bombu vodou. Současně zajistěte svou
vlastní bezpečnost! Je možné, že se objeví spontánní a explozivní znovuvzplanutí.
• Haste pouze unikající hořící plyn, jestliže nemůžete zabránit v jeho úniku. Lze použít všechny hasicí přístroje.
57
Page 58

Opatření první pomoci
- Opatření po nadýchání se plynu
• Vysoké koncentrace mohou způsobit zadušení. Symptomy zahrnují ztrátu mobility a bezvědomí. Oběť nerealizuje, že dušení je dusivé. Nízké koncentrace mohou vést k mdlobám, bolestem hlavy, nucení na zvracení a problémům koordinace.
• Pacienta přineste na čerstvý vzduch. Informujte doktora nebo pohotovost. V případě, že pacient přestane dýchat, proveďte umělé dýchání.
- Opatření pro případ rozsáhlých popálenin nebo opaření
• V těchto případech existuje riziko hypotermie a šoku. Okamžitě volejte pohotovostní službu!
• Uhaste veškeré hořící šatstvo okamžitě vodou nebo doutnající plameny tlustou dekou.
• V případě opaření: Vysvlečte okamžitě šaty postiženému.
• V případě popálení: Nechejte šaty postiženému na těle.
• Ochlaďte studenou vodou alespoň 15 minut dokud neutichne bolest.
• Postižené místo zakryjte sterilním minerálním obvazem s obsahem kovů (na popáleniny). Aplikujte stranou napuštěnou minerálními kovy na postiženou kůži a lehce převažte gázou nebo třícípým šátkem.
• Nepoužívejte domácí přípravky jako jsou masti, pudry, oleje, dezinfekční prostředky atd!
- Opatření pro případ menších popálenin nebo opaření
• V případě opaření: Vysvlečte okamžitě šaty postiženému.
• V případě popálení: Šaty odstraňte pouze v případě, že nejsou nalepené na pokožce.
• Ochlaďte studenou vodou alespoň 15 minut dokud neutichne bolest.
• V případě menších popálenin nebo opařenin, kdy se nevytvořila žádná bublina, nechejte hojit na vzduchu. Nezakrývejte náplastí ani obvazem.
Pokyny týkající se transportu
VÝSTRAHA: NEBEZPEČÍ POPÁLENÍ A VÝBUCHU!
• Tam, kde je to možné, nepřevážejte plynový gril ve vozidlech, kde nákladní plocha není oddělena od řidičovy kabiny. Řidič si musí být vědom možných
nebezpečí spojených s nákladem a musí znát, co dělat v případě nehody nebo stavu nouze.
• Plynovou bombu přepravujte kolmo postavenou a zabezpečte ji před pádem nebo posunem.
• Ujistěte se, že ventil plynové bomby je uzavřen a má dobré těsnění.
Poznámky ke skladování
VÝSTRAHA: NEBEZPEČÍ POPÁLENÍ A VÝBUCHU!
• Jestliže přístroj nepoužíváte, plynová bomba musí být od něj odpojena.
• Plynový gril skladujte mimo dosah dětí.
• Plynový gril skladujte mimo dosah oxidačních plynů a dalších materiálů, které podporují hoření.
• Tekutý plyn, který uniká, je těžší než vzduchu a drží se u země. Ne skladujte plynový gril uvnitř pod úrovní země (například ve sklepě, v šachtě, podzemní garáži atd.) nebo v nevětraných prostorách, kde by se unikající plyn mohl hromadit.
• Nevystavujte plynovou bombu slunečnímu záření a jiným zdrojům tepla.
• Je-li teplota nižší jak 50°C, skladujte plynovou bombu na dobře větraném místě, ve stínu a chráněnou proti povětrnostním vlivům.
• Plynovou bombu skladujte postavenou a zabezpečenou proti převrácení.
• Prázdná plynová bomba vždy obsahuje zbytkové množství tekutého plynu. Dodržujte pokyny ke skladování i pro prázdné plynové bomby.
Technické specikace
Design a vybavení
• Přenosný tepelný zářič s místem pro plynovou láhev
• Povrch krytu s vypáleným práškovým pigmentem
• Přípojka plynu se šroubovým spojem
• Vyzařování tepla přes odraznou plochu
Technické údaje
• Výhradně k venkovnímu použití
• Výhradně pro směs plynů LPG
• Max.: 14000 Wattů
• Min.: 5000 Wattů
58
Page 59
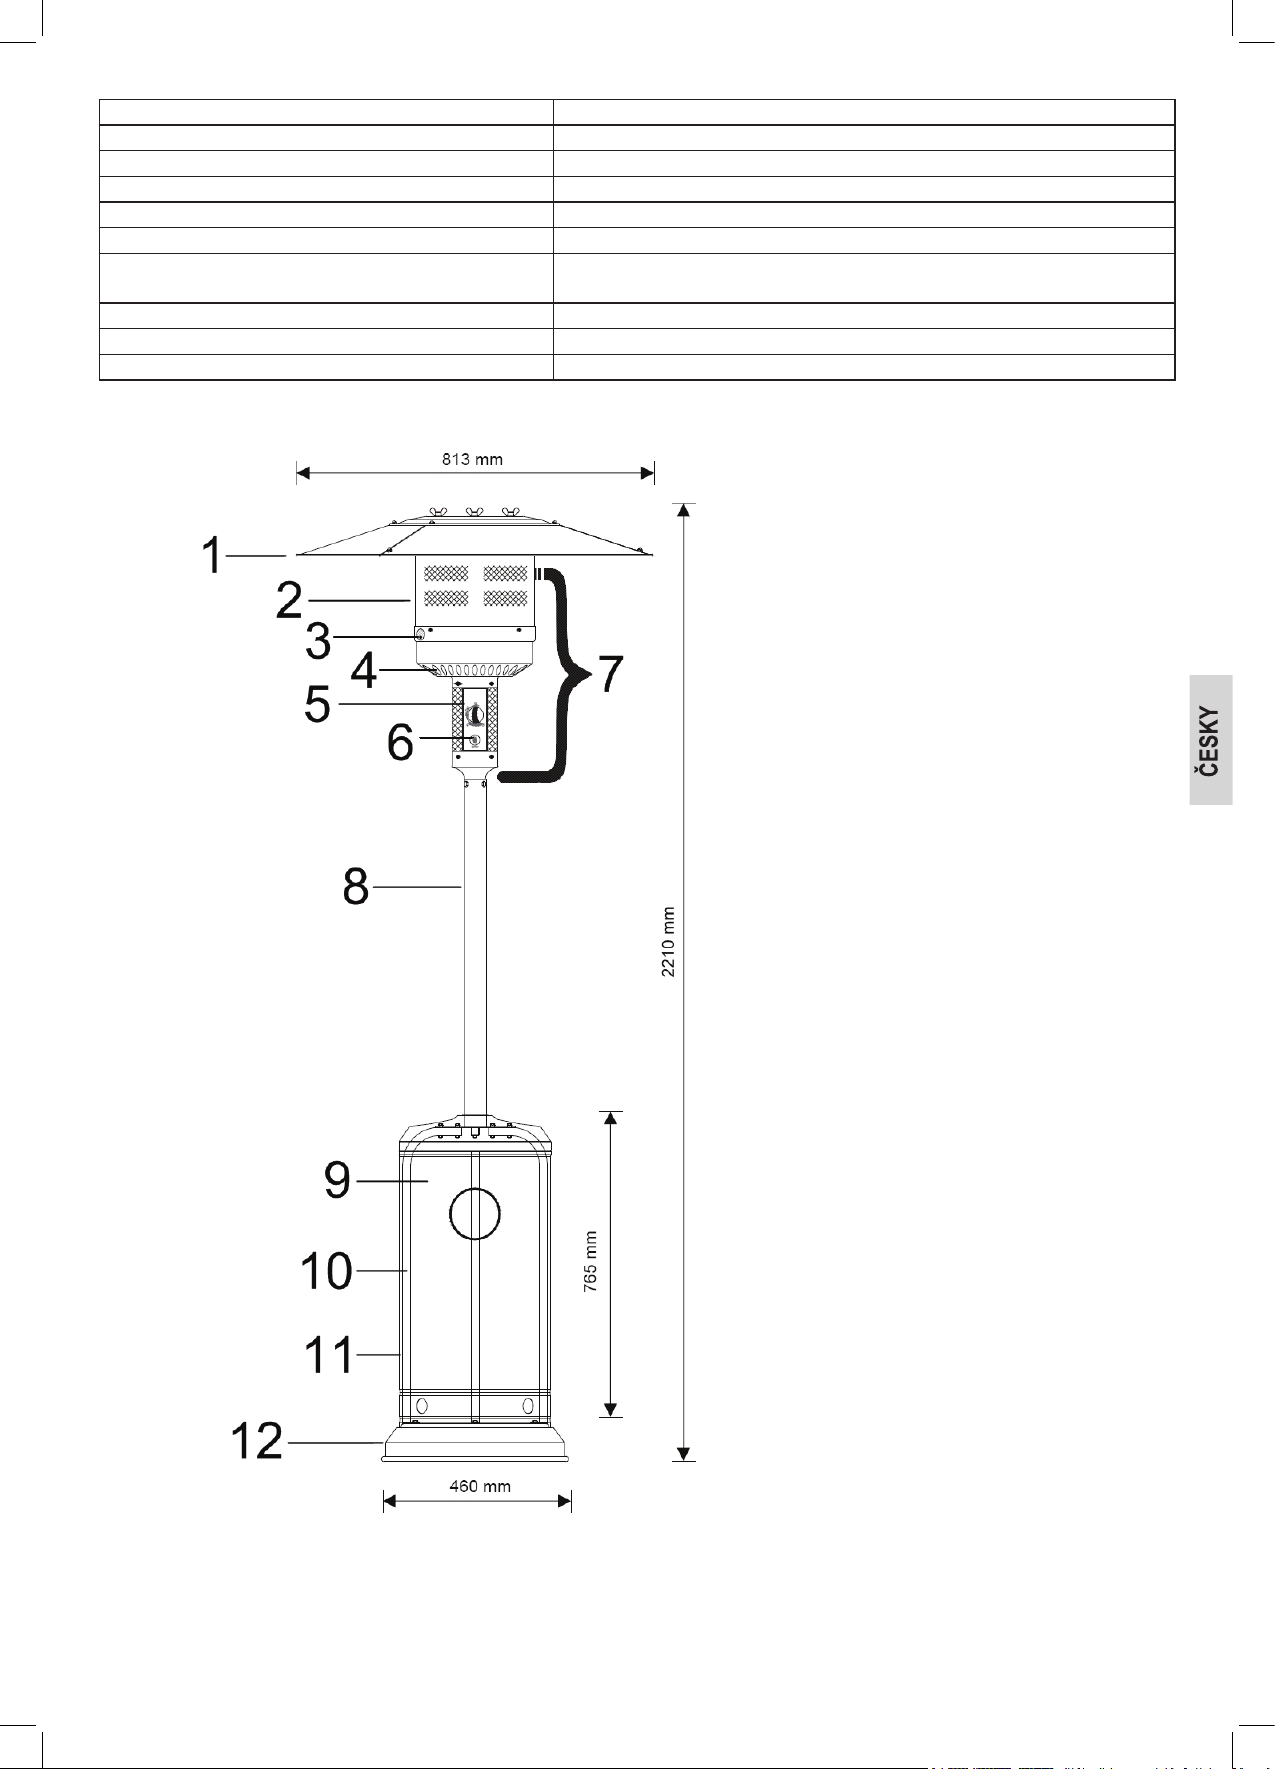
Výrobce Hongmaoxinda Electric.
Výrobek: Tepelný zářič
Popis modelu: THS 3550 (HMXD-A)
Kategorie plynu: I
Typ plynu: Směs plynů LPG
Tlak plynu: 50 mbar
Celkové spotřebované teplo
všechny kategorie plynu:
Plynová tryska: 1,70 mm hlavní hořák 0,18 mm zapalovací hořák
Cílové země: AT, DE, CZ, CH
Identikační číslo: 0063BU7882
3B/P(50)
14 kW (870 g/h)
Souhrn
1 Odrazná plocha
2 Kryt hořáku
3 Otvor zapalovacího plamene
4 Ventilační otvory
5 Ovládací knoík plynu
6 Zapalovač
7 Jednotka hořáku
8 Stojan
9 Místo pro tlakovou láhev
10 Čtvercová trubka
11 Kryt láhve
12 Podstavec
59
Page 60

Seznam dílů
Položka Popis ks Položka Popis ks
Klíč 2
12 Podstavec 1 7 Jednotka hořáku 1
Sada koleček 1
+ šroub M8 X 16 2
+ matice M8 2
+ podložka M8 4 1 Odrazná plocha se skládá z 3
10 Čtvercová trubka, ohnutá o 90° 3 + šrouby M5 X 10 9
+ šroub M8 X 16 3 + uzavřené matice M5 9
8 Stojan 1 + podložky M5 6
+ šroub M6 X 30 6 + rozpěrné šrouby M8 X 10 1
+ matice M6 6 + křídlové matice M8 3
11 Místo pro tlakovou láhev 1 + podložky M8 6
Plynová trubka 880 mm s uzavřenou maticí a závitem
šrouby EDS k upevnění hořáku ke stojanu
M6 X 10
Sestavení tepelného zářiče
1
4
K montáži grilu budete potřebovat: • 2 osoby
• Ochranné rukavice
• Je-li to nezbytné, vložte těsnicí spodní podstavec.
• Klíč na matice pro boční stěny 10, 14 a 17 (v balení)
• Šroubovák (velikost PZ2)
• Kleště
• Detektor netěsnosti nebo mýdlový roztok
Předem odstraňte ochrannou vrstvu, kterou jsou napuštěné povrchy.
Při montáži si prostudujte seznam dílů a prohlédněte si obrázkový návod k montáži:
60
Page 61

6162636465
Page 62
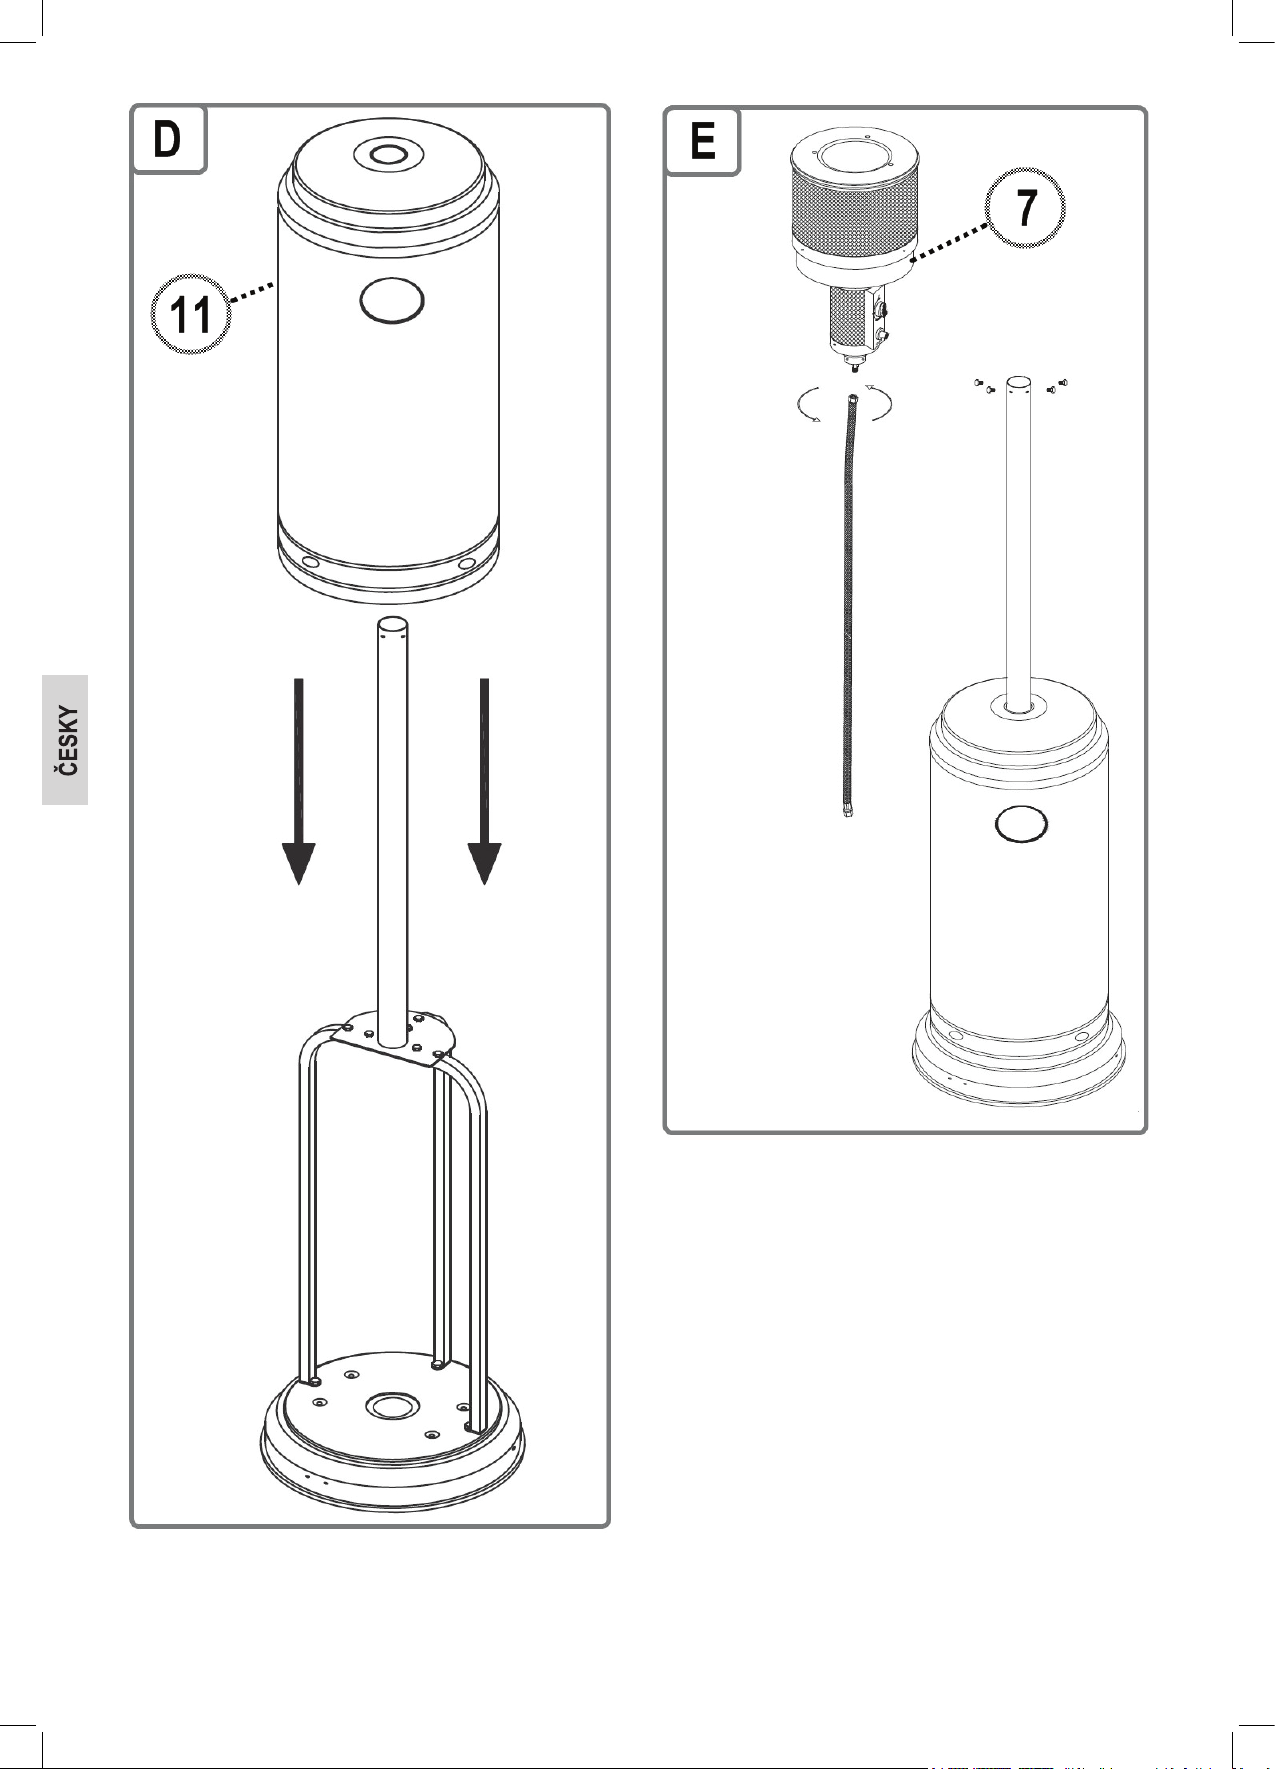
Page 63

Page 64
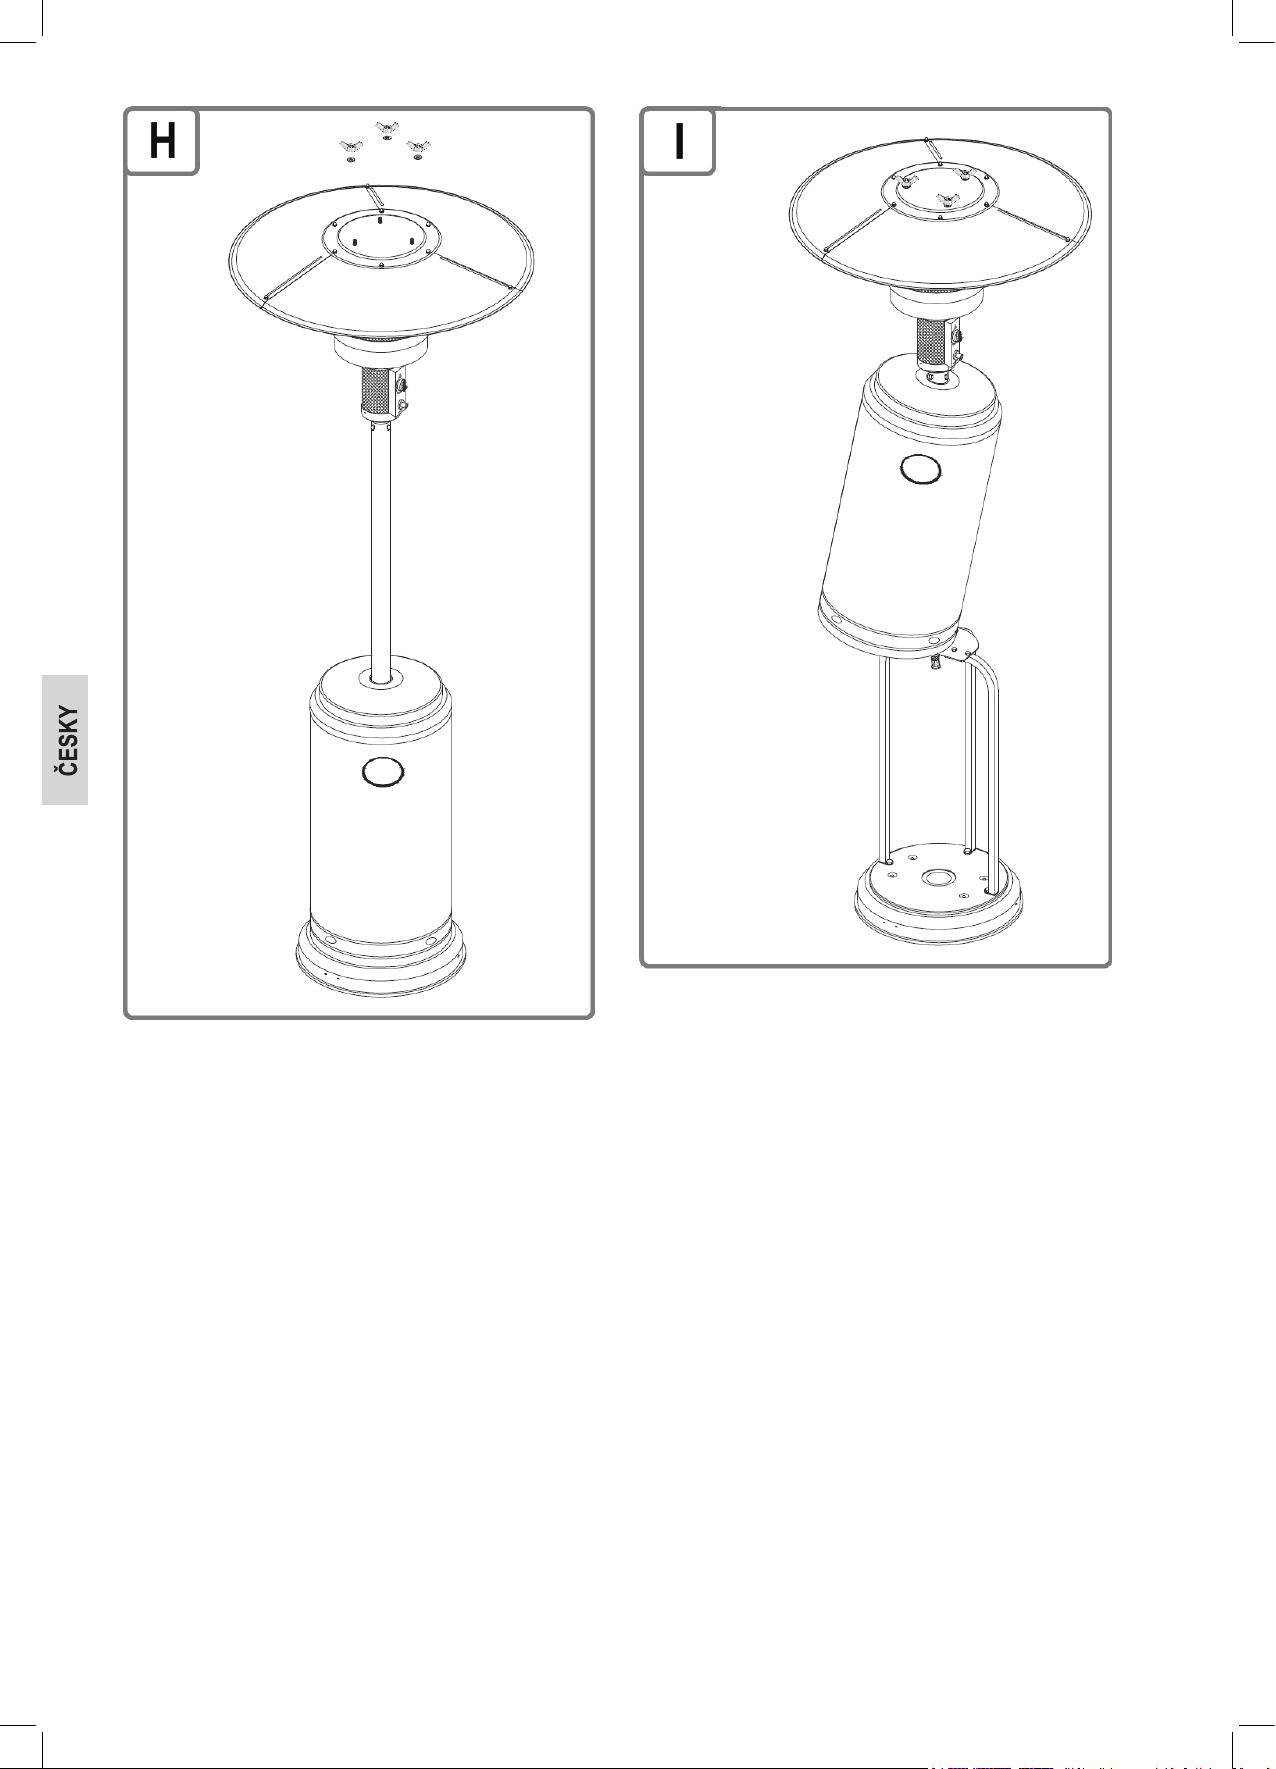
Page 65

Page 66
Připojení plynu
Obecné informace
Tento tepelný zářič lze provozovat s plynovými láhvemi mezi 5 kg a 15 kg. Plynové směsi LPG s 50 mbar jsou povoleny.
Váš tepelný zářič bude nejlépe fungovat na propan nebo směs plynů LPG. Butan lze použít; plynová láhev však může mrznout v důsledku jmenovitého výkonu spotřebiče. Tlak plynu se tím sníží a váš tepelný zářič nebude dodávat plný výkon.
Používejte regulátor tlaku, jenž je certikován podle DIN EN 12864:2001.
UPOZORNĚNÍ:
Pro informace týkající se správného regulátoru pro plynové bomby, prosím kontaktujte dodavatele LPG.
Regulátor a hadice
Tyto díly jsou součástí tepelného zářiče. Náhradní díly lze zakoupit u vašeho prodejce nebo u autorizovaného prodejce LPG. Používejte pouze hadice a
regulátory na tlak uvedený výše, které jsou schváleny pro LPG.
Normální servisní životnost regulátoru je 2 roky. Doporučuje se vyměnit regulátor každé dva roky 2 od data výroby.
VÝSTRAHA:
• Tlakovou láhev měňte pouze na dobře větraných místech.
• Použitá hadice musí odpovídat zákonným ustanovením.
• Použití nesprávných hadic a nesprávných regulátorů je nebezpečné.
• Před uvedením do provozu se přesvědčte, že používáte správné díly.
Připojení přívodu plynu
Připojení se realizuje prostřednictvím exibilní hadice a správného nízkotlakého regulátoru. Nízkotlaký regulátor by se měl namontovat na plynovou bombu.
1. Sejměte ochrannou hlavici a chránič závitu na plynové bombě.
2. Vyberte příslušný klíč a dotáhněte lehce připojovací matici (pozor: levý závit) nízkotlakého regulátoru na plynové bombě.
3. Vyberte příslušný klíč a dotáhněte lehce připojovací matici (pozor: levý závit) hadice na nízkotlakém regulátoru.
Připojení přístroje
Pavučiny nebo hmyz mohou ucpat trubky. Před zapojením zajistěte, aby otvory byly čisté.
• Vyberte vhodný klíč a utáhněte uzavřenou matici (poznámka: levý závit) hadice plynového vedení rukou.
Šroubové spojení hadice musí být bezpečně připojeno k přístroji a nízkotlakému regulátoru.
Jak nalézt plochy se špatným těsněním?
POZOR: Před použitím se ujistěte, že všechny plochy dobře těsní.
• Nikdy nehledejte netěsnící oblasti pomocí otevřeného ohně.
• Použijte sprej na detekci úniku plynu nebo mýdlovou vodu.
Netěsnící sekce se brzo projeví v mýdlové vodě. Potřebujete asi 50 ml (směs v poměru 1:3).
1. Ujistěte se, že všechny knoíky jsou v poloze odpovídající 12 hodině (OFF).
2. Jakmile jste připojili všechny komponenty podle návodu výše, otevřete přívod plynu.
3. Natřete mýdlovou vodu na hadici a všechny spoje. Jestliže se objeví bublinky na určitých místech, tato místa špatně těsní a je zapotřebí je před použití
znovu utěsnit.
4. Opakujte test po opravě.
5. Po testu zavřete ventil na plynové bombě.
Jestliže naleznete sekci, která špatně těsní, kterou nelze opravit, zavolejte k opravě plynaře.
Použití tepelného zářiče
Místo instalace
• Tento tepelný zářič je určen výhradně k venkovnímu použití.
• Pokud je tepelný zářič ustaven pod přístřeškem, pak minimálně 25 % ohraničeného prostoru musí být otevřeno.
• Postavte tepelný zářič na rovný, stabilní povrch.
• Tepelný zářič je citlivý na vítr a mohl by se převrátit. Musí být uchycen k zemi šrouby.
• Odstraňte hořlavé materiály v okruhu 3 m.
Viz obrázek K
• Zajistěte dostatečný prostor minimálně 1 m nad a okolo spotřebiče.
• Nezakrývejte vyzařování tepla. Nezakrývejte tepelný zářič žádným způsobem.
66
Page 67

Jestliže si povšimnete pachu plynu,
1. Uzavřete plynový ventil na bombě.
2. Uhaste otevřený plamen a nepoužívejte v blízkosti elektrická zařízení.
3. Vyvětrejte prostor.
4. Vyhledejte oblast, která špatně těsní (způsobem popsaným dříve).
5. Jestliže stále cítíte zápach plynu, obraťte se na prodejce nebo plynaře.
Obsluha tepelného zářiče
Zapálení
Podívejte se na obrázek L.
1. Otevřete naplno přívod plynu na tlakové láhvi.
2. Stiskněte tlačítko plynového ventilu a otočte jím proti směru hodinových ručiček
3. Stiskněte plynový ventil na přibližně 30 sekund a zároveň opakovaně stiskněte zapalovač.
4. Podívejte se do otvoru 4, zdali zapalovací plamínek hoří.
UPOZORNĚNÍ:
• Pokud byla zapojena nová tlaková láhev, může plynu trvat až minutu, než se dostane do zapalovače.
• Ovládací knoík plynu musí být trvale stisknutý během procesu zapalování, aby plyn mohl protékat.
• Pokud po 30 sekundách nevidíte žádný zapalovací plamen v otvoru 4, opakujte krok 3.
• Jestliže zapalovací plamen hoří, nechte ovládací knoík plynu v poloze
5. Pak otočte ovládacím knoíkem plynu do požadovaného nastavení vytápění.
Uzavření
1. Otočte ovládací knoík plynu ve směru hodinových ručiček
2. Stiskněte ovládací knoík plynu a vypněte ho do polohy OFF.
3. Uzavřete přívod plynu na tlakové láhvi.
.
.
dalších cca 5 minut.
Lokalizace a odstraňování poruch
Poruchy často způsobují pouze maličkosti. Než kontaktujete zákaznické centrum, prosím zkontrolujte tabulku níže:
Problém Možné příčiny Poznámky/řešení
Zapalovací plamen se nevznítí
Zapalovací plamen pohasíná Zapalovací hořák je znečištěný Očistěte ho přes otvor 4
Hořák se nezapálí Nízký tlak Vyměňte tlakovou láhev
Plynový kohout je uzavřen Otevřete plynový kohout
Tlaková láhev je prázdná Vyměňte tlakovou láhev
Plynové vedení je ucpané Zkontrolujte hadice/ potrubí
Vzduch v systému Držte knoík stisknutý delší dobu
Netěsné spoje Zkontrolujte zapojení
Elektrický zapalovač je vadný Systém zapalování si nechte ihned opravit odborníkem
Netěsné/ volné zapojení nebo únik Zkontrolujte hadice/ trubky a zapojení
Nízký tlak Vyměňte tlakovou láhev
Topné těleso je poškozeno Obraťte se na plynaře
Plynové vedení je ucpané Zkontrolujte hadice/ potrubí
Plynový kohout je uzavřen Otevřete plynový kohout
Zapalovací hořák je ohnutý nebo hořák není ve správné
poloze
Obraťte se na plynaře
Čištění tepelného zářiče
VÝSTRAHA: Horké povrchy
Před čištěním vyčkejte, až tepelný zářič zcela vychladne.
VÝSTRAHA: NEBEZPEČÍ POŽÁRU A VÝBUCHU
• Demontujte plynovou láhev před čištěním.
• Nepoužívejte žádné hořlavé čisticí prostředky.
67
Page 68

POZOR:
• Nepoužívejte drátěné kartáče nebo jiné abrazivní přípravky k čištění.
• Nepoužívejte žádné tlakové ani parní čističe. Tyto přístroje způsobují korozi lakovaných povrchů a mohou poškodit citlivé součásti plynového systému.
Externí povrchy
1. Používejte slabé čisticí prostředky a horkou vodu.
2. Poté opláchněte pečlivě vodou.
Další čištění….
Vyčištění hořáku nebo zapalovacího hořáku, regulace plynu nebo zapalovače musí provádět plynař.
Servis
Kontrolujte hadice a spoje při každé výměně tlakové láhve, ale nejméně jednou měsíčně.
Ihned vyměňte netěsné hadice nebo spojovací součásti. Používejte pouze díly stejné kvality a stejného označení.
Pokud jste některé díly vyměnili, proveďte následně test těsnosti.
Obraťte se na plynaře kvůli další údržby (jednou ročně) a opravám.
Skladování tepelného zářiče
• Je-li tepelný zářič čistý a suchý, můžete ho chránit zakrytím.
• Kondenzace může mít za následek nežádoucí, vlhké prostředí pod krytem. V případě dlouhodobého vystavení může toto vlhké prostředí způsobovat
korozi.
• Při výběru plachty se ujistěte, že je prodyšná.
• Tepelný zářič uložte do místnosti, která je suchá a ve které nemrzne.
• Zavřete ventil plynové bomby a uložte ji mimo dosah dětí.
• Co se týká skladování, viz. informace v kapitole “Bezpečnostní poznámky”.
Plynová bomba
Vždy s ní manipulujte opatrně!
• Jestliže přístroj nepoužíváte, zavřete plynovou bombu a odpojte regulátor tlaku.
• Zavřete bombu a našroubujte ochrannou zátku.
• Během provozu by plynová bomba neměla být umístěna uvnitř grilu!
• Plynové bomby by měly stát kolmo venku a měly by být uloženy mimo dosah dětí.
• Neukládejte plynovou bombu do sklepa, protože unikající plyn se drží u země.
• Nikdy neukládejte plynovou bombu na místa, kde teplota překračuje 50°C.
• Plynovou bombu neumisťujte do blízkosti otevřeného ohně nebo jiných zdrojů tepla.
Likvidace
Obal
Obal výrobku se hlavně skládá z recyklovatelných materiálů.
Pomáhejte chránit životní prostředí! Likvidujte tyto materiály v relevantních kontejnerech pro recyklovatelné materiály, které máte k dispozici.
Tepelný zářič
Nevyhazujte tepelný zářič spolu s domovním odpadem na konci jeho životnosti!
O správném způsobu likvidace se informujte na místních úřadech nebo u místní společnosti zabývající se recyklací odpadů.
Tento přístroj byl testován podle všech relevantních evropských směrnic EC (CE), např. Evropská směrnice 2009/142/EC týkající se plynových zařízení a byl
konstruován podle aktuálních bezpečnostních norem.
68
Page 69

Page 70

Page 71

Page 72

THS 3550
Stand 02/14
 Loading...