

Page 1
CL7FLWD1
Page 2
CONTENTS
Safety Instructions
Safety Instructions ..................................................
Installation
Product Description ................................................
Installation ...........................................................
Operations
Quick Start .............................................................
Before Each Washing ..............................................
Detergent Dispenser ...............................................
Control Panel .........................................................
Option....................................................................
Other Functions ......................................................
Programmes.............................................................
Washing Programmes Table .....................................
Maintenances
2
9
10
13
14
15
16
17
19
22
23
Cleaning And Care .................................................
Trouble Shooting ....................................................
Technical Specifications .........................................
Testing methods .....................................................
1
24
27
28
29
Page 3
SAFETY INSTRUCTIONS
Safety Instructions
For your safety,the information in this manual must be followed
to minimize the risk of fire or explosion, electric shock, or to
prevent property damage, personal injury or loss of life.
Explanation of the symbols:
!
Warning!
This combination of symbol and signal word indicates
a potentially dangerous situation which may result in
death or serious injuries unless it’s avoided.
Caution!
This combination of symbol and signal word indicates
a potentially dangerous situation which may result in
slight or minor injuries or damage to property and the
environment.
Note!
This combination of symbol and signal word indicates
a potentially dangerous situation which may result in
slight or minor injuries.
!
Warning!
Risk of Electric Shock!
• If the supply cord is damaged, it must be replaced by the
manufacturer, its service agent or similarly qualified
persons in order to avoid a hazard.
2
Page 4

SAFETY INSTRUCTIONS
• The new hose supplied with the appliance must be used
and any old hoses should be discarded.
• Before any maintenance on the device, unplug the
appliance from the mains.
• Always have the installation procedures carried out by
a competent and authorized person. The manufacturer
shall not be held liable for damages that may arise from
procedures carried out by unauthorized persons.
• Check carefully and make sure that your socket is
properly and reliably earthed.
• Make sure that the water and all electrical devices are
connected in accordance with the manufacturer's
instructions and local safety regulations.
The product should be unplugged from the power socket
•
during installation, before cleaning or maintenance and
when not in use.
• Do not use any socket with a rated current less than that
of the appliance. Never pull out the power plug with wet
hands.
Risk to children!
• This appliance is not intended for use by persons
(including children) with reduced physical, sensory or
mental capabilities or lack of experience and knowledge
unless they have been given supervision or instruction
concerning use of the appliance by a person responsible
for their safety.
• Children of less than 8 years should be supervised to
ensure that they do not play with appliance.
3
Page 5
SAFETY INSTRUCTIONS
• Animals and children may climb into the machine. Check
the product before every operation.
• The glass door may become very hot during some wash
cycles and during the drying process. Make sure to keep
kids and pets far away from the machine during the
operation as well as away from rooms with explosive or
caustic gas.
• Important! Remove all packaging and transport bolts
before using the appliance. Otherwise, serious damage
may result!
Risk of explosion!
• Do not wash or dry articles that have been cleaned in, washed
in, soaked in, or dabbed with combustible or explosive
substances( such as wax, oil, paint, gasoline, degreasers,
dry-cleaning solvents, kerosene, etc.) This may result in
fire or explosion.
• The washer dryer shouldn't be used if chemicals have
been used
• The exhaust air must not be discharged into a flue which is
also used for exhausting fumes from appliances, burning
gas or other fuels.
Caution!
.
Installing the product!
• This appliance is for indoor use only and is not intended
to be built-in.
• A carpet must not obstruct the openings.
4
Page 6

SAFETY INSTRUCTIONS
• The appliance should not be installed in bathrooms, very
wet rooms or in rooms that may contain explosive or
caustic gases.
• Check to see if your appliance has a single inlet valve,
this can only can be connected to the cold water supply.
If the appliance has a double inlet valves then it should
be correctly connected to the hot water and cold water
supply.
• Please note: The plug must be accessible after installation
• The appliance must not be installed behind a lockable
door, a sliding door or a door with a hinge on the opposite
side to that of the washer dryer.
• The appliance shall not be installed at a humid place.
Risk of damaging appliance!
• This appliance is design for domestic use only. It is not
suitable for commercial use.
• This appliance designed for use with textiles marked as
suitable for machine washing, rinsing and drying of textile
products marked accordingly.
• Do not climb up and sit on top cover of the appliance.
• Do not lean against machine door.
• When transporting or handling the appliance make sure:
a)That the transport bolts have been reinstalled into the
machine by an authorized person.
b)Make sure that any water that has accumulated in the
machine has been drained out.
c)Please handle the appliance carefully. Never hold any
protruding part of the product whilst lifting and the door
cannot be used to handle or lift the appliance when
moving it.
5
Page 7

SAFETY INSTRUCTIONS
d)This appliance is heavy. Transport with care.
e)That you do not place hands into any running water
extracting tub.
f)Please do not close the door with excessive forces. If it
is found difficult to close the door, please check if the
clothes are put in or distributed well.
• This appliance is not designed to wash carpets
Operating the appliance!
• Before washing the clothes for the first time, the appliance
should be operated for one cycle with no clothes in it.
• Flammable and explosive or toxic solvents are forbidden.
Gasoline and alcohol etc. are not to be used as detergents.
Please only select the detergents suitable for machine
washing.
• Make sure that all pockets are emptied. Sharp and rigid
items such as coins, brooches, nails, screws or stones etc.
may cause serious damages to this machine.
• Please check whether the water inside the drum has
been drained before opening its door. Please do not
open the door if there is any water visible.
• Be careful not to burn yourself if you are draining hot
washing water from the appliance.
• Never refill the water by hand during washing or drying.
• If it is unavoidable that fabrics that contain vegetable or
cooking oil or have been contaminated by hair care
products must be washed in the appliance,they should
first be washed in hot water with extra detergent , this
will reduce, but not eliminate, any potential hazards.
6
Page 8

SAFETY INSTRUCTIONS
• Adequate ventilation has to be provided and avoid the
back flow of gases into the room from appliances
burning other fuels, including open fires.
• Do not dry unwashed items in the appliance.
• Items that have been soiled with substances such as
cooking oil, acetone, alcohol, petrol, kerosene, spot
removers,turpentine,waxes and wax removers should be
washed in hot water first with an extra amount of
detergent before being dried in the appliance.
• Items such as foam rubber (latex foam), shower caps,
water proof textiles, rubber backed articles and clothes
or pillows fitted with foam rubber pads should not be
dried in the machine.
• Fabric softeners, or similar products, should be used as
specified by the fabric softener instructions.
• The final part of a washer dryer cycle occurs without
heat (cool down cycle) to ensure that the items are left
at a temperature that ensures that the items will not be
damaged.
• Remove all objects from pockets such as lighters and
matches before use the appliance.
• WARNING: Never stop a washer dryer before the end of
the drying cycle unless all items are quickly removed
and spread out so that the heat is dissipated.
7
Page 9

SAFETY INSTRUCTIONS
Packaging/Old appliance
This marking indicates that this product should not be
disposed with other household wastes throughout the
EU.To prevent possible harm to the environment or
human health from uncontrolled waste disposal,recycle
it responsibly to promote the sustainable reuse of
material resources.To return your used device, please use
the collection systems or contact the retailer where the
product was purchased. They return and can take this
product for environmental safe recycling.
8
Page 10
INSTALLATION
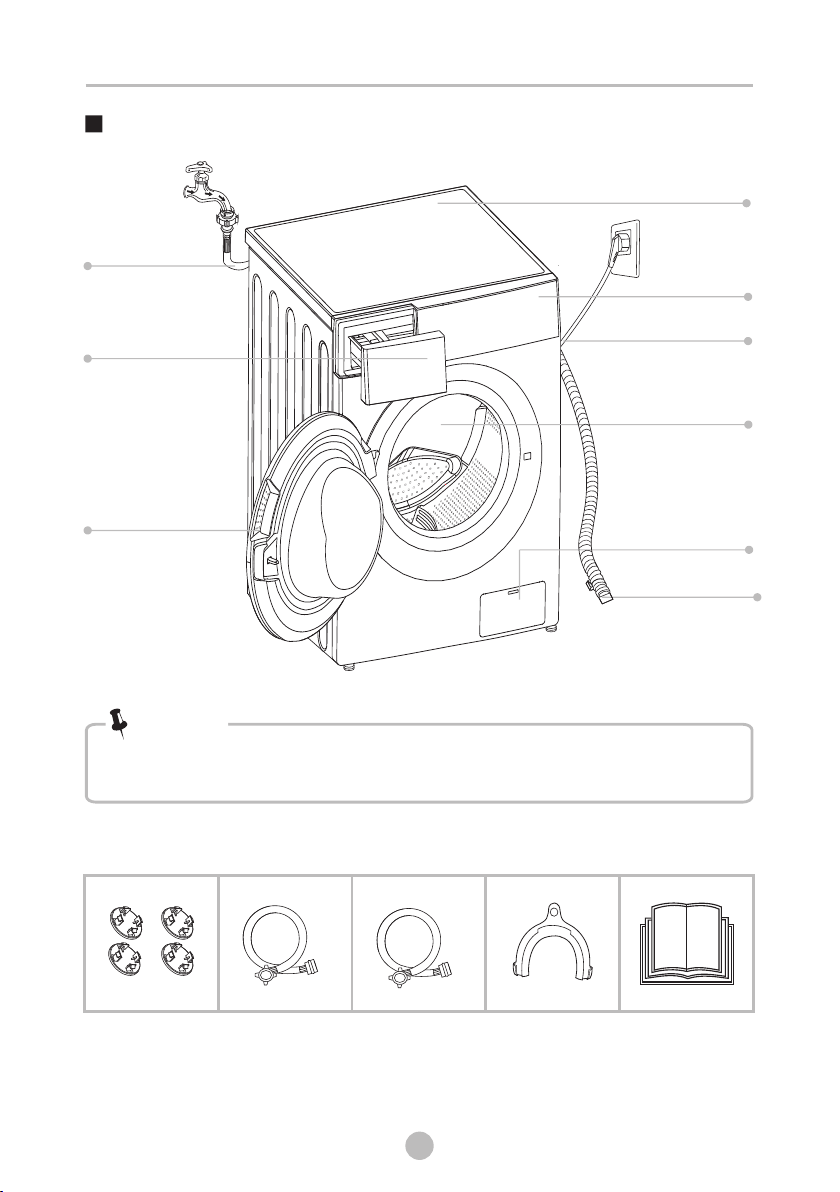
Product Description
Water supply hose
Top cover
Control panel
Detergent dispenser
Power supply cord
Door
Service filter
Note!
• The product line chart is for reference only, please refer to real product as
standard.
Accessories
Drum
Drain hose
Transport
plughole
Supply hose
cold water
Supply hose hot
water (optional)
9
Drain hose
(optional
)
support
Owner’s manual
Page 11
INSTALLATION
Installation
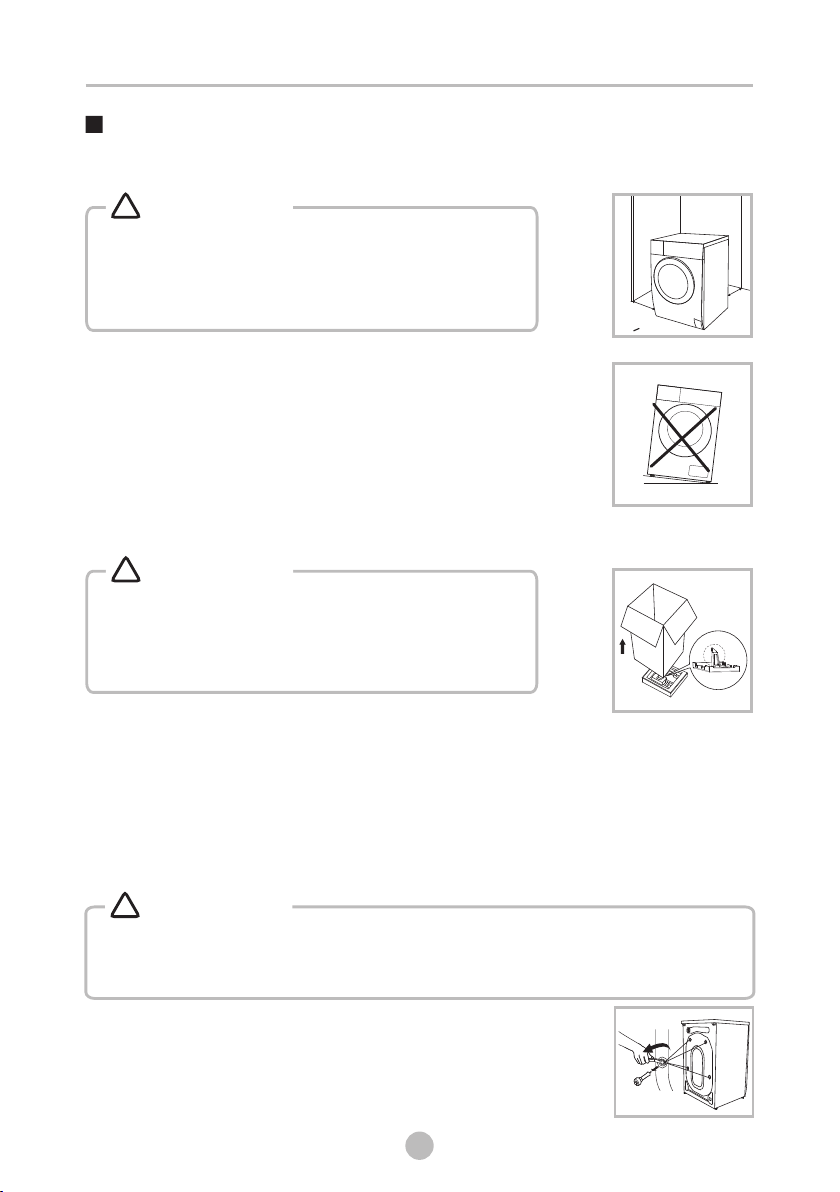
Installation area
!
Warning!
Stability is important to prevent the product from
•
wandering!
Make sure that the product should not stand on
•
the power cord.
Before installing the machine, the location characterized
as
follows shall be selected:
1.Rigid, dry, and level surface
2.Avoid direct sunlight
3.Sufficient ventilation
4.Room temperature is above 0℃
5.Keep far away from the heat resources such as coal or gas.
Unpacking the washer dryer
!
Warning!
•
Packaging material (e.g. Films, Styrofoam) can be
dangerous for children.
•
There is a risk of suffocation ! Keep all packaging
well away from children.
w
W> 2 0m m
w
1. Remove the cardboard box and styrofoam packing.
2. Lift the washer dryer and remove the base packing.
foam is removed with the bottom one together. If not, lay the unit down with side
surface, then remove the small foam from the unit bottom manually.
3. Remove the tape securing the power supply cord and drain hose.
4. Remove the inlet hose from the drum.
Make sure the small triangle
Remove transport bolts
!
Warning!
•
You must remove the transport bolts from the backside before using the product.
• product
You’ll need the transport bolts again if you move the , so make sure
you
keep them in a safe place.
Please take the following steps to remove the bolts:
1.Loosen 4 bolts with spanner and then remove them.
2.Stop the holes with transport hole plugs.
3.Keep the transport bolts properly for future use.
10
Page 12
INSTALLATION
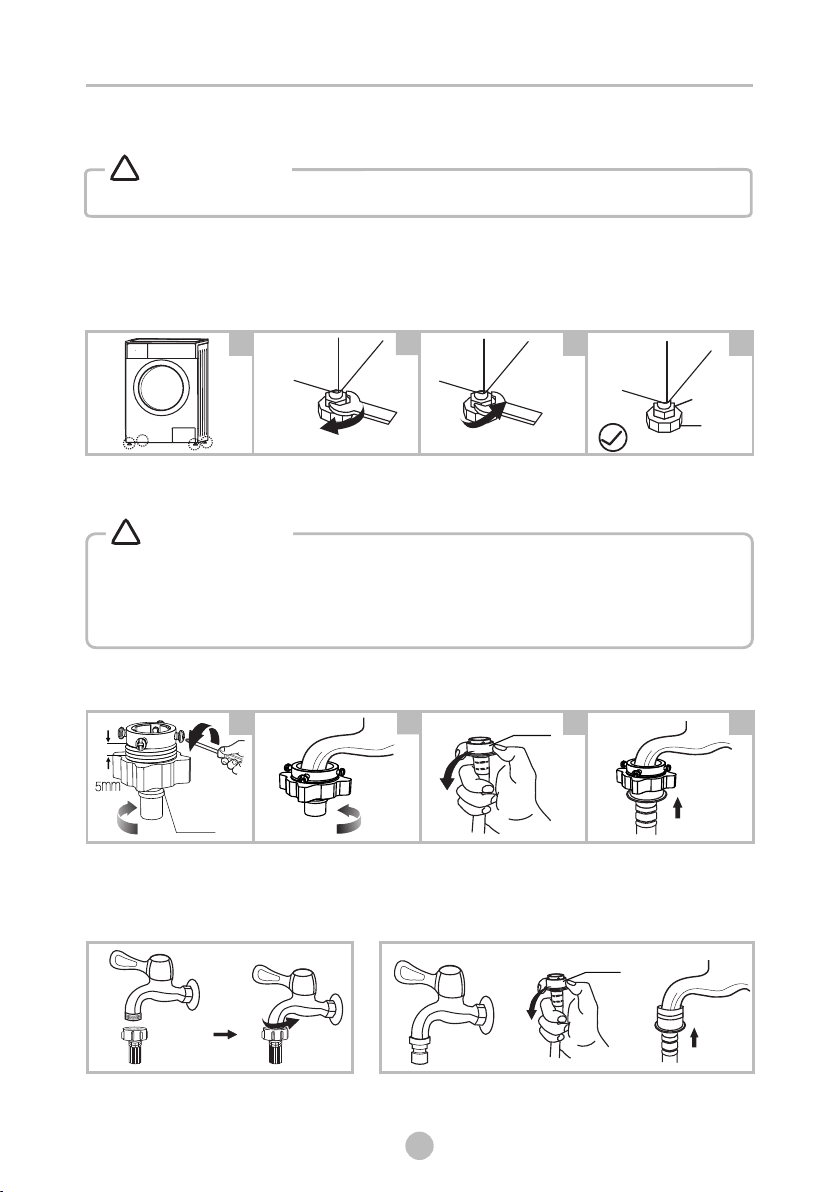
Levelling the washer dryer
!
Warning!
• The lock nuts on all four feet must be screwed tightly against the housing.
1.Check if the legs are closely attached to the cabinet. If not, please turn them to
their original positions tighten the nuts.
2.Loosen the lock nut turn the feet until it closely contacts with the floor.
3.Adjust the legs and lock them with a spanner, make sure the machine is steady.
1
Raise
2
Lower
3
Lock nut
Connect Water Supply Hose
!
Warning!
• To prevent leakage or water damage, follow the instructions in this chapter
Do not kink, crush, modify or sever .
• water inlet hose
• For the model equips hot valve,connect it to hot water tap with hot water supply
hose. Energy consumption will decrease automatically for some program.
Connect the inlet pipe as indicated, There are two ways to connect the inlet pipe.
1.Connection between ordinary tap and inlet hose.
2
clamp nut
Loosen clamp nut and
four bolts
2.Connection between screw tap and inlet hose.
Tighten clamp nut Press slide bushing,
insert inlet hose into
connecting base
slide bushing
3
Connection finished
4
foot
!
41
Tap with threads and inlet hose
Special tap for washing machine
9
11
slide bushing
Page 13
INSTALLATION
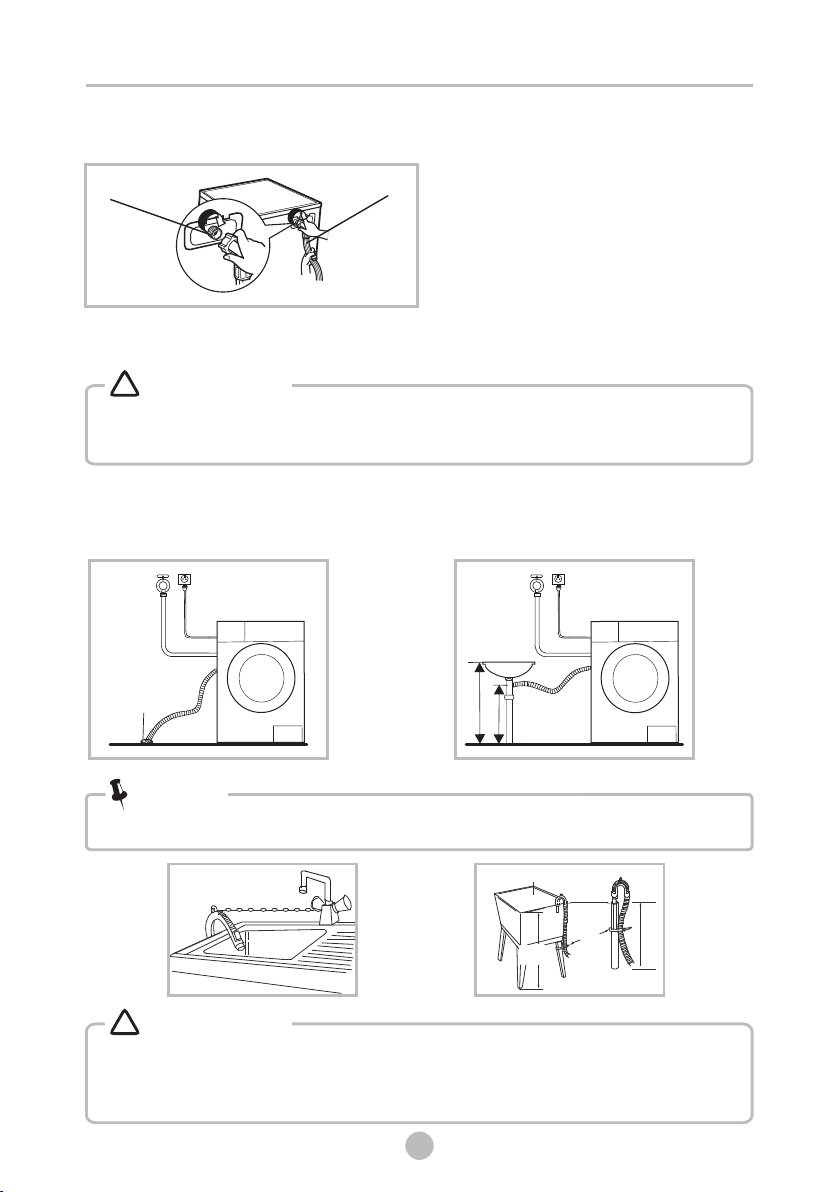
Connect the other end of inlet pipe to the inlet valve at the backside of product
and fasten the pipe tightly clockwise.
wat er I nl et valve
wat er s up pl y ho se
Drain Hose
!
!
Warning!
Warning!
•
Do not kink or protract the drain hose.
• Position drain hose properly ,otherwise damage might result of water leakage.
There are two ways to place the end of drain hose:
1.Put it into the water trough.
Water
trou gh
2.Connect it to the branch drain pipe of
the trough.
m
m
0c
0c
0
6
1
.
n.
Mi
Max
Note!
If the machine has • drain hose support, please install it like the following .
Troug h
Hose R etain er
nd
Bi
Min. 60cm
Max. 100cm
Min. 60cm
!
Warning!
•
When installing drain hose, fix it properly with a rope.
Max. 100cm
• If drain hose is too long, do not force it into washing machine as it will cause
abnormal noises.
10
12
Page 14
OPERATIONS
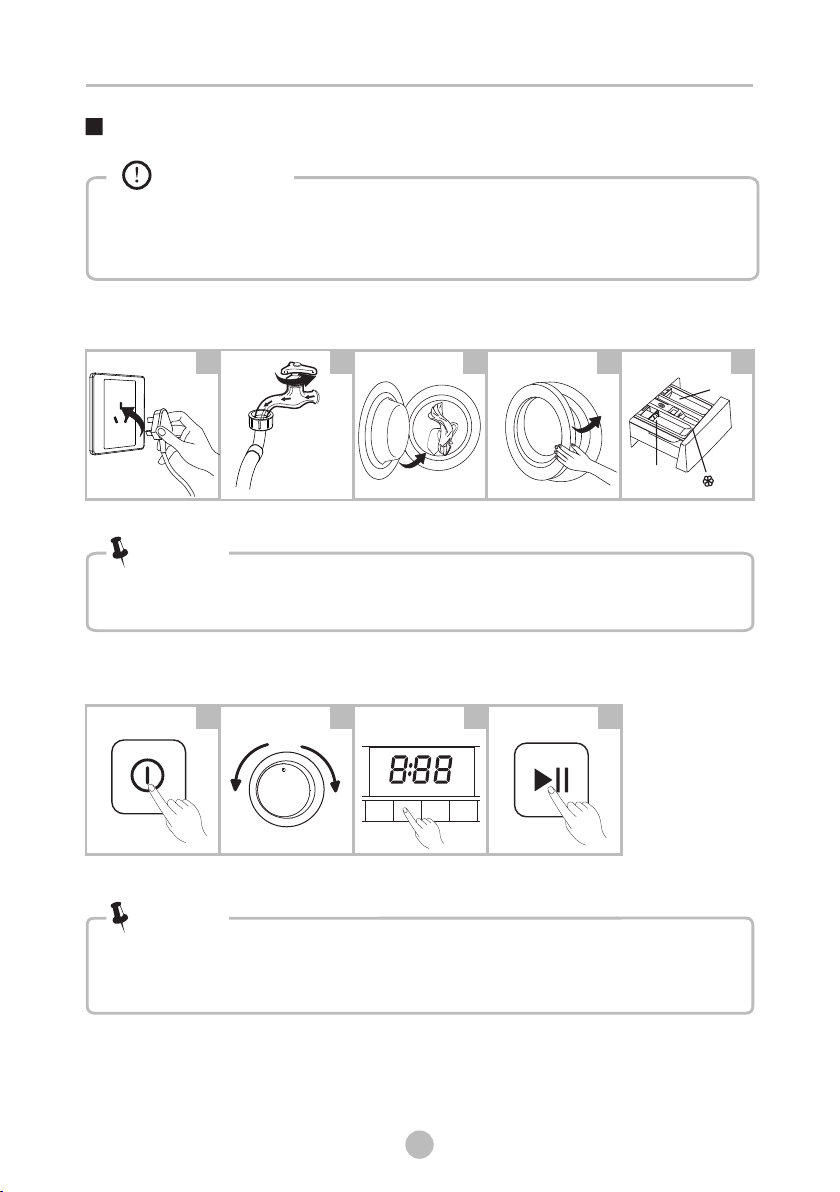
Quick Start
Caution!
Before using, please make sure the appliance is installed properly.
•
Before washing the clothes for the first time, the appliance should be operated
•
for one cycle with no clothes in it.
1. Before Washing
1 2 3 4 5
Main wash
Plug in
Open tap
Load
Close door
Add detergent
Note!
• Detergent only need to be added in "case I “after selecting pre-washing for
product with this function.
2. Washing
1 2 3 4
Power On
Select Programme
Select function or
default
Start up
Note!
• 1.
If default is selected, step 3 can be skipped.
2.The function button line chart is for reference only, please refer to real product
as standard.
Prewash
I
II
Soften er
3. After Washing
Buzzer beep or “End” on display.
13
10
Page 15
OPERATIONS
• The working condition of the washer should be(0-40)℃.If used under 0℃,the
inlet valve and draining system may be damaged. If the machine is placed under
condition of 0℃or less, then it should be transferred to normal ambient
temperature to ensure the water supply hose and drain hose are not frozen
before use.
• Please check the labels and the explanation of using detergent before wash. Use
non-foaming or less-foaming detergent suitable for machine washing properly.
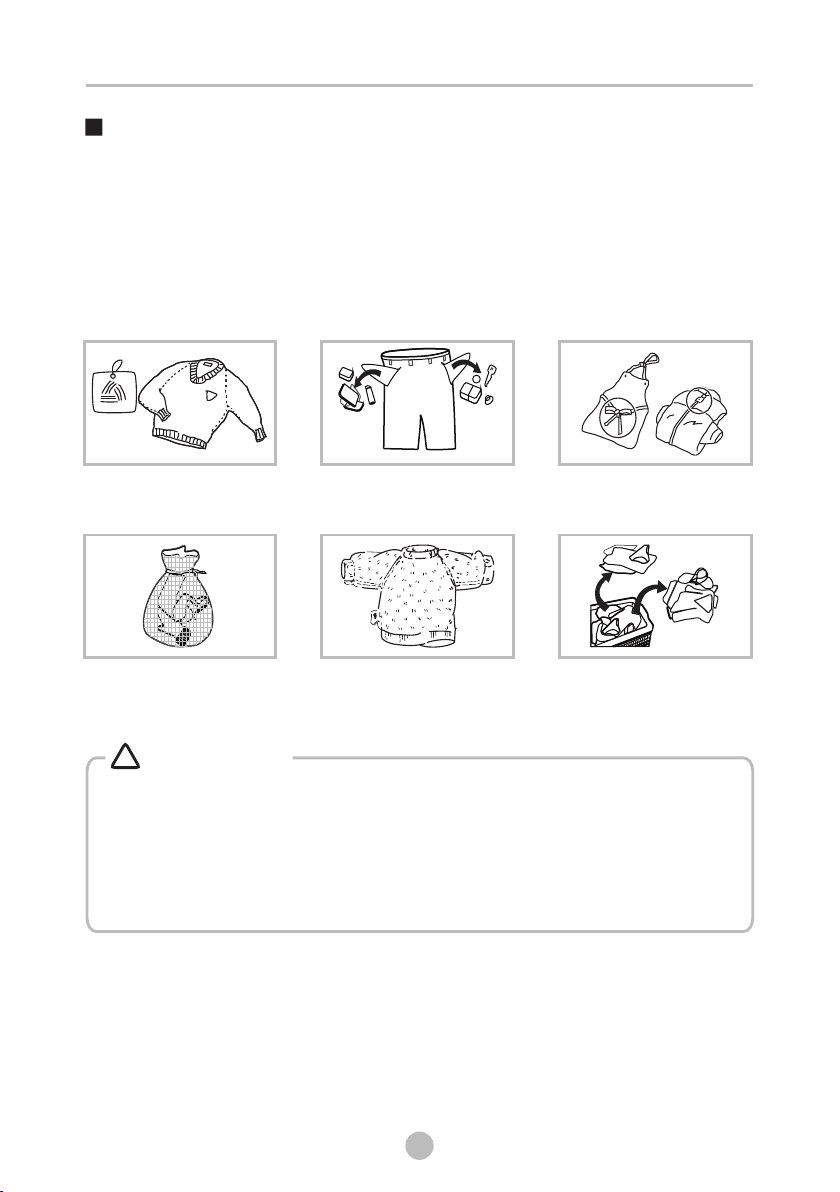
Before Each Washing
Check the label
Put small clothes into the
pillow slip
Take out the items out of
the pockets
Turn easy-pilling and
long-pile fabric inside out
Knot the long strips,zip or
button
Separate clothes with
different textures
!
rotates, especially during the spin cycle, which may cause the appliance to
shudder. To avoid this, it is suggested multiple items of clothing to be washed
together.
• Do not wash or dry clothes which have been exposed to kerosene, gasoline,
alcohol and other flammable materials
Warning!
• Washing single items of clothes may cause an imbalance when the drum
10
14
Page 16
OPERATIONS
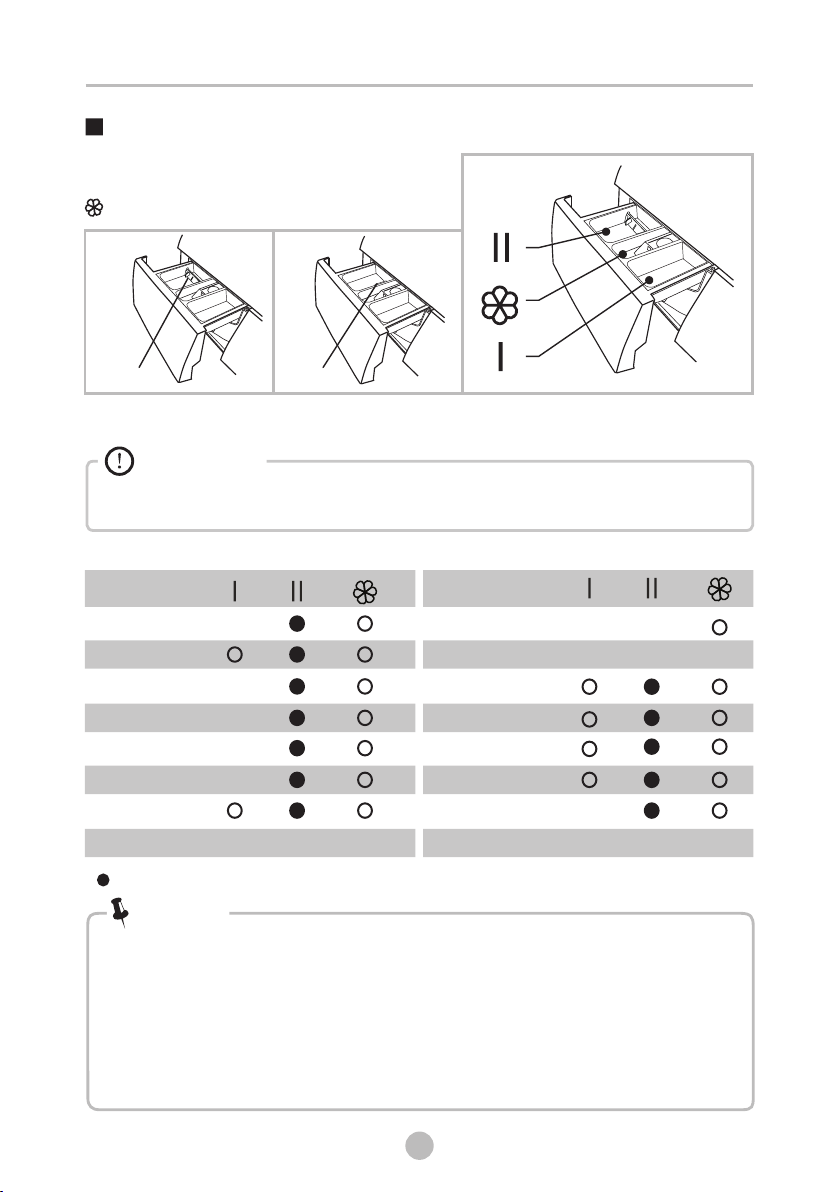
Detergent Dispenser
I
Pre wash detergent
II
Main wash detergent
Softener
Dam-board
Liquid detergent
Dam-board
Powder detergent
Pull out the dispenser
Caution!
• Detergent only need to be added in "case I “after selecting pre-washing
for machines with this function.
Model:CL7FLW D1
Programme
Cotton ECO
Sport Wear
Quick
Delicate
Wool
Colours
Jeans
Spin Only
=Required ○ =optional
Programme
Rinse&Spin
Dry Only
Mix
Baby Care
Synthetic
Cotton
1Hour W/D
Note!
• If you are using a thick or gelatinous detergent or additive, before they are
added into the detergent box, it is suggested to use water to dilute the
detergent, to prevent the inlet of the detergent box from being blocked and
overflowing while filling with water.
• Please make sure you choose a suitable type of detergent for the various
washing temperature to get the best washing performance with less water
and energy consumption.
15
10
Page 17
OPERATIONS
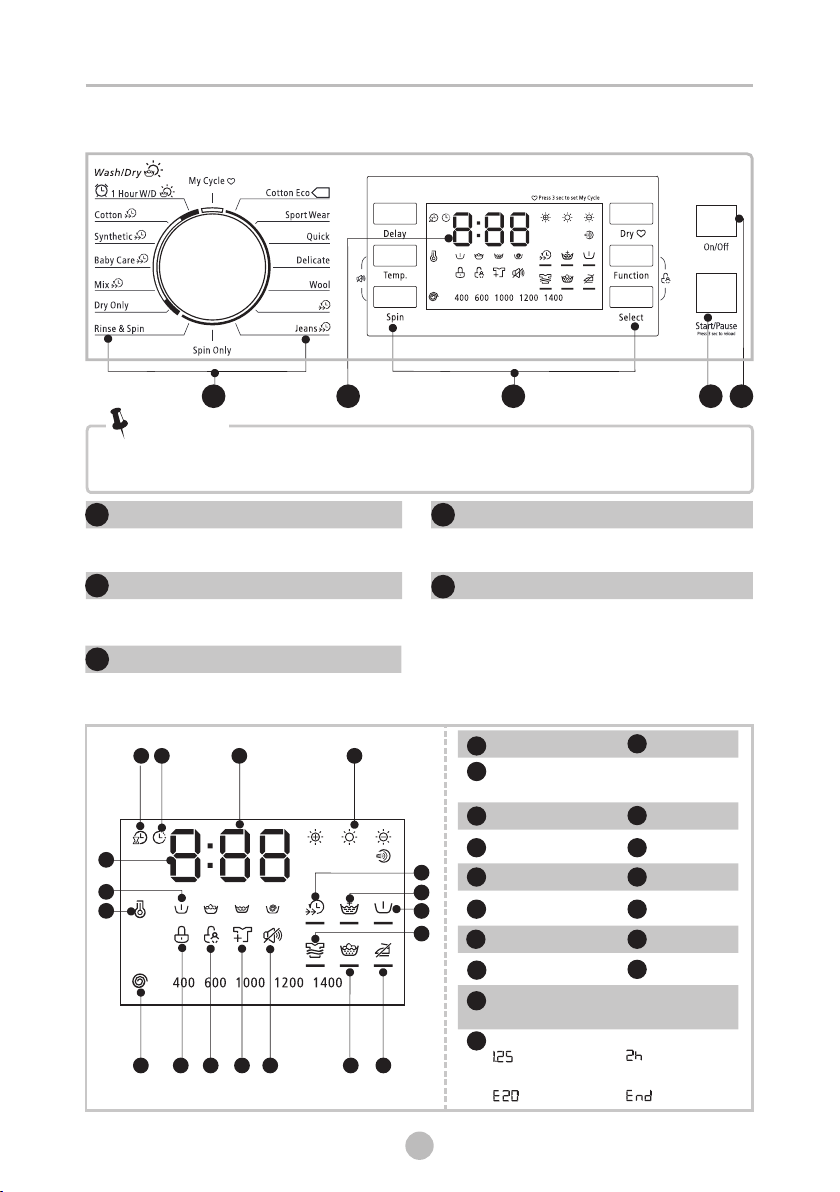
Model:CL7FLWD1
Col ours
4 3
5
1
Note!
•
Programmes with the Speed Wash symbol can be used with the Speed
Wash function
1
On/Off
1
Product is switched on or off.
3
Option
This allows you to select an additional
function and will light when selected.
5
Display
The display shows the settings, estimated time remaining, options, and status messages
for your washer. The display will remain on through the cycle.
A
Q
P
O
N
RB
K
L
M
J
C
I H
2
Start/Pause
1
Press the button to start or pause the
washing cycle.
4
Programmes
Available according to the laundry type.
Remain
A
C
Dry level(Extra Dry-Normal Dry-Gentle
Dry-Air Dry)
Speed Wash
D
F
Pre Wash
D
H
E
F
G
Anti-crease
J
Mute the buzzer
L
Child Lock
N
Spin Speed
P
Rate Of Progress(Pre wash- Wash
-Rinse-Spin)
Q
Wash Time Delay Time
Error End
B
E
G
I
K
M
O
Delay
Extra Rinse
Extra Wash
Soak
Reload
Door Lock
Temp.
2
111
16
10
Page 18
OPERATIONS
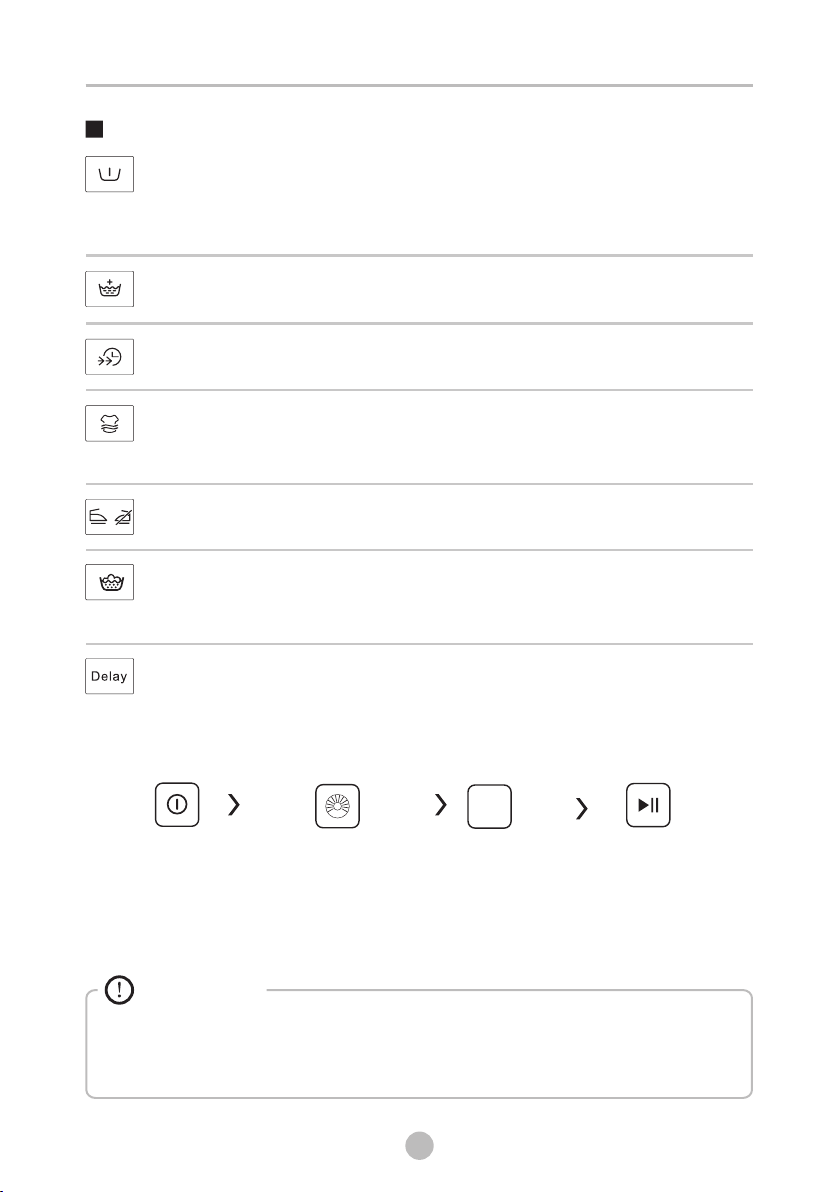
Option
Pre Wash
The Prewash function can get an extra wash before main wash,it is suitable for
washing the dust rises to surface of the clothes;You need to put detergent into
the Case (I) when select it.
Extra Rinse
The laundry will undergo extra rinse once after you select it.
Speed Wash
The function can decrease the washing time.
Extra Wash
For use with very dirty clothes. The Extra Wash Function will increase the washing
time and intensity to provide an intense washing effect.
Anti-Crease
/
It can be used to reduce the wrinkles of clothes.
Soak
When water reaches the target level,sock for 20 minutes and then the motor do
not rotate.
Delay
Set the Delay function:
1. Select a programme
2.Press the Delay button to choose the time(the delaying time is 0-24 H.)
3.Press [Start/Pause] to commence the delay operation
Delay
On/Off
Cancel the Delay function:
Press the [Delay] button until the display be 0H.It should be pressed before
starting the programme. If the programme already started, should press the
[On/Off] button to reset the programme.
Choose the Programme
Setting time
Start
Caution!
• If there is any break in the power supply while the machine is operating, a
special memory stores the selected programme and when the power is
restarted, press the [On/Off]button the program is continues.
10
17
Page 19
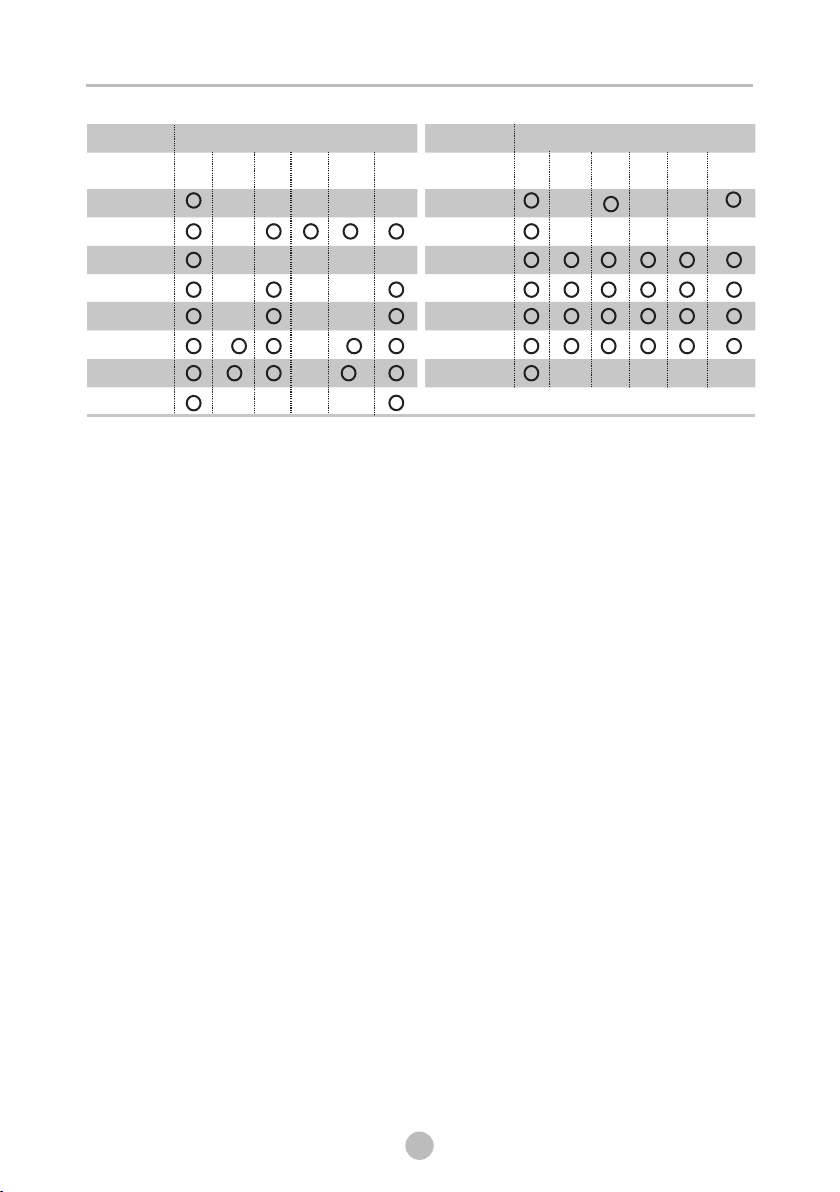
OPERATIONS
Model:CL7FLW D1
Programme Option Programme Option
Anti-
Soak Anti-
crease
Rinse&Spin
Delay
Speed
wash
Dry Only
Mix
Baby Care
Synthetic
Cotton
1Hour W/D
Cotton ECO
Sport Wear
Quick
Delicate
Wool
Colours
Jeans
Spin Only
○ =optional
Delay
Speed
wash
Extra
rinse
Extra
wash
Extra
rinse
Extra
wash
Soak
crease
18
10
Page 20
OPERATIONS
Other functions
Reload
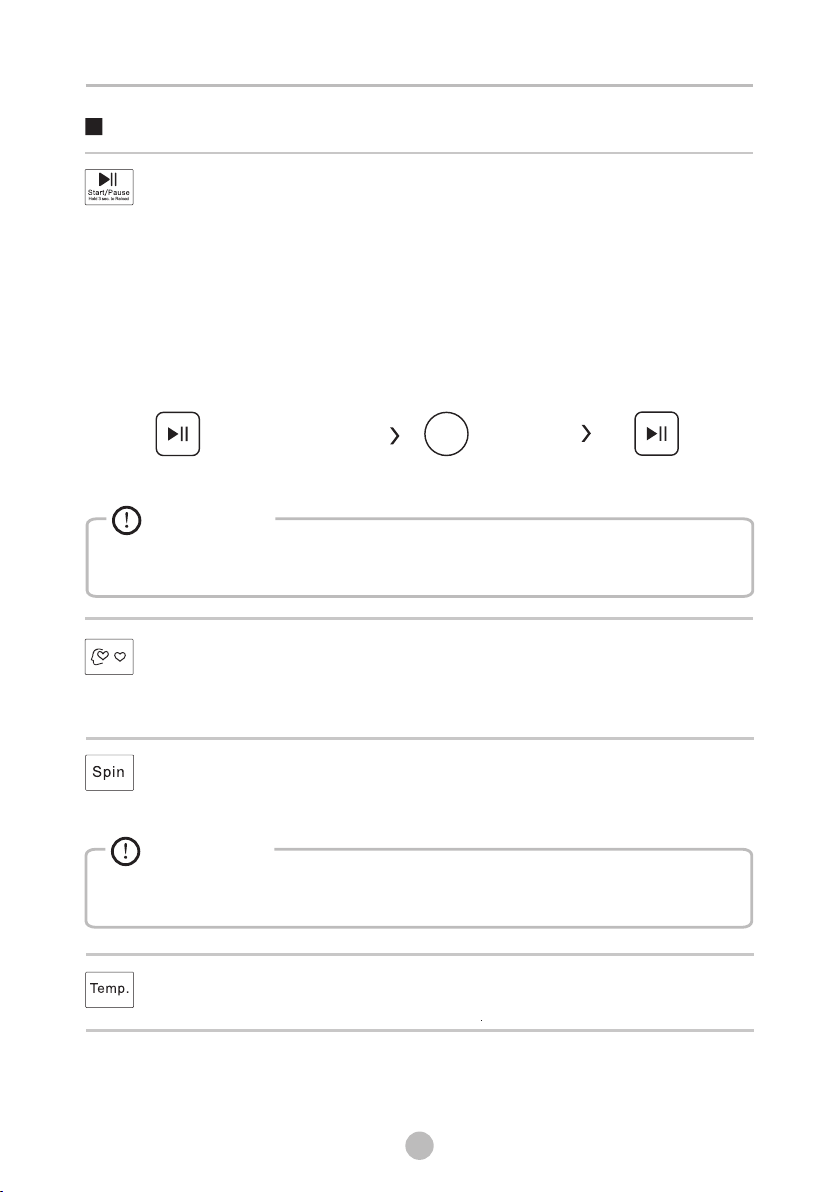
This operation can be executed during the washing progress. When the drum is
still rolling and there is large amount of water with high temperature in the drum.
The state is unsafe and the door cannot be opened forcefully. To press
[Start/Pause] for 3 sec. to reload, and start the clothes adding in the midway
function. Please follow the steps as bellow:
1.Wait until the drum stops rotation.
2.The door lock is unlocked.
3.Close the door when the clothes are reloaded and press the [Start/Pause]
button.
Clothes
P 3sress[Start/Pause] ec.
Reload the clothes
Start
Caution!
• Don't use the Reload function when the water level is over the edge of the
inner tub or the temperature is higher.
My Cycle
( )
Programmes the machine to memorise frequently used programmes.
Press [Spin]([Dry]/[Temp.]) 3sec. to memorise the running programme. The
default is cotton.
Spin
Press the button to change the spin speed.
1400: 0-600-800-1000-1200-1400
Caution!
• When the lights of spin speed (600,800,1000,1200,1400) are off, it means
the spin speed is 0.
Temp.
℃,Press the button to change the temperature(Cold,20 30℃, 40℃,60℃,90℃)
19
10
Page 21
OPERATIONS
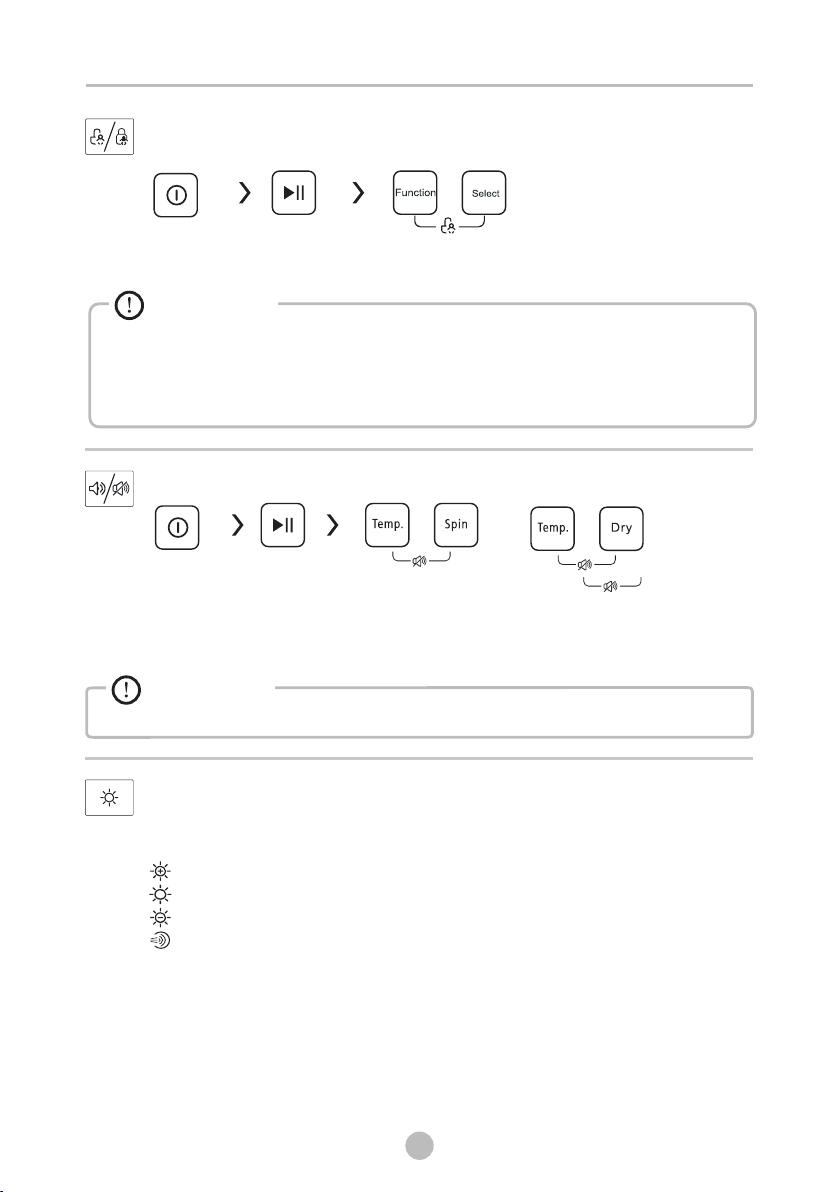
Child Lock
To avoid accidental operation by children.
Power on
Start
Press [Function] and [Select]
3 sec. till buzzer beep.
Caution!
• Press the two button 3sec. also to release the function.
• The “Child Lock” will lock all buttons except [ On/Off ].
• .
The child lock is released once the power supply is lost
• The child lock will remain effective when the power is resumed for some models.
Mute the buzzer
/
Power on
To act the buzzer function, press the two buttons again for 3 seconds. The setting
will be kept
Caution!
• muAfter ting the buzzer function, the sounds will not be activated any more.
Dry
Press the Dry button continuously to choose the dry level: Extra Dry/Normal Dry/
Gentle Dry/Air Dry.
Extra Dry:Need to wear clothes immediately ,we can choose this function
Normal Dry: The normal dry procedure
Gentle Dry:Only to dry slightly and then is just ok .
Air Dry: Clothes is roated to remove peculiar smell without water in high
temperature.
Start
until the next reset.
Press the two button with” “for 3sec.
the buzzer is mute.
20
10
Page 22

OPERATIONS
Note!
• Drying hints
- Clothes should be dried after spinning
- To ensure that the clothes are dried properly separate out the clothes
and dry them according to their different types and required drying
temperature.
- Please note: Synthetic clothing should be set to the correct drying time.
- If you wish to iron your clothes after drying, please leave them for a short
while to allow them to cool properly.
• Clothes not suitable for drying
- Particularly delicate items such as synthetic curtains,woolen and silk,
clothes with metal inserts,nylon stockings,bulky clothes,such as
anoraks,bedcovers,quilts,sleeping bags and duvets must not be dried.
- Clothes padded with foam-rubber or materials similar to foam-rubber
must not be machine dried.
- Fabrics containing residues of setting lotions or hair sprays, nail
solvents or similar solutions must not be machine dried in order to avoid
the formation of harmful vapours.
21
10
Page 23
OPERATIONS
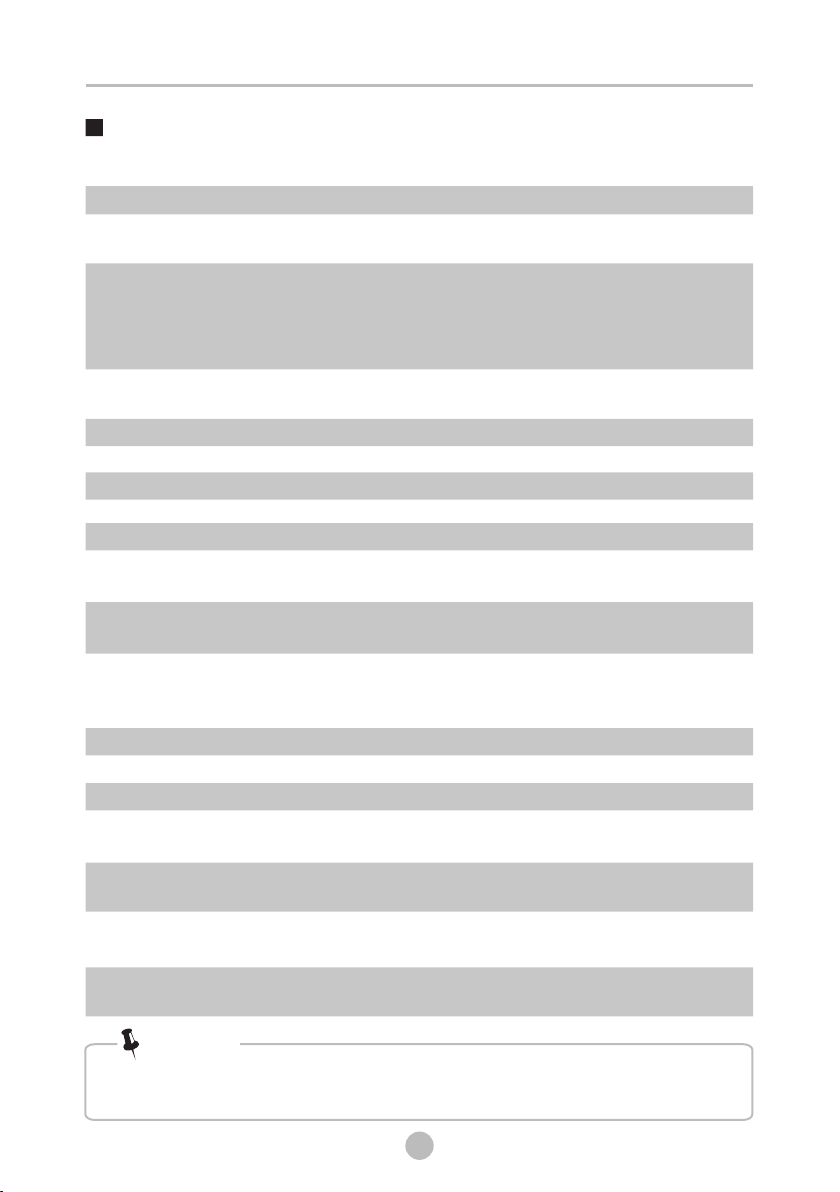
Programmes
Programmes are available according to the laundry type.
Hard-wearing textiles, heat-resistant textiles made of cotton or
linen.
Wash synthetic articles, for example: shirts, coats, blending.
Synthetic
Baby Care
Jeans
Mix
Colours
Cotton Eco
Sport Wear
Quick(Quick15')
Delicate
Wool
Spin Only
Rinse&Spin
Drain Only
Dry Only
(Dry)
1Hour W/D
Refresh
Rapid 45'
While washing the knitting textiles, detergent quantity shall be
reduced due to its loose string construction and easily forming
bubbles.
Washing the baby’s clothes, it can make the baby's wear cleaner
and make the rinse performance better to protect the baby skin.
Specially for jeans.
Mixed load consisting of textiles made of cotton and synthetics.
Washing brightly coloured clothes, it can protect the colours better.
To increase the washing effects, washing time is increased.
Washing the activewear.
Extra short programme approx, suitable for lightly soiled
washing as a small amounts of laundry.
For delicate, washable textiles, e.g. made of silk, satin, synthetic
fibres or blended fabrics.
Hand or machine-washable wool or richwool textiles.Especially
gentle wash programme to prevent shrinkage, longer
programme pauses (textiles rest in wash liquor).
Extra spin with selectable spin speed.
Extra rinse with spin.
Drain off the water.
Select it to dry clothes, the temperature is different .The drying
time according to the load .
Select it to dry clothes,the time less than 1 hour, The default load
is 1kg.
During this cycle, there is only hot air rather than water ejecting
from inside the drum to wash the clothing.
It is suitable for washing not very dirty clothes, save more energy
and washing.
Note!
• Please make sure to select the correct programmes suitable for the
clothing used.
10
22
Page 24
OPERATIONS
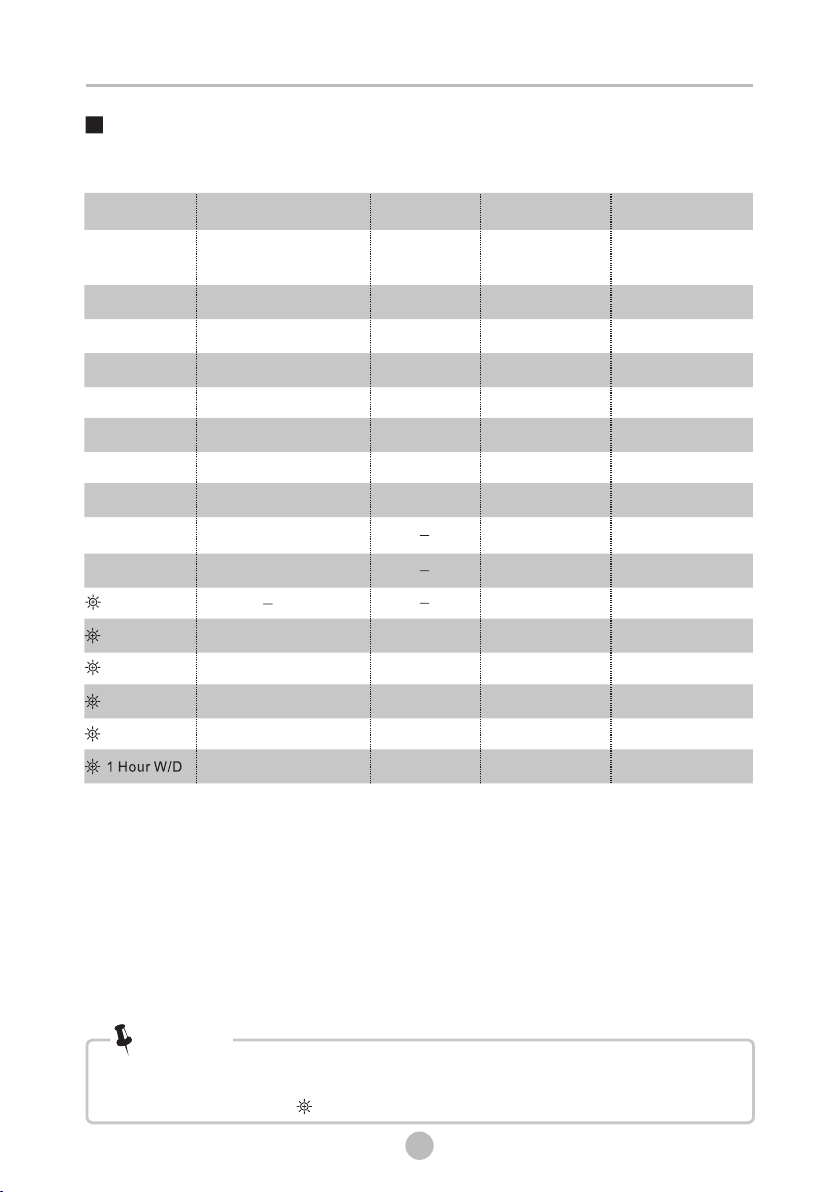
Washing Programmes Table
Model:CL7FLWD1
Programme
Cotton ECO
Sportwear
Quick
Delicate
Wool
Colours
Jeans
Spin Only
Rinse&Spin
Dry Only
Mix
Baby Care
Synthetic
Cotton
Washing/Drying
(kg)
7.0
7.0
3.5
2.0
2.5
2.0
7.0
7.0
7.0
7.0
/3.5
7.0/3.5
7.0/3.5
3.5/3.5
7.0/3.5
1.0/1.0
Load
Temp.(°C)
Default
60
40
Cold
30
40
Cold
60
40
30
40
40
Cold
Default Time(H)
1400
4:50
0:45
0:15
0:50
1:07
1:10
1:45
0:12
0:20
3:32
1:13
1:20
1:40
2:40
0:59
Default Speed(rpm)
1400
1400
1200
800
600
600
1000
800
1000
1000
1400
800
800
800
800
1400
Energy test program: Cotton ECO 60
• °C(7.0kg)
Speed: the highest speed; Other as the default.
Half load for 7.0Kg machine:3.5Kg.
• “Cotton Eco(Cotton ECO 60°C) ” is the standard washing program and “Dry
only ” is the standard drying programs to which the information in the label and
the fiche relates,
and they are suitable to clean normally soiled cotton laundry and
that they are the most efficient programmes in terms of combined energy and
water consumptions for washing that type of cotton laundry,that the actual water
temperature may differ from the declared cycle temperature.
Note!
•
The above table is for reference only - please check your machine as the
programme length may vary depending on load size and other parameters.
•
The programme with will allow the drying function to be chosen.
10
23
Page 25
MAINTENANCES
Cleaning And Care
!
Warning!
• Before your maintenance starts, please unplug the machine and close the tap.
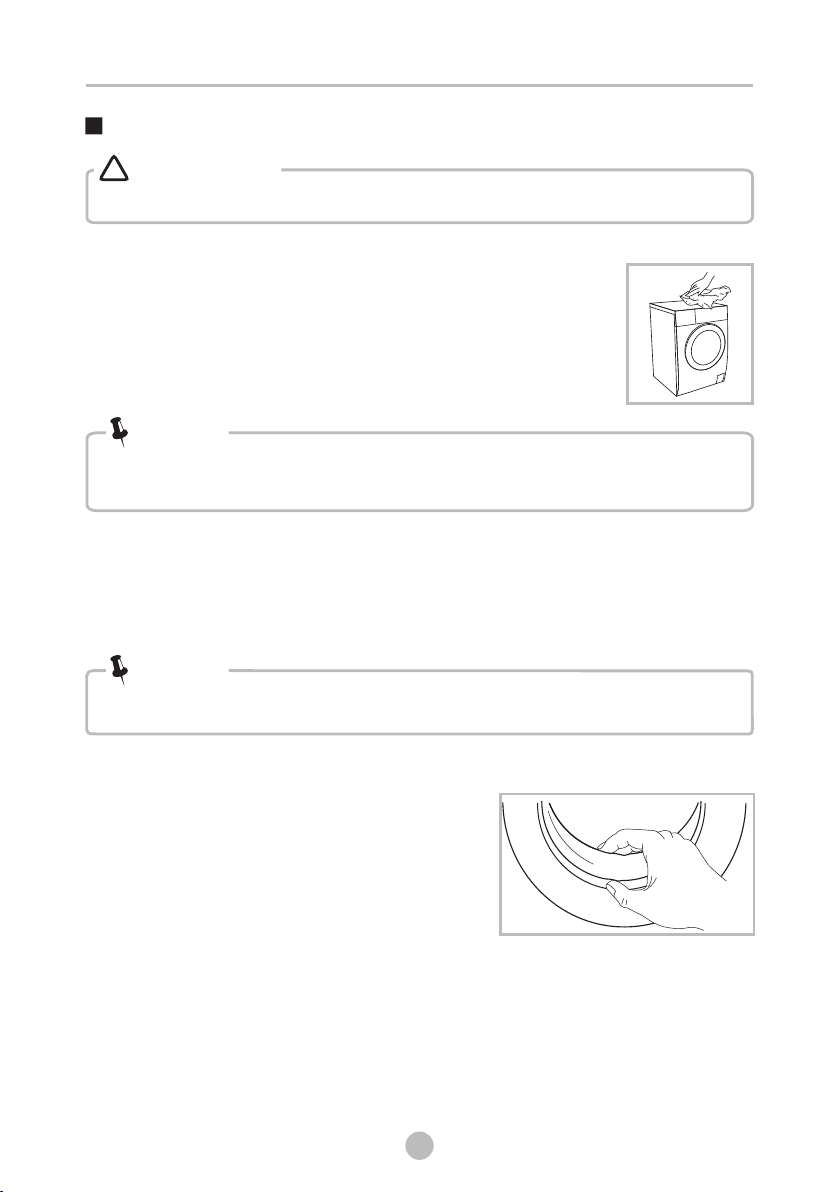
Cleaning The Cabinet
Proper maintenance on the washing machine can extend its
working life. The surface can be cleaned with diluted
non-abrasive neutral detergents when necessary. If there is
any water overflow, use the wet cloth to wipe it off immediately.
No sharp items are allowed.
Note!
•
Formic acid and its diluted solvents or equivalent are forbidden, such as
alcohol,
solvents or chemical products,etc.
Cleaning The Drum
The rusts left inside the drum by the metal articles shall be removed immediately
with chlorine-free detergents.
Never use steel wool.
Note!
• Don’t put laundry in the washing machine during the drum cleaning.
Cleaning The Door Seal And Glass
Wipe the glass and seal after each wash
to remove lint and stains. If lint builds up it
can cause leaks.
Remove any coins, buttons and other objects
from the seal after each wash.
10
24
Page 26
MAINTENANCES
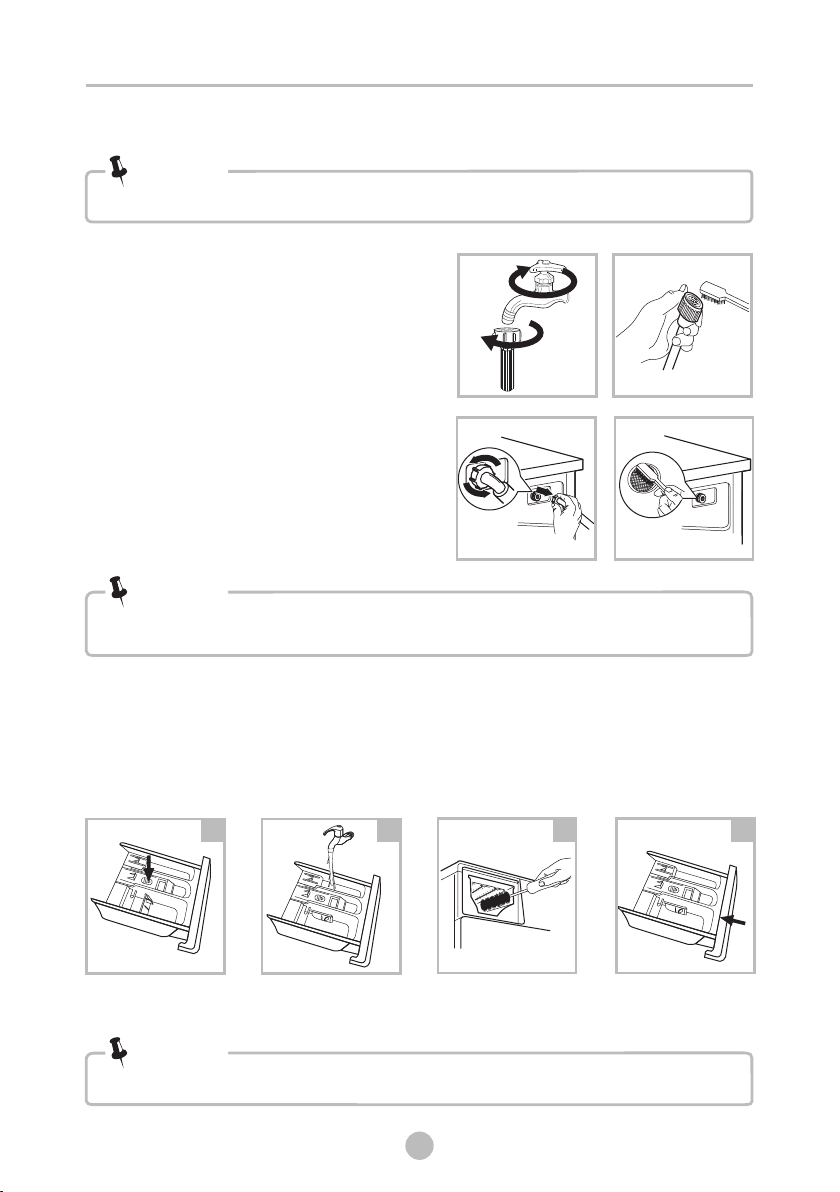
Cleaning The Inlet Filter
Note!
• Inlet filter must be cleaned if there is less water.
Washing the filter in the tap
1.Close the tap.
2.Remove the water supply hose from the tap.
3.clean the filter.
4.Reconnect the .water supply hose
Washing the filter in washing machine:
1.Screw off the inlet pipe from the backside
of the machine.
2.Pull out the filter with long nose pliers
and reinstall it back after being washed.
3.Use to clean the filter.
the brush
4.Reconnect the inlet pipe.
Note!
• If the brush is not clean, you can pull out the filter washed separately;
• Reconnect, turn on the tap.
Clean The Detergent Dispenser
1.Press down the arrow location on softener cover inside the dispenser drawer.
2.Lift the clip up and take out softener cover and wash all grooves with water.
3.Restore the softener cover and push the drawer into position.
1
A
Pull out the dispenser
drawer with press the A
Clean the dispenser
drawer under water
2
Clean inside the recess
with an old toothbrush
3
Insert the dispenser
drawer
Note!
Do not use alcohol,solvents or chemical products to clean the machine.•
10
25
4
Page 27
MAINTENANCES
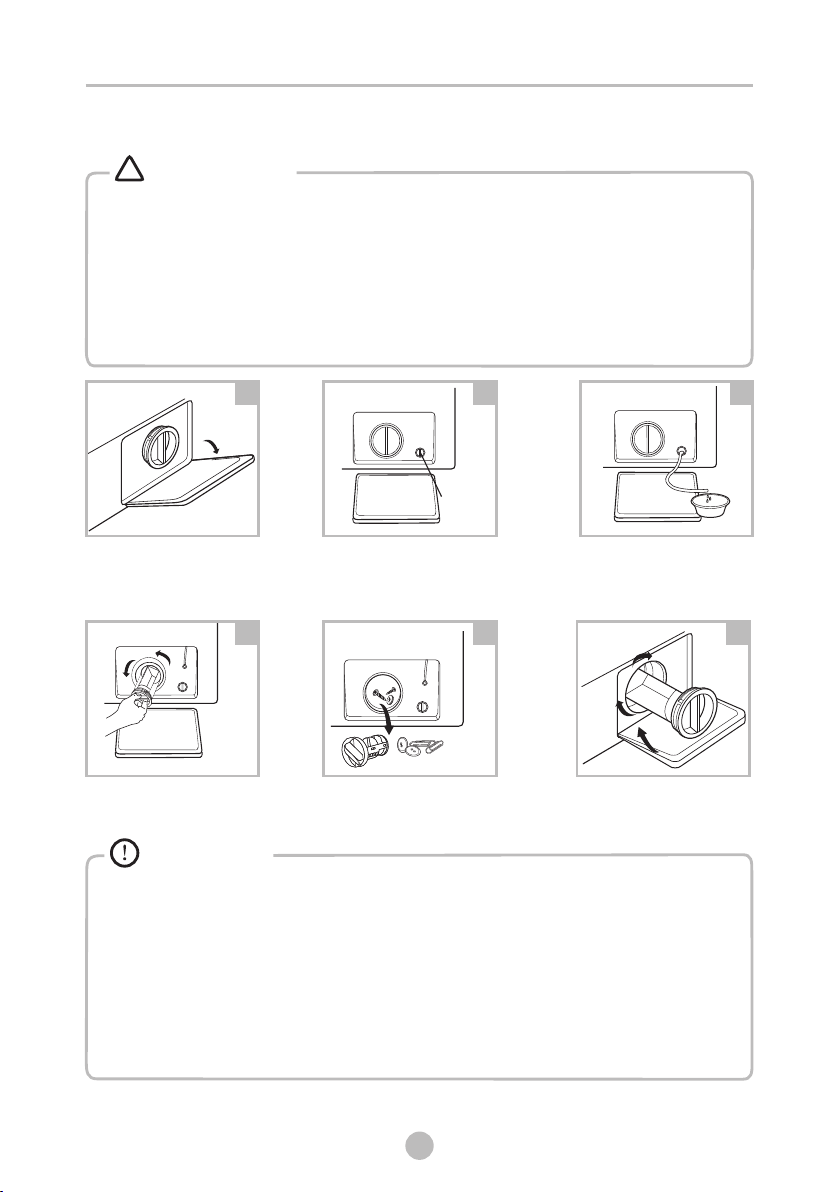
Cleaning The Drain Pump Filter
!
Warning!
Be careful of the hot water!
•
Allow detergent solution to cool down.
•
• Unplug the machine to avoid electrical shock before washing.
• Drain pump filter can filter the yarns and small foreign matters from the
washing.
• Clean the filter periodically to ensure the normal operation of washer
dryer.
Open the lower cover cap
Open the filter by turning
to the counter clockwise
1
Rotate 90°C and pull out
the emergency drain hose,
and take off the hose cap
4
Remove extraneous matter
Emergency
drain hose
2
After water runs out,reset
the drain hose
5
Close the lower cover cap
6
Caution!
• Make sure that valve cap and emergency drain hose are reinstalled properly, cap
plates should be inserted aligning to hole plates otherwise water may leak.
• Some machines don’t have emergency drain hose, so step 2 and step 3 can be skipped.
Rotate lower cover cap directly to make water run into basin.
• When the appliance is in use and depending on the programme selected there can
be hot water in the pump. Never remove the pump cover during a wash cycle, always
wait until the appliance has finished the cycle, and is empty. When replacing the
cover, ensure it is securely re-tightened.
3
26
10
Page 28
MAINTENANCES
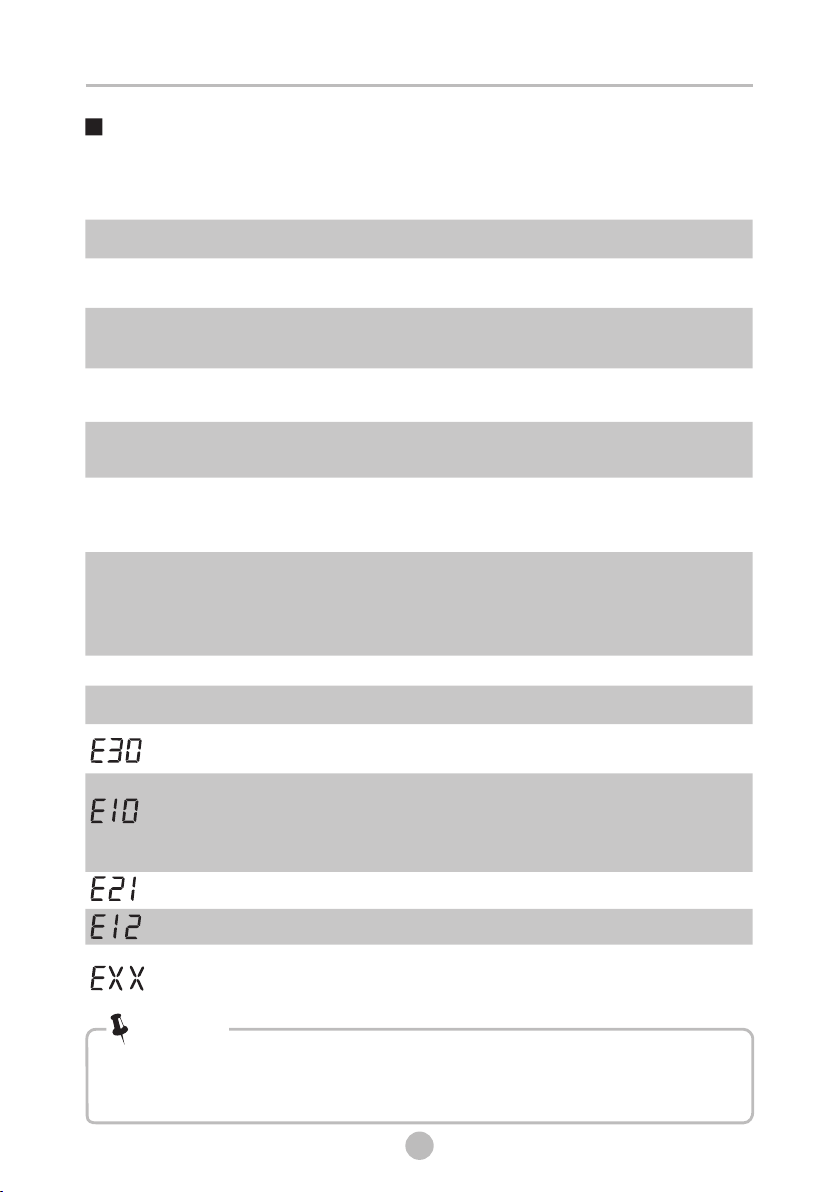
Trouble Shooting
The start of the appliance does not work or it stops during operation.
First try to find a solution to the problem, If not, contact the service centre.
Description
Washing machine
cannot start up
Door can’t be
opened
Water leakage
Detergent residues
in the box
Indicator or display
does not light
Abnormal noise
Description
Reason
Door is not closed properly
Washer's safety
protection design is working
The connection between inlet
pipe or outlet hose is not tight
Detergent is dampened
or viscous
Disconnect the power
PC board or harness has
connection problem
Reason
Door is not closed properly
Water injecting
problem while
washing
Overtime water draining
Solution
Restart after the door is closed
Check if the clothes is stuck
Disconnect the power, restart
the product
Check and fasten water pipes
Clean up outlet hose
Clean and wipe the detergent
box
Check if the power is shut
down and the power plug is
connected correctly
Check if the fixing (bolts) have
been removed
Check
it’s installed on a solid
and level floor
Solution
Restart after the door is closed
Check if the clothes is stuck
Check if the water pressure is
too low
Straighten the water pipe
Check if the inlet valve filter is blocked
Check if the drain hose is blocked
Water overflow
Others
Restart the washer
Please try again first, call up
service line if there are still
troubles
Note!
• After checking the fault, please start the appliance again. If the problem
occurs again, or the display shows another alarm code, please contact our
service support line.
10
27
Page 29
MAINTENANCES
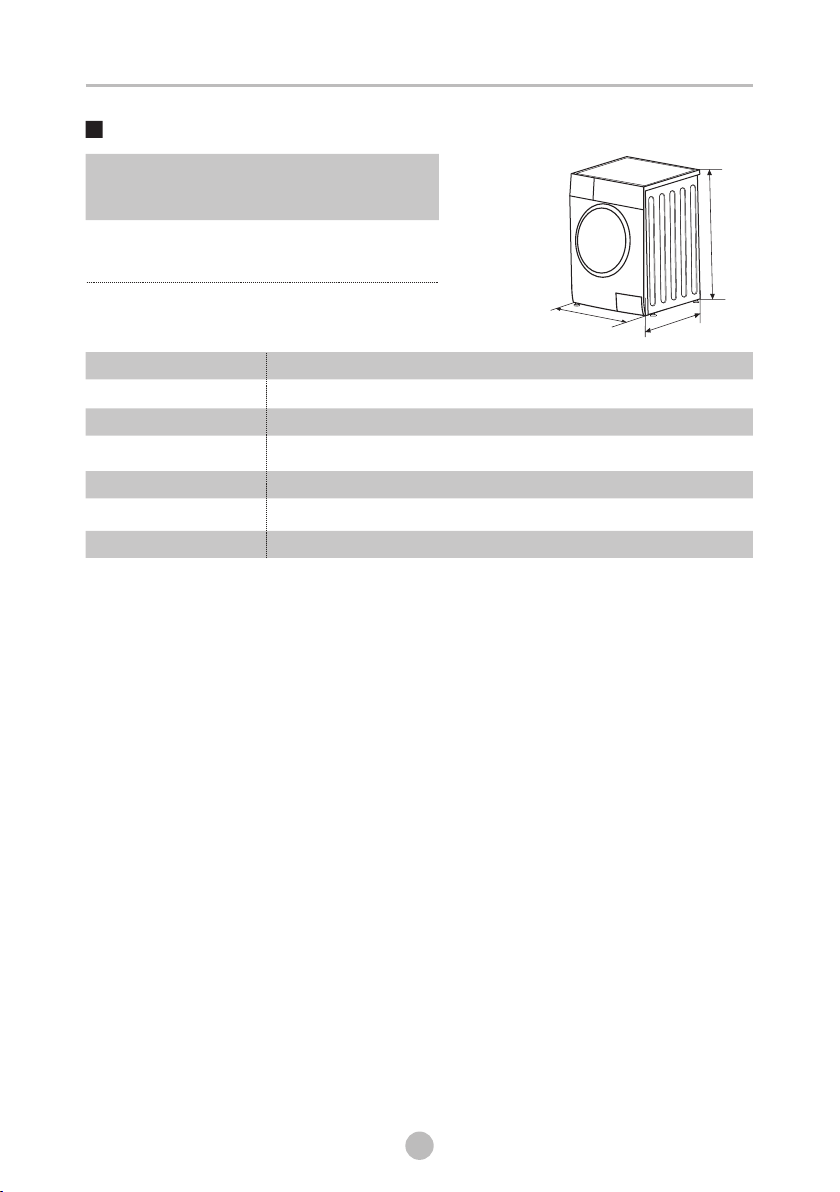
Technical Specifications
Power Supply
MAX.Current
Standard Water Pressure
Model
Washing Capacity
Drying Capacity
Dimension(W*D*H)
Weight
Rated Power
Drying Power
220-240V~,50Hz
10A
0.05MPa~1 MPa
CL7FLWD1
7.0kg
3.5kg
595*470*850
62kg
1900W
1300W
m
m
50
8
59
5m
m
0mm
7
4
28
10
Page 30

MAINTENANCES
Testing methods
Model:CL7FLWD1
ADDITIONAL INFORMATION FOR Standard performance TESTING:(AS/NZS 2040.1:2005+
Amdt1-2007+Amdt2-2009)
1. Water connections:Cold & hot water connection
2. Water supply pressure: 320 kPa
3. Warm wash Program: Cotton Eco 60°C Display: 4:50
Cold wash program: Cotton Cold( no temperature display is cold wash)
4. Detergent type: Drum detergent
5. Detergent quantity: Default
6. Adding detergent:
The detergent is dissolved and added as Paragraph B7.3 of AS/NZS 2040.1
The detergent shall be dissolved in 1 L of water
7. Anti-sudsing agent: Max
8. Test load mass: 7.0kg
9. Water consumption: 72L
10.Test Voltage:220-240V~,50Hz
29
10
Page 31
 Loading...