

Classic Organ Works WMJ-003 User Manual

USER MANUAL
..............................................................................................................................................................LIMITED WARRANTY 2
........................................................................................................................................................................INTRODUCTION 3
WELCOME .................................................................................................................................................................................. 3
APPLICATIONS............................................................................................................................................................................. 3
FEATURES AT A GLANCE .............................................................................................................................................................. 4
..........................................................................................................................MIDIJET PRO USB PACKAGE CONTENTS 4
..............................................................................................................................SWITCHES, PLUGS AND CONNECTORS 5
.............................................................................................................................................BASIC SETUP AND OPERATION 7
................................................................................................................................................................USB CONNECTIVITY 9
..........................................................................................................................................CONNECTING TO IOS DEVICES 10
.................................................................................................BEST PRACTICES FOR WIRELESS COMMUNICATION 10
....................................................................................................................................................................TIPS AND TRICKS 11
..................................................................................................................................................................EXTENDED SETUP 11
CHANNEL SELECTION................................................................................................................................................................ 11
BINDING MIDIJET PRO SETS..................................................................................................................................................... 12
TROUBLESHOOTING CHECK LIST............................................................................................................................................... 12
FIRMWARE UPDATING ............................................................................................................................................................... 13
...................................................................................................APPENDIX A: DIP SWITCH CONFIGURATION TABLE 15
...................................................................................................APPENDIX B: BI-DIRECTIONAL CABLE SCHEMATIC 17
Copyright © 2012 Classic Organ Works
2800 John Street, Unit 4
Markham, Ontario, Canada
L3R 0E2
Tel .: (905 ) 475- 12 75
Fax.: (905) 475-2735
E-mail: support@midijet.com
www.midijet.com

Classic MIDIjet Pro USB
WMJ-003
LIMITED WARRANTY
Classic Organ Works warrants the MIDIjet Pro to be free from defects in materials and workmanship under normal use for a
period of ONE YEAR from the delivery date. This warranty applies only if the product is owned by the original purchaser who
has the bill of sale.
This warranty explicitly excludes any cables provided with the MIDIjet, which may become defective as a result of normal wear
and tear. The DC power adaptor is included in the warranty however.
In the event of a defect in materials or workmanship, please contact Classic Organ Works immediately. In particular, defects due
to shipping should be reported within 15 days for insurance claim purposes. For all other defects, Classic Organ Works agrees to
repair or replace all defective parts of said products which are returned, transportation prepaid, for inspection at its service centre
within the period of the warranty.
In the event that Classic Organ Works determines the product requires repair because of user misuse or regular wear, it will assess
a fair repair or replacement fee. The customer will have the option to pay this fee and have the unit repaired and returned, or not
pay this fee and have the unit returned un-repaired.
Classic Organ Works will not be liable for consequential, special, indirect, or similar damages or claims including loss of profit or
any other commercial damage, and in no event will Classic Organ Works’ liability for any damages to the purchaser or any other
person exceed the price paid for the product, regardless of any form of the claim. Classic Organ Works specifically disclaims all
other warranties, expressed or implied. Specifically, Classic Organ Works makes no warranty that the product is fit for any
particular purpose.
This warranty shall be interpreted, and governed by applicable laws in the province of Ontario, Canada. If any provision of this
warranty is found void, invalid or unenforceable, it will not affect the validity of the balance of the warranty, which shall remain
valid and enforceable according to its terms. In the event any remedy hereunder is determined to have failed of its essential
purpose, all limitations of liability and exclusion of damages set forth herein shall remain in full force and effect.
2
1.INTRODUCTION
1.1 Welcome
Thank you for purchasing the MIDIjet Pro USB Wireless MIDI System. We have designed this product with high-grade
components to ensure a solid, wireless connection that will take you to a new level of performance.
We inv it e y ou to vi si t www.midijet.com or to call us at 905-475-1263 (9:30am to 5:30pm E.S.T) with questions or
comments regarding your MIDIjet Pro USB system. We value your feedback for product improvement. However, we also
love hearing your stories of how you’re using your MIDIjets. Let’s just say that hearing the stories makes what we do seem
even more worth it and gives us ideas for how to make even better products.
1.2 Applications
MIDIjet is designed to replace standard MIDI cables in situations where cables restrict performer mobility, are visually
unpleasant, or awkward to connect.
In live performance environments, MIDIjet Pro allows you to get off stage and interact with your fans. Sure it gets rid of
cables and all that but it’s really about you and your fans having more fun during the show. It’s also about making life easier
for your techs and roadies during setup and teardown.
Lighting applications and syncing DAWs with other software is a great new area where MIDIjet is used now. The built-in
USB interfaces makes it easy to connect computer to computer.
If these applications need MIDI traffic in both directions, all you need is to use the USB connection or to use a bi-directional
MIDI cable in the MIDI Jack.
Drum triggers in live shows are another area great way to use MIDIjet Pro.
MIDI enabled front of house consoles use MIDIjet Pro to connect to gear on stage or to mix remotely.
Recording and TV studios use MIDIjet Pro to get MIDI from room to room (or between floors) without running cables.
Run your patch switching cross-stage without having cables to trip over.
We a re a lw ay s in te re st ed in wh at e ls e yo u de ci de t o do wi th i t. S o le t us k no w wha t yo u co me u p wi th .
3
1.3 Features at a Glance
Quantity
Part Number
Descrition
1
13-MID-WMJ-USB
Wireless MIDIjet Pro USB, including:
1
15-MID-WM-003B
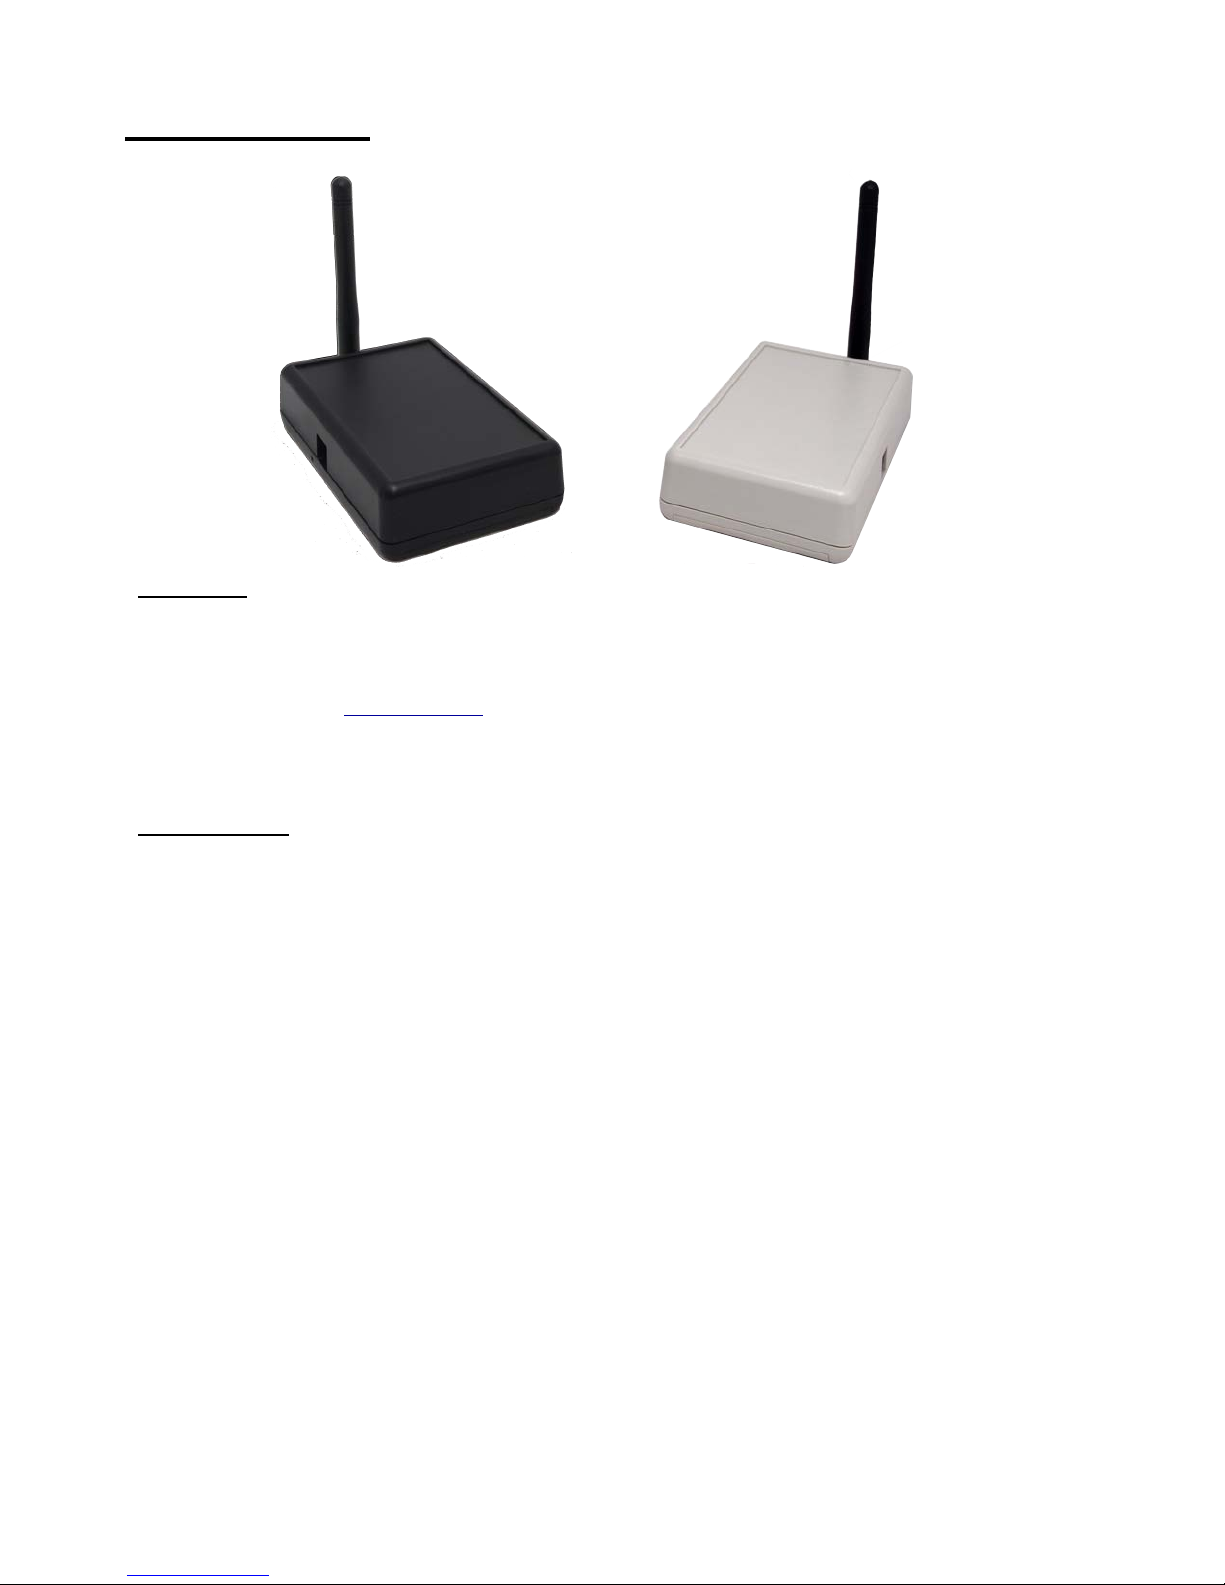
Wireless MIDI Adaptor V2 Transmitter BLK
1
15-MID-WM-003W
Wireless MIDI Adaptor V2 Receiver WHT
2
59-ANT-WUSB-DET
Detachable hinged 2.4GHz Antenna
1
52-DCS-07V5-7.5W
Switching Power Pack 7.5V 1.0A 7.5W (North America)
1
50-BAT-AA-ALK4
Pkg. of 4 AA Alkaline Batteries
1
06-DOC-WMJ-QSU
Quick Startup Guide
•
Up to 500-foot range
•
Bi-directional MIDI traffic - new!
•
Detachable antennas - new!
•
Can use rechargable batteries - new!
•
Powered by either DC power supply, 2 ‘AA’ batteries or USB bus - new!
•
Wire belt clip - new!
•
Each unit can be used as a USB MIDI interface - new!
•
Operate up to 29 adapter pairs simultaneously in the same environment
•
Low latency - 2.7ms
•
20-30-hour transmitter battery life (depends on battery type)
•
Operates on 2.4 GHz license-free band
•
Low Battery and Link display indicators
•
Firmware upgradable - new
•
Allows you to do cool and amazing things - not new!
2. MIDIjet Pro USB Package Contents
4
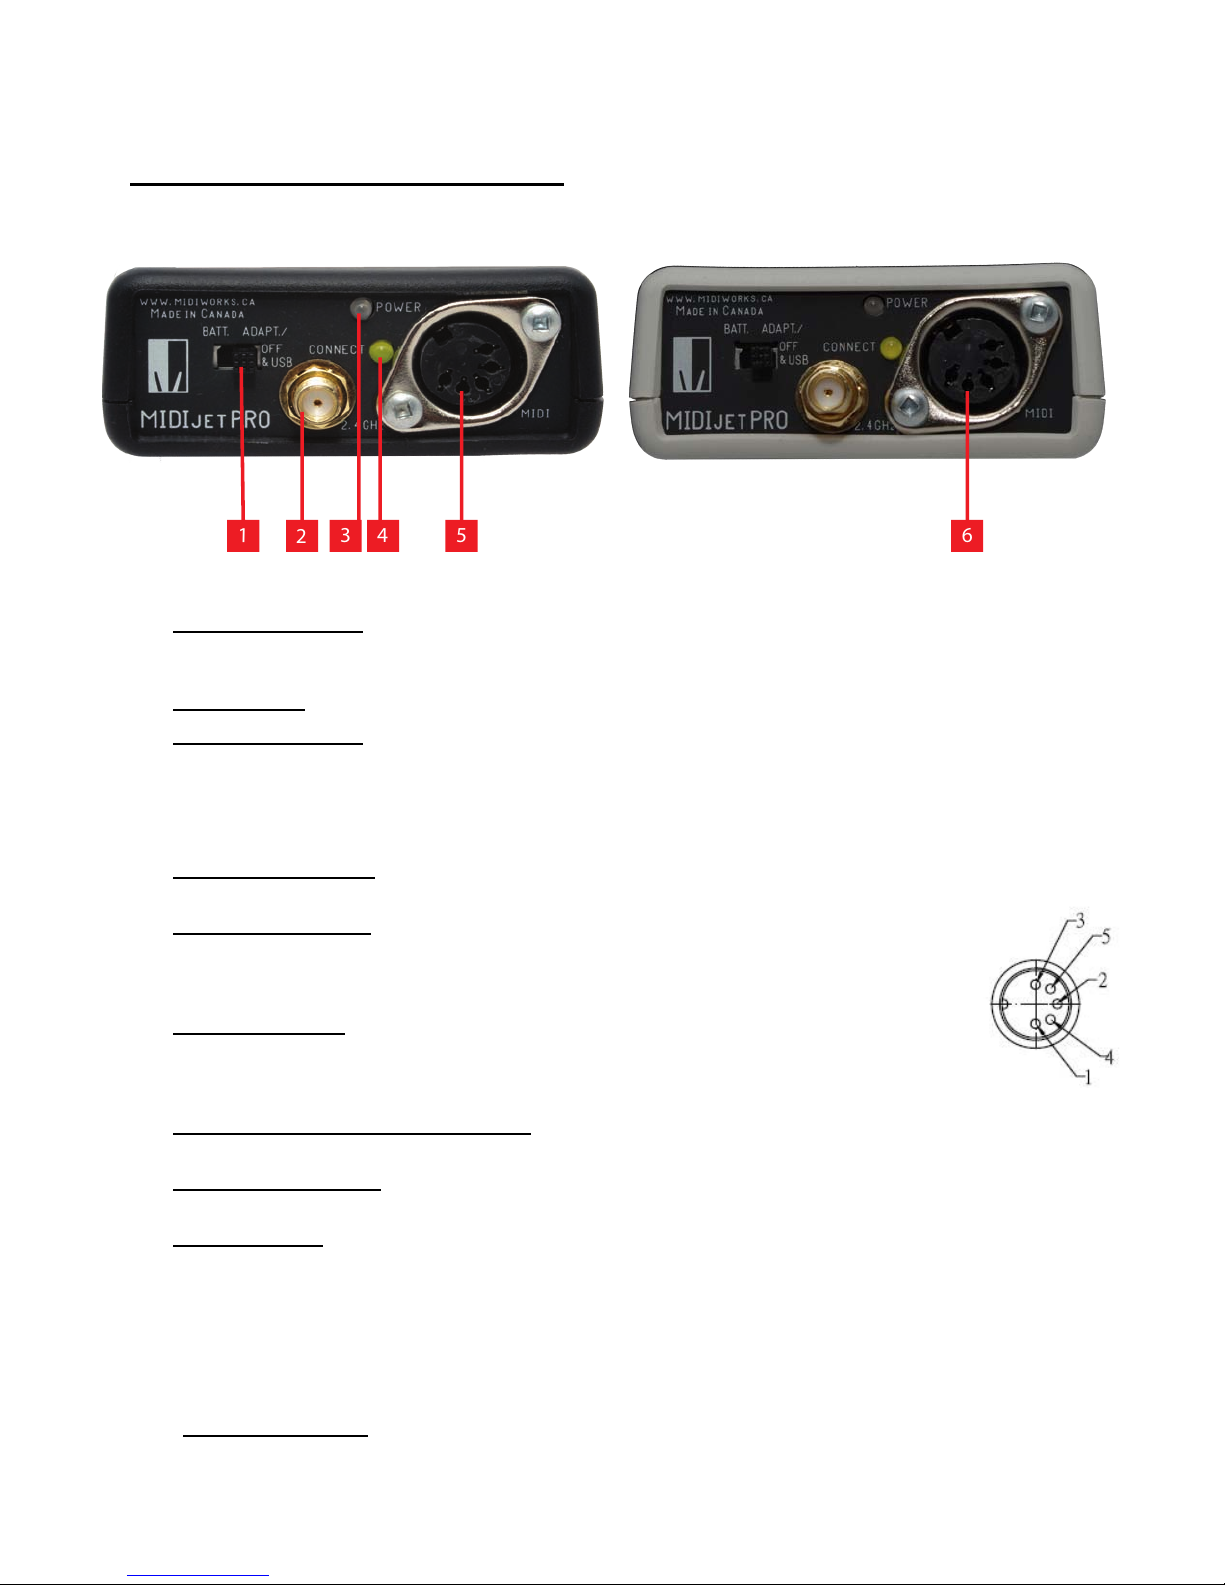
3. Switches, Plugs and Connectors
1
2
3
4
5
6
Transmitter
1) Power Selector Switch - When in the “Batt” position, the unit is powered by batteries only. When in “Adapt/ Off &
USB” position, the unit is powered by the USB port or via the power adapter input. If there is no power coming from
either the USB port or the adapter input, then the unit will be turned off.
2) Antenna Mount - Attach the provided antenna here.
3) Power Indicator Light - When the unit receives power and is working properly, this light will blink green once per
second. If this light is blinking green and red, that means the unit is in bind mode. If you intend for it to be in bind mode,
then proceed. If you accidentally put it in bind mode, just switch the units off, use the dip switches to switch the unit(s) to
the same channel out of bind mode, and turn the units back on. They should connect normally after that.
When the power gets low, this light will start to blink red. This means there is about 1/2 hour of power left in the batteries.
4) Connect Indicator Light - Under normal operation, this light will blink yellow about 3 times per second on both units if
they have a connection. Under heavy MIDI traffic, this light may blink much faster.
5) Transmitter MI DI Ja ck - Connect a regular MIDI cable from the MIDI Out Jack on your MIDI
controller to the MIDIjet Pro transmitter’s MIDI jack. On this black transmitter, pins 4 and 5 are for
MIDI In and pins 1 and 3 are for MIDI Out. Pins 1 and 3 only matter if you are trying to achieve 2way MIDI traffic. For 1-way MIDI traffic, just use a regular MIDI cable.
6) Receiver MIDI Jack - Connect a regular MIDI cable from the MIDI Jack on your MIDI jet Pro
receiver to the MIDI In jack on your MIDI device. On this black transmitter, pins 4 and 5 are for
MIDI Out and pins 1 and 3 are for MIDI Im. Pins 1 and 3 only matter if you are trying to achieve 2way MIDI traffic. For 1-way MIDI traffic, just use a regular MIDI cable.
7) Detachable Hinged and Swiveling Antenna - The antenna is a Taoglas 2.4Ghz 2 DBI hinged dipole
antenna.
8) Belt Clip Mounting Hole - MIDIjet Pro transmitter pack is pre-drilled to be compatible with the provided belt clip or
with the a ULX1 body pack wire belt clip.
9) USB B Connector - This USB port provides MIDI In/Out on both transmitter and receiver. It uses the same standard,
generic MIDI driver that many MIDI interfaces use. It is both OS X and Windows compatible. Both the transmitter and
receiver function as USB Devices rather than as “hosts”. So, to be used, the MIDIjet will need to be plugged into a USB
host like a computer USB port or an iConnect MIDI™ interface to interface with mobile iOS devices.
When a USB cable is plugged into the socket, the MIDIjet Pro’s input/output switches to the USB port and disables the
MIDI jack. The unit can then either be powered by the USB bus or by batteries using the power selector switch.
The USB connector is also for updating firmware should that need arise.
10) Power Adapter Socket - MIDIjet Pro can use a 2.1mm, center-positive switching adapter from 5V - 9V with 200mA or
more. For an analog, non-switching power supply, use an adapter between 7V - 9V.
Receiver
5
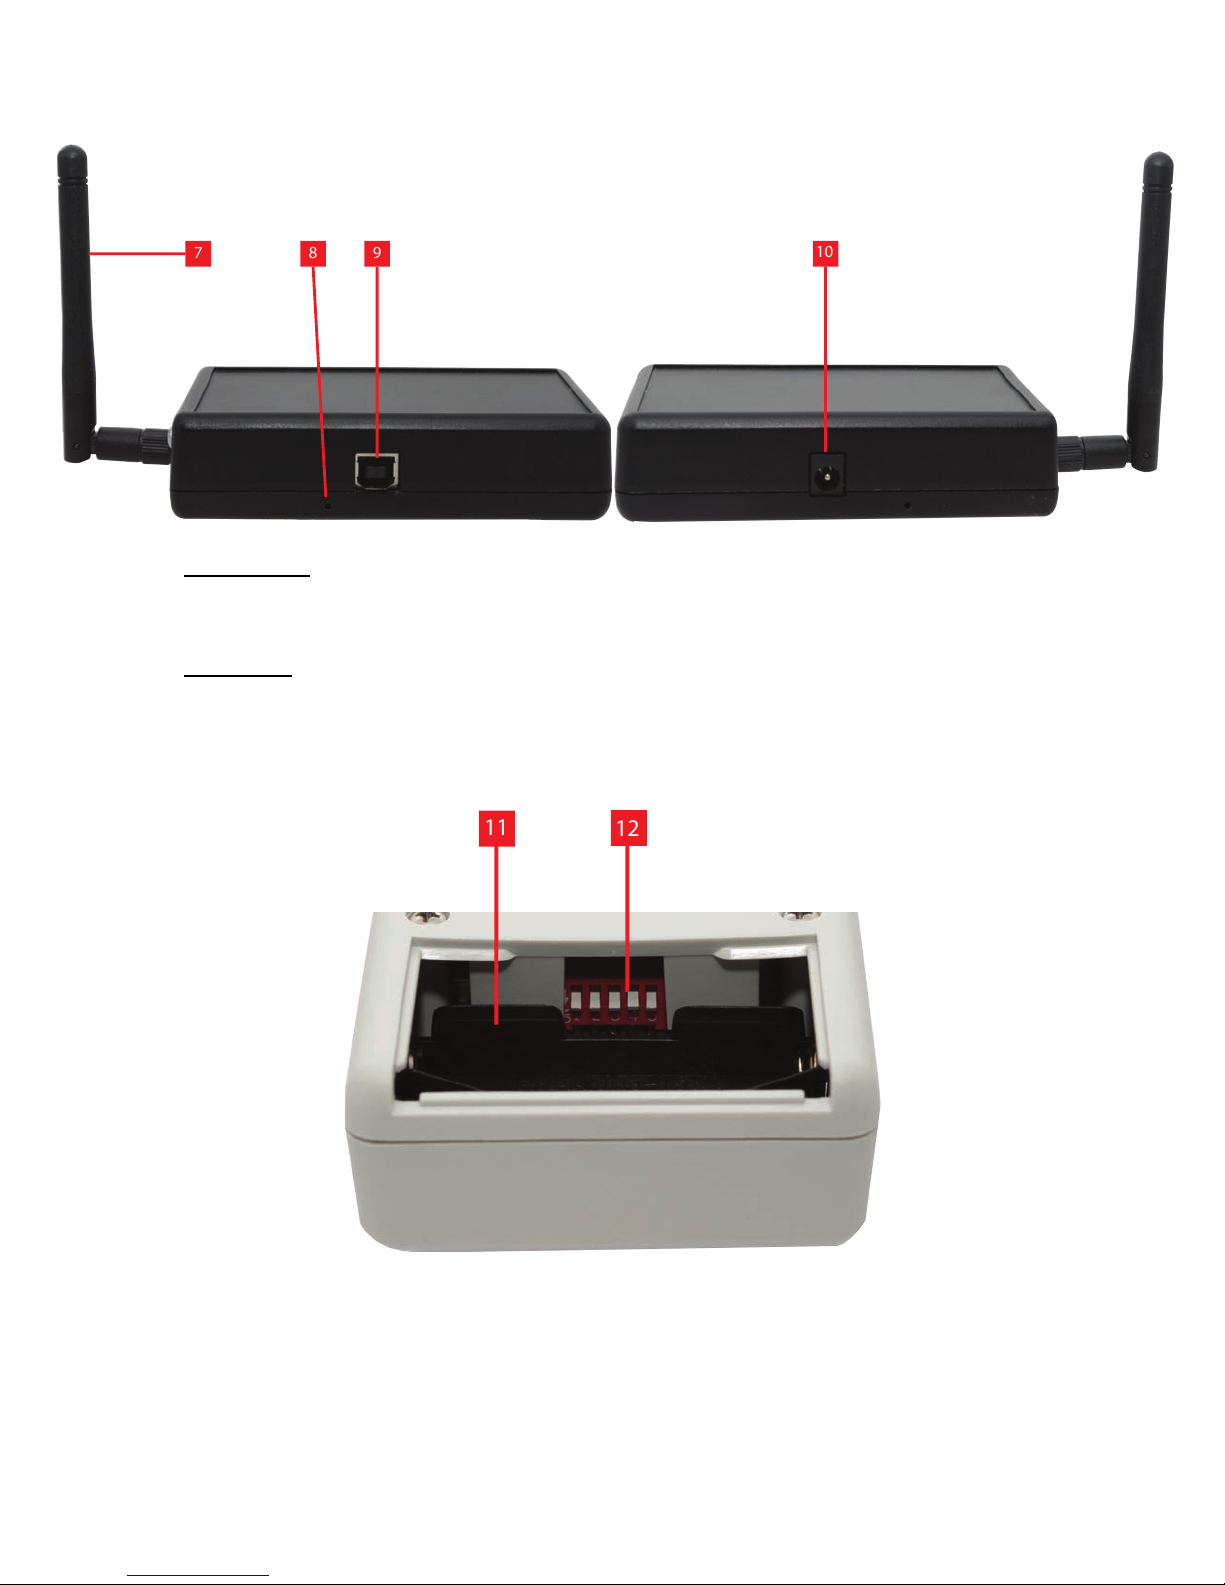
11) Battery Holder - MIDIjet Pro uses 2 x AA batteries. These batteries can be either disposable or rechargable. Regular
7
8
9
10
12
11
1.5V alkaline batteries will last more than 20 hours in the transmitter. They will not last as long in the receiver. The
performance of rechargable batteries varies widely with the voltage and the capacity of the battery. Some high capacity
rechargables can last longer than disposable ones.
12) Dip Switches - The dip switches are used for setting channels of each unit. Always make sure both the transmitter and
receiver are set to the same dip switch setting when both are powered up. Also use the dip switches to put the unit in “bind
mode”, “interface mode”, “unbound mode”, and “firmware update mode”
6
 Loading...