


00016
857/00016858
Version 01/2012
Classic Cantabile
DP 99 Digitalpiano
Users
m
anual
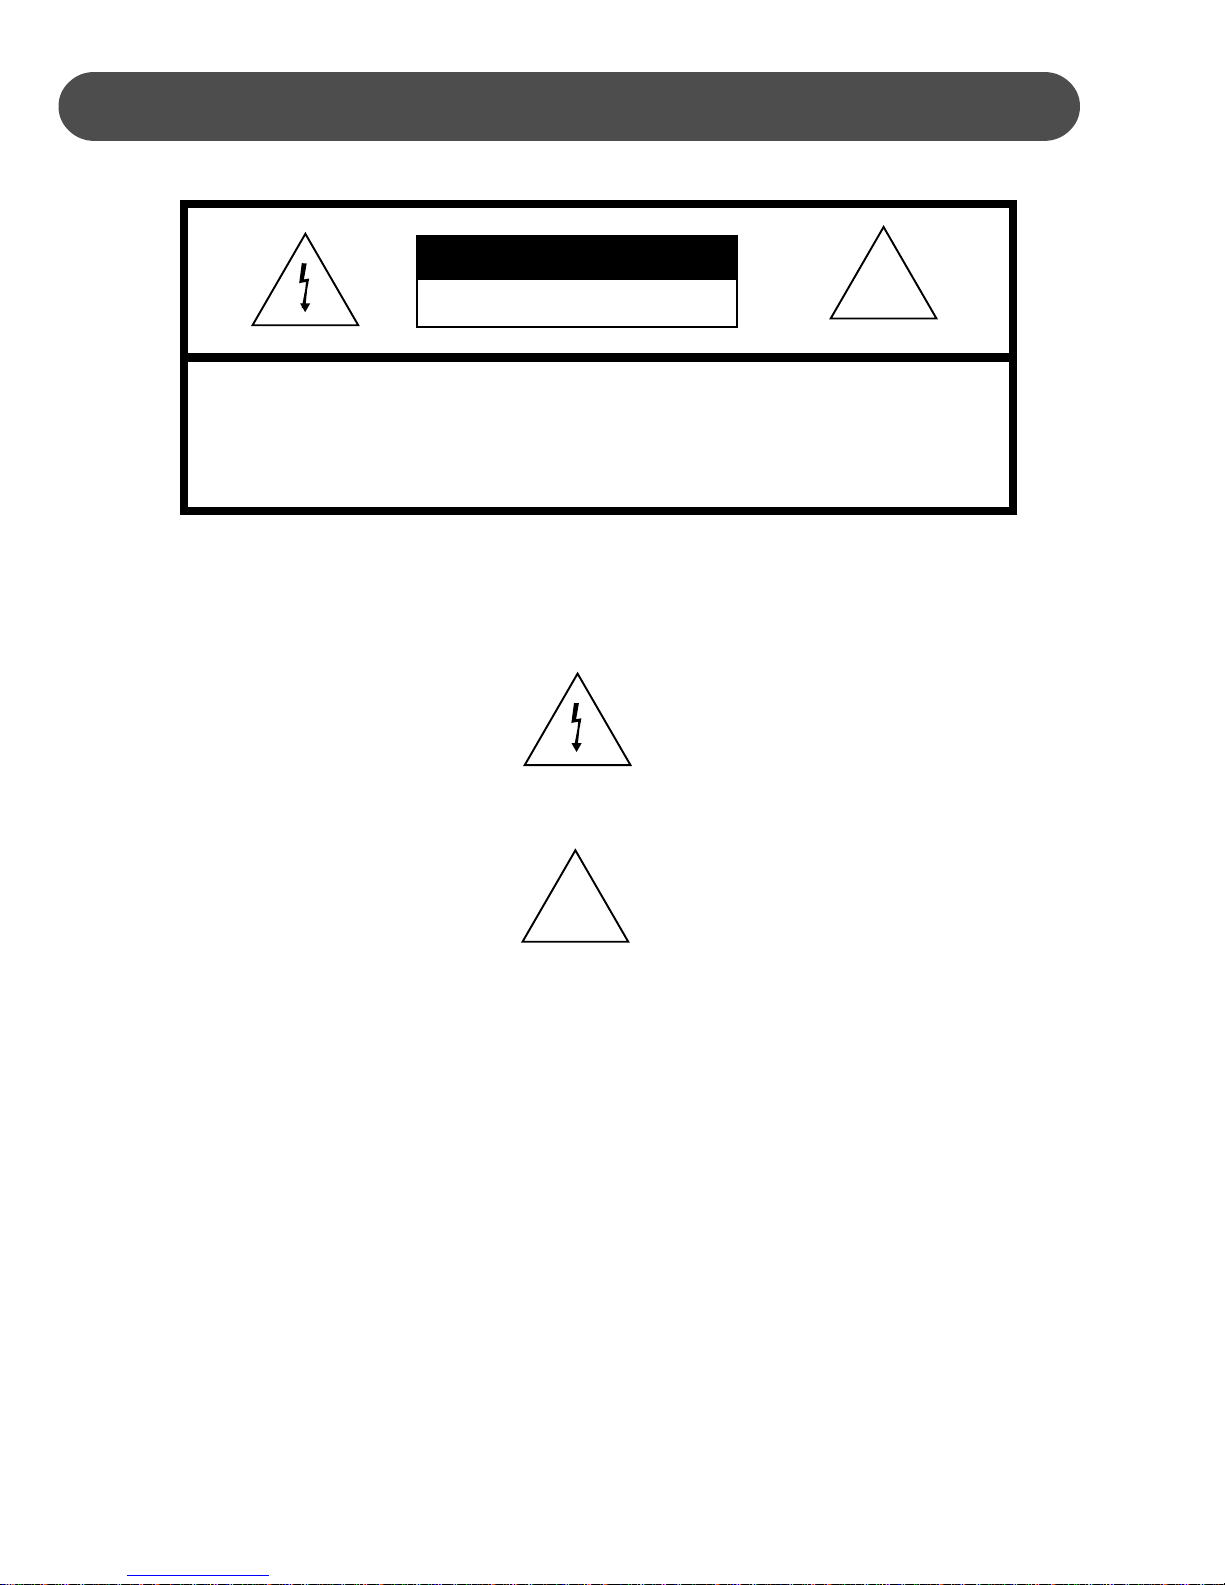
GENERAL PRECAUTIONS
CAUTION
RISK OF ELECTRIC SHOCK
DO NOT OPEN
CAUTION: TO REDUCE THE RISK OF ELECTRIC SHOCK,
DO NOT REMOVE COVER OR BACK
NO USER-SERVICEABLE PARTS INSIDE
REFER SERVICING TO QUALIFIED SERVICE PERSONNEL
INSTRUCTIONS PERTAINING TO A RISK OF FIRE, ELECTRIC SHOCK OR INJURY:
The lightning flash with arrowhead symbol, within an equilateral triangle, is intended to alert the user to the
presence of uninsulated or “dangerous voltage” within the product’s enclosure that may be of sufficient
magnitude to constitute a risk of electric shock to persons.
!
The exclamation point within an equilateral triangle is intended to alert the user to the presence of important
operation and maintenance or servicing instructions in the manual accompanying the product.
!
1. CAUTION: Any changes or modifications in construction of this device which are not expressly approved
by the party responsible for compliance could void the user’s authority to operate the equipment.
2. NOTE: This equipment has been tested and found to comply with the limits for a Class B digital device,
pursuant to Part 15 of the FCC Rules. These limits are designed to provide reasonable protection against
harmful interference in a residential installation. This equipment generates, uses, and can radiate radio
frequency energy and, if not installed and used in accordance with the instructions, may cause harmful
interference to radio communications. However, there is no guarantee that interference will not occur in a
particular installation. If this equipment does cause harmful interference to radio or television reception, which
can be determined by turning the equipment off and on, the user is encouraged to try to correct the interference by one or more of the following measures :
- Reorient or relocate the receiving antenna.
- Increase the separation between the equipment and receiver.
- Connect the equipment into an outlet on a circuit different from that to which the receiver is connected.
- Consult the dealer or an experienced radio/TV technician for help.”
2

PRECAUTIONG
This digital piano will supply you with years of musical enjoyment if you follow the simple rules listed below.
IMPORTANT
Always follow the basic precautions listed below to avoid the possibility of serious injury or even death from
electrical shock, damages, fire or other hazards. These precautions include, but are not limited to, the follows:
1. Read and understand all the instructions.
2. Always follow the instructions on the instrument.
3.Before cleaning the instrument, always remove the electric plug from the outlet as well as the oyher cables. When
cleaning, use a soft, dry cloth. Do not use gasoline, alcohol, acetone, turps or any other organic solution; do not use
liquid cleaner or spray cleaner, or too wet cloth.
4. Do not use the instrument near water or moisture, such as bathtub, washbasin, or washing poor in the kitchen, or
similar places.
5. Do not place the instrument in an unstable position where it might accidentally fall over.
6. Do not jam sinks or holes of the instrument; those sinks of holes are used for air circulation to prevent the
instrument from overheating. Do not place the instrument near heat sink or any places with poor air circulation.
7. Always use the AC adaptor included with the instrument; do not use any other AC adaptor.
8. Do not place anything on the power cord. Make sure the power cord is set on a safe place, so nobody will step on
it and no body will get trip over by it.
9. Do not overload the outlet and AC cable to avoid fire or electrical shock.
10. Do not insert anything in the instrument, which may cause fire or electrical shock. Do not splash any kind of
liquid to the instrument.
11. Do not disassemble the instrument in case of accidental electrical shock.
12. Always take the instrument to qualified service center in need of repair. You will cause yourself in danger if you
open or remove the cover, and improper assembly may cause electrical shock in the future use.
13. Unplug all the connectors and take the instrument to qualified service center if anything in the below list
happens:
A. The power cord or connector get hurt or worn out.
B. Any liquid get in the instrument.
C. The instrument gets rain or water splash.
D. The instrument dose not work properly after following all the instructions regarding to troubleshooting.
E. The instrument falls down or gets broken.
F. The instrument functions poorly.
14. Do not use the instrument when thundering; otherwise the thundering may cause long-distance electrical shock.
15. Do not use the instrument when there is gas leak nearby.
CAUTION:
Setting up
Do not connect the instrument when thundering.
Do not set up the cord or outlet to moisture place, except for that the outlet is specially designed for moisture.
When the power cord is connected to the AC outlet, do not touch the naked part of cord or connector.
Always follow the instructions carefully when setting up the instrument.
WARING:
Do not expose the instrument to rain or moisture, to avoid fire or electrical shock.
OTHER PRECAUTION:
Keep the instrument away from electrical interface source, such as fluorescent light and electrical motor.
Keep the instrument away from dust, hear and vibration.
Do not expose the instrument to sun light.
Do not place heavy object on the instrument; do not place containers with liquid on the instrument.
Do not touch connectors with wet hand
Central Music Co. is not responsible for any damage or data loss caused by improper operation to the instrument.
All the pictures and LCD display in the manual are used for demonstration; they may be different from a real
instrument.
DISPOSAL NOTES:
Should this product become damaged beyond repair, or for some reason its useful life is considered to be at an
end, please observe all local, state, and federal regulations that relate to the disposal of products that contain
lead, batteries, plastics, etc.
3
TABLE OF CONTENTS
ASSEMBLY .................................................................................. 5
CONNECTOR PANEL .................................................................. 7
PANEL
DEMO .......................................................................................... 17
KEYBOARD
RHYTHM
AUTO
FUNCTION .................................................................................. 30
RECOR
REGI
PLAY
MID
MIDI
VOI
STYLE
DRUM
PEDAL
SPECIFICATIONS ....................................................................... 52
CONTROLS ................................................................... ..8
VOICES .................................................................. 18
Voice Selection ........................................................................... 18
Layer
(dual) ................................................................................. 19
(split)................................................................................. 19
Lower
SECTION .................................................................... 21
Rhyt
hm Style Select ..................................................................... 21
Adjusting the Tempo .................................................................... 22
Starting
Varia
Fill-I
Singl
Fingere
Pian
Manual
Auto
Starting
Varia
Fill-I
Keyboard
Reverb
Chorus
Touch
Split
Split
Auto Harmony Type Selecting ...................................................... 34
Mas
Re
Playbac
and Stopping the Rhythm Style.......................................... 23
tion ..................................................................................... 24
n........................................................................................... 24
ACCOMPANIMENT (AUTO BASE CHORD) ....................... 25
e ......................................................................................... 25
d ..................................................................................... 26
o Chord Mode .................................................................... 27
Bass Chord ..................................................................... 27
Harmony ............................................................................. 27
and Stopping the Auto Accompaniment.............................. 28
tion ..................................................................................... 29
n........................................................................................... 29
Percussion................................................................................. 31
Level .............................................................................. 31
Level ............................................................................... 32
Response......................................................................... 32
Point for Lower Voice ............................................................ 33
Point for Auto Accompaniment ............................................... 33
ter Tune ................................................................................ 35
D ..................................................................................... 36
cording................................................................................... 36
k .................................................................................... 37
STRATION MEMORY ........................................................ 39
ALONG SONGS ................................................................ 40
I.............................................................................................. 41
IMPLEMENTATION CHART .............................................. 43
CE LIST ................................................................................. 44
LIST ................................................................................. 47
KIT LIST ........................................................................... 48
S ....................................................................................... 51
4
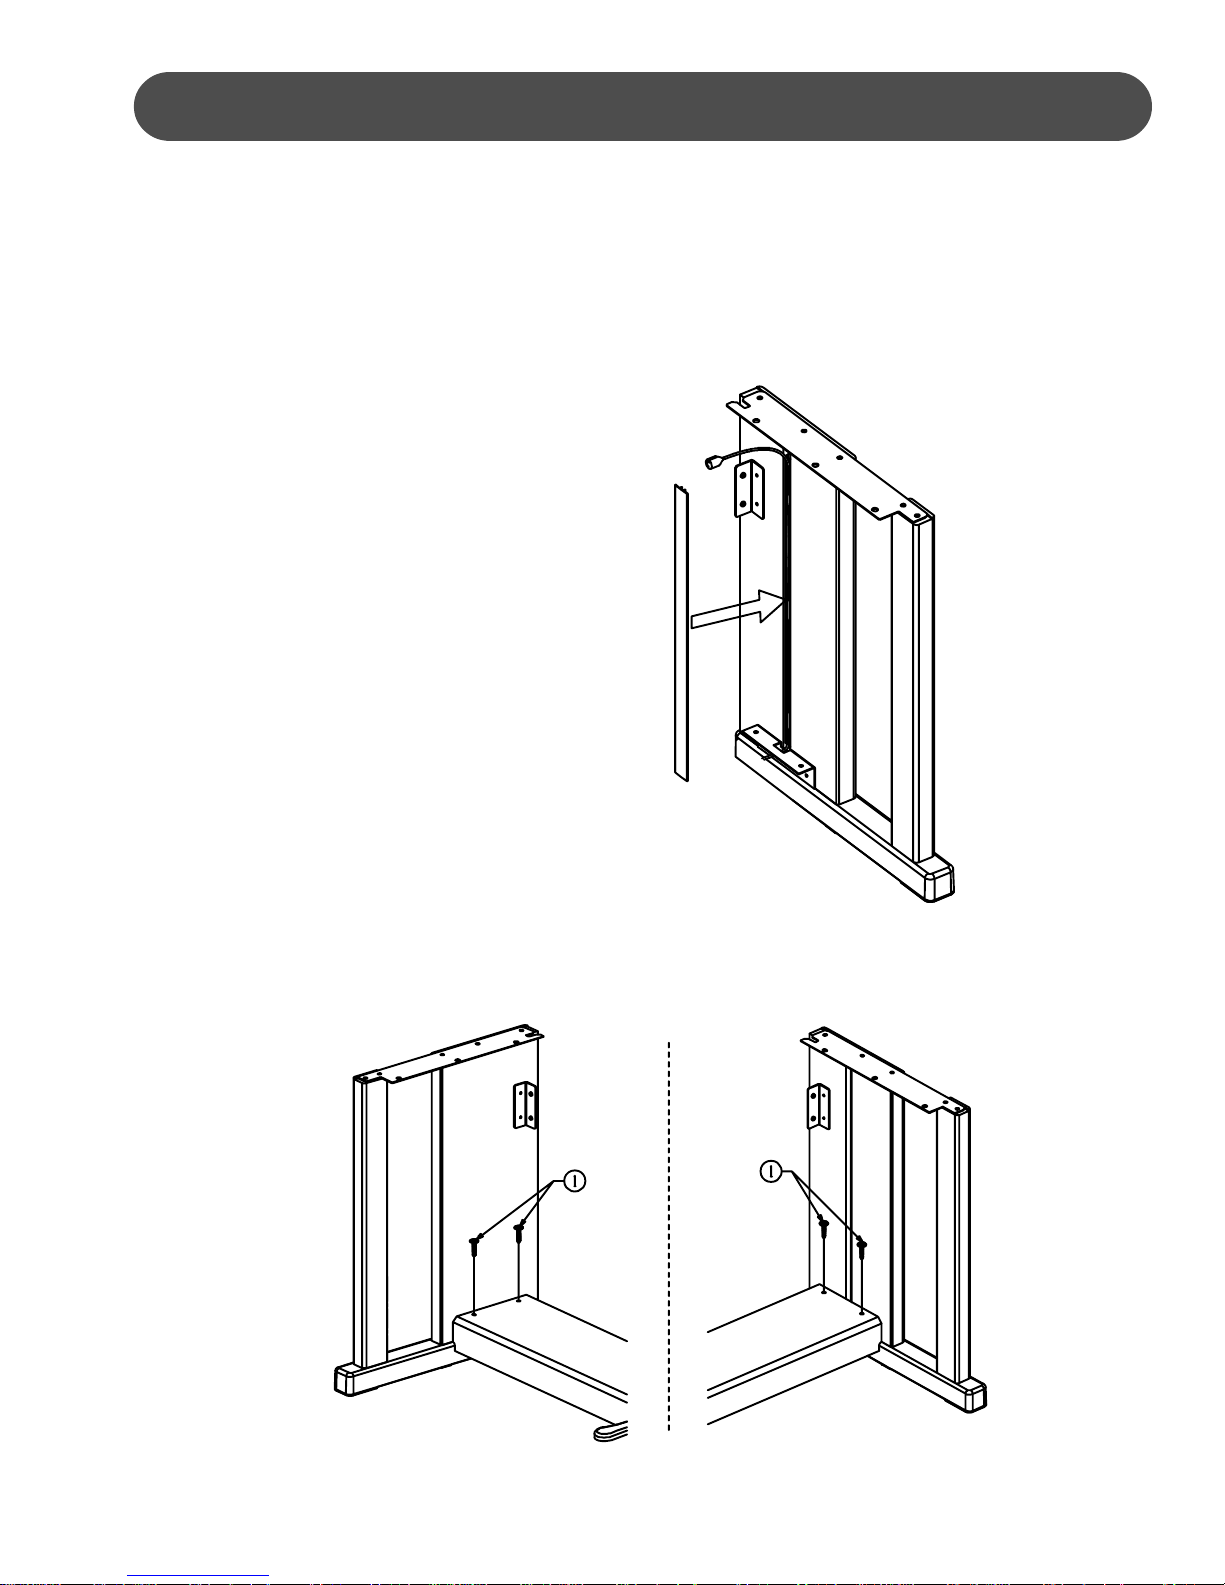
ASSEMBLY
The package contains the following screws:
(1) Ten M6X20 screws
(2) Four M6X15 screws
(3) Six 4X16 selftapping screws
(4) Two 4X12 selftapping screws
1. LAYING THE PEDAL CABEL - Take off the cover of the cabel slot. Lay in the
pedal cabel, then insert the cover.
2. CROSS BAR INSTALLATION - Fix the pedal cross bar to the leg with the screw
(1).
5
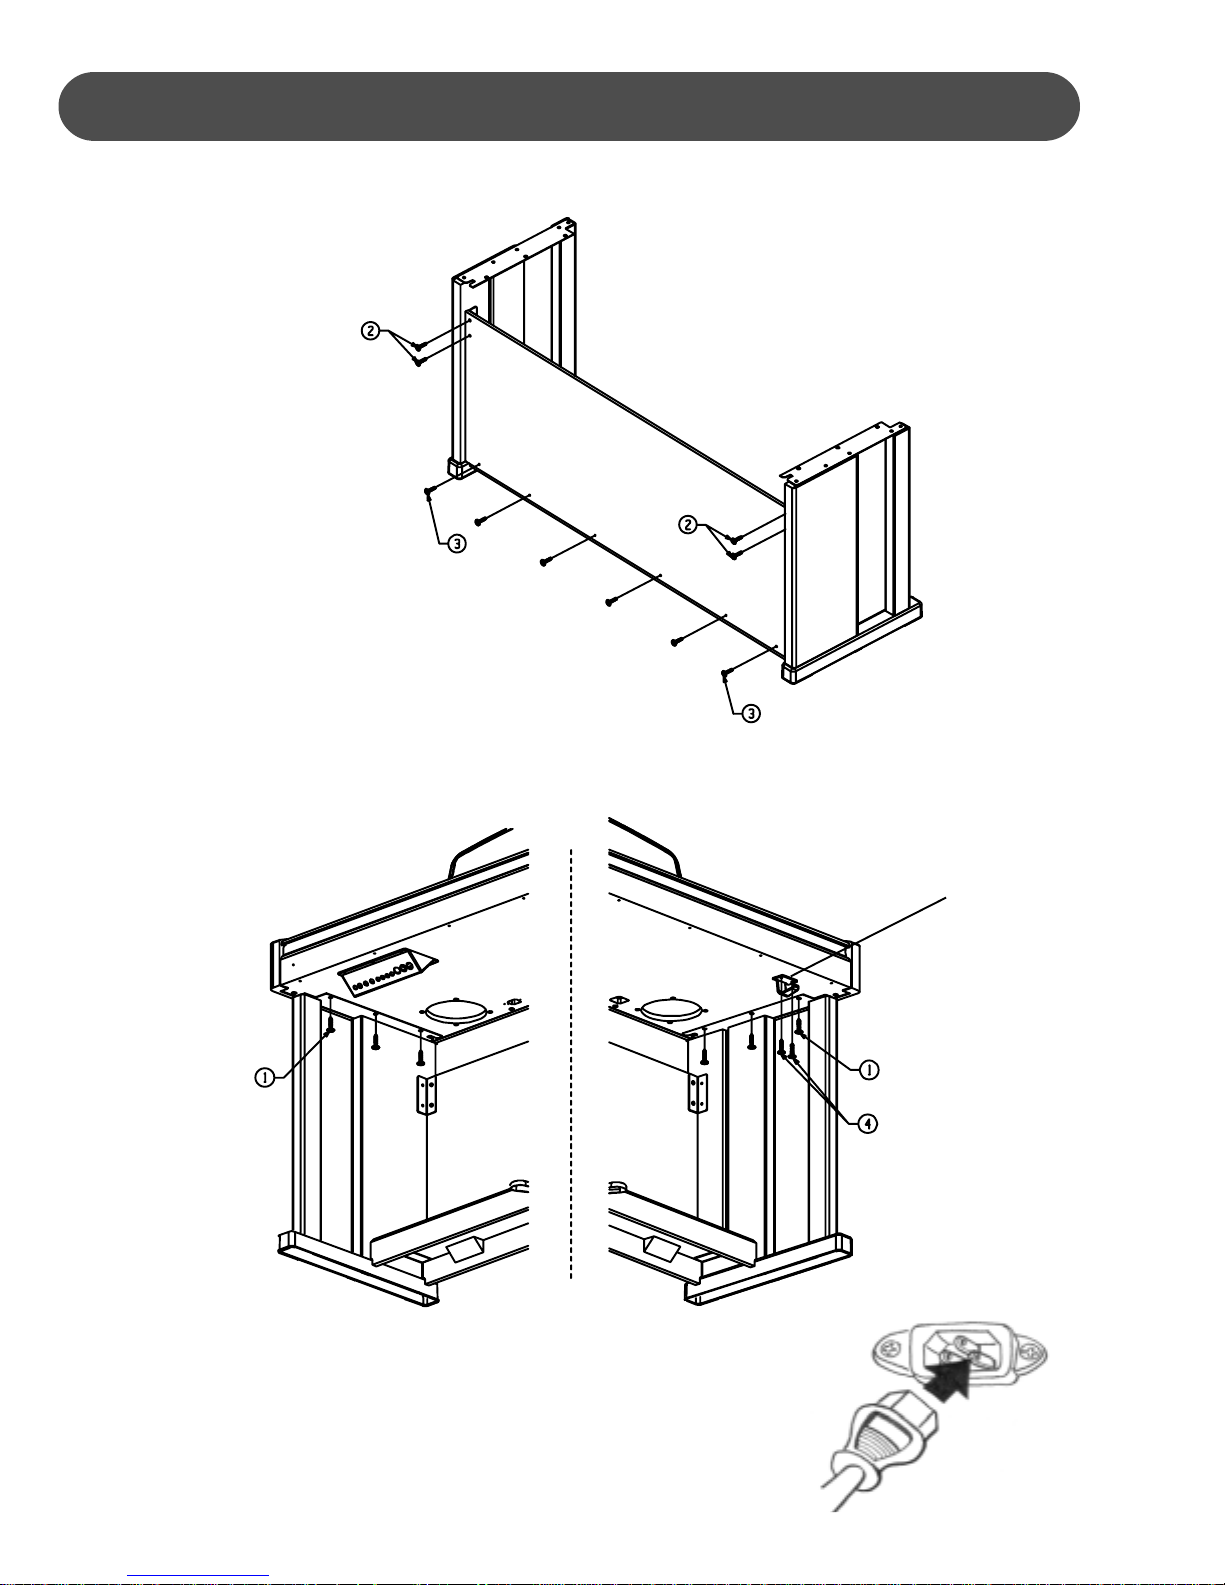
ASSEMBLY
3. BACK BOARD INSTALLATION - Fix the back board to the legs with the screw (3).
4. FINAL INSTALLATION - Put the piano body on the assembled stand then fix it with the
rew
sc
peda
(1). Install the headphone holder in the proper location with the screw (4). Plug the
connector into the socket on the bottom.
l
Headphone Holder
5. POWER SUPPLY CONNECTION -
g the power cord into the receptacle located on the bottom
Plu
of the piano. Plug the 3-pin plug in the another end to the
AC wall outlet.
6
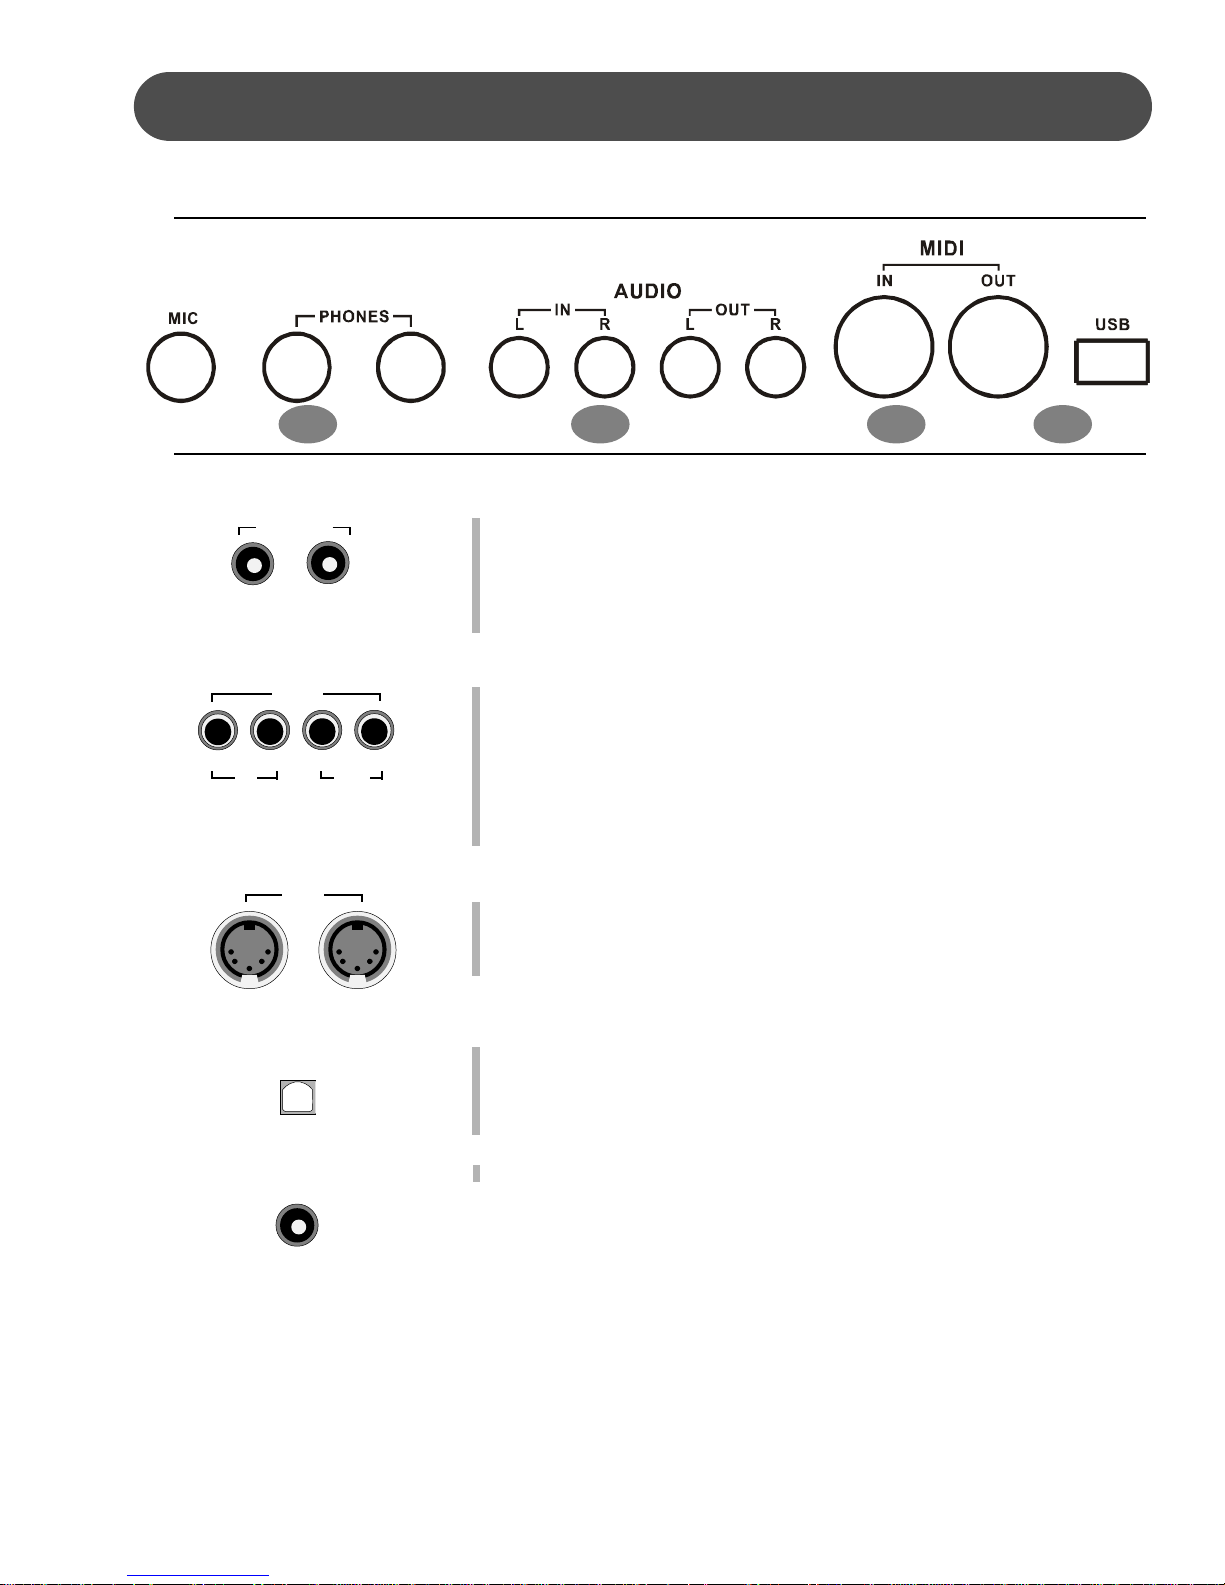
CONNECTOR PANEL
This connector panel, with its various jacks, is located on the bottom left of the piano, under the keybed.
1 2 3 4
PHONES
2 1
LINE
IN OUT
MIDI
IN OUT
USB
1. PHONE 1 / PHONE 2 - You can play in total silence, without disturbing
others in the room, by plugging a set of headphones into one of the
appropriate sockets. When headphones are plugged into either of these
jacks the main speaker system is turned off. Two sets of headphones
may be used simultaneously.
2 LINE IN - These stereo audio input jacks will amplify the supplied signal
through the internal sound delivery system. They can be used to hook
up items such as CD players, MP3 player or Cassette player.
LINE OUT - These stereo audio output jacks supplies the piano’s output
signal to external amplification, such as home stereo, PA system or other
stand alone amplifiers.
3 MIDI IN / MIDI OUT - This piano contains MIDI in and MIDI output ports.
MIDI jacks allow communication with other products equipped with MIDI
interfaces. Please see the MIDI section of this manual for further details.
4 USB - The USB connector allows you to connect the piano directly to your
computer. The piano can be connected with computer without driver
installation under the Windows XP environment. The piano could be
recognized as USB Audio device to receive and transmit MIDI message.
MIC
5 Microphone - Plug in a microphone to sing song with piano playing.
7
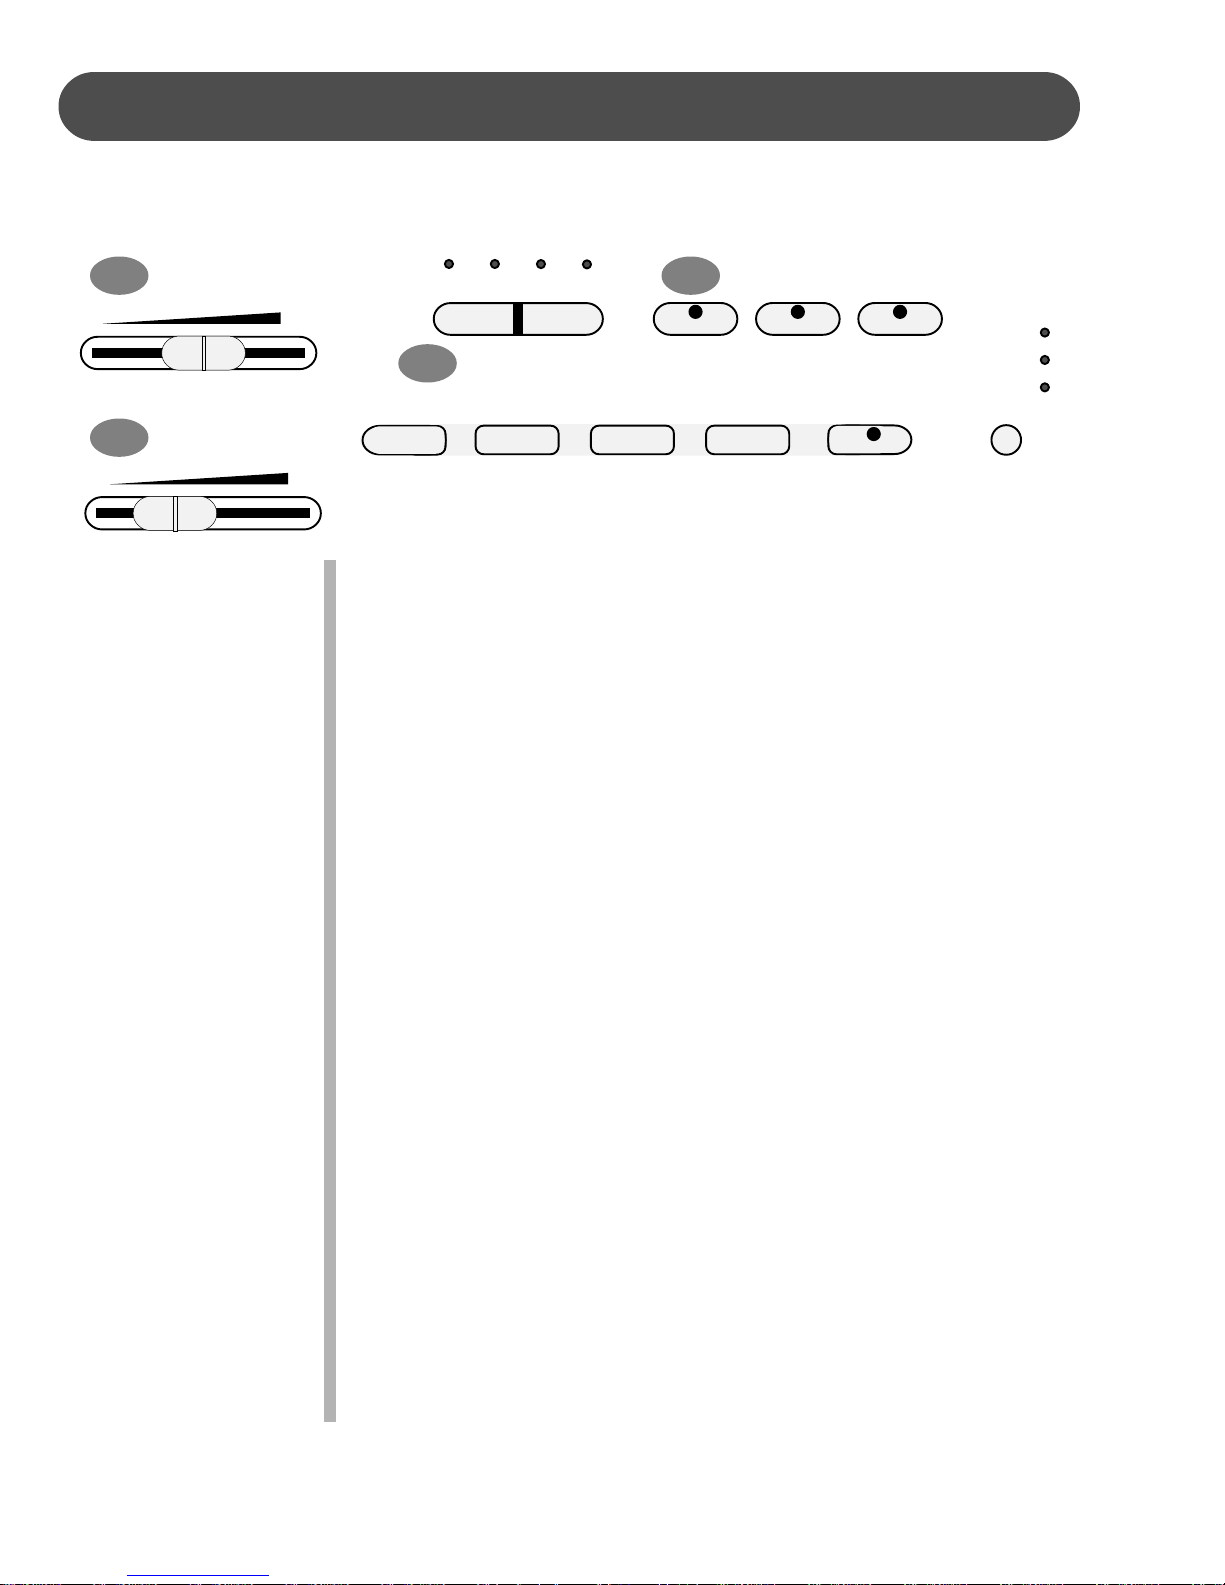
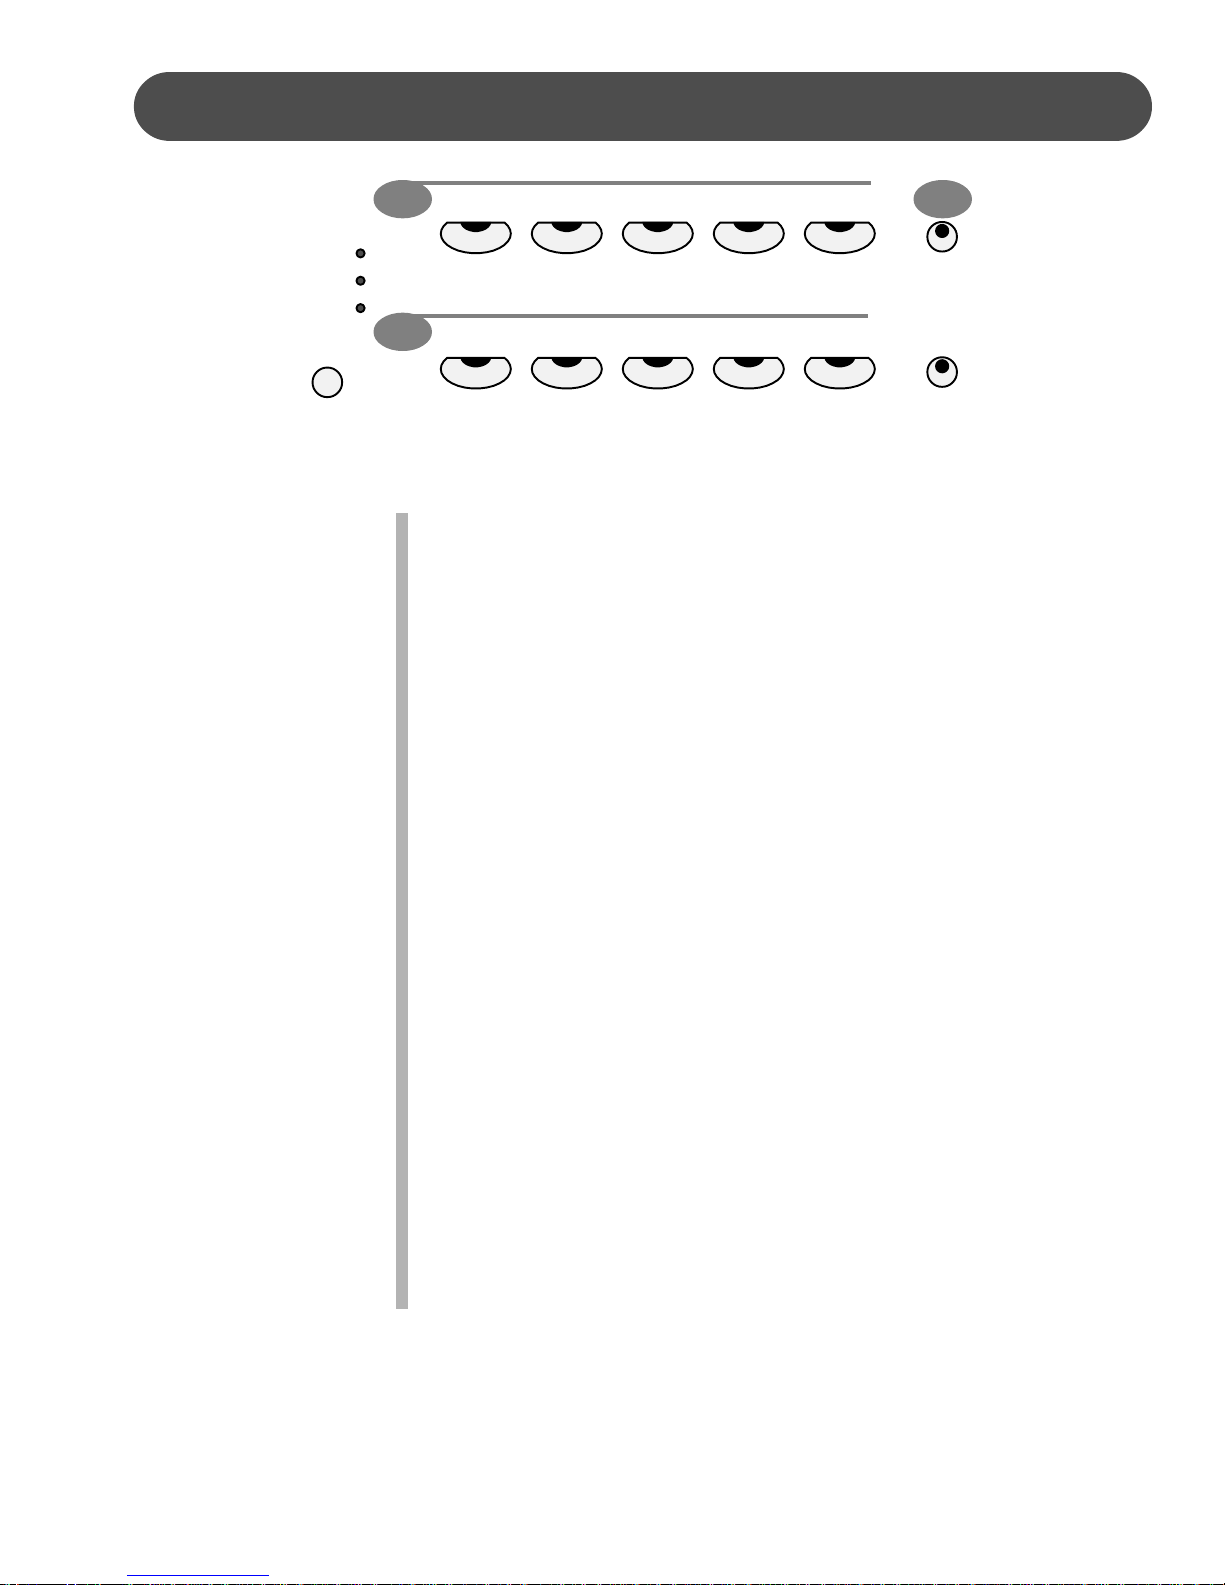
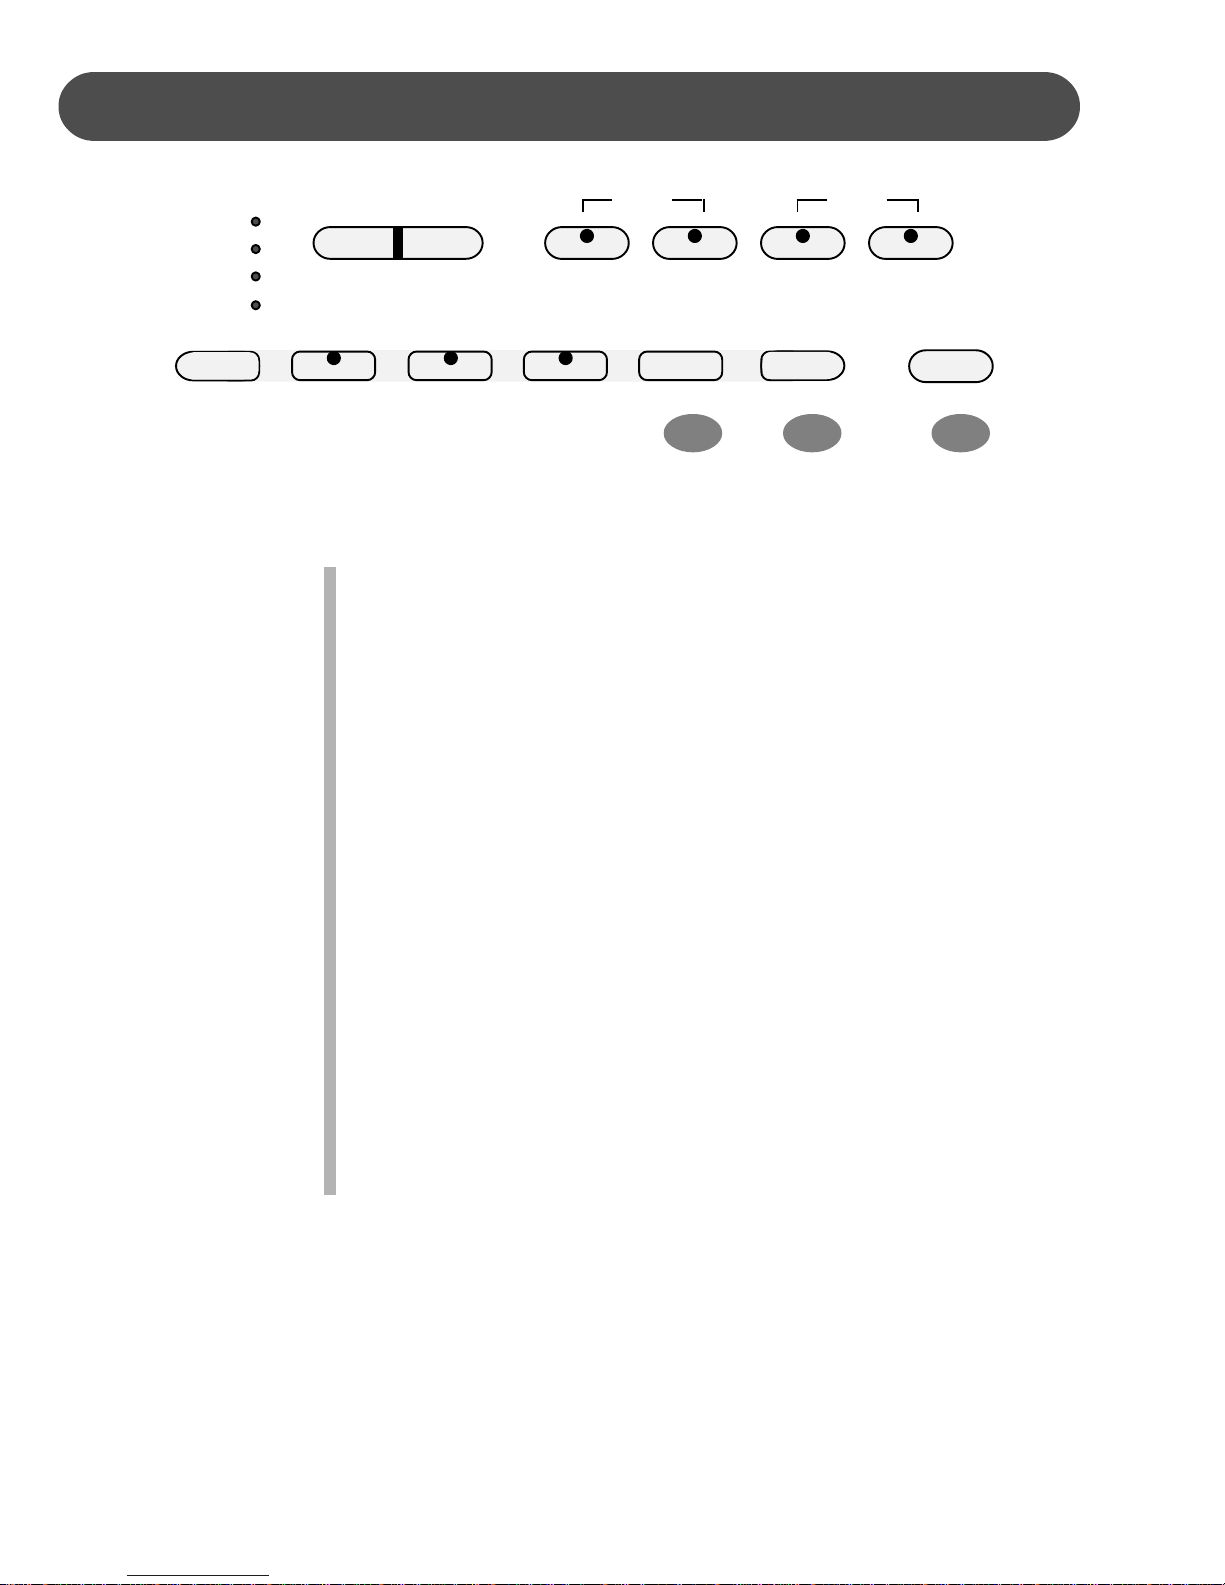
PANEL CONTROLS
The elegant control panel is divided into several distinct sections. The following is a brief
description of all the features located on the control panel.
1
MIN MAX
MASTER VOLUME
2
MIN MAX
ACCOMP VOLUME
1. MASTER VOLUME - Use this sliding control button to adjust
2. ACCOMP VOLUME - Slide this controller to adjust the volume
3. TEMPO - Press one of the TEMPO buttons, the current tempo
4
SINGLE
FINGERED
PIANO
ACCOMP
SYNCH
START
– TEMPO + HARMONY LAYER LOWER
3
START/
STOP
INTRO/
ENDING
FILL IN
VARIATION
the overall volume of the keyboard.
of the auto accompaniment only, the keyboard instrument voice
will not be affected.
value will appear on the display. You can use the TEMPO +,
TEMPO – buttons, or the +/YES and –/NO buttons to change the
tempo value range from 40 to 240 bpm (beats per minute).
Press the TEMPO + or TEMPO – buttons or the +/YES and
–/NO buttons simultaneously to recall the default tempo setting for
the selected rhythm style. After three seconds the display will
revert to the selected voice.
There is a four-dot beat indicator above the tempo buttons. It
indicates the tempo and beat for the accompaniment that is
playing.
4. HARMONY - When selected, the single note played on the righthand section of the keyboard will sound with additional auto
harmony notes. The note played in the upper section of the
piano determines the root key of the harmony. It is recommended that one note be played at a time. If more than one
note is played only the highest note will add harmony.
Auto harmony is only available when the auto accompani-
ment is engaged. The harmony type selection is assigned in
the Function menu. Use it to select the type of harmony, Duet,
Close Harmony, Open Harmony, or Octave. See the Function
section for more information.
8
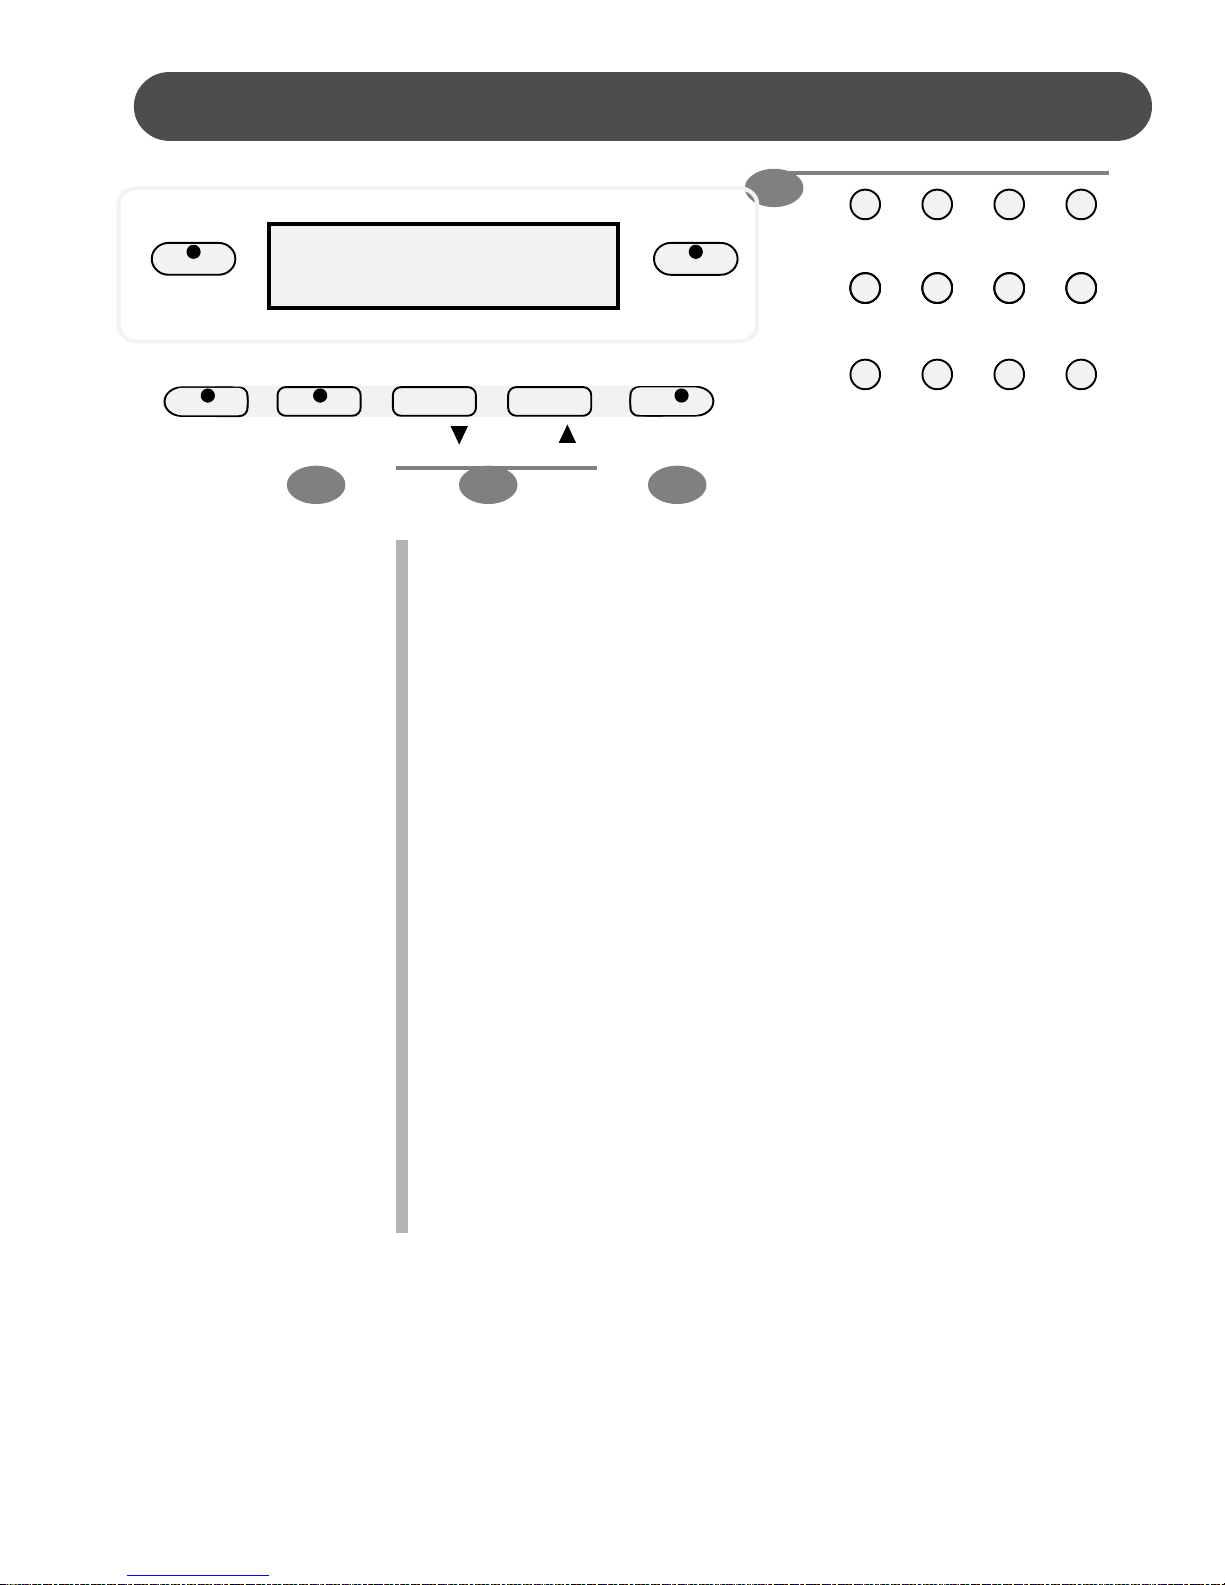
PANEL CONTROLS
MIN MAX
MASTER VOLUME
MIN MAX
ACCOMP VOLUME
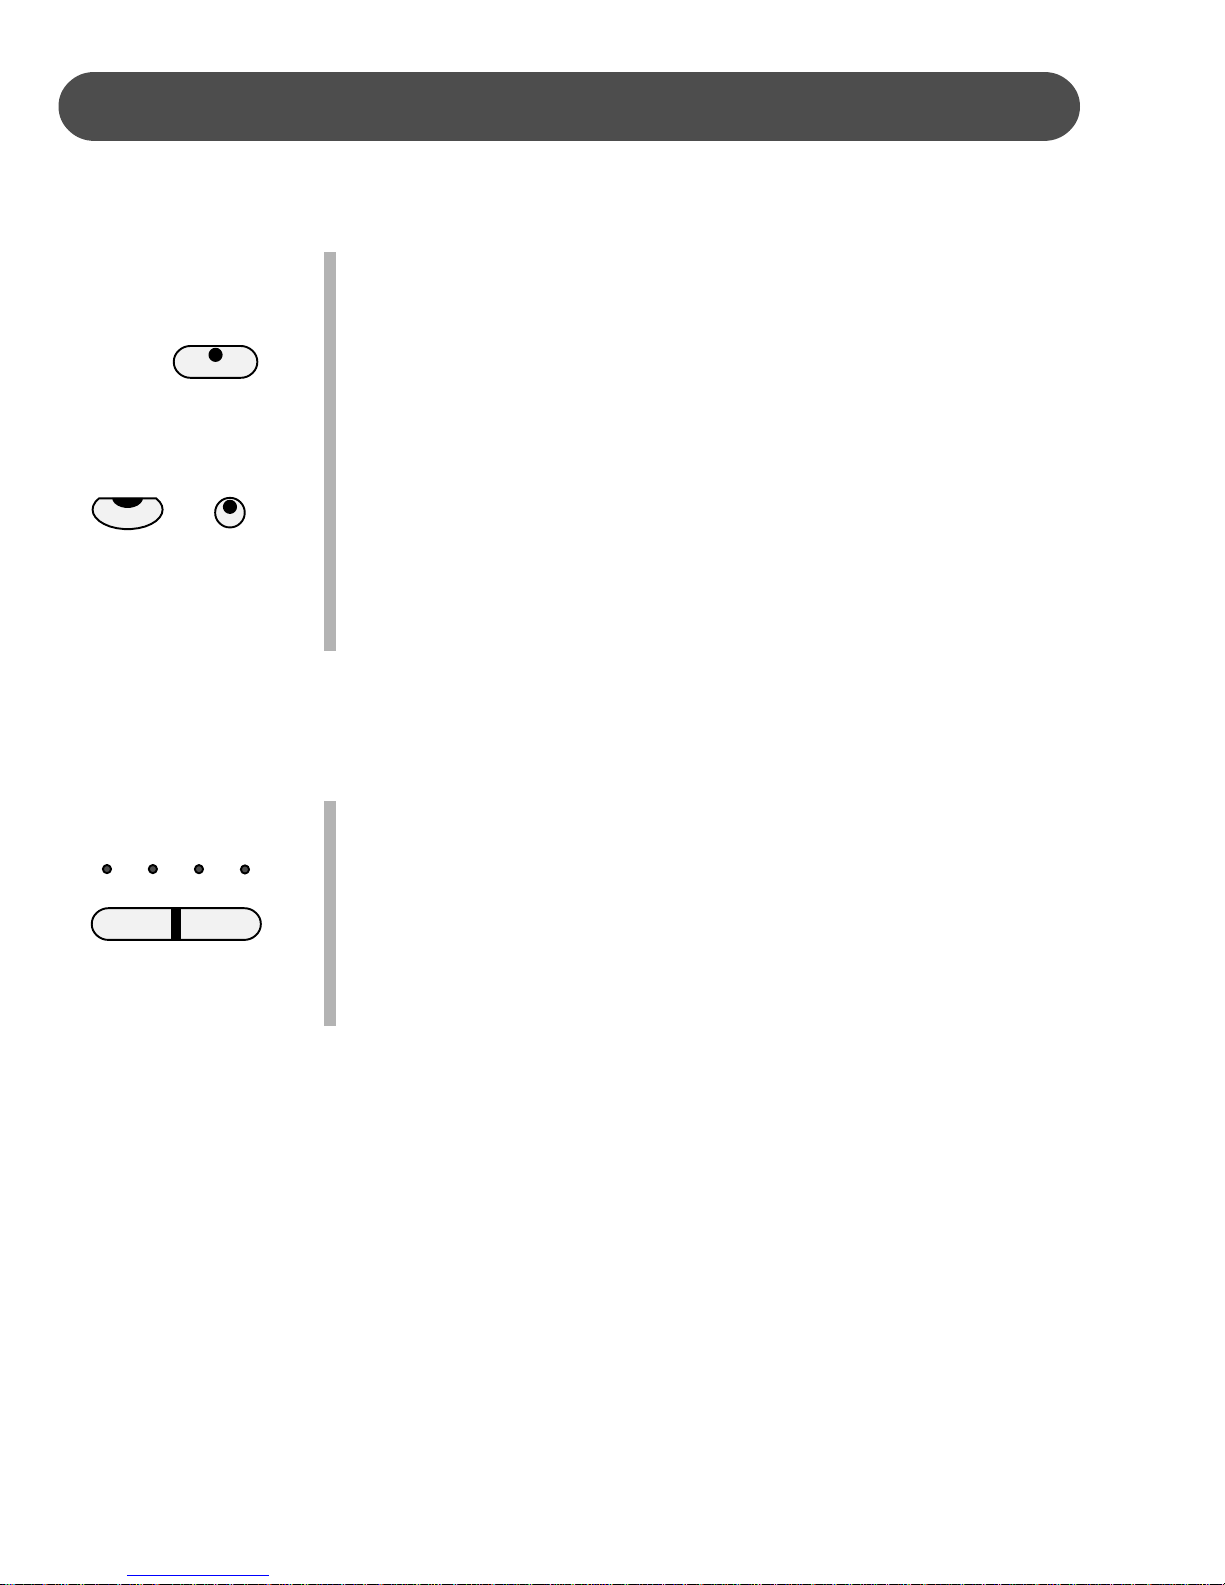
5. LAYER - Engaging the LAYER button will put the keyboard in the
6. LOWER - With the LOWER feature engaged the keyboard oper-
65
S I N G L E
– TEM PO + H A R M O N Y L A Y E R LOWER
/ ENDING
P
8
S T O
F I L
L IN ACCOMP
S Y N C
H
S T A R T /
S T A R T
7
, or dual, mode. Layer, or dual, refers to an additional voice
layer
is tone mixed with the selected keyboard voice. The assigned
that
voice will be heard with the oringinal voice. To select a new
layer
layered
instrument voice us the +Yes or -No buttons within 4
I N T R O
V A R I A T I O
F IN G ER E D
P I A N
N
seconds after the Layer button has been engaged.
ates in the split mode. In the split mode the keyboard is divided
into
two sections. In the right hand section the oringal or layered
voice will sound, and in the left hand section a different voice can
be
assigned to sound when the keys are played. To select a new
Lower
instrument voice us the +Yes or -No buttons within 4 sec-
onds after the Lower button has been engaged.
O
7. SYNC START - Synchronized Start mode sets the auto accompaniment
pressed
into standby mode. When the SYNC START button is
the indicator lights above the tempo will flash to the
Tempo of the selected rhythm style. The rhythm style will start
as
soon as you play in the auto accompaniment section of
the keyboard. The auto accompaniment will start with the first
recognized
keyboard
ing
the SYNC START button again will stop the auto accompani-
ment
and put the keyboard back on standby mode.
chord played in the auto accompaniment section of the
, depending on which fingering mode is selected. Press-
8. START/STOP - This button starts or stops the selected rhythm
style. The
chord
depending
auto accompaniment will start with the first recognized
played in the auto accompaniment section of the keyboard,
on the fingering mode selected.
9
PANEL CONTROLS
– TEMPO + HARMONY LAYER LOWER
SINGLE
FIN-
GERED
PIANO
SYNCH
START
START/
STOP
INTRO/
ENDING
9
ACCOMPFILL IN VARIATION
11 1210
9. INTRO/ENDING - All of the 100 rhythm styles can be started or
finished with an detailed individual introduction or ending pattern.
When engaged, an introduction of rhythm pattern will start followed by the main pattern.
With a rhythm or accompaniment pattern already engaged the
accompaniment can be professionally completed with an ending
pattern from the next measure by pressing the INTRO/ENDING
button. If you press the fill-in button during the ending pattern it
will return to the main accompaniment pattern.
10. FILL IN - The fill-in provides the accompaniment with a short
rhythm pattern of one or two measures for each style. Press the
FILL IN button at any time while the accompaniment is playing to
add a fill-in. If you hold down the FILL IN button, the fill-in pattern
will repeat until the button is released, then the main pattern will
play from the beginning of the next measure.
11. VARIATION - All of the 100 rhythm styles include a variation of
that style that can be played simply by engaging the VARIATION
button. Press the VARIATION button again to disengage and
return to the main pattern.
12. ACCOMP - Each rhythm style has a fully orchestrated auto accompaniment pattern. These accompaniments are dedicated to the
selected rhythm style, and will create rhythm, bass and chord
accompaniments. The ACCOMP button selects the auto accompaniment mode. With this function engaged, the keys to the left
side of the split point are the auto accompaniment section of the
keyboard, while the keys to the right are available for normal
playing.
The auto accompaniment fingering modes are single, fingered,
piano, and off. Press the ACCOMP button until the indicator LED
that corresponds to the fingering mode you desire turns on.
10
PANEL CONTROLS
S I N G L E
F IN
G E R E
P I A N
ACCOM
PIANO E . P I A N O
D
O
15
P
GUITAR
B O S S
N O V
L OU NG E B L U E S J A Z Z G O S P E L
STRING
A
R O C K
A
H A R P S.
S
TRUMPE
P B A L L A D US E R 1
P O
ORGA
FLUT
T
U SE R
USER 2
USER 2
1
1314
A / B
M E T R O N O M E
N
E
13. A/B BUTTON - The five quick select voice and five quick select
buttons are each assigned to a line A and line B. Press the
style
A/B button to alternate between the two selection lines. The
indi
cator light will be lit when selection line B is active. Please see
quick select buttons below for more information.
the
. QUICK SELECT VOICE - There are ten instrument voices that
14
be selected quickly by pressing one of the five voice select
can
buttons. These
voices are assigned to line A and line B. Each of
these selection lines consists of five voices. The voice name in the
A is printed above the voice select button and the voice name
line
on line B is beneath the button. Press the A/B button to select the
voice line of your choice. When the indicator light is lit the B line or
bottom
be
line is active. The selected voice name and its number will
shown on the display. Please see the Keyboard Voices section
of this manual for more information.
. QUICK SELECT STYLE BUTTONS - There are ten Rhythm
15
Styles
Rhyt
that can be selected quickly by pressing one of the five
hm select buttons. These Rhythm Styles are assigned to line
A and line B. Each of these selection lines consists of five rhtyhm
styles. The
select
bu
tton. Press the A/B button to select the Rhythm Style line of
choice. When the indicator light is lit the B line or bottom line
your
is
active. The selected rhythm name and its number will be shown
the display. Please see the Rhythm Styles section of this
on
manual
Style name in the line A is printed above the Style
button and the Rhythm style name on line B is beneath the
for more information.
11

PANEL CONTROLS
A / B
METRONOME
16
16.
17
VOICE
SONG FUNCTION USER REGPAGEPAGE
18
S T Y
L E
19
METRONOME:
metronome. Use the +YES and –NO bu
the m
etronome has been engaged to select the beat of your choice: 1/4,
2/4
, 3/4, 4/4, 5/4, 6/4, 6/8 or 12/8.
Press the METRONOME button to engage the built-in
ttons within three seconds after
17. INSTRUMENT VOICE - There are 128 GM (General MIDI)
instrument voices, plus ten Asian folk instrument voices available
on
this piano. You can instantly select an instrument voice by
pressing one of the voice select buttons. Or you can use the
numbe
be
liste
thi
r pads to select a voice, the voice name and its number will
shown on the display. There is a complete list of all 138 voices
d in the back of the manual. Please see the Voice section of
manual for more information.
s
12
18. STYLE - To engage one of the 100 rhythm styles, and the correspondin
auto accompaniment, press one of the rhythm style
g
buttons or press the STYLE button to engage the style selection
mod
. While its indicator light is lit, use the number pads to select
e
a style, the style name and its number will be shown on the
display. There is a complete list of all 100 rhythm accompaniment
style
sectio
listed in the back of the manual. Please see the Rhythm
s
n of this manual for more information.
19. SONG - This “music teacher” feature can be used as an aid to
lear
n the 50 songs built into this piano. The SONG button turns
the music teacher function on and off. Please see the Training
sectio
n of this manual for more information.
PANEL CONTROLS
23
1 2 3 +/YES
VOICE
S O N G F U N C -
T I O
20
L E
S T Y
3 4 5 6
7 8 9 –/NO
N
P A G EP A G E
U S E R
R E G
21 22
20. FUNCTION - The FUNCTION button is used to access the func-
tion menu. The function menu can be used to adjust or change
the parameters of a number of settings. Metronome settings,
reverb
paniment
mony
level, chorus level, touch, split point for voice, auto accom-
split point, tuning, drum kit selection and the auto har-
type are all set from the function menu. Please see the
Function section of this manual for more information.
. PAGE - The PAGE buttons (up and down) are used to access the
21
di
fferent menus in the Function feature. When the FUNCTION
button has been pressed use the PAGE s and PAGE t to access
the Function menu selections.
. USER REG - Registration is used to store keyboard settings.
22
Press the USER REG button to engage the registration memory
mode,
1-9,
Registration
. NUMERIC PAD - Use the +/YES, –/NO or the numeric pad to input
23
numbers
These
the indicator will light up. Press one of the numeric buttons
the stored setting will be recalled instantly. Please see the
Memory section of the manual for more information.
directly while using the voice, style or function settings.
buttons are also used to access or alter many of the func-
tion features or where ever numerical input is necessary.
. TRANSPOSE - The transpose feature can shift the pitch of the
24
13
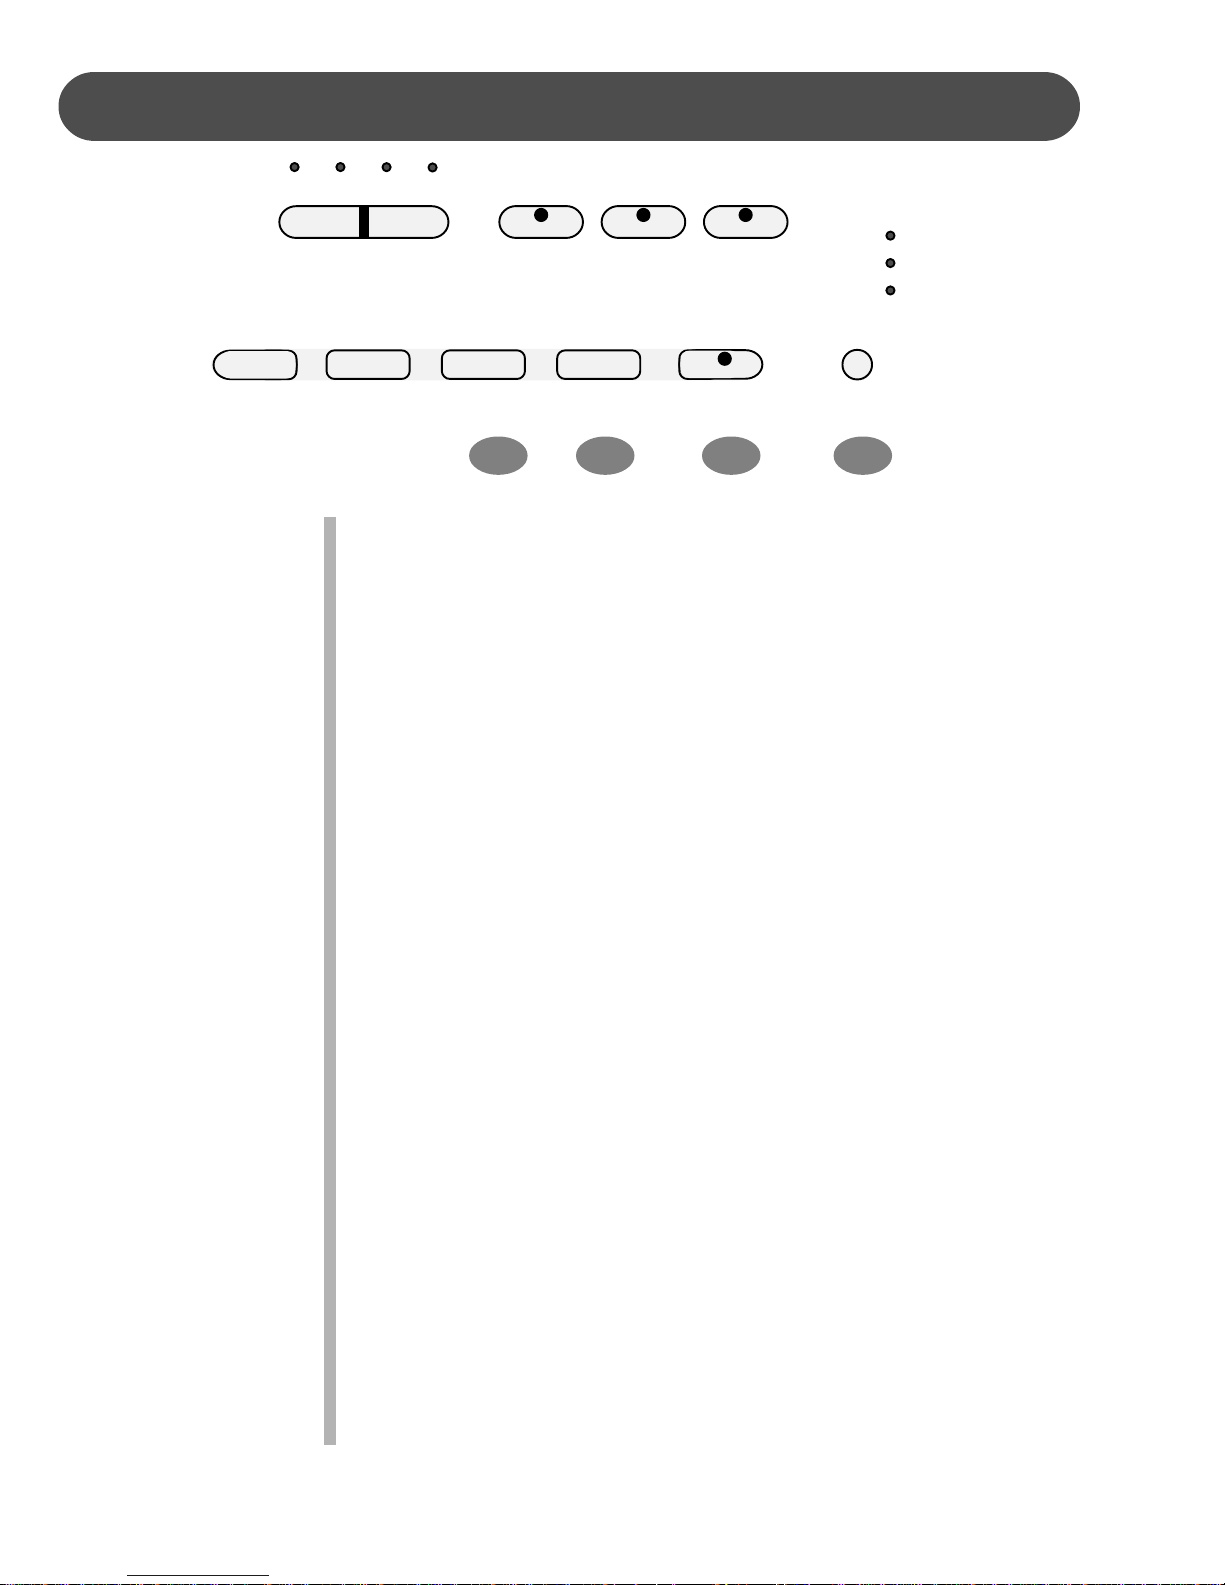
PANEL CONTROLS
1
2
3
4
USER SONG ACCOMP MELODY 1 MELODY 2 REC PLAY/STOP DEMO
– TRANSPOSE + REVERB CHORUS LEFT RIGHT
EFFECT SONG
25 2624
keyboard up or down in semitone intervals up to a maximum of
24 semitones. Press one of the TRANSPOSE buttons, the
current transpose value will appear on the display. Use the
TRANSPOSE + or TRANSPOSE – buttons to set the transpose
value range from –12, one octave lower, to 12, one octave
higher. Press the + and – value buttons simultaneously to recall
the default value of 0. After three seconds the display will return
to the currently selected instrument voice. Transpose does not
affect notes that are currently playing. Transpose does not
affect the keyboard percussion.
25. REVERB - The reverb effect is engaged automatically when the
power is turned on. Reverb simulates the effect of playing in a
big room or hall where the sound reverberates off the walls and
ceiling. Press the REVERB button to turn off the reverb effect.
You can switch the reverb feature on and off by pressing the
REVERB button. The reverb setting does not affect the auto
accompaniment. Reverb depth can be changed in the function
menu “Reverb Level”. Please see the Function Section for more
information.
26. CHORUS - The Chorus effect adds depth and spaciousness to
the selected keyboard voice. Press the CHORUS button to
engage the chorus effect and the indicator will light up. Press
the button again to turn off the chorus effect. The chorus
setting does not affect the auto accompaniment. Chorus depth
can be changed in the function menu “Chorus Level”. Please
see the Function Section for more information.
2 7 . SONG LEFT , SONG RIGHT - These buttons are used in
14
PANEL CONTROLS
1
2
3
4
USER SONG ACCOMP MELODY 1 MELODY 2 REC PLAY/STOP DEMO
28
– TRANSPOSE + REVERB CHORUS LEFT RIGHT
29 30
EFFECT SONG
27
conjunction with the SONG button. It allows the player to play
along with the prerecorded traditional songs contain within this
piano. The LEFT button will play the right hand of the selected
song, so tht the user can practice the Left Hand portion of the
song. The RIGHT button will play the Left Hand of the selected
song, so that the user can practice the Right Hand portion of the
song. When engaging the LEFT and RIGHT buttons simultaneously only the accompaniment (if available) will be heard as the
user should play both the Left and Right portions of the selected
song. Please see the Play Along Song section of this manual for
more information.
2 8. USER SONG - The USER SONG button accesses one of the
four available song settings for recording or playback. Use the +/
YES, –/NO buttons to select the song you wish, if there is recorded information on any of the three tracks their indicator lights
will light up. Please see the Record section of this manual for
more information.
2 9. SEQUENCER ACCOMP - The ACCOMP button is used to
select the auto accompaniment track of a song for recording or
playback. Please see the Record section of this manual for
more information.
3 0. MELODY 1 , MELODY 2 - There are two tracks for recording
melody, which are assigned by the MELODY 1 and MELODY 2
buttons. Please see the Record section of this manual for more
information.
15
PANEL CONTROLS
1
2
3
4
USER SONG ACCOMP MELODY 1 MELODY 2 REC PLAY/STOP DEMO
– TRANSPOSE + REVERB CHORUS LEFT RIGHT
EFFECT SONG
3331 32
31. REC - This unit is able to record four songs, each with a 3-track
sequencer. It will record all note events and the accompaniment
patterns exactly as they are performed. This recorded information
is nonvolatile and therefore will not be lost when the power is
turned off. To Record press and hold down the RECORD button
then press the track button(s) you want to record in. Recording
begins as soon as you start to play on any section of the keyboard.
Press the RECORD button again to stop recording. Please see
the record section of the manual for more information.
32. PLAY/STOP - Press the PLAY/STOP button to hear selected
tracks that you have recorded on. Press the PLAY/STOP button
again to stop the playback. Please see the Record section of this
manual for more information.
33. DEMO - Press the DEMO button. The first demo song will play
back instantly. This piano has twelve different demonstration
songs. All songs will play repeatedly until you press the DEMO
button again to stop the song demonstration. To access an
individual demo song press the + Yes or - No buttons when the
Demo Feature is engaged. Your individually selected demo song
will repeat after completition.
16

DEMO
PLAYING
designed to showcase the different sampled voices that are available. The display will
are
show
display
stration
THE DEMO SONGS - This piano has twelve different demonstration songs that
the song number with a “d” prefix. When playing all the songs, “ALL” will appear on the
initially, and will change to the demo song number as it plays. After exiting the demon-
mode the display will revert to its initial data.
1. PLAY ALL DEMO SONGS - Press the DEMO button. The first
demo
song will playback instantly. This unit has twelve demo
DEMO
songs. All
button
songs will play repeatedly until you press the DEMO
again to stop the demonstration.
VOICE
ALL:Demo Song
S T Y
L E
DEMO
1 2 3 +/YES
3 4 5
7 8 9 –/NO
6
2. PLAY A SINGLE DEMO SONG - Use the +/YES or the -/NO
button
number
digits
s to change songs while the demo is playing, or enter a song
directly by using the numeric pad. Please note that two
are required for selecting a song number, for example, to
select song No. 9 enter “09”. The song will play repeatedly until you
press the demo button again to stop.
VOICE
There
are 50 songs for the musical training course that can also be
played
this
back for demonstration. Please see the Training section of
manual for more information.
d-9:Demo Song
S T Y
L E
17

KEYBOARD VOICES
VOICE
SELECTION - There are 128 GM voices in 16 groups plus 10 Asian ethnic folk
instrument
VOICE A/B
G.PIANO
H.PIANO
voices. There is a complete list of all 138 voices in the back of the manual.
G.PIANO E.PIANO ORGAN N.GUITAR USER 1
STRINGS SAXOPHONE TRUMPET CHOIR USER 2 A / B
QUICK SELECT - There are ten voices that can be selected quickly by
pressing one of the five voice select buttons. These voices are
assigned to Instrument Line A and Instrument Line B. Each Line
consists
the
the
of five voices. The voice name in Line A is printed above
voice select button and the voice name in Line B is beneath
button.
1. Press the A/B button to select a voice kit. Selection of the Instru Lines will alternate when the A/B button is pressed
ment
repeatedly. The
indicator will be lit when Line B is selected .
2. Press the voice select button that corresponds to the desired voice
the Instrument Line you have selected. The voice name and its
in
number
will show on the display.
VOICE
1 2 3 +/YES
3 4 5 6
7 8 9 –/NO
001:Grand Piano
S T Y
L E
SELE
VOICE
CTING ONE OF THE 138 VOICES
1. If the Instrument Voice Button is not already lit press the VOICE
button
on
to engage the voice selection mode, the indicator will turn
.
2. Use the numeric pad or the +/YES, –/NO buttons to select a voice
nu
mber.
Please
digits
selec
note, when using the number pads, you must enter three
to select a voice number from 001-138. For example, to
t voice No. 2 you must enter “002”. The voice name and its
VOICE
002:Bright Piano
S T Y
L E
18

KEYBOARD VOICES
number will show on the display. Please refer to the back of the
manual for a list of all available voices.
USER 1
USER 2 A / B
LAYER
USER DEFINED QUICK SELECTION BUTTON - You can assign a
favorite voice to the voice quick select button in the follow manner.
1. Press the voice USER button, USER 1 from Line A, or USER 2
from Line B.
2. Select the desired voice by using the numeric pad or the +/YES, –/
NO buttons. Please refer to Selecting one of the 138 Voices.
3. The currently selected voice will be assigned to this button to be
available for quick selection. Please note the USER button will
revert to the default setting when the power is turned off (USER
1=65:Soprano Sax, USER 2=063:Synth Brass1).
LAYER (DUAL) VOICE - Layer, or dual, refers to an additional voice
that is tone mixed with the selected keyboard voice. The assigned
layer voice will be heard with the original voice when the layer
feature is engaged.
1. Press the LAYER button, the currently assigned layer voice will
show on the display, and the indicator will light up.
2. Use the +/YES, –/NO buttons or the numeric pad to select the
desired voice. The display will show the layer voice number and
name, after three seconds the display will revert to the selected
main voice.
3. Press the LAYER button again to turn the feature off.
LOWER VOICE - In the lower, or split, mode the keyboard is divided into
LOWER
1. Press the LOWER button, the currently assigned lower voice will
2. Use the +/YES, –/NO buttons or the numeric pad to select the
3. Press the LOWER button again to turn the feature off.
two sections. To the right of the Split Point the currently selected
main voice, or the layer voice will sound. The keys to the left of the
Split Point can play a different instrument voice.
show on the display, and the indicator will light up.
desired voice. The display will show the lower voice number and
name, after three seconds the display will revert to the main voice.
19

KEYBOARD VOICES
ASSIGNING THE SPLIT POINT FOR VOICE - The keyboard is
FUNCTION
split into two sections at the split point. The default split
point is the C3 key for voice. A different voice split point can
be assigned in the Function menu “Split Point”. Please see
the Function section of this manual for more information.
20

RHYTHM SECTION
RHYTHM STYLE SELECTION - This piano offers 100 rhythm styles and a variation of
style pattern to choose from. There is a complete list of all 100 styles in the back of the
each
manual
.
A / B
BOSSA
NOVA1 ROCKNROLL POP 1 BALLADPOP1 USER 1
STYLE A / B
BOSSA NOVA1
LOUNGE
LOUNGE BLUES1 JAZZCOMBO GSPL.
BALLA
USER 2
D
PERCUSSION
QUICK SELECT - There are ten styles that can be selected quickly
pressing one of the five style select buttons. These styles
by
assigned to Line A and Line B. Each Rhythm Style Line
are
consists
above
beneath
of five styles. The style name in Line A is printed
the style select button and the voice name in Line B is
the button.
1. Press the A/B button to select a Line. Selection of the Lines will
al
ternate when the A/B button is pressed repeatedly. The
indicator
will be lit when Line B is selected.
2. Press the style quick select button that corresponds to the
desired
and
style in the Line you have selected. The style name
its number will show on the display.
VOICE
75:BossaNova1
S T Y
L E
SELECTING ONE OF THE 100 STYLES
STYLE
1. Press the STYLE button to engage the style selection mode,
2. Use the numeric pad or the +/YES, –/NO buttons to select a
1 2 3 +/YES
3 4 5
7 8 9 –/NO
6
the
indicator will light up.
number while the indicator is lit.
style
Please not
digits
select
number
the manual for a list of all available styles.
of
e, when using the number pads, you must enter two
to select a style number from 00-99. For example, to
style No. 4 you must enter “04”. The style name and its
will be shown on the display. Please refer to the back
VOICE
04:8BeatPop2
S T Y
L E
21
RHYTHM SECTION
USER DEFINED QUICK SELECTION BUTTON - You can assign a
favorite
manner.
rhythm style to the style quick select button in the following
USER 1
USER 2
S T Y L E
METRONOME
1. Press the voice USER button, USER 1 from Line A, or USER 2
from
Line B.
2. Select the desired style by using the numeric pad or the +/YES, –/
NO buttons. Please refer to Selecting one of the 100 styles.
3. The currently selected style will be assigned to this button to be
available
rever
for quick selection. Please note the USER button will
t to the default setting when the power is turned off (USER
1=82:kids 1, USER 2=32:Folk 2)
ADJUSTING THE TEMPO - There is a four-beat indicator above the
MPO buttons that indicates the tempo and the beat for the
TE
accompaniment
playing. Each style has its own preset tempo.
The tempo can be adjusted before or during rhythm style play by
pressing
the
value
current
the either of the –TEMPO+ buttons. When you change
style before you play, the tempo will be set to that default
. If you change style during play, the tempo will keep its
value, press the –/+ TEMPO buttons simultaneously to set
the tempo to the new styles default value.
22
- TEMPO +

RHYTHM SECTION
STARTING AND STOPPING THE RHYTHM STYLE - There are several ways to start
and stop the rhythm style.
STRAIGHT START - The START/STOP button starts the selected
rhythm style immediately with the percussive rhythm. Press the
START/
STOP
INTRO/
ENDING
SYNCH
START
STARTING WITH AN INTRODUCTION - All of the 100 styles can be
SYNCHRONIZED START - Synchronized Start engages the accom-
START/STOP button again to stop the accompaniment.
started with a appropriate introduction. As soon as you press the
INTRO/ENDING button, the rhythm of the introduction will start
followed by the main pattern. Press the START/STOP button to
stop the accompaniment or the INTRO/ENDING button again to
stop with an ending pattern.
Please note, if you want the selected rhythm style to be engaged
again after the ending pattern has been completed, press the
FILL IN button while the ending pattern is engaged.
paniment in the standby mode.
Press the SYNC START button, the beat indicator dots above the
TEMPO buttons will blink at the current tempo, showing that the
synchronized start mode is ready. The rhythm style will start as
soon as you play in the auto accompaniment section of the
keyboard. You may add an introduction by pressing the INTRO/
ENDING button after pressing the SYNCH START button.
Press the START/STOP or the SYNCH START buttons to stop the
accompaniment. If the SYNCH START button is used, the synchronized start mode will be on standby. Use the INTRO/ENDING
button to stop with an ending pattern.
23

RHYTHM SECTION
VARIATION - To select the variation of the main patterns, press the
VARIATION button. The indicator will light up. If you press the
VARIATION
FILL - IN - The fill feature will insert a short rhythmic pattern of one to
FILL IN
ASSIGNING THE SPLIT POINT FOR THE AUTO ACCOMPANI-
FUNCTION
VARIATION button, then press the INTRO/ENDING button, the
variation pattern will play after the introduction.
two measures in length, depending on the rhythm style selected
and the variation. Holding down the FILL IN button will extend the
fill indefinitely.
MENT - The keyboard is split into two sections at the split point.
The default split point is the G1 key for auto accompaniment. A
different split point for the auto accompaniment can be assigned
in the Function menu “Auto A.Split”. Please see the Function
section of this manual for more information.
24

AUTO ACCOMPANIMENT
AUTO ACCOMPANIMENT (AUTO BASS CHORD) - The rhythm styles have their own
to accompaniment, dedicated to that rhythm style. These auto accompaniments patterns
au
create
you
au
split
The
fully orchestrated rhythm, bass and chord progressions based on the chords that
play with your left hand. The selected rhythm style determines the characteristics of the
to accompaniment. The auto accompaniment section of the keyboard is assigned by the
point. The keys on the left of the split point are reserved for the auto accompaniment.
keys to the right are available for normal playing.
AUTO BASS CHORD FINGERING - This piano has three auto accom-
paniment fingering modes, single, fingered, and piano.
F I
G E R E
N
P I A N
SINGLE
ACCOMP
1. Press the ACCOMP button until the indicator light until the Fingering
D
O
2. Press the START/STOP or the SYNCH START buttons to start the
mode
rhythm
that you desire is selected.
style. Press the INTRO/ENDING button to start with an
introduction.
3. Press the START/STOP or the SYNCH START buttons to stop the
accompaniment, or press the INTRO/ENDING button to stop with
ending.
an
SINGLE (INTELLIGENT) MODE - Single fingering mode makes it
simple to produce four types of orchestrated accompaniment
chords
the
keyboard. In
of
minorpercussive
using a minimum of fingers, ( one, two, or three fingers at
most), while playing in the auto accompaniment section of the
this mode, keys in the auto accompaniment section
the keyboard are used to produce major, seventh, minor, and
seventh chords. The auto accompaniment will start with the
rhythm as soon as a recognized chord is played. The
accompaniment produced is perfectly matched to the selected
rhythm
style.
Major Chord: Press any key in the auto accompaniment section of the
keyboard. The
Minor Chord: Press the root key and two keys to its left in the auto accompaniment
Seventh Chord: Press the root key and one key to its left (7th key) in the
auto
accompaniment section of the keyboard simultaneously.
Minor-Seventh
keys
to its left in the auto accompaniment section of the keyboard
simultaneously
key you press determines the root note of the major chord.
section of the keyboard simultaneously.
Chord: Press the root key and both the first and second
.
25
AUTO ACCOMPANIMENT
FINGERED MODE - The fingered mode is ideal if you already know how
SINGLE
FIN-
GERED
PIANO
ACCOMP
to play chords on the keyboard. It allows you to play the chords in
the auto accompaniment section of the keyboard that produce the
selected auto accompaniment pattern.
Please note, if a chord played cannot be recognized (fingered
beyond the table), the previous chord will keep playing. An unrecognized chord cannot start a bass chord in the straight start mode,
and cannot start the auto accompaniment in the synchronized
start mode. The “Fingering Guide” table below lists all of the 31
playable chords of this mode.
FINGERING
GUIDE
Chord Mark Fingering
Major M 1-3-5
Major sixth M6 1-3-5-6
Major seventh M7 1-3-(5)-7
Major seventh sharp eleventh M7 #11 1-(2)-3-#4-(5)-7
Major add ninth M 9 1-2-3-5
Major seventh ninth M7 9 1-2-3-(5)-7
Major sixth add ninth M6 9 1-2-3-(5)-6
Augmented Aug 1-3-#5
Minor m 1-b3-5
Minor sixth m6 1-b3-5-6
Minor seventh m7 1-b3-(5)-b7
Minor seventh flatten fifth m7b5 1-b3-b5-b7
Minor add ninth m 9 1-2-b3-5
Minor seventh add ninth m7 9 1-2-b3-(5)-b7
Minor seventh add eleventh m7 11 1-(2)-b3-4-5-(b7)
Minor major seventh m M 7 1-b3-(5)-7
Minor major seventh add ninth mM7 9 1-2-b3-(5)-7
Diminished Dim 1-b3-b5
Diminished seventh Dim7 1-b3-b5-6
Seventh 7 1-3-(5)-b7
Seventh suspend fourth 7sus4 1-4-5-b7
Seventh add ninth 7 9 1-2-3-(5)-b7
Seventh sharp eleventh 7 #11 1-(2)-3#4-(5)-b7
Seventh thirteenth 7 13 1-3-(5)-6-b7
Seventh flatted fifth 7 b5 1-3-b5-b7
Seventh flatted ninth 7 b9 1-b2-3-(5)-b7
Seventh flatted thirteenth 7 b13 1-3-5-b6-b7
Seventh sharp ninth 7 # 9 1-#2-3-(5)-b7
Major seventh augmented M7aug 1-3-#5-7
Seventh augmented 7aug 1-3-#5-b7
Suspended fourth Sus4 1-4-5
Please note, the notes listed in parentheses can be omitted.
The listed chord fingerings are all in root note position, other inversions can be used with the exception of:
1. The M6 chords are only recognized in root note position. All other inversions are interpreted as m7.
2. The 6 9 chords are only recognized in root note position. All other inversions are interpreted as minor chords.
3. The m6 chords are only recognized in root note position. All other inversions are interpreted as m7b5.
4. With aug and dim7 chords the lowest note played is assumed to be the root.
5. With 7#11 chords the lowest note played is assumed to be the root or b7.
26

AUTO ACCOMPANIMENT
AUTO BASS CHORD FINGERING continued
SINGLE
FINGERED
PIANO
ACCOMP
HARMONY
START/
STOP
PIANO CHORD MODE - When the Piano fingering chord mode
is engaged you may enter chords anywhere on the
keyboard, and the auto accompaniment will make complete
styled arrangements. You are not limited to the auto accompaniment section or the range of the split point. In this
regard there is no keyboard split point function for this
Piano Chord Mode.
MANUAL BASS CHORD - When engaged in the single or
fingered mode, you may play individual keys in the auto
accompaniment section of the keyboard. The voice on this
section of the keyboard will be a layered bass and chord
voice determined by the current style. This is a split voice
mode, with the right hand playing the main voice.
AUTO HARMONY - With the harmony feature engaged, a single
note on the right-hand section of the keyboard will sound
with additional auto harmony notes. The note played in the
right-hand section of the keyboard determines the root key
of the harmony. If more than one note is played only the
highest note will add harmony.
Please note, auto harmony is only available when the
auto accompaniment is engaged.
FUNC-
TION
Press the HARMONY button to turn the feature on and off.
There are four harmony types that can be selected, duet,
close harmony, open harmony, and octave. The harmony
type selection is assigned in the Function menu. Use the
“Harmony Type” menu to select the type of harmony.
Please see the Function section for more information.
27

AUTO ACCOMPANIMENT
STARTING AND STOPPING THE AUTO ACCOMPANIMENT
STRAIGHT START - The START/STOP button starts the auto accom-
paniment as soon as you play a recognized chord in the auto
accompaniment section of the keyboard. Press the START/STOP
START/
STOP
INTRO/
ENDING
STARTING WITH AN INTRODUCTION - All of the 100 styles can be
SYNCHRONIZED START - Synchronized Start mode makes the auto
button again to stop the accompaniment.
started with an appropriate introduction. Press the INTRO/ENDING button, the introduction, followed by the main pattern will start
as soon as you play a recognized chord in the auto accompaniment section of the keyboard.
Press the START/STOP button to stop the accompaniment or the
INTRO/ENDING button again to stop with an ending pattern.
Please note, if you want the auto accompaniment to be engaged
again after the ending pattern has been completed, press the
FILL IN button while the ending pattern is playing.
accompaniment standby. The auto accompaniment will start as
soon as you play a recognized chord in the auto accompaniment
section of the keyboard.
SYNCH
START
1. Press the SYNC START button, the beat indicator dots above the
TEMPO buttons will blink at the current tempo, indicating that the
synchronized start mode is ready.
Please Note: You may add an introduction by pressing the INTRO/
ENDING button after pressing the SYNCH START button.
2. Play a recognized chord in the Auto Accompaniment Section of the
piano.
If the auto accompaniment is off, (the auto accompaniment indica-
tor is off), only the percussive rhythm will play.
3. Press the START/STOP or the SYNCH START buttons to stop the
accompaniment.
If the SYNCH START button is used, the synchronized start mode
will be on standby. Use the INTRO/ENDING button to stop with
an ending pattern.
28

AUTO ACCOMPANIMENT
VARIATION - To select the variation of the main patterns, press the
VARIATION
FILL IN
FUNCTION
FILL-IN - The fill feature will insert a short rhythmic pattern of one to
ASSIGNING THE SPLIT POINT FOR THE AUTO ACCOMPANI-
VARIATION button. The indicator will light up. If you press the
VARIATION button, then press the INTRO/ENDING button, the
variation pattern will play after the introduction.
two measures in length, depending on the rhythm style selected
and the variation.
Holding down the FILL IN button will extend the fill indefinitely.
MENT - The keyboard is split into two sections at the default split
point G1 key for auto accompaniment.
A different split point for the auto accompaniment can be as-
signed in the Function menu “Auto A.Split”. Please see the
Function section of this manual for more information.
METRONOME
METRONOME - Use the metronome menu to choose the meter of
your choice, 2/4, 3/4, or 4/4 time. When any of the time signatures have been selected, the metronome will be engaged.
If the auto accompaniment is playing the metronome sound will
replace the percussive rhythm sound immediately. If the auto
accompaniment is not engaged, press the METRONOME button
to start the metronome, and again to stop it. If the metronome
setting is in the “off” position, the metronome will not sound.
1. Press the METRONOME button, the “Metronome” menu appears.
Metronome OFF
2. Use the +/YES or the –/NO to choose the meter of your choice or
to turn the metronome off.
Metronome 4/4
29

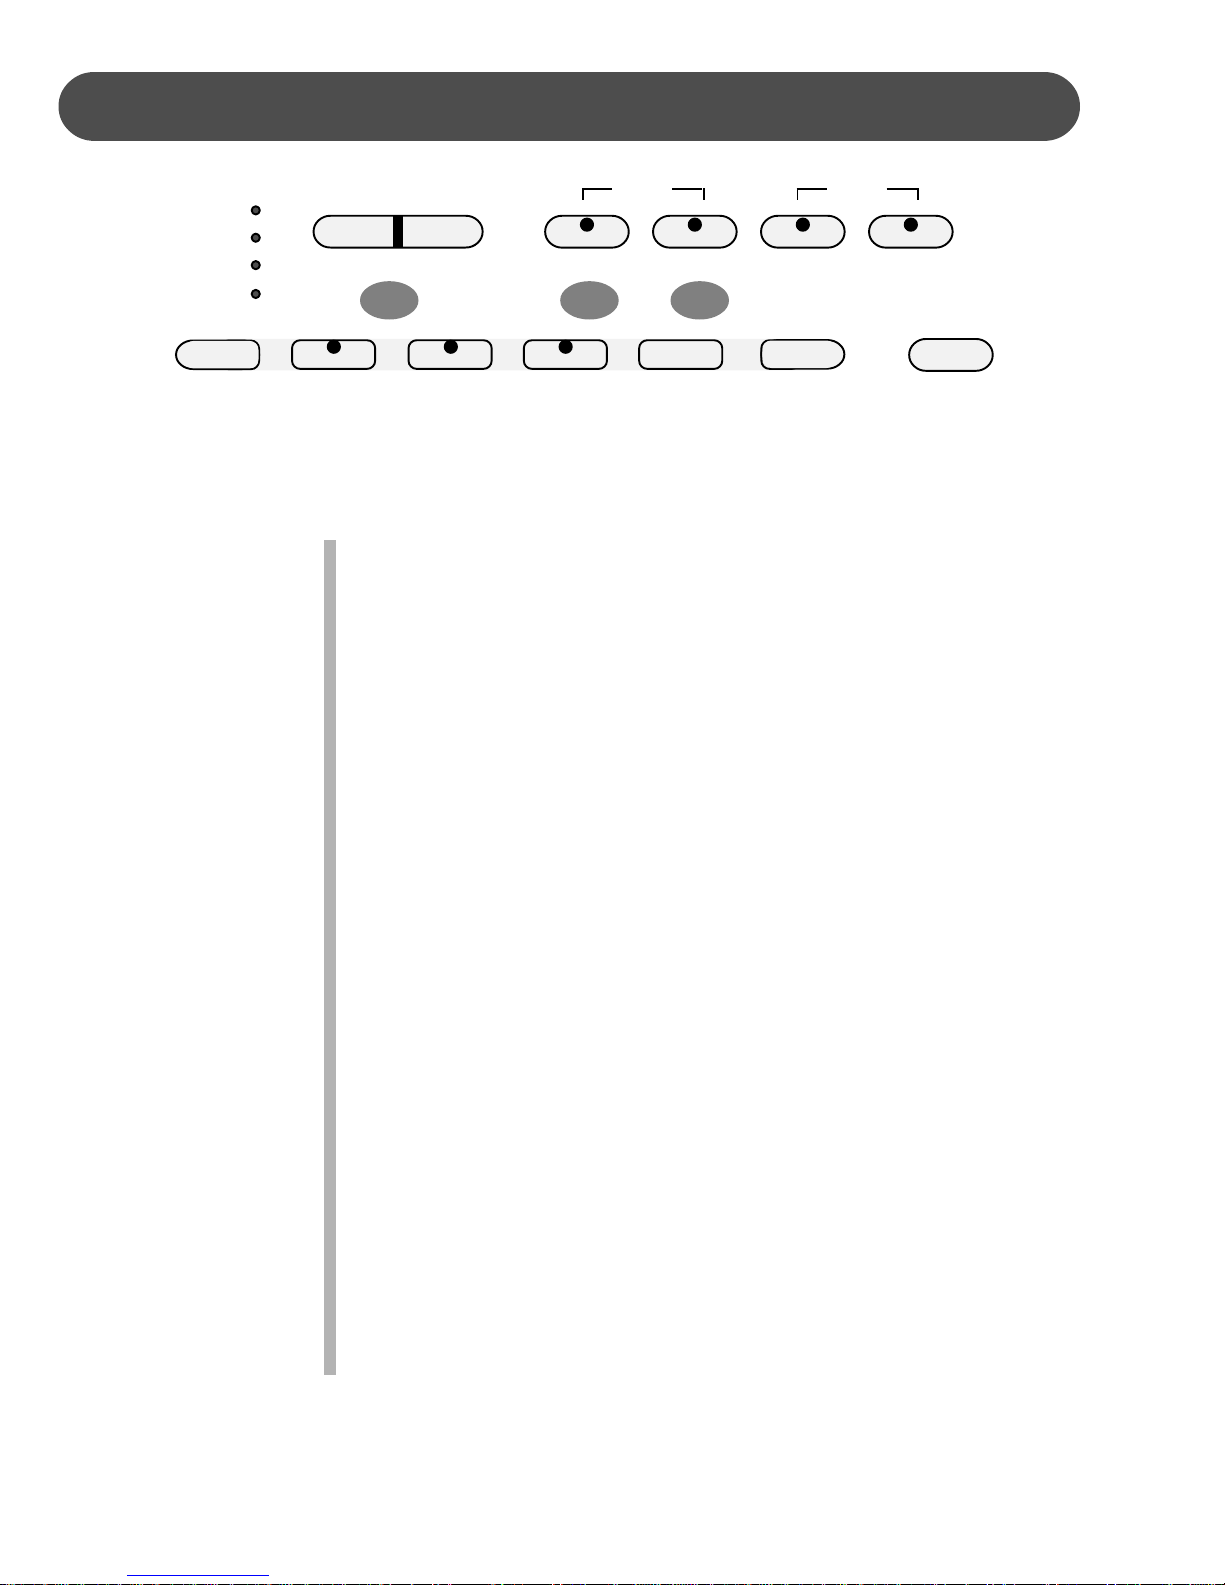
FUNCTION
The Function mode is used to set up or to adjust various parameters related to the operation of this keyboard. With the FUNCTION button engaged you may access the menu for
Metronome, Reverb level, Chorus level, Touch sensitivity, Lower Split point for voice,
the
point for auto accompaniment, tuning, the Drum kit selection, and Harmony type
Split
VOICE
.
1 2 3 +/YES
Drum Kit
S T Y
L E
selection
SONG FUNCTION USER REGPAGEPAGE
USING THE FUNCTION MENU
1. Press the FUNCTION button. The first menu item that can be
FUNCTION
2. Press the PAGE UP or the PAGE DOWN buttons until the menu
PAGE
PAGE
+ / YES
3. Press the +/YES button to show the current parameter for your
3 4 5
7 8 9 –/NO
manipulated
you
wish to access appears on the display screen.
selec
ted function.
will appear on the display.
6
0
4. Use the number pad or the +/YES, –/NO buttons to set a new
parameter
Note:
Pressing the +/YES and the –/NO buttons simultaneously will
- / NO
recall the default setting.
5. Press the FUNCTION button again to exit this mode and confirm
your selection.
FUNCTION
30
.

FUNCTION
DRUM
KIT SELECTION (KEYBOARD PERCUSSION) - When keyboard
percussion has been engaged using the PERCUSSION button, the
entire keyboard will play the percussion voices from the selected
kit. There are ten drum kits, based on the Standard Kit, that
Drum
be assigned. Kit 10 is a sound effects kit. Please see the
can
“Drum
List” at the back of the manual for a complete listing.
Drum Kit
1. Press the FUNCTION button, then the +/YES button to confirm.
2. Press the PAGE UP or the PAGE DOWN buttons until the “Drum Kit”
appears.
menu
3. Press the +/YES button to confirm your selection. The current drum
kit number will be shown.
4. Use the +/YES, –/NO buttons to select a drum kit 01 to 10.
KYBD PERC.01
5. Press the FUNCTION button again to exit the function setting mode.
If a kit is selected, the display will show “Percussion ON”.
Use the +/YES, -/NO or number pad to change drum kit 01 to 10.
6.
Pressing the -/NO key when KYBD PERC 01 is selected will return to
regular Voice mode and display the last selected voice. Pressing the +/YES
key when kit 10 is selected will return the piano to regular voice mode
and display “Percussion OFF”.
Press any voice select key to exit the percussion mode quickly.
REVERB
REVERB LEVEL SETTING
room or hall where the sound reverberates off the walls and
big
ceiling. The reverb effect is engaged automatically when the power
is turned on. You can switch the reverb feature on and off by press-
the REVERB button. Select the level of reverb from the Func-
ing
tion
menu.
- Reverb simulates the effect of playing in a
ReverbLevel
1. Press the FUNCTION button.
2. Press the PAGE UP or the PAGE DOWN buttons until the “Reverb
Level”
3. Press the +/YES button and the current reverb level will be shown.
4. Use the +/YES button to increase the reverb level or the –/NO buttons
to
enter
simultaneously to recover the default setting of 12.
5. Press the FUNCTION button again to exit the function setting mode.
menu appears.
decrease the level. The number pad can also be used to directly
a value ranged from 01-16. Press the +/YES, –/NO buttons
31

FUNCTION
CHORUS LEVEL SETTING - The Chorus effect enriches your selected
CHORUS
1. Press the FUNCTION button.
2. Press the PAGE UP or the PAGE DOWN buttons until the “Chorus
3. Press the +/YES button to confirm your selection and the current
4. Use the +/YES to increase the chorus level or the –/NO buttons to
5. Press the FUNCTION button again to exit the function setting mode.
instrument voice by adding depth and texture.
Press the CHORUS button to engage the chorus effect, the indica-
tor will light up. Adjust the level of chorus in the Function menu.
Chorus Level
Level” menu appears.
Chorus level will be shown.
decrease the level. The number pad can also be used to directly
enter a value ranged from 01-16. Press the +/YES, –/NO buttons
simultaneously to recover the default setting of 08.
TOUCH - The piano offers four types of keyboard touch sensitivity
settings, soft, normal, hard, and fixed. These are also known as
velocity settings and are designed to suit your style of playing.
The normal setting is selected automatically when the piano is
turned on. The touch response can be changed with the function
feature.
Soft is the most sensitive keyboard response which permits maximum sound
levels with a light touch.
Normal is an intermediate response suitable for most styles of music.
Normal is the default setting.
Hard is a less sensitive keyboard response which requires a heavier touch
to obtain maximum sound levels.
Fixed does not offer any touch sensitivity. Each key plays at full volume no
matter how hard the piano key is hit.
It is commonly used on Harpsichord and Organ voices.
Touch
1. Press the FUNCTION button.
2. Press the PAGE UP or the PAGE DOWN buttons until the “Touch”
menu appears.
3. Press the +/YES button to confirm your selection. The current
touch response setting will be shown.
4. Use the +/YES, –/NO buttons to select a touch response.
5. Press the FUNCTION button again to confirm your selection and
exit the function setting mode.
32

FUNCTION
CHANGING THE SPLIT POINT FOR LOWER VOICE - When the lower
LOWER
1. Press the FUNCTION button.
2. Press the PAGE UP or the PAGE DOWN buttons until the “Split
3. Press the +/YES button to confirm your selection and the current
4. Use the +/YES button to shift the split point up the keyboard, to the
5. Press the FUNCTION button again to confirm your selection and
mode isn engaged the keyboard is divided into two parts at the
split point. In the right hand section the original or Upper voice will
sound. In the left hand section a new instrument voice can be
assigned, the lower voice. The split point for the Lower section
can be changed in the Function feature.
Split Point
Point” menu appears.
voice split point will be shown.
right, and the –/NO button to shift the split point down the
keyboard, to the left. The number pad can also be used to enter
the split point directly (by key number) from C3–C7. Press the +/
YES, –/NO buttons simultaneously to recover the default setting of
C3.
exit the function setting mode.
SINGLE
FIN-
GERED
PIANO
ACCOMP
CHANGING THE SPLIT POINT FOR AUTO ACCOMPANIMENT -
The split point that divides the keyboard can also be changed in
the function menu.
Auto A.Split
1. Press the FUNCTION button.
2. Press the PAGE UP or the PAGE DOWN buttons until the “Auto A.
Split” menu appears.
3. Press the +/YES button to confirm your selection and the current
auto accompaniment split point will be shown.
4. Use the +/YES button to shift the split point up the keyboard, to the
right, and the –/NO button to shift the split point down the
keyboard, to the left, from AO–C3. Press the +/YES, –/NO buttons
simultaneously to recover the default setting of G1.
33

FUNCTION
AUTO HARMONY TYPE SELECTING - When the HARMONY
HARMONY
1. Press the FUNCTION button, then the +/YES button to confirm.
2. Press the PAGE UP or the PAGE DOWN buttons until the
3. Press the +/YES button to confirm your selection. The current
4. Use the +/YES or –/NO buttons to select a harmony type.
5. Press the FUNCTION button again to exit the function setting
button is engaged, a single note on the right-hand section of
the keyboard will sound with additional auto harmony notes,
when the auto accompaniment is engaged. There are four
types of harmony that can be selected.
Duet adds a harmonizing note sounding below the single right
hand note that you supply when the chord accompaniment is
playing.
Close harmony adds two harmonizing notes sounding below the
single right hand melody note that you supply, when the chord
accompaniment is playing.
Open harmony
Octave add a note one octave below the note you play in the
right hand section of the keyboard when the chord accompaniment is playing.
“Harmony Type” menu appears.
harmony type will be shown.
mode.
Harmony Type
34

FUNCTION
MASTER TUNE - The pitch of this piano is very accurate and
stable, it is automatically set to standard A440 pitch when the
piano is turned on. The tuning feature makes it possible to
tune the pitch of the instrument in fine intervals. If necessary,
you can alter the piano pitch. Tuning can be accomplished
over –50 to +50 semitone steps, or cents.
Master Tune
1. Press the FUNCTION button.
2. Press the PAGE s or the PAGE t buttons until the “Master
Tune” menu appears.
3. Press the +/YES button the tuning value will be shown.
4. Use the +/YES button to increase the value or the –/NO but-
tons to decrease the value. Press the +/YES, –/NO buttons
simultaneously to recover the default setting of 00.
5. Press the FUNCTION button again to confirm your selection
and exit the function setting mode.
35

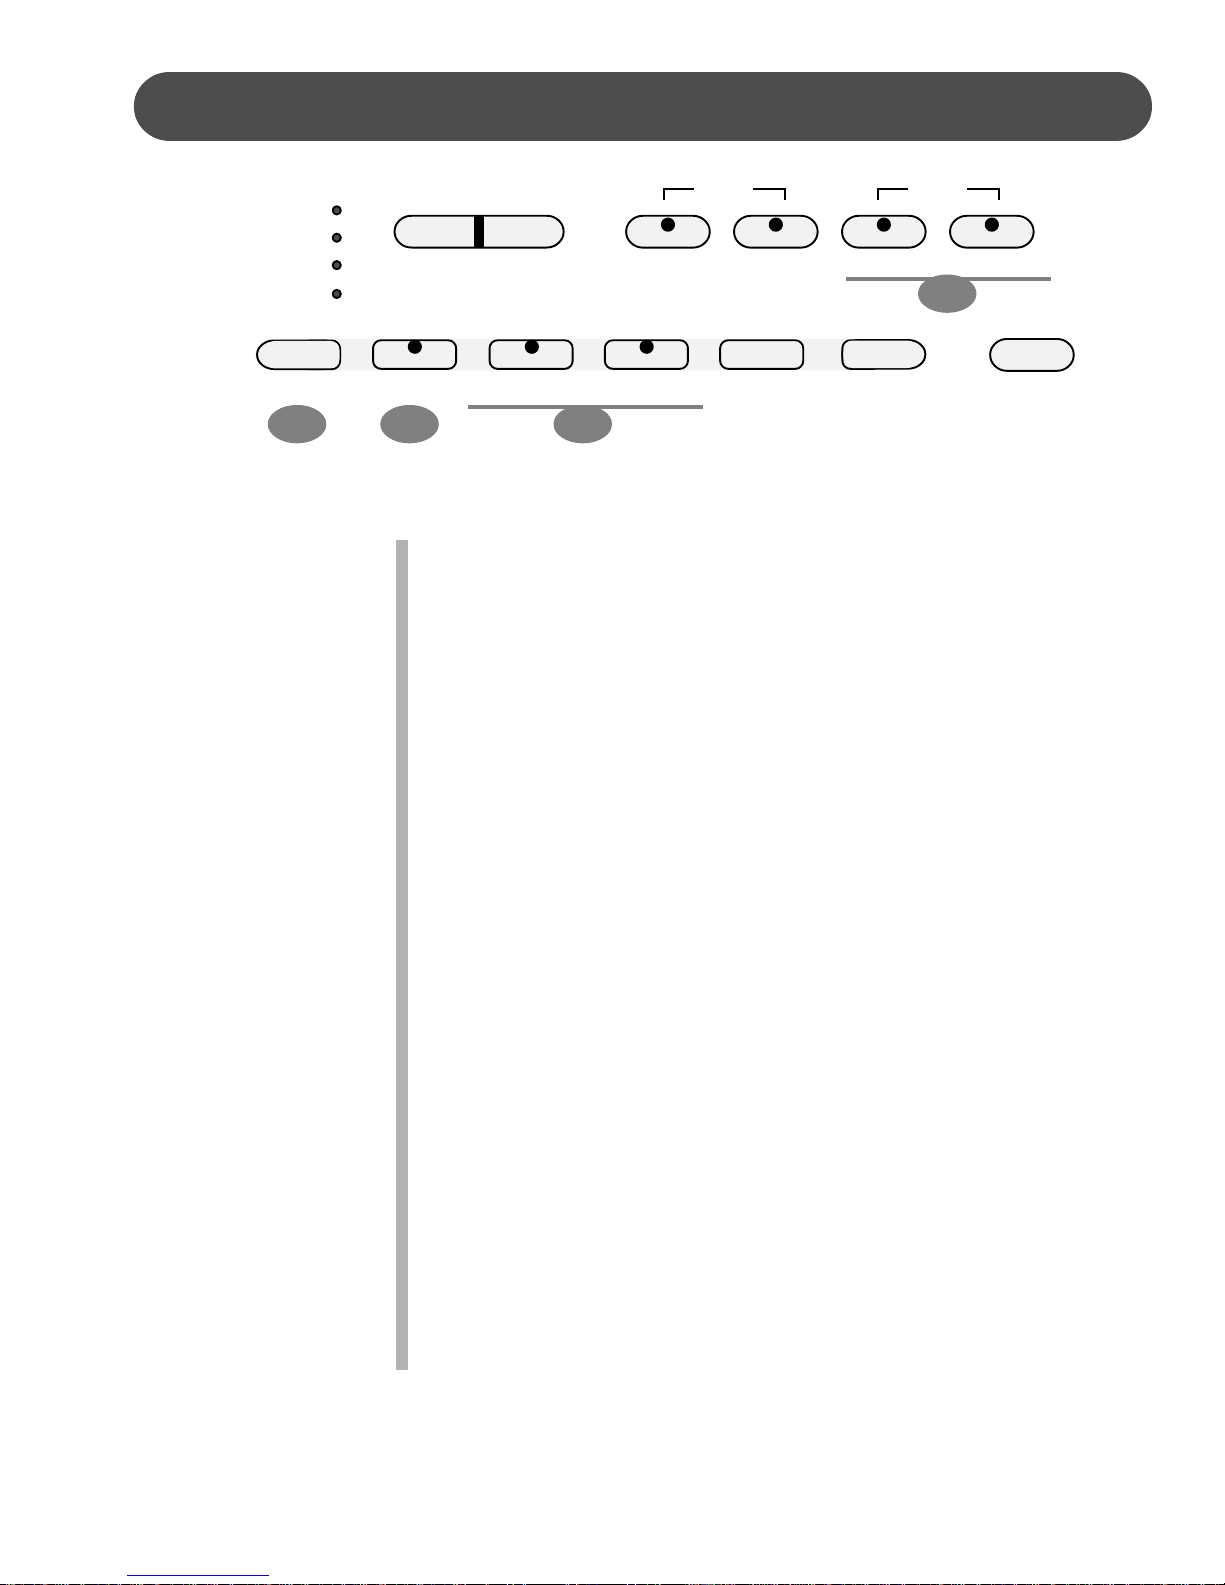
RECORD
This piano is equipped with a real time recorder, able to store four songs, each with a 3-
sequencer. It will record all note events and the accompaniment as they are
track
performed. This
power is turned off. All the tracks can playback separately or together as a complete
the
song
.
USER SONG ACCOMP MELODY 1 MELODY 2 REC PLAY/STOP DEMO
recorded information is nonvolatile and therefore will not be lost when
+/YES
6
–/N
O
MELODY 1
ACCOMP
1
2
3
4
USER SONG
MELODY2
RECORDIN
G -
1. Prepare - Prepare to record by setting the voice, style, tempo and
reverb
These
recall,
information
level and other parameters as desired.
settings can be stored into a registration memory for easy
please see the registration memory section for more
.
2. Select a Song - Press the USER SONG button, and use the +/
–/NO buttons to select a song, the display will show the song
YES,
number
selected. This is where the recorded information will be
stored.
V O I C E
S T Y L
E
1:User Song
3. Select a track -
Melod
There are two tracks available for recording the melody, these are
y will record, all notes.
assigned
by pressing the MELODY 1 or the MELODY 2 button.
Auto Accompaniment will record all the auto accompaniment
events
The
just as they are played.
ACCOMP track button will select the accompaniment track.
Press and hold down the REC button, then press the track button
that
REC
you want to record in. The corresponding track indicator will
blink,
rent
tempo, to show that the recorder is on standby.
you already have a recorded track(s) in the selected song, that
If
indicator
ence
previously
corresponding track button to turn the indicator light off.
Press the METRONOME button to enable the metronome as a reference
when recording only Melody track. The Metronome sound will not be
recorded. If you use the metronome when recording the Accomp. Track,
the Metronome will play in place of the drum part of the auto accomp.
36
and the four dots of the beat indicator will blink with the cur-
will also be lit and the recorded music will play, as a refer-
for you while you record the new track. If you do not wish for
recorded tracks to play while you are recording, press the

RECORD
MELODY 1
ACCOMP
MELODY2
RECORDING (continued)
4. Record - Your performance can be recorded in the following ways:
Record Melody Track Only
If the MELODY 1 or MELODY 2 buttons are selected the recording
will begin as soon as you play the keyboard.
Please Note: It is suggested to turn off the fingering mode when
recording on a melody track alone. When the fingering mode is set
to Fingered or Single, the auto accompaniment section of the
keyboard will not be recorded, although the notes are sounding.
Record Auto Accompaniment Track Only
With the Auto Accompaniment ACCOMP engaged recording will
start as soon as a chord is played on the auto accompaniment
section of the keyboard.
Please note, notes played on the Melody section of the keyboard
will not be recorded in the auto accompaniment track. If the auto
accompaniment is off, only the percussive rhythm will be recorded
in the ACCOMP track.
An unrecognized chord in the fingered mode cannot start the
recording.
ACCOMP MELODY 1
REC
PLAY/STOP
Record the Auto Accompaniment and a Melody Track
If you want to record a melody and the accompaniment at the same
time, Press a MELODY track button, then the ACCOMP track
button and both indicators will blink in the standby mode. Recording begins as soon as you start to play on any section of the
keyboard.
Please Note: the contents in a track will be erased as soon you
start to record on the selected track.
It will be replaced by the new data that the user is recording.
5. Stop Recording - Press the START/STOP button, the PLAY/
STOP button or the REC button to stop recording.
Or when the accompaniment track is being recorded, press the
INTRO/ENDING button to stop the recording with an ending
pattern in the accompaniment track.
Please Note: When the record memory is full, recording will stop
automatically and “End” will appear on the display screen.
PLAYBACK - To listen to the recorded passage:
37

RECORD
1
+ / YES
0
- / NO
MELODY 1
2
3
4
USER SONG
MELODY2
1. Press the USER SONG button and select the song you want to play
back, using the +/YES, –/NO buttons. The display will show the
song number.
VOICE
STYLE
1:User Song
2. After you have selected your desired User Song, the LED indicators
of those recorded channel tracks will be engaged.
If you do not wish to hear a specific track, press the corresponding
track button to turn that track off.
Its LED indicator will turn off.
ACCOMP
PLAY/STOP
PLAY/STOP
USER SONG
3. Press the PLAY/STOP button to hear the recorded track(s).
The dots of the beat indicator will flash.
You can change the tempo by pressing the +TEMPO– buttons. You
may also play on the keyboard while the recording is playing back.
4. Press the PLAY/STOP button again to stop the playback.
Playback will stop automatically when the recording reaches its end.
5. Press the USER SONG button again to exit the Record Mode, the
display screen will revert to the current voice selected.
38

REGISTRATION MEMORY
Registration Memory can recall particular settings of style, voice, chord and other parameters or features you have engaged. This piano has nine registration memories to hold your
favorite settings so that they can be recalled quickly by pressing a button.
The unit is equipped with a backup battery will not be lost when the power is turned off.
Please Note: The Registration Memory is recalled by using the numeric pad buttons.
SAVE YOUR SETTINGS IN THE REGISTRATION MEMORY
1. Set the voice, rhythm, tempo, accompaniment, reverb effect and
any other parameters that you wish to save.
Hold down the REG button.
2.
DIGITAL/REG
VOICE
b-1:Store
123+/
YES
STYLE
3456
7 8 9 –/NO
DIGITAL/REG
123+/
3456
YES
3. Press one of the number pads 1-9. The display will show the
current registration memory number with a “b-” prefix. Your
panel setting will be saved into that registration memory button
instantly.
RECALL CONTENTS IN THE REGISTRATION MEMORY
1. Press and release the DIGITAL/REG button to engage the
registration memory mode, the indicator will light up.
2. Press one of the number pads 1-9 buttons, the stored setting will
be recalled instantly and the display will show the memory number with a “b-” prefix. The relevant parameters will be set and
the display will recover to the voice that has just been recalled.
VOICE
STYLE
b-1:RegisterBank
7 8 9 –/NO
39

PLAY ALONG SONGS
Press the SONG button to access the play along song function.
There are 50 songs built into the piano for your musical enjoyment.
Please Not
button,
can change the song by pressing the +/YES , –/NO buttons or use the number pads to
You
t a song number directly.
inpu
Press the DEMO button again to stop the song demonstration.
e: If you press the SONG button, hold it down, and then press the DEMO
all the training songs will play back.
SONG FUNCTION USER REGPAGEPAGE
SONG
START/
S T O
USING
THE SONG FEATURE
1. Engage the Song mode - Press the SONG button.
+ / YES
0
The first song number will appear on the display.
the +/YES, –/NO buttons or the number pads to select a song.
Use
song number will appear on the display.
The
001:Teach Song
- / NO
2. Listen to the demonstration - Press the START/STOP button to
to the selected song. The chord playing from the auto
listen
accompanimen
P
Right hand play along - Press the RIGHT button. Then press the
START/STOP button, after the metronome sound the auto accom-
RIGHT
paniment
notes
will playback, and you can play the right hand melody
with the rhythm accompaniment track.
Left hand play along - Press the LEFT button. Then press the
START/STOP
LEFT
playback
y the left hand accompaniment pattern to match this melody.
pla
with the rhythm and/or accompaniment track, you can
t and the tempo will be shown on the display.
button, after the metronome sound the melody will
Right
and Left hand play along- Press the RIGHT and LEFT
buttons
the
LEFT
RIGHT
metronome sound, you can play the entire section with both
hand
The
same song passage will continue until you press the START/
STOP
button.
the
Play Along Song Mode.
START/
S T O
SONG
3.
P
4. Stop the Song Function - Press the SONG button again to exit
40
simultaneously, then press the START/STOP button, after
s with the percussive rhythm or metronome track.

MIDI
MIDI stands for Musical Instrument Digital Interface. This is a world wide standard commu-
cation interface that enables electronic musical instruments and computers (of all brands)
ni
to communicate with each other so that instructions and other data can pass between them.
This exchange of information makes it possible to create a system of MIDI instruments and
devices
instruments. Whether
boards
that offers far greater versatility and control than is available with isolated
you interface with computers, sequencers, expanders or other key-
your musical horizons will be greatly enhanced.
MIDI
OUT IN
MIDI
CONNECTION - The MIDI terminals are located on the left side
of the piano.
panel
1. MIDI In: This terminal receives MIDI data from an external MIDI
de
vice.
2. MIDI Out: This terminal transmits data from this instrument to
other MIDI devices. The transmitted data includes the note and
velocity produced while playing on the keyboard, as well as
touch
voice
changes, wheel operation, and recorded playback for the
melody
transmitted.
For
please
chart.
tracks. Demo songs and auto accompaniment are not
more information regarding transmitted MIDI data
see the next page and or the MIDI implementation
41

MIDI
MIDI CHANNELS - The MIDI system in this unit has 16 channels
numbered from 1-16. Each of the channels is responsible for a
voice. When the instrument receives from an external device, the
active channel is determined by the control message. The transmission channels on this keyboard are fixed as follows:
Channel 1: Master voice
Channel 2: Layer voice
Channel 3: Split voice
Channel 4: Bass in manual bass chord mode
Channel 7: Chord in manual bass chord mode
Channel 10: Percussion sound
Please see the MIDI Implementation Chart for more detail.
For further MIDI setup options please see your local Suzuki Music
Store.
Note: When the USB connected with computer, all MIDI mes-
sage will receive/transmit via USB.
42

MIDI IMPLEMENTATION CHART
Function Transmitted Recognized Remark
Basic Channel 1 CH 1–16 CH
Channel changed 1–4,7,10,12–15 CH 1–16 CH
Default Mode X 3
Note Number 11–118 0–127
Velocity: Note On 9nH,V=1–127 9nH,V=1–127
Note Off 9nH,V=0 9nH,V=0 8nH
Pitch Bender X O
Control Change: 1 X O Modulation
5 X O Portamento value
7 X O Volume
10 X O Pan
11 X O Expression
64 O O Sustain
66 O O Sostenuto
67 O O Soft pedal
65 X O Portamento yes/no
80, 81 O O Reverb, chorus progam
91, 92 O O Reverb, chorus send level
98, 99 X O NRPNL, NRPNH
100, 101 X X RPNL, RPNH
121 O O Reset all controllers
123 O O All notes off
Program Change 0 – 127 0 –127
System Exclusive X X
Sys. Common: Song Select X X
Sys. Common: Song Position X X
System: Clock X X
Real Time: Commands X X
Mode 1: OMNI ON, POLY
Mode 2: OMNI ON, MONO
Mode 3: OMNI OFF, POLY
Mode 4: OMNI OFF, MONO
Yes
O =
X = No
43

VOICE LIST
No. Name Display
PIANO
001 Acoustic Grand Piano Grand Piano
002 Bright Acoustic Piano Bright Piano
003 Electric Grand Piano El.G.Piano
004 Honky-Tonk Piano Honky-Tonk
005 Electric Piano 1 Elec.Piano1
006 Electric Piano 2 Elec.Piano2
007 Harpsichord Harpsichord
008 Clavichord Clavichord
CHROMATIC PERCUSSION
009 Celesta Celesta
010 Glockenspiel Glockenspiel
011 Music box Music Box
012 Vibraphone Vibraphone
013 Marimba Marimba
014 Xylophone Xylophone
015 Tubular Bells TubularBells
016 Dulcimer Dulcimer
ORGAN
017 Drawbar Organ Draw Organ
018 Percussive Organ Percus Organ
019 Rock Organ Rock Organ
020 Church Organ ChurchOrgan
021 Reed Organ Reed Organ
022 Accordion Accordion
023 Harmonica Harmonica
024 Tango Accordion Tango Accordn
GUITAR
025 Acoustic Nylon Guitar Nylon Guitar
026 Acoustic Steel Guitar Steel Guitar
027 Electric Jazz Guitar Jazz Guitar
028 Electric Clean Guitar Clean Guitar
029 Electic Muted Guitar Mute Guitar
030 Overdriven Guitar Overdrive
031 Distortion Guitar Dist Guitar
032 Guitar Harmonics GtrHarmonics
BASS
033 Acoustic Bass AcousticBass
034 Electric Bass (finger) Finger Bass
035 Electric Bass (pick) Pick Bass
036 Fretless Bass FretlessBass
037 Slap Bass 1 SlapBass1
038 Slap Bass 2 SlapBass2
039 Synth Bass 1 Synth Bass1
040 Synth Bass 2 Synth Bass2
No. Name Display
STRINGS
041 Violin Violin
042 Viola Viola
043 Cello Cello
044 Contrabass ContraBass
045 Tremolo Strings TremStrings
046 Pizzicato Strings PizzStrings
047 Orchestral Harp OrchHarp
048 Timpani Timpani
ENSEMBLE
049 String Ensemble 1 StringEnsbl1
050 String Ensemble 2 StringEnsbl2
051 Synth Strings 1 SynthString1
052 Synth Strings 2 SynthString2
053 Choir Aahs ChoirAahs
054 Voice Oohs VoiceOohs
055 Synth Voice Synth Voice
056 Orchestra Hit OrchHit
BRASS
057 Trumpet Trumpet
058 Trombone Trombone
059 Tuba Tuba
060 Muted Trumpet MutedTrumpet
061 French Horn FrenchHorn
062 Brass Section BrassSection
063 Synth Brass 1 SynthBrass1
064 Synth Brass 2 SynthBrass2
REED
065 Soprano Sax SopranoSax
066 Alto Sax Alto Sax
067 Tenor Sax Tenor Sax
068 Baritone Sax Baritone Sax
069 Oboe Oboe
070 English Horn English Horn
071 Bassoon Bassoon
072 Clarinet Clarinet
PIPE
073 Piccolo Piccolo
074 Flute Flute
075 Recorder Recorder
076 Pan Flute Pan Flute
077 Bottle Blow Bottle
078 Shakuhachi Shakuhachi
079 Whistle Whistle
080 Ocarina Ocarina
44
VOICE LIST
No. Name Display
NTH LEAD
SY
1 Lead 1 (square) Square Lead
08
2 Lead 2 (sawtooth) SawtoothLead
08
08
3 Lead 3 (caliope lead) CaliopeLead
4 Lead 4 (chiff lead) Chiff Lead
08
5 Lead 5 (charang) Charang Lead
08
08
6 Lead 6 (voice) Voice Lead
7 Lead 7 (fifths) Fifth Lead
08
8 Lead 8 (bass + lead) Bass +Lead
08
EFFECT
ETHN
PAD
IC
SYNTH
9 Pad 1 (new age) New Age Pad
08
09
0 Pad 2 (warm) Warm Pad
1 Pad 3 (polysynth) PolySynthPad
09
2 Pad 4 (choir) Choir Pad
09
3 Pad 5 (bowed) Bowed Pad
09
09
4 Pad 6 (metallic) Metallic Pad
5 Pad 7 (halo) Halo Pad
09
6 Pad 8 (sweep) Sweep Pad
09
SYNTH
7 FX 1 (rain) Rain
09
8 FX 2 (soundtrack) Sound Track
09
09
9 FX 3 (crystal) Crystal
0 FX 4 (atmosphere) Atmosphere
10
10
1 FX 5 (brightness) Brightness
10
2 FX 6 (goblins) Goblins
3 FX 7 (echoes) Echoes
10
10
4 FX 8 (sci-fi) Sci-Fi
10
5 Sitar Sitar
10
6 Banjo Banjo
7 Shamisen Shamisen
10
10
8 Koto Koto
9 Kalimba Kalimba
10
11
0 Bagpipe Bagpipe
11
1 Fiddle Fiddle
2 Shanai Shanai
11
PERCUSSIVE
3 Tinkle Bell Tinkle Bell
11
11
4 Agogo Agogo
11
5 Steel Drums Steel Drums
6 Woodblock WoodBlock
11
11
7 Taiko Drum Taiko Drum
8 Melodic Tom MelodicTom
11
11
9 Synth Drum Synth Drum
12
0 Reverse Cymbal ReversCymbal
No
. Name Display
SOUND EFFECT
12
1 Guitar Fret Noise Fret Noise
2 Breath Noise Breath Noise
12
3 Seashore Seashore
12
12
4 Bird Tweet Bird Tweet
5 Telephone Ring Telephone
12
6 Helicopter Helicopter
12
7 Applause Applause
12
8 Gunshot Gunshot
12
Please
note: For voices from 001 - 128
the table, the “No.” is the dis-
in
played
program
listed
number. For
Acoustic Grand Piano MIDI program
Bright
gram
voice number. The MIDI
number for any voice
is one less than the display
example voice 001
number is 000, voice 002
Acoustic Piano MIDI pro-
number is 001, and so forth.
45

VOICE LIST
More ethnic Asian Instruments have been added to the voice list as shown below.
. Name Display Prog. Change Bank
No
12
9 Yangquin Yangqin 15 1
0 Sanxian Pipa 106 1
13
1 Zheng Zheng 107 1
13
2 Erhu Erhuvib 110 1
13
3 Banhu Banhu 0 1
13
13
4 Suona Suona 1 1
5 Sheng Sheng 2 1
13
6 Dizi Dizi 3 1
13
7 Erhu + Yangqin ErhuYangqin2 7 1
13
13
8 Dizi + Zheng DiziZheng2 11 1
Please note: When the touch sensitivity is in the “Soft,” “Normal,” or “Hard,” mode,
voice
No. 137 will sound as Erhu when a key is struck softly, and as Yangqin
the key is struck hard.
when
If
the touch response is fixed, voice No. 137 will always sound as Yangqin.
Voice No. 138 will sound as Zheng when playing keys below C4, and as Dizi
when playing keys C4 and above.
ASIAN FOLK INSTRUMENTS
46

STYLE LIST
NameNo.
Swing
001. Swing 1
002. Swingin'Organ
003. Swing Trio
004. Slow Swing
005. Dixie
006. Jazz
007 Lounge
008. Shuffle Blues
009. Blues
R&B
010. Gospel 1
011. Gospel 2
012. Reggae 1
013. Reggae 2
014. Motown
015. Shuffle
016. R&B 1
017. R&B 2
018. R&B Shuf
POP
019. Pop 1
020. Pop 2
021. Pop 3
022. 8 Beat Pop 1
023. 8 Beat Pop 2
024. 8 Beat Pop 3
025. Pop16
026. Pop Acoustic
027. EasyPop
028. Funky Pop
029. Disco Pop
030. Slow Groove
031. Florida
032. Folk 1
033. Folk 2
034. Funky
DISCO
035. Disco
NameNo.
036. Disco Dance 1
037. Disco Dance 2
038. Disco Shuffle
039. Disco Groove
040. House
041. Dance
042. Dance Pop 1
043. Dance Pop 2
044. 80’s Dance
045. Dance26
046. Techno
047. Rap
ROCK
048. Rock1
049. Rock2
050. Slow Rock
051. Rock n Roll 1
052. Rock n Roll 2
053. Surf Rock
054. Jerry
BOSSA
055. Bossa Nova
056. Pop Bossa 1
057. Pop Bossa 2
058. Fast Bosa
059. Salsa
060. Tango
061. Merenque
LATIN
062. Rumba
063. Beguine
064. Samba
065. Chacha
066. Latin 1
067. Latin 2
OLDIES
068. Hawaiin
069. Hula
070. Boogie
No.
071. Fox Trot
072. Ragtime
073. Waltz 1
074. Waltz 2
075. Classic 1
076. Classic 2
BALLAD
077. Ballad
078. 50's Ballad
079. Power Ballad
080. Jazz Ballad
081. Bolero
082. Slow 16
ACOUSTIC
083. Kids 1
084. Kids 2
085. March0 1
086. March0 2
087. March0 3
088. Polka 1
089. Polka 2
090. MexPolka
091. NewAge
ROCK
092. Country
093. Country Train
094. Bluegrass
095. SlowBlus
BIG BAND
096. Latin Big Band
097. Brodway1
098. Brodway2
099. Big band
100. Mambo Band
Name
47

DRUM KIT LIST
DRUM KIT LIST 1
No.-Key
27-Eb1
28-E1
29-F1
30-F#1
31-G1
32-G#1
33-A1
34-Bb1
35-B1
36-C2
37-C#2
38-D2
39-Eb2
40-E2
41-F2
42-F#2
43-G2
44-G#2
45-A2
46-Bb2
47-B2
48-C3
49-C#3
50-D3
51-Eb3
52-E3
53-F3
54-F#3
55-G3
56-G#3
57-A3
58-Bb3
59-B3
60-C4
61-C#4
62-D4
63-Eb4
64-E4
65-F4
66-F#4
67-G4
68-G#4
69-A4
70-Bb4
71-B4
72-C5
73-C#5
74-D5
75-Eb5
76-E5
77-F5
78-F#5
79-G5
80-G#5
81-A5
82-Bb5
83-B5
84-C6
85-C#6
86-D6
87-Eb6
Standard (0)
P-1: Standard
High Q
Slap
Scratch Push
Scratch Pull
Stick
Square Click
Metronome Click
Metronome Bell
Kick Drum 2
Kick Drum 1
Side Stick
Snare Drum 2
Hand Clap
Snare Drum 1
Low Floor Tom 2
Close Hi-hat
Low Floor Tom 1
Pedal Hi-hat
Low Tom
Open Hi-hat
Low-mid Tom
Hi-mid Tom
Crash Cymbal 1
High Tom
Ride Cymbal 1
Chinese Cymbal
Ride Bell
Tambourine
Splash Cymbal
Cowbell
Crash Cymbal 2
Vibra Slap
Ride Cymbal 2
Hi Bongo
Low Bongo
Mute Conga
Hi Conga
Low Conga
High Timbale
Low Timbale
High Agogo
Low Agogo
Cabasa
Maracas
Short Whistle
Long Whistle
Short Guiro
Long Guiro
Claves
Hi Wood Block
Low Wood Block
Mute Cuica
Open Cuica
Mute Triangle
Open Triangle
Cabasa
Shaker
Belltree
Castanets
Mute Surdo
Open Surdo
Room (8)
P-2: Room
High Q
Slap
Scratch Push
Scratch Pull
Stick
Square Click
Metronome Click
Metronome Bell
Kick Drum 2
Kick Drum 1
Side Stick
Snare Drum 2
Hand Clap
Snare Drum 1
Room Low Floor Tom 2
Close Hi-hat
Room Low Floor Tom 1
Pedal Hi-hat
Room Low Tom
Open Hi-hat
Room Low-mid Tom
Room Hi-mid Tom
Crash Cymbal 1
Room High Tom
Ride Cymbal 1
Chinese Cymbal
Ride Bell
Tambourine
Splash Cymbal
Cowbell
Crash Cymbal 2
Vibra Slap
Ride Cymbal 2
Hi Bongo
Low Bongo
Mute Conga
Hi Conga
Low Conga
High Timbale
Low Timbale
High Agogo
Low Agogo
Cabasa
Maracas
Short Whistle
Long Whistle
Short Guiro
Long Guiro
Claves
Hi Wood Block
Low Wood Block
Mute Cuica
Open Cuica
Mute Triangle
Open Triangle
Cabasa
Shaker
Belltree
Castanets
Mute Surdo
Open Surdo
Power (16)
P-3: Power
High Q
Slap
Scratch Push
Scratch Pull
Stick
Square Click
Metronome Click
Metronome Bell
Kick Drum 2
Power Kick Drum
Side Stick
Power Snare Drum 2
Hand Clap
Power Snare Drum 1
Low Floor Tom 2
Close Hi-hat
Low Floor Tom 1
Pedal Hi-hat
Low Tom
Open Hi-hat
Low-mid Tom
Hi-mid Tom
Crash Cymbal 1
High Tom
Ride Cymbal 1
Chinese Cymbal
Ride Bell
Tambourine
Splash Cymbal
Cowbell
Crash Cymbal 2
Vibra Slap
Ride Cymbal 2
Hi Bongo
Low Bongo
Mute Conga
Hi Conga
Low Conga
High Timbale
Low Timbale
High Agogo
Low Agogo
Cabasa
Maracas
Short Whistle
Long Whistle
Short Guiro
Long Guiro
Claves
Hi Wood Block
Low Wood Block
Mute Cuica
Open Cuica
Mute Triangle
Open Triangle
Cabasa
Shaker
Belltree
Castanets
Mute Surdo
Open Surdo
Electronic (24)
P-4: Electronic
High Q
Slap
Scratch Push
Scratch Pull
Stick
Square Click
Metronome Click
Metronome Bell
Kick Drum 2
Elec Kick Drum
Side Stick
Elec Snare Drum 2
Hand Clap
Power Snare Drum 1
Elec Low Floor Tom 2
Close Hi-hat
Elec Low Floor Tom 1
Pedal Hi-hat
Elec Low Tom
Open Hi-hat
Elec Low-mid Tom
Elec Hi-mid Tom
Crash Cymbal 1
Elec High Tom
Ride Cymbal 1
Reverse Cymbal
Ride Bell
Tambourine
Splash Cymbal
Cowbell
Crash Cymbal 2
Vibra Slap
Ride Cymbal 2
Hi Bongo
Low Bongo
Mute Conga
Hi Conga
Low Conga
High Timbale
Low Timbale
High Agogo
Low Agogo
Cabasa
Maracas
Short Whistle
Long Whistle
Short Guiro
Long Guiro
Claves
Hi Wood Block
Low Wood Block
Mute Cuica
Open Cuica
Mute Triangle
Open Triangle
Cabasa
Shaker
Belltree
Castanets
Mute Surdo
Open Surdo
TR-808 (25)
P-5: TR-808
High Q
Slap
Scratch Push
Scratch Pull
Stick
Square Click
Metronome Click
Metronome Bell
Kick Drum 2
Synth Kick Drum 1
Synth Side Stick
Synth Snare Drum
Hand Clap
Snare Drum 1
Synth Low Floor Tom 2
Synth Close Hi-hat
Synth Low Floor Tom 1
Synth Pedal Hi-hat
Synth Low Tom
Synth Open Hi-hat
Synth Low-mid Tom
Synth Hi-mid Tom
Synth Crash Cymbal 1
Synth High Tom
Ride Cymbal 1
Chinese Cymbal
Ride Bell
Tambourine
Splash Cymbal
Cowbell
Crash Cymbal 2
Vibra Slap
Ride Cymbal 2
Hi Bongo
Low Bongo
Mute Conga
Hi Conga
Low Conga
High Timbale
Low Timbale
High Agogo
Low Agogo
Cabasa
Maracas
Short Whistle
Long Whistle
Short Guiro
Long Guiro
Claves
Hi Wood Block
Low Wood Block
Mute Cuica
Open Cuica
Mute Triangle
Open Triangle
Cabasa
Shaker
Belltree
Castanets
Mute Surdo
Open Surdo
48

DRUM KIT LIST
DRUM KIT LIST 2
No.-Key
27-Eb1
28-E1
29-F1
30-F#1
31-G1
32-G#1
33-A1
34-Bb1
35-B1
36-C2
37-C#2
38-D2
39-Eb2
40-E2
41-F2
42-F#2
43-G2
44-G#2
45-A2
46-Bb2
47-B2
48-C3
49-C#3
50-D3
51-Eb3
52-E3
53-F3
54-F#3
55-G3
56-G#3
57-A3
58-Bb3
59-B3
60-C4
61-C#4
62-D4
63-Eb4
64-E4
65-F4
66-F#4
67-G4
68-G#4
69-A4
70-Bb4
71-B4
72-C5
73-C#5
74-D5
75-Eb5
76-E5
77-F5
78-F#5
79-G5
80-G#5
81-A5
82-Bb5
83-B5
84-C6
85-C#6
86-D6
87-Eb6
Jazz (32)
P-6: Jazz
High Q
Slap
Scratch Push
Scratch Pull
Stick
Square Click
Metronome Click
Metronome Bell
Jazz Bass Drum
70 Bass Drum 1
Side Stick
Snare Drum 2
Hand Clap
Snare Drum 1
Low Floor Tom 2
Close Hi-hat
Low Floor Tom 1
Pedal Hi-hat
Low Tom
Open Hi-hat
Low-mid Tom
Hi-mid Tom
Crash Cymbal 1
High Tom
Ride Cymbal 1
Chinese Cymbal
Ride Bell
Tambourine
Splash Cymbal
Cowbell
Crash Cymbal 2
Vibra Slap
Ride Cymbal 2
Hi Bongo
Low Bongo
Mute Conga
Hi Conga
Low Conga
High Timbale
Low Timbale
High Agogo
Low Agogo
Cabasa
Maracas
Short Whistle
Long Whistle
Short Guiro
Long Guiro
Claves
Hi Wood Block
Low Wood Block
Mute Cuica
Open Cuica
Mute Triangle
Open Triangle
Cabasa
Shaker
Belltree
Castanets
Mute Surdo
Open Surdo
Brush (40)
P-7: Brush
High Q
Slap
Scratch Push
Scratch Pull
Stick
Square Click
Metronome Click
Metronome Bell
Jazz Bass Drum
70 Bass Drum
Side Stick
Brush Tap
Brush Slap
Brush Swirl
Low Floor Tom 2
Close Hi-hat
Low Floor Tom 1
Pedal Hi-hat
Low Tom
Open Hi-hat
Low-mid Tom
Hi-mid Tom
Crash Cymbal 1
High Tom
Ride Cymbal 1
Chinese Cymbal
Ride Bell
Tambourine
Splash Cymbal
Cowbell
Crash Cymbal 2
Vibra Slap
Ride Cymbal 2
Hi Bongo
Low Bongo
Mute Conga
Hi Conga
Low Conga
High Timbale
Low Timbale
High Agogo
Low Agogo
Cabasa
Maracas
Short Whistle
Long Whistle
Short Guiro
Long Guiro
Claves
Hi Wood Block
Low Wood Block
Mute Cuica
Open Cuica
Mute Triangle
Open Triangle
Cabasa
Shaker
Belltree
Castanets
Mute Surdo
Open Surdo
Orchestra (48)
P-8: Orchestra
High Q
Slap
Scratch Push
Scratch Pull
Stick
Square Click
Metronome Click
Metronome Bell
Orche Bass Drum 2
Orche Bass Drum 1
Side Stick
Orche Snare Drum 2
Hand Clap
Orche Snare Drum 1
Timpani F
Timpani F#
Timpani G
Timpani G#
Timpani A
Timpani A#
Timpani B
Timpani C
Timpani C#
Timpani D
Timpani D#
Timpani E
Timpani F
Tambourine
Splash Cymbal
Cowbell
Orche Crash Cymbal
Vibra Slap
Orche Cymbal
Hi Bongo
Low Bongo
Mute Conga
Hi Conga
Low Conga
High Timbale
Low Timbale
High Agogo
Low Agogo
Cabasa
Maracas
Short Whistle
Long Whistle
Short Guiro
Long Guiro
Claves
Hi Wood Block
Low Wood Block
Mute Cuica
Open Cuica
Mute Triangle
Open Triangle
Cabasa
Shaker
Belltree
Castanets
Mute Surdo
Open Surdo
Chinese (58)
P-9: Chinese
Drum + Hey!
Low Pai Gu
Small Cymbal
Mid Pai Gu
Close Small Cymbal
Hi Pai Gu
Close Jing Luo
Jing Luo
Small Luo
Kick Drum 2
Kick Drum 1
Side Stick
Snare Drum 2
Hand Clap
Snare Drum 1
Low Floor Tom 2
Close Hi-hat
Low Floor Tom 1
Pedal Hi-hat
Low Tom
Open Hi-hat
Low-mid Tom
Hi-mid Tom
Crash Cymbal 1
High Tom
Ride Cymbal 1
Chinese Cymbal
Ride Bell
Tambourine
Splash Cymbal
Cowbell
Crash Cymbal 2
Vibra Slap
Ride Cymbal 2
Hi Bongo
Low Bongo
Mute Conga
Hi Conga
Low Conga
High Timbale
Low Timbale
High Agogo
Low Agogo
Cabasa
Maracas
Short Whistle
Long Whistle
Short Guiro
Long Guiro
Claves
Hi Wood Block
Low Wood Block
Mute Cuica
Mute Triangle
Open Triangle
Low Pai Gu
Small Cymbal
Mid Pai Gu
Mute Small Cymbal
Hi Pai Gu
Mute Jing Gong
Effects (56)
P-10: SFX
High-Q
Slap
Scratch Push
Scratch Pull
Stick
Square Click
Metronome Click
Metronome Bell
Gtr. Cut Noise1 (down)
Gtr. Cut Noise2 (up)
Bass Slap
Bass Pick
Key Click
Laughing
Screaming
Punch
Heart Beat
Footstep 1
Footstep 2
Applause
Door Creaking
Door Closing
Scratch
Wind Chime
Car Engine Starting
Car Crash
Car Pass
Police Siren
Train
Jet Plane
Helicopter
Starship
Gun Shot
Laser Gun
Explosion
Horse Gallop
Birds
Rain
Thunder
Wind
Sea Shore
Stream
Bubble
49
DRUM KIT LIST
Please Note: For the drum kit lists on the previous two pages, in
the first title row, the number in the bracket, after the kit
name, is the MIDI program number. The Drum kits name
and number that are shown on the LCD display are listed in
the second title row.
The “No.” refers to MIDI note number, and “Key” refers to the
key on the keyboard.
A blank space in the table mean there is no sound there.
Keys from A0 to D1 sound as timpani, except for in Kit 10, the
effects kit.
Keys from E6 to C8 sound the same as the D#1 to B6 keys,
except for Kit 9, the Chinese kit.
A list of the sounds of E6 to C8 for Kit 9, Chinese kit are listed
below.
KIT 9 COMPLEMENT
No. - Key Sound
88-E6 Drum + Hey!
89-F6 Low Pai Gu
90-F#6 Small Cymbal
91-G6 Mid Pai Gu
92-G#6 Mute Small Cymbal
93-A6 High Pai Gu
94-A36 Mute Jing Gong
95-B6 Jing Gong
96-C7 Small Gong
50

PEDALS
1 32
PIANO PEDALS
1. SOFT PEDAL - When the left pedal is engaged the piano volume is reduced
and the timbre slightly altered on the notes that are played.
2. FUNCTION PEDAL - This center pedal can be used to trigger various events,
such as start/stop and Fill In. Pedal function is assigned in the setup
menu, “Pedal Assign”. Please see the Setup section of this manual for
more information.
3. SUSTAIN PEDAL - When the right pedal is engaged the piano keys will
continue to sustain as they are played. Thereby the piano note will decay
gradually) as if you were continuing to hold down the piano keys.
51

SPECIFICATIONS
KEYBOARD
88-note, hammer-action keyboard
MAX. POLYPHONY: 32
VOICES
138 Voices
(Including ten Asian folk instrument voices)
Ten quick select voice buttons
VOICE MODE
Layer (dual) voice
Lower (split) voice
VOICE EFFECTS
Reverb
Chorus
SET UP
Power On/Off
Main Volume Control: Min-Max
Accomp Volume Control: Min-Max
NUMERIC PAD: 12
DISPLAY: 16-Character LCD
REGISTRATION MEMORY: 9
DEMONSTRATION: Ten songs,
RECORDING: Four songs, 3 track recording
OVERALL CONTROL
Transpose
Tempo
Touch response: soft, normal, hard, fixed
Voice split point
Accompaniment split point
AUTO BASS CHORD MODE
Single
Fingered
Piano
Off
AUTO ACCOMPANIMENT STYLE
100 Auto accompaniment styles
Ten quick select style buttons
ACCOMPANIMENT CONTROL
Synchro start
Start/Stop
Introduction
Ending
Fill-In
Variation
Metronome
Auto harmony (four types)
PLAY ALONG SONGS
50 songs
Right hand, left hand or both hands performance
FUNCTION
Metronome
Reverb level
Chorus level
Touch Sensitivity
Split point for voice
Split point for auto accompaniment
Master Tune
Drum kit selection
Harmony type selection
AUXILIARY JACKS
Headphone x 2
Line Out
Line In
Power In
MIDI In/Out/Through
Microphone In
PEDALS
Sustain Pedal
Sustenuto Pedal
Soft Pedal
VOLTAGE: AC 120V
AMPLIFIER: 20W x 2
DIMENSIONS
1377mm x 510mm x 862mm
WEIGHT: 70 Kg
STANDARD ACCESSORIES
Music stand
Owner’s manual
Play Along Song Book
52
 Loading...