


00032968/00033008
Version 08/2013
DP
-
30
Digital Piano
Users manual
INFORMATION FOR YOUR SAFETY!
THE FCC REGULATION WARNING (for USA)
This equipment has been tested and found to comply with
the limits for a Class B digital device, pursuant to Part 15 of
the FCC Rules.
These limits are designed to provide reasonable protection
against harmful interference in a residential installation. This
equipment generates, uses, and can radiate radio frequency
energy and, if not installed and used in accordance with the
instructions, may cause harmful interference to radio
communications. However, there is no guarantee that
interference will not occur in a particular installation.
If this equipment does cause harmful interference to radio or
television reception, which can be determined by turning the
equipment off and on, the user is encouraged to try to
correct the interference by one or more of the following
measures:
Reorient or relocate the receiving antenna.
Increase the separation between the equipment and
receiver.
Connect the equipment into an outlet on a circuit
different from that to which the receiver is connected.
Consult the dealer or an experienced radio/TV technician
for help.
Unauthorized changes or modification to this system can
void the user's authority to operate this equipment.
CAUTION
The normal function of the product may be disturbed by
Strong Electro Magnetic Interference. If so, simply reset
the product to resume normal operation by following the
owner's manual. In case the function could not resume,
please use the product in other location.
PRECAUTIONS
PLEASE READ CAREFULLY BEFORE PROCEEDING
Please keep this manual in a safe place for future reference.
Power Supply
Please connect the designated AC adaptor to an AC outlet
of the correct voltage.
Do not connect it to an AC outlet of voltage other than that
for which your instrument is intended.
Unplug the AC power adaptor when not using the
instrument, or during electrical storms.
Connections
Before connecting the instrument to other devices, turn off
the power to all units. This will help prevent malfunction and
/ or damage to other devices.
Location
Do not expose the instrument to the following conditions to
avoid deformation, discoloration, or more serious damage:
Direct sunlight
Extreme temperature or humidity
Excessive dusty or dirty location
Strong vibrations or shocks
Close to magnetic fields
Interference with other electrical devices
Radios and televisions placed nearby may experience
reception interference. Operate this unit at a suitable
distance from radios and televisions.
Cleaning
Clean only with a soft, dry cloth.
Do not use paint thinners, solvents, cleaning fluids, or
chemical-impregnated wiping cloths.
Handling
Do not apply excessive force to the switches or controls.
Do not let paper, metallic, or other objects into the
instrument. If this happens, unplug the AC adaptor from the
wall outlet. Then have the instrument inspected by qualified
service personnel.
Disconnect all cables before moving the instrument.
2
0
5
25
75
95
100

Contents
Panel Description
Front Panel...............................................................4
Rear Panel....................................................................................................................................................................5
Setup
Part List........................................................................................................................................................................6
Setup Guide..................................................................................................................................................................7
Power Supply................................................................................................................................................................8
Connections
Connecting a pair of Headphones................................................................................................................................9
Connecting an Audio Equipment..................................................................................................................................9
Connecting an MP3/CD................................................................................................................................................9
Connecting a Computer................................................................................................................................................9
Listening to the Demo song...........................................................................................................................10
Adjusting the Volume........................................................................................................................................10
Playing Voices
Selecting a Voice........................................................................................................................................................10
Playing two Voice Simultaneously..............................................................................................................................11
Playing a Lower Voice................................................................................................................................................11
Touch Response.........................................................................................................................................................11
Digital Effects.......................................................................................................................................................12
Metronome............................................................................................................................................................12
Tempo......................................................................................................................................................................13
Beep Tone..............................................................................................................................................................13
Troubleshooting..................................................................................................................................................14
Specifications......................................................................................................................................................14
Appendices
Voice List
.................................................................................................................................................................14
MIDI Implementation List chart...................................................................................................................................15
....................................................................................................
3
0
5
25
75
95
100

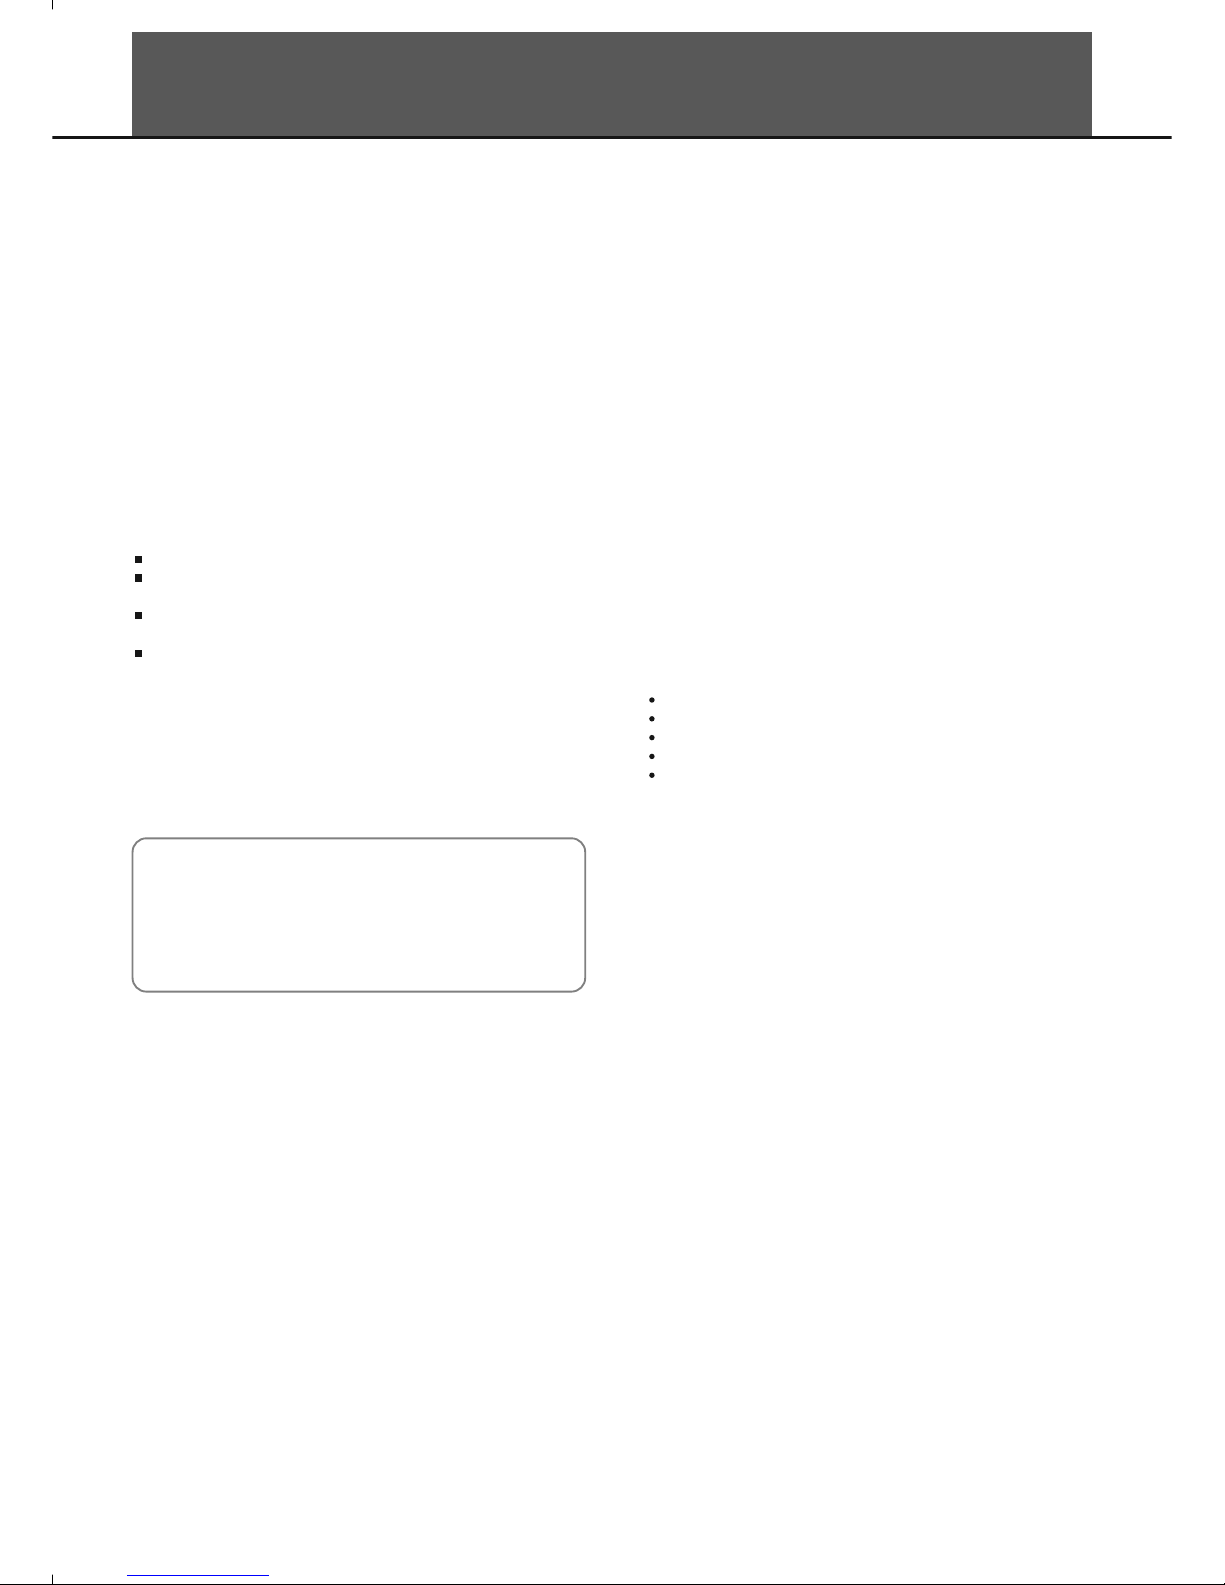
Panel Description
Front Panel
4
1. POWER ON / OFF
Turn the power ON or OFF.
2. MASTER VOLUME
Adjust the master volume.
3. FUNCTION Button
Hold down this button and press the special keys to
realize different functions.
4. VOICE SELECT Key
Hold down the [FUNCTION] button and press the
key to select a voice.
5. TEMPO ADJUST Key
Hold down the [FUNCTION] button and press the
key to adjust the current tempo.
16. SUSTAIN Pedal
Step on the sustain pedal, all notes played on the
keyboard would have a longer sustain.
17. SOSTENUTO Pedal
Step on the sostenuto pedal, the notes played before
you step on would have a sustain effect.
18. SOFT Pedal
Step on the soft pedal, all notes played on the keyboard
would have a softer effect.
1
2
3
4
5
16
17
18
0
5
25
75
95
100
Panel Description
Rear Panel
5
12.
Connect to a computer.
13. AUX. OUT Jack
Connect the audio equipment.
14. AUX. IN Jack
Connect an external sound source, such as an MP3 or
CD player.
15. DC IN Jack
Connect the DC 12V power adaptor.
USB Jack
6
7
8
9
1011
6. METRONOME Key
Hold down the [FUNCTION] button and press the
[ON/OFF] key to turn the metronome ON or OFF.
Hold down the [FUNCTION] button and press the
other key to select the time signature.
7. REVERB Key
Hold down the [FUNCTION] button and press the
[ON/OFF] key to turn reverb effect ON or OFF.
Hold down the [FUNCTION] button and press the
other key to select the reverb type.
8. CHORUS Key
Hold down the [FUNCTION] button and press the
[ON/OFF] key to turn chorus effect ON or OFF.
Hold down the [FUNCTION] button and press the
other key to select the chorus type.
9. TOUCH Key
Hold down the [FUNCTION] button and press the
key to select different touch response level.
10. DEMO Key
Hold down the [FUNCTION] button and press the
key to start or stop playing the demo song.
11. BEEP Key
Hold down the [FUNCTION] button and press the
key to turn the prompt tone ON or OFF.
DC IN
14
13
12
15
0
5
25
75
95
100

Setup
This section contains information about setting up your instrument and preparing to play. Please go through this section carefully
before turning the power on.
Before you proceeding to assemble the stand, get a Philip's
screwdriver (not supplied).
Make sure you have the following parts, which are supplied into
package.
Part List
6
1. Piano Cabinet
2. Support Plate
3. Pedal Box
4. Left Feet edge board
5. Right Feet edge board
6. Hand Screw
7. Screw CM6*50mm(4)
8. Screw Cover(4 pcs)
9. Pedal Cable
1
2
4
5
6
7
8
9
3
0
5
25
75
95
100

Setup
7
B. Place the piano cabinet [1] on the stand, fix it with Hand Screw [6].
C. Insert the pedal cable [9] into the proper socket of the cabinet [1].
Hand screw [6]
Setup Guide
A. Fix and well tighten the left and side boards [4] & [5] to the
Support Plate[2] with Screw CM6*50mm(4pcs) [7]. The screw
Cover(4pcs) [8] above Screw CM6*50mm(4pcs) [7].
right
Screw CM6*50mm [7]
Screw Cover [8]
0
5
25
75
95
100
Setup
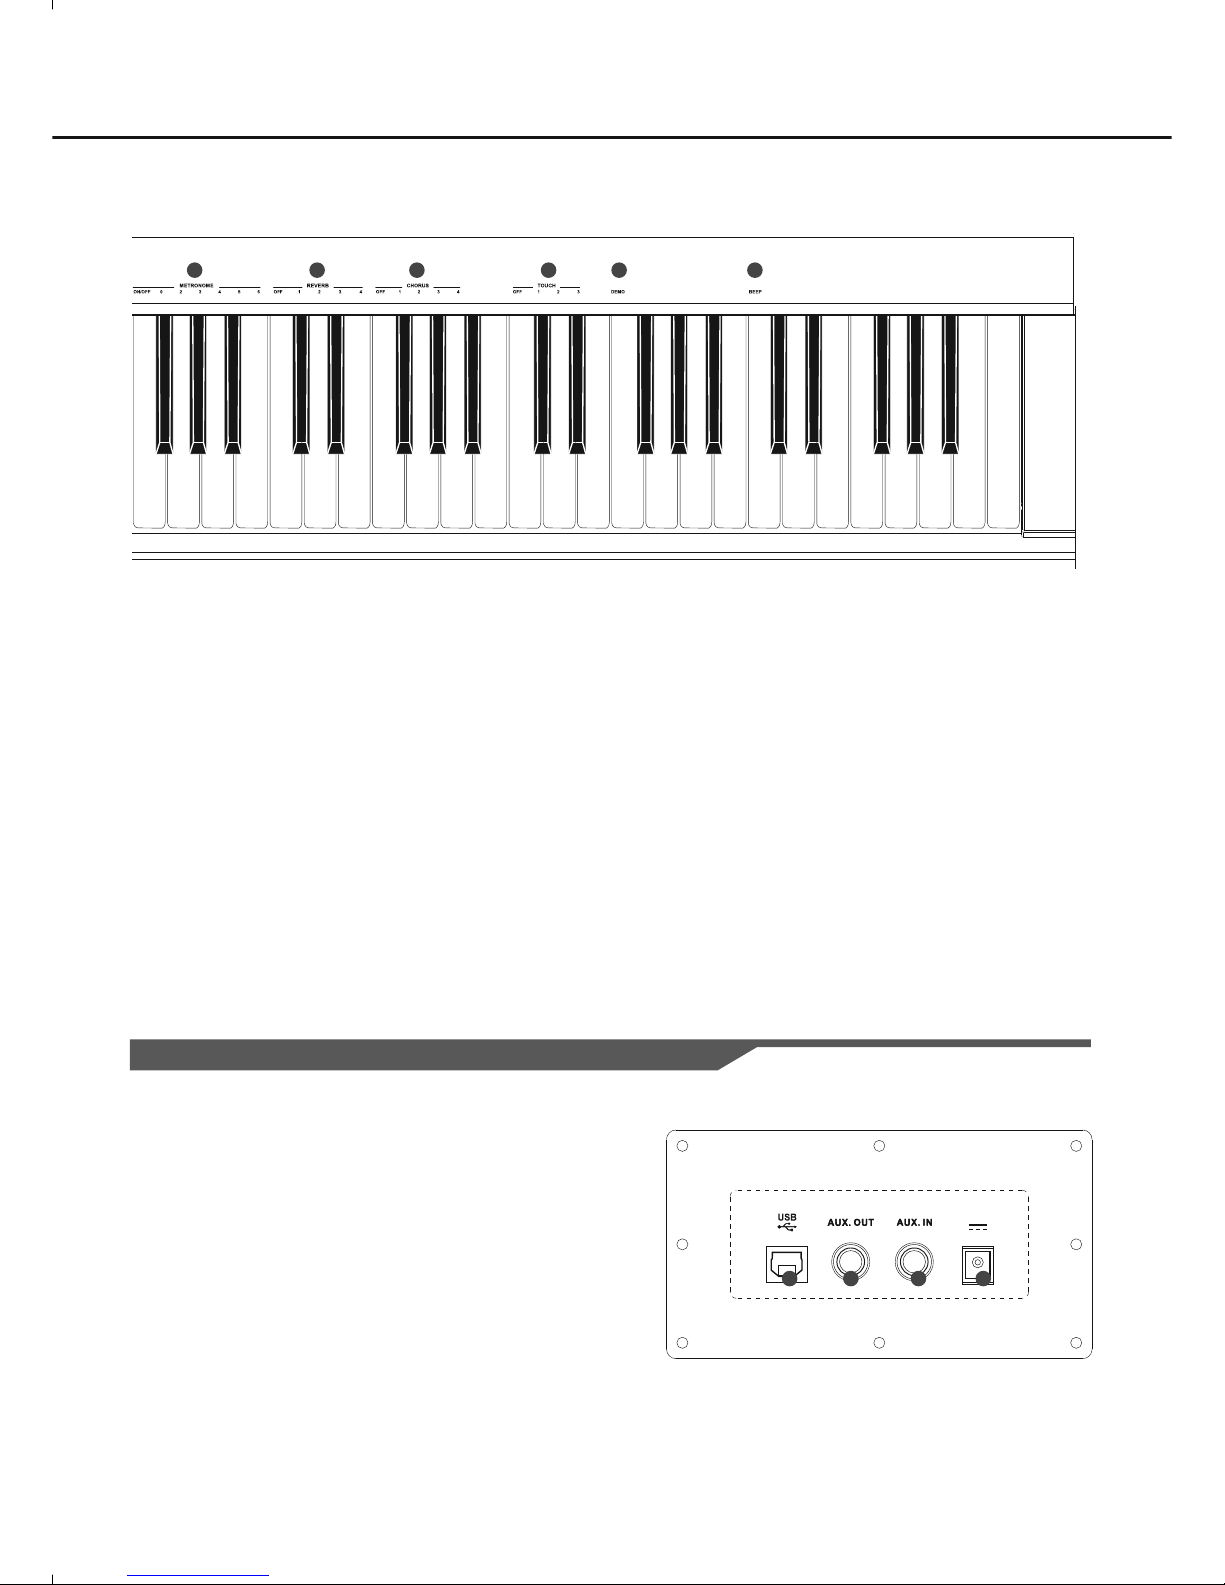
Power Supply
1. Make sure that the piano is turned off. Before you switch your piano
on or off, turn down the volume of piano and any connected audio
equipments first.
2. Connect the AC adaptor to the power supply jack.
3. Plug the AC adaptor into an AC outlet.
4. Press the [POWER] button, the LED display will lights up, that
indicates the piano has powered on.
5. If you are ready to turn off the piano, press the [POWER] switch
again.
Note:
1.
In order to save energy, we have designed the “Automatic
Shutdown” function to the piano. With this function, the piano will
shutdown automatically when you have left it idle for more than 30
minutes. If you don't need this feature, just press and hold the [A0]
key (the 1st key) and turn it on.
2. When the piano is not in use or during thunderstorm, please
disconnect the power for safety purpose.
8
DC IN
0
5
25
75
95
100

Connections
Connecting a pair of Headphones
A standard pair of stereo headphones can be plugged in here for
private practice or late-night playing.
Jack1: When a pair of headphones is plugged into the Jack 1, the
sound can be heard from headphones and speakers of the
instrument.
Jack2: When a pair of headphones is plugged into Jack 2, the internal
stereo speaker system is automatically shut off . The sound
can be heard from headphones.
Note:
Do not listen with the headphones at high volume for long periods of
time. Doing so may cause hearing loss.
Headp hone J ack 1
Headp hone J ack 2
Connecting an Audio Equipment
The rear-panel AUX.OUT jack delivers the output of the instrument for
connection to a keyboard amplifier, stereo sound system, a mixing
console, or tape recorder. Use an audio cord to plug into the AUX.OUT
jack located on the rear board then plug the other end of the cord into
AUX.IN of the amplifier.
Note:
To avoid damaging the speakers, please ensure that the volume has
been set to the minimum level before connecting the power and other
devices.
Connecting a Computer
Connect PC or other USB host devices that support USB audio.
For devices with USB cable, you can simply connect the MIDI/USB
converter to your USB connector on the device and plug the USB cable
into the piano, after the driver is installed and initialization is finished,
you can choose USB Audio Device in the device menu of the software
to transfer midi data.
Note:
Do not select USB audio device in both of input and output setting
together, otherwise the sound overlaps.
9
Connecting an MP3/CD Player
Connect the audio output of an MP3/CD player or other audio source
to the stereo AUX. IN jack on the rear panel.
The input signal is mixed with the piano signal, allowing you to play
along.
DC IN
DC IN
DC IN
0
5
25
75
95
100
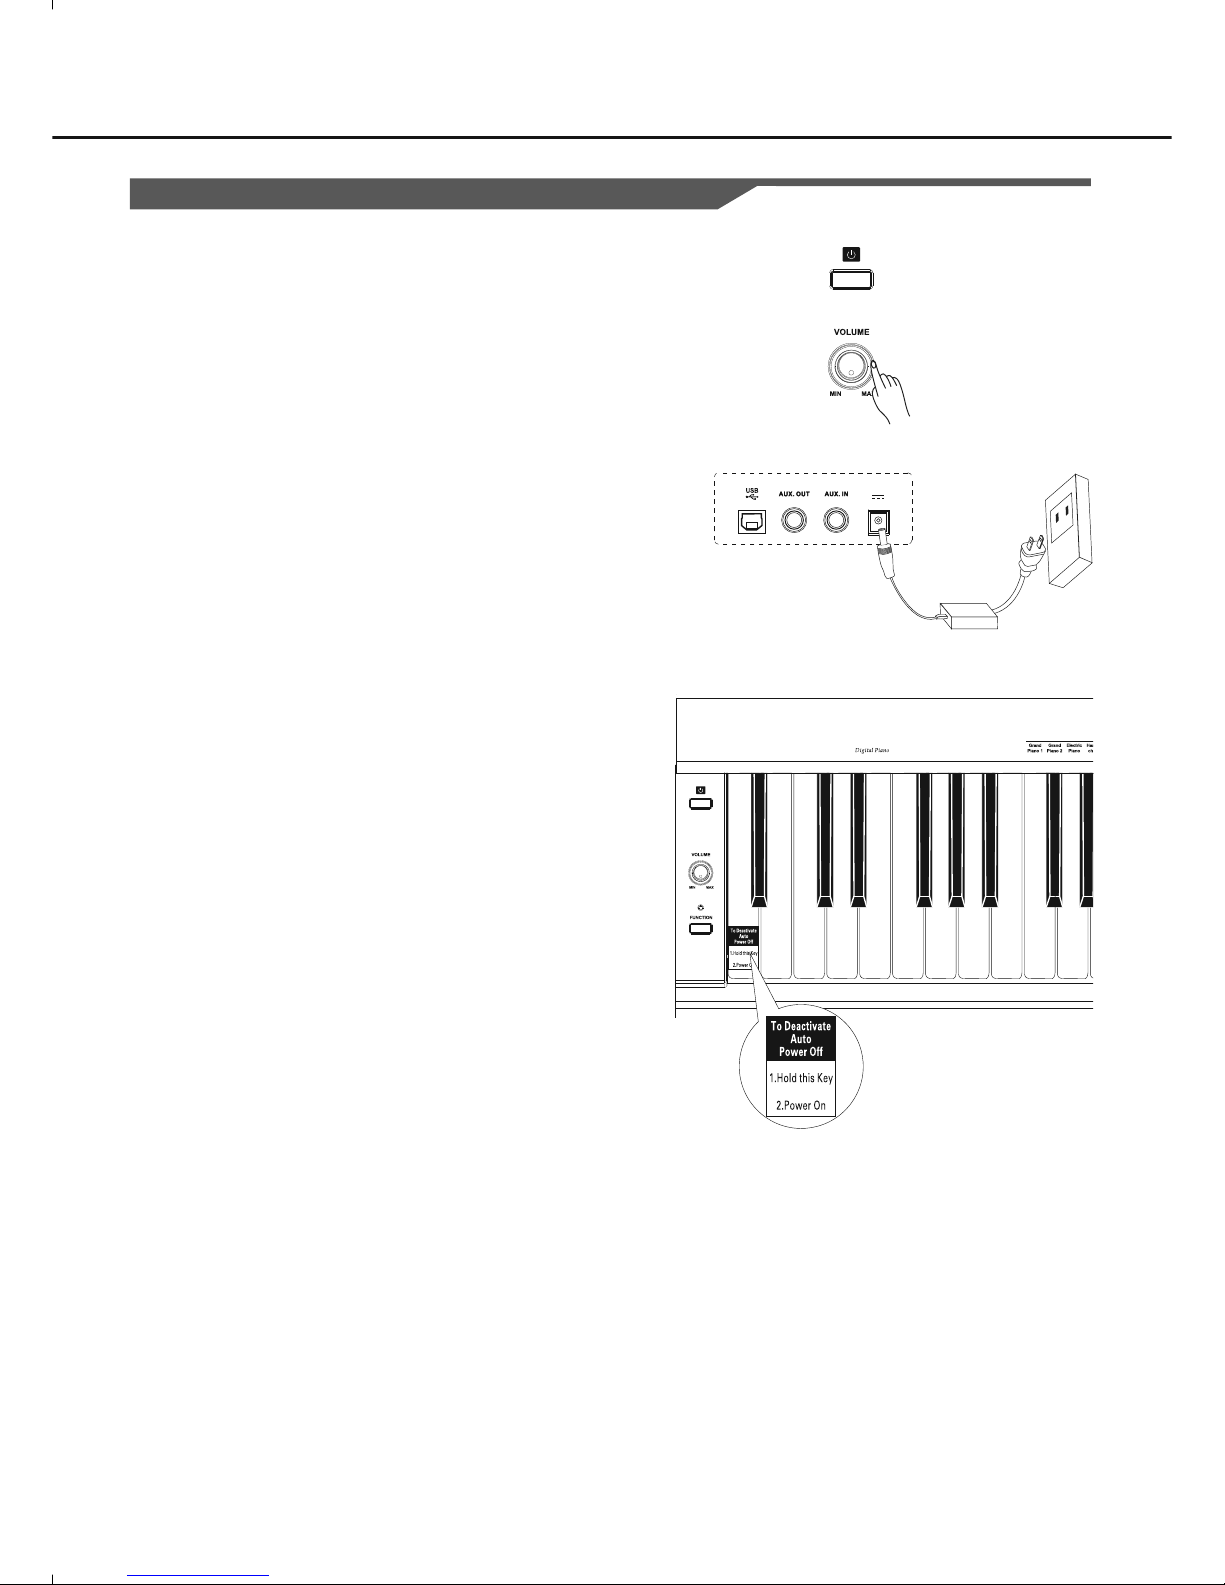
Listening to the Demo song
While holding down the [FUNCTION] button, press DEMO key to start
the demo song playing. Press it again to stop playing.
The keyboard would be disabled when the demo song is playing.
Adjusting the Volume
10
Move the [VOLUME] knob rightwards, the volume increases. Moving it
leftwards will turn the volume down.
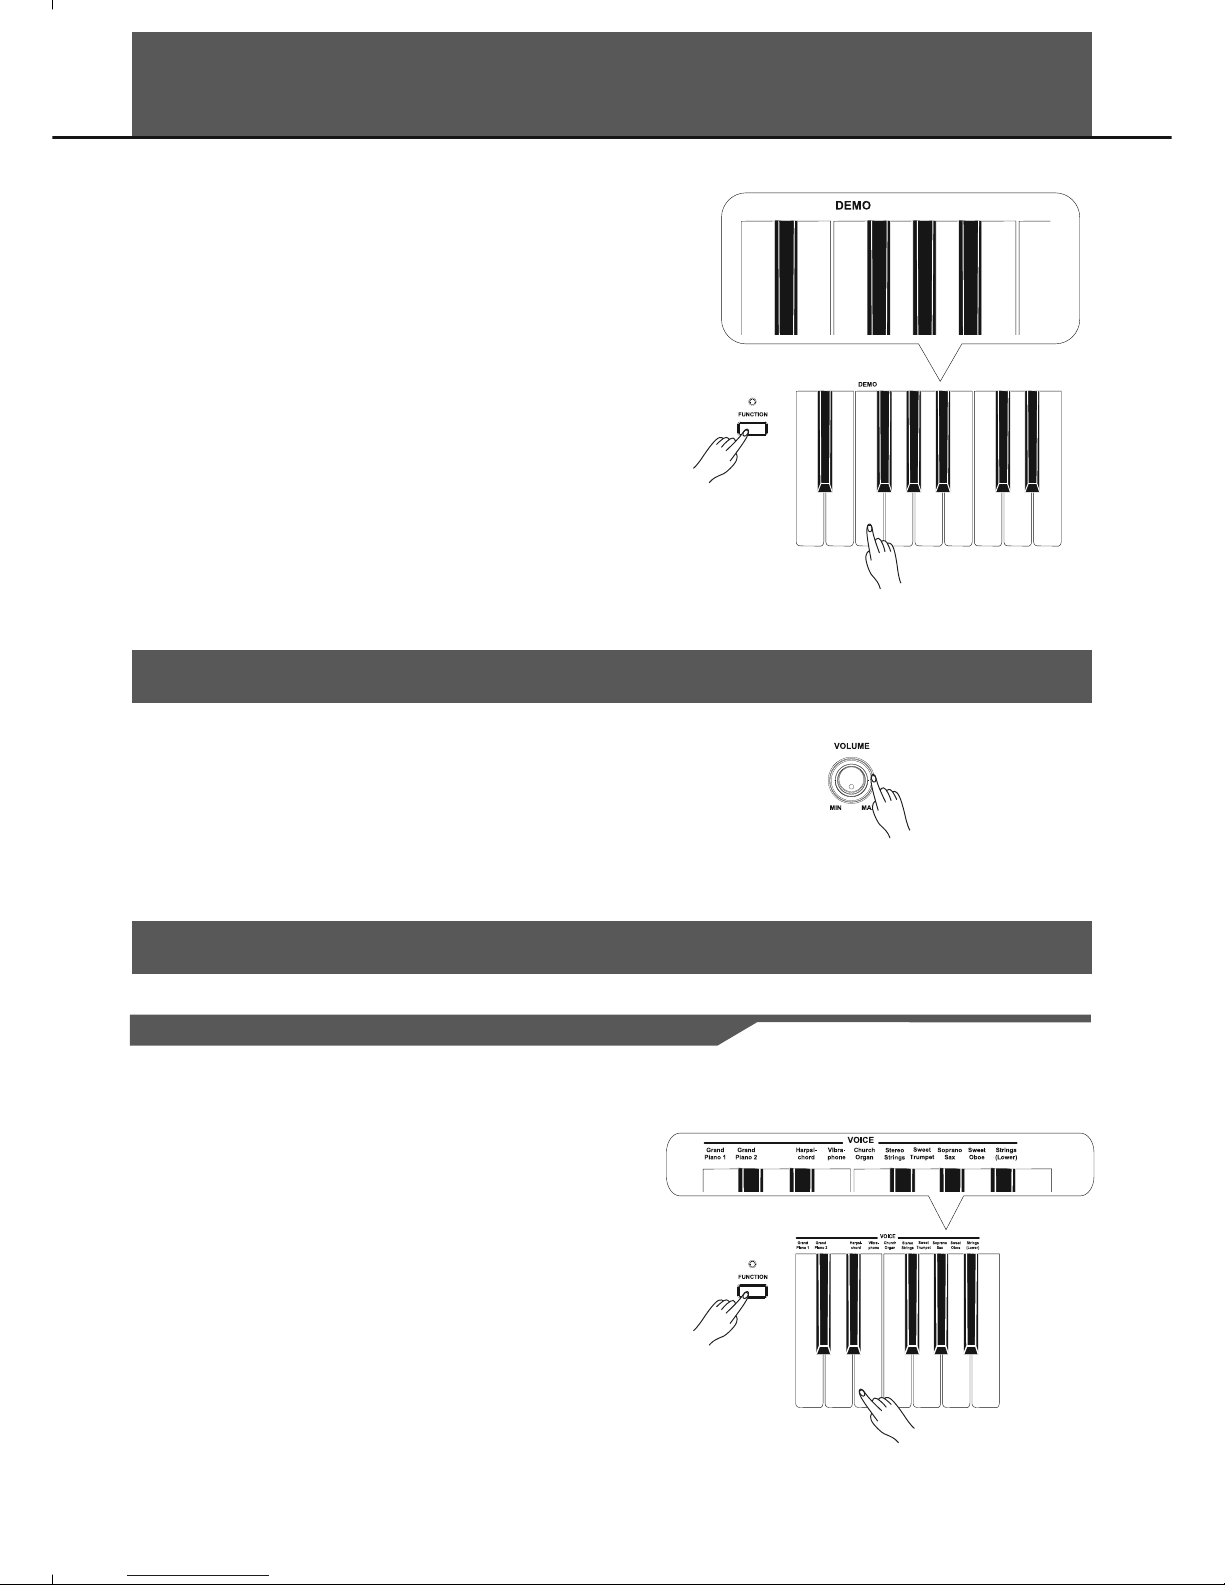
Playing Voices
Selecting a Voice
While holding down the [FUNCTION] button, press corresponding key
in voice selecting area to select the voice you want.
Note:
While only one voice is selected, the dual voice and lower voice will be
turned off automatically.
Electric
Piano
Electric
Piano
0
5
25
75
95
100

Playing two Voice Simultaneously
You can play two voices synchronously on the keyboard by selecting a
dual voice.
While holding down the [FUNCTION] button, press 2 keys
simultaneously in voice selecting area. Press the first key to select the
upper voice, press the second key to select the dual voice.
Notes:
,
Whiledualvoiceisturnedonlowervoicewouldbeturnedoff
automatically
.
Playing a Lower Voice
11
While holding down the [FUNCTION] button, select the
on the keyboard. This will select Strings (Lower) as lower voice and
split the keyboard at F#3 automatically.
Strings (Lower)
Split Pt
Lower
Electric
Piano
Electric
Piano
Electric
Piano
Electric
Piano
Playing Voices
Touch Response
While holding down the [FUNCTION] button, press a key in the
TOUCH selectingareatoselectdifferenttouch responselevel
.
0: OFF
1: Soft
2: Medium
3: Hard
0
5
25
75
95
100
12
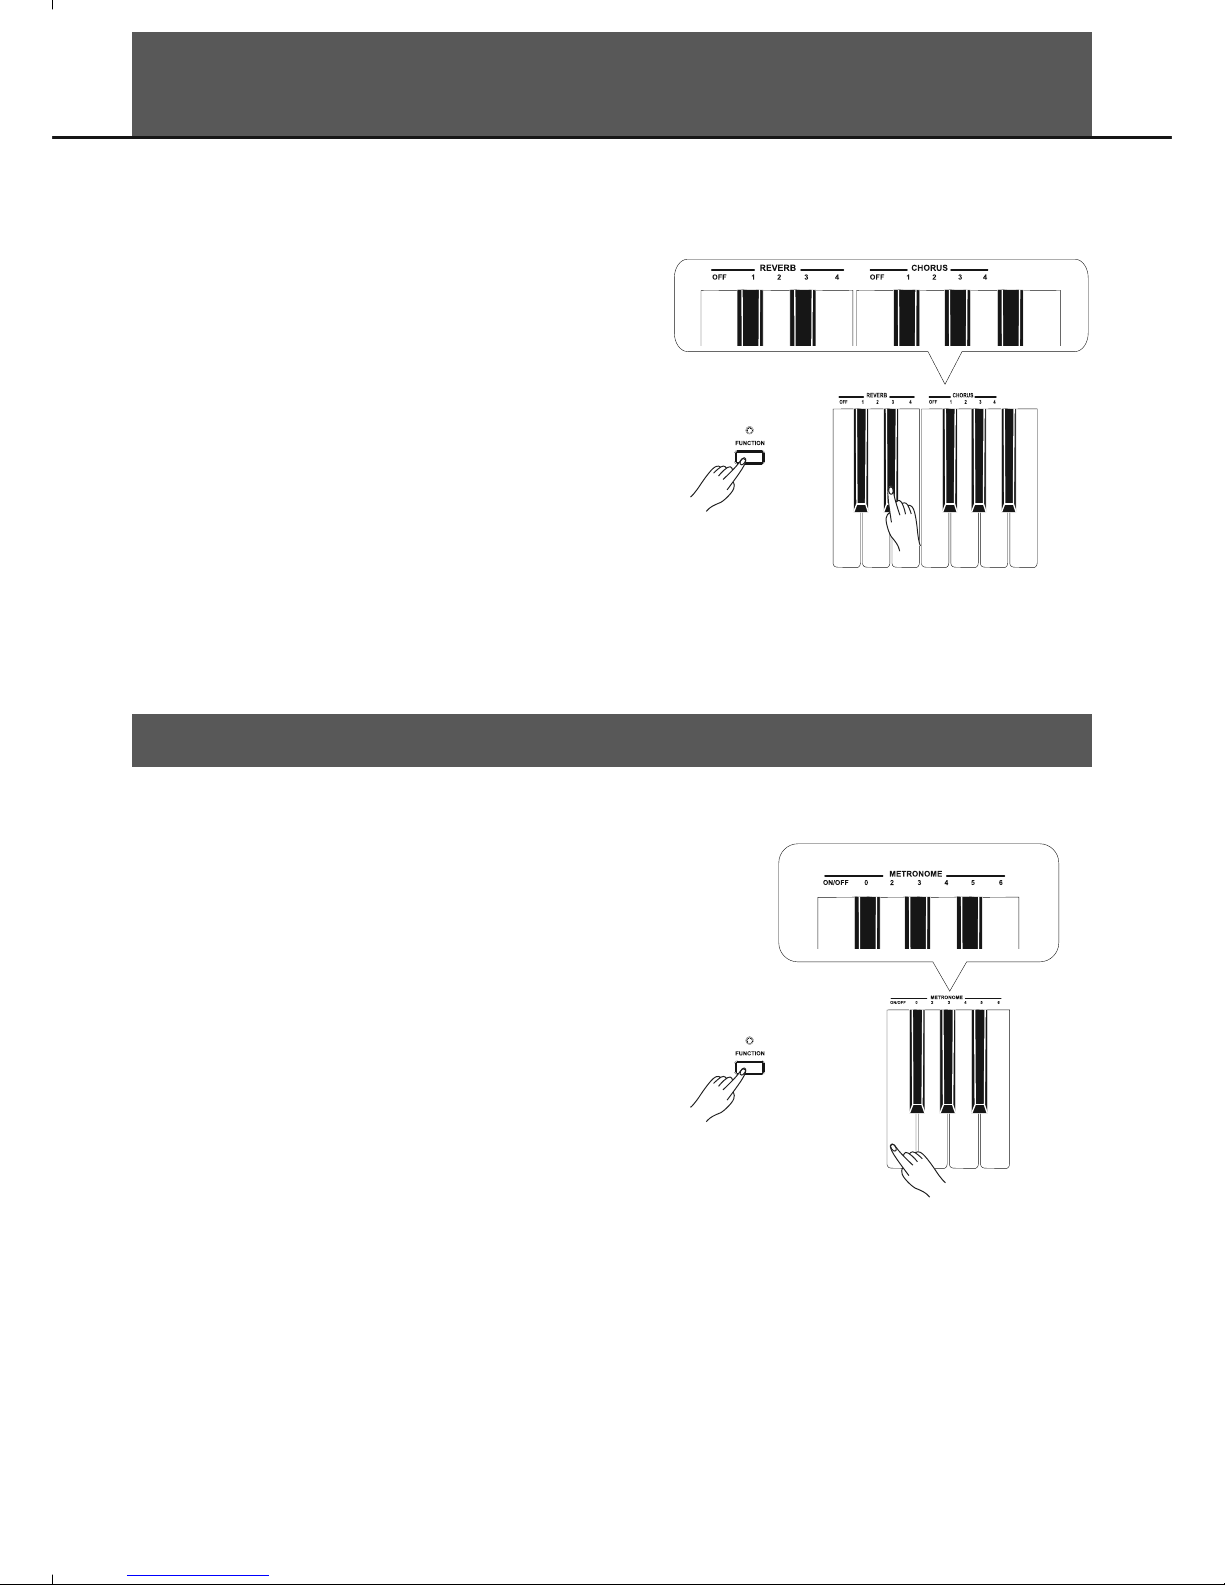
Digital Effects
While holding down the [FUNCTION] button, press the corresponding
keys in effect setting area to select the voice effect type.
Reverb Value:
0: OFF
1: Room
2: Small Hall
3: Large Hall
4: Stadium
Chorus Value:
0: OFF
1: Light Chorus
2: Medium Chorus
3: Deep Chorus
4: Flanger
Metronome
Turn on the metronome:
While holding down the [FUNCTION] button, press METRONOME
ON/OFF key to turn the metronome ON or OFF.
Select different time signature:
While holding down the [FUNCTION] button, select a demanded time
signature by pressing the corresponding keys in metronome setting
area. There are 6 types of time signature: 0, 2, 3, 4, 5, 6.
0
5
25
75
95
100

While holding down the [FUNCTION] button, press beep key to turn the
Beep Tone ON or OFF. The default setting is ON.
If you turn on the beep tone, you can hear a beep sound when you
press a valid functional key while the [FUNCTION] button is held down.
Tempo
Beep Tone
While holding down the [FUNCTION] button, press corresponding keys
in TEMPO selection area. You can change the tempo by input number
or using tap tempo, or press tempo +/- keys to change current tempo.
Notes:
1. Press [tempo +] and [tempo –] keys simultaneously to set the tempo
value back to the default (120).
2. The tempo range is :30 ~ 280
3. If you want to change tempo value by the number keys, you should
input 3 numbers. For example, if you want to set the tempo value as
85, you should input “085”.
13
+
-
+
-
0
5
25
75
95
100

Troubleshooting
Problem
The speakers produce a “pop” sound whenever the
power is turned ON or OFF.
No sound when the keyboard is played.
When using a mobile phone, noise is produced.
Possible Cause and Solution
This is normal and is no cause for alarm.
Make sure the voice volumes are set at appropriate levels.
Using a mobile phone in close proximity to the instrument
may produce interference. To prevent this, turn off the
mobile phone or use it further away from the instrument.
Specifications
Appendices
Voice List
1
2.Grand Piano 2
3.Electric Piano
4.Harpsichord
5.Vibraphone
.Grand Piano 1
Church Organ
Stereo Strings
Sweet Trumpet
Soprano Sax
Sweet Oboe
Lower: Strings (Lower)
6.
7.
8.
9.
10.
Keyboard
88 Hammer-action keys
Polyphony
64
Voice
11(including 1 Lower Voice)
Demo
1
Tempo
30-280
Control Button
Power On/Off switch, Volume, Function.
Control Key
Voice Select Keys, Tempo Tap, Tempo +/-, Tempo
Number Keys, Metronome On/Off, Metronome select
keys, Reverb On/Off, Reverb Type Select Keys,
Chorus On/Off, Chorus Type Select Keys, Touch
On/Off, Touch Select Keys, Demo, Beep.
Connectors
DC IN, Headphones (2 standard.
¼” phone), AUX IN,
AUX OUT, USB, Pedals(Sustain, Soft, Sostenuto)
Power Supply
DC IN
Speaker
20W + 20W
Dimensions
1370(W) x 435(D) x 830(H) mm
Weight
44KG
14
0
5
25
75
95
100

15
MIDI Implementation List chart
0
5
25
75
95
100

WEEE-Declaration / Disposal
Your product is designed and manufactured with materials and components of high quality, which are recyclable
and can be reused. The symbol means that your product should be disposed of separately from household waste
when it reaches its end of life. Please dispose of this equipment at your local collection point or recycling center.
Please help to protect the environment in which we all live.
All specifications and appearances are subject to change without notice. All information was correct at time of printing.
Musikhaus Kirstein GmbH does not guarantee for the accuracy or completeness of any description, photograph or statement
contained in this manual. Printed colors and specifications may vary slightly from product. Products from Musikhaus Kirstein
GmbH are only sold through authorized dealer. Distributors and dealers are not agents of Musikhaus Kirstein GmbH and have
no authority to bind Musikhaus Kirstein GmbH legally in any way. This manual is protected by copyright. Any copying or reprint,
even in excerpts, is only allowed with written consent of Musikhaus Kirstein GmbH. The same applies to reproduction or copying
of images, even in altered form.
Musikhaus Kirstein GmbH
Bernbeurener Strasse 11
86956 Schongau
Telefon: 0049-909494-0
Telefax: 0049-909494-19
www.kirstein.de
 Loading...