

Page 1
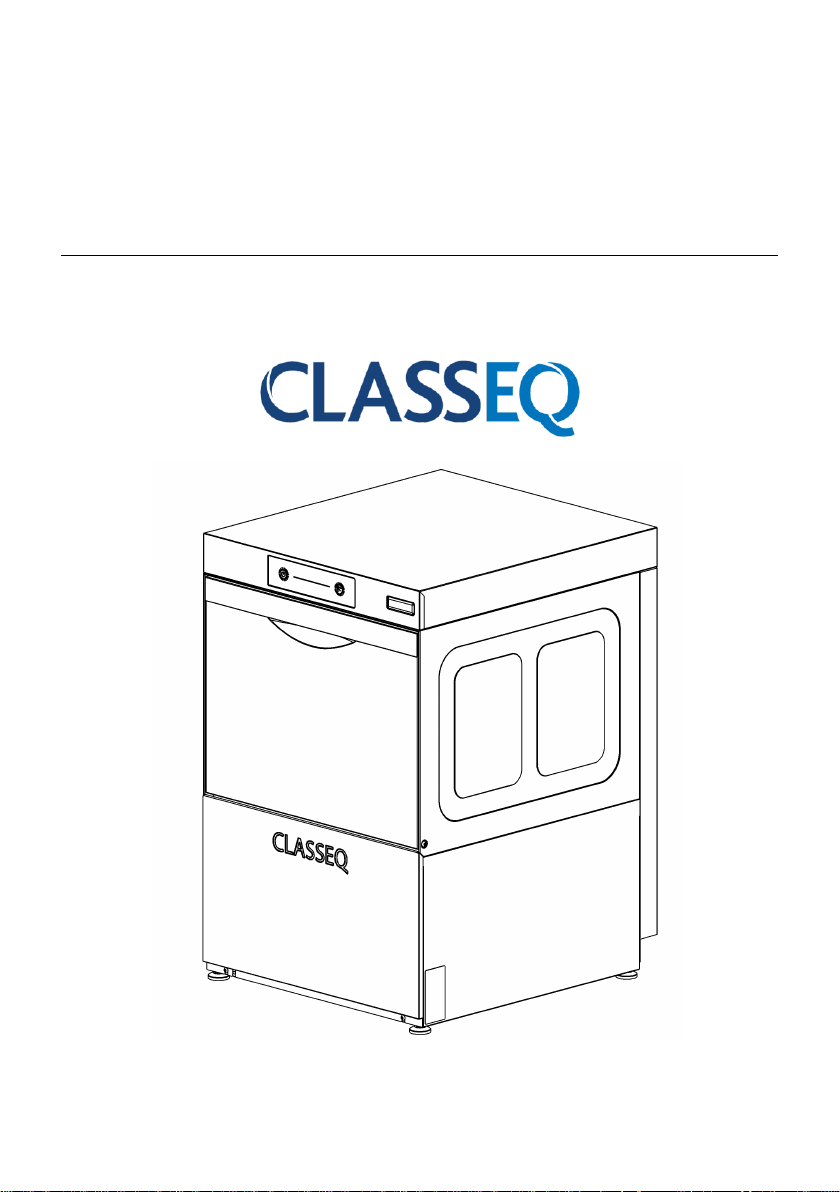
Installation and
operation manual
Under counter machines
CAUTION: Read these instructions before operating the machine
Page 2
Page 1
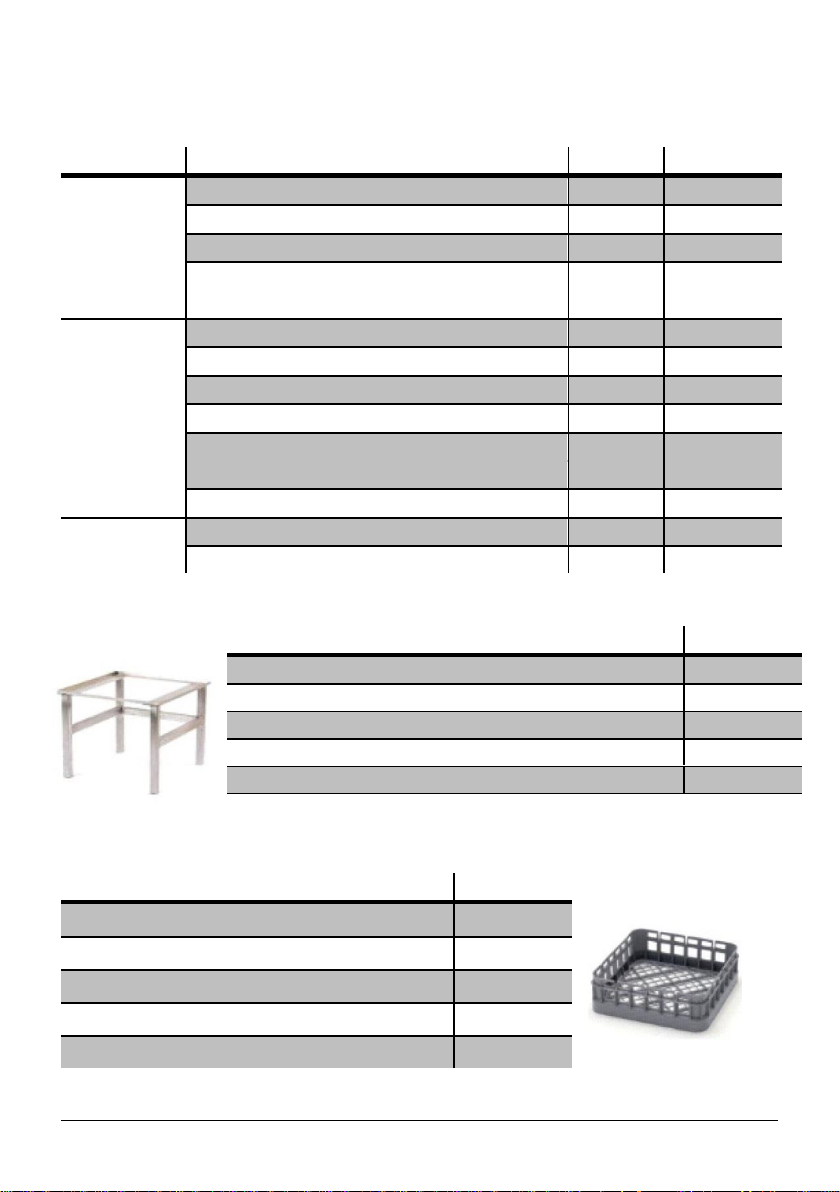
Application
Product Name
Quantity
Order Code
Glass
washing
Products
Super clean glass washing detergent
2x5L
20003020
G3 glass rejuvenator
10kg
20003018
Super shine glass washing rinse aid
2x5L
20003026
Glasswasher starter pack glasswasher detergent
2x5L
20003306
Glasswasher starter pack rinse aid
2x5l
Dishwashing
Products
Super clean dishwashing detergent
2x5L
20003007
Super clean dishwashing detergent
20L
20003040
Super shine dishwashing rinse aid
2x5L
20003013
Super shine dishwashing rinse aid
20L
20003011
Dishwashing starter pack detergent
2x5L
20003306
Dishwashing starter pack rinse aid
2x5L
Super descaler
2x5L
20003006
Salt
Table Salt DuoMatik
25kg
20005167
Granulated
25kg
20005166
Product Name
Order Code
400mm Stainless steel 475(w) x 497(d) x 410(h)
30007363
500mm Stainless steel 575(w) x 580(d) x 400(h)
30007365
350mm Steel coated stand 403(w) x 462(d) x 415(h)
30007235
400mm Steel coated stand 435(w) x 490(d) x 415(h)
30007236
500mm Steel coated stand 543(w) x 565(d) x 440(h)
30007237
Product Name
Order Code
350mm² open basket
30001164
400mm² open basket
30001165
500mm² open basket
30001197
400mm² plate basket
30001166
500mm² plate basket
30001198
Accessories and Extras
Detergents and Hygiene Products
Stands
Baskets
Page 3
Page 2
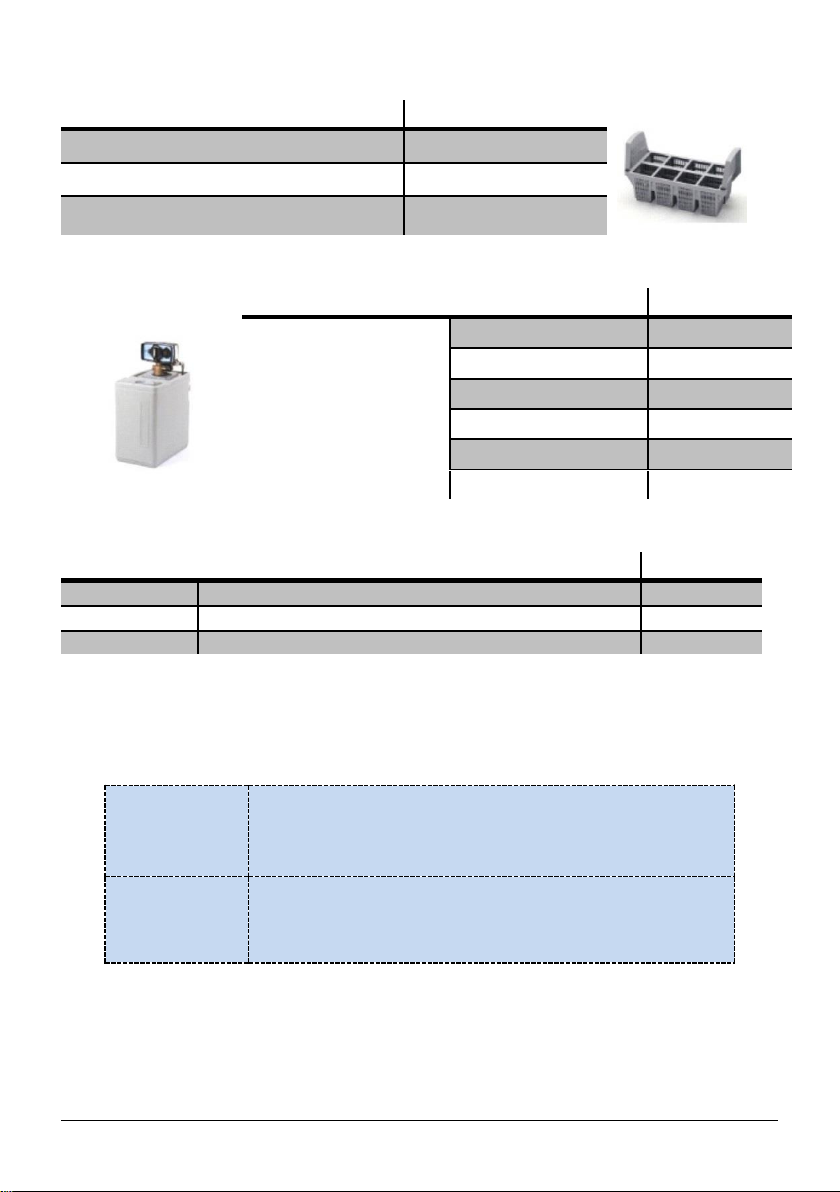
Product Name
Order Code
Single cutlery holder
30001167
400mm plate rack
30007213
8 Compartment cutlery holder
30001199
Description
Order code
Under counter range
8 litre
20004396
12 litre
20004397
16 litre
20004398
20 litre
20004399
Automatic (Cold water)
20003213
Automatic (Hot water)
20003217
Description
Order Code
Boostermatic
Pressure Pump (where water pressure is below 45psi/3bar)
30007219
Fixing Bracket
For pump
30009322
Mixer Valve
For hot water installations
30007229
Four Star
Break down cover only. Call out and labour included. All
replacement parts will be charged.
Five Star
Break down cover with call out, labour and parts included
Basket Inserts
Water treatment
Accessories
Service and Maintenance Contracts
Enjoy complete peace of mind with Classeq’s range of tailored service contracts. We will be
happy to discuss your requirements and provide a proposal which will cater for all your ware
washing service needs.
Page 4

Page 3
Dear Customer,
Thank you for choosing Classeq, the machine you have selected has been designed to give you
lasting service.
Please read these instructions before installing, commissioning and operating this machine.
The information contained herein is provided to avoid accidental risks and/or damage to either
yourself or your machine.
Make sure you and any other users understand the controls prior to using your machine.
Please keep these instructions in a safe place for future reference.
If you have any questions, or are not sure about any information contained in this manual please
contact either your distributor or Classeq, in the ‘Useful contact details’ section of this manual
(►16).
TABLE OF CONTENTS
1. EXPLANATION OF SYMBOLS USED ................................................ 4
2. WARNING AND SAFETY INFORMATION ......................................... 5
3. KNOW YOUR MACHINE ..................................................................... 7
4. PRE-INSTALLATION ........................................................................ 10
5. INSTALLATION ................................................................................. 12
6. COMMISSIONING ............................................................................. 14
7. OPERATION ...................................................................................... 16
8. SERVICE AND MAINTENANCE ....................................................... 18
9. TROUBLESHOOTING ....................................................................... 20
10. DECOMMISSIONING ........................................................................ 22
11. APPENDIX A – WATER HARDNESS EXPLAINED ......................... 23
12. APPENDIX B – WATER HARDNESS MAP ...................................... 24
13. APPENDIX C – MACHINE SPECIFICATIONS ................................. 25
14. PARTS AND LABOUR WARRANTY ................................................ 27
15. NOTES ............................................................................................... 28
16. USEFUL CONTACT DETAILS .......................................................... 30
Page 5
Page 4
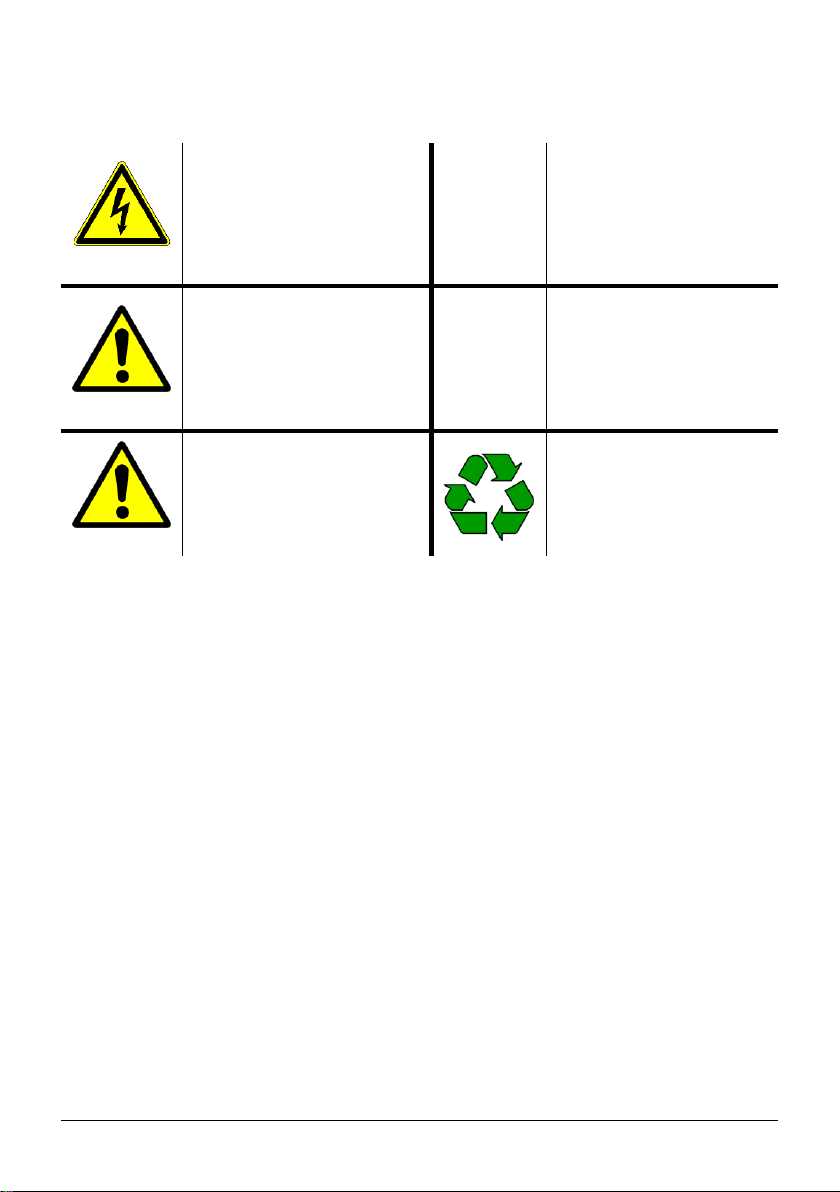
DANGER!
Warning against potentially
serious or fatal injuries to
persons if the described
precautionary measures are not
taken.
►
This symbol refers to a
chapter with more detailed
information
Warning!
Warning against potentially
minor injuries to persons or
material damage if the
described precautionary
measures are not taken
.
1
Refer to foot note at bottom
of page
Caution
Warning against defects in or
destruction of the product if the
described precautionary
measures are not taken.
Recycle
1. Explanation of symbols used
The following symbols have been used in this manual
Page 6

Page 5
2. Warning and safety information
2.1 Danger warnings
For safety reasons your machine MUST be bonded to adjacent
metalwork or earthed so that it is at the same potential (i.e.
voltage) (►4.1).
A means for disconnection that has an all pole seperation of
more than 3mm must be incorporated in the fixed wiring in
accordance with wiring rules (►4.2).
All mains electrical work must be carried out in accordance with
local and national regulations, and by a qualified electrician
(►5.3.1).
The machine MUST be disconnected from its power source
during cleaning, servicing or replacing parts (►8).
Ensure the base of the machine is never submerged or standing
in water when operating the machine (►8).
2.2 Warnings
The machine should only be operated at or within the voltage
specified on the rating plate (►3.1).
Old existing, defective or damaged water supply hoses are NOT
to be used when installing your machine (►4.3.1).
The installer and user are responsible for ensuring the installation
and operation of this machine are in accordance with this manual
and local and national regulations (►5).
DO NOT use electrical extension lead(s) to supply power to your
machine (►5.3.1).
Children should be supervised to ensure that they do not play
with, or operate the machine (►7).
Be aware: Wares may be hot when removed from machine
(►7.6).
Before cleaning the wash chamber, ensure all sharp items, such
as broken glass or other items which could cause injury are
removed carefully (►8.1).
DO NOT use cleaning agents that contain CHLORINE, BLEACH
or HYPOCHLORITE (►8.1).
Wear protective clothing, protective gloves and protective
Page 7

Page 6
goggles when handling chemicals and observe all safety notes
and dosing recommendations printed on their packaging (►5.6)
(►8.4).
If the machine is being drained immediately after use, water
draining from the ‘Boiler drainage hose’ may reach over 95°C
(►10).
2.3 Cautions
Only use commercial grade detergents and rinse-aids within your
machine (►5.6).
Always remove excess food/debris from any dishes/glasses to be
washed. DO NOT use your machine as a waste disposal unit
(►7.6).
It is very important the machine is drained down at the end of
each working day (►7.7).
DO NOT use STEEL WOOL, WIRE BRUSHES or any other
abrasive materials (►8.1).
Damage to the machine caused by lime scale, or poor water
quality will NOT be covered by the Manufacturer’s Warranty
(►8.3).
De-scale must not remain in the machine for more than 2 hours
(►8.4).
Ensure that the items placed on the open door of the machine do
not exceed 20kg in weight (►8).
Page 8
Page 7
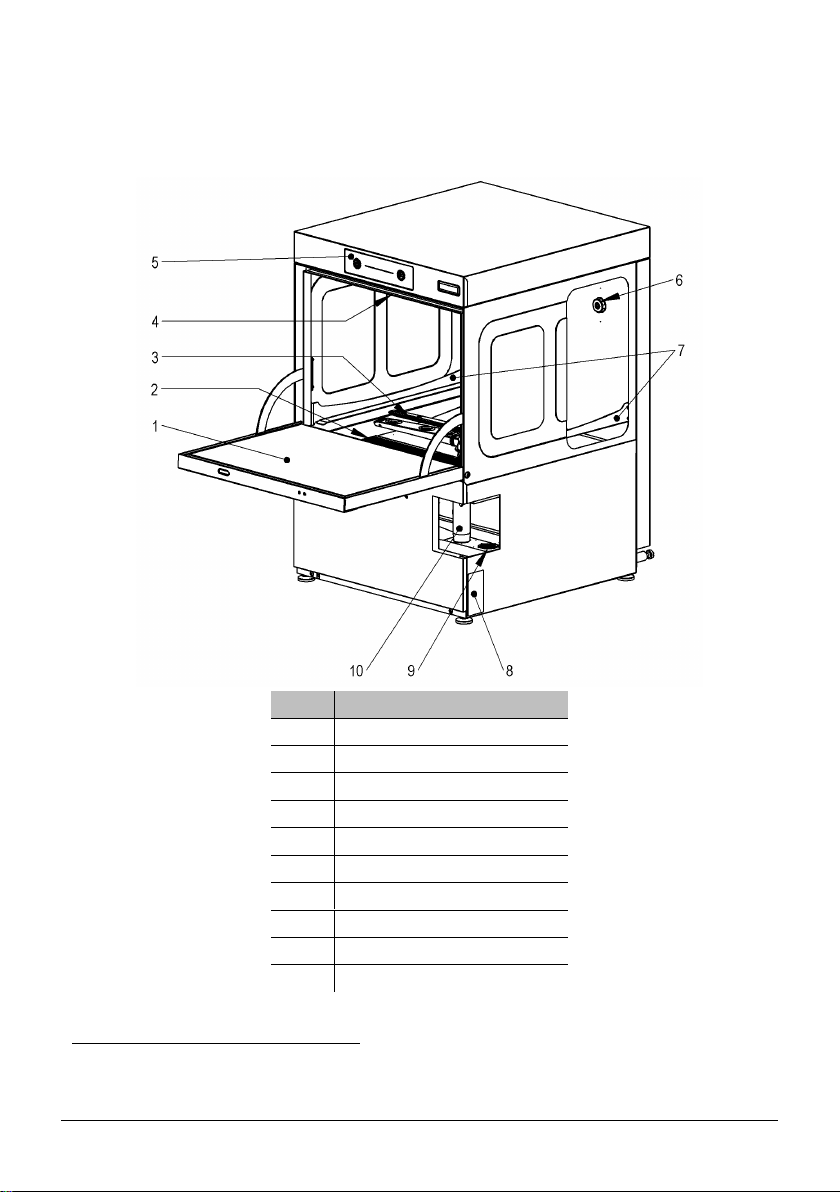
Item
Description
1
Door1
2
Primary filters
3
Bottom wash and rinse arms
4
Top wash and rinse arms2
5
User interface
6
Anti-syphon device3
7
Basket ramp
8
Rating plate
9
Secondary filters
10
Drain plug4
1
2
3
4
3. Know your machine
Before installing your machine you should familiarise yourself with the various components shown
below. For detailed machine specifications see Appendix C (►13)
3.1 Machine layout
The door of the machine should NEVER be used as a step or seat.
Only fitted to 500mm machines
Pumped drain machines only.
Gravity drain machines only.
Page 9
Page 8
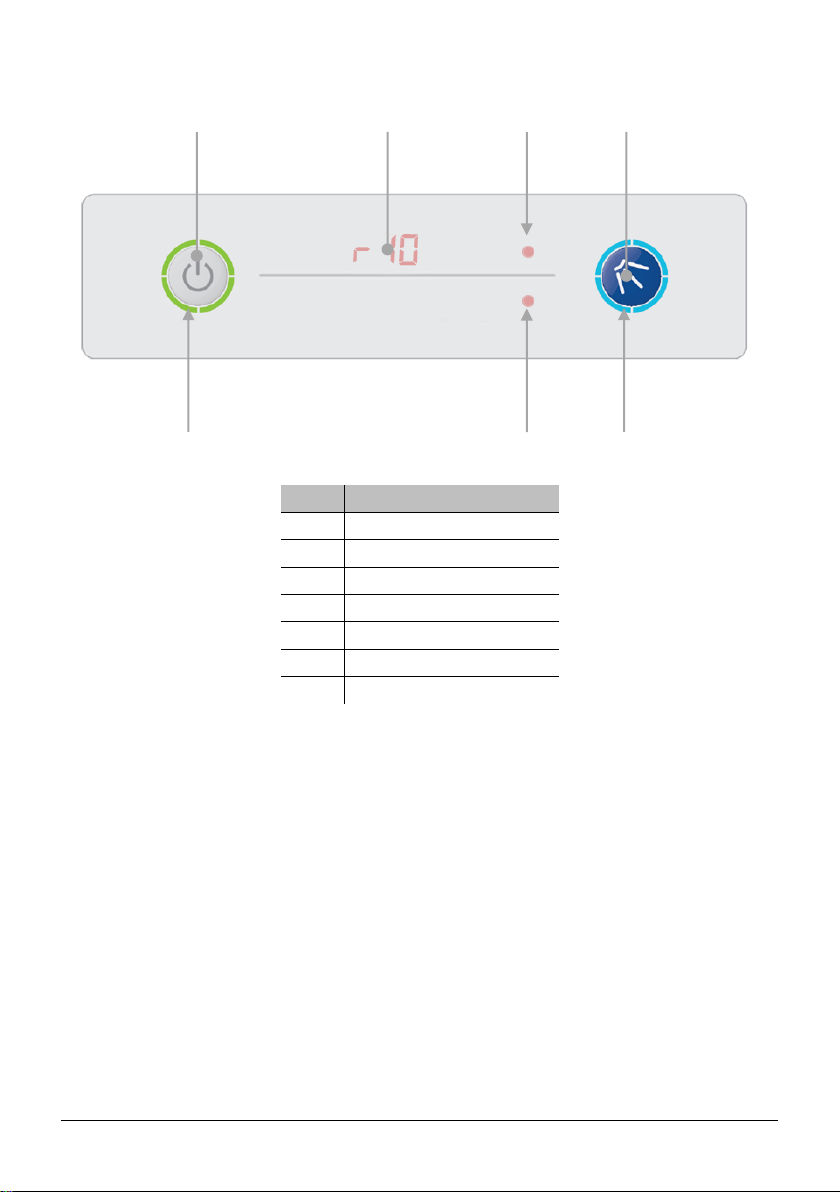
Item
Description
1
On/Off button
2
Cycle button
3
Cycle indicator
4
Heating indicator
5
Hidden until lit display
6
Commissioning button B
7
Commissioning button C
1 4 5
6
7
3
2
3.2 User interface
Page 10
Page 9
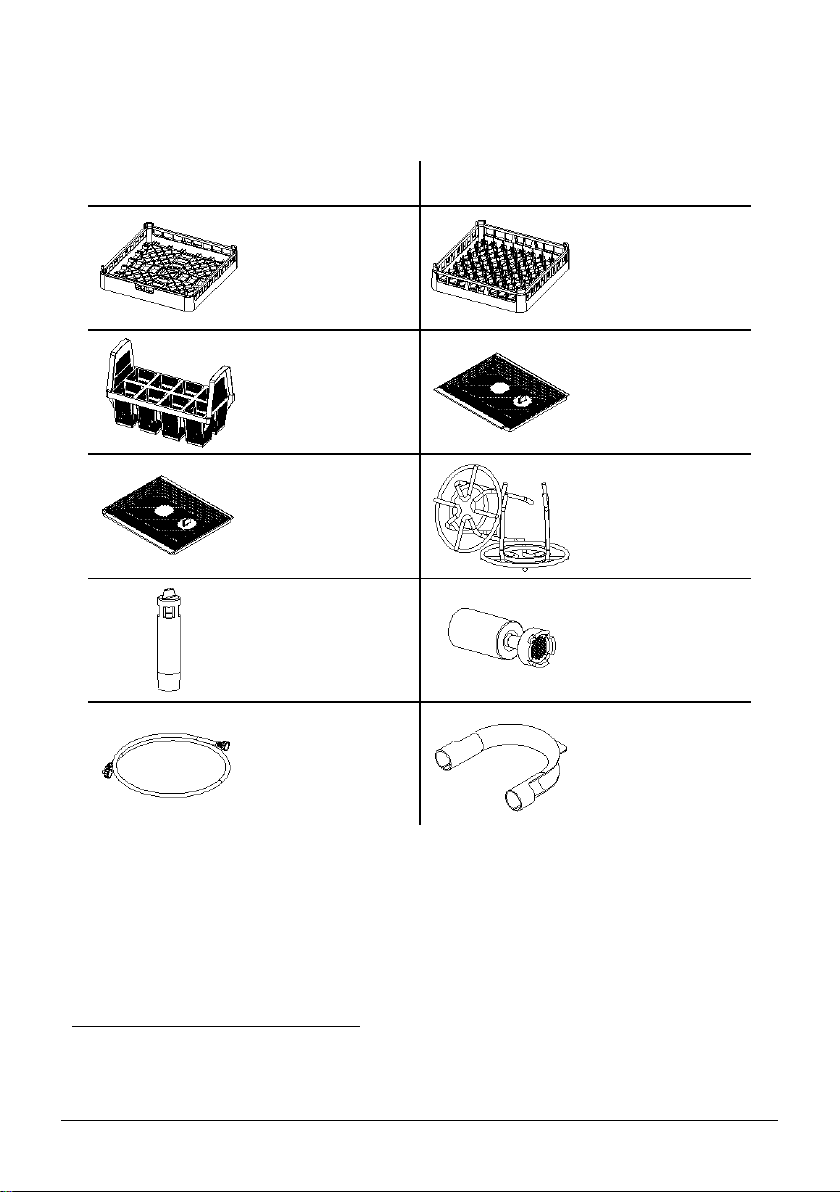
Installation and
operation manual
Good practice guide
Open basket
x2 Glass washer
x1 Dishwasher
Plate basket
x1 Dishwasher only
Cutlery basket
x1 Dishwasher only
Right hand primary
filter6
x1
Left hand primary
filter
x1
Secondary filters7
x2
Drain plug8
x1
Bottle weights
x2
Water inlet hose
x1
Waste hose hook9
x1
5
6
7
8
9
3.3 Accessories with your machine
Items included within machine5
Images are for reference only, actual parts may differ
Differs depending on drain type
Only 1 on gravity drain machines
Only on gravity drain machines
Only on pumped drain machines
Page 11
Page 10
DANGER!
For safety reasons your
machine MUST be bonded
to adjacent metalwork or
earthed so that it is at the
same potential (i.e. voltage).
Machine rating
(Volts / Phase / Amps)
Cable type
220-240V / 1N~/13A
H07RN-f 3G 1.5
220-240V / 1N~/28A
H07RN-f 3G 4.0
380-415V / 3N~/11A
H07RN-f 5G 2.5
Temp.
rating
Length
of
cable
Conforms to
80°C
min.
3m
IEC 60335-2-58
&
IEC 60227 types 56 & 57
Warning
Old existing, defective or
damaged water supply
hoses are NOT to be used
when installing your
machine.
4. Pre-installation
After unpacking your machine, check it for
any possible transport damage. Never
install and use a damaged machine. If your
machine is damaged contact your retailer
immediately.
Make sure the water and electricity
connections of your machine are in
compliance with these instructions.
Remove all outer packaging and the
protective film from your machine before
positioning it.
Ensure all packaging materials are
disposed of in accordance with local and
national regulations.
4.1 Equipotential bonding
Consult your distributor, Classeq or a
qualified electrician if you are unsure how to
do this.
4.2 Electrical connection
Prior to connecting the machine, ensure
that the voltage and the supply fuse comply
with the rating of the machine.
A means for disconnection that has an all
pole separation of more than 3mm must be
incorporated in the fixed wiring in
accordance with wiring rules.
Electrical cable specification 4.2.1
If the mains electrical supply cable is
damaged or has deteriorated, it MUST be
replaced by a cable or cord assembly
supplied by Classeq, its service agents or
similarly qualified persons to avoid hazards,
and be to the following minimum
specifications.
For electrical rating of your machine refer to
the rating plate (►3.1).
Electrical connection 4.2.2
specification
Depending on the specification of your
machine it may be supplied with or without
a moulded mains electrical plug.
4.3 Water connections
Commercial machine wash results may be
affected by external conditions such as
incoming water temperature, pressure,
hardness and choice of chemicals.
Water supply hose 4.3.1
Classeq recommend installing a shut off
valve in the mains water supply line near
the machine such that it is easily accessible
(►13.2).
Your machine is supplied with a new WRAS
approved water hose (►3.3), requiring a
G¾” (¾” BSP) male threaded connection at
the mains water outlet.
Page 12

Page 11
Machine size
Max waste height (mm)
350mm
420
400mm
540
500mm
600
Water supply restrictions 4.3.2
Incoming water temperature:
4°C minimum
55°C maximum
Supply water dynamic pressure:
0 to 2 bar (0 to 200 kPa)
(External rinse booster pump required)
2 to 4 bar (200 to 400 kPa)
(No modifications required)
>4 bar (400 kPa)
(Pressure reducing valve required)
Minimum supply flow rate:
11 litre/minute
Water hardness:
For the longevity of your machine, and to
ensure you get consistently good results, it
is essential your machine is either fed from
a soft water supply (≤3°dH) or is connected
to an appropriate water softener. Appendix
B has a map that can be used as a guide to
water hardness in the UK (►12).
IMPORTANT - All supplier warranties are
void if lime scale is present within your
machine.
Gravity drain machines:
If your machine has a drain plug fitted in the
wash sump the waste hose will fit into
Ø40mm plumbing or over a Ø20mm spigot.
The hose for this machine has to lead away
below the base of the machine.
Pumped drain machines:
The waste hose of your machine will fit into
Ø40mm plumbing or over a Ø28mm spigot.
The waste plumbing for the machine can be
up to a maximum of the following heights
from the base of the machine:
Waste water connection 4.3.3
The waste system of your machine will vary
depending on the variant. You can identify
the type of drain your machine has by
checking whether there is a drain plug
present (►3.1). Machines with a drain plug
are gravity drain and without are pumped
drain.
Page 13
Page 12
Warning
The installer and user are
responsible for ensuring the
installation and operation of
this machine are in
accordance with this manual
and with local and national
regulations.
DANGER!
All mains electrical work
must be carried out in
accordance with local and
national regulations, and by
a qualified electrician
5. Installation
5.1 Recommended hand tools
Classeq recommends that the following
hand tools are used to assist in installing
your machine:
Spirit level
8mm spanner
Multimeter or voltmeter
Insulated No. 2 Posi screw driver
Drill with 8mm bit
5.2 Machine placement
Your machine should be installed on the
stable surface that is capable of holding the
full weight of the machine (►13) and
withstand the vibration of regular use.
Ensure there is a minimum of 10mm
clearance each side of the machine and
with 20 mm clearance at the top and rear of
the machine. (►13).
Once installed use the adjustable feet to
ensure your machine is stable, with its
weight being distributed equally and does
not tilt more than 2° in any direction.
Your machine should be placed in a
location that allows the required supplies to
be fitted (►13.2).
When positioning the machine, ensure that
the water inlet, chemical tubes and drain
hoses are not kinked or squashed. Care
must also be taken to ensure your machine
does not rest upon any of its supply
hoses/leads.
5.3 Electrical connection
Mains cable connection 5.3.1
Your machine must be connected directly to
the mains electricity using the mains
electrical cable provided. DO NOT use
electrical extension lead(s) to supply power
to your machine.
Prior to connecting your machine, ensure
the electrical supply has a suitable and
adequate circuit breaker/fuse. For the
electrical rating of your machine refer to the
rating plate (►3.1). Contact your
distributor, qualified electrician or Classeq
if you are unsure how to check this.
When hard wiring the machine into the
socket use the multimeter or voltmeter to
ensure that the connection point does not
have any voltage before attempting to
connect the terminals.
Equipotential bonding 5.3.2
Your machine MUST be earth bonded to
adjacent metalwork or earthed so that it is
at the same potential (i.e. voltage).
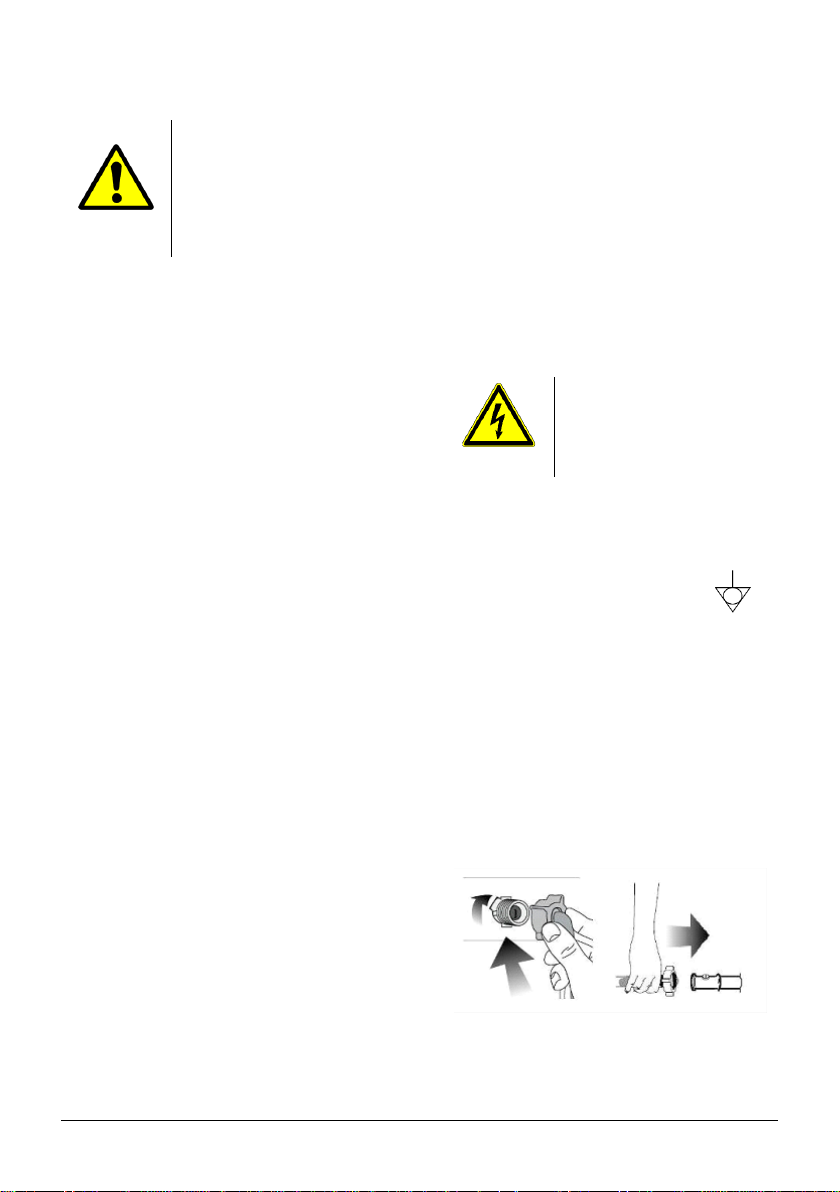
The equipotential bonding stud is located at
the rear of the machine (►13.2) and has a
M5 nut fitted. Use the spanner to connect
the earth wire to this location and ensure
the nut is securely fastened.
5.4 Water supply hose connection
Connect the 90° bend end of the water
supply hose to your machine (►13.2) and
the straight end to your water mains supply.
Ensure the rubber seals within the ends of
the hose are in place.
Ensure all connections are water tight
before using your machine.
Page 14
Page 13
Warning
Wear protective clothing,
protective gloves and
protective goggles when
handling chemicals and
observe all safety notes and
dosing recommendations
printed on their packaging
Caution
Only use commercial grade
detergents and rinse-aids
within your machine.
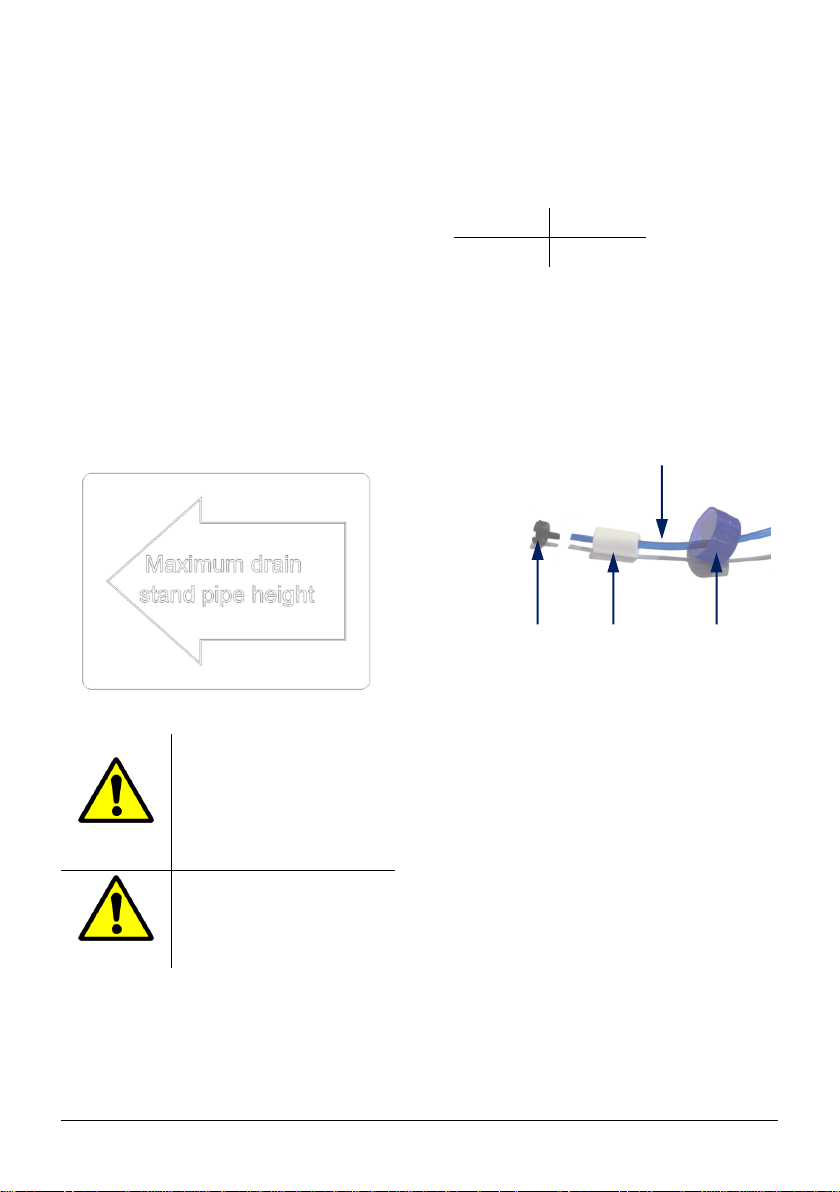
Blue tube
Rinse aid
Clear tube
Detergent
Bottle weight
Bottle cap
PVC hose from machine
5.5 Waste water connection
Fit the waste hose of your machine to the
site plumbing without kinking it.
Ensure that your hose is fitted to the
plumbing in a way that it will not come off or
out during the operation of the machine.
The waste plumbing must only be
connected into the foul drains and not the
surface water drainage system.
A form of back flow prevention must be
installed into the waste plumbing in
accordance with local and national
regulations.
Ensure that the waste hose of the machine
does not pass the height of the sticker on
the rear of the machine when the machine
is in place.
Where the machine is fitted to a stand pipe
the waste hose hook (►3.3) should be
used to help manage the hose
These tubes exit the rear of the machine
and should be routed to the chemical bottle
locations, excess tube may be removed.
The tubes need to be long enough to allow
the bottles to be moved without the risk of
falling over.
Remove the cap from each of the chemical
bottles and use the drill to make a hole in
middle.
Feed the tube through the hole and fit the
bottle weights and filters supplied the end of
each tube before dropping them into the
chemical bottles and fastening the caps.
5.6 Fitting chemical bottles
The chemical bottles should be placed in a
safe, stable location that is close to the
machine (►13.2) and easily accessed to
check chemical levels and replace the
bottles as needed.
A coil of PVC tube is connected to each of
the chemical pumps inside the machine.
Page 15
Page 14
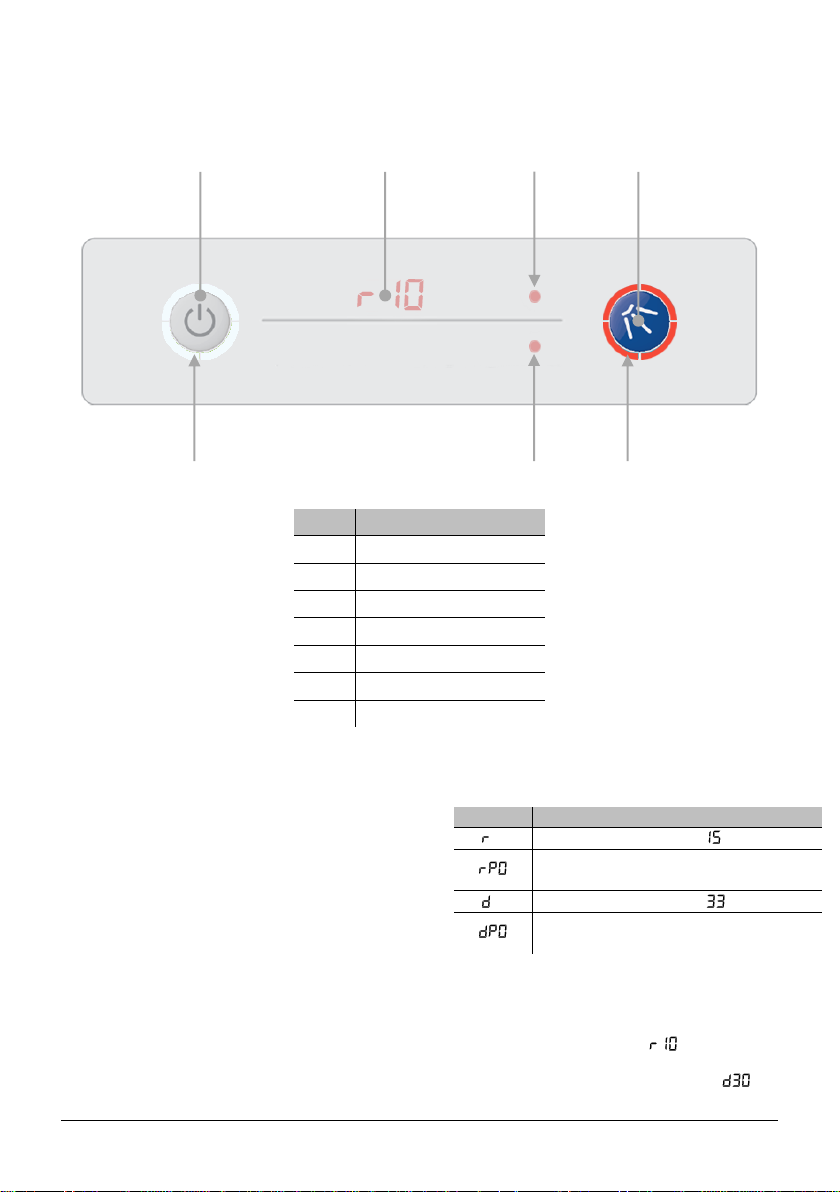
Item
Description
1
Exit button
2
Enter button
3
Cycle indicator
4
Heating indicator
5
Hidden until lit display
6
Up button
7
Down button
Display
Description
**
Rinse aid setting (e.g. = 1.5mL/L)
Rinse aid prime
**
Detergent setting (e.g. = 3.3mL/L)
Detergent prime
1 5 6
2 7 3
4
6. Commissioning
6.1 Commissioning interface
6.2 Commissioning mode
With the machine turned on at the mains
electrical supply but off at the display, press
and hold the Exit (1) and Enter (2) buttons
for 3sec. the display (5) will show the first
menu item and the cycle indicator (3) will
illuminate red.
If no buttons have been pressed for a
period of time the machine will cancel this
mode and return to the off state.
Below is the complete menu list.
** Refers to the setting of the chemical
dosing. For example the default setting for
rinse aid is 1ml of chemical per litre of water
this will be displayed as ‘ ’ the default
setting for detergent is 3ml of chemical per
litre of water this will be displayed as ‘ ’
Page 16

Page 15
6.3 Setting chemical dosage
Your machine will be set to a default
chemical dosing setting however since
there are many different chemicals on the
market and these each have different
concentration requirements the dosage can
be adjusted by following the instructions
below.
1. Refer to your chemical bottle or
contact the supplier to find the
concentration requirements for
your rinse aid and detergent in
millilitres of chemical per litre of
water (ml/L).
2. Enter commissioning mode
(►6.2).
3. Using the up and down keys (6 &
7), scroll to the rinse aid setting
menu item ( **) and press enter
(2).
4. The display will flash.
5. Use the up and down keys (6 &
7) to scroll to the required setting
and press enter (2).
6. Using the up and down keys (6 &
7), scroll to the detergent setting
menu item ( **) and press enter
(2).
7. The display will flash.
8. Use the up and down keys (6 &
7) to scroll to the required setting
and press enter (2).
9. Press exit (1) until you are out of
commissioning mode.
again to stop the pump.
5. The display will stop flashing and
return to .
6. Using the up and down keys (6 &
7), scroll to the detergent prime
menu item ( ) and press enter
(2)
7. The display will flash and will
change to .
8. This will continually run the
detergent pump for a maximum
of 2 minutes and draw chemicals
into the machine. When the
chemicals have reached the back
of the machine press enter (2)
again to stop the pump.
9. The display will stop flashing and
return to .
10. Press exit (1) until you are out of
commissioning mode.
6.5 Wash and rinse tank
temperatures
The wash and rinse boiler temperatures
have been pre-set to temperatures that
comply with environmental health
standards.
6.4 Priming chemicals
Before the machine can be used the
chemical tubes will need to be filled with
chemicals, in order to do this you will need
to follow the below instructions to prime the
chemical pumps.
1. Enter commissioning mode
(►6.2).
2. Using the up and down keys (6 &
7), scroll to the rinse aid prime
menu item ( ) and press enter
(2)
3. The display will flash and will
change to .
4. This will continually run the rinse
aid pump for a maximum of 12
minutes and draw chemicals into
the machine. When the
chemicals have reached the back
of the machine press enter (2)
Page 17
Page 16
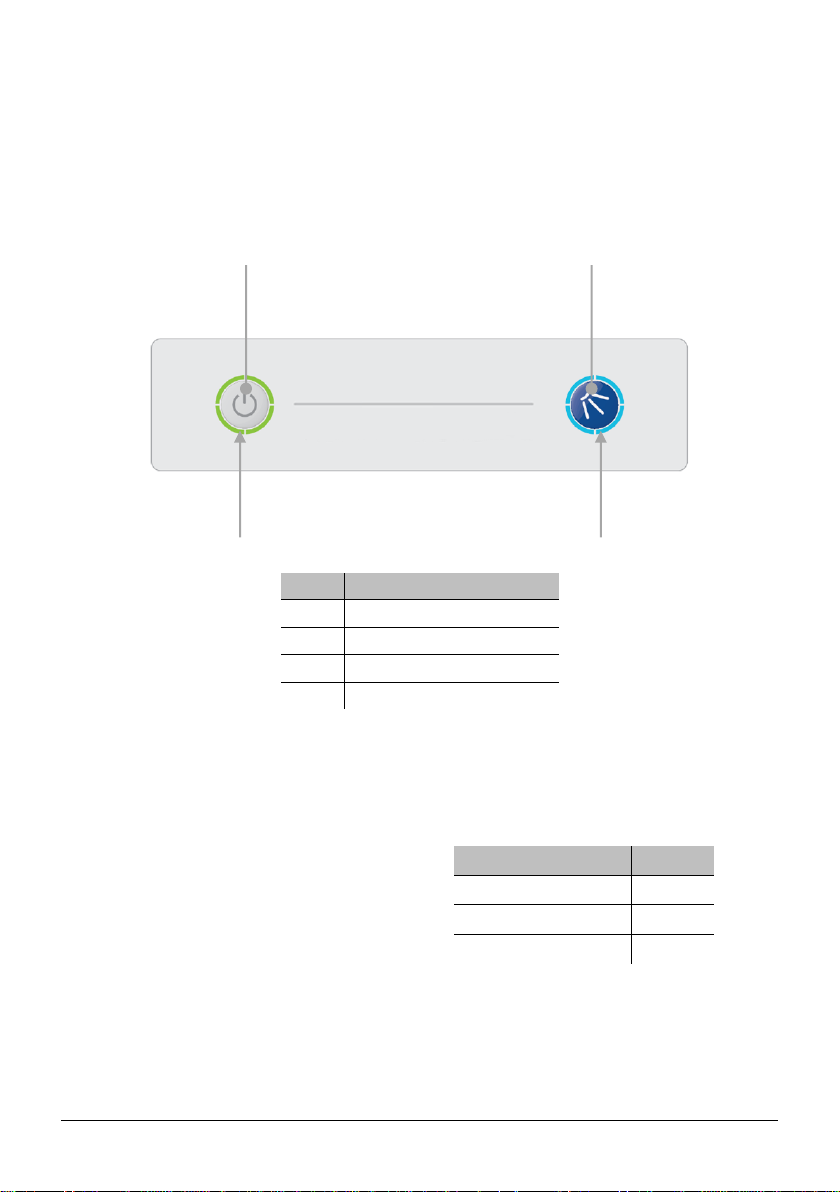
Item
Description
1
On/Off button
2
Cycle button
3
Cycle indicator
4
Heating indicator
Rating
Time
220-240V / 1N~ / 13A
50min
220-240V / 1N~ / 28A
25min
380-415V / 3N~ / 11A
25min
1 4 2
3
7. Operation
Children should be supervised to ensure
that they do not play with, or operate the
machine.
7.1 Operation interface
Before operating the machine, ensure that
the mains electrical and water supplies are
turned on.
7.2 Turning on the machine
To turn on the machine ensure the door is
closed and press the On/Off button (1) on
the keypad of the machine, the display will
illuminate, the machine will start to fill
automatically as long as the door is closed.
7.3 Machine ready to operate
Your machine operates a pulse fill function,
this means that it will fill the rinse boiler,
heat this to a pre-set temperature then
transfer this water to the wash tank. During
the fill stage the heating indicator (4) will
flash amber.
Once the wash tank is filled and both tanks
are up to the required temperatures the
heating indicator will illuminate green to
indicate the machine is ready to run a cycle.
The time required for the machine to fill and
heat will vary depending on the power
rating of the machine as stated on the
rating label (►3.1) and the incoming water
temperature, below is a guide to these
times when the incoming water is 16°C.
7.4 Selecting a wash program
Your machine has one possible program
time that is pre-set to offer the best possible
results. These times are as follows:
Dish washer – 3min
Glass washer – 2min
Page 18

Page 17
Warning
Be aware: Wares may be
hot when removed from
machine
Caution
It is very important the
machine is drained down at
the end of each working
day.
Your machine has a heat interlock to
ensure that the rinse is in accordance with
environmental health requirements. This
will extend the wash cycle if the rinse boiler
has not achieved the required temperature
within the cycle times above.
7.7 Draining down the machine
7.5 Loading a basket
For dishwashers ONLY
Long cutlery, such as ladles and long
knives etc., must be placed horizontally on
the open basket this will avoid possible
collision with wash/rinse arms.
7.6 Starting a cycle
Always remove excess food/debris from
any dishes/glasses to be washed. DO NOT
use your machine as a waste disposal unit.
To start a cycle, follow the instructions
below.
1. Open the door
2. Load the full basket, ensuring
that bottom and top arms rotate
freely.
3. Close the door
4. Press the cycle button (2). The
cycle will start once the machine
has achieved its correct water
levels and temperatures. During
the cycle the blue cycle indicator
(3) will be illuminated blue.
Do NOT open the door during a cycle.
If the cycle button is pressed before the
machine has reached the required levels
the cycle indicator (3) will illuminate blue to
indicate that a cycle has been selected, the
heating indicator (4) will flash amber and
the machine will automatically start when
the requirements have been met.
5. At the end of the cycle, once the
cycle indicator (3) has gone out.
Open the door and remove the
basket
6. Reload the machine and repeat
as required.
Wares in the basket may be wet and will
dry in a short time due to evaporation.
During normal operation the machine will
drain out any excess water.
To fully drain down the machine follow the
below instructions
For gravity drain machines: 7.7.1
1. Open the door to the machine.
2. Locate and remove the drain plug
(►3.1).
For pump drain machines: 7.7.2
1. Close the door to the machine
2. Press the On/Off button (1) to
turn off the machine.
3. Press the cycle button (2)
4. The cycle indicator (3) will flash
blue.
5. The machine will drain down the
wash tank.
6. The machine will do a self-rinse.
7. When the cycle indicator (3) goes
out the drain cycle is complete.
Note!
Once empty Classeq recommends the
mains water and electricity supplies are
turned off and the machine is cleaned
(►8.2).
For hygiene reasons it is recommended
that once the machine has been drained
and cleaned the door is left open to assist
in natural drying of the wash chamber.
Page 19
Page 18
DANGER!
The machine MUST be
disconnected from its power
source during cleaning,
servicing or replacing parts.
Ensure the base of the
machine is never
submerged or standing in
water when operating the
machine.
Caution
DO NOT spray the exterior
or interior of the machine
and the surrounding area
(panels, base) using a water
hose, steam-jet air ejector
or high-pressure cleaner.
Ensure that the items
placed on the open door of
the machine do not exceed
20kg in weight.
Warning
DO NOT use cleaning
agents that contain
CHLORINE, BLEACH or
HYPOCHLORITE.
Before cleaning the wash
chamber, ensure all sharp
items, such as broken glass
or other items which could
cause injury are removed
carefully.
Caution
DO NOT use STEEL
WOOL, WIRE BRUSHES or
any other abrasive
materials.
Caution
Damage to the machined
caused by lime scale will
NOT be covered by the
manufacturer’s warranty
(►13).
10
8. Service and
maintenance
8.1 Prior to cleaning
Ensure the machine has first been drained
down (►7.7).
Turn off the mains electrical supply before
cleaning the machine.
Interior cleaning 8.2.1
The interior of the machine should be
cleaned after each service when the
machine is drained down.
As a minimum Classeq recommends the
following are checked and cleaned (►3.1):
Remove and clean top and
bottom rinse and wash arms.
Remove and clean primary filters
Remove and clean secondary
filters.
Clean interior of the wash tank
with a sponge and/or brush for all
apertures and outlets.
Clean around door hinge
Use a trigger spray bottle with a
jet nozzle to spray the ball in the
anti-syphon device.10
If required apply food grade
grease to the door ball catch.
Ensure all arms and filters are refitted to the
machine before turning it on.
Exterior cleaning 8.2.2
Wipe the exterior of the machine with a
damp (NOT WET) sponge.
Once dry, clean using a STAINLESS
STEEL cleaning agent.
8.3 Lime scale
For best results ensure your machine is
operated with soft water (≤3°dH).
If your machine is connected to an external
softener, ensure this is routinely
‘regenerated’ as per the instruction of the
water softener.
If your machine is operated with hard water
without the relevant water treatment, the
internal working and all water lines can
become ‘scaled’, your results will
deteriorate and the machine could be
damaged. For more information on hard
water refer to Appendix A (►11).
8.2 Daily cleaning
It is recommended that the machine is
cleaned daily to ensure good hygiene in the
machine.
Pump drain machines only
Page 20

Page 19
Warning
Wear protective clothing,
protective gloves and
protective goggles when
handling chemicals and
observe all safety notes and
dosing recommendations
printed on their packaging
8.4 Descaling
You can de-scale the wash tank of your
machine yourself with the help of the
following notes; to de-scale the rinse boiler
you will need to contact your service
engineer or Classeq.
In order to descale the wash tank follow the
instructions below.
1. Remove the chemical tubes from
the chemical bottles.
2. Place the ends tubes into a
container of water.
3. Use the commissioning menu to
prime the rinse aid and detergent
pumps for at least 60sec (►6.4)
to draw water all the way into the
machine.
4. Fill and drain the machine to
remove any chemical residue.
5. Refill the machine.
6. Follow instructions on the
chemical packaging to de-scale
the wash tank.
7. Once the de-scale process is
complete drain the machine.
8. Refill and drain the machine at
least 3 times to remove any
chemical residue.
9. Refit the chemical tubes to the
bottles and prime the pumps
(►6.4).
Page 21

Page 20
NOTE:
In the event of a service call being made
under Warranty and it is found that the
fault(s) are due to non-observance of
instructions in this manual, the call will be
charged at current rates.
9. Troubleshooting
If you believe the machine is not behaving
as expected or has gone into error mode
(Cycle indicator illuminated red) reset the
machine, by pressing the on/off button, then
follow the troubleshooting tips before
requesting a service callout. The service
support number can be found in the ‘Useful
contact details’ section (►16):
9.1 Machine will not fill
Your machine operates a pulse fill function,
this means that it will fill the rinse boiler,
heat this to a pre-set temperature then
transfer this water to the wash tank. During
the fill stage the heating indicator will flash
amber.
If your machine has been in this state for
more than a specific time the error indicator
will illuminate. Check the items below
before requesting a service callout:
Water supply hose is connected
to your machine.
Water supply is turned on.
Water supply hose has not been
trapped or kinked.
Check that the site water supply
has not been interrupted.
Check the machine is turned on.
Check the door is closed.
9.2 Machine will not turn on
Machine is connected to a mains
power supply.
Check power supply switch is
turned on.
On 13A machines first check and
replace the fuse in the plug,
ensuring that the correct rating is
used.
On all ratings of machine check
and reset circuit breaker in the
site fuse board.
If the fuse or breaker continues to
trip, do not reset and request a
service callout.
9.3 Machine fills slowly
Check water supply is turned fully
on.
Check water supply hose has not
been trapped or kinked.
Check that the site water supply
has not been interrupted.
Check site pressure is adequate
(►4.3.2).
9.4 Machine over filling
If your machine is over filling during the fill
cycle attempt to drain the machine (►7.7)
and refill before isolating the machine and
requesting a service callout.
9.5 Machine does not heat
Machine is turned on (►9.2).
Machine able to fill (►9.1).
Enough time has been allowed
for the machine to fill and heat
(►7.3).
9.6 Excessive foam in wash tank
Chemicals are commercial ware
washer grade.
Chemical dosage is correct.
Check wash tank has fully
heated.
9.7 Cycle does not start
Your machine has a heat interlock that will
delay the start of the wash cycle until all
criteria have been met. When the criteria
have been met the heat indicator lamp will
illuminate green and the cycle should start.
If this is not the case please check the
below items before requesting a service
callout.
Machine is on.
Enough time has been allowed
for the machine to fill and heat
(►7.3).
Wash tank is full of water.
Page 22

Page 21
9.8 Cycle runs for a long time
Your machine has a heat interlock to
ensure that the rinse is in accordance with
environmental health requirements. This
will extend the wash cycle if the rinse boiler
has not achieved the required temperature.
9.9 Machine does not rinse
If your machine runs through a full cycle,
but does not rinse, you will need to request
a service call to identify the root cause of
the problem.
9.10 Machine over flowing
Drain/stand pipe is correct for the
machine (►4.3.3).
Site waste is not blocked.
Machine waste hose is not kinked
or blocked.
Remove and clean all filters.
Fully drain and refill machine.
If the machine continues to
overflow isolate the machine and
request a service callout.
9.11 Poor wash results
Soft water is supplied to the
machine (►4.3.2).
The level of chemicals within the
rinse aid and detergent bottles
and the bottle weights and tubes
are correctly positioned.
Chemical dosing set to the
correct concentration levels
(►6.3).
Machine is regularly cleaned
(►8.2).
Water softener regenerated
(external) or salt reservoir full
(internal)
Glasses may need to be
renovated.
9.13 Machine will not turn off
Isolate the machine before requesting a
service callout.
9.12 Machine does not drain
The drain/stand pipe is correct for
the machine (►4.3.3).
Site waste is not blocked.
Machine waste hose is not kinked
or blocked.
Correct drain procedure is being
used for the machine type
(►7.7).
Page 23
Page 22
Warning
If the machine is being
drained immediately after
use, water draining from the
‘Boiler drainage hose’ may
reach up to 95°C.
RECYCLING If you are
recycling or disposing of
your machine, you must
ensure this is done in
accordance with local and
national regulations.
10. Decommissioning
If for any reason you require to remove or
decommission your machine do so in
accordance with local and national
regulations.
As a minimum Classeq recommends the
following procedure is followed.
Prior to removing any chemicals refer to all
safety statements on chemical bottles for
dealing with any spillage.
Remove chemical tubes from the
chemical bottles, ensuring the
bottles are then capped to
prevent any further spillage.
Ensure the machine is fully
drained (►7.7). Once completed
remove the waste hose from the
drain standpipe; ensure any spilt
liquid is dried prior to advancing
to the next step.
Turn off the mains electrical
supply at wall / isolator / junction
box
When disconnecting your machine from the
mains electrical supply:
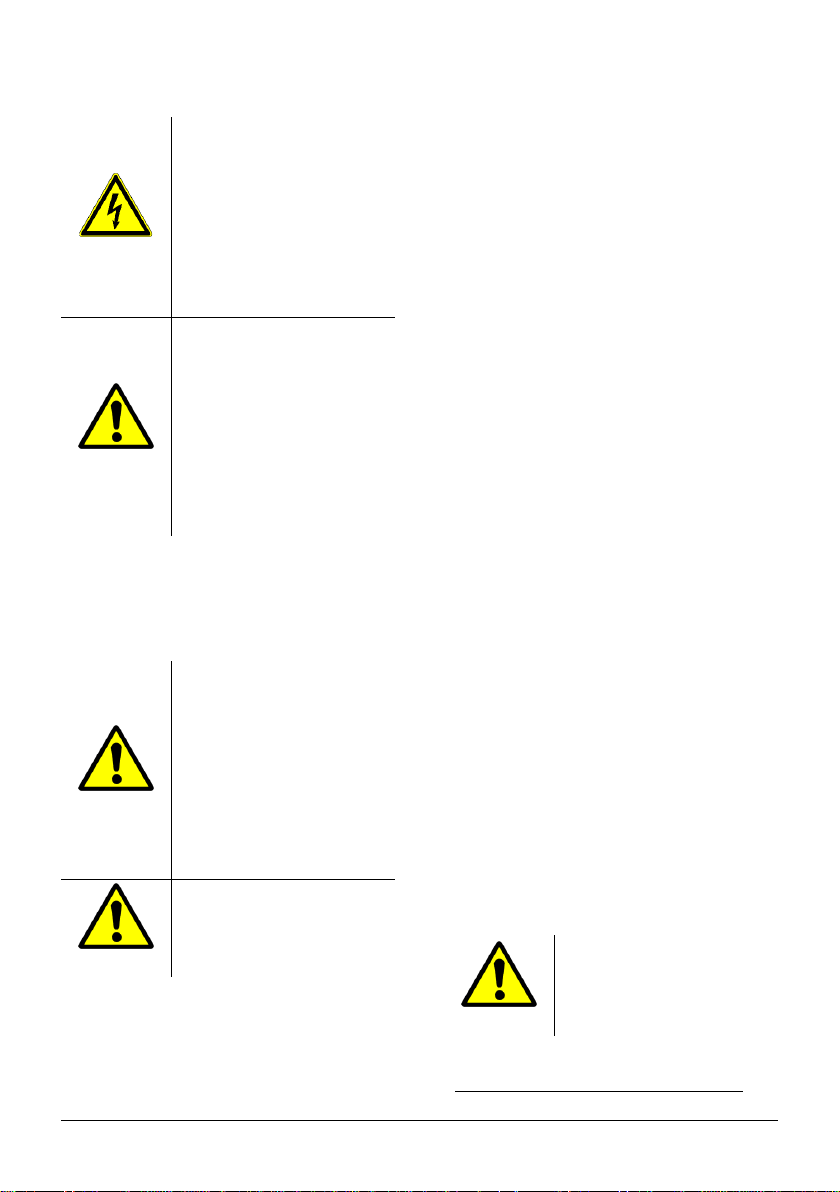
Machines with an electrical plug,
always pull the plug. Never pull the
cord itself.
Once the electrical supply has been
disconnected, ensure the equipotential
wire is removed from the stud at the
rear of the machine.
Turn off the water supply to the
machine and disconnect the water
supply hose from mains water supply,
ensuring any spillage is dried prior to
moving onto next step.
Remove the front lower panel using a
3mm hex key.
Now locate the ‘Boiler drainage hose’
as shown. Ensure this protrudes from
the front of the machine and you have
a container large enough to hold 8
litres of water.
Loosen the jubilee clip and remove the
drain plug, ensuring the water flows
into the container mentioned above.
Once fully drained replace the drain
plug and retighten the jubilee clip.
Replace the front panel, and ensure all
cables and hoses are secured to the
machine to prevent tripping hazards.
The machine is now ready to be
removed.
Machines hard wired (i.e. no plug), this
must be disconnected in accordance
with local and national regulations;
Classeq recommends this is
performed by a qualified electrician.
Page 24
Page 23
11. Appendix A – Water hardness explained
Water hardness occurs because certain chemicals in the rocks through which it passes on its way
to the consumer are slowly dissolved into the water.
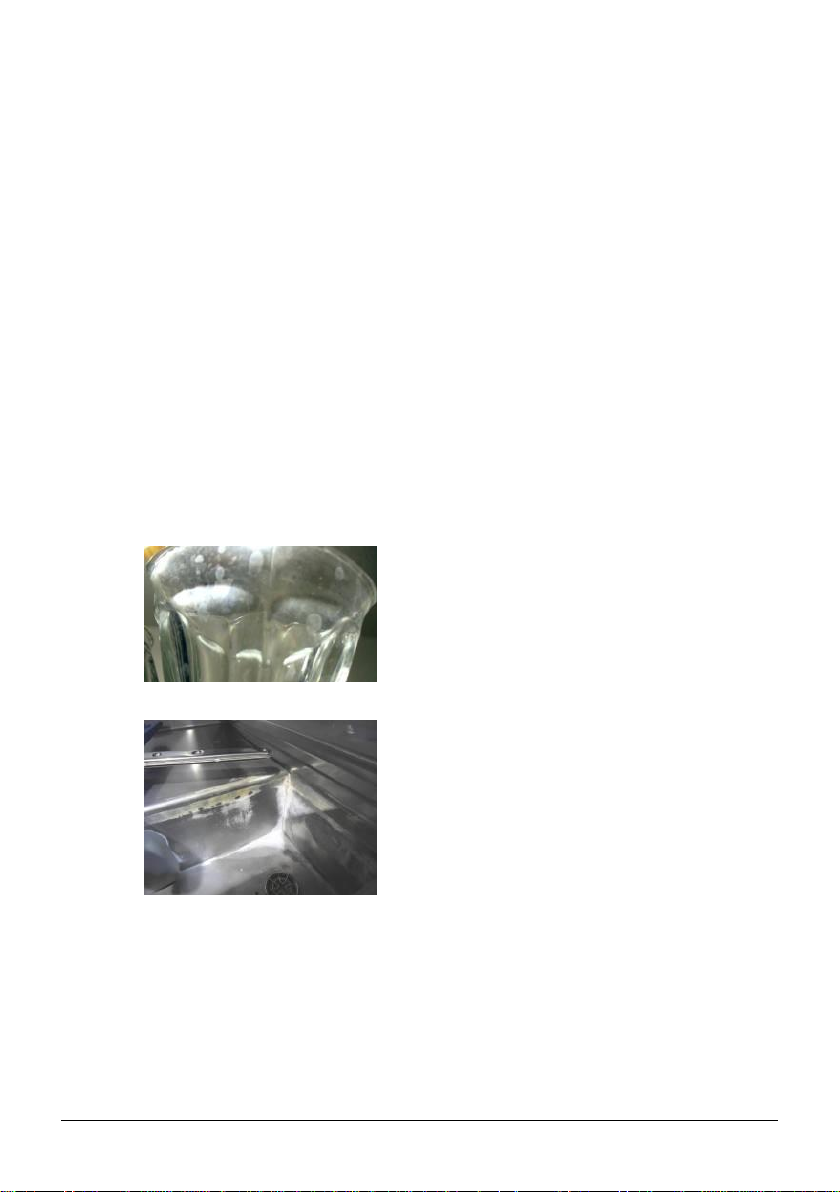
The problem shows itself in two forms. First, when hard water is heated the chemicals come out of
solution and appear as solid particles (lime scale) that are carried round the machine. These
particles are formed most quickly at the hottest part of the machine – normally the rinse element
and the rinse tank in general. This is why the rinse tank is the best place to look to judge if lime
scale is being formed in a machine.
Second, most commercial chemicals operate much less efficiently in hard water, and this will often
show as poor results or failure to remove tannin stains, or condensation on glasses. Tannin stains
appear to cling to the hard water film in the drink, which then clings to the surface of the cup or
saucer. With soft water this is not the case.
Some types of hard water do not produce lime scale when heated, but it will still reduce the
performance of the chemicals, as mentioned above. This is known as permanent hardness.
Temporary hardness is when the hardness can be largely removed by conversion into lime scale
by boiling.
If lime scale is produced inside a machine it will cause a number of maintenance problems, for
example:
Coating of element leading to slow heating and element failure
Blockage of rinse jets showing as poor results
Wear of bushes in centre boss, showing as poor results and possibly wash water
passing backwards into the rinse system.
Blockage of rinse-aid injection point in boiler.
White marks may appear on glasses, dishes and cutlery.
Dishes or cups may appear dirty even after a wash. Especially coffee or tea cups.
Discolouration of inside of machine, making cleaning difficult.
Blockage of hoses due to the deposit “furring up” the inside of the hose.
When lime scale is found, it must be removed with commercial De-scale, used with care in
accordance with the instructions on the product. The descale instructions in this manual should
always be followed. The rinse tank is difficult to de-scale and may require a service engineer.
Your local water board should be able to tell you if the water in your area is hard or soft. As a
guide refer to the map in Appendix B (►12).
Page 25

Page 24
11
12. Appendix B – Water hardness map
Map 1 - Water hardness map11
For more detailed information regarding your water hardness, please contact your water supplier.
Correct at time of going to print
Page 26
Page 25
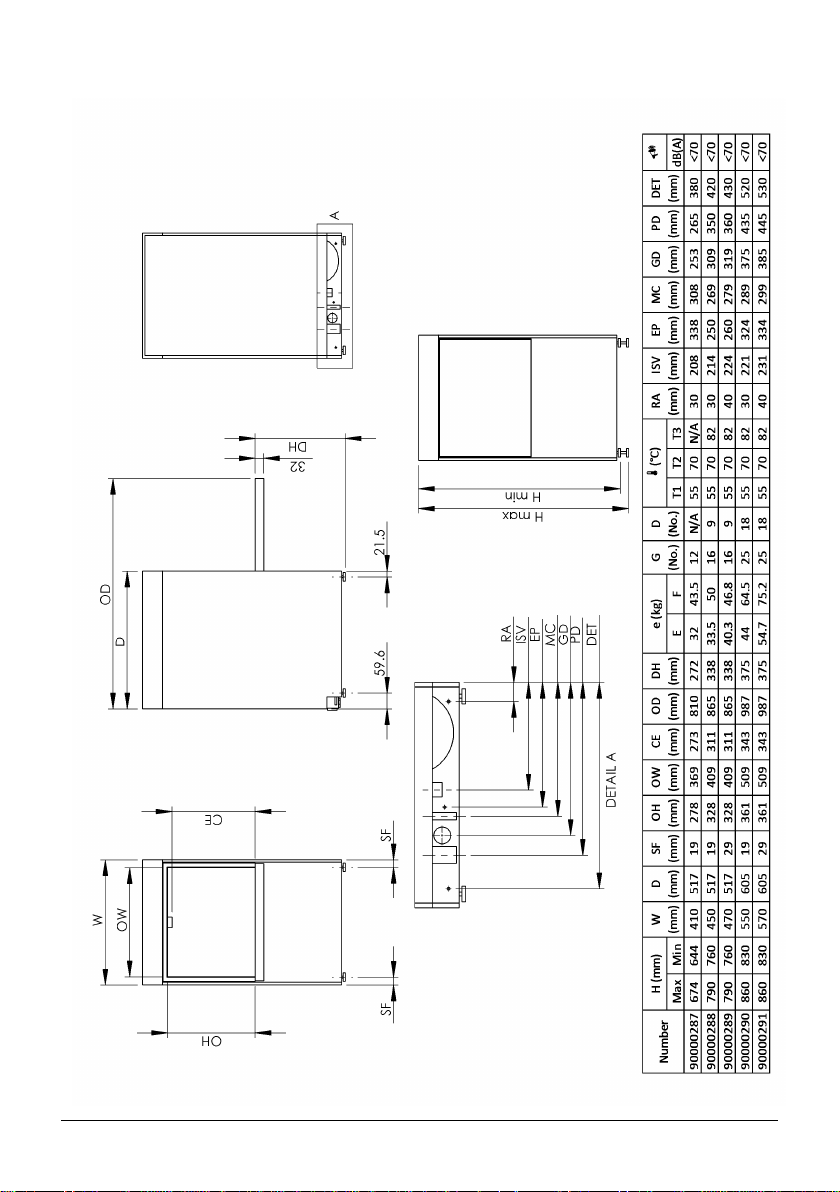
13. Appendix C – Machine specifications
Page 27
Page 26
Item
Description
90000287
G350
90000288
D400; G400
90000289
D400 DUO; G400 DUO; D400 DUO WS; G400 DUO WS
90000290
D500; G500
90000291
D500 DUO; G500 DUO; D500 DUO WS; G500 DUO WS
H
Height of machine
W
Width of machine
D
Depth of machine
SF
Foot dimension to side
OH
Door opening height
OW
Door opening width
CE
Clear entry height
OD
Depth with door open
DH
Door open height
E
Empty weight
F
Full weight
G
Pint glasses per rack
D
Dishes per rack
T1
Wash water temperature
T2
Glass washer rinse temperature
T3
Dish washer rinse temperature
Noise level
Description
Symbol
Radius from
machine (m)
Rinse aid tube
RA
3
Inlet solenoid valve
ISV
1.8
Mains electrical cable
EC
1.3
Gravity waste water outlet
GD
1.5
Pumped waste water outlet
PD
1.5
Equipotential bonding stud
EP
-
Detergent tube
DET
3
12
13.1 Legend12
13.2 Supply locations
A minimum of 10mm air gap should be left on both side and on top of the machine and 20mm at the rear.
Page 28

Page 27
14. Parts and Labour warranty
Classeq Ltd.
Parts and Labour Warranty Terms
The user is entitled to free replacement and fitting of any part found to be faulty in material or
workmanship, including any parts rendered inoperative by the effect of a faulty component, for a
period of one year, or as specified by the vendor at the time of purchase.
Exceptions
All faults or conditions caused by Operator misuse, including (but not exclusively):
Incorrect Installation.
No fault found.
Problems with electricity supply or plumbing e.g. water and waste.
Failure to follow instructions in the User Handbook.
Use of incompatible chemicals or chemical set at incorrect concentration.
Drain pump or drain system blocked or damaged by foreign bodies.
Wash pumps damaged due to foreign bodies entering the wash system.
Use of un-softened (hard) water. The use of a faulty water softener or the failure to
properly regenerate a water softener.
Use of excessive force on the machine, e.g. switches etc.
The cost of replacing any item found to be lost or missing.
Use of non-compatible cleaning materials.
Incorrect assembly after cleaning.
Damage to machine caused by any 3rd party.
Page 29

Page 28
15. Notes
Page 30

Page 29
Page 31

Page 30
16. Useful contact details
Page 32

Page 31
To help when contacting please quote the serial number and model of machine
Original instructions
Classeq Ltd.
Classeq house
Airfield Industrial estate
Hixon
Staffordshire
ST18 0PF
United Kingdom
Document number: 10021367
Revision: D
Date: 06/01/2017
Language: English
 Loading...