

Classeq Duo 750, Duo 3, Duo 2, Hydro 750, Duo 400 Installation & Operator's Manual
...
Installation & Operators Manual
Installation & Operators Manual
Part number 902.0011
Revision F Jan 2012
Language English
The Classeq Under Counter Range
The Classeq Under Counter Range
Glasswashers
Glasswashers
Dishwasher
Dishwasher
Eco 1
Eco 2
Eco 3
Hydro 400
Hydro 700
Hydro 750
Duo 2
Duo 3
Duo 400
Duo 750
www.classeq.co.uk
Service
℡
0844 2245 245
service@classeq.co.uk
Spares
℡
0844 2245 252
spares@classeq.co.uk
Sales
℡
0844 2245 249
sales@classeq.co.uk
Installation and Operation instructions
Installation and Operation instructions
For under counter range of commercial glass & dishwashers.
Section Title Page(s)
1
Safety instructions
1
2
Your Classeq appliance
2
3
Installation
2 - 5
4
Commissioning
6 - 7
5
Operation
8 - 10
6
Cleaning
11 - 12
8
Decommissioning
15
7
Trouble shooting
12 - 14
TO HELP WHEN CONTACTING PLESE QUOTE THIS
SERIAL NUMBER
Useful Contact Details
www.classeq.co.uk
Service
℡
0844 2245 245
service@classeq.co.uk
Spares
℡
0844 2245 252
spares@classeq.co.uk
Sales
℡
0844 2245 249
sales@classeq.co.uk

CAREFULLY READ THESE INSTRUCTIONS, BEFORE INSTALLING
AND OPERATING THIS APPLIANCE
INCORRECT INSTALLATION, ADAPTATIONS OR ALTERATIONS
COULD RESULT IN INJURY OR DAMAGE TO PROPERTY
MALICIOUS DAMAGE, DAMAGE DUE TO NEGLIGENCE, OR FAILURE
TO COMPLY WITH THESE INSTRUCTIONS AND LOCAL LEGISALTION,
OR UNAUTHORISED TAMPERING WILL INVALIDATE ANY WARRANTY
AND RELIEVE THE MANUFACTURER OF ALL LIABILITY
THE DOOR OF ANY APPLIANCE MUST NEVER BE USED TO STAND
ON
DAMAGE TO THE MACHINE CAUSED DUE TO LIMESCALE WILL NOT
BE COVERED BY THE MANUFACTURES WARRANTY
EACH DAY ALLOW MACHINE TO HEAT BEFORE FIRST WASH CYCLE
CHILDREN SHOULD BE SUPERVISED TO ENSURE THAT THEY DO
NOT PLAY WITH, OR OPERATE THE APPLIANCE
1.0 Safety instructions
1.0 Safety instructions
1.1 Warning :
1.2 Installation :
Installation should only be carried out by a ‘Classeq’ approved technician,
and in accordance with current regulations and within our instructions.
1.3 Modification :
‘Classeq’ reserves the right to modify either the appliance or the contents of
these instructions without notice.
1.4 Operation :
The appliance should only be used by a trained operator as instructed in
section 5 of this manual.
1.5 Failure / malfunction :
In the event of a failure / malfunction, the mains electrical and water supplies
MUST be isolated at the wall and not just at the machine.
1.6 Repairs and spare parts :
The appliance must only be repaired by a ‘Classeq’ approved technician,
using genuine ‘Classeq’ spare parts.
Page 1
Please contact :
Service
℡
0844 2245 245
service@classeq.co.uk
Spares
℡
0844 2245 252
spares@classeq.co.uk
2.0 Your Classeq appliance
2.0 Your Classeq appliance
2.1 Unpacking :
Use suitable means and protective equipment to avoid injury whilst unpacking
and handling the appliance. Remove all outer packaging and the protective
film from the outer panels of the appliance prior to installation.
Ensure all packing materials are disposed of in accordance with local and
national regulations.
2.2 Items included within appliance:
•
2 x Baskets
•
1 x Cutlery basket
(Dishwashers only)
•
1 x Water inlet hose
•
2 x Primary filters
•
2 x Secondary filters
(Only 1 on Gravity drain machines)
•
1 x Drain plug
(Gravity drain machines only)
•
2 x Bottle weights
(for Rinse Aid and Detergent tubes)
•
1 x Installation and Operation Instructions
(Must be left with the customer)
•
1 x Warranty card
(Must be left with the customer)
Page 2
F
E
D
C
B
A
3.0 Installation
3.0 Installation
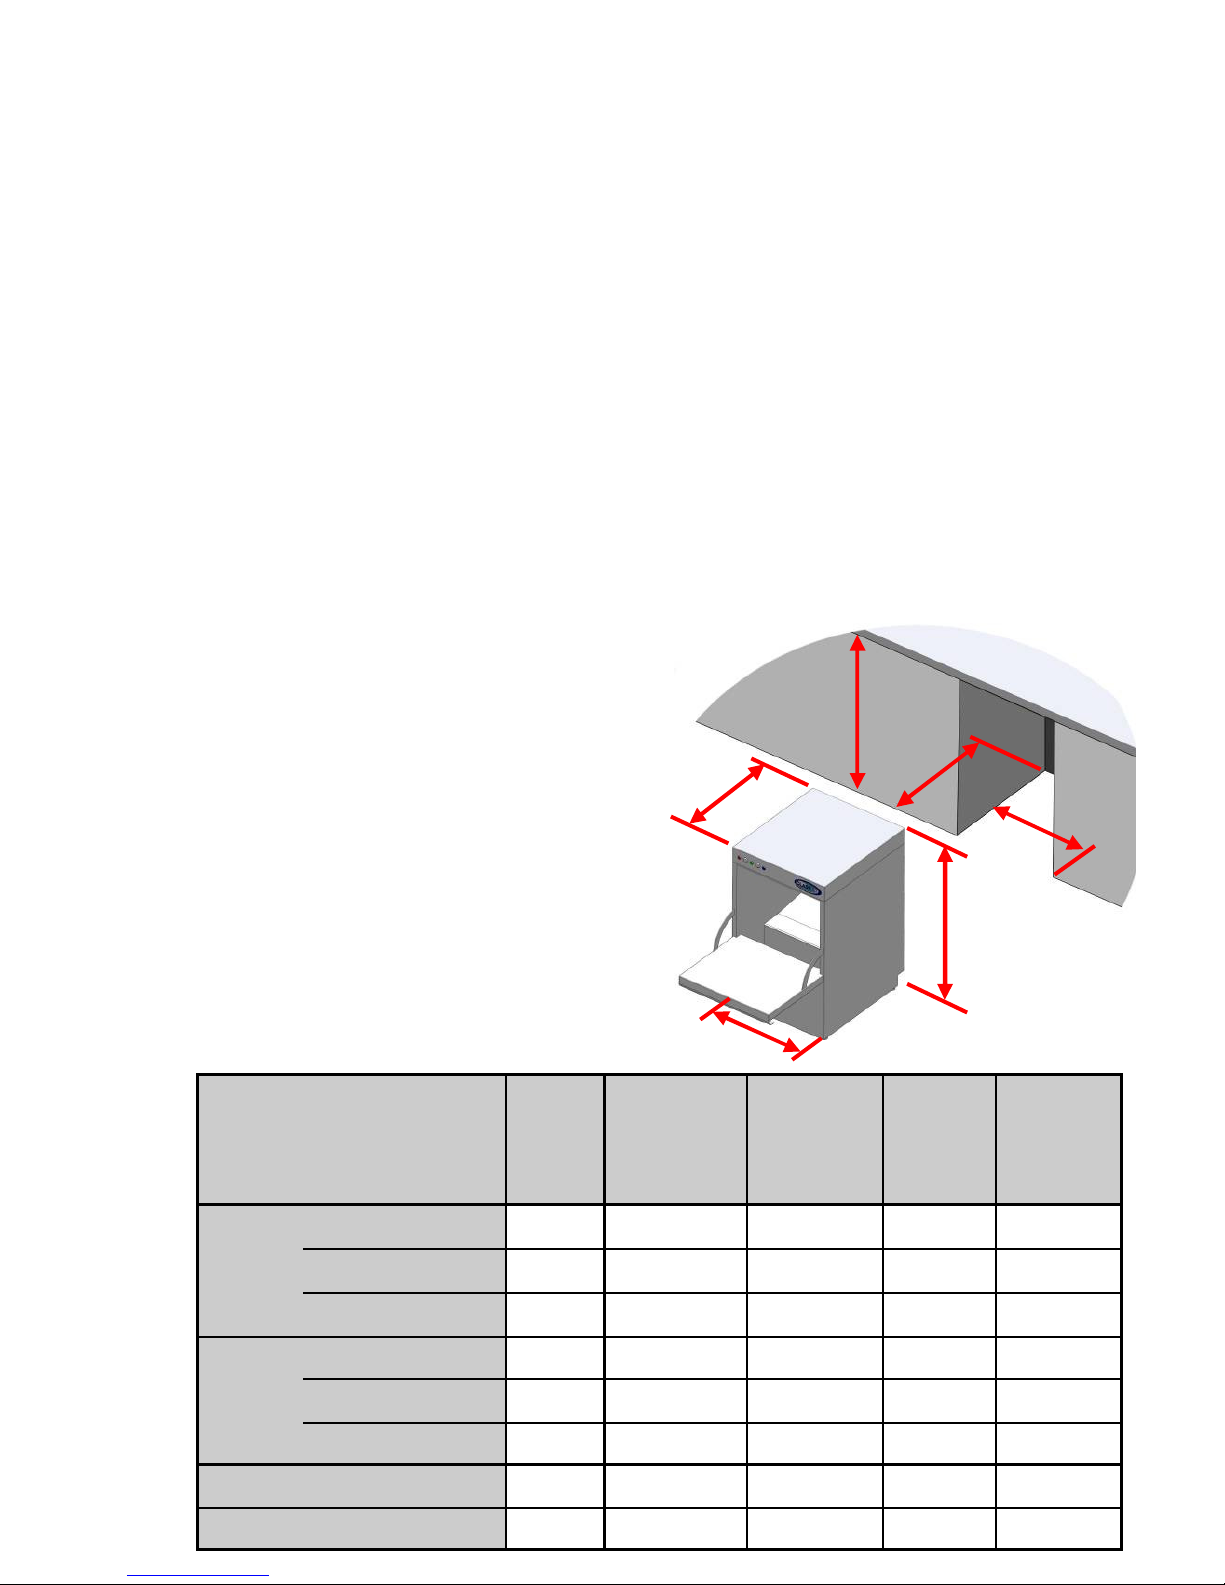
3.1 The site :
Ensure there is sufficient space for
installation, servicing and easy access
to all mains isolator switches / valves
(i.e. electricity and water). The surface
your appliance will be installed onto
MUST be adequately stable and
capable of supporting the appliance
during normal operation.
Once installed ensure the appliance is
stable, with its weight being distributed
equally and does not tilt more than 3°
in any direction.
Dimensions
(mm)
Eco 2 Eco 3 Duo 2 Duo 3
Eco 1 & Hydro 700 & &
Hydro 400 Hydro 750 Duo 400 Duo 750
Machine ‘A’ = Width
410 450 550 470 570
‘B’ = Depth
510 535 625 535 625
‘C’ = Height (min)
640 740 825 750 835
‘D’ = Width (min)
413 453 553 473 573
‘E’ = Depth (min)
530 555 645 545 645
‘F’ = Height (min)
660 760 845 770 855
Machine fully loaded weight
45 kg 61 kg 105 kg 64 kg 110kg
Recess
Operating noise levels <70db <70db <70db <70db <70db
3.3 Electrical connection :
All electrical connections MUST be carried out by an authorised
technician and in accordance with local and national wiring regulations.
As a minimum ‘Classeq’ recommends that the following standards are
maintained :
•
All appliances are connected via a residual current device (R.C.D.)
or earth leakage protection device.
•
EN 60204
Supply isolator switch must have all pole separation of more than 3mm.
•
EN 60335
The appliance must be connected to a equi-potential conductor , the
connection stud is located at the rear of the appliance (a suitable ring
terminal shall be required), this is in addition to the earthed electrical supply.
Prior to connecting the appliance, ensure that the voltage and the supply
fuse complies with the rating plate on the appliance.
If the supply cable is damaged, it must be replaced by a cable or cord
assembly supplied by Classeq, or its service agents, or to the following
minimum specification.
Page 3
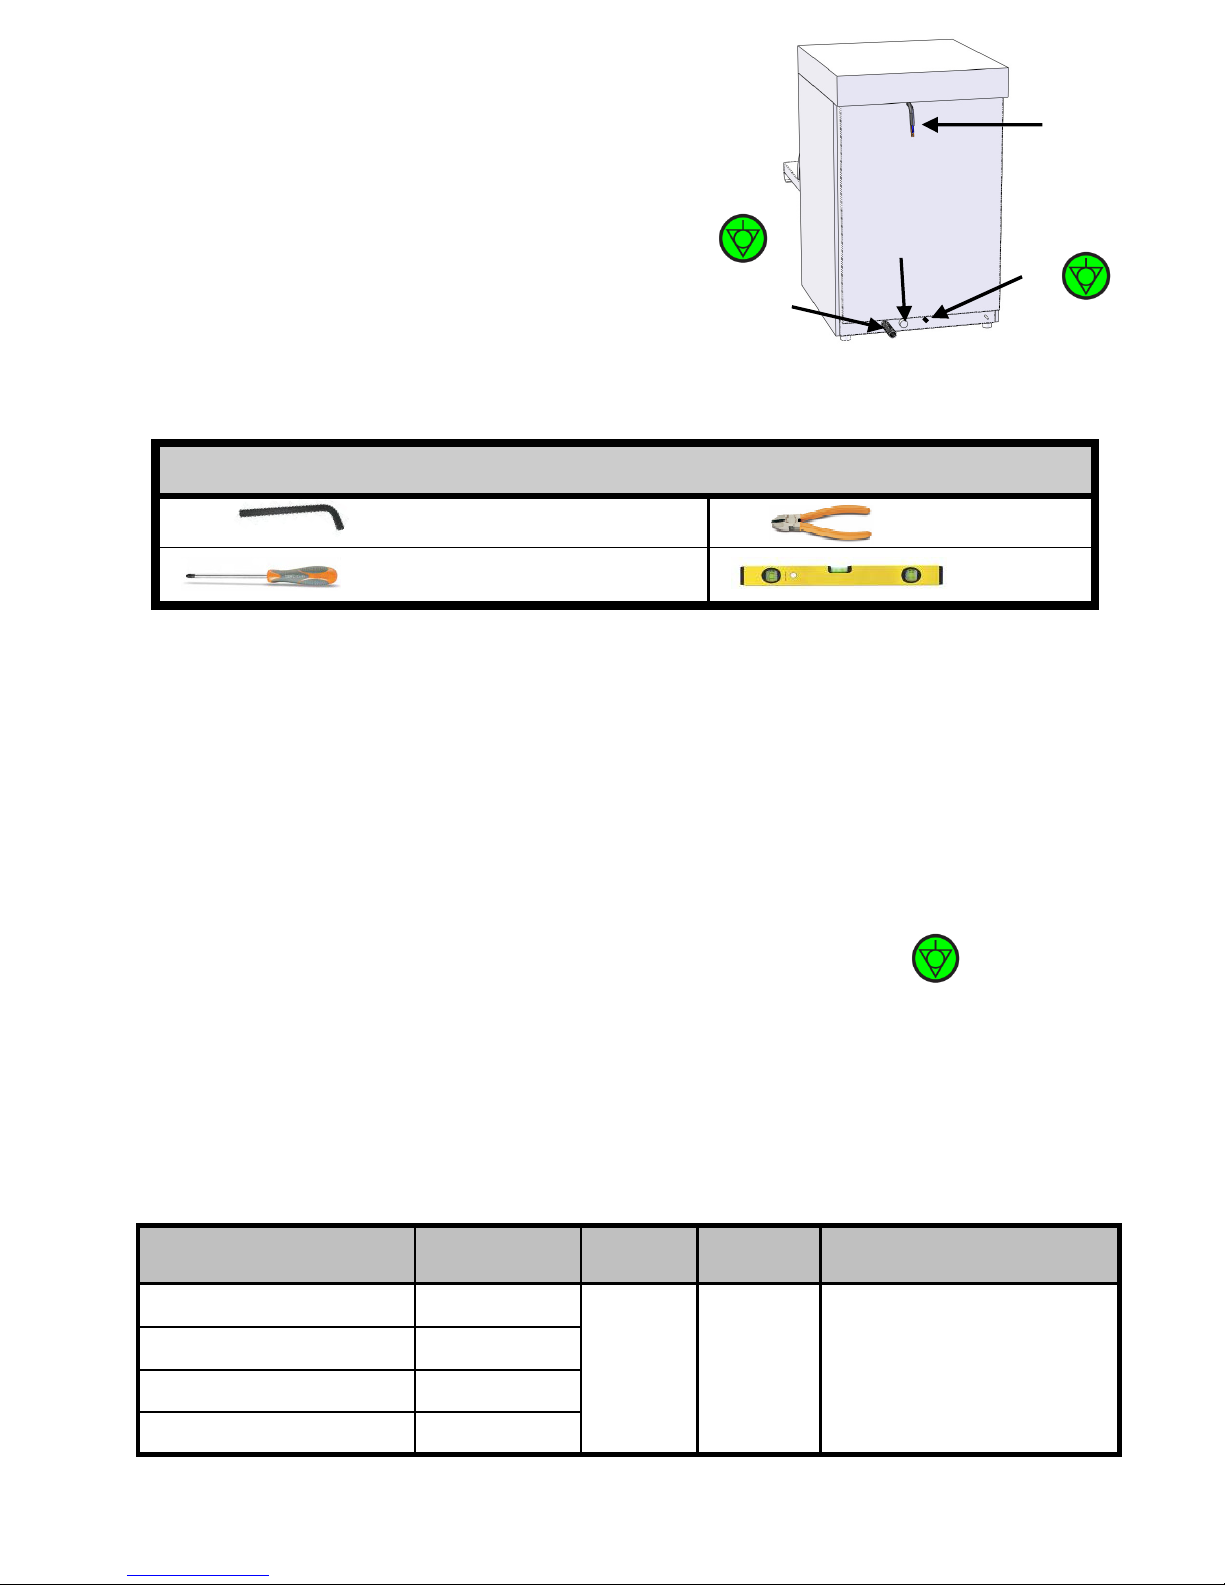
4.0mm - Allen key Wire cutters
Electric screw driver (small) Spirit level
Recommended hand tools
3.2 Connections :
All mains connections are made at the rear of
the appliance
G
= Mains electrical supply lead
H
= Earth bonding / Equi-potential stud
J
= Water supply connector (G 3/4”)
K
= Drain / waste water hose
To aid both installation and connection of the appliance, ‘Classeq’
recommends the following hand tools are used.
For electrical rating of appliance refer to rating plate located on appliance
or in this manual.
Machine rating Cable type Temp.
rating
Length
of cable
Conform to
220-240V / 1N~ / 13A PVC 3G 1.5
80°C
minimum
2.75m
IEC 60335-2-58
&
IEC 60227 types 56 & 57
220-240V / 1N~ / 20A PVC 3G 4.0
220-240V / 1N~ / 32A PVC 3G 4.0
380-415V / 3N~ / 13A PVC 5G 2.5
G
H
J
K
3.4 Water connection :
The appliance comes with a water supply hose requiring a G¾” (¾” BSP) male
threaded connection at the mains water supply, upon installation and
commissioning all water joints must be checked for leaks.
New hoses supplied are to be used. Old existing, defective or damaged water
supply hoses are NOT to be used when installing the appliance.
Commercial appliance wash results will be effected by external conditions such
as incoming water temperature, pressure, harness and choice of chemicals.
For the longevity of any water related devices and to ensure you get consistently
good results it is essential your machine is either fed from a soft water supply , or
your Classeq appliance is connected to an appropriate water softener.
IMPORTANT - All supplier warranties are void if lime scale is present within
an appliance.
Page 4
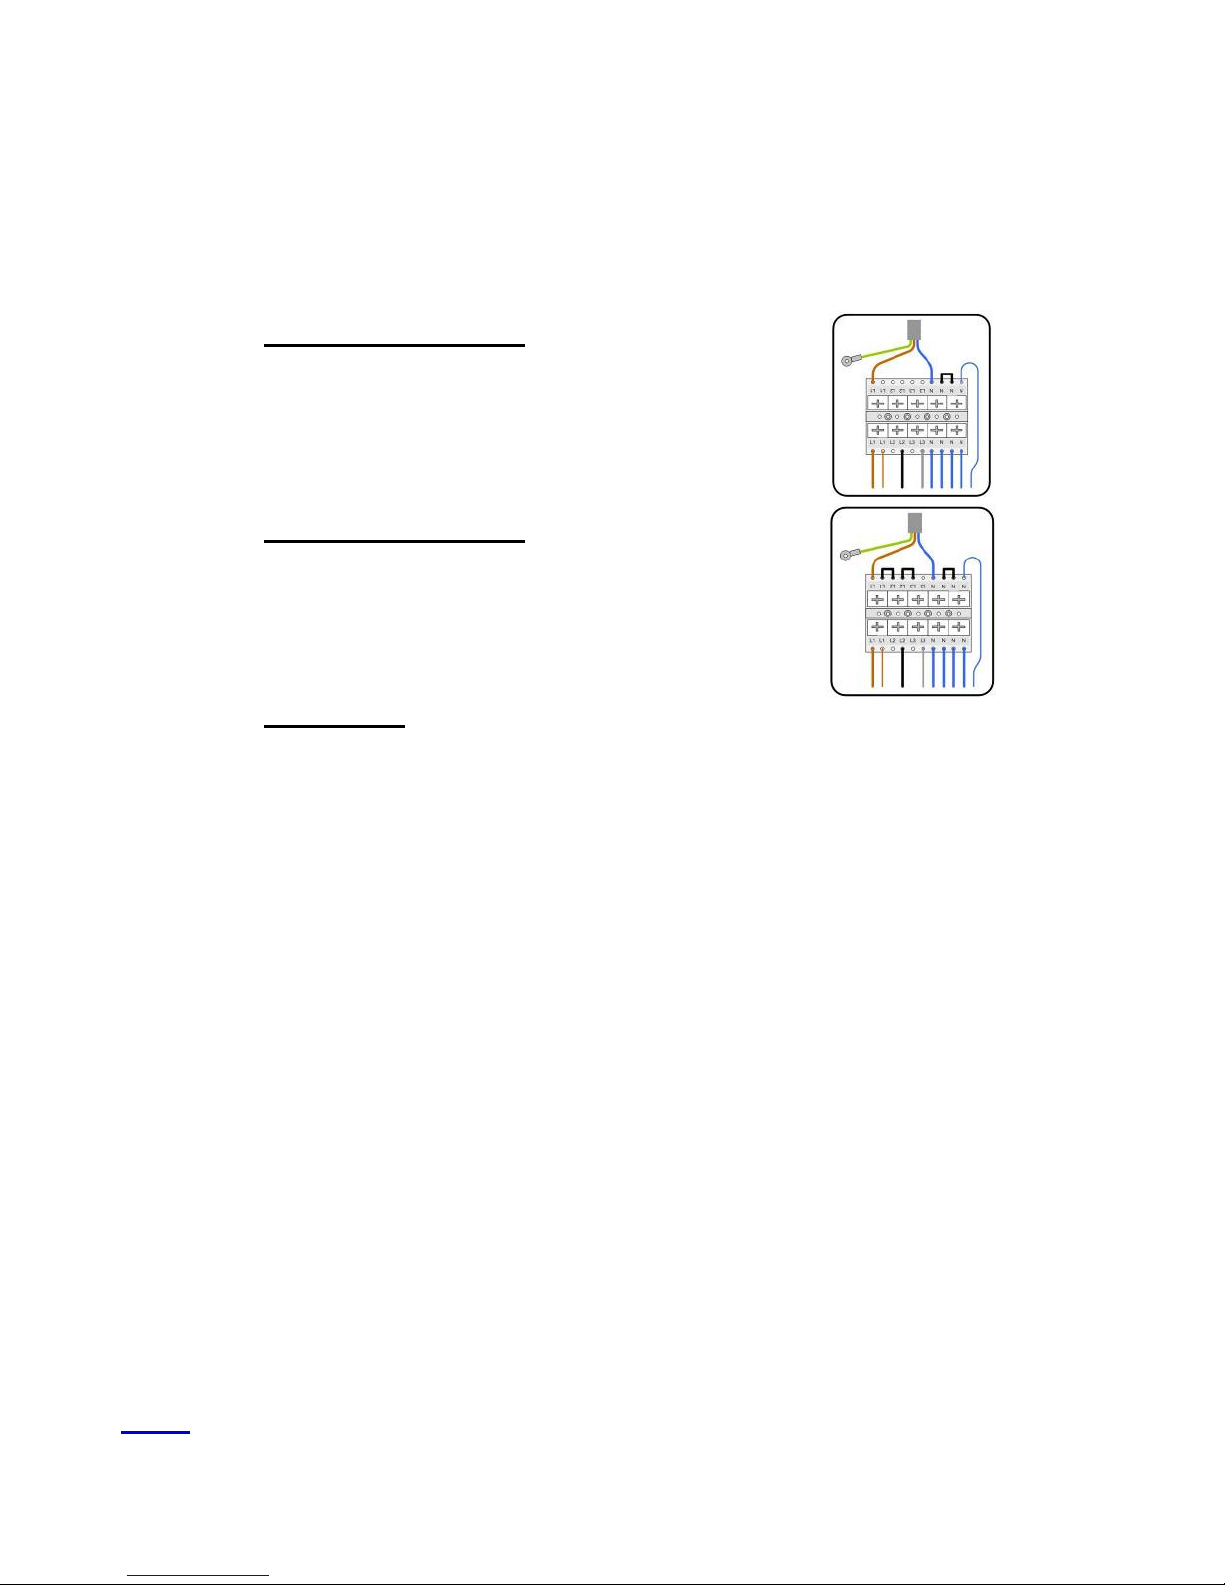
3.3.1 Electrical rating :
Within the ‘Classeq’ range several of the 500mm² basket appliances can
be either down rated or up rated electrically, such a procedure MUST be
carried out by a ‘Classeq’ approved technician.
The down / up rating of the machine is carried out by configuring the
terminal block within the appliance to the following
13 Amp – Single phase
• Links removed between L1, L2 and L3
• Ensure link remains between neutrals (N)
30 Amp – Single phase
• Ensure all link remains between lives
terminals (L1, L2 and L3)
• Ensure link remains between neutrals (N)
Three phase
Only Eco3 and H750 appliances can be converted to three phase, this is performed
by removing electrical links at the terminal between L1 L2 & L3, then installing a new
5 core supply cable, i.e. L1, L2, L3, N and Earth (PE).
FOR ADVISE on water softeners and appropriate chemicals, please contact :
Sales
℡
0844 2245 249
sales@classeq.co.uk
 Loading...