

Clas Ohlsonlson HJ-004, 18-4600, 44-1087 User Manual
Slush Machine
Slushmaskin
Slush-kone
Slush-Maschine
EnglishSvenskaNorskSuomiDeutsch
Art.no Model
18-4600 HJ-004
44-1087 HJ-004
Ver. 20141015

2

Slush Machine
Art.no 18-4600 Model HJ-004
44-1087 HJ-004
Please read theentire instruction manual before using theproduct and then save it for future
reference. We reserve theright for any errors in text or images and any necessary changes
made to technical data. In theevent of technical problems or other queries, please contact our
Customer Services (see address details on theback).
Safety
• Incorrect handling of this machine could result in personal injury.
• Always disconnect themachine from themains when it is not in use, during assembly/disassembly
or cleaning.
• Theslush maker may be used by children aged 8 or over provided they have been instructed
in thesafe use of themachine and that they fully understand thehazards or risks involved.
• Cleaning and maintenance may be carried out by children aged 8 or over, but only under
adult supervision. Ensure that themachine and its mains lead are kept out of thereach of
children under theage of 8.
• Switch themachine off and disconnect it from themains before changing accessories or
handling any of themoving parts.
• Themachine may be used by persons with reduced physical, sensory or mental capability,
lack of experience or knowledge which could jeopardise their safety, provided they have been
given proper supervision or instruction regarding thesafe use of theproduct and understand
any hazards involved.
• Never let children play with themachine.
• Ensure that themachine is used with thecorrect voltage. Refer to therating plate.
• To prevent electric shocks, themachine and its mains lead should be kept dry.
• Never lay themains lead over hot surfaces, sharp edges or corners.
• Always disconnect themachine from thepower supply by holding and pulling theplug.
Do not pull themains lead.
• Make sure that all parts are correctly assembled and that themachine is switched off before
connecting it to thepower supply.
• Never run themachine without any ingredients in theslush container.
• Never use themachine in close proximity to heat sources.
• Only use thesupplied parts and/or accessories.
• Only use themachine for what it was designed for.
• Themachine is intended for indoor use only.
• Never use sharp objects to pry inside themachine.
• Keep hands, hair, clothing and other loose objects away from themachine during use,
as these can become caught and cause injury.
• Themains lead should be checked regularly. Never use theproduct if its mains lead or plug
is damaged.
• Themains lead must be changed if damaged. This is to prevent therisk of electric shock
or fire and should only be carried out by themanufacturer, authorised service facility or
aqualified tradesman.
English
3
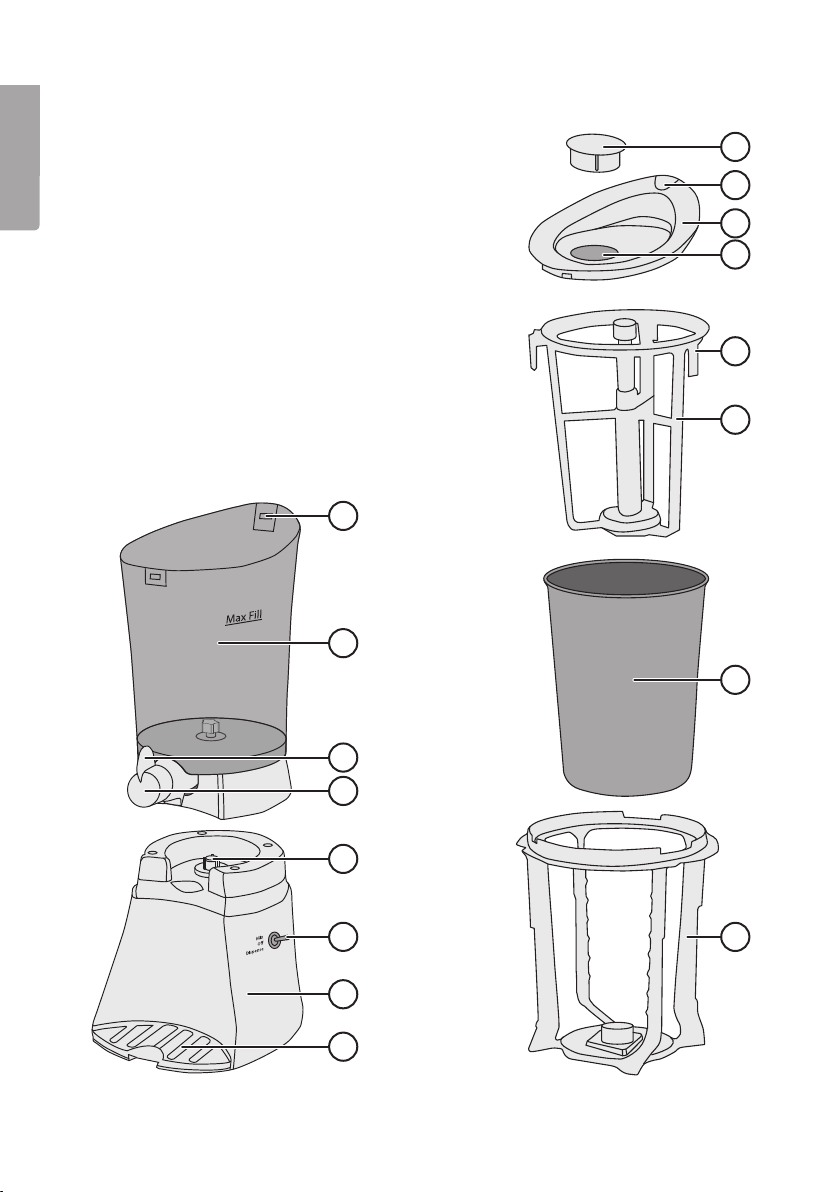
Product description
English
1. Lock notch
2. Slush container
3. Handle
4. Tap
5. Drive stud
6. Mix/off/dispense toggle switch
7. Motor unit
8. Drip tray
9. Lid with measure (Note: used when you add salt
and water)
10. Lid release catch
11. Lid
12. Ice/salt inlet
13. Ice paddle locking latches
14. Ice paddle assembly
15. Ice canister
16. Slush paddle assembly
1
2
9
10
11
12
13
14
15
3
4
5
6
16
7
8
4

Before initial use
Hand wash theslush container and all other removable parts before using.
You need
• About 40–50 regular sized ice cubes. Use more if necessary.
• About 4 measures (9) of coarse salt, which equals about 5 tbsp.
• Up to 1 l of any cold sugar based soda or squash (not diet products or concentrate).
Note:For optimal performance, the soft drink must be cold before usage.
• About 4 measures (9) of lukewarm water, which equals about 5 tbsp.
Note: If non-carbonated soda is used (e. g. squash, which has a higher freezing point) you need
8 measures (9) of lukewarm water and only 2 measures of salt.
Getting started/assembly
1. Place theslush container onto
themotor unit. Ensure that
thecontainer sits securely onto
thedrive stud with thetap centred
over thedrip tray.
2. First insert theice canister into
theslush paddle assembly and
then insert theice paddles into
theice canister.
3. Make sure theice paddle assembly
locking latches snap securely onto
theslush paddle assembly. Check
that the3 locking latches are
securely locked into place.
4. Place theentire assembly into
theslush container. Make sure
that all theassemblies sit securely.
5. Once everything is assembled,
attach thelid and make sure that
it locks securely into place onto
theslush container.
English
5
English
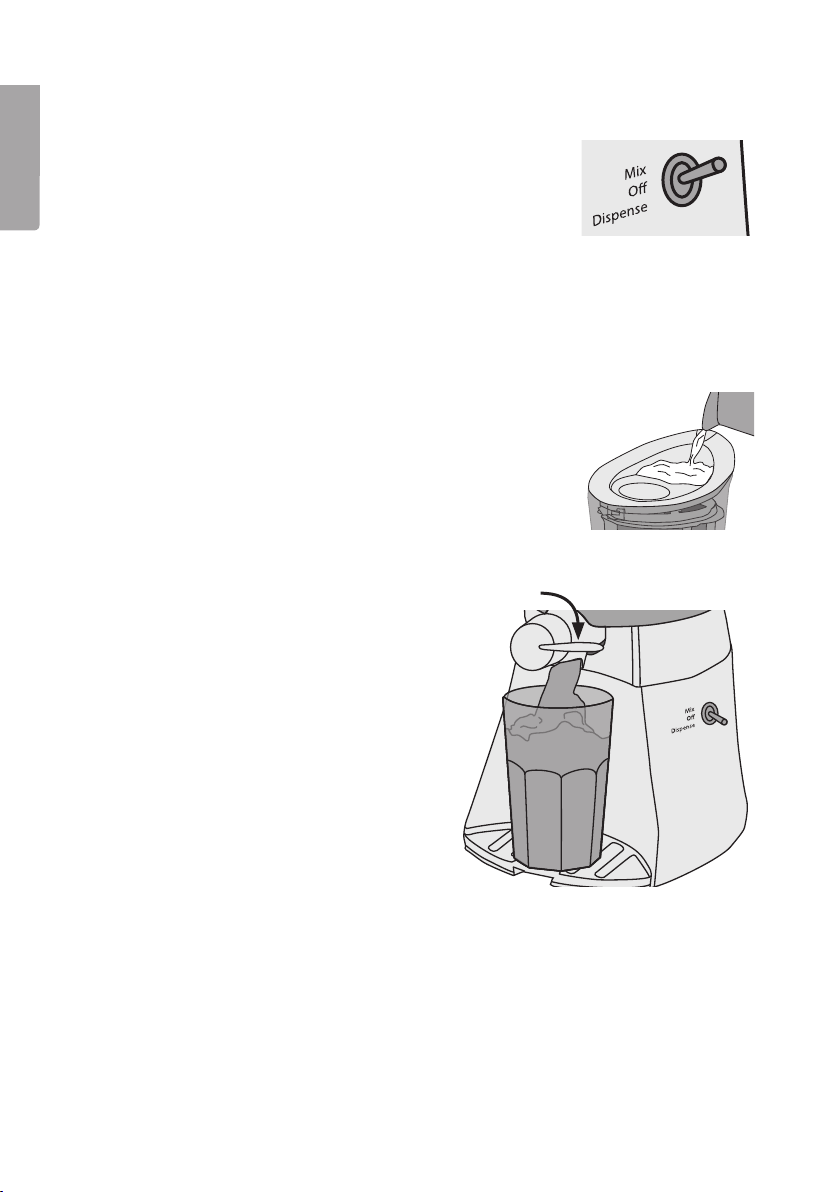
Operating instructions
1. Make sure that the tap is closed.
2. Start the machine by setting the switch (6) to Mix.
3. Pour 4 measures (9) of lukewarm water into the ice container
through the opening in the lid.
4. Half fill the ice container with ice cubes through the opening in
the lid (about 15 big ice cubes from an ice bag).
5. Carefully add 1.5 measures (9) of coarse salt. Do not spill any
salt outside of the opening. If too noisy, pour the salt even slower.
6. Add more ice cubes into the ice container (about 15) untill
about 2.5 cm below the edge.
7. Carefully add another 1.5 measures (9) of coarse salt. If too
noisy, pour the salt even slower.
8. Put the measure into the opening.
9. Carefully pour the cold drink into the opening at the back of
the lid. Max 1 l. Do not fill above the maximum mark.
10. Let the machine run for about 20 min. The time depends on
how cold the drink was from the start, the surrounding temperature, the amount of sugar in the soft drink and the amount of
soft drink.
11. If needed, add more ice and salt into the ice container, whilst
the machine is operated.
Dispensing
1. Flip thetoggle switch to theDispense
position.
2. Place aglass onto thedrip tray and turn thetap
clockwise.
3. Theslush will now begin to dispense from
thetap. Turn thetap anti-clockwise to turn it
off once theglass is full.
4. Flip thetoggle switch to either Off if you are
finished or Mix if there is still any mixture left
to drink.
6

Tips
• Do not use the slush machine with sugar free ingredients, such as water, tea or diet sodas.
Thismay damage the machine since those liquids freeze too fast.
• Fizzy drinks are also possible ingredients to use for making slushies (not diet sodas).
• If you wish to hurry the process, you may put the soft drink, that will be made into a slush,
intothe freezer 5 min before use.
• If you wish to make alcoholic slushes, add it at the end of the freezing process, as alcohol
inhibits freezing.
• Soft drinks with a high sugar content will freeze faster than those with a low sugar content.
• Always start with well cooled liquid ingredients. Never use whipping cream or pre-frozen liquids.
• Never run the machine longer than necessary. If the mixture has not reached the desired
consistency after 40 min, turn off the machine and do not continue.
English
Reasons for
unsuccessful
freezing.
Themachine makes
strange noises.
The lid does not
stay on.
• Theice canister is not sufficiently cold. More ice and salt is needed.
• Thebeverage is too warm.
• Alcohol has been added prematurely.
• Thebeverage has aninsufficient sugar content.
• Thebeverage has frozen too quickly. Add more water to theice
container.
• Make sure that thelock latches are securely in place.
• The ice container is too cold. Add more lukewarm water.
Care and maintenance
• Make sure that themachine is turned off and unplugged before cleaning.
• Never use solvents or abrasive cleaning agents.
• Do not use adishwasher to clean any of theparts.
• Never immerse themotor unit into any type of liquid.
• Rinse out any salt and ice residue from theice canister as soon as possible. Thesalt and
water mixture is corrosive and can severely damage theice canister if not quickly removed.
• Carefully unlatch theice paddle latches for proper disassembly.
Disposal
This product should be disposed of in accordance with local regulations.
If you are unsure how to proceed, contact your local council.
Specifications
Supply voltage 220–240 V, 50 Hz
Wattage 25 W
Capacity Max 1 litre
7

Slushmaskin
Art.nr 18-4600 Modell HJ-004
44-1087 HJ-004
Läs igenom hela bruksanvisningen före användning och spara den sedan för framtida bruk.
Vi reserverar oss för ev. text- och bildfel samt ändringar av tekniska data.
Vid tekniska problem eller andra frågor, kontakta vår kundtjänst (se adressuppgifter på baksidan).
Säkerhet
• Felaktig användning av maskinen kan medföra personskada.
Svenska
• Koppla alltid bort maskinen från elnätet när den inte används, när du monterar ihop/isär
• Maskinen får användas av barn från 8 år om de har fått instruktioner om hur den på ett säkert
• Rengöring och skötsel får utföras av barn från 8 år i vuxens närvaro. Se till att maskinen och
• Slå av maskinen och koppla bort den från elnätet innan du byter tillbehör eller handskas med
• Maskinen får användas av personer med någon form av funktionsnedsättning, brist på
• Låt aldrig barn leka med maskinen.
• Kontrollera att rätt nätspänning används. Se maskinens märkskylt.
• För att undvika elektrisk stöt, skydda maskinen och dess nätsladd från fukt och väta.
• Placera aldrig nätsladden över heta ytor, skarpa kanter eller hörn.
• Koppla aldrig bort maskinen från elnätet genom att dra i nätsladden, dra alltid
• Se till att maskinens delar är korrekt monterade och att maskinen är avstängd
• Använd aldrig maskinen utan innehåll i behållaren.
• Använd aldrig maskinen i närheten av värmekällor.
• Använd endast medföljande tillbehör.
• Använd endast maskinen till det den är avsedd för.
• Maskinen är endast avsedd för inomhusbruk.
• Använd aldrig vassa objekt inuti maskinen.
• Håll undan händer, hår, kläder och annat som kan fastna i maskinen under användning.
• Nätsladden bör regelbundet kontrolleras. Använd aldrig maskinen om nätsladden eller
• Om nätsladden skadats får den, för att risk för elektrisk stöt eller brand ska undvikas, endast
delarna och när den ska rengöras.
sätt ska användas och förstår faror och risker som kan uppkomma.
dess nätsladd är utom räckhåll för barn under 8 år.
de rörliga delarna.
erfarenhet eller kunskap som skulle kunna äventyra säkerheten, om de har fått instruktioner
om hur den på ett säkert sätt ska användas och förstår faror och risker som kan uppkomma.
i stickproppen.
före anslutning till elnätet.
stickproppen är skadade.
bytas av tillverkaren, dess serviceställe eller av en kvalificerad yrkesman.
8
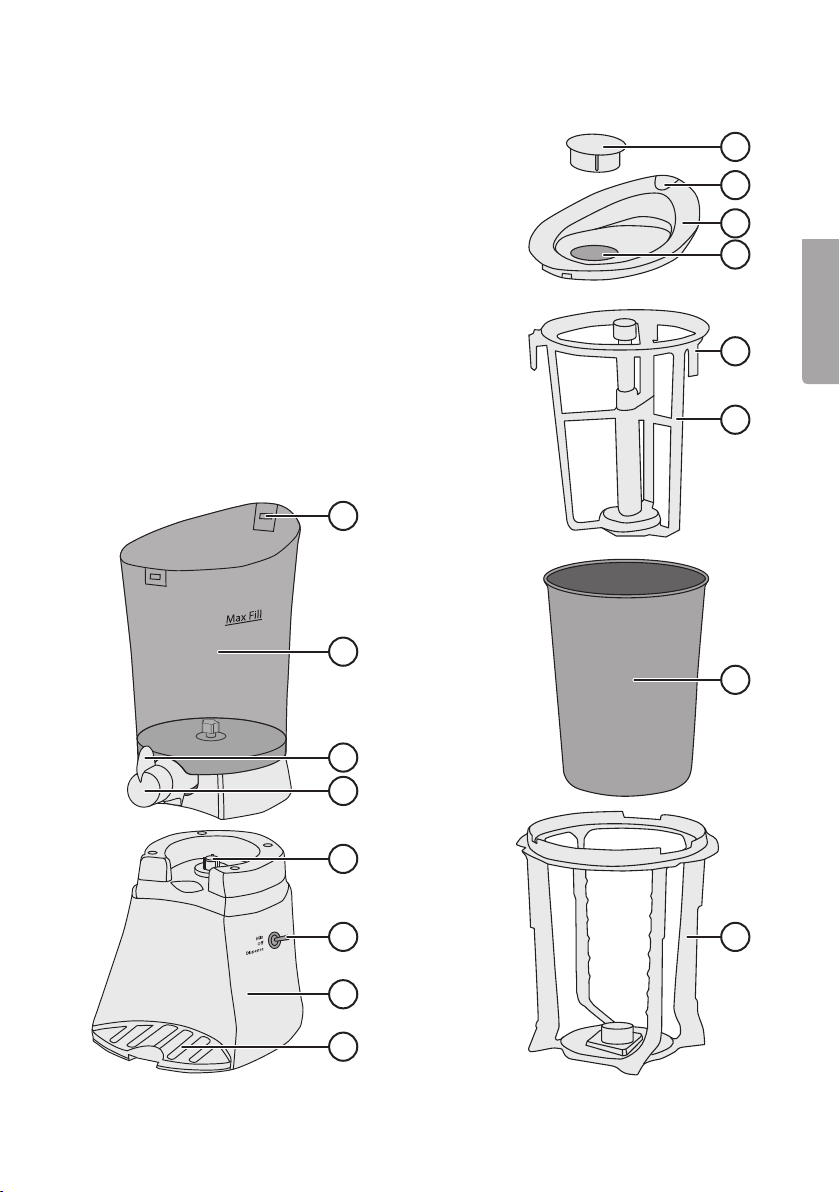
Produktbeskrivning
1. Låsfäste
2. Behållare
3. Handtag
4. Kran
5. Blandare
6. Knapp för blandning/avstängning/upphällning
7. Motordel
8. Bricka
9. Lock med mått (Obs! Används när du tillsätter salt
och vatten)
10. Lås för lock
11. Lock
12. Intag för is och salt
13. Låsring för behållare
14. Insats för is
15. Isbehållare
16. Insats för slush
1
2
10
11
12
13
14
15
9
Svenska
3
4
5
6
16
7
8
9
 Loading...