

Page 1
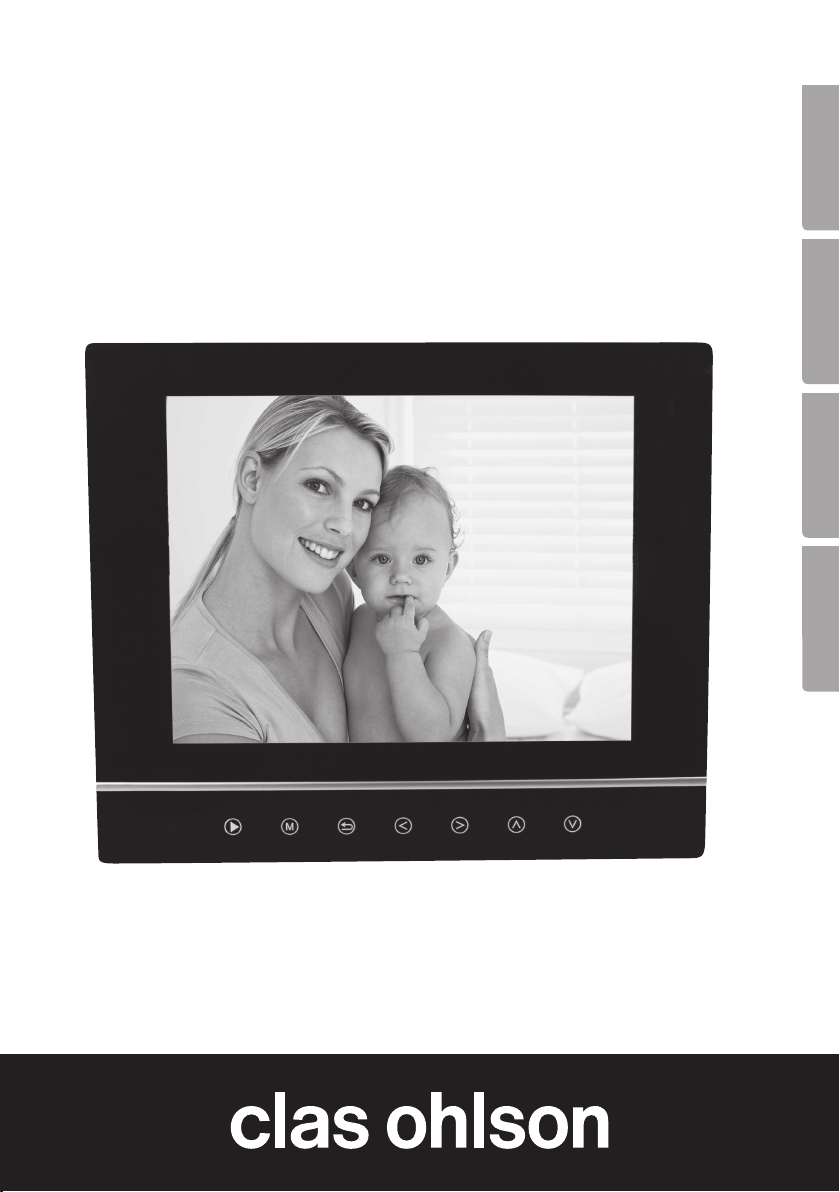
8” Digital Photo Frame
Digital Fotoram 8″
Digital fotoramme 8”
Digitaalinen valokuvakehys 8″
EnglishSvenskaNorskSuomi
Art.no Model
38-3728 PF-8DN-283V3RTC
Ver. 201002
Page 2

8″ Digital Photo Frame
Art. no 38-3728 Model PF-8DN-283V3RTC
English
Please read the entire instruction manual before using the product and save it
for future reference. We reserve the right for any errors in text or images and any
necessary changes made to technical data. If you have any questions regarding
technical problems please contact Customer Services.
Contents
1. Safety
2. Product description
3. Buttons and connections
4. Getting started
5. Use
6. Settings
7. Care and maintenance
8. Troubleshooting guide
9. Disposal
10. Specifications
2
Page 3

1. Safety
• Warning Do not open the casing! Certain components within the product’s casing
carry dangerous currents. Contact with these may give you an electric shock.
• The product should only be repaired by qualified service technicians.
• The product should not be taken apart or modified.
• Do not place the product where there is a risk of it falling into water or other liquid.
Do not place any objects containing liquid on the product, e.g. flower vases
or soft drinks.
• Do not cover the ventilation openings. Do not place the product close to heat
sources such as on top of the radiator or TV. Do not place it on the sofa, as there
is a risk that the ventilation openings will be blocked.
• Use only the included AC/DC mains adaptor. Always unplug the adaptor from the
electrical outlet if the product is not be used for an extended period.
• Do not place heavy of sharp objects onto the display screen. Do not stand on the
mains lead or pull it around any sharp corners or edges.
• The product is designed for 8 to 10 hours of continuous operation. Avoid using it
for a longer period than recommended. Allow the product to cool down for a while
before using it again.
• The product is intended for indoor use only.
• Do not expose the product to direct sunlight for prolonged periods.
• Do not use the product in damp, dusty, or dirty environments.
• Only use a lightly moistened soft cloth with a little washing up liquid to clean
the screen.
• Do not disconnect the mains adaptor while the frame is in use. The attached memory storage device may be damaged. Neither should the connected memory
storage device be removed when the frame is in use.
English
2. Product description
• Digital photo frame with 8″ colour screen, resolution: 800 x 600, aspect ratio: 4:3.
• Displays your digital photos without the need for a computer.
• USB memory and memory card slots (SD/MMC/MS).
• Slideshow with different transition effects and adjustable display intervals.
• The slideshow can play simultaneously with musical accompaniment.
• Supports MPEG-1, MPEG-2 and MPEG-4 formats.
• Supports MP3 and WMA.
• Repeat function for both music and video playback.
• Built-in speakers.
• Touch-control buttons with blue backlighting.
• Calendar
• Alarm (4 different times)
• Comes with remote control and mains adaptor.
• Adjustable automatic on/off function.
3
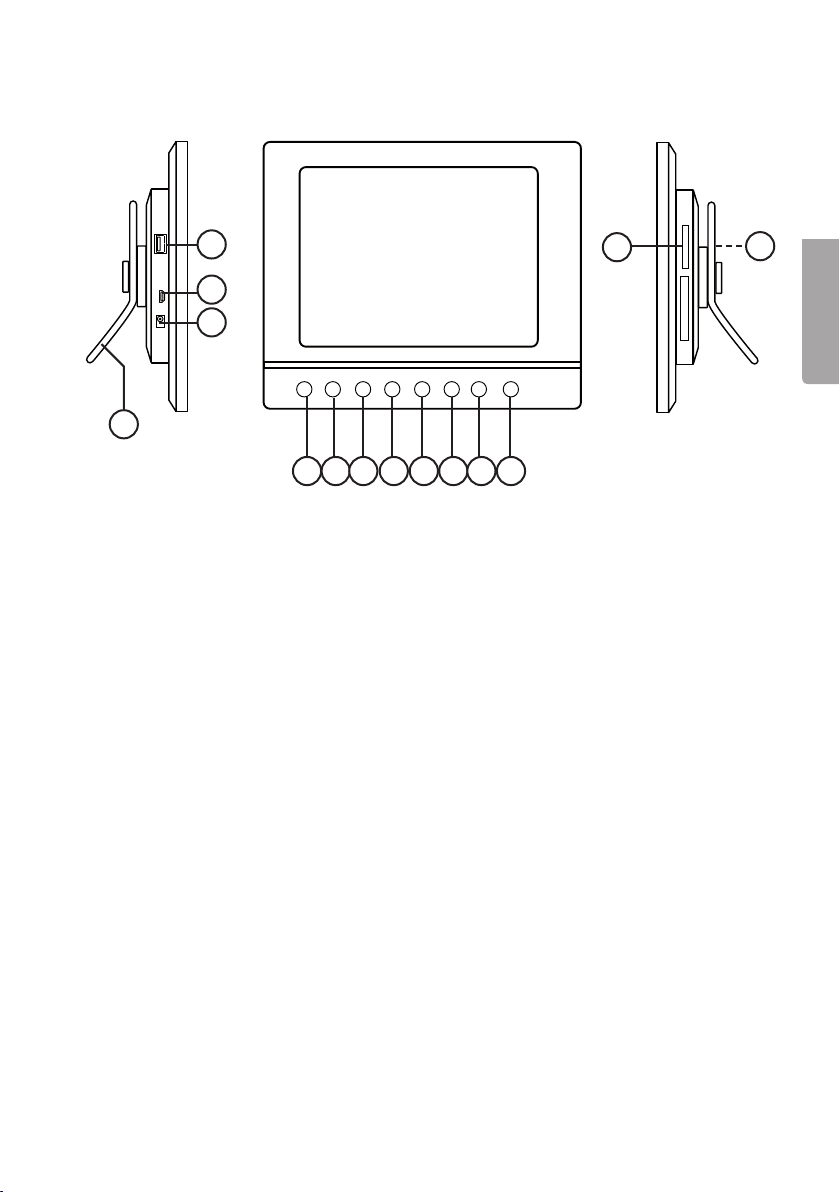
Page 4
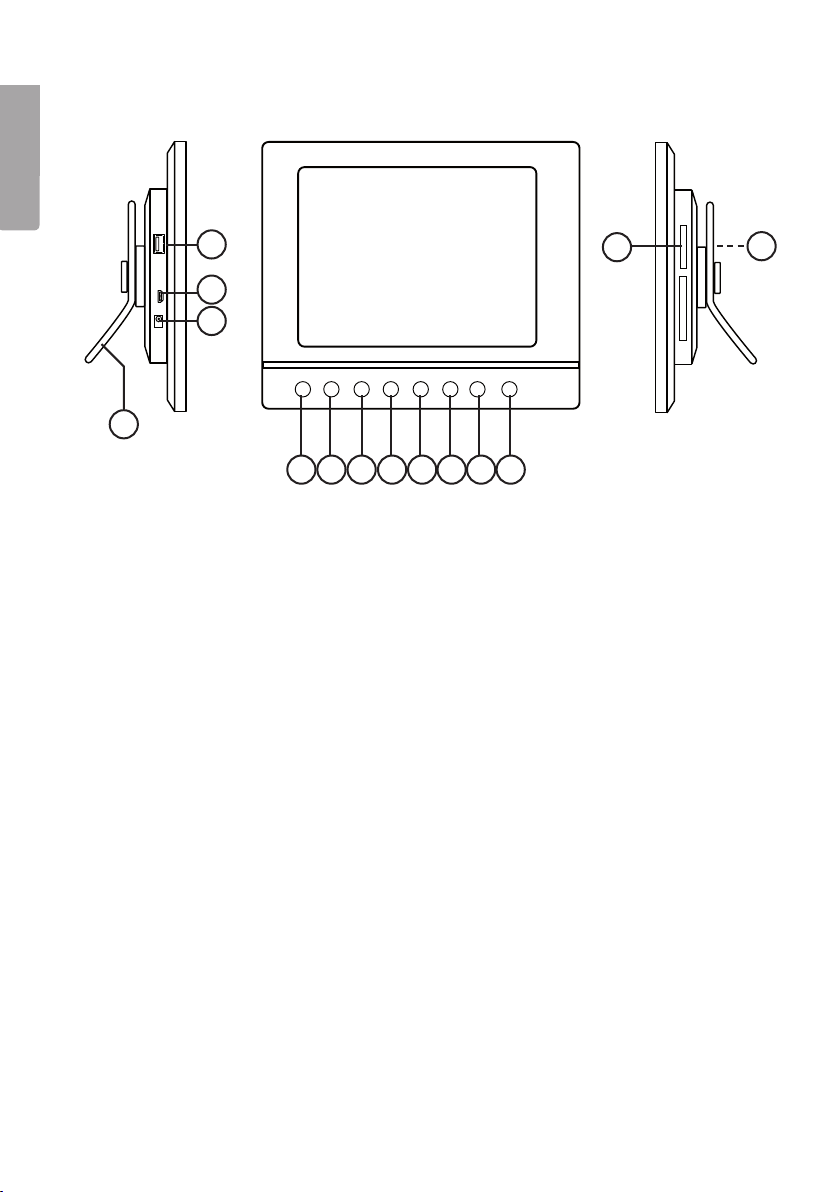
3. Buttons and connections
English
4
13
3
2
◄
M
►
U
V
<
V
>
1
5 6 7 8 9 10 11 12
1. Adjustable table stand
2. DC power input socket for the supplied mains adaptor (5 V DC, 2 A)
(positive centre)
3. Mini-USB port
4. USB port
5. IR sensor for remote control
6. [►] – Begin display/pause display/confirm selection
7. [M] – Open menu Push and hold to show the OSD menu when displaying
photos or video.
8. [O] – Exit main menu
9. [<] Left in menu
10. [>] Right in menu
11. [^] Up in menu
v
] Down in menu
12. [
13. SD/MMC/MS – Memory card slot
14. Power switch – Turn photo frame on/off (hidden by picture)
14
4
Page 5
Remote control
◄
◄
◄
I
▲
15
16
17
18
◄
MENU
19
20
◄◄
21
22
23
15. [ ] – Turn the photo frame on/off
16. [▲] – Scroll up in the menus/Previous photo/track/video
17. [◄] – Scroll left in the menus Rotate the image 90 degrees anticlockwise
18. [MENU] – Push to open the main menu. Push and hold to show the OSD menu
when displaying photos or video.
19. [▼] – Scroll down the menus/Next photo/track/video
20. [◄◄] – Fast rewind (music/video)
] – Push to zoom in on the image
21. [
22. [4:3/16:9] – Change aspect ratio, 4:3 or 16:9
23. [VOL+] – Increase volume
24. [SETUP] – Enter/exit the settings menu
25. [OK] – Confirm/Start or Pause playback
26. [►] – Scroll right in the menus Next image (in display mode)
27. [OSD] – Enter/exit On Screen Display menu (appears at bottom of screen)
] – Return to the previous menu
28. [
29. [►►] – Fast forward (music/video)
] – Start slideshow with background music*
30. [
31. [♫] – Start/stop music playback for current slideshow
32. [VOL-] – Reduce volume
* Only if the connected memory contains music files.
VOL+
SETUP
OK
►
OSD
▼
◄
►►
4:3
16:9
I
–
VOL
♫
24
26
27
29
30
32
25
28
31
English
5
Page 6
English
OFF
ON
SD / MMC / MS
DC USB HOST
OFF
ON
SD / MMC / MS
DC USB HOST
OFF
ON
SD / MMC / MS
DC USB HOST
OFF
ON
SD / MMC / MS
DC
4. Getting started
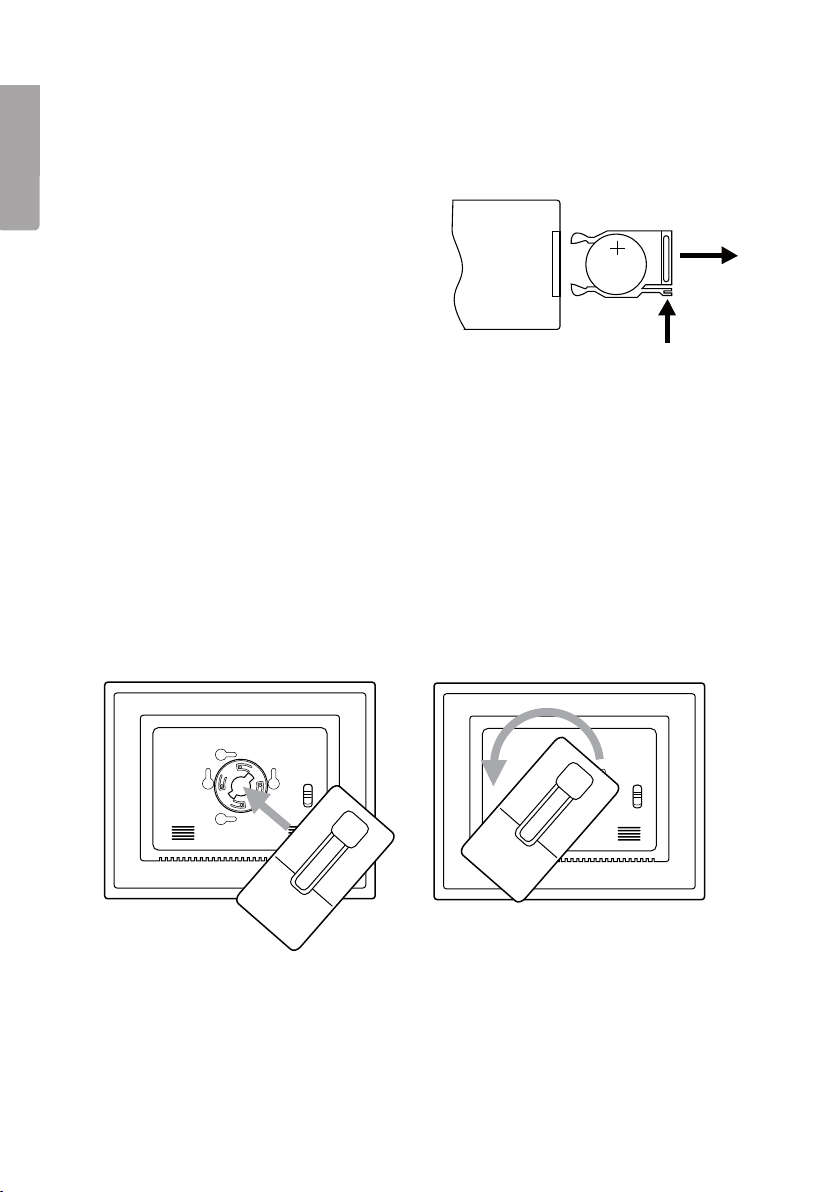
4.1 Inserting the battery into the remote control
The remote control operates on one CR2025 (3 V) battery.
• Insert the battery as shown in the
figures while referring to the polarity
marking (+) on the battery holder.
Remove any protective plastic film
from the battery before use.
• The battery normally lasts for up to
a year, but this is dependant on how
much the remote control is used.
• Change the battery when the remote does not work despite being held close to
the digital photo frame’s sensor.
4.2 Assembling the table stand
The photo frame can be hung on a wall or used with the supplied table stand (1).
There are holes on the back of the frame for wall mounting.
Attaching the table stand:
1. Carefully slot the lugs on the stand into the slots in the back of the frame.
Press gently whilst simultaneously rotating the stand 45˚.
2. Turn the table stand to the desired position. The table stand can be rotated 90˚
for positioning the frame in either portrait or landscape orientation.
CR2025
SD / MMC / MS
SD / MMC / MS
ON
OFF
DC USB HOST
ON
OFF
DC USB HOST
6
Page 7
OFF
ON
SD / MMC / MS
DC USB HOST
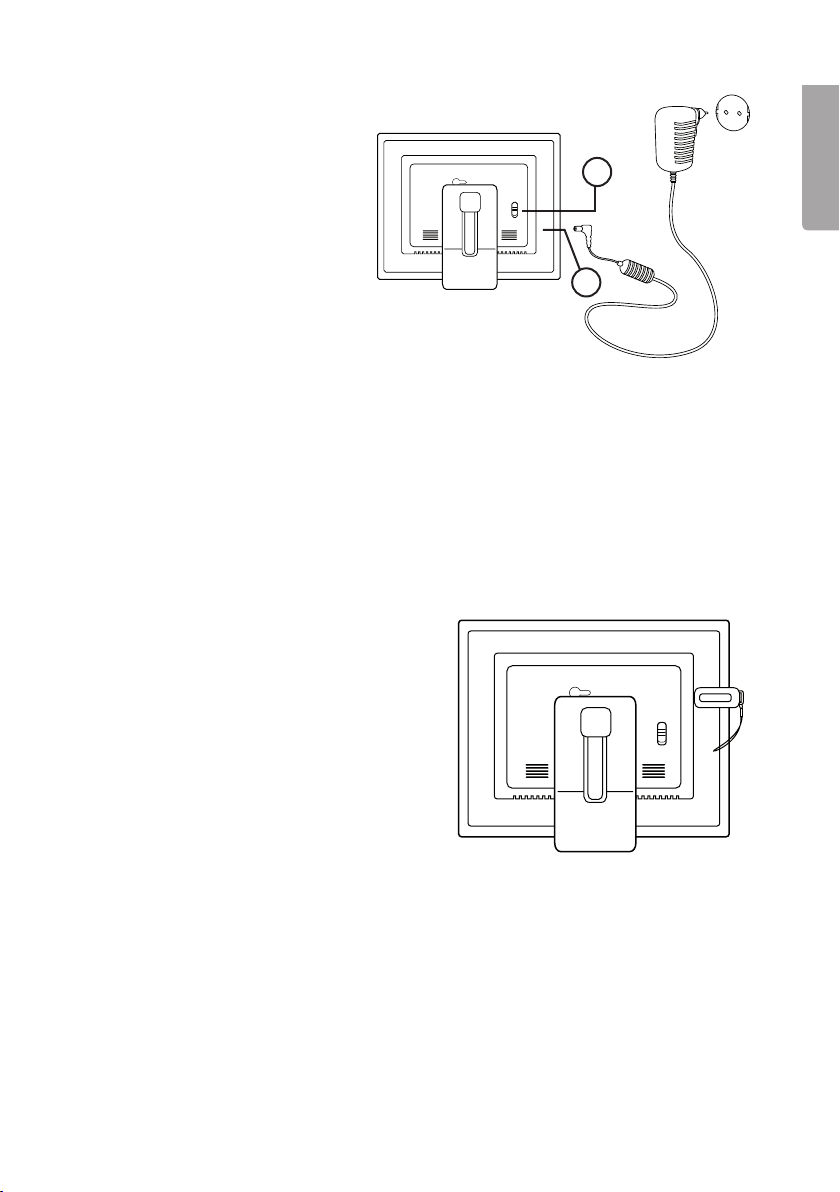
4.3 Connecting the mains adaptor
1. Plug the included adaptor
into a wall socket.
2. Then plug the adaptor’s DC
connector into the socket
on the photo frame marked
SD / MMC / MS
ON
OFF
“DC” (2).
3. Set the power switch on
the back of the photo frame
to the position ON to turn
on the device.
N.B.
• The [POWER] (15) button on the remote control is usually used to turn the photo
frame on or activate standby mode. To completely turn the frame off, the power
switch (14) on the back of the frame must be set to the OFF position.
• Always unplug the adaptor from the electrical outlet if the product is not be used
for an extended period.
4.4. Connecting a memory card or USB memory stick
N.B. Only use one memory card at a time (except when copying).
Memory card
The following memory cards are compatible:
• Secure Digital (SD)
SD / MMC / MS
• Multimedia Card (MMC)
• Memory Stick (MS)
If your digital camera uses any of the above
mentioned memory cards you can connect
the camera’s memory card directly to the
photo frame.
14
DC USB HOST
2
English
ON
OFF
DC
1. Insert the memory card into the appropriate slot – “SD/MMC/MS” (13). Do not use
any force while inserting the memory card.
2. Remove the card by pulling it straight out. N.B. Do not remove a memory card
whilst data transfer is in progress.
USB memory stick
The “USB HOST” slot (4) can be used for connecting USB devices such as
USB memory sticks or MP3 players.
7
Page 8

5. Use
5.1 Copying files from a computer
You can connect the photo frame to a computer in order to copy computer files onto
English
a memory device connected to the frame such as a memory card/USB memory.
N.B.
• Compatible with Windows 2000, XP and Vista.
• When the frame is connected to a computer (via a mini-USB lead) the “USB
HOST” slot (4) is not available for use.
• Do not disconnect the photo frame from the computer during file transfer.
1. Start both the computer and frame.
2. Make sure that the USB memory is connected to the frame before connecting
the frame to the computer.
3. Connect the mini-USB lead to the frame’s Mini-USB slot (3) and the other end
to the computer.
4. The computer will detect “New Hardware” and begin installing the software
automatically. Wait until the computer completes the installation.
5. In “My Computer” you will notice several icons marked “Removable Disk”.
6. “Drag and drop” the files on the computer to the frame’s memory device.
7. When it is time to disconnect the frame from the computer, first double click on the
Safely Remove Hardware icon. Then highlight USB Mass Storage Device and
click on Stop. Finish by clicking OK. Now you can safely remove the USB device
from the computer.
5.2 Viewing photos
1. When a memory device is inserted into the photo frame, the corresponding icon
appears on the main menu.
v
2. Navigate the main menu using [▲] (16) and [▼] (19) or [^] (11) and [
3. Return to the previous menu using [O] (8).
] (12).
5.3 Main menu
1. Press [MENU] (18) or [M] (7) to display the main menu.
SD/
MMC/MS
USB
Clock
Calendar
Setup
Appears when you insert
a memory card.
Appears when you insert
a USB memory stick.
Displays the time and
alarm setting The clock
is set using “Setup”.
Displays the calendar
and alarm setting.
Settings mode.
8
Page 9

2. Navigate the menus using [▲] (16) and [▼] (19) or [^] (11) and [v] (12).
Photo Start a slideshow or view
images from the memory source manually.
Music Start playing MP3
music.
Video Start playing video
Files Browse all files on me-
mory card/USB memory,
copy or delete files
3. In “Photo mode”, the photos on the selected memory source can be displayed as
thumbnails. Up to 15 photos can be displayed at a time.
a. Select a memory source from the
main menu, and press [►] (26),
the mode menu appears.
b. The photos in the memory are
displayed on the screen as
thumbnails.
c. Select the desired photo to view
using [◄] (17) [►] (26) [▲] (16) or
[▼] (19). Press [OK] (25) to start
a slideshow with the displayed
image or to start a slideshow
from the beginning with background music (if the memory
contains music files).
English
5.4 Viewing a single photo
1. Connect a USB memory or a memory card containing JPG/JPEG image files.
2. Select Photo and confirm by pressing [OK] (25).
3. In the main menu, highlight the memory card and press [OK] (25).
4. The photos in the memory are displayed in thumbnail view:
5. Select the desired photo to view using [◄] (17) [►] (26) [▲] (16) or [▼] (19. Press
[OK] (25) to start a slideshow with the displayed image or to start a slideshow from
the beginning with background music (if the memory contains music files).
9
Page 10

5.5 Watching a slideshow
◄
I
The photo frame displays all JPEG images stored on the connected memory device in
slideshow format. If the memory also contains music files these are played simultaneously with the slideshow.
English
1. Connect a USB memory or a memory card containing JPG/JPEG image files.
2. In the main menu, highlight the memory card and press [OK] (25).
3. Use [◄] (17) and [►] (26) to select the memory source you wish to display the
pictures from and then press to start the slideshow.
4. The photo frame automatically locates the files on the connected memory and
starts the slideshow.
5. Slideshow controls:
Photo frame buttons
► Starts the slideshow from the current photo, press [►] again to pause
the slideshow and only display the current photo. Press [►] once more to
resume the slideshow.
Stop the slideshow and display the photos as thumbnails.
O
M Push and hold to show the OSD menu when displaying photos or video.
Remote control buttons
Start slideshow with background music, music files in the memory start
automatically*.
OK Start slideshow, press [OK] again to pause the slideshow and only display
the current photo, press once to start the slideshow again. When the
slideshow is paused, the II icon appears in the corner of the display.
Stop the slideshow and display the photos as thumbnails.
O
MENU Open menu.
* Only if the connected memory contains music files.
Using the OSD menu (On Screen Display) to view photos
• Whilst viewing a photo or slideshow: Press [OSD] (27) or [M] (7) to display the OSD
menu at the bottom of the screen.
• The OSD menu shows the controls that can be used for viewing the photo plus
any information about the photo.
• Select a function using [<] (9) or [>] (10), confirm by pressing [►] (6). The displayed
symbols are from the left:
10
Page 11
II Shows current status, playing
or paused.
Show previous photo.
I◄
Show next photo.
►I
Start slideshow with music,
from the first photo.
Rotate a photo, press
repeatedly to achieve the
correct view.
Zoom in on the photo, press
repeatedly to magnify the
following number of times:
X2, X4, X8 or X16. Press [M]
(7) to exit the OSD menu,
then press [<] (9), [>] (10), [^]
(11) or [v] (12) to move the
enlarged photo.
Start playing music.
♫
Decrease volume.
Increase volume.
Exit the OSD menu.
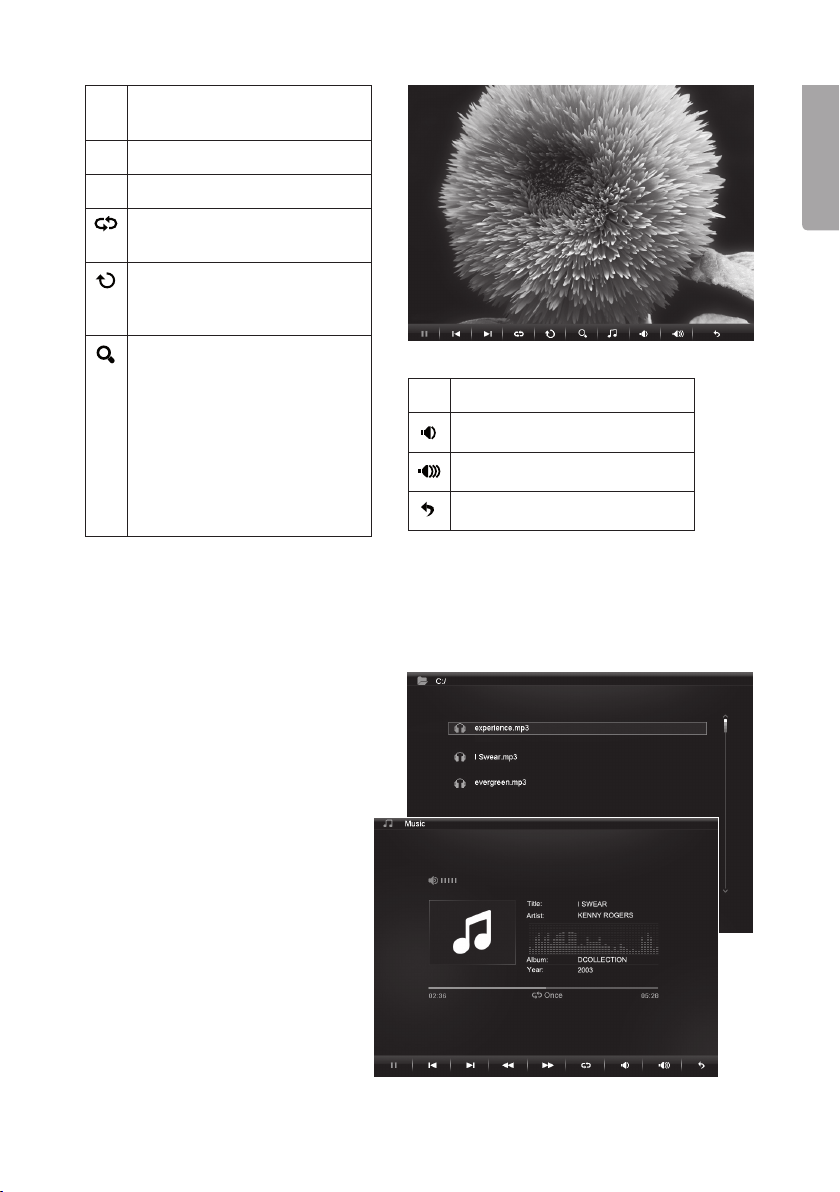
5.6 Listening to music
The photo frame can play music files in MP3/WMA format.
1. Connect a USB memory/memory card containing MP3/WMA files.
2. Highlight the memory in the
main menu, e.g. SD/MMC
and press [OK] (25).
3. Select Music and confirm
with [OK].
4. A list of the available music
files will appear on the
screen.
5. Select the desired music file
using [▲] (16) or [▼] (19).
6. Push [OK] (25) to start
playback.
English
11
Page 12
Music playback controls
◄
I
Photo frame buttons
► Start playback from the selected file, press [►] once more to pause playback,
English
pressing it once more will resume playback.
Stop playback and enter the menu.
O
Remote control buttons
Start slideshow with background music, music files in the
memory start automatically*.
◄
Stop playback and enter the
menu.
VOL+ Increase volume.
OK Start playback, press [OK]
once more to pause playback,
VOL- Reduce volume.
pressing it once more will resume playback. When playback
◄◄
Fast rewind.
is paused, the II icon appears
in the corner of the display.
►►
Fast forward.
* Only if the connected memory contains music files.
Using the OSD menu (On Screen Display) when listening to music
• Whilst listening to music: Press [OSD] (27) or [M] (7) to display the OSD menu at
the bottom of the screen.
• The OSD menu shows the controls that can be used for listening to music plus any
information about the audio file being played.
• Select a function using [<] (9) or [>] (10), confirm by pressing [►] (6). The displayed
symbols are from the left:
II Shows current status, playing
or paused.
Return to the previous audio file.
I◄
Skip to the next audio file.
►I
Repeat music track: Press the
required number of times to
choose:
Off (no repetition) One (repeat
only one file) or All (repeat all).
Decrease volume.
Fast rewind.
◄◄
►►
Fast forward.
Increase volume.
Exit the OSD menu.
12
Page 13
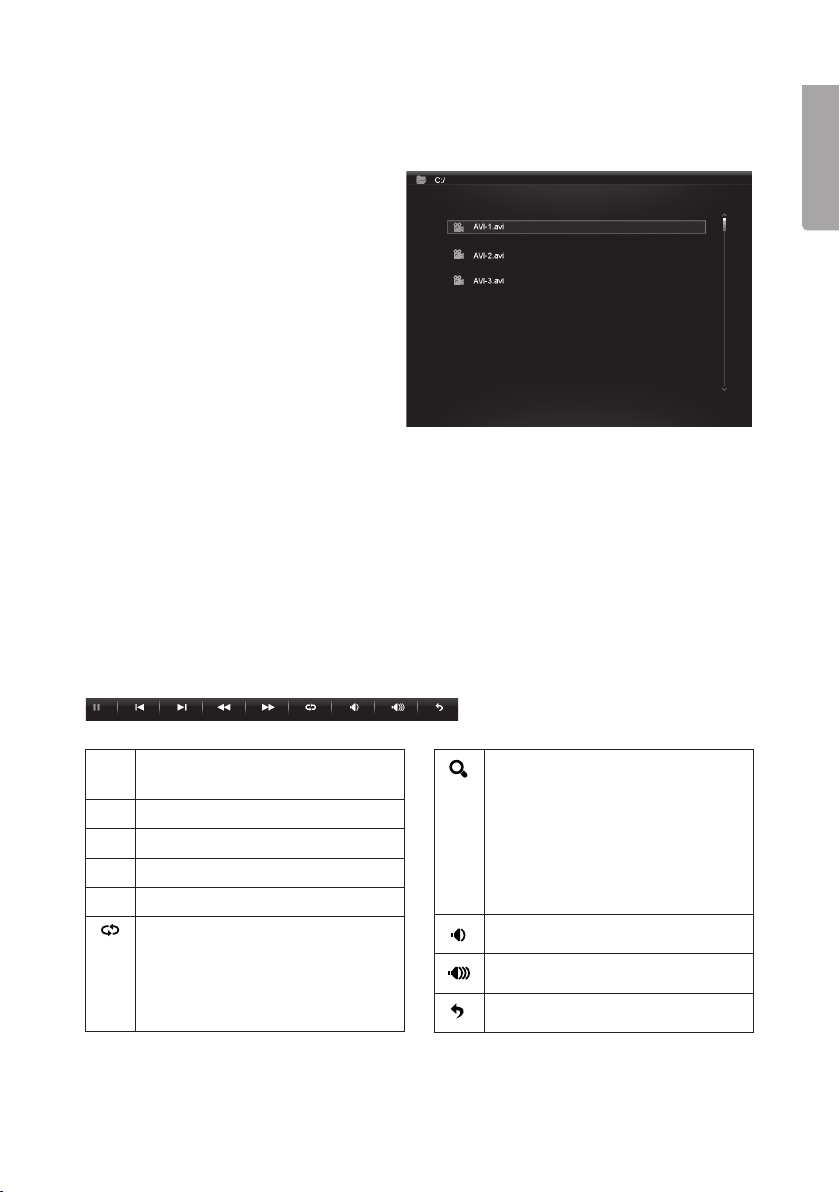
5.7 Watching a film (Video)
The frame can display video films in the following formats: MPEG-1, MPEG-2 or
MPEG-4.
1. Connect a USB memory or a memory card containing video files
in one of these formats: MPEG-1,
MPEG-2 or MPEG-4.
2. Highlight the memory in the main
menu, e.g. SD/MMC and press
[OK] (25).
3. Select Video and confirm by
pressing [OK] (25).
4. A list of the available video files is
displayed on the screen.
5. Select the desired video file using
[▲] (16) or [▼] (19).
6. Push [OK] (25) to start playback.
Using the OSD menu (On Screen Display) when watching a video film
• Whilst watching a video: Press [OSD] (13) or [M] (3) to display the OSD menu at
the bottom of the screen.
• The OSD menu shows the controls that can be used for watching the film plus any
information about the film.
• Select a function using [<] (9) or [>] (10), confirm by pressing [
symbols are from the left:
v
] (6). The displayed
English
II Shows current status, playing
or paused.
Return to previous.
I◄
Skip to the next.
►I
Fast rewind.
◄◄
Fast forward.
►►
Repeat the video: Press the
required number of times
to choose:
Off (no repetition) One (repeat
only one file) or All (repeat all).
Zoom in on the photo, press
repeatedly to magnify the following number of times: X2, X4
or X8. Press [M] to exit the OSD
menu, then press [<] (9), [>] (10),
[^] (11) or [v] (12) to move the
enlarged photo.
Decrease volume.
Increase volume.
Exit the OSD menu.
13
Page 14

Photo frame buttons
► Start playback from the selected file, press [►] (6) once more to pause
playback, pressing it once more will resume playback.
Stop playback and enter the menu.
English
O
Remote control buttons
OK Start playing the video,
press [OK] again to pause
the video, press once more
to start the video again.
When the video is paused,
the II icon appears in the
corner of the display.
Stop playback and enter
O
the menu.
VOL+ Increase volume.
VOL- Reduce volume.
◄◄
►►
Fast rewind.
Fast forward.
5.8 Managing files
In the file mode you can see the available files on all connected memory devices.
You can also copy files between the connected memory devices. N.B. The memory
card might have write-protection activated, check the settings.
1. Connect a USB memory or a memory card containing images, audio, or video files
with these formats MPEG-1 / MPEG-2 / MPEG-4.
2. Highlight the memory in the main menu, e.g. SD/MMC and press [OK] (25).
3. Select Files and confirm by pressing [OK] (25).
4. Available files that the photo frame can display are listed.
5. Select the desired file using [▲] (16) or [▼] (19).
6. Push [OK] (25) to view the photo/start playback.
7. Return to the list by pressing [O] (8) or [
Back up a level in the catalogue tree with [◄] (17).
8. Press [MENU] to return to the main menu.
◄
] (28). Push [OK] to open a subfolder.
Copying files
To copy files you must have two memory devices connected to the photo frame, such
as a USB memory stick and a memory card.
14
Page 15

1. Select the file you wish to copy
using [▲] (16) or [▼] (19).
2. Press [►] (26) to select the file,
the file is marked with a tick √
(pressing once more removes
the tick).
3. Repeat steps 1 and 2 to select
more files if you wish.
4. Push [OSD], a menu with COPY
and DELETE options will be
shown to the right of the list.
5. Select COPY using [▲]or [▼]
and confirm using [OK] (25).
Other connected memory
devices are also shown on a list.
6. Select the destination memory device to copy the files to using [▲] (16) or [▼]
(19). Press [►] (26) if you wish to create a folder to copy the files to.
7. Push [OK] (26) to start copying.
8. When the files have been copied, the “Finished” message will appear.
9. Push [OK] to discontinue.
Deleting files
1. Select the file you wish to delete using [▲] (16) or [▼] (19).
2. Press [►] (26) to select the file, the file is marked with a tick √ (pressing once more
removes the tick).
3. Repeat steps 1 and 2 to select more files if you wish.
4. Push [OSD] (27), a menu with the options COPY and DELETE will be shown to the
right of the list.
5. Select DELETE using [▲]or [▼] and confirm using [OK] (25).
6. Use [◄] and [►] for selecting √ to confirm, or X to finish without removing any
files. Push [OK] to compete file deletion.
N.B. This procedure cannot be reversed!
7. When the files have been deleted “Finished” will be shown.
8. Push [OK] to discontinue.
English
15
Page 16
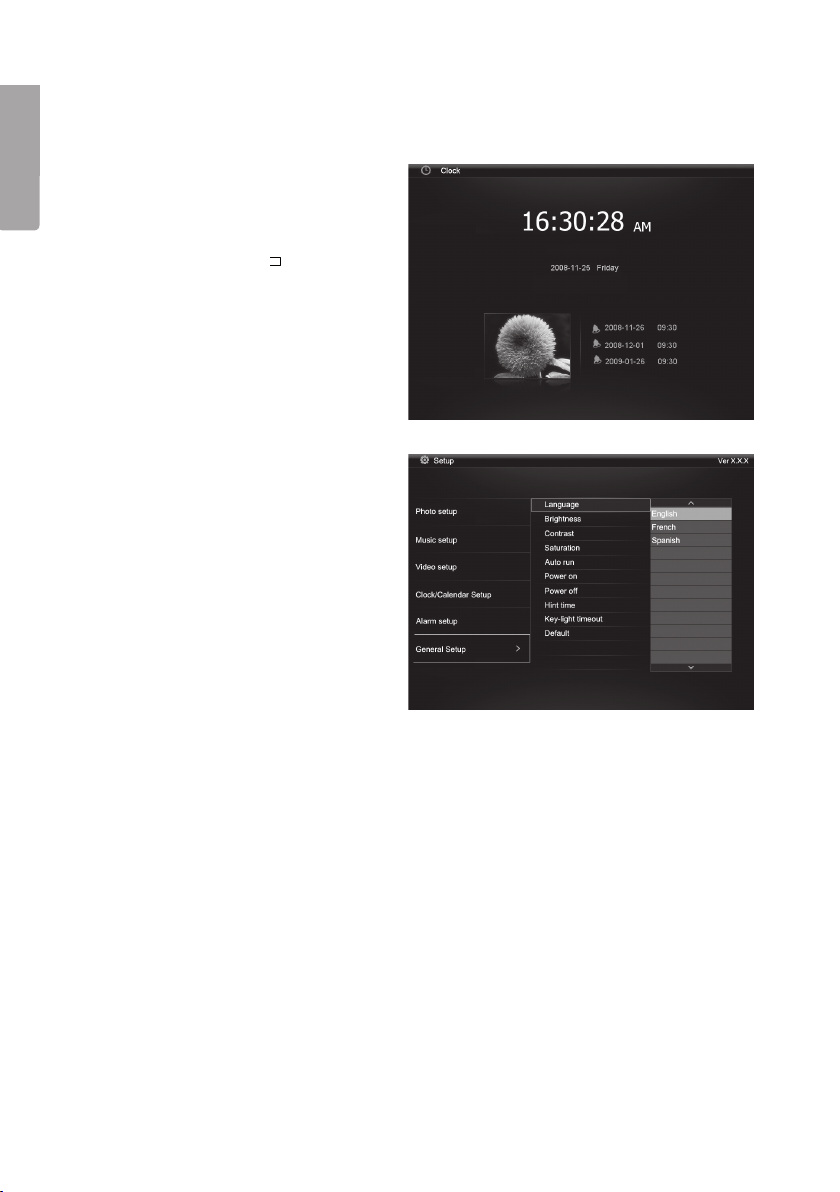
5.9 Displaying the clock/calendar
◄
The photo frame can display the time and calendar at the same time as thumnail
sized images.
English
1. In the main menu, select Clock
(or Calendar) and press [OK]
(25).
2. Return to the main menu by
pressing [O] (8) or [
] (28).
6. Settings
1. Alt. 1: Highlight SETUP in the
main menu and confirm using
[OK[ (25).
Alt. 2: Press [SETUP] (24) on
the remote control.
2. Use [▲] (16) and [▼] (19) to
select a desired setting from
to the list below.
3. Press [◄] (17) or [►] (26) to
change the selected setting.
Confirm by pressing [OK] (25).
Setting options
Photo Setup
• Slide show time (Interval time for slide show) 3 s, 5 s, 15 s, 1 min, 15 min.
• Photo Mode (Image display mode) Full Screen or Standard Screen.
• Transition Effekt (Slideshow frame change) Off or Random.
• Date Stamp (Display details on photos) Off or On.
• Shuffle (Random order display) Off or On.
Music Setup
• Music repeat mode Options include: Repeat Off (no repetition), Repeat One
(repeat current track) or Repeat All (repeat all tracks).
16
Page 17

Video Setup
• Movie repeat mode Options include: Repeat Off (play movies in order), Repeat
One (repeat current or selected movie) or Repeat All (repeat all movies).
Clock/Calendar Setup
• Time mode (Choose analogue/digital clock) Digital clock or Analogue clock.
• Show photo (Display thumbnail photos simutaneously as clock and calendar)
Off or On.
• Clock Wallpaper (Set the colour of the clock backlight) Black, Blue, Grey.
• Set Time (Adjust the time) hh.mm.
• Set time format (Set 12 or 24 hour clock) 12 hr or 24 hr.
• Set Date (Adjust the date) year, month, day.
• Set date format (Set order of date) year, month, day – day, month, year, etc.
Alarm Setup
• Alarm 1 – 4 (Set the time, schedule and ringtone for four alarms) Alarm 1,
Alarm 2 etc.
• Ringtone time mode (Set wake-up display) Digital Clock, Analog Clock
or Calendar.
• Ringtone volume (Set desired volume for alarm 1 – 4) 1, 2, 3, 4, 5 or 6.
• Snooze (Put back wake-up alarm) Off, 1 min, 5 min eller 10 min.
General Setup
• Language (Set the OSD language) (English, Français, Español, Deutsch,
Italiano, Portugués, Polski).
• Brightness (Adjust the brightness of the screen) +3, +2, +1, 0, -1, -2, -3.
• Contrast (Adjust the contrast of the screen) +3, +2, +1, 0, -1, -2, -3.
• Saturation (Adjust the saturation of the screen) +3, +2, +1, 0, -1, -2, -3.
• Auto run (Set the photo frame to enter a specific mode when you turn it on).
Photo, Main menu, Clock, Calendar.
• Power on (Photo frame turns on automatically at set time) hh.mm.
• Power off (Photo frame turns off automatically at set time) hh.mm.
• Hint time (Set time for display of hint for button operation) 0 s, 10 s, 15 s and 20 s.
• Copy Type (Behåll normal bildkvalitet vid kopiering eller komprimera) Normal
eller Resize.
• Default (Resets the device to factory settings).
English
17
Page 18

6.1 Setting the time and date
Time
1. Select Setup > General setup > Clock/Calendar setup > Set time.
English
2. Press [OK] (25) to confirm.
3. Press [▼] (19) or [▲] (16) to enter the current time, first Hours then Minutes
(press [►] (26) to switch from hours to minutes).
4. Push [OK] to confirm.
Date
1. Select Setup > General setup > Clock/Calendar setup > Set date.
2. Press [OK] (25) to confirm.
3. Press [▼] (19) or [▲] (16) to set: Year, Month, Day (press [►] (26) to switch from
setting to setting).
4. Push [OK] to confirm.
6.2 Setting the alarm
1. Select Setup > General setup > Alarm setup > Alarm 1, etc.
2. Select which alarm is to be set, Alarm 1, Alarm 2, etc.
3. Press [OK] (25) to confirm.
4. Press [▼] (19) or [▲] (16) to set: Hours and minutes (press [►] (26) to switch
from setting to setting).
5. Set the schedule of the alarm: Off, Once or Every day.
6. Set the type of alarm signal: Rooster, Forest or Church bell.
7. Push [OK] to confirm.
6.3 Setting Auto start
1. Select Setup > General setup > Auto start.
2. Press [OK] (25) to confirm.
3. Select a specific mode that you wish the frame to enter automatically when you
turn it on: Photo, Main menu, Clock, Calendar, Photo+Music or Video.
4. Press [OK] (25) to confirm.
6.4 Setting automatic activation/deactivation
1. Select Setup > General setup > Power on.
2. Press [OK] (25) to confirm.
3. Press [▼] (19) or [▲] (16) to set: Hours and Minutes (press [►] (26) to switch from
setting to setting).
4. Set the schedule for automatic activation: Off, Once or Every day.
5. Push [OK] to confirm.
6. Select Setup > General setup > Power off. Follow the same procedure as for
Power on above.
18
Page 19

N.B.
• Before setting the activation/deactivation you must first set the clock.
See section 6.1.
• If the time for activation/deactivation has already passed the device will activate at
the preset time the following day.
• In order for the Power on function to work: Only turn the photo frame off using
the [POWER] button (15) on the remote control. Do not turn it off using the power
switch (14) on the back of the photo frame.
7. Care and maintenance
Before cleaning the frame, make sure that it is turned off and that the mains adaptor
is unplugged. Wipe the frame using a soft damp cloth.Never use solvents or strong
detergents. Never spray liquid onto the photo frame.
8. Troubleshooting
A. Why can’t the photo frame display all of the files on my memory card/USB
memory?
• Certain memory cards are incompatible with this photo frame. Use a compatible
memory card.
• Unsupported file format (only JPEG images are supprted).
B. There is a memory card inserted into the frame, but the frame cannot read it.
• Make sure that you are using a type of memory card that is supported by the
frame.
• Make sure that the memory card is correctly inserted.
• Unsupported file format (only JPEG images are supprted).
N.B. Some digital cameras save photos in non-standard formats. Check the camera’s
user manual.
English
C. Some photos are uploaded quicker than others.
• Photos with high resolution take longer to load. Use photos with lower resolution
for quicker display.
• The recommended resolution is 800 x 600 pixels.
N.B. The maximum supported resolution is 8000 x 8000 pixels.
D. The device does not start/no photo is shown.
• Check that the mains adaptor is correctly connected.
• Check that the power switch is in the ON position.
19
Page 20

E. How do I rotate a picture?
• Press [M] (7) and enter the OSD menu (in photo mode)
• Press [<] (9) and [>] (10), to go to P in the OSD menu.
• Press [►] (6) repeatedly to rotate the image to the desired position.
English
N.B. The pictures return to their original orientation if the frame is turned off.
F. What is the best resolution?
• The recommended resolution is 800 x 600 pixels, with the highest resolution
being 8000 x 8000 pixels.
G. The remote control doesn’t work.
• Check the battery and replace it if necessary.
• Point the remote control towards the sensor. Minimize the distance to the photo
frame. Check that there are no obstacles between the remote and sensor.
9. Disposal
Follow local ordinances when disposing of this product. If you are unsure of how to
dispose of this product, please contact your municipality.
10. Specifications
Shade: 8″ colour analogue LCD, 4:3
Resolution: 800 (h) x 600 (v)
Voltage: 5 V DC, 2 A via the supplied mains adaptor
(100-240 V AC, 50/60 Hz)
Remote control battery: 1 x CR2025 (3 V lithium)
USB connection: USB 2.0 (supports USB memory, MP3 player)
Memory card reader: SD (Secure Digital), MMC (Multimedia Card),
MS (Memory Stick)
Picture format: JPEG (highest resolution: 8000 x 8000, native-resolution
800 x 600)
Audio format: MP3, 32-320 kbps bit rate (CBR, VBR)
Video format: MPEG-1, MPEG-2, MPEG-4
Speakers: Built-in
Size: 216 x 182 x 28 mm
Weight: 603 g
Operating environment:
Operating temperature: 0°C – 45°C at <95% RH
Storage temperature: -20°C – 60°C at <80% RH
20
Page 21

Digital Fotoram 8”
Art. nr 38-3728 Modell PF-8DN-283V3RTC
Läs igenom hela bruksanvisningen före användning och spara den sedan för
framtida bruk. Vi reserverar oss för ev. text- och bildfel samt ändringar av
tekniska data. Vid tekniska problem eller andra frågor, kontakta vår kundtjänst
(se adressuppgifter på baksidan).
Innehållsförteckning
1. Säkerhet
2. Produktbeskrivning
3. Knappar och anslutningar
4. Komma igång
5. Användning
6. Inställningar
7. Skötsel och underhåll
8. Felsökningsschema
9. Avfallshantering
10. Specifikationer
Svenska
21
Page 22

1. Säkerhet
Varning! Öppna inte höljet! Farlig spänning finns oskyddat på vissa komponenter inuti
produktens hölje, kontakt med dessa kan ge elektrisk chock.
• Produkten får endast repareras av kvalificerad servicepersonal.
• Produkten får inte demonteras eller ändras.
• Placera inte produkten så att den kan falla ner i vatten eller annan vätska. Ställ inte
några föremål som innehåller vätska på produkten, t.ex. blomvas eller dryck.
• Täck inte för ventilationsöppningarna. Placera inte heller produkten i närheten av
varma ställen som ovanför element, ovanpå en TV eller i t.ex. i en soffa så att ventilationsöppningarna blockeras.
Svenska
• Använd endast den bifogade nätadaptern. Ta alltid ur nätadaptern från eluttaget
om inte produkten ska användas under en längre tid.
• Placera inte tunga eller vassa föremål på displayen. Skydda nätkabeln från vassa
kanter och hörn, se till att ingen stiger på den.
• Produkten är konstruerad för 8 till 10 timmars kontinuerlig drift. Undvik att använda
den under längre tid än så. Låt produkten svalna en stund innan den används igen.
• Produkten är endast avsedd för inomhusbruk.
• Undvik att utsätta produkten för direkt solljus under längre tid.
• Använd inte produkten i fuktiga, dammiga eller smutsiga miljöer.
• Använd endast en mjuk tvättduk som är svagt fuktad med vatten och milt
diskmedel vid rengöring av skärmen.
• Koppla inte ifrån nätadaptern samtidigt som uppspelningen pågår. Risk finns för
att det anslutna minnet skadas. Ta inte heller bort det anslutna minnet när
uppspelning pågår.
2. Produktbeskrivning
• Digital fotoram med 8″ färgskärm, upplösning: 800 x 600, bildformat: 4:3.
• Visar dina digitala bilder utan dator.
• Anslutning för USB-minne eller minneskort (SD/MMC/MS).
• Bildspel med olika visningseffekter och inställbar intervall.
• Bildspel kan visas samtidigt med uppspelning av musik.
• Stöd för MPEG-1, MPEG-2 och MPEG-4-format.
• Stöd för MP3 och WMA.
• Repetitionsfunktion på uppspelning av både musik och film.
• Inbyggda högtalare.
• Touch-knappar med blå bakgrundsbelysning.
• Kalender.
• Alarm (4 olika tider).
• Levereras med fjärrkontroll och nätadapter.
• Inställbart automatiskt till-/frånslag.
22
Page 23
3. Knappar och anslutningar
4
13
3
2
◄
M
►
U
V
<
V
>
1
5 6 7 8 9 10 11 12
1. Ställbart bordsstöd.
2. DC Anslutning för medföljande nätadapter (5 V DC, 2 A) (+ i centrum).
3. Mini-USB-anslutning.
4. USB-anslutning.
5. IR-sensor till fjärrkontroll.
6. [►] – Starta visning/gör paus i visning/bekräfta ett val.
7. [M] – Öppnar menyn. Tryck och håll in för att visa OSD-menyn vid
bild- eller filmvisning.
8. [O] – Gå ur huvudmenyn.
9. [<] Vänster i menyn.
10. [>] Höger i menyn.
] Uppåt i menyn.
11. [
^
v
] Neråt i menyn.
12. [
13. SD/MMC/MS – Anslutning för minneskort (SD/MMC/MS).
14. Strömbrytare – Slå på eller stäng av fotoramen (skymd på bilden).
14
Svenska
23
Page 24

Fjärrkontroll
◄
◄
I
▲
15
16
17
18
◄
MENU
19
20
◄◄
21
Svenska
15. [ ] - Slå på eller stäng av fotoramen
16. [▲]– Förflytta dig uppåt i menyer/Föregående bild/spår/film
17. [◄ ] – Förflytta dig till vänster i menyer. Roterar bilden 90 grader motsols
18. [MENU] – Tryck för att öppna huvudmenyn. Tryck och håll in för att visa
OSD-menyn vid bild- eller filmvisning
19. [▼] – Förflytta dig nedåt i menyer/Nästa bild/spår/film
20. [◄◄] – Snabbspola bakåt (musik/film)
] – Tryck för att zooma i bilden
21. [
22. [4:3/16:9] – Ändra bildformat, 4:3 eller 16:9
23. [VOL+] – Höjer ljudvolymen
24. [SETUP] – Öppna/gå ur inställningsmenyn
25. [OK] – Bekräfta/Starta eller pausa uppspelningen
26. [►] – Förflytta dig till höger i menyer. Nästa bild (under visning)
27. [OSD] – Visa/lämna OSD-menyn (OSD-menyn visas längst ner på skärmen)
◄
] – Gå till föregående meny
28. [
29. [►►] – Snabbspola framåt (musik/film)
] – Starta bildspel med bakgrundsmusik*
30. [
31. [♫] – Startar eller stoppar musikuppspelning vid pågående bildspel
32. [VOL–] – Sänker ljudvolymen
* Endast om det anslutna minnet innehåller musikfiler
22
23
VOL+
SETUP
OK
►
OSD
▼
◄
►►
4:3
16:9
I
–
VOL
♫
24
25
26
27
28
29
30
31
32
24
Page 25

4. Komma igång
OFF
ON
SD / MMC / MS
DC USB HOST
OFF
ON
SD / MMC / MS
DC USB HOST
OFF
ON
SD / MMC / MS
DC USB HOST
OFF
ON
SD / MMC / MS
DC
4.1 Sätt i batteriet i fjärrkontrollen
Fjärrkontrollen drivs av ett batteri av typen CR2025 (3 V).
• Sätt i batteriet som bilderna visar,
CR2025
observera polaritetsmärkningen
(+) på batterihållaren. Ta bort ev.
skyddsplast vid batteriet före
användning.
• Batteriet håller normalt upp till ett år,
men beror naturligtvis på hur mycket
fjärrkontrollen används.
• Byt batteri när fjärrkontrollen inte fungerar trots att den hålls nära sensorn på den
digitala fotoramen.
4.2 Montering av bordsstöd
• Fotoramen kan hängas på en vägg eller användas med det bifogade
bordsstödet (1).
• På baksidan finns upphängningshål för montering på vägg.
Montera bordsstödet:
1. Vrid bordsstödet i ca 45° och tryck försiktigt in det i öppningen på fotoramens
baksida.
2. Vrid sedan bordsstödet till önskad position. Du kan välja att ställa fotoramen
i horisontellt eller vertikalt läge.
SD / MMC / MS
ON
OFF
DC USB HOST
SD / MMC / MS
Svenska
ON
OFF
DC USB HOST
25
Page 26

Svenska
OFF
ON
SD / MMC / MS
DC USB HOST
4.3 Anslut nätadaptern
1. Anslut medföljande nätadap-
ter till ett vägguttag.
2. Anslut sedan nätadapterns
DC-kontakt till ”DC” (2)
på fotoramen.
3. Sätt strömbrytaren (14) på
SD / MMC / MS
ON
OFF
14
DC USB HOST
foto-ramens baksida i läge
ON för att slå på fotoramen.
2
Obs!:
• Normalt används knappen [POWER] (15) på fjärrkontrollen för att slå på eller akti-
vera standby-läge. För att helt stänga av fotoramen måste dock strömbrytaren (14)
på fotoramens baksida sättas i läge OFF.
• Ta alltid ur nätadaptern från eluttaget om inte produkten ska användas under
en längre tid.
4.4. Anslutning av minneskort eller USB-minne
Obs! Använd endast ett minneskort åt gången (utom vid kopiering).
Minneskort
Följande minneskort kan användas:
• Secure Digital (SD)
• Multimedia Card (MMC)
• Memory Stick (MS)
Om din digitalkamera använder något
av ovanstående minneskort kan du
ansluta kamerans minneskort direkt
till fotoramen.
SD / MMC / MS
ON
OFF
DC
1. Sätt minneskortet i passande anslutning - ”SD/MMC/MS” (13) Tryck försiktigt in
kortet i korthållaren.
2. Ta ur minneskortet genom att dra det rakt ut. Obs! Dra inte ur minneskortet när
filöverföring från minneskortet pågår.
USB-minne
Till anslutningen ”USB HOST” (4) kan USB-enheter som t.ex. ett USB-minne eller en
MP3-spelare anslutas.
26
Page 27

5. Användning
5.1 Kopiera filer från en dator
Du kan ansluta fotoramen till en dator för att kopiera filer till det minneskort/USB-minne
som är anslutet till fotoramen.
Obs!
• Kompatibel med Windows 2000, XP och Vista.
• När fotoramen är ansluten till datorn (via mini-USB kabel) är inte USB-ingången
”USB HOST” (4) tillgänglig.
• Koppla inte bort fotoramen från datorn under filöverföringen.
1. Starta datorn och fotoramen.
2. Se till att inget USB-minne är anslutet till fotoramen innan du ansluter den till datorn.
3. Anslut mini-USB-kabeln till uttaget märkt ”USB” (3) på fotoramen och den andra
änden till datorn.
4. Datorn identifierar ”Ny maskinvara” och börjar installera programvaran automatiskt.
Vänta medan datorn slutför installationen.
5. I ”Den här datorn” kan du nu se flera ikoner som ”Flyttbar disk”.
6. ”Drag och släpp” filerna mellan enheterna.
7. När du ska koppla från fotoramen från datorn: Dubbelklicka först på Säker bort-
tagning av maskinvara. Markera sedan USB masslagringsenhet och klicka sedan
på Stoppa. Avsluta med att klicka OK. Sedan kan du koppla loss USB-kontakten
från datorn.
5.2 Visa bilder
1. Om ett minneskort eller USB-minne är anslutet visas huvudmenyn på skärmen.
2. Stega i huvudmenyn med [▲] (16) och [▼] (19) eller [^] (11) och [
3. Gå till föregående meny med [O] (8).
v
] (12).
Svenska
5.3 Huvudmenyn
1. Tryck på [MENU] (18) eller [M] (7) för att visa huvudmenyn:
SD/
MMC/MS
USB Visar anslutna USB-
Clock Visar tiden och inställning
Calendar Visar kalender och
Setup Inställningar.
Visas när du sätter
i ett minneskort.
minnen.
för alarm. Inställning av
tiden sker i ”Setup”.
inställning för alarm.
27
Page 28

2. Stega i menyerna med [▲] (16) och [▼] (19) eller [^] (11) och [v] (12).
Photo Starta bildspel eller visa
bilderna från minnet
manuellt.
Music Starta uppspelning
av MP3 filer.
Video Starta uppspelning
av video.
Files Visa alla filer på minnes-
Svenska
3. I ”Photo-läge” visas bilderna på minnet som miniatyrer. Upp till 15 bilder
a. Markera minneskortet i huvudme-
b. Bilderna på minnet visas som
c. Välj önskad bild att visa med [◄]
kort/USB-minne, kopiera
eller radera filer
visas samtidigt.
nyn, och tryck på [►] (26), undermenyn öppnas.
miniatyrer.
(17) [►] (26) [▲] (16) eller [▼] (19).
Tryck [OK] (25) om du vill starta
bildspel med början vid den valda
bilden eller för att starta bildspel
från början med bakgrundsmusik
(om minnet innehåller musikfiler).
5.4 Visning av en bild
1. Anslut ett USB-minne eller ett minneskort innehållande bildfiler med filformatet
JPG/JPEG.
2. Välj Photo och bekräfta med [OK] (25).
3. Markera minneskortet i huvudmenyn, och tryck på [OK] (25).
4. Bilderna på minnet visas som miniatyrer:
5. Välj önskad bild att visa med [◄] (17) [►] (26) [▲] (16) eller [▼] (19). Tryck [OK] (25)
om du vill starta bildspel med början vid den valda bilden eller för att starta bildspel
från början med bakgrundsmusik (om minnet innehåller musikfiler).
28
Page 29

5.5 Bildspel (Slideshow)
◄
I
Fotoramen visar alla bilder i JPEG-format som finns lagrade på det anslutna minnet
och visar dessa i ett bildspel. Innehåller minnet även musikfiler spelas dessa upp
samtidigt som bildspelet visas.
1. Anslut ett USB-minne eller ett minneskort innehållande bildfiler med filformatet
JPG/JPEG.
2. Markera minneskortet i huvudmenyn, och tryck på [OK] (25).
3. Markera med hjälp av [◄] (17) och [►] (26) knapparna det minne som du vill visa
bilder från och tryck sedan [OK] (25) för att starta bildspelet.
4. Enheten hittar automatiskt bildfilerna på det anslutna minnet och startar bildspelet.
5. Knappfunktioner under bildspelet:
Knappar på fotoramen
Starta bildspel från den bild som visas. Tryck på [►] igen för att göra paus i bild-
►
spelet och endast visa aktuell bild. Tryck en gång till för att starta bildspelet igen.
Stoppa bildspel och visa bilderna som miniatyrer.
O
Öppnar menyn. Tryck och håll in för att visa OSD-menyn vid bild- eller
M
filmvisning.
Knappar på fjärrkontrollen
Starta bildspel med bakgrundsmusik. Musikfilerna på minnet
startar automatiskt*.
Starta bildspel. Tryck på [OK] igen för att göra paus i bildspelet och endast
OK
visa aktuell bild. Tryck en gång till för att starta bildspelet igen. Under paus
visas II i ena hörnet på displayen.
Stoppa bildspel och visa bilderna som miniatyrer.
O
MENU
Öppnar menyn.
Svenska
* Endast om det anslutna minnet innehåller musikfiler.
Använda OSD-menyn (On Screen Display) vid bildvisning
• Vid bildvisning: Tryck på [OSD] (27) eller [M] (7) för att visa OSD-menyn längst ner
på skärmen.
• OSD-menyn visar vilka kontroller som kan användas när bilden visas, samt
information om den aktuella bilden som visas.
• Markera den önskade funktionen med hjälp av [<] (9) eller [>] (10), bekräfta sedan
genom att trycka på [►] (6). Symbolerna som visas, är från vänster:
29
Page 30

Visar aktuell status, uppspel-
II
ning eller paus.
Visa föregående bild.
I◄
Visa nästa bild.
►I
Starta bildspel med musik
från första bilden.
Rotera bilden. Tryck flera
gånger tills bilden visas
rättvänd.
Svenska
Zooma in i bilden. Tryck flera
gånger för att välja förstoring:
X2, X4, X8 eller X16. Tryck på
[M] (7) för att gå ur menyn,
flytta sedan den förstorade
bilden med [<] (9), [>] (10),
[
] (11) eller [v] (12).
^
Starta uppspelning av musik.
♫
Minska volymen.
Öka volymen.
Gå ur OSD-menyn.
5.6 Spela upp musik (Music)
Fotoramen kan spela upp musikfiler i MP3-/WMA-format.
1. Anslut ett USB-minne eller ett
minneskort innehållande ljudfiler
med filformatet MP3 eller WMA.
2. Markera det anslutna minnet
i huvudmenyn, t.ex. SD/MMC
och tryck [OK] (25).
3. Välj Music och bekräfta
med [OK].
4. Tillgängliga musikfiler visas
i en lista.
5. Markera önskad musikfil med
[▲] (16) eller [▼] (19).
6. Tryck [OK] (25) för att starta
uppspelningen.
30
Page 31

Knappfunktioner under uppspelningen
◄
I
◄
Knappar på fotoramen:
Starta uppspelning med den markerade filen. Tryck på [►] igen för att göra
►
paus i uppspelningen, tryck en gång till för att starta uppspelningen igen.
Stoppa uppspelning och öppna menyn.
O
Knappar på fjärrkontrollen
OK
Starta bildspel med bakgrundsmusik, musikfilerna på
minnet startar automatiskt*.
Starta uppspelning. Tryck på
[OK] igen för att göra paus
i uppspelningen, tryck en gång
till för att starta igen. Under
VOL+ Öka volym.
VOL- Minska volym.
◄◄
►►
Stoppa uppspelning och
öppna menyn.
Snabbspola bakåt.
Snabbspola framåt.
paus visas II i ena hörnet
på displayen.
* Endast om det anslutna minnet innehåller musikfiler.
Använda OSD-menyn (On Screen Display) vid musikuppspelning
• Vid musikuppspelning: Tryck på [OSD] (27) eller [M] (7) för att visa OSD-menyn
längst ner på skärmen.
• OSD-menyn visar vilka kontroller som kan användas vid uppspelning av musik,
samt information om den aktuella ljudfilen som hörs.
• Markera den önskade funktionen med hjälp av [<] (9) eller [>] (10). Bekräfta sedan
genom att trycka på [►] (6). Symbolerna som visas, är från väster:
Visar aktuell status, uppspelning
II
eller paus.
Gå till föregående ljudfil.
I◄
Gå till nästa ljudfil.
►I
Snabbspola bakåt.
◄◄
Snabbspola framåt.
►►
Repetera musikspår:
Tryck flera gånger för att välja:
Off (ingen repetition) One (repetera den fil som spelas) eller
All (repetera alla).
Minska volymen.
Öka volymen.
Svenska
Gå ur OSD-menyn.
31
Page 32

5.7 Visa film (Video)
Enheten kan spela upp videofiler i formaten MPEG-1, MPEG-2 eller MPEG-4.
1. Anslut ett USB-minne eller ett minneskort innehållande videofiler med
filformat: MPEG-1, MPEG-2 eller
MPEG-4.
2. Markera det anslutna minnet
i huvudmenyn, t.ex. SD/MMC och
tryck [OK] (25).
3. Välj Video och bekräfta
Svenska
med [OK] (25).
4. Tillgängliga videofiler visas
i en lista.
5. Markera önskad videofil med [▲]
(16) eller [▼] (19).
6. Tryck [OK] (25) för att starta uppspelningen.
Använda OSD-menyn (On Screen Display) vid videouppspelning
• Vid videovisning: Tryck på [OSD] (13) eller [M] 3) för att visa OSD-menyn längst ner
på skärmen.
• OSD-menyn visar vilka kontroller som kan användas när filmen visas, samt information om den aktuella filmen som visas.
• Markera den önskade funktionen med hjälp av [<] (9) eller [>] (10), bekräfta sedan
genom att trycka på [►] (6). Symbolerna som visas, är från väster:
II Visar aktuell status, uppspel-
ning eller paus.
Gå till föregående.
I◄
Gå till nästa.
►I
Snabbspola bakåt.
◄◄
Snabbspola framåt.
►►
Repetera video: Tryck flera
gånger för att välja: Off (ingen
repetition) One (repetera den
fil som spelas) eller
All (repetera alla).
32
Zooma in i bilden, tryck flera
gånger för att välja förstoring:
X2, X4 eller X8.
Tryck på [M] för att gå ur menyn, flytta sedan den förstorade
bilden med [<] (9), [>] (10), [
(11) eller [v] (12).
Minska volymen.
Öka volymen.
Gå ur OSD-menyn.
]
^
Page 33

Knappar på fotoramen
◄
► Starta uppspelning med den markerade filen, tryck på [►] (6) igen för att göra
paus i uppspelningen, tryck en gång till för att starta uppspelningen igen.
Stoppa uppspelning och öppna menyn.
O
Knappar på fjärrkontrollen
OK
O
Starta uppspelning. Tryck på
[OK] igen för att göra paus i
uppspelningen, tryck en gång
till för att starta igen Under paus
visas II ena hörnet på displayen.
Stoppa uppspelning och
öppna menyn.
VOL+ Öka volym.
VOL– Minska volym.
◄◄
►►
Snabbspola bakåt.
Snabbspola framåt.
5.8 Filhanteraren (Files)
Filhanteraren visar tillgängliga filer på anslutna minnen. Du kan även kopiera filer mellan
anslutna minnen. Obs! Minneskorten kan ha skrivskydd som är aktiverat, kontrollera
hur reglaget är inställt.
1. Anslut ett USB-minne eller ett minneskort innehållande bild-, ljud- eller videofiler
med filformaten MPEG-1 / MPEG-2 / MPEG-4.
2. Markera det anslutna minnet i huvudmenyn, t.ex. SD/MMC och tryck [OK] (25).
3. Välj Files och bekräfta med [OK] (25).
4. Tillgängliga filer som fotoramen kan hantera visas i en lista.
5. Markera önskad fil med [▲] (16) eller [▼] (19).
6. Tryck [OK] (25) för att visa bilden/starta uppspelningen.
7. Återgå till listan genom att trycka [O] (8) eller [
en underkatalog. Backa en nivå i katalogträdet med [◄] (17).
8. Tryck [MENU] (18) för att återgå till huvudmenyn.
] (28). Tryck [OK] för att öppna
Svenska
Kopiera filer
För att kopiera filer måste du ha två minnen anslutna till fotoramen, t.ex. ett USBminne och ett minneskort.
33
Page 34

1. Välj den fil du vill kopiera med [▲]
(16) eller [▼] (19).
2. Tryck [►] (26) för att markera filen,
(filen markeras med [√]). Tryck igen
för att avmarkera filen).
3. Repetera steg 1 och 2 om du vill
markera fler filer.
4. Tryck [OSD]. En meny med valen
COPY och DELETE visas till
höger om fillistan.
5. Markera COPY med [▲] eller [▼]
Svenska
och bekräfta med [OK] (25). Andra
anslutna minnen visas i en lista.
6. Välj önskat minne att kopiera filerna till med [▲] (16) eller [▼] (19). Tryck [►] (26)
om du vill välja en katalog filerna ska kopieras till.
7. Tryck på [OK] (25) för att starta kopieringen.
8. När filerna kopierats visas meddelandet ”Finished”.
9. Tryck [OK] för att avsluta.
Radera filer
1. Välj den fil du vill ta bort med [▲] (16) eller [▼] (19).
2. Tryck [►] (26) för att markera filen, (filen markeras med [√] ). Tryck igen för
att avmarkera filen).
3. Repetera steg 1 och 2 om du vill markera fler filer.
4. Tryck [OSD] (27). En meny med valen COPY och DELETE visas till höger om fillistan.
5. Markera DELETE med [▲] eller [▼] och bekräfta med [OK] (25).
6. Använd [◄] och [►] för att antingen välja √ för att bekräfta raderingen, eller X
för att avsluta utan att ta bort filen/filerna. Tryck därefter [OK] för att slutföra
raderingen.
Obs! Denna åtgärd kan inte ångras!
7. När filerna raderats visas meddelandet ”Finished”.
8. Tryck [OK] för att avsluta.
34
Page 35

5.9 Visa klocka/kalender
◄
Enheten kan visa tid och datum samtidigt som en miniatyrbild.
1. Markera Clock (eller Calendar)
i huvudmenyn och tryck [OK] (25).
2. Återgå till huvudmenyn genom att
trycka [O] (8) eller [
] (28).
6. Inställningar
1. Alt. 1: Markera SETUP i huvudme-
nyn och bekräfta med [OK] (25).
Alt. 2: Tryck en gång på [SETUP]
(24) på fjärrkontrollen.
2. Använd [▲] (16) och [▼] (19) för
att markera önskad inställning
enligt listan nedan.
3. Tryck [◄] (17) eller [►] (26) för
att ändra markerad inställning.
Bekräfta med [OK] (25).
Svenska
Inställningsalternativ
Photo Setup
• Slide show time (Intervall för bildspel) 3 s, 5 s, 15 s, 1 min eller 15 min.
• Photo Mode (Bildvisningsläge) Full Screen (fullskärm) eller Standard.
• Transition Effekt (Visningseffekt) Off eller Random.
• Date Stamp (Visa detaljerad information om bilden) Off eller On.
• Shuffle (Visa bilder i slumpvis ordning) Off eller On.
Music Setup
• Music repeat mode (Repetera musikfiler) Repeat Off (ingen repetition),
Repeat One (repetera pågående musikspår) eller Repeat All (repetera alla filer).
35
Page 36

Video Setup
• Movie repeat mode (Repetera videofiler) Repeat Off (ingen repetition),
Repeat One (repetera pågående video) eller Repeat All (repetera alla videofiler).
Clock/Calendar Setup
• Time mode (Visa analog/digital klocka) Digital clock eller Analog clock.
• Show photo (Visa/visa inte miniatyrbild samtidigt som klocka och kalender)
Off eller On.
• Clock Wallpaper (Ställ in bakgrundsfärg till klocka) Black, Blue, Grey.
• Set Time (Ställ in tid) hh.mm timmar, minuter.
Svenska
• Set time format (Ställ in visningsformat för tid) 12hr eller 24hr.
• Set Date (Ställ in datum) år, månad, datum.
• Set date format (Ställ in visningsformat för kalender) år, månad, datum – datum,
månad, år etc.
Alarm Setup
• Alarm 1 – 4 (Ställ in tid, funktion och signal för fyra olika alarm) Alarm 1, Alarm 2 etc.
• Ringtone time mode (Ställ in vad som visas vid väckning) Digital Clock,
Analog Clock eller Calendar.
• Ringtone volume (Ställ in önskad volym för alarm 1 – 4) 1, 2, 3, 4, 5 eller 6.
• Snooze (Snooze-funktion vid väckning) Off, 1 min, 5 min eller 10 min.
General Setup
• Language (Ändrar menyernas språk) (English, Français, Español, Deutsch,
Italiano, Portugués, Polski).
• Brightness (Justera skärmens ljusstyrka) +3, +2, +1, 0, -1, -2, -3.
• Contrast (Justerar skärmens kontrast) +3, +2, +1, 0, -1, -2, -3.
• Saturation (Justerar skärmens färgmättnad) +3, +2, +1, 0, -1, -2, -3.
• Auto run (Inställning hur fotoramen börjar efter tillslag). Photo, Main menu,
Clock, Calendar.
• Power on (Ställer in tid för automatiskt tillslag) hh.mm timmar, minuter.
• Power off (Ställer in tid för automatiskt frånslag) hh.mm timmar, minuter.
• Hint time (Ställ in tid för visning av knappfunktion på skärmen) 0 s, 10 s, 15 s
och 20 s.
• Copy Type (Behåll normal bildkvalitet vid kopiering eller komprimera) Normal
eller Resize.
• Default (Återställer enheten till fabriksinställningar).
36
Page 37

6.1 Ställa in tid och datum
Tid
1. Gå till Setup > General setup > Clock/Calendar setup > Set time.
2. Tryck [OK] (25) för att bekräfta.
3. Använd [▼] (19) eller [▲] (16) för att ställa in aktuell tid, först Timmar sedan
Minuter. Tryck [►] (26) för att växla mellan timmar och minuter).
4. Tryck [OK] för att bekräfta.
Datum
1. Gå till Setup > General setup > Clock/Calendar setup > Set date.
2. Tryck [OK] (25) för att bekräfta.
3. Använd [▼] (19) eller [▲] (16) för att ställa in: År, Månad, Datum. Tryck [►] (26)
för att växla mellan inställningarna).
4. Tryck [OK] för att bekräfta.
6.2 Ställa in alarm
1. Gå till Setup > General setup > Alarm setup > Alarm 1 etc.
2. Markera vilket alarm som ska ställas in Alarm 1, Alarm 2 etc.
3. Tryck [OK] (25) för att bekräfta.
4. Använd [▼] (19) eller [▲] (16) för att ställa in timangivelse och minutangivelse.
Tryck [►] för att växla mellan inställningarna).
5. Ställ in schema för Alarm: Off (avstängd), Once (en gång) eller Every day (varje dag).
6. Ställ in alarmljud: Rooster (galande tupp), Forest (skogsljud) eller Church bell
(kyrkklockor).
7. Tryck [OK] för att bekräfta.
Svenska
6.3 Ställa in Auto start
1. Gå till Setup > General setup > Auto start.
2. Tryck [OK] (25) för att bekräfta.
3. Välj startfunktion: Photo (bildvisning), Main menu (huvudmeny), Clock (tidvisning),
Calendar (datum).
4. Tryck [OK] (25) för att bekräfta.
6.4 Ställa in automatiskt till- och frånslag
1. Gå till Setup > General setup > Power on (tillslag)
2. Tryck [OK] (25) för att bekräfta.
3. Använd [▼] (19) eller [▲] (16) för att ställa in: timangivelse och minutangivelse.
Tryck [►] (26) för att växla mellan inställningarna).
4. Ställ in schema för automatiskt tillslag: Off (avstängd), Once (en gång) eller
Every day (varje dag).
5. Tryck [OK] för att bekräfta.
6. Gå till Setup > General setup > Power off (frånslag). Fortsätt lika som tillslag...
37
Page 38

Obs!
• Innan du ställer in tid för till- och frånslag måste enhetens klocka ställas in.
Se avsnitt 6.1.
• Om tiden för till- eller frånslag redan passerats sker till- eller frånslag
nästkommande dag vid den inställda tidpunkten.
• För att Power on-funktionen ska fungera: Stäng endast av fotoramen med
[POWER]-knappen (15) på fjärrkontrollen, stäng inte av den med strömbrytaren
(14) på fotoramens baksida.
7. Skötsel och underhåll
Svenska
Se till att fotoramen är avstängd och att nätadaptorn urdragen innan rengöring.
Torka av med en mjuk lätt fuktad trasa. Använd inga lösningsmedel eller starka
rengöringsmedel. Spruta aldrig vätska på fotoramen.
8. Felsökning
A. Varför kan inte fotoramen visa alla filerna på minneskortet/USB-minnet ?
• Vissa minneskort är inte kompatibla med fotoramen. Använd ett kompatibelt
minneskort.
• Fel filformat (endast JPEG-bilder stöds).
B. Ett minneskort är anslutet till fotoramen, men det går inte att läsa.
• Se till att du använder ett minneskort som stöds av fotoramen.
• Se till att minneskortet är rätt anslutet.
• Fel filformat (endast JPEG-bilder stöds).
Obs! Vissa digitalkameror sparar bilderna i filformat som inte är standard. Kontrollera
i kamerans bruksanvisning.
C. Vissa bilder laddas fortare än andra.
• Bilder med hög upplösning tar längre tid att ladda. Använd bilder med lägre
upplösning för snabbare visning.
• Rekommenderad upplösning är 800 x 600 bildpunkter.
Obs! Högsta upplösning som stöds är 8000 x 8000 bildpunkter.
D. Fotoramen startar ej/Ingen bild visas.
• Kontrollera att nätadaptern är korrekt ansluten.
• Kontrollera att strömbrytaren står i läge ON.
38
Page 39

E. Hur roterar jag en bild?
• Tryck på [M] (7) och öppna OSD-menyn (i bildvisningsläge)
• Använd [<] (9) och [>] (10), för att gå till P i OSD-menyn.
• Tryck på [►] (6) flera gånger för att rotera bilden till önskat läge
Obs! Bilderna återgår till ursprungsläge när du stänger av fotoramen.
F. Vilken upplösning är bäst?
Rekommenderad upplösning är 800 x 600 bildpunkter, högsta upplösning
är 8000 x 8000 bildpunkter.
G. Fjärrkontrollen fungerar inte.
• Kontrollera batteriet i fjärrkontrollen och byt det vid behov.
• Rikta fjärrkontrollen rakt mot sensorn. Minska avståndet till fotoramen.
Kontrollera att inga hinder finns mellan fjärrkontroll och sensor.
9. Avfallshantering
När du ska göra dig av med produkten ska detta ske enligt lokala föreskrifter.
Är du osäker på hur du ska gå tillväga, kontakta din kommun.
10. Specifikationer
Skärm: 8″ färg TFT LCD, 4:3
Upplösning: 800 (h) x 600 (v)
Drivspänning: 5V DC, 2 A via medföljande nätadapter
(100-240 V AC, 50/60 Hz).
Batteri, fjärrkontroll: 1 x CR2025 (3 V litium)
USB-anslutning: USB 2.0 (stöd för USB-minne, MP3-spelare)
Läsare för minneskort: SD (Secure Digital), MMC (Multimedia Card),
MS (Memory Stick),
Bildformat: Jpeg (högsta upplösning: 8000 x 8000,
native-upplösning 800 x 600).
Ljudformat: MP3, 32-320 kbps bit rate (CBR, VBR)
Videoformat: MPEG-1, MPEG-2, MPEG-4
Högtalare: Inbyggd
Storlek: 216 x 182 x 28 mm
Vikt: 603 g
Användningsmiljö:
Användningstemperatur: 0 °C ~ 45 °C vid <95 % RH
Förvaringstemperatur: -20 °C ~ 60 °C vid <80 % RH
Svenska
39
Page 40

Digital fotoramme 8”
Art. nr. 38-3728 Modell PF-8DN-283V3RTC
Les bruksanvisningen nøye før produktet tas i bruk, og ta vare på den for framtidig
bruk. Vi reserverer oss mot ev. tekst- og bildefeil, samt forandringer av tekniske data.
Ved tekniske problemer eller spørsmål, ta kontakt med vårt kundesenter. (Se opplysninger om kundesenteret i denne bruksanvisningen).
Innholdsfortegnelse
1. Sikkerhet
2. Produktbeskrivelse
3. Knapper og koblinger
4. Kom i gang
5. Bruk
Norsk
6. Innstillinger
7. Stell og vedlikehold
8. Feilsøking
9. Avfallshåndtering
10. Spesifikasjoner
40
Page 41

1. Sikkerhet
Advarsel! Dekselet må ikke åpnes. Farlig spenning finnes ubeskyttet på visse kompo-
nenter inne i produktet. Kontakt med disse kan gi elektrisk støt.
• Produktet må kun repareres av kyndig servicepersonell.
• Produktet må ikke demonteres eller endres på.
• Plasser ikke produktet slik at det kan komme i kontakt med vann eller annen
væske. Plasser aldri produktet i nærheten av gjenstander, som kan forårsake at
vann eller annen væske skylles over produktet. Dette gjelder f.eks. blomstervase
eller leskedrikk.
• Ventilasjonsåpningene må ikke tildekkes. Plasser heller ikke produktet for nær var-
mekilder som varmeelement, oppå tv-apparat eller f.eks. i en sofa hvor ventilasjonsåpningene blokkeres.
• Bruk kun den medfølgende strømadapteren. Strømadapteren må kobles fra strø-
muttaket dersom produktet ikke skal brukes på en stund.
• Plasser ikke tunge eller skarpe gjenstander på displayet. Strømkabelen bør ikke ha
kontakt med skarpe kanter eller hjørner. Man bør heller ikke tråkke på den.
• Produktet er konstruert for 8 til 10 timers kontinuerlig drift. Unngå lengre sammen-
hengende bruk enn dette. La produktet hvile en stund før det tas i bruk igjen.
• Produktet er kun beregnet for innendørs bruk.
• Unngå å utsette produktet for direkte sollys over lang tid.
• Bruk aldri dette produktet i støvete, fuktige eller skitne miljøer.
• Benytt kun en myk, lett fuktet klut og mildt vaskemiddel ved rengjøring av skjermen.
• Nettadapter må ikke kobles fra, mens spilling pågår. Det er fare for at det tilkoblede
minnet skades. Ta heller ikke bort det tilkoblede minnet mens spilling pågår.
Norsk
2. Produktbeskrivelse
• Digital fotoramme med 8” fargeskjerm. Oppløsning: 800 x 600, bildeformat: 4:3.
• Viser dine digitale bilder uten datamaskin.
• Tilkobling for usb-minne eller minnekort (SD/MMC/MS).
• Bildeframvisning med forskjellige effekter og justerbart intervall.
• Bildeframvisningen kan foregå samtidig med avspilling av musikk.
• Støtte for MPEG-1, MPEG-2 og MPEG-4 –format.
• Støtte for mp3 og WMA.
• Repetisjonsfunksjon både på avspilling av musikk og film.
• Innebygde høyttalere.
• Touch-knapper med blå bakgrunnsbelysning.
• Kalender
• Alarm (4 forskjellige tider)
• Leveres med fjernkontroll og nettadapter.
• Automatisk til-/fraslag (stilles inn).
41
Page 42

3. Knapper og koblinger
4
13
14
3
2
◄
M
►
U
V
<
V
>
1
Norsk
1. Bordstøtte
2. DC tilkobling for medfølgende strømadapter (5 V DC, 2 A) (+ i sentrum)
3. Mini-usb-tilkobling
4. Usb-tilkobling
5. IR-sensor for fjernkontroll
6. [►] – Starte visning/pause/bekrefte valg
7. [M] – Åpne menyen. Trykk og hold inne for å vise OSD-menyen
ved bilde- eller filmframvising.
8. [O] – Gå ut av hovedmenyen
9. [<] – Gå til venstre
10. [>] – Gå til høyre
11. [^] – Gå oppover i menyen
v
]– Gå nedover i menyen
12. [
13. SD/MMC/MS – Tilkoblingspunkt for minnekort
14. Strømbryter – Skru på/av fotorammen
5 6 7 8 9 10 11 12
42
Page 43

Fjernkontroll
◄
◄
I
▲
15
16
17
18
◄
MENU
19
20
◄◄
21
22
23
15. [ ] – Skru på/av fotorammen.
16. [▲] – Forflytting oppover i menyen/Foregående bilde/spor/film.
17. [◄] – Forflytt deg mot venstre i menyen. Rotere bildet 90 grader, motsols.
18. [MENU] – Trykk for å åpne hovedmenyen. Trykk og hold inne for å vise
OSD-menyen ved bilde- eller filmframvising.
19. [▼] – Forflytting nedover i menyen/Neste bilde/spor/film.
20. [◄◄] – Hurtigspoling bakover (musikk/film).
] – Trykk for å zoome inn bildet.
21. [
22. [4:3/16:9] – Endre bildeformat, 4:3 eller 16:9.
23. [VOL+] – Heve lydvolumet.
24. [SETUP] – Åpne/gå ut av innstillingsmenyen.
25. [OK] – Bekrefte/Starte eller ta pause i avspillingen.
26. [►] – Forflytt deg mot høyre i menyen. Neste bilde (under visning).
27. [OSD] – Vise/forlate OSD-menyen (OSD- menyen vises nederst på skjermen).
◄
] – Gå til foregående meny.
28. [
29. [►►] – Hurtigspoling framover (musikk/film).
] – Starte bildeframvisning med bakgrunnsmusikk.*
30. [
31. [♫] – Starter eller stopper spilling av musikk ved pågående bildeframvising.
32. [VOL-] – Senke lydvolumet.
* Kun dersom det tilkoblede minnet inneholder musikkfiler.
VOL+
SETUP
OK
►
OSD
▼
◄
►►
4:3
16:9
I
–
VOL
♫
24
25
26
27
28
29
30
31
32
Norsk
43
Page 44

OFF
ON
SD / MMC / MS
DC USB HOST
OFF
ON
SD / MMC / MS
DC USB HOST
OFF
ON
SD / MMC / MS
DC USB HOST
OFF
ON
SD / MMC / MS
DC
4. Kom i gang
4.1 Sette batteriet i fjernkontrollen.
Fjernkontrollen drives av ett CR2025 batteri (3 V).
Norsk
• Sett i batteriet som vist på bildene.
CR2025
Plasseres som vist i batteriholderen.
Fjern ev. beskyttelsesplast ved batteriet før bruk.
• Batteriets levetid er normalt inntil ett
år, men det er naturligvis avhengig
av hvor mye fjernkontrollen brukes.
• Skift batteri når fjernkontrollen ikke fungerer selv om den holdes nær sensoren på
den digitale fotorammen.
4.2 Montering av bordstøtte
Fotorammen kan henges opp på en vegg eller plasseres på et plant underlag ved hjelp
av bordstøtten (1). På baksiden av rammen er det opphengshull for veggmontering.
Montering av bordstøtten
• Drei bordstøtten i ca. 45° og trykk den forsiktig inn i åpningen på fotorammens
bakside.
• Drei den deretter i ønsket posisjon. Fotorammen kan stilles i horisontal- eller
vertikal posisjon.
SD / MMC / MS
ON
OFF
SD / MMC / MS
DC USB HOST
ON
OFF
DC USB HOST
44
Page 45

OFF
ON
SD / MMC / MS
DC USB HOST
4.3 Tilkobling av strømadapter
1. Koble den medfølgende strø-
madapteren til et strømuttak.
2. Koble deretter adapterens
DC-kontakt til tilkoblingspunktet merket DC (2) på
fotorammen.
SD / MMC / MS
ON
OFF
14
DC USB HOST
3. Still strømbrytern (14), som
er på rammens bakside,
2
i ON-posisjon for å skru
på fotorammen.
Obs!:
• Vanligvis brukes knappen POWER (15) på fjernkontrollen til å slå på fotorammen
eller sette den i standby-modus. For å skru av fotorammen helt må bryteren (14)
på rammens bakside settes i OFF modus.
• Strømadapteren må kobles fra strømuttaket dersom produktet ikke skal brukes på
en stund.
4.4. Montering av minnekort eller usb-minne
Obs! Bruk kun et minnekort av gangen (gjelder ikke ved kopiering).
Minnekort
Følgende minnekort kan brukes:
• SD (Secure Digital)
• MMC (Multimedia Card)
• MS (Memory Stick)
Hvis du benytter et av ovennevnte minnekort
til ditt digitalkamera, kan du koble dette minnekort direkte til fotorammen.
SD / MMC / MS
Norsk
ON
OFF
DC
1. Plasser minnekortet i passende kortholder, SD/MMC/MS (13). Trykk forsiktig på
kortet for å feste det.
2. Minnekortet tas ut ved å trekke det rett ut. Obs! Minnekortet må ikke trekkes ut
mens filoverføring pågår.
USB-minne
Til uttaket USB HOST (4) kan usb-enheten, som f.eks. usb-minne eller mp3-spiller,
kobles til.
45
Page 46

5. Bruk
5.1 Kopiere filer fra en datamaskin
Fotorammen kan kobles til en pc for å kopiere filer til minnekortet/usb-minnet som
er koblet til fotorammen.
Obs!
• Kompatibel med Windows 2000, XP og Vista.
• Når fotorammen er koblet til pc-en er ikke usb-inngangen USB HOST (4) tilgjengelig.
• Fotorammen må ikke kobles fra pc-en under filoverføringen.
1. Start pc-en og skru på fotorammen.
2. Påse at usb-minne ikke er koblet til fotorammen før den kobles til pc-en.
3. Mini-usb-kabelen kobles til uttaket merket USB (3) på fotorammen og den andre
enden til pc-en.
4. Pc-en identifiserer ”Ny maskinvare” og begynner å installere programvaren
automatisk. Vent til pc-en har sluttført installasjonen.
5. I ”Min datamaskin” kan du nå se flere ikoner for ”Flyttbar disk”.
Norsk
6. Dra og slipp filene mellom enhetene.
7. Når fotorammen skal kobles fra pc-en, dobbeltklikk først på Sikker fjerning av
maskinvare. Marker ”USB-masselagringsenhet” og klikk deretter på Stopp.
Avslutt med å klikke OK. Nå kan usb-kontakten kobles fra pc-en.
5.2 Vis bilder
1. Når minnekort eller usb-minne er koblet til, vil hovedmenyen vises på skjermen.
2. Manøvrer deg i hovedmenyen med [▲] (16), [▼] (19), [^] (11) eller [
3. Gå til foregående meny med [O] (8).
v
] (12).
5.3 Hovedmenyen
1. Trykk på [MENU] (18) eller [M] (7) for å vise hovedmenyen:
SD/MMC/MSVises når minnekortet
settes i.
USB Viser at USB-minne
er tilkoblet.
Clock Viser tiden og alar-
minnstilling. Tiden
stilles inn i SETUP.
Calendar Viser kalender og
innstilling for alarm.
SETUP Innstillinger.
46
Page 47

2. Manøvrer deg i hovedmenyen med [▲] (16), [▼] (19), [^] (11) eller [v] (12).
Photo Starte bildeframvisningen
eller vise bildene manuelt.
Music Starte avspilling av
mp3-filer.
Video Starte avspilling av video.
Files Vise alle filer på minne-
kort/usb-minne, kopiere
eller slette filer.
3. I Photo-modus vil bildene fra minnet bli vist som miniatyrer. Inntil 15 bilder kan
vises samtidig.
a. Marker minnekortet i hovedme-
nyen, trykk på[►] (26) og undermenyen åpnes.
b. Bildene i minnet vises som
miniatyrer:
c. Velg ønsket bilde med [◄] (17),
[►] (26) [▲] (16) eller [▼] (19).
Trykk OK hvis du vil starte framvisingen med start på det valgte
bildet eller for å starte fra starten
med bakgrunnsmusikk (dersom
minnet inneholder musikkfiler).
Norsk
5.4 Vising av et bilde
1. Koble til et usb-minne eller et minnekort som inneholder bildefiler med filformatene
jpg/jpeg.
2. Velg Photo og bekreft med OK.
3. Marker minnekortet i hovedmenyen og trykk OK.
4. Bildene i minnet vises som miniatyrer:
5. Velg ønsket bilde med [◄] (17), [►] (26) [▲] (16) eller [▼] (19). Trykk [OK] hvis du
vil starte framvisingen med start på det valgte bildet eller for å starte fra starten
med bakgrunnsmusikk (dersom minnet inneholder musikkfiler).
47
Page 48

5.5 Bildeviser (Slideshow)
◄
I
Fotorammen viser alle bilder, som er lagret på det tilkoblede minnet, i jpeg-format.
Disse blir vist som en lysbildeframvising. Dersom minnet også inneholder musikkfiler
vil disse også spilles av samtidig som bildene vises.
1. Koble til et usb-minne eller et minnekort som inneholder bildefiler med filformatene
jpg/jpeg.
2. Marker minnekortet i hovedmenyen og trykk OK.
3. Marker det minne du vil vise bilder fra ved hjelp av ◄ / ►-knappene og trykk
deretter OK for å starte bildeframvisingen.
4. Enheten finner bildefilene på det tilkoblede minnet automatisk. Bildeframvisingen
starter automatisk.
5. Knappefunksjoner for bildeframvisning:
Knapper på fotorammen
► Starte bildeframvisningen fra det bildet som vises: trykk på [►] igjen for
å ta pause i framvisningen og å stoppe ved aktuelle bilde. Trykk en gang
Norsk
Knapper på fjernkontrollen
MENU Åpne menyen.
til for å starte framvisningen igjen.
Stopp framvisningen og vis bildene som miniatyrer.
O
M Trykk og hold inne for å vise OSD-menyen ved bilde- eller filmframvising.
Start bildeframvisningen med bakgrunnsmusikk. Musikkfilene på minnet
starter automatisk.*
OK Start bildeframvisningen. Trykk på [OK] igjen for å ta pause i framvisningen
og kun vise ett aktuelt bilde. Trykk en gang til for å starte framvisningen
igjen. Ved pause vises II i displayets ene hjørne.
Stopp framvisningen og vis bildene som miniatyrer.
O
* Kun dersom det tilkoblede minnet inneholder musikkfiler.
Bruk av OSD-menyen (On Screen Display) ved bildeframvisning
• Ved framvisning av bilder: Trykk på [OSD] (27) eller [M] (7) for å vise OSD-menyen:
• OSD-menyen viser hvilke kontroller som kan brukes når bildet vises. Det viser også
informasjon om det aktuelle bildet som vises.
• Marker den ønskede funksjonen ved hjelp av [<] (9) eller [>] (10). Bekreft deretter
med [►] (6). Symbolene som vises er (fra venstre):
48
Page 49

II Aktuell status, avspilling
eller pause.
Vis foregående bilde.
I◄
Vis neste bilde.
►I
Start bildeframvisningen
med musikk fra første bildet.
Roter bildet. Trykk flere
ganger til bildet vises riktig.
Zoom inn i bildet, og trykk
flere ganger for å velge
ønsket forstørrelse: x 2, x 4,
x 8 eller x 16. Trykk på [M]
(7) for å gå ut av menyen.
Flytt deretter det forstørrede
bildet med [<] (9), [>] (10),
[^] (11) eller [v] (12).
Start avspilling av musikk.
♫
Redusere volumet.
Øke volumet.
Gå ut av OSD-menyen.
5.6 Spille musikk (Music)
Musikkspilleren kan spille av musikkfiler i mp3/wma-format.
1. Koble til et usb-minne eller et minnekort som inneholder musikkfiler med filforma-
tene mp3 eller wma.
2. Marker minnet som er koblet
til i hovedmenyen, f.eks.
”SD/MMC” og trykk OK.
3. Velg Music og bekreft
med OK.
4. Tilgjengelige musikkfiler
vises i en liste.
5. Velg ønsket spor med [▲]
(16) eller [▼] (19).
6. Trykk på OK for å starte
avspillingen.
Norsk
49
Page 50

Knappefunksjoner for avspillingen:
◄
I
Knapper på fotorammen:
► Start avspillingen med den markerte filen. Trykk på ► igjen for å ta pause
i avspillingen. Trykk en gang til for å starte spillingen igjen.
Stopp avspillingen og åpne menyen.
O
Knapper på fjernkontrollen:
Start bildeframvisningen med
bakgrunnsmusikk. Musikkfilene på minnet starter
automatisk.*
OK Start avspillingen. Trykk på
[OK] når du ønsker en pause,
og en gang til for å starte igjen. Ved pause vil II vises i det
ene hjørnet i displayet.
◄
Stopp avspillingen og åpne
menyen.
VOL+ Heve volumet.
VOL- Redusere volumet.
Hurtigspol bakover.
◄◄
Hurtigspol framover.
►►
Norsk
* Kun dersom det tilkoblede minnet inneholder musikkfiler.
Bruk av OSD-menyen (On Screen Display) ved spillingen av musikk
• Ved avspilling av musikk: Trykk på [OSD] (27) eller [M] (7) for å vise OSD-menyen:
• OSD-menyen viser hvilke kontroller som kan brukes ved spilling av musikk.
Den viser også informasjon om det aktuelle lydfilen som høres.
• Marker den ønskede funksjonen ved hjelp av [<] (9) eller [>] (10). Bekreft deretter
med [►] (6). Symbolene som vises er (fra venstre):
Aktuell status, avspilling eller
II
pause.
Repetere musikkspor: Trykk
gjentatte ganger for å velge: Off
(ingen repetisjon), One (repetere
I◄
Gå til forrige lydfil.
►I
Gå til neste lydfil.
◄◄
Hurtigspol bakover
►►
Hurtigspol framover
50
den fil som spilles) eller All
(repetere alle).
Redusere volumet.
Heve volumet.
Gå ut av OSD-menyen.
Page 51

5.7 Vise film (Movie)
Støtter følgende videofilmformater MPEG-1 / MPEG-2 / MPEG-4.
1. Koble til et usb-minne eller minne-
kort som inneholder videofiler
med et av de ovennevnte
filformatene.
2. Marker minnet som er koblet til
i hovedmenyen, f.eks. ”SD/MMC”
og trykk OK.
3. Velg Video og bekreft med OK.
4. Tilgjengelige videofiler vises
i en liste.
5. Velg ønsket fil med [▲] (16) eller
[▼] (19).
6. Trykk på OK for å starte avspillingen.
Bruk av OSD-menyen (On Screen Display) ved videoavspilling
• Ved vising av videofilmer: Trykk på [OSD] (13) eller [M] (7) for å vise OSD-menyen:
• OSD-menyen viser hvilke kontroller som kan brukes når filmen vises. Den viser
også informasjon om den aktuelle filmen som vises.
• Marker den ønskede funksjonen ved hjelp av [<] (9) eller [>] (10). Bekreft deretter
med [►] (6). Symbolene som vises er (fra venstre):
II Aktuell status, avspilling
eller pause.
Gå til forrige.
I◄
Gå til neste.
►I
Hurtigspole bakover.
◄◄
Hurtigspole framover
►►
Repetere video: Trykk gjentatte
ganger for å velge: Off (ingen
repetisjon), One (repetere den
fil som spilles) eller All (repetere
alle).
Zoom inn i bildet, og trykk
flere ganger for å velge ønsket
forstørrelse: x 2, x 4 eller x 8.
Trykk på [M] (3) for å gå ut av
menyen. Flytt deretter det forstørrede bildet med [<] (9), [>]
(10), [^] (11) eller [v] (12).
Redusere volumet.
Heve volumet.
Gå ut av OSD-menyen.
Norsk
51
Page 52

Knapper på fotorammen
◄
► Start avspillingen av merket fil. Trykk på [►] når du ønsker en pause, og
en gang til for å starte igjen.
Stopp avspillingen og åpne menyen.
O
Knapper på fjernkontrollen
OK Start avspillingen. Trykk på
[OK] igjen for å ta pause i
framvisningen og kun vise ett
aktuelt bilde. Trykk en gang til
for å starte igjen. Ved pause
vises II i displayets ene hjørne.
Stopp avspillingen og åpne
O
menyen.
Norsk
VOL+ Heve volumet.
VOL- Redusere volumet.
◄◄
►►
Hurtigspol bakover.
Hurtigspol framover.
5.8 Filhåndtereren
Filhåndtereren viser tilgjengelige filer på det minnet som er koblet til. Du kan også kopiere filer mellom tilkoblede minner. Obs! Minnekort kan ha aktivert skrivebeskyttelse.
Kontroller innstillingen.
1. Koble til usb-minne eller minnekort som inneholder bilde-, lyd- eller videofiler med
filformatet m-jpeg, mpeg-1 og mpeg-2.
2. Marker minnet som er koblet til i hovedmenyen, f.eks. ”SD/MMC” og trykk OK.
3. Velg Files og bekreft med OK.
4. Tilgjengelige filer som fotorammen kan håndtere vil komme opp som en liste.
5. Merk ønsket fil med [▲] (16) eller [▼] (19).
6. Trykk på OK for å vise bilde / starte avspillingen.
7. Returner til listen ved å trykke på [O] (8) eller [
underkatalog. Gå tilbake et nivå ved å trykke på [◄] (17).
8. Trykk en [MENU] (18) for å gå tilbake til hovedmenyen.
] (28). Trykk OK for å åpne en
Kopiere filer
For å kopiere filer må du ha to minner koblet til fotorammen, f.eks. et usb-minne
og et minnekort.
52
Page 53

1. Merk ønsket fil med [▲] (16)
eller [▼] (19).
2. Trykk [►] (26) for å merke filen.
Filen merkes med √ (trykk en
gang til for å fjerne merking).
3. Repeter trinn 1 og 2 dersom du
vil merke flere filer.
4. Trykk [OSD], en meny med val-
gene COPY og DELETE vises
til høyre for fillisten.
5. Merk COPY med [▲] (16) eller
[▼] (19) og bekreft med [OK]
(25). Andre tilkoblede minner
vises i en liste.
6. Velg et minne, hvor de kopierte filene skal lagres, med [▲] (16) eller [▼] (19).
Trykk [►] (26) hvis du vil velge en katalog som filene skal kopieres til.
7. Trykk på OK for å starte kopieringen.
8. Når filene er kopiert vises beskjeden ”Finished”.
9. Trykk OK for å gå tilbake.
Slette filer
1. Merk filen som skal slettes med [▲] (16) eller [▼] (19).
2. Trykk [►] (26) for å merke filen. Filen merkes med √ (trykk en gang til for
å fjerne merking).
3. Repeter trinn 1 og 2 dersom du vil merke flere filer.
4. Trykk [OSD], en meny med valgene COPY og DELETE vises til høyre for fillisten.
5. Merk DELET med [▲] (16) eller [▼] (19) og bekreft med [OK] (25).
6. Bruk [◄] og [►] for å merke √, for sletting eller X for å avslutte uten å slette filen/
filene. Trykk deretter OK for å fullføre slettingen.
Obs! Man kan ikke angre på denne handlingen!
7. Når filene er slettet vises beskjeden ”Finished”.
8. Trykk OK for å gå tilbake.
Norsk
53
Page 54

5.9 Vise klokke/kalender
Enheten kan vise tid og dato samtidig, som miniatyrbilde.
2. Merk Clock (eller Calendar)
i hovedmenyen og trykk OK.
3. Returner til hovedmenyen ved
å trykke på [O] (8) eller [
◄
] (28).
6. Innstillinger
1. Alt. 1: Marker SETUP i hoved-
Norsk
menyen og bekreft med OK.
Alt. 2: Trykk en gang på SETUP
på fjernkontrollen.
2. Bruk [▲] og [▼] for å merke den
ønskede innstilling i henhold til
listen nedenfor.
3. Trykk [◄] eller [►] for å endre
merket innstilling. Bekrefte
med knappen OK.
6.1 Alternativ innstilling
Photo Setup
Slide show time (Intervall for bildeframvisning) 3 s, 5 s, 15 s, 1 min eller 15 min.
Photo Mode (Bildframvisningsmodus), Full Screen (fullskjerm) eller Standard.
Transition Effekt (Visingseffekt) Off eller Random.
Date Stamp (Vis detaljert informasjon om bildene) Off eller On.
Shuffle (Vis bilder i tilfeldig rekkefølge) Off eller On.
Music Setup
Music repeat mode (Repeter musikkfiler), Repeat Off (ingen repetisjon), Repeat One
(repeter pågående musikkspor) eller Repeat All (repeter alle filer).
54
Page 55

Video Setup
• Music repeat mode (Repeter videofiler), Repeat Off (ingen repetisjon), Repeat
One (repeter pågående video) eller Repeat All (repeter alle videofiler).
Clock/Calendar Setup
• Time mode (Vis analog eller digital klokke) Digital clock eller Analog clock.
• Show photo (Vise/ikke vise miniatyrbilder samtidig med klokke og kalender)
OFF eller ON.
• Clock Wallpaper (Still inn bakgrunnsfarge for klokken) Black, Blue, Grey.)
• Set Time (Still inn tid) hh.mm timer, minutter.
• Set time format (Still inn visningsformat for tid) 12hr eller 24hr.
• Set Date (Still inn dato) år, måned, dato.
• Set date format (Still inn visningsformat for kalender) år, måned, dato eller dato,
måned, år etc.
Alarm Setup
• Alarm 1 – 4 (Still inn tid, funksjon og signal for fire valgfrie alarmer) Alarm 1,
Alarm 2 etc.
• Ringtone time mode (Still inn hva som skal vises ved vekking) Digital Clock,
Analog Clock eller Calendar.
• Ringtone volume (Still inn ønsket volum for alarm 1 – 4) 1, 2, 3, 4, 5 eller 6.
• Snooze (Snooze-funktion vid väckning) Off, 1 min, 5 min eller 10 min.
General Setup
• Language (Endre språk på menyene) (English, Français, Español, Deutsch,
Italiano, Portugués, Polski).
• Brightness (Justere lysstyrke på skjermen) +3, +2, +1, 0, -1, -2, -3.
• Contrast (Justere kontrastens skjerm) +3, +2, +1, 0, -1, -2, -3.
• Saturation (Justere fargemetting på skjermen) +3, +2, +1, 0, -1, -2, -3.
• Auto run (Innstilling på hvordan fotorammen skal begynne etter oppstart).
Photo, Main menu, Clock, Calendar.
• Power on (Stille inn tid for automatisk tilslag) hh.mm timer, minutter
• Power off (Stille inn tid for automatisk fraslag) hh.mm timer, minutter.
• Hint time (Stille inn tid for visning av knappefunksjon på skjermen) 0 s, 10s, 15 s
og 20 s.
• Copy Type (Behold vanlig bildekvalitet ved kopiering eller komprimer) Normal
eller Resize.
• Default - Stiller enheten tilbake til fabrikksinnstillinger.
Norsk
55
Page 56

6.2 Stile inn tid og dato
Tid
1. Gå til Setup > General setup > Clock/Calendar setup > Set time.
2. Trykk på [OK] (25) for å bekrefte.
3. Benytt [▲] (16) eller [▼] (19) for å stille inn aktuell tid, først Timer deretter Minutter
(trykk [►] (26) for å skifte mellom timer og minutter).
4. Trykk OK for å bekrefte.
Dato
1. Gå til Setup > General setup > Clock/Calendar setup > Set date.
2. Trykk på [OK] (25) for å bekrefte.
3. Bruk [▼] (16) eller [▼] (19) for å stille inn: År, Måned, Dato (trykk [►] (26) for
å skifte mellom innstillingene).
4. Trykk OK for å bekrefte.
6.2 Stille inn alarm
Norsk
1. Gå til Setup > General setup > Alarm setup > Alarm 1 etc.
2. Merk alarmen som skal stilles inn: Alarm 1, Alarm 2 etc.
3. Trykk på [OK] (25) for å bekrefte.
4. Bruk [▲] (16) eller [▼] (19) for å stille inn: Timer og Minutter (trykk [►] (26) for
å skifte mellom innstillingene).
5. Stille inn skjema for Alarm: Off (avstengt), Once (en gang) eller Every day (hver dag).
6. Still inn lyden for alarm: Rooster (galende hane), Forest (skogslyd) eller Church bell
(kirkeklokker).
7. Trykk på [OK] (25) for å bekrefte.
6.3 Stille inn Auto run
1. Gå til Setup > General setup > Auto run.
2. Trykk på [OK] (25) for å bekrefte.
3. Velg startfunksjon: Photo (bildevisning), Main menu (hovedmeny),
Clock (tidvisning), Calendar (dato).
4. Trykk på [OK] (25) for å bekrefte.
6.4 Stille inn automatisk til- og fraslåing
1. Gå til Setup > General setup > Power on (tilslag)
2. Trykk på [OK] (25) for å bekrefte.
3. Bruk [▲] (16) eller [▼] (19) for å stille inn: Timer og Minutter (trykk [►] (26) for
å skifte mellom innstillingene).
4. Stiller inn skjema for automatisk tilslag. Off (avstengt), Once (en gang) eller
Every day (hver dag).
5. Trykk på [OK] (25) for å bekrefte.
6. Gå til Setup > General setup > Power off (fraslag). Fortsett som innstilling for tilslag.
56
Page 57

Obs!
• Før innstilling av automatisk til- og fraslag, må enhetens klokke stilles inn.
Se avsnitt 6.1.
• Dersom tidspunktet for til- og fraslag allerede er passert, vil den skrus på/av neste
dag til innstilt tidspunk.
• For at ”Power on”-funksjonen skal fungere: Fotorammen skal kun skrus av med
[POWER]-knappen (15) på fjernkontrollen og ikke med bryteren (14) på baksiden
av rammen.
7. Stell og vedlikehold
Påse at fotorammen er avstengt og strømkabelen frakoblet ved rengjøring. Rengjør
med en myk og lett fuktet klut. Bruk aldri løsningsmiddel eller sterke rengjøringsmidler.
Ikke sprut noen form for væske på fotorammen.
8. Feilsøking
A. Hvorfor kan ikke fotorammen vise alle filene på minnekortet/usb-minnet?
• Enkelte minnekort er ikke kompatible med fotorammen. Bruk kun kompatible
minnekort).
• Feil filformat (støtter kun JPEG- bilder).
B. Et minnekort er koblet til fotorammen, men kan ikke avleses.
• Påse at minnekortet støttes av fotorammen.
• Påse at minnekortet er korrekt installert.
• Feil filformat (støtter kun JPEG- bilder).
Obs! Enkelte digitalkameraer lagrer bildene i filformat som ikke er standard.
Kontroller kameraets bruksanvisning.
Norsk
C. Enkelte bilder lades fortere enn andre.
• Bilder med høy oppløsning tar lengre tid å laste ned. Bruk bilder med lavere
oppløsning for raskere vising.
• Anbefalt oppløsning er 800 x 600 punkter.
Obs! Høyeste oppløsning som støttes er 8000 x 800 punkter.
D. Enheten starter ikke / Det kommer ikke opp noe bilde på skjermen.
• Kontroller at strømledningen er riktig satt i.
• Kontroller at strømbryteren står på ON.
57
Page 58

E. Hvordan rotere bildet?
• Trykk på [M] (7) og åpne OSD-menyen (i bilevisningsmodus)
• Benytt [<] (9) og [>] (10), for å gå til P i OSD-menyen.
• Trykk på [►] (6) flere ganger for å rotere bildet til ønsket posisjon.
Obs! Vær klar over at bildet går tilbake til opprinnelig posisjon igjen når fotorammen
skrus av.
F. Hvilken oppløsning er best?
• Anbefalt oppløsning er 800 x 600 bildepunkter. Høyeste bildeoppløsning
er 8000 x 8000 bildepunkter.
G. Fjernkontrollen fungerer ikke.
• Kontroller batteriet og bytt det ved behov.
• Rett fjernkontrollen mot sensoren. Reduser avstanden mellom fjernkontroll
og fotorammen. Kontroller at ingen hinder finnes mellom fjernkontroll og sensor.
Norsk
9. Avfallshåndtering
Når produktet skal kasseres, må det skje i henhold til lokale forskrifter. Ved usikkerhet,
ta kontakt med lokale myndigheter.
10. Spesifikasjoner
Skjerm: 8″ farge TFT LCD, 4:3
Oppløsning: 800 (h) x 600 (v)
Spenning: 5 V DC, 2 A (via medfølgende nettadapter)
(100–240 V AC, 50/60 Hz)
Batteri, fjernkontroll: 1 x CR2025 (3 V litium)
Usb-tilkobling: 2.0 (støtte for USB-minne, Mp3-spiller)
Leser for minnekort: SD (Secure Digital), MMC (Multimedia Card),
MS (Memory Stick)
Bildeformat: JPEG (høyeste oppløsning: 8000 x 8000)
Lydformat: MP3, 32-320 kbps bit rate (CBR, VBR)
Videoformat: MPEG-1, MPEG-2, MPEG-4
Høyttalere: Innebygd
Størrelse: 216 x 182 x 28 mm
Vekt: 603 g
Bruksmiljø:
Temperatur ved bruk: 0 °C ~ 45 °C ved <95 % RH
Temperatur for oppbevaring: -20 °C ~ 60 °C ved <80 % RH
58
Page 59

Digitaalinen valokuvakehys 8″
Tuotenumero 38-3728 Malli PF-8DN-283V3RTC
Lue käyttöohjeet ennen tuotteen käyttöönottoa ja säästä ne tulevaa tarvetta varten.
Pidätämme oikeuden teknisten tietojen muutoksiin. Emme vastaa mahdollisista teksti- tai kuvavirheistä. Jos laitteeseen tulee teknisiä ongelmia, ota yhteys myymälään tai
asiakaspalveluun (yhteystiedot käyttöohjeen lopussa).
Sisällysluettelo
1. Turvallisuus
2. Tuotekuvaus
3. Painikkeet ja liitännät
4. Käytön aloittaminen
5. Käyttö
6. Asetukset
7. Huolto ja ylläpito
8. Vianhaku
9. Kierrätys
10. Tekniset tiedot
Suomi
59
Page 60

1. Turvallisuus
Varoitus! Älä avaa laitteen koteloa. Kotelon sisällä on vaarallista jännitettä sisältäviä
suojaamattomia komponentteja, jotka voivat aiheuttaa sähköiskun.
• Laitteen saa korjata vain alan ammattilainen.
• Älä pura tai muuta laitetta.
• Älä sijoita laitetta sellaiseen paikkaan, josta se voi tippua veteen tai muuhun
nesteeseen. Älä laita laitteen päälle nesteitä sisältäviä esineitä, kuten maljakoita
tai limsapulloja.
• Älä peitä ilmastointiaukkoja. Älä aseta tuotetta lämpimien paikkojen läheisyyteen,
esim. lämmittimen tai tv:n päälle tai sohvalle, jossa ilmastointiaukot ovat
vaarassa peittyä.
• Käytä ainoastaan pakkauksen muuntajaa. Poista muuntaja pistorasiasta, jos et
käytä tuotetta vähään aikaan.
• Älä laita painavia tai teräviä esineitä näytön päälle. Suojaa verkkokaapeli teräviltä
kulmilta ja päälleastumiselta.
• Tuote on suunniteltu 8–10 tunnin jatkuvaan käyttöön. Vältä käyttämästä sitä pidem-
pään yhtäjaksoisesti. Anna laitteen jäähtyä hetki, ennen kuin käytät sitä uudestaan.
• Tuote on tarkoitettu vain sisäkäyttöön.
• Älä altista laitetta pitkäkestoiselle suoralle auringonvalolle.
• Älä käytä laitetta kosteissa, pölyisissä tai likaisissa ympäristöissä.
• Puhdista näyttö pehmeällä liinalla, joka on kostutettu miedossa pesuaineliuoksessa.
• Älä kytke muuntajaa pois toiston aikana. Tämä voi vahingoittaa kehykseen liitettyä
muistia. Älä myöskään poista liitettyä muistia toiston aikana.
Suomi
2. Tuotekuvaus
• Digitaalinen valokuvakehys, jossa 8”:n laajakuvanäyttö. Erottelukyky 800 x 600,
kuvasuhde 4:3.
• Katsele digikuviasi ilman tietokonetta.
• Liitäntä usb-muistille tai muistikortille (SD/MMC/MS).
• Kuvaesitys erilaisilla näyttötehosteilla ja säädettävällä vaihtumisvälillä.
• Voit katsella kuvia ja kuunnella musiikkia samanaikaisesti.
• Tukee MPEG-1-, MPEG-2- ja MPEG-4-formaatteja.
• Mp3- ja WMA-tuki.
• Musiikin ja elokuvien uudelleentoistotoiminto.
• Kiinteät kaiuttimet.
• Hipaisupainikkeet, joissa sininen taustavalo.
• Kalenteri
• Hälytys (4 eri aikaa)
• Mukana kaukosäädin ja muuntaja.
• Laitteen voi säätää kytkeytymään automaattisesti päälle/pois päältä.
60
Page 61

3. Painikkeet ja liitännät
4
13
3
2
◄
M
►
U
V
<
V
>
1
5 6 7 8 9 10 11 12
1. Säädettävä pöytätuki
2. Liitäntä pakkauksen muuntajalle (5 V DC, 2 A) (+ keskellä)
3. Mini-usb -liitäntä
4. Usb-liitäntä
5. Infrapunatunnistin kaukosäätimelle
6. [►] Aloita näyttö/pidä tauko/vahvista valinta
7. [M] – Avaa valikko. Paina ja pidä pohjassa nähdäksesi OSD-valikon kuvien tai
filmin katselun aikana.
8. [O] Poistu päävalikosta
9. [<] Vasemmalle valikossa
10. [>] Oikealle valikossa
11. [^] Ylöspäin valikossa
v
] Alaspäin valikossa
12. [
13. SD/MMC/MS – Muistikorttiliitäntä (SD/MMC/MS)
14. Virtakytkin – Käynnistä tai sammuta valokuvakehys
14
Suomi
61
Page 62

Kaukosäädin
◄
◄
I
▲
15
16
17
18
◄
MENU
19
20
◄◄
21
22
23
15. [ ] – Käynnistä tai sammuta valokuvakehys
16. [▲] – Siirry ylöspäin valikossa / Edellinen kuva/raita/filmi
17. [◄] – Siirry vasemmalle valikossa. Pyöritä kuvaa 90 asetta vastapäivään.
18. [MENU] – Avaa päävalikko. Paina ja pidä pohjassa, niin näet OSD-valikon kuvien
tai filmin katselun aikana.
19. [▼] – Siirry alaspäin valikossa / Seuraava kuva/raita/filmi
Suomi
20. [◄◄] – Pikakelaa taaksepäin (musiikki/filmi)
] – Suurenna kuvaa
21. [
22. [4:3/16:9] – Vaihda kuvasuhdetta: 4:3 tai 16:9
23. [VOL+] – Lisää äänenvoimakkuutta
24. [SETUP] – Avaa asetusvalikko/Poistu asetusvalikosta
25. [OK] – Vahvista / Käynnistä tai pidä tauko
26. [►] – Siirry valikossa oikealle. Seuraava kuva (näytön aikana)
27. [OSD] – Näytä OSD-valikko/poistu OSD-valikosta (OSD-valikko näkyy
näytön alalaidassa)
◄
] Palaa edelliseen valikkoon
28. [
29. [►►] – Pikakelaa eteenpäin (musiikki/filmi)
] – Käynnistä kuvaesitys taustamusiikilla*
30. [
31. [♫] – Aloita/lopeta musiikin toisto meneillään olevan kuvaesityksen aikana
32. [VOL-] – Laske äänenvoimakkuutta
*Vain, jos liitetty muisti sisältää musiikkitiedostoja.
VOL+
SETUP
OK
►
OSD
▼
◄
►►
4:3
16:9
I
–
VOL
♫
24
25
26
27
28
29
30
31
32
62
Page 63

OFF
ON
SD / MMC / MS
DC USB HOST
OFF
ON
SD / MMC / MS
DC USB HOST
OFF
ON
SD / MMC / MS
DC USB HOST
OFF
ON
SD / MMC / MS
DC
4. Käytön aloittaminen
4.1 Aseta paristo kaukosäätimeen
Kaukosäädin toimii yhdellä CR2025-paristolla (3 V).
• Aseta paristo kuvan osoittamalla taval-
la. Varmista, että paristo tulee oikein
CR2025
päin. Poista pariston suojamuovi ennen käyttöä.
• Pariston käyttöikä on normaalisti noin
vuoden, mutta se riippuu kaukosäätimen käytön määrästä.
• Vaihda paristo silloin, kun kaukosäädin ei toimi, vaikka osoitat kehyksessä olevaa
tunnistinta läheltä.
4.2 Pöytätuen asentaminen
• Valokuvakehyksen voi ripustaa seinälle tai sen voi laittaa seisomaan jollekin tasolle
pakkauksen pöytätuen (1) avulla.
• Kehyksen kääntöpuolella on reikä seinäasennusta varten.
Pöytätuen asentaminen
1. Käännä pöytätukea noin 45 °:een kulmaan ja paina se varovasti kehyksen
takaosassa olevaan aukkoon.
2. Käännä sitten pöytätuki haluamaasi asentoon. Voit asettaa valokuvakehyksen joko
vaaka- tai pystyasentoon.
SD / MMC / MS
ON
OFF
DC USB HOST
SD / MMC / MS
Suomi
ON
OFF
DC USB HOST
63
Page 64

Suomi
OFF
ON
SD / MMC / MS
DC USB HOST
4.3 Muuntajan liittäminen
1. Liitä pakkauksen muuntaja
verkkopistorasiaan.
2. Liitä sitten muuntajan DC-
pistoke valokuvakehyksen
DC-liitäntään (2).
3. Käynnistä kehys asettamalla
SD / MMC / MS
ON
OFF
14
DC USB HOST
kehyksen takapuolella oleva
virtakytkin (14) asentoon ON.
2
Huom.
• Yleensä kaukosäätimen POWER-painiketta (14) käytetään valokuvakehyksen
standby-tilan käynnistämiseen tai aktivoimiseen. Kun haluat sammuttaa kehyksen
kokonaan, aseta kehyksen takapuolella oleva virtakytkin (14) OFF-asentoon.
• Poista muuntaja pistorasiasta, jos et käytä tuotetta vähään aikaan.
4.4. Muistikortin tai usb-muistin liittäminen
Huom.! Käytä vain yhtä muistikorttia kerrallaan (paitsi kopioinnin aikana).
Muistikortit
Voit käyttää seuraavia muistikortteja:
• Secure Digital (SD)
• Multimedia Card (MMC)
• Memory Stick (MS)
Jos digitaalikamerassasi on jokin edellä mai-
nituista muistikorteista, voit liittää kameran
muistikortin suoraan valokuvakehykseen.
SD / MMC / MS
ON
OFF
DC
1. Laita muistikortti sopivaan liitäntään – SD/MMC/MS (13). Paina kortti
varovasti sisään.
2. Poista muistikortti vetämällä se suoraan ulospäin. Huom.! Älä vedä muistikorttia
pois tiedostonsiirron aikana.
USB-muistit
USB HOST –liitäntään (4) voi liittää usb-yksiköitä, kuten usb-muistin tai mp3-soittimen.
64
Page 65

5. Käyttö
5.1 Tiedostojen kopioiminen tietokoneelta
Voit liittää valokuvakehyksen tietokoneeseen ja kopioida tiedostoja muistikorttiin/usbmuistiin, joka on liitetty kehykseen.
Huom.!
• Windows 2000-, XP- ja Vista -yhteensopiva.
• Kun valokuvakehys on liitettynä tietokoneeseen (mini-usb -kaapelin kautta),
ei usb-liitäntä USB HOST (4) ole käytettävissä.
• Älä irrota kehystä tietokoneesta kopioinnin aikana.
1. Käynnistä tietokone ja valokuvakehys.
2. Varmista, että kehykseen ei ole liitettynä usb-muistia, kun liität sen tietokoneeseen.
3. Liitä mini-usb -kaapeli kehyksen USB-liitäntään (3) ja tietokoneeseen.
4. Tietokone tunnistaa uuden laitteen ja asennus alkaa automaattisesti. Odota, kunnes
tietokone on suorittanut asennuksen loppuun.
5. Kohdassa ”Oma tietokone” voit nähdä useita kuvakkeita ”Siirrettävänä kovalevynä”.
6. ”Vedä ja pudota” tiedostoja yksiköiden välillä.
7. Kun haluat irrottaa valokuvakehyksen tietokoneesta, kaksoisnapsauta ensin kohtaa
Poista laite turvallisesti. Valitse ”USB-massamuistilaite” ja napsauta ”Sammuta”.
Napsauta lopuksi OK. Nyt voit irrottaa usb-pistokkeen tietokoneesta.
5.2 Kuvien katselu
1. Jos laitteeseen on liitetty muistikortti tai usb-muisti, näkyy näytöllä päävalikko.
2. Liiku päävalikossa painikkeilla [▲] (16) ja [▼] (19) tai [^] (11) ja [
3. Palaa edelliseen valikkoon painikkeella [O] (8).
v
] (12).
Suomi
5.3 Päävalikko
1. Näytä päävalikko painamalla [MENU] (18) tai [M] (7).
SD/MMC/MSNäkyy, kun työnnät
sisään muistikortin.
USB Näyttää liitetyt
usb-muistit.
Clock Näyttää kellonajan ja
asetetun hälytysajan
Kellonaika asetetaan
kohdassa ”Setup”.
Calendar Näyttää kalenterin ja
asetetun hälytysajan.
Setup Asetukset.
65
Page 66

2. Liiku valikoissa painikkeilla [▲] (16) ja [▼] (19) tai [^] (11) ja [v] (12).
Photo Käynnistä kuvaesitys
tai näytä kuvat muistilta
manuaalisesti.
Music Aloita mp3-tiedostojen
esitys.
Video Aloita videon esitys.
Files Näytä muistikortin/usb-
muistin kaikki tiedostot,
tai kopioi tai poista
tiedostoja.
3. ”Photo”-tilassa muistissa olevat kuvat näkyvät pieninä kuvakkeina. Näytöllä voi
samanaikaisesti näyttää korkeintaan 15 kuvaa.
a) Valitse muistikortti päävalikosta ja
paina [►] (26), jolloin alavalikko
avautuu.
b) Muistissa olevat kuvat näkyvät
pieninä kuvakkeina.
Suomi
c) Valitse kuva painikkeilla [◄] (17),
[►] (26), [▲] (16) tai [▼] (19).
Paina [OK] (25), jos haluat aloittaa
kuvaesityksen valitulla kuvalla tai
jos haluat aloittaa kuvaesityksen
alusta taustamusiikin kanssa (jos
muisti sisältää musiikkitiedostoja).
5.4 Kuvan näyttäminen
1. Liitä laitteeseen usb-muisti tai muistikortti, joka sisältää kuvatiedostoja JPG/JPEG-
muodossa.
2. Valitse Photo ja hyväksy painamalla [OK] (25).
3. Valitse muistikortti päävalikossa ja paina [OK] (25).
4. Muistin kuvat näkyvät pieninä kuvakkeina.
5. Valitse kuva painikkeilla [◄] (17), [►] (26), [▲] (16) tai [▼] (19). Paina [OK] (25), jos
haluat aloittaa kuvaesityksen valitulla kuvalla tai jos haluat aloittaa kuvaesityksen
alusta taustamusiikin kanssa (jos muisti sisältää musiikkitiedostoja).
66
Page 67

5.5 Kuvaesitys (Slideshow)
◄
I
Valokuvakehys näyttää kuvaesityksenä kaikki liitetyssä muistissa olevat jpeg-muotoiset
kuvat. Jos muistissa on myös musiikkitiedostoja, toistetaan nämä samalla kun kuvaesitys on käynnissä.
1. Liitä laitteeseen usb-muisti tai muistikortti, joka sisältää kuvatiedostoja JPG/JPEG-
muodossa.
2. Valitse muistikortti päävalikossa ja paina [OK] (25).
3. Valitse ◄ (17) ja ► (26) -painikkeilla se muisti, josta haluat kuvat näyttää ja aloita
kuvaesitys painamalla [OK] (25).
4. Laite löytää kuvatiedostot liitetystä muistista automaattisesti ja käynnistää
kuvaesityksen.
5. Näppäintoiminnot kuvaesityksen aikana:
Valokuvakehyksen painikkeet
Aloita kuvaesitys näkyvillä olevasta kuvasta. Paina [►] uudelleen, kun
►
haluat pitää tauon kuvaesityksessä ja vielä kerran, kun haluat jatkaa
esitystä.
Keskeytä kuvaesitys ja näytä kuvat pieninä.
O
M Avaa valikko. Paina ja pidä pohjassa nähdäksesi OSD-valikon kuvien tai
filmin katselun aikana.
Kaukosäätimen painikkeet
Aloita kuvaesitys ja taustamusiikki. Muistin musiikkitiedostot käynnistyvät
automaattisesti*.
OK Aloita kuvaesitys. Paina [OK] uudelleen, kun haluat pitää tauon kuvaesi-
tyksessä ja näyttää vain näkyvissä olevan kuvan. Paina vielä kerran, kun
haluat jatkaa esitystä. Tauon aikana II näkyy näytön kulmassa.
Keskeytä kuvaesitys ja näytä kuvat pieninä.
O
MENU Avaa valikko.
*Vain, jos liitetty muisti sisältää musiikkitiedostoja.
Suomi
OSD-valikon (On Screen Display) käyttö kuvaesityksen aikana
• Kuvaesityksen aikana: Näytä OSD-valikko näytön alalaidassa painamalla [OSD] (27)
tai [M] (7).
• OSD-valikko kertoo, mitä toimintoja voidaan käyttää kuvien näytön aikana sekä
näyttää tietoja senhetkisestä kuvasta.
• Merkitse haluamasi toiminto painikkeilla [<] (9) tai [>] (10) ja vahvista painamalla [►]
(6). Symbolit vasemmalta alkaen:
67
Page 68

II Näytä status: toisto tai
tauko.
Näytä edellinen kuva.
I◄
Näytä seuraava kuva.
►I
Aloita kuvaesitys ensimmäisestä kuvasta taustamusiikin
säestämänä.
Käännä kuvaa painamalla
niin monta kertaa, että kuva
näkyy oikein päin.
Zoomaa kuvaa. Paina useita
kertoja valitaksesi suurennoksen seuraavista: X2, X4,
X8 tai X16. Poistu valikosta
painamalla [M] (7). Siirrä
suurennettua kuvaa painikkeilla [<] (9), [>] (10), [^] (11)
tai [v] (12).
Aloita musiikin toisto.
♫
Pienennä äänenvoimakkuutta.
Lisää äänenvoimakkuutta.
Poistu OSD-valikosta.
5.6 Kuuntele musiikkia (Music)
Laite toistaa musiikkitiedostoja, jotka ovat mp3/wma-muodossa.
Suomi
1. Liitä laitteeseen usb-muisti tai muistikortti, joka sisältää äänitiedostoja mp3/
wma-muodossa.
2. Valitse liitetty muisti pääva-
likosta, esim. ”SD/MMC” ja
paina [OK] (25).
3. Valitse Music ja hyväksy
painamalla [OK].
4. Saatavilla olevat musiikkitie-
dostot näkyvät listassa.
5. Valitse haluttu musiikkitie-
dosto [▲] (16) tai [▼] (19)
-painikkeella.
6. Aloita toisto painamalla
[OK] (25).
68
Page 69

Näppäintoiminnot toiston aikana
◄
I
Valokuvakehyksen painikkeet
► Aloita toisto merkitystä tiedostosta. Pidä tauko painamalla ► uudelleen ja
jatka toistoa painamalla painiketta vielä kerran.
Keskeytä toisto ja avaa valikko.
O
Kaukosäätimen painikkeet
Aloita kuvaesitys ja taustamusiikki. Muistin musiikkitiedostot
käynnistyvät automaattisesti*.
◄
Keskeytä toisto ja avaa valikko.
VOL+ Lisää äänenvoimakkuutta.
OK Aloita toisto. Pidä tauko pai-
VOL- Pienennä äänenvoimakkuutta.
namalla [OK] uudelleen ja jatka
toistoa painamalla painiketta
◄◄
Pikakelaa taaksepäin
vielä kerran. Tauon aikana II
näkyy näytön kulmassa.
►►
Pikakelaa eteenpäin.
*Vain, jos liitetty muisti sisältää musiikkitiedostoja.
OSD-valikon (On Screen Display) käyttö musiikin toiston aikana
• Näytä OSD-valikko näytön alalaidassa painamalla [OSD] (27) tai [M] (7).
• OSD-valikko näyttää, mitä toimintoja voidaan käyttää musiikin toiston aikana sekä
näyttää tietoja senhetkisestä musiikkitiedostosta.
• Merkitse haluamasi toiminto painikkeilla [<] (9) tai [>] (10) ja vahvista painamalla
[►] (6). Symbolit vasemmalta alkaen:
II Näytä status: toisto tai tauko.
Siirry edelliseen ääniraitaan.
I◄
Siirry seuraavaan ääniraitaan.
►I
Pikakelaa taaksepäin.
◄◄
Pikakelaa eteenpäin.
►►
Toista musiikkiraita: Valitse
seuraavista vaihtoehdoista
painamalla useita kertoja:
Off (ei toistoa), One (toista
senhetkinen tiedosto) tai
All (toista kaikki).
Pienennä äänenvoimakkuutta.
Lisää äänenvoimakkuutta.
Suomi
Poistu OSD-valikosta.
69
Page 70

5.7 Filmien katselu (Video)
Laite toistaa seuraavantyyppisiä videotiedostoja: MPEG-1, MPEG-2 ja MPEG-4.
1. Liitä laitteeseen usb-muisti tai muistikortti, joka sisältää seuraavantyyppisiä videotiedostoja: MPEG-1,
MPEG-2 tai MPEG-4.
2. Valitse liitetty muisti päävalikosta,
esim. ”SD/MMC” ja paina [OK] (25).
3. Valitse Video ja hyväksy painamalla
[OK] (25).
4. Saatavilla olevat videotiedostot
näkyvät listassa.
5. Valitse musiikkitiedosto [▲] (16) tai
[▼] (19) -painikkeella.
6. Aloita toisto painamalla [OK] (25).
OSD-valikon (On Screen Display) käyttö videon toiston aikana
• Paina [OSD] (13) tai [M] (3), jolloin OSD-valikko näkyy näytön alalaidassa.
• OSD-valikko kertoo, mitä toimintoja voidaan käyttää videon näytön aikana sekä
näyttää tietoja senhetkisestä videosta.
• Valitse haluamasi toiminto painikkeilla [<] (9) tai [>] (10) ja vahvista painamalla [►]
(6). Symbolit vasemmalta alkaen:
Suomi
II Näytä senhetkinen status:
toisto tai tauko.
Siirry edelliseen.
I◄
Siirry seuraavaan.
►I
Pikakelaa taaksepäin
◄◄
Pikakelaa eteenpäin.
►►
Toista video: Valitse seuraavista
vaihtoehdoista painamalla useita kertoja: Off (ei toistoa), One
(toista senhetkinen tiedosto) tai
All (toista kaikki).
Zoomaa kuvaa. Paina useita
kertoja valitaksesi suurennoksen: x2, x4 tai x8. Poistu valikosta painamalla [M]. Siirrä suurennettua kuvaa painikkeilla [<]
(9), [>] (10), [^] (11) tai [v] (12).
Pienennä äänenvoimakkuutta.
Lisää äänenvoimakkuutta.
Poistu OSD-valikosta.
70
Page 71

Valokuvakehyksen painikkeet
◄
► Aloita toisto merkitystä tiedostosta. Pidä tauko painamalla [►] (6) uudelleen
ja jatka toistoa painamalla painiketta vielä kerran.
Keskeytä toisto ja avaa valikko.
O
Kaukosäätimen painikkeet
OK Aloita toisto. Paina [OK] uudel-
leen, kun haluat pitää tauon
toistossa. Paina vielä kerran,
kun haluat jatkaa toistoa.
Tauon aikana II näkyy näytön
kulmassa.
Keskeytä toisto ja avaa valikko.
O
VOL+ Lisää äänenvoimakkuutta.
VOL- Pienennä äänenvoimakkuutta.
Pikakelaa taaksepäin.
◄◄
Pikakelaa eteenpäin.
►►
5.8 Tiedostonhallinta (Files)
Tiedostonhallinta näyttää liitetyn muistin saatavilla olevat tiedostot. Voit myös kopioida
tiedostoja liitettyjen muistien välillä. Huom.! Muistikortin kirjoitussuoja voi olla aktivoitu,
tarkista säädön tila.
1. Liitä MPEG-1/M-PEG-2/MPEG-4 -muodossa olevia kuva-, ääni- tai videotiedostoja
sisältävä usb-muisti tai muistikortti.
2. Valitse liitetty muisti päävalikosta, esim. ”SD/MMC” ja paina [OK] (25).
3. Valitse Files ja hyväksy painamalla [OK] (25).
4. Kaikki valokuvakehyksellä saatavissa olevat tiedostot näkyvät listassa.
5. Valitse haluamasi tiedosto [▲] (16) tai [▼] (19) -painikkeella.
6. Näytä kuva/aloita toisto painamalla [OK] (25).
7. Palaa luetteloon painamalla [O] (8) tai [
Palaa edelliselle tiedostotasolle ◄-painikkeella (17).
8. Palaa päävalikkoon painamalla MENU-painiketta (18).
] (28). Avaa alatiedosto painamalla OK.
Suomi
Tiedostojen kopioiminen
Jos haluat kopioida tiedostoja, liitä kehykseen kaksi muistia, esim. usb-muisti
ja muistikortti.
71
Page 72

1. Valitse kopioitava tiedosto painikkeella ▲ (16) tai ▼ (19).
2. Valitse tiedosto painamalla [►] (26),
jolloin tiedoston kohdalle tulee √
(painamalla uudestaan merkintä
poistuu).
3. Toista kohdat 1 ja 2, jos haluat
valita lisää tiedostoja.
4. Paina [OSD], jolloin tiedostoluettelon oikealle puolelle ilmestyy valikko, jossa on valintamahdollisuudet
COPY ja DELETE.
5. Valitse COPY ▲- tai ▼ -painikkeilla
ja vahvista painamalla [OK] (25).
Muut liitetyt muistit näkyvät listassa.
6. Valitse muisti, jolle haluat kopioida tiedoston painikkeilla ▲ (16) ja ▼ (19). Paina
[►] (26), jos haluat valita kansion, mihin tiedostot kopioidaan.
7. Aloita kopioiminen painamalla [OK] (25).
8. Kun tiedostot on kopioitu, ilmoitetaan siitä viestillä ”Finished”.
9. Lopeta painamalla [OK]-painiketta.
Tiedostojen poisto
1. Valitse poistettava tiedosto painikkeella ▲ (16) tai ▼ (19).
Suomi
2. Valitse tiedosto painamalla [►] (26), jolloin tiedoston kohdalle tulee √ (painamalla
uudestaan merkintä poistuu).
3. Toista kohdat 1 ja 2, jos haluat valita lisää tiedostoja.
4. Paina [OSD] (27), jolloin tiedostoluettelon oikealle puolelle ilmestyy valikko, jossa on
valintamahdollisuudet COPY ja DELETE.
5. Valitse DELETE ▲- tai ▼ -painikkeilla ja vahvista painamalla [OK] (25).
6. Valitse ◄- ja ► -painikkeilla joko √ (vahvista poisto) tai x (poistu valikosta poistamatta tiedostoa/tiedostoja). Viimeistele tiedostojen poistaminen painamalla [OK].
Huom.! Poistettuja tiedostoja ei saa enää takaisin!
7. Kun tiedostot on poistettu, ilmoitetaan siitä viestillä ”Finished”.
8. Lopeta painamalla [OK]-painiketta.
72
Page 73

5.9 Näytä kello/kalenteri
Yksikkö voi näyttää ajan ja päivämäärän pienenä kuvakkeena.
1. Valitse Clock (tai Calendar) päävalikossa ja paina [OK] (25).
2. Palaa päävalikkoon painamalla [O]
(8) tai [
◄
] (28).
6. Asetukset
1. Vaihtoehto 1: Valitse päävalikosta
SETUP ja vahvista painamalla
[OK] (25).
Vaihtoehto 2: Paina kerran
kaukosäätimen [SETUP]painiketta (24).
2. Valitse haluamasi asetus alla olevan listan asetuksista [▲](16)- ja
[▼] (19) -painikkeilla.
3. Muuta valittua asetusta painamalla
[◄] (17) tai [►] (26). Vahvista valinta [OK]-painikkeella (25).
Suomi
Asetusvaihtoehdot
Photo Setup
• Slide show time (kuvaesityksen intervalli) 3 s, 5 s, 15 s, 1 min tai 15 min.
• Photo Mode (kuvannäyttötila) Full Screen (koko näyttö) tai Standard screen.
• Transition Effect (näyttötehoste) Off tai Random.
• Date Stamp (näyttää yksityiskohtaista tietoa kuvasta) Off tai On.
• Shuffle (näyttää kuvat satunnaisessa järjestyksessä) Off tai On.
Music Setup
• Music repeat mode (toistaa musiikkitiedostoja) Repeat Off (ei toistoa), Repeat
One (toistaa senhetkisen musiikkiraidan) tai Repeat All (toistaa kaikki tiedostot).
73
Page 74

Video Setup
• Music repeat mode (toistaa videotiedostoja) Repeat Off (ei toistoa), Repeat One
(toistaa senhetkisen videon) tai Repeat All (toistaa kaikki videotiedostot).
Clock/Calendar Setup
• Time mode (näyttää analogisen/digitaalisen kellon) Digital clock tai Analog clock.
• Show photo (kello ja kalenteri näkyvät/eivät näy pienessä kuvakkeessa) Off tai On.
• Clock Wallpaper (valitse kellon taustaväriksi musta, sininen tai harmaa) Black,
Blue, Grey.
• Set Time (aseta tunnit ja minuutit) - hh.mm.
• Set time format (aseta kellonajan näyttötapa 12 tai 24 t) 12 hr tai 24 hr.
• Set date (aseta päivämäärä) vuosi, kuukausi, päivä.
• Set date format (aseta päivämäärän näyttötapa) vuosi, kuukausi, päivä/päivä,
kuukausi, vuosi.
Alarm Setup
• Alarm 1 – 4 (aseta aika, toiminto ja merkkiääni neljälle eri hälytykselle) Alarm 1,
Alarm 2 jne.
• Ringtone time mode (aseta herätyksen aikana näkyvät tiedot) Digital Clock,
Analog Clock tai Calendar.
• Ringtone volume (aseta äänenvoimakkuus hälytyksille 1–4) 1, 2, 3, 4, 5 tai 6.
• Snooze (herätyksen torkkutoiminto) Off, 1 min, 5 min tai 10 min.
Suomi
General Setup
• Language (vaihda valikoiden kieli) English, Deutsch, Français, Español,
Italiano, Portugués, Polski).
• Brightness (säädä näytön valonvoimakkuutta) +3, +2, +1, 0, -1, -2, -3.
• Contrast (säädä näytön kontrastia) +3, +2, +1, 0, -1, -2, -3.
• Saturation (säädä näytön värikylläisyyttä) +3, +2, +1, 0, -1, -2, -3.
• Auto run (aseta käynnistyksen jälkeinen tila) Photo, Main menu, Clock, Calendar.
• Power on (aseta automaattisen käynnistyksen ajankohta) hh.mm: tunnit, minuutit.
• Power off (aseta automaattisen sammutuksen ajankohta) hh.mm: tunnit, minuutit.
• Hint time (aseta näytön näppäintoiminnon näyttöaika) 0 s, 10 s, 15 s ja 20 s.
• Copy Type (säilytä normaali kuvanlaatu kopioinnin aikana / pakkaa) Normal
tai Resize.
• Default (palauta tehdasasetukset).
74
Page 75

6.1 Kellonajan ja päivämäärän asettaminen
Aika
1. Valitse Setup > General setup > Clock/Calendar setup > Set time.
2. Vahvista painamalla [OK] (25).
3. Aseta aika painikkeilla [▼] (19) tai [▲] (16). Ensin tunnit, sitten minuutit (vaihda
tuntien ja minuuttien välillä painamalla [►] (26)).
4. Vahvista painamalla [OK].
Päiväys
1. Valitse Setup > General setup > Clock/Calendar setup > Set date.
2. Vahvista painamalla [OK] (25).
3. Aseta vuosi, kuukausi ja päivä painikkeilla [▼] (19) tai [▲] (16) (liiku asetusten
välillä painikkeella [►] (26) ).
4. Vahvista painamalla [OK].
6.2 Hälytyksen asettaminen
1. Valitse Setup > General setup > Alarm setup > Alarm 1 jne.
2. Valitse asetettava hälytys: Alarm 1, Alarm 2 jne.
3. Vahvista painamalla [OK] (25).
4. Aseta vuosi, kuukausi ja päivä painikkeilla [▼] (19) tai [▲] (16) (liiku asetusten välillä
painikkeella [►]).
5. Aseta hälytyksen tila: Off (pois päältä), Once (hälyttää yhden kerran) tai Every day
(päivittäin toistuva hälytys).
6. Aseta hälytysääni: Rooster (kukko kiekuu), Forest (metsän ääniä) tai Church bell
(kirkonkello).
7. Vahvista painamalla [OK].
Suomi
6.3 Auto runin asettaminen
1. Valitse Setup > General setup > Auto run.
2. Vahvista painamalla [OK] (25).
3. Valitse käynnistystoiminto: Photo (kuva), Main menu (päävalikko), Clock (kellonaika), Calendar (päiväys).
4. Vahvista painamalla [OK] (25).
6.4 Automaattisen päälle-/poiskytkentäajan asettaminen
1. Valitse Setup > General setup > Auto run (päällekytkentä)
2. Vahvista painamalla [OK] (25).
3. Aseta kuukausi ja päivä painikkeilla [▼] (19) tai [▲] (16) (liiku asetusten välillä
painikkeella [►]).
4. Aseta automaattinen päällekytkentäaika: Off (pois päältä), Once (hälyttää yhden
kerran) tai Every day (päivittäin toistuva hälytys).
75
Page 76

5. Vahvista painamalla [OK].
6. Valitse Setup > General setup > Power off (poiskytkentä). Jatka samalla tavoin
kuin päällekytkennän kohdalla.
Huom.!
• Ennen päälle- ja poiskytkennän asettamista tulee laitteen kello asettaa oikeaan
aikaan. Katso kohta 6.1.
• Jos päälle- tai poiskytkennän aika on menneisyydessä, tapahtuu päälle- tai
poiskytkentä seuraavana päivänä ja ohjelmoituna aikana.
• Power on -toiminto: Sammuta valokuvakehys ainoastaan kaukosäätimen
[POWER]-painikkeella (15). Älä sammuta sitä kehyksen takana olevasta
virtakytkimestä (14).
7. Huolto ja ylläpito
Varmista, että valokuvakehys on pois päältä ja että muuntaja on irti ennen laitteen puhdistamista. Pyyhi kevyesti kostutetulla liinalla. Älä käytä voimakkaita puhdistusaineita
tai liuottimia. Älä suihkuta nesteitä suoraan valokuvakehykseen.
8. Vianetsintä
A. Miksi valokuvakehys ei näytä kaikkia muistikortilla/usb-muistissa
olevia tiedostoja?
• Jotkut muistikortit eivät ole yhteensopivia valokuvakehyksen kanssa.
Suomi
Käytä yhteensopivaa muistikorttia.
• Väärä tiedostomuoto (tukee vain JPEG-kuvia).
B. Valokuvakehykseen on liitetty muistikortti, mutta laite ei lue sitä.
• Varmista, että valokuvakehys tukee käyttämääsi muistikorttia.
• Varmista, että muistikortti on asetettu oikein.
• Väärä tiedostomuoto (tukee vain JPEG-kuvia).
Huom.! Jotkut digitaalikamerat tallentavat kuvat tiedostomuotoon, joka ei kuulu
standardeihin. Tarkista tiedostomuoto käyttöohjeesta.
C. Jotkut kuvat latautuvat nopeammin kuin toiset.
• Erottelukyvyltään korkeiden kuvien latautuminen kestää kauemmin.
Matalaerottelukykyisten kuvien näyttäminen on nopeampaa.
• Suositeltava erottelukyky on 800x600 kuvapistettä.
Huom.! Korkein tuettu erottelukyky on 8000x8000 kuvapistettä.
D. Valokuvakehys ei mene päälle/valokuvakehyksessä ei näy kuvaa.
• Varmista, että muuntaja on liitetty oikein.
• Varmista, että virtakytkin on asennossa ON.
76
Page 77

E. Miten pyöritän kuvaa?
• Paina [M] (7) ja avaa OSD-valikko (kuvannäyttötilassa)
• Liiku OSD-valikon P-kohtaan painikkeilla [<] (9) ja [>] (10).
• Paina [►] (6) niin monta kertaa, että kuva on oikein päin.
Huom.! Kuvat palaavat alkuperäiseen asentoon, kun sammutat valokuvakehyksen.
F. Mikä erottelukyky on paras?
• Suositeltu erottelukyky on 800 x 600 kuvapistettä, korkein mahdollinen erottelukyky 8000 x 8000 kuvapistettä.
G. Kaukosäädin ei toimi.
• Tarkista kaukosäätimen paristo ja vaihda tarvittaessa.
• Suuntaa kaukosäädin suoraan tunnistinta kohti. Käytä kaukosäädintä lähempänä
kehystä. Varmista, että kaukosäätimen ja tunnistimen välissä ei ole esteitä.
9. Kierrätys
Kierrätä tuote asianmukaisesti, kun poistat sen käytöstä. Kysy tarkempia kierrätysohjeita kuntasi jäteneuvonnasta.
10. Tekniset tiedot
Näyttö 8″ väri-TFT LCD, 4:3
Erottelukyky 800 (k) x 600 (l)
Käyttöjännite 5V DC, 2 A pakkauksen muuntajan kanssa
(100–240 V AC, 50/60 Hz)
Kaukosäätimen paristo 1 x CR2025 (3 V litiumi)
Usb-liitäntä usb 2.0 (tukee usb-muistia ja mp3-soitinta)
Muistikortin lukija SD (Secure Digital), MMC (Multimedia Card),
MS (Memory Stick)
Kuvaformaatti Jpeg (korkein erottelukyky: 8000 x 8000, normaali
erottelukyky 800 x 600)
Ääniformaatti Mp3, 32-320 Kbps bit rate (CBR, VBR)
Videoformaatti MPEG-1, MPEG-2, MPEG-4
Kaiutin Sisäinen
Mitat 216 x 182 x 28 mm
Paino 603 g
Käyttöympäristö
Käyttölämpötila 0 °C ~ 45 °C , kun <95 %
Säilytyslämpötila -20°C ~ 60°C , kun <80%
Suomi
77
Page 78

78
Page 79

79
Page 80

Sverige
Kundtjänst Tel: 0247/445 00
Fax: 0247/445 09
E-post: kundtjanst@clasohlson.se
Internet www.clasohlson.se
Post Clas Ohlson AB, 793 85 INSJÖN
Norge
Kundesenter Tlf.: 23 21 40 00
Faks: 23 21 40 80
E-post: kundesenter@clasohlson.no
Internett www.clasohlson.no
Post Clas Ohlson AS, Postboks 485 Sentrum, 0105 OSLO
Suomi
Asiakaspalvelu Puh.: 020 111 2222
Sähköposti: info@clasohlson.fi
Internet www.clasohlson.fi
Osoite Clas Ohlson Oy, Annankatu 34–36 A, 00100 HELSINKI
Great Britain
For consumer contact, please visit
www.clasohlson.co.uk and click on
customer service.
Internet www.clasohlson.co.uk
 Loading...