

Page 1
10″ Digital photo frame
Digital fotoram 10″
Digital fotoramme 10″
Digitaalinen valokuvakehys 10″
EnglishSvenskaNorskSuomi
Art.no Model
38-4084 PF-10DN-502V3RC
Ver. 201012
Page 2

2
Page 3

10″ Digital photo frame
Art. no 38-4004 Model PF-10DN-502V3RC
User guide
Read through the entire user guide before using the product and save the guide for future
reference. We cannot accept responsibility for any errors in the text or pictures and reserve
the right to make changes to technical data. If you have technical problems or questions,
contact our customer services.
Contents
1. Safety s. 3
2. Description of the product s. 4
3. Keys and functions s. 4
4. Getting started s. 6
5. Operation and settings s. 8
6. Care and maintenance s. 15
7. Waste management s. 15
8. Troubleshooting chart s. 16
9. Specifications s. 16
1. Safety
• Only qualified service personnel may repair the product.
• Do not dismantle or modify the product.
• Do not place the product where it may fall into water or some other liquid.
Make sure that it is standing firmly.
• Use only the mains adapter supplied. Always unplug the mains adapter from
the wall socket if the product is to be unused for a long period.
• Do not place heavy or sharp objects on the display. Protect the mains cable
from sharp edges and corners. Make sure that is does not get crushed.
• The product is only intended to be used indoors.
• Do not locate the product close to hot radiators or stoves.
• Do not use the product in humid, dusty or dirty surroundings.
• Do not unplug the mains adapter while photos are being displayed,
as this might damage the memory card. Do not remove the memory card
while photos are being displayed.
English
3
Page 4
2. Description of the product
• Digital photo frame with 10-inch colour screen.
• Resolution 1024×768, image format 4:3.
English
• Displays your digital photos without a computer.
• Connection for USB stick or memory card (SD/MMC/MS).
• Slideshow with or without background music and many different display effects.
• Repetition function on playback of music, images and film.
• Support for MPEG-1, MPEG-2, MPEG-4 and M-JPEG formats.
• Support for mp3 and WMA.
• Built-in loudspeakers.
• Clock and calendar display.
• Alarms (four different times).
• Supplied with remote controller and mains adapter.
• ON/OFF-button
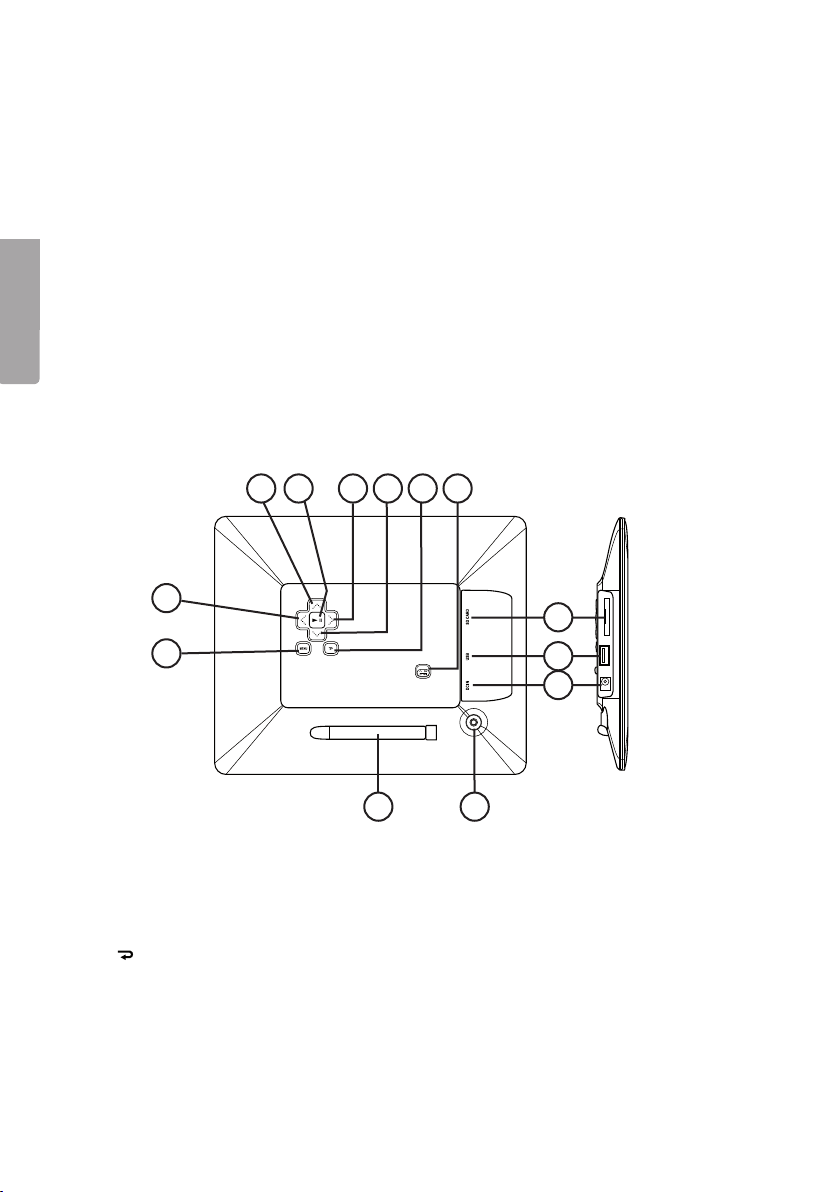
3. Keys and functions
Photo frame
3 4 5 6 7 8
2
1
12 13
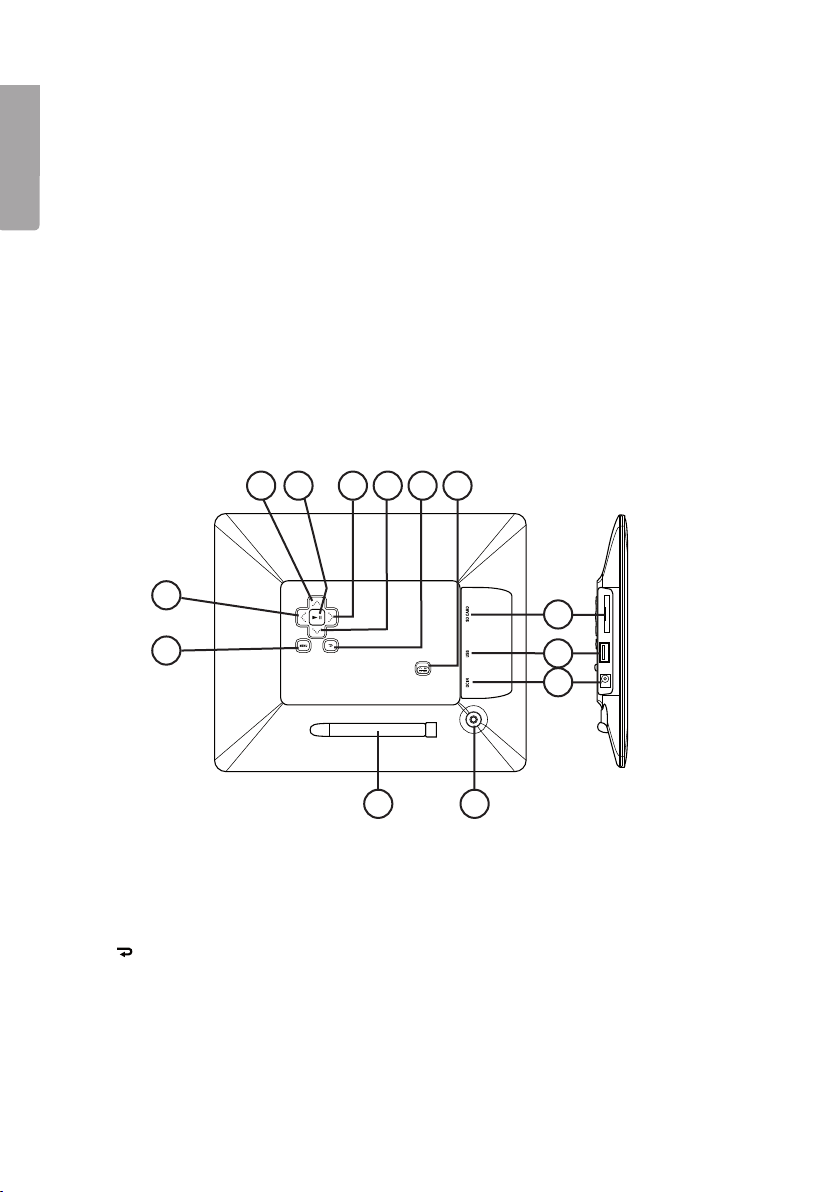
1. [MENU] Open main menu
2. [◄] Move left
3. [▲] Move up
4. [►ll] Start/pause display or confirm a choice
5. [►] Move right
6. [▼] Move down
7. [ ] Back to previous menu
8. [ON/OFF] Switch photo frame on or off
9. Connection for memory card (SD/MMC/MS)
10. Connection for USB stick
11. Connection for supplied main adapter
12. Support
13. Fixing for support
9
10
11
4
Page 5
Remote controller
14
15
16
17
18
19
20
21
22
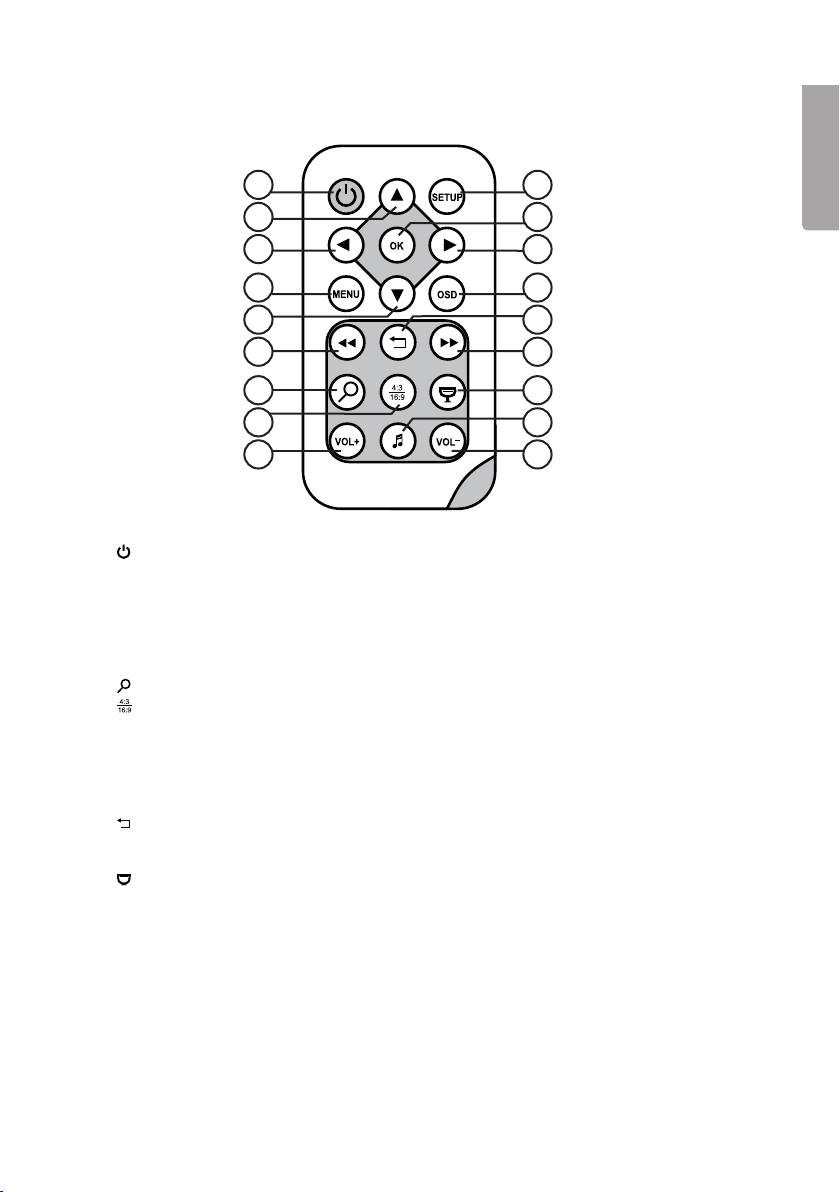
14. [ ] Switch photo frame on or off.
15. [▲] Move up or previous photo/track/film.
16. [◄] Move left or (when you are showing photos) show previous photo.
17. [MENU] Press to open main menu.
18. [▼] Move down or next photo/track/film.
19. [◄◄] Choose previous photo when you are showing photos. Choose previous page when
showing thumbnails. Fast rewind (music/film).
] Press to zoom in to photo.
20. [
21. [ ] Change aspect ratio, 4:3 or 16:9.
22. [VOL+] Increase volume.
23. [SETUP] Open setup menu.
24. [OK] Start playback or pause or confirm choice.
25. [►] Move right or (when displaying photos) next photo.
26. [OSD] Show/quit OSD menu (the OSD menu is displayed at the bottom of the screen).
27. [ ] Go to the previous menu.
28. [►►] Choose next photo (when showing photos). Choose next page when showing
thumbnails. Fast forward (music/film).
29. [ ] Start slideshow with background music*.
30. [♫] Starts or stops music playback during a slideshow.
31. [VOL-] Reduces volume.
23
24
25
26
27
28
29
30
31
English
* Only if the connected memory contains music files.
5
Page 6
4. Getting started
Insert the battery into the remote controller
English
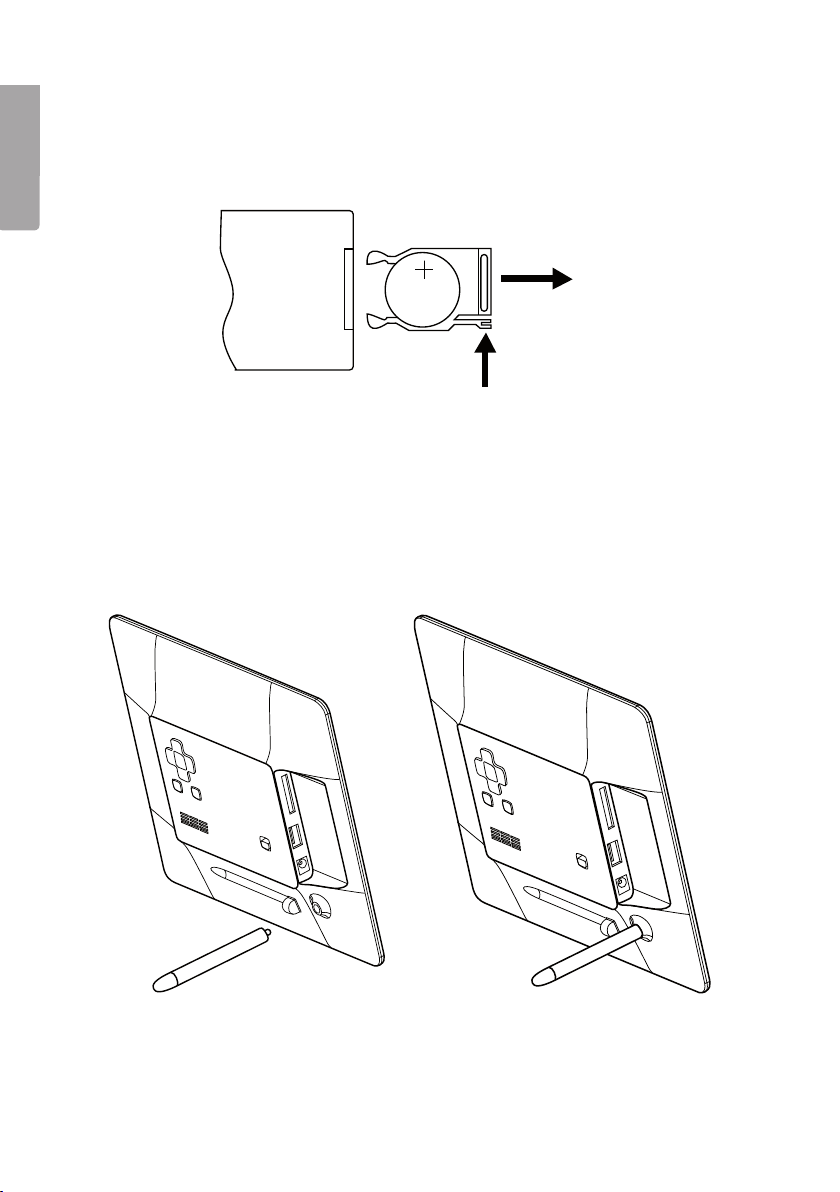
CR2025
The remote controller is powered by 1 × CR2025 battery (3 V).
• Remove any protective plastic from the battery. Insert the battery as shown in the illustration.
Observe the polarity markings.
• When the remote controller no longer works even when held close to the sensor on
the digital photo frame, fit a new battery.
Fitting the support
• Remove the support (12) from its magnetic holder on the back of the photo frame.
• Screw the support into its hole (13). Screw it in firmly (clockwise) but do not overtighten.
• When the support has been fitted, the frame can be stood on its long or short side.
6
Page 7
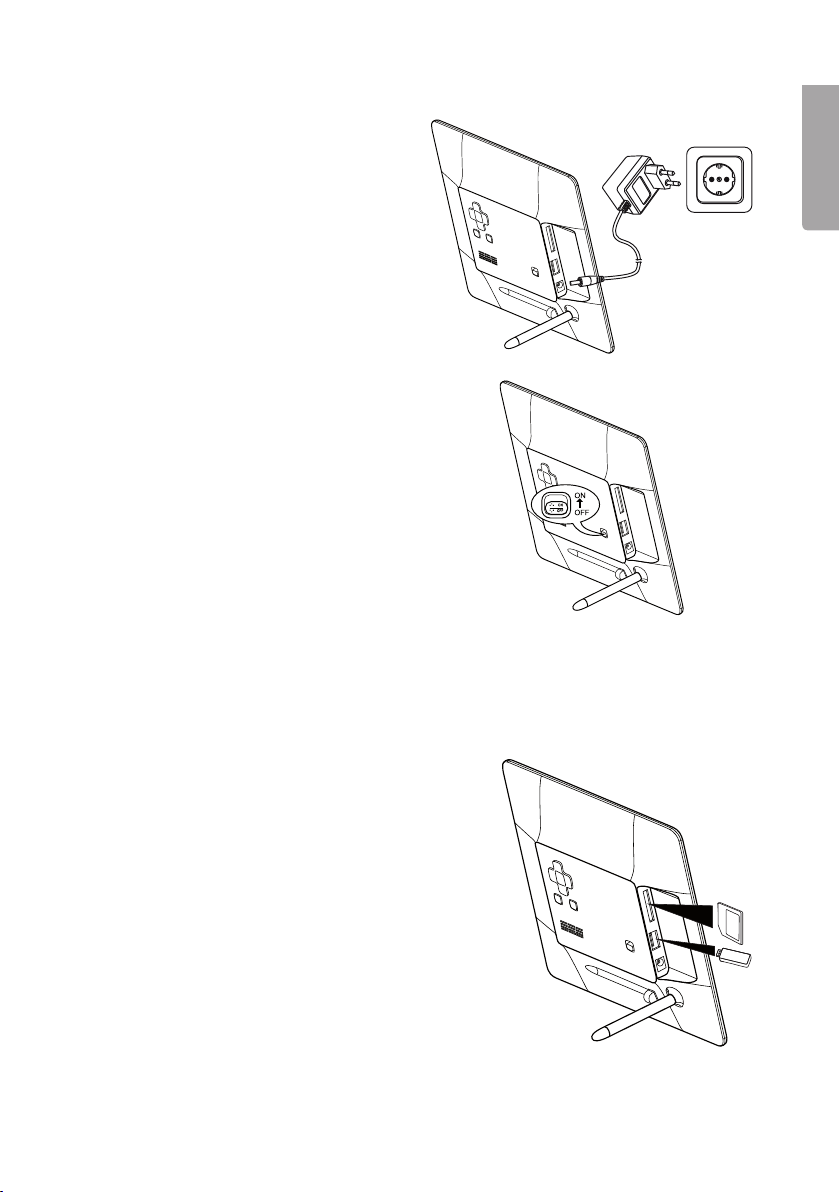
Connecting the mains adapter
1. Connect the supplied mains adapter to
a 230 V wall socket.
2. Then connect the DC plug of the mains
adapter to DC IN (11) on the photo frame.
3. Move the switch on the back of the photo
frame to the ON position to turn on
the photo frame.
NOTE!
Normally the ON/OFF button (14) on the remote
controller is used to switch on the photo frame or
set it to standby mode, but to turn off the photo
frame completely the switch (8) on the back of
the photo frame must be set to OFF. Always
unplug the mains adapter from the wall socket if
the product is to be unused for a long period.
Connecting a memory card or a USB stick
Memory card
The following memory cards can be used:
English
Secure Digital (SD)
Multimedia Card (MMC)
Memory Stick (MS)
• Carefully insert the memory card into the slot (9).
• To remove the memory card, carefully pull it straight out.
• NOTE: Do not remove the memory card when it is being
used to display photos or other files.
USB stick
• Carefully insert a USB stick into the USB port (10)
• To remove the stick or player, pull it straight out.
• NOTE! Do not remove the USB stick when it is being
used to display photos or other files.
7
Page 8

5. Operation and settings
Main menu
English
NOTE!
The first time the photo frame is started or if it has been reset to its factory default settings,
a language must be chosen from the menu that appears. Choose your language and confirm
by pressing [OK] (24) on the remote controller or [►ll] (4) on the back of the photo frame.
If the photo frame is started without a USB stick or a memory card connected, the main menu is
displayed with Clock, Calendar and Setup on the display.
If the photo frame is started with a memory card and/or USB stick connected, the photo frame
automatically starts to display a slideshow if photos are stored in the memory. To interrupt
the slideshow and return to the main menu press [MENU] (17) on the remote controller or
[MENU] (1) on the back of the photo frame.
If both a memory card and a USB stick are connected when the photo frame is powered on,
the main menu looks like this:
SD/
MMC/MS Displayed when a memory card
is connected/inserted.
USB Displayed when a USB-stick is
connected/inserted.
Clock Choose this to display a clock
on the screen.
Calendar Choose this to display
the calendar on the screen.
Setup To change the screen settings.
Choose functions and navigate in the menus with [▼] [▲] [◄] [►] on the remote controller or on
the back of the photo frame. Confirm your choices by pressing [OK] (24) on the remote controller
or [►ll] (4) on the back of the photo frame. To back up in the menus press [
8
] (27) or (7).
Page 9
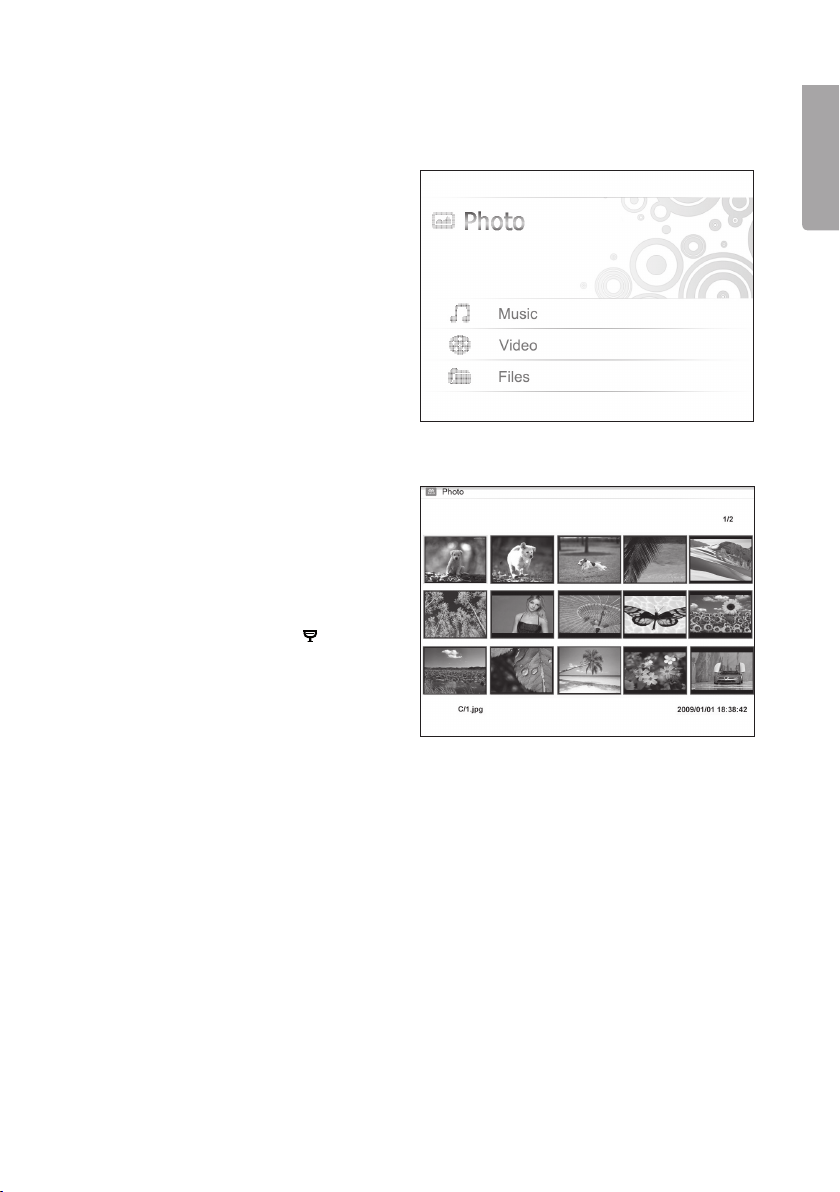
If SD/MMC/MS or USB is chosen, the following submenus appear
Photo
(to open press [OK] or [►ll])
• The photos in the memory are displayed
as thumbnails.
To display the photos one by one,
choose a photo and press [OK] or [►ll].
Then choose more photos one at a time
by pressing [◄] [►].
• To start a slideshow, press [ ] (29) on
the remote controller (it takes a few
seconds for the slideshow to start) or
press [►ll] on the back of the frame.
English
To open the [OSD] menu, press [OSD] (26) on the remote controller or the MENU button (1) on
the back of the photo frame.
NOTE! Can only be displayed when a photo has been chosen and is being displayed or when
the slideshow is running.
• Choose a function with the [◄] [►] buttons and control the functions with [OK] on
the remote controller or [►ll] on the back of the photo frame.
9
Page 10
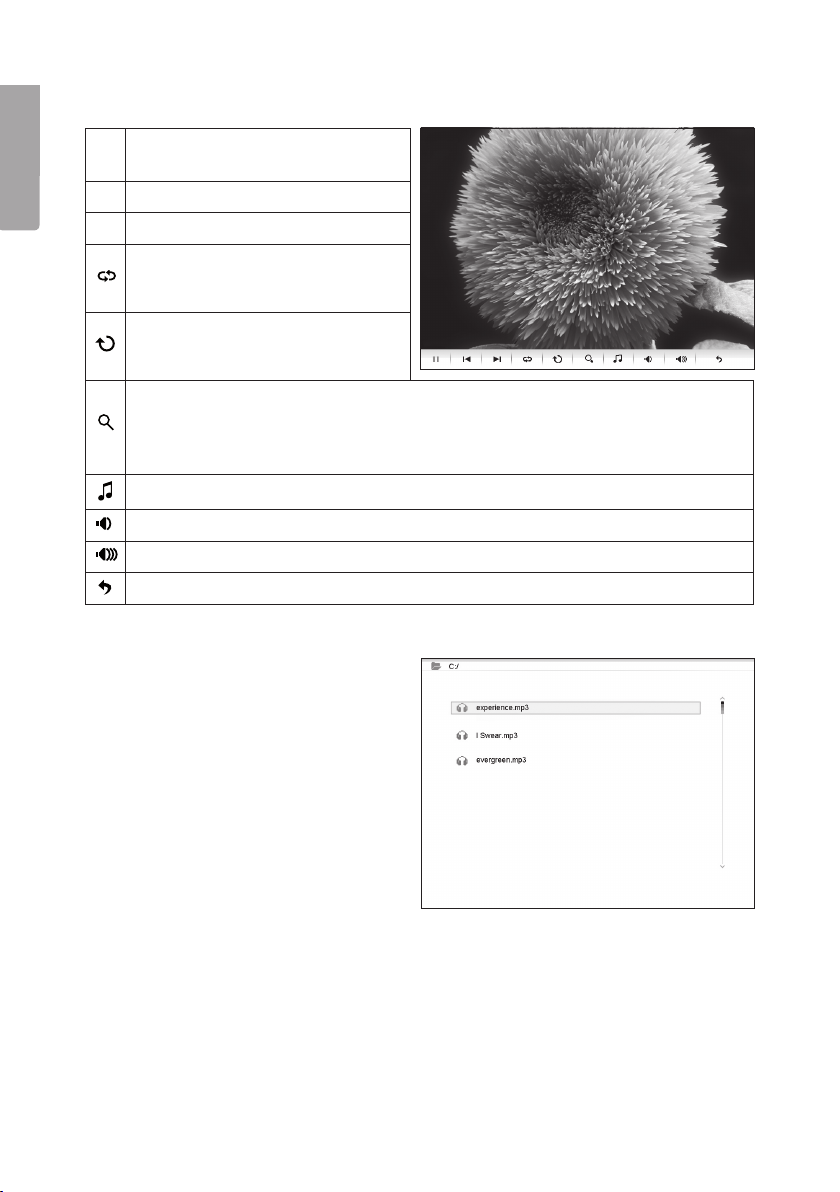
OSD menu during photo display
To start or stop the slideshow,
II
press [OK] or [►ll].
English
I◄
Show the previous photo.
►I
Show the next photo.
Choose different playback/repetition
options for the slideshow. The choices
appear in small text on the screen.
Rotate the photo. Press several times
until the photo is displayed the right
way up.
Zoom in on the photo. Press several times to choose magnification: ×2, ×4, ×8 or ×16
and back to the starting position. When the photo has been enlarged and the OSD menu
disappears from the screen (after a few seconds), you can move around in the photo with [▼]
[▲] [◄] [►].
Start or stop music playback (if there are music files on the memory).
Reduce volume.
Increase volume.
Return to the beginning of the OSD menu.
Music
(to open press [OK] or [►ll])
• If there are files of different types on the
same memory, such as music, video
and photo files, the following menu
appears:
Audio
Picture
Subtitle
Video
• Choose Audio and a list of available music files is displayed.
• In the list and the OSD menu that appears automatically when an audio file is played,
navigate and confirm as described above.
10
Page 11

OSD menu when playing back music files
To start or stop the slideshow,
II
press [OK] or [►ll].
I◄
Choose previous audio file.
►I
Choose next audio file.
◄◄
Fast rewind.
►►
Fast forward.
Choose a repetition option
(One, All or OFF).
Reduce volume.
Increase volume.
Return to the beginning of the OSD
menu.
Video
(to open press [OK] or [►ll])
English
• If there are files of different types on the
same memory, such as music, video and
photo files, the following menu appears:
Audio
Picture
Subtitle
Video
• Choose Video and a list of available video files is displayed.
• Navigate and confirm as described above.
• To open the [OSD] menu, press [OSD] (26) on the remote controller or
MENU (1) on the back of the photo frame.
11
Page 12
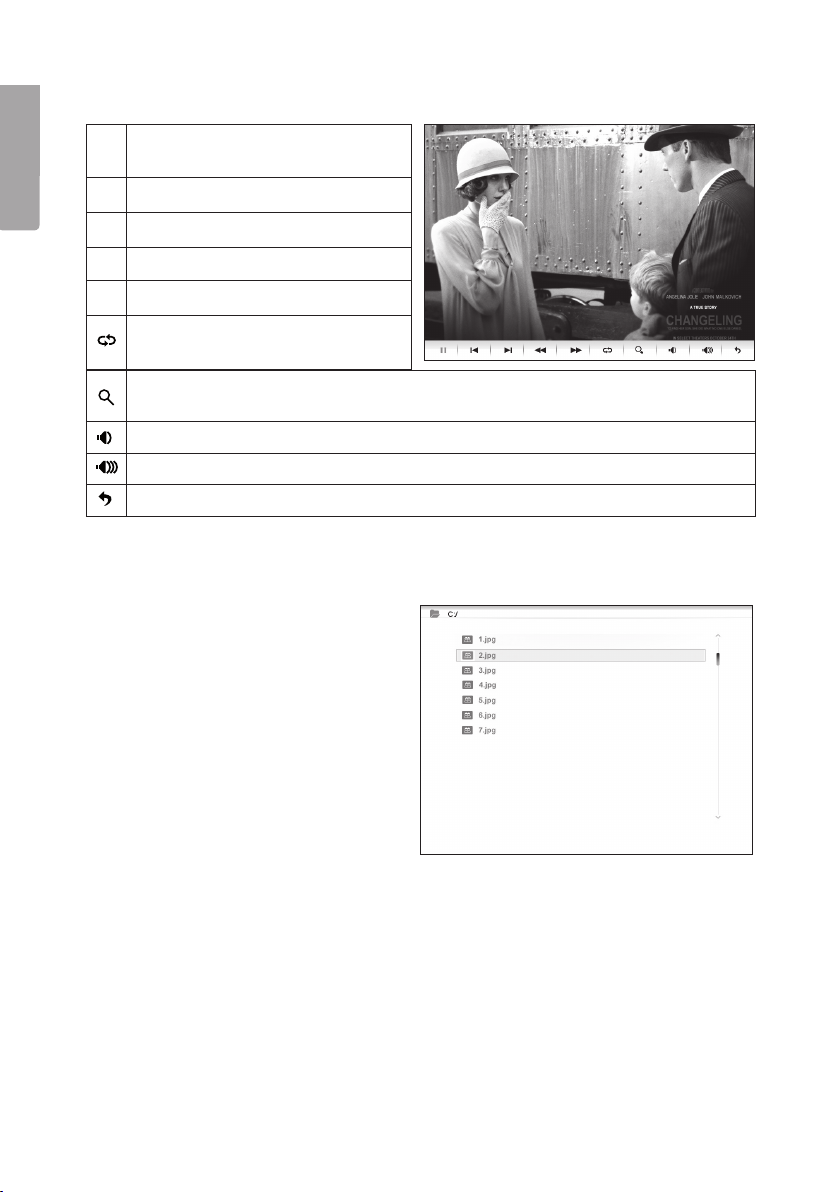
OSD menu when playing video files
To start or stop the video,
II
press [OK] or [►ll].
English
I◄
Show the previous video.
►I
Show the next video.
◄◄
Fast rewind.
Fast forward.
►►
Choose a repetition option
(One, All or OFF).
Zoom in on the video. Press several times to choose magnification: ×2, ×4, ×8 or ×16 and
back to the starting position.
Reduce volume.
Increase volume.
Return to the beginning of the OSD menu.
Files
(to open press [OK] or [►ll])
• If there are files of different types on the
same memory, such as music, video
and photo files, the following menu
appears:
Audio
Picture
Subtitle
Video
• Navigate in the list and confirm as described above.
• You can also copy files between connected memories.
• NOTE! Write protection may be active on the memory cards.
Check the setting of the write-protect switch.
12
Page 13
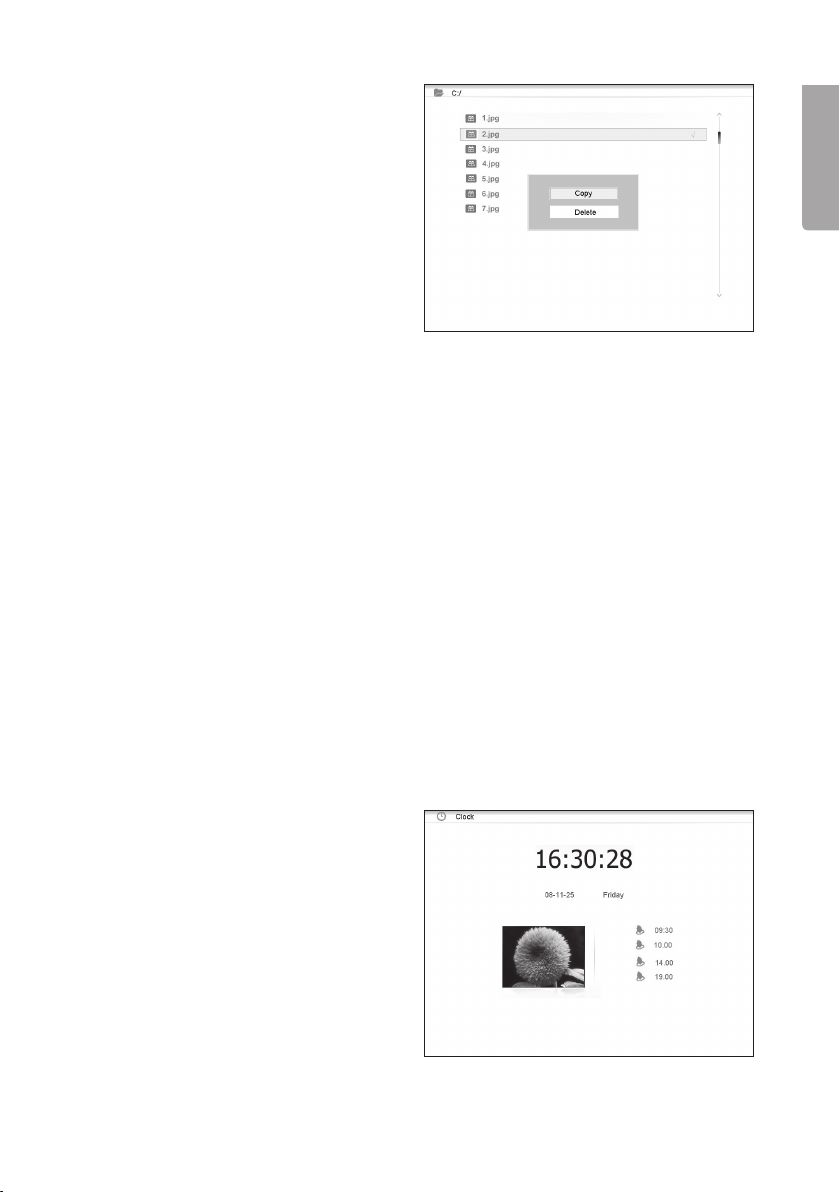
Copying files
To copy files you need to have two memory
devices connected to the photo frame, a
USB stick and a memory card.
1. Choose the file you want to copy with
[▲] or [▼].
2. Press [►] to select the file. The file is
highlighted with a √. (To deselect the file,
press [►] again.)
3. To select more files repeat steps 1 and 2.
4. Press [OSD]. A menu with the options
COPY and DELETE appears to the right
of the file list.
5. Select COPY with [▲] or [▼] and press [OK] to confirm.
A list showing other connected memory devices appears.
6. Choose the memory to copy the files to with [◄] [►] .
7. Press [OK] to start copying.
8. When copying is complete, “Finished” appears.
Deleting a file
1. Choose the file you want to delete with [▲] or [▼].
2. Press [►] to select the file. The file is highlighted with a √.
(To deselect the file, press [►] again.)
3. To select more files repeat steps 1 and 2.
4. Press [OSD]. A menu with the options COPY and DELETE appears to the right of the file list.
5. Select DELETE with [▲] or [▼] and press [OK] to confirm.
6. Use [◄] and [►] to choose YES to confirm deletion or NO to quit without
deleting the file(s). Press [OK] to complete deletion. NOTE! This action cannot be undone!
7. When the files have been deleted, “Finished” appears.
8. Press [OK] to exit.
English
If Clock is chosen
The clock appears on the display together
with a thumbnail slideshow and
the alarm times.
13
Page 14
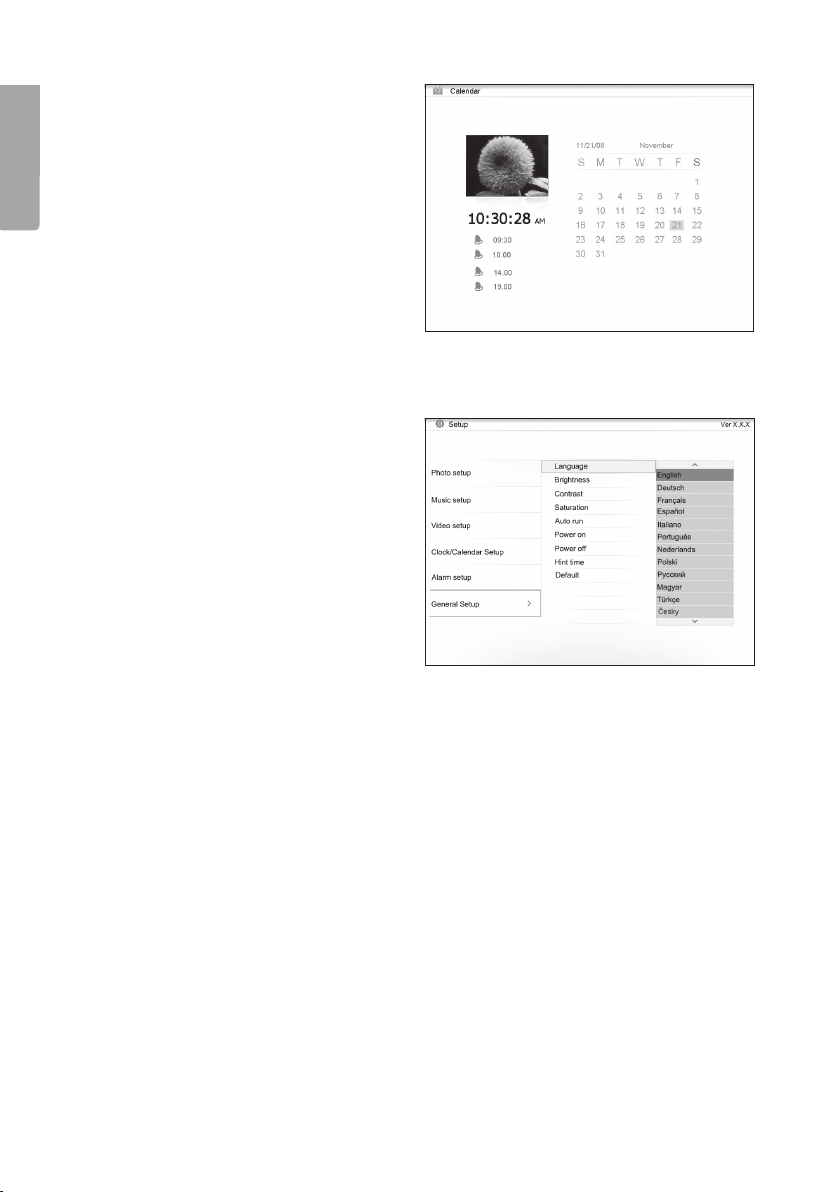
If Calendar is chosen
The calendar appears on the display together
with the clock, alarm times and a thumbnail
English
slideshow.
If Setup is chosen, the following submenus appear
Photo Setup, where you can
make settings for
• Slide show time 3 s, 5 s, 15 s,
1 minute and 15 minutes.
• Photo mode: Full Screen or
Standard Screen.
• Transition effect: Off or Random.
• Date stamp (show detailed information
about the photo): Off or On.
• Shuffle (display photos in
random order): Off or On.
Music Setup, where you can select
• Repeat Off (no repeat).
• Repeat One (repeat the current track).
• Repeat All.
Video Setup, where you can select
• Repeat Off.
• Repeat One (repeat the current track).
• Repeat All.
Clock/Calendar setup
• Time mode: Digital clock/Analog clock.
• Show photo: On/Off (show/don’t show thumbnail when displaying clock and calendar).
• Set Time: hh/mm.
• Set Date: year, month, day.
• Set Date format: year, month, date – date, month, year, etc.
• Set Time format: 12 or 24 hours.
14
Page 15

Alarm setup
• Alarm 1 – 4 (set time, function and signal for four alarms) Alarm 1, Alarm 2, etc.
• Ringtone volume (for alarms 1 – 4): 1, 2, 3, 4, 5 or 6.
General setup
• Language (to change the language of the menus).
• Brightness (of the display): +3, +2, +1, 0, -1, -2, -3.
• Contrast (of the display): +3, +2, +1, 0, -1, -2, -3.
• Saturation (colour saturation of the display): +3, +2, +1, 0, -1, -2, -3.
• Auto start (how the photo frame starts after switch-on): Photo, Main menu, Clock, Calendar.
• Power on (sets the time for automatic switch-on): hh/mm.
• Power off (sets the time for automatic switch-off): hh/mm.
• Hint time (sets the time for which key functions are displayed on the screen):
0, 5, 10 and 20 seconds.
• Default (resets the photo frame to factory settings).
NOTE!
• Before you set switch-on and switch-off times, the clock of the photo frame must be set
(see Clock/Calendar setup).
• If the switch-on or switch-off time has already passed, the photo frame will switch
on or off at the set time on the next day.
• For the Power on function to work: Switch the photo frame off only with the [ ] button (14)
on the remote controller. Do not switch it off with the switch (8) on the back of the photo
frame.
6. Care and maintenance
• Before cleaning the photo frame, make sure that it is switched off and that
the mains adapter has been unplugged from the wall socket.
• Wipe with a soft, damp cloth. Do not use solvents or powerful cleaning agents.
Never spray liquid on the photo frame.
• To clean the LCD display, use a clean, soft, lint-free cloth. If necessary, use a commercially
available cleaning agent to clean the LCD screen.
English
7. Waste management
When the time comes to dispose of the product, do so in accordance with local regulations.
If you are unsure how to proceed, ask your local authority.
15
Page 16
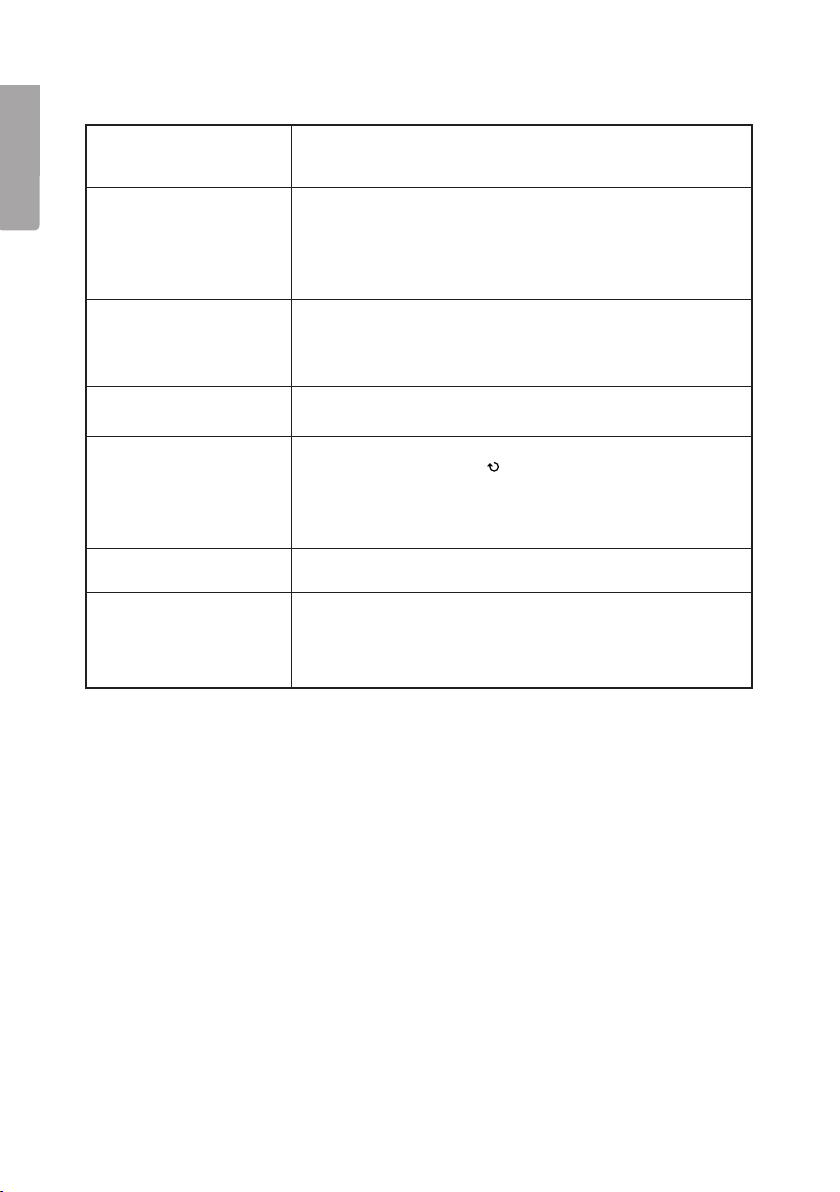
8. Troubleshooting chart
Why can’t the photo frame
display all the files on the
English
memory card/USB stick?
A memory card is connected
to the photo frame, but the
photo frame cannot read it.
Some photos load more
quickly than others.
The photo frame does not start
/ no photos are displayed.
How do I rotate a photo?
Which resolution is best?
The remote controller does
not work.
• Some memory cards are not compatible with the photo frame.
Use a compatible memory card.
• Wrong image format (only JPEG images are supported).
• Make sure that you are using a memory card that is supported by
the photo frame.
• Make sure that the memory card is correctly connected.
• Wrong file format (only JPEG images are supported).
• NOTE: Some digital camera save photos in a non-standard file
format. Check the user guide for the camera.
• Photos with a high resolution take longer to load.
Use lower-resolution photos for faster display.
• The recommended resolution is 800 x 600 pixels.
• NOTE: The highest supported resolution is 8000 x 8000 pixels.
• Check that the mains adapter is correctly connected.
• Check that the switch (8) is set to ON.
• Open the OSD menu (in photo display mode) with the OSD button (26).
• Use [◄] and [►] to go to
• Press [OK] (24) several times to rotate the photo to the required
position.
• NOTE! The photos return to their original position when you switch
off the photo frame.
• The recommended resolution is 800 x 600 pixels.
The highest resolution is 8000 x 8000 pixels.
• Check the battery in the remote controller and fit a new battery
if necessary.
• Aim the remote controller directly at the photo frame. Hold the
remote controller closer to the photo frame. Check that there are no
obstacles between the remote controller and the sensor.
in the OSD menu.
9. Specifications
Display 10” LCD, TFT, 4:3, 1024×768
I/O Remote controller, DC IN
Supply voltage AC-adapter (in: 100–240 V AC, 50–60 Hz, out: DC 5 V 2 A)
USB port USB 2.0
Supported memory card formats SD (Secure Digital), MMC (Multimedia Card), MS (Memory Stick)
Supported image format JPEG (highest resolution: 8000 x 8000)
Supported audio formats MP3, WMA
Supported video formats MPEG-1, MPEG-2, MPEG-4, M-JPEG
Loudspeakers Built-in
Storage temperature -20 ºC to +60 ºC, < 90 % RH
Working temperature 0 ºC to 45 ºC, < 80 % RH
Size 265.5 × 215 × 22.5 mm
Weight 638.6 g
16
Page 17

Digital fotoram 10
″
Art.nr 38-4004 Modell PF-10DN-502V3RC
Bruksanvisning
Läs igenom hela bruksanvisningen före användning och spara den sedan för framtida bruk.
Vi reserverar oss för ev. text- och bildfel samt ändringar av tekniska data. Vid tekniska problem
eller andra frågor, kontakta vår kundtjänst (se adressuppgifter på baksidan).
Innehållsförteckning
1. Säkerhet s. 17
2. Produktbeskrivning s. 18
3. Knappar och funktioner s. 18
4. Att komma igång s. 20
5. Användning och inställningar s. 22
6. Skötsel och underhåll s. 29
7. Avfallshantering s. 29
8. Felsökningsschema s. 30
9. Specifikationer s. 30
1. Säkerhet
• Produkten får endast repareras av kvalificerad servicepersonal.
• Produkten får inte demonteras eller ändras.
• Placera inte produkten så att den kan falla ner i vatten eller annan vätska,
se till att den alltid står stadigt.
• Använd endast den bifogade nätadaptern. Ta alltid ur nätadaptern från
eluttaget om inte produkten ska användas under en längre tid.
• Placera inte tunga eller vassa föremål på displayen. Skydda nätkabeln från
vassa kanter och hörn och se till att den inte kommer i kläm.
• Produkten är endast avsedd för inomhusbruk.
• Placera inte produkten för nära heta element eller kaminer/spisar.
• Använd inte produkten i fuktiga, dammiga eller smutsiga miljöer.
• Koppla inte ifrån nätadaptern samtidigt som uppspelningen pågår. Risk finns för att det
anslutna minnet skadas. Ta inte heller bort det anslutna minnet när uppspelning pågår.
Svenska
17
Page 18
2. Produktbeskrivning
• Digital fotoram med 10″ färgskärm
• Upplösning: 1024×768, bildformat: 4:3
• Visar dina digitala bilder utan dator.
• Anslutning för USB-minne eller minneskort (SD/MMC/MS).
• Bildspel med eller utan bakgrundsmusik och många olika visningseffekter.
• Repetitionsfunktion på uppspelning av både musik, bilder och film.
• Stöd för MPEG-1, MPEG-2, MPEG-4 samt M-JPEG-format.
• Stöd för mp3 och WMA.
• Inbyggda högtalare.
• Visning av klocka och kalender.
• Alarm (4 olika tider).
Svenska
• Levereras med fjärrkontroll och nätadapter.
• ON/OFF-knapp
3. Knappar och funktioner
Fotoram
3 4 5 6 7 8
2
1
12 13
1. [MENU] Öppna huvudmenyn
2. [◄] Förflytta dig till vänster
3. [▲] Förflytta dig uppåt
4. [►ll] Starta visning/gör paus i visning/bekräfta ett val
5. [►] Förflytta dig till höger
6. [▼] Förflytta dig nedåt
7. [ ] Gå tillbaka till föregående meny
8. [ON/OFF] Slå på/stäng av fotoramen
9. Anslutning för minneskort (SD/MMC/MS)
10. Anslutning USB-minne
11. Anslutning för medföljande nätadapter
12. Stödben
13. Fäste för stödben
18
9
10
11
Page 19

Fjärrkontroll
14
15
16
17
18
19
20
21
22
14. [ ] Slå på/stäng av fotoramen
15. [▲] Förflytta dig uppåt/visa föregående bild/spår/film
16. [◄] Förflytta dig till vänster/visa föregående foto när du visar bilder
17. [MENU] Tryck för att öppna huvudmenyn
18. [▼] Förflytta dig nedåt/nästa bild/spår/film
19. [◄◄] Välj föregående foto när du visar bilder. Välj föregående sida när miniatyrbilder
(thumbnails) visas, snabbspola bakåt (musik/film).
20. [ ] Tryck för att zooma i bilden
21. [ ] Ändra bildformat, 4:3 eller 16:9
22. [VOL+] Höjer volymen
23. [SETUP] Öppna inställningsmenyn
24. [OK] Starta uppspelning/gör paus i uppspelning/bekräfta val.
25. [►] Förflytta dig till höger/visa nästa foto när du visar bilder.
26. [OSD] Visa/lämna OSD-menyn, vilken visas längst ner på skärmen.
27. [ ] Gå till föregående meny
28. [►►] Välj nästa foto när du visar bilder. Välj nästa sida när miniatyrbilder (thumbnails) visas,
snabbspola framåt (musik/film).
29. [ ] Starta bildspel med bakgrundsmusik*.
30. [♫] Startar eller stoppar musikuppspelning vid pågående bildspel.
31. [VOL-] Sänker volymen.
23
24
25
26
27
28
29
30
31
Svenska
* Endast om det anslutna minnet innehåller musikfiler.
19
Page 20

4. Att komma igång
Sätt i batteriet i fjärrkontrollen
CR2025
Svenska
Fjärrkontrollen drivs av 1 × CR2025 - batteri (3 V).
• Sätt i batteriet som bilden visar, observera polaritetsmärkningen. Ta bort ev. skyddsplast.
• Byt batteri när fjärrkontrollen inte fungerar trots att den hålls nära sensorn på den digitala
fotoramen.
Montera stödbenet
• Ta bort stödbenet (12) från sin magnetiska hållare på baksidan av fotoramen.
• Skruva fast stödbenet i sitt skruvhål (13). Skruva fast ordentligt (medurs) men överdra inte.
• När stödbenet är monterat kan ramen ställas på endera lång- eller kortsida.
20
Page 21

Anslut nätadaptern
1. Anslut den medföljande nätadaptern
till ett vägguttag med 230 V.
2. Anslut sedan nätadapterns DC-kontakt
till DC IN (11) på fotoramen.
3. Sätt omkopplaren på fotoramens baksida
i läge ON för att slå på fotoramen.
OBS!
Normalt används ON/OFF-knappen (14) på
fjärrkontrollen för att slå på fotoramen eller
aktivera standby-läge. För att helt stänga av
fotoramen måste dock strömbrytaren (8) på fotoramens baksida sättas i läge OFF.
Ta alltid ur nätadaptern från vägguttaget om inte
produkten ska användas under en längre period.
Anslutning av minneskort eller USB-minne
Svenska
Minneskort
Följande minneskort kan användas:
Secure Digital (SD)
Multimedia Card (MMC)
Memory Stick (MS)
• Tryck försiktigt in minneskortet i ingången (9).
• Ta ur minneskortet genom att dra det försiktigt rakt ut.
• Obs! Dra inte ur minneskortet när det används för att
visa bilder eller andra filer.
USB-minne
• Tryck försiktigt in ett USB-minne i USB-ingången (10).
• Ta ur minnet eller spelaren genom att dra det försiktigt
rakt ut.
• OBS! Dra inte ur USB-minnet när det används för att
visa bilder eller andra filer.
21
Page 22

5. Användning och inställningar
Huvudmeny
OBS!
Första gången fotoramen startas eller efter att den återställts till fabriksinställningarna måste
språk väljas i menyn som visas. Välj språk och bekräfta med [OK] (24) på fjärrkontrollen eller
[►ll] (4) på baksidan av fotoramen.
Om fotoramen startas utan USB-minne eller minneskort anslutet så visas huvudmenyn med
Clock, Calendar och Setup på displayen.
Om fotoramen startas med ett minneskort och/eller USB-minne anslutet börjar fotoramen auto-
Svenska
matiskt visa ett bildspel om bilder finns lagrade på minnet. För att avbryta bildspelet och komma
till huvudmenyn tryck [MENU] (17) på fjärrkontrollen eller [MENU] (1) på baksidan av fotoramen.
Om både minneskort och USB-minne är anslutna när fotoramen startas ser huvudmenyn ut så här:
SD/
MMC/MS Visas när ett minneskort är
anslutet/sätts in.
USB Visas när ett USB-minne är
anslutet/sätts in.
Clock Väljs om klockan ska visas
på skärmen.
Calendar Väljs om kalendern ska visas
på skärmen.
Setup För att ändra skärmens inställningar.
Välj funktion och navigera i menyerna med [▼] [▲] [◄] [►] på fjärrkontrollen eller på baksidan
av fotoramen. Bekräfta valen med [OK] (24) på fjärrkontrollen eller [►ll] (4) på baksidan av
fotoramen. Backa i menyerna genom att trycka [
] (27 på fjärrkontrollen, 7 på fotoramen).
22
Page 23

Om SD/MMC/MS eller USB väljs visas följande undermenyer
Photo
(öppna genom att trycka [OK] eller [►ll])
• Bilderna på minnet visas som miniatyrer,
välj att visa bilderna en och en genom
att välja bild och trycka [OK] eller [►ll].
Visa sedan fler bilder genom att trycka
[◄] [►].
• Starta bildspel genom att trycka [ ] (29)
på fjärrkontrollen (det tar någon sekund
innan bildspelet startar) eller tryck [►ll]
på baksidan av ramen.
Svenska
Tryck [OSD] (26) på fjärrkontrollen eller MENU-knappen (1) på baksidan av fotoramen för att
öppna OSD-menyn.
OBS! Kan bara visas när en bild har valts och visas eller när bildspelet är aktiverat.
Välj funktion med [◄] [►] knapparna och styr funktionerna med [OK] på fjärrkontrollen eller [►ll]
på baksidan av fotoramen.
23
Page 24

OSD-meny vid bildvisning
Tryck [OK] eller [►ll] för att starta eller
II
stoppa bildspelet.
I◄
Visa föregående bild.
►I
Visa nästa bild.
Välj olika uppspelnings-/repetitionsalternativ för bildspelet. Valen visas
i liten text på skärmen.
Svenska
Rotera bilden, tryck flera gånger tills
bilden visas rättvänd.
Zooma in i bilden, tryck flera gånger för att välja förstoring: ×2, ×4, ×8 eller ×16 och
tillbaka till utgångsläget. När bilden förstorats och OSD-menyn försvinner från skärmen,
vilket den gör efter några sekunder, går det att flytta runt i bilden med [▼] [▲] [◄] [►].
Starta eller stoppa uppspelning av musik, (om musikfiler finns på minnet).
Minska volymen.
Öka volymen.
Gå tillbaka till början på OSD-menyn.
Music
(öppna genom att trycka [OK] eller [►ll])
• Om det finns filer av olika typ på samma
minne, t.ex. musik, video och bildfiler
visas en meny bestående av:
Audio
Picture
Subtitle
Video
• Välj Audio och tillgängliga musikfiler visas i en lista.
• Navigera och bekräfta likadant som tidigare i listan och i OSD-menyn som
visas automatiskt när en ljudfil spelas.
24
Page 25

OSD-meny vid uppspelning av musikfiler
Tryck [OK] eller [►ll] för att starta eller
II
stoppa uppspelning.
I◄
Välj föregående ljudfil.
►I
Välj nästa ljudfil.
◄◄
Snabbspola bakåt.
Snabbspola framåt.
►►
Välj olika repetitionsalternativ
(One, All eller OFF).
Minska volymen.
Öka volymen.
Gå tillbaka till början på OSD-menyn.
Video
(öppna genom att trycka [OK] eller [►ll])
Svenska
• Om det finns filer av olika typ på samma
minne, t.ex. musik, video och bildfiler
visas en meny bestående av:
Audio
Picture
Subtitle
Video
• Välj Video och tillgängliga musikfiler visas i en lista.
• Navigera och bekräfta likadant som tidigare.
• Tryck [OSD] (26) på fjärrkontrollen eller [MENU] (1) på baksidan av
fotoramen för att öppna OSD-menyn.
25
Page 26

OSD-meny vid uppspelning av videofiler
Tryck [OK] eller [►ll] för att starta eller
II
stoppa videouppspelningen.
I◄
Visa föregående video.
►I
Visa nästa video.
◄◄
Snabbspola bakåt.
►►
Snabbspola framåt.
Svenska
Välj olika repetitionsalternativ
(One, All eller OFF).
Zooma in i bilden, tryck flera gånger för att välja förstoring: ×2, ×4, ×8 eller ×16 och
tillbaka till utgångsläget.
Minska volymen.
Öka volymen.
Gå tillbaka till början på OSD-menyn.
Files
(öppna genom att trycka [OK] eller [►ll])
• Om det finns filer av olika typ på samma
minne, t.ex. musik, video och bildfiler
visas en meny bestående av:
Audio
Picture
Subtitle
Video
• Navigera och bekräfta likadant som tidigare i listan.
• Du kan även kopiera filer mellan anslutna minnen.
• OBS! Minneskorten kan ha skrivskydd som är aktiverat, kontrollera hur reglaget är inställt.
26
Page 27

Kopiera filer
För att kopiera filer måste du ha två minnen
anslutna till fotoramen, t.ex. ett USB-minne
och ett minneskort.
1. Välj den fil du vill kopiera med [▲]
eller [▼].
2. Tryck [►] för att markera filen, filen
markeras med √ (tryck igen för att
avmarkera filen).
3. Repetera steg 1 och 2 om du vill markera
fler filer.
4. Tryck [OSD]. En meny med valen COPY
och DELETE visas till höger om fillistan.
5. Markera COPY med [▲] eller [▼] och bekräfta med [OK] .
Andra anslutna minnen visas i en lista.
6. Välj önskat minne att kopiera filerna till med [◄] [►].
7. Tryck på [OK] för att starta kopieringen.
8. När filerna kopierats visas meddelandet ”Finished”.
Radera filer
1. Välj den fil du vill ta bort med [▲] eller [▼].
2. Tryck [►] för att markera filen. Filen markeras med √ (tryck igen för att avmarkera filen).
3. Repetera steg 1 och 2 om du vill markera fler filer.
4. Tryck [OSD]. En meny med valen COPY och DELETE visas till höger om fillistan.
5. Markera DELETE med [▲] eller [▼] och bekräfta med [OK] .
6. Använd [◄] och [►] för att välja YES för att bekräfta raderingen, eller NO för att
avsluta utan att ta bort filen/filerna. Tryck därefter [OK] för att slutföra raderingen.
OBS! Denna åtgärd kan inte ångras!
7. När filerna raderats visas meddelandet ”Finished”.
8. Tryck [OK] för att avsluta.
Svenska
Om Clock väljs
Klockan visas på displayen tillsammans med
bildspel i miniatyr och alarmtiderna.
27
Page 28

Om Calendar väljs
Kalendern visas på displayen tillsammans
med klocka, alarmtider och bildspel i miniatyr.
Svenska
Om Setup väljs visas följande undermenyer
Photo Setup, där inställningar kan
göras för
• Slide show time (intervall för bildspel):
3 s, 5 s, 15 s, 1 min och 15 min.
• Photo mode (bildvisningsläge): Full Screen
eller Standard screen.
• Transition effect (visningseffekt): Off eller
Random (slumpvis).
• Date stamp (visa detaljerad information
om bilden): Off eller On.
• Shuffle (visa bilder i slumpvis ordning):
Off eller On.
Music Setup, där inställningar kan göras för
• Repeat Off (ingen repetition).
• Repeat One (repetera pågående musikspår).
• Repeat All (repetera alla musikfiler).
Video Setup, där inställningar kan göras för
• Repeat Off (ingen repetition).
• Repeat One (repetera pågående video).
• Repeat All (repetera alla videofiler).
Clock/Calendar Setup
• Time mode: Digital clock/Analog clock (visa analog/digital klocka).
• Show photo: On/Off (visa/visa inte miniatyrbild samtidigt som klocka och kalender visas).
• Set Time: (ställ in tid): hh/mm (tim/min).
• Set Date: (ställ in datum): år, månad, dag.
• Set Date format (ställ in visningsformat för kalender): år, månad, datum – datum, månad, år etc.
• Set Time format (ställ in visningsformat för tid): 12 tim eller 24 tim.
28
Page 29

Alarm Setup
• Alarm 1 – 4 (ställ in tid, funktion och signal för 4 olika alarm) Alarm 1, Alarm 2 etc.
• Ringtone volume (ställ in önskad volym för alarm 1 – 4): 1, 2, 3, 4, 5 eller 6.
General Setup
• Language (ändrar menyernas språk).
• Brightness (justerar skärmens ljusstyrka): +3, +2, +1, 0, -1, -2, -3.
• Contrast (justerar skärmens kontrast): +3, +2, +1, 0, -1, -2, -3.
• Saturation (justerar skärmens färgmättnad): +3, +2, +1, 0, -1, -2, -3.
• Auto start (inställning hur fotoramen startar efter tillslag): Photo, Main menu, Clock, Calendar.
• Power on (ställer in tid för automatiskt tillslag): hh/mm (tim/min).
• Power off (ställer in tid för automatiskt frånslag): hh/mm (tim/min).
• Hint time (ställ in tid för visning av knappfunktion på skärmen): 0 s, 5 s, 10 s och 20 s.
• Default (återställer enheten till fabriksinställningar).
OBS!
• Innan du ställer in tid för till- och frånslag måste enhetens klocka ställas in
(se Clock/Calendar setup).
• Om tiden för till- eller frånslag redan passerats sker till- eller frånslag nästkommande dag vid
den inställda tidpunkten.
• För att Power on-funktionen ska fungera: Stäng endast av fotoramen med [ ]-knappen (14) på
fjärrkontrollen, stäng inte av den med strömbrytaren (8) på fotoramens baksida.
6. Skötsel och underhåll
• Se till att fotoramen är avstängd och att nätadaptern är utdragen ur vägguttaget innan rengöring.
• Torka av med en mjuk, lätt fuktad trasa. Använd inga lösningsmedel eller starka rengöringsmedel. Spruta aldrig vätska på fotoramen.
• Använd en ren, mjuk och luddfri trasa för att torka av LCD-displayen. Använd vid behov
rengöringsmedel för LCD-skärmar som finns att köpa i handeln.
Svenska
7. Avfallshantering
När du ska göra dig av med produkten ska detta ske enligt lokala föreskrifter. Är du osäker på hur
du ska gå tillväga, kontakta din kommun.
29
Page 30

8. Felsökningsschema
Varför kan inte fotoramen visa
alla filerna på minneskortet/
USB-minnet?
Ett minneskort är anslutet till
fotoramen, men det går inte
att läsa.
Vissa bilder laddas fortare
än andra.
Svenska
Fotoramen startar inte/
ingen bild visas.
Hur roterar jag en bild? • Öppna OSD-menyn (i bildvisningsläge) med OSD- knappen (26)
Vilken upplösning är bäst? • Rekommenderad upplösning är 800 x 600 bildpunkter, högsta upp-
Fjärrkontrollen fungerar inte. • Kontrollera batteriet i fjärrkontrollen och byt det vid behov.
• Vissa minneskort är inte kompatibla med fotoramen, använd ett
kompatibelt minneskort.
• Fel bildfilformat (endast JPEG-bilder stöds).
• Se till att du använder ett minneskort som stöds av fotoramen.
• Se till att minneskortet är rätt anslutet.
• Fel filformat (endast JPEG-bilder stöds).
• OBS! Vissa digitalkameror sparar bilderna i filformat som inte är
standard, kontrollera i kamerans bruksanvisning.
• Bilder med hög upplösning tar längre tid att ladda. Använd bilder
med lägre upplösning för snabbare visning.
• Rekommenderad upplösning är 800 x 600 bildpunkter.
• OBS! Högsta upplösning som stöds är 8000 x 8000 bildpunkter.
• Kontrollera att nätadaptern är korrekt ansluten.
• Kontrollera att strömbrytaren (8) står i läge ON.
• Använd [◄] och [►] för att gå till
• Tryck på [OK] (24) flera gånger för att rotera bilden till önskat läge.
• OBS! Bilderna återgår till ursprungsläge när du stänger av fotoramen.
lösning är 8000 x 8000 bildpunkter.
• Rikta fjärrkontrollen rakt mot fotoramen. Minska avståndet till fotoramen. Kontrollera att inga hinder finns mellan fjärrkontroll och sensor.
i OSD-menyn.
9. Specifikationer
Display 10” LCD, TFT, 4:3, 1024×768
I/O Fjärrkontroll, DC IN
Drivspänning AC-adapter (In: 100–240 V AC, 50–60 Hz, Ut: DC 5 V 2 A)
USB port USB 2.0
Minneskort format som stöds SD (Secure Digital), MMC (Multimedia Card), MS (Memory Stick)
Bildformat som stöds JPEG (högsta upplösning: 8000 x 8000)
Ljudformat som stöds mp3, WMA
Videoformat som stöds MPEG-1, MPEG-2, MPEG-4, M-JPEG
Högtalare Inbyggd
Förvaringstemperatur -20 ºC ~ 60 ºC, < 90 % RH
Arbetstemperatur 0 ºC ~ 45 ºC, < 80 % RH
Storlek 265,5 × 215 × 22,5 mm
Vikt 638,6 g
30
Page 31

Digital fotoramme 10
″
Art.nr. 38-4004 Modell PF-10DN-502V3RC
Brukerveiledning
Les brukerveiledningen nøye før produktet tas i bruk, og ta vare på den for framtidig bruk.
Vi reserverer oss mot ev. tekst- og bildefeil, samt forandringer av tekniske data.
Ved tekniske problemer eller spørsmål, ta kontakt med vårt kundesenter.
(Se opplysninger om kundesenteret i denne bruksanvisningen).
Innholdsfortegnelse
1. Sikkerhet s. 31
2. Produktbeskrivelse s. 32
3. Knapper og funksjoner s. 32
4. Kom i gang s. 34
5. Bruk og innstillinger s. 36
6. Stell og vedlikehold s. 43
7. Avfallshåndtering s. 43
8. Feilsøking s. 44
9. Spesifikasjoner s. 44
Norsk
1. Sikkerhet
• Produktet må kun repareres av kyndig servicepersonell.
• Produktet må ikke demonteres eller endres på.
• Plasser ikke produktet slik at det kan bli utsatt for vannsøl eller andre væsker.
Pass på at det står stødig.
• Bruk kun den medfølgende strømadapteren. Strømadapteren må kobles fra
strømuttaket dersom produktet ikke skal brukes på en stund.
• Plasser ikke tunge eller skarpe gjenstander på displayet. Strømkabelen bør ikke ha
kontakt med skarpe kanter eller hjørner. Påse også at den ikke kommer i klem.
• Produktet er kun beregnet for innendørs bruk.
• Produktet må ikke plasseres nær varmeovner eller andre varme flater.
• Bruk aldri dette produktet i støvete, fuktige eller skitne miljøer.
• Nettadapter må ikke kobles fra, mens spilling pågår. Det er fare for at det tilkoblede
minnet skades. Ta heller ikke bort det tilkoblede minnet mens spilling pågår.
31
Page 32

2. Produktbeskrivelse
• Digital fotoramme med 10” fargeskjerm.
• Oppløsning: 1024×768, bildeformat: 4:3.
• Viser dine digitale bilder uten datamaskin.
• Tilkobling for usb-minne eller minnekort (SD/MMC/MS).
• Bildeframvisning med eller uten bakgrunnsmusikk og mange forskjellige framvisninsgseffekter.
• Repetisjonsfunksjon både på avspilling av musikk, bilder og film.
• Støtte for MPEG-1, MPEG-2 og MPEG-4, samt M-JPEG –format.
• Støtte for mp3 og WMA.
• Innebygde høyttalere.
• Vising av klokke og kalender.
• Alarm (4 forskjellige tider).
• Leveres med fjernkontroll og nettadapter.
• ON/OFF
3. Knapper og funksjoner
Fotoramme
Norsk
3 4 5 6 7 8
2
9
1
10
11
12 13
1. [MENU] – Åpne hovedmenyen
2. [◄] Gå til venstre
3. [▲] Oppover
4. [►ll] Start visning/ta pause i visning/bekrefte et valg
5. [►] Gå til høyre
6. [▼] Nedover
7. [ ] Gå tilbake til foregående meny
8. [ON/OFF] Skru på/av fotorammen
9. Tilkobling for minnekort (SD/MMC/MS)
10. Tilkoblingspunkt for usb-minne
11. Tilkobling for nettadapter
12. Støttebein
13. Feste for støttebein
32
Page 33

Fjernkontroll
14
15
16
17
18
19
20
21
22
14. [ ] Skru på/av fotorammen.
15. [▲] Forflytting oppover/Foregående bilde/spor/film.
16. [◄] Gå til venstre/vise foregående foto ved bildeframvisning.
17. [MENU] Trykk for å åpne hovedmenyen.
18. [▼] Forflytting nedover/Neste bilde/spor/film.
19. [◄◄] Velg foregående foto når du viser bilder Velg foregående side når miniatyrbildene
(thumbnails) vises, hurtigspole bakover (musikk/film).
20. [ ] Trykk for å zoome i bildet.
21. [ ] Endre bildeformat, 4:3 eller 16:9.
22. [VOL +] Hev volumet.
23. [SETUP] Åpner innstillingsmenyen.
24. [OK] Starte bildeframvisning, ta pause eller bekrefte valg.
25. [►] Gå til høyre/neste bilde (under visning).
26. [OSD] Vise/forlate OSD-menyen (OSD- menyen vises nederst på skjermen).
27. [ ] Gå til foregående meny.
28. [►►] Velg neste foto når du viser bilder Velg neste side når miniatyrbildene (thumbnails)
vises, hurtigspole framover (musikk/film).
29. [ ] Starte bildeframvisning med bakgrunnsmusikk*.
30. [♫] Starter eller stopper spilling av musikk ved pågående bildeframvising.
31. [VOL-] Senker volumet.
23
24
25
26
27
28
29
30
31
Norsk
* Kun dersom det tilkoblede minnet inneholder musikkfiler.
33
Page 34

4. Kom i gang
Sett batteriet i fjernkontrollen
CR2025
Fjernkontrollen drives av ett CR2025 batteri (3 V).
• Sett i batteriet som vist på bildene. Plasseres som vist i batteriholderen.
Fjern ev. beskyttelsesemballasje.
Norsk
• Skift batteri når fjernkontrollen ikke fungerer selv om den holdes nær
sensoren på den digitale fotorammen.
Montere støttebein
• Fjern støttebeina (12) fra den magnetiske holderen på fotorammens bakside.
• Skru fast støttebeinet i hullet (13). Skru godt fast (medurs), men ikke trekk for hardt til.
• Når støttebeinet er montert kan rammen plasseres enten på kort- eller langsiden.
34
Page 35

Koble til nettadapteren
1. Strømadapterets støpsel skal plugges til
et strømuttak som har 230 V.
2. Koble deretter adapterens DC-kontakt til
DC IN (11) på fotorammen.
3. Still omkobleren, som er på rammens
bakside, i ON-posisjon for å skru på
fotorammen.
OBS!
Vanligvis brukes knappen ON/OFF (14) på fjernkontrollen til å slå på fotorammen eller sette den
i standby-modus. For å skru av fotorammen må
strømbryteren (8) på fotorammens bakside settes
i OFF-modus.
Strømadapteren må kobles fra strømuttaket
dersom produktet ikke skal brukes på en stund.
Montering av minnekort eller usb-minne
Norsk
Minnekort
Følgende minnekort kan brukes:
SD (Secure Digital)
MMC (Multimedia Card)
MS (Memory Stick)
• Trykk minnekortet forsiktig inn i inngangen (9).
• Minnekortet tas ut ved å trekke det rett ut.
• Obs! Ikke trekk minnekortet ut mens det brukes for
å vise bilder eller andre filer.
USB-minne
• Trykk forsiktig inn et usb-minne i usb-inngangen (10).
• Minnekortet tas ut ved å trekke det rett ut.
• Obs! Ikke trekk usb-minnet ut mens det brukes for
å vise bilder eller andre filer.
35
Page 36

5. Bruk og innstillinger
Hovedmeny
OBS!
Første gang fotorammen startes eller etter at den er stilt tilbake til fabrikkinnstillingene må språket
velges i menyen som kommer opp. Velg språk og bekreft med [OK] (24) på fjernkontrollen eller
[►ll] (4) på baksiden av fotorammen.
Hvis fotorammen startes uten usb-minne eller minnekort tilkoblet, vil hovedmenyen vises med
Clock, Calendar og Setup på skjermen.
Hvis fotorammen startes med et minnekort og/eller usb-minne i, vil fotorammen automatisk vise
alle bildene som er lagret i minnet. For å avbryte dette og komme til hovedmenyen, trykk [MENU]
(17) på fjernkontrollen eller [MENU] (1) på rammens bakside.
Hvis både minnekort og usb-minne er tilkoblet når fotorammen startes vil hovedmenyen se slik ut:
Norsk
SD/
MMC/MS Vises når et minnekort er
tilkoblet/settes inn.
USB Vises når et usb-minne er
tilkoblet/settes inn.
Clock Velges hvis klokken skal vises
på skjermen.
Calendar Velges hvis kalenderen skal vises
på skjermen.
Setup For å endre skjermens innstillinger.
Velg funksjon og naviger i menyene med [▼] [▲] [◄] [►] på fjernkontrollen eller på baksiden av
fotorammen. Bekreft med [OK] (24) på fjernkontrollen eller [►ll] (4) på baksiden av fotorammen.
Gå bakover i menyene med [
] (27 på fjernkontrollen, 7 på fotorammen).
36
Page 37

Hvis SD/MMC/MS eller USB velges vises følgende undermenyer
Photo
(åpnes ved å trykke på [OK] eller [►ll])
• Bildene på minnet vises som miniatyrer,
velg å vise bildene en og en og trykk
[OK] eller [►ll]. Vis deretter flere bilder
ved å trykke på[◄] [►].
• Start automatisk bildeframvisning ved
å trykke på [ ] (29) på fjernkontrollen
(det tar noen sekunder før framvisningen
starter) eller trykk [►ll] på baksiden av
rammen.
Norsk
Trykk [OSD] (26) på fjernkontrollen eller MENU-knappen (1) på baksiden av fotorammen for
å åpne [OSD] menyen.
OBS! Kan bare vises når et bilde er valgt og vises eller når bildeframvisningen er arkivert.
Velg funksjon med [◄] [►] knappene og styr funksjonene med [OK] på fjernkontrollen eller
[►ll] på baksiden av fotorammen.
37
Page 38

OSD-meny ved bildeframvisning
Trykk [OK] eller [►ll] for å starte eller
II
stoppe bildeframvisningen.
I◄
Vise foregående bilde.
►I
Vise neste bilde.
Velg forskjellig avspillings-/repetisjonsalternativ for bildeframvisningen.
Valget vises i liten tekst på skjermen.
Roter bildet. Trykk flere ganger til
bildet vises riktig.
Zoom inn i bildet, og trykk flere ganger for å velge ønsket forstørrelse: ×2, ×4, ×8 eller
×16 og tilbake til utgangsstørrelsen. Når bildet forstørres og OSD menyen forsvinner fra
skjermen, noe den gjør etter noen få sekunder, kan man manøvrere rundt i bildet med
[▼] [▲] [◄] [►].
Norsk
Starte eller stoppe avspilling av musikk. (Hvis det er musikkfiler i minnet).
Senke volumet.
Heve volumet.
Gå tilbake til starten i OSD-menyen.
Music
(åpnes ved å trykke på [OK] eller [►ll])
• Hvis det er forskjellige typer på samme
minne for eksempel musikk, video og
bildefiler, vises en meny bestående av:
Audio
Picture
Subtitle
Video
• Velg Audio og tilgjengelige musikkfiler vise i en liste.
• Naviger og bekreft som tidligere i listen og i OSD-menyen som
vises automatisk når en lydfil spilles.
38
Page 39

OSD-meny ved avspilling av musikkfiler
Trykk [OK] eller [►ll] for å starte eller
II
stoppe avspillingen.
I◄
Velg foregående lydfil.
►I
Velg neste lydfil.
◄◄
Hurtigspole bakover.
Hurtigspole framover.
►►
Velg forskjellige repetisjonsalternativer
(One, All eller OFF).
Senke volumet.
Heve volumet.
Gå tilbake till starten i OSD-menyen.
Video
(åpnes ved å trykke på [OK] eller [►ll])
Norsk
• Hvis det er forskjellige typer på samme
minne for eksempel musikk, video og
bildefiler, vises en meny bestående av:
Audio
Picture
Subtitle
Video
• Velg Video og tilgjengelige musikkfiler vise i en liste.
• Naviger og bekreft som tidligere beskrevet.
• Trykk [OSD] (26) på fjernkontrollen eller MENU-knappen (1) på baksiden av
fotorammen for å åpne [OSD] menyen.
39
Page 40

OSD-meny ved avspilling av videofiler
Trykk [OK] eller [►ll] for å starte eller
II
stoppe videoavspillingen.
I◄
Vise foregående video.
►I
Vise neste video.
◄◄
Hurtigspole bakover.
Hurtigspole framover.
►►
Velg forskjellige repetisjonsalternativer
(One, All eller OFF).
Zoom inn i bildet, og trykk flere ganger for å velge ønsket forstørrelse: ×2, ×4, ×8 eller
×16 og tilbake til utgangsstørrelsen.
Senke volumet.
Norsk
Heve volumet.
Gå tilbake til starten i OSD-menyen.
Files
(åpnes ved å trykke på [OK] eller [►ll])
• Hvis det er forskjellige typer på samme
minne for eksempel musikk, video og
bildefiler, vises en meny bestående av:
Audio
Picture
Subtitle
Video
• Naviger og bekreft som tidligere beskrevet.
• Du kan også kopiere filer mellom tilkoblede minner.
• Obs! Minnekort kan ha aktivert skrivebeskyttelse. Kontroller innstillingen.
40
Page 41

Kopiere filer
For å kopiere filer må du ha to minner
koblet til fotorammen, f.eks. et usb-minne
og et minnekort.
1. Velg den filen du vil kopiere med [▲]
eller [▼].
2. Trykk [►] for å merke filen. Filen
merkes med √ (trykk en gang til for
å fjerne merking).
3. Repeter trinn 1 og 2 dersom du vil merke
flere filer.
4. Trykk [OSD], en meny med valgene
COPY og DELETE vises til høyre for fillisten.
5. Merk COPY med [▲] eller [▼] og bekreft med [OK]. Andre tilkoblede minner vises i en liste.
6. Velg hvilket minne du skal kopiere filene til med knappene [◄] [►].
7. Trykk på [OK] for å starte kopieringen.
8. Når filene er kopiert vises beskjeden ”Finished”.
Slette filer
1. Velg den filen du vil fjerne med [▲] eller [▼].
2. Trykk [►] for å merke filen. Filen markeres med √ (trykk igjen for å fjerne merket på filen).
3. Repeter trinn 1 og 2 dersom du vil merke flere filer.
4. Trykk [OSD]. En meny med valgene COPY og DELETE visas til høyre for fillisten.
5. Merk DELETE med [▲] eller [▼] og bekreft med [OK].
6. Bruk [◄] og [►] for å velge YES som bekreftelse på slettingen, eller NO for å avslutte
uten å fjerne filen/filene. Trykk deretter [OK] for å fullføre slettingen. Obs! Man kan ikke
angre på denne handlingen!
7. Når filene er slettet vises beskjeden ”Finished”.
8. Trykk [OK] for å avslutte.
Hvis Clock velges
Klokken vises på skjermen sammen med
bilde framvising av miniatyrbiler og
alarm tidene.
Norsk
41
Page 42

Hvis Calender velges
• Kalenderen vises på skjermen sammen
med klokke, bildeframvising av miniatyrbiler og alarmtidene.
Hvis Setup velges vises følgende undermenyer
Photo Setup, der innstillinger kan
utføres for
Norsk
• Slide show time (intervall for bildeframvisning) 3 s, 5 s, 15 s, 1 min og 15 min.
• Photo mode (bildeframvisningsmodus): Full
Screen (Helskjerm) eller Standard screen.
• Transition effekt (visningseffekt): Off eller
Random (slumpvis).
• Date stamp (vise detaljert informasjon om
bildene): Off eller On.
• Shuffle (vise bilder i tilfeldig rekkefølge):
Off eller On.
Music Setup, der innstillinger kan utføres for
• Repeat Off (ingen repetisjon).
• Repeat One (repetere pågående spor).
• Repeat All (Repeterer alle spor).
Video Setup, der innstillinger kan utføres for
• Repeat Off (ingen repetisjon).
• Repeat One (repetere pågående video)
• Repeat All (Repeterer alle videofiler)
Clock/Calendar Setup
• Time mode: Digital clock/Analog clock (vise analog/digital klokke).
• Show photo: On/Off (vise/ikke vise miniatyrbilder samtidig som klokke og kalender vises).
• Set Time: (stille inn tid) hh/mm (time/min).
• Set Date: (stille inn dato) år, måned, dag.
• Set Date format (Stille inn visningsformat for kalender): år, måned, dato – dato, måned, år etc.
• Set Time format (Stille inn visningsformat for tid): 12 timer eller 24 timer.
42
Page 43

Alarm Setup
• Alarm 1 – 4 (Still inn tid, funksjon og signal for fire valgfrie alarmer) Alarm 1, Alarm 2 etc.
• Ringetone volume (stille inn ønsket volum for alarm 1 – 4): 1, 2, 3, 4, 5 eller 6.
General Setup
• Language (Endrer menyenes språk).
• Brightness (justere skjermens lysstyrke): +3, +2, +1, 0, -1, -2, -3.
• Contrast (justerer skjermens kontrast): +3, +2, +1, 0, -1, -2, -3.
• Saturation (justerer skjermens fargemetning): +3, +2, +1, 0, -1, -2, -3.
• Auto start (Innstilling på hvordan fotorammen skal begynne etter oppstart). Photo, Main
menu, Clock, Calendar.
• Power on (Stiller inn tid for automatisk tilslag): hh/mm (time/min).
• Power off (Stiller inn tid for automatisk fraslag): hh/mm (time/min).
• Hint time (stille inn tid for visning av tastefunksjen på skjermen): 0 s, 5 s, 10 s og 20 s.
• Default (Stiller enheten tilbake til fabrikksinnstillinger).
OBS!
• Før innstilling av automatisk til- og fraslag, må enhetens klokke stilles inn
(se Clock/Calendar setup).
• Dersom tidspunktet for til- og fraslag allerede er passert, vil den skrus på/av neste dag til
innstilt tidspunkt.
• For at Power on-funksjonen skal fungere: Steng fotorammen med [ ]-knappen (14)
på fjernkontrollen, ikke skru av med strømbryteren på rammens bakside.
6. Stell og vedlikehold
• Påse at fotorammen er avstengt og strømkabelen frakoblet ved rengjøring.
• Rengjør med en myk og lett fuktet klut. Bruk aldri løsningsmiddel eller sterke
rengjøringsmidler. Ikke sprut noen form for væske over fotorammen.
• Bruk en ren, myk og lofri klut når du skal tørke av LCD-skjermen. Bruk ved behov
rengjøringsmiddel for LCD-skjermer som er å få kjøpt.
Norsk
7. Avfallshåndtering
Når produktet skal kasseres, må det skje i henhold til lokale forskrifter.
Ved usikkerhet, ta kontakt med lokale myndigheter.
43
Page 44

8. Feilsøking
Hvorfor kan ikke fotorammen
vise alle filene på minnekortet/
usb-minnet?
Et minnekort er koblet til
fotorammen, men kan
ikke avleses.
Enkelte bilder lades fortere
enn andre.
Enheten starter ikke / Det
kommer ikke opp noe bilde
på skjermen.
Hvordan rotere bildet? • Åpne OSD-menyen (i bildframvisningsmodus) med OSD- knappen (26)
Norsk
Hvilken oppløsning er best? • Anbefalt oppløsning er 800 x 600 bildepunkter.
Fjernkontrollen fungerer ikke. • Kontroller batteriet og bytt det ved behov.
• Enkelte minnekort er ikke kompatible med fotorammen. Bruk kun
kompatible minnekort.
• Feil filformat (støtter kun JPEG- bilder).
• Påse at minnekortet støttes av fotorammen.
• Påse at minnekortet er korrekt installert.
• Feil filformat (støtter kun JPEG- bilder).
• Obs! Enkelte digitalkameraer lagrer bildene i filformat som ikke er
standard. Kontroller kameraets bruksanvisning.
• Bilder med høy oppløsning tar lengre tid å laste ned. Bruk bilder
med lavere oppløsning for raskere vising.
• Anbefalt oppløsning er 800 x 600 punkter.
• Obs! Høyeste oppløsning som støttes er 8000 x 8000 punkter.
• Kontroller at strømledningen er riktig satt i.
• Kontroller at strømbryteren står i posisjon ON.
• Bruk [◄] og [►] for å gå til
• Trykk på [OK] (24) flere ganger for å rotere bildet til ønsket posisjon.
• Obs! Vær klar over at bildet går tilbake til opprinnelig posisjon igjen
når fotorammen skrus av.
Høyeste bildeoppløsning er 8000 x 8000 bildepunkter.
• Rett fjernkontrollen mot fotorammen. Reduser avstanden mellom
fjernkontroll og fotorammen. Kontroller at ingen hinder finnes mellom
fjernkontroll og sensor.
i OSD-menyen.
9. Spesifikasjoner
Display 10” LCD, TFT, 4:3, 1024×768
I/O Fjernkontroll, DC IN
Spenning AC-adapter (In: 100–240 V AC, 50–60 Hz, Ut: DC 5 V 2 A)
Usb-port USB 2.0
Minnekort format som støttes SD (Secure Digital), MMC (Multimedia Card), MS (Memory Stick)
Bildeformat som støttes JPEG (høyeste oppløsning: 8000 x 8000)
Lydformat som støttes mp3, WMA
Videoformat som støttes MPEG-1, MPEG-2, MPEG-4, M-JPEG
Høyttaler Innebygd
Oppbevaringstemperatur -20 ºC ~ 60 ºC, < 90 % RH
Arbeidstemperatur 0 ºC ~ 45 ºC, < 80 % RH
Størrelse 265,5 × 215 × 22,5 mm
Vekt 638,6 g
44
Page 45

Digitaalinen valokuvakehys 10
″
Tuotenumero 38-4084 Malli PF-10DN-502V3RC
Käyttöohje
Lue käyttöohjeet ennen tuotteen käyttöönottoa ja säilytä ne tulevaa tarvetta varten.
Pidätämme oikeuden teknisten tietojen muutoksiin. Emme vastaa mahdollisista teksti- tai
kuvavirheistä. Jos laitteeseen tulee teknisiä ongelmia, ota yhteys myymälään tai
asiakaspalveluun (yhteystiedot käyttöohjeen lopussa).
Sisällysluettelo
1. Turvallisuus s. 45
2. Tuotekuvaus s.46
3. Painikkeet ja toiminnot s. 46
4. Käytön aloittaminen s. 48
5. Käyttäminen ja asetukset s. 50
6. Huolto ja ylläpito s. 57
7. Kierrätys s. 57
8. Vianhakutaulukko s. 58
9. Tekniset tiedot s. 58
Suomi
1. Turvallisuus
• Laitteen saa korjata vain valtuutettu huoltoliike.
• Älä pura tai muuta laitetta.
• Älä sijoita laitetta sellaiseen paikkaan, josta se voi tippua veteen tai muuhun nesteeseen.
• Käytä vain mukana toimitettua adapteria. Poista muuntaja aina pistorasiasta, jos et käytä
tuotetta vähään aikaan.
• Älä aseta näytön päälle raskaita tai teräviä esineitä. Suojaa virtajohtoa teräviltä kulmilta ja
varmista, ettei kaapeli joudu puristuksiin.
• Tuote on tarkoitettu vain sisäkäyttöön.
• Älä sijoita tuotetta liian lähelle kuumia esineitä, kuten kamiinoita tai takkoja.
• Älä käytä laitetta kosteissa, pölyisissä tai likaisissa ympäristöissä.
• Älä kytke muuntajaa pois toiston aikana. Tämä voi vahingoittaa kehykseen liitettyä muistia.
Älä myöskään poista liitettyä muistia toiston aikana.
45
Page 46

2. Tuotekuvaus
• Digitaalinen valokuvakehys, 10″:n värinäyttö
• Erotuskyky: 1024x768, kuvasuhde: 4:3.
• Katsele digikuviasi ilman tietokonetta.
• Liitäntä USB-muistille tai muistikortille (SD/MMC/MS).
• Kuvaesitys taustamusiin kanssa tai ilman ja monia eri näyttötehosteita.
• Uudelleentoistotoiminto musiikkia, valokuvia ja elokuvia toistettaessa.
• MPEG-1, MPEG-2, MPEG-4 ja M-JPEG-tuki.
• Mp3- ja wma-tuki
• Sisäiset kaiuttimet.
• Kello ja kalenteri.
• Hälytys (4 aikaa).
• Mukana kaukosäädin ja muuntaja.
• Säädettävä ON/OFF
3. Painikkeet ja toiminnot
Valokuvakehys
3 4 5 6 7 8
2
9
Suomi
1
10
11
12 13
1. [MENU] Päävalikon avaus
2. [◄] Siirry vasemmalle
3. [▲] Siirry ylöspäin
4. [►ll] Käynnistä esitys/pidä tauko esityksessä/vahvista valinta
5. [►] Siirry oikealle
6. [▼] Siirry alaspäin
7. [ ] Palaa edelliseen valikkoon
8. [ON/OFF] Valokuvakehyksen käynnistäminen/sammuttaminen
9. Liitäntä SD/MMC/MS-muistikortille
10. USB-muistin liitäntä
11. Mukana tulevan muuntajan liitäntä
12. Tukijalka
13. Tukijalan kiinnitys
46
Page 47

Kaukosäädin
14
15
16
17
18
19
20
21
22
14. [ ] Valokuvakehyksen käynnistäminen ja sammuttaminen.
15. [▲] Siirry ylöspäin/Edellinen kuva/raita/filmi.
16. [◄] Siirry vasemmalle/edellinen kuva (kuvien katselussa).
17. [MENU] Avaa päävalikko painamalla.
18. [▼] Siirry alaspäin/Seuraava kuva/raita/filmi.
19. [◄◄] Valitse edellinen kuva kuvien katselussa. Valitse edellinen sivu Thumbnail-
miniatyyrikuvien näytössä, pikakelaa taaksepäin (musiikki/filmi).
20. [ [ Zoomaa kuvaa painamalla.
21. [ ] Muuta kuvasuhdetta, 4:3 tai 16:9.
22. [VOL+] Lisää äänenvoimakkuutta.
23. [SETUP] Asetusvalikon avaaminen.
24. [OK] Aloita toisto/pidä tauko toistossa/vahvista valinta.
25. [►] Siirry oikealle/seuraava kuva (esityksen aikana).
26. [OSD] Näytä/poistu OSD-valikosta (OSD-valikko näkyy näytön alalaidassa).
27. [ ] Palaa edelliseen valikkoon.
28. [►►] Valitse seuraava valokuva (katsellessasi kuvia). Valitse seuraava sivu Thumbnail-
miniatyyrikuvien näytössä, pikakelaa eteenpäin (musiikki/filmi).
29. [ ] Aloita kuvaesitys taustamusiikin kanssa*.
30. [♫] Aloita/lopeta musiikin toisto meneillään olevan kuvaesityksen aikana.
31. [VOL-] Alenna äänenvoimakkuutta.
23
24
25
26
27
28
29
30
31
Suomi
*Ainoastaan, jos liitetty muisti sisältää musiikkitiedostoja.
47
Page 48

4. Käytön aloittaminen
Pariston asettaminen kaukosäätimeen
CR2025
Kaukosäädin toimii CR2025-paristolla (3V).
• Aseta paristo kuvan osoittamalla tavalla. Varmista, että paristo tulee oikein päin.
Poista mahdollinen suojamuovi.
• Vaihda paristo silloin, kun kaukosäädin ei enää toimi, vaikka osoitat kehyksessä olevaa
tunnistinta läheltä.
Tukijalan asentaminen
Suomi
• Irrota tukijalka (12) valokuvakehyksen takana olevasta magneettipidikkeestä.
• Ruuvaa tukijalka ruuvinreikään (13). Ruuvaa kiinni kunnolla (myötäpäivään), mutta älä kiristä liikaa.
• Kun tukijalka on asennettu, kehyksen voi asettaa pysty- tai vaaka-asentoon.
48
Page 49

Muuntajan liittäminen
1. Liitä pakkauksen muuntaja 230 V:n
pistorasiaan.
2. Liitä sitten muuntajan DC-pistoke
valokuvakehyksen DC IN -liitäntään (11).
3. Käynnistä kehys asettamalla kehyksen
takapuolella oleva valintakytkin asentoon ON.
Huom.!
Normaalisti valokuvakehys käynnistetään tai
vaihdetaan valmiustilaan kaukosäätimen ON/OFFpainikkeella (14). Kun haluat sammuttaa kehyksen
kokonaan, aseta kehyksen takapuolella oleva
virtakytkin (8) asentoon OFF.
Poista muuntaja aina pistorasiasta, jos et käytä
tuotetta vähään aikaan.
Muistikortin tai usb-muistin liittäminen
Muistikortit
Voit käyttää seuraavia muistikortteja:
Secure Digital (SD)
Multimedia Card (MMC)
Memory Stick (MS)
• Paina muistikortti varovasti liitäntään (9).
• Poista muistikortti vetämällä sitä suoraan ulospäin.
• Huom.! Älä poista muistikorttia, kun siltä katsotaan
kuvia tai muita tiedostoja.
USB-muisti
• Paina usb-muisti varoen usb-liitäntään (10).
• Irrota muisti tai soitin vetämällä suoraan ulospäin.
• Huom.! Älä poista usb-muistia, kun siltä katsotaan
kuvia tai muita tiedostoja.
49
Suomi
Page 50

5.Käyttö ja asetukset
Päävalikko
Huom.!
Kun valokuvakehys otetaan ensimmäisen kerran käyttöön sekä tehdasasetusten palauttamisen
jälkeen, tulee näytön valikosta valita kieli. Valitse kieli ja vahvista painamalla [OK] (24) kaukosäätimellä tai [►ll] (4) valokuvakehyksen takaa.
Jos valokuvakehys käynnistetään ilman usb-muistia tai muistikorttia, päävalikossa näkyy kellonaika, kalenteri ja Setup-valikko.
Jos valokuvakehyksessä on muistikortti ja/tai usb-muisti käynnistettäessä, valokuvakehys käynnistää kuvaesityksen automaattisesti, jos muistissa on kuvia. Keskeytä kuvaesitys ja palaa päävalikkoon painamalla [MENU] (17) kaukosäätimellä tai [MENU] (1) valokuvakehyksen takaa.
Jos valokuvakehykseen on liitetty sekä muistikortti että usb-muisti, päävalikko näyttää seuraavalta:
SD/
MMC/MS Näkyy, kun laitteessa on tai
siihen asetetaan muistikortti.
USB Näkyy, kun laitteessa on tai
siihen asetetaan usb-muisti.
Suomi
Clock Valitse Clock, kun haluat nähdä
kellonajan näytöllä.
Calendar Valitse Calendar, kun haluat
nähdä kalenterin näytöllä.
Setup Näytön asetusten muuttaminen.
Valitse toiminto ja navigoi valikoissa painamalla [▼] [▲] [◄] [►] kaukosäätimellä tai valokuvakehyksen takaa. Vahvista valinta painamalla [OK] (24) kaukosäätimellä tai [►ll] (4) valokuvakehyksen
takaa. Siirry taaksepäin valikoissa painamalla [
] (27 kaukosäätimessä, 7 valokuvakehyksessä).
50
Page 51

Jos valitset SD-/MMC-/MS- tai usb-muistin, näytöllä näkyy
seuraavat alavalikot
Photo
(avaa painamalla [OK] tai [►ll])
• Kuvat näkyvät pienoiskuvina, katso
kuvat yksi kerrallaan valitsemalla kuva ja
painamalla [OK] tai [►ll]. Katso useita
kuvia yksi kerrallaan painamalla [◄] [►].
• Aloita kuvaesitys painamalla [ ] (29)
kaukosäätimellä (kuvaesitys alkaa muutaman sekunnin viiveellä) tai paina [►ll]
kehyksen takaa.
Suomi
Paina [OSD] (26) kaukosäätimellä tai MENU-painiketta (1) valokuvakehyksen takaa avataksesi
[OSD] -valikon.
Huom.! Voidaan näyttää vain, kun kuva on valittu ja se näkyy näytöllä, tai kun kuvaesitys
on aktivoitu.
Valitse toiminto painamalla [◄] [►] ja ohjaa toimintoja painamalla [OK] kaukosäätimellä tai [►ll]
valokuvakehyksen takaa.
51
Page 52

OSD-valikko kuvaesityksessä
Aloita tai lopeta kuvaesitys painamalla
II
[OK] tai [►ll].
I◄
Katso edellinen kuva.
►I
Katso seuraava kuva.
Valitse kuvaesityksen eri toisto-/uudelleentoistovaihtoehdot. Valinnat näkyvät pienenä tekstinä näytöllä.
Pyöritä kuvaa, paina useita kertoja,
kunnes kuva on oikein päin.
Zoomaa kuvaa, paina useita kertoja valitaksesi suurennuksen: ×2, ×4, ×8 tai ×16 ja
takaisin alkuperäiseen kokoon. Kun kuva on suurennettu ja OSD-valikko poistuu näytöltä
muutaman sekunnin kuluttua, kuvaa voi pyörittää painamalla [▼] [▲] [◄] [►].
Musiikin toiston aloittaminen tai lopettaminen. (Jos muistilla on musiikkia).
Äänenvoimakkuuden vähentäminen.
Äänenvoimakkuuden lisääminen.
Palaa takaisin OSD-valikon alkuun.
Suomi
Music
(avaa painamalla [OK] tai [►ll])
• Jos muistilla on erityyppisiä tiedostoja,
esim. musiikkia, videoita ja kuvia,
näytöllä näkyy seuraava valikko:
Audio
Picture
Subtitle
Video
• Valitse Audio, niin saatavilla olevat musiikkitiedostot näkyvät listassa.
• Navigoi ja vahvista kuten aiemmin listalla ja OSD-valikossa, joka näkyy näytöllä
automaattisesti äänitiedoston toiston aikana.
52
Page 53

Musiikkitiedostojen toiston OSD-valikko
Aloita tai lopeta toisto painamalla [OK]
II
tai [►ll].
I◄
Valitse edellinen äänitiedosto.
►I
Valitse seuraava äänitiedosto.
◄◄
Pikakelaus taaksepäin.
Pikakelaus eteenpäin.
►►
Valitse eri toistovaihtoehdoista
(One, All tai OFF).
Äänenvoimakkuuden vähentäminen.
Äänenvoimakkuuden lisääminen.
Palaa takaisin OSD-valikon alkuun.
Video
(avaa painamalla [OK] tai [►ll])
Suomi
• Jos muistilla on erityyppisiä tiedostoja,
esim. musiikkia, videoita ja kuvia, näytöllä
näkyy seuraava valikko:
Audio
Picture
Subtitle
Video
• Valitse Video, niin saatavilla olevat musiikkitiedostot näkyvät listassa.
• Navigoi ja vahvista kuten edellä.
• Paina [OSD] (26) kaukosäätimellä tai MENU-painiketta (1) valokuvakehyksen takaa avataksesi
[OSD] -valikon.
53
Page 54

Videotiedostojen toiston OSD-valikko:
Aloita tai lopeta videon toisto paina-
II
malla [OK] tai [►ll].
I◄
Edellisen videon katsominen.
►I
Seuraavan videon katsominen.
◄◄
Pikakelaus taaksepäin.
►►
Pikakelaus eteenpäin.
Valitse eri toistovaihtoehdoista
(One, All tai OFF).
Zoomaa kuvaa, paina useita kertoja valitaksesi suurennuksen: ×2, ×4, ×8 tai ×16 ja
takaisin alkuperäiseen kokoon.
Äänenvoimakkuuden vähentäminen.
Äänenvoimakkuuden lisääminen.
Palaa takaisin OSD-valikon alkuun.
Suomi
Files
(avaa painamalla [OK] tai [►ll])
• Jos muistilla on erityyppisiä tiedostoja,
esim. musiikkia, videoita ja kuvia,
näytöllä näkyy seuraava valikko:
Audio
Picture
Subtitle
Video
• Navigoi ja vahvista kuten edellä listalla.
• Voit myös kopioida tiedostoja liitetystä muistista toiseen.
• Huom! Muistikortissa voi olla aktivoitu kirjoitussuojaus, tarkasta kuinka suojaus on asetettu.
54
Page 55

Tiedostojen kopiointi
Jos haluat kopioida tiedostoja, liitä kehykseen
kaksi muistia, esim. USB-muisti ja muistikortti.
1. Valitse se tiedosto, jonka haluat kopioida
[▲]- tai [▼]-painikkeilla.
2. Valitse tiedosto painamalla [►], tiedosto
on merkitty √-merkillä (poista valinta
painamalla uudelleen).
3. Toista kohdat 1 ja 2, jos haluat valita lisää
tiedostoja.
4. Paina [OSD] ja tiedostoluettelon oikealle
puolelle ilmestyy valikko, jossa on
valintamahdollisuudet COPY ja DELETE.
5. Valitse COPY [▲]- tai [▼] -painikkeilla ja vahvista painamalla [OK].
Muut liitetyt muistit näkyvät listassa.
6. Valitse [◄] [►] painikkeilla muisti, johon haluat kopioida tiedostot.
7. Aloita kopiointi painamalla [OK].
8. Kun tiedostot on kopioitu, ilmoitetaan siitä viestillä ”Finished”.
Tiedostojen poisto
1. Valitse se tiedosto, jonka haluat poistaa [▲]- tai [▼]-painikkeilla.
2. Valitse tiedosto painamalla [►]. Merkityn tiedoston kohdalle ilmestyy √ (poista valinta
painamalla uudelleen).
3. Toista kohdat 1 ja 2, jos haluat valita lisää tiedostoja.
4. Paina [OSD]. Tiedostoluettelon oikealle puolelle ilmestyy valikko, jossa on
valintamahdollisuudet COPY ja DELETE.
5. Valitse DELETE [▲]- tai [▼] -painikkeilla ja vahvista painamalla [OK].
6. Vahvista poistaminen valitsemalla YES tai poistu poistamatta tiedostoja valitsemalla NO.
Lopeta tiedostojen poistaminen painamalla [OK]. Huom.! Poistettuja tiedostoja ei saa enää
takaisin!
7. Kun tiedostot on poistettu, ilmoitetaan siitä viestillä ”Finished”.
8. Lopeta painamalla [OK].
Suomi
Kello (Clock)
Kellonaika näkyy näytöllä pienoiskuvakuvaesityksen ja hälytysaikojen kanssa.
55
Page 56

Kalenteri (Calender)
Kalenteri näkyy näytöllä kellon, pienoiskuvaesityksen ja hälytysaikojen kanssa.
Jos valitset Setup-vaihtoehdon, näytöllä näkyy seuraavat alavalikot
Photo Setup –valikossa voi tehdä
seuraavat asetukset
• Slide show time (kuvaesityksen kuvien
vaihtumisen väli) 3 s, 5 s, 15 s, 1 minuutti ja
15 minuuttia.
• Photo mode (kuvien esityksen tila): Full Screen
(täysi näyttö) tai Standard screen.
• Transition effekt (näyttöefekti): Off tai
Random (satunnainen).
• Date stamp (näytä kuvan yksityskohtaiset
tiedot): Off tai On.
Suomi
• Shuffle (näyttää kuvat satunnaisessa
järjestyksessä): Off tai On.
Music Setup –valikossa voi tehdä seuraavat asetukset
• Repeat Off (ei uudelleentoistoa).
• Repeat One (senhetkisen musiikkiraidan uudelleentoisto).
• Repeat All (kaikkien tiedostojen uudelleentoisto).
Video Setup –valikossa voi tehdä seuraavat asetukset
• Repeat Off (ei uudelleentoistoa).
• Repeat One (senhetkisen videon uudelleentoisto).
• Repeat All (kaikkien videotiedostojen uudelleentoisto).
Clock/Calendar Setup
• Time mode: Digital clock /Analog clock (digitaalinen/analoginen kello).
• Show photo: On/Off (näytä/älä näytä pienoiskuvia samalla kellonajan ja kalenterin kanssa).
• Set Time: (kellonajan asettaminen) hh/mm (tunnit/minuutit).
• Set Date: (päivämäärän asettaminen) vuosi, kuukausi, päivä.
• Set Date format (Kalenterin näyttötavan asettaminen): vuosi, kuukausi, päivämäärä –
päivämäärä, kuukausi, vuosi jne.
• Set Time format (Kellonajan näyttötavan asettaminen): 12 tai 24 tuntia.
56
Page 57

Alarm Setup
• Alarm 1 – 4 (kellonajan asettaminen, 4 eri hälytyksen toiminta ja äänet) Alarm 1, Alarm 2 jne.
• Ringtone volume (hälytysten 1 – 4 äänenvoimakkuuden asettaminen): 1, 2, 3, 4, 5 tai 6.
General Setup
• Language (valikon kielen muuttaminen).
• Brightness (näytön valonvoimakkuuden säätäminen): +3, +2, +1, 0, -1, -2, -3.
• Contrast (näytön kontrastin säätäminen): +3, +2, +1, 0, -1, -2, -3.
• Saturation (näytön värikylläisyyden säätäminen): +3, +2, +1, 0, -1, -2, -3.
• Auto start (valokuvakehyksen käynnistystavan valinta): Photo, Main menu, Clock, Calendar.
• Power on (automaattisen päällekytkentäajan asettaminen): hh/mm (tunnit/minuutit).
• Power off (automaattisen poiskytkentäajan asettaminen): hh/mm (tunnit/minuutit).
• Hint time (säädä kuinka pitkään painiketoiminnot näkyvät näytöllä): 0 s, 5 s, 10 s ja 20 s.
• Default (tehdasasetusten palautus).
Huom.!
• Ennen päälle- ja poiskytkennän ajan asettamista tulee laitteen kello asettaa oikeaan aikaan
(katso Clock/Calendar setup).
• Jos päälle- tai poiskytkennän aika on jo ollut, tapahtuu se seuraavana päivänä ohjelmoituun
aikaan.
• Jotta Power on -toiminto toimii: Sammuta valokuvakehys vain kaukosäätimen [
(14), älä sammuta sitä valokuvakehyksen takaosan virtakytkimellä (8).
]-painikkeella
6. Huolto ja puhdistus
• Varmista, että valokuvakehys on sammutettu ja että muuntaja on irrotettu pistorasiasta
ennen puhdistusta.
• Pyyhi pehmeällä ja kevyesti kostutetulla liinalla. Älä käytä voimakkaita puhdistusaineita tai
liuottimia. Älä ruiskuta valokuvakehykseen nesteitä.
• Pyyhi lcd-näyttö puhtaalla, pehmeällä ja nukkaamattomalla liinalla. Puhdista näyttö tarvittaessa lcd-näyttöjen puhdistukseen tarkoitetulla liinalla.
Suomi
7. Kierrättäminen
Kierrätä tuote asianmukaisesti, kun poistat sen käytöstä. Tarkempia kierrätysohjeita saat
kuntasi jäteneuvonnasta.
57
Page 58

8. Vianhakutaulukko
Miksei valokuvakehys
näytä kaikkia muistikortin/
usb-muistin tiedostoja?
Valokuvakehykseen on
liitetty muistikortti, mutta
sitä ei voi lukea.
Jotkut kuvat latautuvat
nopeammin kuin toiset.
Valokuvakehys ei käynnisty/
näytä kuvia.
Miten pyöritän kuvaa? • Avaa OSD-valikko (kuviennäyttötilassa) OSD-painikkeella (26)
Mikä tarkkuus on paras? • Suositeltu erottelukyky on 800 x 600 kuvapistettä, korkein mahdol-
Kaukosäädin ei toimi. • Tarkista kaukosäätimen paristo ja vaihda tarvittaessa.
• Kaikki muistikortit eivät ole yhteensopivia valokuvakehyksen kanssa,
käytä yhteensopivaa muistikorttia.
• Väärä tiedostomuoto (tiedostojen tulee olla JPEG-muodossa).
• Varmista, että valokuvakehys tukee muistikorttia.
• Varmista, että muistikortti on liitetty oikein.
• Väärä tiedostomuoto (tiedostojen tulee olla JPEG-muodossa).
• Huom.! Tietyt digikamerat saattavat tallentaa kuvat tiedostomuotoon, joka ei ole standardimuoto. Tarkasta kameran käyttöohjeesta.
• Kuvien, joiden erottelukyky on korkea, latautuminen kestää kauemmin. Matalaerottelukykyisten kuvien näyttäminen on nopeampaa.
• Suositeltu erottelukyky on 800x600 kuvapistettä.
• Huom.! Suurin tuettu tarkkuus on 8000 x 8000 kuvapistettä.
• Varmista, että muuntaja on liitetty oikein.
• Varmista, että virtakytkin (8) on ON-asennossa.
• Paina [◄] ja [►] palataksesi
• Pyöritä kuva haluamaasi asentoon painamalla [OK] (24)
useita kertoja.
• Huom.! Huomioithan, että kuvat palaavat alkuperäiseen asentoon,
kun sammutat valokuvakehyksen.
linen erottelukyky 8000 x 8000 kuvapistettä.
• Osoita kaukosäätimellä suoraan valokuvakehystä kohti. Pienennä
etäisyyttä valokuvakehykseen. Varmista että kaukosäätimen ja tunnistimen välissä ei ole esteitä.
kohtaan OSD-valikossa.
Suomi
9.Tekniset tiedot
Näyttö 10” LCD, TFT, 4:3, 1024×768
I/O Kaukosäädin, DC IN
Käyttöjännite AC-adapteri (sisääntulo: 100–240 V AC, 50/60 Hz, ulostulo: DC, 5 V, 2 A)
USB-portti USB 2.0
Tuetut muistikortit SD (Secure Digital), MMC (Multimedia Card), MS (Memory Stick)
Tuetut kuvaformaatit JPEG (korkein erottelukyky: 8000 x 8000)
Tuetut ääniformaatit mp3, WMA
Tuetut videoformaatit MPEG-1, MPEG-2, MPEG-4, M-JPEG
Kaiuttimet Kiinteät
Säilytyslämpötila -20 ºC ~60 ºC, kun ilmankosteus on < 90 % RH
Käyttölämpötila 0 ºC ~45 ºC, kun ilmankosteus on < 80 % RH
Mitat 265,5 x 215 x 22,5 mm
Paino 638,6 g
58
Page 59

59
Page 60

Sverige
Kundtjänst Tel: 0247/445 00
Fax: 0247/445 09
E-post: kundtjanst@clasohlson.se
Internet www.clasohlson.se
Post Clas Ohlson AB, 793 85 INSJÖN
Norge
Kundesenter Tlf.: 23 21 40 00
Faks: 23 21 40 80
E-post: kundesenter@clasohlson.no
Internett www.clasohlson.no
Post Clas Ohlson AS, Postboks 485 Sentrum, 0105 OSLO
Suomi
Asiakaspalvelu Puh.: 020 111 2222
Sähköposti: info@clasohlson.fi
Internet www.clasohlson.fi
Osoite Clas Ohlson Oy, Annankatu 34–36 A, 00100 HELSINKI
Great Britain
For consumer contact, please visit
www.clasohlson.co.uk and click on
customer service.
Internet www.clasohlson.co.uk
 Loading...